WANT TO SAVE THIS RECIPE?
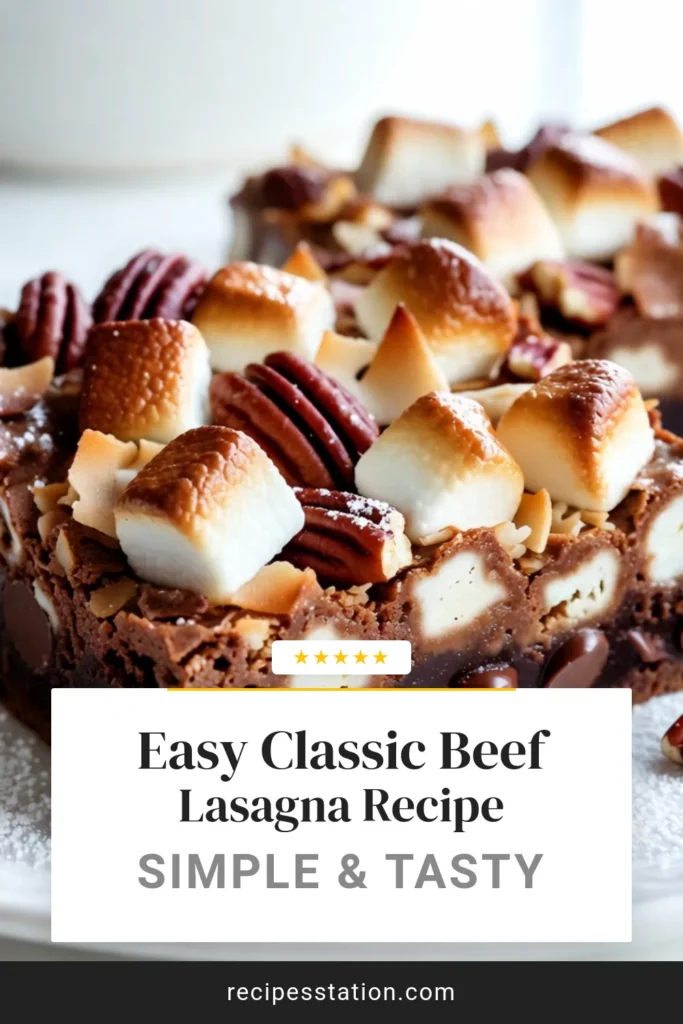
Get ready to impress your family and friends with my Holiday Magic Layer Brownies! This easy recipe brings together rich layers of chocolate, nuts, and creamy toppings for a delightful treat everyone will love. Whether you’re a baking newbie or a pro, I’ll guide you through each step. Let’s dive into the magic and make this sweet treat a holiday favorite at your home!
Why I Love This Recipe
- Decadent Layers: This recipe features rich layers of brownie, coconut, and pecans, creating a delightful texture and flavor combination that is perfect for the holidays.
- Easy to Make: With straightforward steps and simple ingredients, this brownie recipe is accessible for bakers of all skill levels, making it a great choice for holiday gatherings.
- Perfect for Sharing: Yielding 24 delicious squares, these brownies are ideal for parties, potlucks, or as a sweet gift to friends and family during the festive season.
- Festive Touch: The addition of mini marshmallows and a sprinkle of powdered sugar gives these brownies a whimsical, holiday-inspired look that is sure to impress.
Ingredients
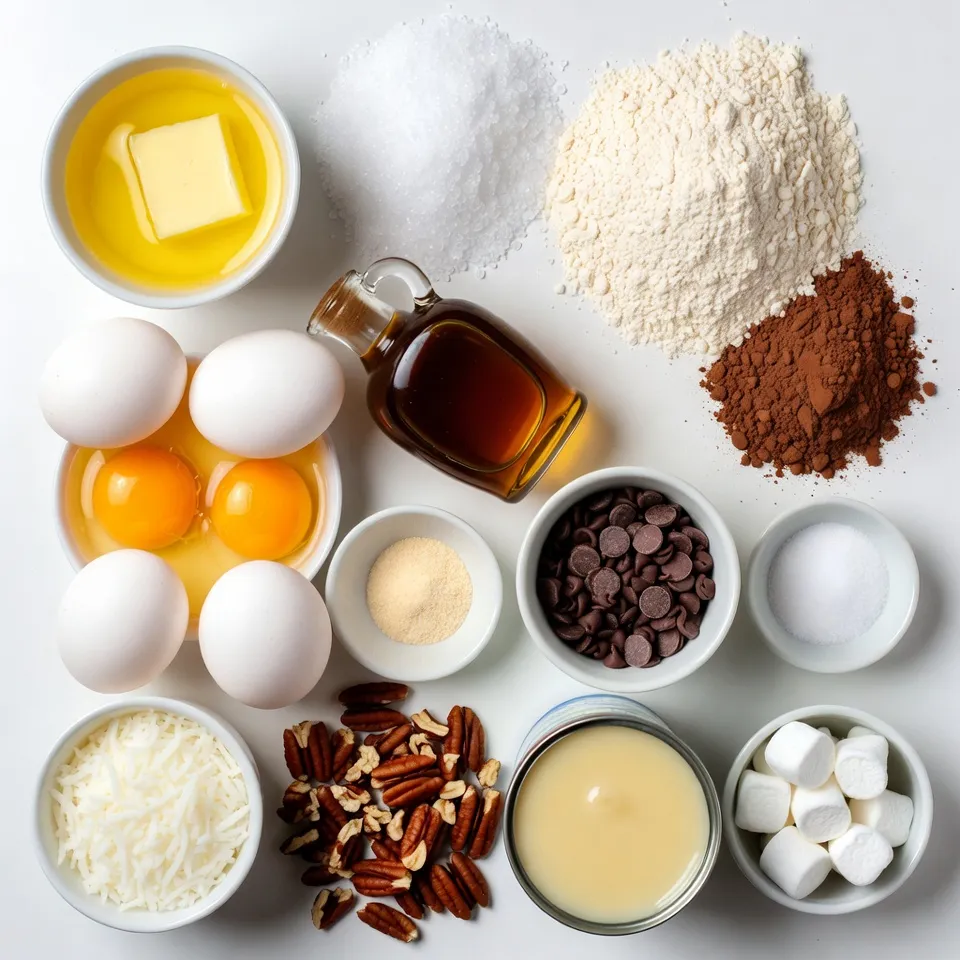
List of Ingredients for Holiday Magic Layer Brownies
– 1 cup unsalted butter, melted
– 2 cups granulated sugar
– 4 large eggs
– 1 teaspoon vanilla extract
– 1 cup all-purpose flour
– ½ cup unsweetened cocoa powder
– ½ teaspoon baking powder
– ½ teaspoon salt
– 1 cup semi-sweet chocolate chips
– 1 cup shredded coconut
– 1 cup chopped pecans (or walnuts)
– 1 cup sweetened condensed milk
– ½ cup mini marshmallows (for topping)
Key Ingredients and their Roles
Butter adds richness and moisture. Sugar sweetens and helps with texture. Eggs bind the mix and add fluffiness. Vanilla extract gives a warm, sweet flavor. All-purpose flour forms the base of the brownies. Cocoa powder adds deep chocolate flavor. Baking powder helps the brownies rise. Salt balances the sweetness. Chocolate chips provide gooey chocolate pockets. Shredded coconut adds chewiness. Chopped pecans add crunch and flavor. Sweetened condensed milk keeps the layers moist. Mini marshmallows on top add sweetness and a fun look.
Suggested Substitutions for Allergies
If you’re allergic to nuts, skip the pecans. Use sunflower seeds instead for crunch. For gluten-free brownies, swap all-purpose flour with almond flour. If you need a dairy-free option, use coconut oil and dairy-free chocolate chips. To replace eggs, use flaxseed meal mixed with water for binding. If you’re avoiding sugar, try a sugar substitute like coconut sugar or stevia.

Step-by-Step Instructions
Preparing the Oven and Baking Pan
Start by preheating your oven to 350°F (175°C). This will ensure even baking. Next, take a 9×13-inch baking pan. Grease it well with butter or cooking spray. This helps the brownies come out easily after baking.
Mixing the Brownie Batter
In a large mixing bowl, pour in 1 cup of melted butter. Add 2 cups of granulated sugar and whisk them together. Your mixture should look smooth. Then, add 4 large eggs, one at a time. Mix well after each egg. This makes the batter rich and fluffy. Finally, stir in 1 teaspoon of vanilla extract for a lovely flavor.
Creating the Layered Effect
In a separate bowl, sift together 1 cup of all-purpose flour, ½ cup of cocoa powder, ½ teaspoon of baking powder, and ½ teaspoon of salt. This step keeps your batter smooth. Gradually mix the dry ingredients into the wet mix. Be gentle to avoid overmixing! Once combined, fold in 1 cup of semi-sweet chocolate chips. This adds yummy chocolate pockets.
Pour half of the brownie batter into your baking pan. Use a spatula to spread it evenly. Now, sprinkle 1 cup of shredded coconut and 1 cup of chopped pecans on top. Drizzle 1 cup of sweetened condensed milk over this layer. This will keep it moist and sweet. Finally, pour the remaining brownie batter over the coconut and pecans, smoothing it out.
Baking and Cooling the Brownies
Distribute ½ cup of mini marshmallows on top. Press them down lightly so they stick during baking. Place your pan in the preheated oven and bake for 30-35 minutes. To check if they are done, insert a toothpick in the center. It should come out mostly clean with a few moist crumbs.
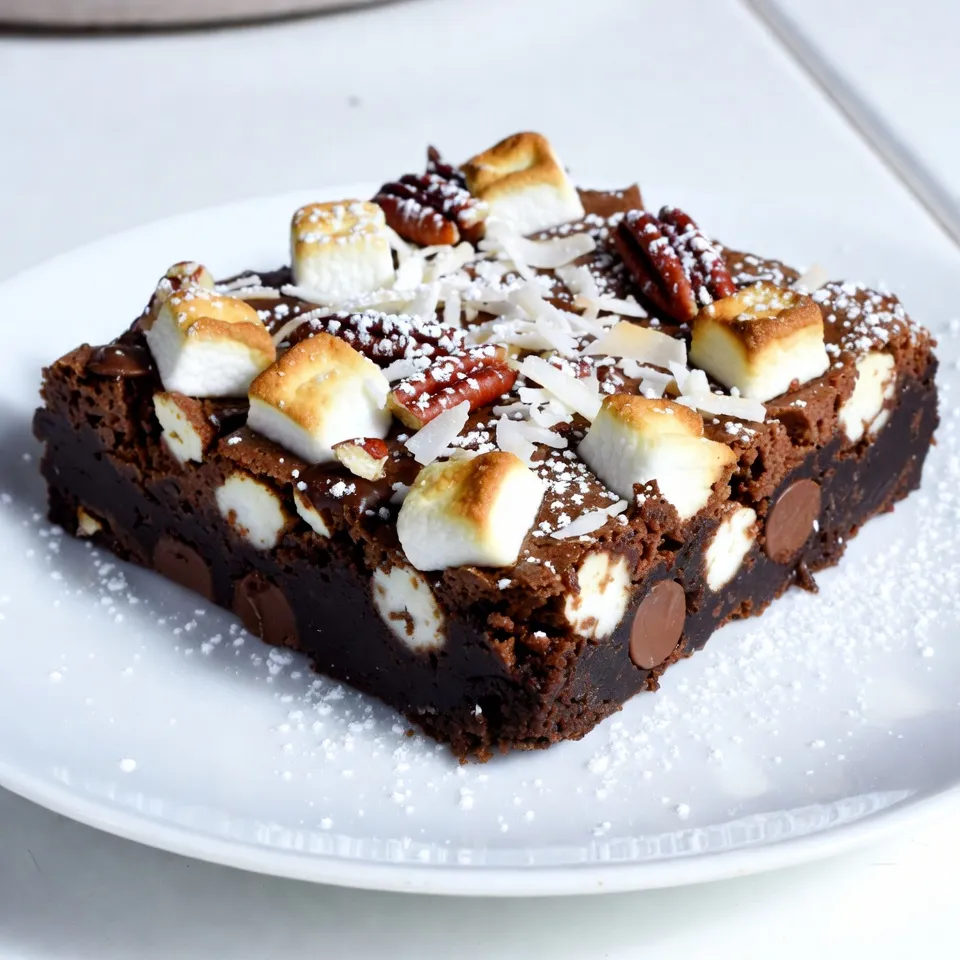
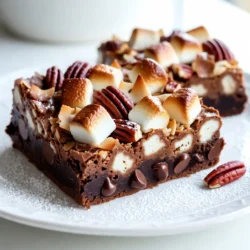
Once baked, take the pan out and let it cool for at least 20 minutes. This helps the brownies set. After cooling, slice them into squares for serving. Enjoy your delicious Holiday Magic Layer Brownies!
Tips & Tricks
Baking Tips for Perfect Brownies
To bake perfect brownies, start with room temperature ingredients. This helps them mix better. Preheat your oven to 350°F (175°C) before you begin. Use a 9×13 inch pan and grease it well. This prevents the brownies from sticking. For a fudgy texture, avoid overbaking. Check them at 30 minutes. The toothpick should come out with a few moist crumbs.
How to Avoid Overmixing
Mixing is key, but overmixing can ruin your brownies. When combining wet and dry ingredients, stir gently. Mix just until you see no flour. This keeps the brownies soft and chewy. Remember, lumps are okay! They will bake out in the oven.
Flavor Enhancements and Add-ins
You can boost the flavor of your brownies easily. Consider adding a pinch of espresso powder. This deepens the chocolate taste. You could also swap in white chocolate chips for a fun twist. Try adding crushed peppermint candies for a festive touch. For texture, add more nuts or a layer of caramel. The options are endless!
Pro Tips
- Use Room Temperature Eggs: Make sure your eggs are at room temperature before mixing them into the batter. This helps create a smoother, more homogeneous mixture, leading to better texture in your brownies.
- Don’t Overmix: When combining the dry and wet ingredients, mix just until combined. Overmixing can lead to tough brownies, so keep it gentle for that perfect fudgy texture.
- Let Them Cool: Allow the brownies to cool completely in the pan before slicing. This helps them set properly and makes for cleaner cuts, ensuring those beautiful layers are visible.
- Experiment with Toppings: Feel free to customize the toppings! Consider adding crushed candy canes, peanut butter chips, or a drizzle of caramel for a unique twist on these holiday brownies.
Variations
Alternative Nuts and Flavors
You can change the nuts in these brownies. Instead of pecans, try walnuts or almonds. Each adds a different taste and crunch. You can also use hazelnuts for a unique twist. If you want a nut-free version, simply skip the nuts or use seeds like sunflower seeds.
You can also try adding different flavors. Swap out vanilla extract for almond extract. This gives your brownies a new flavor profile. You can even add a few drops of peppermint extract for a holiday touch.
Seasonal Additions for Different Holidays
The holidays inspire fun twists on these brownies. For Halloween, add candy corn or chocolate-covered pretzels. For Thanksgiving, mix in pumpkin spice or chopped dried cranberries. In the winter, top with crushed candy canes for a festive flair.
For Christmas, use red and green sprinkles on top. During Easter, you can add pastel-colored candies for a bright look. Seasonal additions keep your brownies fresh and exciting all year round.
Gluten-Free and Vegan Options
You can make these brownies gluten-free. Use a gluten-free flour blend in place of all-purpose flour. Check the labels to ensure all ingredients are gluten-free.
For a vegan version, replace the eggs with flax eggs. Mix one tablespoon of ground flaxseed with three tablespoons of water for each egg. Use a plant-based butter instead of regular butter. Also, choose vegan chocolate chips to keep it dairy-free.
These options let everyone enjoy the magic of these brownies, no matter their diet!
Storage Info
How to Store Leftover Brownies
I love to keep my Holiday Magic Layer Brownies fresh! After they cool, slice the brownies into squares. Place them in an airtight container. This keeps them soft and moist. You can store them at room temperature for up to four days. If you want them to last longer, the fridge works too. Just make sure to seal them well.
Freezing Instructions
Freezing brownies is a great option for later! First, let them cool completely. Wrap each square in plastic wrap. Then, place the wrapped brownies in a freezer bag. They can stay frozen for up to three months. When you’re ready to enjoy them, just take them out and let them thaw at room temperature.
Best Ways to Reheat for Freshness
To make your brownies taste fresh again, reheat them gently. You can use the microwave. Warm one square for about 10-15 seconds. If you prefer the oven, preheat it to 350°F (175°C). Place the brownies on a baking sheet and heat for about 5-10 minutes. This way, you’ll enjoy that warm, gooey goodness!
FAQs
How do I know when the brownies are done baking?
You can tell the brownies are done when a toothpick comes out mostly clean. Insert the toothpick in the center. If it has a few moist crumbs, it’s perfect. If the toothpick is wet with batter, they need more time. Bake them for 30-35 minutes, but check early. Every oven is a little different, so keep an eye on them.
Can I make the brownies ahead of time?
Yes, you can make these brownies ahead of time. They taste great after a day or two. Just store them in an airtight container at room temperature. This helps the flavors meld together. You can also freeze them for longer storage. Just wrap them well in plastic wrap and then foil.
What can I use instead of sweetened condensed milk?
If you need a substitute for sweetened condensed milk, you have options. You can use coconut milk with sugar added. Another choice is evaporated milk mixed with sugar. Both options give a sweet and creamy layer in the brownies.
How do I make brownies chewy and fudgy?
To make your brownies chewy and fudgy, focus on the fat-to-flour ratio. Use more fat, like butter, and less flour. Make sure not to overmix the batter. This keeps the brownies dense and chewy. Also, baking them for the right time helps achieve that perfect fudgy texture.
You learned about creating delicious Holiday Magic Layer Brownies. We explored key ingredients and how they work together. You saw tips for the perfect texture and flavor. I shared safe substitutions for allergies. Plus, there are fun variations for every season. Remember to store leftovers well and reheat correctly for the best taste. Now, you have all the tools to make these brownies shine at your next holiday gathering. Enjoy baking and sharing this treat with other
Holiday Magic Layer Brownies
Delicious layered brownies with chocolate, coconut, and nuts, perfect for the holiday season.
Prep Time 15 minutes mins
Cook Time 35 minutes mins
Total Time 55 minutes mins
Course Dessert
Cuisine American
Servings 24
Calories 200 kcal
- 1 cup unsalted butter, melted
- 2 cups granulated sugar
- 4 large eggs
- 1 teaspoon vanilla extract
- 1 cup all-purpose flour
- 0.5 cup unsweetened cocoa powder
- 0.5 teaspoon baking powder
- 0.5 teaspoon salt
- 1 cup semi-sweet chocolate chips
- 1 cup shredded coconut
- 1 cup chopped pecans (or walnuts)
- 1 cup sweetened condensed milk
- 0.5 cup mini marshmallows (for topping)
Preheat the oven to 350°F (175°C) and grease a 9x13-inch baking pan.
In a large mixing bowl, whisk together the melted butter and granulated sugar until smooth.
Add the eggs one at a time, mixing well after each addition, then stir in the vanilla extract.
In a separate bowl, sift together the flour, cocoa powder, baking powder, and salt. Gradually add to the wet ingredients, stirring gently until just combined.
Fold in the chocolate chips until evenly distributed.
Pour half of the brownie batter into the prepared baking pan and smooth it out.
Sprinkle the shredded coconut and chopped pecans over the first layer of batter, then drizzle the sweetened condensed milk on top.
Pour the remaining brownie batter over the coconut and pecan layer, spreading it gently.
Distribute the mini marshmallows on top and lightly press them down.
Bake for 30-35 minutes, checking for doneness with a toothpick.
Allow the brownies to cool in the pan for at least 20 minutes before slicing.
For a festive presentation, serve on a vibrant holiday platter with powdered sugar and sprinkles.
Keyword brownies, chocolate, coconut, dessert, holiday
WANT TO SAVE THIS RECIPE?