Homemade Otter Pops Refreshing Summer Treat Recipe

Looking for a fun way to beat the summer heat? Homemade Otter Pops are the perfect solution! These tasty frozen treats are easy to make and customizable to fit your favorite flavors. You’ll learn how to blend fresh fruit juices, fill your molds, and freeze them to perfection. Let’s dive into this refreshing recipe that will cool you off all summer long!

Ingredients

List of Ingredients for Homemade Otter Pops

To make these fun treats, you need:

– 2 cups of vibrant fruit juice

– 1 cup of hydrating coconut water

– 1 tablespoon of honey or agave syrup (optional)

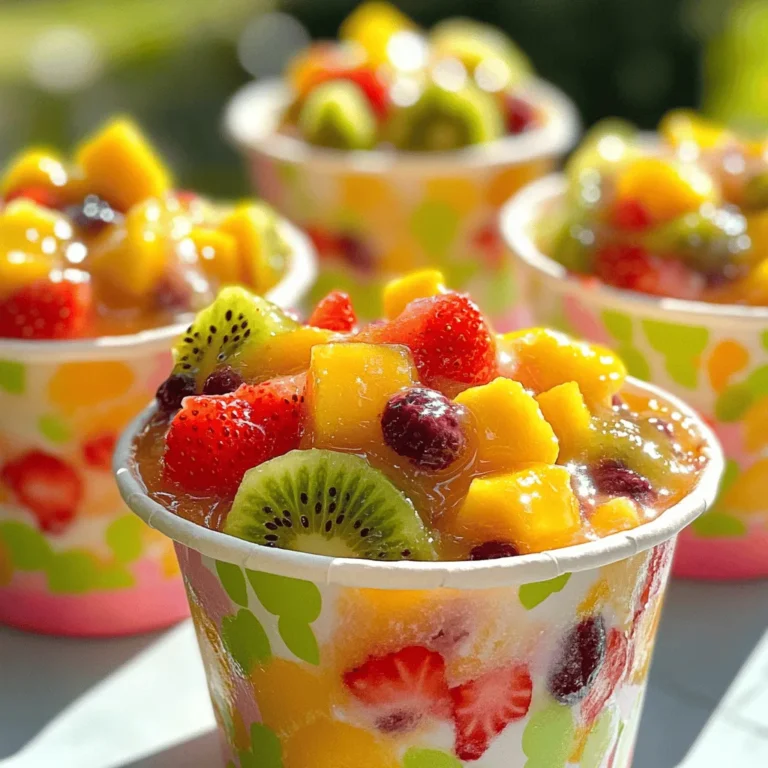
– 1 cup of diced fresh fruit

– Small paper cups or reusable ice pop molds

Suggested Fruit Juice Options

You can use many tasty juices for your otter pops. Here are some great choices:

– Fresh orange juice for a zesty kick

– Rich grape juice for a sweet treat

– Mixed berry juice for a fruity blend

– Pineapple juice for a tropical flavor

– Apple juice for a classic taste

Recommended Fresh Fruits to Use

Adding fruit makes your otter pops extra special. Try these fresh fruits:

– Strawberries for a sweet burst

– Kiwi for a unique tang

– Mango for a tropical touch

– Blueberries for a pop of color

– Raspberries for a tart contrast

Using the right ingredients makes all the difference. The blend of juice and fresh fruit creates a tasty and refreshing treat. For the full recipe, follow the steps to enjoy your homemade otter pops!

Step-by-Step Instructions

Preparation of the Juice Mixture

First, grab a large mixing bowl. Pour in 2 cups of your choice of fruit juice. You can use fresh orange juice, rich grape juice, or even a mix of berries. Then, add 1 cup of coconut water for hydration. If you like your pops sweet, mix in 1 tablespoon of honey or agave syrup.

Now, use a whisk or spoon to stir everything together until it blends well. Taste the mixture. If you want it sweeter, add more honey or syrup. Stir after each addition until you reach your perfect sweet spot.

Filling the Molds and Adding Fruit

Next, it’s time to fill your molds. Take small paper cups or ice pop molds and carefully pour in the juice mixture. Leave about a quarter of space at the top for expansion as it freezes.

Now, grab your fresh fruit. Dice up some strawberries, kiwi, or mango. Add the diced fruit into each cup or mold. Use a spoon to gently push the fruit down so it gets covered in the juice. This gives your otter pops a fun fruity surprise!

If you’re using molds, insert popsicle sticks into the center. Make sure they are stable and centered in the mixture.

Freezing Process and Removal Tips

Now, it’s time to freeze! Place your filled cups or molds in the freezer. Let them freeze for at least 4-6 hours. You want them to be solid before enjoying.

When you’re ready to serve, remove the pops. If they’re stuck, run warm water over the outside of the cups or molds for a few seconds. This helps loosen them so they pop out easily. Now, you can enjoy your refreshing homemade otter pops, perfect for a hot summer day!

For the full recipe, refer to the earlier section.

Tips & Tricks

How to Adjust Sweetness Levels

To adjust sweetness in your otter pops, taste the juice mix first. If it needs more sweetness, add honey or agave syrup. Stir well after each addition. This way, you control the taste. Remember, some fruits are sweeter than others. Use those for a natural boost.

Using Alternative Sweeteners

If you want to avoid sugar, try other sweeteners. Stevia or maple syrup are great options. They add sweetness without extra calories. Always start with a small amount. Taste as you go to find the right balance for your otter pops.

Best Practices for Preventing Freezer Burn

Freezer burn can ruin your pops. To avoid this, use airtight containers or wraps. Make sure the containers are tightly sealed. Leave some space in the cups for liquid expansion. This helps keep your otter pops fresh and tasty!

Variations

Flavor Combinations to Try

You can make otter pops with many flavors. Mix different fruit juices for fun. Here are some tasty combos:

Orange and Pineapple: A sweet and tangy mix.

Berry Medley: Combine strawberries, blueberries, and raspberries for a burst of flavor.

Grape and Lemonade: This mix gives a sweet and sour taste.

Watermelon and Mint: A refreshing twist for hot days.

Feel free to get creative! Try your favorite juices to find new tastes.

Vegan and Allergy-Friendly Options

Making otter pops that fit everyone’s needs is easy. Use fruit juices and coconut water for a vegan base. Instead of honey, try agave syrup or maple syrup. This keeps it vegan and sweet. Check for allergies by choosing fruits that are safe for everyone. Always read labels on store-bought juices and syrups to avoid allergens.

Creative Add-ins (herbs, spices, etc.)

You can add unique flavors to your otter pops. Try these fun add-ins:

Basil: This herb adds a fresh taste, especially with berries.

Ginger: A little ginger gives a spicy kick to any fruit mix.

Cinnamon: Sprinkle some cinnamon for a warm flavor, great with apples or pears.

Chili Powder: For those who love heat, a pinch of chili powder can spice things up.

These add-ins make your pops unique and exciting. Enjoy exploring different flavors!

Storage Info

How to Store Homemade Otter Pops

To store your homemade otter pops, keep them in the freezer. Place them in a sealed container, or wrap them in plastic wrap. This helps prevent ice crystals from forming. If you use paper cups, stack them gently. Make sure they are upright to avoid spills.

Shelf Life of Frozen Treats

Homemade otter pops can last up to three months in the freezer. After that, they may lose flavor and texture. Always check for freezer burn before enjoying them. If they look odd or have ice crystals, it’s best to toss them.

Tips for Refreezing Once Thawed

If your otter pops thaw out, you can refreeze them. Just make sure they are still safe to eat. Check for any signs of spoilage. To refreeze, place them back in the molds or cups and put them in the freezer right away. Remember, repeated thawing and refreezing can change their texture. Enjoy them fresh for the best taste!

FAQs

How long do Homemade Otter Pops take to freeze?

Homemade Otter Pops need at least 4 to 6 hours to freeze. This time lets them become solid and icy. If you want them ready sooner, you can freeze them for a bit longer. Just check them after 6 hours. If they feel hard, they are ready to eat!

Can I use other molds instead of popsicle molds?

Yes, you can use small paper cups or any freezer-safe container. Just make sure they can hold liquid. If you use cups, remember to add popsicle sticks before freezing. This way, you can easily pull them out when they are ready.

What fruits are best for adding texture to Otter Pops?

For a fun texture, try using strawberries, kiwi, or mango. These fruits add color and flavor. You can also mix in blueberries or raspberries for more variety. Make sure to cut the fruit into small pieces. This helps them fit well in the pops and makes each bite tasty!

Homemade Otter Pops are fun and easy to make. We covered the ingredients, from juice to fresh fruits. You learned how to prepare and freeze them well. I shared tips on sweetness and storage. You can try different flavors and add-ins for fun variations.

These treats are perfect for hot days. Now, you can create your own tasty Otter Pops at home. Enjoy the process, and share your ideas with friends!

To make these fun treats, you need: - 2 cups of vibrant fruit juice - 1 cup of hydrating coconut water - 1 tablespoon of honey or agave syrup (optional) - 1 cup of diced fresh fruit - Small paper cups or reusable ice pop molds You can use many tasty juices for your otter pops. Here are some great choices: - Fresh orange juice for a zesty kick - Rich grape juice for a sweet treat - Mixed berry juice for a fruity blend - Pineapple juice for a tropical flavor - Apple juice for a classic taste Adding fruit makes your otter pops extra special. Try these fresh fruits: - Strawberries for a sweet burst - Kiwi for a unique tang - Mango for a tropical touch - Blueberries for a pop of color - Raspberries for a tart contrast Using the right ingredients makes all the difference. The blend of juice and fresh fruit creates a tasty and refreshing treat. For the full recipe, follow the steps to enjoy your homemade otter pops! First, grab a large mixing bowl. Pour in 2 cups of your choice of fruit juice. You can use fresh orange juice, rich grape juice, or even a mix of berries. Then, add 1 cup of coconut water for hydration. If you like your pops sweet, mix in 1 tablespoon of honey or agave syrup. Now, use a whisk or spoon to stir everything together until it blends well. Taste the mixture. If you want it sweeter, add more honey or syrup. Stir after each addition until you reach your perfect sweet spot. Next, it's time to fill your molds. Take small paper cups or ice pop molds and carefully pour in the juice mixture. Leave about a quarter of space at the top for expansion as it freezes. Now, grab your fresh fruit. Dice up some strawberries, kiwi, or mango. Add the diced fruit into each cup or mold. Use a spoon to gently push the fruit down so it gets covered in the juice. This gives your otter pops a fun fruity surprise! If you're using molds, insert popsicle sticks into the center. Make sure they are stable and centered in the mixture. Now, it’s time to freeze! Place your filled cups or molds in the freezer. Let them freeze for at least 4-6 hours. You want them to be solid before enjoying. When you’re ready to serve, remove the pops. If they’re stuck, run warm water over the outside of the cups or molds for a few seconds. This helps loosen them so they pop out easily. Now, you can enjoy your refreshing homemade otter pops, perfect for a hot summer day! For the full recipe, refer to the earlier section. To adjust sweetness in your otter pops, taste the juice mix first. If it needs more sweetness, add honey or agave syrup. Stir well after each addition. This way, you control the taste. Remember, some fruits are sweeter than others. Use those for a natural boost. If you want to avoid sugar, try other sweeteners. Stevia or maple syrup are great options. They add sweetness without extra calories. Always start with a small amount. Taste as you go to find the right balance for your otter pops. Freezer burn can ruin your pops. To avoid this, use airtight containers or wraps. Make sure the containers are tightly sealed. Leave some space in the cups for liquid expansion. This helps keep your otter pops fresh and tasty! {{image_4}} You can make otter pops with many flavors. Mix different fruit juices for fun. Here are some tasty combos: - Orange and Pineapple: A sweet and tangy mix. - Berry Medley: Combine strawberries, blueberries, and raspberries for a burst of flavor. - Grape and Lemonade: This mix gives a sweet and sour taste. - Watermelon and Mint: A refreshing twist for hot days. Feel free to get creative! Try your favorite juices to find new tastes. Making otter pops that fit everyone’s needs is easy. Use fruit juices and coconut water for a vegan base. Instead of honey, try agave syrup or maple syrup. This keeps it vegan and sweet. Check for allergies by choosing fruits that are safe for everyone. Always read labels on store-bought juices and syrups to avoid allergens. You can add unique flavors to your otter pops. Try these fun add-ins: - Basil: This herb adds a fresh taste, especially with berries. - Ginger: A little ginger gives a spicy kick to any fruit mix. - Cinnamon: Sprinkle some cinnamon for a warm flavor, great with apples or pears. - Chili Powder: For those who love heat, a pinch of chili powder can spice things up. These add-ins make your pops unique and exciting. Enjoy exploring different flavors! To store your homemade otter pops, keep them in the freezer. Place them in a sealed container, or wrap them in plastic wrap. This helps prevent ice crystals from forming. If you use paper cups, stack them gently. Make sure they are upright to avoid spills. Homemade otter pops can last up to three months in the freezer. After that, they may lose flavor and texture. Always check for freezer burn before enjoying them. If they look odd or have ice crystals, it’s best to toss them. If your otter pops thaw out, you can refreeze them. Just make sure they are still safe to eat. Check for any signs of spoilage. To refreeze, place them back in the molds or cups and put them in the freezer right away. Remember, repeated thawing and refreezing can change their texture. Enjoy them fresh for the best taste! Homemade Otter Pops need at least 4 to 6 hours to freeze. This time lets them become solid and icy. If you want them ready sooner, you can freeze them for a bit longer. Just check them after 6 hours. If they feel hard, they are ready to eat! Yes, you can use small paper cups or any freezer-safe container. Just make sure they can hold liquid. If you use cups, remember to add popsicle sticks before freezing. This way, you can easily pull them out when they are ready. For a fun texture, try using strawberries, kiwi, or mango. These fruits add color and flavor. You can also mix in blueberries or raspberries for more variety. Make sure to cut the fruit into small pieces. This helps them fit well in the pops and makes each bite tasty! Homemade Otter Pops are fun and easy to make. We covered the ingredients, from juice to fresh fruits. You learned how to prepare and freeze them well. I shared tips on sweetness and storage. You can try different flavors and add-ins for fun variations. These treats are perfect for hot days. Now, you can create your own tasty Otter Pops at home. Enjoy the process, and share your ideas with friends!

Homemade Otter Pops

Beat the heat with these delicious Frosty Fruity Otter Pops! Made with vibrant fruit juice, refreshing coconut water, and loaded with fresh fruit, these homemade treats are perfect for summer. In just 10 minutes of prep, you can create 8 delightful pops that are sure to satisfy your sweet tooth. Click through to discover the full recipe and whip up a batch of these fun and fruity pops to enjoy on a sunny day!

Ingredients
  

2 cups of vibrant fruit juice (such as fresh orange, rich grape, or a medley of mixed berries)

1 cup of hydrating coconut water

1 tablespoon of honey or agave syrup (optional; adjust based on desired sweetness)

1 cup of diced fresh fruit (delightful options include strawberries, kiwi, or mango)

Small paper cups or reusable ice pop molds

Instructions
 

Begin by gathering a large mixing bowl. Pour in the fruit juice and coconut water, then add the honey or agave syrup. Use a whisk or a spoon to stir the mixture until all the ingredients are well blended.

    Next, taste the liquid mixture. If you prefer a sweeter flavor, gradually add more honey or syrup, mixing thoroughly after each addition until the desired sweetness is reached.

      Carefully fill your small paper cups or ice pop molds with the juice mixture, leaving about a quarter of the space at the top to allow for expansion during freezing.

        To each cup or mold, generously add pieces of diced fresh fruit. Use a spoon to gently push the fruit down into the liquid, ensuring they are submerged and evenly distributed.

          If you're using molds, insert popsicle sticks into the center of each one, ensuring they are stable and centered.

            Place the filled cups or molds in the freezer and allow them to freeze for a minimum of 4-6 hours, or until they are perfectly solid and ready to enjoy.

              When you're ready to serve, remove the pops from the molds or cups by briefly running warm water over the outside. This will help loosen the pops for easy removal.

                Indulge in your refreshing homemade otter pops, perfect for cooling down on a hot day!

                  - Prep Time: 10 minutes

                    - Total Time: 6 hours (including freezing)

                      - Servings: 8 pops

                        Leave a Comment

                        Recipe Rating