WANT TO SAVE THIS RECIPE?
Craving a delicious meal that’s easy to make? Japanese Katsu bowls are your answer! With crispy chicken, fresh veggies, and savory sauce, this dish offers a delightful blend of flavors and textures. I’ll guide you through the simple steps to prepare this tasty meal, plus share tips, variations, and even storage hacks. Get ready to impress your taste buds and elevate your dinner game with homemade Katsu!
Why I Love This Recipe
- Flavorful Crunch: The crispy panko coating creates a delightful texture that contrasts perfectly with the tender chicken, making each bite a flavorful experience.
- Colorful Presentation: The vibrant colors of the shredded cabbage and carrots not only enhance the dish’s visual appeal but also add nutritional value, making it a feast for the eyes and the body.
- Quick and Easy: This recipe is straightforward and can be prepared in under 40 minutes, perfect for a weeknight dinner without compromising on taste.
- Customizable Bowls: You can easily modify the ingredients to suit your taste or dietary needs, adding different vegetables or sauces for your unique twist on the classic Chicken Katsu Bowl.
Ingredients
Main Ingredients
– 2 boneless, skinless chicken breasts
– 1 cup panko breadcrumbs
– ½ cup all-purpose flour
– 2 large eggs
– 2 cups cooked white rice (preferably warm)
– 1 cup shredded cabbage
– ½ cup sliced carrots
– ¼ cup sliced green onions
Seasoning
– 1 teaspoon salt
– ½ teaspoon freshly ground black pepper
Accompaniments
– 2 tablespoons Katsu sauce
– Sesame seeds

Step-by-Step Instructions
Preparing the Chicken
– Tenderizing the Chicken: Start by tenderizing the chicken breasts. Place each breast inside a plastic bag or wrap them in plastic wrap. Gently pound them with a meat mallet or rolling pin. Aim for an even thickness of about 1/2 inch. This helps the chicken cook evenly.
– Setting Up the Breading Station: Create a breading station. Use three shallow dishes. Put the all-purpose flour in the first dish. Whisk the eggs in the second dish until well mixed. Fill the third dish with panko breadcrumbs. This setup makes the breading process smoother.
Breading Process
– Seasoning the Flour: Add one teaspoon of salt and ½ teaspoon of black pepper to the flour. Mix it well. This step adds flavor to the chicken.
– Dredging and Coating the Chicken: Dredge each chicken breast in the seasoned flour. Make sure it has an even coating. Shake off any extra flour. Then, dip the chicken into the beaten eggs. Let any excess egg drip back into the bowl.
Cooking the Katsu
– Frying Techniques: Heat about 1/2 inch of oil in a large skillet over medium-high heat. To test if the oil is ready, drop a small piece of bread into the oil. If it sizzles, you are ready to fry. Carefully add the breaded chicken, but do not overcrowd the pan.
– Draining Excess Oil: Fry the chicken for 4-5 minutes on each side. Look for a golden brown color. The chicken should reach an internal temperature of 165°F. Once cooked, transfer the chicken to a plate lined with paper towels. This helps drain any extra oil.
Assembling the Bowl
– Serving the Rice: While the chicken fries, prepare your serving bowl. Place a warm scoop of cooked white rice at the bottom. This rice will be the base of your bowl.
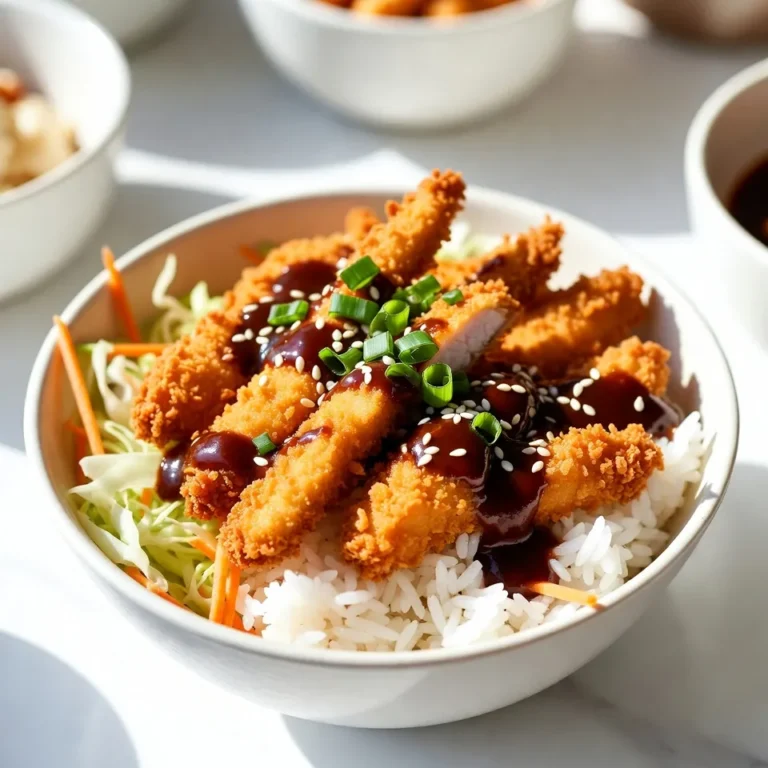
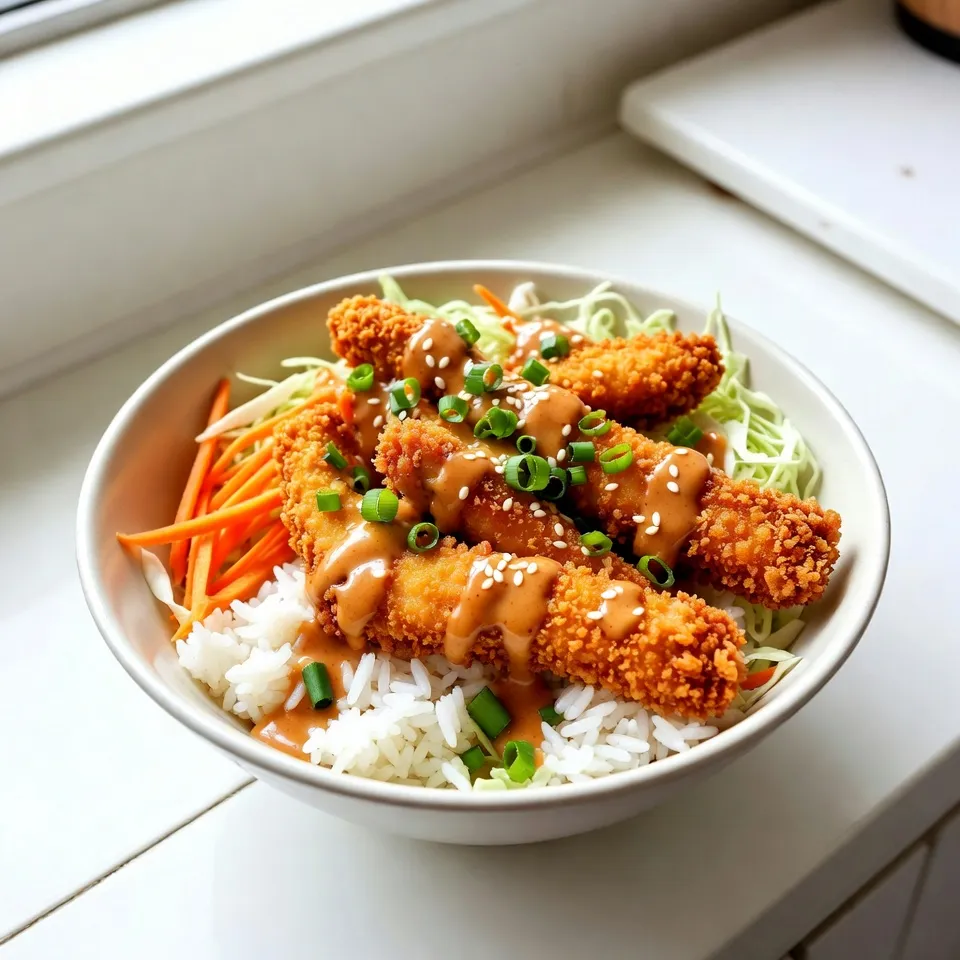
– Arranging Vegetables and Chicken: On one side of the rice, add the fresh vegetables. Arrange shredded cabbage and sliced carrots for a nice crunch. Once the chicken is ready and has rested, slice it into strips. Neatly place the chicken on top of the rice. Drizzle Katsu sauce over the chicken and garnish with sliced green onions and sesame seeds. Enjoy your bowl!
Tips & Tricks
Perfecting the Crunch
– Flour vs. Panko: Use panko instead of regular breadcrumbs. Panko makes the coating much crispier. It has a light, airy texture. This helps create that perfect crunch you want in a katsu bowl.
– Optimal Cooking Temperature: Heat oil to 350°F (175°C). This is key for frying. If the oil is too cool, the chicken will soak up too much oil. If it’s too hot, the coating will burn before the chicken cooks fully.
Presentation Tips
– Colorful Arrangements: Use vibrant vegetables like green cabbage and orange carrots. This makes the bowl look appealing. Neatly arrange the chicken on top of the rice. A well-presented dish is more enjoyable.
– Serving Suggestions: Serve with extra Katsu sauce on the side. This lets everyone add more sauce to their liking. Consider using colorful bowls to enhance the meal’s visual appeal.
Common Mistakes to Avoid
– Overcrowding the Pan: Only fry a few pieces of chicken at a time. Giving each piece space helps it cook evenly. Overcrowding can lead to soggy chicken.
– Inadequate Oil Temperature: Always check the oil temperature before frying. If the oil is not hot enough, your katsu will be greasy. Use the bread test: if it sizzles, it’s ready!
Pro Tips
- Chicken Tenderizing: Ensure even cooking by tenderizing the chicken to about 1/2 inch thickness. This helps prevent dry or unevenly cooked meat.
- Oil Temperature: Maintain the oil temperature around 350°F (175°C) for the perfect crispy texture. Use a thermometer or test with a piece of bread to check readiness.
- Crunchy Panko Coating: For extra crunch, press the panko firmly onto the chicken after dipping in the egg. This helps create a thicker, crunchier layer.
- Serving Suggestion: Serve the Chicken Katsu Bowl immediately while hot for the best contrast of textures and flavors, ensuring the vegetables stay fresh and crisp.
Variations
Different Proteins
You can swap out chicken for other proteins. Pork katsu is a popular choice. It uses the same breading method. The pork has a rich flavor that pairs well with the sauce. Simply follow the same steps as chicken katsu, adjusting the cooking time as needed.
Tofu katsu is another great option. It’s perfect for vegetarians. Use firm tofu for the best texture. Press the tofu to remove excess water before breading. This helps the coating stick better. The result is crispy and delicious!
Flavor Variations
You can make your katsu experience even better with flavor twists. Homemade katsu sauce is easy to make. Combine ketchup, Worcestershire sauce, and soy sauce in a bowl. Add a bit of sugar and mix well. This sauce gives a sweet and tangy kick to your dish.
If you like heat, try a spicy katsu option. Add some chili paste or hot sauce to your katsu sauce. You can adjust the spice level to your taste. This adds a nice zing to the classic flavor.
Grain Alternatives
While white rice is common, you can try different grains for variety. Brown rice is a healthy substitute. It has a nuttier flavor and more fiber. Cook it the same way as white rice for a filling base.
Quinoa is another great choice. It is packed with protein and has a unique texture. Rinse the quinoa before cooking to remove bitterness. Use it in place of rice for a tasty twist on your katsu bowl.
Exploring these variations can make your katsu bowls exciting and fun!
Storage Info
Storing Leftovers
– Refrigeration Tips: Place any leftover Katsu bowls in an airtight container. Store them in the fridge for up to three days. Make sure the chicken is fully cooled before sealing. This helps keep flavors fresh.
– Freezing Advice: You can freeze the chicken katsu separately. Wrap it tightly in plastic wrap, then place it in a freezer bag. It lasts up to three months. Avoid freezing the rice and vegetables, as they don’t hold up well.
Reheating Instructions
– Best Methods for Keeping Crunchiness: To reheat, use an oven or an air fryer. Preheat your oven to 350°F (175°C). Place the chicken on a baking sheet for about 10-15 minutes. This keeps it crunchy. You can also use the air fryer. Set it to 350°F (175°C) for about 5-7 minutes.
Shelf Life
– Duration for Stored Katsu Bowls: When stored properly, cooked Katsu bowls last three days in the fridge. If frozen, the chicken can stay good for three months. Always check for signs of spoilage before eating.
FAQs
What is Katsu?
Katsu is a Japanese dish made with breaded and fried meat, usually chicken or pork. The meat is pounded flat, coated in flour, eggs, and panko breadcrumbs, then fried until golden. Katsu is important in Japanese cuisine because it offers a crunchy texture and rich flavor. It is often served with rice, vegetables, and savory sauce.
How can I make Katsu sauce at home?
You can make Katsu sauce easily with just a few ingredients. Mix together:
– ¼ cup ketchup
– 2 tablespoons soy sauce
– 1 tablespoon Worcestershire sauce
– 1 tablespoon sugar
– 1 teaspoon mustard
Blend these well. Adjust to taste. This sauce adds a sweet and tangy flavor to your Katsu bowls.
Can I bake Katsu instead of frying?
Yes, you can bake Katsu for a healthier option. Preheat your oven to 400°F (200°C). After breading the chicken, place it on a baking sheet lined with parchment paper. Spray the chicken lightly with cooking spray. Bake for 20-25 minutes or until golden brown. This method gives you crispy Katsu with less oil.
What to serve with Katsu bowls?
Katsu bowls pair well with fresh sides and drinks. Here are some ideas:
– Shredded cabbage for crunch
– Sliced carrots for color
– Pickled vegetables for tang
– Miso soup for warmth
– Green tea for a refreshing sip
These sides enhance the meal and provide balance to the rich Katsu.
Katsu bowls are simple yet tasty. We covered the key ingredients, like chicken, breadcrumbs, and fresh veggies. The step-by-step guide made cooking easy, from preparing the chicken to frying it perfectly. I shared tips to achieve the ideal crunch and common mistakes to avoid. Variations allow you to explore different proteins and flavors. Finally, I outlined storage methods and how to reheat your bowls for optimal taste. Enjoy your cooking journey and savor every bit
Crunchy Chicken Katsu Bowl
A delicious and crunchy chicken katsu served over warm rice with fresh vegetables.
Prep Time 20 minutes mins
Cook Time 20 minutes mins
Total Time 40 minutes mins
Course Main Course
Cuisine Japanese
Servings 2
Calories 600 kcal
- 2 pieces boneless, skinless chicken breasts
- 1 cup panko breadcrumbs
- 0.5 cup all-purpose flour
- 2 large eggs
- 1 teaspoon salt
- 0.5 teaspoon freshly ground black pepper
- as needed oil for frying (vegetable or canola)
- 2 cups cooked white rice
- 1 cup shredded cabbage
- 0.5 cup sliced carrots
- 0.25 cup sliced green onions
- 2 tablespoons Katsu sauce
- as needed sesame seeds for garnish
Begin by tenderizing the chicken breasts. Place each breast inside a plastic bag or wrap in plastic wrap, then gently pound them with a meat mallet or rolling pin until they reach an even thickness of about 1/2 inch.
Set up your breading station by placing the all-purpose flour in one shallow dish, whisking the eggs in a second dish until well combined, and placing the panko breadcrumbs in a third dish.
Sprinkle the salt and freshly ground black pepper into the flour, mixing it thoroughly.
Start the breading process by dredging each chicken breast in the seasoned flour, ensuring an even coating. Shake off any excess flour, then dip the chicken into the beaten eggs.
Press the floured and egg-coated chicken into the panko breadcrumbs, ensuring they adhere well.
Heat about 1/2 inch of oil in a large skillet over medium-high heat. Test if the oil is hot enough by dropping a small piece of bread into the oil; it should sizzle.
Fry the chicken for 4-5 minutes on each side until golden brown and has reached an internal temperature of 165°F (74°C). Transfer the chicken to a plate lined with paper towels to drain excess oil.
While the chicken is frying, prepare your serving bowl by placing a generous scoop of warm cooked white rice at the base.
On one side of the rice, artfully arrange the shredded cabbage and sliced carrots.
Once the chicken is fried and rested, slice it into strips and neatly arrange them on top of the rice.
Drizzle the Katsu sauce generously over the chicken. Garnish with sliced green onions and sesame seeds.
Serve the Chicken Katsu Bowl immediately while everything is hot.
Serve immediately for the best texture and flavor.
Keyword bowl, chicken katsu, fried chicken, Japanese cuisine
WANT TO SAVE THIS RECIPE?