Skip to content
DisclaimerTerms Of UseGDPR PolicyCookie Policy

recipesstation

  • Home
  • Drinks
  • Appetizers
  • Dinner
  • Dessert
  • About
  • Contact
  • Privacy Policy
DisclaimerTerms Of UseGDPR PolicyCookie Policy

Emily

- 2 boneless, skinless chicken breasts - 1 cup panko breadcrumbs - ½ cup all-purpose flour - 2 large eggs - 2 cups cooked white rice (preferably warm) - 1 cup shredded cabbage - ½ cup sliced carrots - ¼ cup sliced green onions - 1 teaspoon salt - ½ teaspoon freshly ground black pepper - 2 tablespoons Katsu sauce - Sesame seeds {{ingredient_image_2}} - Tenderizing the Chicken: Start by tenderizing the chicken breasts. Place each breast inside a plastic bag or wrap them in plastic wrap. Gently pound them with a meat mallet or rolling pin. Aim for an even thickness of about 1/2 inch. This helps the chicken cook evenly. - Setting Up the Breading Station: Create a breading station. Use three shallow dishes. Put the all-purpose flour in the first dish. Whisk the eggs in the second dish until well mixed. Fill the third dish with panko breadcrumbs. This setup makes the breading process smoother. - Seasoning the Flour: Add one teaspoon of salt and ½ teaspoon of black pepper to the flour. Mix it well. This step adds flavor to the chicken. - Dredging and Coating the Chicken: Dredge each chicken breast in the seasoned flour. Make sure it has an even coating. Shake off any extra flour. Then, dip the chicken into the beaten eggs. Let any excess egg drip back into the bowl. - Frying Techniques: Heat about 1/2 inch of oil in a large skillet over medium-high heat. To test if the oil is ready, drop a small piece of bread into the oil. If it sizzles, you are ready to fry. Carefully add the breaded chicken, but do not overcrowd the pan. - Draining Excess Oil: Fry the chicken for 4-5 minutes on each side. Look for a golden brown color. The chicken should reach an internal temperature of 165°F. Once cooked, transfer the chicken to a plate lined with paper towels. This helps drain any extra oil. - Serving the Rice: While the chicken fries, prepare your serving bowl. Place a warm scoop of cooked white rice at the bottom. This rice will be the base of your bowl. - Arranging Vegetables and Chicken: On one side of the rice, add the fresh vegetables. Arrange shredded cabbage and sliced carrots for a nice crunch. Once the chicken is ready and has rested, slice it into strips. Neatly place the chicken on top of the rice. Drizzle Katsu sauce over the chicken and garnish with sliced green onions and sesame seeds. Enjoy your bowl! - Flour vs. Panko: Use panko instead of regular breadcrumbs. Panko makes the coating much crispier. It has a light, airy texture. This helps create that perfect crunch you want in a katsu bowl. - Optimal Cooking Temperature: Heat oil to 350°F (175°C). This is key for frying. If the oil is too cool, the chicken will soak up too much oil. If it's too hot, the coating will burn before the chicken cooks fully. - Colorful Arrangements: Use vibrant vegetables like green cabbage and orange carrots. This makes the bowl look appealing. Neatly arrange the chicken on top of the rice. A well-presented dish is more enjoyable. - Serving Suggestions: Serve with extra Katsu sauce on the side. This lets everyone add more sauce to their liking. Consider using colorful bowls to enhance the meal’s visual appeal. - Overcrowding the Pan: Only fry a few pieces of chicken at a time. Giving each piece space helps it cook evenly. Overcrowding can lead to soggy chicken. - Inadequate Oil Temperature: Always check the oil temperature before frying. If the oil is not hot enough, your katsu will be greasy. Use the bread test: if it sizzles, it's ready! Pro Tips Chicken Tenderizing: Ensure even cooking by tenderizing the chicken to about 1/2 inch thickness. This helps prevent dry or unevenly cooked meat. Oil Temperature: Maintain the oil temperature around 350°F (175°C) for the perfect crispy texture. Use a thermometer or test with a piece of bread to check readiness. Crunchy Panko Coating: For extra crunch, press the panko firmly onto the chicken after dipping in the egg. This helps create a thicker, crunchier layer. Serving Suggestion: Serve the Chicken Katsu Bowl immediately while hot for the best contrast of textures and flavors, ensuring the vegetables stay fresh and crisp. {{image_4}} You can swap out chicken for other proteins. Pork katsu is a popular choice. It uses the same breading method. The pork has a rich flavor that pairs well with the sauce. Simply follow the same steps as chicken katsu, adjusting the cooking time as needed. Tofu katsu is another great option. It’s perfect for vegetarians. Use firm tofu for the best texture. Press the tofu to remove excess water before breading. This helps the coating stick better. The result is crispy and delicious! You can make your katsu experience even better with flavor twists. Homemade katsu sauce is easy to make. Combine ketchup, Worcestershire sauce, and soy sauce in a bowl. Add a bit of sugar and mix well. This sauce gives a sweet and tangy kick to your dish. If you like heat, try a spicy katsu option. Add some chili paste or hot sauce to your katsu sauce. You can adjust the spice level to your taste. This adds a nice zing to the classic flavor. While white rice is common, you can try different grains for variety. Brown rice is a healthy substitute. It has a nuttier flavor and more fiber. Cook it the same way as white rice for a filling base. Quinoa is another great choice. It is packed with protein and has a unique texture. Rinse the quinoa before cooking to remove bitterness. Use it in place of rice for a tasty twist on your katsu bowl. Exploring these variations can make your katsu bowls exciting and fun! - Refrigeration Tips: Place any leftover Katsu bowls in an airtight container. Store them in the fridge for up to three days. Make sure the chicken is fully cooled before sealing. This helps keep flavors fresh. - Freezing Advice: You can freeze the chicken katsu separately. Wrap it tightly in plastic wrap, then place it in a freezer bag. It lasts up to three months. Avoid freezing the rice and vegetables, as they don’t hold up well. - Best Methods for Keeping Crunchiness: To reheat, use an oven or an air fryer. Preheat your oven to 350°F (175°C). Place the chicken on a baking sheet for about 10-15 minutes. This keeps it crunchy. You can also use the air fryer. Set it to 350°F (175°C) for about 5-7 minutes. - Duration for Stored Katsu Bowls: When stored properly, cooked Katsu bowls last three days in the fridge. If frozen, the chicken can stay good for three months. Always check for signs of spoilage before eating. Katsu is a Japanese dish made with breaded and fried meat, usually chicken or pork. The meat is pounded flat, coated in flour, eggs, and panko breadcrumbs, then fried until golden. Katsu is important in Japanese cuisine because it offers a crunchy texture and rich flavor. It is often served with rice, vegetables, and savory sauce. You can make Katsu sauce easily with just a few ingredients. Mix together: - ¼ cup ketchup - 2 tablespoons soy sauce - 1 tablespoon Worcestershire sauce - 1 tablespoon sugar - 1 teaspoon mustard Blend these well. Adjust to taste. This sauce adds a sweet and tangy flavor to your Katsu bowls. Yes, you can bake Katsu for a healthier option. Preheat your oven to 400°F (200°C). After breading the chicken, place it on a baking sheet lined with parchment paper. Spray the chicken lightly with cooking spray. Bake for 20-25 minutes or until golden brown. This method gives you crispy Katsu with less oil. Katsu bowls pair well with fresh sides and drinks. Here are some ideas: - Shredded cabbage for crunch - Sliced carrots for color - Pickled vegetables for tang - Miso soup for warmth - Green tea for a refreshing sip These sides enhance the meal and provide balance to the rich Katsu. Katsu bowls are simple yet tasty. We covered the key ingredients, like chicken, breadcrumbs, and fresh veggies. The step-by-step guide made cooking easy, from preparing the chicken to frying it perfectly. I shared tips to achieve the ideal crunch and common mistakes to avoid. Variations allow you to explore different proteins and flavors. Finally, I outlined storage methods and how to reheat your bowls for optimal taste. Enjoy your cooking journey and savor every bite!

Japanese Katsu Bowls Tasty and Easy Meal Idea

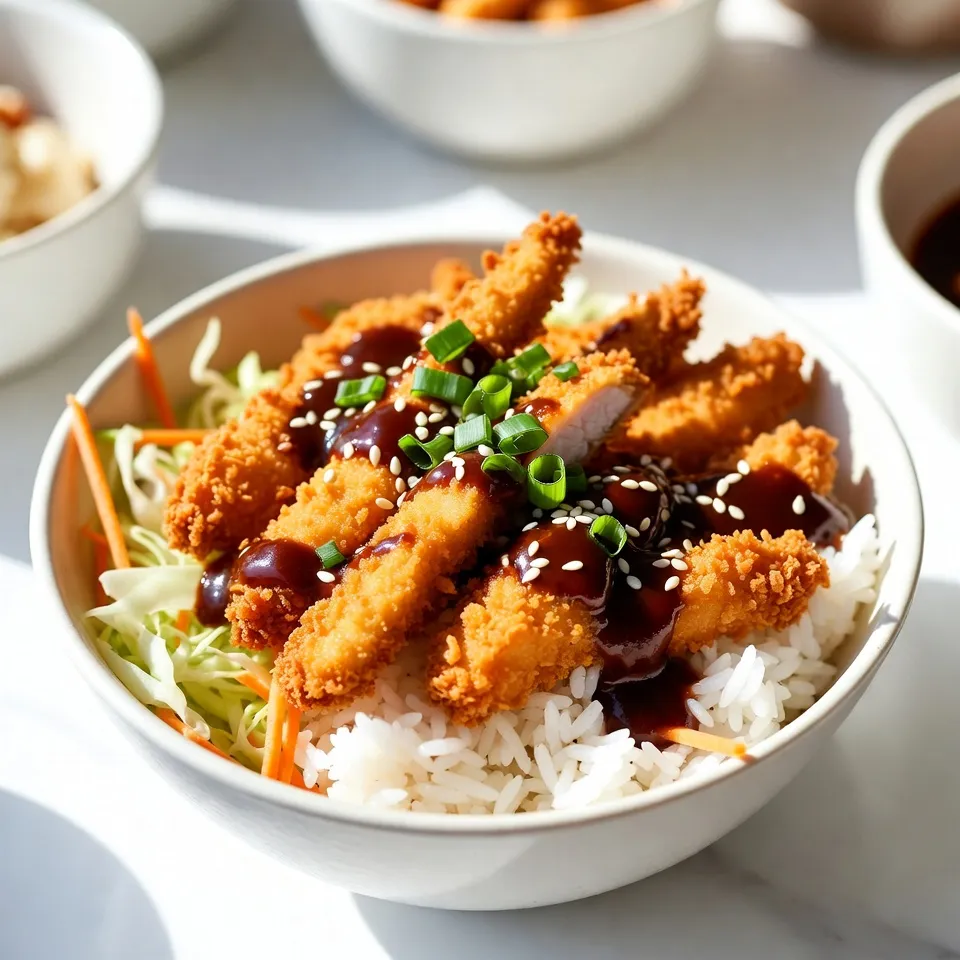
Craving a delicious meal that’s easy to make? Japanese Katsu bowls are your answer! With crispy chicken, fresh veggies, and

- 2 cups pretzel twists - 1 cup popcorn (freshly popped) - 1 cup mixed nuts (unsalted) - 1 cup chocolate chips (dark or milk chocolate) - ½ cup dried cranberries or raisins - ½ cup mini marshmallows - ½ cup toffee bits - 2 tablespoons pure maple syrup - ½ teaspoon flaky sea salt The ingredients for Sweet & Salty Trash Snack Mix are simple yet versatile. Each element adds its own flavor and texture. Pretzel twists bring a salty crunch. You can choose any brand or shape you like. Popcorn adds a light, airy feel. Make sure it is freshly popped for the best taste. Mixed nuts offer a nutty flavor. You can use almonds, peanuts, or cashews. All nuts work well in this mix. Chocolate chips are the sweet part. You can go with dark or milk chocolate. Choose what you love best. Dried cranberries or raisins add a fruity touch. They also balance the sweetness of the chocolate. Mini marshmallows give a chewy texture. They are fun and sweet! Toffee bits add a rich, buttery taste. They make the mix even more special. Pure maple syrup is the glue that holds it all together. It sweetens the mix nicely. Flaky sea salt finishes everything off. It enhances all the flavors in the mix. - For nut-free alternatives, try seeds like sunflower or pumpkin seeds. - For sugar-free chocolate options, use dark chocolate with no added sugar. - Gluten-free pretzel substitutes can be found in many stores. Look for brands made from rice or corn. These substitutions let you customize the mix to fit dietary needs. Enjoy making it your own! {{ingredient_image_2}} 1. First, preheat your oven to 350°F (175°C). This helps the mix bake evenly. 2. Line a large baking sheet with parchment paper. This makes cleanup easy later. 3. In a big bowl, mix the pretzel twists, popcorn, and mixed nuts. Make sure they are combined well. 1. Next, add the chocolate chips, dried cranberries or raisins, mini marshmallows, and toffee bits. Fold them in gently. You don't want to crush the pretzels or popcorn. 2. Drizzle the pure maple syrup all over your mix. Then, sprinkle the flaky sea salt on top. Toss everything again until coated. 1. Spread the mix evenly on the baking sheet. A single layer helps it toast well. 2. Place the baking sheet in the oven. Bake for 10 to 12 minutes. Keep a close eye on it! Stir halfway through. This helps it brown evenly and prevents burning. 3. When it smells great and is golden around the edges, take it out. Let it cool completely on the sheet. It will firm up a bit as it cools. To avoid burning ingredients, keep a close watch while baking. Bake for 10-12 minutes, stirring halfway. This helps all parts cook evenly. Use parchment paper on the baking sheet to prevent sticking. Even layering is key for great taste. Spread the mix out flat on the sheet. This helps it toast evenly. If it clumps, some parts may burn while others stay soft. For parties, get creative! Serve the snack mix in a big, fun bowl. Guests will love digging in. You can also use clear bags for individual servings. Tie them with a ribbon for a nice touch. They make great gifts too! Want to spice things up? Add your favorite spices like cinnamon or chili powder. This gives your mix a unique twist. Mix-ins can be based on what you love. Try adding pretzel crisps, popcorn flavors, or even different dried fruits. You can switch out nuts for seeds if you prefer. The options are endless! Pro Tips Choose Your Chocolate: Select dark or milk chocolate chips based on your sweetness preference for a personalized touch. Fresh Popcorn Matters: For the best flavor and texture, use freshly popped popcorn instead of pre-packaged varieties. Mix and Match: Experiment with different nuts and dried fruits to create a unique blend tailored to your taste. Storing Your Snack Mix: Keep the snack mix in an airtight container to maintain its crunchiness and freshness for longer. {{image_4}} You can customize your Sweet & Salty Trash Snack Mix with a few sweet twists. Start by adding different types of dried fruits. Try apricots, apples, or mangoes. These fruits bring more flavor and color. Next, consider a caramel or chocolate drizzle. Melt some chocolate or caramel and drizzle it over your mix. This adds a rich touch that makes each bite special. For a salty kick, introduce flavored popcorn or nuts. Look for cheese or spicy popcorn. Nuts like spicy almonds or honey-roasted peanuts also work great. Change up the chips too. Use pretzel crisps, tortilla chips, or even cheese puffs. Each type will add a new taste and texture to your mix. Tailor your mix for special occasions. During the holidays, add seasonal treats. Use candy canes for a minty touch or pumpkin spice for fall. You can also create themed mixes for birthdays or parties. Use colors that match the event. This makes your snack mix not just tasty but also festive! To keep your Sweet & Salty Trash Snack Mix fresh, store it in an airtight container. Glass jars or plastic containers work well. Make sure the lid seals tightly. This helps keep air out and moisture in. You can also use resealable plastic bags for easy storage. Just squeeze out the air before sealing. This snack mix can last up to two weeks when stored properly. After that, it may lose its crunch and flavor. If it smells stale or feels soft, it’s time to toss it out. Trust your senses; they know best! You can freeze this mix, but it’s not always ideal. Freezing can change the texture of the ingredients. If you do freeze it, use a freezer-safe bag. Remove as much air as you can before sealing. Thaw it in the fridge when you’re ready to enjoy it again. You can make this snack mix gluten-free by using gluten-free pretzels. Look for brands that clearly label their pretzels as gluten-free. You can also use popcorn, nuts, and chocolate chips, as they are already gluten-free. Just ensure that any added ingredients, like toffee bits, are also gluten-free. Yes, you can make this recipe nut-free. Simply skip the mixed nuts and replace them with an extra cup of pretzel twists or popcorn. You can also add seeds like sunflower or pumpkin seeds for some crunch. These options keep the mix tasty while avoiding nuts. To make this mix healthier, consider these tips: - Use air-popped popcorn for less fat. - Choose dark chocolate chips for added antioxidants. - Replace toffee bits with dried fruit for natural sweetness. To reduce sugar, you can cut down on maple syrup or skip it altogether. This blog post covered a fun and tasty recipe for Sweet & Salty Trash Snack Mix. You learned about the ingredients, easy preparation steps, and tips for baking. I shared ideas for serving and customizing your mix, making it fit any event. Remember to store it well for the freshest taste. With these tips, you can create a snack mix that suits your style and needs. Enjoy making it your own!

Sweet & Salty Trash Snack Mix Easy and Fun Treat

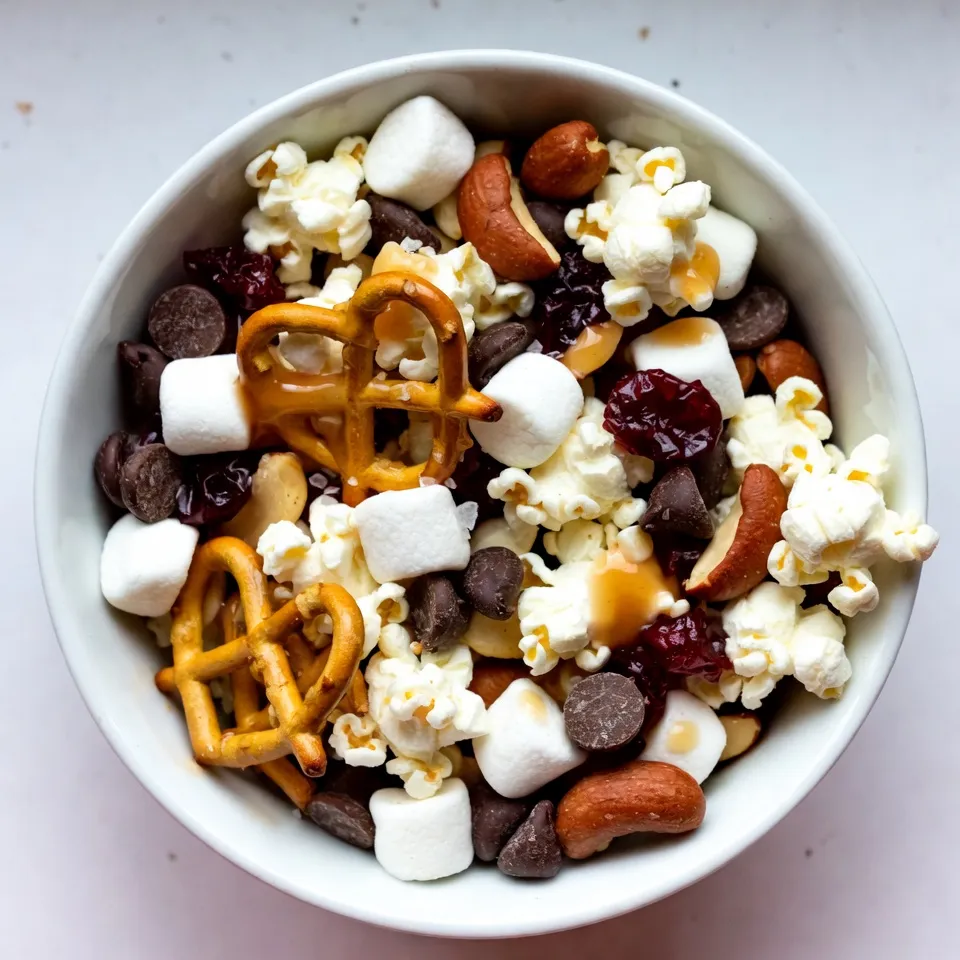
Looking for a quick and easy snack that satisfies both sweet and salty cravings? My Sweet & Salty Trash Snack

- 2 cups all-purpose flour - 1 teaspoon baking soda - 1 tablespoon ground ginger - 1 tablespoon ground cinnamon - 1/2 teaspoon ground nutmeg - 1/2 teaspoon salt - 1/2 cup unsalted butter, softened - 1 cup brown sugar, packed - 2 large eggs, at room temperature - 3/4 cup molasses - 1/2 cup buttermilk, at room temperature - 1 teaspoon vanilla extract - Zest of 1 lemon - 1 cup powdered sugar - 2 tablespoons freshly squeezed lemon juice - 1 tablespoon lemon zest The ingredients for these muffins mix sweet and spicy flavors. The all-purpose flour gives the muffins their base. The baking soda helps them rise. Ground ginger, cinnamon, and nutmeg add warmth and depth. Salt balances the sweetness. Butter and brown sugar create a rich, moist texture. Eggs add structure and help bind the mix. Molasses gives a deep, sweet flavor, while buttermilk adds moisture and tang. Vanilla extract rounds out the taste, and lemon zest brightens it all. For the lemon glaze, powdered sugar provides sweetness. Fresh lemon juice adds tartness, and zest enhances the lemon flavor. This glaze is smooth and bright. It complements the muffins perfectly. {{ingredient_image_2}} This blog post covered how to make delicious muffins from scratch. You learned about the key ingredients, step-by-step baking instructions, and tips for perfect results. Don't forget the lemon glaze to finish your muffins beautifully. Try different flavors and seasonal adds to make each batch unique. Store leftovers properly so they stay fresh, or freeze them for later. Now, it’s time to get baking and enjoy every bite of your homemade treats. Happy baking!

Soft Gingerbread Muffins with Lemon Glaze Delight

Welcome to a delightful bake that’s sure to warm your heart: Soft Gingerbread Muffins with Lemon Glaze! These muffins blend

- 1 cup cornmeal - 1 cup all-purpose flour - 1/4 cup granulated sugar - 1 tablespoon baking powder - 1/2 teaspoon salt - 1 cup buttermilk - 2 large eggs - 1/4 cup unsalted butter, melted - 1/2 cup corn kernels - 1/4 teaspoon cayenne pepper (optional) You can swap buttermilk with regular milk. Just mix 1 cup of milk with 1 tablespoon of vinegar. This will mimic the tangy taste. If you need gluten-free cornbread, use a gluten-free flour blend. For sugar, you can use honey or maple syrup. Adjust to your taste. Fresh corn adds a sweet crunch to your cornbread. To prepare fresh corn, just cut it off the cob. If using frozen corn, it’s easy! Just thaw it and drain any excess water. Both options work well, so choose what you like best. {{ingredient_image_2}} Set your oven to 400°F (200°C). This high heat helps the cornbread cook evenly. Prepare a 9-inch square baking dish or a cast-iron skillet. Grease it well to prevent sticking. Place the dish in the oven to warm while you make the batter. In a large bowl, combine 1 cup of cornmeal, 1 cup of all-purpose flour, and 1/4 cup of sugar. Add 1 tablespoon of baking powder and 1/2 teaspoon of salt. If you like spice, add 1/4 teaspoon of cayenne pepper. Whisk these together well. This step ensures even mixing, which helps the cornbread rise properly. In a separate bowl, mix 1 cup of buttermilk, 2 large eggs, and 1/4 cup of melted butter. Whisk until the mixture is smooth. This helps the eggs and butter blend with the buttermilk. A smooth mixture helps make a light and fluffy cornbread. Pour the wet mixture into the dry ingredients. Use a spatula or wooden spoon to stir gently. Mix until just combined. Do not overmix. A little lumpiness in the batter is okay. It keeps the cornbread tender and moist. Gently fold in 1/2 cup of corn kernels. You can use fresh or frozen corn. Make sure the corn is evenly spread in the batter. If you want extra texture, you can add cheese or diced jalapeños at this stage. Carefully take the hot dish from the oven. Pour the batter into the dish, spreading it evenly. Bake for 20-25 minutes. The top should be golden brown. Insert a toothpick in the center; it should come out clean. Let the cornbread cool in the dish for about 5 minutes. Cut it into squares and serve warm for the best taste. To get soft cornbread, avoid overmixing. You want little lumps in the batter. This keeps the bread light and fluffy. Mix just until the dry and wet ingredients blend. If you stir too much, it can turn dense. Remember, gentle hands make great cornbread. For tenderness, use room temperature ingredients. Cold eggs or buttermilk can make mixing harder. Allow them to sit out for about 30 minutes before use. This small step helps create a moist, tender texture. Want to spice things up? Add a pinch of cayenne pepper. It gives your cornbread a nice kick without being too hot. You can also try paprika or chili powder for a different twist. These spices add warmth and depth to the flavor. Herbs can elevate cornbread, too. Chives, rosemary, or thyme work well. Just chop them finely and fold them in with the corn. Fresh herbs bring a bright taste and smell that pairs nicely with the corn. A good baking dish makes a big difference. I recommend using a cast iron skillet. It heats evenly and gives a nice crispy edge. Plus, it adds a rustic charm to your table. If you don't have a skillet, a 9-inch square baking pan works great. Make sure to grease it well so the cornbread comes out easily. Preheating the dish helps create that perfect golden crust. Pro Tips Use Fresh Corn: If possible, use fresh corn kernels for a sweeter, more vibrant flavor. Frozen corn works well too, but fresh adds a delightful crunch. Don’t Overmix: To achieve a tender cornbread, mix the wet and dry ingredients until just combined. A few lumps are okay; they’ll bake out during cooking. Check for Doneness: Besides the toothpick test, look for a golden-brown top and a slightly firm texture. This ensures your cornbread is cooked through without being dry. Serve Warm: Cornbread is best enjoyed warm. Serve it straight from the oven or skillet, and consider adding a pat of butter for extra richness. {{image_4}} Sweet cornbread uses more sugar and often includes corn kernels. The sweetness pairs well with chili or barbecue. Savory cornbread has less sugar and can include cheese or herbs. Each type fits well in different meals. In the South, sweet cornbread is popular, while other regions prefer savory styles. This reflects cultural tastes and meal traditions. Want to spice it up? You can add jalapeños or other peppers to your mix. They give cornbread a nice kick and make it exciting. You can also adjust the cayenne pepper. A little adds warmth, while more brings heat. Be careful not to overdo it! Start small and taste as you go. Cornbread is so versatile! Consider adding cheese for creaminess or bacon for a savory touch. You can also mix in seasonal veggies like zucchini or bell peppers. These add color and flavor to your dish. Get creative! Each change makes your cornbread unique and fun to eat. Store your cornbread properly to keep it fresh. If you plan to eat it within two days, keep it at room temperature. Use a clean kitchen towel to cover the cornbread. This method helps retain moisture and keeps it soft. If you need to store it longer, place it in the fridge. Wrap it tightly in plastic wrap or foil to prevent drying. You can reheat cornbread in the oven or the microwave. To reheat in the oven, preheat it to 350°F (175°C). Place the cornbread on a baking sheet and cover it with foil. Heat for about 10-15 minutes until warm. If using the microwave, place a piece of cornbread on a plate. Heat it for about 30 seconds or until warm. To avoid drying out, add a small cup of water in the microwave. This will help keep the cornbread moist. Freezing cornbread is simple and effective. First, let it cool completely. Then, wrap each piece tightly in plastic wrap. Place the wrapped pieces in a freezer bag. Label the bag with the date. To thaw, remove the cornbread from the freezer. Let it sit in the fridge overnight. You can also thaw it on the counter for a few hours. After thawing, reheat it using the oven or microwave to restore its flavor. Southern cornbread uses less sugar and more cornmeal. It has a denser, crumbly texture. Northern cornbread is sweeter and lighter, often made with more flour. The classic Southern version often skips eggs, making it heartier. This style pairs well with savory dishes like chili or greens. Yes, you can use regular milk. If you do not have buttermilk, mix 1 cup of milk with 1 tablespoon of vinegar. Let it sit for about 5 minutes. This mixture will mimic buttermilk's tangy flavor and acidity, ensuring the cornbread rises well. To make cornbread without baking powder, use baking soda with an acid. You can mix 1/2 teaspoon of baking soda with 1 cup of buttermilk. This will help the cornbread rise. Make sure to combine it well to avoid lumps in your batter. Cornbread pairs well with many dishes. Here are a few favorites: - Chili - Collard greens - Fried chicken - Barbecue ribs - Vegetable soup These dishes complement cornbread's flavor and texture, making for a hearty meal. To adjust the recipe, simply scale the ingredients up or down. For a larger batch, double everything. For a smaller batch, halve the ingredients. Keep the baking time in mind. A larger batch will need more time, and a smaller batch will cook faster. Always check for doneness with a toothpick. This guide covered everything you need to make great cornbread. We went over the key ingredients, step-by-step instructions, and tips for the best texture. You can add your favorite flavors or use different ingredients. Remember, the right tools matter, too. Storing and reheating cornbread properly keeps it fresh. So, enjoy baking your cornbread and make it your own! This versatile dish will surely please everyone at your table.

Southern Cornbread Flavorful and Easy Recipe Guide

Dive into the heart of Southern cooking with my easy guide to flavorful cornbread! This classic dish combines simple ingredients

- 8 oz spaghetti noodles - 1 lb ground beef - 2 tablespoons soy sauce - 1 tablespoon oyster sauce - 1 teaspoon sesame oil - 2 cloves garlic, minced - 1 inch fresh ginger, finely grated - 1 red bell pepper, julienned - 1 cup snap peas, trimmed - 3 green onions, thinly sliced - 1 tablespoon sriracha or chili sauce (optional, for heat) - Salt and freshly cracked pepper to taste - Toasted sesame seeds for garnish - Fresh cilantro leaves for garnish Gathering all these ingredients makes cooking easy. Start with the spaghetti noodles. They form the base of this dish. The ground beef adds protein and flavor. The Asian sauces bring everything together. Soy sauce gives saltiness, while oyster sauce adds depth. A hint of sesame oil adds a nutty taste. Next, the fresh produce brightens the dish. Garlic and ginger bring warmth and spice. The red bell pepper adds color and crunch. Snap peas add a nice snap and sweetness. Green onions finish the dish with freshness. Don’t forget the seasonings! Sriracha can bring heat if you like spice. Salt and pepper enhance all the flavors. Finally, toasted sesame seeds and cilantro add a lovely touch on top. Enjoy gathering all these ingredients; the cooking will be even more fun! {{ingredient_image_2}} 1. Start by boiling a large pot of salted water. 2. Once the water is boiling, add 8 oz of spaghetti noodles. 3. Cook the noodles according to the package instructions until they are al dente. 4. After cooking, carefully drain the spaghetti and set it aside in a large bowl. 1. In a large skillet or wok, heat 1 teaspoon of sesame oil over medium-high heat. 2. When the oil shimmers, add 2 cloves of minced garlic and 1 inch of finely grated ginger. 3. Sauté for about 1 minute until the mixture becomes fragrant and the garlic is golden. 4. Increase the heat to high and add 1 lb of ground beef. 5. Use a spatula to break up the meat as it cooks. Brown the beef for about 5-7 minutes until there is no pink left. 1. Once the beef is browned, pour in 2 tablespoons of soy sauce, 1 tablespoon of oyster sauce, and 1 tablespoon of sriracha if you want heat. 2. Stir the sauces into the beef to ensure it’s all coated. 3. Add in 1 red bell pepper, julienned, and 1 cup of trimmed snap peas. 4. Stir-fry for an additional 3-4 minutes until the vegetables are bright and tender-crisp. 5. Season the mixture with salt and freshly cracked pepper to taste. 6. Finally, toss in the cooked spaghetti noodles, mixing everything together well so the noodles soak up the tasty flavors. 7. Remove from heat and garnish with sliced green onions, toasted sesame seeds, and fresh cilantro leaves for a bright finish. To get the best al dente spaghetti, start with a big pot of boiling salted water. Add the spaghetti and cook it as the package states. Check the noodles a minute before the time is up. They should be firm yet tender. Drain the spaghetti right away to stop cooking. For sautéing garlic and ginger, heat sesame oil in a skillet over medium-high heat. Add minced garlic and grated ginger after the oil shines. Stir these for about one minute. Stop once the garlic turns golden. This step makes your dish very fragrant. If you like spice, sriracha is your friend. Start with a small amount and taste. You can always add more heat. This lets you control the spice level to fit your taste. Fresh herbs boost flavor. Use green onions and cilantro for a bright taste. Chop them up and add them as a garnish. They give your dish a fresh finish and make it more colorful. Use deep bowls for serving. This keeps the sauce from spilling. Top with extra sesame seeds and cilantro for a pretty look. These small touches impress your guests. For an authentic Asian experience, serve with chopsticks. It adds fun to the meal and helps everyone enjoy the dish fully. Pro Tips Cook Noodles Al Dente: This ensures the spaghetti retains a firm texture that won't become mushy when mixed with the sauce. Use Fresh Ingredients: Whenever possible, opt for fresh vegetables and herbs to enhance the flavor and nutritional value of your dish. Customize the Heat: Adjust the amount of sriracha or chili sauce based on your heat preference, ensuring a balance that suits your taste. Garnish Generously: Adding plenty of green onions, sesame seeds, and cilantro not only elevates the presentation but also adds layers of flavor. {{image_4}} You can make this dish vegetarian-friendly by swapping ground beef for tofu or mushrooms. - Tofu: Use firm tofu. Crumble it and cook until golden. - Mushrooms: Chopped mushrooms, like shiitake or cremini, add depth and a meaty texture. This way, you keep the flavor while making it plant-based. If you want to try other proteins, chicken, pork, or shrimp work great. - Chicken: Ground chicken is lean and cooks fast. - Pork: Ground pork adds a nice richness. - Shrimp: Add shrimp for a seafood twist. Cook them until pink. These options keep the dish exciting and versatile. Boost nutrition and flavor by adding more veggies to your dish. - Seasonal Veggies: Consider zucchini, carrots, or broccoli for freshness. - Alternate Veggies: Bell peppers in different colors or snap peas for crunch. These additions make the dish colorful and packed with nutrients. To keep your cooked spaghetti fresh, store it in an airtight container. Let the dish cool down first to avoid condensation. It’s best to refrigerate within two hours after cooking. This way, you can enjoy your meal later without losing flavor. When you reheat your spaghetti, use a skillet for the best results. Add a splash of water or broth to keep it moist. Warm it over medium heat, stirring often. This method helps to maintain the texture of the noodles and keeps the flavors intact. If you want to freeze your spaghetti, first let it cool completely. Divide it into portions and place them in freezer-safe bags. Make sure to remove as much air as possible. To thaw, place the bag in the fridge overnight. Reheat it in a skillet or microwave, adding a little water if needed. If you do not have oyster sauce, you can use soy sauce. It adds salt and umami. Another good option is hoisin sauce, which is sweeter and thicker. You can mix soy sauce with a bit of sugar to mimic the oyster sauce. Each substitute changes the dish’s flavor slightly, so choose what fits your taste. Yes, you can make this dish gluten-free. Use gluten-free spaghetti made from rice or quinoa. For sauces, look for gluten-free soy sauce. Many brands offer this option, so check the label. This way, you can enjoy the dish without gluten. Several side dishes work great with this meal. You might serve steamed broccoli for a healthy crunch. Fried rice adds extra flavor and texture. A simple cucumber salad can refresh your palate. Each option complements the main dish and creates a well-rounded meal. This blog post explored Asian Style Ground Beef Spaghetti and its delicious details. We covered the key ingredients, like spaghetti noodles and fresh produce, along with easy cooking steps. I shared tips for perfecting your dish and suggested tasty variations to suit any diet. Remember, you can store leftovers easily and reheat them for a quick meal. Try this recipe for a fun, flavorful dish that everyone will enjoy. Enjoy cooking, and don’t hesitate to make it your own!

Asian Style Ground Beef Spaghetti Flavorful Dinner Dish

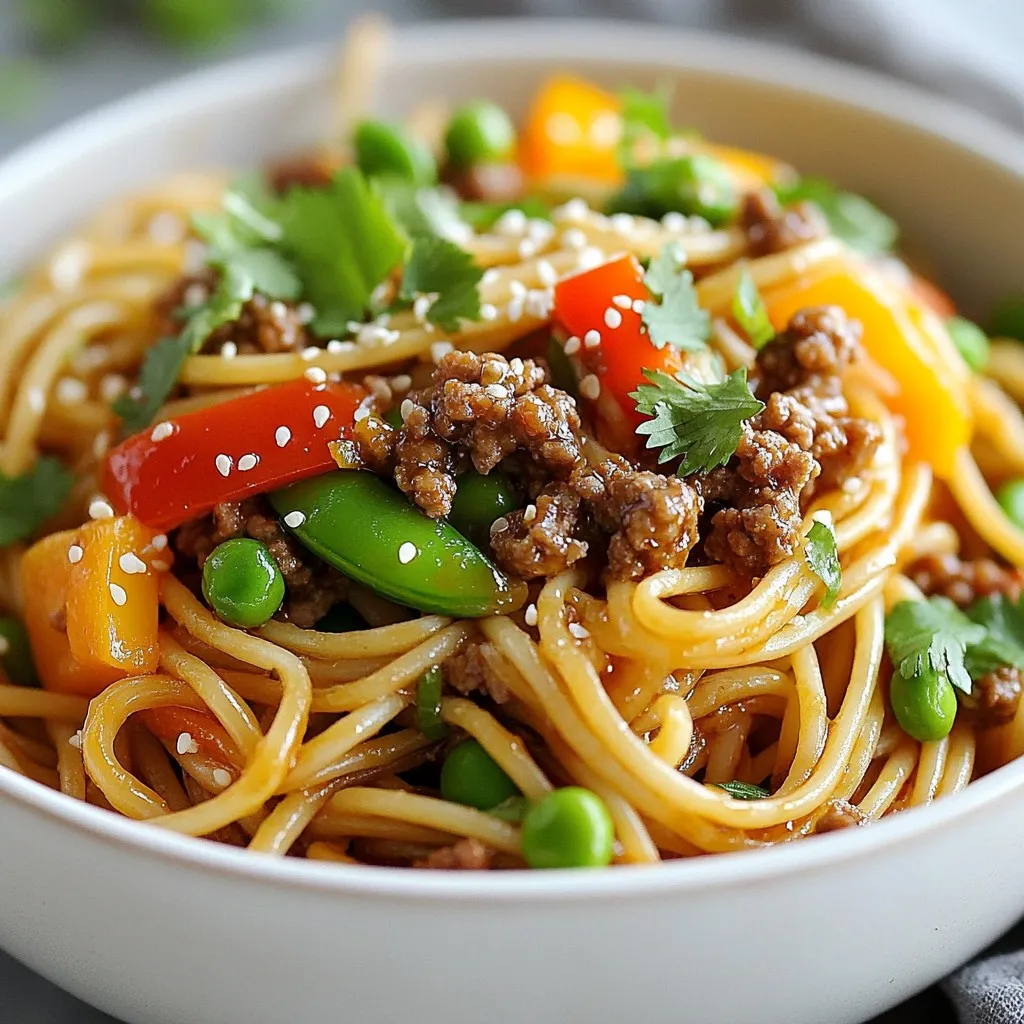
Looking for a quick and delicious dinner idea? Try my Asian Style Ground Beef Spaghetti! This dish blends classic spaghetti

- 3-4 pounds beef roast (chuck or sirloin recommended) - 1 cup fresh cranberries (or frozen, thawed) - 1/2 cup balsamic vinegar - 1 cup beef broth - 2 tablespoons brown sugar - 1 large onion, sliced into thin rings - 4 cloves garlic, minced finely - 2 tablespoons olive oil - 1 teaspoon dried thyme - 1 teaspoon dried rosemary - Salt and freshly ground black pepper to taste - Fresh parsley, roughly chopped for garnish (optional) For this beef roast, I suggest using a chuck roast or sirloin. They both work great. If you can't find fresh cranberries, frozen ones are fine. Just thaw them first. For the balsamic vinegar, you can swap with red wine vinegar if needed. Beef broth can be replaced with vegetable broth, but the flavor may change slightly. If you like sweetness, add more brown sugar. You can also use shallots instead of onions for a milder taste. - Calories: 350 - Protein: 40g - Fat: 15g - Carbohydrates: 20g - Fiber: 2g - Sugar: 5g This dish serves 6-8 people. Each serving provides a hearty amount of protein, making it a filling meal. Enjoy this rich and tangy roast that is sure to impress your guests! {{ingredient_image_2}} First, preheat your oven to 325°F (163°C). This step is crucial for even cooking. While the oven warms up, season your beef roast. Use salt and freshly ground black pepper to coat all sides. This adds flavor right from the start. A well-seasoned roast makes all the difference in taste. Next, heat olive oil in a large skillet over medium-high heat. Once it's hot, carefully add your beef roast. Sear each side for about 3-4 minutes. Look for a nice golden-brown crust. This step locks in the juices and adds great flavor. After searing, remove the beef from the skillet and set it aside. In the same skillet, add sliced onions. Sauté them for about 5 minutes until they turn soft and translucent. Then, add minced garlic and cook for another minute. This will fill your kitchen with a lovely smell. In a bowl, whisk together balsamic vinegar, beef broth, brown sugar, thyme, and rosemary. Mix well to create a rich sauce. In a large roasting pan, layer the sautéed onions and fresh cranberries. Pour the balsamic mixture over this layer. Place the seared beef roast on top, allowing the juices to flow beneath. Cover the pan tightly with aluminum foil. This helps keep the roast moist. Bake for 2.5 to 3 hours. The beef should be tender and easy to pull apart. After cooking, remove the roast and let it rest for 10-15 minutes. This allows the juices to settle. Slice the beef into thick pieces and serve it. Spoon the delicious cranberry sauce over each slice. If you like, add a sprinkle of fresh parsley for a touch of color. Enjoy your savory and succulent dish! To get a great sear, start with a hot skillet. Use medium-high heat and add olive oil. Once the oil shimmers, carefully place your beef roast in the skillet. Sear each side for about 3-4 minutes. Look for a rich, golden-brown crust. This step helps lock in juices and adds flavor. Avoid moving the roast too much. Let it sit and form that perfect crust. Cooking time can vary based on the cut. For a chuck roast, aim for 2.5 to 3 hours at 325°F. If using sirloin, check for tenderness at 2 hours. The goal is to have meat that pulls apart easily. Always use a meat thermometer. Beef should reach 145°F for medium-rare. Adjust time as needed based on the size and cut of your roast. You can add more depth to your roast. Consider using fresh herbs like sage or oregano. A splash of red wine can also enhance the sauce. If you want more sweetness, increase the brown sugar. Feel free to mix in roasted carrots or potatoes in the pan. They will soak up the lovely sauce while cooking. Experimenting with flavors keeps each meal exciting and fresh. Pro Tips Choose the Right Cut: Opt for chuck or sirloin for a tender and flavorful roast. These cuts are well-suited for slow cooking and absorb flavors beautifully. Enhance the Cranberry Flavor: If using frozen cranberries, make sure to thaw them completely to preserve texture and flavor. Fresh cranberries provide a brighter taste! Do Not Skip Resting: Allowing the roast to rest after cooking is crucial. This step ensures the juices redistribute, resulting in a more succulent and juicy roast. Perfect Pairings: Serve this dish with sides like creamy mashed potatoes or roasted vegetables to complement the rich flavors of the balsamic cranberry sauce. {{image_4}} You can switch things up in this dish easily. If you want a different flavor, try using red wine instead of balsamic vinegar. It adds a rich taste that pairs well with beef. For a sweeter touch, swap fresh cranberries for dried cranberries or even cherry preserves. If you like a bit of a kick, add a pinch of red pepper flakes to the balsamic mixture. You can also use fresh herbs like basil or sage instead of thyme and rosemary. These changes will give the roast a new twist while keeping it tasty. You can cook this beef roast in a slow cooker or an Instant Pot. For the slow cooker, follow these steps: brown the beef as usual, then place it in the slow cooker. Add the sautéed onions, garlic, cranberries, and balsamic mixture. Cook on low for 6 to 8 hours or high for 4 to 5 hours. The beef will turn out tender and juicy. For the Instant Pot, brown the beef first, then add everything to the pot. Seal the lid and cook on high pressure for about 60 minutes. Let the pressure release naturally for best results. Both methods create a flavorful meal with less active cooking time. You can easily change the ingredients based on the seasons. In fall, try adding root vegetables like carrots or sweet potatoes. They add nutrition and flavor to the roast. In winter, you can use hearty greens like kale or Swiss chard. In spring, fresh peas or asparagus can brighten the dish. In summer, consider fresh tomatoes or bell peppers for a twist. Adjusting ingredients with the seasons keeps the dish fresh and exciting all year round. To keep your Balsamic Cranberry Beef Roast fresh, let it cool first. Once it's cool, slice the beef into pieces. Place the beef and sauce into airtight containers. Store them in the fridge for up to three days. If you want to keep it longer, freezing is a great option. To reheat, take the beef and sauce out of the fridge. Place the beef in a baking dish. Pour the sauce over the meat. Cover the dish with foil to keep the moisture in. Heat it in the oven at 325°F (163°C) for about 20 to 25 minutes. Check that it is heated through before serving. You can freeze the Balsamic Cranberry Beef Roast for up to three months. It’s best to freeze the beef and sauce separately. Use freezer-safe bags or containers for this. When you’re ready to eat, thaw it in the fridge overnight. Then, reheat it as noted above. Enjoy that tasty roast whenever you want! The best cuts of beef for this dish are chuck or sirloin. Chuck is great for its rich flavor and tenderness when slow-cooked. Sirloin is leaner but still juicy and delicious. Both cuts work well in this recipe, so choose based on your taste and budget. Yes, you can use dried cranberries if fresh ones are not available. Dried cranberries add sweetness and flavor but may not provide the same tartness. If you use dried cranberries, consider adding a bit more balsamic vinegar to balance the sweetness. To check if the beef is done, use a meat thermometer. The internal temperature should reach 145°F (63°C) for medium-rare. If you prefer it more done, aim for 160°F (71°C) for medium. Another way is to pull the beef apart with a fork; it should be tender and easily shred. In this blog post, we explored a tasty recipe for Balsamic Cranberry Beef Roast. We covered ingredients, step-by-step instructions, and tips for best results. You learned about variations and storage tips to make this dish last. Overall, this recipe is simple and flexible. You can adjust it to fit your taste. Enjoy the savory flavors and share it with others! Happy cooking!

Balsamic Cranberry Beef Roast Savory and Succulent Dish

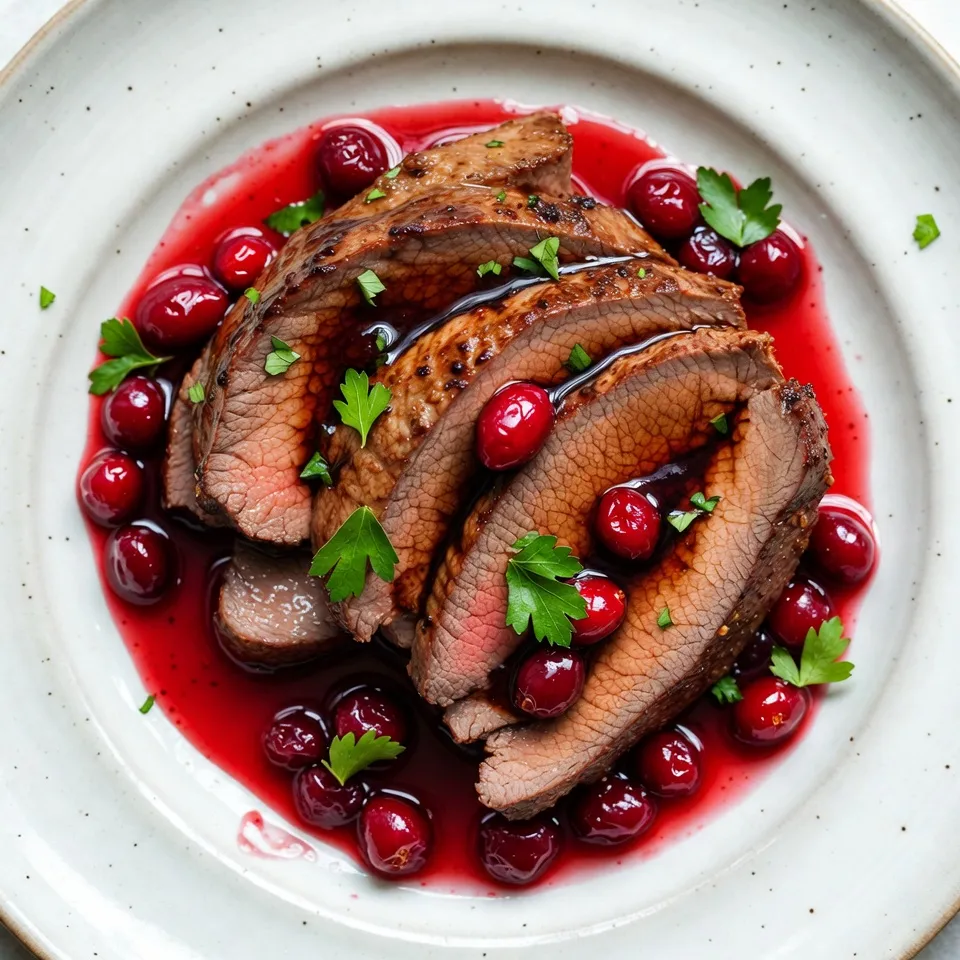
Are you ready to impress your family with a mouth-watering meal? My Balsamic Cranberry Beef Roast is a savory and

- 12 ounces white chocolate chips - 1 cup crushed peppermint candies (or finely crushed candy canes) - 1/2 teaspoon peppermint extract - 1/4 cup dark chocolate chips (optional) - Pinch of sea salt (for garnish) Gathering the right ingredients sets the stage for a great treat. I love using good quality white chocolate chips. They melt smooth and taste sweet. For the peppermint, you can use crushed candies or candy canes. Both options bring that fresh minty flavor. The peppermint extract adds a nice touch. It boosts the mint flavor in the bark. If you want to add some depth, dark chocolate chips work well. Drizzling them on top creates a lovely contrast. Don't forget the sea salt! Just a pinch on top brings out the sweetness. It makes every bite exciting. Enjoy prepping and gathering these simple ingredients; they create a festive treat! {{ingredient_image_2}} Start by lining a baking sheet with parchment paper. The paper helps keep the bark from sticking. Make sure the paper covers the whole surface. This step makes it easy to lift the bark later. For melting the white chocolate, use a microwave-safe bowl. Add the white chocolate chips to the bowl. Heat in the microwave in 30-second bursts. Stir the chocolate well after each burst. Keep heating until it melts and looks smooth. This process should take about 1 to 1.5 minutes. After melting the chocolate, stir in the peppermint extract. Mix it well to spread the minty flavor. Next, gently fold in the crushed peppermint candies. Save a few tablespoons of candies for later. Stir until the candies are spread evenly in the chocolate. Now, transfer this mixture onto the lined baking sheet. Use a spatula to spread it into an even layer. Aim for about 1/4 inch thick. If you want, melt dark chocolate in the same way. Drizzle it over the white chocolate for an extra touch. Once you spread the chocolate, sprinkle the reserved crushed candies on top. Press them in gently. Now, place the baking sheet in the refrigerator. Chill for about 2 hours. This helps the chocolate set well. After the chocolate is firm, carefully remove it from the baking sheet. Break it into pieces of any size you like. You can make big chunks or small bites. For a fun twist, sprinkle a pinch of sea salt on top. This adds a nice contrast to the sweet flavor. To melt white chocolate well, use a microwave-safe bowl. Heat in short bursts. Try 30 seconds at a time. Stir it well between each heating. This helps the chocolate melt evenly. Watch it closely; it burns easily. Once melted, it should be smooth and shiny. If it seems thick, you can add a little coconut oil. This helps with the texture. You can boost the taste of your bark by adding extracts. Vanilla or almond extract work nicely. You can also try different toppings. Chopped nuts or dried fruit add a fun twist. For a zesty kick, try a hint of orange zest. Let your creativity flow. Each variation can make it unique. Presentation makes your bark look special. After breaking it into pieces, arrange it on a nice platter. Add some whole peppermint candies for color. A sprig of fresh mint adds freshness. You can even wrap it in clear bags for gifts. Small touches make your treat festive and fun! Pro Tips Use High-Quality Chocolate: The flavor of your peppermint bark largely depends on the quality of your chocolate. Opt for premium white chocolate chips for a creamier and richer taste. Crush Peppermint Candies Finely: For a more uniform texture and better distribution, crush the peppermint candies into smaller pieces. This will ensure each bite has a balanced flavor. Layer Your Flavors: To enhance the peppermint flavor, consider adding a few drops of peppermint extract to the crushed candies before mixing them into the chocolate. Experiment with Different Chocolates: While white chocolate is traditional, feel free to mix in milk or dark chocolate for a unique twist on the classic peppermint bark. {{image_4}} You can mix up your bark by using milk or dark chocolate. Each type gives a new taste. Milk chocolate adds a creamy touch, while dark chocolate brings a rich flavor. If you want a twist, try a mix of white and dark chocolate. Just melt them separately, then layer them. Peppermint extract is classic, but you can use other flavors too. Almond extract adds a nice nutty taste. Vanilla extract gives a smooth, sweet note. For a spicy kick, try cinnamon or ginger. Just remember, start with a small amount and taste as you go. You can get creative with toppings! Nuts, like almonds or walnuts, add crunch. Sprinkles can make it look festive. Dried fruits, such as cranberries or cherries, add a chewy texture. Just sprinkle them on top after spreading your chocolate. Press them in lightly to help them stick. To keep your white chocolate peppermint bark fresh, store it in an airtight container. Place parchment paper between layers to prevent sticking. Avoid storing it near strong-smelling foods, as chocolate absorbs odors easily. Keep it in a cool, dry place, away from sunlight. When stored at room temperature, the bark lasts about two weeks. If you refrigerate it, it can stay fresh for up to a month. Just remember, cold air can change its texture. So, let it sit at room temp before eating for the best taste. If you want to freeze your bark, wrap it in plastic wrap. Then, place it in a freezer-safe bag. It can last up to three months in the freezer. To defrost, move it to the fridge overnight. Avoid microwaving it, as this can ruin the texture. Enjoy your bark once it's back to room temperature! If you need a substitute for white chocolate, consider using yogurt chips. They offer a similar sweetness. You can also use carob chips for a unique flavor. Each option changes the taste a bit, but they can work well. Remember, they may not melt the same way as white chocolate. Yes, you can make this recipe vegan! Look for dairy-free white chocolate chips. Many brands offer vegan options. Use coconut cream instead of dairy. You can also skip the chocolate drizzle or use dark chocolate chips with no dairy. This way, you keep the taste and stay vegan. Grainy chocolate can happen if it overheats or if water gets in. If your white chocolate is grainy, try these steps: Add a tiny bit of vegetable oil to the chocolate and stir well. This can help smooth it out. If it is too thick, reheat gently in short bursts, stirring often. You’ve learned how to make delicious peppermint bark with simple ingredients and steps. From melting white chocolate to adding crushed candies, each step makes this treat special. Remember to let it chill well for the best texture. Your options for flavors and toppings are endless, so feel free to get creative. Whether making it for yourself or sharing with others, this bark is sure to please. Enjoy your tasty creation, and share it with friends and family for extra joy!

White Chocolate Peppermint Bark Rich and Festive Treat

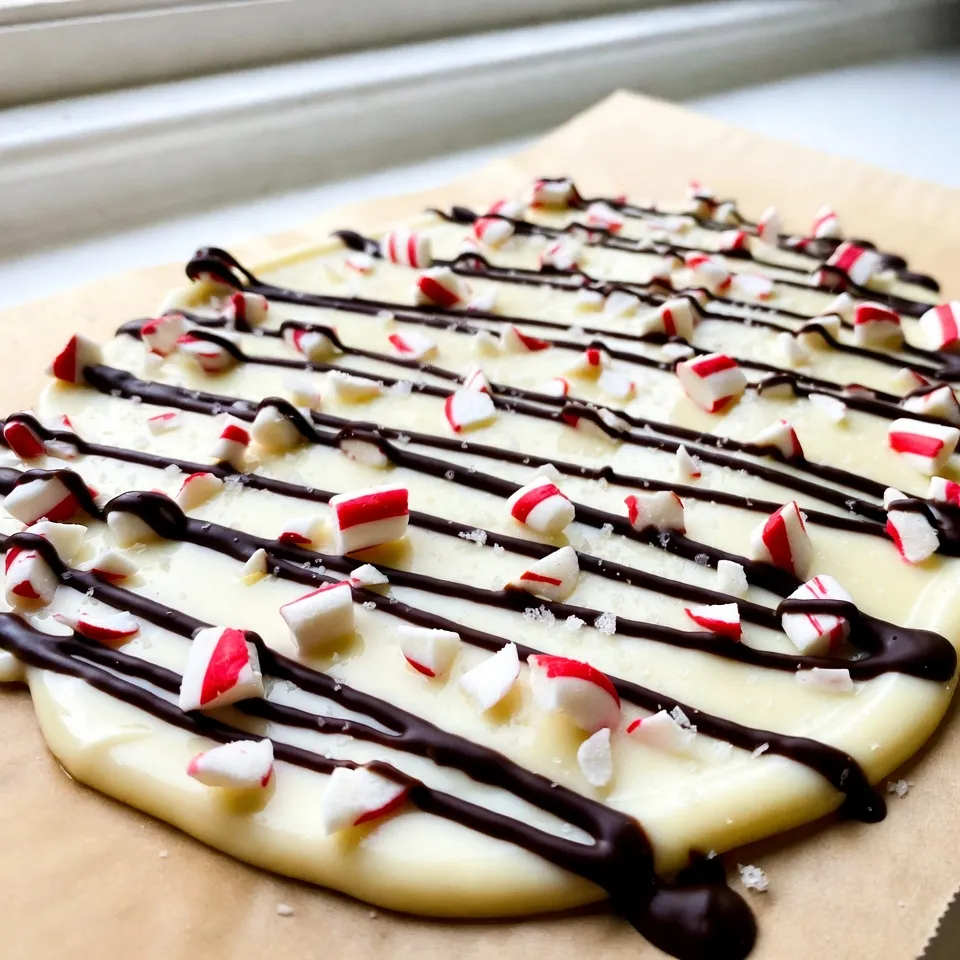
Are you ready to create a treat that screams holiday cheer? White chocolate peppermint bark is the perfect sweet for

- 2 tablespoons olive oil - 1 lb boneless chicken breast, cut into bite-sized pieces - 1 tablespoon Cajun seasoning - 1 small onion, finely chopped - 3 cloves garlic, minced - 1 cup orzo pasta - 4 cups low-sodium chicken broth - 1 cup heavy cream - 1 cup freshly grated Parmesan cheese - 1 cup cherry tomatoes, halved - 2 cups fresh baby spinach - Salt and freshly ground black pepper to taste - Chopped fresh parsley for garnish In this recipe, each ingredient plays a key role. The olive oil gives flavor and helps cook the chicken. Cajun seasoning adds spice and warmth. The onion and garlic bring a sweet and savory base. Orzo is the pasta that absorbs all the flavors. Chicken broth adds depth and richness. Heavy cream makes the dish creamy and smooth. Parmesan cheese adds a salty kick. Cherry tomatoes add freshness and color, while spinach gives a healthy boost. For seasoning, adjust salt and pepper to your taste. You can also add more Cajun spice for heat. The balance of these ingredients creates a meal that is both filling and flavorful. Trust me, you will love the depth of flavor in each bite. {{ingredient_image_2}} 1. Heat 2 tablespoons of olive oil in a large pot over medium-high heat. 2. Cut 1 pound of boneless chicken breast into bite-sized pieces. 3. Add the chicken to the pot and sprinkle with 1 tablespoon of Cajun seasoning. 4. Cook the chicken for 5 to 7 minutes. Look for a golden brown color and no pink inside. 5. When done, take the chicken out and set it aside on a plate. 1. In the same pot, add 1 small chopped onion. 2. Cook the onion for 3 to 4 minutes until it turns translucent and smells good. 3. Next, add 3 cloves of minced garlic and cook for another minute. Make sure the garlic does not burn. 1. Stir in 1 cup of orzo pasta, mixing it well with the oil and flavors. 2. Pour in 4 cups of low-sodium chicken broth and bring it to a gentle simmer. 3. Once simmering, lower the heat to medium-low and cover the pot. 4. Let it cook for about 10 minutes, stirring occasionally. You want the orzo to be tender but not mushy. 1. Lower the heat and stir in 1 cup of heavy cream and 1 cup of freshly grated Parmesan cheese. 2. Mix well until everything is creamy and combined. 3. Add the cooked chicken, 1 cup of halved cherry tomatoes, and 2 cups of fresh baby spinach. 4. Let it simmer for another 5 minutes. You want the spinach to wilt and the flavors to blend. Taste and adjust with salt and black pepper as needed. If it's too thick, add a bit more broth or cream for your desired texture. Enjoy the cooking process! To make your dish just right, you can adjust the spice levels. If you like more heat, add more Cajun seasoning. For a milder flavor, use less. It’s all about finding what works best for your taste. You can also substitute seasonings. If you don’t have Cajun seasoning, try a mix of paprika, cayenne, and garlic powder. This will still give your dish a great flavor. When adding cream, do it slowly. Stir well as you pour it in. This helps mix it smoothly. If you want a creamier sauce, add a bit more cream. If your dish turns out too thick, just add a splash of chicken broth. This will help you reach the perfect thickness without losing flavor. Fresh herbs can really make your dish shine. Chopped parsley or basil adds color and flavor. Scatter them on top right before serving. Adding citrus can lift the dish’s taste. A squeeze of lemon or lime brightens the flavors. It’s a simple way to enhance your meal and make it pop! Pro Tips Perfectly Cooked Orzo: Keep an eye on the orzo as it cooks; stir it occasionally to prevent sticking and ensure even cooking for that perfect al dente texture. Customize the Spice: Adjust the amount of Cajun seasoning to suit your heat preference. You can also add a pinch of cayenne pepper for an extra kick! Fresh Spinach Tip: For a vibrant color and maximum nutrients, add the spinach just at the end of cooking. It will wilt perfectly without losing its freshness. Leftover Magic: This dish is great for leftovers! Store any extras in an airtight container and reheat gently on the stove with a splash of chicken broth to revive the creaminess. {{image_4}} You can swap chicken for shrimp or sausage. Shrimp cooks fast and adds a nice twist. Just sauté it until it's pink and tender. For sausage, choose andouille for a smoky kick. Slice it and sauté with onions for extra flavor. If you want a vegetarian option, try using chickpeas or lentils. These add protein and heartiness. You can also use mushrooms for a meaty texture. Just sauté them until they’re soft and golden. Feel free to add other vegetables. Bell peppers, zucchini, or broccoli work great. They add color and nutrition. You can also use seasonal veggies like asparagus in spring or butternut squash in fall. Chop the vegetables into small pieces so they cook quickly. Add them with the spinach for a tasty mix. To change the flavor, try adding different spices. Smoked paprika, cayenne, or even a bit of oregano can enhance the dish. Start with a small amount and adjust to your taste. For cheese options, if you want a twist, use gouda or mozzarella. They melt well and add a creamy texture. Mixing different cheeses can make the dish even richer. - Use airtight containers to keep your dish fresh. Glass containers work great for this. - If you plan to eat it soon, store it in the fridge. It lasts about 3 days. - For longer storage, freeze the orzo. It stays good for up to 2 months. - You can reheat the orzo in a pot over medium heat. Add a splash of broth or cream. - Stir gently until it warms through. This should take about 5-7 minutes. - If using a microwave, heat in 30-second bursts. Stir in between to avoid hot spots. Yes, you can use other pasta shapes. Here are some great options: - Rice-shaped pasta: A good match for the creamy sauce. - Small shells: They hold sauce well and offer a fun texture. - Fusilli: The spirals catch sauce nicely. When switching pasta, adjust the cooking time. Make sure to check the package for guidance. To make this dish gluten-free, swap the orzo for gluten-free pasta. Here are some ideas: - Quinoa: A protein-rich alternative that cooks well. - Brown rice pasta: A great choice that mimics regular pasta. - Zucchini noodles: A low-carb option that adds freshness. Also, check your chicken broth. Some brands may contain gluten. To keep your dish creamy, here are some tips: - Add cream slowly: Mix it in gradually after lowering the heat. - Use freshly grated cheese: Pre-grated cheese can clump. - Avoid overcooking: Stir gently and don't let the mixture boil. Common pitfalls include adding cold cream or letting it sit too long before serving. Keep it warm and enjoy! This dish combines simple ingredients and steps for a flavorful meal. You learned about making a Cajun-inspired dish with chicken, orzo, and a creamy sauce. I hope you try it and make it your own with different proteins or veggies. Remember, cooking is about enjoying the process and sharing with others. Store leftovers properly, and reheat them with care. Happy cooking!

One-Pot Cajun Chicken Alfredo Orzo Flavorful Meal

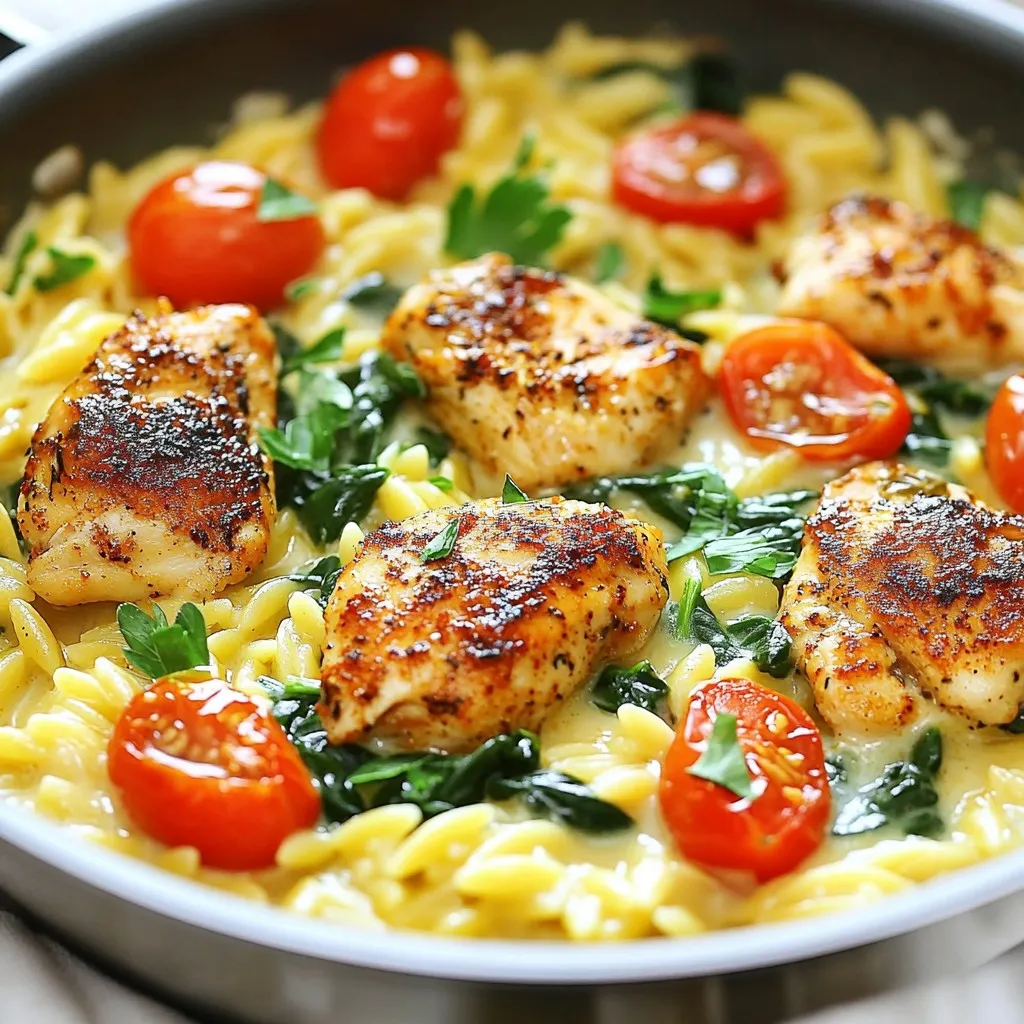
Looking for an easy, tasty dinner? I’ve got you covered with my One-Pot Cajun Chicken Alfredo Orzo! This dish combines

- 12 lasagna noodles - 2 cups cooked chicken breast, shredded - 2 cups ricotta cheese - 2 cups mozzarella cheese, shredded - 1 cup Parmesan cheese, grated - 3 cups Alfredo sauce (store-bought or homemade) - 1 cup fresh spinach, chopped - 2 cloves garlic, minced - 1 teaspoon Italian seasoning - Salt and pepper to taste - Fresh parsley, chopped (for garnish) In this recipe, I use 12 lasagna noodles. They form the base of the dish. Next, I add 2 cups of cooked chicken breast, shredded. This gives the lasagna its hearty flavor. The ricotta cheese adds creaminess, so I use 2 cups. Mozzarella cheese melts wonderfully, so I use 2 cups of that too. For a cheesy crust, I add 1 cup of grated Parmesan cheese. The Alfredo sauce is key for flavor; I use 3 cups. You can choose store-bought or make your own for more taste. Fresh spinach brings in color and nutrients, so I chop 1 cup and add it. I like to add 2 cloves of minced garlic for a nice kick, along with 1 teaspoon of Italian seasoning for depth. Finally, I season with salt and pepper to taste. To make it pretty, I garnish with chopped fresh parsley before serving. This mixture of ingredients creates a rich and flavorful Chicken Alfredo Lasagna that you will love. {{ingredient_image_2}} Preheating your oven to 375°F (190°C) is key. This ensures even cooking and a nice, bubbly top. If you skip this step, your lasagna may cook unevenly. Start by mixing the shredded chicken, ricotta cheese, chopped spinach, minced garlic, and Italian seasoning. Add a pinch of salt and pepper for taste. Use a large mixing bowl and stir until it’s smooth. This mixture is the heart of your lasagna. Grab your 9x13 inch baking dish. Spread a thin layer of Alfredo sauce on the bottom. This helps the noodles not stick. Place four lasagna noodles over the sauce, allowing them to overlap a bit. Next, spread half of your chicken and cheese mixture over the noodles. Sprinkle one cup of mozzarella cheese and drizzle one third of the Alfredo sauce on top. Repeat this process. Add another four noodles, the rest of the chicken mixture, and another cup of mozzarella. Pour half of the remaining Alfredo sauce over this layer. Finish with the last four noodles, the rest of the Alfredo sauce, and the remaining mozzarella and Parmesan cheese on top. Cover the baking dish with aluminum foil. This keeps moisture in and helps the cheese melt nicely. Bake in your preheated oven for 25 minutes. After 25 minutes, remove the foil. Bake for another 15 minutes, or until the top is golden brown and bubbly. Once out of the oven, let your lasagna cool for about 10 minutes. This cooling time helps it set, making slicing much easier. Before serving, sprinkle some chopped parsley on top. This adds a pop of color and fresh flavor to your dish! Making homemade Alfredo sauce is simple and rewarding. Here’s how to do it: - Melt 1 cup of butter in a pan over medium heat. - Add 2 cups of heavy cream and stir well. - Cook for 5 minutes, stirring often. - Add 2 cups of grated Parmesan cheese slowly. - Mix until smooth. - Season with salt and pepper to taste. This sauce adds a rich flavor to your lasagna. Plus, you control the taste! If you need gluten-free options, look for gluten-free lasagna noodles. Many brands offer good choices. They cook just like regular noodles. For dairy-free options, try using cashew cream or almond milk. You can also use vegan cheese to replace the dairy. This way, everyone can enjoy the dish! To get a creamy and golden crust, use a mix of cheeses. I recommend blending mozzarella and Parmesan. This gives a nice stretch and a crisp top. Make sure to layer cheese evenly. This helps it melt well and creates a nice crust. Adding a bit of extra cheese on top before baking makes it even better! Pro Tips Layering Technique: To ensure even cooking and flavor distribution, make sure each layer is spread evenly and that the noodles overlap slightly. This helps the layers meld together beautifully. Homemade Alfredo Sauce: If you prefer a richer flavor, consider making your own Alfredo sauce using butter, heavy cream, and Parmesan cheese. It elevates the dish and is often healthier than store-bought versions. Serving Temperature: Letting the lasagna rest for at least 10 minutes after baking allows it to set, making it easier to slice and serve without falling apart. Vegetable Additions: Feel free to add other vegetables like mushrooms or bell peppers for extra flavor and nutrients. Just sauté them beforehand to reduce moisture in the lasagna. {{image_4}} You can easily make a veggie chicken Alfredo lasagna by adding vegetables. Try bell peppers or mushrooms for a tasty twist. Chop the vegetables and mix them with the chicken and cheese. This adds flavor and makes your dish healthier. You can also use spinach, which is already in the recipe. Other good choices include zucchini, broccoli, or even artichokes. If you like heat, make a spicy chicken Alfredo lasagna. Add jalapeños for a nice kick. You can also sprinkle crushed red pepper flakes on each layer. This adds a burst of flavor and warms up each bite. Adjust the spice to your liking. Start with a small amount and taste as you go. You don’t have to stick with chicken. Try turkey or ham instead. Both meats work well in this dish. Turkey gives a leaner option, while ham adds a nice sweetness. Shred or chop the meat before mixing it with the cheese. This makes it easy to layer and enjoy with every bite. After enjoying your Chicken Alfredo Lasagna, you may have leftovers. Store them in an airtight container. This keeps the lasagna fresh. Make sure to cool it to room temperature before sealing. If you skip this step, moisture builds up, making the lasagna soggy. Leftovers can last in the fridge for up to four days. Freezing your Chicken Alfredo Lasagna is a great option for future meals. First, cut the lasagna into individual servings. Wrap each piece tightly in plastic wrap. Then, place them in a freezer-safe bag or container. This helps prevent freezer burn. You can freeze the lasagna for up to three months. When ready, thaw it in the fridge overnight before reheating. To keep your Chicken Alfredo Lasagna delicious, reheating is key. The oven is the best choice. Preheat it to 350°F (175°C). Place the lasagna in an oven-safe dish. Cover it with foil to keep moisture in. Heat for about 20 minutes or until it’s warm. If you prefer the microwave, use a microwave-safe plate. Heat in 30-second intervals until warm. This helps maintain the creamy texture and rich flavors. Yes, you can prepare Chicken Alfredo Lasagna in advance. Make it up to a day before. Just cover it well and refrigerate it. When ready to bake, remove it from the fridge, let it sit for 30 minutes, and then bake. This gives the flavors time to mix. This recipe takes about 20 minutes to prep. Cooking time is around 40 minutes. In total, you will spend about 1 hour from start to finish. This includes 25 minutes covered with foil and 15 minutes uncovered to brown the cheese. You can pair this dish with a fresh green salad. A simple Caesar salad works great. Garlic bread is also a tasty choice. For a light touch, serve with steamed broccoli or roasted veggies. These sides balance the creamy lasagna perfectly. This blog post covered the key ingredients and steps to make Chicken Alfredo Lasagna. You learned about the main ingredients, suggested tools, and a simple step-by-step guide. I shared helpful tips for tweaks and dietary needs and discussed storage and reheating methods. Now, you have all the tools to create a delicious meal. Enjoy the cooking process and the tasty results. Your friends and family will love it!

Chicken Alfredo Lasagna Flavorful and Easy Recipe

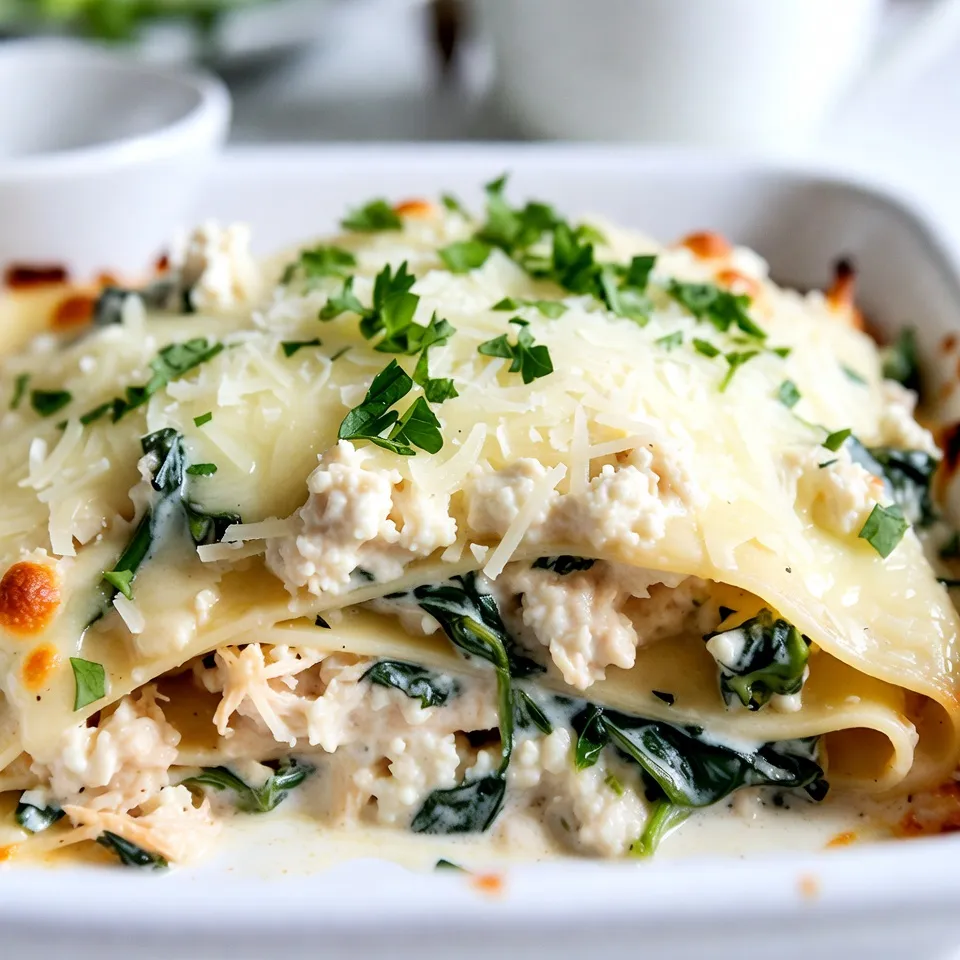
Craving comfort food that’s easy to make? Look no further than Chicken Alfredo Lasagna! This creamy, cheesy dish combines tender

- 1 cup unsalted butter, softened - 1/2 cup granulated sugar - 2 cups all-purpose flour - 1/4 teaspoon salt - 1 teaspoon pure vanilla extract - 1/4 cup cornstarch - Optional: 1/2 cup mini chocolate chips or chopped nuts Each ingredient plays a key role in making buttery shortbread cookies. - Unsalted butter gives the cookies their rich flavor. It also adds moisture. - Granulated sugar sweetens the cookies and helps them to spread. - All-purpose flour forms the base and gives structure. - Salt enhances the sweet flavor and balances the taste. - Vanilla extract adds a warm, inviting aroma. - Cornstarch makes the cookies extra tender and light. Each of these ingredients works together to create the perfect texture and taste. You can easily customize your shortbread cookies. Here are some fun add-ins: - Mini chocolate chips for a sweet surprise in each bite. - Chopped nuts like walnuts or pecans add a crunchy contrast. Feel free to mix and match these options for your favorite flavors! {{ingredient_image_2}} Start by preheating your oven to 325°F (160°C). This helps the cookies bake evenly. While the oven heats, line a baking sheet with parchment paper. This makes it easy to remove the cookies later. In a large bowl, add 1 cup of softened butter and 1/2 cup of granulated sugar. Use an electric mixer on medium speed. Cream these together for about 3-4 minutes. You want the mix to be light and fluffy. It should look pale in color. Add 1 teaspoon of pure vanilla extract and mix until combined. This gives your cookies a nice flavor. In a separate bowl, sift together 2 cups of all-purpose flour, 1/4 cup of cornstarch, and 1/4 teaspoon of salt. Sifting helps to mix these dry ingredients well and removes lumps. Gradually add this dry mix to the wet mix. Combine gently so you don’t over-mix the dough. This keeps your cookies tender. If you want to add a twist, fold in 1/2 cup of mini chocolate chips or finely chopped nuts. Make sure they are evenly spread throughout the dough. Now it’s time to shape the cookies. Take a tablespoon of dough and roll it into a ball in your hands. Place each ball on the prepared baking sheet, spacing them about 2 inches apart. This space allows them to spread while baking. Next, flatten each ball slightly using the back of a fork or your palm. This helps them bake evenly. Bake the cookies in the preheated oven for 15-18 minutes. Look for light golden brown edges, while the centers should stay pale and soft. After baking, remove the cookies from the oven. Let them cool on the baking sheet for 5 minutes. This helps them firm up a bit. Then, use a spatula to move them to a wire rack for full cooling. Enjoy your perfect buttery shortbread cookies! To get that perfect shortbread texture, use room temperature butter. Cold butter won't mix well, and your cookies will not be tender. Cream the butter and sugar for about 3-4 minutes. This step adds air and makes your cookies light. Sift the flour and cornstarch together to avoid lumps. Mix just until combined. Over-mixing will lead to tough cookies. A smooth dough is key. Don’t forget to let the cookies cool for a bit on the baking sheet before moving them. This helps them firm up. One common mistake is using cold butter. It doesn’t blend well with sugar and makes cookies dense. Another issue is over-mixing the dough. This can make your cookies tough instead of tender. Make sure to space the cookies properly on the baking sheet. If they are too close, they will stick together. Lastly, keep an eye on baking time. If you overbake, the cookies will be hard. You want them just golden at the edges. To boost flavor, add 1 teaspoon of almond extract or lemon zest. These small changes give a fresh twist. You can also fold in 1/2 cup of mini chocolate chips or nuts for texture. For a lovely presentation, arrange cookies on a decorative plate. Dust the tops with powdered sugar for a sweet touch. Pair your cookies with tea or coffee for a delightful treat. Happy baking! Pro Tips Chill the Dough: For even more tender cookies, refrigerate the dough for 30 minutes before baking. This helps the butter firm up, leading to less spread as they bake. Uniform Size: Use a cookie scoop to ensure all cookies are the same size. This guarantees even baking and a consistent look. Flavor Variations: Experiment with different extracts such as almond or lemon for a unique twist on the classic flavor. Storage Tips: Keep the cookies in an airtight container at room temperature to maintain their freshness for up to a week. {{image_4}} You can easily add a twist to your classic shortbread. Just fold in 1/2 cup of mini chocolate chips after mixing the dough. The rich chocolate adds a nice contrast to the buttery flavor. It’s an exciting surprise in every bite! Nuts offer more flavor and crunch. You can use finely chopped pecans, almonds, or walnuts. Just add 1/2 cup of your favorite nuts into the dough. This gives the cookies a lovely texture and nutty taste. Want a grain-free treat? You can swap the all-purpose flour for almond flour. This keeps the cookies tender and adds a light nutty flavor. You can also use coconut flour, but reduce the amount to 1/2 cup and add an extra egg for moisture. Enjoy these tasty options without worry! To keep your buttery shortbread cookies fresh, store them in an airtight container. This helps maintain their crispness. You can use a cookie jar or a resealable plastic bag. Place a piece of parchment paper between layers to prevent sticking. Keep the container in a cool, dry place, away from sunlight. Avoid storing cookies in the fridge, as this can make them lose their texture. Freezing shortbread cookies is easy and keeps them tasty. First, let the cookies cool completely. Next, place them in a single layer on a baking sheet. Freeze them for about 1-2 hours until firm. Then, transfer the cookies to a freezer-safe bag or container. Make sure to label it with the date. When you're ready to enjoy them, just thaw at room temperature for a few hours. Buttery shortbread cookies last about 1 week when stored properly in an airtight container. If frozen, they can stay fresh for up to 3 months. Always check for any signs of spoilage before eating. If they look or smell off, it's best to discard them. Enjoying them fresh ensures the best flavor and texture! The secret lies in using high-quality butter. It gives the cookies their rich flavor. Make sure your butter is softened for easy mixing. Also, do not over-mix the dough. This keeps the cookies tender and light. Sifting the flour and cornstarch also helps. It removes lumps and creates a smooth dough. Finally, bake them just until the edges turn golden. Yes, you can make these cookies ahead of time. You can prepare the dough and chill it. Wrap the dough in plastic wrap and store it in the fridge. This keeps it fresh for up to two days. You can also freeze the dough for longer storage. Just thaw it in the fridge before baking. This is a great way to have fresh cookies ready whenever you want. The best way to serve shortbread cookies is with a hot drink. Pair them with tea or coffee for a cozy treat. You can also dust them with powdered sugar for a pretty look. Arrange them on a nice plate to impress guests. For a fun twist, serve them with dips like chocolate or caramel sauce. You can modify the recipe to fit dietary needs. For a dairy-free version, use vegan butter. If you're gluten-free, replace all-purpose flour with a gluten-free blend. You can also make them sugar-free by using a sugar substitute. Always check the labels to ensure all ingredients meet your dietary needs. This blog post covered everything you need for perfect buttery shortbread cookies. We talked about key ingredients and why each one matters. You learned step-by-step instructions to bake cookies with the right texture. We also explored fun flavor variations and important storage tips. In the end, making shortbread cookies is easy and rewarding. You can impress friends and family with your baking skills. Just remember to have fun and be creative in the kitchen. Enjoy your sweet treats!

Perfect Buttery Shortbread Cookies Simple and Tasty

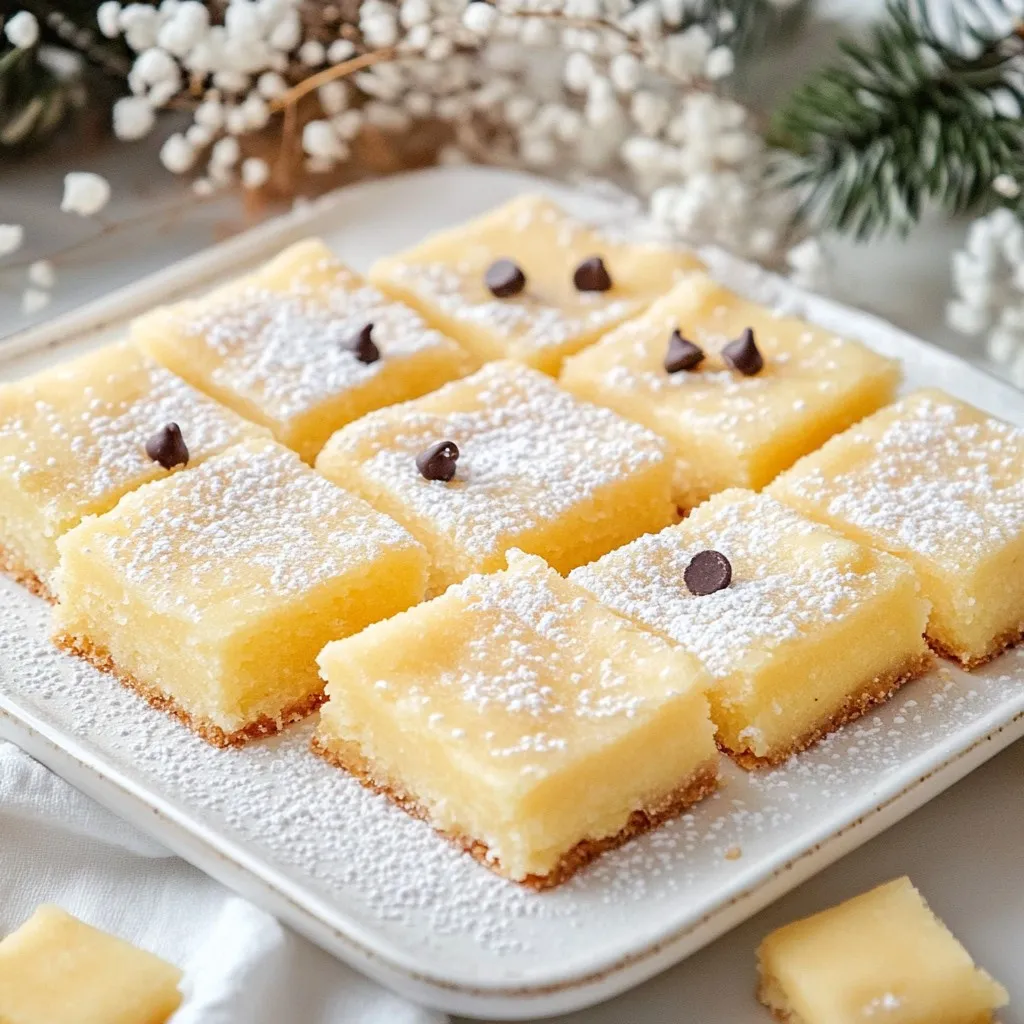
If you want the ultimate treat, look no further! My Perfect Buttery Shortbread Cookies are simple to make and taste

Older posts
Page1 Page2 … Page111 Next →

dsad

© 2025 recipesstation • Built with GeneratePress

Our Policies

  • Copyright Policy
  • Cookie Policy
  • GDPR Policy
  • Privacy Policy
  • Disclaimer
  • Terms Of Use

More Information

  • Home
  • About
  • Contact
  • Appetizers
  • Dessert
  • Dinner
  • Drinks
©2025, recipesstation About Back To Top