Skip to content
DisclaimerTerms Of UseGDPR PolicyCookie Policy

recipesstation

  • Home
  • Drinks
  • Appetizers
  • Dinner
  • Dessert
  • About
  • Contact
  • Privacy Policy
DisclaimerTerms Of UseGDPR PolicyCookie Policy

Emily

- 4 ripe tomatoes, diced into small chunks - 1 cup red onion, finely chopped - 1 clove of garlic, minced - 1/2 cup fresh basil leaves, chopped (plus extra for garnish) For this dip, fresh ingredients shine. The ripe tomatoes bring sweetness. Red onion adds a nice crunch and bite. Garlic gives a warm heat. Fresh basil brings a bright, herbal flavor that ties it all together. - 1 tablespoon balsamic vinegar - 2 tablespoons high-quality olive oil - Sea salt and freshly cracked pepper, to taste Balsamic vinegar adds a tangy depth. Olive oil gives richness and smoothness. Sea salt enhances all the flavors, while freshly cracked pepper adds a nice kick. Together, they create a flavorful dressing for the fresh ingredients. - 1 cup cream cheese, softened at room temperature - 1/4 cup freshly grated Parmesan cheese - 1/2 teaspoon dried oregano Cream cheese makes the dip creamy and rich. Parmesan cheese adds a salty, nutty flavor. Dried oregano brings an earthy touch. Mixing these cheeses creates a base that pairs perfectly with the fresh tomato topping. - 1 baguette, sliced into 1/2-inch rounds Sliced baguette serves as the perfect vehicle for the dip. It is crunchy and soft, making each bite delightful. Arrange the slices around the dip for a beautiful presentation. This adds a lovely touch to your serving table. {{ingredient_image_2}} First, gather your fresh ingredients. Dice four ripe tomatoes into small chunks. Chop one cup of red onion finely. Mince one clove of garlic. Lastly, chop half a cup of fresh basil leaves. In a medium mixing bowl, add all these ingredients. Stir gently until they mix well. This is the heart of your dip. Pour one tablespoon of balsamic vinegar and two tablespoons of high-quality olive oil over the mixture. Season with sea salt and freshly cracked pepper. Fold everything together gently. Set this vibrant tomato medley aside to marinate. Next, grab a separate bowl. In this bowl, beat one cup of softened cream cheese and a quarter cup of freshly grated Parmesan cheese together. Use an electric mixer or a sturdy spatula. Mix until the texture is creamy and smooth. Add half a teaspoon of dried oregano to the cheese mixture. Stir until evenly blended. Now, it’s time to build your dip! In a decorative serving dish, spread an even layer of the creamy cheese mixture. Make sure it covers the bottom well. Carefully spoon the prepared chunky tomato mixture over the cheese layer. Spread it out gently for even distribution. You can serve the dip right away, or cover it with plastic wrap. If you chill it for about 30 minutes, the flavors meld beautifully. Enjoy with fresh baguette slices! Adjust your seasoning to suit your taste. Start with a pinch of sea salt and black pepper. Remember, you can always add more. Balsamic vinegar adds a nice tang. If it feels too strong, balance it with olive oil. Always choose ripe tomatoes for the best flavor. They should be firm yet slightly soft. Fresh basil also enhances the taste. Use it right before serving for the best aroma. Arrange the baguette slices in a circle around the dip. This makes it easy to grab. You can also stack them for a fun look. For a pop of color, garnish the dip with whole basil leaves. It makes your dish look fresh and inviting. Consider using a colorful platter for a nice touch. It adds to the overall appeal of your dish. Prep ingredients ahead of time. Chop tomatoes, onions, and basil earlier in the day. Keep them in the fridge until you’re ready to mix. You can also use pre-sliced baguette to save time. This way, you can focus on the dip. Less time on prep means more time to enjoy with friends! Pro Tips Use Fresh Ingredients: Always opt for ripe, seasonal tomatoes and fresh basil to enhance the flavor of your dip. Chill for Flavor: Allow the dip to chill in the refrigerator for at least 30 minutes to let the flavors meld together beautifully. Variety in Breads: Try serving with different types of bread like ciabatta or pita chips for a unique twist and texture contrast. Extra Garnish: Top with a drizzle of balsamic glaze or a sprinkle of extra Parmesan cheese just before serving for added elegance. {{image_4}} You can easily change the flavors in your Chunky Bruschetta Dip. Adding diced avocado makes it creamy and rich. The avocado blends well with the fresh tomatoes. You can also try adding herbs like parsley or cilantro. These herbs give the dip a fresh twist and a new taste. Want to add some crunch? Try adding bell peppers or olives. They give the dip extra texture and flavor. For a savory kick, crumbled bacon or prosciutto works wonders. These meats add depth and a nice salty flavor. Your guests will love these additions! If you want a vegan version, use dairy-free cream cheese. It still gives a creamy texture without the dairy. You can also substitute balsamic vinegar for a vegan-friendly option. This swap keeps the flavor strong while making it suitable for everyone. To keep your Chunky Bruschetta Dip fresh, store any leftovers in an airtight container. This will help prevent air from drying out the dip. You want to keep all those lovely flavors intact. Make sure the lid seals tightly. If you can, use glass containers. They do a great job of keeping food fresh. To maintain freshness, eat the dip within three days. If you notice any change in smell or color, it's best to toss it. The tomatoes will start to lose their flavor after a couple of days, so enjoy it sooner rather than later. Can this dip be frozen? Yes, but with some tips. To freeze the dip, first, place it in a freezer-safe container. Leave some space at the top. The dip may expand as it freezes. It’s best to avoid freezing the baguette. It won't taste as good after thawing. For the best taste, aim to use the frozen dip within one month. After that, it may lose some flavor. When you're ready to use it, simply thaw it in the fridge overnight. To reheat the dip, first, let it thaw completely. This can take several hours in the fridge. Once thawed, gently mix it up to bring back its texture. You can warm it in the microwave for about 30 seconds. Just be careful not to overheat it. For serving after storage, you can add a splash of olive oil or a sprinkle of fresh basil. This brings back some freshness. Serve it with fresh baguette slices or crunchy veggies for a delightful snack! You can store Chunky Bruschetta Dip in the fridge for up to three days. After that, check for signs of spoilage. Look for changes in color, texture, or smell. If it smells off or has a watery layer on top, it's best to toss it. Yes, you can prepare this dip ahead of time. Mix the tomato and herb blend, then store it separately from the cheese layer. This keeps the flavors fresh. You can combine them just before serving. Cover the dip tightly with plastic wrap or foil to keep it fresh. This dip pairs well with various dippers. Here are some ideas: - Sliced baguette - Crackers - Pita chips - Fresh veggie sticks like carrots and cucumbers - Tortilla chips Feel free to mix and match based on your taste! Yes, there are great gluten-free options. Look for gluten-free bread or crackers at the store. Many brands offer tasty varieties. You can also use cucumber slices for a fresh crunch. This way, everyone can enjoy the dip! This blog shared how to make a tasty Chunky Bruschetta Dip. We discussed fresh ingredients like ripe tomatoes and garlic, and how to blend them with cream cheese and Parmesan for a creamy base. You learned simple steps for preparation and assembly, plus tips for serving and storing. Try adding your twist with different herbs or veggies. Enjoy making this dip for your next gathering!

Chunky Bruschetta Dip Simple and Flavorful Recipe

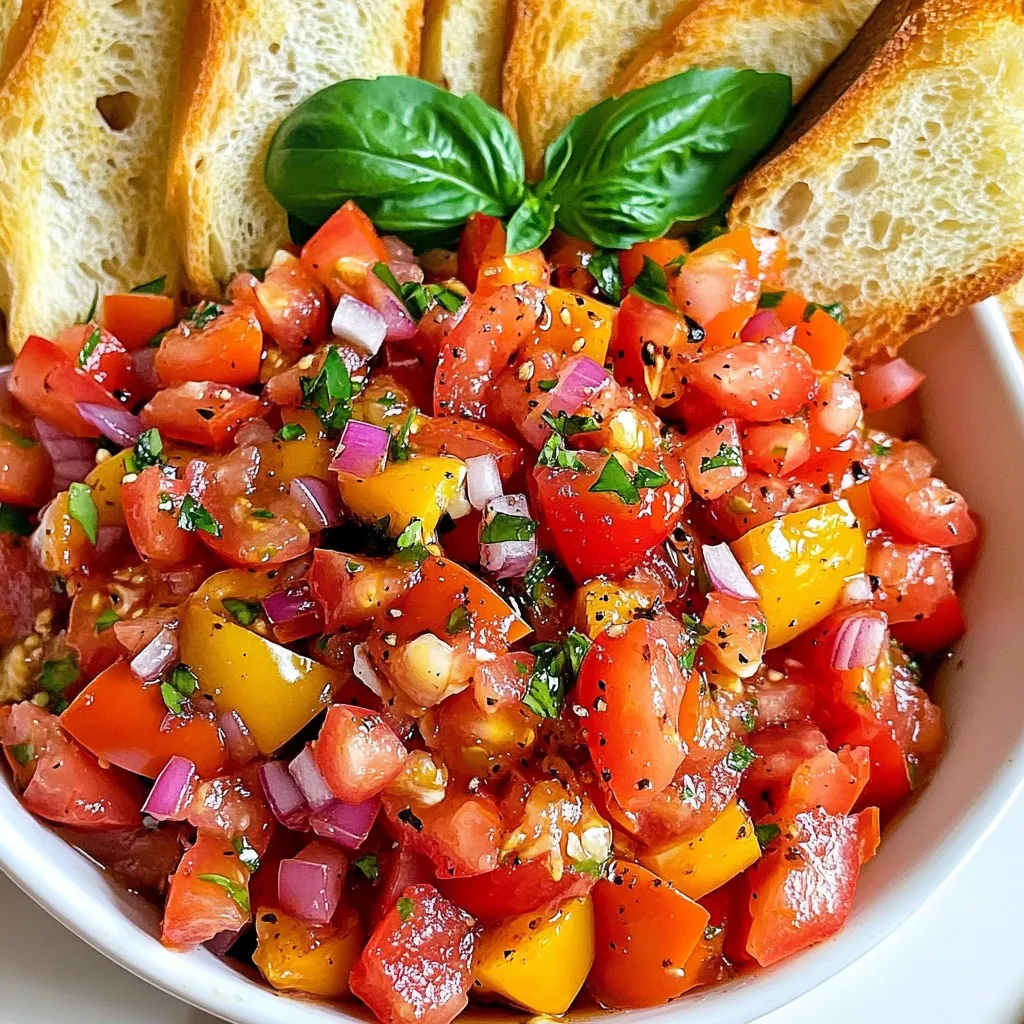
Looking for a fresh and tasty appetizer? This Chunky Bruschetta Dip is your answer! Packed with ripe tomatoes, creamy cheeses,

To start, gather these dry ingredients: - 2 cups all-purpose flour - 1 tablespoon baking powder - 1 teaspoon salt - 1/2 teaspoon baking soda These ingredients create the base for your biscuits, ensuring they rise well and have a nice texture. Next, you’ll need these wet ingredients: - 1/4 cup unsalted butter, cold and cubed - 3/4 cup buttermilk - 2 cups milk The butter adds richness, while buttermilk gives a nice tang. For the gravy, use: - 1 pound spicy breakfast sausage - Salt and freshly ground black pepper, to taste - Fresh parsley, chopped for garnish The sausage provides flavor and heartiness, while pepper and parsley add a nice touch. {{ingredient_image_2}} First, set your oven to 425°F (220°C). This high heat helps the biscuits rise and become fluffy. Line a baking sheet with parchment paper. This step keeps the biscuits from sticking and makes for easy cleanup. In a large bowl, combine 2 cups of all-purpose flour, 1 tablespoon of baking powder, 1 teaspoon of salt, and 1/2 teaspoon of baking soda. Whisk these dry ingredients until they blend well. Next, take 1/4 cup of cold, cubed unsalted butter and add it to the mix. Use your fingers or a pastry cutter to mix until the texture is coarse, like crumbs. This ensures the butter is evenly mixed and will create flaky layers in your biscuits. Now, pour in 3/4 cup of buttermilk. Stir gently until the dough comes together. Be careful not to over-mix; this keeps your biscuits tender. Turn the dough onto a floured surface and pat it to about 1 inch thick. Fold the dough over itself 2 to 3 times, then use a round cutter to cut out biscuits. Place them on the baking sheet and bake for 12-15 minutes, or until they are golden brown and have risen nicely. While the biscuits bake, heat a large skillet over medium heat. Add 1 pound of spicy breakfast sausage, breaking it apart with a spoon. Cook it for about 5-7 minutes until it’s fully browned and crispy. Once the sausage is ready, sprinkle 3 tablespoons of flour over it and stir well. Cook this mix for about a minute to remove the raw flour taste. Then, slowly whisk in 2 cups of milk. Keep stirring until the gravy thickens. Season with salt and freshly ground black pepper to taste. To make great biscuits, avoid over-mixing the dough. When you add the buttermilk, stir just until it forms a dough. This keeps your biscuits tender and light. Over-mixing can lead to tough biscuits, which we want to avoid. Creating flaky layers is key to perfect biscuits. After shaping the dough, fold it over itself 2 to 3 times. This technique helps create those lovely layers. When you cut the biscuits, use a sharp cutter. Press straight down without twisting to keep layers intact. Seasoning your gravy well is crucial. Start by adding salt and freshly ground black pepper. Taste as you go to find the right balance. You can also add a bit of cayenne pepper for a spicy kick. Herbs and spices can elevate your gravy. Try adding thyme or sage. A sprinkle of garlic powder can also boost flavor. These additions give your gravy a unique twist that guests will love. Garnishing your biscuits and gravy makes a big difference. Fresh parsley adds a pop of color. Chopped green onions also work well. This makes your dish look more inviting and fresh. When serving, consider a rustic wooden board. Place the biscuits and gravy on it for a cozy feel. You can also serve individual portions in small bowls. This way, guests can enjoy their own serving without mess. Pro Tips Use Cold Ingredients: Ensure your butter and buttermilk are cold to create flaky layers in your biscuits. Don’t Overmix: Mix the dough just until combined to keep your biscuits tender and light. Flour Your Surface: Lightly flour your work surface when rolling out the dough to prevent sticking. Gravy Consistency: Adjust the amount of milk in the gravy to achieve your desired thickness. {{image_4}} For a vegetarian option, swap the sausage with plant-based crumbles. These crumbles mimic the taste and texture of sausage. You can also use lentils or mushrooms for a hearty bite. For vegan gravy, replace milk with almond or soy milk. Use vegan butter instead of regular butter in the biscuits. This keeps the dish creamy and tasty without animal products. Southern-style biscuits and gravy are famous, but many regions add their twist. In the Midwest, people often use sausage links instead of crumbled sausage. In the West, some cooks add green chilies for a kick. You can also top your biscuits with fried eggs or serve them with grits. These additions bring new flavors and textures to the dish. You can change the flavor of your biscuits and gravy in fun ways. Add shredded cheese to the biscuit dough for a cheesy touch. Cheddar or pepper jack works great. For a spicy twist, mix diced jalapeños into the gravy. Experimenting with different sausage types also adds flair. Try Italian sausage or chorizo for a bold change. Each variation brings its unique taste to this classic breakfast favorite. To keep your biscuits and gravy fresh, store them in the fridge. Place them in an airtight container. This helps prevent them from drying out. You can keep them for up to three days. After that, they may lose their flavor and texture. To reheat biscuits and gravy, the oven works best. Preheat your oven to 350°F (175°C). Place the biscuits on a baking sheet. Heat them for about 10 minutes. This keeps them crispy. For the gravy, warm it in a saucepan over low heat. Stir it often to keep it smooth. If it thickens too much, add a splash of milk. This helps maintain the creamy texture and flavor. To make fluffy biscuits, use cold butter. This keeps the fat solid, creating air pockets. Cut the butter into the flour until it looks like coarse crumbs. Also, don’t overwork the dough. Mix just until it comes together. This keeps your biscuits light and airy. Using buttermilk helps too, as it adds moisture and flavor. The baking powder gives them a nice rise. Yes, you can freeze both biscuits and gravy. For biscuits, cool them completely first. Place them in a freezer bag, and remove as much air as you can. They can last up to three months. For gravy, let it cool, then store in an airtight container. It also freezes well for about three months. To reheat, thaw overnight in the fridge, then warm on the stove. You can serve biscuits and gravy with many tasty sides. Popular choices include scrambled eggs or fresh fruit. A light salad adds freshness too. For drinks, coffee pairs perfectly. You can also enjoy fresh orange juice or sweet tea. These sides balance the rich flavors of the dish. In this post, we explored how to make delicious biscuits and gravy. We discussed the key ingredients, including dry and wet items, along with the perfect meat and seasonings. I shared step-by-step instructions to ensure your biscuits come out fluffy and your gravy rich. We also covered tips for improvement, variations for different diets, storage info, and answered common questions. Remember, practice makes perfect. Enjoy exploring different flavors and techniques to make this classic dish your own. Happy cooking!

Classic Biscuits and Gravy Flavorful Breakfast Treat

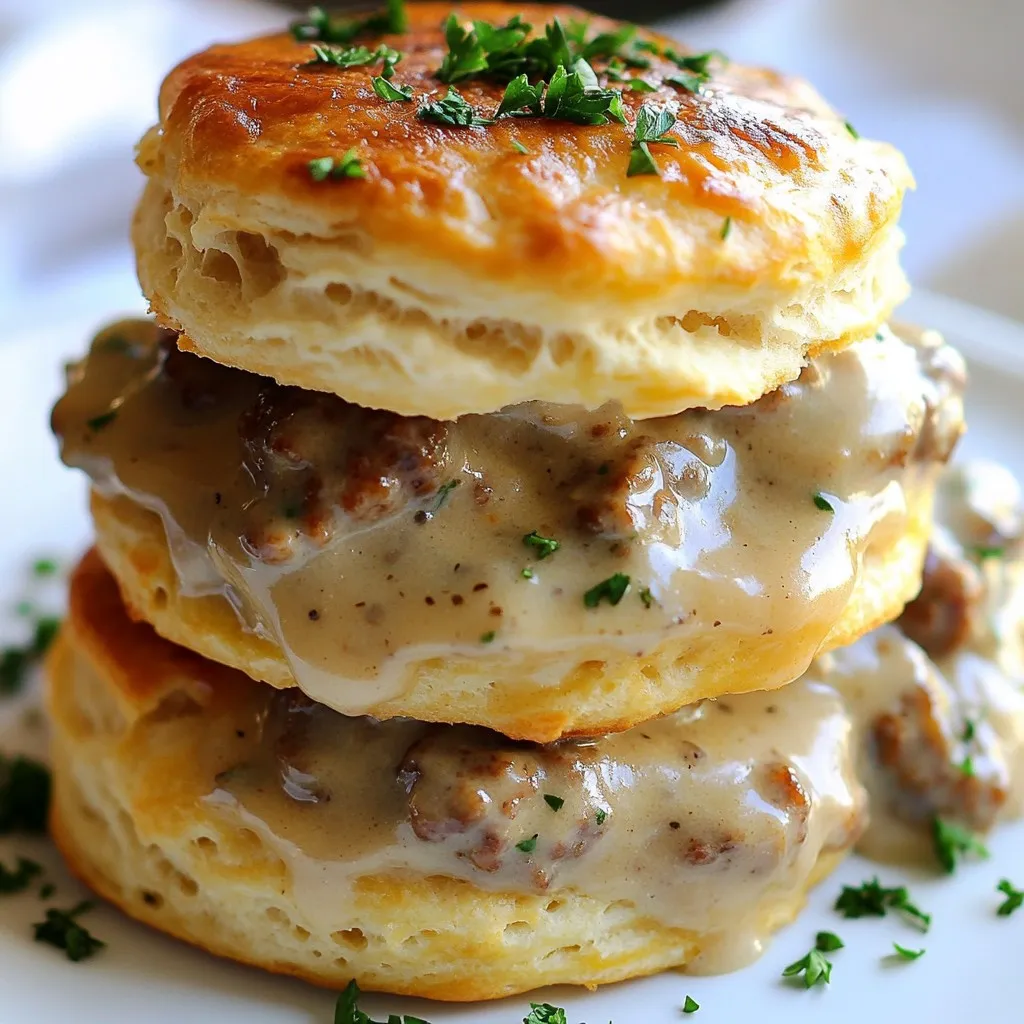
Are you ready to elevate your breakfast game? Classic biscuits and gravy are not just a dish; they’re a warm

To make tasty German Frikadellen, gather these key ingredients: - 500g ground beef - 200g ground pork - 1 medium onion, finely chopped - 2 cloves garlic, minced - 1 teaspoon dried thyme - 1 teaspoon paprika powder - 1 tablespoon Dijon mustard - 1 large egg - 100g breadcrumbs (plus extra for coating) - 2 tablespoons vegetable oil (for frying) - Salt and black pepper to taste - Fresh parsley, finely chopped (for garnish) These ingredients create a rich flavor and nice texture. The mix of beef and pork provides juiciness. The spices and mustard add depth. You can boost flavor with these optional ingredients: - 1 tablespoon Worcestershire sauce - 1 teaspoon onion powder - 1 teaspoon garlic powder - Chopped fresh herbs like thyme or parsley These extras add a unique twist. Worcestershire sauce gives umami, while herbs brighten the dish. Feel free to adjust ingredients based on your taste: - Use ground turkey or chicken instead of beef and pork for a lighter option. - Swap out breadcrumbs for crushed crackers or oats for a different texture. - Replace Dijon mustard with yellow mustard if you prefer a milder flavor. These swaps keep the essence of Frikadellen while allowing for personal flair. Enjoy crafting your perfect patty! {{ingredient_image_2}} Start by taking a large bowl. Add 500g of ground beef and 200g of ground pork. This mix gives Frikadellen great flavor. Next, add one medium onion, finely chopped, and two cloves of minced garlic. The onion adds sweetness, while garlic gives a nice kick. Sprinkle in one teaspoon of dried thyme and one teaspoon of paprika powder for warmth. Then, add one tablespoon of Dijon mustard for a tangy twist. Now, crack one large egg into the bowl. This acts as a binder. Add 100g of breadcrumbs to soak up moisture and keep the patties firm. Season everything with salt and black pepper to taste. Get your hands in there and mix it all well. You want each bite to burst with flavor. Once your meat mixture is well combined, it’s time to form the patties. Take a handful of the mixture and shape it into a round patty about 2 cm thick. This size cooks evenly and keeps the inside juicy. For a crispy crust, lightly coat each patty with extra breadcrumbs. This step is key for that satisfying crunch. Heat two tablespoons of vegetable oil in a large frying pan over medium heat. Wait until the oil shimmers before adding the patties. Be careful not to crowd the pan; this helps them brown nicely. Cook the Frikadellen for about 4-5 minutes on each side. Flip them gently to avoid breaking. Keep an eye on the heat, adjusting if necessary to prevent burning. Once they are golden brown and cooked through, transfer them to a plate lined with paper towels. This helps soak up any excess oil. For a pretty finish, garnish your Frikadellen with fresh parsley before serving. Enjoy your delicious creation with potato salad or pickled cucumbers for a true German experience! For tasty Frikadellen, mixing is key. Use your hands to blend the meats. This ensures the flavors meld well. Add the onion, garlic, and spices into the meat. Mix until everything is well combined. If the mix feels too wet, add a bit more breadcrumbs. This helps the patties hold their shape. Keep a close eye on your frying pan. Heat the oil over medium heat. If it gets too hot, the outside will burn. Cook each patty for about 4-5 minutes per side. Look for a golden brown color. If you’re unsure, use a meat thermometer. The inside should reach at least 160°F. This keeps your Frikadellen juicy, not dry. Frikadellen shine when paired well. Serve them with potato salad for a classic touch. Pickled cucumbers add a nice crunch. You can also add mustard for a zesty kick. For a fun touch, place them on a wooden board. Garnish with fresh parsley for color. These simple sides make your meal feel special. Pro Tips Use Fresh Ingredients: Always opt for fresh herbs and vegetables to enhance the flavor of your Frikadellen. Adjust the Spices: Feel free to tweak the spice levels according to your taste preferences; adding a pinch of cayenne can give it an extra kick. Resting Time: Allow the formed patties to rest for 10-15 minutes before frying; this helps in better texture and flavor integration. Experiment with Fillings: Add a surprise ingredient like cheese or chopped olives in the center of the patties for a delicious twist. {{image_4}} German Frikadellen have many tasty twists based on where you are. In northern Germany, cooks often add fresh fish or seafood. This brings a unique flavor to the patties. In the south, you might find cheese mixed in for extra richness. Each region adds local herbs and spices, too. For example, some use caraway seeds or marjoram. These add depth and warmth to the dish. You can easily make Frikadellen without meat. Use cooked lentils or chickpeas as a base. Mash them up and mix in finely chopped onions and garlic. You can also add grated carrots or zucchini for extra flavor and nutrition. Use bread crumbs made from whole wheat or gluten-free bread if needed. A flaxseed meal can replace the egg to bind everything together. These alternatives keep the same great taste while being plant-based. Spices can change the whole flavor of your Frikadellen. Instead of thyme, try using oregano or basil for a fresh twist. For a bit of heat, add cayenne pepper or crushed red pepper flakes. You could also use curry powder for a fun, unique taste. Experimenting with spices can turn a classic dish into something new and exciting. Don't be afraid to mix and match to find your favorite flavor profile! After cooking, let your Frikadellen cool to room temperature. This step helps keep their texture. Place the patties in an airtight container. If you stack them, add parchment paper between layers. This prevents sticking. Store them in the fridge for up to three days. Always label your container with the date. To reheat your Frikadellen, use a skillet on low heat. This method warms them evenly. Add a bit of oil to the pan to keep them moist. Heat for about 5-7 minutes, flipping carefully. You can also use the oven. Preheat it to 180°C (350°F). Place the patties on a baking sheet and cover with foil. Bake for 10-15 minutes until heated through. Freezing Frikadellen is easy and keeps them fresh. First, let the patties cool completely. Then, wrap each one in plastic wrap. Place the wrapped patties in a freezer bag. Remove as much air as possible. They will stay good for up to three months. To thaw, move them to the fridge overnight. Reheat as described above for the best taste. The best meat combination for Frikadellen is ground beef and ground pork. I use 500g of ground beef and 200g of ground pork. This mix gives a rich flavor and a nice texture. You can adjust the ratio to your taste, but this combination works great for traditional German Frikadellen. Yes, you can bake German Frikadellen! Preheat your oven to 200°C (400°F). Place the patties on a lined baking tray. Bake for about 20-25 minutes, flipping halfway. Baking is a healthier option and still yields tasty results. Just remember, they may not be as crispy as frying them. To check if your Frikadellen are fully cooked, use a meat thermometer. The internal temperature should reach 70°C (160°F). If you don’t have a thermometer, cut one open. It should be no longer pink inside. Golden brown outside and cooked through means they are ready to enjoy! In this post, I covered everything you need for great German Frikadellen. We explored essential ingredients, optional flavors, and substitutions to suit your taste. I shared step-by-step instructions to guide you in preparation, forming patties, and frying them to perfection. You also learned tips for the right texture and serving ideas, plus variations for everyone. Don’t forget how to store and reheat leftovers for the best taste. Now, you can create delicious Frikadellen that impress your friends and family. Enjoy cooking and tasting your homemade dish!

German Frikadellen Easy Recipe for Flavorful Patties

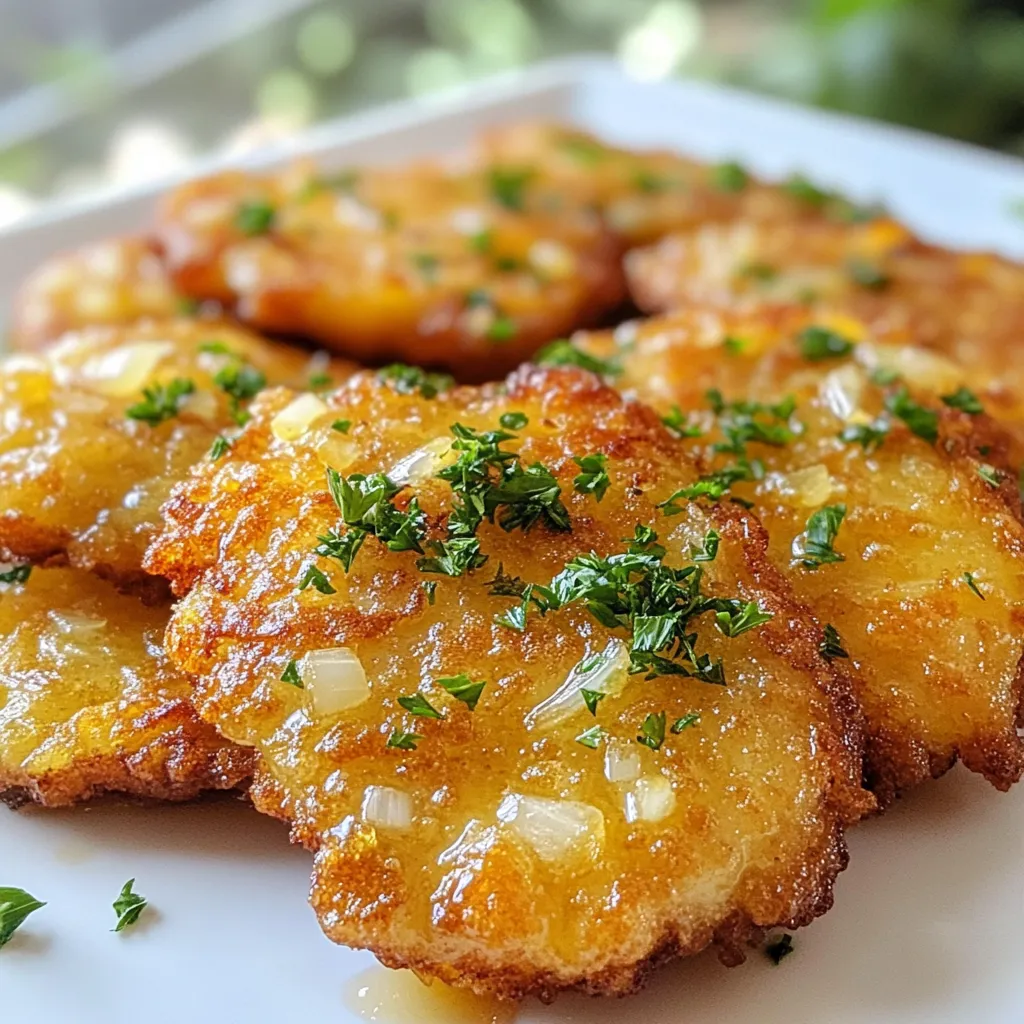
Are you ready to taste a bit of Germany with your own hands? German Frikadellen, those delicious meat patties, are

- 1 lb ground beef (or plant-based protein) - 1 medium onion, diced - 1 bell pepper, diced - 3 cloves garlic, minced - 1 can (14 oz) diced tomatoes - 1 can (15 oz) kidney beans - 1 can (15 oz) black beans The main ingredients create the base of the chili. Ground beef gives it richness. If you prefer plant-based, use lentils or tofu. Diced onion and bell pepper add sweetness and crunch. Garlic boosts flavor and aroma. Canned tomatoes provide moisture and acidity. Kidney and black beans add heartiness and protein. - 2 tablespoons chili powder - 1 tablespoon cumin - 1 teaspoon smoked paprika - 1 teaspoon dried oregano - Salt and pepper to taste Spices are key in chili. Chili powder adds warmth. Cumin gives a deep, earthy taste. Smoked paprika offers a hint of smoke, making the chili rich. Oregano adds herbal notes. Always taste and adjust salt and pepper for balance. - Shredded cheese - Sour cream - Chopped green onions - Cilantro Toppings elevate your chili. Shredded cheese melts into the hot chili, adding creaminess. Sour cream cools the heat and adds a tangy bite. Chopped green onions give a fresh crunch. Cilantro adds brightness and a pop of color. Feel free to mix and match! {{ingredient_image_2}} 1. Pour olive oil into a large pot. Warm it over medium heat. 2. Once the oil shimmers, add diced onion and bell pepper. 3. Sauté for about 5 minutes. The veggies should be tender and smell great. 4. Now, add minced garlic to the pot. Stir and cook for one more minute. 1. Add ground beef or plant-based protein to the pot. 2. Use a spatula to break it up as it cooks. 3. Brown the meat for 5-6 minutes until it is cooked through. 4. Sprinkle in chili powder, cumin, smoked paprika, and oregano. 5. Stir everything to coat the meat and veggies with spices for about a minute. 1. Pour in diced tomatoes with their juices, kidney beans, black beans, and broth. 2. Mix all the ingredients together well until combined. 3. Increase the heat and bring the mixture to a vigorous boil. 1. Once boiling, lower the heat to let it simmer. 2. Allow the chili to cook uncovered for 30-40 minutes. 3. Stir occasionally to keep it from sticking and to blend the flavors. 1. Taste the chili and add salt and pepper as needed. 2. For extra heat, add chopped jalapeños or a splash of hot sauce. For the best flavor in your chili, cook it for about 30-40 minutes. This time lets the flavors blend well. Be sure to let the chili rest for 5 minutes before serving. This helps it set up nicely. A common mistake is overcooking vegetables. This can make them mushy and dull. Another mistake is under-seasoning. Make sure to taste and add enough salt and spices for flavor. Serve your Ultimate Chili in sturdy bowls. For a fun touch, add toppings like shredded cheese, sour cream, or chopped green onions. You can also serve it with warm cornbread or crispy tortilla chips for dipping. Pro Tips Choose Your Protein: Opt for high-quality ground beef for a richer flavor, or use plant-based protein for a lighter, vegetarian alternative that still delivers on taste. Layer the Flavors: Don’t skip the step of blooming your spices; adding them after browning the meat helps release their essential oils, enhancing the overall flavor profile of your chili. Add Complexity: Consider adding a splash of beer or a hint of cocoa powder for a deeper, more complex flavor that will surprise your taste buds. Rest Before Serving: Letting your chili rest for a few minutes after cooking allows the flavors to meld together, resulting in an even tastier dish when served. {{image_4}} You can easily swap out meat for plant-based protein. Use lentils, mushrooms, or tempeh. These options add great texture and taste. You can also add more veggies, like zucchini or carrots. They boost flavor and nutrition. Want more heat? Chop up jalapeños or add hot sauce. This simple step can change the whole dish. If you prefer mild flavors, use less chili powder. You can mix in sweet spices, like smoked paprika, to enhance the taste without heat. Feel free to swap beans and veggies. Use pinto beans or chickpeas instead of kidney beans. You can also add corn for sweetness. For broth, switch between beef or vegetable options. Each choice brings a new twist to your chili. Store leftover chili in an airtight container. This keeps it fresh and tasty. Place it in the fridge within two hours of cooking. The shelf life of refrigerated chili is about 3 to 4 days. Make sure to label the container with the date. This way, you can track how long it has been stored. To freeze chili, let it cool first. Then, portion it into freezer-safe containers. I recommend using freezer bags for easy stacking. Squeeze out as much air as possible before sealing. This helps keep the chili fresh. When you want to eat it, thaw it in the fridge overnight. You can also reheat it directly from the freezer on the stove. For reheating, the best method is on the stove. Use a saucepan and heat over medium heat. Stir often to prevent sticking. You can also microwave it in a bowl, covered with a paper towel. This helps steam it and keep it moist. Taste and adjust the seasoning if needed. This way, the rich flavors stay intact, making every bite enjoyable. The Ultimate Chili takes about 55 minutes to make. This includes 15 minutes for prep and 40 minutes for cooking. First, you chop the vegetables and gather your ingredients. Then, you cook the chili on the stove, letting it simmer and blend the flavors. Yes, you can make Ultimate Chili in a slow cooker. Start by browning the meat and sautéing the onions and peppers on the stove. Then, add all the ingredients to the slow cooker. Set it on low for 6-8 hours or high for 3-4 hours. This method allows the flavors to develop slowly, giving you a rich and tasty chili. You have many great options for sides. Here are some ideas: - Warm cornbread - Crispy tortilla chips - Rice or quinoa For drinks, you might enjoy: - A cold beer - Iced tea - A light red wine These sides and drinks will enhance your chili experience and make it even more enjoyable. To sum up, this chili recipe brings joy with its rich flavors. You start with key ingredients like ground meat or plant-based protein. Next, layer in the spices and let everything cook down properly. Don't forget to take your time, as good things come to those who wait. Feel free to customize with toppings and variations. Whether you're storing leftovers or serving fresh, this dish is a hit. Dive into chili-making and enjoy the warmth it brings to your table!

Ultimate Chili Flavorful Comfort in a Bowl

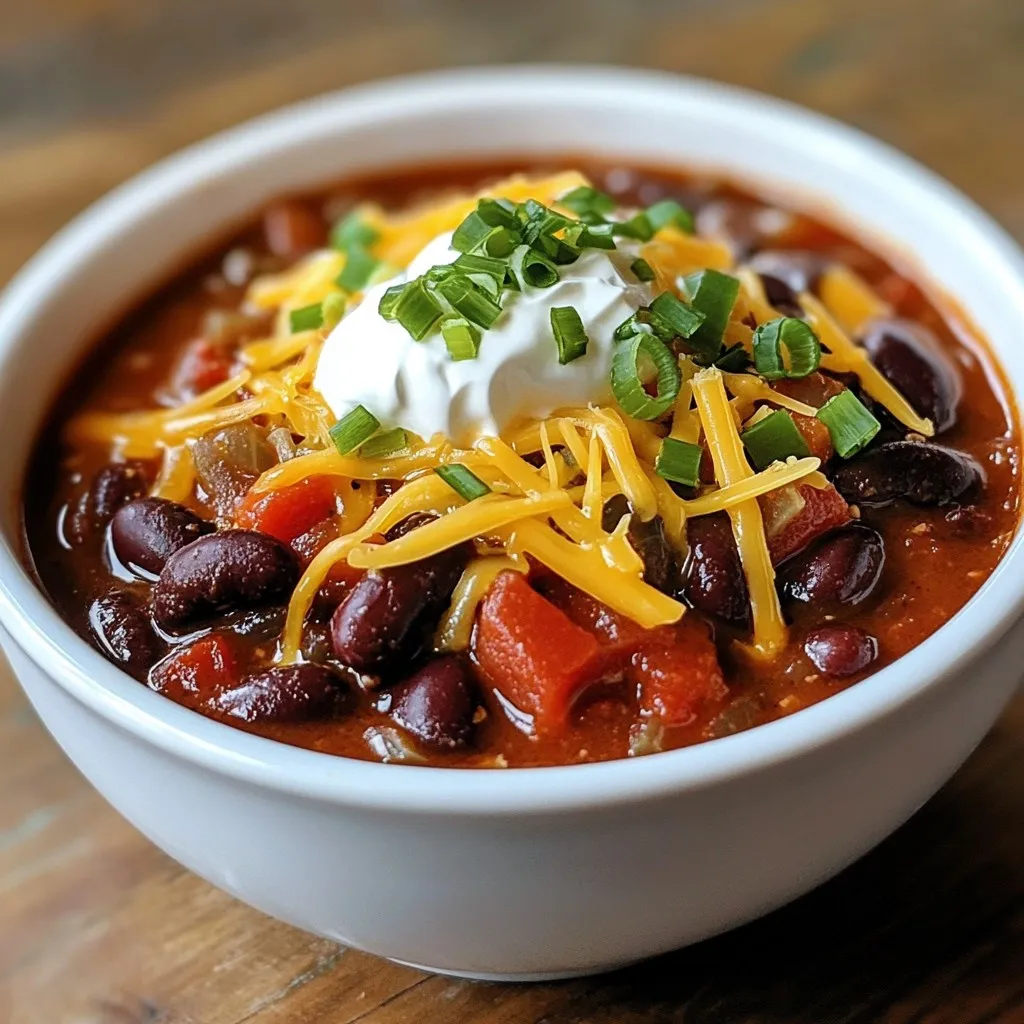
If you’re searching for a warm hug in a bowl, look no further than my Ultimate Chili. Packed with rich

- 1 lb ground beef - 1 packet taco seasoning - 1/2 cup water - 2 cups cooked white rice - 1 cup shredded cheddar cheese - 1 cup nacho cheese sauce - 4 large flour tortillas - 1/2 cup sour cream - 1/4 cup diced tomatoes - 1/4 cup sliced green onions - 1/4 cup cilantro, chopped (optional) - Salt and pepper to taste You can swap the ground beef for ground turkey or chicken. This change cuts down fat but keeps taste. Use brown rice instead of white for added fiber. If you want a creamier texture, try Greek yogurt instead of sour cream. You can also replace nacho cheese with queso dip for a fun twist. If you prefer a vegetarian option, use black beans or lentils for protein. To make this tasty burrito, you need some basic kitchen tools: - Large skillet - Mixing bowl - Spatula - Measuring cups - Cutting board - Knife - Clean surface for assembling burritos - Optional: Skillet for crisping burritos These tools help you prepare and enjoy your Beefy Melt Burrito with ease. {{ingredient_image_2}} Start by heating a large skillet over medium heat. Add 1 pound of ground beef. Cook it for about 6 to 8 minutes. Use a spatula to break the meat into small pieces. When the beef is brown, drain any excess fat. Next, pour in a packet of taco seasoning and 1/2 cup of water. Stir well and let it simmer for 5 minutes. This helps the flavors mix and thicken the sauce. Taste it and add salt and pepper if you want more flavor. In a large bowl, mix 2 cups of cooked white rice with the beef mixture. Add 1 cup of shredded cheddar cheese and 1 cup of nacho cheese sauce. Stir it all together until everything is combined well. The cheese will melt slightly, making the filling creamy and delicious. Warm 4 large flour tortillas in a dry skillet for 10 to 15 seconds on each side. You can also microwave them for 15 to 20 seconds. This makes them easy to fold. Take one warm tortilla and lay it flat. Spoon a generous amount of the beef and rice filling down the center. Add a dollop of sour cream, some diced tomatoes, sliced green onions, and chopped cilantro if you like. After filling each tortilla, fold the sides in and roll it up tightly from the bottom. Heat a skillet over medium heat. Place the burritos seam-side down in the skillet. Cook them for 2 to 3 minutes until they turn golden brown. Flip the burritos and cook for another 2 to 3 minutes. This gives them a nice, crispy texture. Enjoy your Beefy Melt Burrito! To get the best flavor in your Beefy Melt Burrito, use taco seasoning. This seasoning packs a punch. Mix it with the beef and water to boost taste. Let the mixture simmer until thick. This step helps deepen the flavor. You can also add a pinch of salt and pepper for balance. For more zest, consider adding a squeeze of lime juice or a dash of hot sauce. Texture matters in a great burrito. Start by browning the beef well. This gives a nice texture and flavor. Drain excess fat to avoid greasiness. When you mix in the rice and cheeses, stir until combined. This makes each bite creamy and satisfying. Warm the tortillas well to keep them soft. This prevents tearing when you fill and roll them. Finally, crisp the burritos in a skillet. This adds a fun crunch to each bite. Presentation can make your meal more enjoyable. Serve your burritos with extra nacho cheese for dipping. It adds flavor and fun. Garnish with chopped cilantro for a fresh look. A colorful plate can enhance the visual appeal. Add sides like fresh avocado or diced tomatoes for extra color. These simple tips can elevate your meal from good to great! Pro Tips Use Lean Ground Beef: Opt for lean ground beef (90% lean or higher) to reduce excess fat and make the burritos healthier without sacrificing flavor. Customize Your Fillings: Feel free to add or substitute ingredients like black beans, corn, or bell peppers for added texture and flavor in your burrito. Don’t Overstuff: Ensure you don’t overfill the tortillas, as this makes rolling them difficult and can lead to spills while cooking. Rest Before Serving: Let the burritos rest for a couple of minutes after cooking. This allows the filling to settle and makes them easier to cut and serve. {{image_4}} You can easily make a vegetarian or vegan Beefy Melt Burrito. Instead of ground beef, use black beans, lentils, or crumbled tofu. These options provide protein and texture. For cheese, choose dairy-free cheese or skip it altogether. Use guacamole or avocado for creaminess. You can also add extra veggies like corn or bell peppers for more flavor and crunch. Cheese makes a big difference in flavor. Besides cheddar, try Monterey Jack or pepper jack for a spicy kick. You can also use a blend of cheeses for a unique taste. If you want something different, consider using queso fresco or feta. Just remember, fresh cheese melts differently, so adjust your cooking time. Feel free to add your favorite toppings to the burrito. Some great options include: - Sliced jalapeños for heat - Fresh salsa for zest - Avocado slices for creaminess - Crunchy lettuce for freshness Mix and match according to your taste. This way, each burrito can be unique and exciting for everyone at the table. To keep your Beefy Melt Burrito fresh, store it in an airtight container. If you have leftovers, let the burritos cool first. Wrap each burrito in plastic wrap or foil. This keeps moisture in and prevents them from drying out. You can store them in the fridge for up to three days. When you're ready to enjoy your burrito again, there are a few easy ways to reheat it. The best method is using a skillet. Heat the skillet over medium heat. Place the burrito in the skillet for about 2-3 minutes on each side. This keeps it crispy. You can also use the microwave. Wrap the burrito in a damp paper towel and heat for about 30-60 seconds. Check if it’s warm, and if not, add more time. If you want to save your burritos for later, freezing is a great option. Wrap each burrito tightly in foil or plastic wrap. Place them in a freezer-safe bag. They can last up to three months in the freezer. When you're ready to eat, thaw them in the fridge overnight. Then, reheat them using one of the methods above. Enjoy your tasty, homemade burritos anytime! To add heat to your burrito, try these options: - Use spicy taco seasoning instead of regular. - Add jalapeños or chipotle peppers to the filling. - Mix in hot sauce or salsa before wrapping. These simple changes will boost flavor and spice. You can always adjust the heat level based on your taste. Yes, you can! Here are some great options: - Quinoa is a protein-rich alternative. - Cauliflower rice is low-carb and adds texture. - Lentils can provide a hearty base. These choices will keep the burrito filling while offering different flavors and nutrition. Feel free to experiment! Pair your burritos with these tasty sides: - Mexican street corn for a sweet crunch. - Refried beans offer creaminess and protein. - A fresh salad adds brightness and color. These sides will complement your burritos nicely, making your meal balanced and satisfying. Enjoy mixing and matching! The Beefy Melt Burrito is easy to make and full of flavor. We covered the key ingredients, cooking steps, and tips to enhance taste and texture. You can even customize your burrito to fit your diet. Storing leftovers is simple, too, ensuring you enjoy this dish later. With these ideas, you'll impress anyone at your table. Cook with fun and confidence as you create your perfect burrito. Enjoy every bite!

Taco Bell Copycat Beefy Melt Burrito Easy Recipe

Are you craving Taco Bell’s Beefy Melt Burrito but don’t want to leave home? I’ve got you covered! This easy

- 1.5 lbs boneless, skinless chicken thighs, cut into bite-sized pieces - 1 tablespoon ghee (or unsalted butter) - 1 large onion, finely chopped - 4 cloves garlic, minced - 1 tablespoon fresh ginger, grated - 1 tablespoon garam masala - 2 teaspoons ground cumin - 1 teaspoon turmeric - 1 teaspoon cayenne pepper (adjust based on your spice preference) - 1 (15 oz) can tomato sauce - 1 cup full-fat coconut milk (for an extra creamy texture) - 2 tablespoons brown sugar - Salt to taste - Fresh cilantro, chopped, for garnish The heart of butter chicken lies in its simple yet rich ingredients. The chicken thighs are tender and soak up all the flavors. Ghee gives a lovely buttery taste, making each bite divine. Aromatics like onion, garlic, and ginger form a fragrant base. Spices play a big role. Garam masala brings warmth, while cumin adds depth. Turmeric brightens the dish, and cayenne gives a kick. The tomato sauce and coconut milk create a creamy sauce that is hard to resist. Brown sugar balances the spices, rounding out the flavor. - Slow cooker - Large skillet - Cutting board and knife - Measuring cups and spoons Using the right tools makes cooking easier. A slow cooker perfectly blends flavors over time. A large skillet helps sauté the aromatics well. A cutting board and knife are essential for prepping chicken and veggies. Measuring cups and spoons ensure you get the right amounts of each ingredient. With these tools and ingredients, you can create a delicious slow cooker butter chicken that warms the heart and fills the belly. {{ingredient_image_2}} First, I heat 1 tablespoon of ghee in a large skillet over medium heat. Once it melts, I add 1 large finely chopped onion. I sauté the onion for about 5-7 minutes until it becomes soft. Next, I add 4 cloves of minced garlic and 1 tablespoon of grated ginger. I continue to cook this mix for 1-2 minutes until I smell that lovely aroma. After that, I sprinkle in the spices: 1 tablespoon of garam masala, 2 teaspoons of ground cumin, 1 teaspoon of turmeric, and 1 teaspoon of cayenne pepper. I let these spices toast for about 1 minute while stirring constantly. Toasting brings out their full flavors, making the dish taste amazing. Next, I transfer the fragrant onion and spice mix into the slow cooker. I then add 1.5 lbs of boneless, skinless chicken thighs, cut into bite-sized pieces. It’s important to coat all the chicken with the spice mix for the best flavor. I pour in 1 (15 oz) can of tomato sauce and 1 cup of full-fat coconut milk. The coconut milk adds creaminess to the dish. Finally, I mix in 2 tablespoons of brown sugar and season with salt to taste. Gently stirring all the ingredients together ensures they blend well. I cover the slow cooker with its lid and set it to cook. If I choose the low setting, I let it cook for 6-8 hours. On high, it takes about 3-4 hours. The key is to make sure the chicken becomes tender and fully cooked. Tender chicken makes each bite melt in your mouth. After cooking, I give the curry a good stir to mix everything. If needed, I adjust the seasoning for the perfect taste. To make your butter chicken shine, adjust the spice levels. If you want it milder, reduce the cayenne pepper. If you love heat, add more! Taste as you go. Using fresh ingredients makes a big difference. Fresh ginger and garlic add a bright flavor. Choose ripe tomatoes for the best sauce. You can also add fresh green chilies for a kick. For a creamy texture, use full-fat coconut milk. It makes the dish rich and smooth. If it seems too thin, cook it longer to thicken. To achieve your desired thickness, check the sauce before serving. If it’s too watery, let it cook with the lid off for a bit. This helps evaporate extra liquid and intensifies the flavors. Serving suggestions can elevate your dish. Pair the butter chicken with fluffy basmati rice or warm naan. This makes for a filling meal. For a beautiful finish, garnish with chopped cilantro. A lime wedge adds a pop of color and fresh flavor. Place everything in a shallow bowl for an inviting look. Enjoy! Pro Tips Marinate for Flavor: For an even richer flavor, marinate the chicken in yogurt and spices for a few hours or overnight before cooking. Adjust the Spice Level: Customize the heat by adjusting the amount of cayenne pepper. Start with less if you're unsure, and add more to taste. Use Fresh Ingredients: Whenever possible, use fresh ginger and garlic instead of powdered for a more vibrant and aromatic dish. Leftover Magic: This butter chicken tastes even better the next day! Store leftovers in an airtight container in the fridge for up to 3 days. {{image_4}} You can switch up the chicken in butter chicken. Chicken thighs add flavor and tenderness. They soak up spices well. Chicken breast works too, but may be drier. For a vegetarian option, try paneer or chickpeas. Paneer gives a creamy texture, while chickpeas add protein and fiber. Both options make the dish rich and satisfying. Add some veggies for more flavor and color. Bell peppers or peas work great in the slow cooker. They add sweetness and a pop of green. You can even use a pressure cooker for a quicker version. This method will keep flavors strong and tenderize the meat fast. The butter chicken tastes just as good, but in less time. Want to make this dish low-carb? Skip the sugar and serve with cauliflower rice instead. This keeps the meal light and still tasty. For dairy-free, use coconut cream instead of dairy products. It gives a rich flavor without any milk. Gluten-free? You’re already set! Just ensure your spices are gluten-free, and you’re good to go. After you enjoy your slow cooker butter chicken, store the leftovers properly. First, let the dish cool to room temperature. Then, place the butter chicken in the fridge. Use airtight containers to keep it fresh. Glass or plastic containers work well. Make sure to eat the leftovers within 3 to 4 days to ensure quality. When it's time to reheat your butter chicken, you have two good options: the microwave or the stovetop. The microwave is quick and easy. Just heat it on medium power in a microwave-safe dish. Stir it halfway to warm it evenly. The stovetop method is great for keeping the flavor. Use a saucepan over low heat, stirring as it warms. This helps keep the sauce creamy and tasty. If you want to freeze butter chicken, it’s simple. First, let it cool completely. Then, scoop it into freezer-safe bags or containers. Leave some space at the top for expansion. You can freeze it for up to 3 months. When you're ready to eat, thaw it in the fridge overnight. Reheat it on the stovetop for the best flavor and texture. Enjoy your meal! The best chicken for butter chicken is boneless, skinless chicken thighs. They stay juicy and tender during cooking. Thighs have more flavor than chicken breast, which can dry out. If you prefer chicken breast, you can use it, but watch the cooking time. Aim for moist and tasty chicken in your dish. Yes, you can make this recipe ahead of time. This dish is great for meal prep. You can cook it a day in advance and store it in the fridge. The flavors deepen as it sits. Just reheat it before serving. You can also freeze it for up to three months. Thaw overnight in the fridge before reheating. Butter chicken pairs well with several side dishes. Here are some popular options: - Fluffy basmati rice - Warm naan bread - Steamed vegetables - Cucumber salad - Raita (yogurt sauce) These sides help balance the rich flavors of the butter chicken. Enjoy a complete and satisfying meal! We explored how to make slow cooker butter chicken, from ingredients to cooking tips. You learned the importance of boneless chicken thighs, spices, and creamy sauces. Don’t forget the recommended tools that make your cooking easier. Experiment with flavors and textures to suit your taste. Store leftovers properly to enjoy later, or even freeze them for future meals. By following these steps, you’ll create a delicious dish that impresses family and friends. Enjoy every bite of your homemade butter chicken!

Slow Cooker Butter Chicken Flavorful and Easy Recipe

Looking for a meal that’s both easy and bursting with flavor? This Slow Cooker Butter Chicken recipe has you covered!

For the cake, you will need: - 2 cups all-purpose flour - 1 ½ cups granulated sugar - ½ cup unsalted butter, softened - 1 cup whole milk, at room temperature - 3 large eggs, at room temperature - 2 teaspoons baking powder - 1 teaspoon vanilla extract - 1 teaspoon almond extract - ½ teaspoon salt - Green food coloring (1-2 teaspoons, to your liking) - 1 batch of buttercream frosting (see below) For the buttercream frosting, gather: - 1 cup unsalted butter, softened - 4 cups powdered sugar - 2-4 tablespoons heavy cream or whole milk - 1 teaspoon vanilla extract - Green food coloring (as needed) You can make your cake fun with these decorations: - Colorful sprinkles in red, gold, and silver - Mini candy ornaments for a festive touch - Star toppers to crown your cake If you want to change it up, think about using edible glitter or candy canes. You can mix and match styles to create your perfect cake! {{ingredient_image_2}} 1. Preheat your oven to 350°F (175°C). Grease a 13x18-inch baking sheet or line it with parchment paper. This helps the cake come out easily. 2. In a large bowl, mix the softened butter and granulated sugar. Use an electric mixer to beat them until light and fluffy, about 3-4 minutes. 3. Add the eggs one at a time, mixing well after each. Then, add the vanilla and almond extracts and blend until smooth. 4. In another bowl, whisk together the flour, baking powder, and salt. Make sure they are well mixed. 5. Gradually add the dry mix to the wet mix, alternating with the milk. Start and end with the flour mixture. Mix until just combined, so you don’t overmix. 6. Add green food coloring a little at a time. Mix until you reach the shade you want. 1. Pour the green batter into the prepared baking sheet. Use a spatula to spread it evenly. 2. Bake in the preheated oven for 25-30 minutes. Check with a toothpick. It should come out clean when the cake is ready. 3. Once baked, let the cake cool fully on a wire rack before frosting. 1. In a large bowl, beat the softened butter until smooth and creamy. This takes about 2 minutes. 2. Gradually add in the powdered sugar, mixing on low speed. This helps avoid a sugar cloud! 3. Stir in 2 tablespoons of heavy cream or milk and the vanilla extract. Add more cream if needed to reach your desired consistency. 4. Add green food coloring if you want the frosting to match the cake. Beat the mixture until it is light, fluffy, and creamy. 1. Once the cake is fully cool, use an offset spatula to spread the green buttercream frosting evenly on top. 2. Get creative! Use colorful sprinkles, mini candy ornaments, or a festive star topper to make your cake look like a Christmas tree. 3. For fun shapes, cut the cake into triangle pieces. Arrange them on a festive platter to create a tree shape. Dust with powdered sugar for a snowy touch. To bake the perfect Christmas Tree Sheet Cake, keep these tips in mind: - Room Temperature Ingredients: Ensure your butter, eggs, and milk are at room temperature. This helps them mix well. - Preheat the Oven: Always preheat your oven to 350°F (175°C). This ensures even baking. - Measure Ingredients Properly: Use dry measuring cups for flour and sugar. Level them off with a knife for accuracy. Common baking mistakes to avoid: - Overmixing Batter: Mix until just combined. Overmixing can make your cake dense. - Skipping the Parchment Paper: Line the baking sheet with parchment to make cake removal easy. - Not Testing for Doneness: Use a toothpick to check if the cake is done. It should come out clean. For even baking and texture, rotate the pan halfway through baking. This helps all sides bake evenly. Applying frosting smoothly is key to a pretty cake. Here’s how: - Use an Offset Spatula: This tool helps spread the frosting evenly. - Start in the Center: Place a dollop of frosting in the center and spread outwards. - Smooth the Edges: Run the spatula around the edge for a clean finish. For frosting styles, you can: - Create Swirls: Use the spatula to swirl the frosting for a fun look. - Make Peaks: Lift the spatula to create peaks for a festive touch. To cut the cake into tree shapes: - Use a Triangle Template: Cut the cake into triangles to mimic trees. - Arrange on a Platter: Place the triangles on a festive platter for a great display. For garnishes, consider: - Dusting with Powdered Sugar: This gives a snowy effect. - Adding Edible Decorations: Use colorful sprinkles or mini ornaments to bring the cake to life. These tips can help you create a beautiful and fun Christmas Tree Sheet Cake that will impress your guests! Pro Tips Make It Moist: Ensure all your ingredients, especially the eggs and milk, are at room temperature. This helps the batter mix more evenly and results in a moist cake. Perfectly Colored Frosting: Start with a small amount of green food coloring, and gradually add more until you achieve your desired shade. It’s easier to darken the color than to lighten it! Decorating Tips: For a festive touch, add edible glitter or gold sprinkles to your decorations to mimic the sparkle of ornaments on a Christmas tree. Cooling Time: Always let the cake cool completely before frosting. If it’s warm, the frosting may melt and slide off, ruining your beautiful design! {{image_4}} You can change the flavor of your Christmas Tree Sheet Cake. If you love chocolate, use cocoa powder. Replace ½ cup of flour with cocoa powder for a rich chocolate cake. Vanilla is another great choice. Simply skip the almond extract and use more vanilla for a classic taste. Frosting flavors can also switch things up. Try chocolate buttercream for a fun twist. Add melted chocolate to your basic buttercream recipe. You can even mix in peppermint extract for a minty flavor. This will taste great during the holiday season! Get creative with your cake decorations! You can choose themes beyond Christmas. For a winter wonderland, use white frosting and snowflake sprinkles. For a birthday, use colorful sprinkles and candles. Customize your decorations for any event. Use edible glitter for a magical look. You can also use fruit or candy to fit the theme. For Halloween, decorate with orange and black frosting. This way, your cake can shine at any occasion! To store your Christmas Tree Sheet Cake, follow these tips: - Short-term storage: Keep the cake in an airtight container at room temperature. It can stay fresh for up to three days. - Long-term storage: For longer storage, wrap the cake tightly in plastic wrap and then in aluminum foil. Place it in the freezer. It can last for up to three months when frozen. When you are ready to enjoy it again, thaw the cake in the fridge overnight. This keeps it moist and tasty. The cake lasts well at room temperature for about three days. If you keep it in the fridge, it can last for about a week. The buttercream frosting can also stay fresh in the fridge for up to a week. For edible decorations, keep them in a cool, dry place. They can last for several weeks if stored properly. Avoid placing them on the cake until serving time for the best look. Yes, you can make this cake ahead of time. Bake it one or two days before your event. Let the cake cool completely. Wrap it well in plastic wrap. Store it in the fridge to keep it fresh. When you're ready, frost it and add decorations. This makes it easy to enjoy your party without stress. If you want a dairy-free or vegan option, try using coconut oil or vegan butter. Both options work well and keep the cake moist. Make sure to use the same amount as the butter in the recipe. You can also use applesauce for a lighter texture, but reduce the sugar slightly. To reduce the sweetness of the frosting, use less powdered sugar. You can also add a pinch of salt to balance the flavor. Another tip is to mix in some cream cheese for a tangy twist. This change adds flavor without making it too sweet. Adjust until you find the taste you love. Yes, you can use a different size pan, but baking time may change. If you use a smaller pan, the cake will be thicker. This means you may need to bake it longer. For a larger pan, the cake will bake faster. Always check for doneness with a toothpick inserted in the center. Adjust time as needed. This blog post covered how to make a Christmas Tree Sheet Cake. You learned about the key ingredients and decorations. We walked through easy steps for baking and cooling your cake. I shared tips for frosting and presentation. You even saw a few fun variations. Now, you can create a festive treat for your holiday gathering. Enjoy making this cake and sharing it with loved ones. Let your creativity shine in the kitchen!

Christmas Tree Sheet Cake Festive and Fun Dessert

Get ready to bake a delightful Christmas Tree Sheet Cake that’s both festive and fun! This easy dessert will surely

- 2 cups canned butter beans (or dried butter beans, soaked and cooked) - 3 tablespoons extra virgin olive oil - 1 small onion, finely chopped - 3 cloves garlic, minced - 1 teaspoon fresh rosemary, finely chopped - 1 teaspoon fresh thyme leaves - 1 can (14 oz) diced tomatoes, with juices - 1 tablespoon balsamic vinegar - 1 cup low-sodium vegetable broth - 1 pinch red pepper flakes (optional, for a hint of heat) - Salt and freshly ground black pepper, to taste - Fresh basil leaves, torn or whole, for garnish When making Tuscan Marry Me Butter Beans, I always choose high-quality ingredients. Fresh herbs like rosemary and thyme really boost the taste. Extra virgin olive oil adds richness and depth. Use low-sodium vegetable broth to keep the dish light and healthy. Choose canned butter beans that are smooth and creamy. If you prefer dried beans, soak them overnight. Cooking them right makes a big difference. Always select ripe, juicy tomatoes for the best flavor. If you're avoiding certain ingredients, you can still enjoy this dish. For a vegan option, the recipe is already plant-based. You can swap butter beans for chickpeas or cannellini beans if you like. If you're gluten-free, check that your vegetable broth is gluten-free as well. To add protein, toss in some cooked chicken or sausage. You can also omit the red pepper flakes if you prefer no heat. {{ingredient_image_2}} To make Tuscan Marry Me Butter Beans, start with the beans. You can use dried or canned butter beans. If you choose dried beans, soak them overnight in water. This helps soften them. The next day, cook them until tender. If you prefer canned beans, simply rinse and drain them to remove extra sodium. This keeps the beans flavorful. Next, we sauté the aromatics. Grab a large skillet and heat three tablespoons of extra virgin olive oil over medium heat. Once the oil is warm, add one small finely chopped onion. Cook it for about 5-6 minutes. You want the onion to turn soft and translucent. Stir often to avoid burning. Then, add three minced garlic cloves, one teaspoon fresh rosemary, and one teaspoon fresh thyme leaves. If you want a little kick, add a pinch of red pepper flakes. Sauté this mix for 1-2 more minutes. You’ll notice an amazing aroma filling your kitchen! Now, it’s time to add the tomatoes and broth. Pour in one can of diced tomatoes, including their juices. Add one tablespoon of balsamic vinegar and one cup of low-sodium vegetable broth. Stir everything well. Raise the heat slightly to bring the mixture to a gentle simmer. This step adds depth to the dish. Carefully fold in the prepared butter beans. Make sure they spread out evenly in the sauce. Season with salt and freshly ground black pepper to taste. Cover the skillet with a lid and let it simmer for 15-20 minutes. This allows the flavors to blend beautifully. Afterward, taste the dish and adjust the seasoning if needed. Your Tuscan Marry Me Butter Beans are now ready to enjoy! To make your Tuscan marry me butter beans even better, use fresh herbs. Fresh rosemary and thyme add depth. You can also add a splash of lemon juice for brightness. If you want heat, add red pepper flakes. They give a nice kick without overpowering the dish. If you use dried butter beans, soak them overnight. This makes them soft. Cook them until tender for the best texture. If using canned beans, rinse them well. This helps remove extra sodium. Always taste as you go. Adjust salt and pepper to suit your taste. For a beautiful presentation, serve in rustic bowls. Drizzle some olive oil on top. This adds shine and flavor. Garnish with fresh basil leaves to bring color. Serve warm to keep the dish inviting. You can also pair it with crusty bread for a complete meal. Pro Tips Use Fresh Herbs: Fresh herbs like rosemary and thyme enhance the dish's flavor profile immensely, so always opt for fresh over dried when possible. Adjust the Heat: If you prefer a spicier dish, feel free to increase the amount of red pepper flakes or add a dash of hot sauce to kick up the heat. Opt for Quality Olive Oil: A high-quality extra virgin olive oil not only improves the taste but also adds a beautiful finish to the dish. Let it Sit: Allowing the dish to sit for a few minutes after cooking can help the flavors develop even further, making each bite even more delicious. {{image_4}} You can make Tuscan Marry Me Butter Beans even heartier by adding proteins. Chicken or sausage pairs well with the beans. Simply slice cooked chicken or sausage into bite-sized pieces and stir them into the dish during the last few minutes of cooking. This adds richness and makes it more filling. For a vegetarian or vegan twist, skip the meat and amp up the flavor. You can add more vegetables, like bell peppers or zucchini. They will add texture and taste. You can also use vegetable broth instead of chicken broth to keep it plant-based. A sprinkle of nutritional yeast can give a cheesy taste without dairy. Using seasonal ingredients can change the flavor of your dish. In spring, try adding fresh asparagus or peas. In summer, diced zucchini or fresh corn can bring brightness. In fall, use roasted squash or sweet potatoes for a cozy touch. Finally, in winter, root vegetables like carrots and parsnips work great. These swaps keep your dish fresh and exciting! To keep your Tuscan Marry Me Butter Beans fresh, store them in an airtight container. Place the container in your fridge. They stay good for about 3 to 5 days. If you have a lot left over, divide them into smaller portions. This makes it easy to grab a quick meal later. When reheating, use a skillet over medium heat. Add a splash of vegetable broth or water to help keep them moist. Stir often to avoid sticking. You can also use the microwave for quick reheating. Just cover the bowl with a lid or a damp paper towel to trap steam. To freeze your butter beans, let them cool completely first. Then, scoop them into freezer-safe bags or containers. Make sure to remove as much air as possible to prevent freezer burn. They will stay fresh for up to 3 months. When you want to eat them, thaw in the fridge overnight before reheating. Yes, you can make Tuscan Marry Me Butter Beans ahead of time. I often prepare them a day in advance. This allows the flavors to blend well. Simply store them in an airtight container in the fridge. When ready to eat, just reheat them on the stove. They taste great even after a day. Tuscan Marry Me Butter Beans pair well with many dishes. Here are some tasty options: - Crusty bread to soak up the sauce - A fresh green salad for crunch - Grilled chicken or fish for protein - Quinoa or rice for a hearty meal These options will balance the beans' rich flavors and add variety to your plate. Yes, butter beans and lima beans are the same. They both come from the same plant. The name "butter beans" often refers to the larger, creamier variety. Lima beans can be smaller and have a slightly different taste. Both beans offer a creamy texture and work well in dishes like this one. This blog post shared how to make delicious Tuscan Marry Me Butter Beans. We explored key ingredients and their quality, along with swaps for dietary needs. You learned step-by-step cooking instructions and tips for enhancing flavors. We also discussed variations for adding proteins and seasonal swaps. Lastly, we covered storage tips and answered common questions. In conclusion, cooking can be fun and easy. Enjoy creating your dish and share it with others!

Tuscan Marry Me Butter Beans Flavorful and Satisfying

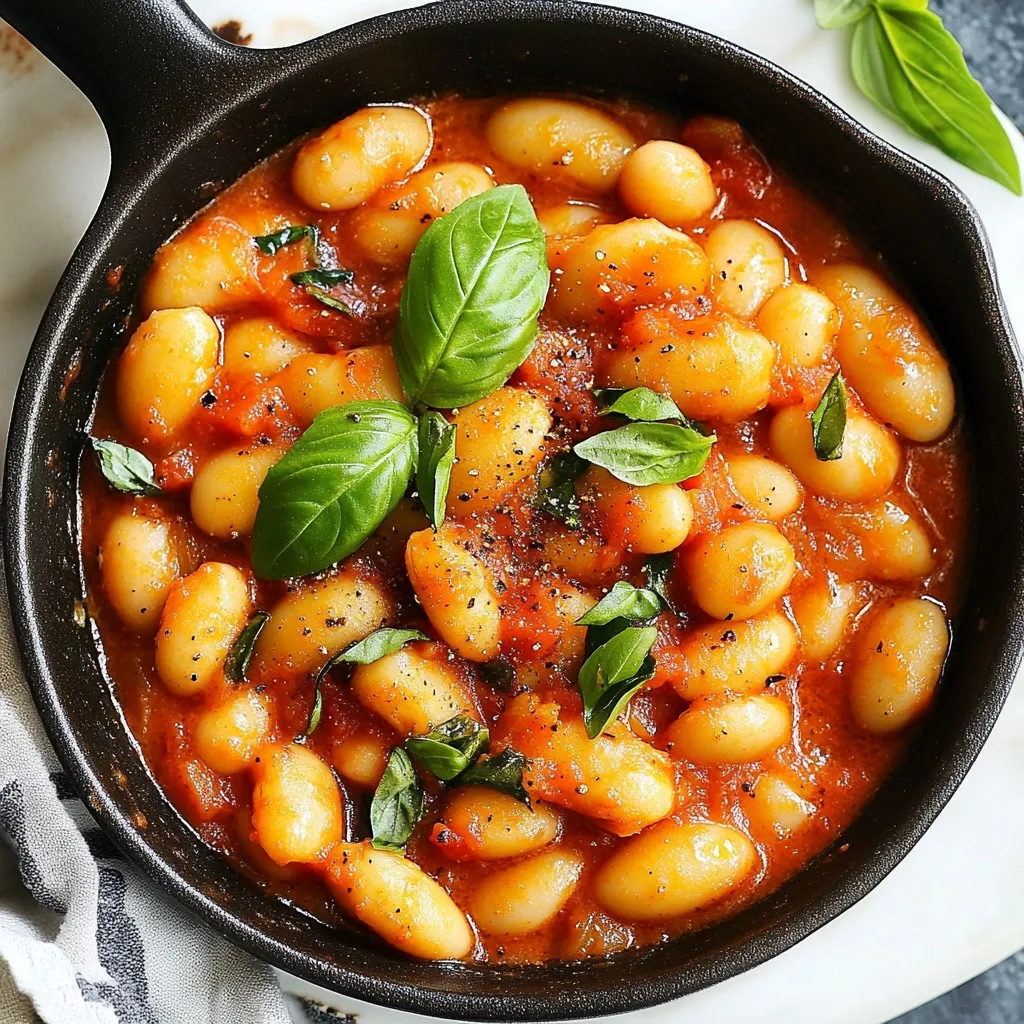
Imagine a dish so tasty that it might just make someone propose! Tuscan Marry Me Butter Beans are rich, flavorful,

To make cottage cheese lasagna, gather these ingredients: - 9 lasagna noodles - 2 cups cottage cheese - 1 cup ricotta cheese - 2 cups shredded mozzarella cheese - 2 cups marinara sauce - 1/2 cup grated Parmesan cheese - 1 large egg - 2 cups fresh spinach, chopped - 1 teaspoon dried basil - 1 teaspoon dried oregano - Salt and pepper to taste - Fresh basil leaves for garnish (optional) Want to switch things up? Here are some optional ingredients you can add: - Grilled chicken or ground beef for protein - Sliced mushrooms for an earthy flavor - Zucchini or bell peppers for extra veggies - Ricotta cheese can be switched with goat cheese To cook this dish, you will need: - A large pot for boiling noodles - A mixing bowl for the cheese mixture - A 9x13 inch baking dish for assembling - Aluminum foil to cover the dish while baking - A spatula for layering and serving - Oven mitts for safety when removing the hot dish {{ingredient_image_2}} First, preheat your oven to 375°F (190°C). This step is key for even cooking. While the oven heats, fill a large pot with water, add salt, and bring it to a rolling boil. Once boiling, add the lasagna noodles. Cook them according to the package instructions until they are al dente. After cooking, drain the noodles and set them aside to cool slightly. In a mixing bowl, combine 2 cups of cottage cheese, 1 cup of ricotta cheese, and 1 large egg. Add 2 cups of chopped spinach for color and nutrition. Then, mix in 1 teaspoon of dried basil and 1 teaspoon of dried oregano. Season with salt and pepper to taste. Stir the mixture well until it becomes creamy and smooth. Grab a 9x13 inch baking dish. Start by spreading 1 cup of marinara sauce evenly at the bottom. Place 3 lasagna noodles on top of the sauce. Next, spoon half of your cheese mixture over the noodles. Make sure to spread it evenly. Follow this with 1 cup of shredded mozzarella cheese. Repeat this layering process: pour another cup of marinara sauce, add 3 more noodles, and then the remaining cheese mixture and mozzarella. Finish with the last 3 noodles, the rest of the marinara sauce, and top with the last cup of mozzarella. Cover your baking dish tightly with aluminum foil. This helps trap steam for moist lasagna. Bake in the preheated oven for 25 minutes. After that, remove the foil and bake for another 15 minutes. Look for bubbly cheese with a light golden hue on top. After baking, carefully take the lasagna out of the oven. Let it rest for about 10 minutes. This helps the layers set and makes slicing easier. If you want to add a fresh touch, garnish with basil leaves before serving. Serve warm and enjoy your delicious cottage cheese lasagna! To avoid a soggy lasagna, be sure to cook your noodles al dente. If they are too soft, they will absorb excess moisture. Also, drain the noodles well after cooking. When layering, spread a thin layer of marinara sauce at the bottom. This keeps the noodles from sticking and helps them stay firm. Layering is key to a great lasagna. Start with sauce, then noodles, followed by cheese mixture. Make sure to spread each layer evenly. This way, every bite has great flavor. Repeat the process and finish with sauce and cheese on top. This creates a beautiful, golden crust. Adding herbs can elevate your lasagna's taste. Fresh basil or parsley adds a nice touch. You can also try thyme or rosemary for a new twist. Simply sprinkle herbs between layers or on top before baking. This makes your dish even more flavorful and aromatic. Pro Tips Use No-Boil Noodles: For a quicker assembly, consider using no-boil lasagna noodles. They soften while baking, saving you time and effort. Customize Your Greens: Feel free to mix in other vegetables like zucchini or mushrooms with the spinach for added flavor and nutrition. Let It Rest: Allow the lasagna to rest after baking. This will help the layers set and make serving much easier. Experiment with Cheeses: Try adding different cheeses like feta or goat cheese to the ricotta mixture for a unique twist on flavor. {{image_4}} You can easily make this dish gluten-free. Replace regular lasagna noodles with gluten-free ones. Many brands offer great options that taste just as good. Look for rice or corn-based noodles. Cook them according to package directions. Assemble your lasagna as usual, and enjoy a hearty meal without gluten. For a low-fat version, use low-fat cottage cheese and ricotta. This will cut some calories but keep the taste. If you want a vegan choice, use plant-based cheeses. Many brands now offer vegan ricotta and mozzarella. You can also skip the egg or use a flaxseed mixture for binding. These swaps make the dish lighter and still delicious. Adding vegetables boosts the nutrition of your lasagna. Spinach is a great start, but try other veggies too. Consider diced zucchini, sliced mushrooms, or bell peppers. Mix them into your cheese mixture or layer them between noodles. This adds color and flavor while making your meal healthier. Plus, it sneaks in more vitamins for you and your family. To keep your cottage cheese lasagna fresh, let it cool first. Once cooled, cover it tightly with plastic wrap or aluminum foil. You can also place it in an airtight container. Store it in the fridge for up to 3 days. This helps keep the flavors and texture intact. When you're ready to enjoy your leftovers, preheat the oven to 350°F (175°C). Place the lasagna in a baking dish. Cover it with foil to prevent drying out. Heat for about 20 minutes or until it's hot throughout. You can also microwave individual slices. Heat for 1-2 minutes, checking often to avoid overheating. To freeze your lasagna, let it cool completely. Wrap it tightly in plastic wrap, then in foil. You can also use a freezer-safe container. It will keep well for up to 3 months. When ready to eat, thaw it overnight in the fridge before reheating. This method keeps the taste fresh and delicious. Yes, you can use different cheeses. Try using ricotta or mozzarella for creaminess. You can also blend in sharp cheddar or goat cheese for added flavor. Just keep the cottage cheese for texture and protein. You can tell the lasagna is done when the cheese is bubbly and golden. The edges should be slightly crispy. Insert a knife in the center; it should feel hot. Let it rest for 10 minutes before slicing. Cottage cheese lasagna pairs well with a fresh salad. A simple green salad with vinaigrette is great. You can also serve garlic bread or roasted vegetables as sides. They add flavor and balance to the meal. You can keep leftovers in the fridge for about three to five days. Store them in an airtight container for best quality. When you're ready to eat, reheat slices in the oven or microwave until warm. In this post, we explored how to make delicious cottage cheese lasagna. We covered key ingredients, tools needed, and step-by-step baking techniques. I shared tips for preventing sogginess and enhancing flavor. You learned variations for dietary needs, plus storage and reheating advice. Lasagna is easy and fun to make. With these tricks, you can enjoy a tasty meal anytime. Happy cooking!

Cottage Cheese Lasagna Flavorful and Easy Recipe

Looking for a tasty twist on a classic favorite? This Cottage Cheese Lasagna recipe is not just easy to whip

- 1 cup brewed espresso, cooled - 1/2 cup unsweetened cocoa powder - 1/4 cup powdered sugar - 1 1/2 cups milk (dairy or non-dairy) - 1 teaspoon vanilla extract - 1/4 cup chocolate syrup (for drizzling) - Whipped cream for topping - Cocoa nibs or dark chocolate shavings for garnish For this rich and tasty drink, you'll need: - 1 cup brewed espresso, cooled - 1/2 cup unsweetened cocoa powder - 1/4 cup powdered sugar - 1 1/2 cups milk (dairy or non-dairy) - 1 teaspoon vanilla extract - 1/4 cup chocolate syrup (for drizzling) - Whipped cream for topping - Cocoa nibs or dark chocolate shavings for garnish If you want a non-dairy option, try almond milk or oat milk. These will keep the drink creamy while fitting into your dietary needs. For sugar alternatives, consider using stevia or coconut sugar. These options can give you sweetness without the refined sugar. {{ingredient_image_2}} 1. Brewing espresso: Start by brewing 1 cup of espresso. Allow it to cool. This step is key for a rich flavor in your drink. You can use a coffee machine, French press, or espresso maker. 2. Measuring and preparing dry ingredients: Measure out 1/2 cup of unsweetened cocoa powder and 1/4 cup of powdered sugar. Having these ready makes the next steps easier. 1. Heating milk and combining ingredients: Pour 1 1/2 cups of milk into a medium saucepan. Heat it on medium until warm. Do not let it boil. Once warm, add the cooled espresso, cocoa powder, and powdered sugar. 2. Whisking tips for smooth consistency: Whisk continuously. This helps dissolve the cocoa and sugar well. Keep whisking until the mixture is creamy and smooth. Stir in 1 teaspoon of vanilla extract. Heat for one more minute to blend flavors. 1. Drizzling chocolate syrup: Take 1/4 cup of chocolate syrup and drizzle it inside four martini glasses. Create elegant swirls that catch the eye. 2. Pouring and garnishing the drink: Carefully pour the mocha mixture into each glass, filling them three-quarters full. Top with a dollop of whipped cream. Finally, sprinkle cocoa nibs or dark chocolate shavings on top for garnish. Enjoy your rich and tasty treat! To avoid boiling milk, heat it slowly over medium heat. Keep a close eye on it. Stir gently as it warms. This helps create a creamy texture without burning. For whisking effectively, use a small whisk. Move it in a circular motion. This helps mix the cocoa powder and sugar quickly. Focus on the corners of the pan. This ensures no lumps remain. You can add flavored syrups for a twist. Try hazelnut or caramel syrups. They bring extra depth to your drink. Another option is adding liqueurs. A splash of coffee liqueur can brighten the flavors. For additional spices, consider a pinch of cinnamon or nutmeg. These spices add warmth and a cozy feel. Experiment with different flavors to find your favorite mix. For glassware, choose elegant martini glasses. Their shape showcases the drink beautifully. You can also use coupe glasses for a chic look. Pair your Baileys Mocha Martini Deluxe with desserts. Dark chocolate truffles work great. They complement the rich flavors. You can also serve with a slice of chocolate cake. This makes for an indulgent treat! Pro Tips Use Fresh Espresso: For the best flavor, always use freshly brewed espresso. This will enhance the overall taste and aroma of your mocha delight. Experiment with Milk Types: Feel free to use different types of milk, such as almond, oat, or soy, to cater to dietary preferences and to add unique flavors to your drink. Chill Your Espresso: Allow your brewed espresso to cool before adding it to the milk mixture, which helps maintain the creamy texture and prevents curdling. Garnish Creatively: Get creative with your garnishes! Consider adding a sprinkle of cinnamon or a drizzle of caramel for an extra layer of flavor and visual appeal. {{image_4}} You can change the flavor of your Baileys Mocha Martini. Here are two fun ideas. - Mocha Mint Martini: Add peppermint extract to your mocha mix. Use a few drops for a light mint taste. This gives a fresh twist to the rich flavors. - Hazelnut Coffee Martini: Swap regular milk for hazelnut milk. This adds a nutty flavor that pairs well with chocolate and coffee. You can also add a splash of hazelnut liqueur for extra depth. If you like your drink sweeter or less sweet, you can adjust the sugar. - Modifying sugar content: Use more or less powdered sugar in your mocha mix. Start with half and taste it. Add more if you like it sweeter. - Using flavored sugars: Try using flavored sugars, like cinnamon or vanilla. This adds a unique taste to your drink. You can easily find these at most stores. Want to enjoy a frozen version? It’s simple to blend this drink into a frozen delight. 1. Prepare your mocha mixture as usual. 2. Let it cool completely. 3. Pour the cooled mixture into a blender. 4. Add ice, about two cups, and blend until smooth. 5. Pour into glasses and top with whipped cream and cocoa nibs or chocolate shavings. This frozen treat is perfect for hot days or special occasions! For best results, store cocoa powder in a cool, dry place. Keep it in an airtight container to avoid moisture. Espresso should be kept in the fridge if you have leftovers. Use it within a few days for the best flavor. Yes, you can prepare the mocha mixture in advance. Make it ahead and store it in the fridge. Just remember to cover it well. When you’re ready to serve, give it a quick stir to mix everything back together. To reheat the mocha drink, use low heat on the stove. Avoid boiling it, as this can change the texture. Stir gently while heating to keep it smooth. Serve it warm and enjoy the rich flavors! Yes, you can easily make this drink non-alcoholic. Simply skip adding any alcohol. Use your favorite non-alcoholic coffee or chocolate syrup. You can also add a splash of milk for creaminess. This way, you still enjoy the rich mocha flavor. The total time for making this cocktail is about 15 minutes. Here’s the breakdown: - Preparation Time: 10 minutes - Cooking Time: 5 minutes This quick prep makes it easy to enjoy a tasty drink anytime. Serve your Baileys Mocha Martini Deluxe in a classic martini glass. The wide rim allows for lovely garnishes. The elegant shape also shows off the beautiful layers of your drink. For a fun twist, try using a coupe glass for a vintage touch! In this blog post, we covered how to make the Baileys Mocha Martini Deluxe. I shared key ingredients, measuring tips, and a step-by-step guide for preparation. We also explored ways to enhance flavor and create fun variations. Finally, I provided storage tips and answered common questions about the drink. Enjoy experimenting with this tasty cocktail at home! You can adjust ingredients to fit your taste. Remember to have fun and share your creations with friends.

Baileys Mocha Martini Deluxe Tasty and Rich Recipe

Are you ready to indulge in the rich flavors of a Baileys Mocha Martini Deluxe? This creamy drink combines brewed

Older posts
Newer posts
← Previous Page1 … Page104 Page105 Page106 … Page115 Next →

dsad

© 2025 recipesstation • Built with GeneratePress

Our Policies

  • Copyright Policy
  • Cookie Policy
  • GDPR Policy
  • Privacy Policy
  • Disclaimer
  • Terms Of Use

More Information

  • Home
  • About
  • Contact
  • Appetizers
  • Dessert
  • Dinner
  • Drinks
©2025, recipesstation About Back To Top