Skip to content
DisclaimerTerms Of UseGDPR PolicyCookie Policy

recipesstation

  • Home
  • Drinks
  • Appetizers
  • Dinner
  • Dessert
  • About
  • Contact
  • Privacy Policy
DisclaimerTerms Of UseGDPR PolicyCookie Policy

Emily

- 2 cups all-purpose flour - 1/2 cup granulated sugar - 1/2 cup unsalted butter, softened - 1/4 cup brown sugar, packed - 3-4 medium-sized fresh apples (Granny Smith or Honeycrisp) The core of this recipe lies in the main ingredients. All-purpose flour serves as the base for the dough. Granulated sugar adds sweetness, while brown sugar brings a richer flavor. Unsalted butter helps create a tender texture. Fresh apples are the star of the show, providing both sweetness and tartness. - 1/4 cup chopped pecans or walnuts - 1/4 cup raisins - Powdered sugar for drizzling Adding optional ingredients can elevate your Cinnamon Roll Apple Pie. Chopped nuts give it a crunchy texture. Raisins add a hint of natural sweetness. A drizzle of powdered sugar on top brings a beautiful finish. You can mix and match based on your taste. {{ingredient_image_2}} Start by mixing your dry ingredients. In a large bowl, whisk together 2 cups of flour, 1/2 cup of granulated sugar, 1 teaspoon of baking powder, 1/2 teaspoon of salt, 1/2 teaspoon of cinnamon, and 1/4 teaspoon of nutmeg. This mix gives your dough a great flavor. Next, incorporate 1/2 cup of softened butter. You can use a pastry cutter or your hands to blend it until it looks like coarse crumbs. Then, add 1 large egg. Stir until a soft dough forms. You want it smooth but not sticky. Now it’s time to create the apple filling. Take 3 to 4 medium apples and peel, core, and slice them thin. Place them in a bowl. Add 1 tablespoon of fresh lemon juice, 1/4 cup of brown sugar, and 1 teaspoon of vanilla extract. You can also add nuts or raisins if you like. Toss everything well. This step is key to flavoring the apples. To roll out the dough, lightly flour your work surface. Divide your dough in half. Roll out about two-thirds of the dough into a big circle, about 12 inches wide. This will be the base for your pie. Make sure it’s even for a nice bake. Gently transfer the rolled-out dough to a 9-inch pie dish. Press it into the bottom and up the sides. Pour the apple filling into the crust. Spread it evenly so every slice will be delicious. This is where the magic happens. For the topping, roll out the remaining dough into a rectangle. Sprinkle 2 tablespoons of sugar and 1 teaspoon of cinnamon over it. Roll the dough tightly into a log. Slice it into 1-inch rounds. Arrange these slices on top of the apple filling to make a pretty pattern. For the final touches, beat 1 egg in a small bowl. Use a pastry brush to apply the egg wash over the topping. This will give it a shiny, golden finish. Preheat your oven to 375°F (190°C). Bake the pie for 35 to 40 minutes. You want the topping to be golden and the filling bubbly. Enjoy the sweet aroma while it bakes! To make great dough, keep your butter cold. If the butter is too warm, your dough can turn tough. Mix the dry ingredients well before adding the butter. Cut the butter into small pieces. Use a pastry cutter or your hands to blend until it looks like crumbs. Be gentle when mixing in the egg. Too much mixing can lead to a dense dough. The best apples for baking are Granny Smith or Honeycrisp. Granny Smith apples are tart and hold their shape well. Honeycrisp apples are sweet and juicy. You can also mix both for great flavor. Avoid soft apples like Red Delicious. They can turn mushy in the pie. Serve this pie warm for the best taste. A scoop of vanilla ice cream on the side makes it extra special. You can also drizzle some powdered sugar on top for a nice finish. For a pop of color, add a sprig of mint. This makes your dessert look fancy and fun. Pro Tips Use Cold Butter: For a flakier crust, consider using cold butter instead of softened butter when making your dough. Choose the Right Apples: Opt for tart apples like Granny Smith or Honeycrisp, as they hold their shape well and provide a nice contrast to the sweetness. Let it Rest: Allow the assembled pie to rest for about 10 minutes before slicing to help the filling set, making for cleaner slices. Experiment with Spices: Feel free to add additional spices like ginger or cloves for a customized flavor profile that suits your taste. {{image_4}} You can add fun flavors to your pie. Try mixing in spices like ginger or allspice. These spices can enhance the apple taste. You can also use a splash of maple syrup for a sweet twist. If you want a nutty flavor, add ground almonds to the filling. These additions make your pie unique and tasty. If you need a gluten-free option, use gluten-free flour. It works well in the dough. You can also swap regular sugar for coconut sugar for a healthier choice. Use dairy-free butter to make it vegan. These swaps maintain the pie's flavor while meeting dietary needs. For a fun twist, serve mini versions of this pie. Use a muffin tin to make individual pies. They are perfect for parties or family gatherings. You can also use a cookie cutter to make fun shapes. This makes the pie fun and easy to eat. Try serving your pie with ice cream or whipped cream for extra delight. Each serving becomes a special treat! To keep your Cinnamon Roll Apple Pie fresh, store it in the fridge. Use an airtight container or wrap it tightly in plastic wrap. This helps keep the pie moist and tasty. It can last in the fridge for up to three days. If you want to save it longer, consider freezing it. When it's time to enjoy your pie again, preheat your oven to 350°F (175°C). Place slices on a baking sheet. Cover with foil to keep them from drying out. Heat for about 10-15 minutes, until warm. You can also microwave a slice for about 30-45 seconds. Just be careful not to overheat it. Enjoy the warm, gooey goodness just like when it was fresh! To keep apples fresh, use lemon juice. After slicing, toss the apples in a bowl with lemon juice. This slows browning. You can also soak the slices in a mix of water and lemon juice for ten minutes. This method keeps the apples bright and tasty. Yes, you can make the dough early. Prepare it and wrap it in plastic wrap. Store it in the fridge for up to two days. When ready, let it sit at room temp for 10-15 minutes before rolling. This makes it easier to handle. Yes, you can freeze this pie. After baking, let it cool completely. Wrap it tightly in plastic wrap and aluminum foil. It will stay good in the freezer for up to three months. When ready to eat, thaw it in the fridge overnight and then reheat in the oven. Enjoy warm! This blog post covered the key steps to make a delicious Cinnamon Roll Apple Pie. We explored the ingredients, from simple all-purpose flour to fresh apples. I shared tips on perfecting the dough and choosing the best apples. You can enhance flavor with spices or even make gluten-free versions. Proper storage and reheating will keep your pie fresh. Now, grab your ingredients and bake something warm and tasty. You’ll enjoy every bite!

Cinnamon Roll Apple Pie Festive and Flavorful Delight

Looking for a dessert that screams comfort? Look no further than my Cinnamon Roll Apple Pie! This festive treat combines

Here’s what you need for a tasty chicken stir fry: - 2 boneless, skinless chicken breasts, thinly sliced - 2 cups mixed bell peppers (red, yellow, green), cut into strips - 1 cup fresh broccoli florets - 2 medium carrots, julienned - 3 cloves garlic, minced - 1-inch piece of ginger, grated - 3 tablespoons low-sodium soy sauce - 1 tablespoon sesame oil - 1 tablespoon vegetable oil - 2 teaspoons cornstarch - 1 tablespoon cold water - Salt and pepper, to taste - Sesame seeds, for garnish - Cooked rice or noodles, for serving Using fresh ingredients makes the dish bright and flavorful. The chicken adds protein, while the veggies bring color and crunch. You can even switch up the veggies based on what you have. Think about adding snap peas or zucchini for extra flavor. Always remember to season well for the best taste! {{ingredient_image_2}} To start, slice the chicken breasts thinly. This helps them cook faster. I like to season the chicken with salt and pepper. You can also marinate it in soy sauce for extra flavor. Heat vegetable oil in a large skillet over medium-high heat. Once the oil is hot, add the chicken. Cook it for about 5 to 7 minutes. Stir often until it's browned and no longer pink. Then, set the chicken aside on a plate. Next, add minced garlic and grated ginger to the same skillet. This step adds great flavor. Stir them for about 30 seconds. You want them aromatic but not burnt. This is where the magic happens! Now it’s time for the veggies! Add the mixed bell peppers, broccoli florets, and julienned carrots. Stir-fry them for about 4 to 5 minutes. This keeps their color bright and texture crisp. You want them tender but still crunchy. Once they look good, it's time to add the chicken back into the skillet. Combine everything well. Pour the soy sauce and sesame oil over the chicken and veggies. Stir to mix the flavors evenly. Now, take the cornstarch and cold water mixture you made earlier. Pour it into the skillet while stirring continuously. This helps to thicken the sauce. Cook for another 1 to 2 minutes. Once it’s thick and bubbly, remove the skillet from heat. Lastly, sprinkle sesame seeds on top for a fun crunch. Enjoy your easy chicken stir fry! High heat is key for a great stir-fry. It helps the food cook fast and keeps it from getting soggy. Always preheat your pan until it’s hot. This way, your chicken will brown nicely. To avoid overcooking your veggies, keep them moving. Stir them often for about four to five minutes. They should be tender but still bright and crisp. This makes your dish colorful and fresh. To amp up the taste, try adding more spices. A pinch of red pepper flakes can add heat. You can also use a splash of rice vinegar for a tangy kick. For umami, consider making a simple homemade sauce. Mix soy sauce, honey, and a bit of lime juice. This blend enhances the dish’s depth and flavor. You can even experiment with peanut butter for a creamy texture! Pro Tips Use High Heat: Cooking at a high temperature helps to sear the chicken quickly and preserve its juiciness while giving the vegetables a nice crunch. Prep Ingredients Ahead: Having all your ingredients prepped and ready to go will make the stir-fry process smoother and quicker, allowing you to enjoy your meal sooner. Mix and Match Vegetables: Feel free to substitute the vegetables based on what you have on hand or your personal preferences. Snow peas, snap peas, or zucchini work wonderfully too! Garnish for Flavor: Don't skip the sesame seeds! They add a delightful nutty flavor and a nice crunch, enhancing the overall dish. {{image_4}} You can switch up the protein in your stir fry. Shrimp cooks quickly and adds a nice flavor. Tofu is a great choice for a plant-based meal. It soaks up the sauce well and gives a satisfying texture. Beef is another option. Use thin cuts, like flank steak, for quick cooking. These alternatives keep the dish exciting and cater to different diets. Feel free to play with seasonal vegetables. Asparagus, snap peas, and zucchini can bring fresh flavors. Think about what you have on hand. For a gluten-free option, use tamari instead of soy sauce. This keeps the taste while meeting dietary needs. Colorful veggies not only taste great but also make the dish look beautiful. Always aim for a mix of textures and colors for the best results. To keep your Easy Chicken Stir Fry fresh, store leftovers right. Use airtight containers. This helps lock in flavor and moisture. Place your stir fry in the fridge if you eat it within a few days. It stays good for about 3 to 4 days. For longer storage, use your freezer. Freeze leftovers in small portions. This way, you can heat only what you need later. When reheating, keep your stir fry tasty and fresh. The best method is using a skillet. Heat it on medium and add a splash of water. This helps steam the dish and keeps it moist. Stir often to prevent sticking. You can also use a microwave. Put your stir fry in a microwave-safe bowl. Cover it with a damp paper towel and heat in short bursts. This keeps the flavor and texture just right. To make chicken stir fry from scratch, follow these steps: 1. Prep the chicken: Slice two boneless, skinless chicken breasts thinly. 2. Heat the pan: Use a large skillet or wok. Heat vegetable oil over medium-high heat. 3. Cook the chicken: Add the chicken to the skillet. Season with salt and pepper. Cook for 5-7 minutes until browned. 4. Sauté garlic and ginger: In the same skillet, add minced garlic and grated ginger. Sauté for about 30 seconds. 5. Add vegetables: Stir in mixed bell peppers, broccoli, and julienned carrots. Cook for 4-5 minutes. 6. Combine: Return the chicken to the skillet. Pour in soy sauce and sesame oil. 7. Thicken the sauce: Mix cornstarch with cold water. Add to the skillet and stir for 1-2 minutes. 8. Serve: Garnish with sesame seeds and enjoy over rice or noodles. Watch out for these common pitfalls: - Don’t overcrowd the pan; it can steam the chicken. - Avoid burning the garlic and ginger; they cook quickly. Yes, you can use frozen vegetables in your stir fry. However, they may change the cooking time and flavor. - Cook time: Frozen veggies take longer to heat. Add them earlier than fresh ones. - Flavor impact: Frozen vegetables can lose some texture. They might not be as crisp as fresh ones. If using frozen, make sure to thaw them before cooking. Pat them dry to reduce excess moisture. The best sauce for stir fry often includes soy sauce and sesame oil for that classic flavor. Here are some recommendations: - Soy sauce: A must for seasoning. - Teriyaki sauce: Adds sweetness and depth. - Oyster sauce: Brings umami flavor. - Homemade sauce: Combine soy sauce, ginger, garlic, and a splash of rice vinegar. Feel free to mix and match sauces to find your perfect blend! You've learned how to make a tasty chicken stir fry. We covered ingredients, step-by-step cooking, and useful tips. You can also customize the recipe with different proteins and veggies. Remember, using high heat keeps veggies crisp. Store any leftovers in the fridge or freezer for later. With this guide, you can create a delicious dish with ease. Enjoy making this meal!

Easy Chicken Stir Fry Delicious and Quick Meal

Looking for a meal that’s quick, easy, and bursting with flavor? My Easy Chicken Stir Fry will save your weeknight

This soup starts with just the right base. You will need: - 1 pound ground chicken - 6 cups low-sodium chicken broth Next, we add fresh veggies. They give the soup great taste and color. Here are the essentials: - Diced onion - Minced garlic - Chopped carrots - Chopped celery - Diced bell pepper (any color) - Diced zucchini - Chopped green beans Good flavor comes from the right spices. You will need: - 1 teaspoon dried thyme - 1 teaspoon dried oregano - Salt and pepper to taste - 1 tablespoon fresh parsley (for garnish) Each ingredient plays a key role in making the soup tasty and healthy. The ground chicken adds protein, while the broth gives a rich base. The mix of vegetables brings crunch and nutrition. Finally, the herbs and spices tie all the flavors together. {{ingredient_image_2}} Start by heating one tablespoon of olive oil in a large pot over medium heat. When the oil is hot, add one diced onion. Cook the onion until it turns soft and clear, about five minutes. This step adds a lot of flavor to your soup. Next, add two minced garlic cloves. Stir and cook for one more minute. This makes the kitchen smell great! Now, it's time to add the main ingredients. Put in one pound of ground chicken. Use a wooden spoon to break it apart. Cook the chicken for five to seven minutes, until it is brown and no longer pink. Once the chicken is ready, toss in two chopped carrots and two chopped celery stalks. Cook these for three to four minutes, so they soften a bit. Then, add one diced bell pepper, one diced zucchini, and one cup of chopped green beans. Stir everything together and cook for another five minutes. This keeps the veggies crunchy and tasty. Pour in six cups of low-sodium chicken broth and one can of diced tomatoes with juice. Season the mix with one teaspoon of dried thyme and one teaspoon of dried oregano. Add salt and pepper to taste. Stir everything well to blend the flavors. Increase the heat until the soup starts to boil. Once it's boiling, lower the heat to a simmer. Cover the pot and let it cook for 15 to 20 minutes. This helps the flavors mix and taste even better. After that, taste the soup and adjust the seasoning if needed. If you want a thinner soup, add a splash of water. Serve hot, and don't forget to garnish with fresh parsley! To make your ground chicken veggie soup truly shine, focus on the aromatics. Start by sautéing the onion until it turns clear. This step builds a solid flavor base. After that, add minced garlic and cook it until fragrant. This mix of onion and garlic adds depth to your soup. Don’t forget to balance your seasoning. Use salt and pepper to enhance the taste and add dried thyme and oregano for a warm, earthy feel. Sometimes you want your soup thicker or thinner. If your soup is too thick, add a splash of water or broth. Stir it in and let it warm up. For a thicker soup, let it simmer longer. This helps the flavors meld and reduces excess liquid. You can also mash some of the veggies to create a creamier texture. Serving your soup well makes it more enjoyable. Use deep bowls to hold the hot soup. Add a slice of crusty bread on the side for dipping. This adds heartiness to the meal. For a pop of color, sprinkle fresh parsley on top. It brightens the dish and adds a fresh taste. Enjoy the warmth and comfort of your beautiful soup! Pro Tips Use Fresh Herbs: Fresh herbs like basil or cilantro can elevate the flavor of the soup. Add them just before serving for a burst of freshness. Customize Your Veggies: Feel free to substitute or add any vegetables you have on hand. This recipe is versatile and can accommodate your favorites! Make it Ahead: This soup tastes even better the next day. Make a big batch and store leftovers in the fridge for an easy meal later. Adjust the Thickness: If you prefer a thicker soup, you can blend a portion of it using an immersion blender before serving. {{image_4}} You can switch the ground chicken with other proteins. Ground turkey works well and is lean. You can also try ground beef for a richer taste. If you want a plant-based option, use lentils or crumbled tofu. These swaps add a fun twist to the soup. Each protein brings its own flavor, making your meal unique. Feel free to add different vegetables based on the season. Spinach or kale adds great nutrients and color. Sweet potatoes provide a hearty texture and sweetness. Broccoli and cauliflower are also tasty choices. You can mix and match veggies based on what you have. This keeps the soup fresh and exciting. Want to add some heat? Consider adding red pepper flakes or diced jalapeños. A little goes a long way in giving your soup a kick. For unique flavors, try adding a splash of soy sauce or a hint of ginger. You can also add fresh herbs like basil or cilantro for extra depth. These simple changes can elevate your soup to a new level. Store leftover soup in an airtight container. Let it cool before sealing. Place it in the fridge within two hours of cooking. This keeps the soup fresh and safe to eat. It is best to eat leftovers within three to four days. To freeze the soup, let it cool completely first. Then, pour it into freezer-safe containers or bags. Leave some space at the top for expansion. You can freeze the soup for up to three months. When ready to eat, thaw it in the fridge overnight. Reheat it on the stove until hot. Stir it well to mix any ingredients that settle. In the fridge, the soup lasts about three to four days. In the freezer, it stays good for up to three months. Always check for signs of spoilage before eating. If it smells off or looks strange, throw it away. Yes, you can use frozen veggies. They save time and add nutrients. Look for mixed bags of frozen vegetables. They work well in this soup. Just add them straight to the pot. No need to thaw first. This keeps it simple and quick. To lower the carbs, swap some veggies. Use less carrot and potato. Add more leafy greens like spinach or kale. You can also skip the beans. This keeps the soup light and fresh. Another tip is to choose low-carb chicken broth. It makes a tasty difference. This soup pairs well with many sides. Try crusty bread or rolls for dipping. A green salad adds crunch and freshness. You can also serve it with cheese sticks for extra flavor. If you want something warm, serve it with garlic bread. These options make the meal complete and satisfying. This article shared how to create a tasty Ground Chicken Veggie Soup. We covered essential ingredients like ground chicken, broth, and fresh vegetables. You learned step-by-step instructions for prep, cooking, and seasoning. Useful tips helped you master flavor and consistency. Variations let you mix in different proteins or spices. Finally, you got storage tips to keep your soup fresh. This dish is easy, nutritious, and adaptable for everyone. Enjoy your cooking and the delicious rewards that follow!

Ground Chicken Veggie Soup Flavorful and Easy Recipe

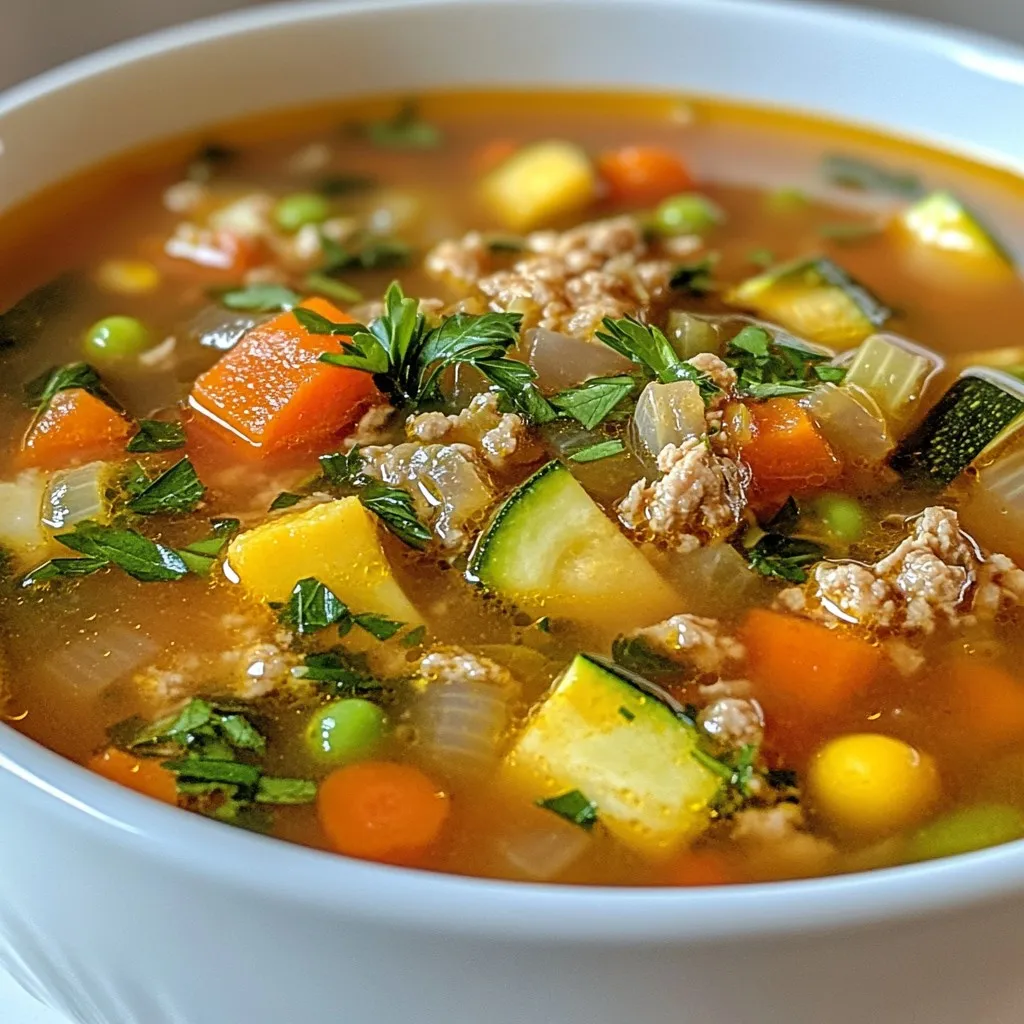
Looking for a warm and tasty soup that’s easy to make? This Ground Chicken Veggie Soup is your answer! Packed

- 2 cups cooked chicken, shredded - 8 oz spaghetti or fettuccine - 1 cup mushrooms, sliced - 1/2 cup frozen peas - 1/4 cup onion, finely chopped - 3 cloves garlic, minced - 1/4 cup all-purpose flour - 3 cups chicken broth - 1 cup heavy cream - 1 cup grated Parmesan cheese - 1 teaspoon Italian seasoning - 1/2 teaspoon salt - 1/4 teaspoon black pepper - 1 tablespoon olive oil - 1/2 cup breadcrumbs (optional for topping) Each ingredient adds its own flavor and texture to the dish. The shredded chicken provides protein, while the pasta serves as a filling base. Mushrooms add earthiness, and peas bring a pop of color and sweetness. Onion and garlic give a savory depth. Flour helps to thicken the creamy sauce. Chicken broth makes the sauce flavorful and rich. Heavy cream creates a smooth, luxurious texture. Parmesan cheese gives a salty, nutty taste. Italian seasoning adds warmth and aroma, while salt and pepper enhance all the flavors. You can customize this dish easily. For example, use different pasta types or add more veggies. This flexibility makes Creamy Chicken Tetrazzini Bake a fun recipe to explore. {{ingredient_image_2}} 1. Preheat your oven to 350°F (175°C). This warms up the space for baking. 2. Cook the spaghetti or fettuccine in boiling salted water. Follow the package instructions until it is al dente. Drain and let it cool a bit. 3. Heat olive oil in a large skillet over medium heat. Add the finely chopped onion and sauté for about 3 minutes. You want it to look clear. 4. Add minced garlic and sliced mushrooms. Cook for about 5 minutes. Stir occasionally until the mushrooms are soft. 1. Sprinkle in the all-purpose flour and mix well. Cook for another minute. This helps the flour blend with the veggies. 2. Gradually whisk in the chicken broth while stirring. This keeps lumps from forming. Bring it to a gentle simmer to thicken. 3. Stir in heavy cream along with Italian seasoning, salt, and black pepper. Cook for 5-7 minutes, stirring often until the sauce is creamy. 1. Gently fold in the shredded chicken, cooked pasta, and frozen peas. Make sure everything is coated in the creamy sauce. 2. Transfer the mixture to a greased 9x13 inch baking dish. Spread it out evenly. 3. If you like a crunchy top, sprinkle breadcrumbs over the dish. 4. Grate Parmesan cheese on top. This adds rich flavor and helps create a golden crust. 5. Place the dish in the oven and bake for 25-30 minutes. Look for a golden and bubbly top. The smell will be amazing! 6. Once it's done, take it out of the oven and let it cool for a few minutes. This helps set the layers. To make the sauce just right, focus on its thickness. It should be creamy but not too runny. Start by adding the chicken broth slowly while whisking. This helps the sauce stay smooth. When you add the heavy cream, keep stirring. If you see lumps, break them up with a whisk. Cook it longer for a thicker sauce. Remember, it will thicken more as it bakes. If you want a lighter dish, swap out heavy cream. Use half-and-half or a mix of milk and Greek yogurt. These options still give great flavor without being too rich. For pasta, spaghetti or fettuccine works well. You can also try penne or rotini. These shapes hold the sauce nicely. Garnish your dish with fresh parsley or basil. This adds a pop of color and fresh taste. You might also sprinkle more Parmesan on top right before serving. For side dishes, a simple salad pairs well. Garlic bread or roasted vegetables can make the meal even better. Enjoy your creamy chicken tetrazzini bake hot for the best taste! Pro Tips Use Leftover Chicken: This recipe is perfect for using up leftover rotisserie chicken or any cooked chicken you have on hand, making it a great time-saver. Customize Your Veggies: Feel free to add or substitute other vegetables like bell peppers, spinach, or broccoli for added flavor and nutrition. Make it Ahead: You can prepare the dish in advance and store it covered in the fridge. Just bake it when you're ready to serve! Breadcrumb Topping: If you prefer a crustier top, mix the breadcrumbs with a little melted butter and Italian herbs before sprinkling them on for extra flavor. {{image_4}} To make a vegetarian version, simply remove the chicken. You can add a mix of veggies instead. Think bell peppers, zucchini, and spinach. These add color and flavor. You can sauté them just like the mushrooms. This change keeps the dish hearty and delicious. Adding different herbs and spices can lift the flavor. Try thyme or rosemary for a fresh taste. You can also sprinkle in some red pepper flakes for heat. Using flavored broth can also change the taste. A mushroom or vegetable broth works well. It adds depth and richness to the sauce. If you want fewer calories, substitute light cream for heavy cream. This keeps it creamy but cuts down on fat. You can also skip the breadcrumbs on top. This makes the dish lighter while still tasty. Enjoy your creamy chicken tetrazzini bake, tailored to fit your needs! To keep your creamy chicken tetrazzini fresh, use airtight containers. Glass or plastic containers work well. Make sure to cool the dish to room temperature before sealing. Store the leftovers in the fridge. They will stay good for up to three days. The best way to reheat this dish is in the oven. Preheat your oven to 350°F (175°C). Place the tetrazzini in an oven-safe dish. Cover it with foil to keep it moist. Heat for about 20 minutes or until warm. You can also use the microwave. Heat in short intervals, stirring in between. This keeps the texture nice. You can freeze this dish either before or after baking. If freezing before baking, assemble the dish and cover it tightly. It can last up to three months in the freezer. To bake from frozen, add an extra 15-20 minutes to your baking time. If you freeze it after baking, let it cool first. Thaw it in the fridge overnight before reheating. Yes, you can use leftover rotisserie chicken. It saves time and adds flavor. Just shred the chicken and mix it in. This way, you create a hearty meal with less effort. To make this dish gluten-free, swap regular pasta for gluten-free pasta. Use a gluten-free flour blend in the sauce too. Check your chicken broth for gluten-free options. These changes let everyone enjoy this tasty dish. Serve this bake with a simple green salad. Garlic bread pairs well too. A light dessert, like sorbet, can balance the meal. These sides enhance the overall dining experience. Yes, you can prepare it ahead of time. Assemble the dish and cover it. Store it in the fridge for up to 24 hours. Just bake it when you're ready to serve. This makes it great for busy days. For a richer sauce, use half-and-half instead of heavy cream. You can also add cream cheese for extra creaminess. Try mixing in some shredded cheese, like cheddar, for more flavor. These tweaks create your perfect creamy sauce. Creamy Chicken Tetrazzini Bake is a simple yet satisfying dish. This recipe combines tender chicken, pasta, and a rich sauce. You learned about easy steps for preparation, baking, and storage tips. I shared helpful variations to suit different diets. As you try this recipe, remember to explore ingredient swaps and serving ideas. Enjoy your cooking, and savor every bite of this creamy comfort food!

Creamy Chicken Tetrazzini Bake Flavorful Comfort Dish

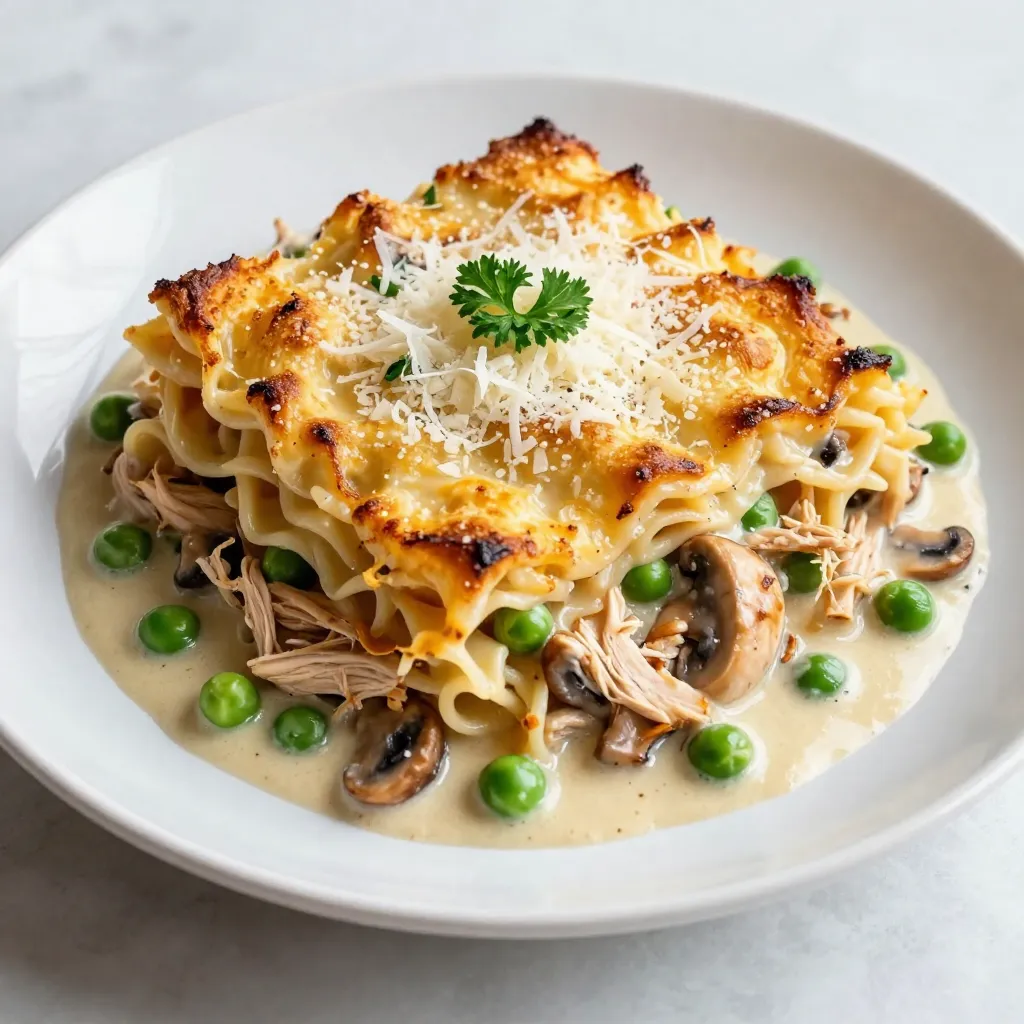
Looking for a warm, comforting dish that’s easy to make? Let me introduce you to Creamy Chicken Tetrazzini Bake! This

To make Soft Fudgy Hot Chocolate Cookies, here’s what you need: - 1 cup all-purpose flour - 1/2 cup unsweetened cocoa powder - 1/2 teaspoon baking soda - 1/4 teaspoon salt - 1/2 cup unsalted butter, softened - 1 cup brown sugar, packed - 1/2 cup granulated sugar - 1 large egg - 1 teaspoon pure vanilla extract - 1 cup chocolate chips - 1/2 cup mini marshmallows - Optional: Flaky sea salt for topping These simple ingredients make a rich, gooey treat. Each one plays a key role. The flour gives structure. Cocoa powder adds that deep chocolate flavor. Baking soda helps them rise, while salt enhances the sweetness. Using softened butter helps create a smooth dough. Brown sugar adds moisture and a hint of caramel. Granulated sugar adds sweetness and crunch. The egg binds everything together and adds richness. Vanilla extract gives a warm flavor. Chocolate chips and mini marshmallows bring gooey goodness to each bite. For an extra touch, flaky sea salt adds a burst of flavor that contrasts perfectly with the sweet chocolate. Gather these items before starting. You’ll be glad you did when these cookies come out warm and fudgy! {{ingredient_image_2}} - Preheat your oven to 350°F (175°C). - Line a baking sheet with parchment paper. This helps the cookies not stick. - In a medium bowl, sift together: - 1 cup all-purpose flour - 1/2 cup unsweetened cocoa powder - 1/2 teaspoon baking soda - 1/4 teaspoon salt - Set this mix aside to get an even blend. - In a large bowl, mix: - 1/2 cup unsalted butter, softened - 1 cup packed brown sugar - 1/2 cup granulated sugar - Use an electric mixer on medium speed. Beat for 3-4 minutes until it’s light and fluffy. - Add in: - 1 large egg - 1 teaspoon pure vanilla extract - Beat again until the mix is smooth and well blended. - Gradually add the dry mix to the wet mix. Stir gently until just combined. - Avoid overmixing; the dough should feel soft and sticky. - Carefully fold in: - 1 cup chocolate chips - 1/2 cup mini marshmallows - Make sure they are evenly spread throughout the dough for maximum gooeyness. - Use a cookie scoop or tablespoon to drop rounded dough onto the baking sheet. - Leave about 2 inches of space between each cookie. This allows room for spreading. - Bake the cookies for 10-12 minutes. The edges should be set, but the centers should stay soft and fudgy. - Let the cookies cool on the baking sheet for about 5 minutes before moving them to a wire rack. This helps them hold their shape. To get that soft, fudgy texture, timing is key. Bake the cookies for 10-12 minutes. The edges should be set, but the centers should look soft. They will continue to cook as they cool. Avoid overbaking. If you do, the cookies will turn dry instead of fudgy. Also, let the dough rest. This helps the flavors meld, and the cookies will taste even better. When you mix your wet and dry ingredients, do so gently. Overmixing creates tough cookies. The dough should feel soft and slightly sticky. Accurate measurements are vital for perfect cookies. Use a kitchen scale for best results. For flour, spoon it into a measuring cup and level it off with a knife. Don't scoop directly from the bag. This packs the flour and makes your cookies dense. For cocoa powder, do the same. Pack it lightly for a precise measurement. Similarly, when measuring brown sugar, pack it firmly into the cup. This ensures you use the right amount for that rich, sweet flavor. Serve these cookies warm for the best taste. Pair them with a glass of milk or a cozy cup of hot chocolate. The sweetness of the cookies contrasts perfectly with the drink. For a fun presentation, stack the cookies on a colorful plate. Drizzle some melted chocolate on top for an extra treat. If you want to impress guests, sprinkle flaky sea salt on top just before serving. It adds a delightful crunch and enhances the flavor. Pro Tips Chill the Dough: If your dough feels too soft to handle, chill it in the refrigerator for 30 minutes. This helps the cookies maintain their shape while baking. Use Fresh Ingredients: Ensure your baking powder and cocoa powder are fresh for the best taste and texture. Stale ingredients can affect the rise and flavor of your cookies. Don’t Overbake: For fudgy cookies, underbake them slightly. They will continue to firm up as they cool on the baking sheet, giving you that perfect soft center. Experiment with Mix-ins: Feel free to substitute chocolate chips with other mix-ins like chopped nuts or different flavored chips to customize your cookies to your liking. {{image_4}} You can change the flavor of these cookies to match your mood. Here are some ideas: - Add a teaspoon of instant coffee for a mocha twist. - Swap out the chocolate chips for butterscotch or peanut butter chips. - Mix in a handful of chopped nuts for a crunchy bite. - Use flavored extracts like almond or mint for a unique taste. Feel free to mix and match these flavors. Each tweak makes the cookies special and fun. If you want a lighter cookie, try these swaps: - Use whole wheat flour instead of all-purpose flour for added fiber. - Replace butter with coconut oil for a dairy-free option. - Use less sugar or try a natural sweetener like honey or maple syrup. - Substitute mini marshmallows with dried fruit for a chewy texture. These changes let you enjoy cookies without the extra guilt. Make these cookies festive for the holidays. Here are some fun ideas: - Add peppermint extract and crushed candy canes for a holiday minty flavor. - Decorate with red and green sprinkles for a festive look. - Use shaped cookie cutters to create holiday-themed cookies. - Replace marshmallows with holiday-themed chocolates for a seasonal twist. These variations will make your cookies a hit at any holiday gathering. To keep your soft fudgy hot chocolate cookies fresh, store them in an airtight container. This helps maintain their rich, moist texture. You can place a slice of bread in the container. The bread keeps the cookies soft longer. For best results, store them at room temperature. Avoid putting them in the fridge, as cold air can dry them out. You can freeze the dough or baked cookies. To freeze the dough, scoop it into balls and place them on a baking sheet. Freeze them for about 1 hour until firm. Once frozen, transfer the cookie balls to a freezer bag. Remove as much air as possible before sealing. For baked cookies, let them cool completely. Then, wrap each cookie in plastic wrap and place them in a freezer bag. They can last for up to three months in the freezer. These cookies stay fresh for about one week when stored properly at room temperature. If you freeze them, they can last up to three months and still taste amazing. Just remember to thaw them at room temperature before enjoying. This way, you keep the soft, fudgy goodness intact. Yes, you can! I often use semi-sweet or milk chocolate chips. You can also try dark chocolate for a richer taste. If you want a twist, mix in white chocolate chips. Each type of chocolate adds its own flavor. Experiment to find your favorite combo. You’ll know the cookies are done when the edges are set. The center should still look soft and fudgy. This means they will continue to bake as they cool. Aim for a baking time of 10 to 12 minutes. Keep an eye on them to avoid overbaking. Absolutely! You can prepare the dough a day ahead. Just chill it in the fridge until you’re ready to bake. This will keep your cookies fresh and tasty. You can also bake and store them. Just remember to keep them in an airtight container. To reheat cookies, use the microwave for about 10 seconds. This warms them up and keeps them soft. You can also use the oven. Preheat it to 350°F (175°C) and heat for 5 minutes. This method helps restore their fresh-baked texture. Baking cookies can be simple and fun. You learned about essential ingredients and clear steps. I shared tips for the perfect texture and fun variations. Storing cookies properly keeps them fresh longer. With these ideas, you can create tasty treats that everyone will love. Enjoy baking and sharing your new cookies, and let your creativity shine in the kitchen!

Soft Fudgy Hot Chocolate Cookies Delightful and Rich

If you adore rich, chocolatey treats, you’re in for a special delight! These Soft Fudgy Hot Chocolate Cookies promise to

- 2 cups cooked rice (white or brown) - 2 cups shredded cooked chicken - 1 can (10 oz) enchilada sauce Chicken is the star of this dish. I use shredded cooked chicken, which makes prep easy. You can use leftover rotisserie chicken or cook your own. Rice is the base of the casserole. It absorbs all the great flavors. You can choose white or brown rice based on your taste. The enchilada sauce brings the heat and flavor. You can pick mild or spicy, depending on your family’s preference. - 1 can (15 oz) black beans, rinsed and drained - 1 cup corn kernels (fresh, canned, or frozen) - 1 cup diced tomatoes (with their juice) - 1 bell pepper (any color), diced - 1 teaspoon ground cumin - 1 teaspoon paprika - 1 cup shredded cheddar cheese - 1 cup shredded Monterey Jack cheese - Salt and pepper to taste - 1 tablespoon olive oil I like to add black beans for protein and fiber. Corn adds a sweet crunch. Diced tomatoes give moisture and flavor. Bell peppers add color and taste. I always use cumin and paprika for a warm flavor. Both cheeses melt nicely, creating a gooey topping. Don’t forget to season with salt and pepper! - Fresh cilantro - Sour cream For garnishes, fresh cilantro adds a burst of color and flavor. It gives a fresh taste that brightens the dish. A dollop of sour cream serves as a cool contrast to the spices. It also adds creaminess that everyone loves. {{ingredient_image_2}} - Preheating the oven Start by preheating your oven to 350°F (175°C). This step is key to getting that perfect bake for your casserole. - Sautéing the vegetables In a large skillet, heat 1 tablespoon of olive oil over medium heat. Add 1 diced bell pepper and sauté for about 5 minutes. You want it soft and slightly see-through. - Mixing the sautéed mixture with rice Next, add 2 cups of shredded cooked chicken, 1 can of black beans, 1 cup of corn, and 1 cup of diced tomatoes with their juice to the skillet. Stir it together with 1 teaspoon ground cumin and 1 teaspoon paprika. Season with salt and pepper. Cook for an extra 3 to 4 minutes until it’s all warm and mixed well. Then, in a large bowl, combine this mixture with 2 cups of cooked rice and half of the enchilada sauce. Mix until everything is well blended. - Preparing the baking dish Grease a 9x13-inch baking dish with cooking spray or a little olive oil. Transfer the rice and chicken blend into the dish, spreading it evenly. - Pouring sauce and topping with cheese Pour the remaining enchilada sauce over the top of your casserole. Make sure it covers everything. Then, sprinkle 1 cup of shredded cheddar cheese and 1 cup of shredded Monterey Jack cheese evenly over the top. - Baking time and temperature Place your casserole in the preheated oven. Bake for 25 to 30 minutes. Look for the cheese to be melted, bubbly, and lightly golden. Once done, take it out and let it cool for about 5 minutes before serving. This lets the flavors settle and keeps you from burning your mouth! To get the best texture, use cooked rice. This can be white or brown. If you want fluffy rice, rinse it before cooking. This helps remove excess starch. For even cooking, mix the ingredients well. When you combine the sautéed mixture with the rice, stir until everything is coated. This ensures all flavors blend nicely. To add more spices, try chili powder or oregano. These spices can give the dish a nice kick. You can adjust the amount based on your taste. For extra toppings, consider sliced olives or diced avocado. These add freshness and texture. You can also use jalapeños for some heat. Don't forget to sprinkle fresh cilantro on top for a burst of color and flavor! Pro Tips Use Leftover Chicken: This recipe is perfect for using up leftover rotisserie chicken or any cooked chicken you have on hand, saving you time and effort. Customize Your Heat: Adjust the spiciness of your enchilada casserole by choosing a milder or spicier enchilada sauce and adding jalapeños if you like extra heat. Mix Your Cheeses: For a more complex flavor, try mixing different types of cheese, such as pepper jack or queso blanco, with the cheddar and Monterey Jack. Let It Rest: Allow the casserole to rest for a few minutes after baking. This helps the layers set and makes serving easier. {{image_4}} - Using different proteins: You can switch chicken for beef, turkey, or even shrimp. Tofu is a great plant-based choice too. Each protein brings its own taste. So feel free to mix things up! - Alternative vegetables: Add your favorite veggies. Zucchini, mushrooms, or spinach work well. They add color and nutrients. You can even toss in some jalapeños for a spicy kick! - Gluten-free options: This casserole is easy to make gluten-free. Just check the enchilada sauce for gluten. Most brands are safe, but always read labels. Use gluten-free rice to keep it safe for all. - Vegetarian adaptations: Replace chicken with more beans or lentils. You can use extra veggies or a meat substitute. This keeps the dish hearty and filling without meat. - Pairing with sides: This casserole pairs nicely with a fresh salad or tortilla chips. You can serve it with guacamole or salsa for extra flavor. These sides add crunch and brightness. - Adjusting portion sizes: This dish serves 6-8, but you can easily scale it. If you need smaller portions, use a smaller dish. You can also freeze leftovers for later. Just reheat for a quick meal! To keep your Chicken Enchilada Rice Casserole fresh, store it properly. First, let the casserole cool down to room temperature. Then, transfer it to an airtight container. You can keep it in the fridge for up to four days. If you want to store it longer, freezing is a great option. For freezing, place the casserole in a freezer-safe container. It can stay frozen for up to three months. Make sure to label the container with the date. This will help you keep track of how long it has been in the freezer. When it's time to enjoy your leftovers, you have two great options: the oven or the microwave. Using the oven is often best for reheating casseroles. Preheat your oven to 350°F (175°C). Place the casserole in a baking dish and cover it with foil. Bake for about 20-25 minutes until it's heated through. This method helps keep the cheese melty and the dish moist. If you're short on time, the microwave works too. Put a portion on a microwave-safe plate. Heat it in short bursts, about 1-2 minutes at a time. Stir between intervals to ensure even heating. To maintain the flavor and texture, cover the dish with a microwave-safe lid or wrap. This keeps moisture in and prevents it from drying out. Can I prepare this casserole in advance? Yes, you can prepare this casserole ahead of time. Make it, then cover it and store it in the fridge for up to 24 hours. When ready to bake, just pop it in the oven. You may need to add a few minutes to the baking time if it is cold. How can I make this dish spicier? To add spice, use a spicy enchilada sauce instead of mild. You can also add fresh chopped jalapeños or a pinch of cayenne pepper. Try adding some crushed red pepper flakes for a little kick. Caloric content and serving sizes This casserole serves about 6-8 people. Each serving has around 350-400 calories, depending on the cheese you use and any added toppings. Key nutritional benefits This dish offers protein from the chicken and beans. It also has fiber from the beans and corn. The tomatoes and peppers add vitamins, making this meal both tasty and nutritious. How to modify for various serving sizes If you need more or fewer servings, simply adjust the ingredients. For 4 servings, use 1.5 cups of rice and 1 cup of chicken. For 10 servings, double all ingredients. Tips for meal prep and batch cooking This recipe is great for meal prep. Make a large batch and portion it into containers for lunch or dinner. You can freeze any leftovers for quick meals later. Just reheat and enjoy! This blog post detailed how to make a tasty casserole. We covered main ingredients, like chicken and rice, plus beans and cheese. After outlining easy preparation steps, we shared baking tips for perfect results. We explored variations for different diets and storage tips for leftovers. Casseroles are versatile and great for any meal. Feel free to get creative with flavors and ingredients. Remember, the right spices can elevate any dish. Enjoy cooking and share this recipe with others!

Chicken Enchilada Rice Casserole Flavorful Family Dish

Looking for a dish that’s both tasty and easy? This Chicken Enchilada Rice Casserole is just what you need! Packed

For a hearty one-pot beef stew, gather these key ingredients: - 2 pounds beef chuck, cut into 1-inch cubes - 3 tablespoons extra virgin olive oil - 1 large onion, finely chopped - 3 garlic cloves, minced - 4 medium carrots, peeled and sliced into rounds - 3 medium potatoes, peeled and diced - 2 cups rich beef broth - 1 teaspoon dried thyme - 1 teaspoon dried rosemary - 2 bay leaves - 1 cup frozen green peas - Salt and freshly ground black pepper, to taste - Fresh parsley, chopped (for garnish) - Beef Chuck: This cut is great for stews because it becomes tender. You can use brisket or round as a substitute. - Olive Oil: Use any cooking oil you prefer, like canola or vegetable oil, if you run out. - Onion and Garlic: Fresh is best, but you can use onion powder and garlic powder in a pinch. - Carrots and Potatoes: Feel free to swap in parsnips or sweet potatoes for a twist. - Herbs: Fresh herbs can enhance flavor if you have them. Use about three times the amount of fresh compared to dried. - Frozen Peas: You can replace them with fresh peas or other green veggies like green beans or corn. When picking beef for stew, choose cuts that have some fat and connective tissue. This fat adds flavor, and the connective tissue breaks down during cooking. - Look for marbling: Fat specks within the meat help keep it juicy. - Check the color: The beef should be a bright red hue. Avoid any gray or brown spots. - Ask your butcher: They can recommend the best cuts for stewing. With these tips, your one-pot beef stew will be rich, tasty, and comforting! {{ingredient_image_2}} To start, heat 3 tablespoons of olive oil in a large pot over medium-high heat. When the oil shimmers, it is ready for the beef. Cut 2 pounds of beef chuck into 1-inch cubes. Season the beef with salt and black pepper. Add the beef in batches to the hot pot. This helps it brown well. Sear each side for 6 to 8 minutes until it's a nice brown color. Once browned, take the beef out and set it aside on a plate. Next, add the finely chopped onion to the same pot. Sauté it for about 3 to 4 minutes. Stir often until the onion is soft and clear. After that, add 3 minced garlic cloves. Cook for another minute until you smell the garlic. Then, add 4 sliced carrots and 3 diced potatoes. Stir everything well and let it cook for 4 to 5 minutes. This softens the veggies and builds flavor. Now, return the seared beef to the pot. Add any juices from the plate too. Pour in 2 cups of rich beef broth, covering all the ingredients. Stir in 1 teaspoon each of dried thyme and rosemary, plus 2 bay leaves. Bring the stew to a gentle simmer. Once it's simmering, lower the heat and cover the pot. Let it simmer for 1.5 to 2 hours. Stir occasionally to mix the flavors. About 10 minutes before serving, add 1 cup of frozen green peas. Taste the stew and adjust the salt and pepper as needed. Before serving, take out the bay leaves. Enjoy your hearty meal! To make the best one-pot beef stew, follow these tips: - Sear the beef well: Searing adds flavor. Brown the beef in batches to keep it juicy. - Use fresh herbs: Fresh thyme and rosemary bring great taste. If possible, use them instead of dried. - Add veggies in stages: This helps them cook perfectly. Start with onions, then add carrots and potatoes. - Simmer gently: Keep the heat low and cover the pot. This makes the beef tender and juicy. - Taste as you go: Always check for seasoning. Adjust salt and pepper before serving. Avoid these common mistakes to ensure success: - Overcrowding the pot: Too much beef at once won’t brown. Cook in smaller batches. - Skipping the browning step: Don’t rush to add everything at once. Browning is key for flavor. - Not simmering long enough: Stew needs time for flavors to blend. Aim for at least 1.5 hours. - Ignoring bay leaves: These add depth. Remember to remove them before serving. - Under-seasoning: Don’t forget to taste and adjust. A little salt goes a long way. Enjoy your beef stew with these serving ideas: - Serve in rustic bowls: This adds charm to your meal. - Garnish with parsley: A sprinkle of fresh parsley brightens the dish. - Pair with crusty bread: Bread is perfect for soaking up the stew's rich broth. - Add a side salad: A fresh salad complements the hearty stew nicely. - Try with a glass of red wine: A full-bodied red wine enhances the meal experience. These tips and tricks will help you create a warm and comforting one-pot beef stew that everyone will love. Pro Tips Brown the Beef: For a deeper flavor, make sure to thoroughly brown the beef cubes on all sides. This caramelization adds richness to the stew. Use Quality Broth: The base of your stew is crucial. Opt for a high-quality beef broth or homemade stock for the best flavor. Let it Simmer: Patience is key! Allow the stew to simmer slowly for at least 1.5 to 2 hours to ensure the beef becomes tender and the flavors meld beautifully. Adjust Seasoning: Before serving, taste the stew and adjust the seasoning to your liking. A little extra salt or pepper can enhance the overall flavor profile. {{image_4}} You can make this beef stew in a slow cooker. Just follow these steps: 1. Sear the beef in a pan first. This helps add flavor. 2. Place the beef in the slow cooker. 3. Add all the veggies and broth. 4. Season with thyme, rosemary, and bay leaves. 5. Set it on low for 6 to 8 hours or high for about 4 hours. This method makes it easy, and your stew will still taste great! Feel free to change the meat! Chicken or pork can work well. Here’s how: - Chicken: Use boneless thighs for juicy results. Cook until the chicken is tender. - Pork: Pork shoulder is a good choice. Cut it into cubes just like the beef. Both options will create a hearty stew with a different flavor. You can make a vegetarian or vegan stew by swapping the meat. Here’s what to do: - Replace beef with hearty mushrooms or chickpeas for protein. - Use vegetable broth instead of beef broth. - Add more veggies like bell peppers or zucchini for texture. This way, you can enjoy a hearty meal that fits your diet! After enjoying your beef stew, allow it to cool. Store leftovers in an airtight container. Keep it in the fridge for up to three days. Make sure to label the container with the date. This helps you keep track of freshness. To freeze beef stew, use freezer-safe containers. Leave some space at the top, as liquids expand when frozen. You can freeze it for up to three months. For best quality, consume it sooner. Consider portioning it into smaller containers for easy meals later. When reheating, bring the stew to a gentle simmer on the stove. Stir it occasionally to ensure even heating. If it seems too thick, add a splash of broth or water. You can also use the microwave: heat it in a microwave-safe bowl. Cover it with a lid or wrap to keep moisture in. Heat in short bursts, stirring in between. Enjoy your hearty meal again just like the first time! The best cut of beef for stew is beef chuck. This cut has a lot of flavor and becomes very tender when cooked slow. It has enough fat to keep the meat juicy. Other good cuts include brisket and round. They also work well in stews, but chuck is my top pick. Cooking beef stew takes about 1.5 to 2 hours. This time lets the meat become tender and soak up flavors. You simmer the stew gently on low heat. Stir it occasionally to mix the flavors. The longer it cooks, the more tasty it becomes. So, patience is key! Yes, you can make one-pot beef stew ahead of time. It tastes even better the next day! Just let the stew cool before you put it in the fridge. When you’re ready to eat, heat it on the stove until warm. This makes it a great meal for busy days! In this blog post, we explored making a tasty one-pot beef stew. You learned about essential ingredients and helpful tips. I shared step-by-step instructions for perfect beef and veggies. We covered cooking tips, common mistakes, and serving ideas. You also discovered variations, storage methods, and answered key FAQs. Making stew is fun and rewarding. Enjoy your cooking adventure and share your results!

One-Pot Beef Stew Hearty and Comforting Meal

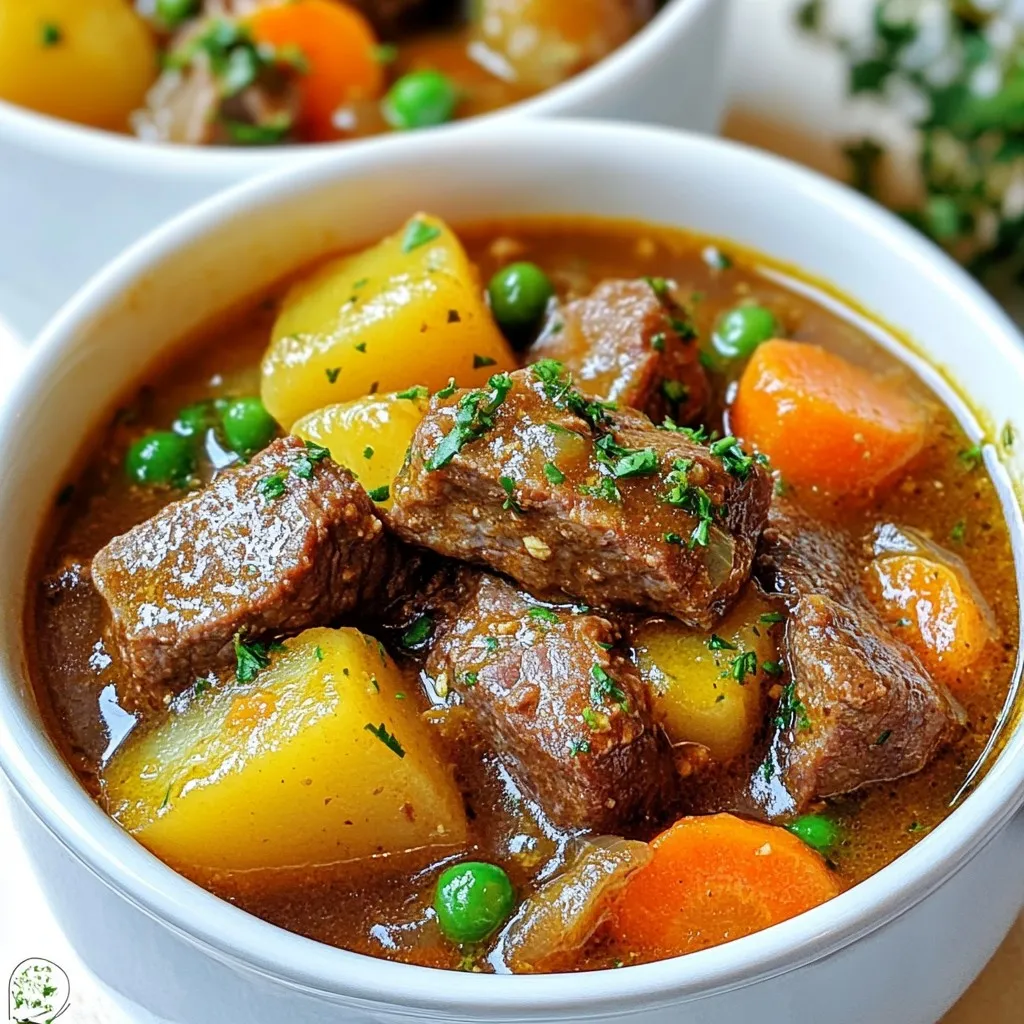
Warm up your kitchen with my One-Pot Beef Stew recipe, a true comfort classic! I’ll guide you through easy steps

- 1 whole chicken (3-4 lbs) - 2 tablespoons extra virgin olive oil - 2 tablespoons fresh rosemary, finely chopped - 1 tablespoon fresh thyme, finely chopped - 1 tablespoon fresh garlic, minced - 1 teaspoon fresh lemon zest - Sea salt and freshly ground black pepper to taste - 8 oz button mushrooms, cleaned and sliced - 1 cup heavy cream - 1/2 cup low-sodium chicken broth - 2 tablespoons fresh parsley, chopped (for garnish) To make Herb Roasted Chicken with Creamy Mushrooms, you need fresh and good-quality ingredients. A whole chicken between 3 to 4 pounds works best. Use fresh herbs for the best flavor. I love using rosemary and thyme, along with garlic and lemon zest to add a bright taste. For the creamy sauce, button mushrooms are perfect. They soak up flavor well and add a nice texture. Heavy cream and chicken broth make the sauce rich and smooth. Don't forget olive oil, sea salt, and black pepper to season everything just right. Finally, fresh parsley not only looks great but adds a fresh touch to the dish. Gather these ingredients, and you're ready to create a delicious meal that everyone will love! {{ingredient_image_2}} 1. Preheat your oven to 425°F (220°C). This helps the chicken get crispy skin. 2. In a bowl, mix olive oil, rosemary, thyme, garlic, lemon zest, sea salt, and pepper. This makes a tasty herb paste. 3. Gently loosen the skin of the chicken with your fingers. Be careful not to tear it. 4. Rub the herb paste all over the chicken and under the skin for flavor. 5. Place the chicken, breast-side up, on a roasting rack in a pan. Roast for 1 hour to 1 hour 15 minutes. The chicken is done when it reaches 165°F (75°C) and the skin is golden brown. 1. While the chicken cooks, heat some olive oil in a skillet over medium heat. 2. Add the sliced mushrooms and sauté them until tender and caramelized, about 5-7 minutes. Stir them often for even cooking. 3. Pour in low-sodium chicken broth and let it simmer for 2-3 minutes. Scrape the tasty bits off the skillet. 4. Lower the heat and stir in heavy cream. Cook for 3-5 minutes until the sauce thickens. Season with salt and pepper to taste. 1. After cooking, let the chicken rest for 10 minutes. This helps keep it juicy. 2. Carve the chicken into pieces and place them on a serving platter. 3. Spoon the creamy mushroom sauce over the chicken. 4. Finish with a sprinkle of fresh parsley for color. This simple process lets you create a lovely meal full of flavor. Enjoy every bite! A high roasting temperature is key to crispy skin. Preheat your oven to 425°F (220°C). This helps the skin crisp up nicely. To improve texture, loosen the skin gently with your fingers. Rub the herb paste directly under the skin. This adds flavor and helps with browning. You can use different herbs to change the taste. Try thyme, sage, or even oregano. Each herb adds a unique twist. For sides, roasted vegetables or a fresh salad pair well. They balance the meal and add color to your plate. For the perfect sauce thickness, let it simmer for a few minutes. Stir as it cooks to prevent sticking. If you want a lighter sauce, consider using half-and-half or coconut milk. Both options maintain creaminess while cutting down on fat. Pro Tips Use a Meat Thermometer: For perfectly cooked chicken, insert a meat thermometer into the thickest part of the thigh, avoiding the bone. This ensures it reaches the safe internal temperature of 165°F (75°C). Resting is Key: Allow the chicken to rest for at least 10 minutes after roasting. This helps the juices redistribute, resulting in a juicier and more flavorful dish. Enhance the Mushroom Flavor: For an extra depth of flavor in the creamy mushroom sauce, consider adding a splash of white wine after sautéing the mushrooms before adding the chicken broth. Herb Variations: Feel free to experiment with different herbs such as sage or tarragon for a unique flavor profile. Fresh herbs can significantly enhance the overall taste of the dish. {{image_4}} You can easily switch herbs in this recipe. Try thyme or sage for a new taste. These herbs bring their own unique flavors. You can also mix in spices like paprika or cumin. They add warmth and depth to the dish. Experimenting with herbs lets you customize the chicken to your liking. Different mushrooms can change the sauce's flavor. Use shiitake, cremini, or portobello for richer tastes. Each type adds its own twist to the creamy sauce. You can also add vegetables like spinach or peas. This makes the sauce heartier and more colorful. Roasting gives the chicken a crispy skin. Grilling adds a smoky flavor and keeps it juicy. If you want a hands-off method, use an Instant Pot or slow cooker. These methods still yield tender chicken. Adjust cooking times based on your method to ensure juicy results. After enjoying your herb roasted chicken with creamy mushrooms, let it cool down. Place the leftovers in an airtight container. You can store it in the fridge for 3 to 4 days. If you want to keep it longer, freezing is a great option. Wrap the chicken tightly in plastic wrap or foil before placing it in a freezer-safe bag. The frozen chicken will last for about 3 months. For the creamy mushrooms, store them separately. They can also stay in the fridge for 3 to 4 days or freeze for up to 2 months. To reheat the chicken, preheat your oven to 350°F (175°C). Place the chicken in a baking dish. Cover it with foil to keep it moist. Heat for about 20-25 minutes or until warm. For the creamy mushroom sauce, heat it in a pan over low heat. Stir often to avoid burning. If the sauce is too thick, add a splash of chicken broth or cream to loosen it. This way, you’ll keep all the flavor and texture of the dish. The chicken takes about 1 hour to 1 hour 15 minutes to cook. For safety, the internal temperature must reach 165°F (75°C). Cooking time varies based on the chicken's weight. A 3-4 lb chicken cooks in this range. Always use a meat thermometer for best results. Yes, you can prepare parts of this recipe ahead. You can make the herb paste and store it in the fridge. You can also cook the mushrooms and sauce, then refrigerate them. When ready to serve, reheat the chicken and sauce in the oven. Many sides go well with Herb Roasted Chicken. Here are some popular options: - Roasted seasonal vegetables like carrots or Brussels sprouts - Creamy mashed potatoes or garlic mashed cauliflower - A fresh side salad with greens and vinaigrette These sides balance the dish and enhance its flavors. You learned how to create a delicious and hearty dish with herb roasted chicken and creamy mushroom sauce. We covered the main ingredients, step-by-step preparation, and useful tips. You can customize the recipe with different herbs and cooking methods. Store leftovers properly to enjoy later. This meal is not just tasty; it’s also special for family gatherings. With these insights, you’ll impress your guests and make every bite count. Get ready to cook and enjoy!

Herb Roasted Chicken with Creamy Mushrooms Delight

Welcome to my kitchen, where flavor meets comfort! Today, I’m sharing my favorite dish: Herb Roasted Chicken with Creamy Mushrooms.

- 12 oz white chocolate chips - 12 oz dark chocolate chips - 1 teaspoon peppermint extract - 1/2 cup crushed peppermint candies - A pinch of sea salt (optional) To make easy peppermint bark, gather these basic ingredients. You need two types of chocolate: white and dark. The white chocolate gives a creamy base, while dark chocolate adds depth. The peppermint extract gives a fresh burst of flavor. Crushed peppermint candies add a nice crunch and festive color. You can use candy canes or any peppermint candy. The optional sea salt can enhance the taste. It gives a nice contrast to the sweetness. With these ingredients, you create a delightful treat. Each piece has layers of flavor and texture. It's the perfect holiday snack or gift! {{ingredient_image_2}} Start by lining a baking sheet with parchment paper. Make sure the paper is smooth and covers the whole sheet. This helps the bark come off easily when it’s done. A clean and organized space makes cooking more fun. To melt the dark chocolate, use a microwave-safe bowl. Add the dark chocolate chips to the bowl. Microwave them in 30-second bursts. Stir after each burst to check the melt. It should take about 1-2 minutes total. You want the chocolate to be smooth and shiny. Pour the melted dark chocolate onto the lined baking sheet. Use a spatula to spread it evenly, aim for a 1/4 inch thick layer. After spreading, chill it in the fridge for 10-15 minutes until it hardens. Next, melt the white chocolate the same way. Once it’s smooth, mix in the peppermint extract for that minty flavor. After the dark chocolate sets, pour the white chocolate over it. Quickly spread it out to cover the dark layer. Before it sets, sprinkle the crushed peppermint candies on top. Press them lightly so they stick. For an extra touch, you can sprinkle a pinch of sea salt on top. This adds a nice contrast to the sweetness! For great peppermint bark, your chocolate must melt well. Here are some tips: - Use the right bowl: Always choose a microwave-safe bowl. Glass or ceramic works best. - Stir often: Melt chocolate in 30-second bursts. Stir in between to keep it smooth. - Watch the time: Ideally, it takes 1-2 minutes to melt chocolate. Seizing chocolate can ruin your bark. To avoid this: - Keep water away: Even a drop can cause chocolate to seize. - Avoid overheating: If chocolate gets too hot, it will clump. Using real peppermint makes a big difference. Fresh peppermint gives a bright taste. If you use extract, stick to one teaspoon. It’s strong! For extra flavor, consider these ideas: - Add a pinch of cinnamon: It adds warmth to your bark. - Mix in nuts: Chopped pecans or almonds can add crunch. - Try different extracts: Vanilla or orange can change the taste. Experiment with these tips and make your peppermint bark special! Pro Tips Choose Quality Chocolate: Use high-quality chocolate chips for the best flavor and texture. Look for brands with a high cocoa content for rich taste. Keep It Cool: Ensure your workspace is cool to prevent the chocolate from melting too quickly while spreading. This will help maintain clean layers. Crush Peppermints Evenly: Use a zip-top bag and a rolling pin to crush peppermint candies into uniform pieces, ensuring they distribute evenly over the bark. Store Properly: Keep the peppermint bark in an airtight container at room temperature or in the refrigerator, depending on your preference for firmness. {{image_4}} You can switch up the chocolate in your peppermint bark. Instead of dark chocolate, try using milk chocolate or semi-sweet chocolate. Milk chocolate gives a creamier taste. Semi-sweet chocolate offers a rich, balanced flavor. Both options mix well with the peppermint flavor. If you prefer a lighter touch, consider white chocolate alternatives. You can use vanilla-flavored chocolate or even yogurt-covered chips. These alternatives add a fun twist and still taste great with peppermint. Experiment with these combinations to find your favorite mix! To make your peppermint bark more unique, add different flavor extracts. Vanilla extract pairs well with both dark and white chocolate. Just a few drops can enhance the overall taste. You could also try almond extract for a nutty twist. Incorporating nuts or dried fruits can add texture and flavor. Chopped almonds or walnuts give a nice crunch. Dried cranberries or cherries add a sweet touch. Mix and match these add-ins to create your own special version! To keep your peppermint bark fresh, use airtight containers. Glass or plastic containers work well. Make sure the bark is completely cool before sealing it. This keeps moisture out and helps it stay crisp. You can store peppermint bark at room temperature for up to two weeks. If you want it to last longer, keep it in the fridge for about a month. Just remember to let it warm up a bit before serving. This will help the chocolate regain its smooth texture. For a festive touch, serve your peppermint bark on a pretty platter. You can also cut it into fun shapes. Place it in decorative bags tied with ribbon for gifts. This makes a delightful treat for friends and family. If you want to impress guests, try adding a sprinkle of crushed peppermint on top. It adds color and texture. For an extra special touch, pair it with hot cocoa or coffee. This creates a cozy holiday vibe that everyone will love. You can make peppermint bark without chocolate by using yogurt or white candy melts. These alternatives provide a sweet base. Simply melt your choice of yogurt or candy melts and spread it on parchment. Add crushed peppermint candies before it sets. This method keeps the fun and flavor intact. Yes, almond bark works great as a substitute. It melts well and has a nice snap when set. Just melt it the same way you melt chocolate chips. Use almond bark in either dark or white flavors to suit your taste. The best way to cut peppermint bark is to use a sharp knife or break it by hand. If you want neat pieces, score the bark with a knife before it fully sets. This makes it easier to break into smaller pieces once hardened. Homemade peppermint bark lasts about two weeks if stored properly. Keep it in an airtight container at room temperature. If you live in a warm area, store it in the fridge to prevent melting. You now know how to make easy peppermint bark. With simple ingredients, step-by-step instructions, and fun tips, you can create a tasty treat. Remember, you can customize it with different chocolates or flavors. Store your bark well to keep it fresh. Enjoy sharing this sweet creation at parties or as gifts. Happy baking, and have fun experimenting!

Easy Peppermint Bark Simple and Fun Holiday Treat

Looking for a holiday treat that’s both simple and fun to make? Easy Peppermint Bark is perfect! With just a

- Chicken and Marinade Components - 2 large chicken breasts - 2 tablespoons extra virgin olive oil - 1 teaspoon dried oregano - 1 teaspoon garlic powder - Sea salt and freshly cracked pepper, to taste To make your chicken flavorful, start with a simple marinade. Mix the olive oil, oregano, garlic powder, salt, and pepper in a bowl. This mix helps the chicken soak up great flavors. - Quinoa and Broth Details - 1 cup quinoa, thoroughly rinsed - 2 cups chicken broth (or water for a lighter option) Quinoa is a wonderful base for these bowls. Rinse it well to remove bitterness. Use chicken broth for a richer taste, or water for a lighter option. - Veggies, Cheese, and Seasonings - 1 medium cucumber, diced into small cubes - 1 cup cherry tomatoes, halved for a burst of flavor - 1/2 red onion, finely diced - 1 cup feta cheese, crumbled for creaminess - 1/2 cup kalamata olives, pitted and halved for a salty kick - Juice of 1 fresh lemon for brightness - Fresh parsley, chopped finely for garnishing Fresh veggies bring color and crunch to your bowls. Feta cheese adds creaminess, while olives give a salty punch. The lemon juice brightens the dish and balances the flavors. Finally, parsley adds a nice touch of freshness. This combination of ingredients makes a tasty and healthy meal prep option. You can easily mix and match based on your preferences! {{ingredient_image_2}} - Preparing the Marinade: In a bowl, mix 2 tablespoons of olive oil, 1 teaspoon of dried oregano, 1 teaspoon of garlic powder, sea salt, and pepper. This mix gives great flavor to the chicken. - Proper Marination Techniques: Add the chicken breasts to the bowl. Make sure they are fully coated. Let them marinate for at least 30 minutes. For more flavor, cover and refrigerate them overnight. - Boiling and Simmering Steps: In a medium pot, bring 2 cups of chicken broth or water to a boil. Add 1 cup of rinsed quinoa and stir. Cover the pot and lower the heat. - Fluffing and Cooling Tips: Let it simmer for about 15 minutes. Once all the liquid is gone, fluff the quinoa with a fork. Set it aside to cool. - Grill/Skillet Preheating: Preheat your grill or skillet to medium-high heat. This step is key for good chicken. - Cooking Times and Temperature Check: Cook the marinated chicken for about 6-7 minutes on each side. Check that it reaches an internal temperature of 165°F. Let it rest for 5 minutes before slicing. - Chopping and Mixing Ingredients: In a large bowl, mix diced cucumber, halved cherry tomatoes, diced red onion, crumbled feta cheese, and halved kalamata olives. - Dressing and Flavor Integration: Squeeze the juice of one lemon over the salad mix. Stir gently to blend all the flavors. - Portioning Techniques: Divide the cooled quinoa among meal prep containers. It helps to use a measuring cup for even portions. - Presentation Suggestions: Top each quinoa portion with sliced chicken. Add a generous scoop of salad on the side. Finish with fresh parsley for a colorful touch. - Cooling the Bowls Properly: Let the meal prep bowls cool completely before sealing them. This helps prevent moisture buildup. - Refrigeration Guidelines: Store in the fridge for up to 4 days. This makes for easy, tasty meals throughout the week. Best Practices for Quick Cooking To save time, prep all your ingredients before cooking. Chop veggies and measure spices first. This helps keep the process smooth. Cook the quinoa while marinating the chicken. This way, both can finish around the same time. Tools to Simplify Preparation Use a sharp knife for quick chopping. A good cutting board helps too. A reliable pot for quinoa is key. If you have one, use a grill pan for the chicken. This makes it easy to cook and adds great flavor. Additional Seasoning Suggestions For more flavor, try adding lemon zest or smoked paprika. These add a nice kick to the chicken. You can also sprinkle some red pepper flakes for heat. Don’t be shy to adjust seasonings to your taste. Marination Time for Best Results Marinate the chicken for at least 30 minutes. If you can, let it sit overnight. This gives the chicken a deep, rich flavor. Remember, the longer it marinates, the better it tastes! Pairing Ideas and Side Dishes These meal prep bowls go well with pita bread or hummus. You can add a side of tzatziki for a creamy touch. For a fresh crunch, serve with a side of mixed greens. Creative Serving Techniques Layer the salad on top of the quinoa and chicken for a colorful look. You can also serve each component in separate containers. This keeps everything fresh and crunchy until you’re ready to eat. Pro Tips Marinate Longer for Flavor: For the best flavor, marinate the chicken overnight. This allows the spices to penetrate the meat, resulting in a juicier and more flavorful dish. Quinoa Rinsing is Key: Always rinse your quinoa before cooking. This removes the natural coating called saponin, which can impart a bitter taste to your dish. Rest the Chicken: After cooking, let the chicken rest for at least 5 minutes. This helps the juices redistribute, ensuring the meat stays moist and tender when sliced. Customize Your Salad: Feel free to add other Mediterranean ingredients like bell peppers, artichokes, or chickpeas to the salad for extra flavor and nutrition. {{image_4}} Alternatives to Chicken If you want a change, use turkey breast. It cooks like chicken and has a similar taste. You can also try shrimp or fish. Both add a fresh twist to your bowls. Plant-Based Options For a vegan twist, use tofu or tempeh. They soak up marinades well. You can also use chickpeas for protein. They add a nice crunch and flavor. Different Types of Grains to Use Quinoa is great, but you can swap it out. Try brown rice for a hearty base. Farro adds a nutty taste. Bulgur wheat is quick to cook, too. Low-Carb Alternatives For a lighter option, use cauliflower rice. It’s low in carbs and full of flavor. Zucchini noodles are another great choice. They add a unique texture. Customizing Dressing or Marinades You can change the flavor of your bowls easily. Use different herbs like basil or dill. A dash of balsamic vinegar adds a sweet touch. Experiment with spices for a kick. Seasonal Ingredient Swaps Use veggies that are in season. Spring peas add sweetness in summer. In fall, you can use roasted butternut squash. These swaps keep your meals fresh and fun. To keep your Greek chicken meal prep bowls fresh, store them in airtight containers. Use glass or BPA-free plastic containers to avoid any unwanted flavors. Make sure the food cools down before sealing. This helps prevent condensation, which can make your food soggy. For reheating, the microwave works well. Heat in 30-second intervals until warm. Stir between intervals to ensure even heating. If you want to maintain texture, try using an oven. Preheat it to 350°F and heat the bowls for about 10-15 minutes. This method keeps the chicken juicy and the quinoa fluffy. For long-term storage, you can freeze the meal prep bowls. Pack them in freezer-safe containers, leaving some space for expansion. They can last up to three months in the freezer. When ready to eat, thaw them overnight in the fridge. Reheat as mentioned before, and your meal will taste fresh and delicious. Yes, you can make these bowls in advance. I recommend prepping them on Sunday for the week ahead. This way, you can enjoy healthy meals without daily cooking. Prepare the chicken and quinoa first. Then, chop the veggies. You can store everything in the fridge for up to four days. These meal prep bowls last in the fridge for about four days. Store them in airtight containers to keep them fresh. Always check for any signs of spoilage before eating. If you notice any off smells or changes in texture, it's best to discard it. If you want to swap quinoa, try brown rice or farro. Both grains are healthy and tasty. You can also use couscous or barley. These options add different textures and flavors to your meal prep bowls. Yes, you can use frozen chicken. Just make sure to thaw it completely before marinating. This helps the marinade soak in better. You can thaw chicken in the fridge overnight or use the microwave. Once thawed, follow the marinating steps as usual. Adding more veggies is easy! Try bell peppers, zucchini, or spinach. You can also toss in some roasted broccoli or snap peas. Get creative with seasonal veggies to keep things fresh and exciting. Mix and match to find your favorite combinations! This blog post covered the process of making Greek chicken meal prep bowls. We discussed key ingredients, including chicken, quinoa, veggies, and seasonings. I detailed steps for marinating, cooking, and grilling. You also learned how to assemble and store your meals efficiently. In closing, enjoy the freedom to customize these bowls. Use different proteins, grains, and flavors. Meal prep can be simple. Plan your week and eat well. Get creative and make it fun!

Greek Chicken Meal Prep Bowls Simple and Tasty Recipe

Are you ready to take your meal prep to the next level? My Greek Chicken Meal Prep Bowls are not

Older posts
Newer posts
← Previous Page1 … Page105 Page106 Page107 … Page115 Next →

dsad

© 2025 recipesstation • Built with GeneratePress

Our Policies

  • Copyright Policy
  • Cookie Policy
  • GDPR Policy
  • Privacy Policy
  • Disclaimer
  • Terms Of Use

More Information

  • Home
  • About
  • Contact
  • Appetizers
  • Dessert
  • Dinner
  • Drinks
©2025, recipesstation About Back To Top