Skip to content
DisclaimerTerms Of UseGDPR PolicyCookie Policy

recipesstation

  • Home
  • Drinks
  • Appetizers
  • Dinner
  • Dessert
  • About
  • Contact
  • Privacy Policy
DisclaimerTerms Of UseGDPR PolicyCookie Policy

Emily

To make this dish, you need a few key items. Here’s what you will need: - 2 boneless, skinless chicken breasts - 8 ounces spaghetti - 1 tablespoon olive oil - 1 small onion, finely diced - 2 cloves garlic, minced - 1 bell pepper (red or green), diced - 1 can (14.5 ounces) diced tomatoes with green chilies - 1 tablespoon tomato paste - 2 cups chicken broth - 1 cup shredded cheddar cheese The right spices make this dish pop. Here’s what to include: - 1 teaspoon Cajun seasoning - ½ teaspoon smoked paprika - ½ teaspoon cayenne pepper (adjust for your heat level) - Salt and pepper to taste Garnishes add a nice touch to the dish. You might want to use: - 2 green onions, thinly sliced These ingredients combine to create a rich and spicy flavor. They make the chicken spaghetti comforting and satisfying. {{ingredient_image_2}} To start, fill a large pot with water. Add a good pinch of salt. Bring it to a rolling boil. Next, add the spaghetti. Cook it according to the package instructions until it’s al dente. This usually takes about 8-10 minutes. Once cooked, drain the pasta and set it aside. Now, let’s sauté the chicken. In a large skillet, heat one tablespoon of olive oil over medium heat. While it heats, season the chicken breasts with salt and pepper. Place them in the skillet. Cook for about 6-7 minutes on each side. You want them golden brown and fully cooked. After cooking, transfer the chicken to a cutting board. Let it rest for a few minutes, then slice it into strips. In the same skillet, add the diced onion, minced garlic, and diced bell pepper. Sauté these for about 5 minutes. You want the veggies to soften and become fragrant. After that, stir in a can of diced tomatoes with green chilies. Add tomato paste, Cajun seasoning, smoked paprika, and cayenne pepper. Mix everything well and let it cook for 3 more minutes. This allows the flavors to meld beautifully. Next, pour in 2 cups of chicken broth. Bring the mixture to a gentle simmer. Allow it to simmer for about 5 minutes. This step helps all the flavors come together. Now, add the cooked spaghetti and sliced chicken to the skillet. Toss everything together to coat the pasta in the sauce. Cook for another 2-3 minutes until everything is warm. For the cheesy finish, remove the skillet from heat. Stir in half of the shredded cheddar cheese until it melts. Sprinkle the rest on top and cover the skillet. Let it sit for a couple of minutes for the cheese to melt perfectly. Finally, plate the Spicy Southern Chicken Spaghetti and garnish with sliced green onions. Enjoy your flavorful weeknight meal! To cook chicken well, start with fresh, boneless, skinless breasts. Pat them dry with a paper towel. This helps the chicken brown nicely. Heat olive oil in a skillet over medium heat. Season both sides with salt and pepper. Cook each side for about 6-7 minutes until golden brown. Use a meat thermometer to check for doneness; it should read 165°F. Let the chicken rest before slicing. This keeps it juicy. When cooking spaghetti, use a large pot filled with water. Add a generous pinch of salt for flavor. Bring the water to a rolling boil. Add the spaghetti and stir to prevent sticking. Cook according to package instructions until al dente. Drain the pasta, but save a bit of pasta water. This starchy water helps the sauce cling to the pasta. To boost flavors, add fresh herbs like basil or parsley. A squeeze of lemon juice brightens the dish. You can also adjust the heat with more cayenne or a dash of hot sauce. For a smoky flavor, use smoked salt instead of regular salt. Mixing in some sautéed mushrooms or spinach adds depth and nutrition. Don’t forget to taste your sauce before serving; adjust the seasoning as needed! Pro Tips Don’t Overcook the Pasta: Cooking your spaghetti to al dente ensures it retains a firm texture, allowing it to absorb the sauce without becoming mushy. Season the Chicken Well: Generously seasoning the chicken before cooking will enhance the overall flavor of the dish. Don’t be shy with salt and pepper! Adjust the Heat: Customize the spice level by adjusting the amount of cayenne pepper in the sauce. Start with less if you prefer a milder dish and add more to taste. Let the Cheese Melt: Covering the skillet after adding cheese allows it to melt evenly, creating a delicious, gooey topping that perfectly complements the dish. {{image_4}} You can easily make this dish vegetarian. Instead of chicken, use grilled mushrooms or firm tofu. Both options add great texture. For the broth, choose vegetable broth. This keeps the flavor rich. You might also add more veggies, like zucchini or spinach, for extra nutrition. These swaps create a filling meal that everyone can enjoy. If you need a gluten-free dish, swap traditional spaghetti for gluten-free pasta. Many brands offer great options that taste just as good. Use rice pasta or chickpea pasta for added protein. Ensure the chicken broth is gluten-free, too. This way, you can enjoy the same delicious flavors without worry. Get creative with sauces! Instead of diced tomatoes, try a creamy Alfredo sauce for a different taste. You can also use a spicy arrabbiata sauce if you love heat. For cheese, swap cheddar for pepper jack or mozzarella. Each choice will change the dish's character. Feel free to mix and match until you find your favorite flavor profile! To keep your Spicy Southern Chicken Spaghetti fresh, you need the right storage method. Allow the dish to cool down to room temperature. Use an airtight container to store the spaghetti. This helps to keep the flavors locked in and prevents it from drying out. If you have leftovers, you can store them for up to three days in the fridge. Reheating your spaghetti is quick and easy. You can use the microwave or the stovetop. If using the microwave, place your serving in a bowl. Cover it with a microwave-safe lid. Heat in one-minute bursts, stirring in between. If you prefer the stovetop, add a splash of chicken broth to a pan. Heat over medium until warmed through, stirring often. This keeps the pasta moist and tasty. If you want to save your spaghetti for later, freezing is a great option. Portion the spaghetti into freezer-safe bags or containers. Make sure to remove as much air as possible. Label the bags with the date. Your dish can stay fresh in the freezer for up to three months. To reheat, thaw in the fridge overnight, then follow the reheating tips above. You can use turkey or tofu. Both work well in this dish. For turkey, use the same amount as chicken. For tofu, use firm or extra-firm tofu. Just cut it into cubes and sauté it until golden. Yes, you can make this dish ahead. Cook the pasta and sauce, then combine them. Store it in an airtight container in the fridge. When ready to eat, reheat it in a pan on low heat. Add a splash of chicken broth to keep it moist. To cut the heat, reduce or omit the cayenne pepper. You can also use less Cajun seasoning. Adding more cheese or a dollop of sour cream can help cool it down too. This blog post covered everything you need for Spicy Southern Chicken Spaghetti. We explored key ingredients, step-by-step cooking tips, and variations for different diets. You learned how to cook chicken perfectly and enhance flavors. Remember, whether you prefer vegetarian options or gluten-free substitutions, this dish can be for everyone. Store leftovers properly for future meals. Enjoy your cooking journey and have fun exploring all these flavors!

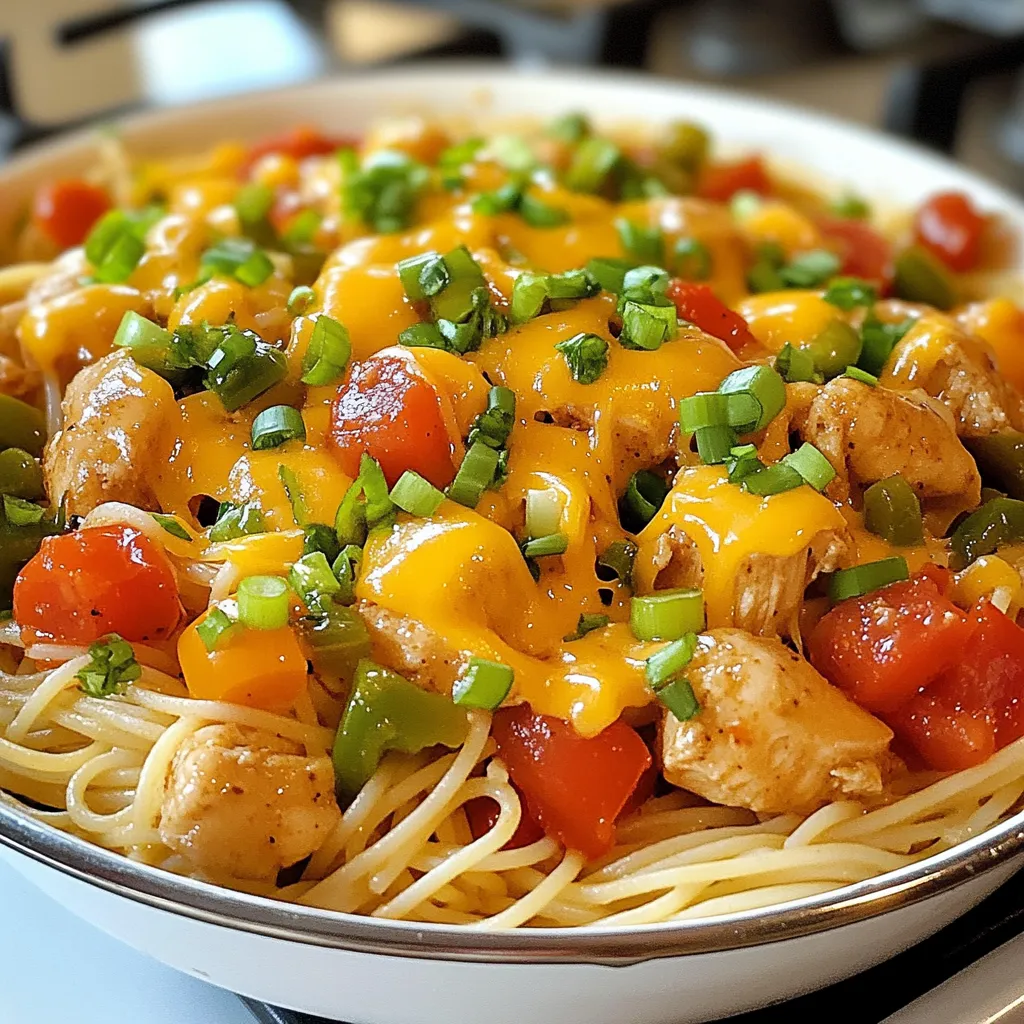
Spicy Southern Chicken Spaghetti Flavorful Weeknight Meal

Looking for a quick, tasty meal that packs a punch? This Spicy Southern Chicken Spaghetti is your answer! I blend

To make flourless pumpkin brownies, gather these simple ingredients: - 1 cup pumpkin puree (canned or homemade) - 1/2 cup creamy almond butter (or natural peanut butter) - 1/3 cup honey or maple syrup - 2 large eggs - 1/4 cup unsweetened cocoa powder - 1 teaspoon vanilla extract - 1/2 teaspoon baking soda - 1/2 teaspoon pumpkin pie spice (or ground cinnamon) - 1/4 teaspoon salt - 1/2 cup dark chocolate chips (optional) If you need substitutes, here are some great options: - Swap almond butter for sunflower seed butter for a nut-free choice. - Use agave nectar instead of honey or maple syrup. - Replace dark chocolate chips with white chocolate chips for a twist. For extra flavor, consider these add-ins: - Chopped nuts, like walnuts or pecans, can add crunch. - Dried fruits, such as cranberries or cherries, can add sweetness. - A sprinkle of sea salt on top can enhance the flavor. {{ingredient_image_2}} Start by preheating your oven to 350°F (175°C). Next, grab an 8x8 inch baking pan. Line it with parchment paper. Leave some paper hanging over the edges. This helps you lift the brownies out easily later. In a large bowl, add the pumpkin puree, almond butter, honey, and eggs. Use a whisk or a wooden spoon to mix these well. You want a smooth blend with no lumps. This step is key for a rich texture. Now, add the cocoa powder, baking soda, pumpkin pie spice, and salt to the wet mix. Stir gently until everything is combined. Make sure no dry bits are left. The batter will be thick, and that's just right! Pour the batter into your prepared pan. Use a spatula to spread it evenly. Bake in your preheated oven for 25-30 minutes. To check if they're done, insert a toothpick in the center. It should come out with some moist crumbs. Let the brownies cool for about 10 minutes in the pan. Then, lift them out using the parchment paper and place them on a wire rack to cool completely. Enjoy the process! To make fudgy brownies, focus on the right ingredients. Use almond butter for moisture. Pumpkin puree adds richness without extra fat. Cocoa powder gives that deep chocolate flavor. Eggs bind everything and keep it soft. Don't overmix the batter; just stir until smooth. Bake until a toothpick shows moist crumbs, not dry. This keeps them soft and fudgy. One common mistake is overbaking. If you leave them too long, they get dry. Follow the baking time closely. Another mistake is not measuring ingredients accurately. Even a little too much flour can change the texture. Also, don’t skip the pumpkin pie spice; it adds warmth and flavor. Lastly, remember to let them cool before slicing. Cutting too soon can make them fall apart. When using nut butters, choose creamy varieties for a smooth texture. Stir the nut butter well before measuring to avoid clumps. If it’s too thick, warm it slightly to make it easier to mix. Make sure to use a scale or measuring cup to get the right amount. If you're using peanut butter, make sure it's natural, with no added sugar. This helps keep the brownies rich and healthy. Pro Tips Use Fresh Pumpkin: If possible, use homemade pumpkin puree for a fresher flavor. Roast the pumpkin until tender, scoop it out, and blend until smooth. Don’t Overmix: When combining the wet and dry ingredients, mix until just combined. Overmixing can lead to denser brownies. Experiment with Spices: Feel free to add additional spices like nutmeg or ginger for a spicier flavor profile that complements the pumpkin. Check for Doneness: When testing with a toothpick, a few moist crumbs are perfect. If it comes out completely clean, the brownies may be overbaked. {{image_4}} These brownies are naturally gluten-free. The main ingredients don’t contain any gluten. If you want more options, you can use almond flour instead of cocoa powder. Be sure to check that any nut butter you choose is labeled gluten-free. To make these brownies vegan, you can replace the eggs. Use flax eggs instead. Mix one tablespoon of flaxseed meal with three tablespoons of water. Let it sit for five minutes to thicken. This will help bind your brownies without using eggs. You can enhance the flavor of these brownies in many ways. Adding nuts like walnuts or pecans gives a great crunch. You can also mix in some chocolate chips for extra richness. If you like spices, try adding a pinch of nutmeg or ginger. These flavors work well with pumpkin. To keep your flourless pumpkin brownies fresh, store them in an airtight container. Place parchment paper between layers if stacking. This helps prevent sticking. Store the brownies at room temperature for up to three days. For longer freshness, consider refrigeration. The cooler air will help maintain their flavor and texture. You can freeze these brownies for later enjoyment. First, let them cool completely. Next, cut the brownies into squares. Wrap each square in plastic wrap, then place them in a freezer-safe bag. When you want to enjoy one, simply take it out and let it thaw at room temperature. They can last in the freezer for up to three months. These brownies have a shelf life of about five days at room temperature. If they are stored in the fridge, they can last up to a week. Always check for any signs of spoilage before eating. If you notice any changes in texture or smell, it's best to discard them. Yes, you can make these brownies without eggs. You can use flaxseed meal or chia seeds as a great substitute. Mix 1 tablespoon of flaxseed meal with 2.5 tablespoons of water. Let it sit for about 5 minutes until it thickens. This mix acts like an egg and binds the ingredients together. To check if the brownies are done, insert a toothpick in the center. If it comes out with a few moist crumbs, they are ready. If it has wet batter on it, bake for a few more minutes. Remember, you want them fudgy, not dry. To enhance the chocolate flavor, add more cocoa powder or chocolate chips. You can increase cocoa powder to 1/2 cup for a rich taste. Also, try using dark chocolate chips for an extra kick. Mixing in some chocolate chunks can also add texture and flavor. You’ve learned about making delicious brownies from scratch. We covered key ingredients, easy steps, and helpful tips. I shared options for gluten-free and vegan brownies. Now you know how to store them for later. These tips will help you bake perfect brownies every time. Enjoy the process and share them with those you love. Happy baking!

Flourless Pumpkin Brownies Rich and Fudgy Delight

Are you ready to indulge in a treat that’s both rich and guilt-free? These flourless pumpkin brownies are fudgy, delicious,

- 1 cup green or brown lentils, thoroughly rinsed - 1 medium onion, finely chopped - 2 carrots, peeled and diced - 2 celery stalks, diced - 3 cloves garlic, minced - 1 can (14 oz) diced tomatoes with their juices - 6 cups vegetable broth (low-sodium recommended) The main star of this dish is the lentils. They are packed with protein and fiber. I prefer green lentils for their firm texture, but brown lentils work too. Both types give a nice base for the soup. Next, I add fresh vegetables. The onion adds sweetness, while the carrots and celery give crunch and flavor. Garlic brings warmth and depth to each bite. Together, these ingredients create a rich and vibrant taste. Don't forget the diced tomatoes! They add acidity and a beautiful color to the mix. The vegetable broth helps blend all the flavors together. I always choose low-sodium broth for better control over the saltiness. - 1 tablespoon extra virgin olive oil - 1 teaspoon dried thyme - 1 teaspoon ground cumin - 1 bay leaf - Sea salt and freshly cracked black pepper, to taste - Fresh parsley, chopped (for garnish) Seasoning makes this soup truly shine. I use olive oil for richness. Dried thyme and ground cumin add warmth and earthy notes. The bay leaf infuses a subtle flavor that ties everything together. Adjust the salt and pepper to your liking. This step is key! Before serving, I taste the soup and tweak the seasoning. Finally, I finish the soup with fresh parsley. It adds a pop of color and a fresh taste. When you serve it, the parsley brightens the bowl and makes it look inviting. The blend of these ingredients ensures your crockpot lentil soup is both flavorful and nutritious. {{ingredient_image_2}} 1. Rinsing lentils: Start by rinsing 1 cup of green or brown lentils under cool water. This step removes any dirt or debris. You want clean lentils for the best flavor. 2. Chopping vegetables: Chop 1 medium onion, 2 peeled carrots, and 2 celery stalks. Dice them into small pieces for even cooking. Mince 3 cloves of garlic. Fresh veggies add great taste. 1. Layering ingredients in the crockpot: In your crockpot, add the rinsed lentils first. Then, layer the chopped onion, diced carrots, and celery. Next, add the minced garlic. Pour in 1 can of diced tomatoes and 6 cups of vegetable broth. This mixture gives your soup a rich base. 2. Cooking times for low and high settings: Drizzle 1 tablespoon of olive oil over the mix. Sprinkle in 1 teaspoon of dried thyme, 1 teaspoon of ground cumin, and add 1 bay leaf. Gently stir all the ingredients to mix them well. Cover your crockpot and cook on low for 6-8 hours or on high for 4-5 hours. The lentils should be tender when done. 3. Adjusting flavor before serving: About 30 minutes before serving, taste the soup. Adjust the flavor with sea salt and freshly cracked black pepper to your liking. Don’t forget to remove the bay leaf before serving. Ladle the hot soup into bowls and garnish with chopped parsley for a fresh touch. Enjoy your hearty meal! - Selecting lentils: Choose green or brown lentils. They hold their shape well. Avoid red lentils for this recipe. They cook faster and turn mushy. - Chopping vegetables: Cut your onion, carrots, and celery into small, equal pieces. This ensures they cook evenly. Use a sharp knife to make chopping easy. - Even cooking: Layer the ingredients well in the crockpot. Place lentils at the bottom. This helps them cook evenly. Stir the mixture gently before cooking. - Spices and herbs: Use dried thyme and ground cumin. They add warmth and depth. For a twist, try adding smoked paprika or a pinch of cayenne. - Boosting nutrition: Add leafy greens like spinach or kale. They cook down and add vitamins. You can also include cooked quinoa or chopped nuts for protein. Pro Tips Soak Your Lentils: For even creamier lentils, soak them in water for a few hours or overnight before cooking. This can help reduce cooking time and improve texture. Customize Your Vegetables: Feel free to add or substitute other vegetables such as bell peppers, zucchini, or spinach to enhance flavor and nutrition. Add Heat: If you enjoy a bit of spice, consider adding a pinch of red pepper flakes or a diced jalapeño to the soup for some heat. Storage Tips: This soup stores well in the refrigerator for up to a week or can be frozen for up to three months. Just remember to cool it completely before freezing. {{image_4}} You can make this soup your own by adding different vegetables. Try bell peppers, zucchini, or even sweet potatoes. Each vegetable brings a new taste and texture. You can also think about adding protein. Sausage adds a rich flavor, while tofu keeps it light and healthy. Just chop the protein into small pieces and mix it in during cooking. Explore global flavors with your lentil soup. For a Mediterranean twist, add olives, feta cheese, and a squeeze of lemon. This will give your soup a bright and tangy taste. If you want something spicy, try an Indian version. Add curry powder or garam masala for warmth. You can even toss in some coconut milk for creaminess. These ideas will take your soup to new heights! After enjoying your soup, let it cool down. Once it’s cool, you can store it safely. - Refrigeration guidelines: Place the soup in an airtight container. It can stay fresh in the fridge for about 3 to 5 days. Make sure to label the container with the date. - Freezing portions for later use: If you want to keep the soup longer, freezing is a great option. Divide it into smaller portions. Use freezer-safe bags or containers. It can last up to 3 months in the freezer. Remember to leave some space in the container for expansion. When it’s time to heat up your soup, follow these methods to keep it tasty. - Proper methods for reheating soup: You can reheat the soup on the stove or in the microwave. If using the stove, heat it in a pot over medium heat. Stir it often to avoid sticking. For the microwave, use a microwave-safe bowl. Heat for 1-2 minutes, stirring halfway through. - Maintaining texture and flavor: Add a splash of broth or water if the soup seems thick. Stir well to mix it. This helps keep the lentils soft and the flavors bright. Enjoy your warm bowl of goodness! Can I use different types of lentils? Yes, you can use many types of lentils. Green and brown lentils work best for this soup. They hold their shape well during cooking. You can also try red lentils, but they cook faster and become mushy. Adjust your cooking time if you use them. How do I adjust the recipe for a smaller batch? To make a smaller batch, reduce each ingredient by half. Use ½ cup of lentils and 3 cups of vegetable broth. You can also cut the vegetables down to fit your needs. This way, you still get that rich flavor without making too much soup. Is lentil soup healthy? Yes, lentil soup is very healthy. Lentils are packed with protein, fiber, and essential nutrients. They help keep you full and satisfied. The fresh veggies boost vitamins and minerals, making this soup a nutritious choice. What are the calories per serving? Each serving has about 200 calories. This can vary based on the exact ingredients you use. The soup is filling and low in calories, making it a great option for meals. In this blog post, we explored how to make delicious crockpot lentil soup. We covered key ingredients like lentils, fresh veggies, and seasoning. I shared step-by-step instructions for preparing and cooking the soup. You learned tips for enhancing flavor and storing leftovers. Crockpot lentil soup is easy to customize based on your taste. This dish is nutritious and satisfying. With the right ingredients and care, anyone can make a hearty meal.

Crockpot Lentil Soup Flavorful and Nutritious Recipe

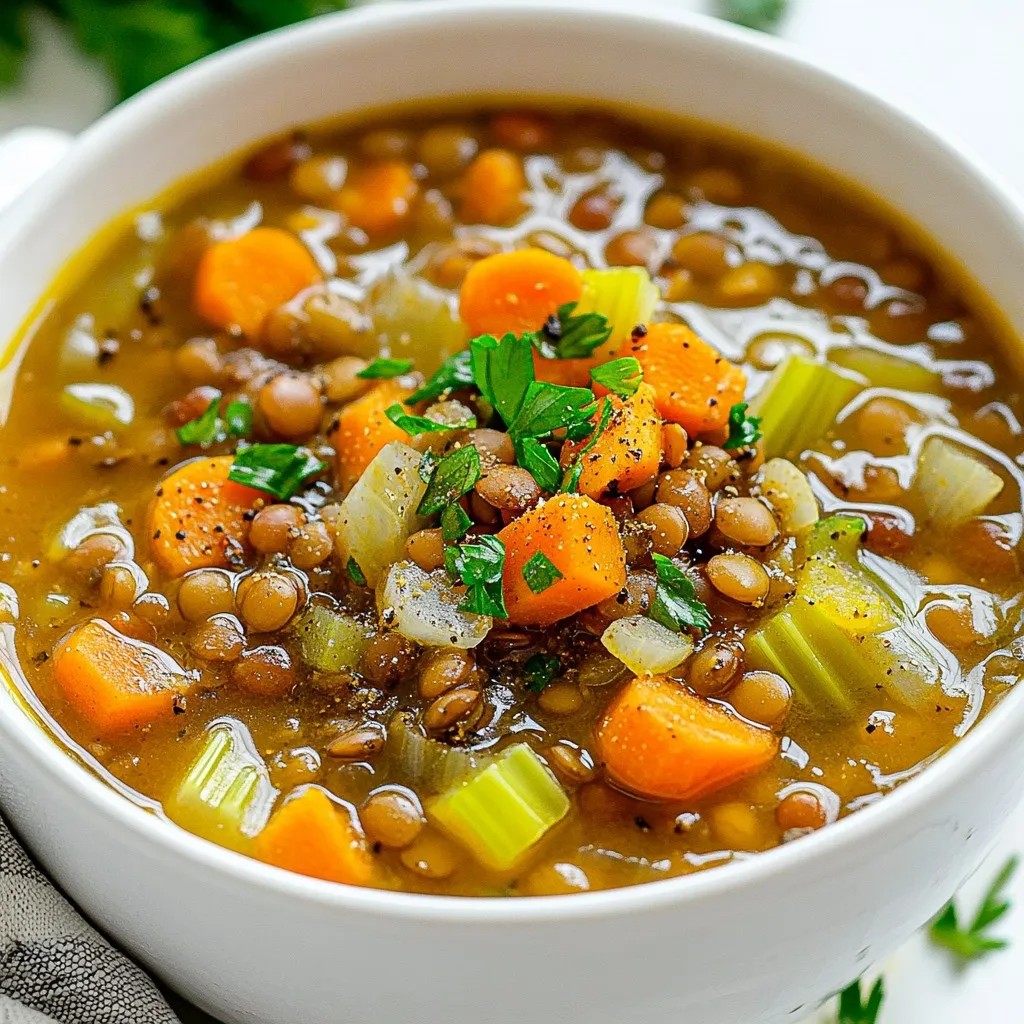
Looking for a warm, cozy meal that’s both flavorful and healthy? My Crockpot Lentil Soup recipe is just what you

To make a tasty Chicken and Broccoli Stir Fry, you need fresh and simple ingredients. Here’s what you will need: - 2 boneless, skinless chicken breasts, thinly sliced - 2 cups broccoli florets - 1 red bell pepper, sliced into thin strips - 1 large carrot, julienned - 3 cloves garlic, minced - 1 tablespoon fresh ginger, finely minced These main ingredients bring great flavor and nutrition. The chicken gives protein, while the veggies add color and crunch. - 3 tablespoons soy sauce (or tamari for a gluten-free option) - 2 tablespoons sesame oil, divided - 1 tablespoon honey - 1 tablespoon cornstarch - 1/4 cup chicken broth (or vegetable broth for a vegetarian option) These sauces and seasonings create a flavorful base. The soy sauce adds saltiness, and honey gives a touch of sweetness. - Sesame seeds, for garnish - Green onions, thinly sliced, for garnish Garnishes add a nice look and extra flavor. Sesame seeds give a nutty crunch, while green onions add freshness. {{ingredient_image_2}} To start, grab a large bowl. Add thinly sliced chicken breasts, 1 tablespoon of soy sauce, and 1 tablespoon of cornstarch. Mix well until the chicken is fully coated. Cover the bowl and set it aside for 15 minutes. This step helps tenderize the meat and adds flavor. Heat 1 tablespoon of sesame oil in a large pan over medium-high heat. Once hot, add the marinated chicken. Stir-fry for about 4 to 5 minutes. Cook until the chicken turns golden brown and is fully cooked. When done, transfer the chicken to a plate and set it aside. In the same pan, pour in the remaining tablespoon of sesame oil. Add 3 minced garlic cloves and 1 tablespoon of finely minced ginger. Sauté them for about 30 seconds. This step releases their amazing aroma without burning the garlic. Next, add 2 cups of broccoli florets, 1 sliced red bell pepper, and 1 julienned carrot to the pan. Stir-fry the veggies for 3 to 4 minutes. Cook until they are tender-crisp. They should keep their bright color. Return the chicken to the pan. In a small bowl, whisk together the leftover soy sauce, 1 tablespoon of honey, and 1/4 cup of chicken broth. Pour this sauce over the chicken and veggies. Stir well to coat everything. Cook for 1 to 2 more minutes to let the sauce thicken. Once everything is heated through and mixed, take the pan off the heat. This keeps the dish fresh and bright. Spoon the stir-fry onto plates or bowls. For a lovely presentation, sprinkle sesame seeds and sliced green onions on top. You can serve this over steamed rice or quinoa. A drizzle of extra sesame oil adds a nice touch. For a zesty kick, consider adding lime wedges on the side. To stir-fry well, heat is key. Use a hot pan or wok to cook fast. This helps seal in flavors and keeps food from getting soggy. Here are some best practices: - Prep First: Gather all your ingredients. Cut them up before you start cooking. - Don’t Overcrowd: Cook in batches if your pan is small. Too much food lowers the heat. - Keep It Moving: Stir often to cook evenly. This prevents burning and ensures all sides get nice and brown. If you need gluten-free options, use tamari instead of soy sauce. This gives the same great taste without gluten. For veggies, you can swap broccoli with snap peas or bell peppers. Here are more ideas: - Protein Variations: Use tofu, shrimp, or beef for different flavors. - Veggie Alternatives: Try zucchini or mushrooms for a twist. To keep your veggies crunchy, cook them for a short time. Stir-fry them just until they are bright and tender-crisp. Here’s how: - Cut Evenly: Make sure all veggies are cut to the same size. This helps them cook evenly. - Add at the Right Time: Cook harder veggies, like carrots, first. Then add softer ones, like bell peppers, later. - Quick Cooking: Stir-fry for just 3-4 minutes. This keeps them vibrant and crisp. Pro Tips Marinating Matters: Allowing the chicken to marinate for at least 15 minutes not only enhances flavor but also helps tenderize the meat, making it more succulent. High Heat is Key: Stir-frying at medium-high heat ensures that the chicken and vegetables cook quickly, preserving their texture and flavor. Veggie Variations: Feel free to swap out the vegetables based on your preferences or what's in season. Snap peas, bell peppers, or zucchini can add a delightful twist! Garnish for Greatness: A sprinkle of sesame seeds and sliced green onions not only adds flavor but also elevates the dish's presentation, making it more appealing when served. {{image_4}} You can easily switch the chicken for beef, tofu, or shrimp. Beef adds a rich taste. Use thin strips of flank steak for best results. Tofu is a great choice for a vegetarian meal. Press it first to remove excess water. Shrimp cooks fast and adds a nice flavor. Just be careful not to overcook it. Feel free to add more veggies for color and taste. Snap peas, bok choy, or water chestnuts work well. Mushrooms add an earthy note, while bell peppers bring sweetness. You can also use zucchini or snow peas for a fresh crunch. Experiment with what you have on hand! Spices and sauces can take your dish to the next level. Try adding red pepper flakes for heat. A splash of rice vinegar will brighten up the taste. You can also mix in a little hoisin sauce for a sweet kick. Fresh herbs like basil or cilantro add a burst of flavor. Don't forget a squeeze of lime for extra zing! To store leftovers properly, let the stir fry cool first. Place it in an airtight container. You can keep it in the fridge for up to three days. Always label the container with the date. This way, you know when to eat it. If you want to freeze it, pack the stir fry in a freezer-safe bag. Remove as much air as you can. It can last up to three months in the freezer. When ready to eat, thaw it in the fridge overnight before reheating. To reheat for the best taste and texture, use a skillet over medium heat. Add a splash of water or broth to keep it moist. Stir occasionally until it’s hot. You can also use the microwave; heat in short bursts and stir in between. Enjoy your stir fry just like fresh! To make this dish gluten-free, swap regular soy sauce for tamari. Tamari is a gluten-free soy sauce. You can also use coconut aminos. These options keep the flavor but remove gluten. Always check labels to ensure no hidden gluten is present. Yes, you can use frozen broccoli. It saves time and works well. Frozen broccoli may cook faster, so watch it closely. If you like fresh broccoli, use that for better texture. Fresh broccoli stays crisp and bright. For stir fry, slice chicken breasts thinly. Cut against the grain for tender pieces. Aim for strips about 1/4 inch thick. This helps the chicken cook quickly and evenly. A sharp knife makes cutting easier and safer. You can store leftovers in the fridge for about three days. Use a sealed container for best results. If you want to keep it longer, freeze it. Frozen stir fry can last up to three months. Just make sure it’s cool before freezing. Absolutely! You can add bell peppers, snap peas, or carrots. Broccoli pairs well with many veggies. Zucchini and mushrooms work great too. Feel free to mix and match based on what you have. This blog post covered the key ingredients and step-by-step instructions for a tasty Chicken and Broccoli Stir Fry. You learned how to marinate chicken, sauté vegetables, and create a flavorful sauce. I also shared helpful tips on cooking techniques and ingredient swaps for your preferences. Remember, you can add your unique touch with different proteins or veggies. Enjoy your cooking journey!

Chicken and Broccoli Stir Fry Quick and Easy Meal

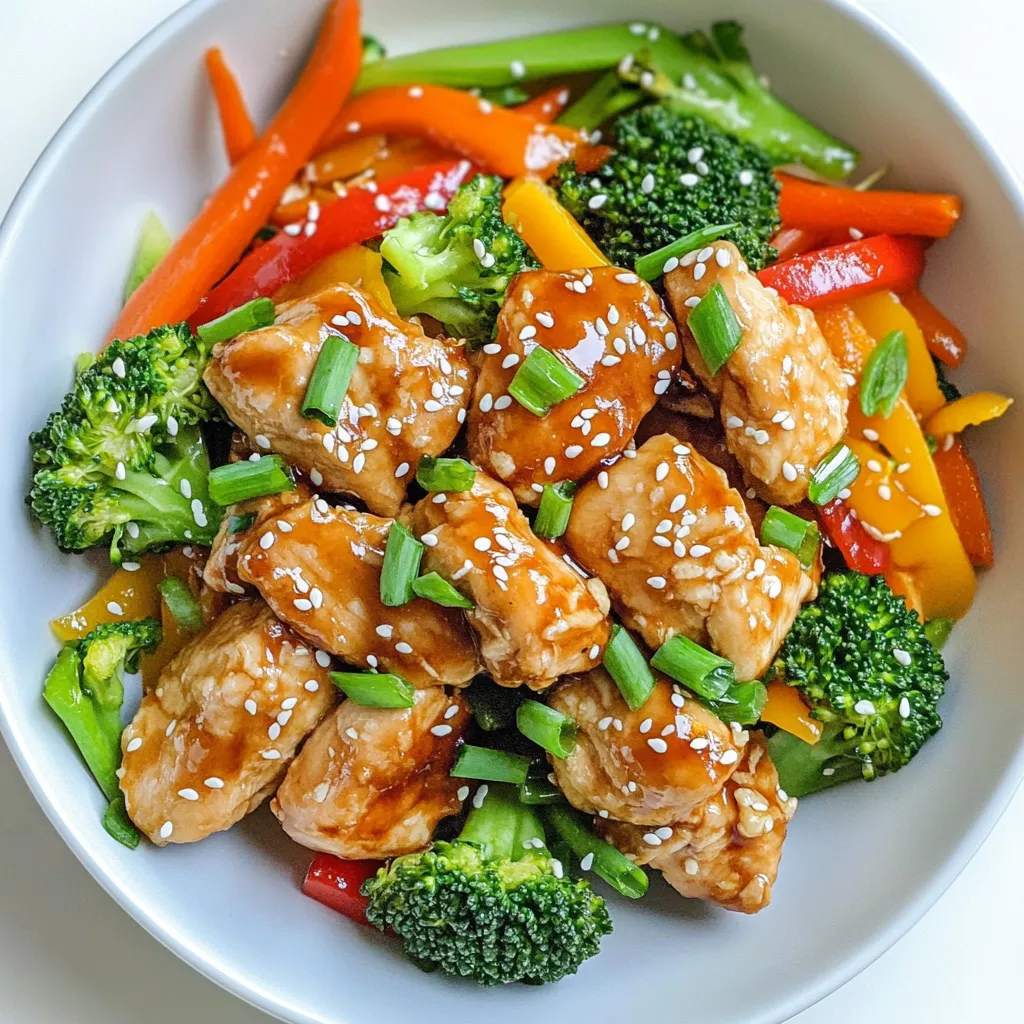
If you’re looking for a quick and easy meal that packs flavor, then this Chicken and Broccoli Stir Fry is

- 1 cup unsalted butter - 1 cup packed brown sugar - 1/2 cup granulated sugar - 2 large eggs - 1 teaspoon pure vanilla extract - 3 cups all-purpose flour - 1 teaspoon baking soda - 1/2 teaspoon fine sea salt - 1 cup caramel sauce - 1 cup chocolate chips - 1/2 cup crushed shortbread cookies These ingredients make the heart of Twix cookies. Let’s dive deeper into why each one matters. Unsalted butter gives the cookies a rich and creamy base. It adds flavor and helps create a tender texture. Softening it first helps it mix better with sugars. Brown sugar and granulated sugar work together for sweetness. Brown sugar adds moisture and a hint of caramel flavor. Granulated sugar helps the cookies spread out while baking. Eggs add moisture and act as a binder. They help the cookies rise and hold their shape. The vanilla extract gives a warm, sweet aroma that makes each bite special. All-purpose flour is the main building block. It gives the cookies structure. Baking soda helps them rise while baking. Sea salt balances the sweetness and enhances flavors. Caramel sauce is the star of the show. It adds gooey richness that reminds you of a Twix bar. You can use store-bought or homemade for convenience. Chocolate chips bring that classic chocolatey taste. You can choose between milk or dark chocolate based on your preference. Finally, crushed shortbread cookies add a perfect crunch. They mimic the cookie layer in a Twix bar and give each bite a fun texture. With these ingredients, you're set to create a treat that will satisfy any sweet tooth! {{ingredient_image_2}} Preheat your oven to 350°F (175°C). Line two baking sheets with parchment paper. This helps the cookies not stick and makes cleanup easy. In a large mixing bowl, use an electric mixer to beat 1 cup of softened butter, 1 cup of packed brown sugar, and 1/2 cup of granulated sugar together. Mix for about 3-5 minutes until the mixture is light and fluffy. This step adds air to the cookies. Add 2 large eggs, one at a time. Blend well after each egg. Then pour in 1 teaspoon of pure vanilla extract. Mix until everything is smooth and well combined. In a separate bowl, whisk together 3 cups of all-purpose flour, 1 teaspoon of baking soda, and 1/2 teaspoon of fine sea salt. This ensures the leavening agent is evenly mixed. Gradually add the dry mixture to the wet mixture. Use a spatula or a wooden spoon to mix gently. Be careful not to overmix. This keeps the cookies tender and soft. Fold in 1 cup of chocolate chips and 1/2 cup of crushed shortbread cookies. Make sure they are evenly distributed throughout the dough for that delightful Twix crunch. Use a cookie scoop or your hands to form dough balls. Place them on the prepared sheets about 2 inches apart. This gives them space to spread. Before baking, use your thumb to press into the center of each dough ball. This creates a small indent for the caramel. Spoon 1 cup of caramel sauce into each indentation. Bake the cookies for 12-15 minutes. They should be golden brown at the edges. The centers will be soft. Once baked, let them cool on the sheets for 5 minutes. Then transfer the cookies to wire racks to cool completely. This allows any extra caramel to set and firm up. If you want an extra treat, melt some chocolate. Drizzle it over the cooled cookies for a beautiful touch. This step makes your cookies look even more tempting! To make sure your Twix cookies are tender, avoid overmixing. Once you add the dry ingredients, mix until just combined. This keeps the cookies soft. Also, remember to cream the butter and sugars until fluffy. This step adds air and lightness to your cookies. You can swap some ingredients if needed. For a dairy-free option, use plant-based butter. If you lack brown sugar, use more granulated sugar; just add a bit of molasses for flavor. Instead of chocolate chips, you can chop up your favorite chocolate bars. This way, you can customize your cookies. Use store-bought caramel sauce for ease, but homemade is even better. If making your own, ensure it’s not too thick. It should flow easily into the cookie's center. If the caramel is too thick, warm it gently. This will help it fill the indentation well. For uniform cookies, use a cookie scoop. This ensures each cookie is the same size, which helps them bake evenly. Make sure to space the dough balls about 2 inches apart on the baking sheet. This prevents them from sticking together while baking. When they cool, they will hold their shape beautifully. Pro Tips Chill the Dough: If you have time, chill the cookie dough for about 30 minutes before baking. This helps the cookies maintain their shape and results in a thicker, chewier texture. Use Quality Chocolate: The chocolate chips are a major flavor component in these cookies. Opt for high-quality chocolate for a richer taste. Customize Your Fillings: Feel free to experiment with different types of caramel or add components like nuts or toffee bits to the dough for extra texture and flavor. Store Properly: To keep your cookies fresh, store them in an airtight container at room temperature. You can also freeze them for longer storage; just thaw before enjoying! {{image_4}} You can choose between milk and dark chocolate for your Twix cookies. Milk chocolate gives a sweet, creamy flavor. Dark chocolate adds a rich, bold taste. You can mix both for a unique twist. Each choice changes the cookie's overall flavor, so pick what you love best. Feel free to add nuts or other mix-ins to your cookies. Chopped pecans or walnuts work well. You can also use toffee bits for extra crunch and sweetness. These add flavors and textures that make each bite exciting. Get creative and mix it up! Making mini Twix cookies is easy and fun. Simply scoop out smaller portions of dough. Bake them for a shorter time, about 8-10 minutes. These bite-sized treats are perfect for sharing or snacking. Kids love them, and they are cute on any dessert table. You can make these cookies gluten-free. Substitute regular flour with a gluten-free blend. Make sure it contains xanthan gum for the right texture. The cookies will still taste amazing and be soft and chewy. Everyone can enjoy them, no matter their dietary needs. To keep your Twix cookies fresh, store them in an airtight container. This will help them stay soft and chewy. You can keep them at room temperature for up to one week. If you want to keep them longer, consider refrigerating them. Just make sure they are sealed well to avoid drying out. Freezing cookies is a great way to save some for later. First, let the cookies cool completely. Then, place them in a single layer on a baking sheet. Freeze them for about an hour. Once they are firm, transfer them to a freezer bag or container. Be sure to label it with the date. These cookies can last up to three months in the freezer. To enjoy your cookies warm, you can reheat them easily. Preheat your oven to 350°F (175°C). Place the cookies on a baking sheet. Heat them for about 5-7 minutes. This will make them soft and tasty again. You can also use the microwave. Just heat them for about 10-15 seconds. Enjoy the gooey caramel and chocolate! For the best Twix cookies, I recommend using a thick caramel sauce. You can use store-bought brands like Ghirardelli or Smucker's. If you want to make your own, combine sugar and heavy cream over low heat. This creates a rich flavor that adds to the cookie's taste. To keep your Twix cookies fresh, place them in an airtight container. Store them at room temperature for up to a week. If you want to keep them longer, you can refrigerate them. Just make sure to let them come to room temperature before enjoying. Yes, you can prepare the dough a day before! Just wrap it tightly in plastic wrap and store it in the fridge. When you are ready to bake, let the dough sit at room temperature for about 30 minutes. This will make it easier to scoop and shape. If your dough feels too sticky, you can add a bit more flour. Start with a tablespoon at a time. Mix it in until the dough becomes more manageable. Just be careful not to add too much flour, as this can make your cookies tough. You now have a clear guide to making delicious cookies inspired by Twix. We covered all the ingredients, step-by-step instructions, and even tips for perfect cookies. Don’t forget to try the variations, like using dark chocolate or adding nuts. Proper storage will keep your cookies fresh for longer. Bake and enjoy these treats; they will impress everyone. Your baking skills will shine bright with this recipe. Happy baking!

Twix Cookies Irresistible Treat for Sweet Lovers

If you love sweet treats, you’ve got to try these Twix Cookies! This recipe combines rich chocolate, smooth caramel, and

- 1 cup sweetened shredded coconut - 1 cup powdered sugar - 1 cup finely chopped pecans or walnuts - 1/2 cup creamy peanut butter - 1 teaspoon pure vanilla extract - 2 cups semi-sweet chocolate chips - 1 tablespoon coconut oil Each serving has about 140 calories. You get 8 grams of fat, 18 grams of carbs, and 2 grams of protein. This treat is sweet and has a nice crunch from the nuts. It also gives a good amount of energy. When choosing your coconut, look for sweetened shredded coconut in the baking aisle. It should be moist and fresh. For nuts, select pecans or walnuts that are raw and unsalted. Fresh nuts have a better taste. Use creamy peanut butter with no added sugar for the best flavor and texture. When picking chocolate chips, go for high-quality semi-sweet ones. They melt better and taste richer. Always read the labels to ensure you get the best quality. {{ingredient_image_2}} To start, gather all your ingredients. You will need sweetened shredded coconut, powdered sugar, chopped nuts, peanut butter, and vanilla extract. In a large bowl, mix the coconut, powdered sugar, and chopped nuts. Add the peanut butter and vanilla. Use your hands or a spatula to mix until the blend is sticky. Next, shape this mixture into small balls. Each ball should be about 1 inch wide. Place them on a baking sheet lined with parchment paper. Make sure to space them well so they don’t stick together. Cover the sheet and chill the balls in the fridge for 30 minutes. When shaping the coconut balls, keep your hands slightly damp. This helps prevent the mixture from sticking to your fingers. If the mixture is too soft, let it chill a bit longer before shaping. After shaping, make sure to chill them well. This helps them hold their shape during coating. While your coconut balls chill, it’s time to melt the chocolate. In a microwave-safe bowl, combine chocolate chips and coconut oil. Microwave in 30-second bursts. Stir after each time until smooth. Once the chocolate melts, remove the coconut balls from the fridge. Dip each one into the melted chocolate using a fork. Make sure to coat each ball completely. Let any extra chocolate drip back into the bowl. Place the coated balls back on the parchment-lined sheet. Chill the baking sheet for another 30 minutes. This helps the chocolate set completely. For a fun touch, you can drizzle some extra melted chocolate over the top before serving. Enjoy your Martha Washington Candy! One common mistake is not mixing the ingredients well. If the mixture is not sticky, the balls won’t hold together. Be sure to combine the shredded coconut, powdered sugar, nuts, peanut butter, and vanilla extract thoroughly. Another mistake is not chilling the coconut balls long enough. Chilling firms them up and makes coating easier. If the balls are too soft, the chocolate will not stick well. Finally, avoid using chocolate that is not designed for melting. Use semi-sweet chocolate chips for the best taste and texture. To get a smooth chocolate coating, make sure the chocolate is fully melted. Microwave it in short bursts, stirring often. This method helps prevent burning. When dipping the coconut balls, use a fork for an even coat. Let the excess chocolate drip off before placing them back on the baking sheet. This keeps the coating thin and nice. Chill the chocolate-coated treats again to help the chocolate set firmly. This step is key for a clean bite. You can enhance the flavor by adding spices like cinnamon or nutmeg. Just a pinch can give your treats a warm twist. For added texture, try mixing in some crushed graham crackers. They add a nice crunch and complement the coconut well. Finally, consider drizzling melted white chocolate over the treats for a fun look. This adds sweetness and makes them extra special for events. Pro Tips Chill for Better Coating: Make sure to chill the coconut balls for at least 30 minutes before dipping them in chocolate. This helps the chocolate adhere better and keeps the shape intact. Use High-Quality Chocolate: Opt for high-quality semi-sweet chocolate chips for a richer flavor. Good chocolate makes a noticeable difference in taste. Experiment with Nuts: Feel free to substitute pecans or walnuts with other nuts like almonds or hazelnuts for a different flavor profile that complements the coconut. Add a Pinch of Sea Salt: A light sprinkle of sea salt on top of the chocolate treats before they set enhances the sweetness and adds a delightful contrast. {{image_4}} If you have dietary needs, you can still enjoy Martha Washington candy. Here are some easy swaps: - Nut-Free: Use sunflower seeds instead of pecans or walnuts. - Vegan: Replace creamy peanut butter with almond or sunflower seed butter. Use dairy-free chocolate chips for coating. - Gluten-Free: This recipe is naturally gluten-free, so no changes are needed! These swaps keep the flavor strong while meeting your needs. Want to mix it up? You can add different flavors to your Martha Washington candy. Here are some fun ideas: - Spices: A pinch of cinnamon or nutmeg can add warmth. - Extracts: Try almond or coconut extract for a twist. - Citrus Zest: Add a touch of orange or lemon zest for brightness. Experimenting with flavors can make this treat even more special! Make your Martha Washington candy shine at parties! Here are some tips to present your treats beautifully: - Colorful Platter: Arrange the candies on a bright, fun platter. - Garnish: Sprinkle extra shredded coconut or crushed nuts on top. - Individual Wrapping: Wrap each piece in clear plastic and tie with a ribbon. These ideas will impress your guests and make the treats even more inviting! To keep your Martha Washington Candy fresh, store it in an airtight container. This prevents air from making the treats dry. You can layer the candies with parchment paper to avoid sticking. Keep the container in a cool, dark place. A pantry or cupboard works well. Avoid direct sunlight and heat, as they can ruin the chocolate coating. When stored properly, these treats can last up to two weeks. You can enjoy them for a while, but they taste best in the first few days. If the treats start to lose their texture or flavor, it’s time to enjoy them before they go stale. You can freeze Martha Washington Candy for long-term storage. First, place the treats in a single layer on a baking sheet. Freeze them for about an hour until firm. Then, transfer them to a freezer-safe container. They can last up to three months in the freezer. When you want to enjoy them, take them out and let them thaw in the fridge. This helps keep the chocolate smooth and tasty. Avoid thawing at room temperature, as it may cause condensation. Martha Washington Candy is named after the first lady of the United States. She was known for her love of sweets. This candy is said to have originated from her recipes. The treats mix coconut, nuts, and chocolate. They reflect the flavors of early American cooking. Martha's candy has become a favorite for many during the holidays. Yes, you can substitute some ingredients. If you don’t have pecans, use walnuts or almonds. You can also swap creamy peanut butter for almond butter for a nut-free option. If you are avoiding sugar, try using a sugar substitute. Just keep in mind that the taste and texture may change slightly. The chocolate coating is set when it feels firm to the touch. After chilling in the fridge, it should not be sticky. If you see a dull finish, it’s ready. You can also test by gently pressing the chocolate with your finger. If it holds its shape, you're good to go! Can I freeze these treats? Yes, you can freeze Martha Washington Candy. Place them in an airtight container. They will last for up to three months. Just thaw them in the fridge before serving. How long do they take to make? The total time is about 1 hour and 20 minutes. This includes chilling time. The prep alone takes around 20 minutes, so it's quick! Can I add more flavors? Absolutely! You can add spices like cinnamon or nutmeg. A splash of orange or almond extract can also boost the flavor. Just be careful not to overpower the coconut and chocolate. You now have a complete guide to making Martha Washington Candy. We covered the ingredients, steps, and tips to get it right. Remember to avoid common mistakes and consider variations to suit your needs. Store your treats properly to keep them fresh. Enjoy making these fun candies with your own twist. You'll impress everyone with your skills and creativity. Happy cooking!

Martha Washington Candy Simple and Tasty Treats

Looking for a sweet treat that’s easy to make and full of flavor? Martha Washington Candy is here to satisfy

For this cozy Pumpkin Wild Rice Soup, you'll need: - 1 cup wild rice, thoroughly rinsed - 2 cups pumpkin puree (freshly made or canned) - 1 medium onion, finely diced - 2 cloves garlic, minced - 2 carrots, peeled and diced - 2 celery stalks, diced - 1 teaspoon ground ginger - 1 teaspoon ground cinnamon - 4 cups vegetable broth (homemade or low sodium) - 1 cup coconut milk (full-fat for creaminess) - 2 tablespoons olive oil - Salt and freshly ground black pepper to taste - Fresh parsley, chopped (for garnish, optional) Choosing the best ingredients sets the stage for a great soup. Here are some tips: - Pumpkin: Look for deep orange color. Fresh pumpkin should feel heavy and firm. - Wild Rice: Select grains that are dark and have a nutty scent. Avoid any with a musty smell. - Vegetables: Choose crisp carrots and celery. They should snap when you break them. - Herbs: Fresh parsley should be bright green and fragrant. You can swap some ingredients to suit your taste or diet: - Rice Options: Use brown rice or quinoa for a different texture. - Milk Choices: Substitute almond milk or oat milk if you prefer non-dairy. - Pumpkin Varieties: Butternut squash can replace pumpkin for a sweeter flavor. - Broth Variants: Chicken broth can add a richer taste if you are not vegetarian. These choices keep the soup delicious while allowing for personal touches! {{ingredient_image_2}} Start by gathering all your ingredients. You need: - 1 cup wild rice, thoroughly rinsed - 2 cups pumpkin puree (freshly made or canned) - 1 medium onion, finely diced - 2 cloves garlic, minced - 2 carrots, peeled and diced - 2 celery stalks, diced - 1 teaspoon ground ginger - 1 teaspoon ground cinnamon - 4 cups vegetable broth (homemade or low sodium) - 1 cup coconut milk (full-fat for creaminess) - 2 tablespoons olive oil - Salt and freshly ground black pepper to taste - Fresh parsley, chopped (for garnish, optional) Chop the onion, carrots, and celery. Mince the garlic. Rinse the wild rice and set it aside. This will help everything cook evenly and save time. In a large pot, heat the olive oil over medium heat. Once it shimmers, add the onion, garlic, carrots, and celery. Sauté for 5-7 minutes. The veggies should be soft, and the onion should look clear. This step builds your soup’s base. Next, stir in the ginger and cinnamon. Cook this for about one minute. You want the spices to blend well with the veggies. This will add warmth and flavor. Now, add the rinsed wild rice. Stir it well to coat each grain with oil and spices. Pour in the vegetable broth and pumpkin puree. Mix everything together and bring it to a boil. Once it boils, reduce the heat to low. Cover the pot and simmer for about 45 minutes. The wild rice will be tender when done. After the rice is cooked, stir in the coconut milk. This adds creaminess. Adjust the heat to warm it gently. Season with salt and pepper to taste. Heat this through for about 5 minutes. For a smoother texture, blend the soup with an immersion blender. If you prefer a chunkier soup, leave it as is. Serve the soup hot. You can garnish it with fresh parsley for extra flavor and color. Drizzle a little coconut milk on top for a beautiful finish. Enjoy this cozy and nourishing meal! To perfect your pumpkin wild rice soup, start with fresh ingredients. Fresh vegetables add flavor and nutrients. A good broth is key, too. I recommend using homemade or low-sodium vegetable broth for the best taste. For a smooth soup, blend it well after cooking. If you like some texture, leave it chunky. Adjust the cooking time based on the wild rice you use. Some types may cook faster than others. Always taste as you go. This helps you find the right balance of flavors. Adjusting spice levels is simple. Start with the recipe's amounts. If you want more heat, add a pinch of cayenne pepper or red pepper flakes. You can also add more ginger or cinnamon for a warm kick. If it gets too spicy, balance it with more coconut milk. This adds creaminess and cools down the heat. Remember, spices can get stronger as the soup sits. Taste again before serving to ensure it’s just right. To enhance creaminess, use full-fat coconut milk. This gives your soup a rich texture. You can also stir in a bit of cream or yogurt if you want. For a different flavor, try adding cashew cream. Just blend soaked cashews with water until smooth. If you like a thicker soup, blend more of it. This thickens the broth while keeping some rice whole. Don't forget to taste and adjust seasoning after adding any creamy elements. This ensures a balanced and delightful dish. Pro Tips Use Fresh Pumpkin: If using fresh pumpkin, roast it first for a deeper, sweeter flavor. Cut it in half, scoop out the seeds, and roast it at 400°F for about 45 minutes or until tender. Wild Rice Cooking Tip: To ensure even cooking, soak the wild rice in water for a few hours before adding it to the soup. This helps it cook more evenly and reduces overall cooking time. Flavor Enhancements: Add a splash of apple cider vinegar or lemon juice at the end for a bright flavor contrast that complements the sweetness of the pumpkin. Storage Suggestions: This soup can be stored in the refrigerator for up to 5 days or frozen for up to 3 months. Just make sure to leave out the coconut milk if you plan to freeze it, and add it when reheating. {{image_4}} You can make this soup more filling by adding proteins. Cooked chicken or turkey works well. For a plant-based option, try adding beans like chickpeas or black beans. These not only boost protein but also add texture. You can also toss in cooked lentils for a hearty blend. Just stir them in during the last few minutes of cooking. This way, you keep the flavors fresh and vibrant. This recipe is already vegetarian. To make it vegan, simply use vegetable broth and coconut milk, as the recipe suggests. If you want extra creaminess, blend in some soaked cashews. They add a rich taste without any dairy. For a fun twist, try adding tofu. Just cube it and sauté it with your veggies. It soaks up the flavors and adds a nice bite. To enhance the flavors, consider adding herbs. Fresh thyme or rosemary can give your soup a new depth. Toss them in with the sautéed veggies for a robust taste. You can also add a splash of soy sauce or tamari for umami. A touch of lime juice right before serving brightens the whole dish. Don’t forget spices! A hint of nutmeg or cayenne can change the game. Add them according to your taste. After you finish your soup, let it cool. Pour the soup into an airtight container. Make sure the lid seals well. Store it in the fridge for up to four days. Always label your container with the date. This way, you know when to eat it! You can freeze Pumpkin Wild Rice Soup, too! Use a freezer-safe container or a heavy-duty freezer bag. Leave some space at the top, as soup expands when frozen. It stays good for about three months. When you are ready to eat it, remember to thaw it in the fridge overnight. Reheat the soup on the stove over medium heat. Stir it often to warm it evenly. If it seems too thick, add a splash of broth or water. You can also use the microwave for quick heating. Place in a microwave-safe bowl and cover it loosely. Heat in short bursts, stirring in between. Enjoy your cozy soup again! Pumpkin Wild Rice Soup lasts about 4 to 5 days in the fridge. Store it in an airtight container. This keeps it fresh and tasty for you. Yes, you can make this soup in advance. It tastes even better after sitting for a day. Just let it cool, then store it in the fridge. You can serve this soup with crusty bread or a fresh salad. A slice of sourdough is perfect for dipping. You might also enjoy it with roasted veggies on the side. Absolutely! This recipe is great for meal prep. You can make a big batch and portion it out. It freezes well too, making it easy to enjoy later. You can use brown rice, but it will change the texture. Brown rice cooks longer, so adjust cooking time to about 60 minutes. Wild rice gives a nutty flavor and chewier bite that works well in this soup. You learned about the key ingredients for your soup. Choose fresh items for the best taste. Following the step-by-step instructions ensures a tasty meal. Use tips and tricks to make your soup just right. Don’t forget the variations to fit your needs. Lastly, know how to store and reheat leftovers. In conclusion, this soup is easy to make and delicious. Enjoy the flavors and share with others!

Pumpkin Wild Rice Soup Cozy and Nourishing Meal

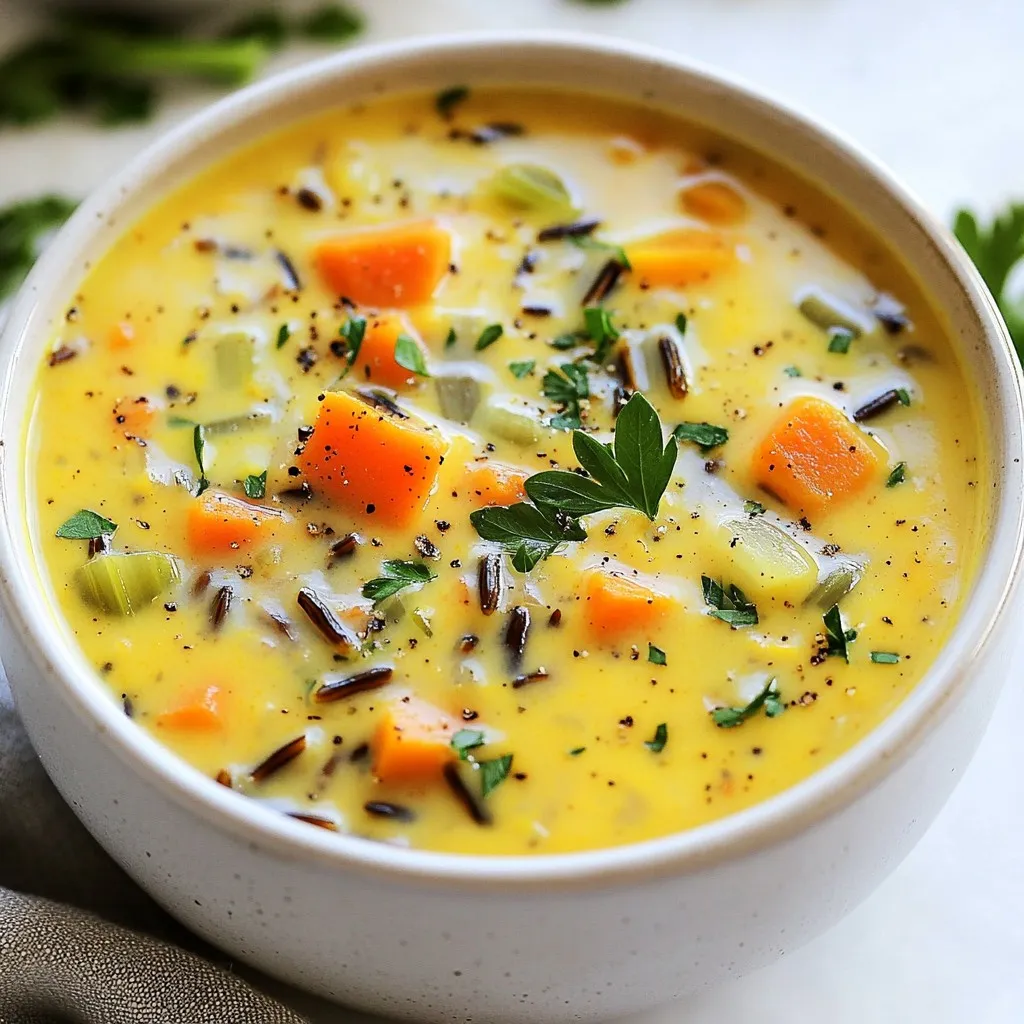
Looking for a warm and nourishing meal? Pumpkin Wild Rice Soup is the answer! This cozy recipe combines rich pumpkin

- 1 ripe avocado - 1/2 cup fresh cilantro leaves, tightly packed - 1/4 cup Greek yogurt - 2 tablespoons fresh lime juice - 1 garlic clove, minced - 1/4 teaspoon ground cumin - Sea salt and black pepper, to taste - Water, as needed - Use one ripe avocado for creaminess. - Tightly pack half a cup of cilantro leaves. - Full-fat Greek yogurt gives the best taste. - Fresh lime juice adds a bright flavor. - Adjust minced garlic to your taste. - Use just a pinch of cumin for warmth. - Season with salt and pepper to your liking. - Add water to change the dressing's thickness. This dressing is rich in healthy fats from the avocado. - Calories: About 80 per serving - Fat: 6g (mostly healthy fats) - Carbohydrates: 5g - Protein: 2g - Fiber: 2g This dressing makes a great option for salads or as a dip. {{ingredient_image_2}} To start, gather your ingredients. You will need: - 1 ripe avocado - 1/2 cup fresh cilantro leaves, tightly packed - 1/4 cup Greek yogurt - 2 tablespoons freshly squeezed lime juice - 1 garlic clove, minced - 1/4 teaspoon ground cumin - Sea salt and freshly cracked black pepper - Water, as needed First, slice the avocado in half. Remove the pit carefully. Scoop the green flesh into your blender. Next, wash the cilantro leaves. Make sure they are tightly packed in your measuring cup. Add them to the blender next, along with the Greek yogurt, lime juice, minced garlic, and ground cumin. Now, secure the lid on the blender. Blend the mixture on high speed. You want a smooth and creamy texture. Stop to scrape down the sides with a spatula if needed. This helps blend everything evenly. Check the thickness of your dressing. If it seems too thick, add water. Start with one tablespoon at a time. Blend after each addition until you reach the desired consistency. Next, taste your dressing. Adjust the flavor using sea salt and freshly cracked black pepper. Mix well after making any changes. Once satisfied, transfer the dressing to an airtight container. Refrigerate it for at least 30 minutes. This helps the flavors blend and chill. Enjoy your creamy avocado cilantro dressing on salads or as a dip! Pick a ripe avocado for the best flavor. Ripe avocados feel slightly soft when you squeeze them. Their skin should have a dark green or nearly black color. If it is too hard, it is not ripe. If it feels mushy, it is overripe. You want perfect ripeness for a creamy dressing. You can swap Greek yogurt for sour cream if you like a tangy taste. For a dairy-free option, use coconut yogurt or silken tofu. Fresh lime juice is key, but lemon juice works too. If you don't have cumin, try using chili powder for a spicy twist. Use what you have for a personal touch. To boost the flavor, add more garlic or lime juice. A pinch of chili flakes can bring heat. Consider mixing in a splash of vinegar for brightness. If you love sweetness, a tiny bit of honey or agave can balance the flavors. Experiment with these tips to find your perfect blend. Pro Tips Use Ripe Avocados: Ensure your avocados are perfectly ripe for a smoother, creamier texture in your dressing. Adjust Creaminess: Depending on your preference, you can substitute Greek yogurt with sour cream for a tangier flavor. Fresh Herbs Matter: For the best flavor, use fresh cilantro instead of dried; it really enhances the dressing's freshness. Experiment with Spices: Feel free to customize the seasoning by adding a pinch of chili powder or smoked paprika for a kick! {{image_4}} Want a kick? Add jalapeño or chili powder. Start with a small amount. Blend it in with the other ingredients. Taste as you go to find the right heat. This spicy twist enhances the creamy avocado taste. Feel free to play with flavors! Try adding fresh basil or parsley for a new twist. You can also mix in a spoonful of honey for a sweet touch. Another idea is to include a splash of apple cider vinegar for tanginess. Each herb or ingredient can change the flavor profile of your dressing. To make this dressing vegan, swap the Greek yogurt for silken tofu or a plant-based yogurt. This keeps it creamy without dairy. You can also add a bit of nutritional yeast for a cheesy flavor. These changes make the dressing suitable for all diets while still tasting great! To store your creamy avocado cilantro dressing, place it in an airtight container. This keeps it fresh and prevents air from making it brown. Always seal the lid tightly. If you don’t have a container, plastic wrap works in a pinch. Just press it directly onto the surface of the dressing. This dressing lasts about 3 to 5 days in the fridge. The lime juice helps keep it bright and tasty. After a few days, check for any off smells or discoloration. If it looks or smells strange, throw it out. Always trust your senses when it comes to food safety. You can freeze this dressing! Portion it into ice cube trays for easy use. After it freezes solid, pop the cubes into a freezer bag. Label the bag with the date. It lasts about 2 to 3 months in the freezer. When you’re ready to use it, thaw it in the fridge overnight. Give it a good stir before serving to bring back that creamy texture. You can use Creamy Avocado Cilantro Dressing on many dishes. It adds a fresh taste to salads. Drizzle it over mixed greens, tomatoes, and peppers for a burst of flavor. Use it as a dip for fresh veggies like carrots and cucumbers. It also works great on tacos or grilled chicken. Feel free to experiment! Yes, you can make this dressing ahead of time. It stores well in the fridge. Just place it in an airtight container. For the best taste, chill it for at least 30 minutes. This helps the flavors blend nicely. You can keep it for up to three days. Just give it a stir before using. If your dressing is too thick, don’t worry! Simply add water to adjust the texture. Start with one tablespoon of water. Blend it well and check the consistency. Keep adding more water until it reaches your desired thickness. This way, you can enjoy a smooth, pourable dressing every time. This article covered how to make creamy avocado cilantro dressing. We discussed the ingredients, steps, and tips to enhance your dressing. I shared tasty variations, including spicy options and vegan choices. Lastly, we talked about how to store the dressing properly to keep it fresh. Making this dressing adds flavor to your meals. Follow these steps to create your own unique version. Enjoy the burst of freshness on your favorite dishes!

Creamy Avocado Cilantro Dressing Quick and Easy Recipe

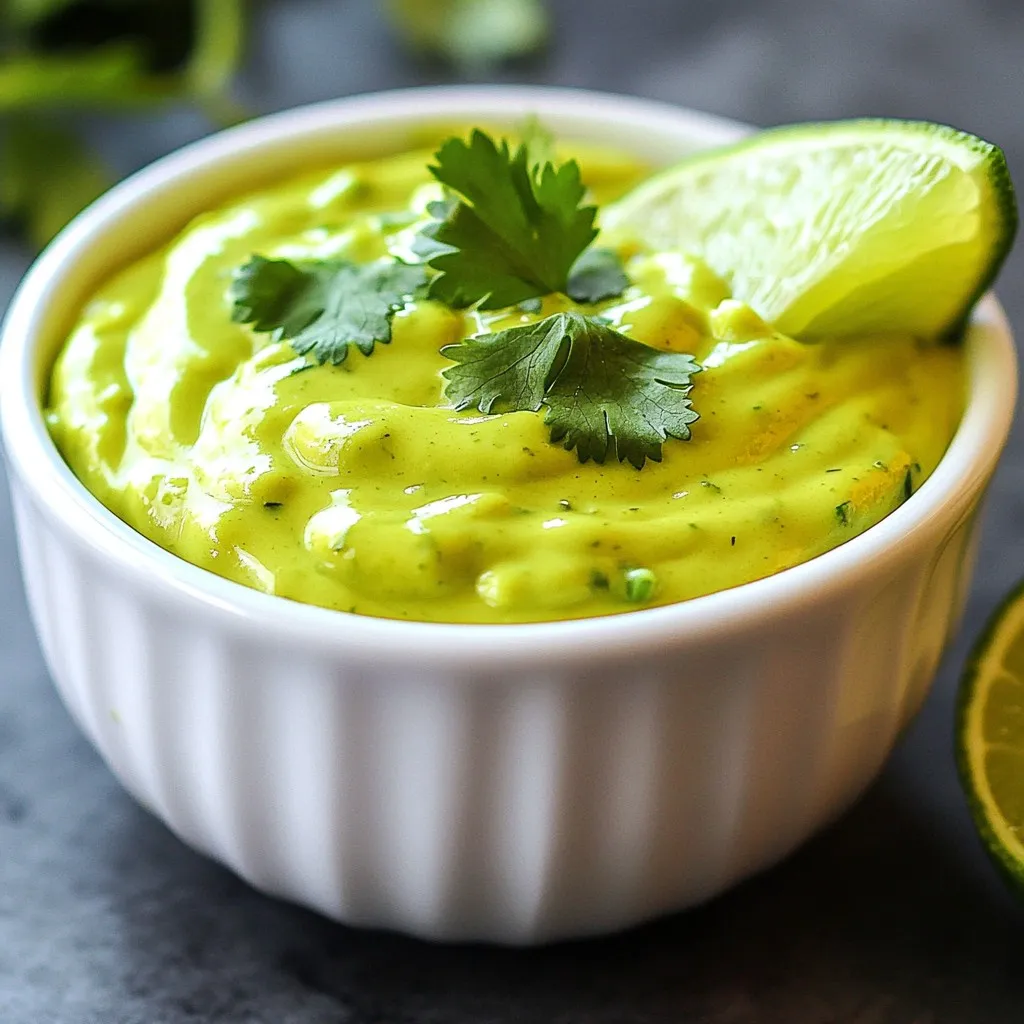
Looking for a creamy dressing that adds zest to any meal? You’re in the right place! This Creamy Avocado Cilantro

- 1 pound ground turkey - 1 medium Granny Smith apple, finely grated - 1/4 cup fresh sage, finely chopped These main ingredients create a unique flavor in the meatballs. Ground turkey gives a lean protein base. The Granny Smith apple adds a sweet and tart twist. Fresh sage brings a lovely herbal note. Together, they make a tasty and healthy dish. - 1/2 cup whole wheat breadcrumbs - 1/4 cup grated Parmesan cheese - 1 large egg, lightly beaten - 2 cloves garlic, minced - 1 teaspoon onion powder - 1 teaspoon salt - 1/2 teaspoon freshly ground black pepper These ingredients hold the meatballs together while adding flavor. Whole wheat breadcrumbs absorb moisture, making the meatballs tender. Grated Parmesan cheese adds a savory depth. The egg binds everything, while garlic and onion powder enhance the taste. Salt and black pepper season the mix perfectly. - Fresh parsley, chopped, for garnish (optional) - Suggested side dishes: cranberry sauce, light salad Fresh parsley not only brightens the dish but also adds color. Serving the meatballs with cranberry sauce or a light salad complements the flavors well. These garnishes and sides elevate the meal, making it even more inviting. {{ingredient_image_2}} - Mixing ingredients In a large bowl, combine 1 pound of ground turkey, 1 grated Granny Smith apple, and 1/4 cup of chopped fresh sage. Add 1/2 cup of whole wheat breadcrumbs, 1/4 cup of grated Parmesan cheese, and 1 lightly beaten egg. Sprinkle in 2 minced garlic cloves, 1 teaspoon of onion powder, 1 teaspoon of salt, and 1/2 teaspoon of black pepper. Use your hands or a spoon to mix everything well. Be gentle; overmixing can make the meatballs tough. - Forming the meatballs After mixing, take a small amount of the meat mixture and roll it into a ball, about 1 inch wide. You should make around 20 meatballs. Place them on a plate as you go. - Searing the meatballs in a skillet Heat 1 tablespoon of olive oil in a large skillet over medium heat. Once hot, add the meatballs in batches. Don't overcrowd the pan; this helps them brown nicely. Sear the meatballs for about 6 to 8 minutes, turning them to get a golden color all around. - Checking for doneness and reheating tips To check if the meatballs are done, use a meat thermometer. They should reach 165°F inside. Once cooked, move them to a plate lined with paper towels to soak up any extra oil. If you have leftovers, you can reheat them in the skillet or microwave until warm. - Arranging meatballs for serving Place the warm meatballs on a serving platter. This makes a beautiful dish to share. - Garnishing suggestions For a pop of color and flavor, sprinkle some chopped fresh parsley on top. You can also serve them with a side of cranberry sauce or a light salad. If you need a different meat, try chicken or pork. They work well in this recipe. For breadcrumbs, you can use crushed crackers or oats. Both give a nice texture. For herbs, you can swap sage with thyme or rosemary. These herbs add a unique taste. You can also experiment with spices like paprika or cumin for extra flavor. Mix the ingredients gently. Overmixing makes meatballs tough. Just mix until everything is combined. Cook the meatballs in batches. Avoid overcrowding the pan. This helps them cook evenly. Turn the meatballs often for a nice brown color. Use a meat thermometer to check the internal temperature. It should reach 165°F. Add more seasoning if you like bold flavors. Try a pinch of red pepper flakes for heat. You can also add a splash of lemon juice for brightness. To keep meatballs moist, don’t skip the grated apple. It adds moisture and flavor. You can also add a little milk to the mix if it seems dry. This keeps your meatballs tender and juicy. Pro Tips Choose the Right Apple: Granny Smith apples provide the perfect tartness to balance the flavor of the turkey. You can experiment with other varieties for a sweeter taste. Don't Overmix: When combining the ingredients, mix gently to avoid tough meatballs. Overmixing can lead to a dense texture. Check for Doneness: Use a meat thermometer to ensure the meatballs reach an internal temperature of 165°F. This guarantees they are fully cooked and safe to eat. Make Ahead: You can prepare the meatballs in advance and store them in the fridge for up to 24 hours. This makes dinner prep a breeze on busy nights! {{image_4}} You can switch up the meat in your meatballs. Ground beef works well for a richer taste. Ground chicken is a lighter choice and keeps the dish healthy. If you want a meat-free option, try a plant-based ground meat. Each option brings a unique flavor to your dish. Adding spices can boost the taste of your meatballs. Try a teaspoon of cumin for warmth or paprika for a mild kick. You can also sneak in some grated vegetables. Carrots or zucchini add moisture and nutrition without changing the flavor much. Pair your meatballs with different sauces. A sweet and tangy cranberry sauce complements the apple flavor. You can also use a creamy dip or simple marinara. For sides, consider a fresh salad or roasted veggies for a balanced meal. Enjoy your delightful creation! To store leftover meatballs, place them in an airtight container. Make sure they cool down first. This keeps them fresh and prevents odors from mixing. Store them in the fridge for up to three days. When ready to eat, simply reheat them on the stove or in the microwave. If you want to save some meatballs for later, freezing is great. Lay them out on a baking sheet in a single layer. Freeze them for about two hours until firm. Then, transfer them to a freezer-safe bag. This way, you can pull out just what you need later. To thaw, move the meatballs to the fridge overnight. If you're in a hurry, you can microwave them on low power. Reheat them until they reach 165°F for safe eating. In the fridge, these meatballs last up to three days. If you freeze them, they can last for up to three months. Just remember, the longer they stay frozen, the more the flavor might fade. Enjoy your tasty meatballs while they’re fresh! You can try many tasty sides with these meatballs. Here are some great options: - Cranberry Sauce: This adds a sweet touch. - Mashed Potatoes: Creamy potatoes balance the meatballs well. - Roasted Vegetables: Carrots, zucchini, or green beans work nicely. - Fresh Salad: A light salad gives a crisp contrast. - Whole Wheat Pasta: Serve the meatballs over pasta for a hearty meal. Yes, you can easily make these meatballs gluten-free. Here’s how: - Use Gluten-Free Breadcrumbs: Swap out whole wheat breadcrumbs for gluten-free ones. - Check Seasonings: Some seasonings may contain gluten. Always read labels. Keeping meatballs moist is key for great flavor. Here are some tips: - Do Not Overmix: Mix just until combined to avoid tough meatballs. - Add Grated Apple: The apple adds moisture and flavor. - Cook at Medium Heat: This helps meatballs cook evenly without drying out. - Check Internal Temperature: Make sure they reach 165°F for safety and juiciness. In this blog post, we covered the key ingredients for apple sage turkey meatballs and how to prepare them. We discussed cooking techniques and tips to ensure they turn out juicy and flavorful. You can try variations with different meats or spices, and we shared storage methods to keep leftovers fresh. Remember, you can customize these meatballs to fit your taste, making them a fun dish for everyone. Enjoy making this healthy meal that adds a twist to your dinner table.

Apple Sage Turkey Meatballs Flavorful and Easy Recipe

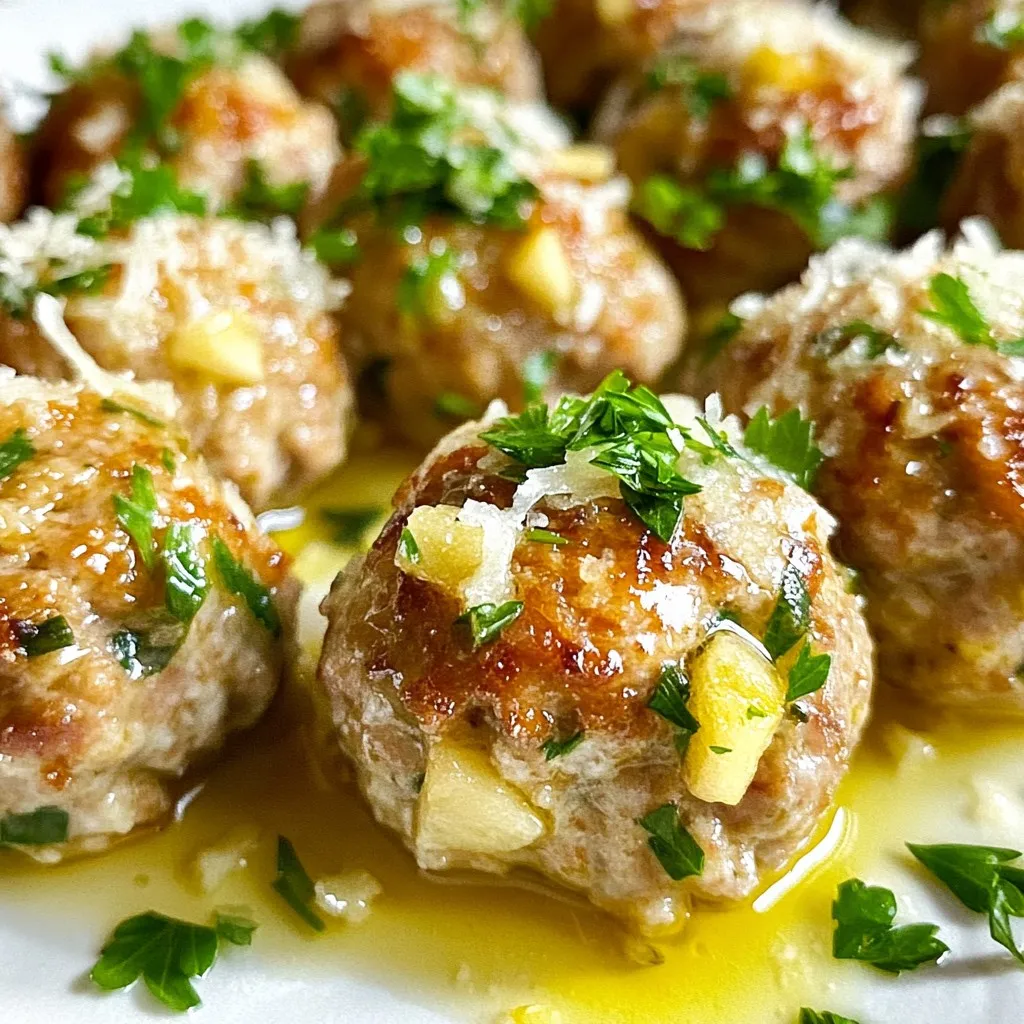
Looking for a delicious and easy recipe to spice up your dinner? Try my Apple Sage Turkey Meatballs! These meatballs

- 1 cup eggnog - 1 cup mascarpone cheese - 1 cup heavy cream - 1/2 cup granulated sugar - 1 teaspoon vanilla extract - 1/2 teaspoon ground nutmeg - 1 package ladyfinger cookies - Cocoa powder for dusting - Extra nutmeg for garnish For this eggnog tiramisu, stick to the exact amounts. Use 1 cup of eggnog. It gives the dessert its rich flavor. Use 1 cup of mascarpone cheese. This makes a creamy texture. The heavy cream helps to create a light, fluffy layer, so measure 1 cup. Use 1/2 cup of granulated sugar for sweetness. Add 1 teaspoon of vanilla extract for flavor depth. A small amount of nutmeg, about 1/2 teaspoon, enhances the holiday feel. Finally, use a full package of ladyfinger cookies. This helps build the layers. I recommend using well-known brands for the best taste. For eggnog, try Land O'Lakes or Southern Comfort. They offer rich flavors that stand out. For mascarpone, Galbani is a trusted choice. It has a smooth, creamy texture. Use heavy cream from Horizon Organic for richness. For sugar, any pure granulated sugar works well. For vanilla extract, look for pure options like Nielsen-Massey. As for ladyfingers, Savoiardi is a great brand to ensure they hold up well. {{ingredient_image_2}} To start, grab a large mixing bowl. Add 1 cup of mascarpone cheese. Next, pour in 1 cup of heavy cream. Then, add 1/2 cup of granulated sugar. Include 1 teaspoon of vanilla extract and 1/2 teaspoon of ground nutmeg. Use an electric mixer. Set it to medium speed. Beat the mixture for about 4-5 minutes. You want it smooth and creamy. Look for soft peaks that hold their shape. Now, take 1 cup of eggnog and pour it into a shallow dish. This will be your soaking station. Quickly dip each ladyfinger cookie into the eggnog. Make sure to soak them, but only for 1-2 seconds per side. You want them moist, not mushy. This step brings in the eggnog flavor. Use a rectangular dish, about 9x13 inches. Start with a layer of soaked ladyfingers. Place them side by side to cover the bottom evenly. Once you have the first layer, it’s time for the cream. Spoon half of your mascarpone mixture over the ladyfingers. Spread it out gently with a spatula. Make sure it reaches all the edges. Next, repeat the process. Add another layer of dipped ladyfingers on top of the cream. Then, spoon the rest of the mascarpone mixture over this layer. Again, smooth it out gently. Now, cover the dish with plastic wrap. Place it in the fridge for at least 4 hours. For best results, leave it overnight. This chilling time lets the flavors blend and helps the dessert set. Before serving, dust the top with cocoa powder. Use a fine sieve for even coverage. For a festive touch, sprinkle some extra ground nutmeg on top. Your Eggnog Tiramisu is now ready to impress! To get the best cream for your tiramisu, you need the right mix. Start with cold mascarpone cheese. This helps it blend better. Combine it with heavy cream, sugar, vanilla, and nutmeg in a bowl. Use an electric mixer on medium speed. Beat for about 4-5 minutes. Look for soft peaks that hold their shape. If it looks too runny, keep mixing a bit longer. This creamy mix makes the tiramisu rich and smooth. Soaking ladyfingers can be tricky. You want them soft but not mushy. Pour 1 cup of eggnog into a shallow dish. Dip each ladyfinger quickly, just 1-2 seconds on each side. If you soak too long, they will fall apart. Lay the soaked ladyfingers in your dish. They should be wet but still hold their shape. This gives the dessert a good texture. When it comes to serving, make it special. For a nice touch, use small glasses or dessert cups. Layer the ingredients inside to show off those pretty layers. Dust the top with cocoa powder right before serving. Use a fine sieve for an even coat. Add some extra nutmeg for a festive look. You can also garnish with fresh mint or a cinnamon stick. This will make your eggnog tiramisu not just tasty but also beautiful. Pro Tips Use Fresh Eggnog: For the best flavor, opt for fresh, high-quality eggnog instead of store-bought. This enhances the creaminess and overall taste of your tiramisu. Chill for Longer: Although 4 hours is the minimum chill time, letting the tiramisu sit overnight allows the flavors to develop even more, resulting in a richer dessert. Layering Technique: When layering the ladyfingers and mascarpone mixture, ensure even distribution to create a balanced dessert. This helps maintain the structure when serving. Garnish Wisely: Use a fine sieve to dust cocoa powder for a smooth finish. Add a sprinkle of freshly grated nutmeg or a cinnamon stick for an aromatic touch that enhances the festive presentation. {{image_4}} You can change the flavor of your eggnog tiramisu. Try using flavored eggnog, like vanilla or spiced. You could also mix in a splash of rum or bourbon for warmth. Consider adding a hint of orange zest for a fresh twist. This will add bright notes to the creamy layers. If you need to make this dessert for special diets, I have some ideas. For a dairy-free version, use coconut cream instead of mascarpone and heavy cream. Almond milk can work great as a substitute for eggnog. If you want to make it gluten-free, use gluten-free ladyfingers. These swaps can make this dessert fit for everyone. Get creative with seasonal flavors! In spring, add fresh berries between the layers. For summer, try a hint of mint or lemon zest. In fall, add pumpkin spice to the cream mixture. Each season brings new tastes that can elevate your eggnog tiramisu. Enjoy exploring these fun options! To keep your eggnog tiramisu fresh, cover it well. Use plastic wrap or a lid. This keeps the dessert safe from odors in the fridge. Store it in the main part of the fridge, not the door. The door's temperature can change too much. Eggnog tiramisu lasts about 3 to 4 days in the fridge. After that, it may lose flavor and texture. You can freeze it too, but the cream may change. If you freeze it, wrap it tightly. It can last for up to 2 months in the freezer. You do not need to reheat eggnog tiramisu. It tastes best cold. If it is frozen, let it thaw in the fridge overnight. This helps the texture stay smooth. Before serving, dust with cocoa powder and add nutmeg for a fresh look. Yes, you can make Eggnog Tiramisu ahead of time. In fact, it tastes better after chilling. The flavors mix well when it sits. I recommend making it one day before you want to serve it. Just cover it tightly with plastic wrap. This keeps it fresh and creamy. If you don’t have eggnog, you can use a few substitutes. Try a mix of milk and cream with spices. Use 1 cup of milk, 1/4 cup of heavy cream, and add 1/2 teaspoon of vanilla. You can also add a pinch of nutmeg and cinnamon for flavor. This gives a similar creamy taste. Serve Eggnog Tiramisu in a few fun ways. You can use individual cups to show off the layers. This makes it look fancy. Dust cocoa powder on top and add extra nutmeg for style. A sprig of mint or a cinnamon stick can add a nice touch, too. Enjoy every bite! In this blog post, I covered how to make Eggnog Tiramisu step by step. We looked at key ingredients, their measurements, and preferred brands. I shared tips for the best cream and soaking ladyfingers without making them soggy. I also provided variations to meet different tastes and dietary needs. Finally, I explained storage options to keep your dessert fresh. With these insights, you can create a delicious treat that impresses everyone. Enjoy your Eggnog Tiramisu and share it with friends and family!

Eggnog Tiramisu Decadent Holiday Dessert Recipe

Craving a festive treat that will wow your guests? Look no further! This Eggnog Tiramisu is the perfect blend of

Older posts
Newer posts
← Previous Page1 … Page107 Page108 Page109 … Page113 Next →

dsad

© 2025 recipesstation • Built with GeneratePress

Our Policies

  • Copyright Policy
  • Cookie Policy
  • GDPR Policy
  • Privacy Policy
  • Disclaimer
  • Terms Of Use

More Information

  • Home
  • About
  • Contact
  • Appetizers
  • Dessert
  • Dinner
  • Drinks
©2025, recipesstation About Back To Top