Skip to content
DisclaimerTerms Of UseGDPR PolicyCookie Policy

recipesstation

  • Home
  • Drinks
  • Appetizers
  • Dinner
  • Dessert
  • About
  • Contact
  • Privacy Policy
DisclaimerTerms Of UseGDPR PolicyCookie Policy

Emily

- 1 pound Italian sausage (mild or spicy) - 1 pound gnocchi (store-bought or homemade) - 1 cup heavy cream - 1 cup chicken broth - 1 cup fresh spinach The main ingredients are key to making this creamy sausage gnocchi skillet. The Italian sausage adds a rich flavor. You can choose mild for a gentle taste or spicy for a kick. Gnocchi gives a soft, pillowy texture. Use store-bought for ease or homemade for a fun challenge. Heavy cream makes the dish rich and smooth. Chicken broth adds depth, while fresh spinach brings color and nutrition. - 1/2 cup sun-dried tomatoes, finely chopped - 2 cloves garlic, finely minced - 1 teaspoon Italian seasoning - Salt and pepper to taste Flavor enhancers elevate this dish. Sun-dried tomatoes add sweetness and tang. Garlic gives a warm, savory note. Italian seasoning combines herbs for a classic taste. Don’t forget to adjust salt and pepper. This helps balance all the flavors perfectly. - Fresh basil leaves - 1 cup mozzarella cheese, freshly shredded Garnishes make your dish look and taste even better. Fresh basil leaves add a pop of color and a fresh scent. Shredded mozzarella melts beautifully, adding creaminess. They’re not just for looks; they enhance the taste too. {{ingredient_image_2}} Start by heating a large skillet over medium heat. Add one tablespoon of olive oil to the skillet. Once the oil is hot, add one pound of Italian sausage. You can choose either mild or spicy. Use a spatula to break the sausage into small pieces. Cook for about 5 to 7 minutes. You want it to be browned and cooked through. Next, add two cloves of finely minced garlic to the skillet. Stir it in for about one minute. This will make your kitchen smell amazing! Then, add half a cup of finely chopped sun-dried tomatoes. Pour in one cup of chicken broth. Sprinkle in one teaspoon of Italian seasoning, along with some salt and pepper. Bring the mixture to a gentle simmer. Let it cook for about 5 minutes to blend the flavors. Now, it’s time to make it creamy! Gradually add one cup of heavy cream while stirring. Allow the mixture to return to a gentle simmer. Carefully fold in one pound of gnocchi. Cook according to the package instructions, usually about 3 to 4 minutes. You’ll know it’s done when the gnocchi float to the surface. Once the gnocchi are cooked, stir in one cup of fresh spinach. Cook until the spinach wilts. Then, fold in one cup of freshly shredded mozzarella cheese. Stir until the cheese melts and the sauce is creamy. Adjust the seasoning with more salt and pepper if needed. Let the skillet sit for a few minutes before serving. This will help the flavors come together even more. To get a smooth, creamy sauce, add the heavy cream slowly. Mix it well with the chicken broth before it simmers. This helps keep the cream from curdling. Stir constantly during this step. If you want it richer, you can add more cream or cheese. Gnocchi cooks quickly. When they float to the top of the skillet, they are done. This usually takes about 3-4 minutes. Don’t forget to stir gently, so they don’t stick together. Overcooking can make them too soft, so watch closely. Taste the dish before serving. Adjust seasoning with salt and pepper to suit your taste. If you like spice, add red pepper flakes for a kick. For a fresh feel, try adding lemon juice or zest. Fresh herbs like basil can also boost the flavor. Pro Tips Quality Sausage: Choose a high-quality Italian sausage for the best flavor. Freshly ground sausage often has more spices and a richer taste. Gnocchi Cooking Time: Keep an eye on the gnocchi as they cook; they are done when they float to the surface. Overcooking can lead to a mushy texture. Spinach Variation: Feel free to substitute fresh spinach with kale or arugula for a different flavor profile and added nutrients. Cheese Melting: For an even creamier dish, use a combination of mozzarella and a sharper cheese like parmesan to enhance the flavor depth. {{image_4}} You can use chicken or turkey sausage in this dish. These options are leaner than pork sausage. They still add great flavor and spice. Just cook them the same way as the Italian sausage. The cooking time might be a little less, so keep an eye on them. For a meat-free take, swap the sausage for vegetable stock. This keeps the dish rich and creamy without any meat. You can also add plant-based sausage for more texture. With these changes, you still get a hearty meal that everyone will enjoy. If you don't have spinach, try using kale or other greens. Kale gives a nice crunch and is packed with nutrients. You can also use Swiss chard or arugula for a different flavor. Just add them when you would add the spinach to keep them fresh and colorful. To store leftovers, let the dish cool first. Then, place it in an airtight container. Make sure to seal it well to keep it fresh. You can store it in the fridge for up to three days. This helps keep the flavors intact. When you're ready to eat, just take it out to reheat. If you want to freeze the creamy sausage gnocchi, you can do that too! Pour the cooled dish into a freezer-safe container. Leave some space at the top for expansion. It can stay in the freezer for up to three months. Just label the container with the date. This way, you’ll remember when you made it. To reheat, I suggest using the stovetop for best results. Pour the gnocchi into a skillet over low heat. Add a splash of chicken broth or cream to keep it moist. Stir often to avoid burning. Heat until it’s warmed through, about 5-7 minutes. You can also use the microwave, but be careful. Heat in short bursts, stirring in between, to keep it creamy. Yes, you can use homemade gnocchi in this dish. Making your own gnocchi adds a personal touch. Here are some benefits and tips: - Taste: Homemade gnocchi can taste fresher and more flavorful. - Texture: You can get the texture just right to your liking. - Ingredients: You control the ingredients, making it healthier if desired. To make homemade gnocchi, combine boiled potatoes, flour, and egg. Roll the dough into small pieces and shape them. Cook them in boiling water until they float, then add them to your skillet. Yes, this recipe is great for meal prep. Here are some suggestions: - Make Ahead: Cook the dish in advance and store it in the fridge. - Reheat: When ready to eat, simply reheat it on the stove or in the microwave. - Divide: Portion the dish into containers to grab and go during the week. This dish tastes even better the next day as the flavors meld together. You can easily add more veggies to your creamy sausage gnocchi. Here are some ideas: - Bell Peppers: Dice them and sauté with the sausage for added crunch and sweetness. - Zucchini: Slice or dice zucchini and add it in with the spinach. - Broccoli: Steam broccoli florets and mix them in for extra nutrition. - Mushrooms: Sauté sliced mushrooms with the sausage for a rich, earthy flavor. Feel free to experiment with your favorite vegetables to make this dish even more vibrant! This article covers how to make a simple yet tasty dish. We explored the main ingredients, like Italian sausage, gnocchi, and spinach, plus flavor enhancers like garlic and sun-dried tomatoes. I shared step-by-step instructions and handy tips for perfecting the creamy sauce. We even looked at fun variations and storage tips. This dish offers flexibility for your taste. Try different proteins and greens to match your style. Enjoy cooking and savoring this dish!

Creamy Sausage Gnocchi Skillet Easy One-Pan Dinner

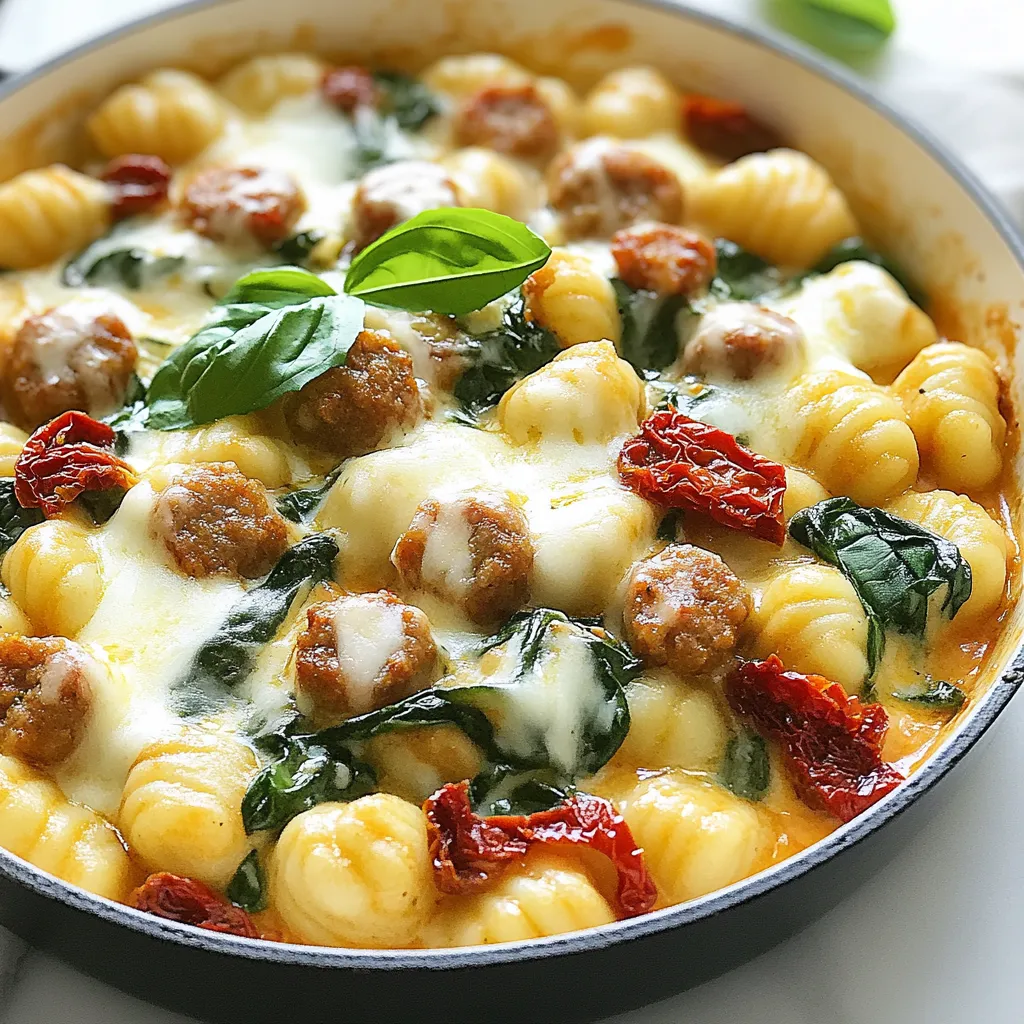
Looking for a quick and tasty dinner? Try my Creamy Sausage Gnocchi Skillet! This easy one-pan dish offers a delightful

- 1 ½ cups crushed graham crackers - ½ cup unsalted butter, melted - 1 (8 oz) package cream cheese, softened at room temperature - ½ cup powdered sugar - 1 teaspoon vanilla extract - 1 cup heavy whipping cream - 1 cup crushed candy canes (reserve a little for garnish) - ¼ cup peppermint extract - 1 tablespoon chocolate syrup (for drizzling) To make the No-Bake Candy Cane Pie, you need a few simple ingredients. First, the crust uses crushed graham crackers and melted butter. This mix creates a sweet base. Next, the filling is all about rich flavors. Cream cheese adds creaminess, while powdered sugar brings sweetness. Vanilla extract lifts the taste, making it delightful. The heavy whipping cream gives the filling a light and fluffy texture. The star of the pie is crushed candy canes. They add a crunchy bite and a minty flavor. Reserve some for the topping! Finally, peppermint extract gives an extra burst of mint. A drizzle of chocolate syrup adds a fun finish. With these ingredients, you will make a pie that brings joy and holiday spirit to any gathering. {{ingredient_image_2}} - Combine 1 ½ cups of crushed graham crackers with ½ cup of melted unsalted butter. - Stir until the mixture looks like wet sand. - Press the mixture firmly into a 9-inch pie dish. - Chill the crust in the refrigerator for 15 minutes. - In a large bowl, beat 1 (8 oz) package of softened cream cheese until smooth. - Gradually add ½ cup of powdered sugar and 1 teaspoon of vanilla extract. - Mix until everything is well combined. - In another bowl, pour in 1 cup of heavy whipping cream. - Whip the cream on high speed until stiff peaks form. - Be careful not to over-whip it, or it will turn grainy. - Gently fold the whipped cream into the cream cheese mixture. - Add in 1 cup of crushed candy canes and ¼ cup of peppermint extract. - Pour the creamy filling into the chilled graham cracker crust. - Use a spatula to smooth the top for an even finish. - Cover the pie with plastic wrap and refrigerate for at least 4 hours. - For the best flavor, let it chill overnight. - Just before serving, drizzle 1 tablespoon of chocolate syrup over the pie. - Sprinkle reserved crushed candy canes on top for a festive touch. To avoid grainy cream, do not over-whip the heavy cream. Whip it until stiff peaks form. Keep an eye on it to prevent over-whipping. When mixing the whipped cream into the cream cheese, use a gentle folding technique. This keeps the filling light and fluffy. Insert the spatula at the bottom and fold it over the top. Repeat until combined, but do not stir vigorously. For an extra minty kick, add a bit of peppermint extract. Just a teaspoon can boost the flavor. You can also mix in chocolate flavors. A little cocoa powder or melted chocolate can create a rich twist. Feel free to experiment with other flavors too. Adding crushed cookies or nuts can make it unique. Serve each slice with a dollop of whipped cream on top. This adds a nice touch and makes it look pretty. A drizzle of chocolate syrup on each slice will make it even more inviting. For garnishing, sprinkle some of the reserved crushed candy canes on top. It adds color and a festive feel. You can also use fresh mint leaves or chocolate shavings for an elegant finish. Pro Tips Chill the Mixing Bowl: Before whipping the cream, chill your mixing bowl and beaters in the refrigerator for about 15 minutes. This helps the cream whip up faster and achieve better volume. Use Fresh Candy Canes: For the best flavor and texture, use fresh candy canes. Older candy canes may lose their crunch and flavor intensity. Mixing Technique: When folding the whipped cream into the cream cheese mixture, use a gentle motion to avoid deflating the whipped cream. This will keep your filling light and airy. Serving Temperature: For the best taste and texture, allow the pie to sit at room temperature for about 10-15 minutes before serving. This will make slicing easier and enhance the flavors. {{image_4}} You can switch up the crust for your No-Bake Candy Cane Pie. Instead of graham crackers, try an Oreo or chocolate cookie crust. This option adds a rich, chocolatey flavor. If you need a gluten-free choice, look for gluten-free graham crackers or chocolate cookies. Both options are tasty and easy to work with. Get creative with flavors! You can add different types of crushed candies. Try using crushed peppermint patties or butterscotch candies for a twist. You can also experiment with fruit flavors. Adding fruit liqueurs or purees can bring a fresh taste. Raspberry or strawberry flavors mix well with peppermint, creating a unique dessert. If you find the pie too sweet, you can reduce the powdered sugar. This change allows the peppermint flavor to shine. Using unsweetened whipped cream can also help balance the sweetness. This way, you get a light and refreshing dessert, perfect for any holiday table. To keep your No-Bake Candy Cane Pie fresh, place it in the fridge. Use an airtight container to prevent it from drying out. If you don't have a container, cover the pie with plastic wrap. This method helps maintain its flavor and creaminess. You can freeze this pie for later enjoyment. First, let it chill in the fridge for about 4 hours. Once set, wrap the pie tightly in plastic wrap. Then, place it in a freezer-safe container. This pie can stay fresh in the freezer for up to two months. When you're ready to eat it, move the pie to the fridge for a few hours to thaw. In the fridge, the No-Bake Candy Cane Pie stays fresh for about five days. Look for signs of spoilage like a changed smell or discoloration. If the whipped cream looks grainy or the filling seems watery, it’s time to toss it. Always trust your senses when it comes to food freshness. Yes, you can make this pie in advance. I suggest chilling it for at least 4 hours. For the best flavor and texture, let it chill overnight. This allows the filling to set properly and the flavors to meld. If you don't have graham crackers, you can use other options. Crushed Oreos make a great substitute. You can also try crushed vanilla wafers or any sweet cookie. Just make sure to mix them with melted butter. To adjust the recipe, reduce the ingredients proportionally. If you want to make half the pie, use half the ingredients. For example, use ¾ cup of crushed graham crackers and ¼ cup of unsalted butter. Adjust each ingredient similarly. While chilling overnight isn’t strictly necessary, it improves the pie. Longer chilling helps the filling set more firmly. It also enhances the flavor, making every bite taste even better. If you're in a hurry, 4 hours works too. Yes, you can use sugar substitutes. Opt for powdered erythritol or stevia in place of powdered sugar. Make sure to check the conversion ratios on the package, as some substitutes are sweeter than regular sugar. Adjust accordingly for the best taste. This pie is easy and fun to make. You combine graham crackers, cream cheese, and candy canes for a sweet treat. Follow the steps for a smooth texture and tasty flavors. Use the tips for garnish and storage to make it shine. Feel free to try different crusts and flavors too! I hope you enjoy making this pie as much as I do. It’s a festive delight for everyone!

No-Bake Candy Cane Pie Festive Holiday Delight

Get ready to impress your guests with a festive No-Bake Candy Cane Pie! This easy, no-bake dessert combines creamy goodness

To make this tasty dish, you will need: - 4 boneless, skinless chicken breasts - 4 ounces brie cheese, rind removed and sliced - 1 cup cranberry sauce (homemade or store-bought for convenience) - 1 teaspoon garlic powder - 1 teaspoon dried thyme - 1 teaspoon salt - ½ teaspoon black pepper - 2 tablespoons extra-virgin olive oil - 1 cup fresh spinach (optional for added nutrition and color) - 1 tablespoon fresh parsley, finely chopped (for garnish) You can swap some ingredients based on your taste or what you have on hand. - Chicken Breasts: Use chicken thighs for more flavor and moisture. - Brie Cheese: Try cream cheese or goat cheese for a different taste. - Cranberry Sauce: Substitute with apple butter for a sweeter option. - Spinach: You can replace spinach with kale or arugula for variety. - Olive Oil: Use butter or avocado oil for different flavors while cooking. To boost nutrition, consider adding: - Fresh spinach: This adds vitamins and a nice color. - Mushrooms: Sauté some mushrooms for an earthy flavor. - Nuts: Chopped walnuts or almonds can add a crunchy texture. - Sun-dried tomatoes: These add a tangy taste and more nutrients. These options let you customize the dish to your liking while keeping it healthy and delicious. {{ingredient_image_2}} First, preheat your oven to 375°F (190°C). This step is key for even cooking. While the oven heats, take your chicken breasts. Place them between two sheets of plastic wrap or parchment paper. Using a meat mallet or rolling pin, gently pound the chicken to about ½ inch thick. This helps the chicken cook evenly and makes stuffing easier. In a small mixing bowl, combine the garlic powder, dried thyme, salt, and black pepper. Use your hands to rub this mix onto both sides of each chicken breast. This seasoning gives the chicken great flavor. On one half of each chicken breast, layer the sliced brie cheese. Add a spoonful of cranberry sauce on top. If you want extra color and nutrition, add fresh spinach too. Now, heat two tablespoons of extra-virgin olive oil in a large oven-proof skillet over medium-high heat. Once hot, place the stuffed chicken breasts in the skillet. Sear them for about 3-4 minutes on each side until they turn golden brown. After searing, transfer the skillet to your preheated oven. Bake the chicken for 20-25 minutes, or until the internal temperature reaches 165°F (75°C). This ensures the chicken is safe to eat. Once done, let the chicken rest for about 5 minutes before serving. This resting time helps keep the chicken juicy. Before serving, sprinkle fresh parsley on top for a lovely finish. To keep the chicken juicy, start with good quality meat. Choose fresh, boneless, skinless chicken breasts. Pounding the chicken to an even thickness helps it cook evenly. After cooking, let it rest for five minutes. This step makes the juices settle back in, keeping each bite moist. You can also add a bit of olive oil to the chicken before cooking. This extra fat helps lock in flavor and moisture. When stuffing chicken, don’t overfill it. Too much stuffing can cause the chicken to burst open. Use about two tablespoons of cranberry sauce and a few slices of brie per breast. Fold the chicken over gently to create a pocket. If needed, secure the edges with toothpicks. This keeps the filling inside during cooking, so you get that burst of flavor when you cut into it. One common mistake is cooking the chicken at too high a heat. This can brown the outside too quickly while leaving the inside raw. Aim for medium-high heat when searing, then transfer to the oven. Always use a meat thermometer to check for doneness. Chicken should reach 165°F (75°C) at its thickest part. Lastly, don't skip the resting time after cooking. This step is key for juicy, flavorful chicken. Pro Tips Use Fresh Ingredients: Fresh spinach and high-quality brie can elevate the flavor and texture of your dish. Always opt for the freshest ingredients available to enhance the overall taste. Properly Pound the Chicken: Evenly pounding the chicken breasts not only helps them cook uniformly but also makes them easier to stuff. Aim for a thickness of about ½ inch for the best results. Let the Chicken Rest: After baking, allowing the chicken to rest for about 5 minutes is crucial. This step ensures that the juices redistribute throughout the meat, resulting in a juicy and flavorful dish. Experiment with Fillings: Feel free to get creative with the stuffing! Adding nuts, herbs, or different types of cheese can bring new flavors and textures to your stuffed chicken. {{image_4}} You can swap brie cheese with other cheeses to change the taste. Try goat cheese for a tangy kick. Cream cheese gives a smooth and rich texture. For a sharper bite, use aged cheddar. Each cheese brings its own unique flavor. Mix and match based on what you like. To make a vegetarian version, skip the chicken. Use portobello mushrooms instead. These meaty caps can hold the stuffing well. Fill them with brie and cranberry sauce as before. You can also add spinach for nutrition. Bake them until they are tender and juicy. Pair your chicken with tasty sauces. A balsamic glaze adds sweetness and depth. A simple garlic butter sauce can also work wonders. As for sides, roasted vegetables are a great match. A light salad with mixed greens brings freshness. You can also serve the chicken on a bed of wild rice or quinoa for a complete meal. After enjoying your Cranberry Brie Stuffed Chicken, let the leftovers cool down. Place them in an airtight container. This keeps the chicken fresh and tasty. Store it in the fridge for up to three days. If you want to keep it longer, freezing is a great option. To reheat, preheat your oven to 350°F (175°C). Place the chicken in an oven-safe dish. Cover it with foil to keep it moist. Heat for about 15-20 minutes. This method helps keep the chicken juicy and warm. You can also use a microwave, but be careful. The chicken might dry out if heated too long. If you want to freeze the chicken, wrap each piece tightly in plastic wrap. Then, place the wrapped chicken in a freezer bag. Remove as much air as you can to prevent freezer burn. You can freeze it for up to three months. When ready to eat, thaw it in the fridge overnight before reheating. Enjoy your delicious meal again! I love serving this dish with roasted vegetables. They add color, flavor, and nutrients. You can try carrots, Brussels sprouts, or green beans. Another great option is a light salad. A simple mix of greens with a lemon vinaigrette works well. For something hearty, serve it on a bed of wild rice or quinoa. These sides balance the rich flavors of the chicken. Yes, you can prepare the stuffed chicken ahead of time. Stuff and sear the chicken, then store it in the fridge for up to a day. When you are ready to bake it, just follow the cooking steps. You may need to add a few extra minutes to the baking time if it’s cold. This makes dinner easy on busy nights. To check if the chicken is done, use a meat thermometer. The internal temperature should reach 165°F (75°C). Insert the thermometer into the thickest part of the chicken. If you don’t have a thermometer, cut into the chicken. The juices should run clear, and the meat should be white, not pink. Let the chicken rest for five minutes after baking for the best flavor. Cranberry Brie Stuffed Chicken combines rich flavors with a simple method. We covered ingredients, cooking steps, and variations. By adding alternative cheeses or vegetarian options, you can change the dish to fit your taste. Remember to store leftovers well and reheat properly for the best results. With these tips, you can impress anyone at your next meal. Enjoy your cooking journey and keep experimenting with flavors and techniques!

Cranberry Brie Stuffed Chicken Flavorful Dinner Delight

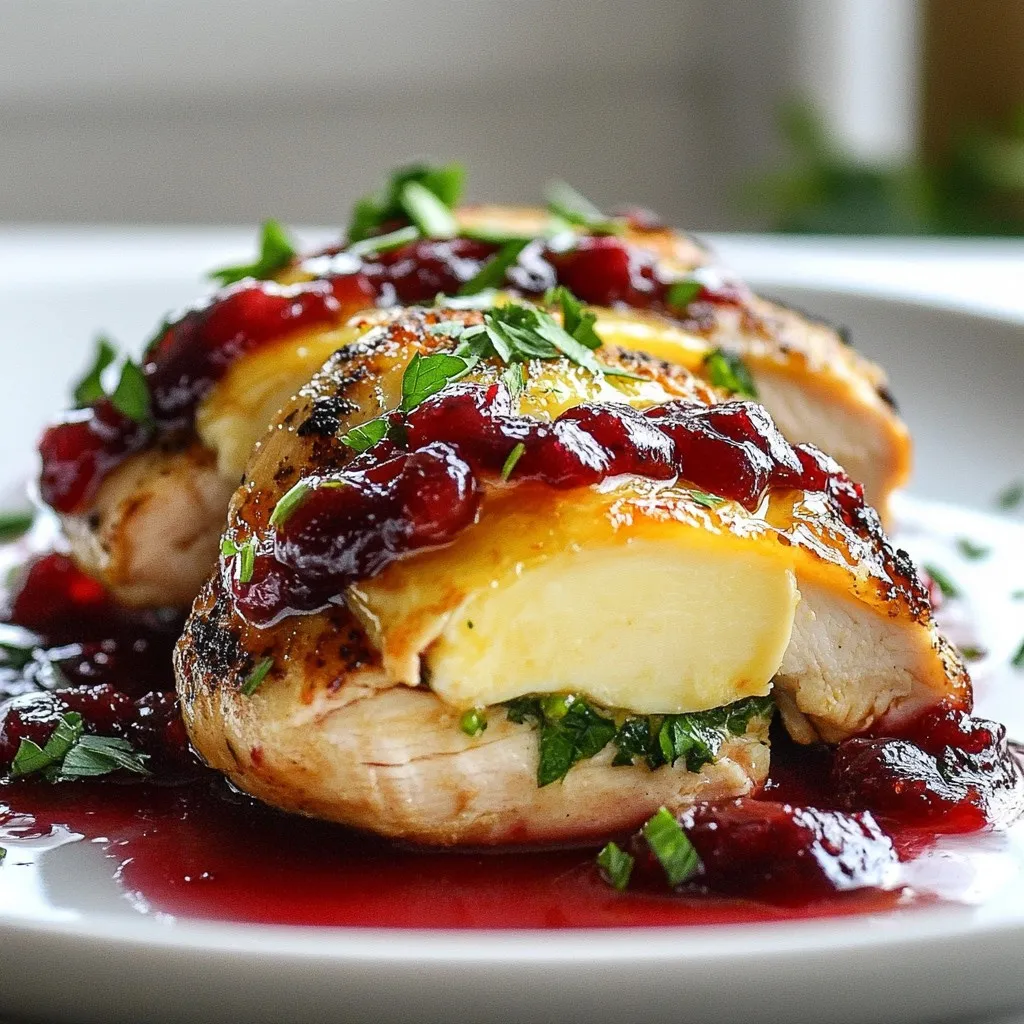
Looking for a tasty dinner that wows? Try my Cranberry Brie Stuffed Chicken! This dish combines juicy chicken breast with

- 2 cups all-purpose flour - 1 teaspoon baking powder - 1/2 teaspoon baking soda - 1/2 teaspoon ground nutmeg - 1/4 teaspoon ground cinnamon - 1/2 teaspoon salt - 1/2 cup unsalted butter, softened - 1 cup packed brown sugar - 1/2 cup granulated sugar - 2 large eggs, at room temperature - 2 teaspoons pure vanilla extract - 1 cup eggnog - 1/2 cup finely chopped pecans or walnuts (optional) - Whipped cream for topping (optional) You can add chopped pecans or walnuts for extra flavor and crunch. Whipped cream also makes a great topping. If you do not have eggnog, you can use a mix of milk, cream, and spices. You can swap the nuts for chocolate chips if you prefer. Use a dairy-free butter and egg substitute for a vegan version. {{ingredient_image_2}} 1. Start by preheating your oven to 350°F (175°C). This helps the bars bake evenly. 2. Grab a 9x13 inch baking pan. Lightly grease it or line it with parchment paper. This ensures easy removal later. 3. In a medium bowl, mix the dry ingredients. Combine 2 cups of all-purpose flour, 1 teaspoon of baking powder, 1/2 teaspoon of baking soda, 1/2 teaspoon of ground nutmeg, 1/4 teaspoon of ground cinnamon, and 1/2 teaspoon of salt. Set this mixture aside. 1. In a large mixing bowl, cream together 1/2 cup of softened unsalted butter, 1 cup of packed brown sugar, and 1/2 cup of granulated sugar. Mix on medium speed until light and fluffy, about 3 to 5 minutes. 2. Add 2 large eggs one at a time. Beat well after each addition. Then, mix in 2 teaspoons of pure vanilla extract. 3. Gradually add the dry mixture. Alternate with 1 cup of eggnog. Start and end with the flour mixture. Mix gently to avoid overmixing. 4. If you like, fold in 1/2 cup of finely chopped pecans or walnuts. This adds a nice crunch. 5. Pour the batter into the prepared pan. Spread it out evenly with a spatula. 1. Bake in your preheated oven for 25 to 30 minutes. Check if a toothpick comes out clean or with a few moist crumbs. 2. Let the cookie bars cool in the pan for at least 10 minutes. This makes cutting easier. 3. Once cool enough, cut into generous squares. For a festive touch, top each square with whipped cream before serving. 4. To impress guests, arrange the bars on a decorative platter. Dust lightly with powdered sugar or add a sprinkle of nutmeg for a special look. To get the best texture, use room temperature ingredients. This includes butter, eggs, and eggnog. They blend better, creating a smooth batter. When mixing, be careful not to overmix after adding dry ingredients. This helps keep your cookie bars soft and chewy. Adding chopped nuts gives a nice crunch and flavor boost. I like to use pecans or walnuts, but you can skip them if you prefer. One common mistake is not measuring ingredients correctly. Too much flour can make the bars dry. Always use a spoon to fluff up the flour before scooping it into your measuring cup. Another mistake is not letting the bars cool before cutting. They need time to set. If you cut them too soon, they may fall apart. For a fun and festive look, arrange the cookie bars on a pretty platter. You can dust them lightly with powdered sugar for a snowy effect. A sprinkle of nutmeg adds a touch of spice and color. For extra flair, place a cinnamon stick next to each bar. This not only looks nice, but it also adds aroma when served. Pro Tips Use Room Temperature Ingredients: Let your butter, eggs, and eggnog come to room temperature before mixing. This helps create a smoother batter and ensures even baking. Don't Overmix: When combining dry and wet ingredients, mix until just combined. Overmixing can lead to tough cookie bars. Check for Doneness: For perfectly baked cookie bars, start checking for doneness a few minutes before the suggested baking time. A toothpick should come out clean or with a few moist crumbs. Experiment with Flavor: Feel free to customize your eggnog cookie bars by adding chocolate chips or swapping out nuts for dried fruits for a unique twist. {{image_4}} You can change the flavor of your eggnog cookie bars easily. Try using different spices, like ginger or cardamom, for a unique twist. Instead of eggnog, you can use chai tea or spiced milk. This gives a different taste while keeping the festive feel. You may also add a splash of rum extract for a more adult flavor. If you need to adjust for dietary needs, there are many options. To make these bars gluten-free, swap the all-purpose flour for a gluten-free blend. For a dairy-free version, use coconut oil or a dairy-free butter substitute. You can replace eggs with flax eggs or applesauce for a vegan option. Each switch can make these bars fit your needs without losing flavor. Seasonal add-ins can make your cookie bars even better. Try folding in dried cranberries or chopped apples for a fruity touch. You can also mix in mini chocolate chips or white chocolate for a sweet surprise. Top the bars with crushed candy canes around the holidays. These fun twists keep the flavors fresh and exciting all season long. To keep your eggnog cookie bars fresh, store them in an airtight container. This helps prevent them from drying out. I recommend placing parchment paper between layers to avoid sticking. You can store them at room temperature for up to three days. If you want to keep them longer, refrigerate them. They will stay fresh for about a week in the fridge. Freezing is a great option for longer storage. First, let the cookie bars cool completely. Then, cut them into squares. Wrap each square tightly in plastic wrap. After wrapping, place the squares in a freezer-safe bag or container. Make sure to remove as much air as possible. They can last up to three months in the freezer. When you’re ready to enjoy, just thaw them in the fridge overnight. If you want to enjoy your cookie bars warm, reheating is easy. Preheat your oven to 350°F (175°C). Place the cookie bars on a baking sheet. Heat them for about 5 to 10 minutes. You can also use the microwave. Just heat them for 10 to 15 seconds. Be careful not to overheat, or they may become dry. Serve them warm for a cozy treat! To cut eggnog cookie bars, wait until they cool. Use a sharp knife. Start at the center and cut straight down. This gives you clean, neat squares. If the bars are warm, they might crumble. For best results, chill them for a bit before cutting. Yes, you can use other types of milk. Whole milk, almond milk, or even soy milk work well. However, using eggnog adds a rich flavor and festive taste. If you skip the eggnog, you may want to add spices like nutmeg or cinnamon to keep the flavor strong. Eggnog cookie bars stay fresh for about 3-5 days. Store them in an airtight container at room temperature. For longer storage, you can freeze them. They can last up to three months in the freezer. Just make sure to wrap them tightly! We explored key ingredients, including optional items and smart substitutions. The step-by-step instructions covered prep, baking, and serving. I shared tips for perfect texture and flavor, plus common mistakes to watch out for. We discussed fun variations for flavor and dietary needs, along with storage and reheating methods. Use these insights to create tasty eggnog cookie bars. Enjoy your baking and share your joyful treats with friends and family!

Eggnog Cookie Bars Festive and Flavorful Treat

Get ready for a festive treat that will delight your taste buds! Eggnog Cookie Bars are a delicious twist on

- 4 salmon fillets - 1 cup teriyaki sauce - 2 tablespoons honey - 1 tablespoon fresh ginger, finely grated - 2 garlic cloves, minced Salmon is the star of this dish. You want fresh fillets for the best taste. I love using a good teriyaki sauce. It adds a sweet and savory touch. Mixing in honey, ginger, and garlic boosts the flavor. Together, they create a delicious marinade. Letting the salmon soak in this mix makes it even better. - 1 cup broccoli florets - 1 cup bell peppers, thinly sliced (mix of red and yellow) - 1 cup snap peas The veggies add color and crunch. I like to use a mix of broccoli, bell peppers, and snap peas. They cook well and taste great with salmon. Tossing them in sesame oil adds a rich flavor. This mix gives a nice balance to your meal. - 2 tablespoons sesame oil - 1 tablespoon sesame seeds (for garnish) - 2 green onions, thinly sliced (for garnish) - Cooked jasmine rice (for serving) For garnish, I sprinkle sesame seeds and sliced green onions. They add a nice touch to the dish. Serving this meal over jasmine rice makes it hearty. The rice soaks up the tasty sauce. You can also add a lemon slice for extra zing. This meal is not just good; it looks great too! {{ingredient_image_2}} - Preheat oven to 400°F (200°C). - In a bowl, mix teriyaki sauce, honey, ginger, and garlic. - Whisk until smooth to make a tasty marinade. - Place salmon fillets skin-side down on a lined sheet pan. - Pour half the marinade over each fillet. - Let them marinate for 15 minutes. This helps the salmon soak up the flavors. - In a separate bowl, add broccoli, bell peppers, and snap peas. - Drizzle sesame oil over the veggies. - Toss gently until the vegetables are well-coated. - Arrange the marinated salmon fillets in the middle of the sheet pan. - Scatter the veggies around the salmon for a colorful look. - Drizzle the rest of the marinade over the veggies for added flavor. - Place the sheet pan in your preheated oven. - Bake for 15-20 minutes or until the salmon flakes easily with a fork. - For a shiny glaze, switch to broil for 2-3 minutes. - Keep an eye on it to avoid burning. This method gives you a meal that is both easy and full of flavor! To know if your salmon is done, check for flakiness with a fork. The fish should easily break apart. You can also use a meat thermometer. The salmon is perfect at 145°F. This simple step helps ensure your meal is safe and tasty. Want to boost the taste? Add more spices to your marinade. Try a pinch of red pepper flakes for heat or a sprinkle of ground black pepper for depth. When serving, garnishing with lemon brightens the dish. A slice of lemon adds color and zest, making your plate pop. Pair your salmon with fluffy jasmine rice. The rice soaks up the teriyaki sauce well. You can also serve it with roasted vegetables or a fresh salad. For guests, try creative serving methods. Use a large platter to arrange the salmon and veggies. This shows off the vibrant colors and makes your meal look gourmet. Pro Tips Marinate Longer for More Flavor: For an even deeper flavor, consider marinating the salmon for up to 30 minutes. This allows the teriyaki sauce to penetrate the fish more thoroughly. Use Fresh Ingredients: Fresh ginger and garlic will enhance the flavor significantly compared to dried versions. Always opt for fresh when possible! Variety of Vegetables: Feel free to mix in additional vegetables such as carrots or zucchini. This not only adds color but also boosts nutritional value. Check Salmon Doneness: Use a fork to gently flake the salmon at its thickest part. If it flakes easily and is opaque, it’s ready to enjoy! {{image_4}} You can switch up the veggies in this dish. Try using asparagus or zucchini instead of broccoli. Cauliflower also works well. Seasonal choices keep your meal fresh. In spring, use sweet peas or fresh green beans. In summer, add corn or cherry tomatoes for a burst of color. If you're looking for a change, consider other sauces. Honey-soy sauce is a great swap. You can also use a garlic-lime mix for a zesty kick. For something bold, try a spicy chili sauce. Mixing flavors opens doors to unique tastes. Consider adding citrus juice for brightness. You don’t have to bake your salmon. Grilling gives it a nice smoky flavor. Just make sure to use a grill pan if you’re inside. Pan-searing is another quick option. It creates a crispy skin that many love. If you have an air fryer, it can work wonders too. Cook it at 400°F for about 10-12 minutes. This method keeps the salmon moist and flavorful. To store your Teriyaki Salmon leftovers, first let them cool. Place the salmon and vegetables in an airtight container. You can use glass or plastic containers with tight lids. Make sure to separate the salmon from the rice if you have any. This helps keep everything fresh. Store the container in the fridge. Your dish will stay good for up to three days. When you want to reheat your salmon, do it gently. I recommend using the oven. Preheat it to 350°F (175°C). Place the salmon and veggies on a baking sheet. Cover them with foil to keep moisture in. Heat for about 10-15 minutes or until warm. To keep your salmon juicy, avoid the microwave. Microwaving can dry it out quickly. If you want to freeze the salmon and veggies, start by placing them in freezer bags. Remove as much air as you can to prevent freezer burn. For best results, freeze them within two days of cooking. When you are ready to eat, take the bag out and place it in the fridge overnight to thaw. After thawing, reheat gently in the oven or on the stove. This way, you can enjoy your Teriyaki Salmon later with all its great flavor. Yes, you can use frozen salmon. Thaw it first in the fridge for safety. You want it to be cold but not still frozen. This ensures even cooking. If you start with frozen salmon, increase the baking time by a few minutes. Just keep an eye on it. The salmon should flake easily when it's done. To tell if salmon is done, look for color change. The flesh will change from a bright pink to a light pink. It should also flake easily with a fork. If you have one, use a meat thermometer. The internal temperature should reach 145°F (63°C). This ensures it’s safe to eat. Yes, you can prepare this dish ahead of time. Marinate the salmon and store it in the fridge for up to 24 hours. This helps the flavors soak in. You can also chop the veggies in advance. Just keep them in the fridge until you're ready to cook. This makes dinner time quick and easy! This blog covered a tasty salmon recipe with fresh vegetables and a sweet marinade. You learned how to prepare and cook everything perfectly while exploring different options and tips. Remember, cooking can be fun and easy. Don’t hesitate to try new flavors or make adjustments. Fresh ingredients and your creativity will make this meal shine. Enjoy every bite and share it with friends. Happy cooking!

Sheet Pan Teriyaki Salmon Easy and Flavorful Meal

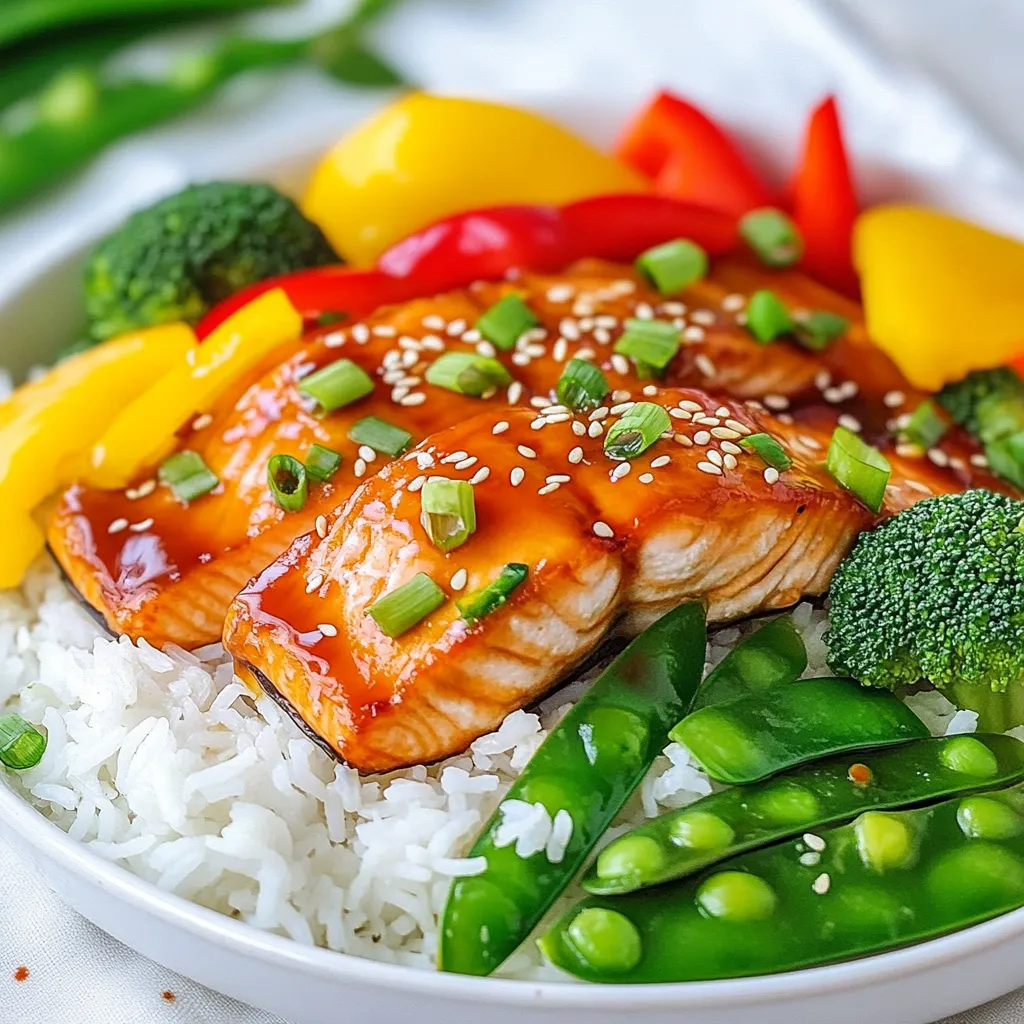
If you’re looking for a simple yet tasty dinner, try this Sheet Pan Teriyaki Salmon. With just a few ingredients,

- 4 chicken thighs, bone-in and skin-on - 2 tablespoons Dijon mustard - 1 tablespoon whole grain mustard - 3 cloves garlic, finely minced - 1 tablespoon honey - 1 tablespoon extra virgin olive oil - 1/2 cup low-sodium chicken broth - 1 teaspoon fresh thyme leaves - 1/2 teaspoon sea salt - 1/4 teaspoon freshly cracked black pepper - Fresh parsley, chopped {{ingredient_image_2}} First, preheat your oven to 400°F (200°C). This helps the chicken cook evenly. While the oven warms up, take your chicken thighs out. Pat them dry with paper towels. This step is key for crispy skin. Place the chicken in a large baking dish, skin-side up. In a medium bowl, mix two tablespoons of Dijon mustard and one tablespoon of whole grain mustard. Add three cloves of minced garlic and one tablespoon of honey. Then, pour in one tablespoon of olive oil. Toss in one teaspoon of fresh thyme leaves, half a teaspoon of sea salt, and a quarter teaspoon of black pepper. Whisk this mixture until smooth. This blend adds great flavor to your chicken. Now, use a brush or your hands to coat each chicken thigh with the mustard mixture. Make sure to cover every part well. Next, pour half a cup of chicken broth into the bottom of the dish. This keeps the chicken moist. Place the dish in the oven and bake for 35 to 40 minutes. Check that the chicken skin turns golden brown. Use a meat thermometer to ensure it hits 165°F (75°C). After cooking, let the chicken rest for five minutes. This helps keep it juicy. Finish with chopped parsley for a fresh touch before serving. To get crispy chicken skin, start by patting the chicken thighs dry. Moisture makes the skin soggy. Next, coat the skin with the mustard mixture. Use a brush for even coverage. Bake the chicken skin-side up in a hot oven. This helps the skin crisp up nicely. Juiciness is key for great chicken. Use bone-in, skin-on thighs for the best flavor. The bones keep the meat moist as it cooks. Also, pour chicken broth into the baking dish. This adds steam and moisture. Let the chicken rest after baking. This step helps the juices stay inside. Avoid cooking chicken straight from the fridge. Always let it sit at room temperature for 15 minutes. This helps it cook evenly. Don’t skip the drying step; it’s crucial for crispy skin. Lastly, always check the internal temperature. Chicken should reach 165°F to be safe to eat. Pro Tips Dry the Chicken: Patting the chicken thighs dry before applying the mustard mixture ensures the skin gets crispy during baking. Use a Meat Thermometer: To guarantee perfect doneness, check the internal temperature of the chicken; it should reach 165°F (75°C). Let it Rest: Allow the chicken to rest for about 5 minutes after baking to let the juices redistribute for maximum juiciness. Garnish with Fresh Herbs: Sprinkling freshly chopped parsley not only adds color but also enhances the flavor profile of the dish. {{image_4}} You can switch up your mustards for fun flavors. Dijon mustard adds a sharp taste. Whole grain mustard brings a nice crunch and texture. If you want something spicy, try hot English mustard. For a sweet kick, honey mustard fits perfectly. Each type of mustard changes the dish's flavor profile, making it unique. Herbs and spices make your chicken even better. Fresh thyme adds a nice earthy flavor. You can also use rosemary for a strong, fragrant taste. Add a pinch of paprika for a little heat. If you like garlic, try adding more minced garlic to boost the flavor. Mix and match to find your favorite blend! Pair your French mustard chicken with delicious sides. Roasted vegetables like carrots and Brussels sprouts complement the dish well. A light salad with greens and a tangy vinaigrette adds freshness. Creamy mashed potatoes or fluffy rice can soak up the sauce, creating a rich meal. Choose your sides based on what you love! Once your French Mustard Chicken is cool, store it in an airtight container. Place it in the fridge. It will last for about 3 to 4 days. Make sure the chicken is fully cooled before sealing. This helps avoid condensation, which can ruin the texture. If you want to keep it longer, freezing is a great option. Wrap each piece of chicken tightly in plastic wrap. Place the wrapped chicken in a freezer-safe bag. It can stay fresh for up to 3 months. When you're ready to eat, thaw it in the fridge overnight. Reheating chicken can be tricky. To keep it juicy, use the oven. Preheat the oven to 350°F (175°C). Place the chicken in a baking dish and cover it with foil. Heat for about 15 to 20 minutes. Check that the internal temperature reaches 165°F (75°C) before serving. Enjoy your tasty leftovers! You can use yellow mustard if you want a milder taste. Whole grain mustard also works well. If you like a little spice, try spicy brown mustard. Each option gives a different flavor, but they all taste great in this recipe. Experiment to find what you like best. Check the chicken's internal temperature with a meat thermometer. It should read 165°F (75°C). Look for golden brown skin and juices that run clear. If the juices are pink, it needs more cooking. Letting it rest for five minutes after baking helps keep it juicy. Yes, you can use boneless chicken thighs or breasts. The cooking time may change, so check for doneness earlier. Boneless chicken cooks faster. Just ensure the internal temperature reaches 165°F (75°C). The mustard sauce will still flavor the chicken beautifully. This article guides you through making French mustard chicken, from key ingredients to cooking tips. You learned how to create a savory mustard mixture and achieve that perfect crispy skin. Remember, choosing the right mustard can change the dish's flavor. Always watch the chicken's doneness for juicy meat. With these tips and tricks, you can avoid common mistakes. Store leftovers properly to enjoy your meal later. Dive into this recipe, experiment, and make it your own. Happy cooking!

French Mustard Chicken Savory and Simple Recipe

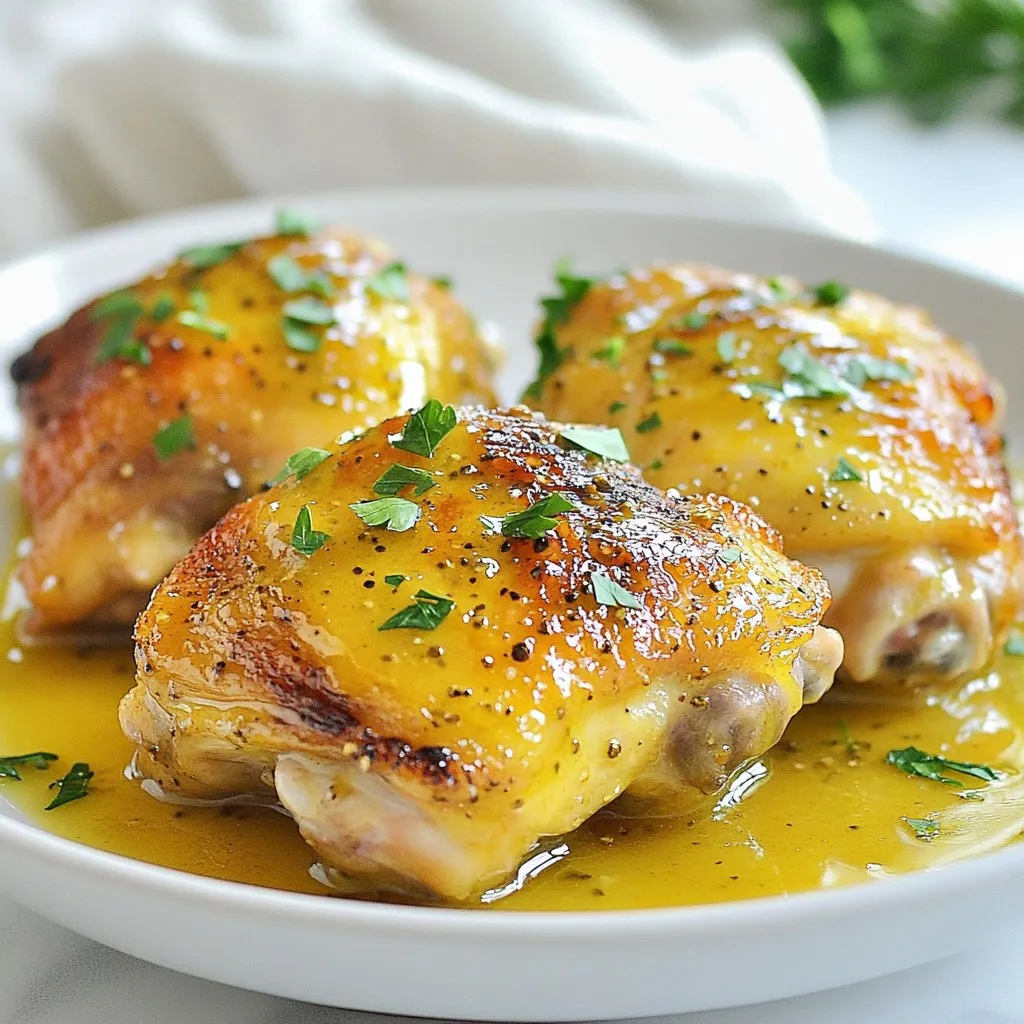
Looking for a simple yet delicious dinner idea? French Mustard Chicken is your answer! This dish blends juicy chicken with

- 1 cup creamy peanut butter - 1/4 cup powdered sugar - 1/2 teaspoon pure vanilla extract - 1 1/2 cups dark chocolate chips (preferably 70% cacao) - 1 tablespoon coconut oil - A pinch of flaky sea salt - Peanut Butter: You can use crunchy peanut butter if you prefer some texture. - Powdered Sugar: This sugar helps sweeten and thicken the filling. You may replace it with a sugar substitute if needed. - Chocolate Chips: Use high-quality chocolate for a better taste. Dark chocolate gives a rich flavor. - Coconut Oil: This helps make the chocolate smooth. You can skip it, but the texture will change. - Flaky Sea Salt: A little pinch on top boosts flavor and looks great. - Use dry measuring cups for solids like peanut butter and sugar. - Level off the measuring cup with a knife for exact amounts. - For sticky ingredients, lightly grease the cup with oil. - Use a kitchen scale for precise measurements, especially for chocolate chips. - Always double-check your ingredients before starting to ensure nothing is missing. {{ingredient_image_2}} To start, grab a medium bowl. Add 1 cup of creamy peanut butter. Next, mix in 1/4 cup of powdered sugar. Add 1/2 teaspoon of pure vanilla extract. Finally, toss in a pinch of flaky sea salt. Stir all these together until smooth. This mixture should be thick and creamy. Set it aside for now. It will firm up as you melt the chocolate. Now, take a microwave-safe bowl. In it, combine 1 1/2 cups of dark chocolate chips and 1 tablespoon of coconut oil. The coconut oil helps the chocolate melt evenly. Microwave this mix in 30-second bursts. After each burst, take it out and stir. Repeat this until the chocolate is shiny and smooth. Be careful not to overheat; it should not be burnt or lumpy. Line a standard muffin tin with paper liners. This helps to easily remove the cups later. Pour about 1 tablespoon of the melted chocolate into each liner. Use the back of a spoon to spread it evenly across the bottom. Make sure the chocolate layer is thick enough to hold the filling. This will create a solid base for your peanut butter cups. Next, take the peanut butter filling. Scoop about 1 tablespoon and place it on top of the chocolate layer in each liner. Press it down gently to flatten it. This helps it stick to the chocolate below. Now, pour another tablespoon of melted chocolate over the peanut butter. Make sure it covers the filling completely. Use a spatula to smooth the top for a neat look. Place the muffin tin into the refrigerator. Let the cups chill for at least 30 minutes. This allows the chocolate to harden well. Once they are set, take them out carefully. Peel off the paper liners. Now, you can serve your homemade peanut butter cups. They are perfect as a sweet treat or a fun dessert! When melting chocolate, use a microwave-safe bowl. Mix dark chocolate chips with coconut oil. Heat in 30-second bursts. Stir well between heats. This helps prevent burning. The chocolate should be smooth and shiny. If it looks grainy, it’s overheated. You can fix it by adding a bit more coconut oil and stirring until smooth. For the peanut butter filling, mix creamy peanut butter with powdered sugar. Add vanilla extract and a pinch of flaky sea salt. Stir until smooth. Let it sit for a few minutes. This makes it firmer and easier to work with. When layering, scoop a tablespoon of filling. Press it down gently in the chocolate shell. Make sure it’s flat and sticks to the chocolate. Before chilling, sprinkle a tiny pinch of flaky sea salt on top. This adds flavor and looks great. Once set, remove the cups from liners carefully. Arrange them on a nice plate. For a fun touch, use colorful liners. You can also add a drizzle of melted chocolate on top for a fancy look. This makes your homemade peanut butter cups stand out! Pro Tips Quality Chocolate Matters: Use high-quality dark chocolate for a richer flavor. The better the chocolate, the more decadent your peanut butter cups will taste. Chill Between Layers: For better layering, chill the chocolate shell before adding the peanut butter filling. This helps prevent the layers from mixing and keeps the cups looking neat. Experiment with Flavors: Feel free to add a pinch of cinnamon or a dash of espresso powder to the peanut butter mixture for an extra flavor kick! Storage Tips: Store your peanut butter cups in an airtight container in the fridge to keep them fresh and maintain the perfect texture. {{image_4}} You can make vegan peanut butter cups easily. Replace the dark chocolate with dairy-free chocolate chips. Use maple syrup instead of powdered sugar. The creamy peanut butter stays the same. This way, you keep the rich taste without any animal products. To make low-sugar or sugar-free peanut butter cups, swap the powdered sugar with a sugar substitute. Erythritol or stevia work well. These options let you enjoy the treat while keeping sugar low. Just check the substitute's sweetness level. Adjust the amount you use for the best flavor. You can add fun flavors to your peanut butter cups. Try mixing in a pinch of sea salt for a sweet and salty taste. Crushed nuts like almonds or hazelnuts add crunch and flavor. You can also add a dash of cinnamon or chili powder for a spicy twist. Get creative with your favorite flavors! To keep your homemade peanut butter cups fresh, store them in an airtight container. A simple plastic or glass container works well. If you leave them in the freezer, they can last longer. These treats stay fresh in the fridge for about a week. If you want to save them longer, freeze them. They can last for up to three months in the freezer. Just make sure to wrap them well to avoid freezer burn. Use a shallow container with a lid for the fridge. This keeps the cups from getting squished. For the freezer, a freezer-safe bag or a hard container with a tight seal works best. You can also place parchment paper between layers to prevent sticking. Yes, you can use crunchy peanut butter. It adds a fun texture. Just keep in mind that the filling may be less smooth. If you enjoy a bit of crunch in your treats, this is a great option. Dark chocolate is best for peanut butter cups. I recommend using chocolate that is at least 70% cacao. This gives a rich flavor that pairs well with the sweet peanut butter. You can also use milk chocolate if you prefer a sweeter taste. If your chocolate is grainy, it may have overheated. To fix it, add a small amount of coconut oil. Stir it in gently until the chocolate becomes smooth again. Remember, heating chocolate in short bursts helps prevent this problem. Yes, you can make these cups a day or two ahead of time. Just store them in an airtight container in the fridge. This way, they stay fresh and ready to enjoy when you want a sweet treat. For a party, arrange the peanut butter cups on a nice platter. You can sprinkle a little flaky sea salt on top for extra flair. These treats are perfect for sharing! You can also offer them in individual cupcake liners for a fun touch. In this post, we covered how to make peanut butter cups from start to finish. You learned about the key ingredients, tips for perfecting your technique, and fun variations to try. Whether you're vegan, low-sugar, or looking for new flavors, there’s something for everyone. Remember, storing them right keeps your treats fresh longer. Enjoy sharing these treats with friends and family. Making peanut butter cups is not just fun; it’s a tasty way to impress! Stay creative and keep experimenting with your own ideas in the kitchen.

Homemade Peanut Butter Cups Easy and Tasty Recipe

Craving a sweet and salty treat? You’re in the right place! I’m sharing my easy and tasty recipe for homemade

- 8 ounces elbow macaroni - 2 cups cooked chicken, shredded - 1 cup shredded sharp cheddar cheese - 1 cup shredded mozzarella cheese - 1 cup whole milk - 1 cup honey BBQ sauce - 2 tablespoons unsalted butter - 2 tablespoons all-purpose flour - 1 teaspoon garlic powder - 1 teaspoon onion powder - Salt and freshly ground black pepper - ½ cup seasoned breadcrumbs - 2 tablespoons freshly chopped parsley This recipe shines with its simple yet flavorful ingredients. First, the elbow macaroni serves as the perfect base. It holds the creamy sauce well, making each bite enjoyable. I like to use rotisserie chicken for ease. It saves time and adds great flavor. For the cheese, I use sharp cheddar and mozzarella. Sharp cheddar gives a nice tang, while mozzarella adds creaminess. Together, they create a rich, gooey texture that you will love. The sauce combines milk and honey BBQ sauce. This mix brings a sweet and savory taste. The butter and flour help thicken it into a creamy sauce that coats your pasta and chicken perfectly. Seasonings are key. Garlic powder and onion powder add depth. Adjust the salt and pepper to your taste. Lastly, the seasoned breadcrumbs on top add a crunchy finish. The parsley not only adds color but also freshness. With these ingredients, you create a dish that is hearty and comforting. It's perfect for a weeknight meal and sure to please everyone at your table. {{ingredient_image_2}} First, bring a big pot of salted water to a boil. This adds flavor to the pasta. Once the water boils, add 8 ounces of elbow macaroni. Cook it until it is al dente, which usually takes about 7 to 8 minutes. Drain the pasta and set it aside in a bowl. Next, you will need a medium saucepan. Over medium heat, melt 2 tablespoons of unsalted butter. After it melts, whisk in 2 tablespoons of all-purpose flour, 1 teaspoon of garlic powder, and 1 teaspoon of onion powder. Keep whisking for about 2 minutes until it turns smooth and light golden. Then, slowly add 1 cup of whole milk while whisking. Stir for about 5 minutes until the sauce thickens to a creamy texture. Now, take the saucepan off the heat. Add 1 cup each of shredded sharp cheddar and mozzarella cheese. Stir until the cheeses melt and blend smoothly. Next, fold in 1 cup of honey BBQ sauce. Make sure it mixes well with the cheese. In a large bowl, combine the cooked macaroni, shredded chicken, and the creamy cheese mixture. Use a spatula to coat everything evenly. Season with salt and freshly cracked pepper to taste. Preheat your oven to 350°F (175°C). Grease a medium-sized baking dish with cooking spray or a bit of butter. Pour the entire mixture into the dish and spread it out evenly. For the topping, mix ½ cup of seasoned breadcrumbs with a splash of olive oil or melted butter in a small bowl. This will give your topping a nice crunch. Sprinkle the breadcrumb mixture over the mac and cheese. Bake in the oven for 20 to 25 minutes. Look for a golden brown and crispy top before taking it out. To avoid lumps in your cheese sauce, whisk the flour and spices into the melted butter well. This step is key. When you add milk, do it slowly. Whisk constantly to keep it smooth. If you find lumps, use an immersion blender to fix it. For a creamy texture, cook the sauce over medium heat. Stir often, so it doesn't stick. Once the sauce thickens, remove it from the heat before adding cheese. This step helps the cheese melt evenly. You can use different types of cheese to change the flavor. Gouda or pepper jack adds a nice twist. You might also try cream cheese for extra creaminess. Mix and match to find your favorite blend. If you want to swap out proteins, shredded pork or turkey works well. For a veggie option, try adding steamed broccoli or sautéed mushrooms. This adds flavor and color. For garnishes, sprinkle fresh parsley on top. It adds a nice pop of color. You could also drizzle more honey BBQ sauce for extra sweetness. When serving a crowd, use a large baking dish. Scoop portions into bowls for easy serving. This way, guests can dish out their own servings. It makes the meal feel more casual and fun. Pro Tips Cheese Choices: For added depth, consider mixing in some smoked gouda or pepper jack cheese along with the cheddar and mozzarella. Chicken Variations: Use leftover turkey or even cooked sausage for a different flavor profile in your mac and cheese. Breadcrumb Topping: For extra flavor, combine the breadcrumbs with some grated Parmesan cheese and Italian herbs before sprinkling on top. Make-Ahead Option: Assemble the mac and cheese in advance and refrigerate it. Just add an extra 5-10 minutes to the baking time when you're ready to cook. {{image_4}} You can easily swap chicken for vegetables. Use bell peppers, zucchini, or mushrooms for a great taste. Roast the veggies first to enhance their flavor. Mix them into the cheese sauce and pasta for a hearty meal. This version is just as creamy and satisfying. For a kick, add jalapeños or hot sauce. Chop fresh jalapeños and mix them into the cheese sauce. You can also drizzle hot sauce on top before baking. This adds heat and depth to your mac and cheese. Adjust the spice level to suit your taste. Instead of chicken, try using pulled pork. This gives the dish a smoky flavor. Simply fold in the pulled pork with the cheeses and BBQ sauce. The tender meat pairs well with the creamy sauce. You’ll get a delicious twist on the classic recipe. To keep your Honey BBQ Chicken Mac and Cheese fresh, follow these steps: - Let it cool to room temperature before storing. - Place leftovers in an airtight container. - Store in the fridge for up to three days. This helps keep the flavors intact. Reheat portions in the microwave. Cover with a lid or paper towel to prevent splatters. Stir halfway through for even heating. You can freeze this dish for later enjoyment. Here’s how: - Allow the mac and cheese to cool completely. - Transfer it to a freezer-safe container. - Seal tightly and label with the date. It can stay in the freezer for up to three months. To reheat: - Thaw in the fridge overnight. - Bake at 350°F (175°C) until heated through, about 25-30 minutes. This method keeps it creamy and delicious. How long will Honey BBQ Chicken Mac and Cheese last? - In the fridge, it lasts about three days. - In the freezer, it stays good for up to three months. Always check for signs of spoilage, like odd smells or changes in texture. Proper storage helps maintain taste and quality, making it a great meal option for busy nights. Yes, you can use other types of pasta. Some great alternatives include: - Penne - Fusilli - Shells - Rotini These shapes hold sauce well and add fun texture. If you need a substitute, consider these options: - Homemade BBQ sauce with honey - Store-bought BBQ sauce mixed with honey - Sweet chili sauce for a twist These options keep the sweet and tangy flavor. To prepare in advance, follow these tips: 1. Cook the pasta and make the cheese sauce. 2. Mix in chicken and BBQ sauce with pasta. 3. Transfer to the baking dish but do not bake yet. 4. Cover tightly and refrigerate for up to 24 hours. When ready to eat, bake straight from the fridge. Just add a few extra minutes to the bake time. We covered how to make a delicious Honey BBQ Chicken Mac and Cheese. You now know the key ingredients, steps, and tips to create a creamy dish. Remember, you can customize it with different cheeses or proteins. Try the vegetarian or spicy versions for new flavors. Store leftovers well, and enjoy them later. This dish is perfect for sharing with family or friends. You have everything needed to make this recipe a hit every time. Enjoy your cooking adventure!

Honey BBQ Chicken Mac and Cheese Tasty Weeknight Meal

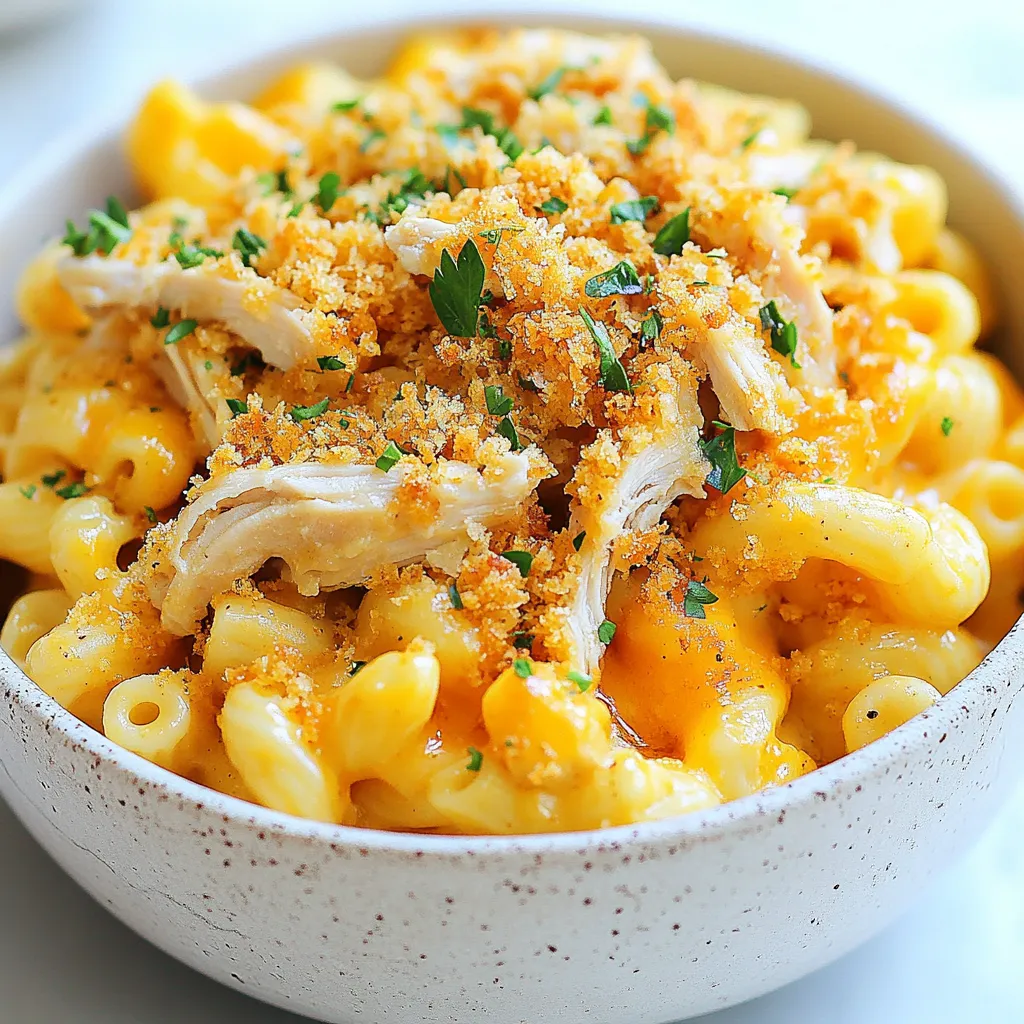
Are you ready to elevate your weeknight dinners? This Honey BBQ Chicken Mac and Cheese is a fun twist on

- 2 tablespoons olive oil - 1 medium onion, finely chopped - 2 garlic cloves, minced - 2 medium carrots, peeled and diced - 2 celery stalks, diced - 1 bell pepper, chopped - 1 medium zucchini, diced - 1 cup green beans, trimmed and cut into 1-inch pieces - 1 cup corn kernels - 4 cups vegetable broth - 1 can (14 oz) diced tomatoes, with juices - 1 teaspoon dried thyme - 1 teaspoon dried basil - Salt and pepper to taste - 2 cups fresh spinach or kale, roughly chopped - Juice of 1 lemon You can swap olive oil for coconut oil or butter. Both give a nice flavor. If you don't like onion, try shallots or leeks. Garlic can be replaced with garlic powder if needed. For a sweeter soup, use sweet bell peppers or add a pinch of sugar. You can change the veggies too. Try squash or peas instead of green beans. If you want a meatier soup, add cooked chicken or sausage. Use vegetable broth or chicken broth based on your taste. This soup is packed with nutrients. Each serving has about: - Calories: 150 - Protein: 5g - Carbohydrates: 30g - Dietary Fiber: 7g - Sugars: 5g - Fat: 3g This soup is low in calories but high in vitamins and minerals. The mix of veggies offers fiber, which helps digestion. Plus, the greens add iron and vitamins A and C. Enjoy this soup for a healthy meal that warms you up! {{ingredient_image_2}} Start by heating 2 tablespoons of olive oil in a large pot over medium heat. Once the oil is warm, add 1 medium onion, finely chopped. Sauté the onion for about 3-4 minutes until it turns soft and clear. Next, add 2 minced garlic cloves and cook for 1 more minute, stirring often. This step builds a strong flavor base for your soup. Now, it’s time to add more veggies. Toss in 2 medium carrots, peeled and diced, along with 2 diced celery stalks and 1 chopped bell pepper of your choice. Cook this mix for 5 minutes. You want the veggies to become softer but not mushy. After that, add 1 diced zucchini and 1 cup of green beans cut into 1-inch pieces. Let them cook together for another 3 minutes. Now, pour in 4 cups of vegetable broth and add a 14-ounce can of diced tomatoes, juices included. Stir the pot to combine everything well. Add 1 teaspoon of dried thyme, 1 teaspoon of dried basil, and a pinch of salt and pepper. Bring the soup to a gentle boil. This helps release the rich smells of the herbs. Once the soup boils, lower the heat to let it simmer. Keep it uncovered and let it cook for about 15-20 minutes. This simmering time allows all the vegetables to become tender and mix their flavors. After that, stir in 1 cup of corn kernels and 2 cups of roughly chopped fresh spinach or kale. Cook for another 2-3 minutes until the greens turn bright. Just before serving, add the juice of 1 lemon to brighten the flavor. Taste and adjust the seasoning if needed. To make the flavor pop, start with fresh ingredients. Use ripe tomatoes and firm vegetables. Sauté the onion until soft to develop a sweet base. Add the garlic just before other veggies to keep its bright taste. Don't rush the simmering; let the soup cook slowly to blend the flavors well. A splash of lemon juice at the end brings a bright kick. One common mistake is overcooking the vegetables. This can make them mushy and bland. Cut all veggies to similar sizes for even cooking. Avoid using too much salt at first; taste as you go. Lastly, don’t skip the herbs. They add depth and aroma, making your soup stand out. Gather your tools before starting. You will need: - A large pot or Dutch oven - A sharp knife for chopping - A cutting board - A wooden spoon for stirring - Measuring spoons for accuracy - A can opener for the tomatoes Having these ready will make your cooking process smooth and enjoyable. Pro Tips Fresh Ingredients Matter: Using fresh vegetables will enhance the flavor and nutrition of your soup. Visit your local farmer's market for the best seasonal produce. Customize Your Veggies: Feel free to swap out any vegetables you don't have on hand or prefer. This soup is versatile and can accommodate whatever is in your fridge. Herb Variations: Try adding fresh herbs like parsley or cilantro just before serving for an extra burst of flavor and freshness. Make It Heartier: For a more filling soup, consider adding cooked beans or lentils to the mix, which will also boost the protein content. {{image_4}} You can easily add protein to this soup. Beans, lentils, or chicken work well. For a quick boost, use canned beans like cannellini or chickpeas. If you want meat, shredded chicken or turkey adds heartiness. Cook your protein separately and stir it in at the end. This keeps it tender and juicy. Choose vegetables based on the season. In spring, try peas and asparagus. Summer is great for tomatoes and squash. Fall offers root veggies like butternut squash and parsnips. Winter brings hearty greens like kale and collards. Mixing seasonal veggies makes the soup fresh and vibrant. This soup is naturally vegan if you use vegetable broth. To keep it gluten-free, ensure your broth is gluten-free. Most vegetable broths are safe, but always check the label. You can also add quinoa or rice for a filling option. Adjust the herbs and spices to suit your taste, keeping it healthy and enjoyable. To store leftovers, let the soup cool. Then, pour it into airtight containers. This keeps the soup fresh and tasty. I recommend using glass containers for best results. Label the containers with the date. Store them in the fridge for up to four days. Make sure to check for any changes in smell or color before eating. Freezing is a great way to keep your soup longer. Once cooled, transfer the soup to freezer-safe bags or containers. Leave some space at the top for expansion. Seal tightly to avoid freezer burn. You can freeze the soup for up to three months. For easy use, consider freezing in single servings. This way, you can thaw just what you need. When you're ready to enjoy your soup, remove it from the fridge or freezer. For refrigerated soup, pour it into a pot and heat on medium. Stir often to heat evenly. If frozen, place the soup in the fridge overnight to thaw. Then follow the same steps. You can also use a microwave if you're in a hurry. Heat in short bursts, stirring in between, until hot. Always taste and adjust seasoning after reheating. Enjoy your hearty soup! To enhance the flavor, you can add fresh herbs, like parsley or dill. A splash of vinegar or hot sauce also boosts taste. Lemon juice adds brightness. For deeper flavor, try roasting your veggies first. This adds a nice caramelized taste. You can also add a dash of smoked paprika for a warm, smoky kick. Yes, you can use canned vegetables in your soup. Drain and rinse them to cut down on sodium. Canned veggies save time and add flavor. However, fresh veggies give a better texture. You might miss the crunch of fresh ones. If you use canned, add them near the end of cooking. This keeps them from getting mushy. Many side dishes pair well with vegetable soup. Crusty bread is a great option. A simple green salad adds freshness. You can also serve grilled cheese sandwiches for a classic combo. Crackers or breadsticks are fun additions too. Consider a light fruit salad for a sweet side. Homemade vegetable soup lasts about 3 to 5 days in the fridge. Store it in an airtight container to keep it fresh. If you want it to last longer, consider freezing it. Frozen soup can last up to 3 months. Just thaw it in the fridge before serving. Reheat on the stove or in the microwave. This article gave you clear steps to make a great vegetable soup. We covered ingredients, cooking methods, and tips to get the best flavor. Remember to try out substitutions to fit your tastes. Also, don’t hesitate to explore variations for different diets. Storing leftovers the right way will help you enjoy your soup later. With these tools and info, you can create a tasty meal. So, gather your ingredients and get cooking!

Classic Garden Vegetable Soup Hearty and Comforting

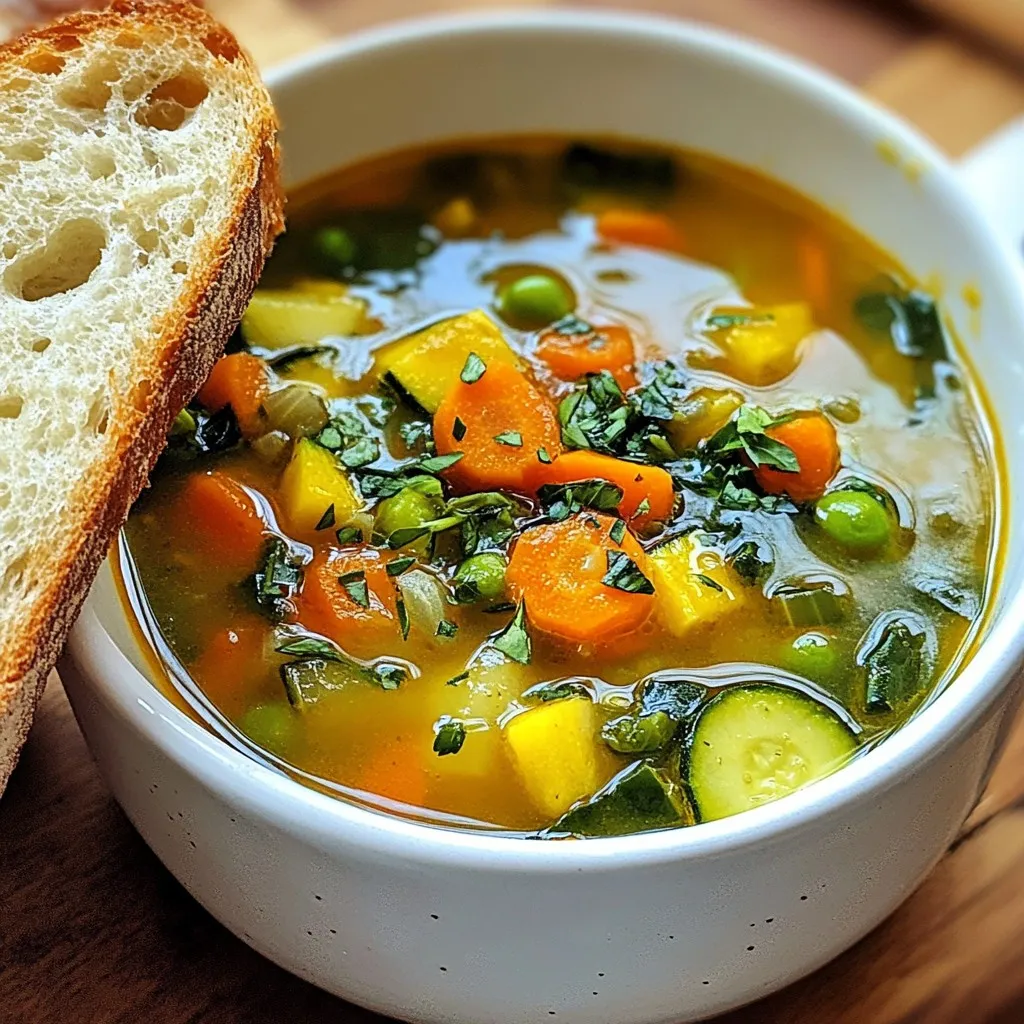
Welcome to my kitchen, where comfort meets flavor! Today, I’m excited to share my recipe for Classic Garden Vegetable Soup.

- 9 lasagna noodles - 2 cups cooked chicken, shredded - 1 cup ricotta cheese - 1 cup mozzarella cheese, shredded (divided) - 1/2 cup Parmesan cheese, grated - 2 cups Alfredo sauce (store-bought or homemade) - 1 teaspoon garlic powder - 1 teaspoon Italian seasoning - Salt and pepper to taste - Fresh parsley, chopped (for garnish) To make Chicken Alfredo Lasagna Rolls, you need a mix of tasty ingredients. Start with 9 lasagna noodles. These will hold all the yummy filling. You will also need 2 cups of cooked chicken. Shred it well so it mixes nicely with other ingredients. Next, grab 1 cup of ricotta cheese. This cheese adds creaminess. You also need 1 cup of shredded mozzarella cheese. We will use half in the filling and the rest on top. For a salty kick, use 1/2 cup of grated Parmesan cheese. Now, for the sauce! You can use 2 cups of Alfredo sauce. You can buy it or make your own. Don't forget to add 1 teaspoon of garlic powder and 1 teaspoon of Italian seasoning for flavor. Add salt and pepper to taste. Finally, fresh parsley adds color and flavor. - 9x13 inch baking dish - Mixing bowl - Aluminum foil - Flat surface for rolling noodles You will need a few kitchen tools to help you. A 9x13 inch baking dish is perfect for holding all the rolls. A mixing bowl helps you combine the filling. Use aluminum foil to cover the dish while baking. Finally, a flat surface is best for rolling the noodles. With these ingredients and tools, you are ready to create a delicious dish! {{ingredient_image_2}} 1. Preheat your oven to 375°F (190°C). This heat warms up the dish well. 2. Cook the lasagna noodles as per the package instructions. They should be soft but firm, known as al dente. After cooking, drain them and lay them flat on a clean kitchen towel to cool. This helps prevent sticking. 1. In a medium bowl, mix together the shredded chicken, ricotta cheese, half of the mozzarella cheese, garlic powder, Italian seasoning, and a pinch of salt and pepper. 2. Stir well until all the ingredients blend together smoothly. This filling brings great flavor to your rolls. 1. Grab your baking dish and pour a thin layer of Alfredo sauce at the bottom. This keeps the rolls from sticking. 2. Take a cooled noodle and lay it on a flat surface. Spread about 1/4 cup of the chicken and cheese mixture along the noodle's length. 3. Carefully roll the noodle tightly, keeping the filling inside. Place it seam-side down in the baking dish. Repeat this with the remaining noodles and filling. 1. Pour the rest of the Alfredo sauce over the rolled noodles. Make sure all are covered well. 2. Sprinkle the remaining mozzarella cheese and all of the grated Parmesan cheese on top. 3. Cover the dish tightly with aluminum foil. Bake in the preheated oven for 25 minutes. 4. After 25 minutes, take off the foil and bake for an extra 15 minutes. This makes the cheese bubbly and golden brown. Now you have a warm and tasty dish ready to enjoy! - Cook your lasagna noodles until they are al dente. This means they should be firm but not hard. Al dente noodles roll easily and hold their shape well when baked. - I prefer using homemade Alfredo sauce for a richer taste. It’s simple to make and so much better than store-bought. With just butter, cream, and cheese, you can whip up a delicious sauce that will elevate your dish. - To make your Chicken Alfredo Lasagna Rolls look fancy, serve them on a large, flat platter. Drizzle some extra Alfredo sauce around the edges for a nice touch. - Garnish with fresh parsley on top. This not only adds color but also a burst of freshness. You can also sprinkle a little extra cheese for fun. - Avoid overfilling your noodles. Too much filling can make them hard to roll and may spill out while baking. Stick to about 1/4 cup of filling per noodle for best results. - Let the dish cool for about 5 minutes before serving. This helps the cheese set and makes it easier to slice. If you cut too soon, the filling may ooze out. Pro Tips Use fresh ingredients: Fresh herbs and quality cheeses can elevate the flavor of your lasagna rolls significantly. Customize the filling: Experiment with different proteins or vegetables to create your own unique filling and cater to your taste preferences. Make ahead: You can assemble the lasagna rolls in advance and store them in the refrigerator for up to a day before baking for a quicker meal. Extra sauce: Serve with additional Alfredo sauce on the side for those who prefer a creamier experience. {{image_4}} You can change the cheeses in your lasagna rolls. Try goat cheese for a tangy twist. Cream cheese adds a rich, creamy layer. If you want to swap out chicken, ground beef or turkey works well. These options give you a different flavor while keeping it hearty. Alfredo sauce is great, but feel free to experiment. Make homemade Alfredo with butter, cream, and cheese for a fresh taste. You could also use a garlic Alfredo or a white wine Alfredo for something unique. If you need gluten-free options, look for gluten-free lasagna noodles. They hold up well and taste great. For a vegetarian version, skip the meat. You can add spinach, mushrooms, or zucchini for extra flavor and texture. These swaps keep your meal both satisfying and tasty. To keep your Chicken Alfredo Lasagna Rolls fresh, store them properly. Once cool, place leftovers in an airtight container. Make sure to layer parchment paper between rolls to prevent sticking. This method helps maintain the shape and taste. You can refrigerate them for up to three days. For longer storage, freeze them. Wrap each roll tightly in plastic wrap and then in aluminum foil. This prevents freezer burn. When you're ready to enjoy them again, reheating is key. Preheat your oven to 350°F (175°C). Place the rolls in a baking dish. Add a splash of Alfredo sauce on top. Cover the dish with foil to keep moisture in. Bake for about 20 minutes, or until heated through. This keeps the rolls creamy and prevents them from drying out. You can also use the microwave for a quick option. Heat in short bursts, checking to avoid overcooking. In the fridge, your Chicken Alfredo Lasagna Rolls last about three days. In the freezer, they can stay good for up to three months. Always mark the date on your containers. This way, you know when to enjoy them. Proper storage will keep your meal tasty and ready for your next craving. Yes, you can prepare these rolls in advance. Start by making the filling and cooking the noodles. Once the noodles cool, fill and roll them. Place the rolls in the baking dish, but don’t add the sauce yet. Cover the dish with foil and store it in the fridge for up to 24 hours. When you're ready to bake, pour the Alfredo sauce on top and bake as usual. This makes meal prep easy and quick! To stop the noodles from sticking, cook them until they are al dente. This means they should be soft but still firm. After cooking, lay the noodles flat on a clean kitchen towel. This prevents them from touching and sticking together. Use enough Alfredo sauce at the bottom of the baking dish. This creates a barrier that helps keep the rolls from sticking to the dish. Yes! You can swap the Alfredo sauce for other sauces. Marinara sauce adds a rich tomato flavor. Pesto gives a fresh, herb taste. You could even blend both for a unique twist. Just make sure any sauce you choose complements the chicken and cheese well. These rolls pair well with a simple side salad. A green salad with a light vinaigrette adds freshness. Garlic bread is also a great choice for soaking up extra sauce. You might even add some steamed veggies like broccoli or green beans for a healthy side. In this blog post, we covered how to make Chicken Alfredo Lasagna Rolls. We explored the ingredients you need, from noodles to Alfredo sauce. I shared step-by-step instructions for making the rolls, baking them, and tips to avoid common mistakes. You can also try different ingredient swaps and sauces. Remember to store leftovers properly for later. With these tips, you can create a tasty dish that impresses everyone. Dive in and enjoy making this dish your own!

Chicken Alfredo Lasagna Rolls Tasty Comfort Dish

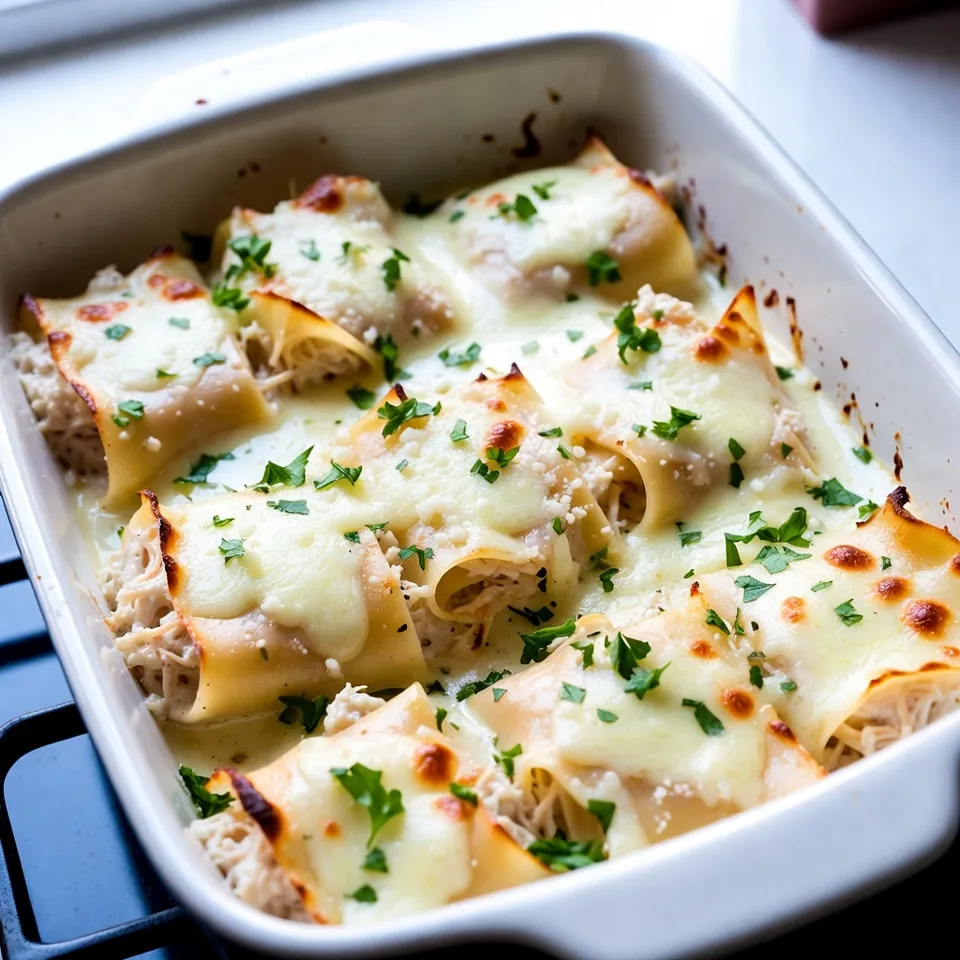
Are you ready to elevate your dinner game? Chicken Alfredo Lasagna Rolls are the perfect dish for comfort and flavor.

Older posts
Newer posts
← Previous Page1 … Page108 Page109 Page110 … Page113 Next →

dsad

© 2025 recipesstation • Built with GeneratePress

Our Policies

  • Copyright Policy
  • Cookie Policy
  • GDPR Policy
  • Privacy Policy
  • Disclaimer
  • Terms Of Use

More Information

  • Home
  • About
  • Contact
  • Appetizers
  • Dessert
  • Dinner
  • Drinks
©2025, recipesstation About Back To Top