Skip to content
DisclaimerTerms Of UseGDPR PolicyCookie Policy

recipesstation

  • Home
  • Drinks
  • Appetizers
  • Dinner
  • Dessert
  • About
  • Contact
  • Privacy Policy
DisclaimerTerms Of UseGDPR PolicyCookie Policy

Emily

- 2 cups shredded cooked chicken - 1/2 cup buffalo sauce - 1 package (8 oz) cream cheese, softened - 1/2 cup sour cream - 1/2 cup ranch dressing - 1 cup shredded cheddar cheese - 1/2 cup blue cheese crumbles (optional) - Fresh green onions, finely chopped (for garnish) To make your dip even better, consider adding: - Extra buffalo sauce for more heat - A dash of garlic powder for depth - Jalapeños for a spicy kick Pair this dip with: - Tortilla chips for crunch - Celery sticks for freshness - Carrot sticks for sweetness {{ingredient_image_2}} 1. Start by preheating your oven to 350°F (175°C). This step ensures the dip bakes evenly. 2. In a large bowl, mix the softened cream cheese, sour cream, and ranch dressing. Use a hand mixer or a spoon. Blend until the mixture is smooth and creamy. 3. Add the shredded chicken and buffalo sauce into the cream cheese mix. Stir well so every piece of chicken gets that bold flavor. 4. If you like blue cheese, gently fold it in now. Also, add half of the shredded cheddar cheese. Mix without overdoing it. 5. Spoon the creamy chicken mixture into an 8x8 inch baking dish. Spread it out evenly with a spatula. 6. Top the dip with the rest of the cheddar cheese and any extra blue cheese crumbles. This adds a lovely cheesy finish. 7. Place your baking dish in the oven. Bake for 20-25 minutes. Look for bubbly edges and golden cheese on top. 8. Once baked, take the dish out of the oven. Let it cool for a few minutes. 9. Before serving, sprinkle chopped green onions on top for a fresh touch. 10. Serve this warm dip with tortilla chips, celery sticks, and carrot sticks. Enjoy with friends! To make your dip spicier, add more buffalo sauce. Start with a little and taste. If it’s not hot enough, keep adding until you reach your sweet spot. For a milder dip, use less buffalo sauce. You can even mix in some cream cheese to tone down the heat. You can make this dip ahead of time. Simply prepare it, but don’t bake it. Cover it with plastic wrap and store it in the fridge. When you’re ready to serve, pop it in the oven. Bake it at 350°F (175°C) for 20-25 minutes. This way, you save time and stress before your guests arrive. Use a large mixing bowl for easy blending. A hand mixer helps create a smooth dip. A spatula is great for spreading the mixture evenly in the baking dish. A baking dish around 8x8 inches works best for even cooking. Finally, keep some parchment paper handy to line the dish for easy cleanup. Pro Tips Adjust the Spice Level: Feel free to modify the amount of buffalo sauce based on your heat tolerance—less for a milder dip, more for a fiery kick! Mix It Up: Experiment with different cheeses such as pepper jack or Monterey Jack for a unique flavor twist. Serving Temperature: This dip is best served warm—make sure to bake it just until bubbly and golden for the perfect texture. Make Ahead: You can prepare the dip in advance and store it in the refrigerator. Just bake it when you're ready to serve for a quick and easy appetizer! {{image_4}} If you love garlic, try adding minced garlic to the dip. Mix in two cloves of minced garlic with the cream cheese, sour cream, and ranch dressing. This change gives the dip a rich, savory taste. It pairs well with the spicy buffalo flavor. You can also use garlic powder if you want a milder taste. To make a lighter dip, swap sour cream with Greek yogurt. This adds protein and cuts calories. Use one cup of plain Greek yogurt instead of sour cream. It keeps the dip creamy and tangy. You can also use low-fat cream cheese to reduce fat. If you want a vegetarian version, skip the chicken. Replace it with canned chickpeas or white beans. Mash them slightly before mixing with the other ingredients. This adds protein while keeping the dip hearty. You can still use all the same sauces and cheeses for that classic flavor. After enjoying your dip, let it cool down. Place any leftovers in an airtight container. Store it in the fridge for up to three days. Make sure to cover it well to keep it fresh. When you're ready to enjoy the dip again, preheat your oven to 350°F (175°C). Scoop the dip into a baking dish. Cover it with foil to avoid drying out. Heat for about 15-20 minutes or until it's hot and bubbly. You can also microwave it in a safe dish. Heat it in short bursts, stirring in between, until warm. If you want to save the dip for later, freezing is a great option. Transfer the cooled dip into a freezer-safe container. Seal it tightly to prevent freezer burn. It can stay in the freezer for up to three months. When you're ready to enjoy it, thaw it in the fridge overnight. Then, reheat as mentioned above. Yes, you can use canned chicken! Canned chicken saves time. Just drain and shred it. It works well in this dip. The flavor stays great, and it’s easy to mix in. You can use blue cheese dressing as a substitute. Greek yogurt also works well. If you want a lighter option, try plain yogurt. Each choice gives a unique taste! To make it spicier, add more buffalo sauce. You can also mix in hot sauce. For a milder dip, reduce the buffalo sauce. Adding cream cheese can also help tone down the heat. You now have all the tools to make a great dip. We covered the key ingredients, optional flavors, and tasty dips to pair with your dish. I shared simple instructions for preparation and baking, plus tips for spice, storage, and making ahead. You also learned fun variations, including a creamy garlic option and healthier choices. Make this dip your own, and enjoy sharing it with others. Happy dipping!

Baked Buffalo Chicken Dip Flavorful Party Favorite

If you want a hit at your next gathering, this Baked Buffalo Chicken Dip is the answer! It’s a blend

- 1 ½ lbs ground beef - 1 cup breadcrumbs - 1 large onion, finely chopped - 2 cloves garlic, minced - 1 large egg - 2 tablespoons Worcestershire sauce - 1 tablespoon Dijon mustard - 1 teaspoon dried thyme - Salt and pepper to taste - 1 cup shredded mozzarella cheese - 1 cup diced bell peppers (mix of red and green) - ½ cup grated Parmesan cheese - 1 tablespoon fresh parsley, chopped - ½ cup ketchup When creating Stuffed Meatloaf Supreme, the right ingredients are key. Ground beef forms the base. It provides a rich flavor and a great texture. Breadcrumbs help bind the meatloaf. They keep it moist and tender. Onion adds sweetness, while garlic gives a nice kick. The egg helps hold everything together. For flavor, Worcestershire sauce adds depth. Dijon mustard gives a slight tang. Dried thyme brings a warm herbal note. Don't forget salt and pepper! They enhance all the flavors. The stuffing is where the magic happens. Shredded mozzarella cheese melts beautifully. Diced bell peppers add color and crunch. Grated Parmesan cheese adds a nutty flavor that rounds out the stuffing. Finally, for the glaze, fresh parsley adds brightness. Ketchup gives sweetness and a nice finish. This combination of ingredients makes for a delicious and beautiful meatloaf that will impress everyone at the table! {{ingredient_image_2}} - Preheat the oven to 350°F (175°C). This step gets your oven ready for the best meatloaf. - In a large bowl, mix 1 ½ lbs of ground beef, 1 cup of breadcrumbs, 1 chopped onion, 2 minced garlic cloves, 1 egg, 2 tablespoons of Worcestershire sauce, 1 tablespoon of Dijon mustard, 1 teaspoon of dried thyme, salt, and pepper. Mix carefully. Do not overmix; you want a tender meatloaf. - On a clean surface, spread the meat mixture into a rectangle. Aim for about ½ inch thick. This shape helps with rolling. - For the stuffing, mix 1 cup of shredded mozzarella cheese, 1 cup of diced bell peppers, and ½ cup of grated Parmesan cheese in a separate bowl. This mix adds flavor and texture. - Spread the cheese and pepper mixture over the meat rectangle, leaving a border at the edges. This helps keep the stuffing inside. - Start rolling the meatloaf tightly from one end. Make sure the stuffing stays tucked in. Place the rolled meatloaf seam-side down in a greased baking dish. - Brush the top with ½ cup of ketchup for a nice glaze. This adds sweetness and color. - Bake the meatloaf for 45-55 minutes. Use a meat thermometer to check if it hits 160°F (70°C). This ensures it’s safe to eat. - Once done, take it out of the oven and let it rest for 10 minutes. This helps the juices stay in the meatloaf, making it juicy when sliced. To make your meatloaf soft and juicy, avoid overmixing. When you combine the meat with the other ingredients, mix just until everything blends. Overmixing can make the meat tough. A tender meatloaf is what you want! You can use different sauces for the glaze. Ketchup is classic, but BBQ sauce adds a nice twist. You might also try mustard or even a sweet chili sauce. Adding fresh herbs will boost flavor as well. Consider mixing in rosemary or basil for a fresh taste. For sides, mashed potatoes or steamed veggies pair well with stuffed meatloaf. A crisp salad also makes a nice addition. When serving, slice the meatloaf into thick rounds. This shows off the colorful stuffing inside. Arrange it on a platter and add extra ketchup on the side for dipping. Pro Tips Use Lean Meat: Opt for lean ground beef (80/20) to keep the meatloaf moist without excess fat. Rest Before Slicing: Allow the meatloaf to rest for 10 minutes after baking to help retain its juices and prevent crumbling. Customize the Stuffing: Feel free to experiment with different cheeses or add vegetables like spinach or mushrooms for extra flavor. Perfect the Glaze: Mix the ketchup with a bit of brown sugar or balsamic vinegar for a richer, sweeter glaze on top. {{image_4}} You can switch up the meat in this recipe. Ground turkey or chicken works well. They give a lighter taste. Mixing meats can also boost flavor. Try combining beef with pork for a richer profile. Stuffing doesn't have to be just cheese and peppers. Add vegetables like spinach or mushrooms for extra nutrients. You can also try different cheeses. Cheddar or feta can bring new flavors to the dish. Ketchup is classic, but you can get creative. Use BBQ sauce for a smoky twist. Tomato paste mixed with honey can add sweetness. Mustard can also give a nice zing. Experiment with flavors to find what you love! To keep your stuffed meatloaf fresh, use airtight containers. Glass or plastic containers work well. Make sure to let your meatloaf cool down before sealing it. This prevents moisture build-up, which can make it soggy. When it's time to enjoy leftovers, there are two great ways to reheat meatloaf. 1. Microwave: Place slices on a microwave-safe plate. Cover with a damp paper towel. Heat for 1-2 minutes until warm. This method is quick but may make the meatloaf a bit dry. 2. Oven: Preheat your oven to 350°F (175°C). Wrap the meatloaf in foil and bake for about 20 minutes. This keeps it moist and helps revive the flavors. If you want to save some for later, freezing is a great option. - How to freeze portions: Slice the meatloaf into individual pieces. Wrap each slice tightly in plastic wrap. Then, place the slices in a freezer bag or container. Label it with the date. - Thawing and cooking instructions: To thaw, move the meatloaf to the fridge a day before. Once thawed, reheat it using the oven method for the best taste. Enjoy your delicious stuffed meatloaf any time! Bake the Stuffed Meatloaf Supreme for 45 to 55 minutes at 350°F (175°C). Use a meat thermometer to check the center. It should read 160°F (70°C) to ensure it's safe to eat. This ensures the meatloaf cooks through yet stays juicy. Yes, you can make the meatloaf ahead of time. Prepare it up to the rolling step and place it in the fridge. Cover tightly with plastic wrap. You can store it in the fridge for up to 24 hours. When ready to bake, remove it from the fridge and let it sit for 15 minutes. Then, bake as directed. If you need a substitute for breadcrumbs, try crushed crackers or oats. Both options work well as binding agents. For a gluten-free choice, use almond flour or gluten-free breadcrumbs. These alternatives will hold the meatloaf together without changing the taste. In this article, we explored the key ingredients for stuffed meatloaf, including ground beef, spices, and cheeses. I shared step-by-step instructions for mixing, shaping, rolling, and baking your meatloaf to perfection. We also discussed tips for texture, flavor, serving, and variations. You can get creative with meats and stuffings for unique flavors. Keep these tips in mind, and you’ll enjoy a delicious, satisfying meal. Now, give it a try and impress your family with your cooking skills!

Stuffed Meatloaf Supreme Flavorful and Easy Recipe

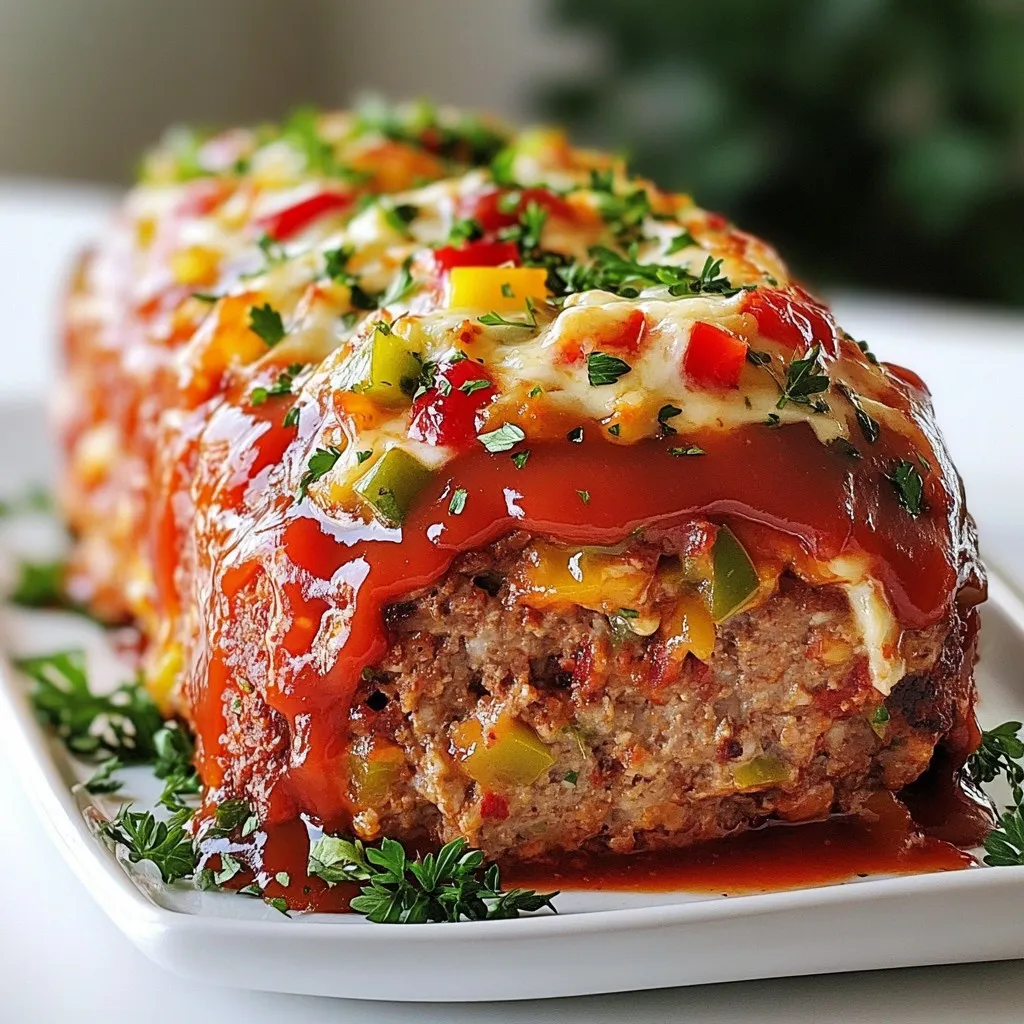
If you’re looking to impress your family with a hearty dish, try my Stuffed Meatloaf Supreme recipe. It combines savory

To make a classic roast turkey, you need the following ingredients: - 1 whole turkey (12-14 pounds), fully thawed - 1/2 cup unsalted butter, softened to room temperature - 1 tablespoon extra virgin olive oil - 2 tablespoons fresh sage, finely chopped - 2 tablespoons fresh thyme, finely chopped - 2 tablespoons fresh rosemary, finely chopped - 1 tablespoon garlic powder - 1 tablespoon onion powder - Salt and freshly ground black pepper, to taste - 4 cups low-sodium chicken broth - 1 large onion, quartered - 2 carrots, peeled and chopped - 2 celery stalks, chopped - 1 lemon, halved - 1 apple, cored and quartered If you cannot find an ingredient, here are some options: - Use margarine instead of unsalted butter for the herb mixture. - Try dried herbs if fresh ones are not available. Use one-third of the amount. - For a different flavor, substitute chicken broth with vegetable broth. - Any apple variety works; use your favorite for stuffing. Using the best ingredients makes a big difference. Here are some tips: - Choose a fresh turkey from a local farm if possible. - Use high-quality olive oil for richer taste. - Fresh herbs add more flavor than dried ones. - Ensure your butter is soft for easy mixing with herbs. - Fresh vegetables should be firm and colorful to enhance taste. {{ingredient_image_2}} Start by preheating your oven to 325°F (165°C). This step is key for even cooking. Next, take the turkey out of its packaging. Be sure to remove the giblets from the cavity. Pat the turkey dry with paper towels. Drying the skin helps it crisp up when roasting. To make the herb butter, gather a mixing bowl. Combine 1/2 cup of softened unsalted butter with 1 tablespoon of olive oil. Add 2 tablespoons each of chopped sage, thyme, and rosemary. Then mix in 1 tablespoon of garlic powder and 1 tablespoon of onion powder. Stir until the mixture is creamy and well blended. Now it’s time to season the turkey. Gently loosen the skin over the breast. Create a pocket for the herb butter. Spread half of the butter mixture under the skin. Rub the rest of the butter on the turkey’s outside. Don’t forget to add salt and pepper all over. Next, stuff the cavity with quartered onion, chopped carrots, chopped celery, lemon halves, and apple quarters. Position the turkey breast-side up on a roasting rack in a large pan. Pour 4 cups of chicken broth into the bottom of the pan. This helps keep the turkey moist. Loosely cover the turkey with aluminum foil. Place it in the oven and roast for about 13-15 minutes per pound. Baste the turkey with pan juices every 45 minutes. After 2 to 2.5 hours, remove the foil. Keep roasting until the turkey's internal temperature reaches 165°F (75°C). This may take an extra 30 to 60 minutes. Once done, let the turkey rest for at least 30 minutes before carving. This helps the juices stay in the meat, making it tender and juicy. To get that crispy skin, start with a dry turkey. Pat it down well with paper towels. Next, make an herb butter and rub it under the skin. Use a mix of butter and olive oil for extra crispiness. When roasting, keep the turkey uncovered for the last hour. This helps the skin turn golden brown. Basting your turkey is key to keeping it moist. I suggest using the pan juices every 45 minutes. Start basting 1 hour after the turkey goes in the oven. Use a baster or a ladle to pour the juices over the turkey. This adds flavor and helps the skin stay crisp. To check if your turkey is done, use a meat thermometer. Insert it into the thickest part of the breast. The turkey is safe to eat when it reaches 165°F (75°C). Let it rest for at least 30 minutes after roasting. This allows the juices to settle and keeps the meat juicy. Pro Tips Resting is Key: Allow the turkey to rest for at least 30 minutes after roasting. This helps the juices redistribute throughout the meat, resulting in a more succulent and flavorful turkey. Flavor Under the Skin: For maximum flavor, spread the herb butter mixture under the skin of the turkey breast. This infuses the meat with delicious herbal notes as it cooks. Basting Matters: Baste the turkey every 45 minutes with the pan juices. This not only enhances the flavor but also helps keep the meat moist during roasting. Check the Temperature: Use a meat thermometer to ensure the turkey is cooked to perfection. Check the thickest part of the breast; it should reach an internal temperature of 165°F (75°C). {{image_4}} Brining is soaking the turkey in a saltwater solution. This method adds moisture and flavor. It helps keep the meat juicy. Non-brined turkey is drier but can still be tasty. If you want a simple roast, skip the brine. For a flavorful twist, try brining the turkey overnight. Use about 1 cup of salt for every gallon of water. Let the turkey soak for at least 12 hours. Rinse and dry it before seasoning and roasting. The right herbs and spices make the turkey shine. I like to use fresh sage, thyme, and rosemary. These herbs add depth and aroma. Garlic powder and onion powder give warmth and richness. You can also try other herbs like parsley or tarragon. For a spicy kick, add chili flakes or paprika. Mix and match to find your favorite flavor combo. Don't be afraid to experiment with different spices! Stuffing adds flavor and moisture to your turkey. You can use traditional bread stuffing or go for something unique. Try a wild rice mix for a nutty flavor. You can also use quinoa for a gluten-free option. Add chopped fruits like apples or cranberries for sweetness. For savory notes, include sausage or nuts. Always pack stuffing loosely inside the turkey. This helps it cook evenly and keeps it moist. Remember, stuffing should reach 165°F (75°C) to be safe to eat. After your feast, store any turkey leftovers right away. Keep them fresh and tasty. Use airtight containers or wrap them tightly in foil. Place them in the fridge. They will stay good for about 3 to 4 days. Make sure to cool down the turkey before storing. This helps keep it safe to eat. When you're ready to enjoy leftovers, reheating is key. I suggest the oven for the best results. Preheat it to 325°F (165°C). Slice the turkey and place it in a baking dish. Add a splash of chicken broth to keep it moist. Cover the dish with foil to prevent drying out. Heat for about 20-30 minutes or until warm. You can also use the microwave for quick meals. Just heat in short bursts, stirring often. If you want to save turkey for later, freezing works well. Cut the turkey into smaller pieces. This helps it freeze faster and thaw easier. Wrap each piece tightly in plastic wrap and then foil. Label the bags with the date. Frozen turkey can last up to 4 months. To thaw, move it to the fridge a day before you plan to eat. It takes about 13 to 15 minutes per pound to roast a turkey. For a 12-14 pound turkey, plan for around 2.5 to 4 hours. This time varies based on your oven and turkey size. Always check the internal temperature to be sure. Set your oven to 325°F (165°C) for roasting. This temperature cooks the turkey evenly and keeps it juicy. Lower temps can dry it out, while higher temps may burn the skin. Yes, you can prep the turkey the night before. Season it and make the herb butter. Store it in the fridge, covered tightly. This makes cooking easier on the big day and allows flavors to blend. Start by removing the legs. Cut through the joint where the leg meets the body. Next, slice down each side of the breastbone to get clean slices. Hold the turkey steady while you carve. Use a meat thermometer to check the thickest part of the breast. It should read 165°F (75°C). If you don’t have a thermometer, the juices should run clear, not pink. Let it rest for 30 minutes before carving for the best flavor. You learned about key ingredients, step-by-step cooking, and smart tips for roasting a turkey. From choosing the best herbs to mastering the basting techniques, you can now create a delicious meal. Remember, each step matters, so take your time. With the right care, your turkey can be the star of your table. Use these insights to surprise your friends and family with a perfect roast. Enjoy the process and make lasting memories this holiday.

Classic Roast Turkey Flavorful and Juicy Guide

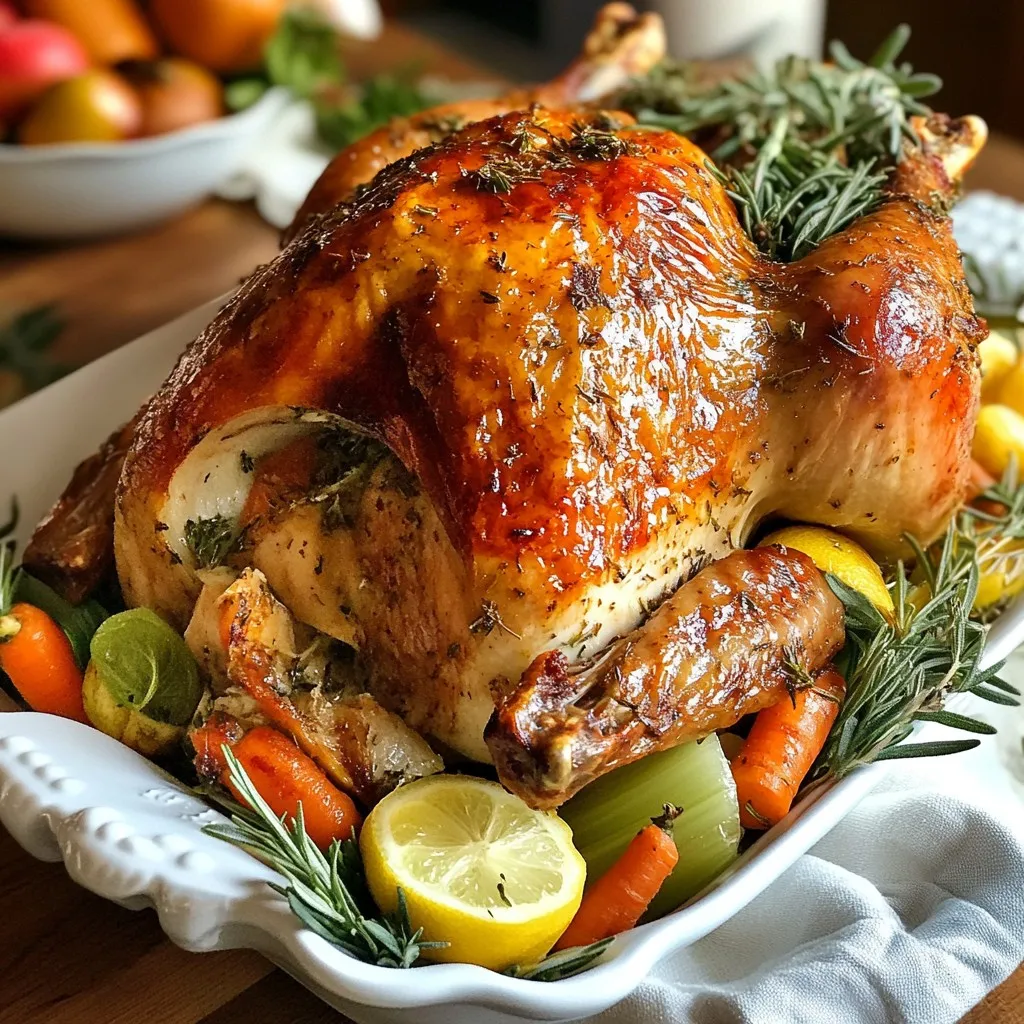
Are you ready to master the art of roasting the perfect turkey? In this guide, I’ll share my favorite tips

To make your brownies rich and tasty, gather these items: - 1 cup unsalted butter (2 sticks) - 8 ounces semi-sweet chocolate, finely chopped - 1 cup granulated sugar - 1 cup packed brown sugar - 4 large eggs, at room temperature - 1 teaspoon pure vanilla extract - 1 cup all-purpose flour - 1/4 cup unsweetened cocoa powder - 1/2 teaspoon baking powder - 1/4 teaspoon salt These ingredients create a dense and fudgy base that pairs perfectly with the mousse. For a smooth and creamy mousse, you will need: - 1 cup heavy cream - 4 ounces dark chocolate, finely chopped (for mousse) - 2 tablespoons powdered sugar - 1 teaspoon pure vanilla extract (for mousse) These ingredients will help you whip up a cloud-like mousse that sits atop the brownies. You will need some basic tools to make this treat: - 9x13 inch baking pan - Parchment paper - Medium saucepan - Large mixing bowl - Whisk - Electric mixer - Wire rack Having the right tools makes the process easy and fun. Enjoy the baking! {{ingredient_image_2}} Start by preheating your oven to 350°F (175°C). Grease a 9x13 inch baking pan. Line it with parchment paper. Leave some overhang. This helps lift the brownies later. In a medium saucepan, combine 1 cup of unsalted butter and 8 ounces of chopped semi-sweet chocolate. Heat this over low heat. Stir until the mixture is melted and smooth. Let it cool for about 10 minutes. In a large bowl, mix 1 cup of granulated sugar and 1 cup of brown sugar. Add the cooled chocolate mixture. Whisk until mixed well. Add 4 large eggs, one at a time. Make sure each egg is mixed in before adding the next. Finally, stir in 1 teaspoon of pure vanilla extract. In another bowl, whisk together 1 cup of all-purpose flour, 1/4 cup of cocoa powder, 1/2 teaspoon of baking powder, and 1/4 teaspoon of salt. Gradually fold this dry mixture into the wet batter. Mix gently until combined, but do not overmix. Pour the batter into the lined pan. Spread it evenly. Bake for 25-30 minutes. Use a toothpick to check if they are done. It should come out with a few moist crumbs. Let the brownies cool completely on a wire rack. In a medium saucepan, heat 1 cup of heavy cream over medium heat. Wait until it barely simmers. Remove it from heat. Add 4 ounces of finely chopped dark chocolate. Stir until smooth. Allow this mixture to cool for about 10 minutes. Transfer the cooled chocolate mixture to a mixing bowl. Whip it with an electric mixer until fluffy and light. Add 2 tablespoons of powdered sugar and 1 teaspoon of vanilla extract. Keep whipping until soft peaks form. Be careful not to overwhip. Once the brownies are cool, pour the whipped mousse over them. Spread it evenly. Cover with plastic wrap and chill in the fridge for at least 2 hours. This helps the mousse set. When ready, lift the brownies out using the parchment. Cut them into squares or rectangles. Enjoy them chilled or at room temperature for a sweet treat! To get the best brownie texture, start by mixing your wet and dry ingredients carefully. Make sure your butter and chocolate blend smoothly. Mix the sugars and eggs well. This helps the brownies rise and stay soft. When adding the flour and cocoa, fold gently. Overmixing can lead to tough brownies. Bake them until a toothpick shows a few moist crumbs. This means they are fudgy and not dry. Whipping the mousse is key to getting it light and fluffy. First, heat the cream until it simmers. Then, add the chopped dark chocolate and stir until smooth. Let it cool slightly before whipping. Use an electric mixer for the best results. Beat until soft peaks form, but stop before it gets too thick. If you overwhip, the mousse can become grainy. It should be airy and smooth when done. To make your brownies look extra special, think about how you serve them. You can sprinkle grated chocolate or cocoa powder on top of the mousse. This adds a nice touch. Fresh berries or mint leaves can also brighten the dish. Use a sharp knife to cut the brownies for neat squares. Serve them chilled or at room temp for the best taste. Pro Tips Use Quality Chocolate: The flavor of your brownies and mousse largely depends on the chocolate you choose. Opt for high-quality semi-sweet and dark chocolate for the best taste experience. Room Temperature Eggs: Using eggs at room temperature helps them incorporate better into the batter, resulting in a smoother texture for your brownies. Don’t Overmix: When combining the dry ingredients with the wet, mix just until incorporated. Overmixing can lead to dense brownies instead of the desired fudgy texture. Chill to Set: Allowing the mousse to chill for at least 2 hours is crucial for it to set properly. This ensures a light and airy texture when you serve it atop the brownies. {{image_4}} You can make your brownies even better with added flavors. Try adding a dash of espresso powder. This will enhance the chocolate taste. You can also mix in orange zest. It gives a bright, fresh twist. If you like nuts, add chopped walnuts or pecans. They add a nice crunch. For a minty flavor, use mint extract instead of vanilla. Just a little will make a big difference. Toppings can change the whole look and taste. Instead of mousse, try whipped cream. It will lighten the dessert. You can also add a drizzle of caramel sauce. It adds sweetness and a lovely shine. For a fruity touch, top with fresh berries. Strawberries or raspberries work great. If you want a fun crunch, sprinkle crushed cookie crumbs on top. They add texture and flavor. Making brownies gluten-free is easy. Just swap all-purpose flour for almond flour or gluten-free flour. For a vegan option, replace eggs with flax eggs. To make a flax egg, mix one tablespoon of flaxseed meal with three tablespoons of water. Let it sit for a few minutes. Use dairy-free chocolate and coconut cream for the mousse. These swaps keep the taste rich and creamy while being friendly to different diets. To keep your brownies fresh, store them in an airtight container. This helps keep them moist. Place parchment paper between layers to avoid sticking. Keep them at room temperature for up to four days. If you want to keep them longer, refrigeration is an option. Just make sure to wrap them well to avoid drying out. For any leftover mousse, transfer it to a clean, airtight container. Store it in the fridge for up to three days. If you notice any separation, gently stir it before serving. Always cover the container tightly to keep it from absorbing other food odors. You can freeze brownies and mousse for later enjoyment. To freeze brownies, wrap each piece in plastic wrap, then place them in a freezer bag. They can last for up to three months. For mousse, spoon it into individual servings in freezer-safe containers. It can also freeze for up to three months. When you're ready to enjoy, thaw in the fridge overnight. Yes, you can. I often mix semi-sweet and dark chocolate for depth. You can also try milk chocolate for a sweeter treat. Just remember, the type of chocolate affects the taste. Dark chocolate gives a rich, bold flavor. Milk chocolate offers a creamier and sweeter bite. Adjust the sugar if you change the chocolate type. Check for moist crumbs on a toothpick. Insert it into the center of the brownies. If it comes out with a few moist crumbs, they are ready. Remember, they will continue to cook after you take them out. Avoid overbaking for the best texture. Brownies should be soft and fudgy inside. If your mousse does not set, check a few things. First, make sure the cream was whipped enough. It needs to form soft peaks. If it’s too runny, try chilling it longer. You can also gently fold in more whipped cream. This will help give it structure. Just be gentle to keep it airy. Yes, you can. These brownies are great for making ahead. You can prepare them a day or two in advance. Just store them in the fridge once assembled. The mousse will taste even better after chilling. Just remember to cover them well with plastic wrap. This keeps them fresh and tasty. We explored the key ingredients and steps to create delicious brownies with chocolate mousse. I shared tips to ensure perfect textures and suggested variations to suit different diets. Remember, with the right techniques, you can impress anyone with this dessert. Use these recipes and tips to make something special! Enjoy experimenting and sharing your tasty creations with loved ones. Happy baking!

Decadent Chocolate Mousse Brownies Easy Delightful Treat

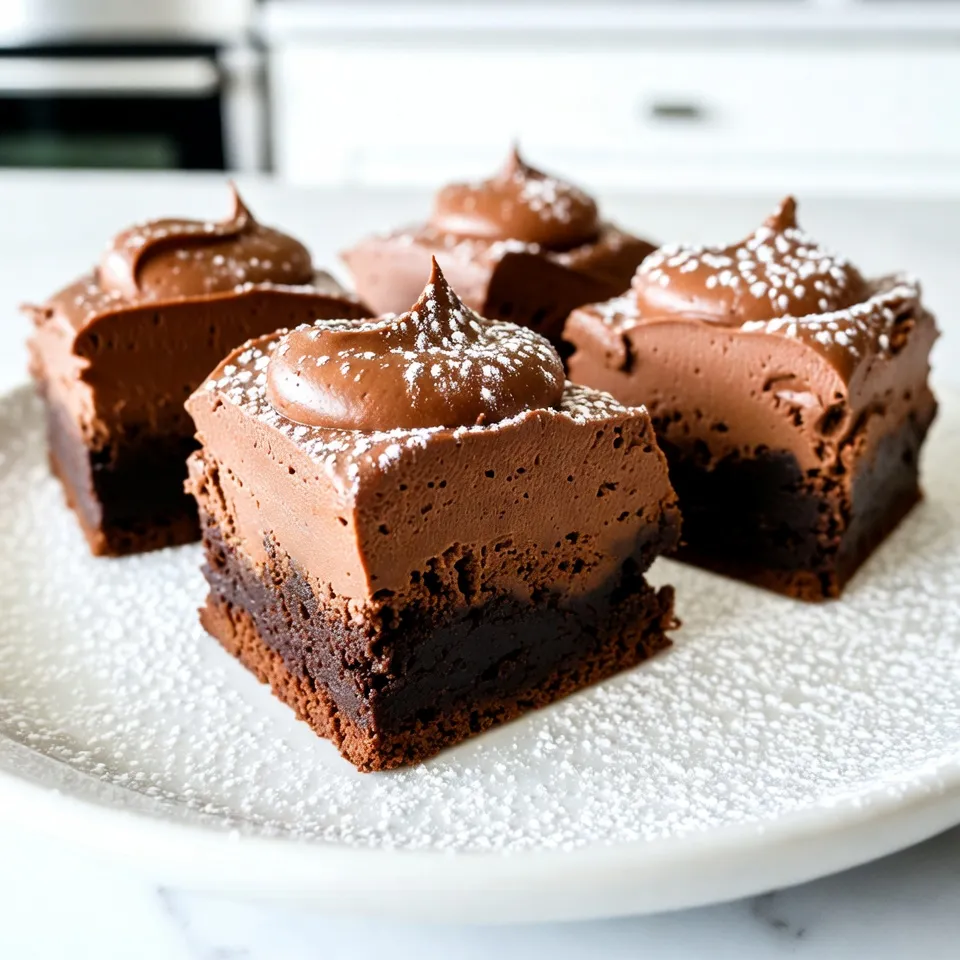
Are you ready to indulge in a treat that’s both easy and delightful? These Decadent Chocolate Mousse Brownies combine rich,

To make a rich and tasty Creamy Cowboy Soup, gather these ingredients: - 1 pound ground beef - 1 medium onion, finely diced - 2 cloves garlic, minced - 2 medium carrots, peeled and diced - 2 celery stalks, diced - 1 can (15 oz) black beans, drained and rinsed - 1 can (15 oz) sweet corn, drained - 1 can (10 oz) diced tomatoes with green chilies, including juices - 4 cups beef broth (preferably low-sodium) - 1 cup heavy cream - 1 tablespoon chili powder - 1 teaspoon ground cumin - Salt and freshly ground black pepper to taste - Fresh cilantro, chopped, for garnish - 1 cup shredded sharp cheddar cheese for topping You can add fun garnishes to make your soup even better: - Extra shredded cheddar cheese - Chopped green onions - Sliced jalapeños for heat - Sour cream for creaminess - Crushed tortilla chips for crunch Having the right tools makes cooking easier. Here’s what you need: - A large pot for cooking the soup - A spatula for stirring - A knife and cutting board for chopping - Measuring cups and spoons for accuracy - Ladle for serving the soup {{ingredient_image_2}} Start by heating a large pot over medium heat. Add 1 pound of ground beef to the pot. Use a spatula to break it apart. Cook the beef until it turns brown, about 5-7 minutes. This step builds a rich base for your soup. Drain any fat that collects in the pot. Next, stir in 1 medium onion that you diced finely. Cook the onion for about 3-4 minutes. You want it to become soft and clear. Then add 2 minced cloves of garlic. Cook this mix for another minute. The garlic will smell great and add depth to your soup. Now, add 2 diced carrots and 2 diced celery stalks to the pot. Stir them in and cook for about 5 minutes. This helps the veggies to soften and release their flavors. You want a nice blend of colors and textures. It’s time to add the rest of the ingredients. Pour in 1 can of black beans, drained and rinsed, and 1 can of sweet corn, drained. Next, add 1 can of diced tomatoes with green chilies. Make sure to include the juices. Pour in 4 cups of beef broth, which adds richness. Stir everything well to combine. Season the soup with 1 tablespoon of chili powder, 1 teaspoon of ground cumin, and salt and pepper to taste. Increase the heat until the soup boils gently. Once it boils, lower the heat to let it simmer. Keep it uncovered for 15-20 minutes. This step helps the flavors mix well. After simmering, it’s time to make it creamy. Stir in 1 cup of heavy cream. Let the soup cook on low for another 5 minutes. Taste your soup and adjust the seasoning if needed. You can add more salt or pepper to make it perfect. Now your Creamy Cowboy Soup is ready! Serve it in warm bowls. You can top it with shredded sharp cheddar cheese and chopped cilantro for a fresh touch. Enjoy this hearty dish! To make Creamy Cowboy Soup even creamier, you can add more heavy cream. A half cup more will boost the richness. You can also try blending half of the soup. This will add a thick texture while keeping some chunks. Using cream cheese is another option. Just melt it into the soup for a rich taste. To boost the flavor, add more spices. A pinch of smoked paprika will add depth. Fresh herbs like thyme or oregano can also brighten the soup. For a kick, add diced jalapeños or hot sauce. If you want a sweet note, try adding a bit of sugar or honey. This balances the flavors and makes the soup pop. For an inviting look, serve the soup in rustic bowls. A sprinkle of cheese and cilantro on top adds color. You can also add a squeeze of lime juice for zest. Pair the soup with crispy tortilla chips or warm cornbread. This not only looks great but adds crunch and fun to the meal. Pro Tips Use Fresh Ingredients: Opt for fresh vegetables and herbs to enhance the flavor of your soup. Fresh ingredients can make a noticeable difference in taste and nutrition. Adjust the Cream: If you prefer a lighter version, you can substitute half of the heavy cream with low-fat milk or a non-dairy alternative without losing the creamy texture. Spice it Up: For a spicier kick, add diced jalapeños or a few dashes of hot sauce while cooking. Adjust the spice level to suit your taste preferences. Make it Ahead: This soup tastes even better the next day! Make a batch ahead of time and let the flavors develop overnight in the refrigerator. {{image_4}} If you want a vegetarian twist on Creamy Cowboy Soup, it’s easy. Swap the ground beef for 1 pound of lentils. Use green or brown lentils for a hearty texture. Cook them in the broth for about 20 minutes before adding other ingredients. You can also use veggie broth instead of beef broth. This keeps it rich and tasty without meat. Add more veggies for extra color and taste. Try bell peppers or zucchini for a fun twist. Feel free to play with the ingredients! If you don’t like black beans, use kidney beans or chickpeas. They add protein and change the flavor a bit. You can also swap the heavy cream for coconut milk for a dairy-free option. This gives a nice tropical hint. If diced tomatoes don’t suit your taste, replace them with fresh tomatoes or tomato sauce. Each swap can change the soup’s flavor and texture, so have fun experimenting! Do you like it spicy? You can boost the heat easily! Add more chili powder or include diced jalapeños when you cook the beef. If you want it milder, skip the chili powder or use sweet paprika instead. You can also serve hot sauce on the side. This way, everyone can adjust the spice to their liking. Finding the right heat can make the soup even more enjoyable for you and your guests! To keep your Creamy Cowboy Soup fresh, let it cool first. Once cool, pour it into a container. Make sure the container is airtight. Store it in the fridge for up to three days. If you want to keep it longer, freezing is a great option. When you’re ready to eat the soup, take it out of the fridge. Pour the soup into a pot. Heat it on low to medium heat. Stir often to avoid burning. You can also reheat it in the microwave. Place soup in a microwave-safe bowl. Heat for one to two minutes, stirring halfway through. Be careful, as it can get hot quickly. To freeze your soup, use freezer-safe containers. Leave some space at the top for the soup to expand. Label the containers with the date. The soup can last up to three months in the freezer. When you’re ready to eat, thaw it overnight in the fridge. Reheat as shown above. Enjoy your hearty meal anytime! You can use ground turkey or chicken instead of ground beef. Both options give a lighter taste. For a meatless choice, try lentils or mushrooms. They add texture and flavor. You can also use plant-based meat for a vegan version. This way, you keep the soup hearty and delicious. Yes, you can make this soup in a slow cooker. First, brown the meat in a pan. Then, add all the ingredients to the slow cooker. Cook on low for 6-8 hours or high for 3-4 hours. Just add the heavy cream in the last 30 minutes of cooking. This makes the soup rich and creamy. Creamy Cowboy Soup lasts about 3-4 days in the fridge. Store it in an airtight container. If you want to keep it longer, freezing is a good option. Just remember to leave out the cream if you freeze it. You can add it when you reheat the soup for a fresh taste. In summary, this blog post walks you through making Creamy Cowboy Soup. We covered ingredients, cooking steps, tips, variations, and storage. Each section helps you create a delicious meal easily. Remember, you can adjust flavors and try substitutes to fit your taste. Enjoy this soup with friends and family, warm and hearty. By following these steps, you'll impress everyone at your table. Cook with joy, and don’t forget to share your results!

Creamy Cowboy Soup Hearty and Flavorful Comfort Dish

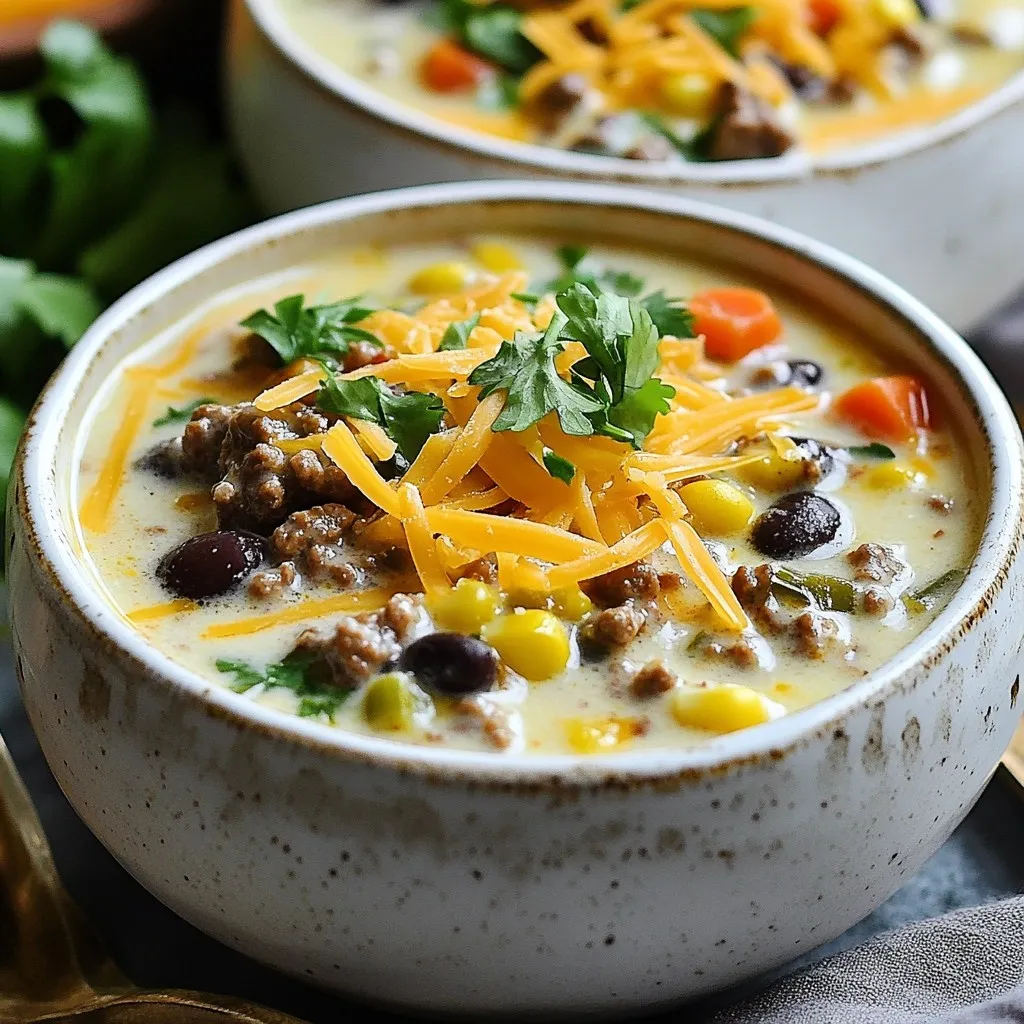
Looking for a dish that’s both hearty and full of flavor? Look no further than Creamy Cowboy Soup! This comforting

- 1 cup all-purpose flour - 1 teaspoon baking powder - 1 teaspoon baking soda - 2 teaspoons ground ginger - 1 teaspoon ground cinnamon - 1/2 teaspoon ground nutmeg - 1/4 teaspoon ground cloves - 1/2 teaspoon salt - 1/2 cup unsalted butter, softened - 3/4 cup brown sugar, tightly packed - 2 large eggs - 1/2 cup unsulfured molasses - 1/2 cup whole milk - 1/2 cup pecans, roughly chopped (optional) - 1/2 cup unsalted butter - 1 cup brown sugar, packed - 1 cup heavy cream - 1 teaspoon pure vanilla extract Gathering these ingredients is the first step to making this cake. Each one plays a key role in the flavor and texture. The spices like ginger, cinnamon, and nutmeg bring warmth and a festive feel. The molasses adds deep sweetness and moisture. Brown sugar gives the cake a lovely caramel touch. Using unsalted butter helps control the salt levels. For the toffee sauce, the mix of butter, brown sugar, and cream creates a rich topping. The vanilla extract adds a hint of sweetness that complements the cake. Remember to check your pantry for these items. You might have some already! {{ingredient_image_2}} Preheat the oven to 350°F (175°C). Grease a 9-inch round cake pan well. This helps the cake come out easily after baking. In a medium bowl, whisk together: - 1 cup all-purpose flour - 1 teaspoon baking powder - 1 teaspoon baking soda - 2 teaspoons ground ginger - 1 teaspoon ground cinnamon - 1/2 teaspoon ground nutmeg - 1/4 teaspoon ground cloves - 1/2 teaspoon salt Make sure to mix these dry ingredients well. Set the bowl aside for later. In a large bowl, use an electric mixer to beat together: - 1/2 cup unsalted butter, softened - 3/4 cup brown sugar Mix until the mixture is fluffy and light. This step is key for a good texture. Add 2 large eggs to the butter-sugar mix, one at a time. Mix well after each egg. Then, pour in 1/2 cup of unsulfured molasses. Continue mixing until it is smooth and well combined. Gradually add the dry mixture to the wet mix. Alternate with: - 1/2 cup whole milk Stir gently until just combined. If you like, fold in 1/2 cup of roughly chopped pecans at this stage. Pour the batter into the prepared pan. Smooth the top with a spatula. Bake for 30-35 minutes. Use a toothpick to check if it’s done. If it comes out clean, it's ready! Let it cool in the pan for 10 minutes before transferring to a wire rack. While the cake cools, prepare the toffee sauce. In a medium saucepan over medium heat, mix together: - 1/2 cup unsalted butter - 1 cup packed brown sugar - 1 cup heavy cream Stir constantly until the sugar dissolves and the mix bubbles. Lower the heat and let it simmer for 5-7 minutes until it thickens. Remove from heat and mix in 1 teaspoon of pure vanilla extract. Slice the gingerbread pudding cake into pieces. Drizzle warm toffee sauce over each slice. For a beautiful touch, serve on white plates and sprinkle with powdered sugar. A dollop of whipped cream adds a nice finish. Enjoy every bite! Avoid overmixing your batter. If you mix too much, your cake can become tough. Always measure your ingredients accurately. A little too much flour can lead to a dry cake. Use a kitchen scale or measuring cups for the best results. To add more flavor, try using extra spices. A pinch of ground cardamom can bring warmth. You can also add a splash of vanilla or almond extract. These small changes can make a big difference in taste. Make sure your oven is at the right temperature. An oven thermometer can help with accuracy. Bake your cake for the right amount of time. Check for doneness with a toothpick. If it comes out clean, your cake is ready. Pro Tips Use Fresh Spices: For the best flavor, use fresh ground spices instead of pre-ground. This enhances the warmth and aroma of your gingerbread pudding cake. Check for Doneness: Instead of relying solely on the baking time, use a toothpick to test for doneness. It should come out clean or with a few moist crumbs, but not wet batter. Make Ahead: You can prepare the cake batter ahead of time and refrigerate it for up to 24 hours. Just bring it back to room temperature before baking for even results. Serve with Ice Cream: For an indulgent twist, serve slices of the gingerbread pudding cake with a scoop of vanilla or caramel ice cream alongside the toffee sauce. {{image_4}} You can easily swap regular flour for gluten-free flour. Try a blend for the best results. For a dairy-free option, use almond milk or coconut milk instead of whole milk. This keeps the cake moist and delicious. Add a twist to your gingerbread pudding cake by mixing in citrus zest. Lemon or orange adds a fresh taste. You can also fold in chocolate chips for a rich surprise. Both options give the cake a unique flair. If you want to change up the toffee sauce, consider using caramel sauce. It adds a sweet, buttery flavor. Vanilla sauce is another great choice. Each topping brings a different taste, allowing you to customize your dessert experience. To keep your gingerbread pudding cake fresh, cover it well. Use plastic wrap or place it in an airtight container. Store it in the fridge for up to three days. This keeps the cake moist and tasty. If you want it to last longer, consider freezing it. To freeze the cake, first let it cool completely. Wrap individual slices tightly in plastic wrap. Place them in a freezer bag or airtight container. This helps prevent freezer burn. You can also freeze the toffee sauce. Store it in a separate container. It can last in the freezer for up to two months. When you’re ready to enjoy your cake again, take it out of the fridge. Let it sit at room temperature for about 30 minutes. For the best texture, reheat it in the oven. Preheat the oven to 350°F and warm the cake for about 10 minutes. For the toffee sauce, heat it in a small saucepan over low heat. Stir until it's warm and smooth. Enjoy the warm flavors of your gingerbread pudding cake! Yes, you can use whole wheat flour. It adds a nutty flavor. For gluten-free options, try almond flour or a gluten-free blend. These will change the cake's texture but still taste great. You can store the gingerbread pudding cake for up to three days in the fridge. Keep it covered to maintain its moistness. If you freeze it, it can last for up to three months. Just make sure to wrap it well to avoid freezer burn. Absolutely! You can prepare the cake batter a day before. Just store it in the fridge. You can also make the toffee sauce ahead of time and reheat it. This lets you enjoy more time with your guests! This blog post covers all you need for making gingerbread pudding cake and toffee sauce. You learned about the essential ingredients and how to combine them step by step. I shared tips to avoid common baking mistakes and offered tasty variations to suit your needs. You also got helpful storage and reheating tips. Baking should be fun and creative, so don’t hesitate to make this recipe your own. Enjoy every bite and happy baking!

Gingerbread Pudding Cake with Toffee Sauce Delight

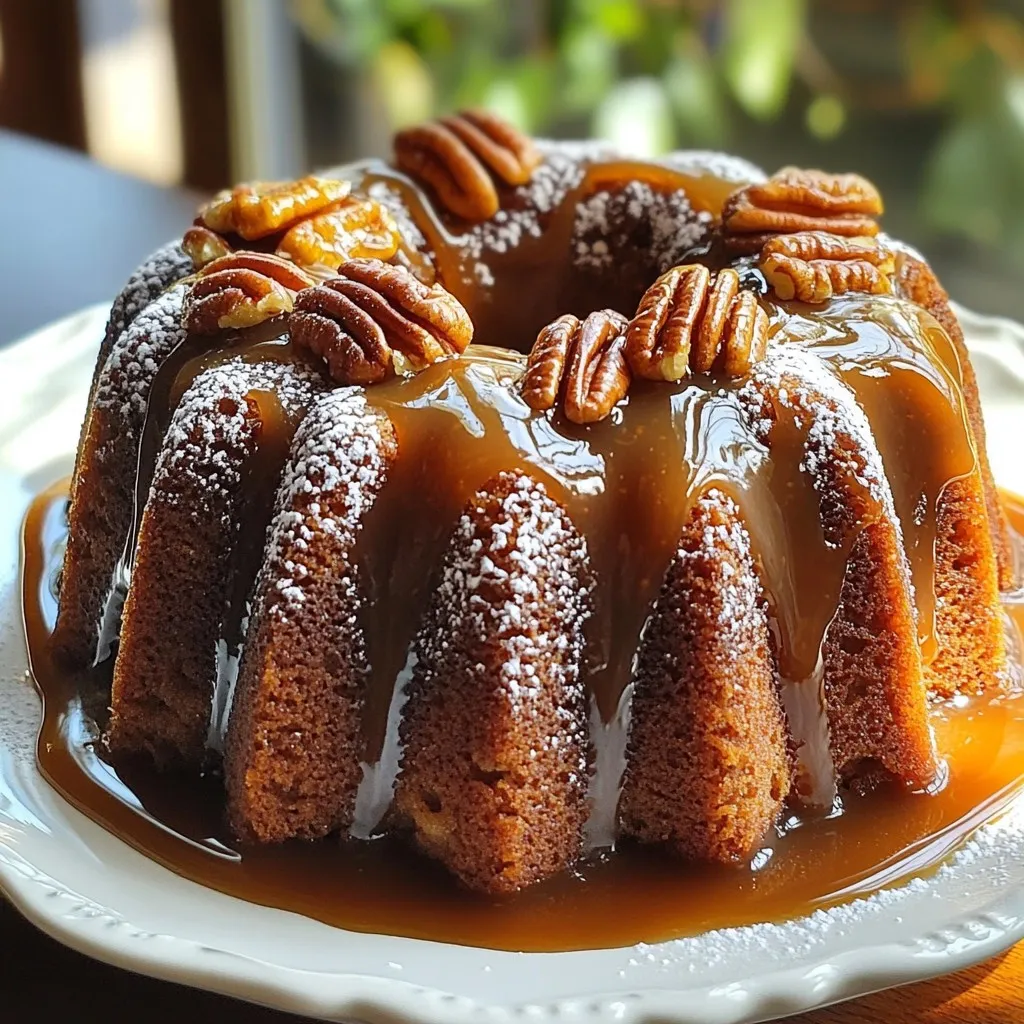
Get ready to treat your taste buds! My Gingerbread Pudding Cake with Toffee Sauce Delight is the perfect winter dessert.

- 8 oz spaghetti, cooked al dente and drained - 2 tablespoons extra virgin olive oil - 1 small onion, finely chopped - 2 cloves garlic, minced - 1 cup creamy ricotta cheese - 1 ½ cups shredded mozzarella cheese, divided - ½ cup grated Parmesan cheese - 2 large eggs, lightly beaten - 1 teaspoon Italian seasoning blend - Salt and freshly ground black pepper to taste - 1 cup marinara sauce (for topping) - Fresh basil leaves for garnish The key ingredients in Cheesy Spaghetti Pie create a rich and creamy dish. The combination of ricotta and mozzarella brings a lovely texture. The eggs help bind the mixture, keeping it together when baked. Using fresh garlic and onion adds depth to the flavor. - Cooked ground beef or sausage - Sliced olives - Chopped bell peppers - Spinach or other leafy greens - Different herbs like thyme or oregano You can add your favorite ingredients to make this dish your own. Adding meat makes it heartier, while veggies can add color and nutrition. Mix it up based on what you love or have on hand. - Whole milk ricotta for creaminess - Whole milk or part-skim mozzarella for melting - Grated Parmesan for sharp flavor Using high-quality cheese makes a big difference in taste. Look for fresh cheese at your local store. Brands that focus on quality will give you the best results in this dish. {{ingredient_image_2}} First, I set my oven to 350°F (175°C). This helps it get hot for baking. I gather all my ingredients on the counter. It makes cooking easier when I have everything in sight. Next, I grab a large skillet and add the olive oil. I turn the heat to medium. I toss in the finely chopped onion and stir it for about 3-4 minutes. The onion should turn soft and clear. Then, I add the minced garlic and cook for another minute. The smell is amazing! After that, I take the skillet off the heat and set it aside. In a big mixing bowl, I combine the cooked spaghetti with the creamy ricotta cheese. I add 1 cup of shredded mozzarella and the grated Parmesan cheese. Next, I pour in the lightly beaten eggs. I also add the sautéed onion and garlic mix, Italian seasoning, and a pinch of salt and pepper. I use a spatula to mix everything until it’s well blended. Now it’s time to prepare the baking dish. I lightly grease a 9-inch pie dish with non-stick spray or olive oil. I carefully pour the spaghetti mixture into the dish. With my spatula, I spread it out evenly. I sprinkle the remaining ½ cup of shredded mozzarella cheese on top. Then, I cover it with a layer of marinara sauce. I make sure to cover everything well. I place the pie dish in the oven and bake it for 25-30 minutes. I know it’s done when the cheese is bubbly and golden brown. After baking, I take the spaghetti pie out of the oven. I let it cool for about 5 minutes. This makes slicing easier. Before serving, I add fresh basil leaves on top for a nice touch. Then, I slice it into wedges and serve warm. It looks and tastes so good! - Use al dente spaghetti. This helps keep the texture firm during baking. - Mix well. Ensure all ingredients blend evenly for a tasty bite. - Preheat your oven. A hot oven ensures the cheese melts perfectly. - Let it cool. Cooling for a few minutes helps the pie set for easy slicing. - Top with fresh herbs. Basil adds a nice touch of flavor and color. - Overcooking the pasta. This can make the pie too soft. Stick to al dente. - Skipping the cooling step. Slicing too soon can lead to a messy pie. - Not greasing the dish. This can cause sticking and make serving tricky. - Using too much sauce. Too much marinara can make the pie soggy. - Under-seasoning. Always taste before baking. Adjust salt and pepper as needed. - Gluten-free pasta: Use gluten-free spaghetti if you need a gluten-free option. - Dairy-free cheese: Swap regular cheese for dairy-free versions for lactose intolerance. - Egg substitute: Use flaxseed meal mixed with water as an egg replacement. - Add veggies: Toss in some spinach or mushrooms for extra nutrients and flavor. - Lean meats: Ground turkey or chicken can be mixed in for added protein. Pro Tips Use Fresh Ingredients: Fresh garlic and herbs will enhance the flavor of your spaghetti pie significantly. Opt for fresh basil instead of dried for a vibrant taste. Customize Your Cheese: Feel free to mix different types of cheese such as provolone or gouda to create a unique flavor profile for your pie. Extra Crispy Topping: For a crunchier top, broil the spaghetti pie for the last 2-3 minutes of baking. Keep a close eye to prevent burning. Make Ahead: You can prepare the spaghetti pie a day in advance. Just cover it tightly and refrigerate, then bake when you're ready to serve. {{image_4}} For a vegetarian twist, skip the meat and add veggies. You can use mushrooms, spinach, or bell peppers. Sauté the veggies with the onion and garlic for extra flavor. Mix them into your spaghetti filling. This version is still creamy and cheesy, perfect for veggie lovers. If you love meat, this version is for you. Brown ground beef or sausage in the skillet before adding the onion and garlic. You can also mix in cooked bacon or ham for a smoky flavor. This pie becomes a hearty meal with all the meat goodness. To make a gluten-free cheesy spaghetti pie, swap regular spaghetti for gluten-free pasta. There are many options, like rice or corn-based pasta. Just cook it al dente, like the regular kind. Follow the same steps to mix and bake. You’ll enjoy the same great taste without the gluten. After enjoying your cheesy spaghetti pie, let it cool. Then, place any leftovers in an airtight container. It will stay fresh in the fridge for up to three days. Make sure to cover it well to keep out moisture and odors. To reheat, you can use the oven or microwave. For the oven, preheat it to 350°F (175°C). Place the pie in an oven-safe dish and cover it with foil. Heat for about 15-20 minutes until warm. If you choose the microwave, place a slice on a microwave-safe plate. Heat for 1-2 minutes, checking to avoid overheating. You can freeze cheesy spaghetti pie for later! Cut it into slices and wrap each slice in plastic wrap. Then, put the wrapped slices in a freezer bag. Label the bag with the date. It will keep well for up to three months. When ready to eat, thaw it in the fridge overnight before reheating. Cheesy spaghetti pie is a fun dish that combines pasta and cheese. It looks like a pie but uses spaghetti as the base. You mix cooked spaghetti with creamy ricotta, mozzarella, and Parmesan cheese. Then, you bake it until the cheese is bubbly and golden. It’s a hearty meal that everyone loves. Yes, you can prepare cheesy spaghetti pie ahead of time. Just follow the recipe up to the baking step. Cover the pie and store it in the fridge for up to 24 hours. When you’re ready, bake it straight from the fridge. It will still taste great! To reheat leftovers, preheat your oven to 350°F (175°C). Place the pie in a baking dish and cover it with foil. Heat it for about 15-20 minutes. This keeps the pie moist and warm. You can also use the microwave if you prefer. Just heat in short bursts. Absolutely! You can use any pasta you like. Penne or rigatoni work well. Just make sure to cook it al dente so it holds its shape. The flavor will still be amazing, no matter the pasta shape. You can get creative with toppings! Try adding cooked meats like ground beef or sausage. Vegetables like spinach or mushrooms can also add flavor. For a spicy kick, sprinkle some red pepper flakes on top. Just remember to keep it balanced with the cheese. In this blog post, I shared how to make a delicious cheesy spaghetti pie. We covered the key ingredients, step-by-step instructions, and tips for the best results. I also included variations for different diets and ways to store leftovers. Cheesy spaghetti pie is a fun dish to make and share. With some simple changes, you can match it to your taste. Enjoy this dish with family or friends, and get creative with your own twists!

Cheesy Spaghetti Pie Savory and Simple Recipe

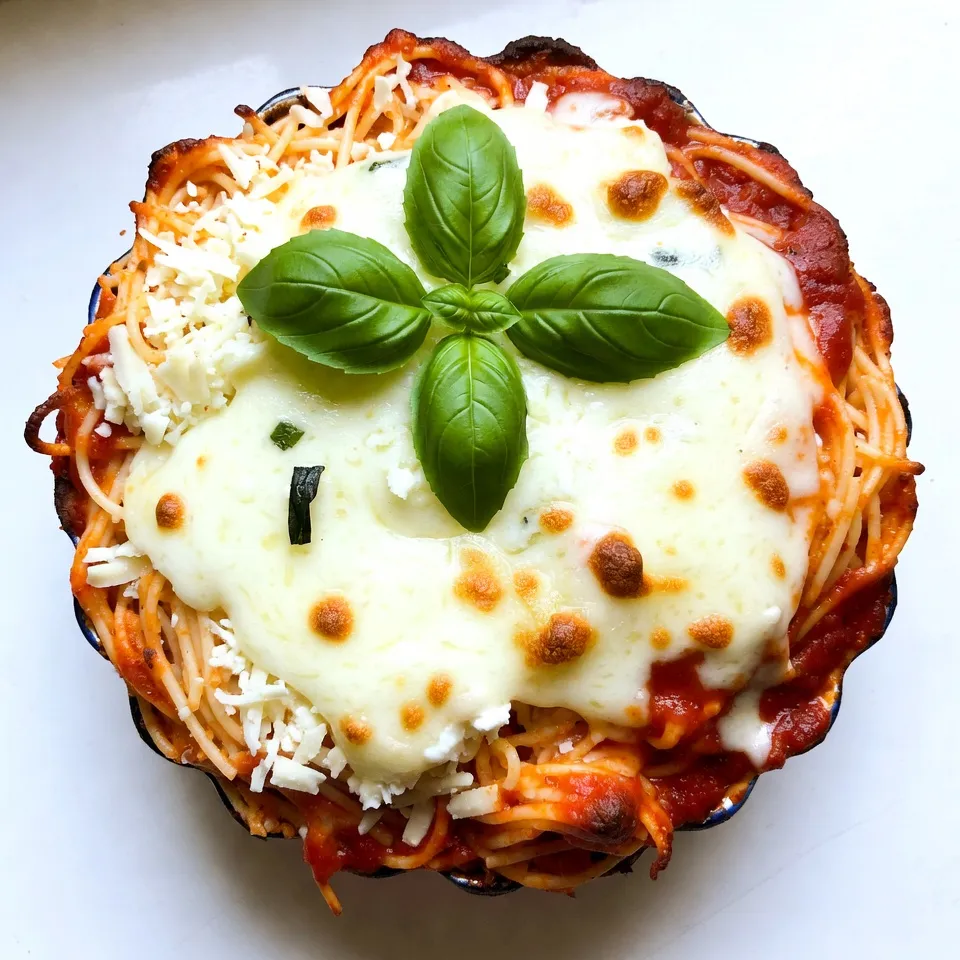
Looking for a fun and tasty twist on dinner? Let me introduce you to Cheesy Spaghetti Pie! This dish combines

- 1 lb chicken tenderloins - 1 cup buttermilk - 1 cup all-purpose flour - 1 teaspoon garlic powder - 1 teaspoon onion powder - 1 teaspoon paprika - Salt and pepper to taste - Vegetable oil (for frying) To start with chicken tenderloins, I love using fresh ones. They are juicy and cook quickly. Soak these tenderloins in buttermilk. This makes them super tender and tasty. You can let them soak for 30 minutes or overnight for the best results. - 1 cup elbow macaroni - 2 cups shredded sharp cheddar cheese - 1/2 cup milk - 2 tablespoons butter - 1 teaspoon Dijon mustard - 1/2 teaspoon black pepper - 1/4 teaspoon paprika (for the mac and cheese) For the mac and cheese, elbow macaroni is the best. It holds the cheese sauce well. Use sharp cheddar for a rich taste. Combine it with butter, milk, and a bit of mustard for extra flavor. The black pepper and paprika give it a nice kick. - 1/2 cup hot honey (store-bought or homemade) Hot honey is the star here. You can buy it or make your own. Mix honey with hot sauce in equal parts. This gives the chicken a sweet and spicy finish. If you love heat, add more hot sauce. {{ingredient_image_2}} To start, take the chicken tenderloins and place them in a large bowl. Pour in 1 cup of buttermilk, making sure the chicken is fully soaked. Cover the bowl and let it chill in the fridge for at least 30 minutes. For best results, marinate overnight. This step makes the chicken juicy and tender. Next, grab a shallow dish. In this dish, mix 1 cup of all-purpose flour, 1 teaspoon of garlic powder, 1 teaspoon of onion powder, 1 teaspoon of paprika, salt, and pepper. Whisk it well to combine all the dry ingredients. This coating will give your chicken a crispy texture. Now, heat about 1 inch of vegetable oil in a large skillet. Use medium-high heat, aiming for a temperature of 350°F (175°C). Remove the chicken from the buttermilk and let the excess drip off. Dredge each tenderloin in the flour mixture. Ensure each piece is fully coated. Place the coated chicken in the hot oil carefully. Fry them in batches for about 4-5 minutes on each side. Look for a golden brown color and ensure they are fully cooked. Transfer the cooked chicken to a plate lined with paper towels to drain any extra oil. While the chicken fries, prepare the hot honey sauce. In a small bowl, mix 1/2 cup of hot honey. You can adjust the heat level to your liking. If you want more spice, add a splash of extra hot sauce. Next, boil a pot of salted water. Add 1 cup of elbow macaroni and cook it until al dente, following the package instructions. Once cooked, drain the macaroni well and set it aside. In the same pot, melt 2 tablespoons of butter over medium heat. Stir in 1/2 cup of milk, 1 teaspoon of Dijon mustard, 1/2 teaspoon of black pepper, and 1/4 teaspoon of paprika. Gradually stir in 2 cups of shredded sharp cheddar cheese. Keep stirring until the cheese melts and becomes creamy. Add the drained macaroni to this cheese sauce. Stir well so all the macaroni is coated. To serve, place the creamy mac and cheese on a large platter. Arrange the crispy chicken tenders around it. Drizzle the hot honey over the chicken for a sweet and spicy touch. Enjoy your delicious meal! To get that perfect crunch, start with high-quality chicken tenderloins. Marinating them in buttermilk not only adds flavor but also keeps them juicy. Coat the chicken in the flour mixture evenly. When frying, keep the oil hot, around 350°F. Fry in small batches to avoid steaming. This helps achieve that golden brown color everyone loves. For creamy mac and cheese, use sharp cheddar cheese. It melts well and adds a nice bite. Cook the elbow macaroni until al dente. This ensures it stays firm when mixed with the cheese sauce. When making the cheese sauce, melt the butter first. Then, gradually add milk and cheese while stirring. This method helps create a smooth and creamy texture. If you like heat, adjust the hot honey sauce. Start with half a cup of hot honey. For more spice, add extra hot sauce or use less honey. Taste as you go to find your perfect balance. You can drizzle more hot honey on the chicken before serving. This gives every bite a sweet and spicy kick. Pro Tips Brine for Extra Juiciness: For even juicier chicken tenders, consider brining the tenderloins in a saltwater solution for a few hours before marinating in buttermilk. This will enhance the flavor and moisture retention during cooking. Use a Thermometer: To ensure your chicken is perfectly cooked, use a meat thermometer. The internal temperature should reach 165°F (75°C). This way, you can avoid overcooking and keep the tenders juicy. Customize Your Heat: If you prefer a milder kick, mix the hot honey with regular honey or maple syrup. For more heat, add minced fresh chili or cayenne pepper to your hot honey sauce to customize it to your taste. Cheese Sauce Secret: For a creamier mac and cheese, use a combination of cheeses like Gruyère or Monterey Jack along with sharp cheddar. This blend adds depth and enhances the overall flavor of the dish. {{image_4}} You can change the cheese in your mac and cheese for a new taste. Sharp cheddar is a classic choice. But you can use mozzarella for a stretchier feel. Gouda adds a nice smoky flavor. For a tangy touch, try feta or goat cheese. Mixing different cheeses creates a rich flavor profile. Experiment to find your favorite blend! You can make your hot honey at home. Combine honey and your favorite hot sauce in a pan. Heat gently until mixed well. Adjust the heat level to your liking. Try adding chili flakes for extra spice. A squeeze of lemon juice adds a nice zing. This way, you can customize your hot honey for any dish! Boost nutrition by adding vegetables to your mac and cheese. Spinach wilts down nicely and adds color. Broccoli florets give a crunchy bite. You can also mix in cooked peas or diced tomatoes. Sautéed mushrooms add an earthy flavor. Not only do veggies add taste, but they also make your meal healthier! To keep your hot honey chicken tenders and mac and cheese fresh, store them in airtight containers. Place the cooled chicken tenders in one container and the mac and cheese in another. They can stay in the fridge for up to three days. Make sure to let them cool before sealing the containers. This helps keep moisture in check and prevents sogginess. When you’re ready to enjoy your leftovers, reheating them properly is key. For the chicken tenders, preheat your oven to 375°F (190°C). Place the tenders on a baking sheet lined with parchment paper. Heat for about 10-15 minutes until they are crispy and warm. For the mac and cheese, you can reheat it on the stove or in the microwave. If using a microwave, heat in short bursts of 30 seconds, stirring in between. Add a splash of milk if it seems dry. If you want to save some for later, you can freeze the chicken tenders and mac and cheese. First, let them cool completely. Then, wrap each chicken tender tightly with plastic wrap. For the mac and cheese, scoop it into a freezer-safe container. You can freeze both for up to two months. When you’re ready to eat, thaw them in the fridge overnight before reheating. This method helps keep their flavor and texture. Yes, you can use chicken breasts. Cut them into strips to match the size of tenderloins. This way, they will cook evenly. The cooking time may vary slightly. Make sure they reach 165°F (74°C) for safety. To make hot honey, mix equal parts of honey and your favorite hot sauce. Heat this mix in a saucepan over low heat. Stir until it warms up and blends well. Adjust the heat by adding more hot sauce if you like it spicier. Mac and cheese can last for about 3 to 5 days in the fridge. Store it in an airtight container. Make sure it cools down before putting it in the fridge. Always check for any off smells or mold before eating leftovers. Yes, you can bake the chicken tenders. Preheat the oven to 400°F (200°C). Place coated tenders on a baking sheet lined with parchment paper. Bake for about 20-25 minutes, flipping halfway through. Make sure they are golden brown and cooked through. This blog post covered how to make delicious chicken tenderloins, creamy mac and cheese, and a sweet hot honey sauce. I shared tips for crispy chicken and cheesy mac. I also suggested fun variations and how to store leftovers safely. In my opinion, this meal is fun to make and enjoy with friends or family. You can easily change it up to fit your taste. Whether frying or baking, I hope you try these recipes soon!

Hot Honey Chicken Tenders with Mac and Cheese Delight

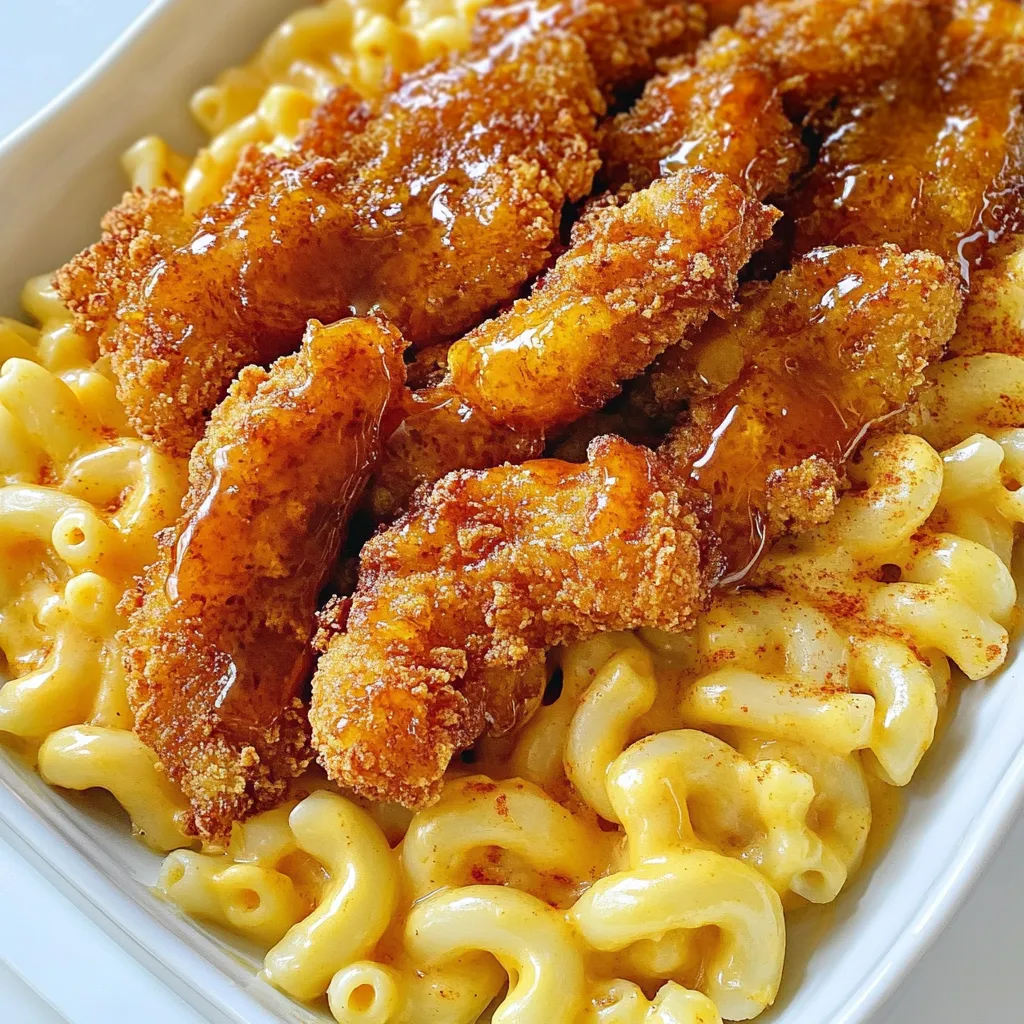
Are you ready to spice up your dinner routine? Today, I’m sharing my recipe for Hot Honey Chicken Tenders with

- 1 can (15 oz) chickpeas, drained and rinsed - 1 large onion, finely chopped - 3 cloves garlic, minced - 1 inch fresh ginger, grated - 1 can (14 oz) coconut milk - 1 can (14 oz) diced tomatoes The star of this dish is the chickpeas. They add protein and texture. I use canned chickpeas for quick prep. The coconut milk and diced tomatoes give a creamy base. The onions, garlic, and ginger provide a flavor kick. - 2 tablespoons tikka masala spice blend - 1 teaspoon garam masala - Sea salt, to taste - 1 tablespoon fresh lemon juice The tikka masala spice blend brings warmth and depth. Garam masala adds a sweet note. Sea salt enhances all the flavors. A squeeze of fresh lemon juice brightens the dish. - Fresh cilantro for garnish - Cooked basmati rice or quinoa for serving I love garnishing with fresh cilantro. It adds color and freshness. Serve the tikka masala over fluffy basmati rice or quinoa. This makes for a satisfying meal. {{ingredient_image_2}} - Sautéing Onions Start with a large skillet. Heat 1 tablespoon of extra virgin olive oil over medium heat. Once hot, add 1 large, finely chopped onion. Stir it often. Cook until the onion turns translucent and golden. This should take about 5 minutes. - Adding Garlic and Ginger Next, add 3 minced garlic cloves and 1 inch of grated fresh ginger. Stir continuously for about 2 minutes. You will smell a wonderful aroma as they cook. - Toasting the Tikka Masala Now, sprinkle in 2 tablespoons of tikka masala spice blend. Keep stirring for about 1 minute. This toasts the spices and brings out their flavors. - Combining Tomatoes and Coconut Milk Pour in 1 can of diced tomatoes and 1 can of creamy coconut milk. Stir well until mixed. Raise the heat a bit and let it simmer gently for about 5 minutes. This helps all the flavors mix together. - Folding in Chickpeas Gently fold in 1 can (15 oz) of drained and rinsed chickpeas. Make sure they get well coated in the sauce. - Simmering to Thicken the Sauce Lower the heat and let the chickpea mixture simmer for another 10 minutes. Stir occasionally. This will let the sauce thicken nicely. Perfecting Spice Toasting Toasting spices brings out their best taste. Start by heating the oil, then add the tikka masala spice blend. Stir it for about one minute. This simple step boosts the flavor of your dish. Adjusting Seasoning to Taste Always taste your dish as you cook. Add sea salt one pinch at a time. If you want more zing, try fresh lemon juice. Each person has different tastes, so make it yours. Pairing with Rice or Quinoa Serve chickpea tikka masala over basmati rice or quinoa. The grains soak up the tasty sauce. This combination makes every bite satisfying and filling. Garnishing for Presentation Add fresh cilantro on top before serving. This not only looks good but adds flavor too. A great garnish makes the dish pop and feel special. Overlooking Simmering Time Let the dish simmer long enough. This helps the flavors blend well. If you rush, the sauce may taste flat and bland. Ignoring Ingredients Quality Always use fresh ingredients. The better the onion, garlic, and spices, the tastier your dish. Don't skip on quality; it makes a big difference in flavor. Pro Tips Fresh Ingredients: Use fresh ginger and garlic for a more vibrant flavor. Pre-packaged versions can lose potency and affect the dish’s overall taste. Perfect Simmer: Allow the dish to simmer gently; this helps the flavors meld without burning the sauce. Keep an eye on it to prevent sticking. Adjusting Spice: If you prefer a spicier dish, add a pinch of cayenne pepper or red chili flakes when you add the tikka masala spices for an extra kick. Garnish Wisely: Fresh cilantro not only adds color but also enhances the dish’s flavor profile. Don’t skip this step for a fresh finish! {{image_4}} Using Other Legumes You can swap chickpeas for other legumes. Black beans or lentils work well. They add unique flavors and textures. Each option brings its own charm to the dish. Try red lentils for a softer bite or black beans for a heartier feel. Incorporating Vegetables Adding vegetables makes this dish more colorful and nutritious. You can use spinach, bell peppers, or cauliflower. Just chop them into small pieces and add them when you mix in the tomatoes and coconut milk. This boosts the dish's flavor and adds vitamins. Adjusting Spice Levels You can control the spice level to suit your taste. If you prefer milder flavors, use less tikka masala. For a stronger kick, add more. Experimenting with the spice blend can make each meal unique and fun. Adding Heat with Chilis If you love heat, try adding chilis. Fresh green chilis can be chopped and added at the start. Dried red chili flakes are also great for a quick boost. Add them in small amounts and taste as you go. Ensuring the Recipe is Allergy-Friendly This dish is naturally gluten-free and nut-free. You can enjoy it safely if you have allergies. Just be sure to check any added ingredients for allergens. This way, you can savor every bite without worry. Substituting Ingredients Safely If you need to make substitutions, do so carefully. Use vegetable broth instead of stock if needed. Coconut milk adds creaminess, but you can use oat or soy milk as alternatives. Always check labels to avoid allergens. To keep your chickpea tikka masala fresh, store it in an airtight container. This helps maintain its flavors and texture. Place the container in the fridge right after cooling it down. The dish lasts about 3 to 5 days in the fridge. Make sure to check for any signs of spoilage before eating. Freezing is a great option for long-term storage. To freeze, let the dish cool completely. Then, pour it into a freezer-safe container. Leave some space at the top for expansion. Seal the container tightly. Chickpea tikka masala can stay in the freezer for up to 3 months. To thaw, move the container to the fridge for several hours or overnight. When ready to eat, reheat in a saucepan over low heat. Stir often to prevent sticking. You can also use the microwave, heating it in 1-minute intervals until warm. For easy meals, prep your chickpea tikka masala ahead of time. You can make a big batch and store it in portions. This way, you have quick meals ready to go. Use small containers to keep each portion separate. This makes reheating simple and fast. Plus, it helps with portion control! Yes, you can use dried chickpeas. They require more prep time. Here's how to get them ready: - Soak the Chickpeas: Place dried chickpeas in a bowl. Cover them with water. Soak overnight. This softens them. - Cook the Chickpeas: Drain and rinse the soaked chickpeas. In a pot, add fresh water. Boil them for 1 to 2 hours. Check for softness. - Use in the Recipe: Once soft, you can use them in the chickpea tikka masala. Yes, this recipe is gluten-free. Here’s how to confirm: - Chickpeas: Naturally gluten-free. - Coconut Milk: Pure coconut milk is gluten-free. - Spices: Most spices do not contain gluten. Always check labels. - Olive Oil and Lemon Juice: Both are gluten-free. You can easily add more heat and flavor. Here are some ideas: - Chili Powder: Add a pinch of chili powder when cooking the onions. - Fresh Chilis: Chop fresh green or red chilis. Stir them in with the garlic. - Cayenne Pepper: Sprinkle a bit of cayenne pepper for extra heat. - Spicy Tikka Masala: Use a spicy tikka masala blend for a bolder taste. These tips will help you create a more exciting dish! This blog post showed how to make vegan chickpea tikka masala. You learned about the key ingredients, like chickpeas, coconut milk, and spices. I walked you through cooking steps and shared tips for best results. You explored variations and learned how to store leftovers. In closing, this dish is rich in flavor and easy to make. Enjoy your tasty creation!

Vegan Chickpea Tikka Masala Flavorful and Easy Dish

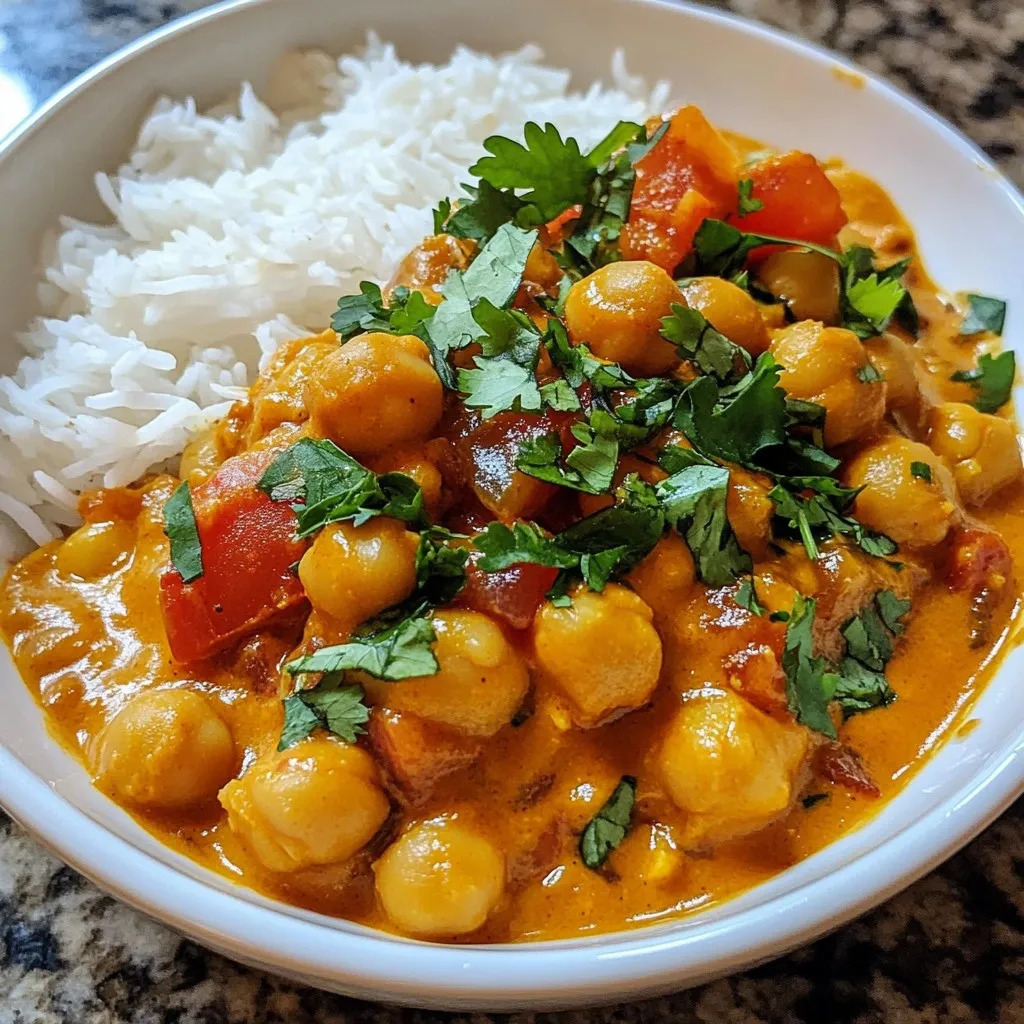
Are you ready for a delicious vegan meal that’s quick and easy to make? Try my Vegan Chickpea Tikka Masala!

To make Cannoli Cookies, you need a few simple items. Here’s what you will need: - 1 cup all-purpose flour - 1/2 teaspoon baking powder - 1/4 teaspoon salt - 1/2 teaspoon ground cinnamon - 1/2 cup unsalted butter, softened to room temperature - 1/2 cup granulated sugar - 1 large egg - 1 teaspoon vanilla extract - 1/2 cup ricotta cheese (drained if watery) - 1/4 cup mini chocolate chips - 1/4 cup powdered sugar (for dusting) Each ingredient plays a key role in making these cookies delightful. The all-purpose flour gives the cookies structure. Baking powder helps them rise. Salt enhances flavor, while cinnamon adds warmth. Butter and sugar create a creamy base. The egg binds everything together, and vanilla adds a sweet aroma. Ricotta cheese gives a rich, creamy texture. Finally, the chocolate chips add little bursts of sweetness. Gather these ingredients before you start. It makes the process smooth and fun! {{ingredient_image_2}} - Preheat your oven to 350°F (175°C). Line a baking sheet with parchment paper. - In a medium bowl, mix together 1 cup of all-purpose flour, 1/2 teaspoon baking powder, 1/4 teaspoon salt, and 1/2 teaspoon ground cinnamon. Set this dry mix aside. - In a large bowl, cream together 1/2 cup softened butter and 1/2 cup granulated sugar. Use an electric mixer for 2-3 minutes until fluffy. - Add 1 large egg and 1 teaspoon vanilla extract to the creamed butter and sugar. Beat until smooth and mixed well. - Gradually mix the dry ingredients into your wet mixture. Stir until just combined. Don't overmix; this keeps the cookies tender. - Use a spatula to fold in 1/2 cup drained ricotta cheese and 1/4 cup mini chocolate chips. Make sure they are evenly spread in the dough. - Use a tablespoon or cookie scoop to portion the dough into small balls. Place them on the prepared baking sheet, leaving 2 inches between them. - Bake for 12-15 minutes. Look for golden brown edges and soft centers. - Let the cookies cool on the baking sheet for 5 minutes. Then, move them to a wire rack to cool completely. - Once cooled, lightly dust with 1/4 cup powdered sugar to add a lovely finish before serving. To ensure tender cookies, do not overmix the dough. When you combine wet and dry ingredients, mix just until you see no flour. This keeps your cookies soft and chewy. The ideal baking time for these cookies is 12-15 minutes. Look for golden edges while the center stays soft. This combination gives you the best texture. For a lovely presentation, arrange the cannoli cookies on a colorful plate. Scatter extra mini chocolate chips around them for a fun look. You can pair these cookies with whipped cream. This adds a sweet touch for dipping and makes each bite even better. Enjoy the flavors together! Pro Tips Use High-Quality Ricotta: For the best flavor and texture, opt for whole milk ricotta cheese. It provides a creamier consistency and enhances the overall taste of your cookies. Chill the Dough: If you find the dough is too soft to handle, refrigerate it for about 30 minutes. This will make rolling the cookies easier and help them maintain their shape while baking. Customize the Mix-Ins: Feel free to experiment with different mix-ins like chopped nuts or dried fruit to create your own unique twist on these cannoli cookies. Store Properly: To keep your cookies fresh, store them in an airtight container at room temperature for up to a week. You can also freeze them for longer storage! {{image_4}} To make your cannoli cookies even more fun, you can try adding citrus zests. Zest from lemons or oranges gives a bright, fresh taste. Just add about a teaspoon of zest to your dough. This small change can make a big difference in flavor! You can also explore different types of chocolate. Instead of mini chocolate chips, try dark chocolate chunks or white chocolate. Each type brings its own unique taste. You can even mix several kinds for a chocolate lover's dream! If you need gluten-free options, you can use gluten-free flour. Make sure to use a blend that works well for baking. This way, everyone can enjoy these cookies without worry. For vegan substitutions, swap the butter with a vegan butter or coconut oil. Use a flax egg instead of a regular egg. To make a flax egg, mix one tablespoon of ground flaxseed with three tablespoons of water. Let it sit for a few minutes to thicken. These swaps keep your cookies vegan while still tasting amazing! To keep your cannoli cookies fresh, use an airtight container. This type of container helps prevent moisture loss. You can stack the cookies in a single layer or add parchment paper between layers. Before you store them, let the cookies cool completely. Cooling prevents sogginess. Place them on a wire rack for even cooling. Cannoli cookies last about 5 days at room temperature. Store them in a cool, dry place. If you want to keep them longer, freezing is a great option. To freeze your cookies, place them in a freezer-safe bag or container. Make sure to remove as much air as possible. They can stay in the freezer for up to 3 months. When you’re ready to eat them, thaw them at room temperature. Enjoy your sweet treat later! Can I use ricotta cheese substitutes? Yes, you can. Cream cheese or mascarpone works well. They provide a similar creamy texture. How do I know when the cookies are done? Look for golden edges and a soft center. The cookies should look puffy but not wet. Can I make the dough ahead of time? Yes, you can. Chill the dough for up to two days. Just wrap it tightly before storing. What type of flour works best? All-purpose flour is ideal for these cookies. It gives the right texture and structure. Can I add nuts to the dough? Absolutely! Chopped pistachios or walnuts add a nice crunch. Just mix them in gently. What is the best way to ensure cookies are chewy? Do not overmix the dough. Mixing just until combined keeps them tender and chewy. How can I make my cookies more flavorful? Try adding a bit of almond extract or extra vanilla. A pinch of salt enhances the sweetness too. In summary, you’ve learned to make Cannoli Cookies with simple steps and tasty variations. From mixing the ingredients to baking, each step is key to perfect cookies. Remember to avoid overmixing for tenderness and enjoy serving these treats with flair. Explore flavor twists or modifications that fit your needs. Proper storage helps keep them fresh, and your cookies will shine. Try these tips, and enjoy baking and sharing your delicious creations!

Cannoli Cookies Delightful and Simple Recipe Guide

If you love sweet treats, you’ll adore these Cannoli Cookies! They’re simple to make and burst with flavor. This guide

Older posts
Newer posts
← Previous Page1 … Page109 Page110 Page111 … Page113 Next →

dsad

© 2025 recipesstation • Built with GeneratePress

Our Policies

  • Copyright Policy
  • Cookie Policy
  • GDPR Policy
  • Privacy Policy
  • Disclaimer
  • Terms Of Use

More Information

  • Home
  • About
  • Contact
  • Appetizers
  • Dessert
  • Dinner
  • Drinks
©2025, recipesstation About Back To Top