Skip to content
DisclaimerTerms Of UseGDPR PolicyCookie Policy

recipesstation

  • Home
  • Drinks
  • Appetizers
  • Dinner
  • Dessert
  • About
  • Contact
  • Privacy Policy
DisclaimerTerms Of UseGDPR PolicyCookie Policy

Emily

To make the best pumpkin muffins, you need key ingredients. Here’s what you will need: - 1 cup canned pumpkin puree - 1/2 cup vegetable oil - 2 large eggs - 3/4 cup packed brown sugar - 1/2 cup granulated sugar - 1 teaspoon pure vanilla extract - 2 cups all-purpose flour - 1 teaspoon baking soda - 1/2 teaspoon baking powder - 1 teaspoon ground cinnamon - 1/2 teaspoon ground nutmeg - 1/4 teaspoon ground ginger - 1/2 teaspoon salt The star of the show is the canned pumpkin puree. It gives the muffins a rich flavor and moist texture. The combination of brown sugar and granulated sugar adds sweetness and depth. The dry ingredients, including flour, baking soda, and spices, create the perfect base for your muffins. You can make your muffins even better with optional additions. Here are some great ideas: - 1 cup chopped walnuts or pecans - 1/2 cup semi-sweet chocolate chips Adding nuts will give a nice crunch to your muffins. Chocolate chips add sweetness and richness. Feel free to mix and match these options based on your taste. For the full recipe, check out the Ultimate Pumpkin Muffins recipe. First, preheat your oven to 350°F (175°C). This step is key for even baking. While the oven warms up, take your muffin tin. You can line it with paper liners or grease it with non-stick spray. This will help the muffins pop out easily. In a large mixing bowl, add the pumpkin puree, vegetable oil, eggs, brown sugar, granulated sugar, and vanilla extract. Whisk these together until the mix is smooth. This will create a moist base for your muffins. Make sure all ingredients blend well. In another bowl, sift together the all-purpose flour, baking soda, baking powder, ground cinnamon, ground nutmeg, ground ginger, and salt. Sifting helps avoid lumps in your batter. Once sifted, mix these dry ingredients gently to ensure they are well combined. Now it's time to combine everything. Gradually mix the dry ingredients into the wet pumpkin mixture. Stir gently until just combined. Don’t worry if some lumps remain; this will keep your muffins light. If you like, fold in the chopped walnuts or chocolate chips for extra flavor. Carefully fill each muffin cup about two-thirds full. This gives the muffins room to rise. Bake them in the oven for 18-20 minutes. To check if they are done, insert a toothpick into the center. It should come out clean or with a few moist crumbs. Once baked, let them cool in the tin for five minutes. Then, transfer the muffins to a wire rack to cool completely. Enjoy your Ultimate Pumpkin Muffins! For the full recipe, refer to the details above. To make the best muffins, avoid overmixing your batter. When you mix too much, the muffins can turn out tough. Mix just until you see no dry flour. Some lumps are okay; they help keep the muffins fluffy. How do you know when your muffins are done? A toothpick is your best friend. Stick it in the middle of a muffin. If it comes out clean or with a few moist crumbs, they are ready. You can enhance the flavor by adding spices. Ground cinnamon, nutmeg, and ginger work perfectly with pumpkin. These spices give warmth and depth to the muffins. Using fresh ingredients also helps the taste. Fresh eggs and high-quality pumpkin puree make a big difference. Fresh nuts add crunch and flavor. Choose what you love, and it will shine through in your muffins. For the full recipe, check out [Full Recipe]. {{image_4}} You can easily change up the flavor of your pumpkin muffins. One great way is to add cranberries or raisins. These fruits bring a sweet and tart taste that pairs well with pumpkin. You can mix in about 1/2 cup of cranberries or raisins into the batter. This simple addition makes each bite exciting. Another fun option is to play with spices. If you want a twist on the classic pumpkin spice, try using cardamom, allspice, or cloves. Each spice adds a unique flavor that can brighten your muffins. For a bolder taste, use more ground cinnamon or nutmeg. You can adjust the spices in the Full Recipe to find your favorite blend. If you're on a gluten-free diet, you can still enjoy these muffins. Swap out the all-purpose flour for a gluten-free blend. Look for a mix that works well for baking. You can also add a little xanthan gum if needed. This will help with texture and rise. For those looking for vegan substitutions, it's easy to make this recipe plant-based. Replace the eggs with flax eggs. To make one flax egg, mix one tablespoon of ground flaxseed with three tablespoons of water. Let it sit for about five minutes until it thickens. You can also use a plant-based oil instead of vegetable oil. These changes keep your muffins tasty and suitable for everyone. Store your ultimate pumpkin muffins at room temperature. Place them in an airtight container. This keeps them fresh and moist. You can also wrap them in plastic wrap. If you live in a humid area, refrigeration may help. But cold can dry them out. To freeze muffins, let them cool completely. Wrap each muffin in plastic wrap. Then, place them in a freezer bag. This prevents freezer burn. To thaw, take out a muffin and leave it at room temperature. You can also warm it in the microwave for about 15 seconds. This brings back the fresh-baked taste. For reheating, use the oven at 350°F (175°C) for about 5-10 minutes. This makes them warm and soft again. For the full recipe, check out the details above! To keep muffins fresh, store them in an airtight container. This traps moisture and keeps them soft. You can also wrap them in plastic wrap. Place them in a cool, dry place. If you want them to last longer, refrigerate them. Just remember, refrigeration can change their texture. For the best taste, eat them within a few days. Yes, you can use fresh pumpkin! Fresh pumpkin has a bright flavor and unique texture. However, it takes more time to prepare. You need to roast and puree it first. Canned pumpkin is convenient and consistent. It is ready to use right away. Both can work well, depending on your needs. You can tell if muffins are done by looking for a few signs. They should be golden brown on top. The edges pull away from the muffin tin slightly. You can also do the toothpick test. Insert a toothpick into the center of a muffin. If it comes out clean or with a few crumbs, they are done. These muffins have some healthy ingredients. Pumpkin is rich in vitamins and fiber. The sugars add sweetness, but you can adjust the amounts. If you add nuts, they provide healthy fats. Chocolate chips add taste but also extra sugar. Overall, these muffins can fit into a balanced diet if enjoyed in moderation. For the full recipe, check out the Ultimate Pumpkin Muffins. You now have a solid guide for making delicious pumpkin muffins. We covered key ingredients, step-by-step instructions, and useful tips. Remember that options like nuts and chocolate chips can make your muffins even tastier. Storing and freezing correctly will keep them fresh longer. Get creative with flavor variations to suit your taste. I hope you feel inspired to bake. Enjoy every bite of your homemade pumpkin muffins!

Savory Ultimate Pumpkin Muffins Perfect for Fall

Fall is here, and what better way to celebrate than with delicious pumpkin muffins? These savory Ultimate Pumpkin Muffins are

For this cozy soup, you will need: - 1 medium butternut squash, peeled, seeded, and diced into 1-inch cubes - 2 tablespoons olive oil, divided - 1 onion, finely chopped - 2 cloves garlic, minced - 1 carrot, diced - 4 cups vegetable broth (preferably low sodium) - 1 teaspoon ground cumin - 1/2 teaspoon ground cinnamon - Salt and pepper, to taste - 1/2 cup coconut milk (for creaminess) - Fresh parsley or cilantro, chopped for garnish These ingredients give the soup a warm and rich flavor. The butternut squash is sweet and soft when roasted. The onion and garlic add depth. Carrots lend a touch of sweetness, while spices bring warmth. To make your soup even tastier, consider adding: - A pinch of nutmeg for warmth - A dash of cayenne pepper for heat - Croutons for crunch - A swirl of extra coconut milk for creaminess These seasonings enhance the soup's flavor. The garnishes make it look pretty and add texture. If you have dietary needs, you can try these swaps: - Use olive oil or avocado oil for frying. - Replace coconut milk with almond milk for a lighter soup. - Swap vegetable broth with chicken broth if you prefer. - For a nut-free version, skip the coconut milk. These substitutions keep the soup delicious while meeting different diets. You can still enjoy a creamy texture and rich taste. For the full recipe, check out the instructions above. To start, preheat your oven to 400°F (200°C). This helps the squash roast evenly. Next, take 1 medium butternut squash and peel it. Slice it open to remove the seeds. Cut the squash into 1-inch cubes. In a large bowl, toss the squash with 1 tablespoon of olive oil. Sprinkle with salt and pepper to taste. Lay the cubes on a baking sheet in a single layer. This way, they cook evenly. Roast the squash for 25-30 minutes. They should be golden brown and tender when done. Remember to toss them halfway for the best results. While the squash roasts, grab a large pot. Heat 1 tablespoon of olive oil over medium heat. Add 1 finely chopped onion and cook until it becomes soft and clear, about 5 minutes. Next, stir in 2 minced garlic cloves and 1 diced carrot. Cook for an additional 3-4 minutes. This mix adds great flavor to your soup. Once the squash is ready, add it to the pot. Pour in 4 cups of vegetable broth, along with 1 teaspoon of ground cumin and 1/2 teaspoon of ground cinnamon. Stir everything together, then bring it to a gentle boil. Lower the heat and let it simmer for 10-15 minutes. This helps blend all the flavors nicely. To make the soup creamy, you need to blend it. If you have an immersion blender, use it to puree the soup until smooth. If not, carefully transfer the soup in batches to a standard blender. Blend it until it reaches a creamy texture. After blending, return the soup to the pot. Stir in 1/2 cup of coconut milk for added creaminess. Heat the soup over low heat for a few more minutes. Taste it and adjust the seasoning with salt and pepper as needed. Enjoy this cozy meal with warm bread for a delightful experience! For full details, check the Full Recipe. When choosing butternut squash, look for one that feels heavy for its size. The skin should be tan with no soft spots. A firm squash means it is fresh. Avoid squashes with blemishes or cuts. Freshness matters here, as it affects taste. For great roasted butternut squash, cut it into even 1-inch cubes. This size ensures even cooking. Toss the cubes with olive oil and season well with salt and pepper. Spread them out in a single layer on your baking sheet. This helps them brown nicely. Roast at 400°F (200°C) for 25-30 minutes. Flip them halfway through cooking for best results. Add spices like cumin and cinnamon to bring warmth to the soup. They add depth and make the flavors pop. You can also mix in fresh herbs like parsley or cilantro for brightness. If you want a kick, add a pinch of cayenne pepper. For a touch of sweetness, try adding a diced apple or pear. These additions can enhance the soup's flavor and make it even more delicious. For the full recipe, check the details provided. {{image_4}} You can make this soup vegan and dairy-free easily. Just skip the coconut milk if you want. Instead, use cashew cream for a rich texture. Blend soaked cashews with water until smooth. You can add a bit of lemon juice for a fresh taste. This keeps the soup creamy without dairy. If you love heat, add some spice! Try adding a pinch of cayenne pepper. You can also include chopped jalapeños for a kick. This adds flavor and warmth to your soup. Pair the spice with a cool topping like avocado. It gives you a nice balance of flavors. Want to make the soup heartier? Add protein! Cooked lentils or chickpeas work great. You can stir them in after blending. For meat lovers, shredded chicken or turkey is perfect too. This makes the soup filling and satisfying. Explore your options and find what you like best! Check out the Full Recipe for more details on making this cozy dish. To store leftover roasted butternut squash soup, let it cool first. Transfer the cooled soup to an airtight container. Make sure you seal it well. Store it in the fridge for up to three days. If you want to keep it longer, freezing is a great option. To reheat your soup, pour it into a pot. Heat on low to medium heat. Stir it often to prevent sticking. You can add a splash of water or broth if it seems too thick. Heat until it is warm all through. You can also reheat it in the microwave. Use a microwave-safe bowl and cover it loosely. Heat for one to two minutes, stirring halfway. Freezing is easy. Pour your cooled soup into freezer-safe containers. Leave some space at the top for expansion. Seal tightly and label with the date. You can freeze it for up to three months. When ready to eat, thaw it in the fridge overnight. Reheat as mentioned above. Enjoy your cozy soup later! Check out the Full Recipe for more tips. Yes, you can use frozen butternut squash. It is a great time-saver. Just thaw and drain any excess water before use. The flavor may be slightly different, but it still makes a tasty soup. You can skip the roasting step since frozen squash is often pre-cooked. Just add it directly to the pot with the broth and spices. To thicken your soup, you have a few options. First, you can add more butternut squash. Another method is to blend in some cooked potatoes. This adds creaminess without altering the flavor. You can also use a cornstarch slurry. Mix cornstarch with cold water, then stir it into the soup while it simmers. Allow it to cook for a few minutes to thicken. Roasted butternut squash soup pairs well with many sides. Here are some great options: - Crusty bread or rolls for dipping - A simple green salad for freshness - Grilled cheese sandwiches for comfort - Roasted vegetables for added flavor - Spiced nuts for a crunchy contrast These pairings enhance the soup's rich, creamy texture and make for a delightful meal. For the full recipe, check out the Cozy Roasted Butternut Squash Soup. Roasted butternut squash soup is simple and tasty. We explored key ingredients, step-by-step instructions, and helpful tips. Don't forget the fun variations to suit your taste, and storage methods for leftovers. Now you can enjoy this soup anytime. It's creamy, warm, and full of flavor. Make it your own with seasonings or garnishes. Happy cooking!

Roasted Butternut Squash Soup Creamy and Tasty Recipe

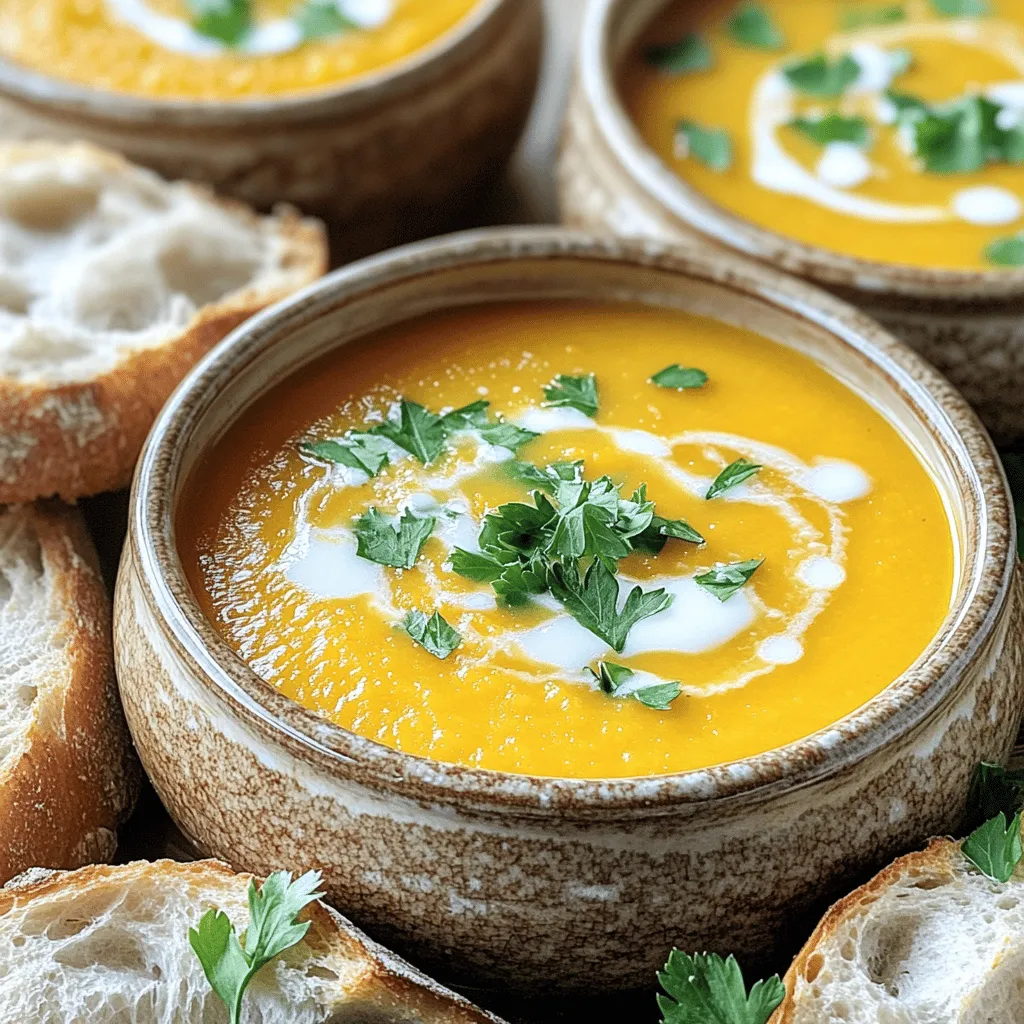
Looking for a warm dish that brings comfort and flavor? My Roasted Butternut Squash Soup is creamy, tasty, and perfect

To make delicious Southern deviled eggs, you need a few key ingredients. Here is what you will need: - 6 large eggs - 3 tablespoons creamy mayonnaise - 1 tablespoon Dijon mustard - 1 teaspoon apple cider vinegar - 1/2 teaspoon smoked paprika (plus extra for garnish) - 1/4 teaspoon garlic powder - Salt and freshly ground black pepper to taste - 2 tablespoons sweet pickle relish - Fresh chives, chopped (for a vibrant garnish) You can add fun twists to your deviled eggs. Here are some options to try: - A dash of hot sauce for heat - Crumbled bacon for a savory crunch - Fresh herbs like dill or parsley for a fresh taste - A sprinkle of curry powder for a unique flavor - Pickled jalapeños for an extra kick Choosing the right brands can elevate your dish. Here are my top picks: - For mayonnaise, I recommend Hellmann’s or Duke’s for their creamy texture. - Use Grey Poupon for a smooth Dijon mustard that adds depth. - Bragg’s apple cider vinegar is a great choice for its tangy flavor. - McCormick smoked paprika brings a rich, smoky essence to your eggs. With these ingredients, you can create a delightful dish that is sure to impress. For the full recipe, refer back to the detailed instructions. To cook the eggs, start by placing six large eggs in a medium saucepan. Cover them with cold water, making sure there’s at least an inch above the eggs. Heat the water on medium-high until it boils. Once boiling, cover the saucepan and take it off the heat. Let the eggs sit, covered, for exactly 12 minutes. After 12 minutes, prepare an ice bath in a bowl with cold water and ice. Carefully move the eggs from the hot water to the ice bath. Let them cool for about 5 minutes. This makes peeling easier. Once cool, gently tap each egg on a hard surface to crack the shell. Peel the eggs under cool, running water to remove any stubborn bits of shell. Pat them dry with a paper towel. Next, cut each egg in half lengthwise. Carefully pop out the yolks and place them in a mixing bowl. Make sure to keep the egg whites intact. Use a fork to mash the yolks until they crumble. Now, add three tablespoons of creamy mayonnaise, one tablespoon of Dijon mustard, one teaspoon of apple cider vinegar, and one-half teaspoon of smoked paprika. Include a sprinkle of garlic powder along with salt and freshly ground black pepper. Mix everything until it’s smooth and creamy. For a sweet touch, fold in two tablespoons of sweet pickle relish. This adds a delightful crunch and flavor to the filling. To fill the egg whites, you can either spoon the yolk mixture in or pipe it for a fancy touch. If you choose to pipe, use a pastry bag or a zip-top bag with one corner cut off. Once all the egg whites are filled, sprinkle a bit of smoked paprika on top. Add some chopped chives for a fresh and colorful finish. You can find the full recipe for Southern deviled eggs with a smoky twist above. Enjoy your delicious creation! To peel eggs without fuss, start with fresh eggs. Older eggs peel easier. Once your eggs are cooked, chill them in an ice bath. This cools them down fast and makes peeling smooth. Crack the shell gently on a hard surface. Then peel under cool running water. The water helps remove tiny shell bits. For a stunning display, use a colorful platter. Arrange the deviled eggs in a circle or a line. Add whole chive sprigs or small edible flowers for extra flair. You can also use a piping bag for a neat filling. This makes your deviled eggs look fancy and appetizing. One common mistake is overcooking the eggs. This can make them rubbery. Stick to the 12-minute rule for perfect yolks. Another mistake is skipping the ice bath. This step helps with peeling. Lastly, don’t skimp on seasoning. Taste your filling before you stuff the eggs. Adjust salt and pepper as needed for the best flavor. You can find the full recipe for Southern Deviled Eggs with a Smoky Twist in the earlier section. {{image_4}} For a bold twist, try Southwest-inspired deviled eggs. Add diced tomatoes, chopped cilantro, and a dash of lime juice. These flavors bring a fresh zing to the classic recipe. You can also mix in some taco seasoning for an extra kick. The creamy filling pairs well with the spices. Serve them chilled for a cool treat at gatherings. If you love bacon, this variation is for you. Start with the classic filling, then mix in some crispy, crumbled bacon and sharp cheddar cheese. The smokiness from the bacon adds depth. You can also add a splash of Worcestershire sauce for a savory note. Garnish with extra bacon bits on top. These deviled eggs will disappear quickly at any party. For those who enjoy heat, spicy jalapeño deviled eggs are a great choice. Chop some pickled jalapeños and mix them into the yolk filling. You can adjust the amount based on your spice preference. Add a bit of sriracha for more heat. The creamy filling balances the spice nicely. Top with a slice of jalapeño for a fun garnish. These eggs bring a fiery flair to your table. These variations keep the spirit of Southern deviled eggs alive while adding exciting new flavors. You can mix and match these ideas to create your perfect bite. For the full recipe, refer back to the main instructions. To keep your Southern deviled eggs fresh, store them in an airtight container. You can place parchment paper between layers to avoid sticking. Make sure to cover the container well. This helps keep the eggs moist and tasty. If you want, you can also cover the eggs with plastic wrap. This keeps the air out and prevents drying. Southern deviled eggs stay good for about three to four days in the fridge. After that, they may not taste as fresh. Keep an eye on their smell and look. If they smell off or look weird, it’s best to toss them. Always check before you eat! You usually eat Southern deviled eggs cold, so reheating is not common. However, if you want to warm them, do it gently. Place the eggs in a warm oven for a few minutes. Keep the heat low, around 200°F, to avoid overcooking. You can enjoy the creamy filling warm, but it’s best to serve them chilled. For the full recipe, check out the details above. Yes, you can make Southern deviled eggs ahead of time. Prepare the filling and store it in the fridge. Keep the egg whites separate. Just before serving, fill the egg whites with the yolk mixture. This way, the eggs stay fresh and tasty. If you want a different taste, there are good substitutes for mayonnaise. You can use Greek yogurt for a tangy flavor. Avocado is another option; it gives a creamy texture. For a dairy-free choice, try hummus for a unique twist. Each option gives a new take on Southern deviled eggs. Making a vegetarian version of deviled eggs is simple. Just stick to the classic ingredients but skip any animal products. Use plant-based mayonnaise or yogurt as your base. You can also add some mashed avocado for creaminess. This way, you create a delicious and meat-free treat that everyone will enjoy. In this blog post, we explored the key ingredients and steps for making Southern deviled eggs. You learned how to cook the eggs, prepare the filling, and assemble them perfectly. We also discussed tips for easy peeling and avoiding common mistakes. Plus, we shared tasty variations and proper storage methods. Deviled eggs are fun and versatile. Feel free to experiment with flavors and make them your own. Enjoy sharing these delicious bites with family and friends!

Southern Deviled Eggs Tasty and Simple Recipe

Looking to impress your guests with a classic Southern dish? Southern Deviled Eggs are tasty, easy, and perfect for any

- 4 boneless, skinless chicken breasts - 1/4 cup extra-virgin olive oil - 4 cloves garlic, minced - Juice and zest of 2 medium-sized lemons - 1 teaspoon dried oregano - 1 teaspoon dried thyme - Salt and freshly cracked pepper, to taste - 1 cup feta cheese, crumbled - 1/2 cup cherry tomatoes, halved - 1/4 cup kalamata olives, pitted and sliced - Fresh parsley, finely chopped for garnish - Lemon wedges - Additional feta cheese - Mixing bowl - Grill or large skillet - Whisk - Plastic wrap or lid In this recipe, you’ll need some simple and fresh ingredients. The chicken breasts are a great base, and they soak up the marinade well. The olive oil adds richness, while garlic gives a nice kick. Fresh lemon juice and zest bring brightness. Oregano and thyme add warm, herbaceous notes. The feta cheese is key. It adds a creamy, tangy flavor that pairs perfectly with chicken. Halved cherry tomatoes and kalamata olives add color and burst of flavor. Finally, fresh parsley makes it look nice and adds a hint of freshness. You can also use some lemon wedges on the side for extra zest. If you love feta, feel free to sprinkle more on top when serving. For equipment, a mixing bowl makes it easy to combine everything. A grill or skillet will cook the chicken evenly. A whisk helps mix the marinade well. Lastly, plastic wrap or a lid keeps the chicken covered while it marinates. With these ingredients and tools, you’re ready to create a delicious dish! {{ingredient_image_2}} To start, I pour olive oil into a big mixing bowl. Next, I add minced garlic, the juice, and zest of two lemons. This gives the marinade a bright flavor. Then, I sprinkle in dried oregano and thyme. I season it with salt and pepper to taste. I whisk everything until it blends well. This marinade is key to making the chicken juicy and tasty. Now, I take the chicken breasts and coat them well in the marinade. I make sure every piece is covered. This step is important for flavor. I cover the bowl with plastic wrap and place it in the fridge. I let the chicken marinate for at least 30 minutes. For stronger flavor, I can let it sit for up to 2 hours. While the chicken marinates, I preheat my grill or skillet to medium-high heat. After it’s hot, I remove the chicken from the marinade, letting the excess drip off. I place the chicken on the grill or skillet. I cook each side for 6 to 7 minutes. I check the internal temperature to ensure it reaches 165°F. This keeps the chicken juicy and safe to eat. In the last few minutes of cooking, I sprinkle crumbled feta cheese, halved cherry tomatoes, and sliced kalamata olives on top. I let these toppings warm and the feta soften. This adds extra flavor and color to the dish. Once the chicken is cooked, I take it off the heat and let it rest for about 5 minutes. Resting helps the juices stay inside the chicken. After that, I slice the chicken into thick pieces. I serve it on a platter, drizzled with the leftover marinade. To finish, I garnish with freshly chopped parsley for a bright touch. - Letting the chicken rest in the marinade is key. This time lets the flavors soak in. Aim for at least 30 minutes. For more flavor, go up to 2 hours. - Always refrigerate the marinated chicken. This keeps the meat safe and fresh. Cover the bowl with plastic wrap or a lid to prevent spills. - To check if the chicken is done, use a meat thermometer. The inside should reach 165°F (75°C). This ensures your chicken is safe to eat. - To avoid dryness, do not overcook the chicken. Keep an eye on the cooking time. Also, letting the chicken rest after cooking helps keep it juicy. - For serving, arrange the chicken slices on a bright dish. Surround it with cherry tomatoes and olives. This makes the plate pop with color. - Add extras like lemon wedges or more feta cheese on the side. This not only looks good but also gives guests a chance to customize their meal. Pro Tips Marinate Longer for More Flavor: Allowing the chicken to marinate for up to 2 hours enhances the flavors significantly, making the dish even more delicious. Check for Doneness: Use a meat thermometer to ensure the chicken reaches an internal temperature of 165°F (75°C) for safe and juicy results. Use Fresh Herbs: Incorporating fresh herbs instead of dried can elevate the dish's flavor profile, adding brightness and freshness. Presentation Matters: Arrange the chicken slices artfully on the plate, garnished with vibrant cherry tomatoes and olives for an eye-catching and appetizing presentation. {{image_4}} You can switch out chicken for shrimp or fish. Shrimp cooks fast and adds a nice flavor. Use firm fish like salmon or cod for a tasty change. Marinate them just like chicken. For a vegetarian option, try grilled vegetables. Bell peppers, zucchini, and eggplant work well. They soak up the marinade's flavors and grill nicely. Adding spices can change the flavor of this dish. Paprika gives a smoky touch, while red pepper flakes add heat. You can also play with herbs. Try fresh basil or dill for a twist. Mixing herbs keeps the meal exciting and fresh. Pair this dish with sides like Greek salad or rice. The salad adds crunch and freshness. Rice soaks up the juices and makes it filling. You can also serve it as a wrap. Use pita bread or tortillas for a fun twist. Fill them with chicken and toppings for a tasty meal on the go. After enjoying your Greek Lemon Feta Chicken, store leftovers right away. Place the chicken in an airtight container. This keeps it fresh and prevents odors from mixing. Make sure to refrigerate within two hours of cooking. The chicken will stay good for about three to four days in the fridge. To freeze Greek Lemon Feta Chicken, wrap it tightly in plastic wrap. Then, place it in a freezer-safe bag or container. Be sure to remove as much air as possible. This helps keep the chicken flavorful and prevents freezer burn. You can freeze it for up to three months. When you're ready to eat, thaw it overnight in the fridge. When reheating, the goal is to keep the chicken juicy. You can use the oven or microwave. For the oven, preheat it to 350°F (175°C) and cover the chicken with foil. This keeps moisture in. Heat for about 15-20 minutes. In the microwave, use a microwave-safe dish and cover it. Heat in short bursts, checking often. Avoid overcooking to keep the chicken tender. You can pair this dish with many tasty sides. Here are some ideas: - Greek salad with cucumber, tomatoes, and olives - Roasted vegetables like zucchini and bell peppers - Lemon rice or couscous for a light touch - Pita bread to soak up the juices - Tzatziki sauce for a cool, creamy dip These sides will enhance the flavors of the chicken and create a balanced meal. Yes, you can make this dish ahead. Here are some tips: - Marinate the chicken the night before. It will soak up more flavor. - Cook the chicken and store it in the fridge for up to three days. - Warm it gently in the oven or microwave before serving. Doing this saves time on busy days. To keep your chicken juicy, follow these steps: - Always marinate the chicken. This adds flavor and moisture. - Cook the chicken on medium-high heat. Avoid high heat, as it dries out the meat. - Use a meat thermometer. When it reaches 165°F (75°C), it's perfectly cooked. - Let the chicken rest after cooking. This allows the juices to settle. These steps will help you serve moist chicken every time. Yes, this recipe is gluten-free. None of the ingredients contain gluten. If you want to ensure no cross-contamination, check your feta and olives. Some brands may add gluten. Feel free to enjoy this dish without worry! You now have a delicious recipe for Greek Lemon Feta Chicken. We covered the key ingredients, including the chicken, herbs, and feta. I explained how to marinate and cook the chicken for great flavor. You learned tips to store your leftovers and even variations to switch it up. Try this dish to impress your family or friends. It’s easy to make and always a hit. Enjoy every bite!

Greek Lemon Feta Chicken Flavorful and Easy Recipe

Are you ready to take your dinner game to the next level? My Greek Lemon Feta Chicken recipe is packed

To make creamy skillet corn, you need simple and fresh ingredients. Here’s what you'll need: - 4 cups fresh corn kernels (or 3 cups frozen corn if fresh is unavailable) - 1 cup heavy cream - 1 tablespoon unsalted butter - 1 small onion, finely chopped - 2 cloves garlic, minced - 1 teaspoon smoked paprika - 1/2 teaspoon cayenne pepper (adjust to your heat preference) - Salt and freshly ground pepper to taste - Fresh chives or parsley, finely chopped for garnish These ingredients come together to create a rich, creamy dish. Fresh corn gives the best flavor. If you can’t find it, frozen corn works well too. The heavy cream adds richness, while the onion and garlic provide depth. Smoked paprika gives a warm, smoky flavor, and cayenne pepper adds a nice kick. I love to finish this dish with fresh herbs. They add a pop of color and a nice contrast in flavor. Once you gather these ingredients, you're ready to create a creamy skillet corn that will impress everyone at your table. For the complete cooking instructions, check out the Full Recipe. 1. First, melt 1 tablespoon of unsalted butter in a large skillet over medium heat. Watch it closely until it foams. 2. Next, add 1 small onion, finely chopped. Sauté until it is soft and clear, about 4-5 minutes. 3. Then, mix in 2 cloves of minced garlic. Cook for 1 more minute. Make sure not to burn the garlic. 4. Now, add 4 cups of fresh corn kernels (or 3 cups of frozen corn). Sauté for around 5 minutes. This will help caramelize the corn and bring out its sweet flavor. 5. Carefully pour in 1 cup of heavy cream. Stir well to blend all the ingredients. 6. Season the mixture with 1 teaspoon of smoked paprika, 1/2 teaspoon of cayenne pepper, and a good pinch of salt and pepper. Mix everything thoroughly. 1. Lower the heat and let the mixture simmer. Cook for about 10 minutes. Stir often so it doesn’t stick to the skillet. 2. When the corn mixture has thickened, remove the skillet from heat. Taste it and adjust the seasoning if needed. 3. Before serving, sprinkle some freshly chopped chives or parsley on top. This adds a nice pop of color and flavor. You can find the full recipe in the provided link. Enjoy making this dish! - Add cheese for extra creaminess: Cheese melts well and adds a rich taste. Try cream cheese or cheddar for a delightful twist. - Use fresh herbs for freshness: Chives or parsley can brighten the dish. They add color and a fresh taste. - Avoid burning garlic: Garlic burns easily and turns bitter. Cook it just until fragrant, about one minute. - Optimal sauté timing for onions and corn: Sauté onions until tender. This takes about 4-5 minutes. Then, add corn and cook for 5 more minutes. This method gives the corn a nice caramelized flavor. These tips will help you get the best flavor from your creamy skillet corn. For the full recipe, check out the instructions above. Enjoy cooking! {{image_4}} You can easily change this recipe to suit your taste. Here are a couple of swaps: - Use coconut milk instead of heavy cream for a dairy-free version. This keeps it creamy but makes it suitable for those avoiding dairy. - Experiment with different peppers or spices to change the heat level. If you like it mild, skip the cayenne. For more heat, add a bit more. This creamy skillet corn shines as a side dish. Here are some great ways to enjoy it: - Pair it with grilled chicken or fish. The rich, creamy corn complements the smoky flavors of grilled meats perfectly. - Turn it into a main dish by adding proteins like shredded chicken or cooked shrimp. This makes it filling and hearty, perfect for a light dinner. For the complete recipe, check out the Full Recipe. To keep your creamy skillet corn fresh, follow these steps: - Refrigeration: Store leftovers in an airtight container. It will last up to 3 days. Make sure to cool it first before sealing. - Freezing: For long-term storage, place the corn in a freezer-safe bag. It can last up to 2 months. Remove as much air as possible to prevent freezer burn. When you're ready to enjoy your creamy skillet corn again, reheating is key: - Stovetop: Place the corn in a skillet over low heat. Add a splash of cream or water to keep it moist. Stir frequently until warmed through. - Microwave: Use a microwave-safe bowl. Cover it with a damp paper towel to trap steam. Heat in short bursts, stirring in between, until warm. This keeps it from drying out. How long does creamy skillet corn last in the fridge? Creamy skillet corn can last in the fridge for about 3 to 4 days. Make sure to store it in an airtight container. If you want to keep it fresh longer, consider freezing it. Can I use canned corn instead of fresh or frozen? Yes, you can use canned corn. Just drain and rinse it before adding it to the skillet. Canned corn is convenient and still tasty, but fresh or frozen corn gives the best flavor. What can I serve with creamy skillet corn? Creamy skillet corn pairs well with many dishes. Here are some ideas: - Grilled chicken or fish - Barbecue ribs - Tacos or burritos - A fresh garden salad These options enhance the meal and make it more fun! You can find the full recipe above to get started. You learned how to make creamy skillet corn with fresh ingredients and easy steps. We covered preparation, cooking, and variations to suit your taste. Seasoning can elevate your dish, and storage tips ensure it stays fresh. Feel free to try different herbs and spices for more flavor. This dish pairs well with proteins, making it a versatile option. Enjoy creating your own version and impress your table. Cook with confidence, and savor every bite.

Creamy Skillet Corn Savory Side Dish Recipe

Are you craving a side dish that’s both creamy and bursting with flavor? Look no further! My Creamy Skillet Corn

To make this dish, gather these ingredients: - 8 oz elbow macaroni - 2 cups cooked chicken, shredded - 1 cup barbecue sauce (homemade or store-bought) - 2 cups sharp cheddar cheese, shredded - 1 cup mozzarella cheese, shredded - 1 cup milk - 1/2 cup cream cheese, softened - 1 tablespoon olive oil - 1 teaspoon garlic powder - 1 teaspoon onion powder - Salt and freshly cracked pepper to taste - 1/2 cup breadcrumbs (for topping) - 1 tablespoon freshly chopped parsley (for garnish) You can swap some ingredients for a different taste. If you don’t have elbow macaroni, use any pasta shape you like. For the chicken, rotisserie chicken works well if you want to save time. Change the barbecue sauce too! Use a sweet, smoky, or spicy sauce based on your taste. If you want a creamier dish, add more cream cheese or use sour cream instead. To cook this BBQ Chicken Mac and Cheese, you will need: - A large pot for boiling pasta - A medium mixing bowl for the chicken and sauce - A large saucepan for the cheese sauce - A whisk or spatula for mixing - A greased 9x13 inch baking dish for baking - An oven to finish cooking and browning the top With these ingredients and tools, you can make a delicious BBQ Chicken Mac and Cheese. For the full recipe, check the details above! To cook the elbow macaroni, start with a large pot. Fill it with 4-6 quarts of salted water. Bring this water to a rolling boil. Once boiling, add the elbow macaroni. Cook it according to the package directions, usually 7-9 minutes until al dente. After cooking, drain the pasta well in a colander. Set it aside for later. For the BBQ chicken, take a medium mixing bowl. Add your shredded cooked chicken into this bowl. Pour in 1 cup of barbecue sauce. You can use homemade or store-bought sauce. Mix the chicken and sauce with a fork or spoon. Make sure the chicken is evenly coated. Set this bowl aside while you prepare the cheese sauce. To create your cheese sauce, grab a large saucepan. Heat 1 tablespoon of olive oil over medium heat. Next, pour in 1 cup of milk. Add 1/2 cup of softened cream cheese. Stir this mixture continuously until the cream cheese melts. This will create a creamy base. After that, gradually add 2 cups of shredded sharp cheddar cheese and 1 cup of shredded mozzarella cheese. Stir constantly until the cheeses melt and the sauce is smooth. Sprinkle in 1 teaspoon of garlic powder and 1 teaspoon of onion powder. Season with salt and freshly cracked pepper to taste. Mix well to combine the flavors. Now, it’s time to combine everything. Fold the cooked elbow macaroni and BBQ chicken into the cheese sauce. Stir gently until everything is mixed well. Transfer this mixture into a greased 9x13 inch baking dish. Spread it out evenly with a spatula. For the topping, take a small bowl and add 1/2 cup of breadcrumbs. Drizzle a bit of olive oil over them. Toss lightly to coat the breadcrumbs. Sprinkle this mixture evenly over the mac and cheese. Preheat your oven to 350°F (175°C). Bake the dish for 25-30 minutes. Look for a golden brown and crispy top. Once done, let it cool for a few minutes. Garnish with 1 tablespoon of freshly chopped parsley before serving. For the full recipe, you can refer to the complete list above. Enjoy your BBQ chicken mac and cheese! To make great mac and cheese, start with the right pasta. Elbow macaroni works best because it holds the sauce well. Always salt your water before cooking pasta. This helps enhance the pasta's flavor. Cook it just until al dente. This keeps the pasta firm and prevents mushiness when baking. For a smooth cheese sauce, melt the cream cheese first. This creates a creamy base. Gradually add your shredded cheeses while stirring. This helps prevent clumping. If your sauce is too thick, add a splash of milk. Stir until it reaches the perfect creamy texture. Serve your BBQ chicken mac and cheese in bright bowls. This makes the dish look inviting. Drizzle extra barbecue sauce on top for added flavor and fun. For a pop of color, sprinkle fresh parsley on each serving. Pair it with coleslaw for a crisp contrast. You can also use the [Full Recipe] as a guide for more tips. {{image_4}} You can make BBQ Chicken Mac and Cheese even better with add-ins. Try using vegetables like: - Broccoli - Spinach - Peas - Bell peppers Adding these not only boosts flavor but also nutrition. Mix in some spices like cayenne or paprika for extra heat. A sprinkle of smoked paprika gives a nice touch! Cheese is the star of this dish. You can change the flavor by using different cheeses. Here are some great options: - Pepper jack for a spicy kick - Gouda for a smoky taste - Fontina for a creamy texture Mixing cheeses creates a rich and tasty sauce. Experiment to find your favorite combo! Want to switch things up? Try a spicy version! Add jalapeños or hot sauce to the chicken mix. For a vegetarian twist, use black beans and corn instead of chicken. This keeps it hearty and full of flavor. You can also make it healthier by using whole grain pasta. The options are endless! Check out the Full Recipe for more ideas on making this dish your own. To keep your BBQ Chicken Mac and Cheese fresh, store it in an airtight container. Make sure the dish has cooled down before sealing. This helps prevent moisture build-up. You can keep it in the fridge for up to 3 days. If you want to enjoy it later, freezing is a great option. When you're ready to enjoy your leftovers, reheat them in the oven for the best taste. Preheat your oven to 350°F (175°C). Place the mac and cheese in an oven-safe dish. Cover it with foil to keep it moist. Bake for about 20 minutes or until it’s hot throughout. You can also microwave it, but it may not be as creamy. If you want to freeze your BBQ Chicken Mac and Cheese, it’s best to do so before baking. After mixing the ingredients, transfer the mixture to a freezer-safe container. Make sure to leave space for expansion. It can stay in the freezer for up to 3 months. When you’re ready to eat, thaw it in the fridge overnight. Then, bake as directed in the Full Recipe. Enjoy your delicious dish anytime! You can use sour cream or Greek yogurt. Both options give a creamy texture. Cream cheese adds richness, but these substitutes work well too. If you want a dairy-free option, try cashew cream or silken tofu. Both can blend smoothly into the cheese sauce. Yes, you can! Prepare the dish and store it in the fridge. Just cover it tightly with plastic wrap. When you are ready to bake, preheat your oven. Bake it straight from the fridge, adding a few extra minutes to the cooking time. Try serving it with a fresh green salad. Coleslaw pairs well too, adding a crunchy texture. For a fun twist, serve garlic bread or corn on the cob. These sides balance the creamy dish and add variety to your meal. BBQ Chicken Mac and Cheese is a modern dish. It likely comes from the blend of Southern BBQ and classic mac and cheese. Many cooks experimented with flavors, creating this tasty twist. It became popular in homes and restaurants alike. You can use whole grain pasta for more fiber. Swap the cheese for lower-fat options or use less cheese overall. Adding veggies like spinach or broccoli boosts nutrition. You can also use grilled chicken instead of fried for a healthier protein. In this blog post, we explored the fun and tasty world of BBQ Chicken Mac and Cheese. We detailed ingredients, cooking steps, and tips for great results. You learned how to customize this dish with different cheeses and add-ins. We also covered storage and reheating for leftovers. Now you have all the tools to make a delicious meal. Enjoy experimenting, and remember, the best dish comes from your creativity in the kitchen!

BBQ Chicken Mac and Cheese Tasty Family Favorite Dish

If you’re looking for a dish that brings the family together, BBQ Chicken Mac and Cheese is the perfect choice.

- 1 pound ground beef - 1 can (15 oz) black beans, rinsed and drained - 1 can (15 oz) sweet corn, drained - 1 can (10 oz) diced tomatoes with green chilies - 1 onion, finely diced - 2 cloves garlic, minced - 1 cup frozen mixed bell peppers - 2 cups shredded sharp cheddar cheese - 2 cups frozen tater tots - 1 tablespoon chili powder - 1 teaspoon ground cumin - 1 teaspoon smoked paprika - Salt and freshly ground black pepper to taste When you prepare Slow Cooker Cowboy Casserole, you set the stage for a hearty meal. Each ingredient plays a role in making this dish flavorful and filling. Ground beef forms the base, giving it a rich taste. Black beans and sweet corn add texture and sweetness. Diced tomatoes with green chilies bring a nice zing. As for the additional ingredients, the onion and garlic provide a savory aroma. Frozen mixed bell peppers add color and nutrition. The cheddar cheese melts into a gooey topping, making it irresistible. Tater tots, placed on top, create a crispy layer that contrasts with the soft ingredients below. Seasoning is key. Chili powder, ground cumin, and smoked paprika enhance the flavor profile. Salt and black pepper tie everything together. For the full recipe, you can check the link. Enjoy the process of gathering these ingredients and watch how they transform into a delicious meal! - Brown the ground beef with onion and garlic. - Drain excess fat and set aside. To start, take a large skillet and heat it over medium heat. Add the ground beef, diced onion, and minced garlic to the pan. Stir them together often. Cook until the beef is brown and there’s no pink left, which should take about 7 to 10 minutes. Once it’s done, carefully drain any extra fat. Set your beef mixture aside for now; it will play a key role in making your casserole hearty and rich. - Mix in black beans, corn, tomatoes, and bell peppers. - Add spices and stir until combined. Next, grab your slow cooker. Pour in the beef mixture you just made. Add the rinsed black beans and drained sweet corn. Toss in the diced tomatoes with green chilies and the frozen mixed bell peppers. Now, it’s time to add flavor. Sprinkle in the chili powder, cumin, smoked paprika, salt, and pepper. Stir everything together well. You want the flavors to mingle nicely. - Layer tater tots over the mixture. - Cook on low for 6 hours or high for 3 hours. Now, take those frozen tater tots and layer them evenly over the top of your beef and veggie mix. This will create a crisp topping as it cooks. Cover the slow cooker with its lid. You can set it to cook on low for about 6 hours or high for around 3 hours. Either way, you’ll end up with a warm and bubbly casserole. - Add cheddar cheese 15 minutes before serving. - Serve hot from the slow cooker. When your cooking time is nearly up, take 2 cups of shredded sharp cheddar cheese and sprinkle it over the top of the casserole. Don’t stir it in; just let it rest on top. Cover the slow cooker again and let the cheese melt for about 15 minutes. Once it’s melted and gooey, gently stir the casserole if you want to blend the layers a bit. Serve it hot right from the slow cooker. Enjoy your delicious creation! For the complete recipe, check [Full Recipe]. - Use lean ground beef to reduce fat. This helps keep the dish lighter. - For a spicier kick, add diced jalapeños. They boost flavor and heat. - Adjust cook time based on your slow cooker type. Some cook faster than others. - I recommend cooking on low for 6 hours or high for 3 hours. This timing ensures everything is hot and bubbly. - Presentation ideas can elevate your dish. Ladle the casserole into bowls and top with fresh cilantro or chopped green onions. - Serve with sour cream and slices of creamy avocado. This adds richness and balances the flavors. For the full recipe, check out the details above! {{image_4}} You can make this dish even better by swapping out some ingredients. Use ground turkey or chicken instead of beef. This change lowers fat while keeping the flavor. You can also try different beans, like pinto or kidney beans. Adding more vegetables, such as zucchini or carrots, boosts nutrition and taste. If you want a vegetarian version, use meat alternatives like lentils or plant-based crumbles. These options provide protein without meat. For gluten-free needs, check your tater tots. Some brands make gluten-free versions, so you can enjoy this dish without worry. Want to spice things up? Add a few dashes of hot sauce for heat. You can also switch up the cheese. Try pepper jack for a kick or mozzarella for a milder taste. Fresh herbs like cilantro or parsley can add fresh flavors. A sprinkle of oregano can also deepen the taste. Experiment and find your favorite! For the full recipe, check out the Rustic Slow Cooker Cowboy Casserole. To store your Slow Cooker Cowboy Casserole, first let it cool completely. Place it in an airtight container. This keeps the flavors fresh and prevents drying out. Glass or BPA-free plastic containers work well. Make sure to label the date on the container. This helps you remember when you made it. If you want to freeze some, divide the casserole into portions. Use freezer-safe containers or bags. Remove as much air as possible to avoid freezer burn. You can freeze it for up to three months. When you're ready to eat, thaw it in the fridge overnight. Reheat it in the oven or microwave until hot. Stir it gently to ensure even heating. In the fridge, your casserole lasts about three days. After that, the taste and texture may change. In the freezer, it keeps well for about three months. However, the sooner you eat it, the better it will taste. Enjoy your delicious meals without waste by following these storage tips. For the full recipe, refer back to the section above. Yes, you can prepare this dish in advance. Simply follow these steps: - Cook the beef, onion, and garlic. - Mix in the other ingredients and place them in your slow cooker. - Cover and refrigerate until you're ready to cook. - When ready, set your slow cooker to cook. You can heat it on low for 6 hours or high for 3 hours. This method helps save time on busy days. Just remember to let it cool before placing it in the fridge. Absolutely! You can easily swap out the meat. Here are some ideas: - Use cooked lentils or black beans instead of ground beef. - Add extra veggies like zucchini or mushrooms for added texture. - Tofu can also be a great protein source in this dish. These changes keep flavors rich and satisfying. Yes! You can adjust the spice level to fit your taste. Here’s how: - To make it milder, reduce the chili powder and omit any spicy peppers. - For more heat, add diced jalapeños or a splash of hot sauce. - You can also try different spices, like cayenne pepper or red pepper flakes. This allows you to create a dish that everyone will enjoy. This casserole pairs well with many sides. Here are a few suggestions: - A fresh green salad adds a nice crunch. - Serve with warm cornbread for a classic touch. - You can also enjoy it with tortilla chips for added texture. These sides enhance the meal and make it even more enjoyable. Slow Cooker Cowboy Casserole is simple and filling. We covered key ingredients like ground beef, beans, and cheese. I shared step-by-step instructions for a smooth cook. You can tweak flavors and make it your own. Remember to store leftovers properly for best taste. This dish is easy to adapt for any dietary need. Enjoy serving it hot, and don't forget the toppings!

Slow Cooker Cowboy Casserole Hearty Family Favorite

Are you ready for a meal that’s warm, hearty, and easy to make? The Slow Cooker Cowboy Casserole is the

- 1 lb beef steak (ribeye or sirloin) - 4 slices of provolone cheese - 4 hoagie rolls - 1 cup sliced mushrooms - 1 large onion, thinly sliced - 1 green bell pepper, thinly sliced - Salt and black pepper - 1 teaspoon garlic powder (optional) - 2 tablespoons olive oil The main ingredients make this dish shine. I love using ribeye or sirloin for its rich taste. These cuts cook well and stay tender. Provolone cheese brings a creamy texture and flavor that melts perfectly. You can add mushrooms, onions, and green bell peppers for extra taste. They bring sweetness and depth to your cheesesteak. I often sauté these veggies to enhance their flavors. For seasoning, simple salt and pepper work wonders. Garlic powder adds a nice kick, but it’s optional. A drizzle of olive oil helps everything cook evenly and adds a layer of flavor. Using fresh hoagie rolls is key. They hold the filling well and give a nice bite. You can find them at most bakeries or grocery stores. Once you have these ingredients, you're set for a tasty meal. If you want to check out the full recipe, it's a great guide for making this easy Philly cheesesteak! To start, place the beef steak in your freezer for 30-45 minutes. This helps firm it up, making it easier to slice. Once chilled, cut the beef into very thin strips. In a bowl, season the beef with salt, black pepper, and garlic powder, if you like a bit of kick. Next, heat 1 tablespoon of olive oil in a large skillet over medium-high heat. Add the sliced onions, green bell peppers, and mushrooms if you choose to use them. Sauté for about 5-7 minutes until the veggies soften and caramelize. When done, transfer them to a plate and set aside. In the same skillet, add the remaining tablespoon of olive oil. Turn the heat up to high and add the thinly sliced beef in an even layer. Cook it undisturbed for 2-3 minutes to get a nice sear. Then, stir the beef and cook for another 2-3 minutes until it is browned and cooked through. Now, return the cooked vegetables back to the skillet with the beef. Mix everything gently for about 1 minute to meld the flavors. Lower the heat, layer the provolone cheese slices over the beef and veggie mix, and cover the skillet. Let it sit for 2-3 minutes until the cheese melts and becomes gooey. Using a large spoon, fill each hoagie roll with the cheesy beef and vegetable mixture. Serve immediately while the cheesesteaks are hot and the cheese is deliciously gooey! For full details on this recipe, you can check the Full Recipe. Choosing the right beef makes a big difference. Ribeye and sirloin are the best cuts for a cheesesteak. They have a great mix of fat and flavor. Use thin slices for the best texture. Thickness matters because thicker pieces do not cook evenly. Aim for slices that are about 1/8 inch thick. This makes sure the meat cooks fast and stays tender. To boost flavor, I love adding garlic powder and seasoning. A little salt and black pepper go a long way. These simple spices bring out the beef's natural taste. For cheese, provolone is a classic choice. It melts nicely and has a creamy flavor. If you want to try something new, Swiss or cheddar also works well. Searing the beef gives it a nice crust. Always use high heat for this step. It helps lock in the juices. Avoid simmering the beef; it can make it tough. Also, don’t overcrowd the pan. If you add too much meat at once, it will steam instead of sear. Work in batches if you need to. This way, you get a perfect, crispy finish every time. {{image_4}} You can easily swap beef for chicken in your cheesesteak. This option is lighter but still packed with flavor. Use chicken breast or thighs, sliced thinly. Cooking times will differ slightly. Cook chicken for about 6-8 minutes until it is fully cooked. Make sure it reaches an internal temperature of 165°F (75°C). Add your favorite veggies and cheese just like in the classic version. For a meat-free version, try using portobello mushrooms or seitan. Both options provide great texture and flavor. Slice portobello mushrooms thick, and sauté them until they’re tender. If you use seitan, cook it until it's heated through. To add flavor, use garlic powder, onion powder, or even soy sauce. You can also try adding roasted red peppers for sweetness. While provolone is traditional, feel free to mix it up. You can use mozzarella, cheddar, or even a spicy pepper jack. Each cheese provides its unique taste and creaminess. To melt cheese effectively, cover the skillet after adding cheese. Keep the heat low and let it melt slowly. This way, you’ll achieve that gooey, cheesy goodness everyone loves in a cheesesteak. For the full recipe, check out the [Full Recipe]. Store leftover cheesesteaks in an airtight container. This keeps them fresh and tasty. You can safely eat them within three days. If they sit longer, they may spoil. To reheat, use a skillet over medium heat. This method keeps the cheesesteak tasty and warm. Avoid microwaving, as it can make the bread soggy. Instead, cover the skillet with a lid to keep moisture in while reheating. To freeze, wrap the cheesesteaks tightly in foil or plastic wrap. Label them with the date. You can store them for up to three months. When ready to eat, thaw in the fridge overnight. Reheat in a skillet for the best taste and texture. The best cuts are ribeye or sirloin. Ribeye has great fat, making it juicy. Sirloin is leaner but still packs flavor. Thin slices work best for quick cooking. These cuts help you get that classic cheesesteak taste. Yes, you can prep cheesesteak ahead of time. Cook the beef and veggies, then store them in the fridge. Keep the hoagie rolls separate. When ready to eat, reheat the beef and veggies. Then, assemble the sandwiches. This saves time on busy days. No, you don’t need cheese whiz. Provolone cheese works well and tastes great. You can also try Cheez-Whiz or mozzarella. Each cheese gives a different flavor. Choose what you like best for your cheesesteak. Philly cheesesteak goes great with crispy fries or onion rings. A light salad also works well. You can even serve it with coleslaw for a crunchy side. These options complement the rich flavors of the cheesesteak. To add heat, you can mix in jalapeños or hot sauce. For a milder taste, skip the spicy ingredients. Adjust the amount of garlic powder for extra flavor. Always taste as you go to find your perfect spice level. The Philly cheesesteak is a delicious dish you can make at home. This guide covered the main and optional ingredients, plus step-by-step cooking instructions. I shared tips on selecting quality beef and enhancing flavors with the right seasonings. You learned about variations for chicken and vegetarian options, and storage methods for leftovers. Now it’s time to get cooking! Enjoy making this classic sandwich your own.

Easy Philly Cheesesteak Recipe Quick and Tasty Meal

Craving a quick and tasty meal? You’ve come to the right place! This Easy Philly Cheesesteak recipe delivers rich flavors

- 1.5 pounds boneless, skinless chicken thighs - 1 can (10 oz) diced tomatoes with green chilies - 1 cup low-sodium chicken broth - 1 bell pepper (red or green), sliced into thin strips - 1 medium onion, diced finely - 3 cloves garlic, minced - 2 tablespoons Cajun seasoning - 1 teaspoon smoked paprika - 1 teaspoon dried thyme - 8 ounces penne pasta - 1 cup heavy cream - Salt and pepper to taste - 1/4 cup fresh parsley, chopped (for garnish) - Grated Parmesan cheese (for serving) Using boneless, skinless chicken thighs gives great flavor and keeps the dish juicy. You can swap them for chicken breasts, but they might dry out a bit. The diced tomatoes with green chilies add a nice kick. If you want more heat, try using spicy diced tomatoes. You can adjust the Cajun seasoning to suit your taste if you prefer milder flavors. I often choose Hunt’s for canned tomatoes; they have great flavor. For Cajun seasoning, Slap Ya Mama gives a balanced heat. Better Than Bouillon makes a tasty chicken broth that enhances the dish. For pasta, I like Barilla penne; it holds sauce well. Finally, Kraft Parmesan cheese is a classic choice for a good finish. First, take your boneless chicken thighs. Lay them flat at the bottom of the crockpot. Make sure they are spaced out. This helps them cook evenly. Next, slice your bell pepper into thin strips. Dice the onion finely. Mince the garlic. Layer the bell pepper, onion, and garlic over the chicken. This adds color and flavor. In a bowl, mix the diced tomatoes with their juices, chicken broth, Cajun seasoning, smoked paprika, and thyme. Stir well. Pour this mixture over the chicken and vegetables in the crockpot. Set your crockpot to low. Let it cook for 6 to 7 hours. If you're in a hurry, set it to high for 3 to 4 hours. The chicken should be done when it easily shreds. About 30 minutes before serving, take the chicken out. Shred it into bite-sized pieces with two forks. Add uncooked penne pasta to the crockpot. Cover it and cook for 15 to 20 minutes. The pasta should be al dente. Once the pasta is ready, fold in heavy cream for richness. Return the shredded chicken to the pot and mix everything well. Taste it and add salt and pepper as needed. You can find the full recipe to guide you through each step. Enjoy this easy and flavorful dinner! For the best flavor, use fresh spices. Fresh spices add more taste than old ones. Make sure to shred the chicken after cooking. This helps mix the flavors well. Stir in the heavy cream slowly. This keeps it rich and smooth. If you like a little tang, add a squeeze of lemon juice. It brightens the dish and adds depth. A common mistake is overcooking the chicken. Chicken thighs are tender, but if cooked too long, they can dry out. Avoid skipping the heavy cream. This step adds creaminess and balances the spice. Don’t forget to taste as you cook. Adjust the salt and pepper to your liking. Lastly, be careful with the pasta. Stir gently to prevent it from clumping. To make it spicy, add extra Cajun seasoning. You can also toss in sliced jalapeños. If you prefer mild flavors, reduce the seasoning. Use less Cajun spice or pick a milder brand. You can also add more cream to tone down the heat. Feel free to adjust the heat based on your taste. Enjoy this dish your way! For the full recipe, check out the details above. {{image_4}} You can easily make a vegetarian version of this dish. Replace the chicken with firm tofu or chickpeas. Both options soak up flavors well. Just make sure to adjust cooking times. Tofu needs less time to cook, so add it in the last hour. This way, it stays firm and delicious. Feel free to add more vegetables to your pasta. Zucchini, spinach, or mushrooms are great choices. They add color and nutrition. Chop them into small pieces and add with the other veggies. This will boost the flavor and make your meal even heartier. If you need a gluten-free option, swap the pasta for gluten-free penne. There are many brands available. Check the cooking times, as gluten-free pasta might cook faster. You can also use spiralized veggies like zucchini or carrots instead of pasta for a lighter meal. This keeps the dish tasty while meeting your dietary needs. For the full recipe, you can refer to the earlier section. After enjoying your Crockpot Cajun Chicken Pasta, let it cool down. Use an airtight container to store leftovers. This keeps the flavors fresh. You can keep it in the fridge for up to three days. Make sure to label your container with the date. This way, you will know when to eat it. To reheat, you can use the microwave or stovetop. If using a microwave, place the pasta in a bowl. Heat it for about 1-2 minutes, stirring halfway. If you prefer the stovetop, pour the pasta into a pot. Heat it on low, stirring often until warm. You may want to add a splash of cream or broth to keep it creamy. If you want to save some for later, freezing is a great option. First, let the pasta cool completely. Then, portion it into freezer-safe bags or containers. Make sure to leave some space for expansion. You can freeze it for up to three months. When you're ready to eat, thaw it overnight in the fridge and reheat as mentioned above. Enjoy your meal anytime! For the detailed recipe, check out the Full Recipe section. Cooking Cajun Chicken Pasta in a crockpot takes about 6 to 7 hours on low. If you want it done faster, you can set it to high for 3 to 4 hours. The chicken should be tender and easy to shred when it’s ready. Yes, you can use chicken breasts instead of thighs. Chicken breasts will work well but may dry out a bit more. Thighs have more fat, which keeps them moist. If you use breasts, watch the cooking time closely. Cajun Chicken Pasta tastes great with a few sides. Here are some ideas: - Garlic bread for a crunchy touch - A fresh green salad for a light bite - Steamed veggies to add color and nutrition You can make this dish ahead of time! Just prepare everything and store it in the fridge. Cook it in the crockpot when you’re ready to eat. If you want it ready in the morning, put it in the crockpot before you leave for the day. It’s that easy! For the full recipe, check the details above. This article covered the key points for making delicious Cajun Chicken Pasta. We discussed essential ingredients, step-by-step cooking instructions, and helpful tips. I shared ways to spice up your dish and variations for different diets. Plus, we reviewed how to store leftovers and easy reheating methods. In the end, cooking should be fun and tasty. With these tips, you'll impress everyone at the table. Enjoy making and sharing your Cajun Chicken Pasta!

Crockpot Cajun Chicken Pasta Easy and Flavorful Dinner

Are you ready for an easy, tasty meal that brings the flavors of Cajun cooking right to your table? My

- 2 cups all-purpose flour - 1/2 teaspoon baking powder - 1/4 teaspoon salt - 1/2 cup unsalted butter, softened to room temperature - 1/2 cup granulated sugar - 1/4 cup powdered sugar (plus extra for dusting) - 1 large egg yolk - 1 teaspoon pure vanilla extract - 1/2 cup colorful sprinkles (or finely chopped nuts of your choice) - 1/2 cup your favorite jam (choices include raspberry, apricot, or strawberry) The key to soft holiday thumbprint cookies lies in the balance of ingredients. You need flour, baking powder, and salt for structure. Butter, sugar, and egg yolk provide moisture and sweetness. Vanilla extract adds a lovely aroma. The jam, of course, gives that classic thumbprint touch. - You can use gluten-free flour for a gluten-free option. - Dairy-free butter alternatives work well for those avoiding dairy. - Try sugar substitutes if you want to make a healthier version. These swaps help you cater to different diets without sacrificing taste. Always remember to measure carefully for the best results. For more details on how to make these cookies, check the Full Recipe. 1. Preheat your oven to 350°F (175°C). This gets it ready for baking. 2. Line a baking sheet with parchment paper. This helps the cookies not stick. 1. In a large bowl, cream together the unsalted butter, granulated sugar, and powdered sugar. Use an electric mixer on medium speed. Mix until light and fluffy, about 3–4 minutes. 2. Add one egg yolk and one teaspoon of pure vanilla extract to the mixture. Mix until everything is smooth and combined. 1. Scoop out portions of dough, about 1 inch wide. Roll these portions into balls using your hands. 2. Roll each ball in colorful sprinkles or chopped nuts until fully coated. This adds a fun look. 3. Place the dough balls on the prepared baking sheet. Make sure they are about 2 inches apart. 4. Press your thumb or a small spoon gently in the center of each ball to create a small indentation. This will hold the jam well. 5. Spoon your favorite jam into each indentation. Be careful not to overfill, as the jam can overflow when baking. 1. Place the baking sheet in the oven and bake for 10–12 minutes. Look for lightly golden edges. 2. After baking, take the cookie sheet out and let the cookies cool on it for about 5 minutes. Then move them to a wire rack to cool completely. For the full recipe, you can refer to the complete guide I provided earlier. Enjoy making these soft holiday thumbprint cookies! To get the best soft texture in your thumbprint cookies, start with room temperature butter. Soft butter blends well with sugar, making the dough light and airy. If the butter is cold, it will not mix properly, and your cookies may turn out dense or hard. Another key is to avoid overmixing. When you mix the dough, do it just until the flour disappears. Overmixing activates the gluten in the flour, which can lead to tough cookies. Aim for a soft, tender dough for the best results. Get creative with your decorations! You can use festive sprinkle combinations to make your cookies pop. Think red and green for the holidays or gold and silver for a more elegant look. Using themed jam flavors also adds a nice touch. Raspberry, apricot, or strawberry jams can enhance the holiday spirit. Feel free to mix and match flavors to keep things exciting. Your guests will love the tasty surprises! Pair your cookies with warm beverages. A cup of hot cocoa or spiced tea can enhance the flavors. The warmth of the drink pairs well with the soft texture of the cookies. For presentation, use a decorative platter. Arrange the cookies in a fun way and dust them with powdered sugar for a snowy effect. This way, your cookies not only taste great but look festive too! {{image_4}} You can change the jam for a new taste. Try raspberry, apricot, or strawberry. Each jam brings its own flavor to the cookie. You can also mix in flavors like almond extract. A little almond extract adds warmth and depth. Just a few drops make a big difference. If you're vegan, you can still enjoy these cookies. Use a vegan butter substitute and replace the egg yolk with flaxseed meal. Mix one tablespoon of flaxseed with three tablespoons of water. Let it sit until it thickens. That will work as your egg. For nut-free cookies, skip the nuts and sprinkles. Use seeds like pumpkin or sunflower instead. They add crunch without the worry of nuts. Make your cookies festive for the holidays. Use red and green sprinkles for Christmas or pastel colors for Easter. You can also add spices like cinnamon or nutmeg to the dough. These spices give the cookies a cozy, warm taste. A sprinkle of holiday cheer goes a long way! For the full recipe, check the link above. To keep your thumbprint cookies fresh, store them at room temperature. The ideal temperature is between 60°F and 75°F. This range helps maintain their soft texture. Use an airtight container to keep air out. A cookie jar can work too, but it should be tightly sealed. A good seal protects the cookies from drying out. You can freeze the dough before baking. Shape the balls and place them on a baking sheet. Freeze until firm, then transfer them to a freezer bag. This method saves time on busy days. For baked cookies, let them cool completely first. Place them in an airtight container or a freezer bag. They can last up to three months in the freezer. To reheat, warm them in the oven at 350°F for about 5 minutes. This will restore their soft texture. Soft holiday thumbprint cookies last about one week at room temperature. Store them properly to maintain freshness. If you notice any changes in texture or smell, it may be time to toss them. Signs of spoilage include a hard texture or an off smell. Always trust your senses when it comes to food safety. You can use oil, but the cookies may not be as soft. Butter adds flavor and richness. If you choose oil, use a light one like canola. Use about 3/8 cup of oil for 1/2 cup of butter. The texture will change, but they will still be tasty. To stop the jam from overflowing, do not overfill the indentations. Use just a small spoonful of jam. You can also press the dough gently to make deeper indents. This way, the jam stays in its place while baking. Yes, you can prep the dough ahead of time! Roll the dough into balls and freeze them. When ready, bake them straight from the freezer. Just add a minute or two to the baking time. Choose jams that are thick and flavorful. Raspberry, apricot, and strawberry are excellent picks. You could also try blackberry or cherry for a twist. Each jam gives a unique taste that pairs well with the cookie. These thumbprint cookies are easy and fun to make. You need simple ingredients and can customize them with your favorite jams. Remember to use room temperature butter for a soft texture. Decorate with colorful sprinkles for a festive touch. Store them in airtight containers to keep them fresh. With options for dietary needs and fun variations, these cookies fit any occasion. Enjoy baking and sharing these delightful treats with friends and family!

Soft Holiday Thumbprint Cookies Sweet and Simple Treat

Looking for a fun and sweet treat to add to your holiday cookie lineup? You’ve found it! These Soft Holiday

Older posts
Newer posts
← Previous Page1 … Page13 Page14 Page15 … Page91 Next →

dsad

© 2025 recipesstation • Built with GeneratePress

Our Policies

  • Copyright Policy
  • Cookie Policy
  • GDPR Policy
  • Privacy Policy
  • Disclaimer
  • Terms Of Use

More Information

  • Home
  • About
  • Contact
  • Appetizers
  • Dessert
  • Dinner
  • Drinks
©2025, recipesstation About Back To Top