Skip to content
DisclaimerTerms Of UseGDPR PolicyCookie Policy

recipesstation

  • Home
  • Drinks
  • Appetizers
  • Dinner
  • Dessert
  • About
  • Contact
  • Privacy Policy
DisclaimerTerms Of UseGDPR PolicyCookie Policy

Emily

To make Loaded Veggie Baked Ziti, gather these items: - 12 oz ziti pasta - 2 tablespoons extra virgin olive oil - 1 medium onion, finely diced - 3 cloves garlic, minced - 1 bell pepper (any color), diced - 1 medium zucchini, diced - 1 medium yellow squash, diced - 1 cup fresh spinach, roughly chopped - 24 oz marinara sauce (store-bought or homemade) - 1 teaspoon dried basil - 1 teaspoon dried oregano - Salt and freshly ground black pepper to taste - 2 cups ricotta cheese (full-fat for creaminess) - 2 cups shredded mozzarella cheese (plus more for topping) - 1/2 cup freshly grated Parmesan cheese - Fresh basil leaves for garnish (optional but recommended) You can change some ingredients if you need to. Here are a few ideas: - Pasta: Use any short pasta like penne or fusilli. - Ricotta Cheese: Cottage cheese works well if you're in a pinch. - Marinara Sauce: A jar of your favorite pasta sauce will also do. - Vegetables: Try eggplant or mushrooms for a different taste. - Cheese: Swap mozzarella for provolone or gouda for a unique flavor. Loaded Veggie Baked Ziti is hearty and filling. Here’s a rough breakdown per serving: - Calories: About 450-500 - Protein: 20-25 grams - Carbohydrates: 50-55 grams - Fat: 20-25 grams - Fiber: 4-6 grams This dish packs in nutrients from veggies and cheese, making it a balanced meal. You get fiber from the veggies and protein from the cheese, making it a great option for everyone. {{ingredient_image_2}} First, you need to make the ziti pasta. Start by preheating your oven to 375°F (190°C). This helps the dish cook evenly later. In a large pot, bring salted water to a boil. Once boiling, add 12 oz of ziti pasta. Cook it according to the package directions until it is al dente. This means it should be firm to the bite. After cooking, drain the pasta and set it aside in a large mixing bowl. Now it's time to add flavor with veggies. Heat 2 tablespoons of extra virgin olive oil in a large skillet over medium heat. Add 1 medium onion, finely diced, and 3 cloves of minced garlic. Sauté these for about 2-3 minutes. You want the garlic and onion to smell great and the onion to turn translucent. Next, add 1 diced bell pepper, 1 medium diced zucchini, and 1 medium diced yellow squash to the skillet. Sauté these veggies for 5-7 minutes. Stir occasionally until they soften. Finally, add 1 cup of roughly chopped fresh spinach. Cook for 1-2 more minutes until it wilts. Pour in 24 oz of marinara sauce along with 1 teaspoon of dried basil and 1 teaspoon of dried oregano. Season the mixture with salt and freshly ground black pepper to taste. Allow it to simmer gently for about 5 minutes. This helps all the flavors mix well together. Now it's time to put everything together. In the large mixing bowl with the cooked ziti, gently fold in the veggie sauce mixture. Add 2 cups of ricotta cheese and stir well until everything is evenly combined. The pasta should be fully coated in that rich veggie sauce. Next, transfer half of this ziti and veggie mix into a greased 9x13 inch baking dish. Spread it out evenly. Sprinkle half of the 2 cups of shredded mozzarella on top. Layer the remaining ziti mixture over this. Finish by adding the rest of the mozzarella and 1/2 cup of grated Parmesan cheese on top. Cover the baking dish tightly with aluminum foil to keep the cheese from burning. Place it in the preheated oven and bake for 25 minutes. After that, carefully remove the foil. Bake for another 10-15 minutes until the cheese is bubbly and golden brown. Once done, let the baked ziti cool for a few minutes. You can garnish it with fresh basil leaves for extra flavor and color. Enjoy! To bake the loaded veggie ziti just right, start with a hot oven. Preheat it to 375°F (190°C). This helps the cheese melt and brown perfectly. Cover the dish with foil for the first half of baking. This keeps the dish moist. Remove the foil for the last 10-15 minutes. This allows the cheese to get that golden crust. Let it cool for a few minutes before serving. This helps the layers set and makes serving easier. For the best ricotta cheese blend, choose full-fat ricotta. It gives a rich, creamy texture. Mix the ricotta with the veggie sauce evenly. This helps each bite be creamy and flavorful. You can also add a splash of heavy cream for extra richness. Blend well until smooth. If you like herbs, add some fresh basil or parsley to the ricotta. This adds a fresh taste and brightens the dish. Herbs and spices are key to making this dish special. Dried basil and oregano work well in the sauce. You can add red pepper flakes for heat. Fresh herbs, like basil or parsley, can be added right before serving. This gives a fresh flavor boost. Always taste as you go. Adjust salt and pepper to your liking. If you want more depth, a splash of balsamic vinegar can enhance the overall flavor. Pro Tips Fresh Herbs: Enhance the flavor by using fresh herbs instead of dried. Add chopped fresh basil or parsley just before serving for a burst of freshness. Extra Creaminess: For an even creamier texture, mix in a little cream cheese or sour cream with the ricotta. This adds richness to every bite. Make-Ahead Option: Assemble the dish a day in advance and store it in the refrigerator. Just bake it right before serving for a quick dinner option. Vegetable Variations: Feel free to swap or add your favorite vegetables! Mushrooms, broccoli, or eggplant work beautifully in this dish. {{image_4}} You can make Loaded Veggie Baked Ziti gluten-free by using gluten-free ziti pasta. Many brands offer good options. For a vegan twist, swap ricotta and mozzarella for plant-based cheeses. Nutritional yeast can add a cheesy flavor too. Use vegan marinara to keep it dairy-free. These changes still keep all the taste. Cheese is key in this dish. You can mix different cheeses for a unique taste. Try adding gouda for smokiness or pepper jack for a kick. A blend of cream cheese and mozzarella can make it extra creamy. Always adjust the types of cheese to fit your taste. Using seasonal veggies can change the flavor profile. In spring, add asparagus or peas for freshness. In summer, try using eggplant or heirloom tomatoes. Fall brings great options like butternut squash or kale. Winter can be brightened with carrots or Brussels sprouts. Tailoring your veggies keeps the dish exciting and delicious. To keep your Loaded Veggie Baked Ziti fresh, let it cool first. Once it’s cool, cover it tightly with plastic wrap or aluminum foil. You can also use an airtight container. This way, it stays tasty in the fridge for up to four days. When you’re ready to enjoy the leftovers, preheat your oven to 350°F (175°C). Place the ziti in an oven-safe dish. Add a splash of marinara sauce to keep it moist. Cover the dish with foil to avoid drying out. Bake for about 20 minutes, or until it's hot all the way through. If you want a crispy top, remove the foil for the last 5 minutes. To freeze your Loaded Veggie Baked Ziti, first let it cool completely. Portion it into freezer-safe containers. Leave some space at the top of each container for expansion. You can freeze it for up to three months. When you’re ready to eat, thaw it overnight in the fridge. Then, follow the reheating instructions above for a warm, hearty meal. Bake the Loaded Veggie Baked Ziti for 25 minutes covered with foil. After that, remove the foil and bake for another 10 to 15 minutes. This allows the cheese to melt and brown nicely. You want it bubbly and golden for the best texture and flavor. Yes, you can use whole wheat pasta instead of ziti. Whole wheat pasta adds fiber and a nutty taste. Just make sure to adjust the cooking time. Whole wheat pasta often cooks a bit faster than regular pasta. Keep an eye on it so it doesn’t get mushy. You can serve a fresh salad alongside the Loaded Veggie Baked Ziti. A crisp green salad with a light vinaigrette adds a nice contrast. Garlic bread also pairs well and helps soak up the sauce. For a fun twist, try some roasted veggies for extra flavor and color. This post covered the key ingredients, step-by-step instructions, and useful tips for making Loaded Veggie Baked Ziti. We explored substitutions and nutritional info, and discussed variations for gluten-free and vegan options. Proper storage and reheating tips ensure you can enjoy it later. In closing, baked ziti is versatile and fun to make. You can tweak it to fit your taste and needs. Enjoy cooking and sharing this hearty dish!

Loaded Veggie Baked Ziti Hearty and Flavorful Meal

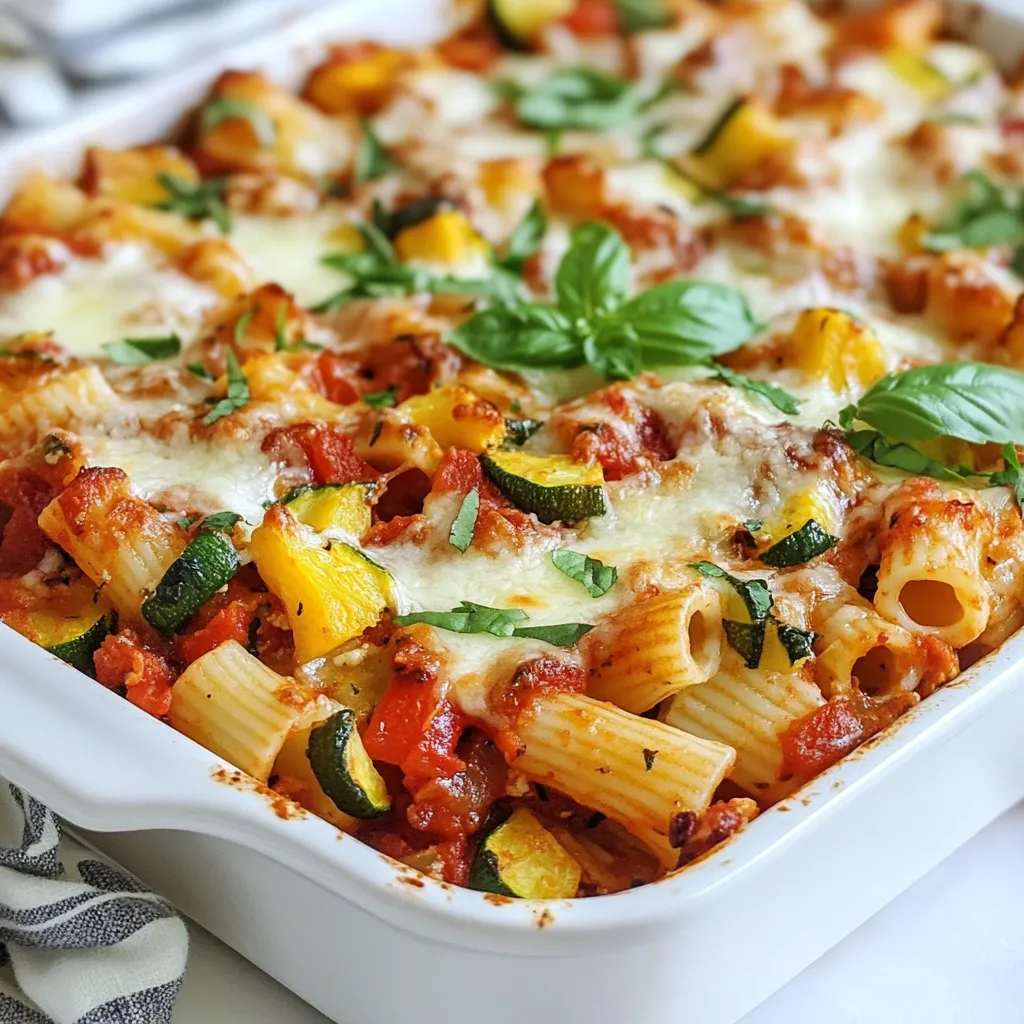
Looking for a hearty meal that’s packed with flavor? This Loaded Veggie Baked Ziti is your answer! Bursting with fresh

To make Bisquick sausage balls, you need a few key ingredients. They are simple and easy to find. Here’s what you need: - 1 pound breakfast sausage (pick spicy or mild) - 2 cups Bisquick mix - 1 cup shredded sharp cheddar cheese - 1/2 cup grated Parmesan cheese - 1/4 cup milk - 1 tablespoon Dijon mustard - 1 teaspoon garlic powder - 1 teaspoon onion powder - 1/2 teaspoon black pepper - 1/2 teaspoon red pepper flakes (optional) These ingredients create a tasty and satisfying snack. The sausage gives it a hearty flavor, while the cheeses add creaminess. The spices bring everything together. If you want to boost the flavor, consider these optional ingredients: - Fresh herbs like thyme or rosemary for a fragrant touch - Jalapeños for extra heat - Smoked paprika for a smoky flavor - Cream cheese for a richer texture Adding these items can change the taste and make your sausage balls even better. Feel free to experiment with what you have at home. Serve these sausage balls warm for the best taste. They are perfect for parties, game days, or family gatherings. Here are some great ways to serve them: - Pair with your favorite dipping sauces like ranch or barbecue sauce - Serve with a side of pickles for a crunchy contrast - Add a fresh salad to balance the richness of the balls These options will make your Bisquick sausage balls a hit at any event. Enjoy the fun of sharing this tasty snack! For the complete recipe, check out the Full Recipe section. Start by preheating your oven to 375°F (190°C). This step is key to ensure even cooking. Line a baking sheet with parchment paper. This prevents sticking and makes cleanup easy. In a big bowl, mix together the breakfast sausage, Bisquick mix, shredded sharp cheddar cheese, and grated Parmesan cheese. Make sure everything blends well for great flavor. In another bowl, whisk the milk, Dijon mustard, garlic powder, onion powder, black pepper, and red pepper flakes if you like heat. This mixture adds depth to your sausage balls. Pour this liquid mix over the sausage and cheese blend. With your hands, knead the mixture gently until it forms a soft dough. Don’t overmix, as this can change the texture. Now, scoop out portions of the dough. Roll them into 1-inch balls. Place them on the baking sheet with some space between each ball. This allows them to cook evenly. Put the baking sheet in your preheated oven. Bake for 20-25 minutes. You’ll know they’re done when they turn golden brown. The inside should reach 160°F (71°C) for safe eating. Once baked, take the sausage balls out of the oven. Let them cool for a few minutes. This makes them easier to handle. For a fresh look, sprinkle some chopped parsley on top before you serve. These simple steps will make your Bisquick sausage balls tasty and inviting. Enjoy your snack! To get the best texture, mix the dough gently. Overmixing can make the sausage balls tough. You want a nice, soft dough that holds its shape. Rolling them into 1-inch balls helps them cook evenly. If you want a crispier outside, bake them a minute or two longer. Using fresh ingredients can really boost flavor. Fresh sausage has a richer taste than pre-packaged ones. If you can, use freshly shredded cheese. Packaged cheese often has anti-caking agents that affect melting. Fresh cheese gives you that gooey, tasty experience you want. One common mistake is not measuring ingredients correctly. Too much Bisquick can make the balls dry. Also, don't skip the milk; it adds moisture. Another mistake is overcrowding the baking sheet. Give each ball space to cook evenly. Finally, check the internal temperature. They need to reach 160°F for safe eating. These tips will help you create the best Bisquick sausage balls. For a complete guide, check the Full Recipe. {{image_4}} You can switch up the cheese in your sausage balls. Try using pepper jack cheese for a spicy kick. Mozzarella adds a nice meltiness. Experiment with goat cheese for a tangy flavor. Mix two or more cheeses for extra depth. Each option brings a unique taste to your snack. To make gluten-free sausage balls, simply use gluten-free Bisquick. Check the sausage label to ensure it is gluten-free too. You can also add almond flour or oat flour as a substitute. These options keep the texture light and fluffy. Enjoy great flavor without gluten. Adding veggies can boost nutrition and flavor. Finely chopped bell peppers and green onions work well. You can also add spinach for a pop of color. For spices, consider cumin or smoked paprika. These add warmth and depth to your sausage balls. Don't be afraid to get creative with your mixes! After you enjoy your tasty sausage balls, let them cool completely. Place them in an airtight container. Store them in the fridge for up to three days. If you want to keep them longer, freezing is a great option. To freeze your sausage balls, first let them cool down. Arrange them in a single layer on a baking sheet. Freeze them for about one hour. Once frozen, transfer the sausage balls to a freezer-safe bag. They can stay in the freezer for up to three months. This way, you can enjoy them later! When you're ready to eat the sausage balls again, preheat your oven to 350°F (175°C). Place the sausage balls on a baking sheet. Heat them for about 10-15 minutes, or until they are warm. You can also use a microwave. Just heat them for about 30-60 seconds, but the oven gives a better texture. Enjoy your snack fresh and warm! Yes, you can use turkey sausage. It works well in this recipe. The flavor will be lighter, but still tasty. Just choose your favorite brand. Bisquick sausage balls last about 3 to 4 days in the fridge. Keep them in an airtight container. This helps keep them fresh and tasty for snacking. Several sauces go great with sausage balls. Here are some tasty options: - Honey mustard - Ranch dressing - Barbecue sauce - Hot sauce Feel free to mix and match to find your favorite! You can find the Full Recipe for Sassy Cheesy Sausage Balls above. It has all the details you need to make this delicious snack! Bisquick sausage balls are easy and fun to make. You learned about key ingredients, plus extra options to boost flavor. Following my steps, you can bake these tasty treats perfectly every time. I shared tips to avoid mistakes and achieve great texture. You can also try fun variations or find storage ideas for leftovers. In the end, these sausage balls are a hit for any gathering. Enjoy every bite!

Bisquick Sausage Balls Flavorful and Easy Snack

Looking for a quick and tasty snack? Bisquick Sausage Balls are simple to make and packed with flavor. They’re perfect

- 2 large carrots, julienned - 1 medium cucumber, thinly sliced - 1 red bell pepper, julienned - 1/4 cup red onion, thinly sliced - 1/4 cup fresh cilantro, roughly chopped - 3 tablespoons rice vinegar - 2 tablespoons sesame oil - 1 tablespoon honey or maple syrup - 1 teaspoon freshly grated ginger - Salt and freshly ground black pepper, to taste - Toasted sesame seeds, for garnish To make a fresh and crunchy carrot cucumber salad, you'll need simple, bright ingredients. Start with the fresh vegetables. I love using large carrots, julienned for the perfect bite. The cucumber adds a cool crunch, while the red bell pepper brings color and sweetness. Red onion adds a nice kick, and cilantro gives a burst of freshness. Next, let's talk about the dressing. Rice vinegar is my go-to for a tangy base. It pairs well with sesame oil, which adds a nutty flavor. Honey or maple syrup balances the acidity, making it sweet and tangy. Fresh ginger gives the dressing a lively zing. Finally, don't forget the seasoning. A little salt and freshly ground black pepper will enhance the flavors. Toasted sesame seeds on top add extra crunch and a lovely finish to this salad. For the full recipe, check out the Crisp Carrot-Cucumber Salad section. - Step 1: Prepare the Vegetables Start by peeling the carrots. Cut them into thin julienned strips. This step adds crunch to your salad. Slice the cucumber into thin rounds. Halve each round to make refreshing half-moons. Julienne the red bell pepper and slice the red onion. Uniform pieces help the flavors mix well. - Step 2: Mix the Base Ingredients In a large mixing bowl, combine the julienned carrots, cucumber half-moons, red bell pepper, sliced red onion, and chopped cilantro. Gently toss the vegetables together. This creates a beautiful mix of colors and flavors. - Step 3: Create the Dressing In a small bowl, whisk together the rice vinegar, sesame oil, honey (or maple syrup if you prefer), and grated ginger. Make sure the dressing blends well. This mixture provides a sweet and tangy flavor that complements the veggies. - Step 4: Combine the Salad Drizzle the dressing over the mixed vegetables in the large bowl. Gently toss everything together. This ensures every piece is coated in the flavorful dressing. - Step 5: Season the Salad Add salt and freshly ground black pepper to taste. Adjust the seasoning to fit your flavor preference. A little salt can really enhance the taste of the salad. - Step 6: Rest for Flavor Let the salad sit for about 10 minutes. This resting time allows the flavors to blend together. It makes a big difference in taste. - Step 7: Final Touch Just before serving, sprinkle toasted sesame seeds on top. This adds crunch and looks nice. If you want, garnish with extra cilantro leaves for a fresh finish. [Full Recipe] - Seasoning Adjustments: Taste your salad after mixing. Add salt and pepper as needed. This step makes flavors pop and brings life to the dish. You can also add a pinch of chili flakes for some heat. - Letting the Salad Rest: After mixing, let the salad sit for 10 minutes. This wait helps the flavors blend. You'll notice a big difference in taste! - Cutting Techniques for Uniformity: Cut carrots and cucumbers into similar sizes. This helps with even cooking and looks nice. Use a sharp knife for clean cuts. - Vegetable Freshness Guidance: Use fresh vegetables for the best crunch. Look for bright colors and firm textures. Avoid limp or wilted veggies for a vibrant salad. - Serving Suggestions: Serve the salad in a large bowl. This makes it easy for guests to help themselves. You can also plate individual servings for a fancy touch. - Garnish Techniques: Sprinkle toasted sesame seeds on top. This adds crunch and looks appealing. You can also add extra cilantro for a fresh finish. {{image_4}} You can add more crunch to your carrot cucumber salad. Try these vegetables: - Radishes, thinly sliced - Snap peas, halved - Bell peppers, in various colors Adding these will enhance the colors and flavors. You might also like to add grated apple. It brings a sweet touch that pairs well with the salad. To make your salad heartier, consider adding protein. Here are some tasty options: - Grilled chicken, diced - Tofu, cubed - Chickpeas, drained and rinsed These proteins balance the dish and keep you full longer. I recommend grilled chicken for a classic touch. You can switch up the dressing for new flavors. Try different oils like: - Olive oil for richness - Avocado oil for a smooth finish You can also change the sweetener. Use maple syrup or agave nectar instead of honey. Each choice will give your salad a new twist! - How to Store Leftovers: Place leftover salad in an airtight container. This keeps it fresh longer. If you have extra dressing, store it separately to avoid sogginess. - Best Containers for Storing: Glass containers work well as they seal tightly. They also help keep the salad crisp and tasty. - How Long the Salad Lasts: When stored properly, this salad lasts about 3 days in the fridge. - Signs of Spoilage: Look for wilted veggies or an off smell. If you see these signs, it’s best to toss the salad. - Can You Freeze the Salad?: Freezing this salad is not ideal, as vegetables lose their crunch. - Freezing Tips for Ingredients: If you want to freeze, consider freezing carrots and cucumbers separately. Chop them, then freeze in bags. This way, they stay fresh for later use. Enjoy the fresh taste of carrot cucumber salad anytime by following these storage tips! For the full recipe, check out the earlier section. What is the best way to prepare carrots for salads? The best way to prepare carrots is to julienne them. First, peel the carrots. Then, cut them into thin strips. This method adds a nice crunch to your salad. Can I make this salad in advance? Yes, you can make this salad in advance. It keeps well in the fridge for about a day. Just remember to add the dressing right before serving. This keeps the salad crisp and fresh. What are the health benefits of carrots and cucumbers? Carrots are rich in vitamins, especially vitamin A. They support eye health and boost the immune system. Cucumbers are low in calories and high in water, promoting hydration. Together, they make a healthy and refreshing combination. What can I substitute for rice vinegar? You can use apple cider vinegar or white wine vinegar in place of rice vinegar. Both options give a nice tangy flavor to the salad. Can I use different herbs instead of cilantro? Absolutely! You can use parsley or mint for a different taste. Both herbs add a fresh note to the salad. What meals pair well with Carrot Cucumber Salad? This salad pairs well with grilled chicken, fish, or tofu. It also goes great with sandwiches or wraps. How can I make this salad more filling? To make it more filling, add cooked quinoa or chickpeas. You can also mix in some sliced avocado or nuts for added texture and protein. For the full recipe, check out the Crisp Carrot-Cucumber Salad section! This article covered how to make a fresh and tasty carrot cucumber salad. We looked at the best ingredients, steps to prepare, and tips for flavor and presentation. Remember, using fresh veggies and letting the salad rest will improve the taste. You can also customize it with proteins or different dressings. This salad is perfect for any meal. Enjoy your healthy dish and feel good about feeding your body right!

Carrot Cucumber Salad Fresh and Crunchy Delight

Looking for a refreshing dish that’s both crunchy and healthy? You’ve come to the right place! This Carrot Cucumber Salad

To make the best sweet potato casserole, gather these key ingredients: - 4 large sweet potatoes, peeled and diced into 1-inch cubes - 1/2 cup packed brown sugar - 1/4 cup pure maple syrup - 1/2 cup milk (or unsweetened almond milk for a dairy-free option) - 1/3 cup unsalted butter, melted and slightly cooled - 2 large eggs, lightly beaten - 1 teaspoon pure vanilla extract - 1 teaspoon ground cinnamon - 1/2 teaspoon ground nutmeg - 1/4 teaspoon fine sea salt - 1 cup mini marshmallows - 1 cup pecans, roughly chopped - 1/2 cup crushed graham crackers These ingredients create a warm and sweet dish that comforts everyone. You can add a twist to the recipe with these options: - A pinch of cayenne pepper for heat - Chopped apples for added texture and sweetness - A splash of orange juice for a citrusy flavor - Coconut flakes to enhance the tropical vibe Feel free to mix and match to suit your taste! If you have allergies or dietary needs, consider these substitutions: - Use coconut milk instead of regular milk for a vegan option. - Swap brown sugar for coconut sugar for a lower glycemic index. - Replace eggs with flaxseed meal mixed with water (1 tablespoon flaxseed + 3 tablespoons water = 1 egg). - Use sunflower seeds instead of pecans for a nut-free option. These swaps keep the dish delicious while accommodating different diets. You can find the full recipe for more details! First, you need to preheat your oven. Set it to 350°F (175°C). Grab your 9x13 inch baking dish and grease it with butter or non-stick spray. This keeps your casserole from sticking. Next, fill a large pot with water and bring it to a boil. Add your diced sweet potatoes carefully. Cook them for 15 to 20 minutes. They should be soft enough to pierce with a fork. Once done, drain the water and let the potatoes cool for a few minutes. Now, place the warm sweet potatoes into a big mixing bowl. Use a potato masher or a fork to mash them smooth. You don't want any lumps! Then, add brown sugar, maple syrup, milk, melted butter, beaten eggs, vanilla extract, ground cinnamon, ground nutmeg, and sea salt to the bowl. Stir everything until it's creamy and well mixed. In a separate bowl, combine mini marshmallows, chopped pecans, and crushed graham crackers. Mix them well. This will create a delicious topping for your casserole. Pour the sweet potato mix into your greased baking dish. Smooth the top to make it even. Then, spread the marshmallow-pecan-graham cracker mix over the sweet potatoes. Bake the casserole in your preheated oven for 30 to 35 minutes. It should be golden brown on top when done. Let the casserole cool for about 5 to 10 minutes before serving. This makes it easier to serve. You can serve it straight from the baking dish. For a nice touch, sprinkle a little cinnamon or drizzle some maple syrup on top. Enjoy this warm and comforting dish! You can find the full recipe [here](#). To get a smooth mash, start with hot sweet potatoes. They mash easier when warm. Use a potato masher or fork. I like to mash with a gentle hand. This keeps some texture, which adds charm. Avoid using a blender; it can make the mash gluey. A few lumps are fine, as they add character. To keep your casserole thick, drain the sweet potatoes well after boiling. Any extra water will make the dish runny. Also, use the right amount of milk. Start with half a cup, and add more only if needed. If you want a richer texture, use heavy cream instead. Lastly, let the casserole cool a bit before serving. This helps it set up nicely. When layering toppings, spread them evenly across the sweet potato mix. This ensures every bite has flavor. Start with a layer of mini marshmallows for sweetness. Then, sprinkle the pecans for crunch. Finally, add crushed graham crackers for a sweet, crumbly finish. Press down lightly to help them stick during baking. This creates a golden crust that everyone will love. For more details, check the Full Recipe! {{image_4}} You can easily make this casserole gluten-free. Just swap out the graham crackers for gluten-free ones. Many brands offer tasty options that work well. You can also check for gluten-free mini marshmallows. This way, everyone can enjoy a warm dish without worries. To make a vegan version, use unsweetened almond milk instead of regular milk. Replace the eggs with flax eggs. To make one flax egg, mix one tablespoon of ground flaxseed with three tablespoons of water. Let it sit for a few minutes to thicken. This keeps the texture creamy and delicious. You can play with spices to change the flavor. Try adding ground ginger for a warm kick. A pinch of cloves gives a unique taste, too. You can even use pumpkin spice for a seasonal twist. Experimenting will make your casserole special every time. After enjoying your delicious sweet potato casserole, let it cool completely. Use an airtight container to store leftovers. This keeps the casserole fresh and tasty. You can place it in the fridge for up to four days. I love using glass containers, as they help me see the food inside. When you're ready to enjoy leftovers, preheat your oven to 350°F (175°C). Transfer the casserole to an oven-safe dish if needed. Cover it with foil to keep moisture in, and heat for about 20 minutes. If you prefer, you can microwave individual portions for about 1-2 minutes. Just watch it closely, so it doesn’t get too hot. You can freeze sweet potato casserole, too! First, let it cool completely. Then, wrap it tightly in plastic wrap and foil, or use a freezer-safe container. It can last in the freezer for up to three months. To cook, thaw it overnight in the fridge. Then, reheat it in the oven until warm. This way, you can enjoy this comfort dish anytime you want! Don't forget to check out the Full Recipe for all the details on making this amazing casserole. Sweet potato casserole lasts about 3 to 5 days in the fridge. Store it in an airtight container to keep it fresh. The flavors often improve after a day. Yes, you can make sweet potato casserole ahead of time. Prepare it up to the baking step. Cover it and store it in the fridge for up to 24 hours. When ready, just bake it straight from the fridge. You can use mashed bananas or unsweetened applesauce as egg substitutes. Use 1/4 cup of either per egg. This keeps the casserole moist and adds a hint of sweetness. Sweet potato casserole is best served hot. The warm, gooey marshmallows create a delightful texture. It’s comfort food that tastes amazing when fresh from the oven. Each serving offers around 250 calories. It has good fiber from sweet potatoes and healthy fats from pecans. This dish also provides vitamins A and C, making it a tasty and nutritious choice. You can find the full recipe for Ultimate Sweet Potato Casserole in the earlier section of this article. Enjoy the step-by-step guide to make this dish perfectly! You learned about the key ingredients for a tasty sweet potato casserole. We covered the steps to prepare, bake, and serve it. You now have tips to ensure it turns out just right. Plus, you explored variations for different diets and how to store leftovers. Enjoy making this dish for any gathering. With the right approach, your casserole will impress everyone. Happy cooking!

Ultimate Sweet Potato Casserole Flavorful Comfort Dish

Are you ready to dive into the world of comfort food? My Ultimate Sweet Potato Casserole is a crowd-pleaser that

To make Slow Cooker Garlic Butter Beef Bites, gather your ingredients. Here’s what you need: - 1 lb beef sirloin, cut into bite-sized cubes - 1/4 cup unsalted butter - 6 cloves of garlic, finely minced - 1 teaspoon onion powder - 1 teaspoon smoked paprika - 1 teaspoon dried thyme - 1/2 teaspoon freshly ground black pepper - 2 tablespoons low sodium soy sauce - 2 tablespoons fresh parsley, chopped (for garnish) - Sea salt, to taste These simple ingredients create a hearty dish. The beef sirloin provides tenderness, while garlic and butter add rich flavor. The spices, like smoked paprika and thyme, enhance the dish’s aroma. You can use low sodium soy sauce to control saltiness. I always recommend using fresh parsley for garnish. It adds color and a fresh touch. When measuring your ingredients, be precise. This ensures balanced flavors. If you want to try different flavors, feel free to adjust the spices or add your favorites. For the full recipe, refer to the section above. Enjoy creating this delicious meal! First, grab a large skillet and put it on the stove. Set the heat to medium. Add 1/4 cup of unsalted butter to the pan. Let it melt completely. Once melted, add 6 cloves of finely minced garlic. Stir it for 1-2 minutes. You want it fragrant but not burnt. If it burns, the taste will be off. Now it's time to sear the beef. Take 1 pound of beef sirloin and cut it into bite-sized cubes. Place these cubes in the hot skillet. Sear them for about 3-4 minutes. Turn them occasionally, so they brown on all sides. Once they are browned, remove the skillet from the heat. Next, transfer the browned beef into the slow cooker. In the same cooker, add your seasonings. This includes 1 teaspoon of onion powder, 1 teaspoon of smoked paprika, 1 teaspoon of dried thyme, and 1/2 teaspoon of freshly ground black pepper. Don't forget to add sea salt to taste. Pour the sautéed garlic and melted butter over the beef. Stir everything well to coat the beef in those tasty spices. Cover the slow cooker with its lid. Set it to cook on low for 6 hours or on high for 3 hours. The beef will become tender and full of flavor. When the cooking time is up, taste the beef bites. Adjust the seasoning if needed. You may want a little more salt or pepper. This is your chance to make it perfect. Serve the warm beef bites in a bowl, and garnish with fresh chopped parsley. For the complete cooking guide, refer to the Full Recipe. To make your garlic butter beef bites shine, adjust the seasoning. Taste the dish before serving. If you want more flavor, add a pinch of salt or pepper. For a hint of sweetness, a bit of brown sugar can balance the savory notes. Remember, small tweaks can make a big difference in taste! Ensure even cooking by cutting the beef into uniform pieces. This helps all the beef cook at the same rate. Layer the ingredients properly in the slow cooker. Place the beef at the bottom, then add the seasonings and garlic butter on top. Stir lightly to mix, but do not overdo it. Let the slow cooker work its magic! Serve your beef bites in a rustic wooden bowl for a cozy feel. Drizzle some of the cooking juices over the top for added flavor and color. For a fresh touch, sprinkle chopped parsley on the beef right before serving. Pair it with crusty bread or creamy mashed potatoes to soak up the delicious juices. This makes your dish not just tasty, but also a feast for the eyes! {{image_4}} If you want to switch things up, try using chicken or pork instead of beef. Both meats work well with the garlic butter sauce. For chicken, use boneless thighs or breasts cut into bite-sized pieces. For pork, tenderloin is a great choice. Just remember to adjust the cooking time. Chicken may cook faster, so check it after 4 hours on low. Pork may need a bit longer. For those needing gluten-free options, simply swap regular soy sauce with tamari or coconut aminos. This keeps the dish tasty while being safe for gluten-free diets. If you want a low-carb version, you can skip the soy sauce or use a low-carb substitute. You can also serve the beef bites over a bed of cauliflower rice instead of mashed potatoes. Adding different herbs or spices can create unique flavors. Try rosemary or oregano for a fresh twist. You can also add a bit of heat with red pepper flakes. For a smoky flavor, consider using smoked sea salt instead of regular salt. Experimenting with these changes can keep the meal exciting and cater to your taste preferences. To store leftovers, let the beef bites cool first. Place them in an airtight container. Store the container in the fridge. They will last for about three days. Be sure to label the container with the date. This helps you keep track of how long they’ve been there. When you’re ready to enjoy the leftovers, use a few simple methods. The microwave is quick. Place the beef bites in a microwave-safe dish. Cover it with a lid or damp paper towel. Heat in short bursts, stirring in between. You can also use the stovetop. Heat a skillet over medium heat. Add a splash of broth or water for moisture. Stir the beef bites until heated through. To freeze the beef bites, pack them in a freezer-safe container. Make sure to leave some space for expansion. The beef can freeze well for up to three months. When you are ready to eat, thaw them in the fridge overnight. Reheat them using the methods above for the best taste. For a full recipe, check out the details in the main article. You can store the beef bites in the fridge for up to four days. Keep them in a sealed container. This helps keep the flavors fresh and safe to eat. Always check for any signs of spoilage before enjoying leftovers. If you notice any off smells or changes in texture, it’s best to toss them out. Yes, you can make these garlic butter beef bites ahead of time. Cook them as directed and let them cool completely. Then store in the fridge. For meal prep, pack them in individual containers for easy lunches or dinners. When you’re ready to eat, just reheat in the microwave or on the stove. Add a splash of beef broth for moisture if needed. These beef bites pair well with many side dishes. Here are some great options: - Creamy mashed potatoes - Crusty artisan bread - Steamed broccoli or green beans - Rice or quinoa for a hearty meal Feel free to experiment with sides that you love. The rich garlic butter flavor complements many dishes, making it fun to mix and match! For the full recipe, check out the earlier sections. You now have a complete guide to making Slow Cooker Garlic Butter Beef Bites. We covered all the key steps, from choosing the right ingredients to perfecting your cooking technique. Remember, adjusting the spices can make a big difference. Don't be afraid to experiment with different proteins or flavors. Proper storage will keep your leftovers fresh for next time. I hope you enjoy this dish as much as I do. Happy cooking!

Slow Cooker Garlic Butter Beef Bites Simple Recipe

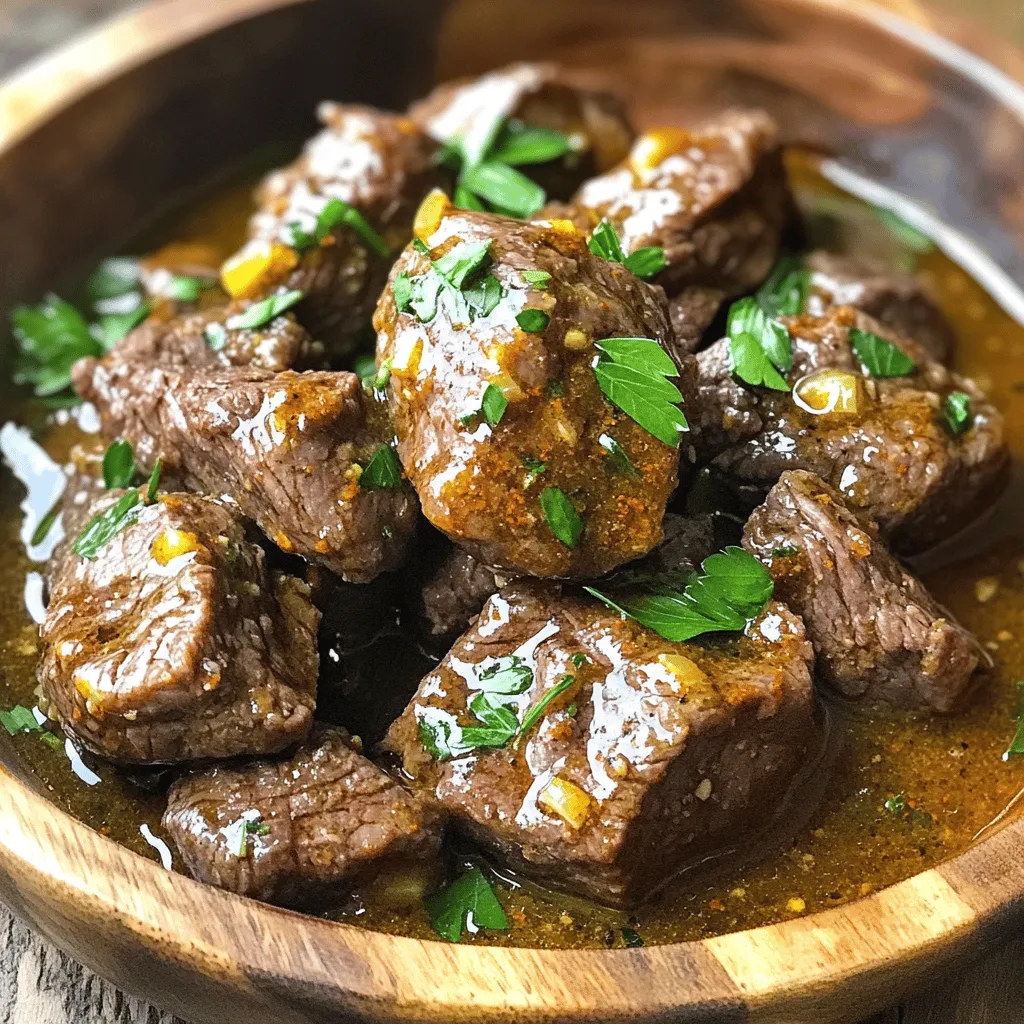
If you love tender, flavorful beef, my Slow Cooker Garlic Butter Beef Bites recipe is for you! In just a

- 2 cups powdered sugar - 2 tablespoons meringue powder - 4 tablespoons warm water - 1 teaspoon vanilla extract - Food coloring (optional) - Parchment paper for easy cleanup Making icing that hardens fast can be simple with the right ingredients. I use powdered sugar as a base. It gives the icing a sweet taste. Meringue powder helps the icing set and hold its shape. Warm water makes it easy to mix. Vanilla extract adds a nice flavor. You can use food coloring to make your icing fun. For easy cleanup, I recommend using parchment paper. Lay it down before you start. It catches drips and keeps your workspace clean. This makes decorating your cookies a joy. You’ll find that these ingredients work well together. They help you create a beautiful finish on your cookies. If you want to see the full process, check out the Full Recipe. It guides you through each step to make perfect icing. First, grab a large mixing bowl. Sift together 2 cups of powdered sugar and 2 tablespoons of meringue powder. Sifting helps remove lumps and creates a smooth base for your icing. This step is key for a perfect finish on your cookies. Next, gradually add 4 tablespoons of warm water to the dry mix. Stir with a spatula or whisk. Keep mixing until the icing is thick yet pourable. This texture will help you create nice, even coats on your cookies. Now it's time to add some flavor. Mix in 1 teaspoon of vanilla extract. This will enhance the taste of your icing. If you want colorful designs, divide the icing into small bowls. Add food coloring one drop at a time. Stir well until you reach your desired color. To decorate, use a piping bag fitted with a round tip. Start by outlining the edges of your cookies. This creates a barrier. Let the outline set for a few minutes until it firms up. Then, fill in the center with icing. This gives your cookies a professional look. After decorating, let the cookies sit at room temperature for 6-8 hours. This time allows the icing to harden fully. A complete hardening creates a nice glaze. Make sure to keep them in a cool spot for the best results. To fix runny icing, add more powdered sugar. Start with a tablespoon at a time until you achieve the right thickness. If your icing is too thick, add a few drops of water to thin it out. This helps you create different designs easily. Adjust the thickness based on your design. For outlines, aim for a thicker icing. For filling in, a thinner icing works best. Test your icing on a plate first. This way, you can see how it flows before decorating your cookies. After decorating, keep your cookies fresh. Store them in an airtight container. This protects them from air and moisture. Use wax paper between layers to avoid sticking. Choose a container that seals tightly. Glass or plastic containers work great. This keeps your cookies tasty for longer. When serving, think about creative arrangements. Use a decorative platter for an eye-catching display. You can even add a ribbon around the platter for flair. For extra fun, sprinkle edible glitter on top of the icing. This gives your cookies a festive look. You can also use colored sprinkles for added texture and color. These little touches make your cookies stand out! {{image_4}} You can easily change the flavor of your icing by using different extracts. Here are some ideas: - Almond extract adds a sweet, nutty taste. - Lemon extract gives a fresh, zesty kick. - Peppermint extract brings a cool, minty flavor. You can also mix flavors for a unique icing. Try combining vanilla and almond for a rich taste. Or mix lemon and vanilla for a bright, sweet blend. Want to make your cookies stand out? Here are some fun color techniques: - Marbling Icing: To create a marbled effect, use two colors. Pour one color onto the cookie, then add drops of the second color. Use a toothpick to swirl them together gently. This makes beautiful patterns! - Rub-On Designs: You can use rub-on designs for added flair. These are easy to apply. Just place the design on the icing and rub gently. It transfers the design onto your cookie, giving it a professional look. If you want to change up the recipe, here are some alternative ingredients: - Substituting Meringue Powder: If you don’t have meringue powder, you can use egg whites. Just ensure they are pasteurized for safety. Use about 2 tablespoons of egg whites instead of 2 tablespoons of meringue powder. - Vegan Options: If you prefer a vegan icing, replace meringue powder with aquafaba. This is the liquid from canned chickpeas. It works well and gives you a nice, sturdy icing. Using these variations can make your sugar cookie icing even more exciting and fun! Meringue powder is made from dried egg whites. It helps create a strong icing. It adds stability, which keeps the icing from getting too soft. This means your cookies stay pretty and neat. Using meringue powder makes your icing shine and harden well. Typically, sugar cookie icing takes about 6 to 8 hours to dry. This time can change based on air flow and humidity. If it’s humid, the icing might take longer. A good tip is to let them dry at room temperature. Avoid moving them until they are fully set. Yes, you can make icing ahead of time. Store it in an airtight container. Keep it in the fridge for up to a week. Before using, stir it well to get the right consistency again. Humidity can affect icing. It may take longer to harden or even stay soft. To help with this, use a dehumidifier in the room. You can also wait for a dry day to decorate your cookies. This keeps your icing firm and looking great. If your icing is too thick, simply add a few drops of warm water. Mix well until it reaches the right consistency. You want it to be smooth and pourable. If it’s still thick, add more water bit by bit. This keeps your icing easy to work with. To make sweet glaze sugar cookie icing, start with simple steps. First, mix two cups of powdered sugar with two tablespoons of meringue powder in a bowl. Sift them together to remove lumps. Next, add four tablespoons of warm water while stirring. This helps create a thick yet pourable icing. Then, stir in one teaspoon of vanilla extract for flavor. If you want color, divide the icing into bowls and add food coloring. Use a piping bag to outline your cookies, allowing them to set for a few minutes. After that, fill in the centers. Let the cookies dry at room temperature for 6 to 8 hours, and enjoy the beautiful finish! - Prep Time: 15 minutes - Total Time: 8 hours - Servings: 24 cookies In this post, we explored how to make perfect sugar cookie icing. We discussed key ingredients like powdered sugar and meringue powder. Next, we covered step-by-step instructions to blend dry ingredients and achieve the right consistency. You learned useful decorating techniques and drying times. Remember to experiment with flavors and colors for a unique touch. Keep cookies fresh by storing them properly. Now, you can create beautiful and tasty cookies to impress everyone. Enjoy your baking adventure!

Sugar Cookie Icing That Hardens Fast and Easy

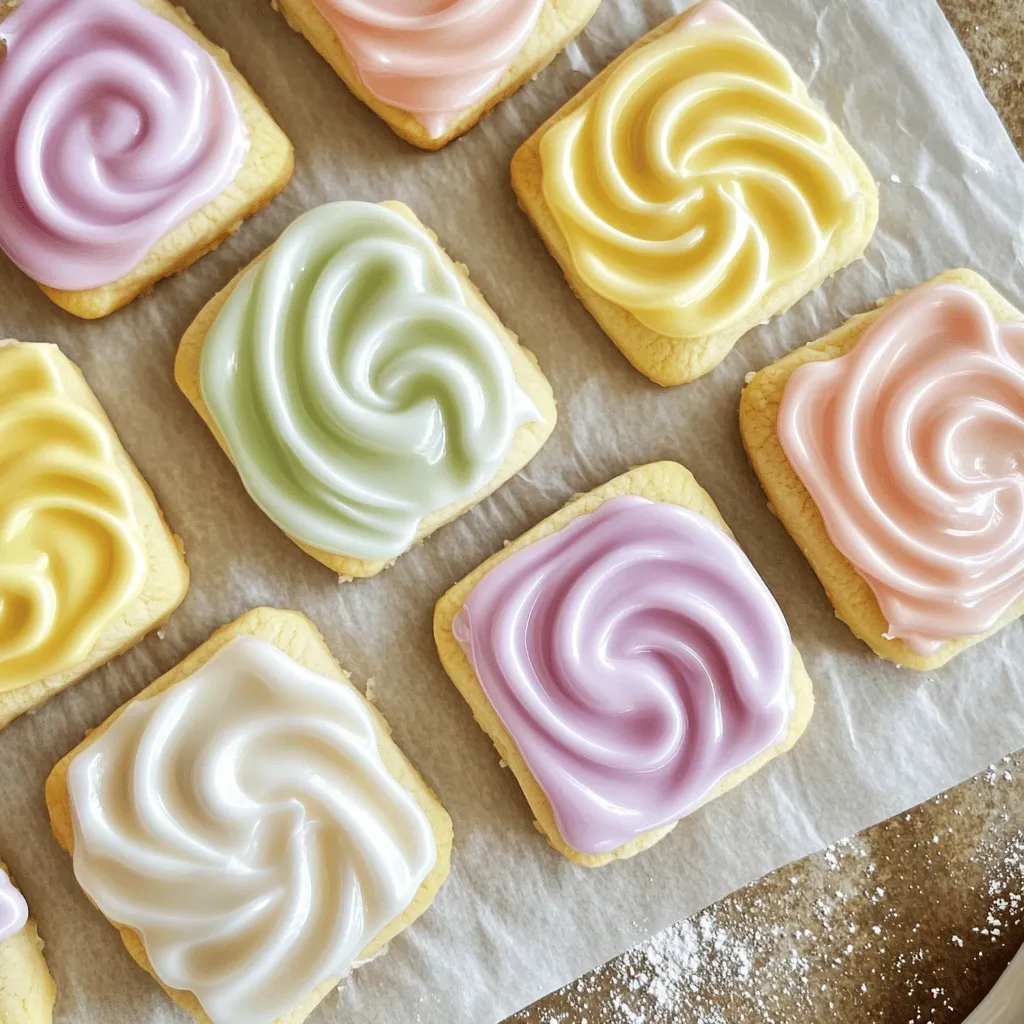
Are you ready to transform your sugar cookies into edible art? I’ve got a simple icing recipe that hardens fast

To make this dish, you need the following main ingredients: - 1.5 pounds boneless, skinless chicken thighs - 1/2 cup sweet chili sauce - 2 tablespoons soy sauce - 1 tablespoon freshly grated ginger - 3 cloves of garlic, minced - 1 tablespoon rice vinegar - 1 tablespoon sesame oil - 1/2 teaspoon ground black pepper These ingredients create a tasty and balanced flavor. The chicken thighs work well because they stay juicy when cooked. The sweet chili sauce brings a nice sweetness, while ginger and garlic add depth. To make your dish look even better, consider these optional garnishes: - 1/2 cup green onions, finely chopped - Sesame seeds Adding green onions gives a fresh taste and a pop of color. The sesame seeds add a nice crunch and a nutty flavor. Here are the tools you will need for this recipe: - Large mixing bowl - Whisk - Grill or skillet - Plastic wrap - Small saucepan - Cooking spray or oil brush Having the right tools makes cooking easier. A good grill or skillet is key for achieving those perfect grill marks and flavor. To start, gather your ingredients for the marinade. You need sweet chili sauce, soy sauce, ginger, garlic, rice vinegar, sesame oil, and black pepper. In a large bowl, whisk these together. Make sure they blend well. This mix gives the chicken its tasty flavor. Now, it’s time to marinate the chicken. Take 1.5 pounds of boneless, skinless chicken thighs and add them to the marinade. Use your hands or a spoon to coat each piece fully. This step is key for making the chicken juicy. Cover the bowl with plastic wrap and put it in the fridge. Let it sit for at least 30 minutes. For best results, marinate it overnight. Next, decide how to cook your chicken. You can grill it or use a skillet. If you choose to grill, preheat it over medium-high heat. Make sure to oil the grates to prevent sticking. If using a skillet, heat it the same way. Both methods work great and give the chicken a nice crust. Grill the chicken for about 5-7 minutes on each side. Check the internal temperature. It should reach 165°F (75°C). After cooking, brush the chicken with the reserved marinade. This adds more flavor. Let the chicken rest for a few minutes before slicing it. This keeps the juices inside. For the full recipe, check the details above. Marinating chicken adds great flavor. Use a bowl that fits all the chicken. Whisk together the sweet chili sauce, soy sauce, ginger, garlic, rice vinegar, sesame oil, and black pepper. Coat each piece of chicken well. Cover the bowl and let it sit in the fridge. Aim for at least 30 minutes, but longer is better. Overnight is ideal for richer taste. To keep the chicken juicy, avoid overcooking. Grill or pan-sear until the internal temperature hits 165°F (75°C). Let the chicken rest for a few minutes after cooking. This helps seal in the juices. Use the thickened marinade as a glaze to boost flavor. Slice the grilled chicken into strips for better presentation. Arrange the strips on a platter. Drizzle extra thickened marinade over the top. Garnish with chopped green onions and sesame seeds. This adds color and texture. A beautiful plate makes the meal even more inviting. For the full recipe, check the earlier section. {{image_4}} To make your sweet chili chicken spicy, add more chili sauce. You can also use fresh chopped chili peppers. Try jalapeños or Thai bird chilies for a kick. Adjust the amount based on your taste. This added heat will balance nicely with the sweet sauce. If you want a vegetarian option, swap chicken for tofu. Use firm or extra-firm tofu for best results. Press the tofu to remove extra water, then cube it. Marinate it just like the chicken for great flavor. Cook the tofu until golden brown. You will love this twist on the dish. For a complete meal, serve your sweet chili chicken with rice. Steamed jasmine or brown rice complements the dish well. You can also add sautéed vegetables like bell peppers or broccoli. This adds color and nutrition to your plate. Mix and match sides to suit your taste. You can use the [Full Recipe] for more ideas. After enjoying your sweet chili chicken, let it cool down. Place any leftovers in an airtight container. Store it in the fridge for up to three days. This keeps the chicken fresh and tasty. If you have extra sauce, store it in a separate container. When you’re ready to eat leftovers, you can reheat them easily. Use the microwave for quick heating. Just place the chicken on a plate and cover it. Heat for about one to two minutes. Check if it’s hot enough before serving. You can also reheat in a skillet over low heat. This keeps the chicken juicy. Add a splash of water or sauce to prevent drying out. If you need to store sweet chili chicken for longer, freezing is a great option. Wrap the chicken tightly in plastic wrap, then place it in a freezer bag. Squeeze out as much air as possible. This helps prevent freezer burn. Label the bag with the date. You can freeze it for up to three months. When you are ready to enjoy it again, thaw it overnight in the fridge. Reheat it as explained above for best results. You should marinate the chicken for at least 30 minutes. This time allows the flavors to soak in. For the best taste, marinate overnight. The longer you let it sit, the more flavorful it becomes. Yes, you can use chicken breasts instead of thighs. Chicken breasts are leaner, but they still work well. Just keep an eye on the cooking time. Breasts might cook faster, so check them often. If you need a substitute for sweet chili sauce, try mixing honey with hot sauce. This mix gives a sweet and spicy flavor. You can also use a mix of ketchup and sriracha for a similar taste. Just adjust to your liking! For the full recipe, check it out to see how to make this dish in detail. This guide covered all you need for making Sweet Chili Chicken. You learned about key ingredients, tools, and cooking methods. Each step ensures tasty results. Remember to marinate well and keep your chicken juicy. Feel free to try variations like adding heat or using tofu. Store leftovers safely and reheat carefully. Now, you are set to impress with a delicious meal. Enjoy your cooking and savor every bite!

Irresistible Sweet Chili Chicken Flavorful Meal Idea

Are you ready to elevate your dinner game? In this post, I’ll share my favorite recipe: Irresistible Sweet Chili Chicken.

- Apples (4 medium-sized, peeled and sliced) - Brown Sugar (½ cup packed) - Rolled Oats (1 cup) - Ground Cinnamon (1 teaspoon) - Unsalted Butter (½ cup, melted) - Optional Nuts (¼ cup chopped walnuts or pecans) For this easy apple crumble, I focus on simple yet flavorful ingredients. I love using four medium-sized apples. You can pick tart ones like Granny Smith or sweeter types like Honeycrisp. Both add great taste to the dish. I pack half a cup of brown sugar for sweetness. This sugar gives the crumble a rich flavor. Adding one cup of rolled oats makes the topping crunchy and hearty. To enhance the apple flavor, I add one teaspoon of ground cinnamon. The warm spice pairs well with the apples. For the topping, I melt half a cup of unsalted butter. This binds the crumble together and gives it a nice golden color when baked. Finally, I like to add optional chopped nuts. A quarter cup of walnuts or pecans adds a lovely crunch. If you want a nut-free version, feel free to skip them. This delightful apple crumble recipe is all about using fresh, high-quality ingredients for the best results. For the full recipe, check out the detailed instructions included above. 1. Preheat the Oven Start by preheating your oven to 350°F (175°C). This helps the crumble bake evenly. 2. Mix Apples with Cinnamon and Lemon Juice In a large bowl, add the sliced apples. Pour in the lemon juice and sprinkle the ground cinnamon over them. Mix well to coat the apple slices. The lemon juice keeps the apples fresh, while the cinnamon adds warm flavor. 3. Transfer Apples to Baking Dish Take a greased 9-inch baking dish. Pour the apple mixture into it. Spread the apples evenly across the dish. This step ensures every bite has that sweet apple goodness. 1. Combine Dry Ingredients In another bowl, mix together the rolled oats, all-purpose flour, brown sugar, and a pinch of salt. This creates a sweet base for the topping. 2. Add Melted Butter Pour the melted butter into the dry mixture. The butter adds richness and helps bind everything together. 3. Mix to Achieve Crumbly Texture Use a fork or your fingers to combine the ingredients until you see a crumbly texture. This should look like coarse sand. It’s important to not overmix, as you want those lovely little crumbles. 1. Assemble Layers in the Baking Dish Sprinkle the crumble topping generously over the apple layer in the baking dish. Make sure to cover all the apples for an even bake. 2. Bake in Preheated Oven Place the dish in the oven and bake for 30-35 minutes. Look for the apples to become tender and the topping to turn golden brown. This means your crumble is ready. 3. Cool Before Serving After baking, let the crumble cool for about 10 minutes. This helps the flavors settle and makes it easier to serve. For a delightful treat, serve warm with ice cream or whipped cream. You can find the full recipe linked above for all the delicious details on this easy apple crumble! Sweet vs. Tart Varietals When making apple crumble, the type of apple is key. I love using a mix of sweet and tart apples. Granny Smith offers a nice tartness. Honeycrisp brings out the sweetness. Combining these gives great flavor and balance. Seasonal Recommendations Always choose apples that are in season. In the fall, you can find many fresh varieties. This makes your crumble taste better and supports local farmers. Optimal Butter Temperature Using melted butter is essential for a great crumble. It helps bind the dry ingredients. Make sure it’s not too hot; warm is perfect. This makes mixing easier and prevents clumping. Mixing Techniques for Crumbly Finish Mix the dry ingredients gently. You want a coarse, crumbly texture. Use your fingers or a fork to combine. Avoid over-mixing; this keeps the topping light and airy. Pairing with Ice Cream or Cream Serve your apple crumble warm. A scoop of vanilla ice cream on top is a must. The cold creaminess pairs well with the warm crumble. You can also use fresh whipped cream for a lighter touch. Adding Garnishes for Aesthetic Appeal Garnishing makes a dish pop. Sprinkle ground cinnamon on top for color. You can also add thin apple slices for a fresh look. This adds a nice touch and makes your dessert more inviting. For the complete apple crumble recipe, refer to the Full Recipe. Enjoy crafting this delightful dessert! {{image_4}} You can easily change the taste of your apple crumble by adding spices. A dash of nutmeg brings warmth. Ginger adds a nice zing. You might try a bit of allspice for a cozy, sweet flavor. Mix in other fruits for fun. Berries like blueberries or raspberries work well. Pears add a juicy twist. Experimenting with these fruits can create a new favorite dish. If you need a gluten-free version, use alternative flours. Almond flour or coconut flour are great choices. They keep the crumble tasty while being safe for gluten-free diets. You can also swap brown sugar with coconut sugar or maple syrup. These options still give you sweetness without the refined sugar. To make a healthier apple crumble, try reducing sugar or butter. Use only a third of a cup of sugar. You can replace half the butter with applesauce for less fat. Incorporating nuts and seeds adds nutrition. Try adding chia seeds or pumpkin seeds to the crumble. This not only boosts health but also gives a nice crunch. For the full recipe, you can explore the key ingredients and instructions to create your own delightful apple crumble. - Use an airtight container for storing leftovers. - You can keep it in the fridge for up to three days. - To reheat, use the oven at 350°F (175°C). - Cover with foil to keep the topping crispy. - Avoid the microwave as it makes the topping soggy. - Let the apple crumble cool completely before freezing. - Wrap it tightly in plastic wrap and then in foil. - It can last up to three months in the freezer. - To thaw, place it in the fridge overnight. - Reheat in the oven at 350°F (175°C) until warm. For the full recipe, check out the Easy Apple Crumble Delight. The best apples for apple crumble mix sweet and tart flavors. I recommend using: - Granny Smith (tart and firm) - Honeycrisp (sweet and juicy) - Fuji (crispy and sweet) - Braeburn (balanced sweetness) These apples hold their shape well during baking. They give your crumble a lovely texture and flavor. Yes, you can make apple crumble ahead of time. Here’s how: - Prepare the apple filling and crumble topping separately. - Store them in the fridge for up to 24 hours. - When ready to bake, layer the topping over the apples and bake as directed. This method saves time on busy days. You can enjoy the warm crumble fresh from the oven. Absolutely! To make this recipe vegan, swap a few ingredients: - Use coconut oil or vegan butter instead of unsalted butter. - Replace brown sugar with coconut sugar or maple syrup. These simple changes make the dish plant-based while keeping the flavors rich and delicious. Enjoy your vegan apple crumble! In this blog post, we explored the delightful world of apple crumble. We covered essential ingredients, step-by-step instructions, and tips for a perfect bake. You learned about apple choices, variations, and storage methods to keep your crumble fresh. As you create your own apple crumble, remember to experiment with flavors and adjust to your taste. Enjoy this warm dessert with friends or family, and savor the joy it brings. Happy baking!

Easy Apple Crumble Delightful and Simple Dessert Recipe

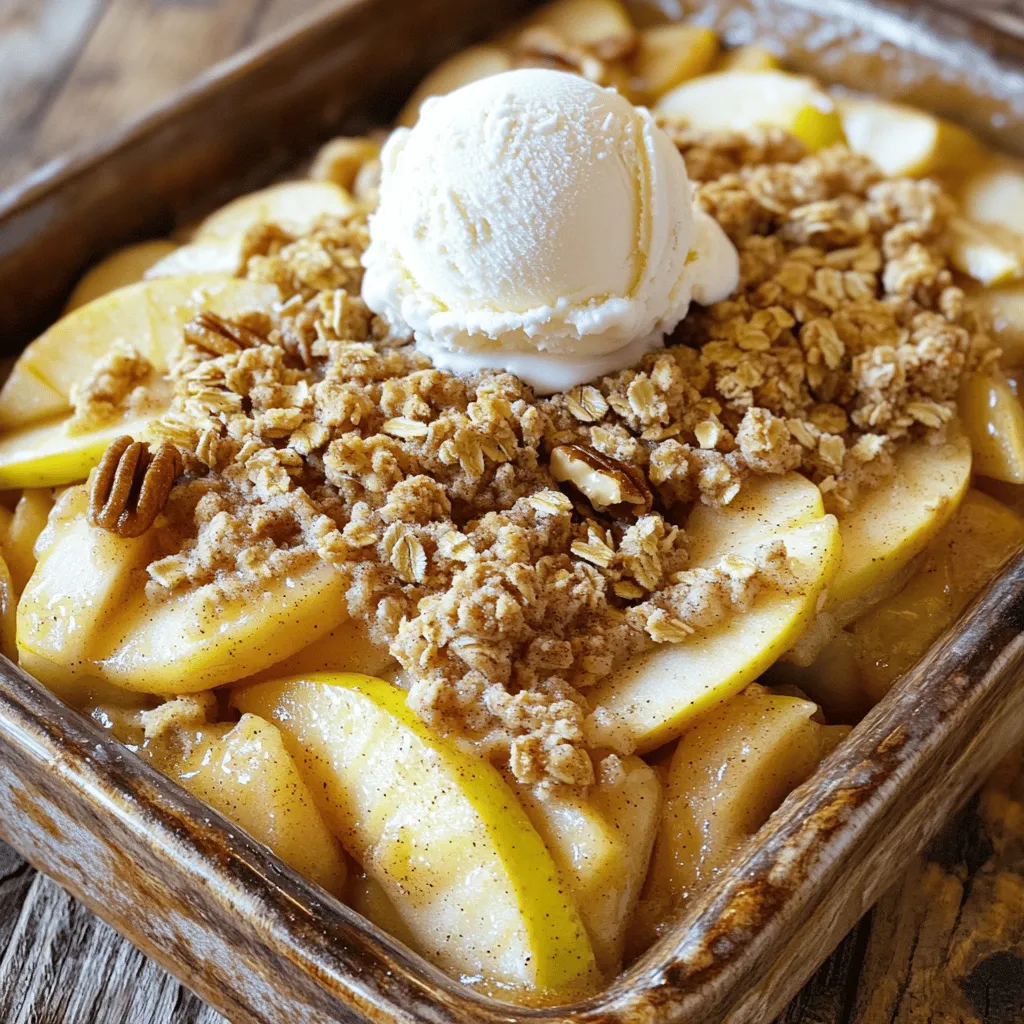
If you’re craving a warm, comforting dessert, look no further than this Easy Apple Crumble. With just a few simple

- 2 cups all-purpose flour - 1/2 cup granulated sugar - 1/2 teaspoon salt - 1 teaspoon baking powder - 1/2 teaspoon ground cinnamon - 1/2 cup unsalted butter, chilled and cubed - 1 large egg - 1 teaspoon vanilla extract - 2 large apples, peeled, cored, and diced - 1 tablespoon lemon juice - 1 tablespoon packed brown sugar - 1/4 teaspoon nutmeg - Optional: egg wash, powdered sugar for dusting The main ingredients for these cookies create a lovely blend of flavors. The flour gives the cookies their structure, while the sugar adds sweetness. Salt helps balance the flavors, and baking powder gives them a nice rise. Cinnamon and nutmeg bring warmth and spice. The butter adds richness, and the egg helps bind everything. The apples add a juicy sweetness and tartness, especially if you use Granny Smith. Lemon juice brightens the apple flavor and keeps them fresh. Brown sugar enhances the cookies with its deep, caramel notes. For those wanting to mix things up, consider these optional ingredients for variations. You can use gluten-free flour for a different texture. Vegan butter is a great choice for a dairy-free version. You can also add spices like ginger or cloves for a unique twist. These ingredients make the perfect base for delicious apple pie cookies. If you want to dive deeper into the full recipe, check out the link! - Mix dry ingredients: In a large bowl, add 2 cups of all-purpose flour, 1/2 cup of granulated sugar, 1/2 teaspoon of salt, 1 teaspoon of baking powder, and 1/2 teaspoon of ground cinnamon. Whisk these ingredients well until they are blended. - Incorporate butter and form dough: Next, take 1/2 cup of chilled, cubed unsalted butter. Add it to the flour mix. Use your fingers or a pastry cutter to mix until it looks like coarse crumbs. You should see small pea-sized pieces of butter. - Toss apples with lemon juice: Peel, core, and dice 2 large apples. I prefer Granny Smith for their tartness. In a separate bowl, mix the diced apples with 1 tablespoon of lemon juice. This helps keep them fresh and adds flavor. - Blend flavors: Add 1 tablespoon of packed brown sugar and 1/4 teaspoon of freshly grated nutmeg to the apples. Let this mixture sit for about 10 minutes. This step allows the apples to soak in all the yummy flavors. - Preheat oven and roll out dough: Preheat your oven to 350°F (175°C). While it heats, roll out your dough on a floured surface. Aim for a thickness of about 1/4 inch. Use a 3-inch round cookie cutter to cut out circles. - Assemble and seal cookies: Place half of your dough circles on lined baking sheets. Spoon a generous teaspoon of the apple mixture onto each circle. Don’t overfill; just enough is perfect. - Bake until golden brown: Top each filled circle with another dough circle. Press the edges together firmly. You can use a fork to crimp the edges for a nice look. Bake your cookies for 15-18 minutes until they are puffed and edges are golden brown. Once you try this full recipe, you’ll see how easy and tasty these apple pie cookies can be! To make the best dough for your apple pie cookies, start with the right amount of flour. If your dough feels sticky, add a little flour as needed. This helps you avoid sticky fingers and a messy counter. Aim for a soft but manageable dough. When you roll it out, it should not stick to your rolling pin or surface. You want a dough that holds together but is not too tough. Mix until just blended for a light texture. Overworking the dough can make it tough, which isn’t what you want in a cookie. Baking time is key for these cookies. I suggest baking them for 15-18 minutes at 350°F. Keep an eye on them. You want the edges to turn golden brown. If your oven runs hot or cold, you may need to adjust the time. For convection ovens, reduce the baking time by a few minutes. This ensures even cooking and helps the cookies puff nicely. Always check for a light golden color and a slight spring when you touch the cookies. To make your apple pie cookies shine, dust them with powdered sugar after they cool. This adds a sweet touch and makes them look lovely. For a fun twist, try adding a drizzle of caramel sauce or a scoop of vanilla ice cream on the side. You can also plate them with thin apple slices for a colorful display. Let your creativity flow and impress your family and friends! {{image_4}} You can make these cookies gluten-free! To do this, use a gluten-free flour blend. Look for blends that have xanthan gum for best results. This will help mimic the texture of regular flour. You may also need to adjust baking times. Gluten-free cookies can bake quicker, so keep an eye on them. Check for a golden edge after about 12–15 minutes. If you want vegan cookies, you can easily swap out the eggs and butter. Use a flax egg instead of a regular egg. Mix one tablespoon of ground flaxseed with two and a half tablespoons of water. Let it sit for about five minutes until it thickens. For butter, use vegan butter or coconut oil. You can also switch to maple syrup or agave for sweetening. Each gives a nice flavor without using animal products. To take these cookies up a notch, think about adding nuts or raisins. Chopped walnuts or pecans give a nice crunch. You could also add a handful of raisins for extra sweetness. Another fun idea is to try different apple varieties. Each type gives a unique taste. Honeycrisp apples add sweetness, while Granny Smith offers a tart bite. Get creative and mix different apples for a fun twist! To keep your apple pie cookies fresh, store them in an airtight container. This method locks in moisture and flavor. You can use a plastic container or a glass jar with a lid. Make sure the cookies are completely cooled before sealing them. If you want to save cookies for later, freezing is a great option. First, let the cookies cool completely. Then, place them in a single layer on a baking sheet. Freeze them for about an hour. After they are firm, transfer them to a freezer-safe bag. Ensure you remove excess air from the bag to prevent freezer burn. When you’re ready to eat them, take the cookies out and let them thaw at room temperature. This keeps their taste and texture just right. Apple pie cookies last about a week at room temperature when stored correctly. In the fridge, they can last up to two weeks. Check for any signs of spoilage, like mold or an off smell. If they feel hard or dry, they may not taste good anymore. Always trust your senses to keep your treats safe! Yes, you can use many fruits! Pears, peaches, and berries work well too. Each fruit brings its own taste. For instance, pears add a sweet touch. Berries, like blueberries or raspberries, give a tart kick. Just make sure to adjust the sugar. You want the filling to taste just right. Experiment and find your favorite filling! To make your cookies crispier, try a few simple tips. First, roll the dough thinner. A thinner dough bakes to a crisp finish. Second, bake them a little longer. Keep an eye on them to avoid burning. Lastly, let the cookies cool completely. This helps them harden and stay crispy. Enjoy that crunch! Reheat your cookies in the oven for the best taste. Set your oven to 350°F (175°C). Place the cookies on a baking sheet. Heat them for about 5-7 minutes. This warms them through and keeps them soft. If you're in a hurry, use a microwave. Heat them for 10-15 seconds. Enjoy the warm, gooey goodness! Yes, you can make the dough ahead of time! Wrap it tightly in plastic wrap. Store it in the fridge for up to 2 days. For longer storage, freeze the dough. Just make sure to thaw it in the fridge before using. This way, you can enjoy fresh cookies anytime! Check out the Full Recipe for more tips. This blog post covered everything you need to make delicious apple pie cookies. We discussed the main ingredients like flour, apples, and spices. You learned the step-by-step process to mix, bake, and serve them. We also explored variations for gluten-free and vegan options, along with helpful storage tips. Now you can enjoy these treats anytime. Baking apple pie cookies is fun and rewarding. Share this recipe with friends and savor the rewards together. Happy baking!

Savory Apple Pie Cookies Easy and Tasty Recipe

Craving a tasty treat that combines the classic flavors of apple pie with the fun of cookies? You’re in the

- 2 cups all-purpose flour - 1 cup apple cider - 1/2 cup granulated sugar - 1/4 cup packed brown sugar - 1 teaspoon baking powder - 1 teaspoon baking soda - 1 teaspoon ground cinnamon - 1/2 teaspoon ground nutmeg - 1/2 teaspoon salt - 2 large eggs - 1/4 cup vegetable oil - 1 teaspoon vanilla extract - 1/2 cup powdered sugar (for dusting) Gathering the right ingredients is key to making baked apple cider donuts. Start with all-purpose flour. This is the base for your donuts. Next, you'll need apple cider. It gives the donuts their sweet and tangy flavor. The two types of sugar, granulated and brown, add sweetness and depth. Baking powder and baking soda help the donuts rise. Ground cinnamon and nutmeg bring warmth and spice. Don't forget salt; it enhances all the flavors. For the wet ingredients, you'll use eggs, vegetable oil, and vanilla extract. Eggs provide structure. Oil keeps the donuts moist. Vanilla adds a lovely aroma. Lastly, the powdered sugar is for dusting. It gives the donuts that perfect finishing touch. - Donut pan - Mixing bowls - Whisk - Spatula You will need a donut pan to shape your donuts. Using a donut pan gives the classic look you want. Mixing bowls are essential for combining your ingredients. A whisk helps blend the dry and wet ingredients smoothly. A spatula helps you fold the batter without overmixing. With these tools, you're ready to create delicious baked apple cider donuts. - Calories per donut: Approximately 150 - Carbohydrate content: About 22 grams - Dietary considerations: You can make vegan and gluten-free options. Understanding the nutritional facts helps in meal planning. Each donut has around 150 calories, making them a sweet treat. They contain about 22 grams of carbs, so enjoy them in moderation. If you have dietary needs, consider vegan options. You can replace eggs with flaxseed or applesauce. For gluten-free donuts, almond flour works well. These options let everyone enjoy your baked apple cider donuts. Check the Full Recipe for more details. - Preheat the oven to 350°F (175°C). - Grease the donut pan with non-stick spray. - In a large bowl, whisk the dry ingredients. This includes flour, sugars, baking powder, baking soda, cinnamon, nutmeg, and salt. Make sure they mix well. - In another bowl, whisk the wet ingredients together. Use apple cider, eggs, oil, and vanilla. Mix until smooth. - Gently combine the wet mix with the dry mix. Stir with a spatula until just combined. Avoid overmixing to keep the donuts light. - Transfer the batter into a piping bag or a zip-top bag. Pipe the batter into the donut pan, filling each mold about two-thirds full. - Bake the donuts for 12-15 minutes. They are ready when a toothpick comes out clean. Look for a light golden color. - Let the donuts cool in the pan for about 5 minutes. After that, transfer them to a wire rack to cool completely. - For extra sweetness, roll the cooled donuts in powdered sugar before serving. Enjoy these tasty treats! For the full recipe, check out the details above. To get the best texture in your baked apple cider donuts, avoid overmixing. When you mix the wet and dry ingredients, stir gently. You want to combine them just enough to blend. Overmixing will make the donuts dense. Using room temperature ingredients is key too. Eggs and oil mix better when they are warm. This results in a smoother batter and airier donuts. Adding spices can really boost flavor. Try adding a pinch of ginger or allspice for warmth. You can also use fresh apple chunks or unsweetened apple sauce. These additions give your donuts a fun twist and extra moisture. For a fun finish, consider different toppings. You can glaze the donuts with maple syrup or yogurt. Cinnamon sugar is a great alternative to powdered sugar. Just mix sugar with cinnamon for a sweet, warm flavor. Use these tips to make your baked apple cider donuts even better! For all the details, check out the Full Recipe. {{image_4}} You can change up the flavors in your baked apple cider donuts. One fun option is pumpkin spice apple cider donuts. Just add pumpkin puree and a bit more spice to the mix. This gives a warm and cozy taste that is perfect for fall. Another great twist is maple-infused apple cider donuts. Use real maple syrup instead of some sugar. This adds a rich and sweet flavor that pairs well with apple cider. If you need a gluten-free option, use almond flour instead of all-purpose flour. This keeps the donuts light and tasty while catering to dietary needs. You can also mix in a bit of gluten-free baking powder for the right rise. For vegan substitutions, replace the eggs with flaxseed meal or applesauce. Both work well to bind the ingredients. You can also use plant-based milk in place of the apple cider for a dairy-free version. Pair these donuts with a warm drink like coffee or fresh apple cider. The flavors blend perfectly, making for a delightful snack. For special occasions, try serving them on a nice plate with a drizzle of maple syrup. You can also sprinkle extra cinnamon on top for a beautiful touch. These small ideas make your treats stand out during gatherings. To keep your donuts fresh, store them in an airtight container. This helps prevent them from drying out. Place parchment paper between layers to avoid sticking. You can also wrap each donut in plastic wrap for extra protection. To freeze your donuts, wait until they cool completely. Place them in a single layer on a baking sheet. Freeze for about an hour until firm, then transfer them to a freezer-safe bag. When you want to enjoy them, just reheat in the oven at 350°F (175°C) for 5-10 minutes. Baked apple cider donuts last about 2-3 days at room temperature. If you keep them in the fridge, they can last up to a week. Look for signs of spoilage, like a dry texture or off smell, to know when to toss them. Enjoy your treats while they're fresh! Baked apple cider donuts stay fresh for about 3-5 days. Keep them in an airtight container at room temperature. This helps maintain their soft texture. If you want them to stay fresh longer, you can refrigerate them. Just remember, refrigeration can change the texture a bit. Yes, you can prepare these donuts ahead of time. Mix the dry ingredients and the wet ingredients separately. Store them in the fridge overnight. The next day, combine them and bake. This saves time and makes mornings easier. If you don’t have apple cider, you can use apple juice or even a mix of water and a little vinegar. These options still give a nice flavor. Using flavored teas can also add a unique twist to your donuts. You can make these donuts healthier by reducing the sugar. Try using less granulated sugar and brown sugar. You can also swap out some of the all-purpose flour for whole wheat flour. This adds fiber and nutrients while still keeping them tasty. To reheat baked apple cider donuts, use the oven. Preheat it to 350°F (175°C). Place the donuts on a baking sheet for about 5-7 minutes. This warms them up nicely without drying them out. You can also use a microwave, but be careful. Heat them in short bursts to avoid making them rubbery. These apple cider donuts are simple to make and delicious. We covered the ingredients, tools, and step-by-step instructions to ensure success. You also learned some tips to perfect the texture and flavor, as well as exciting variations. Storing and reheating methods will help keep your donuts fresh and tasty. Enjoy these treats with your favorite drinks or for special moments. With this guide, you can now create yummy apple cider donuts at home. Happy baking!

Baked Apple Cider Donuts Delightful and Easy Recipe

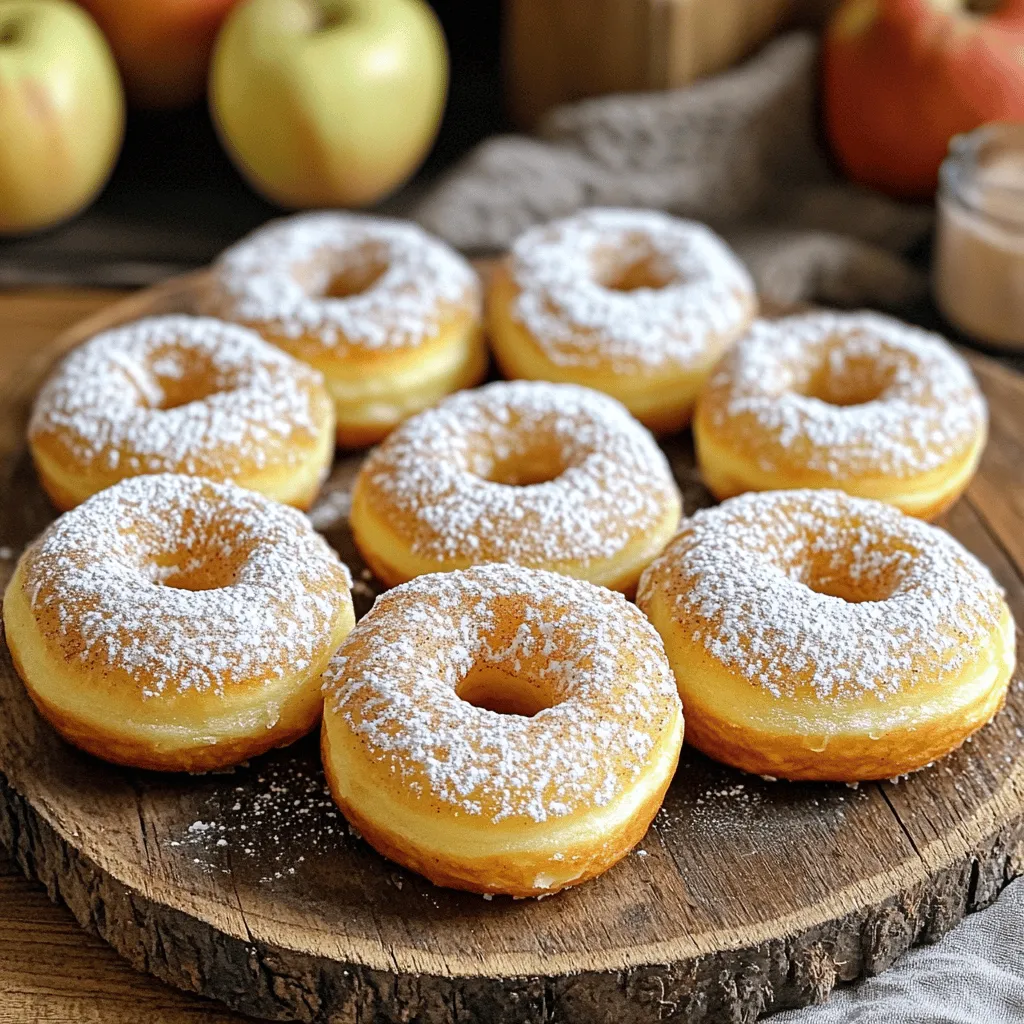
Dive into the cozy world of baked apple cider donuts! These soft and sweet treats are perfect for any fall

Older posts
Newer posts
← Previous Page1 … Page14 Page15 Page16 … Page91 Next →

dsad

© 2025 recipesstation • Built with GeneratePress

Our Policies

  • Copyright Policy
  • Cookie Policy
  • GDPR Policy
  • Privacy Policy
  • Disclaimer
  • Terms Of Use

More Information

  • Home
  • About
  • Contact
  • Appetizers
  • Dessert
  • Dinner
  • Drinks
©2025, recipesstation About Back To Top