![To make a delicious salted caramel pumpkin pie, you'll need these key ingredients: - 1 pre-made 9-inch pie crust - 1 can (15 oz) pumpkin puree - 3/4 cup packed brown sugar - 1/4 cup granulated sugar - 1 teaspoon ground cinnamon - 1/2 teaspoon ground nutmeg - 1/2 teaspoon ground ginger - 1/4 teaspoon ground cloves - 3 large eggs - 1 cup heavy cream - 1 teaspoon pure vanilla extract - 1/2 cup salted caramel sauce (homemade or store-bought) - Sea salt flakes for garnish To create this pie, gather these essential tools: - 9-inch pie dish - Mixing bowls - Whisk - Spatula - Measuring cups and spoons - Knife for cutting Selecting the right ingredients makes a big difference. Here’s what to look for: - Pumpkin puree: Choose 100% pure pumpkin. Avoid pumpkin pie filling, as it contains added sugars and spices. - Sugars: Use fresh brown sugar for a rich flavor. Granulated sugar should be fine and dry. - Spices: Fresh spices bring out better flavors. Check the date on the spice jar for freshness. - Heavy cream: Select high-fat cream for a rich texture. Look for cream with no additives. - Salted caramel: If you make your own, use quality butter and brown sugar. Store-bought should have simple ingredients. These choices will help your pie taste amazing. Follow the full recipe to create a dessert everyone will love! Begin by preheating your oven to 425°F (220°C). This helps the crust bake well. Next, take your pre-made pie crust. Fit it into a 9-inch pie dish. Press it firmly into the bottom and sides. Trim any excess pastry for a clean edge. This neatness makes for a pretty pie. In a large bowl, combine the pumpkin puree, brown sugar, and granulated sugar. Add cinnamon, nutmeg, ginger, and cloves. Whisk these ingredients well until they blend into a smooth mixture. Crack the eggs into the bowl, then add the heavy cream and vanilla extract. Mix vigorously until the filling is silky. Drizzle half of the salted caramel sauce into this filling. Use a spatula to fold it in gently. This creates a beautiful marbled effect. Carefully pour the pumpkin filling into your prepared pie crust. Smooth the top if needed. Place the pie in the oven and bake for 15 minutes at 425°F (220°C). After that, lower the oven temperature to 350°F (175°C). Bake for an additional 35 to 40 minutes. You’ll know it’s done when a knife inserted in the center comes out clean. Once baked, let the pie cool for at least 2 hours. This time helps the filling set properly. Before serving, drizzle the remaining salted caramel sauce on top. Sprinkle with sea salt flakes for that perfect sweet and salty touch. To make a great pie, focus on the filling. Whisk it until smooth. The mix should not be lumpy. Use fresh eggs and high-quality cream for best results. They add richness and creaminess. Bake at the right temperatures. Start hot to set the crust, then lower the heat. This method ensures your filling cooks evenly. Let the pie cool for at least two hours. This step helps it firm up for easy slicing. When it’s time to serve, slice the pie into wedges. Place each slice on a plate. Add a dollop of whipped cream on top. Drizzle extra salted caramel sauce over the cream. It adds a tasty touch. You can also sprinkle some sea salt flakes on top. This contrast enhances the sweet flavor. Serve with coffee or tea for a warm touch. Toppings can elevate your pie. Fresh whipped cream is a classic choice. You might also try vanilla ice cream for a cold treat. For a crunchy twist, add some chopped nuts. Pecans or walnuts pair well with pumpkin. You can also add a sprinkle of cinnamon on top. This adds warmth and spice. If you want to get creative, drizzle some chocolate sauce. It gives a fun twist to the classic taste. For more details, check the Full Recipe. {{image_4}} If you want to change the crust, try these ideas: - Graham cracker crust: Crush graham crackers and mix with melted butter. - Cookie crust: Use crushed Oreos or ginger snaps for a sweet twist. - Nut crust: Blend nuts like almonds or pecans with butter for a gluten-free option. These choices add unique flavors and textures to your pie. Want a lighter pie? Substitute these ingredients: - Greek yogurt for heavy cream: This adds creaminess with less fat. - Maple syrup instead of brown sugar: It gives the pie a warm flavor. - Pumpkin spice blend: Use this in place of individual spices for ease. These swaps keep the taste rich while making it a bit healthier. To make your pie special, add these seasonal touches: - Chopped pecans: Stir in some nuts for crunch. - Dried cranberries: They add a tart burst that pairs well with pumpkin. - Fresh herbs: A touch of thyme or rosemary can bring a fresh note. These add-ins make every slice exciting and new. For the complete recipe, check out the Full Recipe. To keep your salted caramel pumpkin pie fresh, let it cool. Cover it with plastic wrap or aluminum foil. Store it in the fridge. Leftover pie can last up to four days. Make sure it is well covered to avoid drying out. Use an airtight container for best results. A glass dish with a lid works great. You can also use the pie dish with plastic wrap. Just ensure it’s snug to protect the pie. This keeps the flavors intact and prevents odors from other foods in the fridge. When you want to enjoy your pie again, reheat it gently. Preheat your oven to 350°F (175°C). Place the pie in the oven for about 10-15 minutes. This warms it while keeping the crust crisp. If you prefer, you can microwave a slice for about 30 seconds. Just be careful not to overheat it, as this might make the filling too hot. The key is to keep that delicious taste and texture alive. Enjoy your pie just as you made it! Yes, you can use fresh pumpkin. Start by roasting a sugar pumpkin. Cut it in half, scoop out the seeds, and bake it at 350°F (175°C) for about an hour. After it cools, scoop the flesh into a bowl and blend until smooth. Use this fresh puree in your pie recipe, just like you would use canned pumpkin. Making homemade salted caramel sauce is simple. You need sugar, butter, cream, and sea salt. First, heat 1 cup of sugar in a saucepan over medium heat. Stir it gently until it melts and turns golden brown. Next, add 6 tablespoons of butter and mix until melted. Slowly pour in 1/2 cup of cream, stirring constantly. Remove from heat and add a pinch of sea salt. Let it cool and enjoy! To prevent a soggy crust, blind bake it. This means you pre-bake the crust before adding the filling. Use pie weights or dried beans to hold it down. Bake it for 15 minutes, then remove the weights and bake for another 5-10 minutes until golden. This helps keep the crust crispy. The pie stays fresh in the fridge for about 3 to 4 days. Cover it tightly with plastic wrap or foil. This keeps air out, which helps preserve its taste and texture. Enjoy it chilled or warmed up! Yes, you can freeze the pie! Wrap it well in plastic wrap and then in aluminum foil. It can last for up to 2 months in the freezer. When ready to eat, let it thaw in the fridge overnight. You can warm it up in the oven if you like. For the complete recipe, check out the [Full Recipe]. In this post, we covered all the steps to make your perfect pumpkin pie. We listed the key ingredients, tools, and tips for picking quality items. We also outlined how to prepare the crust and filling, bake, and serve. Don't forget the fun variations and storage tips at the end. Now, you have all the tools and tricks you need to impress. Enjoy baking and eating your delicious pie!](https://recipesstation.com/wp-content/uploads/2025/07/f2fcdd1e-a76f-4690-a5d9-aaf0e884d8e5.webp)
Salted Caramel Pumpkin Pie Delicious Fall Treat
Get ready to dive into fall with my delicious Salted Caramel Pumpkin Pie! This blend of sweet pumpkin, rich caramel,
Get ready to dive into fall with my delicious Salted Caramel Pumpkin Pie! This blend of sweet pumpkin, rich caramel,
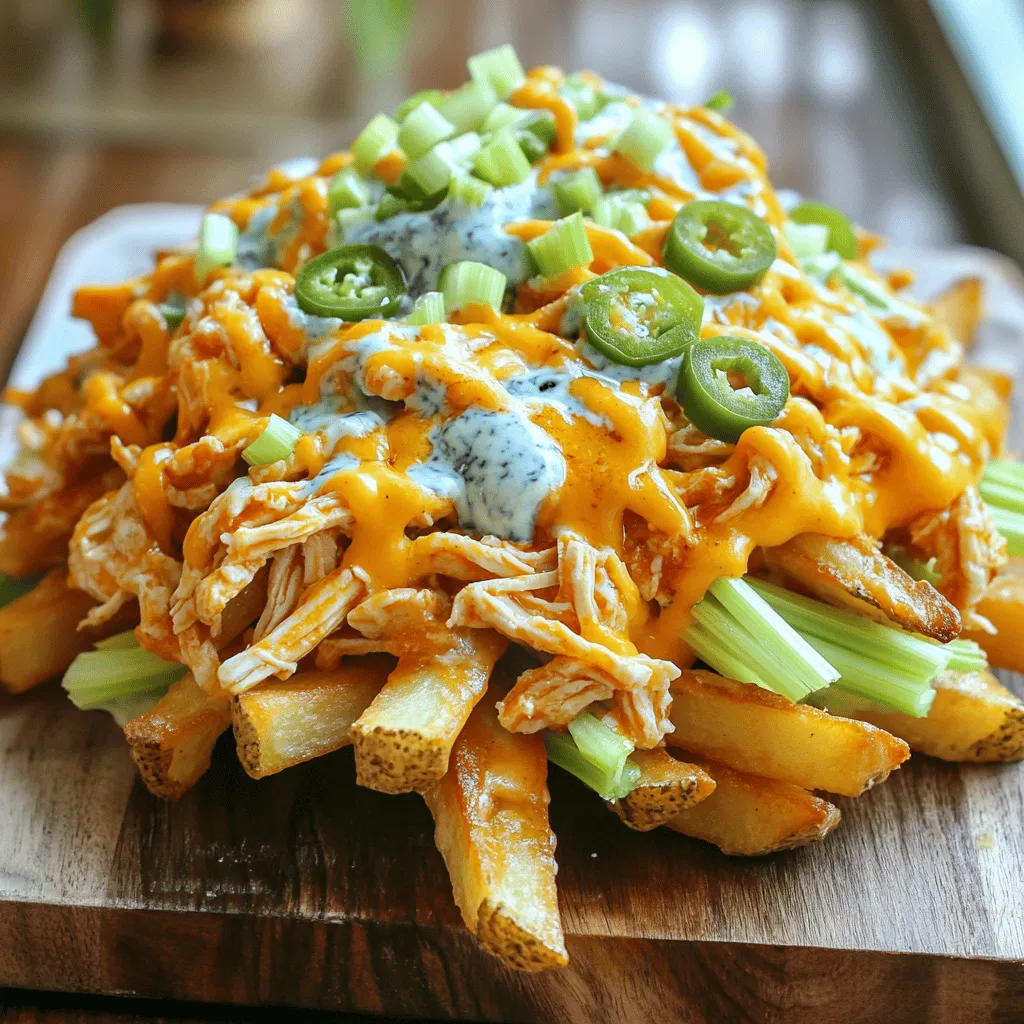
Do you crave a dish that’s packed with flavor and easy to make? Loaded Buffalo Chicken Fries hit the spot!
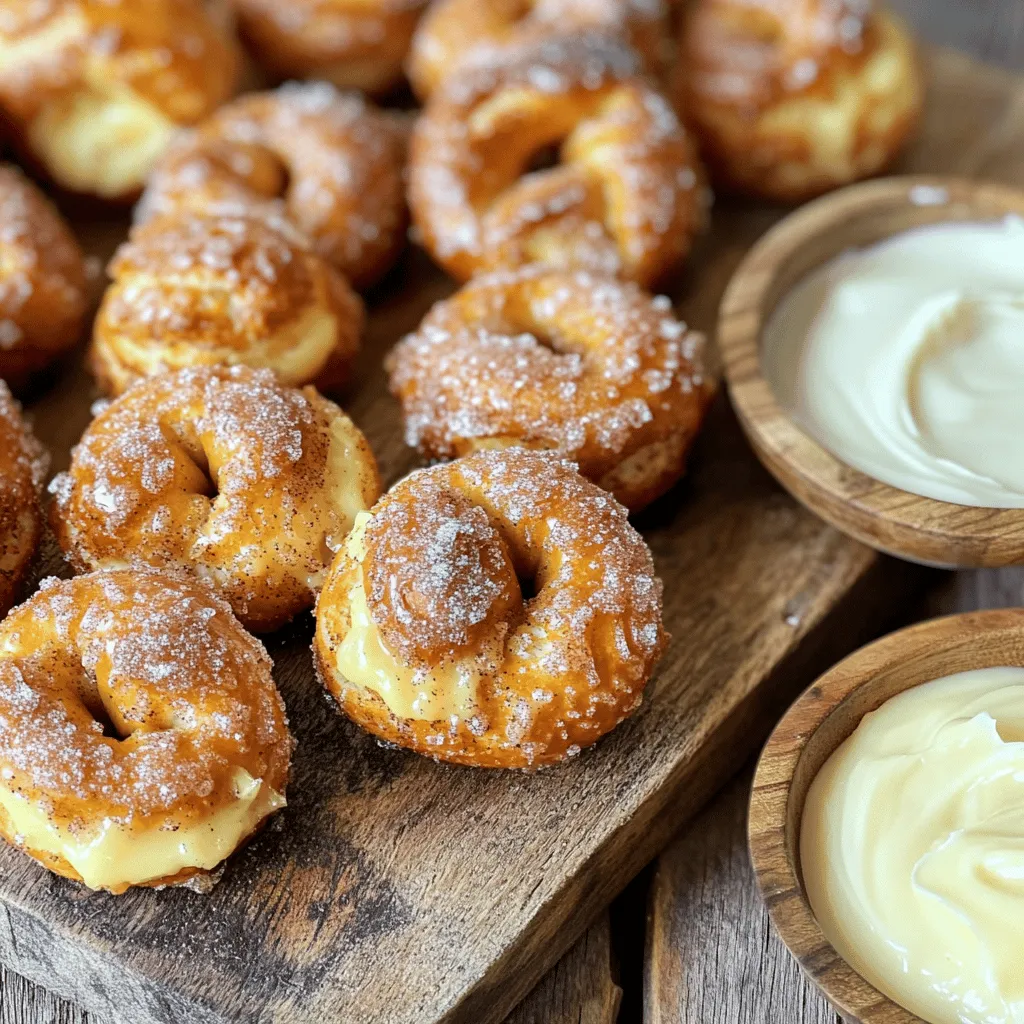
Are you craving a sweet and salty snack? Look no further! Cinnamon Sugar Pretzel Bites are not just tasty—they’re easy
![- 2 cups all-purpose flour - 1 cup apple cider - 1/2 cup granulated sugar - 1/4 cup brown sugar, packed - 2 teaspoons baking powder - 1 teaspoon baking soda - 1 teaspoon ground cinnamon - 1/2 teaspoon ground nutmeg - 1/2 teaspoon salt - 1 large egg - 1/4 cup unsalted butter, melted - 1 teaspoon vanilla extract - Cinnamon sugar for coating To get the best results, use a kitchen scale. This helps you measure ingredients accurately. For common substitutions, you can swap the all-purpose flour for whole wheat flour. This will add a nice nutty flavor. If you don't have apple cider, you can use apple juice instead. Just remember, this may change the taste a bit. When measuring brown sugar, pack it firmly into the cup to get the right amount. This adds more sweetness to your donuts. A teaspoon of baking powder can replace baking soda if you run out. Keep these tips in mind to make your donuts great! For the full recipe, you can check the details above. To start, pour 1 cup of apple cider into a medium saucepan. Heat it over medium heat. Once it boils, reduce the heat. Let it simmer for about 10 to 15 minutes. You want it to reduce to about 1/2 cup. This step makes the flavor stronger. After simmering, take it off the heat and let it cool. Next, grab a large mixing bowl. Add the dry ingredients: 2 cups of all-purpose flour, 1/2 cup of granulated sugar, 1/4 cup of brown sugar, 2 teaspoons of baking powder, 1 teaspoon of baking soda, 1 teaspoon of ground cinnamon, 1/2 teaspoon of ground nutmeg, and 1/2 teaspoon of salt. Use a whisk to mix well. Make sure there are no lumps. Proper whisking helps blend evenly and gives great texture. In a separate bowl, crack one large egg. Whisk it with 1/4 cup of melted unsalted butter, 1 teaspoon of vanilla extract, and the cooled apple cider. Mix until smooth. Then, pour this wet mixture into the bowl with the dry ingredients. Stir gently until just combined. Do not overmix! It's okay if there are a few lumps. Overworking the batter can make the donuts tough. Now, preheat your air fryer to 350°F (175°C). This usually takes about 5 minutes. While it heats, lightly grease your donut pan or silicone molds. Spoon the batter into the donut cavities. Fill each one about three-quarters full. This allows the donuts to rise properly. Place the pan in the air fryer. Cook for 6 to 8 minutes. They should have a light golden color and spring back when pressed. After cooking, carefully take out the donuts from the pan. Let them cool slightly on a wire rack. When they are warm but not hot, roll them in a mixture of cinnamon sugar. To make this, mix 1/4 cup of granulated sugar with 1 tablespoon of ground cinnamon. Ensure the donuts are well coated. Let them cool completely before serving. This will help them set perfectly! For more details, check out the Full Recipe. To get the best results, do not overcrowd the air fryer. If you stack or pack the donuts too tightly, they won’t cook properly. The hot air needs space to move around. For even cooking, place the donuts in a single layer. This way, they will brown nicely and cook through without any soggy spots. To make fluffy and moist donuts, follow a few secrets. First, do not overmix the batter. Stir until just combined. A few lumps are okay! Second, use fresh ingredients. Old baking powder and spices can make your donuts dense. Finally, let the donuts cool on a wire rack. This allows steam to escape, keeping them light and airy. For a great look, arrange the finished donuts on a nice platter. You can sprinkle extra cinnamon sugar on top for flair. Another idea is to drizzle a simple glaze made from powdered sugar and milk over them. This adds sweetness and makes your donuts shine. The more attractive they look, the more fun they will be to eat! Check out the Full Recipe for more details on how to make these delightful treats. {{image_4}} You can spice up your donuts with different flavors. Try adding chocolate or vanilla to the mix. For chocolate, use cocoa powder. Replace some flour with it. This adds a rich, sweet taste. For vanilla, add a teaspoon of pure vanilla extract. This gives your donuts a warm, sweet aroma. Coatings make a big difference. You can roll your donuts in powdered sugar or a glaze. To make a glaze, mix powdered sugar with milk. Drizzle this over the warm donuts. You can also dip them in melted chocolate. Each coating changes the flavor and look of your treats. You can switch things up with seasonal spices. Try adding pumpkin spice for a fall twist. You can also use different apple varieties. Honeycrisp apples give a sweet bite. Granny Smith apples add a tart flavor. These changes bring out new flavors in your donuts. For the full recipe, check out the [Full Recipe]. To keep your apple cider donuts fresh, place them in an airtight container. This helps seal in moisture and flavor. You can also line the container with paper towels. This absorbs extra moisture and keeps the donuts from getting soggy. Store them at room temperature for the best taste. To freeze your donuts, let them cool completely first. Wrap each donut in plastic wrap. Then, place them in a freezer-safe bag. Try to remove as much air as possible. When you want to enjoy them, simply take one out and let it thaw at room temperature. For a warm treat, pop it in the air fryer for a few minutes. At room temperature, your apple cider donuts last about 2-3 days. If you store them in the fridge, they can last up to a week. However, the fridge may change their texture, making them less soft. For the best taste, enjoy them fresh! Check the Full Recipe for more details on making these delicious treats. You can use apple juice or white grape juice. Both will add sweetness. For a tangy twist, try lemon juice mixed with water. Each choice will change the flavor a bit. Apple juice gives a sweeter taste. Lemon juice adds a zesty note. Yes, you can bake these donuts. Preheat your oven to 350°F (175°C). Bake for about 12-15 minutes. Check for a light golden color. You might need to adjust the cooking time. Using a donut pan helps shape them well. The donuts are done when they spring back when pressed. They should be light golden brown. A toothpick inserted should come out clean. If it has wet batter, cook for a few more minutes. Yes, whole wheat flour works well. It changes the flavor and texture. Your donuts will be denser and nuttier. They may need a bit more liquid too. Start with adding a tablespoon of cider. To avoid soggy donuts, cool them on a wire rack. This lets air circulate around them. Avoid stacking donuts until they are cool. You can also store them in a paper bag. This helps absorb moisture and keeps them fresh. For the full recipe, check out the Apple Cider Donuts in the Air Fryer. You now have a complete guide to making delicious apple cider donuts. We covered all the ingredients, from flour to spices, and detailed each step, including air frying and glazing techniques. Remember, it’s all about precision and care in every stage. You can also tweak the recipe with different flavors or presentations to make it your own. With these tips, you’ll bake fresh and tasty donuts to share. Enjoy your cooking!](https://recipesstation.com/wp-content/uploads/2025/07/c157f5ba-c486-420d-a341-5f6056c96e48.webp)
Looking for a tasty treat that’s easy to make? Your search ends here! This Air Fryer Apple Cider Donuts recipe
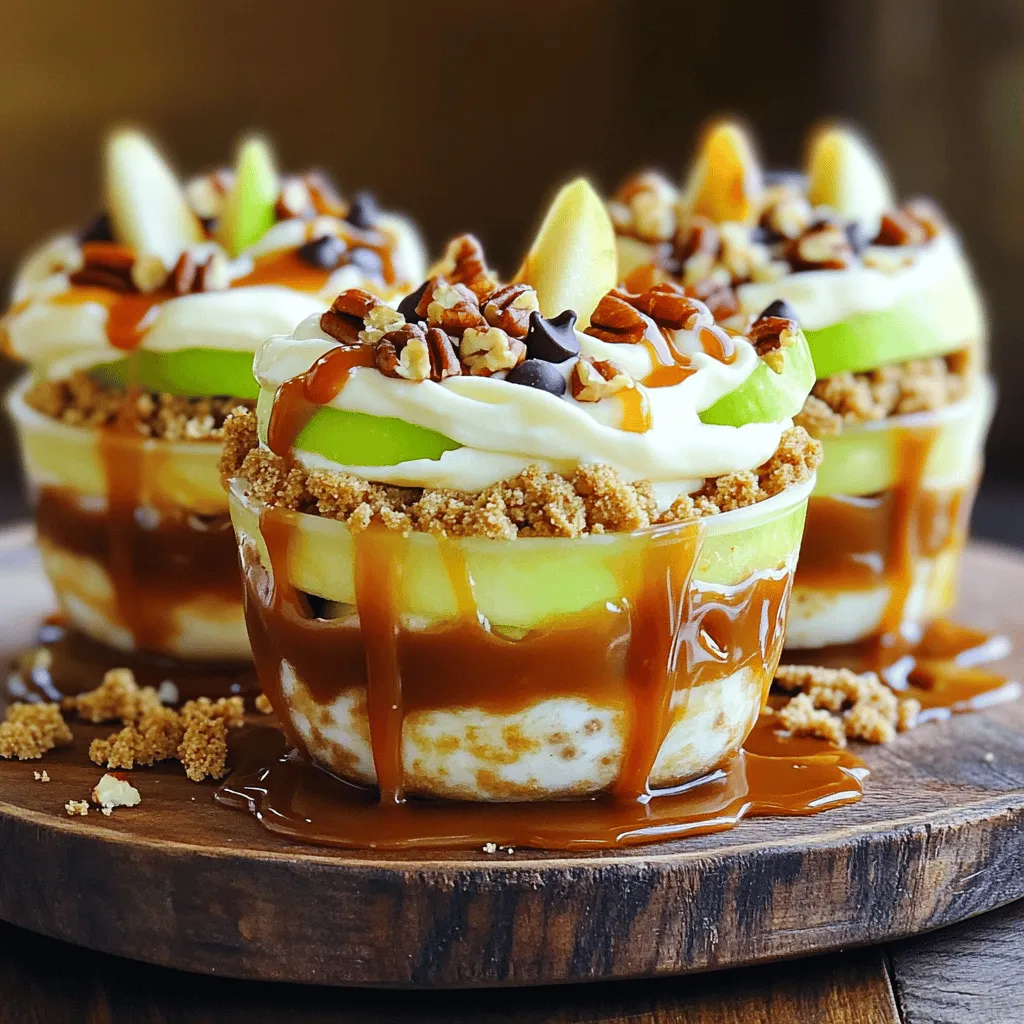
Looking for a sweet and fun treat? Caramel Apple Dip Cups are your answer! These bite-sized delights combine crisp apple
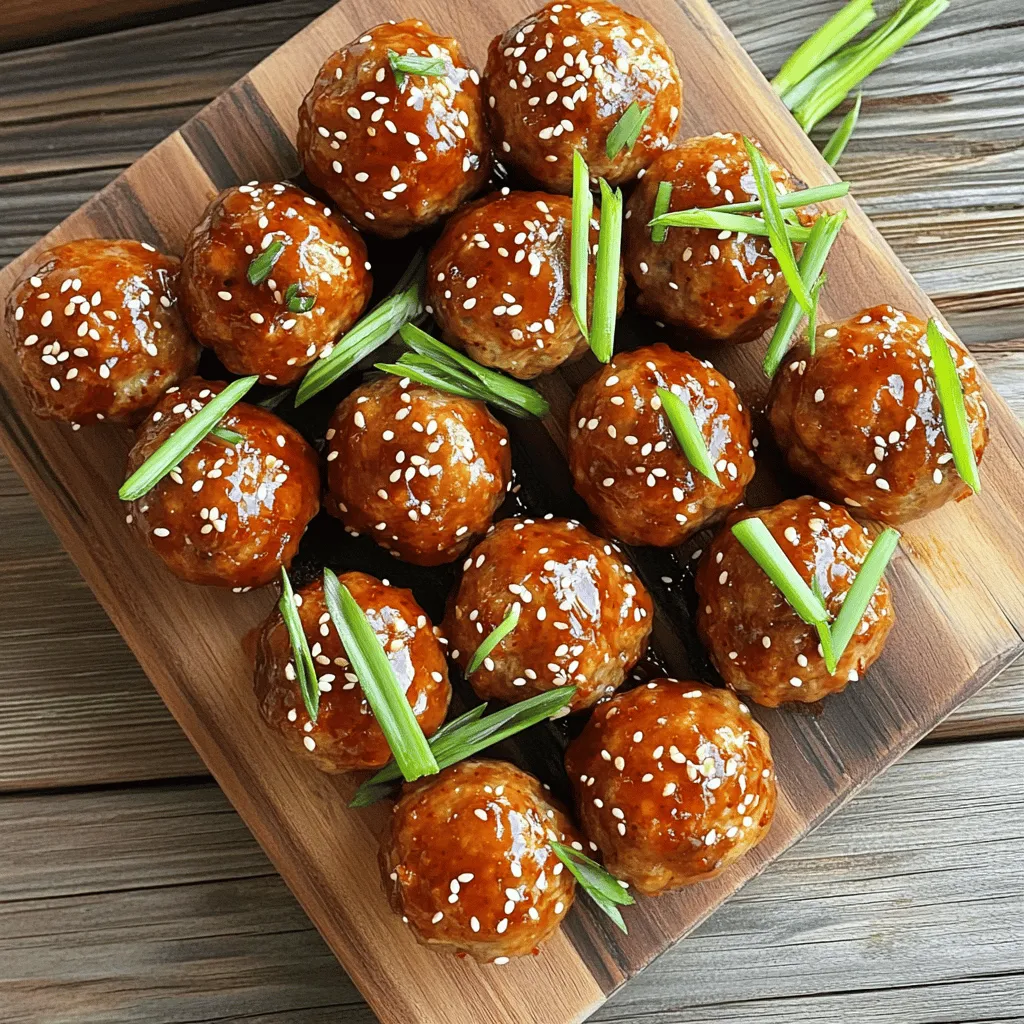
If you love bold flavors, you’ll enjoy my Korean BBQ meatballs! They combine savory and sweet tastes, making a perfect
![To make pumpkin crinkle cookies, gather these ingredients: - 1 cup canned pumpkin puree (ensure it's not pumpkin pie filling) - 1/2 cup vegetable oil - 1 cup packed brown sugar - 1/2 cup granulated sugar - 2 teaspoons pure vanilla extract - 2 cups all-purpose flour - 2 teaspoons baking powder - 1 teaspoon baking soda - 1 teaspoon ground cinnamon - 1/2 teaspoon ground ginger - 1/4 teaspoon ground nutmeg - 1/4 teaspoon salt - 1/2 cup powdered sugar (for rolling) When choosing pumpkin puree, select pure pumpkin. This gives the best flavor. Avoid pumpkin pie filling as it includes sugar and spices. Using fresh spices also boosts taste. Ground spices lose flavor over time, so fresh is best. You can customize your cookies. Try adding chocolate chips or nuts for extra crunch. If you want a spicy kick, add a dash of cayenne pepper. 1. Start by preheating your oven to 350°F (175°C). This step gets your oven ready for baking. 2. Line two baking sheets with parchment paper. This will help prevent sticking. 3. In a large mixing bowl, combine the canned pumpkin puree, vegetable oil, brown sugar, granulated sugar, and vanilla extract. Mix these until smooth. A whisk or hand mixer works great here. 4. In another bowl, mix the flour, baking powder, baking soda, cinnamon, ginger, nutmeg, and salt. Whisk until blended. This helps the spices and leavening agents mix well. 5. Gradually add the dry mixture to the wet ingredients. Stir gently until just combined. The dough will be thick and a bit sticky. 6. Cover the bowl with plastic wrap. Chill the dough in the fridge for about 30 minutes. Chilling makes the dough easier to shape. 7. After chilling, scoop out about 1.5 tablespoons of dough for each cookie. Roll each piece into a ball using your hands. 8. Pour powdered sugar onto a plate. Roll each dough ball in the sugar until fully coated. This creates that lovely crinkle effect. 9. Place the rolled cookies on the prepared baking sheets. Space them about 2 inches apart to allow for spreading while baking. 1. Bake the cookies in the preheated oven for 12-15 minutes. Look for edges that are set and tops with crinkles. 2. The cookies should feel soft yet firm when you gently press them. 3. Once baked, remove the sheets from the oven. Let the cookies cool on the sheets for 5 minutes. Then transfer them to a wire rack for complete cooling. For the [Full Recipe], you can follow these steps to create your delicious pumpkin crinkle cookies. Enjoy every bite! To make great pumpkin crinkle cookies, start with the right dough. A common mistake is over-mixing. Stir until just combined to keep the cookies soft. If the dough feels too sticky, add a bit of flour. This will help shape the cookies easily. Chilling the dough for 30 minutes makes it easier to scoop and roll. For more flavor, try extra spices like allspice or cloves. A splash of maple extract can add a warm twist. Adjust sweetness by using less sugar if you enjoy a spicier cookie. Balance helps the flavor shine through. For the best results, taste the dough before baking. This way, you can tweak it to your liking. Enjoy the process of creating your perfect cookie! {{image_4}} For those with dietary needs, I have great tips. - Gluten-free version: Use a gluten-free flour blend. Make sure it’s a 1:1 ratio. This keeps the cookies light and fluffy. - Vegan adaptations: Replace eggs with flaxseed meal. Mix one tablespoon of flaxseed with three tablespoons of water. Let it sit for five minutes to thicken. Use plant-based oil instead of vegetable oil. Let’s make these cookies even more fun! - Adding chocolate chips or nuts: Fold in half a cup of chocolate chips or chopped nuts. This adds richness and crunch. Try walnuts or pecans for a nutty twist. - Swapping spices for seasonal variations: You can switch up the spices. Try adding a pinch of cardamom for a warm flavor. Use allspice instead of the nutmeg for a different taste. You can even add a dash of cayenne for a spicy kick! These variations keep your pumpkin crinkle cookies exciting. Feel free to mix and match! Try the full recipe to get started. To keep your pumpkin crinkle cookies fresh, store them in an airtight container. This helps maintain their soft texture and flavor. I recommend using a container that fits the cookies without squishing them. Line the bottom with parchment paper for added protection. Place a layer of cookies, then add more parchment if stacking. Keep them at room temperature for up to a week. You can freeze both the dough and the baked cookies. To freeze the dough, scoop and roll it into balls. Place the balls on a baking sheet and freeze them until solid. Then, transfer them to a freezer bag. For baked cookies, let them cool completely. Layer them between parchment paper in a freezer-safe container. They can last up to three months in the freezer. When you’re ready to enjoy them, thaw the dough overnight in the fridge. For baked cookies, just let them sit at room temperature. You can warm them in the oven for a few minutes to restore their soft texture. Enjoy your pumpkin crinkle cookies anytime! For the full recipe, check out the complete guide. How to tell if my cookies are baked properly? Your cookies are baked when their edges are set and the tops show cracks. They should feel soft but firm when you press them gently. A golden edge and a slightly shiny top are signs of perfection. Can I use pumpkin pie filling instead of pumpkin puree? No, you should not use pumpkin pie filling. It has spices and sweeteners added. Use only plain canned pumpkin puree for the best flavor and texture in your cookies. How long do pumpkin crinkle cookies last? Pumpkin crinkle cookies stay fresh for about 5 days when stored properly. Keep them in an airtight container at room temperature. For longer storage, you can freeze them. Can I make the dough ahead of time? Yes! You can make the dough a day in advance. Just wrap it tightly in plastic wrap and store it in the fridge. This makes it easy to bake fresh cookies when you're ready. For even longer storage, freeze the dough. We explored how to make delicious Pumpkin Crinkle Cookies. You learned the right ingredients and their quality importance. I shared step-by-step instructions and baking tips to ensure your cookies turn out perfect every time. We also covered variations and storage methods to keep your treats fresh. In the end, you can customize these cookies to fit your tastes. Enjoy making them for yourself or sharing with friends! Your baking skills will shine with this fun recipe.](https://recipesstation.com/wp-content/uploads/2025/07/05606341-7676-4ffe-b13c-9afcca424cc9.webp)
Get ready to bake a delicious treat that screams autumn! Pumpkin crinkle cookies are easy to whip up and full
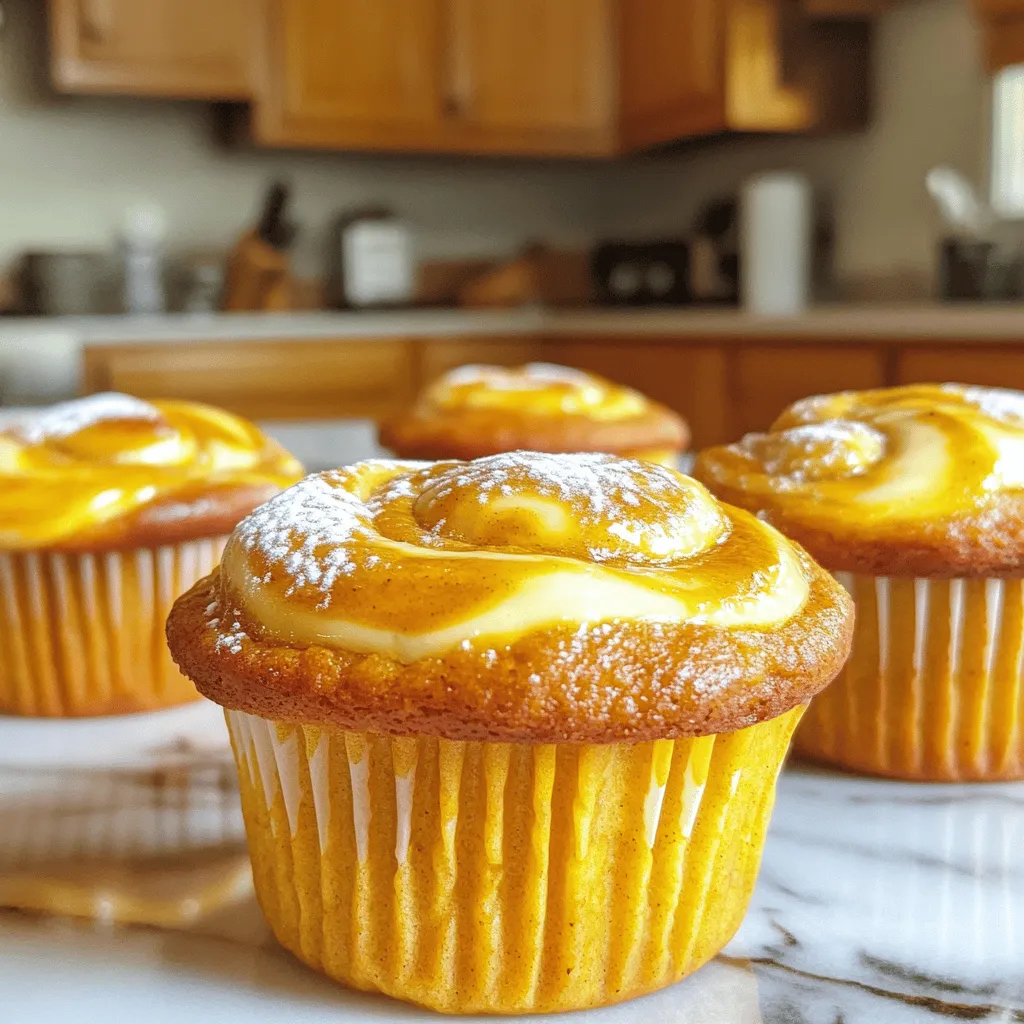
Are you ready to indulge in the cozy flavors of fall? My Pumpkin Swirl Muffins will sweep you off your

Craving a fun and tasty snack? You’ve come to the right place! Dirty Loaded Fries are perfect for parties, game

Get ready to impress your family and friends with No Bake Christmas Cookie Cups! These festive treats are easy to
