
Creamy Pumpkin Pie Coffee Creamer Flavorful Delight
Your morning coffee deserves a twist, and what better way than with creamy pumpkin pie coffee creamer? This flavorful delight
Your morning coffee deserves a twist, and what better way than with creamy pumpkin pie coffee creamer? This flavorful delight
Fall flavors are here, and it’s time for a delectable treat! Imagine sipping your morning coffee, rich with the taste

Do you want to impress this holiday season? Frosted Christmas Brownies are your answer! These delicious treats are easy to
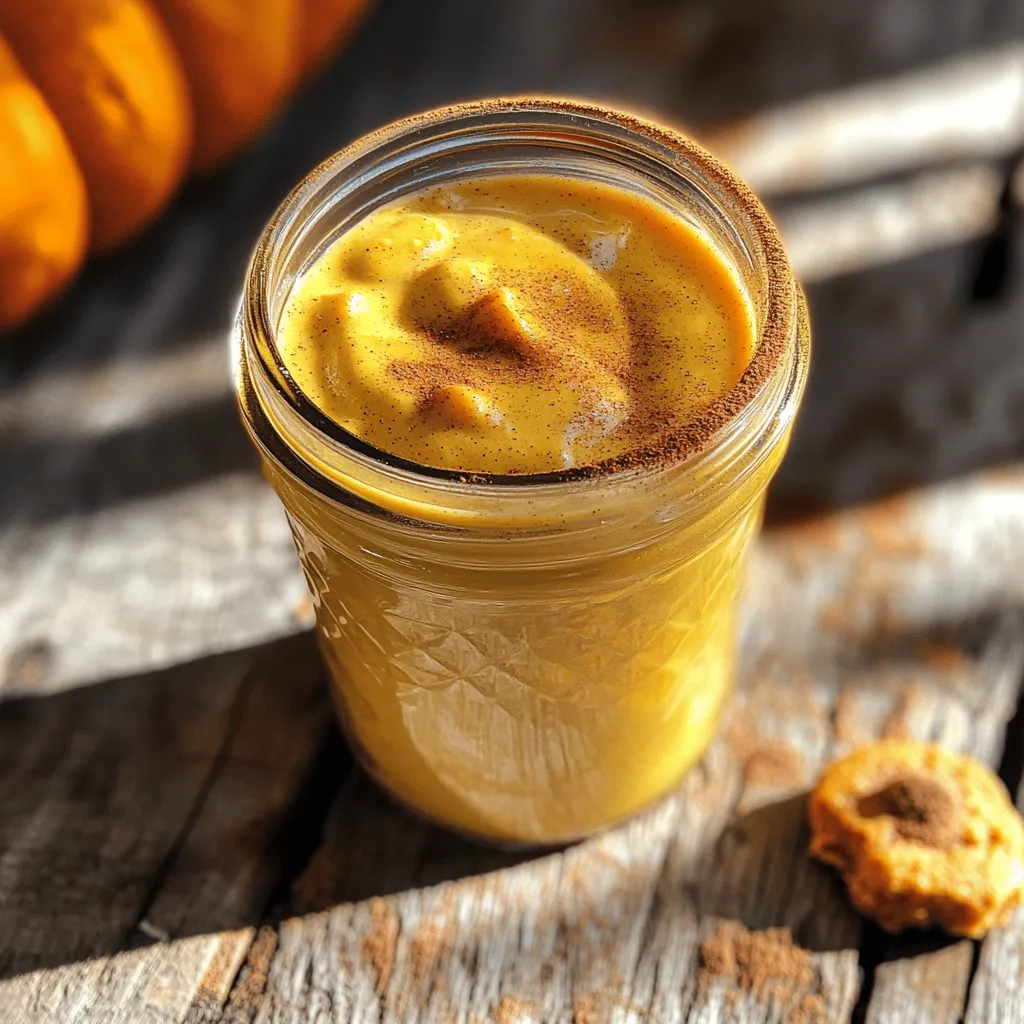
![- 1 cup pumpkin puree (canned or homemade) - 1 cup granulated sugar - 1 cup water - 1 teaspoon pure vanilla extract - 1 teaspoon pumpkin pie spice - 1/2 teaspoon salt You can swap out granulated sugar for other sweeteners, like brown sugar or honey. If you want a lighter syrup, try agave syrup. For pumpkin puree, you can make your own by roasting fresh pumpkin. Just bake it until soft, scoop out the flesh, and blend it smooth. Canned puree works too, and it's faster! You can also change the spice mix. If you like more heat, add a pinch of cayenne. For a different flavor, mix in nutmeg or cardamom. This way, you can make the syrup your own. To make your syrup, you need a few tools: - Medium saucepan - Whisk - Fine-mesh sieve These will help you cook, mix, and strain your syrup. 1. Dissolving sugar in water: Start by adding 1 cup of water and 1 cup of granulated sugar to your saucepan. Heat it on medium. Stir non-stop until the sugar dissolves. You will have a simple syrup. 2. Blending in pumpkin and spices: Once the sugar is dissolved, add 1 cup of pumpkin puree, 1 teaspoon of pumpkin pie spice, and 1/2 teaspoon of salt. Use your whisk to mix it all well. Make sure there are no lumps. 3. Simmering: Turn up the heat slightly until the mix boils. When you see bubbles, lower the heat to let it simmer. Keep it on low for about 10 minutes. Stir it now and then so it cooks evenly. After simmering, take the saucepan off the heat. Stir in 1 teaspoon of pure vanilla extract for extra flavor. Let the syrup cool on the counter until it reaches room temperature. Next, use a fine-mesh sieve to strain the syrup into a clean jar or bottle. This step removes any solids, giving you a smooth syrup. Seal your jar tightly and place it in the fridge. Your syrup will stay fresh for up to two weeks. Enjoy it in drinks or on pancakes! To get the best flavor for your syrup, start with the right pumpkin. I suggest using canned pumpkin puree. It’s smooth and rich. You can also make your own pumpkin puree. Just bake fresh pumpkin and blend it. Both options work great. Next, think about spice levels. Adjust the pumpkin pie spice to your taste. If you want it spicier, add a bit more cinnamon or ginger. If you prefer it milder, use less. Tasting as you go helps you find your perfect mix. You can use this pumpkin syrup in many ways. Pour it into your coffee for a tasty twist. It’s also great in lattes, hot chocolate, and even chai. Drizzle it over pancakes or waffles to add a fall touch. Try mixing it with whipped cream for a fun dessert topping. Get creative! Use the syrup in baking too. Add it to muffins or cakes for extra flavor. You can even stir it into oatmeal for a cozy breakfast. Sometimes, you might notice separation in your syrup. This can happen if it sits too long. Just give it a good shake before using. If your syrup feels too thick, add a little water and stir. Avoid common mistakes like not mixing well. It’s important to whisk the pumpkin and spices into the syrup. This ensures a smooth blend. Also, don’t skip the straining step. Straining removes any lumps, making your syrup silky smooth. For the complete recipe, check out the [Full Recipe]. {{image_4}} You can play with flavors in your pumpkin syrup. Here are two tasty ideas: - Maple Pumpkin Syrup: Swap half the sugar for maple syrup. This adds a deep, rich flavor. The maple pairs beautifully with the pumpkin, giving your drinks a cozy vibe. - Spiced Chai Pumpkin Syrup: Mix in chai spices like cardamom and cloves. This twist adds warmth and a hint of spice. It’s perfect for a chilly day, enhancing your latte or tea. Want a syrup without sugar? Try these methods: - Using Natural Sweeteners: Use options like stevia, erythritol, or monk fruit. These sweeteners provide a similar taste with fewer calories. Adjust the amount based on your taste. - Adjusting Caloric Content: If you reduce sugar, remember to adjust the liquid. Less sugar means a thinner syrup. Add a bit more pumpkin puree for texture. You can also change your pumpkin syrup for different holidays: - Halloween: Add a touch of orange zest for a spooky twist. It gives a fresh flavor that fits the season. - Christmas: Mix in a hint of peppermint extract. This makes your syrup festive and fun, perfect for holiday drinks. Try these ideas to make your pumpkin syrup unique for any season! This syrup will last for two weeks in the fridge. It keeps well if stored right. Always check for any off smells or changes in color before using. Use a clean glass jar or bottle for storage. Glass keeps flavors fresh and prevents spills. Make sure to seal the container tightly. For longer storage, you can freeze the syrup. Pour it into ice cube trays. Once frozen, transfer the cubes to a freezer bag. This way, you can use just what you need. If you have extra pumpkin puree, use it in baking. It’s great in muffins or pancakes. You can also stir it into oatmeal for some fall flavor. Any leftover spices can enhance your coffee or tea. Just a pinch is enough to add warmth to your drinks. You can easily make your own Starbucks style pumpkin syrup at home. This recipe only needs a few simple ingredients. You will use pumpkin puree, sugar, water, and spices. The process takes about 20 minutes from start to finish. You heat the water and sugar, then add the pumpkin and spices. After simmering, you strain the syrup and store it in the fridge. For more details, check the Full Recipe. You can use pumpkin syrup in many ways! Here are some ideas: - Coffee drinks: Add it to lattes or cold brews. - Desserts: Drizzle it over pancakes, waffles, or ice cream. - Baking: Use it in muffins, cakes, or cookies. - Smoothies: Blend it into your favorite fruit smoothies for a fall twist. The syrup adds a warm, cozy flavor to any dish! If you prefer store-bought options, several brands offer pumpkin syrup similar to Starbucks. Look for brands like Torani, Monin, or DaVinci. They often have great flavors. Check your local grocery store or online shops. Just ensure to read the labels to find the right taste for you. You learned how to make a delicious Starbucks Style Pumpkin Syrup. We covered the important ingredients, easy steps, and tips for the best flavor. You can also try fun variations and store this syrup well. Remember, you can even use leftover ingredients in creative ways. Enjoy making this syrup and enhancing your drinks and desserts. It’s a simple way to add that fall flavor all year round. Get ready to impress with your homemade pumpkin syrup!](https://recipesstation.com/wp-content/uploads/2025/07/dba29e6d-126d-4664-986a-6f0269819530.webp)
Fall is here, and you can enjoy a taste of Starbucks at home! This easy homemade Starbucks Style Pumpkin Syrup
Ready to elevate your snack game? My Savory Sweet and Spicy Pickle Dip Board Delight will amaze your friends and
![- 1 pound store-bought gnocchi - 2 cups pumpkin puree - 1 cup heavy cream These main ingredients make the base of our dish. The gnocchi is soft and pillowy. The pumpkin puree brings warmth and sweetness. Heavy cream adds richness, making everything creamy and smooth. - 3 tablespoons unsalted butter - 4 cloves garlic, finely minced - 1 cup grated Parmesan cheese Butter gives a lovely richness. Garlic adds a bold flavor that wakes up the dish. Grated Parmesan cheese melts beautifully and adds a salty, nutty taste. - 1 teaspoon dried sage - 1/2 teaspoon ground nutmeg - Salt and freshly ground black pepper to taste Dried sage offers earthy notes that complement the pumpkin. Nutmeg adds warmth and depth. The salt and pepper balance the flavors, making each bite vibrant. For the complete recipe, check out the Full Recipe. Each ingredient plays a role in creating a cozy, satisfying meal. Enjoy the blend of flavors that sing together in harmony! First, fill a large pot with water and add salt. Bring it to a rolling boil. Carefully add the gnocchi to the pot. Cook according to the package instructions. The gnocchi will float to the top when done. Use a slotted spoon to remove them and drain in a colander. Set the gnocchi aside in a bowl. In a large skillet, add the unsalted butter. Melt it over medium heat. Once melted, add the minced garlic. Sauté the garlic for about one minute. You want it fragrant but not burnt. Next, add the pumpkin puree and heavy cream to the skillet. Stir it well to mix. Now, add the grated Parmesan cheese, dried sage, ground nutmeg, and a pinch of salt and pepper. Stir everything together. Let it simmer for about five minutes. This will blend all the flavors nicely. Gently fold the cooked gnocchi into the creamy pumpkin sauce. Make sure each piece is well-coated. Preheat your oven to 375°F (190°C). Lightly grease a 9x13-inch baking dish. Transfer the gnocchi and sauce mixture into the dish. Sprinkle extra grated Parmesan cheese on top for a cheesy crust. Bake in the oven for 20 to 25 minutes. You want the top to be golden brown and bubbly. The aroma will fill your kitchen. For the full recipe, check the details above. To boost the taste, I love to add fresh herbs. Fresh thyme or basil can elevate this dish. They bring a fresh zing that dried herbs can’t match. If using dried herbs, sage works well. But fresh is better if you have it. Fresh garlic also adds a nice punch. For a creamy sauce, use heavy cream. It gives the bake a rich, velvety feel. If you want more depth, mix in some cream cheese. This adds a delightful tang. Bake until the top is golden and bubbly. Keep an eye on it to prevent burning. Serve the gnocchi bake right from the dish. This makes it cozy and inviting. Spoon out portions into bowls. Drizzle with any leftover sauce for extra flavor. For a fun touch, add toasted pine nuts on top. They give a crunch that pairs well with the soft gnocchi. You can find the Full Recipe to guide you through this delicious dish! {{image_4}} If you need gluten-free options, try using gluten-free gnocchi made from rice or potato flour. Many brands offer tasty alternatives that cook just as well. For those who want a dairy-free meal, substitute heavy cream with coconut cream or a nut-based cream. Nutritional yeast can replace Parmesan cheese for a cheesy flavor without dairy. You can boost the nutrition by adding spinach, kale, or roasted vegetables. These options not only add color but also flavor and health benefits. If you feel adventurous, try using different cheeses like mozzarella, gouda, or even feta. Each cheese will give a unique taste to your gnocchi bake. Pair your gnocchi bake with a crisp salad or some garlic bread for a full meal. Seasonal flavors can enhance your dish, too. In fall, add roasted butternut squash or cranberries for a sweet touch. In spring, fresh peas or asparagus can lighten the dish and add crunch. For the full recipe, check the Buttery Garlic Parm Pumpkin Gnocchi Bake. To keep your buttery garlic parm pumpkin gnocchi bake fresh, store it in the fridge. Place the leftovers in an airtight container. Make sure to cool the dish completely before sealing it. This helps prevent condensation that can make the dish soggy. If you want to freeze it, use a freezer-safe container. You can also wrap it tightly in plastic wrap and then in foil. This will keep out air and prevent freezer burn. Reheating gnocchi bake is easy. You can use the oven or microwave. For the oven, preheat it to 350°F (175°C). Place the dish in a baking pan, cover it with foil, and heat for about 15-20 minutes. This keeps the top from burning while warming the inside. If you use a microwave, place a portion on a microwave-safe plate. Heat it in 30-second intervals, stirring between. This helps heat the dish evenly. To maintain creaminess, add a splash of cream or milk during reheating. This will keep the sauce smooth and rich. In the fridge, your gnocchi bake lasts about 3-4 days. Make sure to check for any signs of spoilage before eating. If you freeze it, it can last up to 2-3 months. Just remember to label the container with the date. This helps you track its freshness. For the full recipe, click here: [Full Recipe]. This dish takes about 15 minutes to prep and 25 minutes to cook. You can have it ready in 40 minutes. It's quick and easy! Yes! Homemade gnocchi adds a lovely touch. It can taste fresher and softer than store-bought. Just make sure to cook it right before adding to the sauce. You can pair it with a simple green salad. A fresh arugula salad with lemon dressing works well. Roasted veggies also make a great side dish. Yes! You can use gluten-free gnocchi for a gluten-free option. For a dairy-free version, try coconut cream and a dairy-free cheese. To add heat, mix in some red pepper flakes. You can also add diced jalapeños or hot sauce. Adjust to your taste for the perfect kick! For the full recipe, check the original post. This blog post covered a simple yet delicious recipe for Buttery Garlic Parm Pumpkin Gnocchi Bake. You learned about the key ingredients, like pumpkin puree and Parmesan cheese, and the step-by-step process to make it creamy and flavorful. I also shared tips to enhance taste, perfect the texture, and present this dish beautifully. Consider trying different variations to suit your taste. Enjoy cooking and sharing this dish with friends or family. It’s a comforting meal that everyone will love.](https://recipesstation.com/wp-content/uploads/2025/07/c93a1011-8f78-4fbe-95ba-e821f56e9480.webp)
Get ready to sink your fork into the ultimate comfort food: Buttery Garlic Parm Pumpkin Gnocchi Bake! This creamy, cheesy
![The Crispy Rice Salmon Harvest Salad is a vibrant dish that bursts with flavor. Let’s dive into the list of ingredients you will need to make this delicious meal: - Sushi rice: 1 cup - Water: 2 cups - Rice vinegar: 1 tablespoon - Sugar: 1 teaspoon - Salt: 1/2 teaspoon - Sesame oil: 2 tablespoons, divided - Salmon fillet: 1 pound - Mixed salad greens: 4 cups (e.g., arugula, spinach, and kale) - Cherry tomatoes: 1 cup, halved - Cucumber: 1/2, thinly sliced - Radishes: 1/4 cup, thinly sliced - Avocado: 1, sliced - Sesame seeds: 1/4 cup - Soy sauce: 2 tablespoons (or tamari for gluten-free) - Fresh lemon juice: 1 tablespoon - Fresh herbs for garnish: e.g., cilantro or parsley Each ingredient plays a key role. The sushi rice provides a base that gets crispy and adds texture. Fresh greens and veggies give color and crunch. Salmon adds a rich, savory flavor. Together, they create a bright, balanced salad that is both filling and refreshing. For the complete recipe, check out the Full Recipe section. - Rinse the sushi rice until the water is clear. - Combine rinsed rice and water in a saucepan and bring to boil. - Reduce heat and simmer covered for 15-20 minutes. To make perfect sushi rice, rinse it well. This removes extra starch. You want the water to run clear. After rinsing, add the rice and water to a pan. Bring it to a boil over medium heat. Once boiling, lower the heat. Cover it and let it simmer for 15-20 minutes. The rice will absorb all the water and become soft. - Whisk together rice vinegar, sugar, and salt. - Fold mixture into warm rice and let it cool. After cooking, mix rice vinegar, sugar, and salt in a small bowl. Whisk until everything dissolves. Gently fold this mix into the warm rice. This adds flavor and a slight tang. Let the rice cool completely while you prepare the other ingredients. - Heat sesame oil in a nonstick skillet. - Spread cooled rice into an even layer and cook for 5 minutes. - Gently flip and crisp the other side for an additional 5 minutes. Heat one tablespoon of sesame oil in a nonstick skillet over medium-low heat. Once hot, spread the cooled rice evenly. Cook it without stirring for about 5 minutes. This will make the bottom crispy. Carefully flip the rice and cook the other side for another 5 minutes until crispy. Remove it from the heat and let it cool. - Season salmon fillet with salt and pepper. - Cook in a skillet until flaky, around 4-5 minutes per side. While the rice crisps, season the salmon fillet with salt and pepper. In another skillet, add a drizzle of sesame oil over medium heat. Place the salmon skin-side down. Cook for about 4-5 minutes, then flip it. Cook for another 3-4 minutes until it flakes easily. Remove it from the pan and let it cool before flaking it with a fork. - Combine salad greens and mix in cherry tomatoes, cucumber, radishes, and avocado. - Gently fold in flaked salmon. In a large bowl, add mixed salad greens. Next, add halved cherry tomatoes, thinly sliced cucumber, radishes, and avocado. Gently fold in the flaked salmon. Be careful not to mash the salad. - Whisk together soy sauce and lemon juice. - Drizzle dressing over salad and toss to coat. In a small bowl, whisk soy sauce and lemon juice together. Drizzle this dressing over the salad. Toss everything gently to coat the greens and veggies evenly. - Top with crispy rice pieces and sesame seeds. Finally, sprinkle the crispy rice pieces over the salad. Add sesame seeds for crunch. This adds a delightful texture and flavor to the dish. Enjoy your Crispy Rice Salmon Harvest Salad! For the full recipe, check out the detailed steps above. - Rinse the sushi rice until the water is clear. This step helps to remove excess starch. - After cooking, let the rice rest for about 10 minutes. This resting time gives the rice a better texture. - Use medium-low heat to cook the rice. This method helps prevent burning. - Avoid stirring the rice too much while it cooks. This helps create an even crisp on the surface. - For a different flavor, try substituting lime juice for lemon juice. It adds a nice twist. - Adding a dash of sesame oil to your dressing gives the dish extra richness. These tips can help you elevate your Crispy Rice Salmon Harvest Salad. For more detailed instructions, check the Full Recipe. Enjoy your cooking! {{image_4}} You can swap out the salmon for grilled chicken or tofu. Both options add great flavor and protein. If you love seafood, try adding shrimp for a fun twist. Feel free to add more crunch by including bell peppers or carrots. You can also switch up the greens by using romaine or baby kale. The more colors, the better! Instead of sushi rice, you can use quinoa or brown rice. Both grains offer a nice texture and taste. If you want something nutty, try farro for a delicious change. For the full recipe, check out [Full Recipe]. Store salad components separately to keep everything fresh. Place your crispy rice in an airtight container. This helps maintain its crunch. I like to keep the salmon and greens in separate containers too. This way, they stay fresh longer. When it's time to enjoy leftovers, warm the salmon gently. You can do this in the microwave or a skillet. If the salad greens look wilted, refresh them with a splash of dressing. This adds moisture and flavor back to the greens. For the best quality, consume leftovers within 2-3 days. The crispy rice is best enjoyed fresh but can last in the fridge for up to 5 days. It may lose some crunch, but it still tastes great! If you want to enjoy this dish later, check out the Full Recipe for tips on making it again. I recommend using wild-caught salmon. It has the best flavor and texture. Farmed salmon can be less tasty. Wild salmon is also healthier. Yes, you can prepare the components ahead. Just keep them separate. Assemble the salad right before serving for the best taste and texture. If you need a substitute, use olive oil or a light vegetable oil. These oils work well in the dressing and do not change the flavor much. Yes, this salad can be gluten-free. Just make sure to use gluten-free soy sauce, also known as tamari. This keeps the dish safe for those with gluten allergies. Absolutely! You can add toasted almonds or pumpkin seeds. They will give the salad a nice crunch and boost the flavor. For the full recipe, check out the complete guide to making this delicious dish! This salad combines fresh ingredients with crispy rice and flavorful salmon. You start by preparing the rice, then season and crisp it up. Cooking the salmon brings out its rich taste. Finally, you assemble everything into a vibrant, healthy dish. Enjoy this easy recipe anytime. It’s perfect for quick meals or when hosting friends. Creating your salad allows for customization, making it uniquely yours. Have fun experimenting with different proteins and vegetables. You’ll love the results!](https://recipesstation.com/wp-content/uploads/2025/07/31f09ab4-826d-498c-988e-239364941983.webp)
Ready to elevate your salad game? My Crispy Rice Salmon Harvest Salad is both colorful and delicious! Packed with fresh
Get ready for the ultimate treat with my Miso Caramel Apple Crumble Bars! These bars combine sweet apples, rich miso

Get ready to wow your friends with a fun and tasty Tailgate Chili Mac Bread Bowl! This dish combines hearty

Are you ready to dive into a fall favorite that combines two classic desserts? These Pumpkin Cheesecake Swirl Brownies offer
