Skip to content
DisclaimerTerms Of UseGDPR PolicyCookie Policy

recipesstation

  • Home
  • Drinks
  • Appetizers
  • Dinner
  • Dessert
  • About
  • Contact
  • Privacy Policy
DisclaimerTerms Of UseGDPR PolicyCookie Policy

Emily

To make Honey Chipotle Cauliflower Wing Wraps, you need fresh, simple ingredients. Here’s what to gather: - 1 medium head of cauliflower, separated into florets - 1 tablespoon extra virgin olive oil - 1 teaspoon smoked paprika - ½ teaspoon garlic powder - ½ teaspoon sea salt - ½ teaspoon ground black pepper - 1 tablespoon pure honey - 1 tablespoon chipotle sauce (adjust for desired heat) - 4 large whole wheat tortillas - 1 cup shredded lettuce (preferably romaine for crunch) - ½ cup diced ripe tomatoes - ½ cup fresh cilantro, roughly chopped - ½ cup ripe avocado, sliced - Lime wedges for fresh garnish These ingredients create a balance of flavors and textures. The cauliflower brings a nice crunch, while the honey and chipotle add a sweet and spicy kick. If you have certain dietary needs, you can swap some ingredients. Here are a few ideas: - Use olive oil spray instead of extra virgin olive oil for fewer calories. - Replace honey with agave syrup for a vegan option. - Choose gluten-free tortillas if you have gluten sensitivity. - Use nutritional yeast instead of cheese for a cheesy flavor without dairy. These swaps keep the spirit of the dish while fitting your needs. Toppings can take your wraps to the next level. Here are some great options: - Sliced jalapeños for extra heat - Crumbled feta or goat cheese for creaminess - Sliced radishes for crunch - A drizzle of ranch or yogurt sauce for added flavor Feel free to mix and match these toppings. They add freshness and flair to your wraps. For the full recipe, refer to the earlier section. Enjoy your cooking journey! Start by washing your cauliflower well. Remove the leaves and stem. Cut the head into bite-sized florets. This helps them cook evenly. After cutting, place the florets in a large bowl. Add the olive oil, smoked paprika, garlic powder, sea salt, and black pepper. Toss them until all the florets are coated well. This step adds great flavor. Preheat your oven to 425°F (220°C). Spread the seasoned florets on a baking sheet lined with parchment paper. Make sure to arrange them in a single layer. This helps them roast better. Bake for about 25 minutes. Halfway through, take them out and turn them gently. This ensures they get crispy on all sides. While the cauliflower roasts, grab a small bowl. Mix the honey and chipotle sauce together with a whisk. Blend them until smooth. Once the cauliflower is golden and crispy, take it out of the oven. Drizzle the honey chipotle glaze over the florets. Toss gently to coat them. Return the baking sheet to the oven for 5 more minutes. This sets the glaze nicely. Warm your whole wheat tortillas in a skillet or microwave. Place a handful of shredded lettuce in the center of each tortilla. Next, add a portion of the roasted cauliflower. Top it with diced tomatoes, fresh cilantro, and avocado slices. Fold the sides of each tortilla in, then roll them up tightly. Cut the wraps in half for a nice look. Serve with lime wedges for a fresh squeeze. Enjoy the flavors! To make your cauliflower wings extra crispy, follow these tips: - Dry the Cauliflower: Pat the florets dry with a towel before cooking. - Oil Generously: Use enough olive oil to coat the florets well. - Single Layer: Spread the florets in a single layer on the baking sheet. - Flip Midway: Turn the florets halfway through roasting for even crispness. - High Heat: Roast at 425°F (220°C) for that perfect crunch. If you like it mild, use less chipotle sauce. For more heat, add extra sauce. You can also try these tips: - Taste as You Go: Mix honey and chipotle sauce, then taste it. - Add Spice Gradually: Start with a small amount, then increase as needed. - Pair with Cooling Ingredients: Use avocado or yogurt to balance heat. To keep your wraps fresh, follow these steps: - Cool Completely: Let wraps cool before storing. - Wrap Well: Use plastic wrap or foil to cover tightly. - Fridge Storage: Keep in the fridge for up to three days. - Reheat Gently: To reheat, use an oven at 350°F (175°C) for 10–15 minutes. You can find the full recipe for these tasty Honey Chipotle Cauliflower Wing Wraps to explore more delicious details. {{image_4}} You can make this dish vegan easily. Replace the honey with maple syrup. This swap keeps the sweetness while staying plant-based. You can also use agave syrup for a similar taste. Both options work great in the honey chipotle glaze. Feel free to add more veggies to your wraps. Bell peppers add color and crunch. Carrots bring a nice sweetness. You can also try zucchini or mushrooms for a different texture. Just roast them along with the cauliflower. This will create a mix of flavors that everyone will love. Switch up the sauce for a new twist. Try barbecue sauce for a smoky taste. A buffalo sauce gives it a spicy kick. You could also use a creamy ranch dressing for a cool contrast. Each option adds its own layer of flavor to the wraps. Experiment and find your favorite! To keep your leftover wraps fresh, wrap them tightly in plastic wrap. You can also place them in an airtight container. Store them in the fridge for up to three days. This method keeps the flavors intact and prevents the wraps from drying out. If you want to save your wraps for later, freezing is a great option. Wrap each wrap in foil or plastic wrap. Place them in a freezer-safe bag and remove as much air as possible. These wraps will stay good in the freezer for about a month. When you’re ready to eat, let them thaw in the fridge overnight. To reheat your wraps, unwrap them first. You can use an oven or a skillet. For the oven, preheat to 350°F (175°C) and bake for about 10 minutes. If using a skillet, heat it on medium and warm the wraps for a few minutes on each side. This way, they stay crispy and delicious. Enjoy your Honey Chipotle Cauliflower Wing Wraps! For the full recipe, check the section above. Yes, you can make these wraps gluten-free. Just use gluten-free tortillas instead. Many brands offer gluten-free options made from rice or corn. Check labels to ensure they fit your needs. For a vegan option, use maple syrup or agave nectar instead of honey. Both work well and add sweetness. They also blend nicely with the chipotle sauce. The honey chipotle cauliflower will stay fresh for about 3 to 5 days in the fridge. Store it in an airtight container. Reheat it before using for best taste. Yes, you can use corn tortillas or spinach tortillas as substitutes. Both add different flavors and colors. Choose what you like best for your wraps. You learned how to make tasty honey chipotle cauliflower wing wraps. We explored the key ingredients, smart tips, and creative variations. You can adjust the spice and even try different sauces. Storing leftovers is easy, so you can enjoy them later. I hope you feel inspired to whip up this dish. It’s not just yummy but also fun to make! Enjoy your cooking adventure!

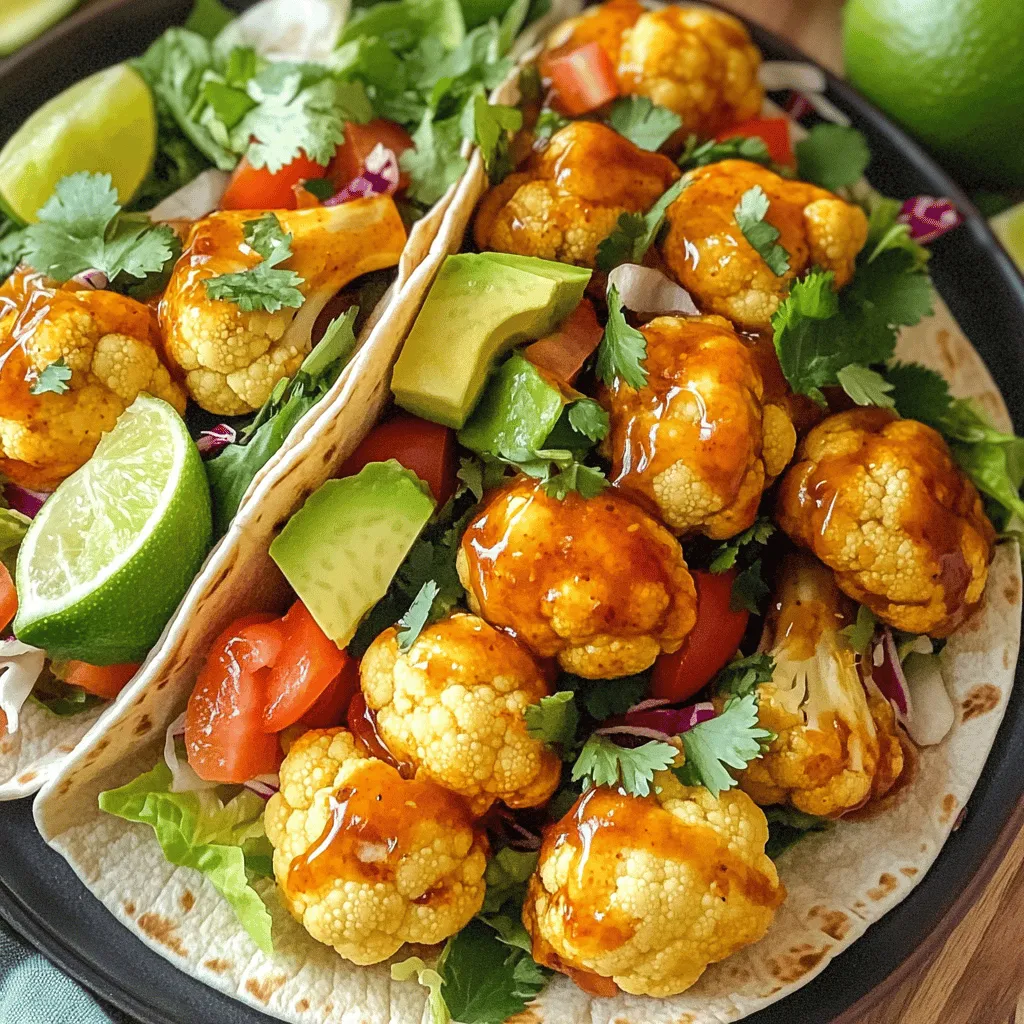
Honey Chipotle Cauliflower Wing Wraps Savory Treat

If you’re craving a savory treat that packs a punch, Honey Chipotle Cauliflower Wing Wraps are the answer. This dish

To make Cherry Tahini Energy Bites, you'll need simple and wholesome ingredients. Here’s what you should gather: - 1 cup rolled oats - 1/2 cup almond flour - 1/2 cup tahini (smooth and creamy) - 1/3 cup pure maple syrup - 1/2 cup dried cherries, roughly chopped - 1/4 cup pumpkin seeds (pepitas) - 1 teaspoon pure vanilla extract - 1/4 teaspoon sea salt - Optional: 1 tablespoon chia seeds Each ingredient plays a key role. The rolled oats give a nice texture. Almond flour adds a nutty taste. Tahini brings creaminess and healthy fat. Maple syrup sweetens the bites naturally. Dried cherries offer a fruity punch. Pumpkin seeds add crunch and nutrients. Vanilla gives warmth and depth. Sea salt balances the sweetness. Chia seeds can boost fiber if you choose to add them. These ingredients combine to create a nutrient-packed snack. They provide energy for your day. You can enjoy them as a quick breakfast, a post-workout treat, or a sweet pick-me-up. For the full recipe, you can check the details in the recipe section. Start by gathering your dry ingredients. In a large mixing bowl, add: - 1 cup rolled oats - 1/2 cup almond flour Mix them well. Stir until you see no clumps. This step helps ensure even distribution of flavors. In a separate bowl, combine your wet ingredients. Add: - 1/2 cup tahini - 1/3 cup pure maple syrup - 1 teaspoon pure vanilla extract - 1/4 teaspoon sea salt Whisk these together until smooth and creamy. Make sure there are no lumps. A good mix helps the flavors blend perfectly. Now, pour the tahini mixture into your dry ingredients. Use a spatula or wooden spoon to mix well. Once combined, gently fold in: - 1/2 cup dried cherries, roughly chopped - 1/4 cup pumpkin seeds If you'd like, you can add 1 tablespoon of chia seeds for extra texture. Stir until everything is evenly mixed. With your mixture ready, it's time to form the energy bites. Use your clean hands to roll small balls, about 1 inch in diameter. If the mix feels sticky, chill it in the fridge for 15-20 minutes. This makes it easier to handle. After rolling the bites, place them on a tray lined with parchment paper. Refrigerate them for at least 1 hour. This helps them set. Once chilled, transfer the energy bites to an airtight container. You can store them in the fridge for up to one week. Enjoy them fresh! For the complete recipe, check the [Full Recipe]. To achieve the perfect consistency for your Cherry Tahini Energy Bites, start with the right balance of dry and wet ingredients. Make sure the tahini is smooth and creamy. This helps to bind everything together. If your mixture feels too dry, add a little more maple syrup or tahini. If too wet, mix in more almond flour or oats. For added flavor, consider incorporating a pinch of cinnamon or a splash of orange juice. You might try adding chopped nuts or even a dash of espresso powder for a twist. These changes can elevate the energy bites and make them even more delicious. Arranging your energy bites on a colorful serving platter makes a great first impression. Use a vibrant plate to highlight the rich colors of the cherries and tahini. For a stylish touch, sprinkle extra pumpkin seeds on top. You can also drizzle a bit of tahini over the bites right before serving. This adds a nice visual appeal and a touch of extra flavor. Cherry Tahini Energy Bites are perfect for snacking anytime. They work well as a quick breakfast or a midday pick-me-up. Pair them with fresh fruit or yogurt for a balanced snack. The ingredients offer great nutritional benefits. Rolled oats provide fiber, while tahini adds healthy fats and protein. Dried cherries contribute antioxidants, which are good for your health. Pumpkin seeds bring in minerals like magnesium and zinc. Each bite is not just tasty but also packed with nutrition. {{image_4}} If you have nut allergies, don’t worry! You can use seed butter instead of tahini. Sunflower seed butter is a great choice. It has a creamy texture and adds a rich flavor. For those needing gluten-free options, make sure to use certified gluten-free oats. This keeps the energy bites safe for everyone to enjoy. Want to change up the taste? You can add different dried fruits to your energy bites. Try cranberries or apricots for a twist. Each fruit brings its own unique flavor and sweetness. You can also experiment with spices. Adding cinnamon gives warmth, while cacao offers a rich chocolatey taste. This keeps your bites exciting and fresh. If you like crunch, think about adding nuts. Chopped walnuts or almonds can give a fun texture. You can also coat your bites for extra flavor. Rolling them in shredded coconut or sesame seeds adds a tasty finish. These tweaks make each bite special and more enjoyable. To keep your Cherry Tahini Energy Bites fresh, use an airtight container. Glass containers work best, as they do not absorb odors. You can also use plastic containers if glass is not available. Store the bites in the refrigerator to maintain their flavor and texture. They stay fresh for up to one week this way. For long-term storage, freezing is a great option. First, place the energy bites on a tray lined with parchment paper. Freeze them until solid, about an hour. Then, transfer the bites to a freezer-safe bag or container. Remove as much air as possible to prevent freezer burn. They can last for up to three months in the freezer. When you are ready to eat them, simply take out the number of bites you want. Let them thaw in the fridge for a few hours or at room temperature for about 30 minutes. Enjoy your tasty snack anytime! Cherry tahini energy bites stay fresh for about one week in the refrigerator. To keep them longer, you can freeze them. In the freezer, they can last up to three months. Just make sure to store them in an airtight container to prevent freezer burn. Yes, cherry tahini energy bites are already vegan-friendly. The main ingredients, like tahini, oats, and maple syrup, are all plant-based. You can enjoy these bites without worrying about any animal products. Tahini packs a healthy punch. It is rich in protein, healthy fats, and vitamins. Here are some benefits: - Protein: Great for muscle repair. - Healthy Fats: Supports heart health. - Vitamins: Provides B vitamins and vitamin E. These nutrients help keep your energy levels high and your body strong. Absolutely! If you want a nut-free version, just replace almond flour with sunflower seed flour or oat flour. This way, you still get great texture and flavor without using nuts. You can swap dried cherries with other dried fruits. Here are some tasty options: - Dried cranberries - Dried apricots - Raisins You can even use fresh fruits like blueberries or chopped figs for a fun twist. You can easily modify the sweetness. If you want less sweetness, use less maple syrup. You can also add a bit of mashed banana or applesauce for natural sweetness. Adjust it to fit your taste buds! For the full recipe, check out the detailed instructions above. These cherry tahini energy bites are simple and fun to make. We covered the key ingredients, and steps for preparation, and even tips for variation. Experimenting with flavors and textures can make this recipe your own. Store them right to keep them fresh, and enjoy their health benefits. Whether for a snack or as a treat, these bites can fit any occasion. Get ready to savor a nutritious boost that makes eating healthy easy and enjoyable.

Cherry Tahini Energy Bites Nutrient-Packed Snack

Looking for a snack that fuels your day? These Cherry Tahini Energy Bites pack a nutrient punch while keeping things

- 2 cups root beer soda - 1 1/2 cups heavy cream - 1 cup powdered sugar - 3 tablespoons unflavored gelatin powder - 1 cup graham cracker crumbs - 1/4 cup unsalted butter, melted - Pinch of salt - Vanilla ice cream - Maraschino cherries - Extra root beer for drizzling When I prepare these delicious root beer cream bars, I focus on great ingredients. The main star is the root beer soda. Its sweet and spicy flavor makes these bars fun. I also add heavy cream to make the filling rich and smooth. Powdered sugar sweetens the mix perfectly. I use gelatin powder to help it set. For the crust, I crush graham crackers. They add a nice crunch. Mixing these crumbs with melted butter and a pinch of salt creates a tasty base. This combo holds everything together. You can make these bars even better with optional garnishes. A scoop of vanilla ice cream on the side adds creaminess. Maraschino cherries bring a pop of color and sweetness. A drizzle of extra root beer gives it that special touch. If you want the full recipe, check out the details above. The right ingredients make all the difference in creating this delightful dessert! - Combine graham cracker crumbs, melted butter, and salt. - Press mixture firmly into a greased baking dish. Start by mixing the graham cracker crumbs with melted butter and a pinch of salt. This mixture should feel moist but crumbly. Next, firmly press the mixture into the bottom of a greased baking dish. Use your fingers or a flat-bottomed glass to create an even layer. This crust will hold all the deliciousness that follows. - Mix cold water with gelatin powder. - Allow to sit for 5 minutes until thickened. In a small bowl, mix the cold water with the gelatin powder. Stir gently until it looks smooth. Let this sit for five minutes. Watching it thicken is fun! This step is key for a firm but creamy texture in your bars. - Heat 1 cup of root beer and dissolve bloomed gelatin. - Add remaining root beer and vanilla extract. In a small pot, heat one cup of root beer over medium heat. You don’t need it to boil, just warm enough. Remove it from the heat and add the thickened gelatin mixture. Stir until the gelatin dissolves completely. Then, add the rest of the root beer and a teaspoon of vanilla extract. This mixture will bring that classic root beer flavor right into your dessert. - Whip heavy cream with powdered sugar. - Gently fold in the root beer mixture. In a large mixing bowl, whip the heavy cream with powdered sugar until it forms soft peaks. This will take about 3-5 minutes. Once it's ready, gently fold in the root beer mixture. Be careful not to deflate the cream. This step creates a light and airy filling that pairs perfectly with the crust. - Pour cream mixture over the crust. - Cover and refrigerate for 4–6 hours until set. Pour the creamy root beer mixture over the graham cracker crust. Use a spatula to spread it evenly. Cover the dish with plastic wrap and place it in the refrigerator. Chill for at least 4 to 6 hours until the filling is set. Waiting can be hard, but trust me, it’s worth it! For the full recipe, you can check out the detailed instructions and tips to make this dessert a hit. To get the right consistency in your cream mixture, whip the heavy cream until it forms soft peaks. This means the cream holds its shape but is still smooth. Avoid over-whipping, or it may turn grainy. To check, lift the whisk; the peaks should gently fold back over. - Chill your mixing bowl and beaters before whipping. - Start at a low speed, then increase to medium. - Stop once you see soft peaks forming. To boost flavor, consider adding spices or extracts to your mixture. A pinch of cinnamon or nutmeg can add warmth. Almond extract pairs well with root beer too. For the best root beer flavor, choose a brand that uses real cane sugar. Some recommended brands include A&W, Barq's, and Virgil's. Serving is key to impressing your guests. I like to serve each bar on a plate with a scoop of vanilla ice cream. Drizzle extra root beer over the top for added flavor. For a playful touch, add a maraschino cherry on top. When cutting the bars, use a sharp knife dipped in hot water. This helps make clean slices and gives your bars a professional look. {{image_4}} You can change the flavor of root beer cream bars by using different sodas. Try cream soda for a smoother taste or cola for a classic twist. Both options add a fun new flavor. You can even layer chocolate or caramel for extra richness. This will give your bars a unique touch. If you want to impress friends, these changes will do the trick! If you need a gluten-free crust, use gluten-free graham cracker crumbs. They work just as well and taste great. For a dairy-free option, try coconut cream instead of heavy cream. It gives a nice flavor and texture. You can also find vegan gelatin to replace regular gelatin, making this dessert fit your needs. To make bite-sized root beer cream bars, use mini muffin tins. Just follow the same steps but pour less mixture into each cup. Bake them for about 15-20 minutes. The smaller size is perfect for parties or snacks. Be sure to check them often so they don’t overcook. These mini treats will be fun to share! To keep your root beer cream bars fresh, use a sealed container. Glass or plastic containers work well. If you do not have a container, wrap the bars tightly in plastic wrap. This keeps the moisture in and prevents them from drying out. Store them in the fridge to maintain their creamy texture. Yes, you can freeze root beer cream bars! This is a great way to save leftovers. To freeze them, cut the bars into squares first. Then, place them in a single layer on a baking sheet. Freeze until solid. After that, transfer them to a freezer-safe container. This helps keep their shape and texture. Remember to label the container with the date. These bars last about five days in the fridge. They may lose firmness after a few days, but they are still tasty. Look for signs of spoilage, such as a sour smell or changes in color. If you see any of these signs, it’s best to toss them. Enjoy your delightful dessert fresh whenever you can! Yes, you can use diet root beer. It changes the taste and texture slightly. The bars will be less sweet and may not have the same creamy feel. If you prefer a lighter option, diet root beer works fine. To cut the cream bars, use a sharp knife. Dip the knife in warm water for clean slices. Wipe the knife between cuts to keep the edges neat. This method helps keep the layers intact. You can swap heavy cream with coconut cream. Use dairy-free whipped topping for the filling. Make sure to check the gelatin as some brands are not vegan. These swaps help make the bars dairy-free. You can find pre-made root beer cream bars in specialty dessert shops. Some grocery stores may carry brands like Edy's or Haagen-Dazs. Check the frozen dessert aisle for options. Kids can help with many steps! They can mix the crust and press it down. They can also help fold the cream mixture. Just keep them away from sharp knives and hot stoves for safety. You’ve learned how to make delicious root beer cream bars step-by-step. With ingredients like root beer, heavy cream, and a graham cracker crust, you can create a tasty treat everyone will love. Remember, you can customize these bars with different flavors or garnishes. They are easy to store and perfect for sharing. Enjoy making this simple dessert with family and friends. You’ll impress everyone with your new skills!

Root Beer Cream Bars Delightful and Easy Dessert

Looking for a sweet treat that’s light and fizzy? Try my Root Beer Cream Bars! This easy dessert combines root

To make dill pickle deviled eggs, you will need: - 6 large eggs - 3 tablespoons mayonnaise - 2 tablespoons dill pickle relish - 1 teaspoon Dijon mustard - 1 teaspoon apple cider vinegar - 1/4 teaspoon garlic powder - Salt and black pepper to taste - Fresh dill for garnish (optional) - Paprika for garnish (optional) This mix gives a creamy and tangy flavor that is hard to resist. You can easily swap some ingredients if you need to. Here are a few ideas: - Mayonnaise: Use Greek yogurt for a lighter option. - Dill pickle relish: Chopped dill pickles work well too. - Dijon mustard: Yellow mustard can replace Dijon if you prefer. - Apple cider vinegar: White vinegar is a good substitute if needed. - Garlic powder: Fresh minced garlic adds a nice touch, but use less. These swaps can help fit your taste or what you have on hand. To make these deviled eggs, you will need some basic tools: - Medium-sized pot for boiling eggs - Bowl for an ice bath - Sharp knife for cutting eggs - Mixing bowl for the filling - Fork for mashing yolks - Spoon or piping bag for filling eggs Having the right tools makes the process smooth and fun. For the full recipe, check the detailed instructions! To start, you need to cook the eggs. Place 6 large eggs in a medium pot. Fill the pot with cold water until the eggs are covered. Set the pot on medium-high heat. Bring the water to a boil. Once boiling, cover the pot and take it off the heat. Let the eggs sit for 10-12 minutes to cook. Next, prepare an ice bath. Fill a large bowl with ice and cold water. Carefully move the eggs to the ice bath. This cools them down fast and makes peeling easier. After 5 minutes, tap each egg gently on a hard surface. Peel the eggs under running water for smooth results. Now it's time to make the filling. Slice each peeled egg in half lengthwise. Scoop the yolks into a mixing bowl. For the filling, you will need: - 3 tablespoons mayonnaise - 2 tablespoons dill pickle relish - 1 teaspoon Dijon mustard - 1 teaspoon apple cider vinegar - 1/4 teaspoon garlic powder - Salt and black pepper to taste Add these ingredients to the yolks. Use a fork to mash them together. Mix until creamy and smooth. Taste the filling and adjust salt and pepper as you like. To fill the egg whites, you have two options. Use a piping bag for a neat look. If you prefer, you can use a spoon for a more rustic style. Fill each egg white half with the yolk mixture. Lastly, add a sprinkle of paprika on top for color. If you want, place a small piece of fresh dill as a garnish. This adds a nice touch and makes the eggs look great. For the full recipe, check the earlier section. Enjoy your delicious Dill Pickle Deviled Eggs! To cook eggs just right, I start with cold water. Place the eggs in a pot and cover them. Bring the water to a boil over medium-high heat. Once boiling, cover the pot and take it off the heat. Let the eggs sit for 10-12 minutes. This method helps prevent green rings around the yolks. After cooking, I move the eggs to an ice bath. This cools them quickly and stops cooking. It also makes peeling easier. When peeling, tap the eggs gently. Peel them under running water to make it smoother. Store leftover deviled eggs in a sealed container. Keep them in the fridge for up to three days. To serve, place them on a platter to show off their beauty. You can add fresh dill or sprinkle paprika for extra flair. If you’re taking them to a party, use a covered dish. This will keep them safe and fresh. Serve them chilled for the best taste. Want to kick up the flavor? You can add hot sauce for a spicy kick. A splash of pickle juice can add more tang. Chopped green onions or bacon bits can give a nice crunch. Experiment with different herbs like chives or parsley. Each addition can make your deviled eggs unique. Customize them to suit your taste or the occasion. For the full recipe, check out the details earlier. {{image_4}} To spice things up, try adding heat to your deviled eggs. You can mix in a bit of hot sauce or diced jalapeños with the yolk filling. This will give your eggs a nice kick. You can also sprinkle crushed red pepper flakes on top for extra flavor. Adjust the heat level to suit your taste. Want a vegan twist? You can swap the eggs for tofu. Silken tofu works best for a creamy texture. Blend the tofu with dill pickle relish, vegan mayo, and spices from the original recipe. This gives you a tasty and plant-based version. It's a fun option for your vegan friends. Garnishing can elevate your deviled eggs. Instead of paprika, try using crushed nuts or seeds for crunch. You could also top them with sliced olives or capers for a savory touch. Fresh herbs like chives or parsley add a pop of color and flavor. Experiment with different toppings to make your eggs stand out. For the full recipe, check out the complete steps to make these delicious Dill Pickle Deviled Eggs. To keep your Dill Pickle Deviled Eggs fresh, place them in an airtight container. Cover the container tightly to prevent any odors from getting in. Store them in the fridge for up to three days. If you expect to have leftovers, I suggest not filling all the eggs at once. This way, the egg whites stay fresh longer. While deviled eggs do not freeze well, you can freeze the filling. Scoop the yolk mixture into a freezer-safe bag. Seal it tightly, then label it with the date. You can store the filling for up to three months. When ready to use, thaw it in the fridge overnight. Then, fill the egg whites fresh for the best taste. To keep your eggs fresh before cooking, store them in their original carton in the fridge. The carton protects them from absorbing odors. Also, try to use them within three to five weeks of purchase for the best results. Remember to check for cracks before cooking. If they look good, you’ll have perfect eggs for your deviled eggs! Yes, you can make Dill Pickle Deviled Eggs ahead of time. They taste great when chilled. I suggest making them a day before your event. Store them in the fridge in an airtight container. This keeps them fresh and tasty. The flavors blend well when they sit, making them even better! For this recipe, dill pickle relish works best. It adds that classic tangy flavor. You can also use finely chopped dill pickles if you prefer more crunch. Sweet pickles do not work well here, as they change the taste. Stick with dill for the real deal! To know when your eggs are perfectly hard-boiled, follow the cooking time closely. After boiling, let them rest for 10-12 minutes. Then, cool them in an ice bath. If the yolk is bright yellow and firm, you did it right! If you see a green ring around the yolk, they overcooked. A perfect egg is key for great Dill Pickle Deviled Eggs. For the full recipe, check out the details above! Dill pickle deviled eggs make a tasty twist on a classic dish. We covered the key ingredients, suggested swaps, and the tools you need. I shared tips to cook perfect eggs and fresh storage methods. You can even try fun variations, like spicy or vegan options. With this guide, you can impress anyone with these easy yet flavorful bites. Enjoy making your dill pickle deviled eggs perfect for any gathering!

Dill Pickle Deviled Eggs Quick and Easy Recipe

Are you ready to spice up your next gathering with a fun twist on a classic snack? My Dill Pickle

- 2 cups all-purpose flour - 1 cup warm water (about 110°F or 43°C) - 1 packet (2 1/4 teaspoons) active dry yeast - 1 teaspoon granulated sugar - 1 teaspoon fine sea salt - 2 tablespoons extra virgin olive oil (plus more for drizzling) - 1 cup fresh cherries, pitted and halved - 2 tablespoons fresh rosemary, finely chopped - Coarse sea salt for topping The ingredients for Cherry Rosemary Focaccia Art are simple yet special. Each one brings unique flavors. First, the all-purpose flour serves as the base. It gives the focaccia structure. The active dry yeast is next. This ingredient makes the dough rise and adds a lovely texture. Then, we have warm water. It activates the yeast. The granulated sugar helps the yeast work better and adds a touch of sweetness. Fine sea salt adds flavor. It balances the sweetness of the cherries. The extra virgin olive oil adds richness and a nice texture. Use some for the dough and drizzle more over the top. Fresh cherries bring a burst of flavor. Their sweetness complements the aromatic rosemary. Finally, coarse sea salt on top enhances the flavor right before baking. With these ingredients, you are ready to create a delightful focaccia. You can find the full recipe later in this article. - Activate the Yeast: Start by mixing warm water, sugar, and active dry yeast in a small bowl. Stir gently to mix. Let it sit for 5 to 10 minutes until it gets frothy. This means your yeast is active. - Prepare the Dough: In a large bowl, mix all-purpose flour and fine sea salt. Make a well in the center and pour in the frothy yeast mix along with olive oil. Stir with a wooden spoon until the dough forms. Transfer it to a floured surface and knead for 5 to 7 minutes. You want it smooth and elastic. - First Rise: Shape the dough into a ball and place it in an oiled bowl. Cover it with a damp cloth. Let it rise in a warm spot for about 1 hour, or until it doubles in size. - Preheat and Prepare the Baking Pan: While the dough rises, preheat your oven to 425°F (220°C). Grease your baking sheet with olive oil to help the focaccia get a nice crust. - Shape the Focaccia: Once the dough has risen, gently punch it down. Transfer it to the prepared pan. Use your fingers to stretch and spread the dough to about 1/2 inch thick. - Create Patterns and Add Toppings: Use your fingertips to make dimples all over the dough. Scatter the halved cherries on top and sprinkle with chopped rosemary. Drizzle more olive oil over it, and finish with a sprinkle of coarse sea salt. - Second Rise: Cover the dough again with a cloth and let it rise for another 20 to 30 minutes. It should puff up a bit more. - Bake the Focaccia: Place the pan in the oven and bake for 20 to 25 minutes. It should turn a lovely golden brown and sound hollow when tapped. - Cool and Serve: Once baked, take the focaccia out and let it cool on a wire rack. When cool enough, slice it into squares or wedges. For a special touch, serve it warm with extra olive oil drizzled on top. For full instructions, check the Full Recipe. Kneading the Dough Effectively Kneading is key to great focaccia. Use your hands to push the dough down and fold it over. Do this for about 5 to 7 minutes. You want the dough to feel smooth and elastic. If it is too sticky, add a little flour. Keep your surface floured to avoid sticking. Ensuring Proper Dough Rise Times Rising is where magic happens. For the first rise, let the dough sit in a warm spot. Cover it well to keep warmth in. It should double in size, which takes about 1 hour. For the second rise, let it puff up for another 20 to 30 minutes. This helps create a light and airy focaccia. Best Practices for Topping Distribution To get even toppings, scatter your cherries and rosemary evenly. Press them gently into the dough. This helps them stick during baking. Don't forget to drizzle olive oil over the top. It adds flavor and helps the toppings caramelize nicely. Using High-Quality Olive Oil Good olive oil makes a big difference. Use extra virgin olive oil for the best taste. It adds richness and depth to your focaccia. Drizzle it on before baking and as a finish. This will enhance the flavor and make your focaccia look shiny and inviting. Substituting Ingredients for Enhanced Flavor Feel free to swap some ingredients for fun flavors. Try using different herbs like thyme or basil. You can also add cheeses like feta for a salty kick. If you want a sweeter touch, consider using honey or even a sprinkle of sugar over the top. These changes can make your focaccia truly unique. For the full recipe, check the earlier section! {{image_4}} Adding cheeses like feta or goat cheese can enhance the flavors. These cheeses bring a creamy taste that pairs well with cherries. You can sprinkle them on top before baking. Incorporating other fruit toppings can also add variety. Try figs, peaches, or even blueberries for a sweet twist. Each fruit offers a unique taste, making your focaccia fun and fresh. Herb variations can change the aroma profile. Basil or thyme can replace rosemary for a different flavor. Use your favorite herbs to create your signature focaccia. If you need gluten-free options, use gluten-free flour substitutes. Almond flour, coconut flour, or a gluten-free blend can work well. Just make sure to follow the package instructions for best results. For vegan modifications, you can make this recipe egg-free. Replace any eggs with a mixture of ground flaxseed and water. This simple swap keeps the texture while making it suitable for a vegan diet. To enjoy your focaccia, store any leftovers properly. I recommend placing the focaccia in an airtight container. This keeps it fresh and soft. You can also wrap it tightly in plastic wrap. - Room Temperature: If you plan to eat your focaccia within two days, keep it at room temperature. This works best in a cool, dry place. - Refrigeration: For longer storage, you can refrigerate it. However, this may dry it out. If you choose this option, cover it well to keep moisture in. When you are ready to eat your focaccia again, reheating is key. You want it warm and soft, not soggy. - Best Ways to Reheat Focaccia: Preheat your oven to 350°F (175°C). Place the focaccia directly on the oven rack or a baking sheet. Heat for about 10 minutes. This gives it a nice crust again. - Avoiding Sogginess: If you use a microwave, keep it short. Heat in 10-second bursts. This helps prevent sogginess. A quick blast of heat is enough to warm it up without making it rubbery. Enjoy your cherry rosemary focaccia art fresh, or save it for later with these tips! How do I know when the yeast is activated? You will see bubbles and foam on the surface. This usually takes about 5 to 10 minutes. The mixture should look frothy. If you don’t see this, the yeast may be dead. Can I use frozen cherries for this recipe? Yes, you can use frozen cherries. Just thaw them first and drain any extra liquid. This keeps your focaccia from becoming soggy. What can I serve with cherry rosemary focaccia? You can serve it with a nice salad, cheese, or dips like olive oil and balsamic vinegar. It also pairs well with soups or stews. How long does focaccia last? Focaccia stays fresh for about 2 to 3 days at room temperature. Store it in a bread bag or wrapped in foil to keep it soft. Can I freeze focaccia bread? Yes, you can freeze focaccia. Wrap it well in plastic wrap and foil. It can last up to 3 months in the freezer. What are the best topping combinations for focaccia? You can mix and match toppings! Try olives, sun-dried tomatoes, or different herbs. Cheese can also add a lovely flavor. Use your favorite ingredients to make it unique! Cherry rosemary focaccia is a fun and tasty project. You learned how to prepare the dough, shape it, and add toppings. Remember to activate the yeast and give the dough time to rise. Consider the tips for perfecting your bread and adding unique flavors. With practice, you’ll make focaccia that impresses everyone. Enjoy experimenting with different ingredients and variations. Happy baking!

Cherry Rosemary Focaccia Art Delightful Baking Guide

Are you ready to create a stunning Cherry Rosemary Focaccia? This delightful baking guide shows you how to mix fresh

- Canned tuna: Choose your preferred variety (e.g., chunk light, solid white) - Dill pickle relish: This adds a tangy kick to the salad. - Mayonnaise: It brings a creamy texture and rich flavor. - Greek yogurt: Adds a healthy twist and boosts creaminess. - Celery: Gives a nice crunch to the salad. - Green onion: Adds a mild onion flavor and freshness. When making Pickle Tuna Salad Lettuce Wraps, I love to use canned tuna. You can pick chunk light or solid white. Each type has its own taste and texture. Dill pickle relish is key here. It gives the salad a bright, zesty flavor. I often add both mayonnaise and Greek yogurt. This mix makes the salad creamy and rich, but lighter. Next, I always chop celery and green onion finely. The celery gives a satisfying crunch, while green onion adds freshness and a hint of sharpness. This combo creates a perfect balance of flavors and textures. You can find the full recipe to help you get started right away. Enjoy making these delicious wraps! To start, you need to drain and flake the tuna properly. Open the can and pour out the liquid. Use a fork to break the tuna into small pieces. This helps the salad mix well and makes it easy to eat. Next, mix the base of your salad. In a medium bowl, combine the flaked tuna, dill pickle relish, mayonnaise, Greek yogurt, and Dijon mustard. Stir this mixture well with a fork until it is creamy and smooth. The relish adds a nice zing, while the mayo and yogurt give it a great texture. Now, it's time to add in some vegetables. Chop one celery stalk finely and slice one green onion thinly. Add these to the bowl and mix gently. This gives the salad a nice crunch and fresh flavor. Season with salt and pepper to taste. Adjust the seasoning to your liking if you want more tang or creaminess. Choosing the right lettuce leaves is key for wraps. I recommend using butter or romaine lettuce. These types hold up well and provide a nice crunch. Take one large leaf at a time. To assemble, spoon about 2-3 tablespoons of the tuna salad into the center of the leaf. Fold the sides of the lettuce around the tuna filling to create a wrap. This makes it easy to eat and keeps everything inside. Repeat this with the remaining leaves and tuna salad until you use it all. For a great finish, garnish each wrap with a sprig of fresh dill. This adds a pop of color and flavor. For presentation, arrange the completed wraps on a platter. Place them upright for a vibrant look. You could also add a light dipping sauce or some extra dill to make it even more appealing. This quick and tasty meal is ready to serve! Enjoy making and sharing these delicious Pickle Tuna Salad Lettuce Wraps. For a detailed list of ingredients and instructions, check the Full Recipe. To make your pickle tuna salad sing, adjust the seasoning to your taste. Start with a bit of salt and pepper. You can always add more later if needed. For extra flavor, try adding: - A dash of garlic powder - A sprinkle of paprika - Chopped fresh herbs like parsley or dill These additions can elevate your dish and offer a unique twist. If you want a fast meal, prep the tuna salad in advance. Make it a day before and keep it in the fridge. It will taste even better after the flavors meld. Store the salad in an airtight container. When you are ready to eat, assemble the wraps. It keeps the lettuce crisp and fresh. Assembled wraps can get soggy, so only wrap them just before serving. Pair your pickle tuna salad lettuce wraps with tasty dips or sides. Here are some ideas to consider: - A light ranch or yogurt dip - Fresh cut veggies like carrots or bell peppers - A side of fruit for a sweet touch These items can make your meal more fun and colorful. Enjoy the crunch of the lettuce with the creaminess of the tuna salad. For the full recipe, check out the recipe above. {{image_4}} For a vegetarian version, swap the tuna with chickpeas. Just mash them up and mix with the same base ingredients. You can also use canned salmon or crab if you like seafood but want something different. If you have dietary needs, replace mayonnaise with avocado or a vegan mayo. This keeps the creamy texture while making it vegan-friendly. Adding herbs can change the whole dish! Try fresh dill, cilantro, or parsley for new flavors. You can also mix in spices like paprika or garlic powder to kick it up a notch. Want some heat? Add a dash of hot sauce or some cayenne pepper. For sauces, consider using sriracha or tzatziki for a fun twist. If you have a big gathering, double or triple the recipe. It’s easy to make more and a crowd-pleaser. For special occasions, serve the wraps on a colorful platter. Arrange them upright for a fun display. You can garnish with lemon wedges or extra herbs for a touch of flair. For the full recipe, check out the [Full Recipe]. To store leftover tuna salad, place it in an airtight container. This helps keep it fresh. You can store the salad in the fridge for up to three days. If you have assembled wraps, it is better to separate the tuna salad from the lettuce. The lettuce can get soggy, losing its crunch. Store the tuna salad in one container and the lettuce leaves in another. This way, you can enjoy your wraps fresh. The typical shelf life of tuna salad is about three days in the fridge. After that, it might start to lose flavor and texture. Always check for signs that the tuna salad has gone bad. If you notice a change in smell, color, or texture, it’s best to throw it away. Freshness is key to enjoying your meal. Yes, you can freeze tuna salad! However, freezing can change the texture. If you plan to freeze it, use a freezer-safe container. Make sure to leave some space for expansion. Tuna salad can last up to three months in the freezer. When you’re ready to use it, thaw in the fridge overnight. Avoid thawing at room temperature. After thawing, mix well before serving to restore its creaminess. How long does it take to prepare Pickle Tuna Salad Lettuce Wraps? It only takes about 10 minutes to prepare these wraps. You can whip them up quickly, making them perfect for a busy day. Can I use fresh tuna instead of canned? Yes, you can use fresh tuna! Just cook it first, then flake it. This adds a nice, fresh flavor to the wraps. Are there gluten-free options for the lettuce wraps? Absolutely! Lettuce is naturally gluten-free. Just use large leaves, like butter or romaine, as your wrap. Is this recipe suitable for keto or low-carb diets? Yes, this recipe fits well into keto and low-carb diets. The main ingredients are low in carbs and high in protein. Suggestions for dairy-free alternatives in the recipe For a dairy-free option, skip the Greek yogurt. You can use more mayonnaise or avocado for creaminess. What vegetables can I add to this recipe? You can add bell peppers, cucumbers, or shredded carrots. These will add extra crunch and flavor. Can I make this dish spicier, and how? Yes! Add a dash of hot sauce, chopped jalapeños, or a sprinkle of cayenne pepper. This will give your wraps a nice kick! This blog post covered the key ingredients, steps, and variations for making Pickle Tuna Salad Lettuce Wraps. You learned how to prepare and assemble the wraps, enhancing their taste and presentation. Use tips for easy meal prep and storage, along with customization options. In summary, these wraps offer fun, tasty, and healthy choices. Feel free to experiment and make them your own. Enjoy your cooking, and let your taste buds lead the way!

Pickle Tuna Salad Lettuce Wraps Quick and Tasty Meal

Looking for a quick and tasty meal that’s easy to make? Dive into my Pickle Tuna Salad Lettuce Wraps! This

- 2 ripe peaches, pitted and sliced - 1 cup peach sorbet - 2 cups sparkling water (or lemon-lime soda) - 1 tablespoon freshly squeezed lemon juice - 1 tablespoon chopped fresh mint leaves (for garnish) - Ice cubes Gather these ingredients to create a Peach Fizz Float. Fresh peaches are key for flavor. You want ripe ones that smell sweet and juicy. If you can't find fresh peaches, frozen ones work too. The peach sorbet gives a creamy texture and adds to the sweetness. You may choose sparkling water for a light fizz or lemon-lime soda for more sweetness. Lemon juice brightens the drink, while fresh mint adds a pop of color and aroma. Ice cubes help keep your drink chilled, which is perfect for hot summer days. Each ingredient plays a role in making this drink refreshing and delicious. For the complete preparation guide, check the Full Recipe. - Combine sliced peaches and lemon juice in a blender. - Blend until smooth and free of chunks. To start, grab two ripe peaches. Slice and pit them, then add them to your blender. I like to squeeze in some fresh lemon juice. This adds a zing and keeps the color bright. Blend on high until it’s smooth. You don’t want any chunks—just pure peach goodness. - Place a scoop of peach sorbet into serving glasses. - Pour peach puree over the sorbet. Next, pick your favorite glasses for serving. I always use clear glasses to show off the layers. Place one big scoop of peach sorbet in each glass. It creates a nice, frozen base. Carefully pour the peach puree over the sorbet. Fill each glass halfway, but try not to disturb the sorbet too much. - Fill glasses with sparkling water or lemon-lime soda. - Add ice cubes for extra chill. Now, it’s time for the fizz! Slowly fill each glass with sparkling water or lemon-lime soda. This makes the drink bubbly and fun. You can add ice cubes if you like it extra cold. The ice also makes the drink look cool and refreshing. Enjoy your Peach Fizz Floats! To get a smooth texture, blend the peaches well. You want no chunks in your puree. If you like more fizz, adjust the sparkling water to your taste. Some prefer a light sparkle, while others enjoy a strong fizz. Garnish your drink for a fun look. Fresh mint adds both aroma and color. You can also place peach slices on top or use colorful straws. These details make your Peach Fizz Floats pop! Serve your Peach Fizz Floats right away. This keeps the texture perfect. Pair them with light snacks or summer dishes. They go well with salads or grilled foods. Enjoy a refreshing drink with a tasty bite! {{image_4}} You can switch up the flavor of your Peach Fizz Floats by using different sorbets. Try mango, raspberry, or lemon sorbet instead of peach! Each will bring a new taste to your drink. You can also use flavored sparkling waters. For example, a berry-flavored sparkling water will add a nice twist. If you can't find fresh peaches, don't worry! Frozen peaches work great too. They make it easy to whip up the drink without any fuss. If you prefer a less sweet option, use club soda instead of sparkling water or lemon-lime soda. This will still give you that fizzy feel but with less sugar. With each season, you can change the fruits used in your floats. In summer, try adding strawberries or watermelon. In fall, apples or pears could work well. You can also add herbs like basil or rosemary for a surprising twist. These herbs will give your drink an extra layer of flavor that is both fresh and unique. To keep your Peach Fizz Floats fresh, store leftover peach puree in the fridge. Use an airtight container to keep it from browning. This puree stays tasty for up to three days. If you have extra peach sorbet, keep it in the freezer according to the manufacturer's instructions. Sorbet can last for weeks when stored properly. Don’t let that peach puree go to waste! You can blend it into smoothies or drizzle it over pancakes. It adds great flavor and nutrition. If you have leftover sorbet, think about freezing it for later use. You can scoop it into new drinks or enjoy it on its own as a treat. To make a family-friendly version, skip any spirits. Use only the peach sorbet, sparkling water, and puree. You can also add a splash of extra lemon juice for zest. This version keeps the fun and flavor without the alcohol. Yes, you can prep some parts ahead. Make the peach puree a few hours before serving. Store it in the fridge. Keep the sorbet in the freezer until you are ready to serve. Assemble the floats just before guests arrive. This way, they stay fresh and fizzy. For food pairings, try light snacks. Fresh fruit platters work well. You can also serve peach fizz floats with summer salads or grilled chicken. These dishes complement the sweet and fizzy drink nicely. For dessert, a slice of peach pie or a fruit tart can be perfect. Enjoy the flavors together! To recap, we explored how to make delicious Peach Fizz Floats using fresh peaches, peach sorbet, and sparkling water. I shared tips for getting the right texture and serving ideas that make these floats shine. You can even mix things up with different fruits and flavors. Enjoy these floats fresh, and don’t forget to save any leftovers for smoothies later. Making this treat is fun, easy, and perfect for summer days. I hope you dive in and create your own refreshing version!

Peach Fizz Floats Refreshing Summer Drink Recipe

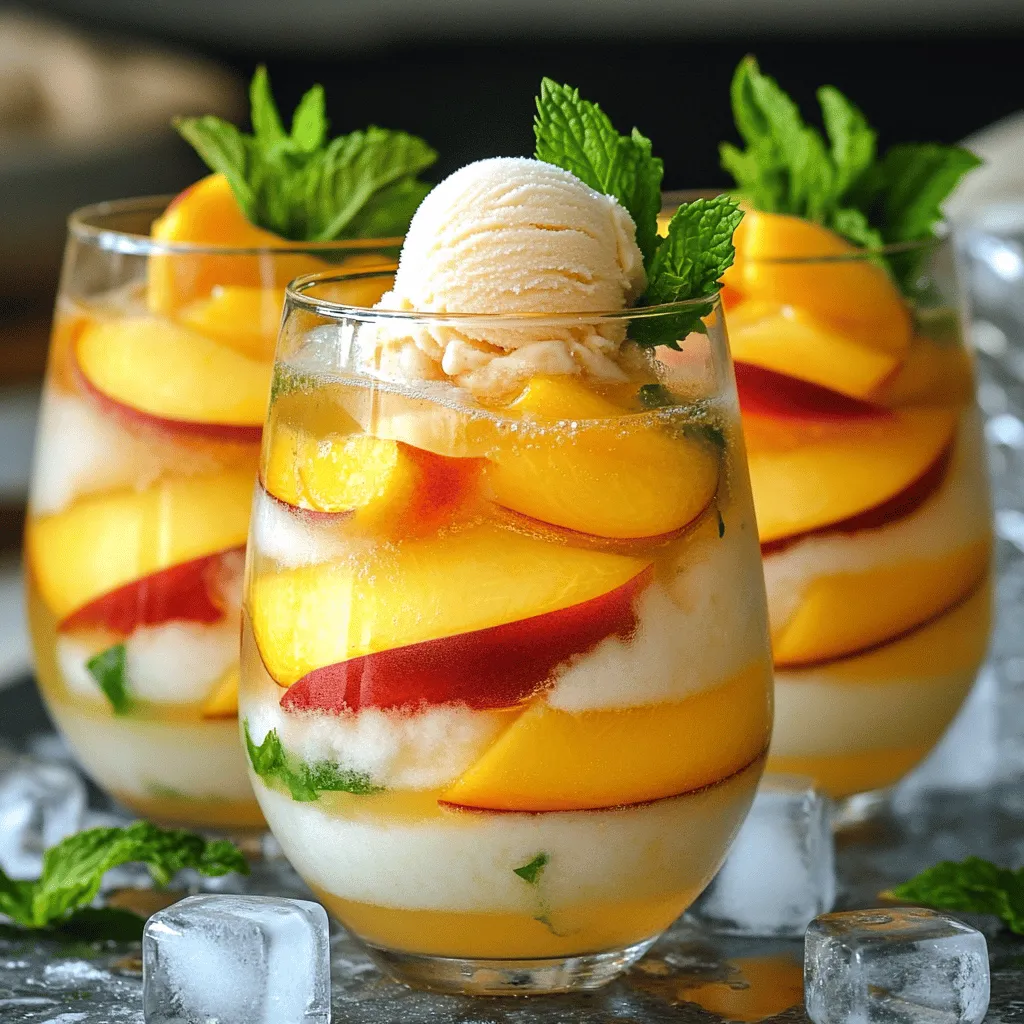
Looking for a cool drink to beat the summer heat? Peach Fizz Floats are a fun, fruity treat you can

- 4 tablespoons all-purpose flour - 2 tablespoons unsweetened cocoa powder - 4 tablespoons granulated sugar - 1/8 teaspoon baking powder - 1/4 cup milk - 2 tablespoons vegetable oil - 1/4 teaspoon pure vanilla extract - 1/4 cup dark chocolate chips - 2 tablespoons cherry pie filling (or fresh cherries, pitted and chopped) - A pinch of salt Each ingredient plays a big role in this recipe. The all-purpose flour gives the cake its structure. The unsweetened cocoa powder adds rich chocolate flavor. Granulated sugar sweetens the cake, while the baking powder helps it rise. Milk and vegetable oil keep the cake moist and tender. Pure vanilla extract adds warmth and depth. Dark chocolate chips give oozy pockets of melted chocolate. Cherries bring a burst of tartness, balancing the sweetness. For flour, I like using King Arthur or Bob's Red Mill. Both brands provide great quality. Ghirardelli is my go-to for cocoa powder and chocolate chips. They have a deep, rich taste that enhances the cake. If you want to switch it up, try using fresh raspberries or strawberries instead of cherries. You can also use almond milk for a dairy-free option, or coconut oil in place of vegetable oil for a hint of tropical flavor. For the full recipe, check out the Cherry Chocolate Lava Mug Cake section. First, grab a large microwave-safe mug. In it, combine your dry ingredients. You need 4 tablespoons of all-purpose flour, 2 tablespoons of unsweetened cocoa powder, 4 tablespoons of granulated sugar, 1/8 teaspoon of baking powder, and a pinch of salt. Use a whisk to mix these well. This step is key to a smooth batter. Make sure there are no lumps. Now, add the wet ingredients. Pour in 1/4 cup of milk, 2 tablespoons of vegetable oil, and 1/4 teaspoon of pure vanilla extract. Stir it all together with vigor. Your goal is a smooth and consistent batter. Then, gently fold in 1/4 cup of dark chocolate chips and 2 tablespoons of cherry pie filling or chopped fresh cherries. Mix them evenly into the batter. This adds a burst of flavor in every bite. Place the mug in the microwave. Cook it on high for about 40 to 60 seconds. Keep an eye on it to avoid overflow. The edges should look set, while the center stays soft and gooey. After cooking, let it cool for one minute. This helps prevent burns. You can top it with vanilla ice cream or whipped cream for extra delight. For the full recipe, check the previous section. Enjoy your creation! To get that gooey center, cook the mug cake for just the right time. I recommend starting with 40 seconds. Check it closely. If the edges look set but the middle is soft, it's perfect. Using dark chocolate chips adds to that rich lava feel. They melt nicely and create that delightful ooze when you dig in. One mistake I see often is overcooking. Microwaves vary, so keep an eye on your mug cake. If you cook it too long, it won’t have that lava effect. Another mistake is not mixing well. Make sure your batter is smooth with no lumps. Lastly, don’t forget the salt! It balances the sweetness and enhances the flavors. Toppings can take your mug cake to the next level. I love adding a scoop of vanilla ice cream on top. The cold ice cream melts slightly and mixes with the warm cake. You can also use whipped cream or even a drizzle of chocolate sauce. Fresh cherries on top add a nice touch, too. For a bit of crunch, sprinkle some crushed nuts or chocolate shavings. Enjoy your Cherry Chocolate Lava Mug Cake with your favorite toppings! {{image_4}} You can switch up the cherry filling for other fruits. Try using raspberries, blueberries, or strawberries. Each fruit adds its own taste and flair. For example, blueberries give a sweet burst, while raspberries add a tangy kick. Use the same amount of fruit as in the full recipe. Just fold them into the batter like you would with cherries. This will keep that yummy lava center while changing the flavor. To make a vegan version, swap the milk for a plant-based option. Almond milk or oat milk works great. Replace the egg with one tablespoon of ground flaxseed mixed with three tablespoons of water. Allow it to sit for about five minutes to thicken. It acts as a great binder. Use vegan chocolate chips to keep it dairy-free. With these changes, you still get a rich and gooey treat. If you need a gluten-free cake, switch the all-purpose flour for gluten-free flour. Many brands work well for baking. Check labels to ensure they are safe for your needs. The texture may be slightly different, but it will still be delicious. Always keep an eye on the cooking time, as gluten-free versions may cook faster. Enjoy this treat without worry! If you have leftover Cherry Chocolate Lava Mug Cake, store it in an airtight container. This keeps the cake moist. You can leave it at room temperature for a day. If you want to keep it longer, refrigerate it. Just remember to cover it well to avoid drying out. To reheat, use the microwave. Place the mug in the microwave for about 10-15 seconds. Check it to ensure it warms evenly. You want it warm but not hot. If it feels too cool, add a few more seconds. Enjoy that gooey chocolate center again! The ingredients in this mug cake have different shelf lives. Here’s a quick guide: - All-purpose flour: lasts about a year when stored in a cool, dry place. - Cocoa powder: can last up to two years if sealed tightly. - Sugar: lasts indefinitely if kept dry. - Baking powder: good for about six months after opening. - Milk: typically lasts about a week after opening in the fridge. - Vegetable oil: can last up to a year. - Vanilla extract: remains good for several years if stored well. - Chocolate chips: stay fresh for about a year. - Cherry pie filling: check the can for the best-by date, but opened, it lasts about a week. For the best results, check these items often and replace as needed. This ensures every mug cake is as delicious as the first! To make a Cherry Chocolate Lava Mug Cake, start with a microwave-safe mug. Mix the dry ingredients: flour, cocoa powder, sugar, baking powder, and salt. Then, add milk, vegetable oil, and vanilla extract. Stir until smooth. Fold in dark chocolate chips and cherry filling. Microwave for 40-60 seconds until set around the edges but gooey in the middle. Yes, you can use any chocolate you like. Milk chocolate adds creaminess, while dark chocolate gives a rich taste. You can even try white chocolate for a sweet twist. Each will change the flavor slightly but still work well in this recipe. Watch the edges of the mug cake as it cooks. The edges should look firm, while the center stays soft. If it looks too watery, give it a few more seconds. Just be careful not to overcook it, or it won't have that lava effect. This guide covers all you need for a perfect Lava Mug Cake. We explored ingredients, cooking steps, and tips for success. You learned how to get the right texture and avoid common mistakes. Plus, we discussed fun variations and storage tips. With this knowledge, you can enjoy a tasty treat at home. Give it a try and share your results with friends!

Cherry Chocolate Lava Mug Cake Delightful Dessert Treat

Indulge in the rich flavors of a Cherry Chocolate Lava Mug Cake that you can make in minutes! This delightful

- 2 large cucumbers - 1 cup fresh mint leaves, finely chopped - 1/2 cup plain yogurt (Greek yogurt can be used for a thicker consistency) - 2 tablespoons fresh lemon juice - 1 tablespoon extra virgin olive oil - 1 teaspoon ground cumin - 1 teaspoon chili powder - 1/2 teaspoon sea salt - Freshly ground black pepper, to taste - 1/4 cup roasted peanuts, coarsely crushed (for garnish) Gather these ingredients before you start. Fresh cucumbers bring a nice crunch. Mint leaves add a bright flavor, while yogurt gives a creamy texture. The lemon juice adds a zesty touch. Extra virgin olive oil makes everything smooth. Ground cumin and chili powder give warmth and spice. Sea salt and black pepper enhance the taste. Finally, roasted peanuts add a delightful crunch on top. You can find the full recipe for these Mint Pickle Cucumber Cups above. This dish is simple and quick to make, yet it impresses with its flavor and presentation. First, wash the cucumbers under cold water. Make sure they are clean. Next, slice them in half lengthwise. Use a small spoon or a melon baller to scoop out the seeds. This will create hollow cups. Place the cucumber halves on a paper towel. This helps absorb any extra moisture. Set them aside while you prepare the filling. In a medium bowl, combine the finely chopped mint leaves and plain yogurt. Add the lemon juice, olive oil, ground cumin, chili powder, sea salt, and freshly ground black pepper. Use a whisk or spatula to mix everything well. The mixture should be smooth and creamy. Taste it and adjust the seasoning if you want. You can add more salt or chili for extra flavor. Now, take a spoon and scoop the mint yogurt mixture into each cucumber half. Fill them generously but do not overfill. Lightly pack the filling to help it hold its shape. This also makes each cup look nice and full. After filling all the cucumber cups, sprinkle the coarsely crushed roasted peanuts on top. This adds a nice crunch. It also enhances the flavors of the mint and yogurt. Arrange the filled cucumber cups on a serving platter. Chill them in the fridge for at least 20 minutes. This helps the flavors blend. Serve the cucumber cups cold for the best taste. For a great look, garnish your cucumber cups with mint sprigs and lemon slices. The green from the mint and the yellow from the lemon create a bright, fresh vibe. You can also arrange the cups on a colorful platter. This adds a fun pop and invites guests to grab one. To kick up the spice, add more chili powder to the mint filling. If you want less heat, cut the chili powder in half. You can also swap the crushed peanuts for chopped almonds or walnuts for a different crunch. Both options add a unique twist to the flavor. You need a few simple tools for this recipe. A sharp knife helps slice the cucumbers easily. A spoon or melon baller is great for scooping out the seeds. Use a mixing bowl for the mint filling and a whisk or spatula for blending. Finally, a nice serving platter will showcase your cucumber cups beautifully. {{image_4}} For a vegan option, you can swap the yogurt with a plant-based alternative. Coconut yogurt works well and brings a nice creaminess. You can also try cashew cream for a rich, nutty flavor. When it comes to herbs, feel free to mix in fresh basil or cilantro. Both add a unique twist and enhance the taste. Diced vegetables can boost the crunch in your cucumber cups. Try adding bell peppers, radishes, or carrots. These will not only add texture but also color. You can also sprinkle other nuts on top. Chopped almonds or walnuts can add a different crunch and flavor profile. Spice blends can change the taste of your mint pickle cucumber cups. Try adding smoked paprika for a smoky flavor or some cayenne for heat. If you want to explore substitutions, you can replace lemon juice with lime juice. It will give a fresh, zesty taste. Mint pickle cucumber cups stay fresh for about 2 to 3 days in the fridge. To keep them crisp, store them in an airtight container. Place a paper towel inside to absorb moisture. This helps keep the cucumbers from getting soggy. You can prep the filling a day ahead. Just keep it in the fridge in a sealed container. For best flavor, assemble the cups just before serving. This way, the cucumbers stay crunchy and fresh. I do not recommend freezing the mint filling. The texture changes and becomes watery when thawed. If you want to freeze cucumber cups, do it without the filling. Wrap them well in plastic wrap and store in a freezer-safe bag. When ready to eat, thaw in the fridge, then fill and serve. Enjoy your mint pickle cucumber cups fresh for the best taste. For the full recipe, check out the details above. To make your mint pickle cucumber cups gluten-free, focus on your ingredients. Here are tips to ensure you avoid gluten: - Yogurt: Use plain yogurt or Greek yogurt that is labeled gluten-free. - Spices: Check that your ground cumin and chili powder do not have gluten. Some spices may contain fillers with gluten, so read labels carefully. - Oils: Extra virgin olive oil is naturally gluten-free. - Peanuts: Ensure your roasted peanuts are gluten-free by checking for cross-contamination. These simple swaps will keep your dish safe for gluten-sensitive friends. Yes, you can use other herbs if you want a different flavor. Here are some great options: - Basil: This herb adds a sweet, aromatic touch. - Cilantro: This gives a fresh, zesty flavor. - Dill: Dill provides a light, grassy taste that pairs well with cucumber. Feel free to mix and match herbs to create your perfect flavor profile! For serving your cucumber cups, think about how to make them look great. Here are some ideas: - Platter: Arrange the cups on a large platter for visual impact. - Garnishes: Add fresh mint sprigs and lemon slices around the cups for color. - Pairing: These cups go well with light drinks. Try serving them with iced tea or sparkling water. This way, you create a lovely and inviting display for your guests! Cucumber cups filled with mint yogurt are fresh and fun. You learned key ingredients, step-by-step instructions, and valuable tips. Remember to customize your flavors and garnishes. These cups make a great snack or appetizer. Don’t be afraid to experiment and have fun. With the right prep and care, they’ll impress friends and family. Enjoy these tasty bites, and keep exploring new ways to make them your own!

Mint Pickle Cucumber Cups Refreshing and Easy Recipe

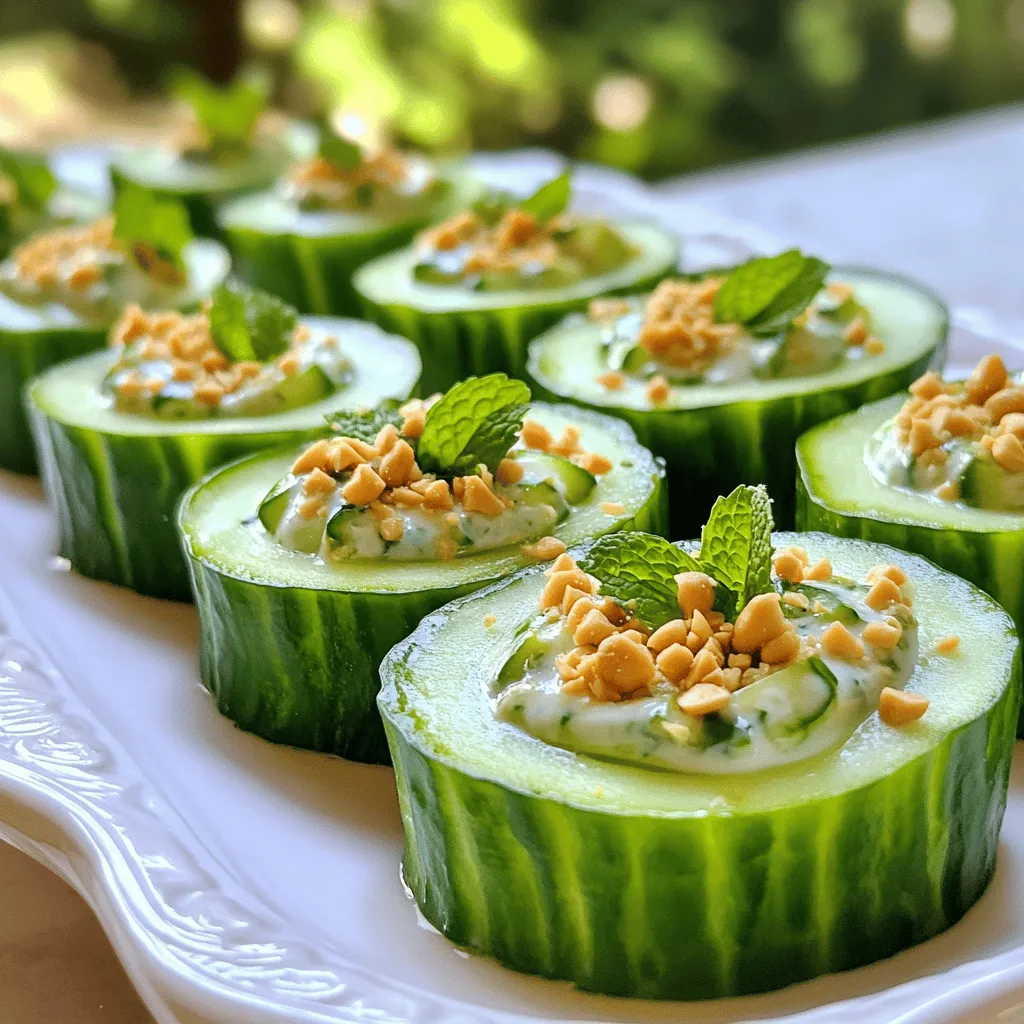
Looking for a fresh, simple, and delicious snack? My Mint Pickle Cucumber Cups are your answer! These bite-sized delights blend

To make Caprese stuffed cupcakes, gather these fresh ingredients: - 1 ½ cups all-purpose flour - 1 teaspoon baking powder - ½ teaspoon baking soda - ¼ teaspoon salt - ½ cup unsalted butter, softened - 1 cup granulated sugar - 2 large eggs - 1 teaspoon pure vanilla extract - ½ cup buttermilk, room temperature - 1 cup cherry tomatoes, halved - 1 cup fresh mozzarella balls, halved - ½ cup fresh basil leaves, finely chopped - 2 tablespoons balsamic glaze, plus extra for drizzling - Freshly cracked salt and black pepper to taste Measuring ingredients correctly is key! Use a dry measuring cup for flour and sugar. Spoon flour into the cup and level it off with a knife. For butter, stick to the standard measurement markings. If you need to swap ingredients, use these tips: - Buttermilk: You can make your own with milk and vinegar or lemon juice. Just add one tablespoon of vinegar or lemon juice to a cup of milk and let it sit for five minutes. - Sugar: If you're out of granulated sugar, you can use brown sugar for a deeper flavor. - Butter: You can use coconut oil or vegetable oil instead of butter, but the texture will change slightly. Fresh ingredients make a huge difference in taste! When you use fresh tomatoes, mozzarella, and basil, you boost flavor and aroma. Here’s why freshness matters: - Tomatoes: Fresh cherry tomatoes add a sweet, juicy burst. They contrast well with the rich cupcake base. - Mozzarella: Fresh mozzarella provides a creamy texture that melts beautifully. This adds a delightful surprise in each bite. - Basil: Fresh basil brings a fragrant note. Its bright flavor cuts through the richness of the cupcake. Using fresh ingredients not only enhances taste but also keeps your dish vibrant and appealing. For the full recipe, check out the detailed instructions provided earlier. First, preheat your oven to 350°F (175°C). Line a 12-cup muffin tin with colorful cupcake liners. In a medium bowl, mix the flour, baking powder, baking soda, and salt. Whisk them well and set aside. In a large bowl, cream the softened butter and granulated sugar together using an electric mixer. Mix for about 3-5 minutes until fluffy. Add the eggs one at a time, mixing well after each. Then, stir in the vanilla extract. Next, gradually add the flour mixture and buttermilk, mixing gently until just combined. Avoid overmixing, as this helps keep the cupcakes fluffy. In a separate bowl, combine the halved cherry tomatoes, mozzarella balls, chopped basil, and balsamic glaze. Add a pinch of salt and pepper, then toss everything together until well mixed. This filling brings the fresh flavors of Caprese salad to your cupcakes. Fill each cupcake liner halfway with batter. Place a generous tablespoon of the Caprese mixture in the center of each cupcake. Cover with more batter until the liners are about ¾ full. Bake the cupcakes for 18-20 minutes. To check for doneness, insert a toothpick into the center; it should come out clean. Once baked, let the cupcakes cool in the tin for 5 minutes. Then, transfer them to a wire rack to cool completely. This cooling step is key for keeping your cupcakes light and airy. For an added touch, drizzle extra balsamic glaze over the cooled cupcakes just before serving. Enjoy the delightful flavors! For detailed steps, check the Full Recipe. One big mistake is overmixing the batter. This makes the cupcakes dense. Mix just until the flour is combined. Another mistake is not using room temperature ingredients. Cold butter or eggs can lead to uneven baking. Make sure all your wet ingredients are warm. Also, filling cupcake liners too full can cause messy overflow. Fill them only three-quarters full. To make fluffy cupcakes, cream the butter and sugar well. This adds air to the batter. Use an electric mixer on medium speed for three to five minutes. Also, separate the dry and wet ingredients properly. Alternate adding them together to keep the mixture light. Lastly, avoid opening the oven door while baking. This keeps the heat steady and helps them rise. For a beautiful presentation, serve the cupcakes on a rustic wooden board or a white platter. Garnish them with extra fresh basil leaves. A drizzle of balsamic glaze on top makes them look fancy. You can also use colorful cupcake liners to add a pop of color. Freshly cracked salt and black pepper can enhance the look and taste. For the full recipe, check out the details above. {{image_4}} You can switch the cheese in your Caprese stuffed cupcakes. Instead of mozzarella, try goat cheese or feta. Both cheeses add a different tang. Goat cheese gives a creamy finish, while feta adds a salty punch. This keeps your cupcakes fresh and exciting. If you need a gluten-free option, use a gluten-free flour blend. Many brands work well in baking. Just make sure your blend has a good mix of starches and proteins. This way, your cupcakes stay fluffy and tasty. Always check labels to ensure they are truly gluten-free. Boost the flavor with herbs or spices. Add a pinch of garlic powder for a savory kick. You can also mix in dried oregano or thyme. Fresh herbs like parsley or chives can give a bright taste. Experiment to find your favorite mix. These small changes make a big impact on your cupcakes. For the full recipe, check out Caprese Stuffed Cupcakes. To keep your Caprese stuffed cupcakes fresh, store them in an airtight container. This helps keep moisture in and prevents them from drying out. Place a piece of parchment paper between layers if you stack them. This way, they won't stick together. Store the cupcakes at room temperature for up to three days. If you want to keep them longer, refrigeration is your best bet. Just remember to let them sit out for about 15 minutes before serving. This helps restore their soft texture. If you have leftover cupcakes, reheating can bring them back to life. Preheat your oven to 350°F (175°C). Place the cupcakes on a baking sheet and cover them loosely with foil. Heat them for about 5 to 10 minutes. This warms them through without drying them out. You can also use a microwave. Just heat each cupcake for about 10 to 15 seconds. Keep an eye on them so they don’t get too hot. Enjoy that fresh taste again! For longer storage, freezing is a great option. First, let the cupcakes cool completely. Wrap each cupcake in plastic wrap, then place them in a freezer-safe bag or container. This prevents freezer burn. You can freeze the cupcakes for up to three months. When you're ready to enjoy one, take it out and let it thaw in the fridge overnight. For a quick treat, leave it at room temp for a few hours. You can even reheat it as mentioned before for that fresh-from-the-oven taste! For the full recipe, visit the provided link. Yes, you can make these cupcakes ahead of time. They taste great even after a few days. After they cool, store them in an airtight container. This keeps them moist and fresh. For the best taste, add the balsamic glaze just before serving. If you need a substitute for balsamic glaze, try using a mix of olive oil and lemon juice. This blend adds a nice tangy flavor. You can also reduce regular balsamic vinegar on the stove until it thickens. This creates a similar glaze to drizzle over your cupcakes. To check if your cupcakes are done, insert a toothpick into the center. If it comes out clean, the cupcakes are ready. You can also gently press the tops. If they spring back, they are done. Avoid opening the oven too soon; this helps them rise better. In this blog post, we explored how to create delicious Caprese stuffed cupcakes. We discussed key ingredients, including tips for using fresh items to boost flavor. I provided step-by-step instructions for preparing the batter and making the filling. We also covered common mistakes and ways to make your cupcakes fluffy. Finally, I shared storage tips and addressed common questions about the recipe. Remember, fresh ingredients make a big difference. Enjoy making these tasty treats!

Caprese Stuffed Cupcakes Flavorful Delight to Savor

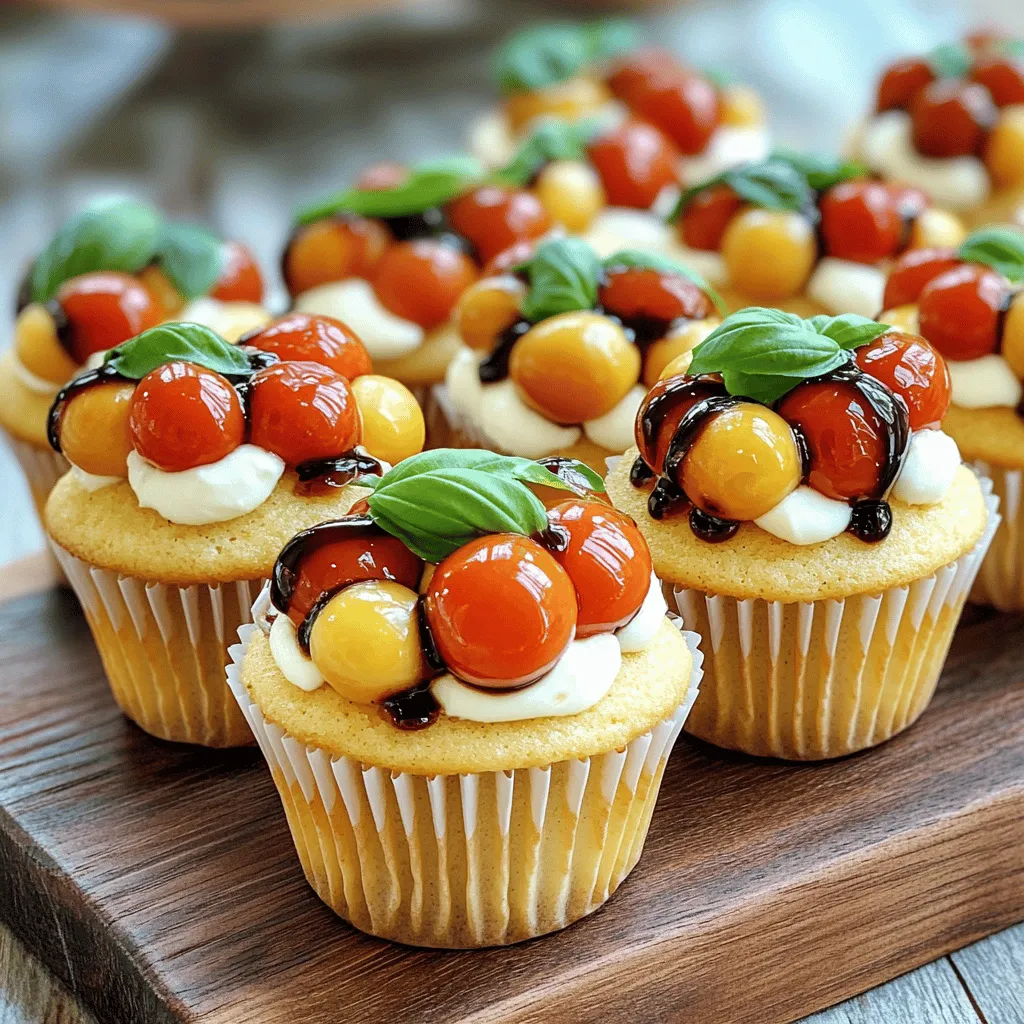
Get ready to elevate your dessert game with my Caprese Stuffed Cupcakes! Imagine fluffy cupcakes filled with fresh basil, rich

Older posts
Newer posts
← Previous Page1 … Page20 Page21 Page22 … Page91 Next →

dsad

© 2025 recipesstation • Built with GeneratePress

Our Policies

  • Copyright Policy
  • Cookie Policy
  • GDPR Policy
  • Privacy Policy
  • Disclaimer
  • Terms Of Use

More Information

  • Home
  • About
  • Contact
  • Appetizers
  • Dessert
  • Dinner
  • Drinks
©2025, recipesstation About Back To Top