Skip to content
DisclaimerTerms Of UseGDPR PolicyCookie Policy

recipesstation

  • Home
  • Drinks
  • Appetizers
  • Dinner
  • Dessert
  • About
  • Contact
  • Privacy Policy
DisclaimerTerms Of UseGDPR PolicyCookie Policy

Emily

- 1 cup mango cake mix - 1/2 cup water - 1/4 cup vegetable oil - 2 large eggs - 1/2 cup mango puree (fresh or canned) - 1/4 teaspoon vanilla extract - 1/4 cup Tajin seasoning (plus extra for coating) - 1 cup white chocolate chips - 1 tablespoon coconut oil - Lollipop sticks - Mixing bowls - Whisk - Baking pan - Parchment paper - Microwave-safe bowl - Additional Tajin for garnish - Decorative container for presentation In this recipe, the main ingredients create a burst of mango flavor. The mango cake mix and mango puree work together for a sweet, fruity base. The Tajin seasoning adds a zesty kick, making these cake pops unique. You will need simple tools for easy mixing and melting. A whisk helps blend the batter, while a microwave-safe bowl makes it easy to melt the chocolate. Parchment paper makes clean-up a breeze. For a special touch, consider adding extra Tajin as a garnish. A decorative container can also add flair to your presentation. This way, your Mango Tajin Cake Pops will look as good as they taste! For the full recipe, follow the detailed instructions to create these delightful treats. - Preheat your oven to 350°F (175°C). Grease a cake pan or line it with parchment paper. - In a large bowl, mix together 1 cup of mango cake mix, 1/2 cup of water, 1/4 cup of vegetable oil, 2 large eggs, 1/2 cup of mango puree, and 1/4 teaspoon of vanilla extract. Use a whisk to blend until smooth. - Pour the batter into the prepared cake pan. Bake for 25-30 minutes. Check with a toothpick; it should come out clean when done. - Let the cake cool in the pan for about 30 minutes. This step is key for easy crumbling. - Once cooled, transfer the cake to a large bowl. Crumble the cake into fine pieces using your hands or a fork. - Sprinkle 1/4 cup of Tajin seasoning over the crumbled cake. Mix well to ensure even flavor. - Take small portions of the cake mixture and roll them into 1-inch balls. Place them on a lined baking sheet. Refrigerate for 30 minutes to firm them up. - In a microwave-safe bowl, combine 1 cup of white chocolate chips and 1 tablespoon of coconut oil. Melt in 30-second intervals, stirring in between until smooth. - Dip one end of a lollipop stick into the melted chocolate. Insert the stick into the center of each cake ball. - Dip each cake pop into the melted chocolate, letting excess drip off. Sprinkle extra Tajin on top for a zesty finish. - Return the coated pops to the baking sheet. Refrigerate for 15-20 minutes until the chocolate sets. For the full recipe, check [Full Recipe]. Enjoy making these fun and tasty treats! To get the best texture for your Mango Tajin Cake Pops, start with proper cooling. Allow your cake to cool completely before crumbling. This step helps the cake hold its shape better. After cooling, use your hands or a fork to crumble it into fine pieces. Make sure there are no large chunks. When rolling the cake balls, take small amounts from the mixture. Roll them firmly but gently into 1-inch balls. A consistent size helps them cook evenly and look great. If the mixture feels too sticky, dampen your hands slightly before rolling. For a unique presentation, display your cake pops upright. Use a decorative container filled with rice or foam. This keeps the pops stable and adds flair. To enhance the look, sprinkle extra Tajin around the base of the container. It adds a colorful touch and hints at the flavor. You can also add toppings that pair well with mango and Tajin. Consider adding shredded coconut, chopped nuts, or even edible flowers. These options not only taste great but also make your cake pops visually appealing. If your cake pop mixture is too crumbly, simply add a little more mango puree. A small amount can help bind the crumbs together. Mix thoroughly after adding to ensure even consistency. For chocolate coating issues, if the chocolate is too thick, add a bit more coconut oil. This makes it easier to coat the cake pops. If you get lumps, heat it in the microwave for a few seconds more. Stir well after each interval to keep it smooth. Enjoy making these delightful treats! {{image_4}} You can switch up the flavor of your Mango Tajin Cake Pops. Instead of mango cake mix, try cherry, pineapple, or lemon mixes. Each fruit brings its own taste. You can mix and match flavors for fun. Adding spices can also change the game. Consider cinnamon or nutmeg for warmth. A splash of almond extract adds a nutty twist. Experiment with different flavors to find your favorite. If you need gluten-free cake pops, look for a gluten-free cake mix. Many brands now offer tasty options. You can also make your own mix using gluten-free flour blends. For a vegan version, swap out the eggs. Use flaxseed meal or applesauce instead. You can find dairy-free chocolate chips for the coating. These small changes keep the joy of cake pops for everyone. Serve your cake pops with fun dipping sauces. Try chocolate sauce, caramel, or even fruit coulis. Each sauce adds a new flavor to your pops. For special events, create a cake pop tower. Stick them into a foam base for a stunning display. Guests will love grabbing these delightful treats. The presentation adds excitement to any event. You can even sprinkle some extra Tajin on top for flair. For the full recipe, check out the details in the earlier sections. To keep your Mango Tajin Cake Pops fresh, refrigerate them in an airtight container. The cool air helps maintain their flavor and texture. You can also freeze them for up to three months. To freeze, wrap each pop in plastic wrap. Then, place them in a freezer bag or container. This keeps them safe from freezer burn. Tips on extending shelf life: - Use wax paper to separate pops if stacking them. - Keep them away from strong-smelling foods. If you store your pops in the fridge, they can be enjoyed cold. To refresh them, let them sit at room temperature for a few minutes. This helps soften the chocolate coating. Safety tips for thawing frozen cake pops: - Move the pops from the freezer to the fridge for several hours. - Avoid using the microwave, as this can melt the chocolate unevenly. Check your cake pops for any signs of spoilage. Look for changes in color or texture. If they smell off or feel sticky, it’s best to toss them. Proper labels for storage containers: - Use clear labels that state the date made. - Write “Mango Tajin Cake Pops” to avoid confusion. This way, you can enjoy your delicious treats for a longer time! Mango Tajin Cake Pops stay fresh for about a week in the fridge. Store them in an airtight container to keep them moist. If you want to freeze them, they can last up to three months. Wrap each pop in plastic wrap before placing them in a freezer bag. This keeps them safe from freezer burn. Yes, you can make these cake pops ahead of time. Prepare them one to two days before your event. After shaping the cake pops, refrigerate them. This helps them hold their shape well. Just remember to coat them in chocolate the day you serve them for the best taste and texture. Definitely! If you want a different flavor, try using crushed nuts, coconut flakes, or sprinkles. You can also use cinnamon sugar for a sweet twist. These toppings add different tastes and make your cake pops look fun and colorful. Experiment with what you like! You can make delicious Mango Tajin Cake Pops by following the steps outlined. Start with simple ingredients and tools, then prepare, bake, and cool your cake. Use the tips for texture and decoration to impress. When you try different flavors or variations, the fun continues. These cake pops are easy to store and serve at any event. Enjoy sharing your tasty treats, and don’t forget to customize them! It’s all about creating joy through sweet snacks.

Mango Tajin Cake Pops Delightful Treat for Any Event

Are you ready to impress your guests with a treat that blends sweet and spicy? Mango Tajin Cake Pops are

- 2 medium zucchinis - 1 cup ricotta cheese - 1/4 cup grated Parmesan cheese - 1/4 cup fresh basil, finely chopped - 2 tablespoons fresh parsley, finely chopped - 1 garlic clove, minced - 1 teaspoon lemon zest - Salt and pepper to taste - 1 cup marinara sauce (for serving) - Olive oil for drizzling - Vegetable peeler or mandoline - Baking sheet - Parchment paper - Mixing bowl To make Herbed Ricotta Zucchini Roll Ups, you need fresh ingredients and simple tools. Zucchini serves as the perfect base, bringing a mild flavor and nice texture. Ricotta cheese adds creaminess, while Parmesan gives a salty kick. Fresh herbs like basil and parsley brighten up the dish. Garlic and lemon zest provide depth, making each bite exciting. I like using a vegetable peeler or mandoline to get even zucchini strips. This way, they cook uniformly and roll easily. Lining a baking sheet with parchment paper makes cleanup simple and prevents sticking. A mixing bowl helps combine all the filling ingredients smoothly. Using quality ingredients makes a big difference. Fresh herbs enhance flavor and nutrition. This dish is not only tasty but also healthy. The total prep and cooking time is only about 30 minutes, making it a great choice for busy days. Check the Full Recipe for detailed steps. - Preheat oven to 400°F (200°C). - Slice zucchinis into thin strips, about 1/8-inch thick. - Arrange strips on a baking sheet lined with parchment. - Drizzle with olive oil and sprinkle with salt. - Roast for about 10 minutes, until just softened. Roasting the zucchini helps bring out its natural flavors. It also makes the strips pliable for rolling. Use a mandoline for even slices. This ensures all pieces cook at the same rate. After roasting, let them cool slightly before handling. - In a mixing bowl, combine ricotta cheese, grated Parmesan, chopped basil, and parsley. - Add minced garlic, lemon zest, salt, and pepper to taste. - Mix until smooth and well combined. This filling bursts with flavor. The herbs bring freshness, while the cheese adds creaminess. The lemon zest gives a bright note that balances the richness. Taste the mix before rolling it. Adjust salt and pepper to your liking for the best flavor. - Take a zucchini strip and place about 1 tablespoon of the ricotta mixture at one end. - Roll the strip tightly, encasing the filling inside. - Place the roll seam-side down on a serving plate. - Repeat until all zucchini and filling are used. Assembling these roll-ups is fun and easy. Make sure to roll them tightly to keep the filling inside. You can serve these warm or at room temperature. Pair with marinara sauce for dipping. For the full recipe, check out the section above. Enjoy the fresh flavors of this dish! - Ensure zucchini is sliced evenly for uniform cooking. - Use a non-stick baking sheet or parchment to prevent sticking. When you cut the zucchini, aim for 1/8-inch strips. This thickness helps them cook evenly. If your slices are too thick, they may not roll up well. Using parchment paper is a smart choice. It keeps the zucchini from sticking to the pan. This way, you can enjoy the roll-ups without any mess. - Experiment with different herbs such as thyme or oregano. - Add red pepper flakes for a spicy kick. Mixing in herbs like thyme can change the taste. Thyme gives a warm, earthy flavor. Oregano adds a fresh touch. Try different combinations to find your favorite. For those who like heat, red pepper flakes are a must. Just a pinch can add a nice kick without overpowering the dish. - Arrange roll-ups on a platter and drizzle with olive oil. - Garnish with extra herbs for visual appeal. Presentation is key to making meals look tasty. Place the roll-ups neatly on a large platter. A drizzle of olive oil adds shine and flavor. Garnishing with herbs makes the dish pop visually. Fresh basil or parsley can brighten up your roll-ups. It’s an easy way to make your meal more inviting. For the full recipe, check out the details above! {{image_4}} For a gluten-free twist, simply swap out the marinara sauce. Look for a brand labeled gluten-free. This small change ensures that everyone can enjoy these roll-ups without worry. Always check labels to avoid hidden gluten. Want a vegan version? You can use tofu ricotta or cashew-based cheese. Both options work well and taste great. Make sure to use a plant-based sauce to keep it vegan-friendly. This way, you still enjoy creamy goodness without dairy. To kick up the flavor, try adding sun-dried tomatoes. They give a rich taste that pairs nicely with the zucchini. You can also incorporate other vegetables like bell peppers. This adds a colorful crunch and extra nutrients to your meal. The possibilities are endless, so feel free to experiment! For more details, check out the Full Recipe. After enjoying your Herbed Ricotta Zucchini Roll Ups, store any leftovers in an airtight container in the fridge. This will keep them fresh and tasty. It’s best to eat them within 2-3 days to enjoy their full flavor and texture. You can freeze uncooked roll-ups before baking. This is a great way to save time for later. Just make sure to wrap them tightly in plastic wrap and place them in a freezer bag. When you’re ready to enjoy them, thaw the roll-ups in the fridge overnight and bake as needed. To reheat your roll-ups, the oven works best for keeping their texture nice. Preheat the oven to 400°F. Place the roll-ups on a baking sheet and heat them for 10-15 minutes or until they are warmed through. This method will help them stay delicious and not soggy. Roasting at a high temperature helps remove moisture. Set your oven to 400°F (200°C). This crispness keeps the zucchini tender and tasty. It also allows the flavors to shine through. Yes, prepare and refrigerate them up to a day in advance. This makes meal prep easy. Just roll them up and store in a covered dish. When you're ready to eat, bake them for a quick meal. Pair with marinara sauce or a fresh salad for a complete meal. The marinara adds a nice tang. A crisp salad complements the soft roll-ups well. Yes, cream cheese or goat cheese can be substituted for ricotta. These options create a different taste. Each cheese brings its own unique flavor to the dish. Total time is approximately 30 minutes, including prep and cooking. This makes them a quick and easy dish for busy days. You can enjoy a tasty meal in no time! This recipe for Herbed Ricotta Zucchini Roll-Ups offers a tasty and healthy meal option. You learned how to prepare, assemble, and enhance these rolls. You can even customize them with variations like vegan or gluten-free adaptations. Remember to store leftovers properly and reheat for best flavor. Try these roll-ups for your next meal and enjoy the fresh flavors!

Herbed Ricotta Zucchini Roll Ups Flavorful and Healthy

Do you want a healthy and tasty dish that’s easy to make? Try these Herbed Ricotta Zucchini Roll Ups! With

- 6 large eggs - 3 tablespoons mayonnaise - 2 tablespoons dill pickles, finely chopped - 1 teaspoon Dijon mustard - 1 teaspoon apple cider vinegar - 1 teaspoon hot sauce (to taste) - Salt and pepper, to taste - Fresh dill sprigs for garnish - Extra dill pickle slices for garnish Each ingredient plays a key role in creating the perfect Dill Pickle Deviled Eggs with Hot Sauce. The eggs provide a rich base, while the mayonnaise adds creaminess. Dill pickles bring a tangy crunch that pairs well with the heat from hot sauce. You can adjust the hot sauce based on your taste. Want more heat? Add a little more. Prefer it milder? Just use less. The apple cider vinegar gives a nice zing that balances the mix. For garnish, I love using fresh dill sprigs; they add color and flavor. Extra dill pickle slices on top create a beautiful presentation. This dish shines at any gathering or as a snack. For the complete guide on how to bring these flavors together, check out the [Full Recipe]. - Hard-boil the eggs: Start by placing the eggs in a medium saucepan. Cover them with cold water, leaving about an inch above the eggs. Heat the pan on medium-high until it boils. Once boiling, cover and remove from heat. Let them sit for 10-12 minutes. - Cool the eggs using an ice bath: After the time is up, move the eggs to an ice bath. This helps stop the cooking. Let them cool for about 5-10 minutes. - Peel the eggs properly: Once cooled, tap each egg on the counter. Peel them under cold running water. This makes the shells come off easily. - Slice the eggs in half: Cut each egg in half lengthwise. Gently scoop out the yolks into a mixing bowl. - Prepare the yolk mixture: Use a fork to mash the yolks. Add in mayonnaise, dill pickles, Dijon mustard, apple cider vinegar, and hot sauce. Blend until smooth and creamy. - Season to taste: Taste the mixture and add salt and pepper as needed. You want it flavorful and just right. - Fill the egg whites: Use a spoon or piping bag to fill the egg whites. Make sure to give each half a generous portion of the yolk mixture. - Garnish the deviled eggs: Top each egg with a slice of dill pickle. Sprinkle fresh dill on top for a lovely look. Now you have a tasty and fun dish! For the full recipe, check out the [Full Recipe]. To make the perfect hard-boiled egg, timing is key. For a firmer yolk, cook for 12 minutes. For a softer yolk, 10 minutes works well. Cool the eggs quickly to stop cooking. An ice bath is the best method. After boiling, place the eggs in a bowl filled with ice and cold water. Let them sit for 5 to 10 minutes. You can customize the heat of your deviled eggs with hot sauce. For a mild kick, use just a dash. If you love spice, add more! Try different brands to find your favorite flavor. To boost the dill flavor, use fresh dill or add extra dill pickles. Chopped fresh herbs can brighten the taste, making it even more delicious. How you arrange the eggs can make them pop. Use a decorative platter for a striking look. Place the eggs in a circle or a nice pattern. For garnishing, add a slice of dill pickle on top. A sprinkle of fresh dill adds color and appeal. You want your dish to look as good as it tastes! {{image_4}} You can easily swap mayonnaise for vegan options. Try using silken tofu blended with a bit of lemon juice for a creamy base. This gives a nice texture without using eggs or dairy. You can also experiment with different pickles. Sweet pickles add a fun twist, while spicy pickles can give extra heat. You can even try relish or chopped olives for unique flavors. Spices can change the whole game. Try adding smoked paprika for a smoky taste or garlic powder for depth. Fresh herbs like chives or parsley can brighten the filling. You might also enjoy adding creamy elements like sour cream or Greek yogurt. They add richness and balance the flavors nicely. These deviled eggs shine as a spread too. Try them on toast for a tasty breakfast or snack. You can even use them as a dip with crackers or veggies. They pair well with drinks, like a crisp white wine or a cold beer. For sides, fresh salads or crunchy chips complement them perfectly. To keep your dill pickle deviled eggs fresh, store them in an airtight container. Place a piece of plastic wrap directly on the eggs to prevent them from drying out. They stay tasty in the fridge for up to three days. If you have leftover filling, store it separately. It also lasts about three days. I do not recommend freezing these eggs. Freezing can change their texture and taste. The egg whites may become rubbery once thawed. If you want to freeze the filling, it’s best to do so. Just ensure it's in a sealed container. Thaw it in the fridge overnight before using. If you want to serve them again, take them out of the fridge. You can serve them cold or let them sit at room temperature for a bit. Avoid reheating in the microwave, as it will change the texture. Enjoy the flavors as they are or make them fresh again with the [Full Recipe]. You can use Greek yogurt as a creamy base. It adds a tangy flavor. Another option is avocado. It gives a nice texture and taste. You can also try vegan mayo for a plant-based choice. Dill pickle deviled eggs last about three to four days in the fridge. Store them in an airtight container. This keeps them fresh and tasty. Yes, you can make them a day ahead. Just prepare the filling and fill the eggs. Keep them in the fridge until ready to serve. They taste great after chilling. You can adjust the hot sauce amount based on your taste. For less heat, use less sauce. For more heat, add extra. You can also use milder sauces or even omit them. These deviled eggs pair well with salads and sandwiches. They also go great with cold cuts or a veggie platter. You can serve them at parties or picnics for a fun treat. Dill Pickle Deviled Eggs with a Kick! 🥚🥒 Ingredients: - 6 large eggs - 3 tablespoons mayonnaise - 2 tablespoons dill pickles, finely chopped - 1 teaspoon Dijon mustard - 1 teaspoon apple cider vinegar - 1 teaspoon hot sauce (adjust according to your spice preference) - Salt and pepper, to taste - Fresh dill sprigs for garnish - Extra dill pickle slices for garnish Dill pickle deviled eggs are simple and fun to make. We covered the key ingredients, from eggs to seasonings. I shared helpful tips for perfect hard-boiled eggs and creative flavor variations. Storing and reheating your deviled eggs will ensure they stay fresh. Remember, this dish is great in many ways, whether as a snack or party treat. By following these steps, you can delight everyone with your tasty creation. Enjoy the process and don’t hesitate to get creative!

Dill Pickle Deviled Eggs with Hot Sauce Delight

Craving a snack that packs a punch? Let’s dive into a zesty twist on a classic! My Dill Pickle Deviled

To create a refreshing Sunset Cherry Peach Sangria, gather these simple ingredients: - 2 cups pure cherry juice - 1 cup peach nectar - 1 cup sparkling water - 1 cup fresh cherries, pitted and halved - 1 ripe peach, sliced into wedges - 1 orange, thinly sliced - 1 lime, thinly sliced - A handful of fresh mint leaves, for garnish - Optional agave syrup or honey, for extra sweetness Using high-quality ingredients makes a big difference. I always choose 100% juice with no added sugar for the cherry juice. Fresh fruits add great flavor and color. Ripe peaches and bright cherries create a lovely balance. The sparkling water brings a fun fizz, making it bubbly and exciting. Feel free to adjust the sweetness. If you like it sweeter, add agave syrup or honey. Remember, you can always taste as you go! This sangria is perfect for summer days. It's easy to make and sure to impress your guests. You can find the full recipe above. To start, combine the cherry juice and peach nectar. Pour both into a large pitcher. Use a spoon to stir until they blend well. You want a smooth color without chunks. Next, add the fresh fruits into the mixture. Carefully drop in the pitted cherries, peach wedges, orange, and lime slices. Spread them evenly for color and flavor. If you like it sweeter, you can add optional sweeteners. Drizzle in agave syrup or honey. Stir again until the sweetener mixes in fully. Now, pour in the sparkling water. This will make your sangria fizzy and fun! Stir gently so you keep the bubbles. For a lovely finish, garnish with fresh mint. You can tear the leaves a bit to release their scent. This step adds a nice touch to your drink. Let the sangria chill in the fridge for at least 30 minutes. This waiting time helps all the flavors meld together. Your sangria will taste even better after it sits! When you’re ready to serve, fill glasses with ice. Pour the sangria over the ice. Garnish each glass with a mint sprig or a peach slice for a pretty look. For the full recipe, check out the detailed instructions. Enjoy a refreshing summer drink! Choosing ripe fruits is key. Look for cherries that are deep red and firm. They should smell sweet. For peaches, find ones that yield slightly to pressure. This means they are juicy and ready. Sweetness is also important. Some fruits are sweeter than others. If you prefer a sweeter drink, add more agave syrup or honey. Start with a small amount, then taste. Adjust until it’s just right for you. Clear glasses work best for sangria. They show off the vibrant colors. You can add fun straws or a small umbrella for a festive feel. Pair your sangria with light snacks. Think fruit skewers, cheese, or fresh salads. These foods enhance the flavors and make for a perfect outdoor gathering. Enjoy your Sunset Cherry Peach Sangria with friends for a refreshing summer treat! {{image_4}} You can switch up the fruits in your sangria. Berries add a burst of flavor. Try strawberries, blueberries, or raspberries for a new twist. Citrus fruits bring a bright zing. Add slices of lemon or grapefruit for extra freshness. Mixing in seasonal fruits can also make your sangria special. Think about using watermelon or pineapple in summer. You can also experiment with different juices. Instead of peach nectar, use mango or pineapple juice. This change adds a tropical vibe to your drink. You can create endless combinations. Just remember to balance sweet and tart flavors. Want to add a kick to your sangria? You can incorporate wine or spirits. Use a light white wine for a classic taste. Pinot Grigio or Sauvignon Blanc works well. If you prefer something sweeter, try a Moscato or Riesling. For a stronger mix, add spirits like vodka or rum. They blend well with the fruity flavors. You can also consider flavored liqueurs. Peach schnapps or cherry brandy can enhance the taste. If you're looking for ideas, use sparkling wine as a mixer. Combine it with the cherry juice and peach nectar for a fizzy treat. Just remember to adjust the sweetness as you mix in alcohol. Enjoy the process of finding your perfect blend! To store leftover sangria, pour it into a clean, airtight container. This helps keep the flavors fresh. You can store it in the refrigerator for up to three days. The longer it sits, the more the fruit will infuse the drink, but it may lose some fizz. Can sunset cherry peach sangria be frozen? Yes, you can freeze it! However, the fruit may become mushy after thawing. For the best taste, freeze it without the sparkling water. When you want to enjoy it again, thaw it in the fridge overnight. Serve it cold, but add fresh sparkling water before drinking for a bubbly kick. Can I make Sunset Cherry Peach Sangria ahead of time? Yes, you can make this sangria ahead of time. I suggest preparing it at least 30 minutes before serving. This allows the flavors to blend well. If you want to make it even earlier, chill it overnight. Just add the sparkling water right before serving. This keeps the fizz fresh. What grapes or wines pair well with this sangria? You can use many wines to enhance the sangria. A light white wine works best. I often use Sauvignon Blanc or Pinot Grigio. These wines add a crisp flavor. You can also try red wines like Merlot. Just remember to keep it light and fruity. What to do if the sangria is too sweet? If your sangria is too sweet, add more citrus. Squeeze in some extra lime or orange juice. This will balance the sweetness. You can also add more sparkling water to dilute the mix. Taste and adjust until it’s just right. How to add carbonation without losing fizz? To keep the fizz, add the sparkling water last. Pour it in gently. Stir lightly to mix, but do not shake. This will help keep the bubbles intact. Serve immediately for the best fizz in your drink. For the full recipe, check out the detailed instructions above. Enjoy making your sangria! You learned how to make a refreshing Sunset Cherry Peach Sangria. We covered key ingredients like cherry juice, peach nectar, and fresh fruits. I shared step-by-step instructions, tips for enhancing flavor, and ways to adapt the recipe. Whether you want a non-alcoholic or boozy version, there are options. Remember, you can store any leftovers or even freeze the sangria for later. Enjoy this drink at your next gathering. It's perfect for sharing and good times. Happy mixing!

Sunset Cherry Peach Sangria Refreshing Summer Drink

Looking for a refreshing drink to cool down on hot summer days? Let me introduce you to Sunset Cherry Peach

- 4 ripe tomatoes, diced - 2 juicy peaches, diced - 1 small red onion, finely chopped - 1 jalapeño, deseeded and finely minced - 1/4 cup fresh cilantro, chopped - 2 tablespoons lime juice - 1 tablespoon smoked paprika - Salt and black pepper, to taste Fresh ingredients make this salsa shine. Ripe tomatoes bring sweetness and juiciness. Juicy peaches add a fruity twist. A small red onion gives a nice crunch and sharpness. Jalapeño adds heat, but you can adjust it to your taste. Fresh cilantro adds a burst of flavor. Lime juice brightens the mix and balances the sweetness. Smoked paprika gives a deep, rich flavor. Salt and black pepper enhance everything. Using fresh ingredients is key to good salsa. Fresh tomatoes and peaches taste so much better. They add natural flavors that dried or canned options can't match. Fresh herbs also bring brightness. They make each bite pop with flavor. Always choose ripe fruits for the best taste. You can really tell the difference when you use fresh. If you can't find an ingredient, don't worry. You can swap them for others. For tomatoes, try canned fire-roasted ones for a smoky flavor. If peaches are out of season, mangoes work well too. You can use a sweet onion instead of red onion. If you want more heat, add a serrano pepper instead of jalapeño. Don’t have cilantro? Try parsley for a different taste. These swaps keep your salsa fresh and exciting. For the full recipe, check out the Smoky Tomato Peach Salsa . To start, you need to prepare your grill or smoker. Preheat it to medium heat. If you don’t have a smoker, a grill works too. Use a smoking box or make a foil packet to add that smoky flavor. This step is key to creating a delicious salsa. Next, slice the tomatoes in half. Place them cut-side down on the grill. Do the same with the peaches. Grill them for about 6-8 minutes. Look for nice grill marks on the fruits. This charring adds depth to the salsa. Once grilled, take the tomatoes and peaches off the heat. Let them cool for a few minutes. Chop them into small, bite-sized pieces. In a large mixing bowl, add the diced tomatoes and peaches. Next, add the finely chopped red onion, minced jalapeño, and chopped cilantro. Now, drizzle fresh lime juice over your mixture. Add a sprinkle of smoked paprika for a rich flavor. Gently fold all the ingredients together. Taste your salsa and adjust the seasoning with salt and black pepper. Let it rest for at least 15 minutes to let the flavors meld. For the full experience, check out the Full Recipe. To get that perfect smoky taste, choose ripe tomatoes and juicy peaches. Grill them over medium heat. This helps to develop a nice char. If you want more smoke, add wood chips to your grill. The type of wood can change the flavor. Try hickory or applewood for a unique twist. If you have leftover salsa, store it in an airtight container. This keeps it fresh for a few days. Make sure to put it in the fridge right away. The flavors can mix and change if you leave it out. Always give it a good stir before serving again. To boost the flavor, try adding more lime juice or smoked paprika. This gives the salsa a fresh kick. You can also mix in diced bell peppers for a crunchy texture. If you love heat, toss in more jalapeño. Each change adds a new layer to your salsa. For the full recipe, check back to ensure you have all the steps down! {{image_4}} To spice up your smoked tomato peach salsa, add more jalapeño. You can keep the seeds in for extra kick. If you want a different kind of heat, try using serrano peppers. These peppers are hotter than jalapeños but add a nice flavor. You could also mix in a dash of hot sauce or red pepper flakes to give it a kick. You can switch out the peaches for mangoes or pineapples. These fruits add sweetness and flavor. If you want a different texture, try using bell peppers or cucumbers. They add crunch and freshness. For a seasonal twist, consider using roasted corn in the mix. It gives a nice smoky taste and pairs well with the other flavors. Serve your salsa with tortilla chips for a fun snack. You can also use it as a topping for grilled meats, like chicken or fish. It makes a great addition to tacos or burritos. For a light meal, spoon it over a bed of greens. This salsa is also perfect for enhancing your favorite grain bowls. For the full recipe, use the details above to create this delicious dish. To keep your smoked tomato peach salsa fresh, use an airtight container. Glass containers work best. Make sure the salsa is cool before sealing. This helps prevent extra moisture inside. Store it in the fridge. Keeping it chilled slows down spoilage. You can keep the salsa for about three to five days in the fridge. After that, the flavors may fade. Always check for any signs of spoilage before eating. If it smells sour or looks off, it’s best to toss it. If you want to save your salsa for a longer time, freezing is a great option. Use freezer-safe bags or containers. Leave some space for expansion. Salsa can last up to three months in the freezer. When you’re ready to use it, defrost it in the fridge overnight. This keeps the texture nice. Enjoy your leftover salsa, and don’t forget to check the full recipe for more tips! Yes, you can use canned tomatoes in this recipe. However, fresh tomatoes offer better flavor and texture. If you choose canned tomatoes, drain them well to avoid excess liquid. Then, chop them into smaller pieces. This way, your salsa will stay thick and vibrant. To make a larger batch, simply double or triple the ingredients. Keep the same cooking method. Make sure to grill enough tomatoes and peaches. Adjust the seasoning to taste as you combine the ingredients. This way, everyone can enjoy the fresh dip! This salsa shines with many dishes. It pairs well with tortilla chips for a great snack. Use it as a topping on grilled chicken or fish for added zest. You can even mix it into tacos or burritos for a fresh twist. The combinations are endless! The good news is this smoked tomato peach salsa is already vegan! All ingredients are plant-based and healthy. Enjoy it freely without any changes. You can serve it with fresh veggies or on grilled tofu for a complete meal. In this post, we covered how to make a delicious smoked tomato peach salsa. We discussed key ingredients like ripe tomatoes, juicy peaches, and fresh cilantro. I shared tips for grilling and seasoning to enhance the flavor. We also explored variations and storage tips to keep your salsa fresh. Fresh, high-quality ingredients make all the difference. Enjoy experimenting with flavors, and share your favorite twists! Your salsa journey can be creative and fun. Get started today!

Smoked Tomato Peach Salsa Flavorful and Fresh Dip

Get ready to elevate your dip game with a burst of flavor! My Smoked Tomato Peach Salsa combines ripe tomatoes

To make this fun treat, you’ll need a few key items: - 1 cup rainbow sherbet - 1 cup lemon-lime soda (or sparkling water) - 1 cup club soda - 1 tablespoon grenadine syrup - Whipped cream, for topping These ingredients blend well together. The rainbow sherbet brings vibrant colors and a fruity taste. The lemon-lime soda adds a tangy fizz that makes it refreshing. Club soda enhances the fizz, while grenadine syrup gives a nice sweet touch. You can make your float even more special with some extras: - Colorful sprinkles, for garnish - Fresh mint leaves, for garnish (optional) Sprinkles add a fun crunch, making the float look festive. Mint leaves can provide a fresh aroma and a pop of green. To whip up your Rainbow Sherbet Soda Float, you’ll need: - A tall glass - A spoon - A straw The tall glass lets you see all those beautiful layers. The spoon helps you scoop the sherbet, while the straw makes sipping easy. If you want more fun, use a colorful straw! For the full recipe, check out the detailed steps in the Full Recipe section. Start by placing 1 scoop of rainbow sherbet at the bottom of a tall glass. This colorful base sets the stage for a fun treat. The bright colors make it exciting for kids and adults alike. The sherbet will melt a bit when you add the soda, creating a creamy layer. Next, carefully pour 1 cup of lemon-lime soda into the glass. Fill it halfway, and watch the fizzy bubbles dance to the top. This soda adds a refreshing kick and balances the sweetness of the sherbet. Add another scoop of rainbow sherbet on top of the fizzy soda. This second layer adds flavor and texture. Then, gently pour 1 cup of club soda over the sherbet. This creates a lovely fizz and distinct layers in your float. Drizzle 1 tablespoon of grenadine syrup into the glass. It will sink and create a stunning rainbow effect. Crown your float with a dollop of whipped cream. This makes it look extra special. Finish with colorful sprinkles for a festive touch. If you want, add a fresh mint leaf on top for color. Serve your delightful creation right away. Include a straw and a long spoon for easy sipping and scooping of the delicious sherbet. Enjoy your Rainbow Sherbet Soda Float! For more details, check out the Full Recipe. Layering makes your float look great. Start with a scoop of rainbow sherbet. Use a tall glass to show off the colors. When you pour soda, do it slowly. This helps keep the layers separate. Add sherbet between the sodas to create a fun look. The more layers, the better! To make it extra tasty, use fresh ingredients. Fresh mint leaves add a nice touch. You can also try flavored sodas to boost taste. For a fun look, use colorful sprinkles. They add joy and crunch. Always serve your float right away. This keeps it fizzy and fresh. Lemon-lime soda works well for a bright taste. You can also use sparkling water for a lighter option. Club soda adds fizz and balances sweetness. Experiment with different sodas to find your favorite flavor. Make sure your sodas are cold for the best experience. You can find the full recipe [here](#). {{image_4}} You can switch out rainbow sherbet for other fun flavors. Try orange, lime, or raspberry sherbet. Each will change the taste and color of your float. You can even mix two flavors for a unique twist. Think about using lemon sherbet for a tart kick. Or go with strawberry for extra sweetness. The options are endless! Changing the soda can also give your float a new vibe. Use root beer for a classic twist. Ginger ale adds a spicy note. If you want a fruity touch, try fruit-flavored sodas. You can even use sparkling water for a lighter version. Just remember, the fizz makes it fun! If you want a healthier version, there are easy swaps. Use low-sugar or sugar-free sherbet. You can also try flavored sparkling water. This way, you can keep the fun without extra calories. For a creamy option, blend yogurt with fruit instead of sherbet. It still tastes great while being a bit healthier! For the full recipe, check out the previous sections and enjoy this refreshing treat! If you have leftover rainbow sherbet, keep it in the freezer. Put it in an airtight container to protect it from freezer burn. This way, it stays fresh and tasty. For the sodas, store them tightly capped in the fridge. They stay fizzy longer this way. Soda floats taste best when fresh. If you have leftovers, drink them within an hour. The sherbet melts and mixes with the soda, changing the flavor and texture. If you must store it, cover it with plastic wrap. However, this can affect the taste. To freeze rainbow sherbet, scoop it into a freezer-safe container. Press it down gently to remove air pockets. This keeps it creamy. Cover the top with plastic wrap before sealing the lid. When you want to use it, let it sit at room temperature for a few minutes. This helps it soften for easy scooping. Yes, you can use diet soda. The taste might change a bit, but it will still be refreshing. Diet soda will keep the float lower in calories. If you enjoy the taste of diet soda, go for it! Just remember that the fizz still gives that fun texture. You can easily scale up the recipe. Just multiply the ingredients by the number of servings you need. For example, use 2 cups of rainbow sherbet for 2 floats. Use a big pitcher to mix the soda and syrup together. Then, serve in individual glasses. This way, everyone gets their own colorful treat! There are many fun toppings to try! You can use: - Chocolate sauce for a sweet twist. - Fresh fruit like berries or banana slices. - Crushed cookies for a crunchy texture. - Nuts for a bit of crunch. - More colorful sprinkles for extra fun. Feel free to get creative with your toppings! Each one adds a new flavor and look to your float. For the full recipe, check out the main section. Rainbow sherbet soda floats are fun treats. We explored the main and optional ingredients, along with the right tools. You learned how to make the base and add fizzy soda. Layering tips helped you create the best float. Don't forget to try different flavors and types of soda! Remember to store leftovers properly to keep them fresh. With these details, you can make a perfect float every time. Enjoy your refreshing treat, and feel free to experiment!

Rainbow Sherbet Soda Float Refreshing Summer Treat

Summer is here, and there’s no better way to beat the heat than with a Rainbow Sherbet Soda Float! This

To make Matcha Pistachio Energy Bites, you will need: - 1 cup rolled oats - 1/2 cup pistachios, shelled and roughly chopped - 1/4 cup honey or maple syrup - 2 tablespoons matcha powder - 1/4 cup almond butter (or your preferred nut butter) - 1/4 cup chia seeds - 1/2 teaspoon vanilla extract - Pinch of sea salt - 1/4 cup unsweetened shredded coconut (optional) You can easily swap some ingredients if you need to. For a nut-free version, use sunflower seed butter instead of almond butter. You can also use agave syrup instead of honey or maple syrup. If you can't find matcha powder, try green tea powder. This will still give some flavor and benefits. Matcha offers many health benefits. It is rich in antioxidants, which help protect your body. It can boost your metabolism and provide a calm energy without a crash. Pistachios are also a great choice. They are high in protein and healthy fats. These nuts can help lower cholesterol and improve heart health. Together, matcha and pistachios make a tasty and nutritious snack, perfect for any time of the day. For the Full Recipe, check the section above. Enjoy making these energy bites! Start by gathering all your ingredients. You need rolled oats, chopped pistachios, and matcha powder. Place these in a large mixing bowl. Add chia seeds and a pinch of sea salt. Mix them well with a spoon. You want to see all the dry bits evenly combined. In another bowl, mix almond butter, honey, and vanilla extract. Whisk this mix until it’s smooth. This helps everything blend nicely. Next, slowly pour the wet mix into the dry bowl. Stir as you add it. Keep going until you don’t see any dry spots. If you like coconut, add it now and fold it gently. When mixing wet and dry ingredients, do it gradually. This helps to avoid lumps. If your mixture is too dry, add more almond butter or honey. This will help it stick together. If it’s too wet, add a few more oats. Make sure to mix thoroughly. You want every bite to taste the same. A good spatula works well here. It helps scrape the sides of the bowl. This way, you won’t waste any of your tasty mix. Once your mix is ready, it’s time to roll the bites. Take a small amount of the mixture in your hands. Roll it into a ball about one inch wide. If it falls apart, it needs more binding. Just add a bit more almond butter or honey. Place the rolled balls on a baking sheet lined with parchment paper. Space them out so they don’t stick together. After rolling them, chill the bites in the fridge for about 30 minutes. This helps them firm up. Once set, store them in an airtight container. Enjoy your tasty Matcha Pistachio Energy Bites! For the full recipe, check out the recipe section above. To get the right texture for your energy bites, focus on the mixture. Start with rolled oats and pistachios. Mix them well with chia seeds and matcha powder. This helps create a base that holds together. When you add the wet ingredients, mix until everything is blended. If the mix is crumbly, add more almond butter or honey. This will help bind the ingredients together. The final texture should be moist but not sticky. One common mistake is not measuring ingredients correctly. Be sure to use the right amounts. Too much liquid can make the bites too soft. Also, avoid skipping the chilling step. Chilling helps the bites form and hold their shape. Another mistake is not mixing well. Make sure all ingredients are evenly combined. This ensures each bite has the same flavor and texture. To boost flavor, try adding spices like cinnamon or nutmeg. They pair well with matcha and pistachios. You can also mix in dried fruit, like cranberries or apricots, for added sweetness. For more nutrition, consider adding flax seeds or hemp seeds. These can enhance both taste and health benefits. Want a little crunch? Add some cacao nibs for a chocolatey texture. Experiment with these options to find your favorite mix. For the full recipe, check out Matcha Pistachio Energy Bites. {{image_4}} You can easily change the flavor and texture of your energy bites. Here are some fun add-ins to try: - Dried fruits like cranberries or apricots add sweetness and chewiness. - Seeds such as sunflower or pumpkin seeds give a nice crunch. - Protein powder can boost your energy bites, making them even more filling. - Cacao nibs bring a chocolatey twist without added sugar. Feel free to mix and match these ingredients. The goal is to make them your own! While matcha is the star here, you can explore other flavors too. Consider using: - Spirulina powder for a green superfood boost with a different taste. - Cocoa powder for a rich chocolate flavor. This will give your bites a dessert vibe. - Cinnamon or nutmeg for a warm, spicy touch. These spices add a cozy feel. Experimenting with these swaps can keep your energy bites exciting! You can easily make these energy bites fit different diets. For a vegan option, use maple syrup instead of honey. To make them gluten-free, ensure your oats are certified gluten-free. Most brands offer this choice, making it simple. These adjustments let everyone enjoy your matcha pistachio energy bites. Plus, they keep your snack healthy and inclusive. Don't forget to check the [Full Recipe] for all the details! Keep your energy bites fresh in an airtight container. Store them in the fridge for up to a week. They stay chewy and delicious this way. If you want to enjoy them later, freezing is a great option. Just make sure the bites are cool before storing them. This helps lock in flavor and texture. To freeze your energy bites, place them on a baking sheet first. Space them apart, so they don’t stick together. Once frozen, transfer them to a freezer-safe bag or container. Label it with the date for easy tracking. They can stay fresh for up to three months in the freezer. This makes meal prep easy and fun. When you’re ready to eat a frozen bite, take it out of the freezer. Let it sit at room temperature for about 15-20 minutes. This way, it softens up nicely. You can also microwave it for a few seconds if you want a warm snack. Enjoy your tasty treat anytime! For the full recipe, check the earlier section. Matcha is a special green tea. It comes from the leaves of the Camellia sinensis plant. You grind the leaves into a fine powder. This powder packs a lot of nutrients. Drinking matcha boosts your energy and focus. It also has antioxidants that fight harmful free radicals. These compounds may help protect your heart and skin. Plus, matcha can aid in weight loss by boosting metabolism. It is a great choice for a healthy snack. Yes, you can use other nuts! Almonds, walnuts, or cashews work well. Each nut gives a different flavor and crunch. If you prefer, you can mix nuts for a fun variety. Just make sure to chop them roughly. This keeps the bites easy to eat. Feel free to experiment and find your favorite nut mix! These energy bites last about a week in the fridge. Store them in an airtight container. If you want them to last longer, freeze them. They can stay fresh for up to three months in the freezer. Just remember to thaw them in the fridge before eating. Enjoy your Matcha Pistachio Energy Bites anytime with these tips! For the full recipe, check out the earlier section. Matcha pistachio energy bites are simple and healthy snacks. We explored their tasty ingredients, fun variations, and storage tips. You can make them your own with easy swaps. Remember, keep mixing those wet and dry parts right for the best bites. Avoid common mistakes, and enjoy customizing flavors. These bites give you energy and taste good! Try them yourself, and enjoy the many benefits!

Matcha Pistachio Energy Bites Quick and Healthy Snack

Looking for a quick and healthy snack? You’ll love these Matcha Pistachio Energy Bites! Packed with energy and flavor, they

To make Spicy Honey Garlic Corn Ribs, gather these main ingredients: - 4 ears of corn, husked and cut in half lengthwise - 1/4 cup honey - 2 tablespoons soy sauce - 3 cloves garlic, finely minced - 1 tablespoon sriracha (adjust to your spice preference) - 1 teaspoon smoked paprika - 1/2 teaspoon sea salt - 1/2 teaspoon freshly ground black pepper - 2 tablespoons fresh lime juice - Fresh cilantro, chopped (for garnish) - Lime wedges (for serving) You can enhance the flavor with some optional ingredients: - A splash of rice vinegar for tanginess - Sesame seeds for crunch and texture - Chopped green onions for freshness - Crumbled feta cheese for a creamy touch If you have specific dietary needs, consider these substitutions: - Use agave syrup instead of honey for a vegan option. - Try coconut aminos instead of soy sauce for a gluten-free choice. - Replace sriracha with a milder sauce if you prefer less heat. These ingredients provide a solid base for a delicious dish. The balance of sweet, spicy, and savory flavors makes every bite a treat. For the complete recipe, check out the Full Recipe section. First, preheat your oven to 400°F (200°C). This ensures your corn ribs cook evenly. Take 4 ears of corn and husk them. Use a sharp knife to cut each ear lengthwise into quarters. This will give you rib-like sections. Place the corn ribs upright on a lined baking sheet. Make sure they are spaced out for even cooking. In a medium bowl, combine the following ingredients: - 1/4 cup honey - 2 tablespoons soy sauce - 3 cloves garlic, finely minced - 1 tablespoon sriracha - 1 teaspoon smoked paprika - 1/2 teaspoon sea salt - 1/2 teaspoon freshly ground black pepper - 2 tablespoons fresh lime juice Whisk these ingredients together until the sauce is smooth. This sauce will give your corn a bold and tasty flavor. Now, take a pastry brush and coat the corn ribs with the spicy honey garlic sauce. Be generous and cover all sides well. Set aside some sauce for later. Place the baking sheet in the oven. Bake the corn ribs for 20-25 minutes. Turn them halfway through to ensure even cooking. In the last 10 minutes, baste the corn with your reserved sauce. This creates a sticky glaze. For extra flavor, switch the oven to broil for 2-3 minutes. Watch closely to prevent burning. Once golden and sticky, remove the corn from the oven. Enjoy your flavorful dish! For the full recipe, visit the link above. To make your corn ribs tender, choose fresh corn. Look for ears with bright green husks and plump kernels. Cut the corn evenly to ensure they cook at the same rate. Bake them as instructed, turning halfway. This helps them cook evenly and stay juicy. You can easily change the flavor of these corn ribs. Add more sriracha for heat or use maple syrup instead of honey for a different sweetness. Mixing in spices like cumin or chili powder gives a unique taste. Fresh herbs like basil or parsley add freshness and color. Feel free to get creative! Baking is my favorite way to cook corn ribs, but broiling adds a nice char. Keep an eye on them while broiling to avoid burning. If you want, you can grill the corn ribs for that smoky flavor. Just remember to baste them often. This helps the flavors soak in and keeps them moist. Cooking them evenly is key for a tasty dish. For the full recipe, check out the original instructions and tips to guide you through making these delicious corn ribs. {{image_4}} You can make these corn ribs as spicy as you like. To adjust the heat, simply change the amount of sriracha. If you want a milder flavor, use less sriracha or omit it. For more heat, add extra sriracha or even some red pepper flakes. This way, you can tailor the dish to your taste and your guests' preferences. Switching up the flavor can keep things exciting. For a BBQ spin, replace the honey and soy sauce with your favorite BBQ sauce. You can also add smoked paprika to get that rich, smoky taste. If you want a teriyaki flavor, use teriyaki sauce instead, and keep the garlic. This makes a sweet and savory twist that many will love. If you're looking for a vegan version, it's easy to make a few swaps. Instead of honey, use maple syrup or agave nectar. Both will give you that sweet touch without using animal products. You can keep the rest of the ingredients the same to make a delicious plant-based treat. This way, everyone can enjoy the spicy honey garlic corn ribs, no matter their dietary choices. For the full recipe, check out the earlier section! To keep your spicy honey garlic corn ribs fresh, allow them to cool first. Place the leftovers in an airtight container. Store them in the fridge for up to three days. Make sure not to leave them out for more than two hours to avoid spoilage. When reheating corn ribs, the oven is your best friend. Preheat it to 350°F (175°C). Place the corn ribs on a baking sheet. Cover them with foil to keep moisture in. Heat for about 10-15 minutes until warm. You can also use a microwave, but this may make them less crispy. Corn ribs make a great meal prep option. Cook a batch and store them for quick meals. Pair them with grilled chicken or a fresh salad for a full meal. You can also chop the corn ribs and add them to tacos or wraps for a fun twist. For more ideas, check the Full Recipe for inspiration! Corn ribs are a fun way to enjoy corn. They are made by cutting corn into rib-like sections. This method makes it easy to hold and eat. The corn gets coated in a tasty sauce, making it bold and delicious. You can enjoy them as a snack or side dish. Using frozen corn is possible, but fresh corn is best. Fresh corn has a better taste and texture. If you use frozen corn, make sure to thaw it first. Pat it dry to remove excess moisture. This helps the sauce stick better. Corn ribs are done when they are tender and slightly crispy. Look for a golden color on the outside. The sauce should be thick and sticky. You can also use a fork to check. If it goes in easily, the corn is ready. Spicy Honey Garlic Corn Ribs pair well with many dishes. Try them with grilled chicken or fish. They also go great with salads. You can serve them as a fun appetizer at parties. Don't forget to add lime wedges for a fresh kick. Yes, this recipe shines on the grill! The high heat adds a nice char and smoky flavor. Prepare the corn ribs as directed, then grill them over medium heat. Watch closely to avoid burning. Baste with sauce for extra flavor while grilling. For a full recipe, check the details above! In this post, we explored how to make delicious corn ribs. We covered main ingredients, step-by-step cooking instructions, and tips for perfect flavor and texture. Variations let you customize spice levels and flavors with ease. Proper storage and reheating tips help keep your leftovers fresh. Now, you can enjoy tasty corn ribs that suit your tastes. Get creative and share these with friends and family!

Spicy Honey Garlic Corn Ribs Bold and Tasty Delight

Get ready to spice up your meals with my bold and tasty Spicy Honey Garlic Corn Ribs! This delightful recipe

To make these tasty cake jars, gather the following ingredients: - 1 cup all-purpose flour - 1 teaspoon baking powder - 1/2 teaspoon baking soda - 1/4 teaspoon salt - 1/4 cup unsalted butter, softened - 1/2 cup granulated sugar - 2 large eggs - 1/2 cup creamy peanut butter - 1/2 cup dill pickle juice - 1 cup diced pickles (sweet or dill) - 1/2 cup creamy frosting - Crushed peanuts for garnish You can add some fun extras to your cake jars. Here are some ideas: - Whipped cream for a creamy layer - Chocolate chips for extra sweetness - A drizzle of caramel sauce for a salty-sweet twist - A decorative slice of dill pickle on top If you need to swap out an ingredient, here are some options: - Use whole wheat flour for a healthier twist. - Replace unsalted butter with coconut oil for a dairy-free option. - If you like a bit of crunch, try using crunchy peanut butter. - Use vinegar mixed with water if you can't find dill pickle juice. These tips will help you make the best Peanut Butter Pickle Cake Jars. For the complete recipe, check the Full Recipe section. First, gather all your baking supplies. You will need an 8-inch square pan, parchment paper, and mixing bowls. This keeps your baking smooth. Preheat your oven to 350°F (175°C). Line the baking pan with parchment paper. This helps you lift the cake out easily later. Now, let's make the cake batter. In a medium bowl, mix the flour, baking powder, baking soda, and salt. Whisk these dry ingredients well, then set them aside. In a large bowl, beat the softened butter with sugar. Use an electric mixer on medium speed. Mix until it is light and fluffy. This takes about 3 minutes. Next, add the eggs one at a time. Make sure each egg is mixed in before adding the next. Then, add the creamy peanut butter and mix until it’s smooth. Gradually add the dry ingredients, alternating with dill pickle juice. Start and end with the dry mix. Be careful not to overmix! Now fold in the diced pickles. This adds a fun crunch to your cake. Once the cake is baked and cooled, cut it into squares. Now, it’s time to assemble your jars. Grab a clean mason jar. Start with a piece of cake at the bottom. Next, add a layer of frosting on top. Repeat this layer until the jar is full. Leave some space at the top for the fun toppings. To finish, sprinkle crushed peanuts on the frosting. This adds a nice texture. For a fun touch, place a slice of dill pickle on the rim of the jar. It looks great and adds a hint of flavor! To get the best cake texture, you must mix the batter well but not too much. Overmixing can make the cake dense. When you combine the dry and wet ingredients, mix until just blended. This way, your cake stays light and fluffy. Also, using room-temperature ingredients helps. It mixes better and gives a nice rise. If you have extra cake jars, store them in the fridge. Cover each jar tightly with a lid or plastic wrap. This helps keep the cake moist. The jars can last for about 3 to 5 days. If you want to keep them longer, consider freezing them. Just make sure to use freezer-safe jars. Thaw in the fridge before enjoying them again. To make your cake jars look stunning, layer them neatly. Use clear mason jars to show off the pretty layers. Garnish with crushed peanuts on top for crunch. A slice of dill pickle on the rim adds a fun twist. Display the jars on a rustic wooden board for a charming look. You can even tie colorful ribbons around the jars to make them pop! {{image_4}} You can switch up the frosting for your cake jars. Instead of creamy frosting, try using a tangy cream cheese frosting. This will enhance the flavor of the pickles and add a nice twist. If you want a lighter option, use whipped cream. It will make the cake feel airy and fresh. Get creative with flavors! You can add chocolate chips for a sweet touch. If you enjoy spices, try cinnamon or nutmeg in the cake batter. These spices will add warmth and depth. You can also mix in fruits like apples or bananas. They will bring a natural sweetness to the cake. To make this recipe gluten-free, swap all-purpose flour for almond or coconut flour. This change keeps the cake moist. For a vegan version, replace the eggs with flax eggs. Mix 1 tablespoon of ground flaxseed with 3 tablespoons of water for each egg. Use a vegan butter substitute for the frosting. These adjustments keep the essence of the cake while catering to different diets. For the complete recipe, check out the Full Recipe. Store your peanut butter pickle cake jars with care. First, make sure the jars are sealed tightly. This keeps the cake fresh longer. Place the jars in the fridge for best results. They can stay fresh for several days. If you need to store them for longer, consider freezing. To freeze the cake layers, start by allowing them to cool completely. Wrap each layer tightly in plastic wrap. Then, place the wrapped layers in a freezer-safe bag. Make sure to remove as much air as possible. You can freeze the cake layers for up to three months. When you are ready to use them, thaw them in the fridge overnight. The shelf life of these cake jars is about five days in the fridge. If you freeze them, they can last up to three months. Just remember to check for any signs of spoilage before serving. If you see any changes in smell or texture, it’s best to discard them. Enjoy your delightful treat while it’s fresh! For the full recipe, check out the details above. Yes, you can use crunchy peanut butter. It adds extra texture. However, creamy peanut butter blends well in the cake batter. The smoothness makes the cake light and fluffy. If you love crunch, go ahead and try it. Just remember, the taste will change a bit! You can find Peanut Butter Pickle Cake Jars at local bakeries or specialty dessert shops. Some stores might sell them in the refrigerated section. You can also make them at home using the full recipe. It’s fun to create your own! Plus, you can adjust flavors to your liking. People often love the mix of sweet and tangy flavors. Many say it is a fun and bold treat. Some find it surprisingly good! The cake’s soft texture pairs well with the frosting. Fans enjoy the unique twist of pickles in a dessert. It’s not your usual cake, and that’s what makes it special! You now know how to make Peanut Butter Pickle Cake Jars. We covered the key ingredients, step-by-step mixing, and assembling. I shared tips for perfect texture and eye-catching presentation. Remember, there are many variations to try, including dietary options. Store your cake jars properly for the best taste. Enjoy this fun treat that surprises everyone. Experiment with flavors and have a great time baking!

Peanut Butter Pickle Cake Jars Delightful Treat Recipe

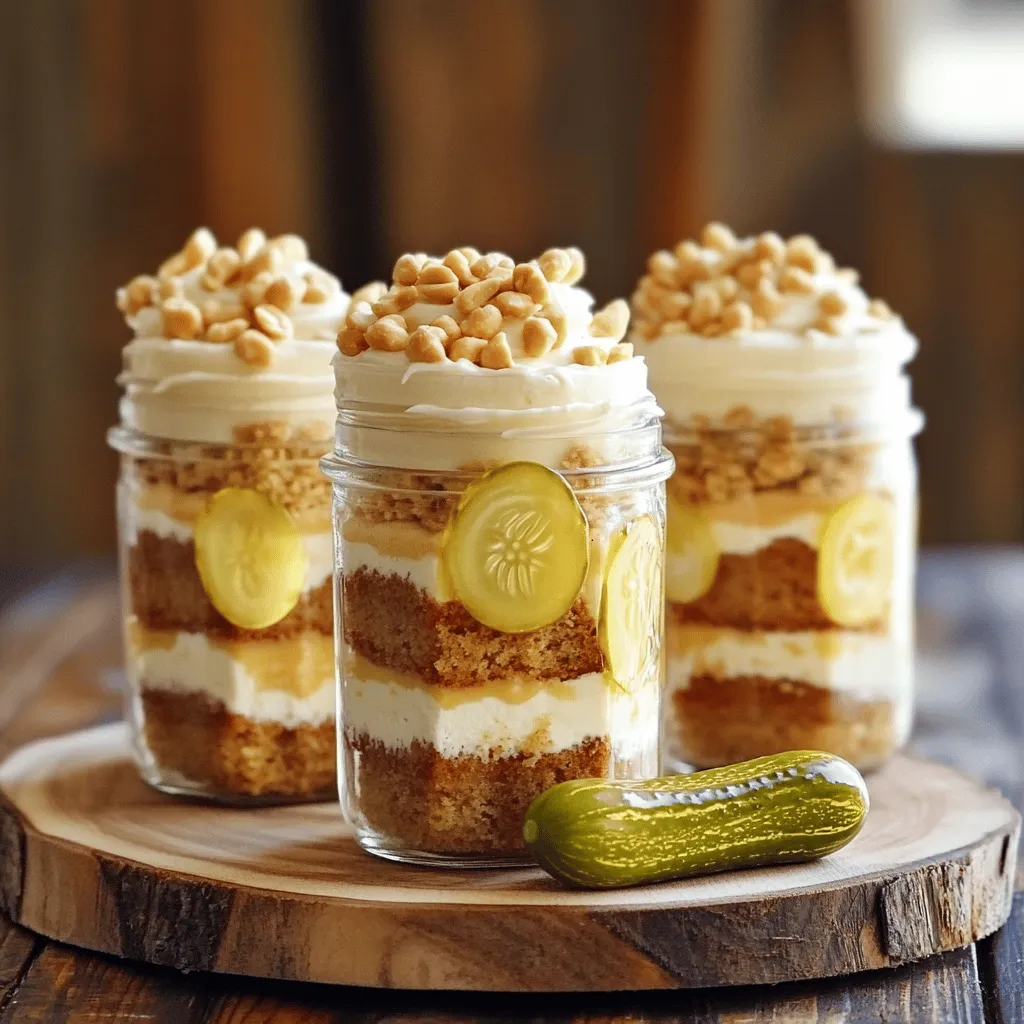
Ready to try something truly unique? Peanut Butter Pickle Cake Jars blend sweet and savory flavors in a fun way.

- 2 ripe avocados - 4 slices of whole grain bread - 1 lemon, juiced - Salt and pepper to taste - 1 small clove of garlic, minced - 1/2 cup cherry tomatoes, halved - 1/4 cup feta cheese, crumbled - 2 tablespoons balsamic glaze - 1/4 cup red pepper hummus (for one variation) - 2 poached eggs (for another variation) - 2 tablespoons toasted pumpkin seeds (for another variation) - 1 teaspoon chili flakes - Fresh basil leaves for garnish For each recipe, these ingredients create a tasty and fresh base. You can mix and match toppings to suit your taste. The ripe avocados provide creaminess, while the bread gives a nice crunch. The lemon juice adds brightness and flavor. Each topping brings its own flair. The cherry tomatoes and feta give a Mediterranean vibe. Hummus adds a hearty touch. Poached eggs create a satisfying breakfast option. There’s something for everyone with these simple choices. You can find the full recipe in the article above to get detailed instructions. Enjoy your avocado toast adventure! To start, cut the avocados in half lengthwise. Carefully remove the pit from each half. Use a spoon to scoop out the green flesh into a bowl. Squeeze fresh lemon juice over the avocado to add flavor and keep it fresh. Next, season with salt, pepper, and minced garlic. Mash the avocado with a fork until you reach your desired texture, whether creamy or chunky. Now it’s time to toast the bread. You can use a toaster or a skillet. If using a skillet, heat it on medium. Toast the bread until it turns golden brown and crispy. This will give you a nice base for your toppings. Aim for that perfect crunch! Mediterranean Delight: 1. Take two slices of your toasted bread. 2. Spread a generous layer of mashed avocado on each. 3. Evenly distribute the halved cherry tomatoes on top. 4. Sprinkle crumbled feta cheese over the tomatoes. 5. Finish with a drizzle of balsamic glaze and a dash of chili flakes. Hummus Heaven: 1. Use the other two slices of toast. 2. Spread a thick layer of red pepper hummus on each slice. 3. Add a nice scoop of the mashed avocado on top. 4. Garnish with toasted pumpkin seeds for crunch. 5. Sprinkle paprika for an extra kick. Egg-Centric Dream: 1. Again, spread the mashed avocado on two slices of toast. 2. Top each slice with a poached egg, letting the yolk shine. 3. Garnish with fresh basil leaves. 4. Lightly season with salt and a pinch of chili flakes. Now you’ve crafted three delicious avocado toast variations! For the full recipe, check out the section above. To find the best avocados, check for ripeness. A ripe avocado should feel slightly soft when you squeeze it. Look for dark green to black skin, but avoid any with large dark spots. If your avocados are not ripe yet, store them at room temperature. Once ripe, keep them in the fridge to slow down the ripening. This way, they stay fresh longer. For the best toast, use whole grain bread. Toast your bread until it is golden brown. This gives it a nice crunch. If you want to avoid soggy bread, let your toast cool for a moment before adding toppings. You can also try toasting in a skillet for a different texture. Make your avocado toast look pretty! Use a large plate to arrange the toasts. Place each kind in its spot for easy serving. Add colorful toppings like cherry tomatoes or fresh herbs to make it pop. Garnishes like chili flakes or feta cheese can add flair and fun. These small touches make your meal look more inviting. {{image_4}} Using seasonal ingredients makes avocado toast fresh and fun. In spring, try adding radishes or peas for a crunch. Summer calls for juicy heirloom tomatoes or fresh corn. In fall, swap in roasted butternut squash or kale. Winter brings hearty greens like arugula or spinach. Pick toppings based on what’s in season or your personal taste. You can mix and match to make it your own. If you need gluten-free options, use gluten-free bread. Many brands offer tasty choices that work well for avocado toast. For vegan toppings, skip cheese and use nutritional yeast for a cheesy flavor. You can top your toast with seeds or nut butters for extra protein. This way, you can enjoy avocado toast while sticking to your diet. Spicing up your toast can take it to the next level. Try adding a sprinkle of smoked paprika or cumin for a warm kick. Fresh herbs like cilantro or dill can brighten your dish. Different cheeses, like goat cheese or cream cheese, add creaminess and flavor. Mixing flavors keeps your avocado toast interesting and fun. Let your taste buds lead the way! For more ideas, check out the Full Recipe. To keep your avocado toast fresh, it's best to eat it right away. If you need to store it, wrap the toast in plastic wrap. This helps keep it from drying out. Don't store it in the fridge, as cold makes the bread soggy. For leftover mashed avocado, place it in an airtight container. Squeeze a little lemon juice on top to prevent browning. This keeps it fresh for up to two days. For busy mornings, you can prep the ingredients the night before. Mash your avocados and store them in the fridge, covered tightly. You can also toast the bread in advance. Just pop it in the toaster again for a few seconds to warm it up. Store the essential ingredients, like cherry tomatoes and feta, in the fridge. Keep everything separate until you are ready to assemble. It’s important to know how long your ingredients last. Ripe avocados can stay fresh for about 1-2 days at room temp. Once cut, they last about 1-2 days in the fridge. Whole grain bread usually lasts about a week. Watch for signs of spoilage, like brown spots on avocados or mold on bread. If you see these, it's best to toss them out. For the full recipe, refer to the main section. To make your avocado toast vegan, skip dairy toppings. Instead, try using hummus or nut cheese. You can also add fresh herbs or seeds for flavor. Use ingredients like cherry tomatoes and cucumbers for freshness. They pair well with avocado. A dash of lemon juice adds zing and keeps it bright. For avocado toast, whole grain bread is a great choice. It gives a hearty texture and nutty flavor. Sourdough also works well, adding a slight tang. Gluten-free bread is perfect if you avoid gluten. Experiment with different breads to find your favorite. You can prep some parts ahead of time. Mash the avocado and store it in an airtight container. Add lemon juice to slow browning. Toast the bread fresh for the best crunch. You can also pre-slice toppings like tomatoes or cheese to save time. Avocados are full of healthy fats. They are rich in vitamins like K, E, and C. These nutrients support heart health and skin. Avocados also contain fiber, helping digestion. Eating them can keep you full longer, making them a great snack. To keep your avocado green, use lemon or lime juice. The acid slows down browning. Store mashed avocado with plastic wrap pressed directly on the surface. This cuts off air and keeps it fresh. You can also store it in an airtight container. Avocado toast is simple and tasty. We covered essential ingredients, like ripe avocados and whole grain bread. You learned how to prepare, toast, and vary your dish. Plus, I shared tips for selecting avocados, maintaining texture, and even presentation ideas. Remember, you can make avocado toast your own with seasonal toppings and dietary options. Enjoy experimenting and creating with different flavors. This meal can fit your taste and needs perfectly. Keep these tips handy for your next brunch or busy morning!

Avocado Toast Three Ways Simple and Tasty Recipes

Are you ready to elevate your breakfast game? In this post, I’ll share three simple and tasty avocado toast recipes

Older posts
Newer posts
← Previous Page1 … Page21 Page22 Page23 … Page91 Next →

dsad

© 2025 recipesstation • Built with GeneratePress

Our Policies

  • Copyright Policy
  • Cookie Policy
  • GDPR Policy
  • Privacy Policy
  • Disclaimer
  • Terms Of Use

More Information

  • Home
  • About
  • Contact
  • Appetizers
  • Dessert
  • Dinner
  • Drinks
©2025, recipesstation About Back To Top