Skip to content
DisclaimerTerms Of UseGDPR PolicyCookie Policy

recipesstation

  • Home
  • Drinks
  • Appetizers
  • Dinner
  • Dessert
  • About
  • Contact
  • Privacy Policy
DisclaimerTerms Of UseGDPR PolicyCookie Policy

Emily

For a tasty frittata, gather these ingredients: - 6 large eggs - 1/4 cup milk (whole or low-fat) - 1 cup fresh spinach, chopped - 1/2 cup cherry tomatoes, halved - 1/2 cup bell peppers (any color), diced - 1/4 cup red onion, finely chopped - 1/2 cup feta cheese, crumbled - 1 tablespoon olive oil - Salt and pepper, to taste - Fresh basil leaves, for garnish Using fresh ingredients makes a big difference. Fresh eggs and veggies add bright flavors and nutrition. They also improve the texture of your frittata. When you pick fresh items, the taste becomes vibrant and full. I always choose organic or local produce when I can. This choice not only supports local farmers but also gives you the best quality. You can easily modify the frittata for dietary needs. Here are some ideas: - Dairy-free: Use almond or oat milk instead of regular milk. Try vegan cheese for a dairy-free option. - Low-carb: Skip the potatoes and focus on more veggies. Zucchini works well here. - Protein boost: Add cooked bacon, sausage, or ham for extra flavor. - Vegetarian: Leave out any meat and add more colorful vegetables. Mushrooms and broccoli are great choices. These substitutions keep the frittata delicious while catering to different diets. For the full recipe, check out the Italian Garden Frittata. Start by gathering all your ingredients. You will need eggs, milk, and fresh veggies. I like to use spinach, cherry tomatoes, bell peppers, red onion, and feta cheese. You can mix and match based on what you like. 1. Preheat the oven to 375°F (190°C). This ensures your frittata cooks evenly. 2. Whisk the eggs: In a large bowl, mix together six large eggs, a 1/4 cup of milk, and a pinch of salt and pepper. You want it well blended. Whisk until it looks frothy. 3. Chop your veggies: Dice the bell peppers and finely chop the red onion. Halve the cherry tomatoes and chop the spinach. Using a skillet that can go in the oven is key here. I recommend a cast iron skillet for even cooking. 1. Heat the skillet: Place it on medium heat and add 1 tablespoon of olive oil. Let it heat until it shimmers. 2. Sauté the veggies: Add the chopped onion and bell peppers first. Cook for about 3-4 minutes. You want them soft and fragrant. 3. Add the spinach and tomatoes: Stir in the spinach and halved tomatoes. Cook for about 2 minutes until the spinach wilts. 1. Combine everything: Carefully pour the egg mixture over the veggies in the skillet. Tilt the skillet to spread it evenly. 2. Top with feta: Sprinkle 1/2 cup of crumbled feta over the eggs. This gives it great flavor. 3. Stovetop cooking: Cook on the stovetop for about 3-4 minutes. The edges should start to set. 4. Bake it: Move the skillet to your preheated oven. Bake for 15-20 minutes. It’s done when it puffs up and a knife inserted in the center comes out clean. 5. Cool and serve: Take it out of the oven and let it cool for a few minutes before slicing. Garnish with fresh basil if you like. This frittata is easy to make and packed with flavor. For the full recipe, check the details above. Enjoy your cooking! To make a great frittata, follow these tips: - Use fresh eggs. Fresh eggs taste better and give a fluffier texture. - Mix well. Whisk the eggs and milk until blended. This adds air. - Cook over medium heat. This keeps the bottom from burning. - Don’t rush the cook time. Let it cook slowly for a tender finish. - Let it cool slightly. This helps with easy slicing. Here are some pitfalls to watch out for: - Not preheating the oven. This can lead to uneven cooking. - Overcrowding with veggies. Too many can make the frittata soggy. - Using low-quality cheese. Cheap cheese can alter the flavor. - Skipping the seasoning. Salt and pepper bring out the taste. - Removing it too soon. Make sure a knife comes out clean before serving. These tools make frittata cooking easier: - Oven-safe skillet. Ideal for stovetop to oven transfers. - Whisk. Great for mixing eggs and milk evenly. - Spatula. Perfect for lifting the frittata out of the skillet. - Knife. Use a sharp knife for clean slices. - Baking mitts. Safety first when handling hot pans! By following these tips and tricks, you will create a delicious frittata every time. For the full recipe, check out the Italian Garden Frittata. {{image_4}} A classic frittata is very versatile. You can easily make it vegetarian. Start with the base recipe and swap out the meat for more veggies. Here are some tasty ideas: - Zucchini - Mushrooms - Broccoli - Asparagus You can add any of these veggies for great flavor and color. They all work well with eggs. Just remember to sauté them first for the best taste. If you want a heartier frittata, add some protein. You can use cooked meat or plant-based options. Here are some great choices: - Cooked bacon - Sausage (chicken or turkey) - Diced ham - Tofu These proteins will make your frittata filling. Make sure to cook them before adding to the eggs. This step ensures they mix well with the other flavors. Adding flavors helps make your frittata unique. Try these simple enhancements: - Fresh herbs like parsley, chives, or dill - Spices such as paprika or cumin - Cheese varieties like goat cheese or cheddar - Hot sauce or salsa for a spicy kick Feel free to mix and match these to suit your taste. Adding different flavors can turn a simple frittata into a gourmet treat. You can find the full recipe for my Italian Garden Frittata above. Enjoy experimenting with your own twists! To keep your frittata fresh, store it right. First, let it cool down to room temperature. Place it in an airtight container. You can also wrap it tightly with plastic wrap. This will help keep moisture in and odors out. Leftover frittata stays good in the fridge for up to four days. Just make sure it’s sealed well. When you’re ready to eat your frittata again, reheating is key. You can use the oven or microwave. For the oven, set it to 350°F (175°C). Place the frittata on a baking sheet for about 10 minutes. This warms it evenly and keeps it tasty. If you use the microwave, heat it in short bursts. Try 30 seconds at a time. Check if it’s warm enough before adding more time. If you want to save your frittata for longer, freezing is a great option. Cut it into wedges first. Wrap each piece tightly in plastic wrap, then place them in a freezer-safe bag. This helps prevent freezer burn. You can store it in the freezer for up to three months. When you're ready to eat, thaw it in the fridge overnight and reheat as mentioned earlier. Enjoy your Italian garden frittata again with ease! A frittata and an omelet are both made with eggs, but they differ in cooking methods. An omelet cooks quickly and is folded, while a frittata cooks slowly and is baked. In a frittata, you mix the eggs with vegetables and cheese before cooking. This gives it a fluffy texture and rich flavor. The frittata is cut into slices and served, making it great for sharing. Yes, you can use egg substitutes in this recipe. Some popular options are silken tofu, flaxseed meal, or commercial egg replacers. These work well, but the texture and taste might change a little. If you want a similar flavor and protein, try using chickpea flour mixed with water. This can mimic the egg's texture and richness while keeping the frittata's heartiness. A frittata lasts about 3 to 4 days in the refrigerator. Store it in an airtight container to keep it fresh. To ensure the best taste and texture, eat it within this time frame. If you want to keep it longer, consider freezing it. Just remember to wrap it well to avoid freezer burn. For the complete dish, check out the Full Recipe. A frittata is a versatile dish that uses fresh ingredients and simple steps. We covered key ingredients, cooking techniques, and helpful tips. You can customize it for dietary needs and store leftovers easily. Whether you enjoy classic flavors or unique variations, frittatas offer endless possibilities. Keep these ideas in mind, and enjoy creating your perfect frittata every time. Embrace your culinary skills and make this dish your own.

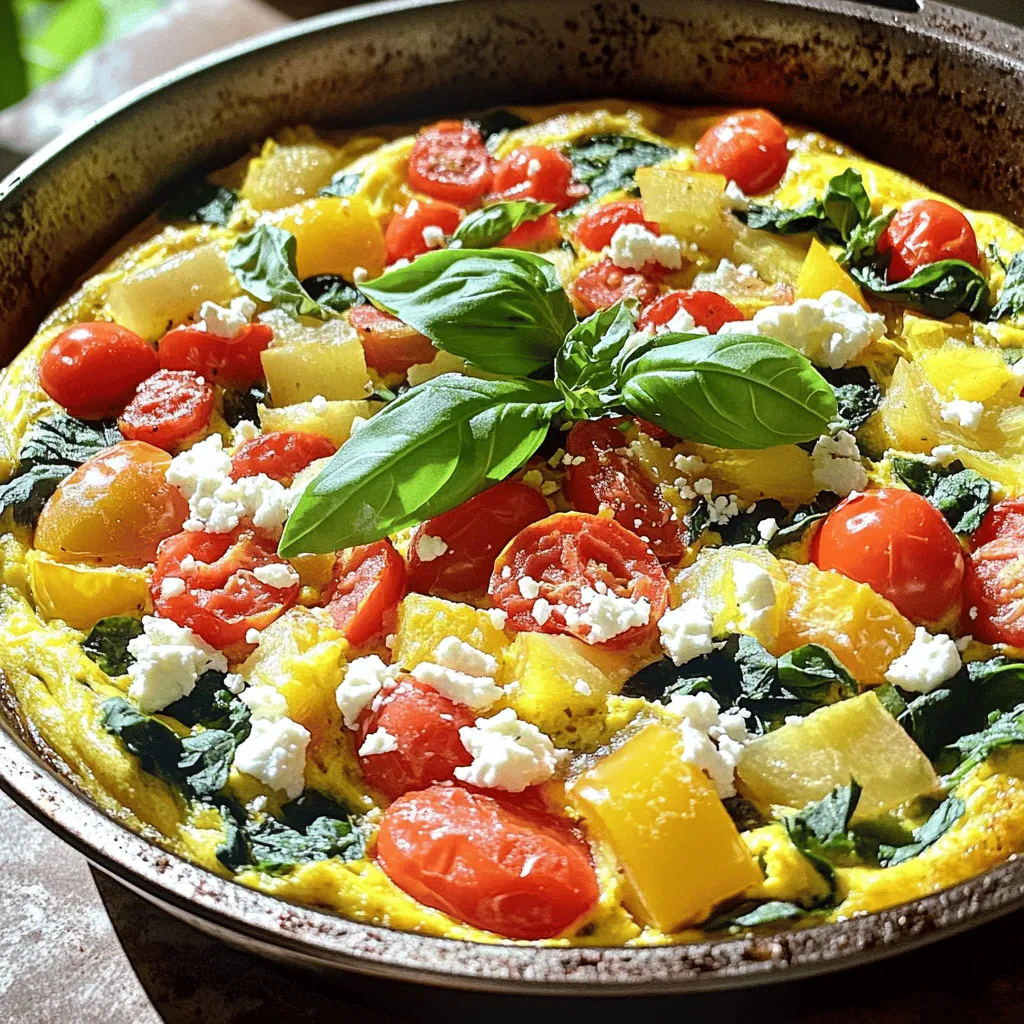
Classic Frittata Delicious and Easy Breakfast Recipe

Are you ready to transform your breakfast routine? The classic frittata is a delicious and easy way to pack your

- 2 pounds fresh figs - 1 cup granulated sugar - 1 tablespoon fresh lemon juice - 1 teaspoon ground cinnamon - 1/2 teaspoon red pepper flakes - 1/4 teaspoon sea salt Fresh ingredients are key for great flavor. When you use ripe figs, they give your jam a rich taste. Look for figs that are soft but not mushy. Their skin should be smooth and slightly shiny. You can find fresh figs in the summer and early fall. Farmers' markets are great places to buy them. If you can, ask the vendor about the figs. They can tell you which ones are at their best. Buying figs in season means they are sweet and juicy. This will make your fig jam shine. If you can’t find fresh figs, frozen figs can work too. Just make sure to thaw them first. But, nothing beats the taste of fresh figs! Be sure to check the full recipe for all the details on how to make this delicious jam. To start, you need to chop the figs. - First, wash the figs under cold water. - Pat them dry with a clean towel. - Remove the stems and cut them into small pieces. This will help the figs break down when cooking. Next, measure your sugar and spices carefully. - Use a dry measuring cup for the sugar. - For the ground cinnamon and red pepper flakes, use measuring spoons. Accurate measurements help balance the flavors of your jam. Now, let's combine the ingredients in the pot. - In a large mixing pot, add chopped figs, sugar, lemon juice, cinnamon, red pepper flakes, and sea salt. - Stir the mixture until it's evenly combined. Place the pot over medium heat. - Bring it to a gentle boil, stirring often. This step helps the sugar dissolve. Once it boils, reduce the heat to low. - Let it simmer uncovered for 30 to 40 minutes. - Stir frequently to prevent sticking. As it cooks, you will see it thicken. To check if your jam is ready, do the cold plate test. - Drop a spoonful of jam onto a cold plate. - Wait a minute and see if it holds its shape. If it stays put and does not run, your jam is ready! Other signs include a thickened texture and a rich, sweet aroma. Once ready, remove the pot from heat and let it cool slightly. You can find the full recipe in the previous section. One big mistake is overcooking your jam. This can make it too thick and sticky. On the flip side, undercooking can leave you with a runny mess. Always watch the time while simmering. Aim for 30 to 40 minutes. Another issue is not sterilizing your jars. This step is key to keeping your jam fresh. Always wash jars in hot, soapy water or run them through the dishwasher. Then, heat them in the oven or boiling water before filling. You can boost your fig jam's taste with citrus. Lemon juice works well. It adds a bright flavor that balances the sweetness. You could also try orange juice for a sweeter note. Adjusting spice levels can make your jam unique. If you like a kick, add more red pepper flakes. For a milder taste, reduce the amount. You can also play with sweetness. If you want less sugar, try honey instead. Serve your Sweet & Spicy Fig Jam in a nice bowl. Pair it with cream cheese or soft goat cheese. This adds a creamy texture that complements the jam. For a fun display, sprinkle some red pepper flakes on top. You can also add fresh fig slices around the bowl. This makes your dish look inviting and colorful. {{image_4}} You can boost your fig jam with fresh herbs. Adding herbs like thyme or rosemary gives it a unique twist. The earthiness of thyme pairs well with the sweet figs. Rosemary adds a fragrant touch that elevates the flavor. Just chop a small amount and stir it in during cooking. You can also mix figs with other fruits. Pairing figs with berries or peaches creates a delightful blend. Berries add a tartness that balances the sweetness of figs. Peaches bring a juicy, fresh element that enhances the jam. If you want to swap sugar, try honey or maple syrup. Honey adds a floral note, while maple syrup gives a rich, earthy flavor. These options can make your jam taste different, yet just as sweet. For health-conscious cooks, low-sugar options are available. You can use pectin to thicken the jam without much sugar. This helps maintain a good texture while cutting calories. You can also reduce the sugar in the original recipe. Just keep in mind that less sugar may alter the taste and shelf life. Explore these variations to make your fig jam truly your own! For the full recipe, check out the Sweet & Spicy Fig Jam section above. To keep your homemade fig jam fresh, you need to use sterilized jars. Start by washing the jars in hot soapy water. Rinse them well. Then, place them in a pot of boiling water for 10 minutes. This step kills germs. Let the jars cool before filling them with jam. After you fill the jars, seal them tightly. You want to keep air out. Store the jars in a cool, dark place. A pantry works well. For longer-lasting freshness, place opened jars in the fridge. This way, your jam stays tasty for weeks. Homemade fig jam lasts about three weeks in the fridge. If you keep it at room temperature, it won’t last long. Always check for signs of spoilage. If you see mold or an off smell, it’s better to toss it. When you open a jar, use a clean spoon each time. This helps prevent germs from getting in. If you notice the jam is runny or has changed color, it may be spoiled. Trust your senses; they are great guides! Homemade fig jam can last up to three weeks in the fridge. Store it in a clean jar. Make sure to seal it tightly to keep it fresh. To freeze fig jam, pour it into freezer-safe containers. Leave some space at the top for expansion. It can last for up to a year in the freezer. You can use dried figs, but the texture will be different. Dried figs are chewier and less juicy than fresh figs. This will change the jam's texture. If using dried figs, chop them finely and soak them in water for a few hours. This helps soften them. You may also need to adjust the sugar level since dried figs are sweeter. Fig jam is great on toast, scones, or biscuits. You can spread it on cheese for a tasty snack. It pairs well with cream cheese or goat cheese. Try mixing it into yogurt or oatmeal for a sweet twist. You can also use fig jam in savory dishes, like glazes for meats or sauces for salads. To make fig jam less sweet, reduce the sugar by one-fourth. You can also add more lemon juice to balance the flavors. This gives a nice tartness. If you want to keep it sweet but lower the sugar, use honey. Honey has a different sweetness level, so taste as you go. This post outlined how to make delicious fig jam. We talked about fresh ingredients, step-by-step cooking, and useful tips. Choose fresh figs for the best taste and follow careful measuring. Remember to avoid common mistakes when cooking. You can also mix flavors and adjust sweetness to fit your taste. Store your jam properly and watch for spoilage. With practice, your fig jam can impress friends and family! Enjoy making, sharing, and tasting your creations.

Simple Fig Jam Flavorful and Easy Homemade Delight

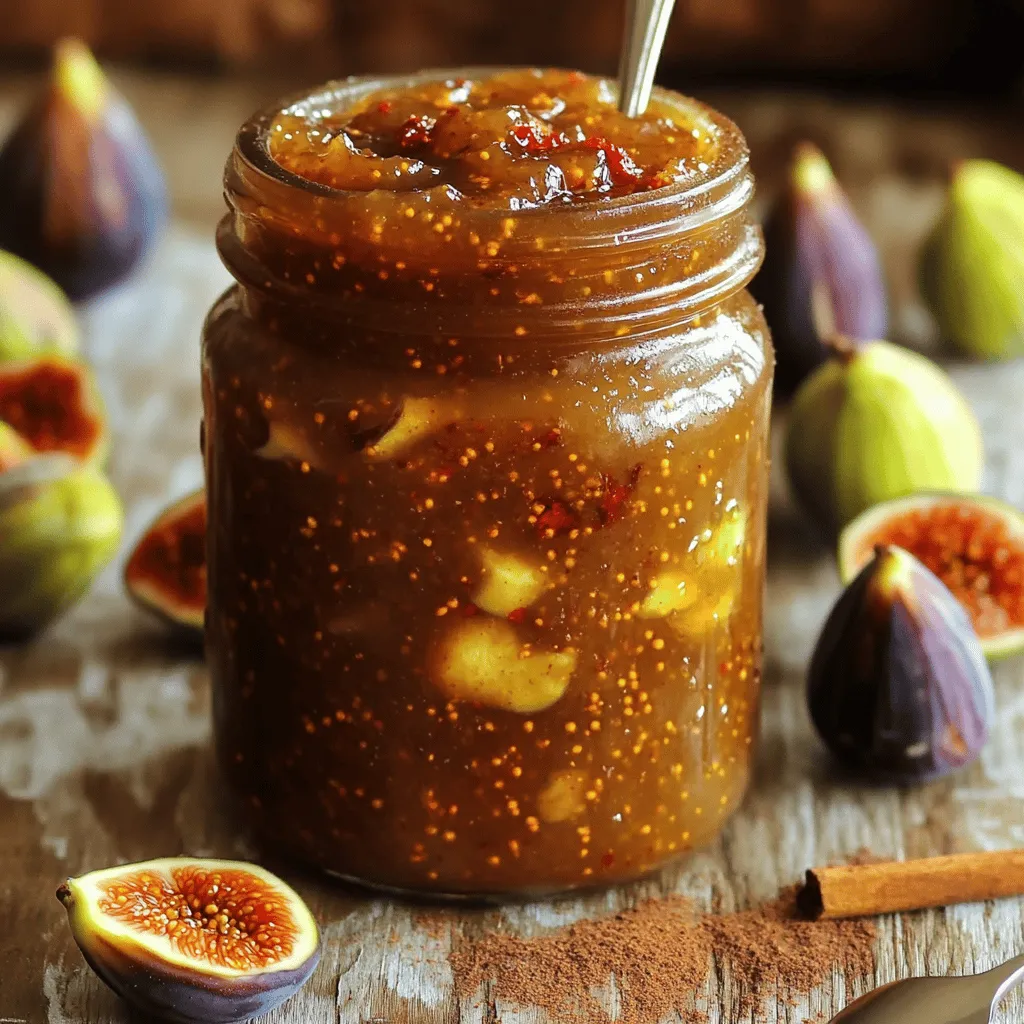
Making homemade fig jam is simple and rewarding. This flavorful delight packs the sweet taste of fresh figs into a

- 1 lb chicken breasts, cut into bite-sized pieces - 2 cups fresh okra, sliced into 1/2-inch pieces - 1 cup buttermilk (or substitute with milk and 1 tbsp vinegar added) - 1 ½ cups cornmeal - 1 cup all-purpose flour - 1 tsp garlic powder - 1 tsp onion powder - 1 tsp smoked paprika - ½ tsp cayenne pepper (adjust according to your spice preference) - Salt and pepper, to taste - Oil for frying (use vegetable or canola oil) - Fresh parsley, chopped for garnish Fried okra and chicken is a true delight. The mix of textures and flavors makes each bite special. You need fresh ingredients for the best results. The chicken should be juicy, and the okra must be crispy. The coating gives it an amazing crunch. The cornmeal and flour blend works well. Don't skip the spices! They add depth and flavor. The cayenne pepper gives a nice kick, but adjust it to your taste. Garnishing with fresh parsley adds a pop of color. It also brings a fresh taste to each bite. For a full recipe, check the section below. Enjoy your cooking! Start by marinating the chicken. Take a medium bowl and add your cut chicken pieces. Pour in the buttermilk. Make sure to sprinkle a good amount of salt and pepper over the chicken. This step is key for flavor. Let the chicken marinate for at least 30 minutes. For the best taste, let it sit in the fridge for up to 2 hours. Next, prepare the coating. Grab a large bowl and mix together the cornmeal, all-purpose flour, garlic powder, onion powder, smoked paprika, and cayenne pepper. Don’t forget a pinch of salt and pepper. This mixture will give your chicken and okra that crunchy texture. It’s the secret to making them extra tasty! Now, it’s time to fry. First, heat up some oil in a large skillet or deep pan. You want about an inch of oil. Heat it over medium-high heat until it’s around 350°F (175°C). Use a thermometer to check the temperature. Once the oil is hot, take the marinated chicken out of the buttermilk. Let any excess drip off. Coat each piece in the cornmeal mixture. Make sure they are well covered. Place the coated chicken on a clean plate. Next, add the okra to the same cornmeal mix. Toss gently so each piece gets a nice coating. Carefully add the chicken to the hot oil in batches. Do not overcrowd the pan. Fry the chicken for about 6-8 minutes. Turn them occasionally. They should be golden brown and cooked through. Remove them with a slotted spoon and place on a paper towel to absorb extra oil. Now, it’s time for the okra. Add the coated okra to the hot oil. Fry for about 3-4 minutes until crispy and golden. Use the slotted spoon again to take them out and let them drain on paper towels. Finally, arrange your crispy fried chicken and okra on a serving platter. For a nice touch, garnish with freshly chopped parsley. Enjoy this crunchy delight! For detailed instructions, check the Full Recipe. To get that perfect crisp on your fried okra and chicken, follow a few key steps. First, coat your chicken and okra well. Make sure every piece is covered in the cornmeal mixture. This coating creates a great crunch. Fry in small batches to avoid steaming. Overcrowding the pan makes your food soggy. Finally, do not skip the paper towels after frying. They soak up extra oil and help keep your dish crisp. Marination adds flavor and moisture to your chicken. I recommend marinating the chicken for at least 30 minutes. If you can, let it soak for up to 2 hours. This extra time allows the buttermilk to tenderize the meat. It also helps the seasoning stick better. The longer you marinate, the tastier your chicken will be. The right oil temperature is key for frying. Aim for about 350°F (175°C). Use a kitchen thermometer to check the heat. If the oil is too cool, your food will absorb too much oil. Too hot, and it can burn. A good way to test is to drop in a small piece of batter. If it sizzles and rises, you’re ready to fry. Keeping the temperature steady ensures a golden, crispy finish. {{image_4}} To add heat, try spicy fried okra and chicken. Just mix in more cayenne pepper. You can also add hot sauce to the buttermilk. This will give the chicken a nice kick. If you love spice, this is a great option! If you want a healthier dish, consider baking or air frying. You can skip the oil and use a baking sheet. Coat the chicken and okra in the same way, then place them on the sheet. Bake at 400°F for about 20-25 minutes. This way, you still get a crispy texture without the extra oil. For a veggie twist, swap the chicken with tofu or tempeh. Marinate them just like the chicken. Coat the tofu or tempeh in the same mixture. Fry or bake as you would with the chicken. You’ll still enjoy that crunchy, flavorful delight without meat. Discover the full recipe to explore these variations! To keep your fried okra and chicken fresh, let them cool first. Place the chicken and okra in an airtight container. This helps keep them crispy and tasty. Store the container in the fridge. They will stay good for up to three days. If you plan to eat them later, avoid stacking them, as this can make them soggy. When you want to enjoy your leftovers, use the oven for the best results. Preheat your oven to 375°F (190°C). Spread the chicken and okra on a baking sheet. Heat them for about 10-15 minutes until they are hot and crispy again. You can also use an air fryer for quick reheating. Set it to 350°F (175°C) and heat for about 5-7 minutes. You can freeze fried okra and chicken if you want to save them longer. Make sure they are completely cool. Wrap each piece in plastic wrap or foil. Then, place them in a freezer bag. Remove as much air as possible before sealing. They can last for up to three months in the freezer. To reheat, first thaw them in the fridge overnight, then follow the reheating methods mentioned above. The best oils for frying are vegetable oil or canola oil. These oils have high smoke points, making them ideal for frying. They help achieve a crispy texture without burning. You can make this dish healthier by using skinless chicken breasts. You may also bake or air fry instead of deep frying. Using whole wheat flour instead of all-purpose flour is another option. Yes, you can prepare the chicken and okra ahead of time. Marinate the chicken and coat the okra, then store them in the fridge. Just fry them when you're ready to serve. I love serving Fried Okra and Chicken with a side of coleslaw or a fresh salad. Another great option is creamy mashed potatoes or cornbread. You can also add dipping sauces like ranch or hot sauce. You can find the Full Recipe for Fried Okra and Chicken above. This recipe gives you all the steps to create this crispy and flavorful dish at home. This blog post outlined how to make delicious Fried Okra and Chicken. We discussed key ingredients, step-by-step cooking methods, and useful tips. Variations offer spice, health, and vegetarian options. You can properly store and reheat leftovers too. Keep experimenting in the kitchen to find your favorite version. Enjoy sharing this tasty dish with family and friends. Cooking should be fun and rewarding!

Fried Okra and Chicken Crispy Flavorful Delight

Craving comfort food? You’re in for a treat with Fried Okra and Chicken. This dish combines crispy okra and juicy

Here is what you need for a tasty creamy cucumber salad: - 2 large cucumbers, finely sliced - 1 cup creamy Greek yogurt - 1 tablespoon apple cider vinegar - 1 clove garlic, minced finely - 1 teaspoon fresh or dried dill, chopped - 1 tablespoon honey - Salt and pepper, to taste - 1/4 red onion, thinly sliced - 1/4 cup cherry tomatoes, halved (optional for garnish) These ingredients come together to create a fresh and creamy dish. The cucumbers offer a cool crunch, while the Greek yogurt adds a rich creaminess. The apple cider vinegar gives a nice tang, and the garlic brings a zesty kick. Dill adds a lovely herb flavor, making the salad refreshing. Honey sweetens the dressing just enough, balancing the flavors. Salt and pepper enhance the taste, making everything pop. The red onion adds a mild sharpness, and the cherry tomatoes, if you choose to use them, provide a burst of color and flavor. Gather these ingredients, and you will be ready to make a delightful salad. For the full recipe, check the earlier section. 1. Start by washing the cucumbers under cold water. This step removes dirt and pesticides. 2. If you want a milder flavor, peel the cucumbers. After that, slice them thinly into rounds. 3. In a medium bowl, mix the Greek yogurt, apple cider vinegar, minced garlic, chopped dill, and honey. 4. Whisk the mixture until it is smooth and creamy. This will be your dressing. 5. Taste the dressing and add salt and pepper as needed. Adjust sweetness with honey or tanginess with vinegar. 6. In a large serving bowl, combine the sliced cucumbers and thinly sliced red onion. Mix gently to mix well. 1. Drizzle the creamy yogurt dressing over the cucumber and onion mixture. 2. Use a large spoon or spatula to toss everything together. Make sure each cucumber slice is well-coated with the dressing. 1. Chilling the salad is important for flavor. It helps all the tastes blend nicely. 2. Cover the salad with plastic wrap or a lid. Refrigerate for at least 30 minutes. This time allows the flavors to enhance. For the full recipe, check out the details shared earlier. Enjoy your refreshing creamy cucumber salad! To make your creamy cucumber salad shine, focus on seasoning. Start with salt and pepper. Sprinkle a little salt to bring out the cucumber’s natural taste. Then, add ground black pepper for a slight kick. You can also enhance the flavor with honey and vinegar. Honey adds a sweet touch, while apple cider vinegar brings a tangy zing. Adjust both to your liking. If you want more sweetness, mix in a bit more honey. For extra tanginess, add a splash of vinegar. This balance makes a big difference. Serving your salad well can impress your guests. Try using a chilled serving bowl for an elegant look. The cold bowl keeps the salad cool and fresh. For garnish, fresh herbs can elevate your dish. Sprinkle chopped dill or parsley on top. This adds color and a fresh taste. You can also add halved cherry tomatoes for a pop of color. They make the salad even more appealing. Avoid overdressing your salad. Too much dressing can make it soggy. Start with a small amount and toss gently. You can always add more if needed. Another mistake is not letting the salad chill long enough. Chilling the salad for at least 30 minutes helps the flavors blend. This step makes the dish taste better. Don’t rush this part; it’s worth the wait. {{image_4}} You can really boost flavor by adding fresh herbs. I love using mint or parsley. Mint gives a cool, refreshing taste, while parsley adds a light, bright note. You can chop them finely and stir them in with the cucumbers. Each herb brings its own twist. Experiment with what you like best! Want to make your salad more filling? Adding protein is a great idea! Grilled chicken or chickpeas work well. Just cut the chicken into small pieces. If you use chickpeas, rinse them well before adding. This way, they mix well without taking over the salad. You still enjoy the cucumber’s crunch! You can try different dressings to change things up. A simple vinaigrette can add a tangy flavor. You can also use ranch dressing for a creamy twist. If you make a homemade dressing, store it in a sealed jar. This keeps it fresh for next time. Mix and match to find your favorite! To keep your creamy cucumber salad fresh, use an airtight container. Glass containers work great for this. They keep the salad cool and safe. If you need to use plastic, ensure it seals tightly to avoid air exposure. Always store the salad in the fridge right after making it. This helps keep the flavors intact and the cucumbers crisp. Your creamy cucumber salad lasts about three days in the fridge. After that, it may lose its crunch and flavor. Look for signs of spoilage, such as a sour smell or a watery texture. If the cucumbers become mushy or the dressing separates, it's best to toss it. You can’t really freeze creamy cucumber salad. Freezing makes cucumbers mushy when thawed. However, you can freeze the cucumbers and dressing separately. Slice the cucumbers and lay them flat on a baking sheet to freeze. For the dressing, store it in a sealed container. This way, you can mix them again when ready to enjoy a fresh salad. Yes, you can use regular yogurt. However, Greek yogurt gives a thicker and creamier texture. It also adds a nice tang to the salad. If you use regular yogurt, try to drain some liquid first. This keeps the salad from getting too watery. English cucumbers are ideal for this dish. They have fewer seeds and a smoother skin. If you use pickling cucumbers, they work too. Just remember to slice them thinly for the best crunch. You can keep leftover creamy cucumber salad for about three days. Store it in a tightly sealed container. If you notice any excess liquid, just drain it before serving again. Yes, making it a few hours ahead is perfect. This gives the flavors time to blend. Just keep it in the fridge until you’re ready to serve. Make sure to add any toppings, like cherry tomatoes, right before serving. Creamy cucumber salad pairs well with grilled chicken or fish. It also complements sandwiches and wraps nicely. For a light meal, serve it with whole grain crackers or fresh bread. You can find the Full Recipe for more details on this refreshing dish. This article covered all the key elements for making a delicious creamy cucumber salad. We explored the ingredients, step-by-step instructions, and tips for flavor and presentation. The variations help tailor this salad to your taste, while storage info ensures it stays fresh. Making this salad should be fun and easy. With these tips, you can create a dish that impresses. Enjoy your cooking and relish every bite!

Creamy Cucumber Salad Refreshing and Easy Recipe

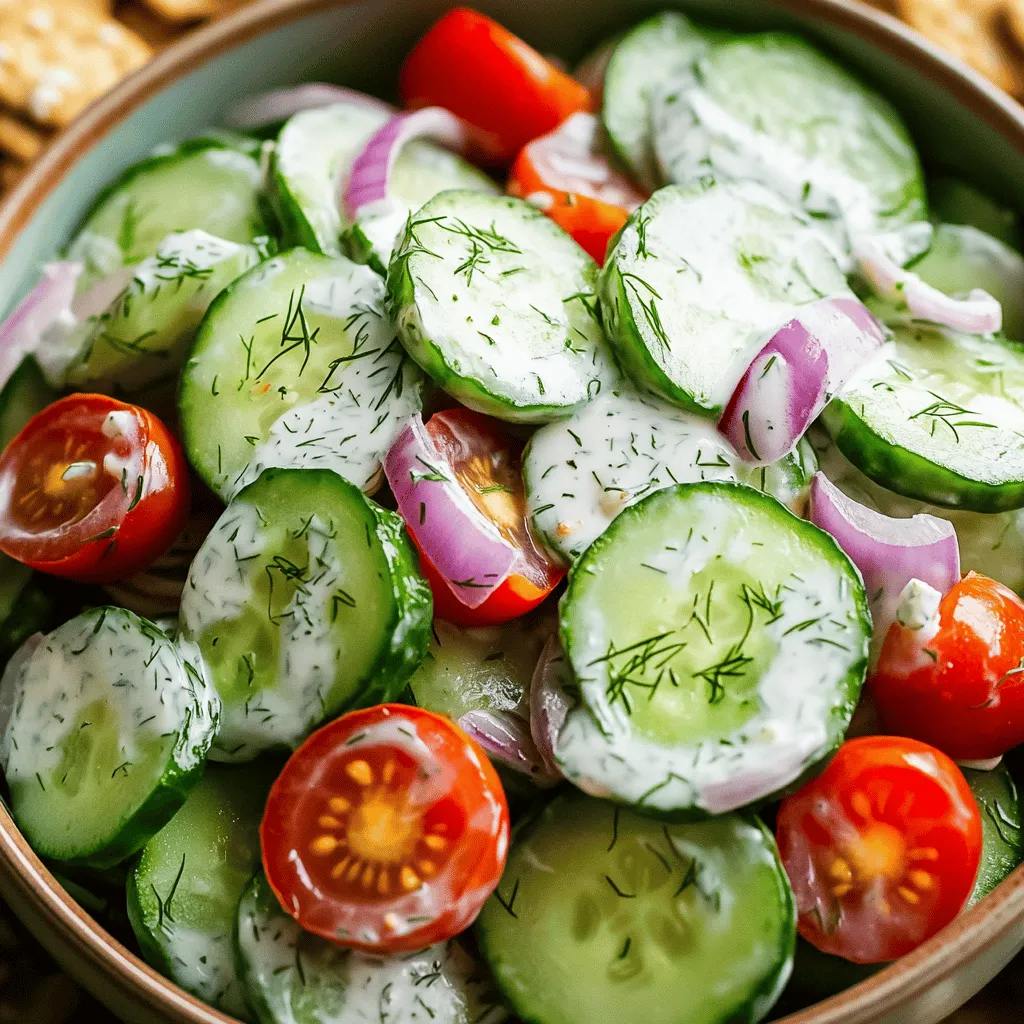
Looking for a quick, tasty dish that cools you down? This Creamy Cucumber Salad is just what you need! With

Here is what you need for this tasty dish: - 1 cup all-purpose flour - 1 cup cornmeal - 1 tablespoon baking powder - 1/2 teaspoon salt - 1/2 teaspoon cayenne pepper (optional for a kick) - 1/4 cup granulated sugar - 1 cup buttermilk (or plant-based milk for a vegan option) - 1/4 cup honey or maple syrup - 2 large eggs (or 1/4 cup applesauce for vegan) - 1 cup grated zucchini (about 1 medium zucchini) - 1 cup corn kernels (fresh, canned, or frozen) - 1/2 cup diced bell pepper (any color) - 1/4 cup fresh cilantro, chopped (optional) - 1/4 cup melted butter or coconut oil You can swap ingredients based on your needs or taste. - Use whole wheat flour for a nuttier flavor. - Try agave nectar instead of honey for a vegan sweetener. - Replace buttermilk with yogurt mixed with water for a similar effect. - Use any fresh herb if cilantro is not your favorite. - Coconut oil can replace butter for a dairy-free option. Zucchini adds moisture and nutrition to cornbread. - It's low in calories, making this dish lighter. - Zucchini is high in vitamins A and C, which boost health. - It adds fiber, aiding digestion and keeping you full. - The flavor is mild, so it blends well with corn and spices. - Plus, it's a great way to use up garden veggies! For the full recipe, check out the Zesty Zucchini Cornbread Delight 🥒. First, gather all your ingredients. You will need: - 1 cup all-purpose flour - 1 cup cornmeal - 1 tablespoon baking powder - 1/2 teaspoon salt - 1/2 teaspoon cayenne pepper (optional) - 1/4 cup granulated sugar - 1 cup buttermilk (or plant-based milk) - 1/4 cup honey or maple syrup - 2 large eggs (or 1/4 cup applesauce) - 1 cup grated zucchini - 1 cup corn kernels - 1/2 cup diced bell pepper - 1/4 cup fresh cilantro (optional) - 1/4 cup melted butter or coconut oil Next, preheat your oven to 375°F (190°C). Grease an 8-inch square baking dish. This helps prevent sticking. In a large bowl, sift the flour, cornmeal, baking powder, salt, cayenne pepper, and sugar. Whisk these dry ingredients together until well mixed. In another bowl, whisk the buttermilk, honey, and eggs (or applesauce) until smooth. Slowly pour the wet mix into the dry mix. Stir gently with a spatula. It’s okay if a few lumps remain; don’t overmix. Now fold in the grated zucchini, corn, diced bell pepper, and cilantro if you're using it. Finally, add the melted butter or coconut oil and mix until just combined. Pour the batter into your prepared baking dish. Use a spatula to spread it evenly. Bake in the preheated oven for 25-30 minutes. Your cornbread should turn golden brown. To check if it's done, insert a toothpick in the center. If it comes out clean, it’s ready. Once baked, take it out of the oven. Let it cool for about 10 minutes. Then slice it into squares or triangles. To get a light and fluffy cornbread, avoid overmixing the batter. A few lumps are fine. Also, ensure your baking powder is fresh for the best rise. If you want extra moisture, consider adding a bit more buttermilk or zucchini. You can also experiment with different types of corn, like sweet corn or roasted corn, for added flavor. For a twist, add spices or herbs like thyme or oregano. These can elevate the taste and make each bite special. Enjoy your journey in making this delicious Zesty Zucchini Cornbread Delight! For detailed instructions and specific measurements, refer to the Full Recipe. When making zucchini cornbread, avoid overmixing the batter. This can make your cornbread tough. Instead, mix until just combined. Another mistake is not squeezing excess water from the zucchini. This can make your cornbread soggy. Use a clean kitchen towel to gently press out moisture. Lastly, ensure you preheat your oven. If you don’t, your cornbread may not rise properly. To boost flavor, add spices to your dry ingredients. Cayenne pepper gives a slight kick. You can also mix in herbs like thyme or oregano for freshness. For a sweet touch, try adding corn kernels or a bit of cheese. Using fresh herbs, like cilantro or chives, can brighten the dish. Don't forget to drizzle honey on top before serving for added sweetness. Serve your cornbread warm and cut into squares. Pair it with a hearty chili or a fresh garden salad. It also goes great with soups. For a fun twist, try it with avocado and a sprinkle of lime juice. If you want something sweet, enjoy it with butter and jam. For more ideas, check out the Full Recipe for additional serving tips. {{image_4}} You can make this cornbread gluten-free. Substitute the all-purpose flour with a blend of gluten-free flour. Look for a mix that includes xanthan gum. This will ensure your cornbread has the right texture. Keep the cornmeal the same, as it’s naturally gluten-free. Just follow the Full Recipe for the same great taste! To make this cornbread vegan, use plant-based milk instead of buttermilk. You can also swap the eggs for applesauce. Use 1/4 cup of applesauce for each egg. Honey can be replaced with maple syrup for sweetness. These changes will keep the cornbread moist and delicious. You can add many flavors to this cornbread. Fresh herbs like chives or parsley can brighten it up. For a spicy kick, try adding diced jalapeños or more cayenne pepper. If you love sweet flavors, mix in some cinnamon or nutmeg. Each variation gives a fun twist to the basic recipe. Store leftover zucchini cornbread in an airtight container. Let it cool fully before sealing. This helps keep it fresh. You can keep it at room temperature for up to two days. For longer storage, place it in the fridge. It will stay good there for about a week. Reheat your cornbread to enjoy it warm. Place slices in the microwave for 15 to 20 seconds. Check it often to prevent overheating. You can also use the oven. Preheat it to 350°F (175°C) and warm the cornbread for about 10 minutes. If you want it a bit crispy, place it under the broiler for a minute. Freezing zucchini cornbread is easy. First, let it cool completely. Then, slice it into pieces. Wrap each piece tightly in plastic wrap. Place the wrapped slices in a freezer bag. Remove as much air as possible. This prevents freezer burn. You can freeze the cornbread for up to three months. When ready to enjoy, thaw it overnight in the fridge. Reheat it as described above for the best taste. Remember to try the Full Recipe for the best results! To make zucchini cornbread moist, add more grated zucchini. This veggie holds water and keeps bread soft. You can also use a bit more buttermilk or honey. Both add moisture and enhance flavor. If you want a richer taste, try using sour cream or yogurt as a substitute for some of the buttermilk. These tips help you achieve a tender, flavorful cornbread. Yes, you can use frozen zucchini! Just thaw it first and drain any excess water. Frozen zucchini may not have the same crunch, but it works well in baking. When using frozen, try to use it right away. If you let it sit, it may become watery. This can affect the texture of your cornbread. Zucchini cornbread pairs great with many dishes! It complements soups like chili or tomato soup. Serve it with a fresh garden salad for a light meal. You can also enjoy it with grilled meats. For a fun twist, add a spicy salsa on top. The flavors mix well and make a tasty treat. Zucchini cornbread lasts about 3 to 4 days at room temperature. Keep it in an airtight container to stay fresh. If you want it to last longer, consider freezing it. Wrap it well in plastic wrap and foil, then store in the freezer. It can last up to 3 months frozen. Just thaw it overnight in the fridge when you're ready to eat it again. For the best taste, eat it fresh! For more details, check the Full Recipe. To make zucchini cornbread, you need some simple ingredients. Here’s a complete list: - 1 cup all-purpose flour - 1 cup cornmeal - 1 tablespoon baking powder - 1/2 teaspoon salt - 1/2 teaspoon cayenne pepper (optional for a kick) - 1/4 cup granulated sugar - 1 cup buttermilk (or substitute with plant-based milk for a vegan option) - 1/4 cup honey or maple syrup - 2 large eggs (or replace with 1/4 cup applesauce for a vegan alternative) - 1 cup grated zucchini (approximately from 1 medium zucchini) - 1 cup corn kernels (use fresh, canned, or frozen) - 1/2 cup diced bell pepper (any vibrant color) - 1/4 cup fresh cilantro, chopped (optional for freshness) - 1/4 cup melted butter or coconut oil Using fresh zucchini adds moisture and flavor. You can swap out some items based on your needs. For a gluten-free option, use gluten-free flour. If you want a vegan version, plant-based milk and applesauce work well. Adding zucchini not only boosts flavor but also adds nutrients. Zucchini is low in calories and high in vitamins. It makes your cornbread moist and delicious. For extra flavor, try adding herbs like thyme or rosemary. Remember to check out the Full Recipe for detailed instructions and specific measurements. Enjoy creating a delightful dish! Zesty Zucchini Cornbread Delight is a fun recipe packed with flavor. We covered ingredients, how to bake, and tips for the best texture. Avoid common mistakes and try different flavors to keep it fresh. Store your leftovers well and reheat for perfect enjoyment later on. With this guide, you can make cornbread that shines at any meal. Enjoy exploring your options and happy baking!

Zucchini Cornbread Flavorful and Simple Recipe

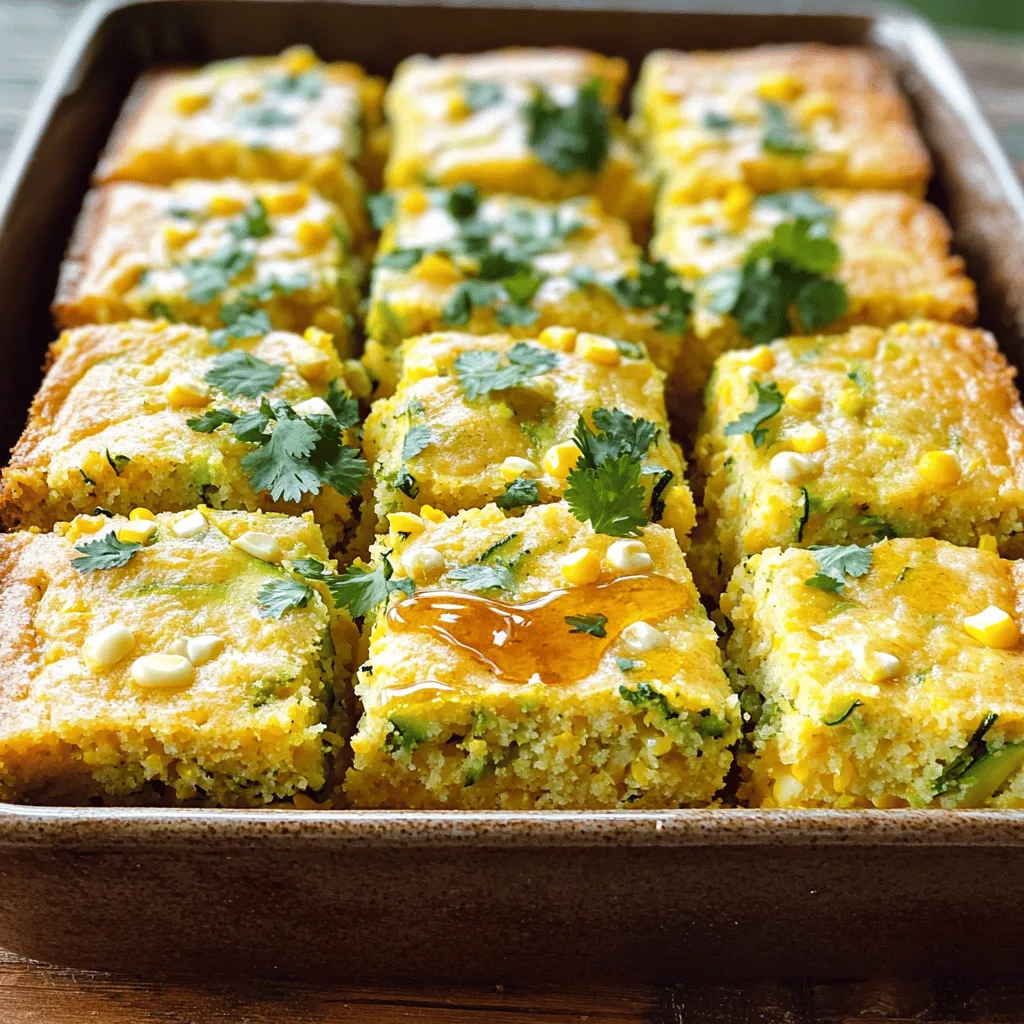
Are you ready to make a dish that bursts with flavor and is super easy to whip up? Zucchini cornbread

- 2 packets (100g each) frozen acai puree - 1 ripe banana, sliced - 1 cup unsweetened almond milk (or any milk of choice) - 1 tablespoon almond butter - 1 tablespoon honey or agave syrup (adjust to taste) For the acai smoothie bowl, you need fresh and frozen ingredients. The frozen acai puree gives your bowl its rich, deep color. Bananas add natural sweetness and creaminess. Use almond milk for a smooth texture that blends well. Almond butter brings healthy fats and a nutty taste. Honey or agave syrup can sweeten the mix, so adjust it based on your liking. - 1/2 cup granola - 1/4 cup unsweetened shredded coconut - Fresh fruits for topping (sliced strawberries, blueberries, kiwi, or mango) - Chia seeds for garnish - Fresh mint leaves for garnish The toppings are what make your acai bowl fun and tasty! Granola adds crunch, while shredded coconut gives a tropical feel. Fresh fruits not only look good but also add more flavor. Chia seeds are great for extra nutrition, and mint leaves add a fresh touch. You can mix and match your toppings based on what you enjoy. Check out the Full Recipe for step-by-step details! Start by preparing your blender. Ensure it is clean and ready to use. Then, measure out your ingredients. You need: - 2 packets (100g each) frozen acai puree - 1 ripe banana, sliced - 1 cup unsweetened almond milk (or any milk of choice) - 1 tablespoon almond butter - 1 tablespoon honey or agave syrup (adjust to taste) Having everything ready makes the next steps smooth and easy. Now, combine the main ingredients in your blender. Add the frozen acai puree, sliced banana, almond milk, almond butter, and honey or agave syrup. Blend on high speed until the mix is smooth and creamy. If the smoothie is thick, add more almond milk bit by bit until you like the texture. After blending, taste your acai mixture. If it needs sweetness, add more honey or agave syrup. Blend briefly to mix in the added sweetness. Carefully pour the acai smoothie mixture into a large bowl. Aim for even distribution for a nice look. Next, layer your toppings. Start with granola on top, then add your fresh fruits like strawberries, blueberries, kiwi, or mango. Sprinkle unsweetened shredded coconut over the fruits. Finish with a dash of chia seeds for a nice touch. To make it beautiful, garnish with fresh mint leaves. This adds a pop of green and a lovely aroma. Serve your Acai Bliss Smoothie Bowl right away with a spoon. Enjoy the vibrant flavors and nutrition! To get the right thickness for your acai smoothie bowl, start by adjusting the almond milk. If your mix is too thick, add more almond milk slowly. This way, you can control the texture. When blending, use short bursts. This helps create a creamy, smooth blend without over-mixing. To make the smoothie bowl sweeter, try adding more honey or agave syrup. Just blend a little more after adding. If you want alternatives to honey, consider maple syrup or mashed ripe banana. These options add sweetness without using extra syrup. When topping your bowl, get creative! Arrange granola in a line, then add fresh fruits in colorful patterns. This not only looks good but tastes great too. For garnishing, sprinkle chia seeds for a nice touch and add fresh mint leaves. They make your bowl pop with color and flavor. {{image_4}} You can make your acai smoothie bowl unique by swapping out flavors. Use different fruits to change the taste. Instead of banana, try mango or even spinach for a green kick. For nut butters, if almond is not your favorite, peanut butter works well. Each option opens a new world of flavor. If you need vegan options, you can easily make this dish plant-based. Replace honey with agave syrup or maple syrup. For nut-free diets, consider sun butter instead of almond butter. Use gluten-free granola if you avoid gluten. This way, everyone can enjoy a tasty bowl. Using seasonal fruits can make your bowl fresh and fun. In summer, add ripe peaches or fresh berries. In winter, consider oranges or pomegranate to brighten your dish. Change your toppings based on what's available. This not only enhances flavor but also keeps it exciting. Enjoy making your acai bowl special! To store your acai smoothie bowl leftovers, place the bowl in the fridge. It stays fresh for up to 24 hours. Cover it with plastic wrap or a lid to prevent drying out. If you want to freeze the smoothie base, pour it into ice cube trays. This method keeps your acai mixture fresh for up to three months. Once frozen, transfer the cubes to a freezer bag. This makes it easy to blend later. When reheating or refreshing leftover bowls, avoid the microwave. Instead, blend your smoothie base with a splash of almond milk. This helps restore its creamy texture. To maintain the freshness of toppings, store them separately. Keep fruits in a sealed container in the fridge. Granola and coconut should stay in airtight bags. This way, they stay crunchy and flavorful. An acai smoothie bowl is a thick blend made from acai berries. It is often topped with fruits, nuts, and seeds. These bowls are popular for breakfast or as a snack. They are vibrant, tasty, and packed with nutrients. Acai bowls are fun to make and easy to enjoy. Many people love them for their beauty and health benefits. Yes, you can easily make this recipe vegan. Instead of almond butter, use peanut or sunflower seed butter. For sweeteners, replace honey with agave syrup or maple syrup. Use any plant-based milk like oat or soy milk. These swaps keep the dish tasty and plant-based. You can customize your smoothie bowl in many ways. Try different fruits, like mango or pineapple, for new flavors. Swap the almond butter for cashew or hazelnut butter. Add protein powder for an extra boost. When it comes to toppings, use nuts, seeds, or your favorite granola. Be creative and make it your own! Acai berries are very healthy. They are high in antioxidants, which help fight free radicals. They can support heart health and improve cholesterol levels. Acai berries may help with weight loss and boost energy. They are also rich in fiber, which aids digestion. Eating acai can contribute to a balanced diet. This blog post covered how to make a delicious acai smoothie bowl. You learned about key ingredients and toppings, plus step-by-step instructions. I shared tips for perfecting your bowl’s texture and sweetness. You also discovered variations for taste and dietary needs. Finally, we discussed storage for any leftovers. Now, you can enjoy this healthy treat anytime. Get creative with your flavors and toppings. Have fun making your own acai bowl!

Acai Smoothie Bowl Powerful and Nutritious Recipe

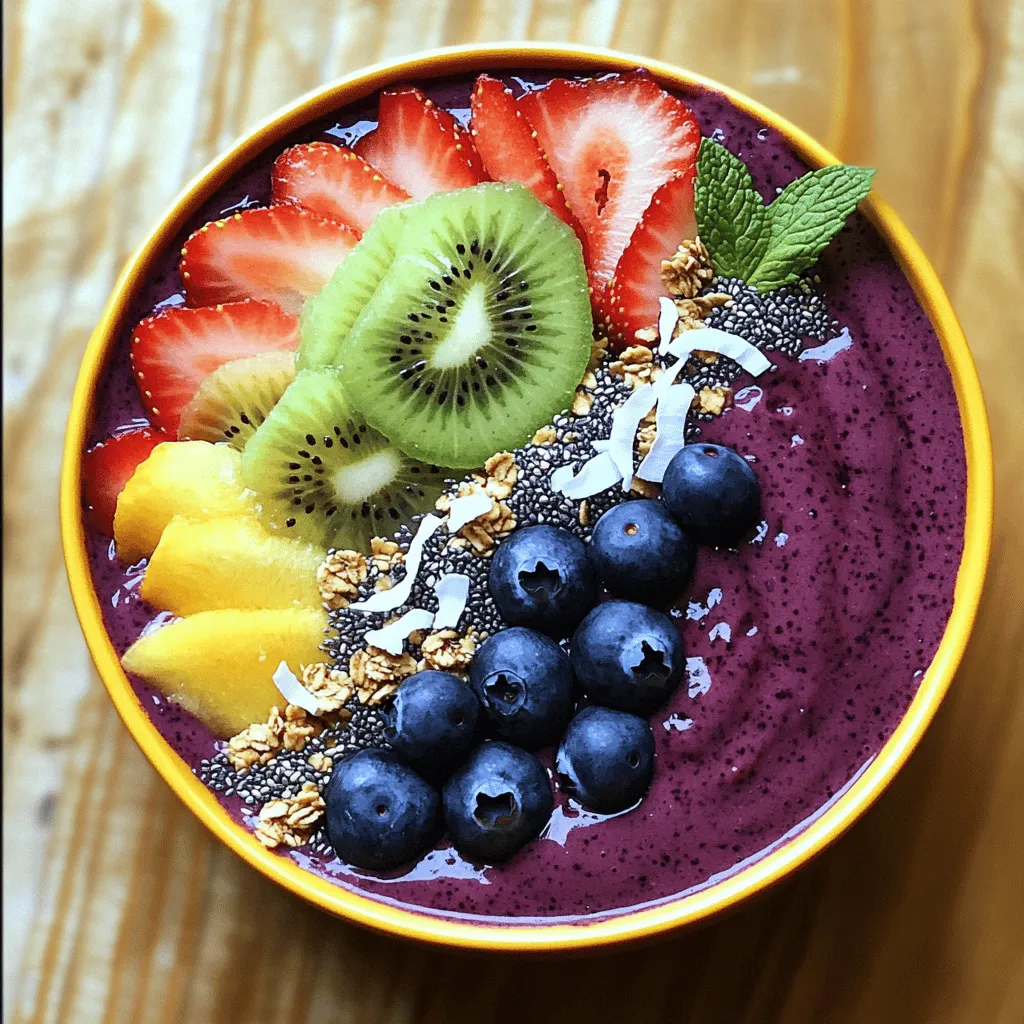
Looking for a tasty way to boost your health? You’ve come to the right place! This Acai Smoothie Bowl is

- All-purpose flour - Powdered sugar - Unsalted butter - Egg yolk - Pure vanilla extract - Heavy cream - Whole milk - Granulated sugar - Cornstarch - Fresh raspberries - Fresh mint leaves Using high-quality ingredients makes a big difference in taste. Here are some tips: - Choose organic raspberries for the best flavor. - Use pure vanilla extract instead of imitation for a richer taste. - Select unsalted butter to control the salt in your recipe. If you need substitutions, consider these options: - For dairy-free, use coconut cream instead of heavy cream and milk. - For gluten-free, swap all-purpose flour with a gluten-free blend. - If you want a lower-sugar option, use a sugar substitute like stevia. These choices let you enjoy this dessert without missing out on flavor! For more details, check out the Full Recipe. To start, I mix the dry ingredients. In a bowl, I whisk together 1 ½ cups of all-purpose flour and ½ cup of powdered sugar. This gives the tart a sweet base. Next, I incorporate the butter and egg yolk. I add ½ cup of softened unsalted butter and 1 large egg yolk to the bowl. I mix with a fork until the mixture looks crumbly. Then, I stir in 1 teaspoon of pure vanilla extract to add richness. Now, I chill the dough. I shape it into a flat disk. I wrap it tightly in plastic wrap and place it in the fridge. This step is crucial, so the butter firms up. I leave it for at least 30 minutes. Meanwhile, I preheat the oven to 350°F (175°C). After chilling, I roll and shape the dough. On a floured countertop, I roll out the dough to about ¼ inch thick. I use a round cutter to cut circles that fit my mini tart pans. I carefully press the dough into each pan. Then, I blind bake the tart shells. I prick the bottoms with a fork to avoid bubbles. I bake them for about 15-20 minutes until the edges turn lightly golden. Once baked, I remove them from the oven and cool them completely in the pans. For the vanilla cream, I cook the custard mixture. In a medium saucepan, I combine 1 cup of heavy cream, 1 cup of whole milk, ½ cup of granulated sugar, and 2 tablespoons of cornstarch. I cook over medium heat, whisking all the time until it thickens. Once it bubbles gently, I take it off the heat. Next, I add flavors and cool. I stir in 2 teaspoons of pure vanilla extract into the warm custard. I let it cool slightly, stirring to keep it smooth. Now, I fill the tarts with vanilla cream. Once the tart shells are cool, I carefully spoon or pipe the custard into each shell. I fill them generously to create a creamy layer. Then, I top with raspberries. I arrange fresh raspberries on top of each filled tart. This adds a bright touch of color and flavor. Finally, I chill before serving. I place the filled tarts in the fridge for at least 1 hour. This allows the flavors to meld and the cream to set. You can find the Full Recipe for more detailed steps and tips! To get a great tart shell, start with cold butter. This helps keep the dough flaky. When mixing, avoid overworking the dough. Overworking can make it tough. Chill the dough for at least 30 minutes. This step prevents cracks and uneven baking. To avoid soggy bottoms, blind bake your tart shells. Prick the bottom with a fork before baking. This allows steam to escape and keeps the crust crisp. Bake until the edges are lightly golden for the best result. For a light and fluffy cream, whip the heavy cream until soft peaks form. Use a clean bowl and beaters to prevent any greasy residue. Gradually fold in the cooled custard. This technique helps keep it airy and smooth. To ensure a lump-free custard, whisk continuously while cooking. Remove it from heat as soon as it thickens. Stir in the vanilla extract to add flavor. Let it cool slightly before using to keep it smooth. For a beautiful finish, garnish each tart with a fresh mint leaf. Mint adds a pop of color and freshness. Arrange the tarts on a decorative platter for an elegant look. You can even layer them for a stunning display. Serve them chilled for the best taste. For more delicious ideas, check the Full Recipe for Mini Vanilla Cream Tarts with Raspberries. {{image_4}} You can change the flavor profile with different fruits. Strawberries and blueberries work well with the vanilla cream. Sliced peaches or kiwi add a fun twist too. For a richer treat, try chocolate or caramel drizzle. A light drizzle can enhance the sweetness and add a nice touch. You can switch up the vanilla flavor easily. Almond extract gives a unique taste. Lemon extract adds brightness and zing. For warmth, consider adding spices like cinnamon or nutmeg. Just a pinch can make your cream special. If you need gluten-free options, use almond flour. For a dairy-free version, try coconut milk or almond milk. You can also make this vegan by using plant-based butter and a vegan cream alternative. These swaps keep the flavors while meeting dietary needs. For the full recipe, check out the detailed instructions above. To keep your mini tarts fresh, store them in the fridge. Use an airtight container to protect them from drying out. This way, the cream stays smooth, and the crust remains crisp. Do not stack the tarts on top of each other. This will help prevent the cream from getting messy. If you need to keep them longer than a day, place parchment paper between the layers. You can freeze mini tarts, but it's best to freeze them unfilled. To do this, bake the tart shells, let them cool, and then freeze them. Wrap each shell in plastic wrap and place them in a freezer bag. They can last up to three months this way. When you want to enjoy them, thaw the shells in the fridge overnight. For filled tarts, freeze them only if necessary. The cream may not hold up well. If you choose to freeze filled tarts, freeze them for one hour. Then, wrap them tightly and store in a freezer bag. To serve, thaw in the fridge for a few hours. After thawing, you can add fresh raspberries for a vibrant touch. Enjoy your mini vanilla cream tarts with raspberries! Yes, you can prepare mini vanilla cream tarts ahead of time. Here are some best practices: - Make the tart shells a day in advance. Store them in an airtight container. - Prepare the vanilla cream the day before. Chill it in the fridge until ready to use. - Fill the tarts with cream a few hours before serving. This keeps the shells crisp. - Top with raspberries just before serving to maintain their freshness. To prevent your tart shells from shrinking during baking, try these tips: - Chill the dough thoroughly before rolling it out. This helps the butter firm up. - Avoid overworking the dough, which can make it tough. - Use pie weights or dried beans when blind baking to hold the shape. - Prick the bottom of the shells with a fork to prevent air bubbles. If your vanilla cream doesn't thicken, here’s how to troubleshoot: - Ensure you cooked the mixture over medium heat, whisking constantly. - If it’s too thin, return it to the heat. Whisk in a bit more cornstarch mixed with water. - Make sure to remove it from heat once it starts to bubble. Overcooking can cause it to thin out. - Allow the cream to cool slightly before filling the tarts. It will thicken more as it cools. Yes, you can use frozen raspberries, but be aware of a few things: - Frozen raspberries might be softer than fresh ones. They can release more juice. - Thaw them before use to avoid excess moisture in the tarts. - The flavor may be slightly less vibrant than fresh raspberries. However, they still add a nice touch. In this post, we explored how to make mini vanilla cream tarts from scratch. You learned about the essential ingredients and their quality, along with step-by-step instructions for baking. I shared tips for perfect tart shells and ways to personalize your tarts with variations. Proper storage methods and FAQs addressed common concerns. These tarts are fun to make and delightful to eat. Use the tips here to impress friends or enjoy a sweet treat at home. Happy baking!

Mini Vanilla Cream Tarts with Raspberries Delight

Are you ready to impress your guests with a sweet treat? These Mini Vanilla Cream Tarts with Raspberries will not

- 2 pounds baby potatoes - 4 tablespoons extra-virgin olive oil - 4 cloves garlic, finely minced - ½ cup finely grated Parmesan cheese - 1 teaspoon garlic powder - 1 teaspoon onion powder - 1 teaspoon smoked paprika - ½ teaspoon dried thyme - ½ teaspoon sea salt - ½ teaspoon freshly ground black pepper - Fresh parsley, chopped Gather these ingredients before you start cooking. The baby potatoes are key to this dish's texture. They give you that crispy outside and fluffy inside. The olive oil adds richness and helps the spices stick. Garlic brings that amazing aroma and flavor. Parmesan cheese gives a nice salty crunch that elevates the dish. In terms of seasoning, garlic powder and onion powder boost the garlic flavor. Smoked paprika adds warmth and depth. Thyme has a lovely herbal note, while salt and pepper bring everything together. Don't forget the fresh parsley! It adds a pop of color and freshness when you serve. For the full recipe, check out the complete guide. Using quality ingredients will make your Crispy Garlic Parmesan Potatoes shine. First, preheat your oven to 425°F (220°C). This high heat helps the potatoes become crispy. While the oven warms up, line a baking sheet with parchment paper. This makes clean-up easy and helps the potatoes cook evenly. In a large bowl, whisk together the extra-virgin olive oil and seasonings. You will need minced garlic, garlic powder, onion powder, smoked paprika, dried thyme, sea salt, and black pepper. Mix until everything is well combined. The scent will be amazing! Now it's time to coat the potatoes. Take your halved baby potatoes and add them to the bowl. Toss them in the garlic-infused oil. Make sure every piece is covered with the seasoning mix. This step is key to giving each potato a burst of flavor. Once coated, transfer the potatoes to the prepared baking sheet. Arrange them in a single layer with the cut sides down. This helps them crisp up nicely. Place the baking sheet in the oven and roast for about 25 to 30 minutes. Remember to flip the potatoes halfway through. This helps them brown evenly. When they are fork-tender and golden, take them out and sprinkle the grated Parmesan on top. Return the sheet to the oven for just 5 more minutes. This will let the cheese melt and form a delicious crust. Enjoy these crispy garlic Parmesan potatoes! For the full recipe, check out the instructions above. For the best crispiness, cut the potatoes in half. Make sure the flat side faces down on the baking sheet. This will help them brown better. The right oven temperature is key too. I recommend 425°F (220°C). This high heat makes them golden and crunchy. You can switch up the potatoes you use. Red, yellow, or even russet potatoes work great. Each type gives a different taste and texture. You can also adjust the seasonings. If you like more heat, add some red pepper flakes. For a fresh twist, use fresh herbs like rosemary or thyme. These crispy garlic Parmesan potatoes pair well with many main dishes. They are great with grilled chicken or fish. Try serving them alongside a hearty steak for a filling meal. For sides, a fresh salad or steamed veggies complement them nicely. Enjoy a bright, colorful plate that looks as good as it tastes! {{image_4}} You can make your crispy potatoes even more special with fresh herbs. Try using rosemary, thyme, or basil. Each herb adds a unique flavor. Chop them finely and mix them into the oil blend. The herbs will give a fresh taste that makes the dish pop. You can also use dried herbs if fresh ones are hard to find. Just remember to use less, as dried herbs are stronger. Want some heat? Add red pepper flakes or a splash of hot sauce. Mix these spicy ingredients into the oil blend. The heat from the pepper pairs well with garlic and Parmesan. Start with a small amount so you can control the spice level. You can always add more if you want it spicier. This variation is great for those who love bold flavors. Feeling adventurous with cheese? You can switch Parmesan for other hard cheeses. Pecorino Romano or Asiago are fantastic options. Each cheese brings its own taste and character. Pecorino has a sharper flavor, while Asiago is creamier. Try different cheeses to see which one you like best. Mixing cheeses can also create a tasty twist on the classic recipe. For the complete cooking process, refer to the Full Recipe of Crispy Garlic Parmesan Potatoes. To keep your crispy garlic Parmesan potatoes fresh, store them in an airtight container. Place them in the fridge within two hours of cooking. They will stay good for about three days. Make sure the container is tight to prevent moisture. This helps maintain their flavor and texture. To reheat, use an oven or an air fryer. Preheat your oven to 350°F (175°C). Spread the potatoes on a baking sheet. Heat for about 10 to 15 minutes until they are warm and crispy again. Avoid using a microwave, as it can make them soggy. For the best results, an air fryer is also great. It brings back that crunch you love. You can freeze crispy potatoes, but they may lose some crunch. To freeze, let them cool completely. Then, place them in a single layer on a baking sheet and freeze for about an hour. Once frozen, transfer them to a freezer bag. They can stay in the freezer for up to three months. When ready to eat, bake directly from frozen. The texture won’t be the same as fresh, but they will still taste good. For the full recipe, refer to the beginning of this article. Yes, you can prep these potatoes ahead. Here are some tips: - Wash and cut the potatoes a day before. Store them in water in the fridge. - Mix the seasoning and oil in advance. Keep it in a sealed container. - On serving day, just toss the potatoes in the mix and bake them. This way, you save time and still enjoy tasty potatoes! To enhance crispiness, try these methods: - Use a higher oven temp. Increase it to 450°F for a crunchier finish. - Soak the potatoes. Soak halved potatoes in cold water for 30 minutes. This removes excess starch. - Use a baking rack. Place the potatoes on a rack in the baking sheet. This allows air to circulate. These steps give you that extra crunch you crave! Crispy garlic Parmesan potatoes go great with many main dishes: - Grilled chicken or steak for a hearty meal. - Roasted salmon or other fish for a lighter option. - Veggie burgers for a tasty vegetarian pairing. These sides make a complete and delicious dinner! You can easily adjust this recipe for different diets: - For gluten-free, ensure all seasonings are labeled gluten-free. - For a vegan option, skip the Parmesan. Use nutritional yeast for a cheesy flavor. These swaps allow everyone to enjoy this dish! This blog post showed you how to make crispy garlic Parmesan potatoes. We covered all the ingredients you need, plus seasonings. I guided you through every step, from preparing the potatoes to roasting them. You now have tips for achieving maximum crispiness and how to store leftovers. Crispy garlic Parmesan potatoes are delicious and easy to make. I hope you enjoy trying these fun recipes and variations!

Crispy Garlic Parmesan Potatoes Easy and Flavorful Recipe

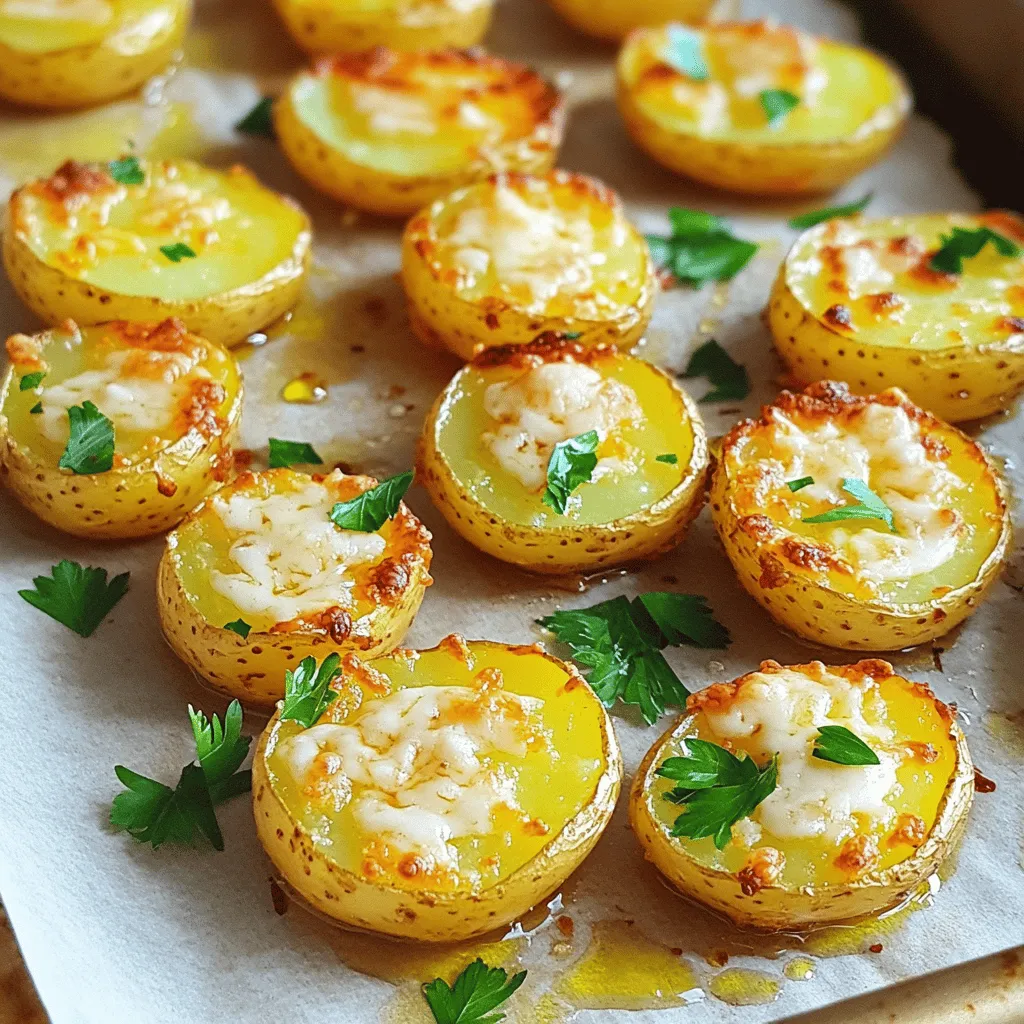
If you’re looking for a dish that packs flavor and crunch, then you’ve found it! This Crispy Garlic Parmesan Potatoes

- 2 cups Greek yogurt (plain or flavored) - 1 tablespoon honey or maple syrup (optional) - 1/2 cup mixed berries (strawberries, blueberries, raspberries) - 1/4 cup chopped nuts (almonds, walnuts, pistachios) - 2 tablespoons dark chocolate chips (optional) - Fresh mint leaves for garnish (optional) Using quality ingredients makes a big difference. Greek yogurt is creamy and thick, giving the bark a great texture. You can choose plain yogurt for a tangy taste or flavored yogurt for sweetness. If you like a sweeter treat, adding honey or maple syrup is a good idea. Mixed berries bring color and flavor. They add a burst of freshness to each bite. You can use any berries you like. Chopped nuts add a nice crunch and some healthy fats. Choose your favorites like almonds, walnuts, or pistachios. For those who enjoy a bit of chocolate, dark chocolate chips are an option. They melt slightly and add a rich flavor. Finally, fresh mint leaves not only look pretty but also add a nice touch of flavor. If you want to explore more ideas, check out the Full Recipe for Frozen Yogurt Bark Delight. - Line a baking sheet with parchment paper. This helps in easy removal later. - Mix 2 cups of Greek yogurt with 1 tablespoon of honey or maple syrup. Stir until smooth. - Spread the yogurt mixture onto the baking sheet. Aim for a rectangle or square about 1/4 inch thick. - Sprinkle 1/2 cup of mixed berries over the yogurt. Gently press them in. - Distribute 1/4 cup of chopped nuts and 2 tablespoons of dark chocolate chips on top. Make sure they are spread evenly. - Freeze the baking sheet for at least 4 hours. Ensure the yogurt is solid before removing it. - Once frozen, lift the bark off the baking sheet and peel away the parchment paper. - Break the bark into pieces of your chosen size. Serve right away or store it in an airtight container in the freezer. For the full recipe, refer to the section above. Enjoy making this fun and healthy snack! To get the best texture for your frozen yogurt bark, start with smooth yogurt. Mix it well. This makes it easy to spread. Smooth yogurt helps create a creamy finish. Next, freeze it thoroughly. Let it freeze for at least 4 hours. You want it solid, so it breaks into nice pieces. Serving matters! Use a decorative platter to present your bark. It makes your snack look fancy. Add fresh mint on top for color. A drizzle of honey adds sweetness and looks great. These small touches make your treat special. This frozen yogurt bark is a low-calorie snack. It satisfies your sweet tooth without guilt. It's also packed with probiotics. These good bacteria help your gut. Plus, berries are full of antioxidants. They fight free radicals and keep you healthy. Enjoy this treat knowing it's good for you! {{image_4}} You can mix things up with frozen yogurt bark by trying different flavors. A tropical variant adds pineapple and coconut for a sweet, sunny taste. This combination gives a fun twist and takes your taste buds on a vacation. If you love chocolate, try a chocolate version. Use chocolate yogurt and add banana slices. This rich flavor makes for a tasty treat that chocolate lovers will adore. You can also play around with toppings. If you want a crunch, replace nuts with granola or seeds. This change adds a delightful texture. You can use other fruits, too. Kiwi and pomegranate give vibrant colors and fresh flavors. They can make your yogurt bark look stunning and taste amazing. If you need a dairy-free option, almond milk yogurt works well. It offers a light flavor and a creamy texture. For a thicker and richer bark, use Skyr. This Icelandic yogurt has more protein and makes a great base for your toppings. Each choice can change the final taste, so feel free to experiment! To keep your frozen yogurt bark fresh, use an airtight container. This helps keep moisture out and maintains the flavor. Store it in the freezer for up to 2 months. This way, you can enjoy your snack whenever you want. When you are ready to eat the bark, let it sit at room temperature for a few minutes. This will make it easier to break and enjoy. If you need to re-freeze it, make sure it is completely thawed first. This will help keep the texture nice. Check your frozen yogurt bark for ice crystals. Ice crystals mean it may have freezer burn. To enjoy the best taste, eat it within the recommended time frame. This ensures you get the full flavor and creamy texture from your delicious treat. Typically, it lasts up to 2 months in the freezer. To keep it fresh, store it in an airtight container. This way, you can enjoy it later without losing flavor or texture. Yes, almond, coconut, or soy yogurt can be great substitutes. These options are perfect if you want a dairy-free snack. Just choose unsweetened versions for the best taste. Yes, it’s low in calories and packed with nutrients, depending on the toppings. Greek yogurt is rich in protein. Adding berries boosts antioxidants. Nuts provide healthy fats. This snack can fit well into a balanced diet. For the full recipe, check out the detailed instructions above. This blog post shared a fun recipe for frozen yogurt bark using simple ingredients. We covered key ingredients, preparation steps, and storage tips. This snack is healthy and easy to customize with your favorite toppings. It’s perfect for enjoying now or saving for later. Make sure to try different flavors and toppings for variety. Enjoy the great taste and health benefits of your homemade frozen yogurt bark!

Frozen Yogurt Bark Easy and Delicious Snack Recipe

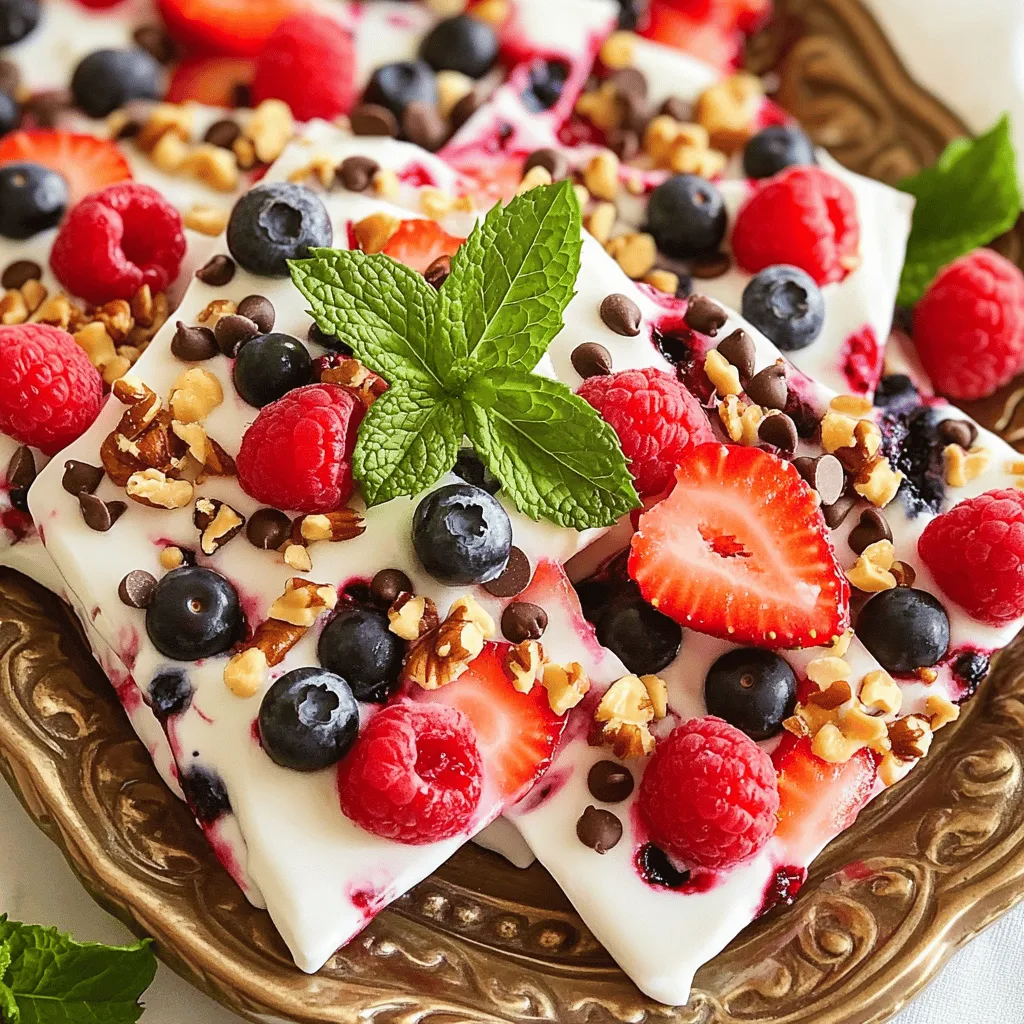
Are you looking for a fun, tasty snack that is easy to make? Frozen yogurt bark is the perfect choice!

A taro latte is a creamy drink made from taro root. This drink has gained popularity in many cafes. It features a beautiful purple hue and a sweet, nutty flavor. You can enjoy it hot or iced, depending on your mood. The main ingredients are taro root, milk, and sweeteners. This treat is perfect for anyone who loves unique flavors. The flavor of a taro latte is smooth and slightly sweet. It combines the earthiness of taro with the creaminess of milk. You can choose any milk you like, such as almond or oat. Here are the key ingredients you need: - 1 cup taro root, peeled and diced - 2 cups water - 1 cup milk (choose between dairy or non-dairy options) - 2-3 tablespoons sugar or sweetener (adjust based on your sweetness preference) - 1/2 teaspoon vanilla extract - A pinch of salt - Ice cubes (optional, for serving an iced version) - Taro powder for garnish (optional, for added visual appeal) These ingredients create a delightful balance of flavors. The vanilla adds warmth, while the sugar enhances the sweetness. Taro is not just tasty; it is also good for you! It’s rich in fiber, which helps with digestion. Eating taro can boost your energy, too. It has vitamins and minerals that support your immune system. Plus, it is low in fat, making it a smart choice for snacks or drinks. Enjoying a taro latte gives you a delicious treat with health benefits. If you want to try making it yourself, check out the Full Recipe. To make a tasty taro latte, you need a few simple ingredients: - 1 cup taro root, peeled and diced - 2 cups water - 1 cup milk (dairy or non-dairy) - 2-3 tablespoons sugar or sweetener - 1/2 teaspoon vanilla extract - A pinch of salt - Ice cubes (optional) - Taro powder for garnish (optional) You can choose milk based on your taste or dietary needs. Here are some great options: - Whole milk adds creaminess. - Almond milk gives a nutty flavor. - Oat milk is very smooth. - Coconut milk brings a tropical twist. - Soy milk is a popular choice. Sweetness makes your taro latte delightful. You can use: - White sugar for a classic taste. - Brown sugar for a deeper flavor. - Honey for a natural sweet option. - Maple syrup for unique sweetness. - Stevia for a low-calorie choice. Feel free to adjust sweetness based on your liking. For the complete recipe, check out the Full Recipe. Start by peeling and dicing the taro root. Cut it into small pieces. This helps it cook faster. Place the diced taro in a pot. Add 2 cups of water to cover the taro completely. Bring the water to a boil over medium heat. Once it boils, lower the heat to simmer. Let it cook for 15-20 minutes. Check if the taro is tender by piercing it with a fork. If it goes in easily, it’s done! After cooking, drain the water from the taro. Move the soft taro to a blender. Add 1 cup of milk, 2-3 tablespoons of sugar, 1/2 teaspoon of vanilla extract, and a pinch of salt. Blend everything until it is smooth and creamy. If you want a warm latte, pour the mixture back into the pot. Heat it gently while stirring. For an iced version, fill a glass with ice and pour the blended mixture over it. To finish, sprinkle some taro powder on top for garnish. This adds a nice touch and flavor. Now, you can enjoy your tasty taro latte! For the full recipe, check the provided link. {{image_4}} To get the best texture for your taro latte, blend well. After cooking, make sure to blend the taro until smooth. If your mixture seems too thick, add a bit more milk. This will help create a creamy drink that feels great in your mouth. Remember, the smoother the blend, the better your drink! Finding the right sweetness is key. Start with 2 tablespoons of sugar. Taste the latte, and if you want it sweeter, add more sugar one teaspoon at a time. You can also use honey or a sugar substitute. Just remember to mix well after each addition to see how much you like it. You can enjoy your taro latte hot or iced. If you like it warm, heat the blended mixture gently on the stove. Stir it often to keep it creamy. For an iced version, pour the latte over ice cubes in a tall glass. This will make a refreshing drink, perfect for warm days. Each way gives a different vibe to your treat! For more details, check out the Full Recipe. You can turn your taro latte into a fun taro milk tea. Start with the same base of cooked taro and milk. After blending, steep some strong black tea. Combine the taro mixture with the tea for a creamy, sweet drink. This adds a nice caffeine boost. Just mix it well and serve it over ice for a refreshing treat. If you want a vegan version, simply swap the milk for a plant-based option. Almond, oat, or coconut milk work great. They add their own taste to the latte. Use a natural sweetener like agave syrup instead of regular sugar. This way, you keep it creamy and delicious without any dairy. You can also play with flavors to make your taro latte special. Adding matcha gives it a bright green color and earthy taste. Just mix in a teaspoon of matcha powder when blending. For a chocolate twist, add cocoa powder for a rich, sweet flavor. These fun additions make your drink unique and exciting. Try different combinations to find your favorite! For more details, check the Full Recipe. You can make a tasty taro latte at home easily. First, gather the ingredients. You need taro root, water, milk, sugar, vanilla, and salt. Follow the steps in the Full Recipe above. Start by boiling the taro until it’s soft. Then, blend it with milk and other ingredients. You can serve it warm or cold. Enjoy your homemade treat! You can buy taro powder in many places. Look in local Asian markets or grocery stores. Online stores also sell it, making it easy to find. Check for brands that have good reviews. Taro powder adds great flavor and color to your drinks! Yes, you can use frozen taro. Frozen taro is a good option if fresh taro is hard to find. Just thaw it before cooking. Follow the same cooking steps as fresh taro. You will still get the creamy taste and lovely color for your latte! A Taro Latte blends unique flavors and health perks. We explored its ingredients, cooking steps, and how to customize your drink perfectly. You can create a tasty latte hot or iced, vegan or with milk. Remember, experimenting with sweetness makes a big difference in flavor. Taro lattes not only taste great but also provide health benefits. Now, it's time to enjoy your own homemade Taro Latte, a delicious drink you can share with friends.

Taro Latte Delight Creamy and Flavorful Treat

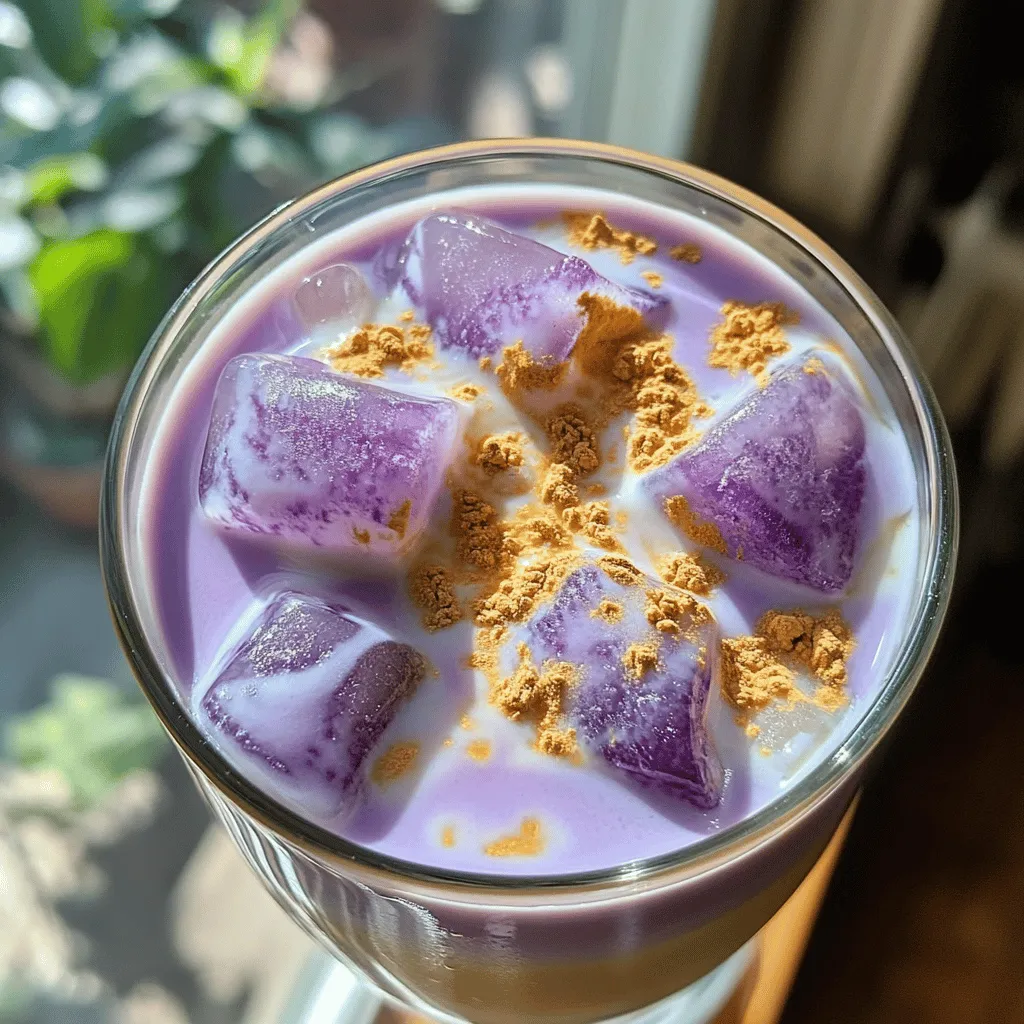
If you crave a creamy and flavorful treat, the Taro Latte is for you! This delightful drink combines smooth taro

Older posts
Newer posts
← Previous Page1 … Page25 Page26 Page27 … Page91 Next →

dsad

© 2025 recipesstation • Built with GeneratePress

Our Policies

  • Copyright Policy
  • Cookie Policy
  • GDPR Policy
  • Privacy Policy
  • Disclaimer
  • Terms Of Use

More Information

  • Home
  • About
  • Contact
  • Appetizers
  • Dessert
  • Dinner
  • Drinks
©2025, recipesstation About Back To Top