Skip to content
DisclaimerTerms Of UseGDPR PolicyCookie Policy

recipesstation

  • Home
  • Drinks
  • Appetizers
  • Dinner
  • Dessert
  • About
  • Contact
  • Privacy Policy
DisclaimerTerms Of UseGDPR PolicyCookie Policy

Emily

- 2 boneless, skinless chicken breasts - 1 cup BBQ sauce - 2 cups cooked quinoa - 1 cup black beans - 1 cup corn kernels - 1 red bell pepper - 1 ripe avocado - 1 cup cherry tomatoes - 1/4 cup fresh cilantro - 1 lime - Salt and pepper to taste The BBQ Chicken Power Bowl packs a lot of flavor and nutrition. Let’s look at what you need. Start with the chicken. I like using boneless, skinless breasts. They cook evenly and stay juicy. Use your favorite BBQ sauce for that smoky sweetness. Quinoa serves as a great base. It’s rich in protein and fiber. Make sure it is cooked and well-fluffed. Next, add black beans for some extra protein and fiber. They also add a nice texture. Corn brings sweetness and crunch. You can use fresh, frozen, or canned corn. The red bell pepper adds color and a bit of crunch. Avocado gives creaminess, while cherry tomatoes add a fresh burst. Fresh cilantro brings a wonderful herbal note. The lime adds a zesty finish, enhancing all the flavors. Don’t forget salt and pepper. They tie everything together. Now that you know the ingredients, you can get started! Check out the Full Recipe for details. - Preheat the grill or grill pan. This step is key for a great sear. - Season the chicken with salt and pepper. This adds flavor to the meat. - Apply BBQ sauce to the chicken. Spread it evenly for a tasty glaze. - Grill the chicken and control the timing. Cook for about 6-7 minutes per side. - Brush additional BBQ sauce during grilling. This enhances the flavor as it cooks. - Rest and slice the chicken. Let it sit for 5 minutes before cutting. - Mix the quinoa and vegetables. Combine cooked quinoa, black beans, corn, bell pepper, and tomatoes. - Create the base for each serving. Divide the quinoa mix into four bowls. - Arrange grilled chicken and avocado on top. Place the chicken and avocado nicely for a colorful dish. For more details, check the Full Recipe. - Achieving the perfect grill marks To get those beautiful grill marks on your chicken, start with a hot grill. Place the chicken on and do not move it for about 3-4 minutes. Then, rotate it 90 degrees to create crosshatch marks. Flip it after 6-7 minutes. This way, you lock in the flavor and moisture. - Checking chicken for doneness To make sure your chicken is fully cooked, use a meat thermometer. Insert it into the thickest part of the chicken. It should read 165°F (75°C). If you don’t have a thermometer, cut into the chicken. The meat should be white with no pink inside. - Suggestions for additional toppings You can add more fun to your BBQ Chicken Power Bowl with toppings. Try sliced jalapeños for heat, shredded cheese for creaminess, or crunchy tortilla strips for texture. Fresh herbs like basil or parsley can add a fresh taste and color. - Using different BBQ sauce varieties Experiment with different BBQ sauces to change the flavor profile. Try a sweet, honey-based sauce for a sticky glaze, or a spicy chipotle sauce for a kick. You can even mix sauces for a unique taste. Each variety can totally transform your bowl! {{image_4}} You can change up the protein in your BBQ chicken power bowl. Instead of chicken, try tofu or shrimp. Tofu is a great choice for a plant-based meal. It absorbs flavors well and gives a nice texture. Shrimp cooks quickly and adds a seafood twist to your bowl. For grains, you can swap quinoa for brown rice or farro. Brown rice is hearty and adds fiber. Farro has a nutty flavor and chewy texture. Both options keep your bowl filling and delicious. If you want a vegan or vegetarian option, skip the chicken. Use grilled mushrooms or chickpeas instead. Both add protein and taste. Just make sure your BBQ sauce is vegan-friendly. For gluten-free variations, ensure the BBQ sauce is gluten-free. Most brands offer gluten-free options. Use quinoa or brown rice as your grain base since they are naturally gluten-free. This way, everyone can enjoy a tasty meal! For the full recipe, check out the details provided earlier. To keep your BBQ Chicken Power Bowl fresh, use airtight containers. Glass or plastic containers work well. Make sure they seal tightly to keep air out. Store in the fridge within two hours of cooking. This helps keep the chicken tasty and safe to eat. You can store leftovers for up to three days. When it's time to enjoy leftovers, reheat them carefully. The best way is to use a microwave. Heat in short bursts, stirring often. This prevents the chicken from drying out. If you prefer, you can use a skillet on the stove. Just warm over low heat, stirring gently. Avoid using high heat, as it can ruin the flavor. Yes, you can freeze the BBQ Chicken Power Bowl. Store it in freezer-safe bags or containers. Be sure to remove as much air as possible. When you’re ready to eat, thaw it in the fridge overnight before reheating. Enjoy your meal without worry! A BBQ Chicken Power Bowl is a tasty and healthy meal. It combines grilled chicken, quinoa, and fresh veggies. The bowl is colorful and full of flavor. You start with a base of fluffy quinoa. Add black beans for protein and corn for sweetness. Then, toss in diced red bell peppers and halved cherry tomatoes for crunch. Finish with sliced avocado and fresh cilantro. The BBQ sauce adds a smoky touch, making each bite exciting. You can find the full recipe above to try this delightful dish. To change the heat in your BBQ Chicken Power Bowl, try these tips. Use a milder BBQ sauce for less spice. You can also mix in sweet chili sauce for a hint of heat without making it too hot. If you like heat, add sliced jalapeños or a dash of hot sauce. For a smoky flavor, try chipotle sauce. Always taste as you go. This way, you can find the perfect balance that suits your taste. This bowl pairs well with many sides and drinks. Try a light salad with mixed greens and a simple vinaigrette. Cornbread or whole-grain bread can also be nice additions. For drinks, a refreshing iced tea or lemonade works well. You may also enjoy a light beer or sparkling water. These sides and drinks enhance the meal and make it more enjoyable. This BBQ Chicken Power Bowl combines healthy ingredients for a tasty meal. You learned how to grill chicken, assemble the bowl, and store leftovers. Don't hesitate to mix and match flavors to suit your taste. Try different proteins or grains for fun variations. Enjoy this meal with friends or family, making it a go-to recipe. Keep experimenting to find your perfect spin on this dish!

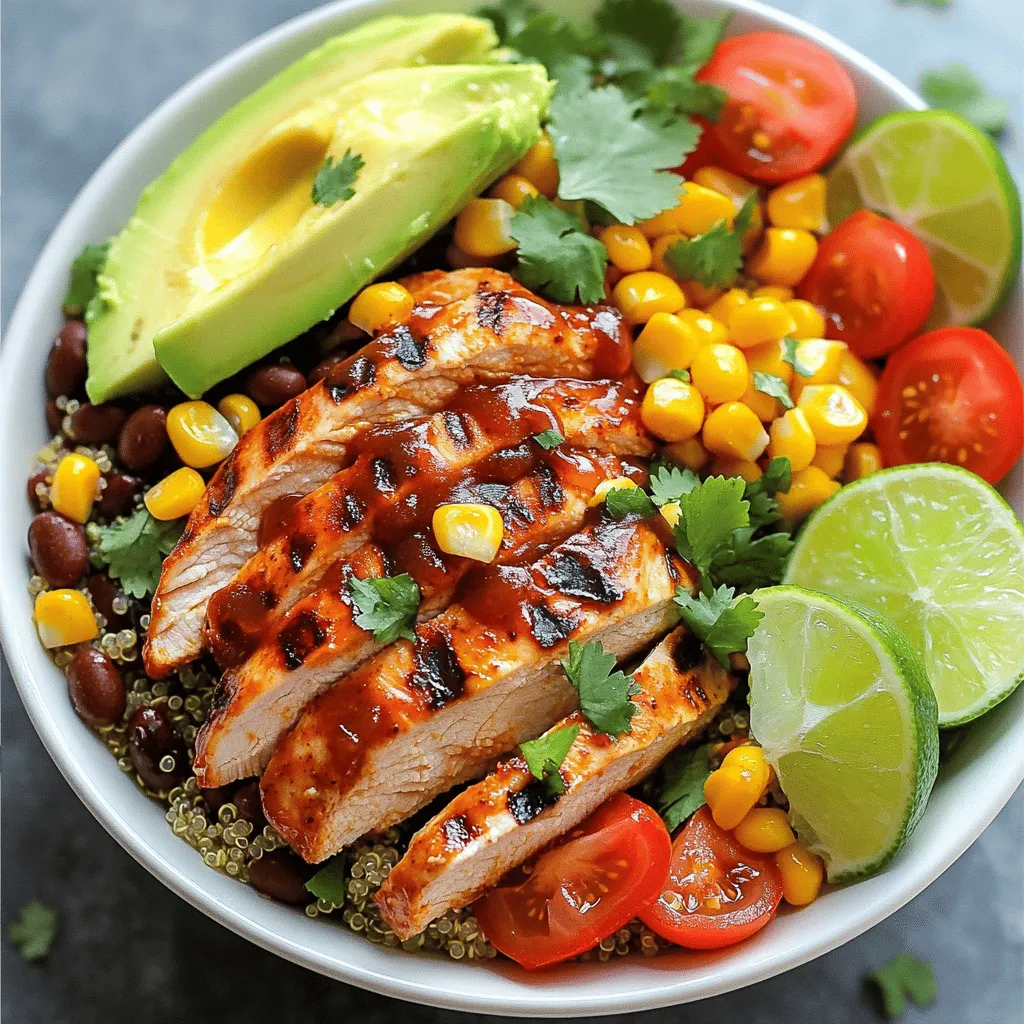
BBQ Chicken Power Bowl Flavorful and Healthy Meal

Looking for a quick, healthy meal that packs a flavor punch? The BBQ Chicken Power Bowl is just what you

To make these yummy lemon cheesecake crumb bars, you need a few key items. Here is the list: - 1 ½ cups graham cracker crumbs - ½ cup unsalted butter, melted - 1/3 cup granulated sugar - 2 (8 oz) packages cream cheese, softened to room temperature - 1 cup powdered sugar - 3 large eggs, at room temperature - 1/4 cup freshly squeezed lemon juice - Zest of 1 lemon - 1 teaspoon vanilla extract - Pinch of salt These ingredients make the base and the creamy filling. The combination of the zesty lemon and rich cream cheese creates a perfect balance of flavors. You can also add a few extra ingredients to make your bars even tastier. Consider these: - Fresh berries (like blueberries or raspberries) for a fruity twist - A dash of almond extract for a nutty flavor - Extra lemon zest for a stronger citrus taste These optional ingredients can add a fun twist to your dessert. Feel free to mix and match as you like! To make your cooking process smooth, having the right tools is key. Here’s what you should gather: - An 8x8-inch baking pan - Parchment paper - Mixing bowls - Electric mixer or whisk - Spatula - Measuring cups and spoons Using these tools makes it easier to prepare and bake your delicious lemon cheesecake crumb bars. Happy baking! To make the crust, start by mixing the graham cracker crumbs with melted unsalted butter and granulated sugar. You want to combine these ingredients in a bowl until they look like wet sand. This helps bind the crust together. Next, transfer the mixture to an 8x8-inch baking pan lined with parchment paper. Press the crumbs down firmly and evenly to form a solid base. Bake it in a preheated oven at 350°F for 10 minutes. This step makes the crust crispy and delicious. For the cheesecake filling, use a large mixing bowl. Beat the softened cream cheese until it is smooth and creamy. Slowly add in the powdered sugar, mixing until fluffy. Then, add the eggs one at a time. Mix gently after each egg. This prevents overmixing, which can make the filling dense. After that, stir in the freshly squeezed lemon juice, lemon zest, vanilla extract, and a pinch of salt. Mix until everything is blended well. The filling should be creamy and smooth. Pour the creamy cheesecake filling over the cooled crust. Spread it evenly with a spatula. Place the pan back into the oven and bake for 30 to 35 minutes. The edges should look set, but the center can have a slight jiggle. This means it will be creamy when cooled. After baking, let it cool at room temperature for about an hour. Then, refrigerate the bars for at least two hours. This helps them set properly. Once chilled, lift the bars from the pan using the parchment overhang. Slice them into neat squares for serving. For the complete recipe, check out the Full Recipe. When making lemon cheesecake crumb bars, it's easy to overlook some details. Here are some common mistakes: - Overmixing the Filling: Mix gently after each egg addition. Overmixing can make the bars dense. - Skipping the Cooling Step: Allow the crust to cool before adding the filling. This helps keep the layers separate. - Not Using Room Temperature Ingredients: Cold cream cheese can lead to lumps. Always soften your cream cheese before mixing. For the best results, follow these tips: - Oven Temperature: Always preheat your oven to 350°F (175°C). An accurate temperature ensures even baking. - Watch the Edges: The edges should be set while the center jiggles slightly. This indicates a creamy texture. - Cooling Time: After baking, let the bars cool for at least 1 hour at room temperature. Then chill them for 2 hours. This helps them set properly. Presentation can elevate your dessert. Here are some ideas: - Dust with Powdered Sugar: A light sprinkle adds sweetness and looks nice. - Garnish with Lemon Slices: Thin slices of lemon add color and freshness. - Mint Leaves: A few mint leaves provide a pop of green and a touch of flavor. For the full recipe, check out the detailed instructions above. {{image_4}} You can easily change the taste of your lemon cheesecake crumb bars. Adding fruit can create a fun twist. Try mixing in berry swirls using raspberry or blueberry puree. Just swirl it into the filling before baking. If you love chocolate, drizzle melted chocolate over the cooled bars for a rich touch. This contrast pairs nicely with the tart lemon flavor. If you need a gluten-free option, you can use gluten-free graham crackers. Just crush them like you would regular graham crackers. Then, follow the same steps in the recipe. You can also try almond flour for the crust. Mix it with melted butter and a bit of sugar for a tasty base. For a dairy-free version, swap out cream cheese for a plant-based cream cheese. Look for brands that have a similar texture and taste. You can also use coconut cream for a rich, creamy filling. This not only makes it dairy-free but adds a lovely tropical note. Just remember to adjust the sugar if your alternative is sweeter. Feel free to explore these variations to find your favorite twist on lemon cheesecake crumb bars! For the full recipe, check out the details above. To keep your Lemon Cheesecake Crumb Bars fresh, store them in an airtight container. This way, they stay moist and keep their flavor. You can keep them in the fridge for up to five days. If you notice any crust on top, cover the bars lightly with plastic wrap to protect them. You can freeze these delicious bars for later enjoyment. First, slice them into squares. Wrap each piece in plastic wrap, then place them into a freezer-safe bag. They will stay good for up to three months in the freezer. This makes for a quick dessert option when you need one! When you're ready to enjoy your frozen bars, take them out of the freezer. Let them thaw in the fridge overnight for the best texture. If you're in a hurry, you can leave them at room temperature for about an hour. Avoid reheating them in the microwave; this can change their texture. Instead, enjoy them chilled right from the fridge for a refreshing treat. You can tell when your bars are done by looking at the edges. The edges should look set, while the center has a slight jiggle. This jiggle means it will still be creamy when cooled. If the edges are brown, you might have overbaked them. It usually takes about 30-35 minutes in the oven. Yes, you can make these bars ahead of time! They taste even better after chilling. I recommend making them a day before you plan to serve them. Just let them cool after baking, then refrigerate. This way, the flavors have time to meld together. If you don’t have graham cracker crumbs, you can use vanilla wafers or digestive biscuits. Just crush them up to make crumbs. Another option is to use oats blended into a fine powder. Each substitute will give a slightly different taste, but they all work well. In this post, we covered how to make Lemon Cheesecake Crumb Bars from scratch. We discussed the main and optional ingredients, along with essential tools. I provided step-by-step instructions for the crust, filling, and baking to ensure perfect results. We explored tips to avoid common mistakes and discussed fun variations. Finally, we shared storage tips for enjoying leftovers. Remember, practice makes perfect. With these steps, you can create a treat that shines!

Lemon Cheesecake Crumb Bars Easy and Delicious Treat

If you love a sweet and tangy treat, you’re in for a delight! Today, I’ll show you how to make

- 1 cup softened unsalted butter - 1 cup packed brown sugar - 1/2 cup granulated sugar - 1 cup fresh blueberries (or frozen blueberries, thawed and drained) - 1/2 cup white chocolate chips These ingredients create a rich and sweet base. The butter gives the cookies a soft texture. The sugars add sweetness and a slight chew. Fresh blueberries burst with flavor, while white chocolate adds a creamy touch. - 2 1/2 cups all-purpose flour - 1 teaspoon baking soda - 1/2 teaspoon fine salt These items are key to make the cookies rise and hold their shape. The flour provides structure, while baking soda helps them puff up. Salt balances the sweetness and enhances flavor. - Zest of 1 lemon - 1 teaspoon pure vanilla extract Adding lemon zest brightens the cookies with a fresh taste. Vanilla extract deepens the flavor and adds warmth. You can choose to use both or just one based on your preferences. For the full recipe, check out the complete instructions to make these delightful cookies! 1. Preheat your oven to 350°F (175°C). This step is key. 2. Line two baking sheets with parchment paper. This keeps cookies from sticking. 3. In a large bowl, cream together the softened butter, brown sugar, and granulated sugar. Use an electric mixer for 3-4 minutes. Mix until light and fluffy. 1. Add the eggs one by one. Mix well after each egg. 2. Pour in the vanilla extract and mix until smooth. 3. In another bowl, whisk together all-purpose flour, baking soda, and salt. 4. Gradually add this dry mix to the butter and sugar. Stir gently until just combined. Don't overmix. 1. Gently fold in the blueberries and white chocolate chips. Use a spatula and be careful not to mash the blueberries. 2. Scoop rounded scoops of dough onto the baking sheets, leaving 2 inches of space between each scoop. 1. Place the baking sheets in the oven. Bake for 12-15 minutes. The edges should be golden brown. The centers should stay soft. 2. Once done, cool the cookies on the baking sheet for 5 minutes. Then, transfer them to a wire rack to cool completely. For a delightful treat, be sure to check the [Full Recipe](#). To get the best texture in your cookies, avoid overmixing the dough. When you mix too much, cookies can turn out tough. Once you add the dry ingredients, mix just until combined. This keeps your cookies soft. For soft and chewy cookies, bake them until the edges are golden, but the centers are still soft. This gives a lovely, tender bite. Let them cool on the sheet for a few minutes before moving them. You can add extra spices to boost the flavor of your Blueberry Heaven Cookies. A pinch of cinnamon or nutmeg can add warmth. These spices work well with blueberries and chocolate. Don't be afraid to experiment with mix-ins! Try adding nuts or different chocolate types for a new taste. This can change each batch into something unique and fun. For a charming display, stack your cookies in a clear glass jar. This lets the colors shine through. You can also arrange them on a decorative plate for a nice touch. Garnishing adds to the appeal! Sprinkle fresh blueberries on top or add a sprig of mint. This adds color and freshness to your cookies. For the full recipe, check the complete instructions to make your cookies shine. {{image_4}} When you want to mix things up, there are many fun ways to change your Blueberry Heaven Cookies. Here are some ideas. - Using Whole Wheat Flour: Swap half of the all-purpose flour for whole wheat flour. This change adds fiber and nutrients without losing flavor. Your cookies will still be soft and tasty. - Alternatives to Sugar: You can use natural sweeteners like honey or maple syrup. This can lower the sugar content and add a unique taste. Just remember to adjust the liquid in your recipe. - Incorporating Different Berries: Try using raspberries, strawberries, or blackberries. Each berry brings its own flavor. You can mix and match for a burst of seasonal goodness. - Holiday-Themed Additions: For winter, add a pinch of cinnamon or nutmeg. This gives your cookies a cozy holiday spirit. You can also use festive sprinkles for a fun touch. - Best Gluten-Free Flour Blends: Look for a good gluten-free flour mix that has xanthan gum. This helps your cookies hold together well. Brands like Bob's Red Mill or King Arthur are great choices. - Adjustments to the Recipe: If you go gluten-free, reduce the baking time a bit. Gluten-free cookies can bake faster. Keep an eye on them to avoid over-baking. These variations keep your Blueberry Heaven Cookies exciting and delicious! For the full recipe, check back to my earlier section. To keep your Blueberry Heaven Cookies fresh, store them properly. - Storing at Room Temperature: Place the cookies in an airtight container. This keeps them soft. Use parchment paper between layers to avoid sticking. They will stay fresh for about 3 days. - Refrigeration Tips for Freshness: If you want them to last longer, refrigerate them. Just make sure to use an airtight container. Cookies can last up to a week in the fridge. If you want to save some cookies for later, freezing is a great option. - Best Practices for Freezing: Allow the cookies to cool completely. Then, place them in a single layer on a baking sheet. Freeze them for about an hour. Once firm, transfer them to a freezer-safe bag. This helps prevent freezer burn. - Thawing Instructions: To enjoy a frozen cookie, take one out and let it thaw at room temperature. This usually takes about 30 minutes. For a warm treat, you can microwave it for a few seconds. Knowing how long your cookies will stay fresh is helpful. - How Long Cookies Stay Fresh: At room temperature, they last about 3 days. In the fridge, they can last up to a week. If frozen, they can stay good for about 3 months. - Signs that Cookies Have Gone Bad: If you notice an off smell or a change in texture, it's time to toss them. Mold is a clear sign they are no longer safe to eat. Enjoy your delicious Blueberry Heaven Cookies while they last! To make Blueberry Heaven Cookies from scratch, follow these steps: 1. Preheat your oven to 350°F (175°C). 2. Cream 1 cup of softened butter with 1 cup of brown sugar and 1/2 cup of granulated sugar. 3. Add 2 large eggs and 1 teaspoon of vanilla extract. Mix well. 4. In another bowl, whisk together 2 1/2 cups of flour, 1 teaspoon of baking soda, and 1/2 teaspoon of salt. 5. Slowly mix the dry ingredients into the wet mixture. 6. Fold in 1 cup of blueberries and 1/2 cup of white chocolate chips gently. 7. Scoop dough onto lined baking sheets. 8. Bake for 12-15 minutes and let them cool. For the full recipe, check the section above. Yes, you can use frozen blueberries. Just make sure to thaw and drain them first. This keeps the dough from becoming too wet. Fresh blueberries work well, but frozen ones are a great option too! To keep cookies soft, store them in an airtight container. Adding a slice of bread can also help. The moisture from the bread keeps the cookies chewy. You can also underbake them slightly. Yes! This recipe is already nut-free. You can also swap the white chocolate chips for a nut-free chocolate option if needed. Enjoy these cookies without worry! You can find pre-made Blueberry Heaven Cookies at local bakeries or specialty shops. Some grocery stores might stock them too. You can also order them online from bakeries that ship. The optimal baking time for chewy cookies is about 12-15 minutes. Watch for golden edges. The centers should look soft. This helps create that delightful chewy texture. Yes! You can use dark chocolate chips or milk chocolate chips instead. Each type adds a unique flavor. Feel free to experiment with your favorite chocolate! Absolutely! Blueberry Heaven Cookies freeze well. Allow them to cool completely, then place them in a freezer-safe bag. They can stay fresh for up to three months. Just thaw them overnight when you're ready to enjoy! In this post, we covered how to make Blueberry Heaven Cookies. We looked at the main ingredients and baking essentials, like butter, sugar, and fresh blueberries. The step-by-step instructions guide you from preparing the dough to baking and cooling. Tips helped us ensure the best texture, flavor, and presentation. We also explored variations and proper storage to keep cookies fresh. Now, you have everything you need to bake these delicious cookies. Enjoy sharing them with friends and family!

Blueberry Heaven Cookies Delightful and Easy Recipe

Are you ready to indulge in a treat that’s as easy to make as it is delicious? Blueberry Heaven Cookies

To make a tasty Asian Chicken Cranberry Salad, you need fresh and simple ingredients. Here’s what I use: - 2 cups cooked chicken breast, shredded - 1 cup mixed salad greens - 1/2 cup red cabbage, finely shredded - 1/2 cup shredded carrots - 1/4 cup dried cranberries - 1/4 cup sliced almonds, toasted - 1/4 cup green onions, chopped - 1/4 cup sesame dressing - Salt and pepper to taste - Optional: 1 tablespoon sesame seeds These ingredients blend well together. The chicken gives protein, while the greens and veggies add crunch and color. The cranberries offer a sweet and tart flavor. You can customize your salad by adding other ingredients. Here are some options: - Cucumber slices for extra crunch - Avocado for creaminess - Bell peppers for sweetness - Fresh herbs like cilantro or mint Feel free to mix and match! Adding different ingredients helps you create your perfect version of the salad. You can choose to use store-bought or homemade dressing. Store-bought sesame dressing is quick and easy. It saves time and still tastes good. If you want to make your own dressing, it's simple! Just mix sesame oil, soy sauce, rice vinegar, and a bit of honey. Homemade dressing can taste fresher and let you adjust flavors to your liking. Whichever dressing you choose, it brings all the flavors together in this delightful salad. For the full recipe, check out the Asian Chicken Cranberry Salad. To start, grab a large mixing bowl. Place your shredded chicken breast into the bowl. Next, add the mixed salad greens. This mix includes spinach, arugula, and romaine. The fresh greens work well with the chicken's savory flavor. Then, add the finely shredded red cabbage. This will give your salad a nice crunch. Don't forget to toss in the shredded carrots. They add both color and sweetness, making each bite delightful. Now it’s time to bring everything together. Add the dried cranberries to the bowl. Their tartness complements the chicken and greens nicely. Then, sprinkle in the toasted sliced almonds. They add a rich flavor and crunch to the mix. Use your hands or a pair of salad tongs to gently toss the ingredients. Make sure everything is mixed well for a good balance of flavors. Drizzle sesame dressing over your colorful salad mix. If you prefer, you can make your own dressing. Use salad tongs to toss again, ensuring every piece gets a nice coating. Now, season your salad with salt and pepper. Taste it to find the right balance for you. For serving, arrange the salad on a large platter or divide it into bowls. Garnish with chopped green onions and, for a final touch, sprinkle sesame seeds on top for a beautiful finish. Enjoy this vibrant Asian Chicken Cranberry Salad! For detailed steps, check the Full Recipe. To make the best Asian chicken cranberry salad, the dressing is key. You want it to be just right. I recommend using a mix of sesame dressing. A good ratio is 1 part dressing to 4 parts salad. This keeps the salad fresh but flavorful. If you like it tangy, add more dressing. For a lighter touch, use less. Shredding chicken can be quick and easy. I use two forks to pull apart the chicken. Hold the chicken with one fork and shred with the other. You can also use your hands if the chicken is cool enough. This gives you nice, even pieces. Make sure not to shred it too fine. You want some texture in your salad. Fresh herbs can take your salad to the next level. I love adding cilantro or mint for a burst of flavor. Just chop them finely and mix them in. You can also try basil or parsley. These herbs add freshness and make the salad pop. Don't forget to taste it as you go. Adjust the herbs to your liking for the best results. {{image_4}} If you want a vegetarian version of this dish, try tofu or chickpeas. Tofu adds protein and absorbs flavors well. Use firm tofu and press it to remove extra water. Then, cube and sauté it until golden. Chickpeas give a nice texture and are full of fiber. You can use canned chickpeas; just rinse and drain them before adding. Both options keep the salad hearty and satisfying. To add more crunch, consider using cashews or walnuts. Cashews are creamy yet crunchy, while walnuts have a rich flavor. You can also use sunflower seeds or pumpkin seeds. These seeds boost nutrition and add a delightful crunch. Toast them lightly in a pan for extra flavor before adding them. Fruit can brighten the salad. Try adding sliced apples or pears for sweetness. You can also use mandarin oranges for a zesty kick. In summer, fresh berries like strawberries or blueberries can work well. They add color and a burst of flavor. Mixing seasonal fruits keeps the salad fresh and exciting. For the full recipe, check out the details above! To keep your Asian Chicken Cranberry Salad fresh, store it in the fridge right away. Place leftovers in an airtight container. This helps prevent spoilage and keeps the flavors intact. Make sure to eat the salad within three days for the best taste. If you see any signs of wilting or discoloration, it’s best to toss it out. The right container matters. Use glass or BPA-free plastic containers. These materials keep your salad fresh and free from harmful chemicals. Look for containers with tight-sealing lids. This helps keep air out and moisture in. For salads with dressing, store the dressing separately to avoid sogginess. You might wonder if you can heat your salad. While I recommend enjoying it cold, some parts can be warmed. If you want to heat the chicken, place it in a microwave-safe dish. Heat it for 30 seconds, then check the temperature. Avoid warming the greens and nuts, as they taste better fresh. If you like, add a dash of sesame dressing after warming for more flavor. For the full recipe, check out the link. Yes, you can make this salad ahead of time. Just prepare the salad base without the dressing. Store it in the fridge for up to three days. When you're ready to eat, add the dressing and toss. This keeps the salad fresh and crunchy. If you need a substitute for sesame dressing, try these options: - Peanut dressing: It offers a nutty flavor. - Soy sauce and olive oil: This combo adds saltiness with richness. - Rice vinegar and honey: This mix gives a sweet and tangy taste. These options work well to keep your salad tasty and vibrant. Yes, this salad can be gluten-free. Just ensure that your sesame dressing is gluten-free. Many store-bought brands contain gluten. Always check the label or make your own at home. Using gluten-free ingredients keeps your dish safe for those with gluten allergies. This blog post covered how to make a tasty Asian Chicken Cranberry Salad. We explored key and optional ingredients to suit your taste. The steps for prepping, combining, and plating were clear and easy to follow. I shared tips for perfecting your dressing and shredding chicken. You also learned about tasty variations and smart storage tips. Feel free to make this salad your own. Enjoy fresh, healthy meals with ease. Take your time, and have fun mixing and matching!

Asian Chicken Cranberry Salad Delightful and Healthy Dish

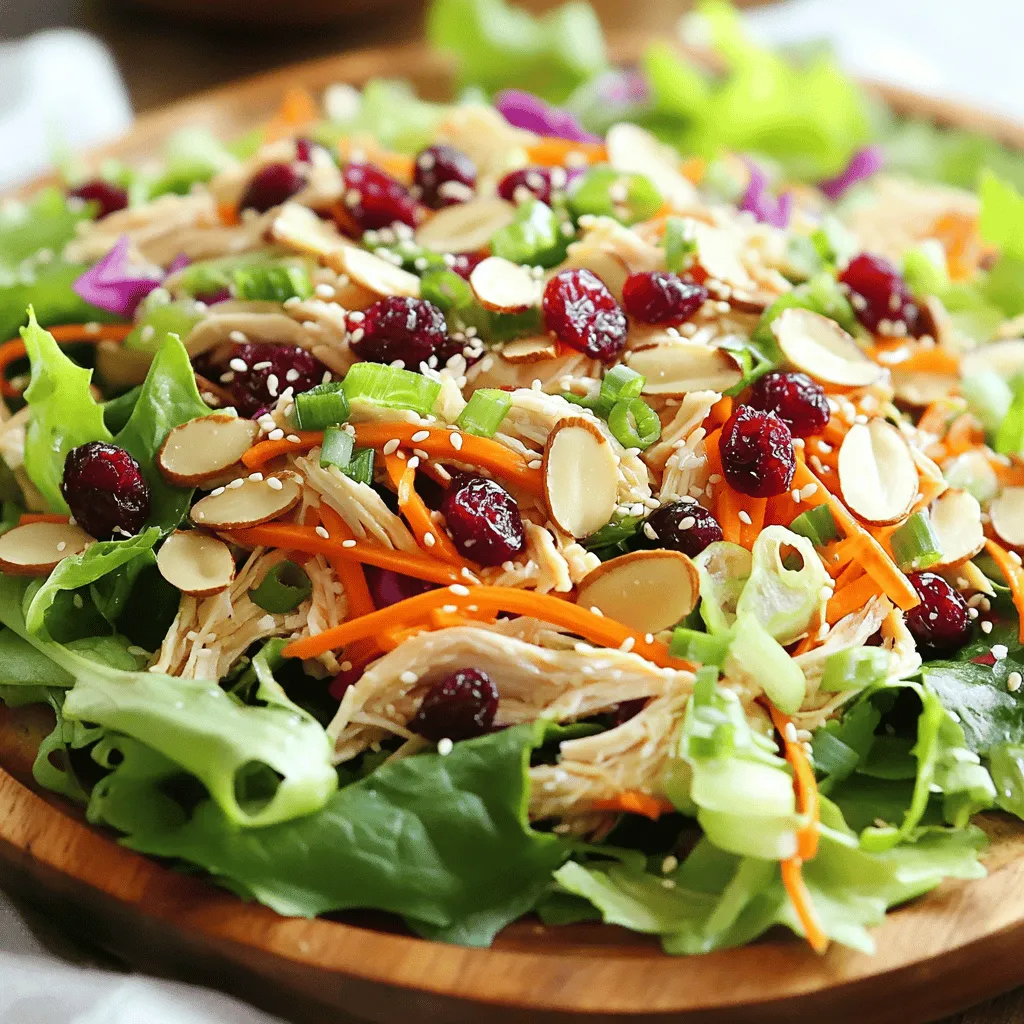
Are you ready to elevate your salad game? The Asian Chicken Cranberry Salad is a delightful mix of flavors and

- 2 cups fresh or frozen blueberries - 1 cup water - 3/4 cup granulated sugar - 1/2 cup freshly squeezed lemon juice - Zest of 1 lemon - Pinch of salt When making lemon blueberry sorbet, fresh or frozen blueberries work well. They provide a sweet, tangy flavor. You need water to create the simple syrup. The sugar adds sweetness, balancing the tartness of the lemons. Freshly squeezed lemon juice gives a bright taste. The zest adds a punch of lemon flavor. A pinch of salt enhances all the flavors. - Calories per serving: Approximately 120 - Fat content: 0 grams - Sugar content: About 25 grams - Fiber content: 2 grams This sorbet is a light treat. Each serving has about 120 calories. With no fat, it’s a smart choice for a sweet snack. The sugar content comes from the blueberries and added sugar. You also get some fiber from the fruit, making it a bit healthier. Enjoy this refreshing dessert without guilt! You can find the full recipe to guide you through each step. - Combine 1 cup of water and 3/4 cup of granulated sugar in a medium saucepan. - Heat over medium heat. Stir until the sugar dissolves. The mixture should be clear. - If using fresh blueberries, rinse 2 cups under cold water. Drain them well. - If using frozen blueberries, you can blend them directly from the freezer. - In a blender, add the cooled simple syrup, blueberries, 1/2 cup of lemon juice, lemon zest, and a pinch of salt. - Blend until smooth, about 30-60 seconds. - For a smoother texture, strain the mixture through a fine mesh sieve into a bowl. - Use a spatula to press the mixture through. Discard any solids left behind. - Pour the strained mixture into a shallow dish. - Place it in the freezer. Every 30 minutes, stir with a fork to break up ice crystals. - Continue this for 2-3 hours until the sorbet is firm and light. - If you use a sorbet maker, follow the manufacturer’s instructions. It usually takes 20-30 minutes. For the full recipe, you can check the detailed instructions above. Enjoy making your Lemon Blueberry Sorbet! Stirring is key when freezing lemon blueberry sorbet. Stir every 30 minutes to break up ice. This helps keep the sorbet smooth and creamy. If you skip stirring, you may end up with hard chunks. For an ultra-smooth consistency, strain the blended mixture through a fine mesh sieve. This step removes any skins or seeds, giving you a silky texture. When serving the sorbet, choose chilled bowls. This keeps the sorbet cool and fresh. Garnish your dessert with whole blueberries and a sprig of fresh mint. It adds color and a delightful scent. You can also use a scoop of whipped cream or yogurt on top for extra creaminess. Before freezing, taste your mixture. Adjust the sweetness as needed. If you want a healthier option, swap granulated sugar for honey or agave nectar. Both options can add unique flavors while keeping it sweet. Remember, the tartness of lemon balances the sweetness, making each bite refreshing. For the full recipe, check out the section above! {{image_4}} You can make this sorbet even more fun. Try adding different fruits. Peaches, raspberries, or strawberries work well. Each fruit brings a new taste to the sorbet. You can also mix fruits together for a unique blend. For instance, lemon and strawberry create a sweet-tart delight. You can also try herb infusions. Fresh mint or basil can add a fresh twist. Just mix chopped herbs into the blueberry-lime blend. The herbs will bring a surprising flavor that elevates your sorbet. If you want a creamier texture, consider dairy-free options. Coconut milk is a great choice. It adds richness without dairy. You can replace some of the water with coconut milk in the recipe. This will give your sorbet a creamy feel. Almond milk is another good option. It has a light flavor and works well. Just like coconut milk, use it instead of water. This makes for a delicious, dairy-free treat. You can pair your sorbet with other desserts. It goes well with cake or pie. A scoop on top of lemon cake is a refreshing choice. The flavors will dance together, making a great treat. You can also create a sorbet float. Just add the sorbet to a glass of lemon-lime soda. It becomes a bubbly, fruity drink. This adds a fun element to your dessert experience. For the full recipe, check [Full Recipe]. To keep your Lemon Blueberry Sorbet fresh, use an airtight container. A glass or plastic container works best. Make sure to leave some space at the top for expansion. The sorbet lasts up to two weeks in the freezer. After that, it may lose flavor or texture. Remember to label your container with the date, so you know when to enjoy it! If your sorbet gets hard, you can revive it. Simply let it sit at room temperature for a few minutes. Then, stir it with a fork until it softens. Watch for signs that your sorbet has gone bad. If it has ice crystals or strange smells, it’s best to toss it. Enjoy your Lemon Blueberry Sorbet while it’s fresh for the best taste! To make Lemon Blueberry Sorbet, follow these steps: 1. Start by making a simple syrup. Combine water and sugar in a pot. Heat until the sugar dissolves. 2. Blend blueberries, cooled syrup, lemon juice, lemon zest, and salt until smooth. 3. Strain the mixture for a silky texture. 4. Freeze the mixture, stirring every 30 minutes. This helps prevent ice crystals. 5. It's best to freeze for about 2-3 hours. You can also use a sorbet maker for creamy results. Common mistakes include not cooling the syrup fully before blending. This can lead to a grainy texture. Also, avoid skipping the straining step; it makes a big difference. You can use bottled lemon juice, but the taste will differ. Fresh lemon juice has a bright, vibrant flavor. Bottled juice often lacks that freshness and can taste more acidic. For the best result, I always recommend using fresh lemons. Yes, it is safe to eat sorbet with alcohol. However, alcohol lowers the freezing point of the mixture. This means your sorbet may not set as firm. If you add alcohol, keep the amount small, so it remains enjoyable. For the best presentation, serve your sorbet in chilled bowls. This keeps it cold longer. Garnish with whole blueberries and a sprig of mint. This not only looks lovely but also adds a refreshing aroma. Enjoy your Lemon Blueberry Sorbet as a bright treat on a hot day! You just learned how to make a tasty lemon blueberry sorbet. We covered ingredients, steps, and tips for a smooth texture. You can mix flavors or use dairy-free options to make it yours. Remember to store your sorbet well for the best taste. Enjoy serving it with your favorite desserts or on its own. Simple and fun, homemade sorbet can refresh any day! Get ready to impress friends and family with this easy recipe.

Lemon Blueberry Sorbet Refreshing Summer Delight

Looking for a cool treat to beat the summer heat? Lemon Blueberry Sorbet is the perfect blend of sweet and

- Mixed greens - Cherry tomatoes - Cucumber - Bell pepper - Sweet corn - Avocado - Feta cheese - Red onion - Fresh herbs - Olive oil - Lemon juice - Salt and pepper The ingredients in this Easy Summer Dinner Salad offer a vibrant mix. First, you need mixed greens. This can be a blend of arugula, spinach, or romaine. Next, cherry tomatoes add color and sweetness. Dice a crisp cucumber to give a refreshing crunch. For a splash of flavor, include a sweet bell pepper. I recommend using red or yellow for the best taste. Add sweet corn for a bit of sweetness, and don't forget the creamy avocado for rich texture. Feta cheese brings tanginess to the dish. Slice red onion thinly for a zesty kick. Fresh herbs, like basil and cilantro, add bright notes. Finish with olive oil and lemon juice for a simple dressing. Don't forget salt and pepper to season nicely. - Caloric content per serving: About 250 calories - Breakdown of macros: 30g carbohydrates, 7g protein, 12g fats - Dietary considerations: This salad is vegetarian. You can make it vegan by omitting feta. It’s also gluten-free, making it suitable for many diets. This salad is not just tasty; it’s also healthy. Each serving packs a lot of nutrients. You can enjoy it guilt-free on hot summer days. For the full recipe, check out the details provided. - Start by washing and drying 4 cups of mixed greens. This step is key to remove dirt. Use cold water and a salad spinner for best results. - Place the clean greens in a large salad bowl. This creates a bright and lovely base. - Next, add 1 cup of halved cherry tomatoes and 1 diced cucumber. These add color and crunch. Mix them gently with the greens. - Then, fold in 1 diced bell pepper and 1 cup of sweet corn. Stir carefully to keep the pieces intact. - Now, add 1 diced avocado and 1/2 cup of crumbled feta cheese. Use a soft hand to fold these in. This prevents mashing the avocado. - Finally, sprinkle 1/4 cup of thinly sliced red onion and 1/4 cup of chopped fresh herbs on top for added flavor. - In a small bowl, whisk together 3 tablespoons of extra virgin olive oil and 2 tablespoons of lemon juice. This mixture creates a bright dressing. - Add salt and freshly ground pepper to taste. Taste as you go to ensure it’s just right. - Just before serving, drizzle the dressing over the salad and toss it lightly. This coats all the ingredients with flavor. For the full recipe, check out the Refreshing Summer Medley Salad. To make your salad burst with flavor, try adding fresh herbs like dill or mint. They give a nice twist to your dish. You can also sprinkle in some crushed red pepper for heat or add a pinch of cumin for depth. For salt, use sea salt or kosher salt. These types are great for enhancing taste. Freshly ground black pepper adds a nice kick, too. For a beautiful presentation, serve your salad in wide, shallow bowls. This allows the colors to shine. You can layer the greens at the bottom and add toppings in a rainbow pattern. Garnish with an extra lemon wedge and a sprig of fresh herbs. This adds color and a fresh aroma, making your salad even more inviting. Pair your salad with grilled chicken or shrimp for a complete meal. You can also serve it with crusty bread or a light soup for a balanced dinner. This salad is perfect for warm nights when you want something light yet filling. It’s fresh and healthy, making it a great choice for summer dining. For the full recipe, check out the details above. {{image_4}} You can change the greens in the salad for variety. Use kale or spring mix instead. For proteins, try grilled chicken or chickpeas. If you want a dairy-free option, swap feta cheese for a nut-based cheese. You can also skip the cheese entirely for a lighter meal. Summer brings fresh produce. Use ripe tomatoes or zucchini from your garden. In fall, add roasted squash or apples for a warm taste. Winter calls for hearty greens like Swiss chard or Brussels sprouts. These swaps keep the salad fresh and tasty all year. While the olive oil and lemon juice dressing is great, you can explore other flavors. A honey mustard dressing adds sweetness. For a creamy touch, mix yogurt with herbs. Vinaigrettes made with balsamic or red wine vinegar also work well. Each dressing can change the salad's vibe and taste. To keep your salad fresh, store it in an airtight container. This will help keep it crisp. Always place a paper towel inside the container. This absorbs extra moisture and helps maintain the crunch. If you have leftover dressing, store it separately. This way, the salad won’t get soggy. I do not recommend freezing this salad. Freezing can change the texture of the greens and other ingredients. However, you can freeze some individual ingredients. For example, you can freeze sweet corn or even diced bell peppers. Just wash and dry them first. Place them in freezer bags and remove as much air as possible. This salad lasts about three days in the fridge. After that, the quality may decline. Look for signs that the salad is no longer good. If the greens look wilted or slimy, it's time to toss it. Also, any strange smells or colors mean it’s no longer safe to eat. Enjoy your salad fresh for the best taste! Yes, you can prepare this salad ahead of time. This makes it a great choice for busy days. To do this, wash and chop your veggies a few hours in advance. Store them in a sealed container in the fridge. Keep the dressing separate until you are ready to eat. This will keep your greens crisp and fresh. Add delicate items, like avocado and feta, just before serving. That way, they stay tasty and intact. To make your salad more filling, think about adding hearty ingredients. You can toss in cooked grains like quinoa or brown rice. These add great texture and nutrition. You can also add proteins like grilled chicken, chickpeas, or beans. These options will give you energy and keep you full longer. To keep your avocado fresh, use a few simple tricks. First, squeeze fresh lemon juice on the cut avocado. This helps slow down browning. You can also store the avocado with the pit in to keep it firm. Place it in an airtight container if you have leftovers. This will help maintain its color and taste. This blog post shared a simple and tasty salad recipe. We covered fresh ingredients, step-by-step instructions, and useful tips. You learned how to mix flavors and make your salad shine. Remember, you can easily adapt this recipe based on seasons or dietary needs. Storing leftovers properly can keep your meal fresh for longer. Use these ideas to enjoy your salad better and impress your family or friends. Simple ingredients can create a delightful dish for any occasion. Enjoy your salad experience!

Easy Summer Dinner Salad Refreshing and Healthy Choice

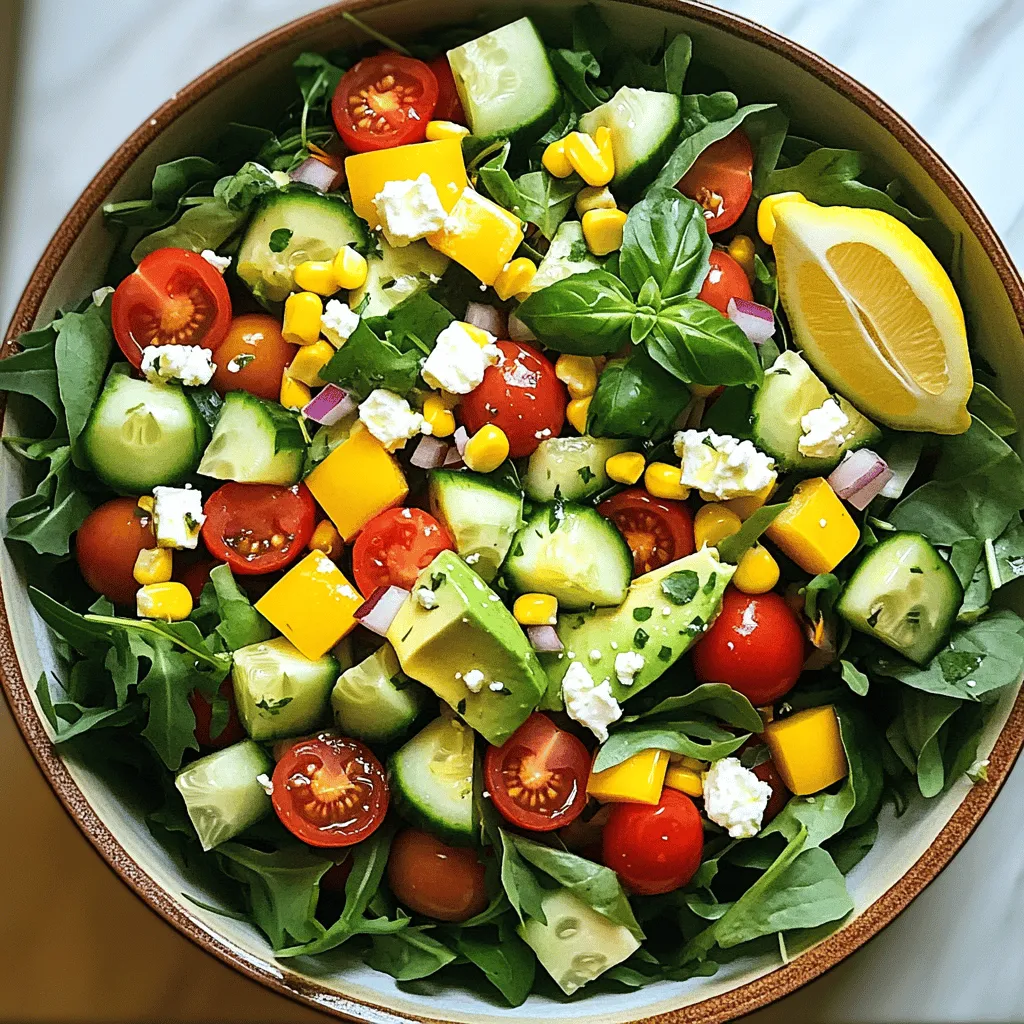
Looking for a simple and healthy meal? This Easy Summer Dinner Salad is just what you need! It’s packed with

- 1 pound ground chicken (or ground turkey) - 4 cups coleslaw mix (shredded cabbage and carrots) - Garlic - Ginger - Green onions Egg Roll in a Bowl needs a few main ingredients to shine. First, choose one pound of ground chicken or ground turkey. This protein adds a nice texture. Next, grab four cups of coleslaw mix, which is mainly shredded cabbage and carrots. This mix gives crunch and color. Don’t forget the fresh garlic and ginger. These two bring a warm, spicy flavor. Finally, slice some green onions for a fresh finish. - Sesame oil - Soy sauce (or tamari for gluten-free) - Rice vinegar - Sriracha To boost the taste, use sesame oil for cooking. It adds a rich, nutty flavor. Soy sauce or tamari gives that savory umami taste. If you want a gluten-free option, tamari is perfect. Rice vinegar adds a bit of tang. For those who like spice, sriracha is a great choice. Mix these flavors well for a tasty meal. - Sesame seeds - Salt - Freshly ground black pepper Lastly, consider adding some garnishes. Sesame seeds add a nice crunch and look great on top. You should also season the dish with salt and freshly ground black pepper. These simple touches will enhance the overall flavor. For the complete recipe, check out the Full Recipe section for detailed steps. 1. First, grab a large skillet. Heat 1 tablespoon of sesame oil over medium heat. 2. When the oil is hot, add 2 cloves of minced garlic and a 1-inch piece of finely grated ginger. 3. Sauté these for 1-2 minutes. They should smell fragrant and turn a light golden. 4. Now, add 1 pound of ground chicken (or ground turkey if you prefer). 5. Use a spatula to break the meat into smaller pieces. Cook it for about 5-7 minutes. 6. Keep cooking until the chicken is browned and no longer pink inside. 1. Next, stir in 4 cups of coleslaw mix. This is a blend of shredded cabbage and carrots. 2. Add 2 tablespoons of soy sauce and 1 tablespoon of rice vinegar to the pan. 3. If you like it spicy, toss in 1 tablespoon of sriracha. 4. Keep cooking for another 3-5 minutes. Stir occasionally until the cabbage is slightly wilted but still has crunch. 5. Taste your dish and season with salt and freshly ground black pepper as needed. 1. Once cooked, remove the skillet from heat. 2. Generously sprinkle 2 thinly sliced green onions over the top for a fresh touch. 3. Serve your Egg Roll in a Bowl hot in individual bowls. 4. For a nice finish, add a sprinkle of sesame seeds for texture and flavor. You can find the full recipe above to make this easy weeknight meal. To make Egg Roll in a Bowl taste great, focus on your cooking methods. Start by heating your sesame oil well before adding garlic and ginger. This step fills the oil with flavor. Use fresh garlic and ginger for the best taste. Quality matters. Choose ground chicken or turkey that is fresh and lean. Good ingredients make a big difference. The coleslaw mix should be crisp. Look for bright colors, which show freshness. You can swap the ground chicken for different proteins. Tofu is a great choice for a vegetarian meal. If you prefer beef, use ground beef and cook it fully. Adjust the spice by adding more or less sriracha. If you want less heat, skip it or use a milder sauce. Add some chopped bell peppers for a sweet flavor. Egg Roll in a Bowl pairs well with rice or quinoa. These sides add texture and are filling. You can also serve it with a side salad for extra crunch. For a fun twist, serve in lettuce cups. This adds a fresh feel and makes it easy to eat. Top with sesame seeds for a nice touch. This dish looks great and tastes even better. {{image_4}} You can easily change this recipe to fit your diet. To make it vegetarian or vegan, swap the ground chicken for tofu or tempeh. Crumble or cube the tofu and cook it just like the chicken. Use soy sauce or a vegan stir-fry sauce to add flavor. For a gluten-free option, choose tamari instead of soy sauce. Tamari gives the same salty kick without gluten. Experiment with different sauces and seasonings for your dish. Try adding hoisin sauce for a sweet touch or chili paste for heat. You can also mix in fresh herbs like cilantro or basil for a burst of flavor. Using seasonal vegetables adds freshness and variety. Bell peppers, snap peas, or mushrooms work well in this dish. Just chop them up and toss them in with the coleslaw mix. Why not add global flair to your Egg Roll in a Bowl? You can incorporate flavors from other cuisines. For a Mexican twist, add black beans and taco seasoning. You could also stir in curry paste for an Indian twist. Each variation makes it fun and unique. Many countries have their style of rolls, so feel free to explore these ideas. The Full Recipe provides a great base to start your culinary adventure! To keep your Egg Roll in a Bowl fresh, use airtight containers. Glass or plastic containers work well. Place the dish in the fridge right after it cools down. You should eat leftovers within three days for the best taste. When reheating, use the stove or microwave. For the stove, put the dish in a pan over low heat. Stir occasionally to heat evenly. If using a microwave, heat in short bursts. This method helps keep the flavor. Avoid overcooking to maintain texture. You can freeze Egg Roll in a Bowl, but it's best to do so before adding the green onions and sesame seeds. Store in freezer-safe bags or containers. When you're ready, thaw it overnight in the fridge. Reheat on the stove or microwave, just as before. This method keeps the dish tasty and enjoyable. What can I substitute for ground chicken? You can use ground turkey instead of chicken. It tastes great and is leaner. For a vegetarian option, try crumbled tofu or tempeh. Both add protein and soak up flavors well. Can I make this dish ahead of time? Yes, you can make Egg Roll in a Bowl ahead of time. Just cook it, let it cool, and store it in an airtight container. It will stay fresh in the fridge for 3-4 days. Simply reheat it on the stove or in the microwave. Breakdown of calories and key nutrients One serving of Egg Roll in a Bowl has around 350 calories. It provides protein from chicken, fiber from the coleslaw mix, and healthy fats from sesame oil. This dish is balanced and filling. Health benefits of the primary ingredients - Ground chicken: Low in fat and high in protein. - Coleslaw mix: Packed with vitamins A and C, plus fiber. - Garlic and ginger: Both have anti-inflammatory properties and boost your immune system. - Sesame oil: Contains healthy fats and antioxidants. Essential kitchen tools for making Egg Roll in a Bowl - A large skillet for even cooking. - A spatula for stirring and breaking up the meat. - A sharp knife for chopping green onions and other veggies. Recommended types of skillets for best results Non-stick skillets are great for this dish. They make cooking and cleanup easy. Cast iron skillets also work well, adding a nice sear to your chicken. This post covered how to make a tasty Egg Roll in a Bowl. We discussed ingredients, preparation steps, and tips to boost flavor. You can customize it to fit your diet and spice preferences. Remember to store leftovers properly and enjoy them later. With the right choices, this dish can be healthy and fun. Now, you can confidently make this easy meal at home. Enjoy experimenting and sharing your delicious results with friends and family!

Egg Roll in a Bowl Flavorful and Easy Weeknight Meal

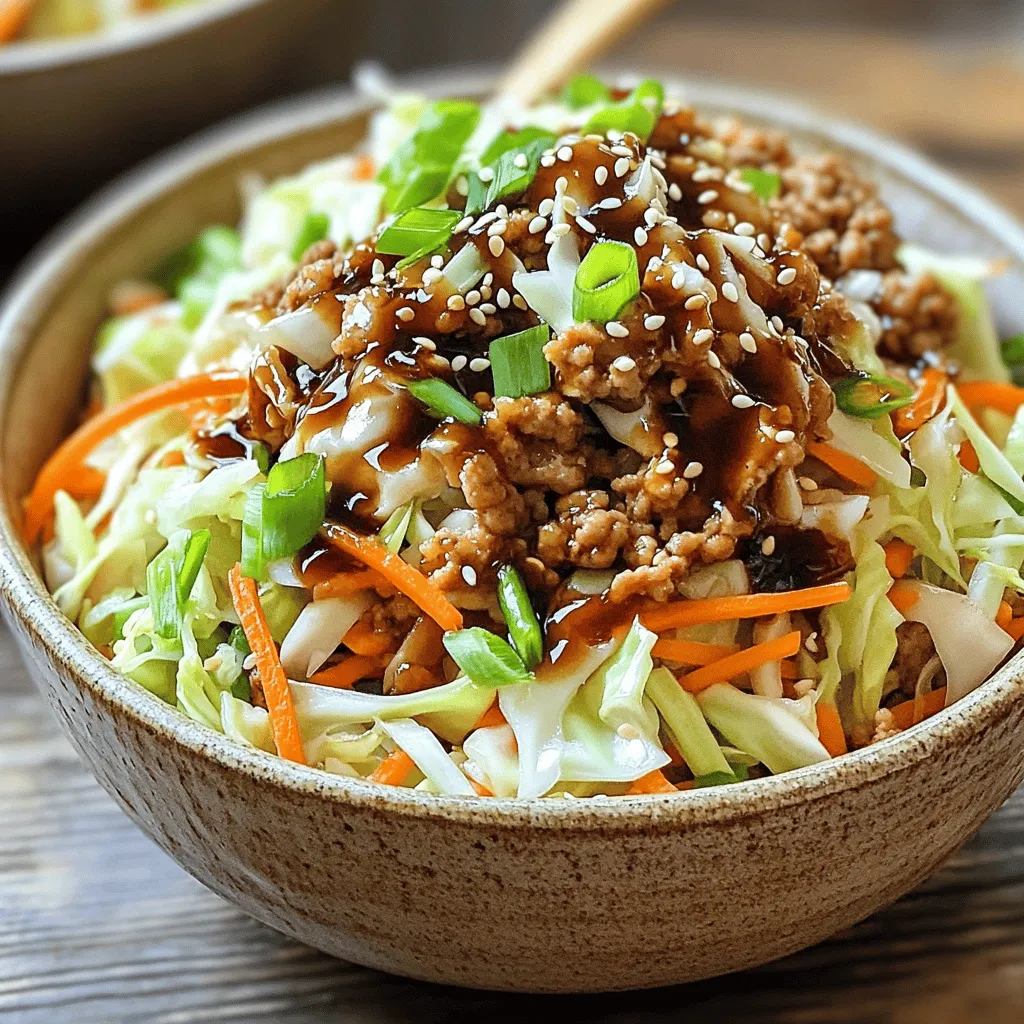
Looking for a quick and tasty dinner? Try my Egg Roll in a Bowl! This dish offers all the classic

- 4 boneless, skinless chicken breasts - 1 cup freshly grated Parmesan cheese - 1 cup panko breadcrumbs (for extra crunch) - 4 cloves garlic, finely minced - 1/4 cup fresh parsley, finely chopped - 1/4 cup extra virgin olive oil - 1 teaspoon sea salt - 1/2 teaspoon freshly ground black pepper - 1/2 teaspoon smoked paprika - 1/2 teaspoon garlic powder - Lemon wedges for a bright finishing touch Each ingredient plays a big role in making Garlic Parmesan Chicken taste great. The chicken is the main part. It gives you protein and a nice base. Parmesan cheese adds a rich, salty flavor. Panko breadcrumbs give it a crispy texture. Garlic brings in a strong, savory taste. Fresh parsley adds a pop of color and freshness. Olive oil helps the coating stick and keeps the chicken moist. Sea salt and black pepper enhance all the flavors. Smoked paprika gives a hint of smokiness. Garlic powder adds more garlic flavor without extra chopping. You can switch some ingredients if needed. For chicken, you can use thighs or drumsticks. If you don’t have Parmesan, try another hard cheese like Pecorino. Instead of panko, regular breadcrumbs work fine but won’t be as crunchy. For olive oil, you can use melted butter. If you don’t have fresh parsley, dried parsley is okay but use less. You can leave out the smoked paprika if you want a milder taste. Lemon wedges can be replaced with lime for a different zest. For the full recipe, check out the details above! Start by preheating your oven to 400°F (200°C). This step gets your oven ready for the chicken. Next, take your boneless chicken breasts and rinse them under cold water. Pat them dry with paper towels. This helps the coating stick better. In a separate bowl, drizzle extra virgin olive oil over each chicken breast. Make sure they are well coated. This adds flavor and helps the crumbs adhere. Now, let’s make the coating. In a large mixing bowl, combine the grated Parmesan cheese, panko breadcrumbs, minced garlic, chopped parsley, sea salt, black pepper, smoked paprika, and garlic powder. Mix these ingredients well. You want a nice blend that will add both flavor and crunch to your chicken. The panko gives that extra crispiness we all love. Once your chicken is prepped and coated, it’s time to bake. Line a baking sheet with parchment paper. This helps prevent sticking and makes cleanup easy. Place the coated chicken breasts on the sheet, making sure they don’t touch. Bake in your preheated oven for 25-30 minutes. The chicken is done when it reaches 165°F (75°C) inside. The coating should be golden and crispy. After baking, let the chicken rest for a few minutes. This keeps it juicy. Serve it with lemon wedges for a fresh touch. For the full recipe, check out the complete guide. To get that perfect crispy coating, use panko breadcrumbs. They add a great crunch. Mix the breadcrumbs with Parmesan cheese and spices well. Make sure to press the coating onto the chicken firmly. This helps the mix stick well. You want every bite to be flavorful. Cooking time may vary based on your oven. Always check the chicken at 25 minutes. It should reach 165°F (75°C) inside. If it’s not done, keep baking in 5-minute increments. This way, you avoid dry chicken. Each oven cooks differently, so trust your thermometer. One common mistake is not drying the chicken. Pat it dry with paper towels first. This helps the coating stick better. Another mistake is skipping the resting time. Let the chicken rest for a few minutes after baking. This keeps it juicy and tasty. Lastly, don’t rush the coating process. Take your time for the best results. For a full recipe, check the Garlic Parmesan Chicken Delight. {{image_4}} You can easily add herbs to the dish. Fresh herbs like thyme or rosemary work well. Chop them finely and mix them into the breadcrumb coating. This adds a bright flavor that pairs perfectly with garlic and Parmesan. For those who love heat, try adding cayenne pepper or red pepper flakes. Mix one teaspoon of cayenne into the breadcrumb coating. This gives the chicken a spicy kick that balances the creamy Parmesan. If you want even more heat, serve with a spicy dipping sauce. You can make a low-carb version by swapping breadcrumbs for crushed pork rinds or almond flour. These options keep the dish crunchy and delicious while cutting carbs. Use the same method for coating the chicken. This way, you can enjoy Garlic Parmesan Chicken while staying on track with your diet. You can find the Full Recipe to try these variations on your next cooking adventure! To store leftovers, let the Garlic Parmesan Chicken cool first. Once cool, place it in an airtight container. Make sure the lid seals tightly to keep the chicken fresh. You can keep it in the fridge for up to three days. This way, you can enjoy the tasty chicken again! When you’re ready to eat, preheat your oven to 350°F (175°C). Place the chicken on a baking sheet. If you want, cover it with foil to keep it moist. Heat for about 15-20 minutes. You can also use a microwave, but the oven keeps the chicken crispy. Just heat it on medium for about 2-3 minutes. You can freeze this dish too! Wrap each piece tightly in plastic wrap. Then, place them in a freezer bag. Make sure to remove as much air as possible. You can freeze the chicken for up to three months. When you're ready to eat, thaw it in the fridge overnight before reheating. Enjoy your delicious Garlic Parmesan Chicken even later! Check out the Full Recipe to get started. To keep the chicken juicy, start with good quality meat. Use boneless, skinless chicken breasts. Coat them well with olive oil before breading. This helps lock in moisture during baking. Bake at 400°F for 25-30 minutes. Always check the internal temperature. It should reach 165°F. Let the chicken rest for a few minutes before cutting. This step lets the juices settle back into the meat. Yes, you can use other cheeses! While Parmesan is great, try mozzarella or cheddar for a twist. Each cheese adds its own flavor. Just make sure to grate or shred them fine. This ensures they melt well and coat the chicken perfectly. You can also mix cheeses for more depth in flavor. Garlic Parmesan Chicken pairs well with many sides. Consider roasted vegetables for a healthy choice. Mashed potatoes or rice add comfort. A fresh salad brings a nice crunch. For a touch of zest, serve lemon wedges on the side. They brighten the dish and enhance the flavors. You can find the complete recipe in the [Full Recipe]. This guide covered all you need for Garlic Parmesan Chicken. We explored ingredients, cooking steps, and variations. I shared helpful tips to make your dish crispy and tasty. Remember to store leftovers properly to keep them fresh. Don’t forget, you can tweak this recipe to match your taste. Enjoy cooking and impressing your family and friends with your new skills!

Garlic Parmesan Chicken Irresistible and Simple Dish

Are you ready to dive into a dish that’s full of flavor and super easy to make? Garlic Parmesan Chicken

- 2 large cucumbers, thinly sliced - 2 cups fresh strawberries, hulled and sliced - 1/4 red onion, very thinly sliced - 1/4 cup feta cheese, crumbled - 1/4 cup fresh mint leaves, finely chopped - 2 tablespoons honey - 2 tablespoons balsamic vinegar - Salt and freshly ground black pepper to taste - You can use mango or peach for a sweeter touch. - Goat cheese or ricotta can replace feta for a different taste. - Try olive oil and lemon juice for a fresh dressing twist. I love how versatile this salad can be. You can change it up based on what you have. If you want a sweeter flavor, mango or peach can work wonders. Fresh fruits add a nice touch and make it fun to eat. When it comes to cheese, feta is great, but goat cheese or ricotta can change the dish's feel. Both options bring creaminess and flavor, making it unique. For dressings, I love honey and balsamic vinegar. But if you're looking for something bright, using olive oil with lemon juice is a great choice. It adds a refreshing taste that pairs well with the fruits. Feel free to mix and match! Cooking should be enjoyable, and using what you have makes it even better. Try these ideas and find your favorite version of this cucumber strawberry salad. To start, slice the cucumbers thinly. This helps them soak up the dressing. I like to use a sharp knife for clean cuts. For the strawberries, hull them first. Then slice them into even pieces. This makes your salad look nice and bright. For the red onion, aim for very thin slices. Use a sharp knife and cut from the root to the tip. This keeps your slices even. If the onion tastes too strong, soak the slices in cold water for ten minutes. This will mellow the flavor. Now, let’s combine all the ingredients. In a large bowl, add the sliced cucumbers and strawberries. Next, sprinkle in the red onion and crumbled feta cheese. Make sure everything is well mixed. For the dressing, grab a small bowl. Combine the honey and balsamic vinegar. Whisk them together until smooth. Drizzle this dressing over your salad mixture. Ensure all pieces are coated for full flavor. When it’s time to toss the salad, use a large spoon. Gently mix the salad without mashing the fruits. You want to keep the strawberries whole for a nice texture. Let the salad rest for about ten minutes. This waiting time helps the flavors blend well. Your salad will taste even better after resting. Serve it in a bright bowl, and enjoy the fresh flavors of this Cucumber Strawberry Salad! If you're looking for a detailed guide, check out the Full Recipe. To boost flavor, add fresh herbs like basil or parsley. You can also sprinkle some chili flakes for a mild kick. Balancing sweetness and acidity is key. If it’s too sweet, add a splash of lemon juice. For more tang, increase the balsamic vinegar. This will make each bite delightful. Make your salad pop with color. Use a large, bright bowl to serve. Arrange the cucumber and strawberries in a spiral for a fun look. Garnish with extra mint leaves for freshness. Drizzle some balsamic vinegar around the edge for an elegant touch. This adds charm and makes the salad more inviting. Prep your salad early for best results. Slice cucumbers and strawberries a few hours before serving. Keep them in a sealed container to stay fresh. Mix the dressing separately until just before serving. This keeps the salad crisp. If you store leftovers, use an airtight container to maintain freshness. Enjoy this refreshing cucumber strawberry salad! Check out the Full Recipe for more details. {{image_4}} You can make this cucumber strawberry salad even better by adding seasonal fruits. Here are some tasty options: - Ripe peaches for a juicy sweetness - Tart apples for a crisp bite - Fresh blueberries for a burst of color To add some crunch, consider incorporating nuts or seeds. Almonds or sunflower seeds work great. Just sprinkle them on top before serving. If you want a vegan option, skip the feta cheese. The salad will still taste fresh and delicious. You can also use avocado for a creamy texture. For those needing gluten-free options, make sure your dressing is gluten-free. Many balsamic vinegars are safe, but always check the label to be sure. You can switch up the flavors by making sweet or savory versions. For a sweet twist, add more honey or even some maple syrup. If you prefer savory, try adding a pinch of salt and some black pepper. You can also add a splash of soy sauce for an international twist. These changes keep the salad fresh and interesting! To keep your Cucumber Strawberry Salad fresh, store it in the fridge. Use an airtight container. This helps keep moisture out and maintains crispness. If you have some dressing left, store it separately. This prevents the salad from getting soggy. You can keep the salad in the fridge for about three days. After this, it may lose its crispness. Look out for signs of spoilage. If the cucumbers get slimy or the strawberries turn mushy, it's time to toss it. If you have leftover salad, don’t worry! You can use it in several ways. Try adding it to a wrap with turkey or chicken. It also makes a great topping for sandwiches. Mixing the salad into grain bowls adds a refreshing touch. These ideas can keep your meals exciting and reduce waste. Enjoy your Cucumber Strawberry Salad in new forms! Check the Full Recipe for more ideas. To keep cucumbers crisp, slice them just before serving. You can also sprinkle salt on the slices and let them sit. This draws out extra moisture. After about 10 minutes, pat them dry with a paper towel. This method helps maintain their crunchiness in the salad. Yes, you can make this salad ahead of time. However, I suggest waiting to add the dressing until just before serving. This keeps the salad fresh and prevents sogginess. You can prepare the cucumber, strawberries, and other ingredients a few hours before you need them. This salad pairs well with grilled chicken or seafood. You can also serve it with a hearty sandwich or wraps. The fresh flavors complement many main dishes. Try it as a side for a summer barbecue or picnic. Absolutely! This salad is great for meal prep. Just store the ingredients separately. Keep the dressing in a jar to mix later. This way, you can enjoy fresh salad throughout the week without losing flavor. To adjust sweetness, add more honey for a sweeter taste. If you want it less sweet, reduce the honey or add a bit of lemon juice. This adds a nice tang and balances the flavors well. You can experiment until you find your perfect blend. This blog post covered a refreshing cucumber and strawberry salad filled with great ingredients. You learned how to prepare and mix everything perfectly. We discussed tips for flavor, presentation, and storage, so your salad tastes its best. Plus, you discovered fun ways to customize the recipe and use leftovers. Overall, this salad is simple, fresh, and versatile. Enjoy making it for any meal or event!

Cucumber Strawberry Salad Refreshing and Easy Recipe

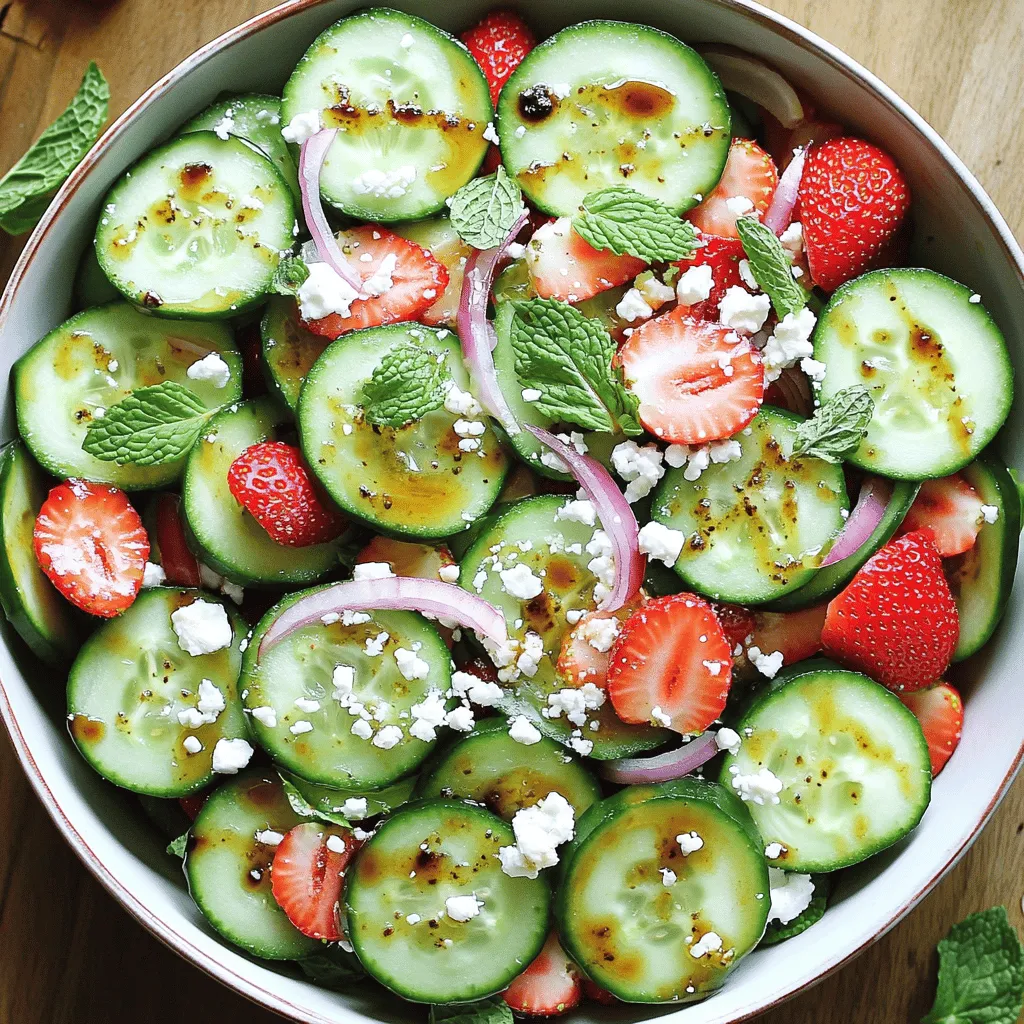
Looking for a fresh dish that’s quick and easy? This Cucumber Strawberry Salad is perfect for you! Combining sweet strawberries

- 1 ½ cups all-purpose flour - 1 teaspoon baking powder - ½ teaspoon baking soda - ¼ teaspoon salt - ½ cup unsalted butter, softened to room temperature - 1 cup granulated sugar - 2 large eggs - Zest and juice of 1 lemon - 1 teaspoon pure vanilla extract - ½ cup buttermilk - 1 cup fresh blueberries (plus more for garnish) - 1 tablespoon flour (for dusting blueberries) You can swap butter for coconut oil. This change gives a nice flavor. For buttermilk, use yogurt or milk with vinegar. Both work well. If you want vegan cupcakes, use applesauce instead of eggs. You can also use almond milk mixed with vinegar for buttermilk. If fresh blueberries are not available, frozen ones work too. Just add them straight from the freezer. They may sink a little but still taste great. For more details on making these cupcakes, check the Full Recipe. - Preheat the oven to 350°F (175°C). - Line your cupcake tray with paper liners. - In a bowl, whisk together the flour, baking powder, baking soda, and salt. - In a large bowl, cream the softened butter and sugar until fluffy. - Add the eggs, lemon zest, lemon juice, and vanilla to the butter mixture. - Gradually add the dry mixture and buttermilk, alternating between them. - Toss the blueberries with a tablespoon of flour before folding them in. - Fill the cupcake liners two-thirds full and bake for 18-20 minutes. These easy steps will guide you through making your zesty lemon blueberry bliss cupcakes. For a full recipe, check the detailed instructions above. Enjoy baking! To bake perfect lemon blueberry cupcakes, time is key. Bake them for 18-20 minutes. Check doneness by inserting a toothpick. If it comes out clean, they are ready. Overmixing the batter is a common mistake. This can make your cupcakes tough. Mix gently to keep them light and fluffy. Frosting is a fun part! Use lemon-infused cream cheese frosting for a bright taste. To frost, use a piping bag for a pretty swirl. Top each cupcake with a fresh blueberry and a sprinkle of lemon zest. This adds color and makes them look amazing! Want more zest? Add fresh herbs like basil or mint. A pinch of cardamom can bring out new flavors too. For frosting, try whipped cream or a citrus glaze. These options can make your cupcakes even more exciting! For the complete recipe, check out the [Full Recipe]. {{image_4}} You can add different berries to your lemon blueberry cupcakes. Raspberries and strawberries work great. These berries bring a new taste and color. You can also mix in coconut or almond flavors. This twist adds a lovely richness to each bite. For frosting, you have choices! Cream cheese frosting pairs well with lemon blueberry cupcakes. It adds a tangy taste that many love. Buttercream is another option. It is sweeter and smooth. You can also use whipped cream for a light touch. Each frosting brings its own charm to the cupcake. You can make mini or jumbo cupcakes too! Adjust the baking time to fit the size. Mini cupcakes bake in about 12-15 minutes. Jumbo ones need about 25-30 minutes. This way, you can serve different sizes for any occasion. Personalize your treats based on your guests' preferences. For a fun twist, serve mini cupcakes as a party treat. They are perfect for sharing! For the full recipe, check out the zesty lemon blueberry bliss cupcakes. To keep your lemon blueberry cupcakes fresh, follow these tips: - Store them in an airtight container. - Keep them at room temperature for up to two days. - If you need longer storage, place them in the fridge. Cupcakes stored in the fridge may last for five days. Just remember, cold air can dry them out. So, wrap them tightly if you choose this method. Freezing is easy and great for later use: - Allow cupcakes to cool completely. - Wrap each one in plastic wrap. - Place them in a freezer-safe bag or container. When you want to enjoy them, take them out and let them thaw at room temperature. This helps keep their soft texture. Avoid microwaving them, as it can make them tough. With proper storage, these cupcakes stay fresh: - At room temperature: 2 days. - In the fridge: up to 5 days. - In the freezer: up to 3 months. Watch for signs of spoilage. If they smell off or have a change in texture, it's best to toss them. Enjoying these treats at their best is key! To get more lemon flavor, add extra lemon zest or juice. Zest adds great aroma. You can add up to two tablespoons of lemon juice to increase tartness. Try this to brighten the taste of your cupcakes. Yes, you can use gluten-free all-purpose flour. Look for blends that contain xanthan gum. This helps mimic the texture of regular flour. Brands like Bob's Red Mill or King Arthur Flour work well. Dry cupcakes can happen for a few reasons. Overbaking is a common cause. Make sure to check them a minute or two early. If they still turn out dry, try adding a little more buttermilk next time. You can prepare the batter a few hours ahead. Store it in the fridge until you are ready to bake. Just stir it gently before filling the cupcake liners. This keeps the batter fresh and ready for baking. These cupcakes are perfect for parties! You can decorate them with lemon frosting and fresh blueberries. Arrange them on a nice platter for an eye-catching display. They will surely impress your guests. For the full recipe, check out the complete guide! This blog post covered how to make delicious lemon blueberry cupcakes. I shared ingredient details, substitutions, and step-by-step instructions. You learned key baking and presentation tips to enhance your cupcakes. You also found variations for flavor and storage options to keep them fresh. Try these ideas to create your own tasty treat. With all the tips provided, your next baking adventure should be a breeze. Enjoy your cupcakes and the smiles they bring!

Lemon Blueberry Cupcakes Delightful Fresh Treat

If you’re craving a refreshing treat that bursts with flavor, you’re in the right place! My Lemon Blueberry Cupcakes are

Older posts
Newer posts
← Previous Page1 … Page27 Page28 Page29 … Page91 Next →

dsad

© 2025 recipesstation • Built with GeneratePress

Our Policies

  • Copyright Policy
  • Cookie Policy
  • GDPR Policy
  • Privacy Policy
  • Disclaimer
  • Terms Of Use

More Information

  • Home
  • About
  • Contact
  • Appetizers
  • Dessert
  • Dinner
  • Drinks
©2025, recipesstation About Back To Top