Skip to content
DisclaimerTerms Of UseGDPR PolicyCookie Policy

recipesstation

  • Home
  • Drinks
  • Appetizers
  • Dinner
  • Dessert
  • About
  • Contact
  • Privacy Policy
DisclaimerTerms Of UseGDPR PolicyCookie Policy

Emily

To make these tasty cookies, you need a few key ingredients. Here’s the list: - 1 cup all-purpose flour - 1/2 teaspoon baking soda - 1/4 teaspoon salt - 1/2 cup unsalted butter, softened to room temperature - 1/3 cup granulated sugar - 1/3 cup light brown sugar, packed tightly - 1 teaspoon pure vanilla extract - 1 large egg - 1/2 cup cream cheese, softened until creamy - 1/2 cup fresh blueberries (or frozen blueberries, thawed and well-drained) - 1/4 teaspoon freshly grated lemon zest These ingredients create a creamy and sweet treat. The cream cheese gives the cookies that cheesecake taste, while the blueberries add a nice burst of flavor. You can add a few optional ingredients to make your cookies even better. Consider these: - Powdered sugar for light dusting Dusting the cookies with powdered sugar gives them a lovely finish. It adds a sweet touch and makes them look fancy. To bake these cookies, you’ll need some handy tools. Gather these items: - Mixing bowls - Measuring cups and spoons - Hand mixer or stand mixer - Baking sheet - Parchment paper - Wire rack Having the right equipment makes baking easy and fun. Prepare everything before you start, and you’ll enjoy the process even more. Start by preheating your oven to 350°F (175°C). This step gets your oven ready for baking. Next, line a baking sheet with parchment paper. This helps the cookies not stick. In a small bowl, mix together the flour, baking soda, and salt. Use a whisk to blend them well, then set this bowl aside. In a large bowl, cream the softened butter, granulated sugar, and brown sugar. Use a hand mixer for about 2-3 minutes. The mixture should be light and fluffy. Then, add the vanilla extract and the egg. Mix until everything is smooth and well combined. In another bowl, beat the cream cheese until smooth. Gently fold this cream cheese into the butter mixture. Blend until you don’t see any streaks of cream cheese. Now, slowly add the dry ingredients to this mixture. Mix just until combined to keep the cookies soft. Finally, fold in the fresh blueberries and lemon zest. This adds great flavor to your cookie dough. Using a tablespoon, scoop portions of dough onto your baking sheet. Leave about 2 inches between each scoop. This gives them room to spread. Bake the cookies for 10-12 minutes. Look for golden edges and soft centers. Once they are baked, take the cookies out and let them rest on the baking sheet for about 5 minutes. This helps set them before moving to a wire rack. After they cool completely, sprinkle with powdered sugar if you want. This adds a pretty touch to your cookies. For the full recipe, check the [Full Recipe]. To make the best blueberry cheesecake cookies, follow a few easy steps. First, measure your ingredients carefully. Too much flour can make cookies dry. Use a kitchen scale for accuracy if you can. Next, always soften your butter and cream cheese. This helps them mix well and makes your cookies fluffy. When mixing, don’t overdo it. Mix just until combined to keep cookies soft and chewy. Many bakers make simple mistakes that can ruin cookies. One common issue is not chilling the dough. Chilling helps the cookies spread less. You also want to avoid using too many blueberries. If you add too many, the cookies can become soggy. Lastly, don’t skip the parchment paper. It can keep your cookies from sticking to the pan. For the best texture, focus on creaming the butter and sugars well. This step adds air and makes cookies light. When folding in the blueberries, do it gently. This keeps the dough from breaking and maintains its softness. Bake until the edges are golden but the center is still soft. This will give you that perfect chewy bite. For more details, check out the Full Recipe for blueberry cheesecake cookies. {{image_4}} You can swap blueberries for other berries. Try raspberries, strawberries, or blackberries. Each berry gives a new taste. You can also add spices like cinnamon or nutmeg. These spices make the cookies warm and cozy. For a twist, mix in a bit of almond extract for a nutty flavor. It pairs well with berries. Make these cookies gluten-free by using almond flour or gluten-free flour. They will still taste great! For a dairy-free version, choose non-dairy cream cheese. Coconut cream can also work well. This will give the cookies a light coconut flavor. Just remember to check labels to avoid hidden dairy. Shape cookies into fun forms. Use a cookie cutter for stars, hearts, or other shapes. This makes them festive for any occasion. You can also drizzle melted white chocolate on top for an elegant touch. Arrange cookies on a pretty platter. Add fresh berries and mint leaves for color. It makes your cookie display pop! For the full recipe, check out the Blueberry Cheesecake Cookies section. To keep your blueberry cheesecake cookies fresh, store them in an airtight container. This helps them stay soft and moist. If you have powdered sugar on top, wait to dust them until you serve. This keeps the sugar from melting into the cookies. You can freeze these cookies for later. First, let them cool completely. Then, place them in a single layer on a baking sheet. Freeze until solid, about 1-2 hours. After that, transfer them to a freezer bag. Make sure to label the bag with the date. You can enjoy them within three months. When stored at room temperature, these cookies last about 3-5 days. If you keep them in the fridge, they can last up to a week. Remember, the fresher they are, the better they taste! For the full recipe, you can check it out above. Yes, you can use frozen blueberries. Just thaw and drain them well before adding to your dough. This keeps the cookies from getting too watery. Frozen berries can work great, but fresh ones add a nice touch. To make your cookies less sweet, you can cut back on the sugar. Try reducing both the granulated and brown sugar by a couple of tablespoons. You can also add a bit more lemon zest to give a fresh taste. If your dough is too sticky, chill it in the fridge for about 30 minutes. This helps it firm up, making it easier to scoop. You can also sprinkle a little extra flour on your hands or the dough to help with sticking. For more tips, check out the Full Recipe. You learned how to make blueberry cheesecake cookies. We covered key ingredients, tools, and step-by-step baking. You now have tips to get perfect cookies and avoid mistakes. Consider fun variations, like different berries or shapes. Finally, I shared how to store and freeze your cookies for later. Enjoy this tasty treat, and feel free to experiment. Baking is fun and rewarding!

Blueberry Cheesecake Cookies Delightful Easy Treat

Get ready to treat your taste buds! These Blueberry Cheesecake Cookies are easy to make and bursting with flavor. Imagine

- 4 fresh white fish fillets (cod or sea bass) - 2 tablespoons extra virgin olive oil - 2 lemons (1 for slicing, 1 for juicing) - 1 teaspoon dried oregano - 1 teaspoon smoked paprika - 1 cup cherry tomatoes, halved - 1/2 cup Kalamata olives, pitted and halved - 2 cloves garlic, minced - Salt and freshly ground black pepper, to taste - Fresh parsley, chopped, for garnish The ingredients for Mediterranean Baked Fish are simple yet full of flavor. Fresh fish fillets are the star of the dish. You can choose cod or sea bass for their mild taste. Extra virgin olive oil adds richness and helps the fish cook smoothly. Lemons bring a bright, zesty flavor that pairs well with the fish. Dried oregano and smoked paprika add depth. They enhance the fish without overpowering it. Cherry tomatoes and Kalamata olives bring sweetness and saltiness. Garlic adds a savory touch. Finally, salt and pepper are crucial for balancing the flavors. Fresh parsley brightens the dish and makes it look pretty. Each serving of Mediterranean Baked Fish contains about 350 calories. You get around 30 grams of protein, 15 grams of fat, and 20 grams of carbs. The health benefits are significant. The fish is rich in omega-3 fatty acids, which are good for your heart. Olive oil is a healthy fat that can lower bad cholesterol. Tomatoes and olives offer vitamins and antioxidants. Garlic can boost your immune system. This dish is not just tasty; it’s good for you too! For the full recipe, check out the Full Recipe section. 1. Preheat your oven to 400°F (200°C). This step is key for even cooking. 2. Take a spacious baking dish and pour 1 tablespoon of olive oil in it. Spread the oil around to avoid sticking. 1. Place 4 fresh fish fillets in the baking dish. Keep the skin side down. 2. Leave some space between each fillet to help them cook evenly. 3. Drizzle the remaining tablespoon of olive oil over the fish. 4. Season with salt, freshly ground black pepper, 1 teaspoon smoked paprika, and 1 teaspoon dried oregano to boost flavor. 5. Squeeze juice from 1 lemon over the fillets. Add lemon slices on top for zest. 1. In a bowl, mix 1 cup halved cherry tomatoes, 1/2 cup pitted Kalamata olives, and 2 minced garlic cloves. Add salt and pepper, then stir. 2. Pour this mix over the fish, spreading it evenly. 3. Cover the dish tightly with aluminum foil to lock in moisture. 4. Bake for 20 minutes. This will keep the fish tender. 5. After 20 minutes, remove the foil to let the top crisp up. Bake for another 10 minutes. 6. Check if the fish flakes easily with a fork. This means it's done. For a full recipe, refer to the Full Recipe section. Enjoy your Mediterranean baked fish! To achieve moisture and flavor, use fresh fish. Fresh fish is key to a tasty dish. Always preheat your oven to 400°F (200°C). This ensures even cooking and keeps the fish juicy. After baking, let the fish rest for a few minutes. This allows the juices to settle. The fish will taste even better when you serve it. For a beautiful look, transfer the fish to a large, colorful platter. Arrange the cherry tomato and olive mixture around it. This adds color and makes it eye-catching. Serve with lemon wedges on the side. This will give a fresh, zesty kick. Garnish with fresh parsley. This adds flavor and a pop of green. You can also sprinkle some extra smoked paprika for an appealing finish. One big mistake is overcooking the fish. Fish should flake easily but not be dry. Keep an eye on the time. Use a fork to check for doneness. Another mistake is not seasoning the fish enough. Fish needs salt and pepper to shine. Be generous with your spices, and don’t hold back on the herbs. A well-seasoned dish will have layers of flavor. For the full recipe, check the section above. {{image_4}} You can use many types of fish for this dish. Here are a few options: - Cod: This fish has a mild flavor. It cooks well and is flaky. - Sea Bass: This fish is rich and buttery. It pairs nicely with lemon. - Tilapia: A budget-friendly option. It has a light taste and cooks quickly. - Snapper: This fish has a firm texture and can hold up to baking. Cooking times may change based on the fish you choose. Generally, thinner fillets like tilapia will cook faster than thicker ones like cod. For best results, check your fish at 15 minutes, especially if you use thinner fillets. Adding vegetables makes your dish even better. Here are some great options: - Zucchini: Slice it thin for quick cooking. - Bell Peppers: Use red or yellow for sweetness and color. - Asparagus: Spear-shaped and tender, it adds a nice crunch. - Spinach: Stir in fresh spinach near the end of baking. You can toss these veggies with olive oil, salt, and pepper. Place them around the fish before baking. This will add great flavors and make your meal colorful. You can change the spices and herbs to fit your taste. Here are a few ideas: - Thyme: This herb has a warm flavor. It goes well with fish. - Basil: Fresh or dried, it adds a sweet touch. - Cumin: This spice gives a warm, earthy flavor. - Chili Flakes: For a spicy kick, sprinkle some on top. Adjust the seasoning to fit your family’s taste. Start with a little, then add more if needed. Experimenting is fun and can lead to new favorites! To keep your Mediterranean baked fish fresh, store it right. Let the dish cool before covering it. Place leftovers in an airtight container. This helps keep out air and moisture. Use glass or BPA-free plastic containers for the best results. Refrigerate the fish within two hours of cooking. It will last for about three days. When you’re ready to eat, reheat the fish carefully. You can use the oven, microwave, or stovetop. If using the oven, preheat it to 350°F (175°C). Place the fish in a baking dish, cover with foil, and heat for about 10-15 minutes. This keeps the fish moist and juicy. If you use the microwave, heat on medium for one minute at a time until warm. Be cautious not to overheat, or the fish will dry out. Want to save some for later? You can freeze cooked fish. First, let it cool completely. Wrap each piece tightly in plastic wrap. Then place the wrapped fish in a freezer bag. Remove as much air as possible to prevent freezer burn. This method keeps the fish fresh for up to three months. When you’re ready to eat, thaw it in the fridge overnight. This slow thaw helps maintain its texture and flavor. The best fish for this dish is white fish like cod or sea bass. These fish have a mild flavor and a flaky texture. Both options soak up the lemon and olive oil well. If you prefer, you can also try snapper or tilapia. Each of these choices will give you a delicious meal that highlights Mediterranean flavors. Yes, you can prepare the fish ahead of time. To do this, season the fish and arrange it in the baking dish. Cover it with plastic wrap and keep it in the fridge for up to 24 hours. This saves time on busy days. When you’re ready, just bake it as usual. The flavors will meld well during the wait. This dish pairs nicely with many sides. You can serve it with roasted vegetables or a fresh salad. A light couscous or quinoa dish also works well. For a classic touch, add crusty bread for dipping. Each side will enhance the fish's flavors and make a complete meal. You can tell if the fish is done when it flakes easily with a fork. Check if the flesh turns opaque and loses its translucent look. Another way is to use a food thermometer. The fish should reach an internal temperature of 145°F (63°C). This ensures your meal is safe and cooked perfectly. This blog post shared a tasty recipe for Mediterranean baked fish. We covered ingredients, baking steps, and serving tips. You learned what to avoid and how to personalize your dish. Always choose fresh fish for great flavor. Try adding seasonal veggies or spices to mix things up. Proper storage helps your leftovers stay fresh. With these tips, you can enjoy this meal any day. Get cooking and make your kitchen shine!

Mediterranean Baked Fish Simple and Healthy Delight

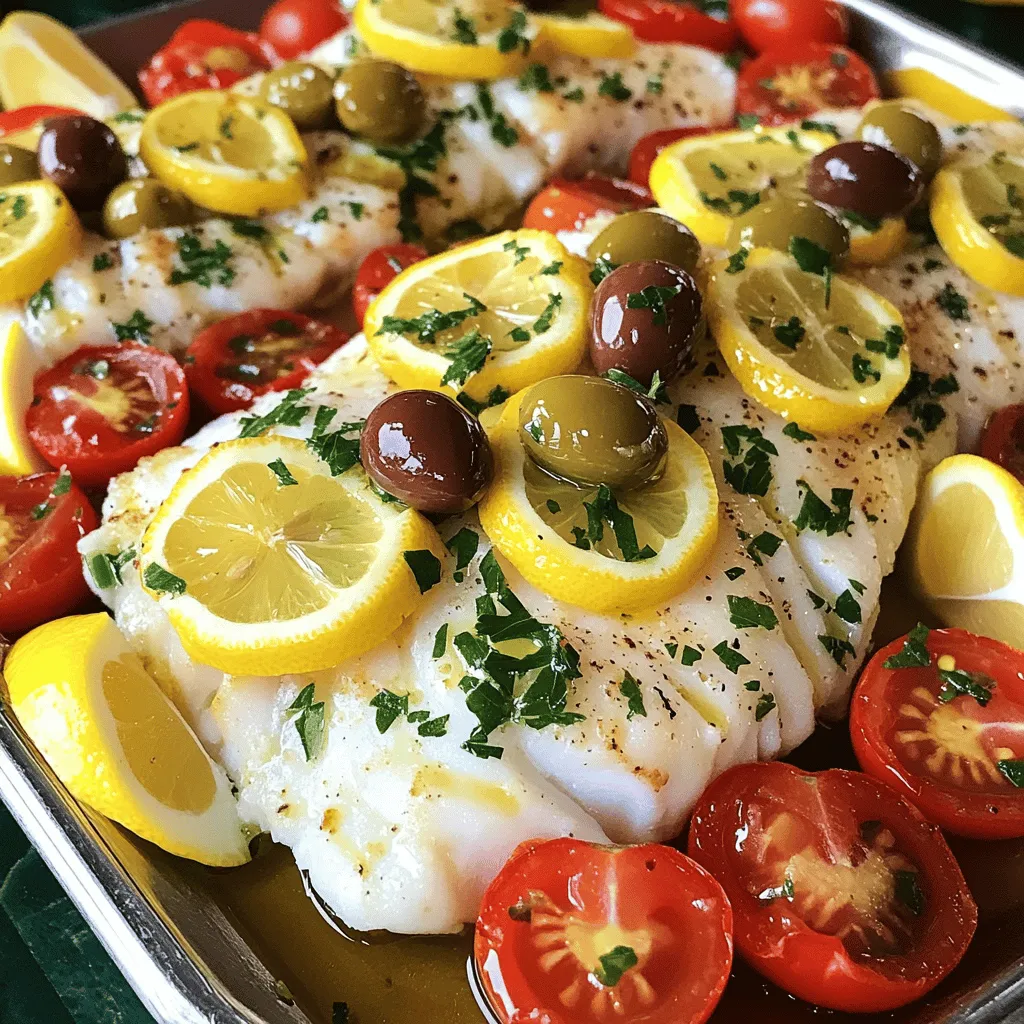
Are you ready to enjoy a taste of the Mediterranean? This Mediterranean Baked Fish recipe is simple, healthy, and packed

For the Creamy Tuscan Chicken Skillet, you need a few key ingredients to make it great. Here’s what you will need: - 4 boneless, skinless chicken breasts - 2 tablespoons olive oil - Salt and freshly cracked pepper, to taste - 3 cloves garlic, finely minced - 1 cup cherry tomatoes, halved - 1 cup fresh spinach leaves - 1 cup heavy cream - ½ cup freshly grated Parmesan cheese - 1 teaspoon Italian seasoning mix - Fresh basil leaves, for garnish Using the right measurements is key to a tasty dish. I suggest using good quality olive oil for depth of flavor. Fresh ingredients always taste better, especially the garlic and spinach. Choose ripe cherry tomatoes; they add sweetness and color. Use heavy cream for a rich sauce, and fresh Parmesan cheese for the best taste. If you lack any ingredients, don’t worry. You can swap out some items: - Use chicken thighs instead of breasts for a juicier option. - Swap heavy cream for half-and-half if you want a lighter sauce. - Use sun-dried tomatoes if you can’t find fresh ones. - Kale can replace spinach for a twist on texture and taste. - You can use nutritional yeast instead of Parmesan for a dairy-free option. These substitutions keep the dish fun and adaptable! For the full recipe, check the details in the section above. Start by gathering all your ingredients. You’ll need chicken breasts, olive oil, garlic, cherry tomatoes, spinach, heavy cream, Parmesan cheese, Italian seasoning, salt, and pepper. This helps make cooking smooth and easy. First, heat the olive oil in a large skillet over medium-high heat. While the oil gets hot, season the chicken breasts on both sides with salt and pepper. Once the oil shimmers, carefully place the chicken in the skillet. Cook each side for about 6-7 minutes. You want the chicken to be golden brown and reach 165°F inside. Remove the chicken from the skillet and cover it to keep warm. Now, lower the heat to medium and add the minced garlic to the same skillet. Sauté it for about 30 seconds. Keep stirring until it smells great, but don’t let it burn. Next, add the halved cherry tomatoes and sauté them for 2-3 minutes. Wait until they soften and start to release their juices. Then, stir in the fresh spinach and cook for another minute until it wilts. Slowly pour in the heavy cream. Stir as you add it to mix well. Add the grated Parmesan cheese and Italian seasoning. Let the sauce cook for 2-3 more minutes until it thickens and becomes creamy. Return the chicken to the skillet, nestling it in the sauce. Spoon the sauce over the chicken and let it simmer for 2 minutes. This melds all the great flavors together. Taste the creamy sauce and add more salt and pepper if you like. Serve the chicken hot, topped with the creamy sauce and fresh basil for a pop of color. For the full recipe, check out the details above! To make the best creamy Tuscan chicken, follow these steps. First, use a large skillet for even cooking. Heat the olive oil until it shimmers. This step ensures a great sear on the chicken. Season the chicken breasts well with salt and pepper. Sear them without moving them for 6-7 minutes on each side. This gives a nice golden crust. Always check the internal temperature. It should reach 165°F for safety. After searing, let the chicken rest. This keeps it juicy. Add depth to your dish with these flavor tips. Use fresh garlic for a stronger taste. Fresh cherry tomatoes add sweetness, while spinach brings a nice earthiness. For a touch of heat, add red pepper flakes. You can also try fresh herbs like thyme or rosemary. They add a wonderful aroma. If you want extra creaminess, stir in more Parmesan at the end. This enriches the sauce without overpowering the dish. Avoid these common pitfalls to ensure success. Don’t overcrowd the skillet when cooking chicken. This can lead to steaming instead of searing. Also, be careful not to burn the garlic. It can turn bitter quickly. When adding cream, do it slowly. Stir continuously to avoid curdling. Lastly, taste your sauce before serving. Adjust the salt and pepper as needed. A little tweak can make a big difference. For the full recipe, check the top of the article. {{image_4}} You can boost nutrition by adding more veggies. Try bell peppers, zucchini, or mushrooms for flavor. They add color and taste without much effort. Simply chop them and add during the cooking steps. Sauté them with garlic for a few minutes. This makes your dish even more healthy and tasty. Do you want to try different proteins? Chicken is great, but you can switch it up. Use shrimp, turkey, or even tofu for a vegetarian option. Each choice brings a unique flavor. Just adjust the cooking time based on what you use. Shrimp cooks fast, while turkey needs a bit longer. These swaps keep the meal exciting. If you need a gluten-free dish, this recipe is easy to adapt. The main ingredients are already gluten-free. Just make sure your chicken broth and any added sauces are also gluten-free. You can also serve it over gluten-free pasta or rice. This keeps the meal satisfying and safe for those with gluten allergies. For the full recipe, check the above section! To keep your creamy Tuscan chicken fresh, store it in an airtight container. Let the dish cool before sealing it. This helps prevent moisture build-up. You can keep the leftovers in the fridge for up to three days. If you want to enjoy it later, follow the freezing tips below. When reheating, use a microwave or a skillet. If using a microwave, place the chicken on a plate. Heat it for one minute, then check if it's warm. Stir in a bit of extra cream if the sauce seems thick. If using a skillet, warm it on low heat. Add a splash of water to keep the sauce creamy. To freeze, first, cool the dish completely. Place portions in freezer-safe bags or containers. Squeeze out as much air as possible. You can freeze it for up to three months. When you’re ready to eat, thaw it overnight in the fridge. Reheat gently to keep the flavors fresh. Enjoy this tasty meal anytime! It takes about 30 minutes to make Creamy Tuscan Chicken Skillet. You spend 10 minutes prepping the ingredients. Cooking the dish takes another 20 minutes. This quick time makes it perfect for busy nights. Yes, you can make this dish ahead of time. Cook the chicken and sauce, then store them in the fridge. You can keep it for up to 3 days. When you’re ready to serve, just reheat it in a skillet. This dish pairs well with several sides. Here are some great options: - Crusty bread - Garlic bread - Light salad - Pasta - Rice Each of these adds a nice touch to your meal. Serve the chicken on a rustic board for a pretty presentation. For the full recipe, check the earlier section! In this post, we covered how to make a creamy Tuscan chicken skillet. We detailed the key ingredients, with tips on measurements and substitutions. I shared step-by-step instructions for perfect cooking and the sauce. You learned helpful tips and tricks to enhance flavor and avoid mistakes. We also explored nutrient-rich variations, storage methods, and common questions regarding preparation. With these tools, you can create a delicious meal that impresses. Enjoy cooking and savoring your creamy Tuscan chicken!

Creamy Tuscan Chicken Skillet Quick and Tasty Recipe

If you’re looking for a quick and tasty meal, the Creamy Tuscan Chicken Skillet is for you. This dish is

- 2 cups plain Greek yogurt - 1 cup creamy coconut milk - 1/2 cup honey or agave syrup Greek yogurt ice cream starts with three key ingredients. First, the plain Greek yogurt gives it a rich base. Second, the coconut milk adds creaminess. Finally, honey or agave syrup brings sweetness. You can tweak the sweetness to fit your taste. - 1 teaspoon pure vanilla extract - 1/4 cup freshly squeezed lemon juice - A pinch of sea salt Now, let's boost the flavor. Pure vanilla extract adds warmth and depth. Fresh lemon juice gives a bright, tangy note. A pinch of sea salt balances the sweetness and enhances all the flavors. - 1 cup mixed berries - Suggestions for additional flavors Want to take your ice cream to the next level? Mix in some fresh berries. Strawberries, blueberries, or raspberries work great. You can also explore other flavors like chocolate or mint. This adds fun and variety to each scoop. For the full recipe, check out the detailed instructions for making this delicious treat. - First, gather your ingredients. You need: - 2 cups plain Greek yogurt - 1 cup creamy coconut milk - 1/2 cup honey or agave syrup - 1 teaspoon pure vanilla extract - 1/4 cup freshly squeezed lemon juice - A pinch of sea salt - In a large bowl, mix the Greek yogurt and coconut milk. Add honey or agave syrup, vanilla extract, lemon juice, and sea salt. - Whisk the mixture well until smooth. Make sure there are no lumps from the yogurt. - Now, it's time for a taste test. Grab a spoon and try a little bit. If you want it sweeter, add more honey or agave syrup. Just keep in mind, the sweetness will balance out when frozen. - Once you’re happy with the taste, pour the mixture into your ice cream maker. - Follow your machine's instructions. Churn for about 20-25 minutes. You want the mix to get thick and creamy, like soft serve. - In the last few minutes of churning, fold in the mixed berries. Use a spatula to gently combine them. This adds flavor and a lovely color. - After churning, transfer the ice cream into an airtight container. Smooth the top with a spatula. - Freeze the ice cream for at least 2 hours. This helps it become firm enough to scoop easily. - When it's time to serve, let it sit at room temperature for 5-10 minutes. This makes it easier to scoop out. Enjoy your homemade Greek yogurt ice cream! To get that creamy, dreamy texture, pay close attention to your mixing and churning time. Churn the ice cream for about 20-25 minutes. This makes it thick and smooth. If you churn it too little, it can be icy. If you churn it too long, it may turn into butter. For freezing, use a shallow container. This helps the ice cream freeze evenly and quickly. You can easily tweak the sweetness to your taste. Start with 1/2 cup of honey or agave syrup. After mixing, taste the base. If you want more sweetness, add a bit more syrup. If you prefer natural sweeteners, try maple syrup or date syrup. These add a unique flavor and keep things healthy. Present your Greek yogurt ice cream in colorful bowls or cones. Top with fresh berries and a drizzle of honey. This makes it look inviting and tasty. You can also add a sprig of mint for a fresh touch. Enjoy it with homemade granola or nuts for extra crunch. {{image_4}} You can make Greek yogurt ice cream in many fun flavors. One popular choice is chocolate. To do this, mix in cocoa powder or melted dark chocolate. This gives a rich and creamy taste. You can also add chocolate chips for extra texture. Another fun flavor is tropical fruit. Use fresh mango, pineapple, or coconut. Blend these fruits into the yogurt base. This creates a refreshing and bright treat, perfect for warm days. If you want a dairy-free ice cream, you can use plant-based yogurt. Look for almond, soy, or coconut yogurt. These will still give you a creamy texture. You can also swap out the coconut milk for a non-dairy milk. Almond milk or cashew milk work well here. For a non-dairy version, use maple syrup instead of honey. This keeps it sweet and yummy. Make sure to check labels for any hidden dairy ingredients. Using seasonal fruits can add a nice twist to your ice cream. In spring, strawberries and rhubarb are great choices. In summer, add peaches or cherries for a burst of flavor. Fall brings apples and pumpkins, while winter can feature cranberries or pomegranates. You can also create holiday-themed recipes. For Christmas, try adding peppermint extract and crushed candy canes. This gives a festive flair. For Halloween, mix in pumpkin puree and spices for a spooky treat. For the full recipe, check the main article. Enjoy your delicious Greek yogurt ice cream! To keep your Greek yogurt ice cream fresh, use an airtight container. This type of container helps seal in the flavor. A glass or plastic container works great. Avoid using metal containers, as they can affect taste. To prevent ice crystal formation, make sure to fill your container to the top. Leave little air space for best results. You can also press a piece of wax paper against the surface of the ice cream before sealing. This method helps keep it smooth and creamy. You can store Greek yogurt ice cream for about two weeks. After this time, the flavor may fade. Look for signs of spoilage, like ice crystals on the surface. If the ice cream smells off or has a strange texture, it’s best to toss it. Yes, you can refreeze Greek yogurt ice cream! To do this properly, let it soften at room temperature for about 10 minutes. Then, stir it to break up any ice crystals. Place it back in the airtight container and freeze again. This helps maintain the creamy texture. Enjoy this delicious treat whenever you want! Greek yogurt ice cream has less fat and fewer calories than regular ice cream. It packs more protein, which helps keep you full longer. Greek yogurt also has probiotics, which are good for your gut. Regular ice cream often has added sugars and unhealthy fats. This makes Greek yogurt ice cream a smart choice for dessert lovers. Yes, you can make Greek yogurt ice cream without an ice cream maker. Simply pour the mixture into a shallow dish. Place it in the freezer for about an hour. Stir the mixture every 20 minutes to break up ice crystals. This process will give you a creamy texture. It may take a little longer, but you’ll still enjoy a tasty treat. Greek yogurt has less lactose than regular yogurt. Many lactose-intolerant people can enjoy it without issues. If you are sensitive, choose lactose-free Greek yogurt. This way, you can still enjoy this ice cream without any discomfort. To make a plant-based version, use dairy-free yogurt. Look for coconut or almond yogurt. You can follow the same steps from the Full Recipe. Add coconut milk for a creamy base. Sweeten with agave syrup and mix in your favorite fruits for flavor. You can find Greek yogurt ice cream at many grocery stores. Some popular brands include Oikos and Yasso. They offer different flavors, so you have plenty of options. Check the frozen section for tasty, ready-to-eat choices. Greek yogurt ice cream is simple to make and delicious. We covered key ingredients, like Greek yogurt and coconut milk, which create a creamy base. After mixing and churning, we discussed ways to enhance flavors and storage tips to keep your treat fresh. Remember, you can customize it with berries or try different flavors. This healthier alternative is perfect for a sweet craving. Making it yourself allows you to adjust sweetness and enjoy seasonal variations. Now you can create a sweet and satisfying treat right at home.

Greek Yogurt Ice Cream Irresistible and Guilt-Free

Are you ready to treat yourself without the guilt? Greek yogurt ice cream is your answer! Packed with protein and

- 2 cups all-purpose flour - 1 ½ cups granulated sugar - ½ cup unsalted butter (softened) - 1 cup buttermilk (preferably room temperature) - 3 large eggs (room temperature) - 2 tablespoons fresh lemon juice - Lemon zest from 1 lemon - 1 teaspoon pure vanilla extract - 2 teaspoons baking powder - ½ teaspoon baking soda - ¼ teaspoon salt - 1 cup fresh strawberries (pureed) - 1 cup heavy cream (chilled) - 2 tablespoons powdered sugar - Extra strawberries and lemon slices for garnish To create the perfect Strawberry Lemonade Layer Cake, gather your ingredients first. This helps keep your kitchen organized. Fresh strawberries will give your cake a bright flavor. Use ripe strawberries for the best taste. Make sure your eggs and buttermilk are at room temperature. This helps them mix well with the other ingredients. - Electric mixer - Mixing bowls - Measuring cups and spoons - 3 8-inch round cake pans - Wire racks Having the right tools makes baking easier. An electric mixer saves time and effort when creaming butter and sugar. Use mixing bowls for separate tasks. Measuring cups and spoons help you get the ingredient amounts just right. The three 8-inch round pans allow even baking. Lastly, wire racks cool your cakes quickly. - Ensure all ingredients are at room temperature for better mixing. - Measure the flour correctly for accurate results. Following these tips will make your cake light and fluffy. Room temperature ingredients blend more smoothly. Accurate measuring, especially for flour, ensures the right texture. Too much flour can make your cake dense. For best results, always follow these simple steps before you start mixing. For the full recipe, check out the [Full Recipe]. Preheat your oven to 350°F (175°C). Grease and flour three 8-inch round cake pans. This step is key to help the cakes come out easily after baking. In a large bowl, beat the softened butter and granulated sugar. Use an electric mixer at medium speed. Mix for about 3-4 minutes until the mixture looks light and fluffy. This adds air for a soft cake. Add the eggs one by one to the butter-sugar mix. Beat well after each egg. Then add the buttermilk, lemon juice, lemon zest, and vanilla extract. Mix until everything is well combined. In a separate bowl, whisk together the flour, baking powder, baking soda, and salt. Gradually add the dry ingredients to the wet mix. Use low speed on your mixer or a spatula. Mix just until combined—don’t overmix! This keeps the cake light. Now, carefully fold in the strawberry puree, ensuring it's evenly mixed without overworking the batter. Divide the batter evenly among the prepared pans. Smooth the tops with a spatula. Bake for 25-30 minutes. A toothpick inserted in the center should come out clean. Once baked, let the cakes cool in the pans for 10 minutes. Then gently turn them out onto wire racks to cool completely. While the cakes cool, whip the chilled heavy cream with powdered sugar until stiff peaks form. This takes about 3-5 minutes with an electric mixer. Once the cake layers are cool, place the first layer on a serving plate. Spread whipped cream on top and add fresh sliced strawberries. Repeat with the second layer. Place the third layer on top and cover the whole cake with the remaining whipped cream. For a lovely finish, decorate the top with extra fresh strawberries and lemon slices. Arrange them nicely to make your cake pop. Remember, you can find the Full Recipe for more detailed steps and tips! To get the best cake texture, avoid overmixing. When you mix the batter, do it just until everything blends. Overmixing can make your cake dense and tough. Keep it light and airy for that perfect bite. Always use fresh lemons and strawberries. Fresh fruit gives the cake a bright, zesty taste. The flavors pop and make every slice a treat. If you can, pick your strawberries just before using them for the best flavor. For a stunning look, add extra fruit on top. Place slices of fresh strawberries and lemons for color. You can also use edible flowers for a unique touch. These decorations not only look great; they also boost the flavor. Get creative with your design to make your cake stand out! {{image_4}} You can change the berries in this cake. Try using raspberries or blueberries. Each berry gives a unique taste and color. Raspberries add a tart flavor, while blueberries give a sweet twist. This allows you to create your own version of the Strawberry Lemonade Layer Cake. You can mix and match berries for fun. If you want a different frosting, look no further than cream cheese frosting. It adds a rich flavor that pairs well with the cake. You could also try a lemon glaze for a light finish. Both options bring their own charm. They can brighten the taste and make the cake even more special. Do you need a gluten-free option? Simply swap all-purpose flour for gluten-free flour. This keeps the cake just as tasty. Make sure to choose a good gluten-free mix. This way, everyone can enjoy the Strawberry Lemonade Layer Cake. You won’t miss the gluten at all! For the full recipe, check out the details above. After enjoying your Strawberry Lemonade Layer Cake, store any leftovers in an airtight container. This keeps the cake fresh and moist. You can keep it in the refrigerator for up to 3 days. Just make sure the container is sealed tightly. This way, you can enjoy your cake later without losing any flavor. If you want to save the cake for a longer time, you can freeze it. First, wrap each cake layer in plastic wrap. This prevents freezer burn and keeps the cake safe. You can freeze the layers for up to 2 months. When you're ready to enjoy, just take them out of the freezer. Thawing the cake is easy. Simply move the wrapped layers to the fridge the night before you want to serve them. This slow thawing method helps retain moisture. It’s best to let them sit in the fridge overnight. When ready, the cake will be soft, tasty, and ready to impress your guests. Yes, prepare and freeze layers ahead of time. This saves you time on the day you plan to serve it. Simply wrap each layer in plastic wrap and store them in the freezer. When you are ready to assemble, let them thaw in the fridge overnight. This keeps the cake fresh and easy to work with. Use fresh, ripe strawberries for the best flavor and pureeing. Look for berries that are bright red and firm. They should smell sweet and have no soft spots. Fresh strawberries enhance the cake's taste and create a lovely color. Reduce the sugar in the cake and frosting to suit your taste. You can cut back on the granulated sugar by a half cup or so. Taste the frosting as you go to ensure it is still creamy and smooth. This way, you can enjoy the bright flavors without it being too sweet. Chilling allows flavors to meld and improves texture. If you let the cake chill for at least 30 minutes, it becomes easier to slice. Plus, the layers hold together better. You’ll enjoy a more delightful bite when you serve it cold. This post covered how to make a delicious Strawberry Lemonade Layer Cake. We discussed the key ingredients and equipment needed. I shared step-by-step instructions to guide you through the process. Tips and tricks helped ensure your cake has the best texture and flavor. Finally, we explored variations and storage options. I hope you feel ready to bake this tasty cake. Enjoy sharing it with friends and family!

Strawberry Lemonade Layer Cake Delightful and Fresh

Are you ready to impress your friends and family with a fresh, zesty treat? Our Strawberry Lemonade Layer Cake is

- 1 pound ground beef - 4 large flour tortillas - 1 cup shredded iceberg lettuce - 1 cup fresh tomatoes, diced - 1 cup sharp cheddar cheese, shredded - 1/2 cup dill pickles, sliced - 1/2 cup mayonnaise - 2 tablespoons ketchup - 1 tablespoon Dijon mustard - 1 tablespoon sweet pickle relish - Seasonings: 1 teaspoon onion powder, 1 teaspoon garlic powder, salt, black pepper To create these tasty Big Mac Wraps, you need fresh and simple ingredients. The ground beef is the star here. It gives the wraps their hearty flavor. You will need flour tortillas for easy wrapping. Shredded iceberg lettuce adds crunch, while fresh tomatoes provide juiciness. Sharp cheddar cheese adds creaminess and sharp flavor. Dill pickles give that classic Big Mac taste. For the special sauce, mix mayonnaise, ketchup, and Dijon mustard. Sweet pickle relish adds a fun twist. The seasonings really enhance the flavor. Onion powder and garlic powder give depth, while salt and black pepper balance the taste. Use this Full Recipe to get started on your fun cooking adventure! First, heat a skillet on medium. Add 1 pound of ground beef. Use a spatula to break it apart. Cook for about 5-7 minutes until it turns brown. Then, season with: - 1 teaspoon onion powder - 1 teaspoon garlic powder - Salt and freshly ground black pepper to taste Once the beef is cooked, take it off the heat. Set the skillet aside for now. In a small bowl, whisk together the following: - 1/2 cup mayonnaise - 2 tablespoons ketchup - 1 tablespoon Dijon mustard - 1 tablespoon sweet pickle relish Mix until it’s well blended. Let the sauce sit so the flavors can come together. Take a large flour tortilla and lay it flat. Spoon some of the cooked beef into the center. Now, layer on top: - 1 cup shredded iceberg lettuce - 1 cup fresh tomatoes, diced - 1 cup sharp cheddar cheese, shredded - 1/2 cup dill pickles, sliced Drizzle a tablespoon of the special sauce over the layers. This adds great flavor. Now, fold the sides of the tortilla in toward the center. Roll it up tightly from the bottom to enclose the filling. Repeat this process with the remaining tortillas and ingredients. For a crunchy twist, heat a non-stick skillet. Place each wrap in the skillet and toast for about 2 minutes on each side until golden brown. Enjoy your Big Mac Wraps with Special Sauce! To make the best Big Mac Wraps, you need to focus on texture. Toasting your wraps in a skillet gives them a nice crunch. Heat a non-stick skillet over medium heat. Place the wraps in for about two minutes on each side. This step makes a big difference! Using fresh ingredients also boosts flavor. Fresh lettuce, ripe tomatoes, and quality cheese add a lot. Choose the best you can find. They will make your wraps taste amazing. Cutting your wraps diagonally makes them look fancy. This simple step adds style to your meal. Arrange the halves on a platter for a great display. Garnishing with fresh herbs adds color and freshness. Try cilantro or parsley for a vibrant touch. It not only looks good but also enhances the taste. For the full recipe, check out the complete instructions above. {{image_4}} When making Big Mac wraps, you can mix things up. Here are some fun ideas to try. - Swap ground beef for turkey or plant-based alternatives. This change cuts fat and adds protein. - Use whole grain or low-carb tortillas. These options boost fiber and lower carbs. - Add sliced avocado or jalapeños for extra zest. These toppings bring creamy and spicy flavors. - Experiment with different cheeses like pepper jack. This cheese adds a nice kick and flavor twist. These variations let you create a wrap that suits your taste and health goals. For the full recipe, check out the complete guide. To keep your leftover wraps fresh, store them in an airtight container. This helps prevent them from drying out. Aim to eat them within 2-3 days for the best taste and texture. The flavors will still be good, but freshness is key. If you want to save wraps for later, wrap each one in plastic wrap. This helps keep them from getting freezer burn. Place the wrapped wraps in a freezer bag. When you're ready to eat, just thaw them overnight in the refrigerator. After thawing, you can reheat them in a skillet or microwave for a quick meal. Enjoy your Big Mac Wraps with Special Sauce anytime! For the Full Recipe, check back to enjoy this tasty dish. To make the sauce taste like McDonald's, use the right ingredients. Start with mayonnaise, ketchup, and sweet pickle relish. Add onion powder and garlic powder for more flavor. I like to use a bit of mustard for a nice kick. Mix it well and let it sit for a bit to blend the flavors. This makes it taste even better! You can make Big Mac Wraps ahead of time. Just prepare the beef and sauce as usual. Once the wraps are filled, you can wrap them tightly in foil or plastic wrap. Store them in the fridge for up to a day. When you’re ready to eat, reheat them in a skillet or microwave. They will still taste great! Big Mac Wraps pair well with many sides. You can serve them with crispy fries or fresh veggie sticks. A simple salad or coleslaw also works nicely. For dipping, try extra special sauce or ranch dressing. These sides will make your meal even more enjoyable! Yes, Big Mac Wraps are great for meal prep. You can make a batch at once and store them. Use an airtight container for the fridge. They stay fresh for about two to three days. If you want to freeze them, wrap each one in plastic. They’ll be ready to heat and enjoy later! You can find Big Mac Wraps at some fast food places. Check menus at local burger joints. Some restaurants may offer similar wraps. If you want the exact taste, making them at home is the best way. You can use the Full Recipe for a tasty and fun meal! Big Mac wraps combine simplicity and taste in a fun way. We covered the key ingredients, from beef to special sauce. You learned how to prepare and assemble wraps easily. Fresh ingredients and clever presentation enhance your dish. With variations and storage tips, you can enjoy this meal multiple ways. Embrace your creativity and make these wraps your own. Enjoy every bite and share with friends.

Big Mac Wraps with Special Sauce Tasty and Simple Meal

Are you craving a quick and tasty meal? Big Mac Wraps with Special Sauce are your answer! This easy recipe

To make the best Frozen Peach Lemonade Slushie, you need just a few simple ingredients. These items blend together to create a refreshing drink perfect for summer. Here’s what you’ll need: - 2 cups frozen peaches - 1 cup lemonade (store-bought or homemade) - 1/2 cup coconut water (or regular water) - 1 tablespoon honey or agave syrup (optional) - 1/2 teaspoon vanilla extract - Fresh mint leaves for garnish (optional) - Lemon slices for garnish (optional) Using frozen peaches adds a wonderful chill to your slushie. Lemonade brings the tartness, while coconut water provides a light, fresh taste. The honey or agave syrup adds sweetness if you like. The vanilla extract gives a nice depth of flavor. You can garnish with mint leaves or lemon slices to make it look pretty. This recipe is simple and quick, so anyone can enjoy it. Check out the Full Recipe for more details! - Add all ingredients into a blender. - Blend until smooth and slushy. - Adjust consistency and sweetness. To make this slushie, I start with the fun part. I gather my ingredients and toss them into the blender. This includes frozen peaches, lemonade, coconut water, honey, and vanilla extract. The frozen peaches give it a nice chill. Next, I blend everything on high speed. I want it to become smooth and slushy. If it’s too thick, I add a little extra coconut water. This way, I can reach just the right texture. After blending, I taste my slushie. If I think it needs more sweetness, I add a bit more honey or agave. Then, I blend again to mix it well. - Pour into chilled glasses. - Ideal for hot summer days. Once my slushie is ready, I carefully pour it into chilled glasses. This keeps the drink cold longer. On a hot summer day, this slushie is so refreshing! For a fun touch, I like to garnish with mint leaves and a lemon slice. It looks pretty and adds a nice flavor. If you want the full experience, check out the Full Recipe for more details. To get that perfect slushy feel, blending is key. Start with a powerful blender. Add the frozen peaches first. This helps to break them down quickly. Then, pour in the lemonade and coconut water. Blend on high until smooth. If it becomes too thick, add more coconut water slowly. This way, you control the texture. Avoid ice chunks by using frozen peaches instead of ice. Ice can make the drink watery. Stick to the recipe for the best outcome. If you do use ice, crush it before adding. This helps keep your slushie smooth. Taste is important. You might want to adjust the sweetness. If your slushie isn’t sweet enough, add more honey or agave syrup. Do this right after blending. Start with a small amount, then blend again. Taste and repeat if needed. If you seek natural options, try maple syrup or dates. These can add unique flavors too. They can also make your drink healthier. Always taste first before adding more. This ensures you get the sweetness just right. For the full recipe, check the [Full Recipe]. {{image_4}} You can make your Frozen Peach Lemonade Slushie even more fun with different flavors. Adding berries like strawberries or blueberries gives a sweet twist. You can also try other fruits, such as mango or pineapple, for a tropical vibe. Using flavored lemonade instead of regular lemonade can also change the taste. For example, try raspberry or strawberry lemonade for a berry blast. If you want a vegan option, this slushie is very easy to adapt. Just skip the honey or agave syrup, and use a sweetener made from plants. For a low-sugar version, use unsweetened coconut water and fresh fruits. This keeps the slushie tasty while cutting down on sugar. You still get a delicious drink without the extra calories. Check out the Full Recipe for more ideas on how to customize your slushie. If you have leftover slushie, you can refrigerate it. Pour the slushie into a sealed container. It will stay fresh for about one day. When ready to enjoy, stir it well. If it seems too thick, add a little water to loosen it. You can also freeze the slushie. Pour it into an ice cube tray or a freezer-safe container. This way, it will last for up to one month. To serve, blend the frozen slushie cubes with a splash of lemonade. This gives you a fresh drink that tastes just made. The shelf life of the slushie depends on its ingredients. The frozen peaches can last up to a year in the freezer. Lemonade, whether store-bought or homemade, usually lasts about a week in the fridge. Signs of spoilage include changes in color or smell. If the slushie separates or develops ice crystals, it’s best to toss it. Always check before you sip to ensure your drink is safe and tasty. You can make a slushie without a blender using a few simple tools. First, chop your frozen peaches into small pieces. Then, place them in a large bowl. Next, add the lemonade and coconut water. Use a fork to mash the mixture. Keep mashing until it reaches a slushy texture. You can also place the mixture in a freezer bag. Then, use a rolling pin to crush the peaches. This method works, but it may take more time. Yes, you can use fresh peaches instead of frozen ones. However, the texture and taste will change. Fresh peaches will make your slushie less thick. To keep it cold, add ice cubes to your mixture. You will also need to add more lemonade to balance the flavor. The taste will be different, but still delicious. If you don’t have coconut water, there are some great substitutes. You can use regular water, which is the simplest choice. Alternatively, try using almond milk or pineapple juice. Each will change the flavor slightly. Almond milk will make it creamier, while pineapple juice adds a tropical twist. Choose what fits your taste best. In this blog post, we explored how to make a refreshing frozen peach lemonade slushie. We covered key ingredients like frozen peaches and lemonade, as well as step-by-step instructions for blending. I shared tips for achieving the perfect consistency and options for flavor variations. Remember, you can store leftovers in the fridge or freeze them for later. This slushie is a tasty treat for hot days, and you can adjust it to fit your taste. Keep experimenting to find your favorite blend!

Frozen Peach Lemonade Slushie Refreshing Summer Drink

Nothing says summer like a refreshing Frozen Peach Lemonade Slushie! This drink is cool, fruity, and perfect for hot days.

- 1 ripe mango, peeled and chopped into bite-sized pieces - 1 banana, sliced into rounds - 1 cup coconut milk (or almond milk for a nut-free alternative) - 1 tablespoon honey (or maple syrup for a vegan-friendly option) - 1/2 cup Greek yogurt (or a dairy-free yogurt alternative) - 1/4 teaspoon ground ginger (or freshly grated ginger for a spicier flavor) - 1 tablespoon chia seeds for an added nutritional boost - Ice cubes (optional, for a thicker and frostier smoothie) The Mango Bango Smoothie is a delicious mix of fresh and creamy. You need ripe mango for natural sweetness and great flavor. When you pick a mango, it should feel soft but not mushy. The banana adds a smooth texture. Make sure it is ripe, too; yellow with a few brown spots works best. Coconut milk gives the smoothie a rich and creamy base. If you want a nut-free option, almond milk is a good choice. Honey adds sweetness, but you can swap it for maple syrup if you prefer vegan options. The Greek yogurt adds protein and creaminess. For a dairy-free option, use a plant-based yogurt. Ginger gives the smoothie a spicy kick. You can use ground ginger or freshly grated ginger for a stronger taste. Chia seeds add fiber and nutrients, making this smoothie even healthier. If you want a thicker smoothie, ice cubes are great to add. This recipe is simple and quick to make. You will enjoy every sip! For the full recipe, check out the details above. Start by chopping the mango into small pieces. Use a sharp knife for this task. Make sure the mango is ripe for the best taste. A ripe mango feels soft and has a sweet smell. Next, slice the banana into rounds. Bananas should be yellow with a few brown spots for peak sweetness. Now, it’s time to blend. First, add the chopped mango. Then, place the sliced banana in the blender. Next, pour in the coconut milk. This adds a creamy texture. Follow that with the honey for sweetness. Add the Greek yogurt and ground ginger. The ginger gives it a nice kick. If you want a thicker smoothie, toss in some ice cubes. Blend on high speed until smooth. Stop to scrape down the sides if needed. This ensures everything mixes well. You want a creamy, thick texture without lumps. Taste your smoothie after blending. If it needs more sweetness, add extra honey or maple syrup. Blend again briefly to mix it in. Pour the smoothie into tall glasses carefully. Leave some space at the top for toppings. You can sprinkle chia seeds on top for a fun touch. A slice of fresh mango on the glass also looks pretty. Enjoy your Mango Bango Smoothie! For the complete recipe, check out the Full Recipe section. To get a thick and creamy smoothie, use frozen fruits. Frozen mango and banana make a great base. They blend well and add a nice chill. If you don’t have frozen fruit, you can add ice cubes. This adds thickness and a frosty feel. For those on special diets, try different sweeteners. Honey is a classic choice, but maple syrup works too. You can also use agave nectar for a vegan option. Adjust the sweetness based on your taste. You can add more ingredients to boost health. Try adding spinach for extra vitamins. A scoop of protein powder can also make it filling. You can add flaxseeds or more chia seeds for fiber. Balancing flavors is key. If your smoothie tastes too sweet, add a splash of lemon juice. This will brighten the taste. A pinch of salt can also enhance sweetness. Garnishing makes your smoothie look fancy. Sprinkle chia seeds on top for a fun texture. Add a slice of fresh mango on the rim for color. You can also use a colorful straw for a festive touch. For parties, serve the smoothie in small cups. This makes it easy for guests to grab and enjoy. You can place a small umbrella or a decorative pick on top to make it fun! {{image_4}} To make your Mango Bango Smoothie even more fun, try adding pineapple or coconut flakes. Pineapple adds a sweet and tart kick. Coconut flakes bring a chewy texture and tropical flavor. You can also sneak in some greens like spinach or kale. They blend well and boost nutrition without changing the taste much. Mixing your smoothie with other fruits can create exciting flavors. Try adding berries like strawberries, blueberries, or raspberries. Each berry brings its unique taste and color. You can also experiment with spices like cinnamon or nutmeg. Just a pinch can add warmth and depth to your drink. If you follow a vegan diet, you have easy swaps. Use maple syrup instead of honey for sweetness. Substitute Greek yogurt with a dairy-free option. For a gluten-free smoothie, you don’t need to worry. All the ingredients in this recipe are naturally gluten-free. These adjustments make the Mango Bango Smoothie friendly for many diets. Check out the Full Recipe to see how easy it is to make these changes! To keep your leftover Mango Bango Smoothie fresh, pour it into an airtight container. This helps prevent air from spoiling the taste. You can store it in the fridge for up to two days. The smoothie may separate, so give it a good shake or stir before drinking. You can freeze your smoothie for later. Just pour it into freezer-safe bags or containers. Leave some space for expansion as it freezes. For best quality, use it within three months. When you're ready to enjoy it, thaw the smoothie overnight in the fridge. You can also run the bag under warm water for a quick thaw. Blend it again if needed for a smooth texture. To make busy mornings easier, prep your smoothie ingredients in advance. Chop the mango and banana and store them in the fridge. You can combine dry ingredients like chia seeds and ginger in a small jar. When you're ready, just add the prepped fruits and other ingredients to your blender. This way, you can whip up a delicious Mango Bango Smoothie in minutes. A Mango Bango Smoothie is a fruity drink that bursts with flavor. It combines ripe mango, banana, and creamy coconut milk. This smoothie is sweet, thick, and tropical. Each sip feels like a sunny day. The ginger adds a hint of spice. You can enjoy it as a snack or breakfast. Yes, you can easily swap ingredients. If you don’t have mango, try pineapple or peaches. You can use almond milk instead of coconut milk for a nut-free option. If you're vegan, switch honey for maple syrup. Greek yogurt can be replaced with dairy-free yogurt. Get creative and adjust to your taste! To boost nutrition, add spinach or kale for greens. You can also use less honey or maple syrup for less sugar. Adding flaxseeds or protein powder can enhance the smoothie’s health benefits. Each of these options keeps the taste great while adding nutrients. Feel free to experiment with your choices! Making a Mango Bango Smoothie is quick and easy. It takes about 10 minutes to prep and blend. You can enjoy it right away. This makes it perfect for busy mornings or a fast snack. You can find the Full Recipe for detailed steps! The Mango Bango Smoothie offers a tasty way to enjoy healthy fruits. We covered key ingredients, step-by-step blending, and tips for a perfect drink. You can adapt the recipe easily for different diets. Remember to store leftovers smartly and think about meal prep for busy days. I hope you feel inspired to whip up this fun, colorful smoothie. Enjoy experimenting with flavors and sharing it with friends. You'll create a refreshing treat everyone will love.

Mango Bango Smoothie Healthy and Refreshing Recipe

Looking for a delicious and healthy treat? Look no further than the Mango Bango Smoothie! This vibrant drink mixes ripe

- Can chickpeas - Cucumbers - Cherry tomatoes - Red onion - Greek yogurt - Garlic - Fresh dill - Lemon juice - Olive oil - Salt and pepper - Feta cheese - Fresh mint leaves Tzatziki Chickpea Salad is full of fresh flavors. You start with a can of chickpeas. They give protein and a nice texture. Next, chop up cucumbers. They add crunch and coolness. Halved cherry tomatoes bring a burst of sweetness. A finely chopped red onion adds a bite. The creamy base comes from Greek yogurt. It makes the salad rich and smooth. Don’t forget the garlic! It gives depth and flavor to the dressing. For the dressing, you need fresh dill. It adds a herby taste. Lemon juice brightens the salad and gives a zesty kick. Olive oil adds richness. For seasoning, use salt and pepper to taste. You can add feta cheese for extra creaminess. Fresh mint leaves can also brighten this dish. These optional ingredients give a nice twist. This Tzatziki Chickpea Salad is easy to make. You can find the Full Recipe to guide you through the steps. Enjoy this fresh and tasty dish! - Combine 1 can of drained chickpeas, 1 cup of diced cucumbers, 1 cup of halved cherry tomatoes, and 1/2 of a finely chopped red onion in a large bowl. - Stir gently to avoid mashing the chickpeas. This keeps the salad light and fresh. - In a separate bowl, whisk together 1/2 cup of plain Greek yogurt, 1 clove of minced garlic, 2 tablespoons of chopped dill, 1 tablespoon of lemon juice, 1 tablespoon of olive oil, salt, and pepper. - Ensure a smooth texture. A well-mixed dressing adds creaminess to the salad. - Drizzle the tzatziki dressing over the vegetable mixture. - Toss gently with a spatula until all ingredients are coated. This step brings all the flavors together. - Taste the salad and adjust seasoning as needed. You can add more salt, pepper, or lemon juice. - If you like, garnish with crumbled feta cheese and fresh mint leaves for added flavor and color. - Cover the salad with plastic wrap or transfer it to an airtight container. - Refrigerate for at least 30 minutes. This chilling time helps the flavors meld beautifully. Enjoy the full recipe for all details! For a lovely bowl presentation, use a wide, shallow dish. Arrange the salad in the center, allowing the vibrant colors to pop. Garnish with extra dill and mint leaves for a touch of green. You can also drizzle a bit of olive oil on top for shine. Pair your salad with warm pita or crunchy veggies for a fresh and satisfying meal. The contrast of textures makes every bite enjoyable. To boost the flavor of your salad, try adding spices like cumin or smoked paprika. Fresh herbs like parsley or cilantro can also add a new twist. If you want more crunch, consider adding chopped bell peppers or radishes. For a creamy finish, sprinkle crumbled feta cheese on top. You can even add olives for a briny kick. When chopping vegetables, use a sharp knife for clean cuts. This helps maintain the shape and texture of each piece. For cucumbers, try a mandoline for even slices. If you want to make the salad ahead of time, prepare the veggie mix and dressing separately. Combine them just before serving to keep everything fresh. Letting the salad chill for at least 30 minutes allows the flavors to mix nicely. Follow the [Full Recipe] to ensure you don't miss any steps! {{image_4}} To make this salad vegan, swap Greek yogurt for a plant-based option. You can use cashew yogurt or coconut yogurt. Both options bring a similar creaminess. To enhance the flavor, add a splash of apple cider vinegar or a bit of nutritional yeast. These will give you a nice tang and depth. If you want to try different beans, black beans or white beans work great too. They add protein and texture. You can also mix in other veggies. Bell peppers, radishes, or even corn can add a crunch. Try mixing colors for a vibrant look. For summer, add juicy diced peaches or fresh corn. They bring sweetness and a nice crunch. In winter, consider roasted beets or carrots. These add warmth and earthiness. Fresh herbs also change with the seasons. In summer, use basil or cilantro. In winter, thyme or parsley work well. These herbs can brighten up your salad all year round. To keep your Tzatziki Chickpea Salad fresh, store it in an airtight container. This step helps prevent moisture loss and keeps flavors intact. The ideal temperature for storage is between 32°F and 40°F (0°C to 4°C). Under these conditions, the salad stays fresh for up to three days. After that, the ingredients may lose their crunch and flavor. Can you freeze the salad? I do not recommend freezing it. The cucumbers and tomatoes become mushy when thawed. If you need to store it long-term, consider freezing just the chickpeas and tzatziki dressing separately. Place them in airtight containers, and they can last for up to three months. To refresh leftovers, give the salad a good stir. This helps mix the flavors that may have settled. If the salad seems dry, add a splash of lemon juice or a drizzle of olive oil. If you have stale salad, try turning it into a wrap or a sandwich filling. It works wonderfully with pita or lavash bread. You can also add it to a grain bowl for extra flavor and texture. Tzatziki sauce has simple ingredients: - Greek yogurt - Cucumber - Garlic - Fresh dill - Lemon juice - Olive oil - Salt and pepper These ingredients come together to create a cool, creamy sauce. The yogurt gives it a rich taste, while the cucumber adds crunch. Garlic and dill bring in fresh flavors. You can store Tzatziki Chickpea Salad for about 3 days in the fridge. To keep it fresh, place it in an airtight container. After a few days, the flavors may change. The salad may lose some crunch, but it still tastes good. Yes, you can use canned chickpeas! Canned chickpeas save time. They are already cooked and ready to eat. Just drain and rinse them well before adding to the salad. This makes preparing the salad quick and easy. Yes, Tzatziki Chickpea Salad is gluten-free! The main ingredients, like chickpeas and veggies, do not have gluten. It’s a great option for anyone with gluten sensitivities or celiac disease. To add heat, try these ideas: - Add diced jalapeños or red pepper flakes - Mix in a bit of hot sauce - Use a spicier type of yogurt These options will give the salad a nice kick. Start with a little and taste as you go. Adjust until it’s just right for you. This blog post guides you through a tasty Tzatziki Chickpea Salad. You learned which ingredients to use, from chickpeas to fresh herbs and yogurt. I outlined step-by-step instructions for preparing and combining the salad. Tips and variations add fun ways to make this dish your own. Overall, this salad is not just delicious but also packs in healthy nutrients. Enjoy it now or save it for later. Happy cooking!

Tzatziki Chickpea Salad Fresh and Flavorful Delight

Are you ready to dive into a fresh and flavorful dish? My Tzatziki Chickpea Salad is a tasty mix of

- 2 medium zucchinis, sliced into ½-inch rounds - 1 can (15 oz) chickpeas, drained and thoroughly rinsed - 2 tablespoons extra virgin olive oil (divided) - 1 teaspoon smoked paprika - 1 teaspoon garlic powder - 1 teaspoon ground cumin - Juice and zest of 1 large lemon - Fresh parsley, finely chopped (for garnish) When I make Lemony Grilled Zucchini with Crispy Chickpeas, I focus on fresh, simple ingredients. Zucchini is my star here. I slice it into rounds for even cooking. Chickpeas add a great crunch. I always use canned chickpeas for quick prep. Rinsing them well removes excess salt and helps them crisp up. Next, I drizzle olive oil on both the zucchini and chickpeas. Olive oil adds flavor and helps with cooking. For seasonings, I use smoked paprika, garlic powder, and ground cumin. These spices give depth to the dish. They also make it smell amazing while cooking. Finally, I add fresh lemon juice and zest. This brightens up the flavors. Chopped parsley adds color and a fresh taste. It makes the dish look beautiful on the plate. You can find the Full Recipe for all the details on how to prepare this delicious dish. 1. First, preheat your grill or grill pan over medium heat. This step is key for good grill marks. 2. While the grill heats, prepare the chickpeas. Use a paper towel to pat them dry. This helps them get crispy. 3. In a bowl, mix the chickpeas with 1 tablespoon of olive oil, smoked paprika, garlic powder, ground cumin, and a pinch of salt and pepper. Toss them well until they are evenly coated. 1. Spread the seasoned chickpeas on a baking sheet in a single layer. 2. Place the baking sheet in a preheated oven set to 400°F (200°C) for 20-25 minutes. 3. Remember to shake the pan halfway through. This helps them crisp up evenly until they turn golden and crunchy. 1. While the chickpeas roast, prepare the zucchini slices. In a bowl, combine the zucchini rounds with the remaining tablespoon of olive oil, lemon juice, lemon zest, and a sprinkle of salt and pepper. Toss gently to coat. 2. Grill the zucchini slices for about 4-5 minutes on each side. Aim for nice grill marks and tenderness while keeping a slight crisp. Follow these steps, and you’ll create a dish that is not only tasty but also visually stunning. For the full recipe, check out the complete guide! To make your chickpeas crispy, start by drying them well. Use a paper towel to soak up moisture. This step is key. Next, coat them with olive oil and spices. I love using smoked paprika, garlic powder, and cumin for a flavor boost. Roast them in the oven at 400°F (200°C) for 20-25 minutes. Shake the pan halfway through to ensure even crispiness. You want them golden and crunchy for the best texture. When grilling zucchini, avoid overcooking. Slice your zucchini into ½-inch rounds for even cooking. Toss them with olive oil, lemon juice, and seasoning before grilling. Grill each side for about 4-5 minutes. Look for those lovely grill marks and a tender but crisp bite. To check for doneness, poke a slice with a fork. It should feel soft but not mushy. To make your dish shine, arrange the grilled zucchini on a platter in a circular pattern. Scatter the crispy chickpeas over them for a colorful look. Just before serving, drizzle a little lemon juice on top. This adds brightness and makes the dish more inviting. A sprinkle of fresh parsley adds a nice touch too! For the full recipe, check out the [Full Recipe]. {{image_4}} You can change the spices to give your dish a new twist. Try adding chili powder for heat or Italian herbs for an aromatic touch. For vegetable swaps, bell peppers or eggplant work well, adding a different texture and flavor. If you're looking for a bit of sweetness, consider roasting carrots alongside your zucchini. If grilling isn't an option, you can roast the zucchini in the oven. Set it to 400°F (200°C) and roast for about 15-20 minutes until tender. You can also cook the zucchini on the stovetop in a skillet over medium heat. Just be sure to oil the pan. For a vegan option, skip the chickpeas or use a different protein like tofu. To enhance your dish, consider pairing it with a yogurt sauce or tahini dressing. These add creaminess and flavor. You could also serve the zucchini and chickpeas with quinoa or rice for a hearty meal. For meal prep, store the zucchini and chickpeas in separate containers. This keeps everything fresh and prevents sogginess. For the full recipe, check the detailed instructions provided earlier. To keep your leftover Lemony Grilled Zucchini with Crispy Chickpeas fresh, follow these tips: - Place the zucchini and chickpeas in separate airtight containers. This prevents sogginess. - Store them in the fridge right away. They stay good for about 3 days. You can freeze the chickpeas but not the zucchini. - For chickpeas, spread them on a baking sheet and freeze until firm. Then, transfer to a freezer bag. - Zucchini does not freeze well. It becomes mushy when thawed. When you want to use frozen chickpeas: - Thaw them overnight in the fridge. - To reheat, you can bake or pan-fry them until warm and crispy. Reheating your dish correctly keeps the flavors and texture intact. - Use an oven for best results. Preheat to 350°F (175°C) and heat for about 10 minutes. - You can use a microwave if in a hurry. Heat in short bursts to avoid sogginess. - For crispy chickpeas, consider a quick pan-fry after reheating to regain crunch. This way, you maintain the tasty experience of the Lemony Grilled Zucchini with Crispy Chickpeas. Yes, you can! If you don't have a grill, use a grill pan or an oven. A grill pan gives you those great marks. Preheat it over medium heat, then add the zucchini. For the oven method, lay zucchini slices on a baking sheet and broil them for about 5-7 minutes. Flip halfway for even cooking. You’ll still get tender, tasty zucchini! To make chickpeas crispy, start by drying them well. Pat them with a paper towel after rinsing. The less moisture, the better! Toss them in oil and seasonings. Spread them in a single layer on a baking sheet. Roast at 400°F (200°C) for 20-25 minutes. Shake the pan halfway through to ensure they crisp up evenly. If you need a substitute for zucchini, try yellow squash or eggplant. Both will grill well and taste great. You can also use bell peppers for a crunchy option. Each brings a different flavor and texture, so feel free to experiment! Yes, this dish is gluten-free! All the ingredients in Lemony Grilled Zucchini with Crispy Chickpeas are safe for those avoiding gluten. Just double-check any store-bought items, like spices, to be sure they are labeled gluten-free. This dish lasts about 3-4 days in the fridge. Store the zucchini and chickpeas in an airtight container. To keep them fresh, eat them within that time. Reheat gently to keep the chickpeas crispy. Enjoy every bite! This article has covered the essential ingredients and steps for grilling zucchini and chickpeas. We explored fresh flavors, seasonings, and helpful tips to ensure delicious results. Remember, you can adjust the ingredients and methods to suit your taste. Try different spices or cooking techniques for fun variations. With proper storage, leftovers stay fresh longer. Enjoy this healthy dish, and don’t hesitate to experiment! Your kitchen creations can be simple and tasty. Happy grilling!

Lemony Grilled Zucchini with Crispy Chickpeas Delight

Get ready to brighten your meal with Lemony Grilled Zucchini with Crispy Chickpeas Delight! This dish blends smoky zucchini and

Older posts
Newer posts
← Previous Page1 … Page28 Page29 Page30 … Page91 Next →

dsad

© 2025 recipesstation • Built with GeneratePress

Our Policies

  • Copyright Policy
  • Cookie Policy
  • GDPR Policy
  • Privacy Policy
  • Disclaimer
  • Terms Of Use

More Information

  • Home
  • About
  • Contact
  • Appetizers
  • Dessert
  • Dinner
  • Drinks
©2025, recipesstation About Back To Top