Skip to content
DisclaimerTerms Of UseGDPR PolicyCookie Policy

recipesstation

  • Home
  • Drinks
  • Appetizers
  • Dinner
  • Dessert
  • About
  • Contact
  • Privacy Policy
DisclaimerTerms Of UseGDPR PolicyCookie Policy

Emily

When making Watermelon Feta Salad, you need fresh, vibrant ingredients. Each one adds a unique touch. Here’s what you will need: - Watermelon (4 cups, cut into cubes) - Feta cheese (1 cup, crumbled) - Fresh mint leaves (1 cup, chopped) - Red onion (1/4 cup, thinly sliced) - Olive oil (2 tablespoons) - Balsamic glaze (1 tablespoon) - Salt and pepper (to taste) - Optional garnish: Pomegranate seeds (1/4 cup) This mix of flavors truly makes the salad special. The sweet watermelon complements the salty feta. Fresh mint adds a burst of flavor. Red onion gives it a nice crunch. Olive oil and balsamic glaze tie it all together. You can even add pomegranate seeds for a pop of color and taste. If you want to see the complete recipe, check out the Full Recipe. You can use this list to gather your ingredients and get started on this tasty dish! Start by cutting your watermelon into bite-sized cubes. Aim for uniform pieces so they mix well. Once cut, transfer the cubes to a large mixing bowl. This big bowl gives you room to toss everything later without spills. Next, add the thinly sliced red onion and roughly chopped fresh mint to the watermelon. These ingredients add bright flavors and a nice crunch. Then, gently sprinkle the crumbled feta cheese on top. This cheese brings a creamy touch that balances the sweetness of the watermelon. Now it’s time to dress the salad. Drizzle the olive oil and balsamic glaze over the top. This adds richness and ties all the flavors together. Season the mix with salt and freshly cracked black pepper to taste. Using a large spoon, carefully toss everything together. Be gentle to avoid crushing those delicious feta chunks. For the full recipe, check out the details above. Enjoy your fresh and tasty creation! - Serve the salad in a large, shallow bowl. This makes it look bright and fun. - Drizzle a little extra balsamic glaze on top just before serving. It adds a nice touch. - Garnish with fresh mint leaves for a burst of color and flavor. - Let the salad rest for 10-15 minutes. This helps the flavors mix well. - You can add lemon zest for a fresh kick. It brightens the taste a lot. - Pair the salad with grilled meats or seafood. It balances the rich flavors perfectly. - Serve it as a refreshing side dish at gatherings. Everyone loves a cool salad! For the complete recipe, see the [Full Recipe]. {{image_4}} You can change your salad by adding new ingredients. - Adding avocado for creaminess: This gives a smooth texture. The rich flavor works well with the salty feta. - Mixing in arugula for peppery flavor: Arugula adds a nice bite. It pairs well with the sweet watermelon. - Incorporating cucumber for crunch: Cucumber brings a fresh crunch. This keeps the salad light and refreshing. These simple swaps can make your salad unique and tasty. You can also switch up the flavors with different cheeses or dressings. - Using different cheese types, such as goat cheese: Goat cheese has a tangy taste. It adds a new twist to the salad. - Experimenting with various dressings: Try honey mustard or yogurt dressing for a different flavor. These dressings can enhance the taste of the watermelon and feta. Feel free to mix and match to find your favorite flavor. Adding local flavors can bring a fun twist to your salad. - Adding jalapeños for a spicy kick: This adds heat and a bold flavor. It contrasts nicely with the sweet watermelon. - Introducing Asian flavors with sesame oil: Sesame oil gives a nutty taste. It can bring a new depth to your dish. These regional twists can turn your salad into a fresh global treat! To keep your watermelon feta salad fresh, store it in an airtight container. Place it in the fridge right after you prepare it. This way, the salad stays crisp and tasty. For the best taste, eat it within 1-2 days. After this time, the watermelon may lose its texture and the flavors might fade. You can freeze watermelon, but it will change the texture. Freezing makes it mushy when thawed, which isn’t good for salads. Instead, prepare salad components like the feta and mint in advance. Keep these items separate until you are ready to serve. This helps maintain the best taste and texture. If your salad ingredients start to wilt, try giving them a cold water soak for a few minutes. This will help revive them. Always dress the salad just before serving. This keeps everything fresh and bright. For the full recipe, check out the detailed steps. Yes, you can prep some parts ahead. Cut the watermelon and store it in the fridge. You can mix the mint and onion, but wait to add the feta and dressing. They taste best fresh. Aim to serve the salad within a few hours for the best flavors. If you can't find feta, try goat cheese or ricotta. For dairy-free options, use almond cheese or cashew cheese. These alternatives still give a creamy texture and add flavor. Just make sure they are crumbled or spreadable to blend well in the salad. Yes! Instead of olive oil and balsamic glaze, try using a splash of lemon juice. You can also mix vinegar with a touch of honey for a sweet zing. These options keep the salad light while still adding a nice taste. To make a vegan version, skip the feta and use a dairy-free cheese. You can also add extra nuts or seeds for a creamy feel. Try using a simple dressing of olive oil, lemon juice, and herbs. This keeps the salad fresh and flavorful while being fully plant-based. In this post, I shared a simple and tasty Watermelon Feta Salad recipe. You learned about key ingredients, step-by-step prep, and serving tips. Remember to try variations and keep the salad fresh for best flavor. With these easy steps, you can enjoy a refreshing dish at any gathering. Experiment with flavors and enjoy the process. Making this salad is quick and fun!

Watermelon Feta Salad Fresh and Flavorful Delight

Craving a refreshing dish that’s both easy to make and full of flavor? Look no further than the Watermelon Feta

- Ripe peaches (2, thinly sliced) - Watermelon (3 cups, cubed) - Crumbled feta cheese (½ cup) - Fresh mint leaves (¼ cup, chopped) - Honey (1 tablespoon) - Fresh lime juice (2 tablespoons) - Salt and pepper to taste - Optional: Toasted pumpkin seeds (1 tablespoon) The key to a great Peach Watermelon Salad lies in its fresh fruits. You need ripe peaches and sweet watermelon. Choose peaches that smell sweet and feel soft to the touch. This ensures they are juicy and flavorful. For the watermelon, select a firm, heavy one. It should sound hollow when tapped. Next, crumbled feta cheese adds a creamy, salty touch. This cheese pairs well with sweet fruits. Fresh mint leaves bring a burst of freshness. Chop them finely for better flavor release. For the dressing, combine honey and fresh lime juice. This mix adds sweetness and tang. Adjust salt and pepper to your taste. If you want more crunch, add toasted pumpkin seeds. They give a nice texture contrast. For the full details and preparation, check the Full Recipe. - Combine sliced peaches and watermelon in a mixing bowl. - Gently stir to avoid mashing the fruit. First, slice the peaches and chop the watermelon into small pieces. Use a sharp knife for clean cuts. Fresh, ripe fruits make this salad pop with flavor. You want the sweetness of the peaches to blend well with the juicy watermelon. - Add crumbled feta cheese to the fruit mixture. - Ensure even distribution of cheese without mashing. Feta cheese adds a creamy contrast to the sweet fruits. Sprinkle it over the fruit mixture evenly. Use your fingers or a fork to break the cheese into small pieces. This way, every bite will have that lovely, salty flavor. - Whisk together honey and lime juice in a separate bowl. - Drizzle the dressing over the fruit and cheese mixture. In a small bowl, combine one tablespoon of honey with two tablespoons of lime juice. Mix well until smooth. The honey adds sweetness, while the lime gives a refreshing kick. Pour this dressing over the salad slowly, so all parts get coated. - Toss the salad gently to coat with dressing. - Season with salt and freshly cracked pepper. - Fold in mint leaves and top with pumpkin seeds. Now, use a spatula to toss the salad carefully. You want to mix everything without breaking the fruit. Adding salt and pepper enhances the flavors. Finally, fold in the mint leaves for a fresh taste. If you want some crunch, sprinkle toasted pumpkin seeds on top. This adds a nice texture to the salad. For the best flavor, let the salad chill in the fridge for about 15 minutes. This helps the flavors blend beautifully. Enjoy your Peach Watermelon Salad fresh and flavorful! For the complete recipe, check out the Full Recipe section. - Look for peaches with a fragrant aroma and a slight give when pressed. - Select watermelons that are heavy for their size and have a uniform shape. To pick the best peach, smell it first. A sweet scent means it's ripe and ready. Then, gently squeeze it. If it has a little give, it’s just right. For watermelon, check its weight. A heavy watermelon feels firm and should sound hollow when tapped. - Serve in a large bowl or individual cups. - Garnish with fresh mint and extra pumpkin seeds for visual appeal. You can make your salad shine with simple tricks. For a big gathering, a large bowl works well. For a more personal touch, use small individual cups. Add a sprig of mint on top. This adds color and fresh flavor. A sprinkle of pumpkin seeds gives a nice crunch and looks pretty. - Consider adding a splash of balsamic vinegar for extra depth. - Add sliced avocados for creaminess. Want to take your salad to the next level? A splash of balsamic vinegar adds a sweet and tangy kick. If you love creamy textures, sliced avocados fit perfectly in this dish. They add rich flavor and blend well with the fruits. For more ideas, check out the Full Recipe for extra tips! {{image_4}} Adding a twist to your Peach Watermelon Salad can make it even more exciting. Here are some fun ideas to try. - Consider adding blueberries or strawberries for added freshness. - Include a handful of arugula for a peppery twist. These fruits bring a burst of color and flavor. Blueberries add a sweet bite, while strawberries enhance the mix with their juicy texture. If you like greens, arugula gives a nice peppery kick that contrasts well with the sweetness of the peaches and watermelon. - Substitute honey with agave syrup for vegan options. - Try using orange juice instead of lime for a different flavor profile. If you want a vegan option, agave syrup works great in place of honey. It has a similar sweetness but is plant-based. For a refreshing twist, orange juice replaces lime juice. This adds a bright, citrusy note that pairs beautifully with the fruits. - Mix in chia seeds or flaxseeds for added fiber. - Add grilled chicken or shrimp for protein enhancement. Chia seeds or flaxseeds give your salad a fiber boost. They are small but pack a punch in nutrition. If you wish to add protein, grilled chicken or shrimp turns this salad into a hearty meal. Both options add a nice texture that balances the fruits' softness. These variations allow you to customize your salad based on your taste and dietary needs. For the full recipe, check out the details above. Store any leftovers in an airtight container in the refrigerator. This keeps the salad fresh. Best consumed within 1-2 days for optimal freshness. After that, the fruit may lose its texture. Freezing is not recommended due to texture changes in the fruits. If you must freeze, consider freezing the dressing separately. This helps maintain the salad's taste and quality. You can remix leftover salad with greens for a new dish. This adds a different look and taste. Another fun idea is to serve it as a topping for grilled meats or fish. It gives a fresh twist to your meal. It's best to use fresh peaches for texture and flavor, but if using canned, drain well. Fresh peaches bring juicy sweetness and a nice crunch. Canned peaches may be softer and less flavorful, altering the salad's taste. If you must use canned, select those without added sugar for a better balance. Choose a firmer variety and avoid overmixing once combined with other ingredients. Select watermelons that feel heavy for their size. A good watermelon has a hollow sound when tapped. Gentle mixing helps maintain fruit shape and texture, keeping your salad fresh and appealing. Try goat cheese or a dairy-free alternative for similar creaminess. Goat cheese has a tangy flavor that pairs well with fruits. If you prefer dairy-free, look for plant-based cheeses that mimic feta's texture. These options keep the salad creamy without losing flavor. Replace feta with a plant-based cheese or omit it entirely and add a sprinkle of nutritional yeast for flavor. Nutritional yeast adds a cheesy taste without dairy. You can also include avocado for creaminess and healthy fats. This way, you keep every bite delicious and satisfying. This blog post highlighted a fresh fruit salad that’s simple to make. You learned how to combine ripe peaches and watermelon with feta cheese and fresh mint. We covered an easy dressing with honey and lime juice to add flavor. You also discovered tips for selecting the best fruits and enhancing the dish. In conclusion, this salad brings summer flavors to any table. It's versatile, healthy, and always a crowd-pleaser. Enjoy experimenting with different fruits and dressings to make it your own. Your taste buds will thank you!

Peach Watermelon Salad Fresh and Flavorful Delight

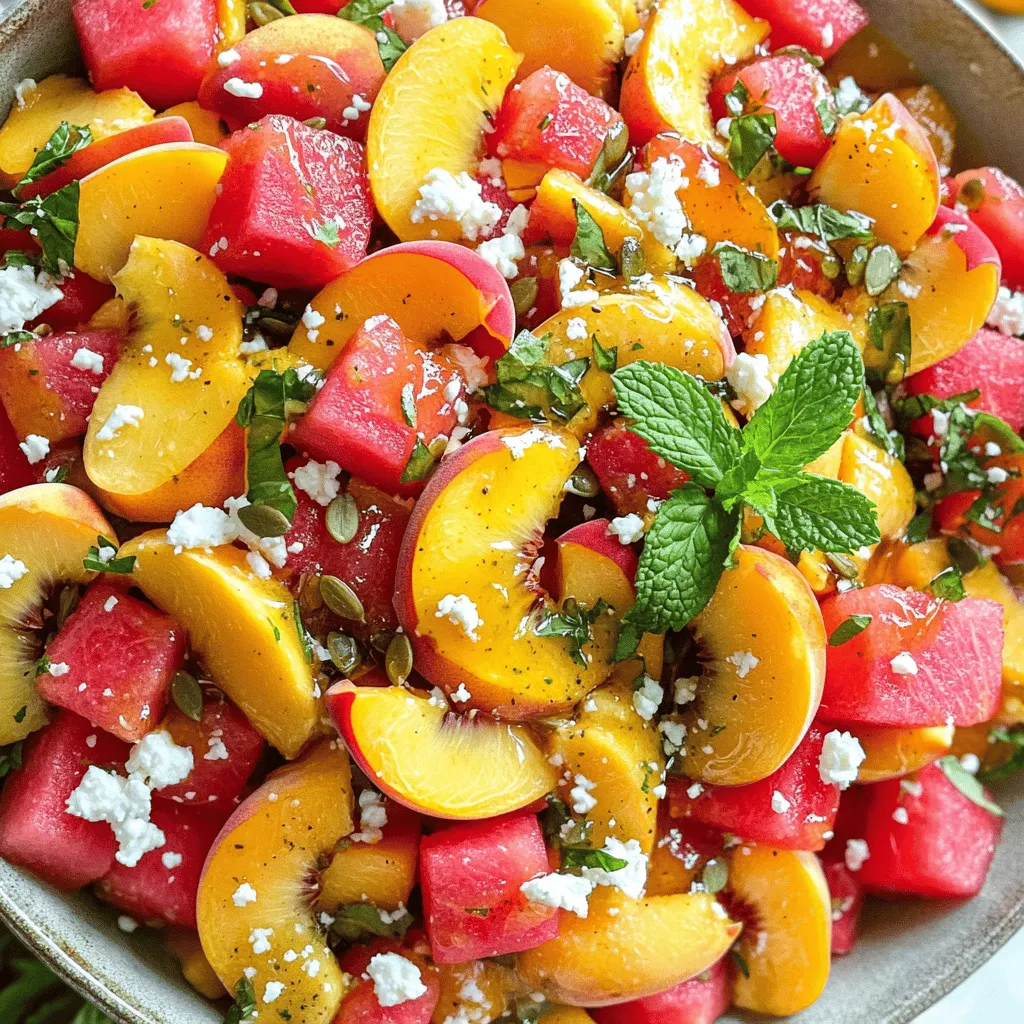
Ready to beat the heat? This Peach Watermelon Salad is your perfect summer dish! It’s bursting with juicy peaches and

- 1 cup cooked chicken breast, shredded - 1 cup green cabbage, finely shredded - 1 cup carrots, cut into thin matchsticks (julienned) - 1/2 cup fresh bean sprouts - 2 green onions, finely sliced - 1 tablespoon low-sodium soy sauce - 1 tablespoon toasted sesame oil - 1 teaspoon fresh ginger, grated - 1 teaspoon garlic, minced - 12 rice paper wrappers - Vegetable oil (for frying) - Salt and freshly ground black pepper (to taste) Getting the right ingredients is key to making great chicken spring rolls. I always start with fresh veggies. They add crunch and color. Shredded chicken makes the filling hearty. The bean sprouts give a nice, fresh taste. For the seasonings, I love the depth of flavor soy sauce provides. Toasted sesame oil adds a nutty touch that makes the rolls special. Fresh ginger and minced garlic boost the flavor, making every bite pop. Finally, rice paper wrappers are essential. They turn crispy when fried. This gives the rolls their delightful crunch. You can find these wrappers in most stores. You can follow the full recipe for detailed steps on how to prepare these tasty treats. Enjoy the process of creating your own chicken spring rolls! To start, I combine the cooked chicken with fresh vegetables. I use: - 1 cup cooked chicken breast, shredded - 1 cup green cabbage, finely shredded - 1 cup carrots, cut into thin matchsticks - 1/2 cup fresh bean sprouts - 2 green onions, finely sliced In a large bowl, I mix these ingredients well. Next, I add seasonings for flavor: - 1 tablespoon low-sodium soy sauce - 1 tablespoon toasted sesame oil - 1 teaspoon fresh ginger, grated - 1 teaspoon garlic, minced - Salt and freshly ground black pepper to taste I ensure everything blends together. This mix creates a tasty filling. Now, I prepare to roll the spring rolls. I fill a shallow dish with warm water. I dip one rice paper wrapper into the water for about 10-15 seconds. It should feel soft. I lift it out carefully and lay it flat on my workspace. Then, I spoon about 2 tablespoons of the chicken filling into the center. I fold the left and right edges over the filling. Next, I roll the wrapper tightly from the bottom. I make sure to roll it securely without tearing. I repeat this for all wrappers and filling. In a deep skillet, I heat vegetable oil to 350°F (180°C). I watch for it to shimmer. Then, I add a few spring rolls at a time. I avoid overcrowding the pan. I fry them for about 3-4 minutes until they turn golden brown. Once cooked, I transfer the spring rolls to a plate lined with paper towels. This helps drain any extra oil. For the full recipe, you can check the complete guide on making these delicious chicken spring rolls. To make chicken spring rolls, the rolling technique is key. Start by softening the rice paper wrappers in warm water. Soak each wrapper for about 10-15 seconds. This step makes them pliable. Be careful not to soak them too long; otherwise, they tear easily. Distribute the filling evenly in the center. Use about two tablespoons of your chicken and veggie mix. Fold the sides in, then roll tightly from the bottom. This method keeps the filling secure. Practice makes perfect, so don’t worry if your first roll isn’t flawless! Crispy spring rolls need the right oil temperature. Heat vegetable oil to about 350°F (180°C). This temperature helps achieve a golden brown color. If the oil is too cool, your rolls will absorb too much oil. Avoid overcrowding the pan. Cook a few rolls at a time. This allows them to fry evenly. If you add too many, they might steam instead of fry. Cook for 3-4 minutes until they are perfectly crispy. Serve your chicken spring rolls with tasty dipping sauces. Sweet chili sauce and soy sauce are popular choices. You can also make a peanut dipping sauce for added flavor. For a beautiful presentation, garnish with fresh herbs like cilantro or mint. A sprinkle of sesame seeds adds a nice touch too. Serve these rolls warm for the best taste. Enjoy every crunchy bite! For the full recipe, check out the Crispy Chicken Spring Rolls recipe. {{image_4}} You can switch up the protein in your spring rolls. Shrimp adds a sweet taste. Tofu gives a hearty, plant-based option. Pork adds a savory twist too. Each choice offers a unique flavor and texture. For those who prefer no meat, try using mushrooms or extra veggies. You can use sliced bell peppers or zucchini. These options keep your spring rolls fresh and fun. You can mix and match to find what you love best. Herbs can take your spring rolls to the next level. Fresh cilantro or basil adds brightness. You can chop them finely and mix them into the filling. They bring a burst of flavor that pairs well with chicken. Don’t shy away from spices either. A pinch of red pepper flakes can add heat. You might try adding ground coriander or cumin for depth. These small changes can really change the taste. Each bite can feel like a new experience. Dipping sauces make your spring rolls even better. A simple sweet chili sauce works wonders. You can also mix soy sauce with a bit of honey for a sweet-savory dip. If you like a kick, try mixing sriracha with mayonnaise. This creamy sauce complements the crunch of the rolls. You can also explore store-bought options like hoisin or peanut sauce. They add rich flavors, making each bite exciting. For more ideas, check the Full Recipe for tasty sauce options. To keep your fried spring rolls fresh, let them cool first. Place them in an airtight container. Line the bottom with paper towels to absorb moisture. This helps maintain crunchiness. Store the container in the fridge. They will stay good for up to three days. When you want to heat them, use the oven. Preheat it to 375°F (190°C). Place the rolls on a baking sheet. Heat them for about 10 to 15 minutes. This method keeps them crispy. You can freeze spring rolls before frying. First, prepare the filling and roll the wrappers. Then, place them on a baking sheet in a single layer. Make sure they do not touch. Freeze them for about 1 to 2 hours. Once frozen, transfer them to a freezer bag. Remove as much air as possible. They will last up to three months in the freezer. To reheat, fry them straight from the freezer. Heat oil to 350°F (180°C) and fry for 5 to 7 minutes until golden. Spring rolls last about three days in the fridge. If you notice any sogginess or off smells, it’s time to toss them. Check for discoloration too. If they look dull or dry, they may no longer be safe to eat. Always trust your senses when it comes to food safety. You should use cooked chicken breast for chicken spring rolls. It shreds easily and keeps the rolls light. You can also use rotisserie chicken for a quick option. If you want more flavor, try poaching the chicken with herbs and spices. For cooking, grilling or baking chicken works well. Just make sure it’s fully cooked and tender. Yes, you can prepare chicken spring rolls in advance. Roll them up and place them on a tray. Cover them with a damp cloth to keep them moist. This helps prevent the rice paper from drying out. You can store them in the fridge for a few hours before frying. Just be sure to fry them fresh for the best crunch. To make chicken spring rolls gluten-free, use gluten-free soy sauce. Coconut aminos is a great substitute. For wrappers, look for rice paper that is labeled gluten-free. Most rice paper is naturally gluten-free, but always check the package. This way, everyone can enjoy these tasty treats without worry. You can find the full recipe for chicken spring rolls by clicking [here](#). This recipe will guide you step-by-step to make the most delicious, crispy chicken spring rolls at home. In this blog post, we covered how to make delicious chicken spring rolls. We explored the main ingredients, seasonings, and step-by-step instructions. You learned tips for rolling, cooking, and serving your rolls. We also discussed variations, storage, and answered common questions. To wrap up, making chicken spring rolls is simple and fun. You can get creative with flavors and fillings. Enjoy this tasty dish with friends and family!

Chicken Spring Rolls Crunchy and Tasty Treat

If you’re craving a snack that’s both crunchy and tasty, chicken spring rolls are the answer! In this article, I’ll

To make a delicious Strawberry Kiwi Pavlova, you will need the following items: - 4 large egg whites - 1 cup granulated sugar - 1 teaspoon white vinegar - 1 teaspoon cornstarch - 1 cup heavy whipping cream - 2 tablespoons powdered sugar - 1 teaspoon vanilla extract - 1 cup strawberries, hulled and sliced - 2 kiwis, peeled and sliced - Fresh mint leaves for garnish (optional) Each ingredient plays a key role in the final dish. The egg whites create a light and airy base, while the sugar helps to stabilize the meringue. Vinegar adds a hint of tang, and cornstarch gives structure. The heavy cream, whipped to perfection, offers a rich and creamy layer. Fresh strawberries and kiwis add vibrant colors and sweet-tart flavors. As you gather these ingredients, think about how you can personalize this recipe. Maybe you want to add a splash of orange zest or try a different fruit. The options are endless! For the complete cooking process, check out the Full Recipe. - Preheat your oven to 275°F (135°C). - Line a baking sheet with parchment paper. - Lightly trace a 9-inch circle in the center. This circle helps shape your meringue. - In a large bowl, beat the egg whites with an electric mixer. - Start on medium speed until soft peaks form, about 2-3 minutes. - Gradually add the granulated sugar, one tablespoon at a time. - Keep beating until you see stiff peaks and a glossy finish, around 5-7 minutes. - Carefully fold in the white vinegar and cornstarch with a spatula. - Make sure to keep the volume by folding, not stirring. - Spoon the meringue onto the prepared parchment paper. - Use the drawn circle as a guide to shape a round, shallow nest. - Create slightly raised edges for a beautiful look. - Place the meringue in the preheated oven and bake for 1 hour. - After baking, turn off the oven and let the pavlova cool inside. - Leave the oven door slightly ajar to allow heat to escape slowly. This method creates a crisp outer layer and a soft inside. You will soon have a stunning pavlova ready for toppings! For the full recipe, check the provided details. To make the best meringue, start with room temperature egg whites. Cold egg whites do not whip well. Let them sit at room temp for about 30 minutes. This small step helps in getting that perfect volume. Avoid moisture in the egg whites by using clean bowls and tools. Even a tiny bit of fat or water can ruin your meringue. Make sure everything is dry and clean before you begin. Whipping cream can be tricky. Use heavy cream and chill your mixing bowl for best results. Beat the cream slowly at first, then increase to medium-high speed. Stop when you see soft peaks. If you beat it too much, you will get butter! Flavor your whipped cream for extra taste. You can add vanilla extract, cocoa powder, or even some fresh fruit puree. This adds a fun twist to your pavlova. Your pavlova deserves an eye-catching display. Serve it on a decorative cake stand to impress your guests. Slice it at the table for a dramatic reveal of that crunchy meringue and fluffy cream. For garnishes, fresh mint leaves add color and a nice touch. You can also sprinkle some powdered sugar over the top for a snowy effect. Creative presentation makes your pavlova even more delightful. For a complete guide, refer to the [Full Recipe]. {{image_4}} You can switch up the fruit on your pavlova to match the season or your taste. Here are some great ideas: - Peaches: Sweet and juicy, they add a lovely flavor. - Mango: This gives a tropical twist to the dish. - Blueberries: Their burst of flavor pairs well with cream. - Raspberries: They add a tart contrast to the sweet meringue. Using seasonal fruits can enhance the taste and make your pavlova even more special. In summer, go for berries. In winter, try citrus like oranges or pomegranates. Think about adding zest to your meringue. A little lemon or lime zest can brighten the taste. You can also try extracts like almond or orange for a fun twist. For the whipped cream, you can be creative. Mix in cocoa powder for a chocolate flavor. Or add instant coffee for a coffee-flavored cream. These options can change the whole vibe of your dessert! Making this pavlova gluten-free is simple. The main ingredients are already gluten-free. Just ensure your sugar and cornstarch are free from cross-contamination. If you want a dairy-free version, swap the heavy cream for coconut cream. Chill a can of coconut milk overnight, then scoop out the solid part. It whips up nicely and adds a tropical taste. For a healthier pavlova, try using natural sweeteners like honey or agave. Adjust the amounts since they can be sweeter than sugar. These swaps let you enjoy this treat while sticking to your dietary needs. For the full recipe, check the section above. To keep your pavlova fresh, store the meringue and cream separately. This way, the meringue stays crunchy, and the cream remains fluffy. Place the meringue in an airtight container at room temperature. It can last up to two days this way. For the cream, keep it in the fridge in a covered bowl. Use the cream within 24 hours for best taste. Can pavlova be frozen? Yes, but it's not the best option. Freezing can change the texture of the meringue. If you must freeze it, follow these steps: 1. Prepare the Meringue: Let it cool completely. Wrap it in plastic wrap tightly. 2. Store in a Container: Place the wrapped meringue in a freezer-safe bag or container. 3. Thawing: To thaw, take it out and let it sit at room temperature for a few hours. Avoid using a microwave, as it can make it soggy. While freezing is possible, enjoy your pavlova fresh for the best experience! For the full recipe, check out the Strawberry Kiwi Pavlova Delight. Pavlova is a light dessert made from meringue. It has a crispy outer shell and a soft, chewy inside. The dessert is named after the Russian ballerina Anna Pavlova. It is popular in Australia and New Zealand. There, it is often served at parties and special events. The meringue symbolizes celebration, bringing a touch of elegance. Yes, you can make pavlova ahead of time. Bake the meringue a day before your event. Let it cool in the oven overnight. This helps prevent cracks. You can whip the cream and prepare the fruit just before serving. This way, your pavlova stays fresh and tasty. Cracks in meringue can happen for many reasons. Here are some tips to help you: - Don't overmix: Once you reach stiff peaks, stop mixing. - Bake at low heat: A low oven temperature helps the meringue dry without burning. - Don’t open the oven: Opening the door can cause temperature drops, leading to cracks. Serving your pavlova is easy and fun. Here are some tips: - Use a cake stand: This adds height and elegance to your dessert. - Layer the cream: Spread whipped cream evenly on top of the meringue. - Add fruit beautifully: Arrange strawberries and kiwis in a colorful pattern. - Garnish: Fresh mint leaves can add a nice touch. For the full recipe, check the Full Recipe section. Enjoy your delicious Strawberry Kiwi Pavlova! Making a perfect Strawberry Kiwi Pavlova takes skill and care. You learned about key ingredients and followed helpful step-by-step instructions. With tips for perfecting your meringue and whipping cream, you can elevate your dish. Variations help you customize the pavlova to your taste and dietary needs. Proper storage ensures your leftovers remain fresh. Enjoy making this delightful dessert, impressing your friends and family with each bite. Remember, practice makes perfect. Now, it's time for you to create your own delicious pavlova!

Strawberry Kiwi Pavlova Delightful and Easy Recipe

Are you ready to impress your friends with a stunning dessert? This Strawberry Kiwi Pavlova is not only easy to

- Ripe mangoes - Creamy coconut milk - Honey or maple syrup (optional) - Fresh lime juice - Sea salt To make mango popsicles, start with ripe mangoes. The best mangoes are sweet and juicy. Choose fruit that feels soft when gently squeezed. You will need two mangoes for this recipe. Next, grab a cup of creamy coconut milk. This adds a rich flavor. If you want some sweetness, add a tablespoon of honey or maple syrup. This step is optional. Fresh lime juice brightens the taste. One tablespoon is enough for a nice zing. Lastly, a pinch of sea salt enhances all the flavors. - Sliced fresh mango - Assorted fresh berries For a fun touch, you can add garnishes. Sliced fresh mango on top gives a nice look. Assorted fresh berries add color and flavor. These garnishes make your popsicles even more exciting! Now that you know the ingredients, you’re ready to make mango popsicles. Check out the Full Recipe for all the steps. Enjoy! To make mango popsicles, start with ripe mangoes. Look for mangoes that are soft to touch. Peel the mangoes and dice them into small pieces. This helps the blending process. For blending, add the diced mangoes to a high-speed blender. Then, pour in one cup of creamy coconut milk. If you like your popsicles sweet, add one tablespoon of honey or maple syrup. Next, squeeze in one tablespoon of fresh lime juice. Finally, add a pinch of fine sea salt to balance the flavors. Blend the mixture until it is smooth and creamy. If needed, pause to scrape down the edges of the blender. Now, it’s time to pour the mixture into popsicle molds. Fill each mold about three-quarters full. This allows room for the popsicles to expand as they freeze. For a fun twist, add fresh mango slices or berries into the molds before filling them. Once filled, insert popsicle sticks into the molds. Make sure they are centered. Place the molds upright in your freezer. Let the popsicles freeze for at least six hours. They need to be frozen solid before you can enjoy them. When your popsicles are ready, it’s time to remove them. Run warm water over the outside of the molds for a few seconds. This will help loosen the popsicles. Then, gently tug on the sticks to release the popsicles. They should come out easily. For the full recipe, check the details above. Enjoy your refreshing mango popsicles! To make tasty mango popsicles, adjust sweetness to your liking. You can start with a tablespoon of honey or maple syrup. Blend, then taste. If you want it sweeter, add more. This simple step makes a big difference! Next, achieving the right creamy texture is key. Use ripe mangoes and creamy coconut milk. Blend until smooth. You want a thick but pourable mix. The creamy base helps your popsicles feel rich and flavorful. Get creative when presenting your mango popsicles! Try arranging them on a colorful plate. Add fresh mint leaves for a pop of color. You can also serve them in fun cups. This makes for a great treat at summer parties. Pair your popsicles with other summer delights. A scoop of sorbet or a slice of cake works well. You can even serve them with fresh fruit. This adds taste and makes your dessert table look great! For perfect mango popsicles, use a good blender. A high-speed blender works best. It ensures a smooth and creamy mixture. If you don’t have one, a food processor can work too, but it may take longer. Next, choose the right popsicle molds. Silicone molds are easy to use. They allow for quick release of your popsicles. Look for molds with fun shapes to make your treats more exciting! For the full recipe, check out the Mango Bliss Popsicles recipe. {{image_4}} You can make mango popsicles even better by adding other fruits. Try mixing in berries for a burst of flavor. Citrus fruits like oranges or lemons can add a zesty twist. You can also infuse your popsicles with herbs. Mint gives a cool taste, while basil adds a unique touch. These infusions make every bite exciting. If you want to change the flavor, use almond or oat milk. These options add a nutty taste that pairs well with mango. For a vegan sweetener, try agave syrup or coconut nectar. These choices keep your popsicles plant-based and delicious. Adding yogurt to your popsicle mix creates a creamy texture. You can swirl in your favorite yogurt or a yogurt alternative. It gives a nice contrast to the fruity mango. Also, consider adding pieces of fruit inside the popsicle. This adds a fun surprise and extra flavor with each bite. For the full recipe, check out the Mango Bliss Popsicles section. Enjoy your creative twists! To store mango popsicles right, use airtight containers or freezer bags. This keeps them fresh. Make sure to label each bag with the date. You can enjoy your popsicles for up to two months without losing taste. After that, the texture may change, and the flavor could fade. When you want to eat a popsicle, run warm water over the mold for a few seconds. This helps loosen the popsicle. You can also leave it at room temperature for a few minutes. If they have been in the freezer for a long time, add a splash of fresh lime juice. This gives them a bright flavor boost. How to make mango popsicles with or without added sugar? To make mango popsicles, blend ripe mangoes with coconut milk. You can add honey or maple syrup for sweetness if you like. If you want to skip the sugar, just blend the mangoes and coconut milk. The ripe fruit already has natural sweetness! Can I use frozen mango for this recipe? Yes, you can use frozen mango! It makes the popsicles extra cool and creamy. Just blend the frozen mango with coconut milk and other ingredients. No need to thaw; it works perfectly. What is the nutritional value of mango popsicles? Mango popsicles are low in calories and packed with vitamins. Mangoes are rich in vitamin C and A. Coconut milk adds healthy fats. If you add honey, it will increase the sugar content a bit. Overall, it’s a healthy treat! How long do homemade popsicles last in the freezer? Homemade popsicles can last up to three months in the freezer. Keep them in a sealed container or wrap them tightly. This helps prevent freezer burn and keeps them fresh. What are the benefits of making homemade mango popsicles? Making homemade mango popsicles allows you to control the ingredients. You can adjust the sweetness and use fresh fruit. Plus, it’s a fun activity for kids! You can also avoid preservatives found in store-bought options. Best brands and types of store-bought mango popsicles available? If you prefer store-bought, look for brands like Outshine or Goodpop. They offer options made with real fruit. Check the labels for fewer added sugars and natural ingredients. Mango popsicles are simple, fun, and refreshing. We covered the ingredients, like ripe mangoes and coconut milk, and how to blend them for the perfect texture. I shared tips for serving, various flavor options, and storage advice. You can create great popsicles for summer fun. With these ideas, making and enjoying mango popsicles will be a breeze. Dive into this sweet treat and experiment with your own yummy versions!

Mango Popsicles Refreshing Summer Treat for Everyone

Get ready to beat the heat with delicious mango popsicles! These frozen treats are simple to make and bursting with

Here are the ingredients you need for a fresh strawberry pie. Each one plays a key role in making this dessert delightful and full of flavor. - 2 cups fresh strawberries, hulled and halved - 1 cup granulated sugar - 1 tablespoon fresh lemon juice - 1 tablespoon cornstarch - 1 pre-made pie crust (store-bought or homemade) - 1/2 teaspoon vanilla extract - 1/4 teaspoon salt - Whipped cream for serving (optional) Using fresh strawberries makes the pie taste bright and sweet. The sugar helps balance the tartness of the berries. The lemon juice adds a zesty kick that brightens the flavor. Cornstarch thickens the filling, giving it a nice texture. Your choice of pie crust is important, as it holds everything together. Adding a splash of vanilla gives a warm flavor to the pie. A pinch of salt enhances all the tastes. For a complete guide, check out the Full Recipe. You can easily adjust the sweetness by adding more or less sugar based on your taste. Enjoy picking out your ingredients, as they set the stage for a delicious pie! Set your oven to 425°F (220°C). This step gets the oven ready for the pie. In a medium saucepan, combine: - 2 cups fresh strawberries, hulled and halved - 1 cup granulated sugar - 1 tablespoon fresh lemon juice - 1/4 teaspoon salt Stir gently and cook over medium heat. Let it cook for about 3-4 minutes. You want the strawberries to soften and juice up. In a small bowl, create a slurry. Mix: - 1 tablespoon cornstarch - 2 tablespoons of water Stir until smooth. Add this slurry to the saucepan. Keep stirring and cook for another 2-3 minutes until it thickens. Remove from heat and add 1/2 teaspoon vanilla extract. Pour the thickened strawberry filling into the pre-made pie crust. Spread it evenly for a nice look. Place the pie in your preheated oven. Bake for 15-20 minutes. Look for a golden brown crust and bubbling filling. Take the pie out of the oven. Let it cool for at least 1 hour. This helps the filling set well. Slice the pie into generous pieces. Top each slice with whipped cream if you like. Enjoy your sweet treat! For the complete recipe, check the Full Recipe. To make a great pie, you need the best strawberries. Look for firm, bright red strawberries with a natural shine. Avoid any that are dull or have dark spots. Fresh strawberries taste sweet and juicy, making your pie delicious. If possible, buy local strawberries in season for the best flavor. A flaky pie crust makes your pie special. If you use a store-bought crust, check the package for tips. If you want to make your crust, keep your butter cold. This helps create layers that flake nicely. Roll the dough evenly and avoid pressing too hard. A bit of practice will help you get it right. Cooling the pie is very important. After baking, let it cool for at least 1 hour. This helps the filling set properly. If you skip this step, the filling may spill out when you slice the pie. A well-cooled pie looks better and tastes great. Enjoy your fresh Strawberry Pie with this helpful cooling time! {{image_4}} You can add other berries to your pie. Raspberries, blueberries, and blackberries work well. They add different flavors and colors. Try mixing them with strawberries for a fun twist. Just keep the strawberry amount the same. This way, the pie stays balanced and fresh. For a creamy version, add a layer of cream under the strawberries. You can mix cream cheese with sugar and vanilla. Whip the cream until it's light and fluffy. Spread this mixture in the pie crust before adding the strawberries. The cream adds richness and makes each bite feel special. If you need a gluten-free pie crust, you have options! Almond flour or coconut flour can work well. You can also find ready-made gluten-free crusts in stores. Just make sure to check the label for gluten-free signs. This allows everyone to enjoy a slice of the pie without worry. For the full recipe, check the link above. To store leftover pie in the fridge, cover it with plastic wrap or foil. This keeps the pie fresh and prevents it from drying out. Place it in the fridge for up to three days. If you want to enjoy it longer, consider freezing. To freeze the pie, let it cool completely first. Wrap it tightly in plastic wrap, then foil. This prevents freezer burn and keeps the pie tasty. You can freeze it for up to three months. When ready to eat, thaw it overnight in the fridge. For reheating, the oven works best. Preheat it to 350°F (175°C). Place the pie on a baking sheet and cover loosely with foil. Heat for about 15-20 minutes. This method keeps the crust crisp and the filling warm. Enjoy your delicious pie like it’s fresh out of the oven! To balance sweetness in your strawberry pie, you can reduce the sugar. Use just 3/4 cup instead of a full cup. You can also add more lemon juice. This will bring out the strawberry flavor. Another tip is to mix in some unsweetened berries. This adds depth while cutting the sweetness. Yes, you can use frozen strawberries. They work well in a pie. However, be sure to thaw and drain them first. This prevents excess water in your pie filling. The flavor may vary slightly, but the result is still tasty. Just follow the same steps as the recipe with fresh strawberries from the [Full Recipe]. To keep your pie crust crisp, try these tips: - Pre-bake your crust for 10 minutes before adding filling. - Brush the crust with egg wash. This creates a barrier. - Use cornstarch in the filling. It helps thicken the juices. These steps will ensure your crust stays flaky and golden. Fresh strawberry pie pairs well with a few things: - A dollop of whipped cream adds creaminess. - Serve it with vanilla ice cream for a classic touch. - Fresh mint leaves give a pop of color and flavor. These sides enhance your pie and create a delightful meal. You now have a detailed guide to making a fresh strawberry pie. We covered the ingredients, step-by-step instructions, and helpful tips to ensure success. Remember, using fresh strawberries and letting the pie cool are key steps. Explore variations like mixed berry pies to keep things exciting. Store leftovers correctly for best taste. Enjoying this simple dessert can bring joy to any meal or gathering. Keep these tips in mind, and your strawberry pie will be a treat everyone loves. Happy baking!

Fresh Strawberry Pie Delightful and Simple Recipe

Do you crave a sweet, refreshing dessert? A Fresh Strawberry Pie is your answer! With juicy strawberries, a flaky crust,

- 1 cup all-purpose flour - 1 cup rolled oats - 1/2 cup brown sugar, packed - 1/2 teaspoon baking powder - 1/4 teaspoon salt - 1/2 cup unsalted butter, melted and slightly cooled - 1 cup fresh raspberries (or frozen, thawed and drained) - 2 tablespoons honey or maple syrup (to taste) - 1 tablespoon fresh lemon juice - 1 teaspoon pure vanilla extract - 1/2 teaspoon ground cinnamon (optional) To make Raspberry Crumble Bars, you need simple, fresh ingredients. The flour and oats create a hearty base. Brown sugar adds a rich sweetness. Baking powder helps the bars rise slightly. Salt balances the flavors. The melted butter binds everything together, making a crumbly texture. Fresh raspberries bring tartness and color. Honey or maple syrup sweetens the fruit mixture. Lemon juice brightens the overall flavor, while vanilla adds depth. If you want to switch things up, consider using gluten-free flour. For a vegan option, swap unsalted butter with a vegan butter alternative. You can also try different sweeteners, like agave syrup or sugar substitutes. This flexibility lets you customize the bars to suit your taste. For the full recipe, check out the details above. - Gluten-free flour options: Brown rice flour, almond flour, or a gluten-free blend. - Vegan butter alternatives: Coconut oil, olive oil, or vegan margarine. - Sweetener variations: Agave nectar, coconut sugar, or stevia. These substitutions help you enjoy Raspberry Crumble Bars no matter your diet. They keep the essence of the recipe while allowing for personal preferences. Start by preheating your oven to 350°F (175°C). This temperature helps the bars bake evenly. Next, prepare your 8x8 inch baking pan. You can grease it lightly or line it with parchment paper. Lining the pan makes it easy to lift out the bars later. In a medium bowl, combine these dry ingredients: - 1 cup all-purpose flour - 1 cup rolled oats - 1/2 cup brown sugar, packed - 1/2 teaspoon baking powder - 1/4 teaspoon salt Whisk them together until they mix well. Then, pour in 1/2 cup melted unsalted butter. Stir with a spatula or a fork until the mixture looks like coarse crumbs. Set aside about 1/2 cup of this crumb mixture for later. In another bowl, mix 1 cup of fresh raspberries with: - 2 tablespoons honey or maple syrup (adjust to taste) - 1 tablespoon fresh lemon juice - 1 teaspoon pure vanilla extract - 1/2 teaspoon ground cinnamon (optional) Gently fold the raspberries into this mixture. Be careful not to mash them too much, as you want some whole berries. Take the remaining crumb mixture and press it firmly into the bottom of your prepared pan. This creates a solid base. Then, spread the raspberry mixture over the crust evenly. Finally, scatter the reserved crumb mixture on top to form a nice topping. Bake your bars in the preheated oven for 30-35 minutes. You will know they are done when the top turns a rich golden brown and the filling bubbles slightly. Let the bars cool in the pan for at least 10 minutes before lifting them out using the parchment paper. Allow them to cool completely on a wire rack before slicing into squares. For the full recipe, click here! To get the right texture, do not overmix the crumb mixture. Mix until it looks like coarse crumbs. For a blend that is crumbly yet holds together, keep the butter cool. If the butter is too hot, it can melt the crumbs. Let the bars cool in the pan for at least 10 minutes after baking. This step helps form a firmer base. After that, lift them out using parchment paper. Allow them to cool completely on a wire rack. This makes slicing easier and helps keep the layers intact. To make your Raspberry Crumble Bars look pretty, place them on a nice plate. A light dusting of powdered sugar adds a sweet touch. You can also add fresh raspberries or mint leaves for color. Pair your bars with a warm cup of tea or coffee. The tartness of the raspberries goes well with these drinks. This makes a perfect afternoon snack or dessert. One common mistake is overmixing the batter. This can make the bars tough. Mix just until combined for the best texture. Another mistake is slicing the bars too soon. If you cut them while they are warm, they may fall apart. Always let them cool completely to ensure nice, clean cuts. {{image_4}} You can switch up the fruit in your Raspberry Crumble Bars. Try using blueberries or strawberries instead of raspberries. Each fruit adds a unique taste. Blueberries give a sweet burst, while strawberries offer a light tartness. You can also add nuts or chocolate chips. Walnuts and almonds give a nice crunch. If you love chocolate, sprinkle in some chocolate chips for a rich flavor. For a gluten-free version, use gluten-free flour. It works well and keeps the bars tasty. You can also make low-sugar options. Swap out honey or maple syrup for a sugar substitute. This way, you can enjoy the bars without too much sugar. Change your recipe based on what fruits are in season. Use fresh peaches in summer or apples in fall. You can also add holiday-themed spices, like nutmeg or ginger, during winter. This makes the bars festive and fun. Adjusting your recipe lets you enjoy Raspberry Crumble Bars year-round. Check out the Full Recipe to explore all these variations! To keep your Raspberry Crumble Bars fresh, store them in the fridge. This helps them stay moist and tasty. Place the bars in an airtight container. If you don't have one, wrap them tightly in plastic wrap. Make sure they are cool before sealing. This keeps moisture in but prevents them from getting mushy. If you want to save your bars for later, freezing is a great option. First, slice the bars into squares. Wrap each square in plastic wrap. Then, place them in a freezer bag or airtight container. Label the bag with the date. You can freeze them for up to three months. When you're ready to eat them, take out a bar and let it thaw in the fridge. This keeps the flavor strong. You can also set it on the counter for quicker thawing. Enjoy your bars at room temperature for the best taste! You can check if your Raspberry Crumble Bars are done by looking for a few signs. First, the top should turn a rich golden brown. Second, you should see the filling bubbling slightly. Lastly, if you gently press the top, it should feel firm, not soft. If you see these signs, your bars are ready! Yes, you can use frozen raspberries! Just make sure to thaw and drain them first. This helps reduce extra moisture. You may want to add a bit more honey or maple syrup. This extra sweetness balances the tartness of frozen berries. Keep an eye on baking time, as frozen berries can add moisture to your mix. You can store your Raspberry Crumble Bars for about four to five days. Keep them in an airtight container at room temperature. If you want to store them longer, move them to the fridge. They can last up to a week when chilled. If you freeze them, they can stay good for up to three months! Absolutely! You can make these bars a day or two in advance. Just let them cool completely before storing. Wrap them tightly or place them in a container. This helps keep them fresh. When you're ready to serve, slice and enjoy. You can even warm them slightly in the oven for that fresh-baked taste. Raspberry Crumble Bars pair great with many treats! Serve them with a scoop of vanilla ice cream for a classic touch. You can also enjoy them with a dollop of whipped cream. A cup of tea or coffee makes a lovely drink to go with your bars. For a bright finish, add fresh mint leaves or a dusting of powdered sugar on top. In this post, we explored how to make delicious Raspberry Crumble Bars. We detailed the ingredients needed, offered substitutes, and provided step-by-step instructions. I shared tips for perfecting texture and suggested fun variations. With these insights, you can create tasty bars for any occasion. Remember that experimenting with flavors can lead to fun and unique treats. Enjoy baking, and share your creations with friends and family!

Raspberry Crumble Bars Simple and Tasty Treat

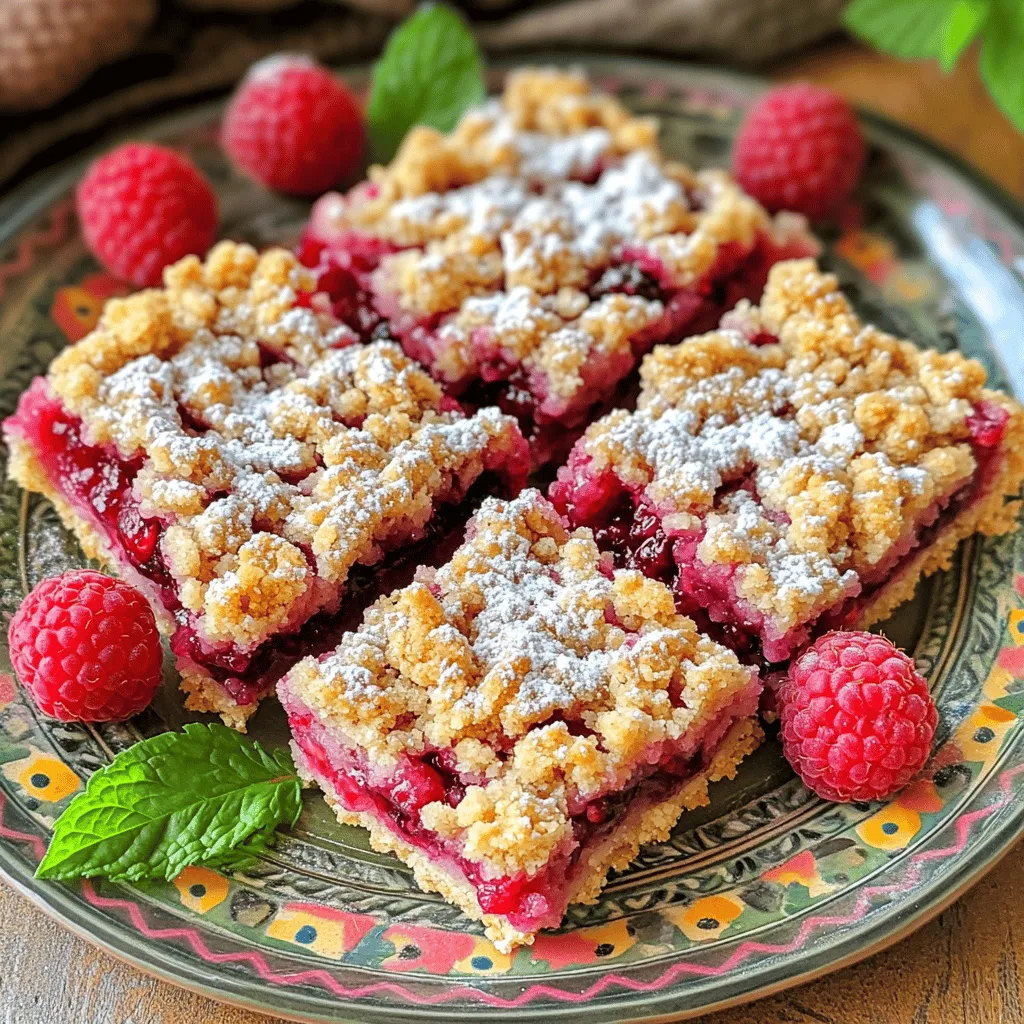
Are you in the mood for a delicious treat that’s easy to make? Look no further than these Raspberry Crumble

To make Blueberry Milk, you need just a few key items: - 1 cup fresh or frozen blueberries - 2 cups milk (dairy or plant-based) - 2 tablespoons honey or maple syrup - 1/2 teaspoon pure vanilla extract - A pinch of salt These ingredients work together to create a sweet and creamy drink. The blueberries add a burst of flavor while the milk gives it a rich texture. You can boost the taste with these extras: - Whipped cream for a creamy topping - A sprinkle of cinnamon for warmth - A dash of lemon juice for a zing These options let you personalize your Blueberry Milk. Adding whipped cream makes it feel special, while a hint of lemon gives it a refreshing twist. If you're seeking a dairy-free option, here are great choices: - Almond milk - Oat milk - Coconut milk These alternatives work well in Blueberry Milk. They each bring unique flavors while keeping the drink creamy and delicious. Enjoy experimenting with different types to find your favorite! For the full recipe, check out the Blueberry Bliss Milk instructions. First, gather your blueberries. You can use fresh or frozen ones. Place them in a small saucepan. Set the heat to medium. Cook the blueberries for about 5 minutes. Stir them occasionally. You want them to soften and burst. This releases their bright juices. The color will become rich and deep. After cooking, take the saucepan off the heat. Use a fine-mesh sieve to strain the blueberries. Pour the mixture into a bowl. Press the blueberries gently with a spoon. This helps you get all the juice. Discard the solids left in the sieve. You want only the smooth liquid. In a separate jug or blender, mix the strained juice with milk. You can choose dairy or any plant-based milk you like. Add honey or maple syrup to sweeten. Don’t forget the pure vanilla extract and a pinch of salt. Blend or whisk until everything combines well and is frothy. Taste your blueberry milk. Adjust the sweetness if needed. Pour it into glasses. If you like, add whipped cream on top. Enjoy your Blueberry Bliss Milk! For the full recipe, check the details above. To get the right sweetness, taste is key. Start with two tablespoons of honey or maple syrup. Mix it in while blending the ingredients. If it’s too tart, add more sweetener a little at a time. Always taste as you go. Everyone has a different sweetness level, so adjust it to your liking. If you have any leftovers, store them in an airtight container. Keep the blueberry milk in the fridge for up to three days. Shake or stir before serving again, as the mixture may separate. Avoid freezing, as it can change the texture. Want to take your blueberry milk to the next level? Try adding a pinch of cinnamon for warmth. You can also mix in a splash of lemon juice for a bright twist. For a creamy texture, blend in a banana. Feeling fancy? Top it with whipped cream for a special touch. For more ideas, check out the Full Recipe. {{image_4}} You can mix many flavors into blueberry milk. Try adding a bit of cinnamon for warmth. A touch of nutmeg gives it a unique twist. You can also use almond or coconut extract for more fun. If you want a tropical vibe, add a splash of pineapple juice. For a richer taste, try adding cocoa powder for a chocolate-blueberry treat. Each option will change the flavor but keep it delicious. If you prefer a dairy-free drink, blueberry milk is easy to adapt. Use almond milk, oat milk, or coconut milk instead of dairy milk. These options add their own taste and make it creamy. For a nut-free choice, go for rice milk or hemp milk. Each plant-based milk will give your drink a new charm. You can switch up your blueberry milk for the seasons. In summer, add fresh mint leaves for a refreshing twist. In fall, try a splash of pumpkin spice to warm things up. During winter, use warm spices like cardamom for a cozy feel. In spring, fresh herbs like basil can brighten your drink. These seasonal changes keep your blueberry milk exciting and fun to enjoy any time. Store your blueberry milk in a clean glass jar. Glass keeps the milk fresh longer. Make sure the jar has a tight lid. This helps keep out air and light. Blueberry milk tastes best when fresh, so store it in the fridge. Use it within three days for the best flavor. To extend the shelf life, pour the milk into smaller containers. This limits air exposure. You can also freeze blueberry milk in ice cube trays. Once frozen, store the cubes in a freezer bag. This way, you can enjoy a refreshing treat later. Just blend a few cubes with fresh milk for a quick drink. If you want to warm your blueberry milk, do so gently. Pour it into a small saucepan over low heat. Stir often to avoid burning. You can also heat it in the microwave. Use a microwave-safe container and heat in short bursts. Stir well between each burst. The milk should be warm, not hot. Enjoy it warm for a cozy treat! Blueberry milk is not just tasty; it has health perks too. Blueberries are full of vitamins. They contain vitamin C and vitamin K. These vitamins help keep your immune system strong. Blueberries also have antioxidants, which can fight off free radicals. This helps your body stay healthy and young. Plus, milk gives you calcium for strong bones. Together, they make a great drink for your body. Yes, you can use frozen blueberries! They work well in this recipe. Frozen blueberries are picked at their peak freshness. They are often just as good as fresh ones. Just make sure to thaw them slightly before cooking. This way, they will burst and release their flavor easily. You can find blueberry milk in some grocery stores. Look in the dairy section. Many brands offer it, often made with real blueberries. If you prefer, you can make your own at home. Follow the Full Recipe to whip up a fresh batch. - Other Related Products to Consider If you enjoy blueberry milk, try blueberry yogurt! You might also like blueberry smoothies. These can add more fruit to your diet. Blueberry-flavored oatmeal is another tasty option. Each of these adds fun flavors and nutrients to your meals. In this post, we explored how to make blueberry milk from start to finish. We covered the main and optional ingredients, how to cook and strain the blueberries, and tips for perfect sweetness. You learned about variations and how to store your drink properly. Blueberry milk offers great taste and health benefits. Experiment with flavors, and enjoy this fun drink anytime! Now, go ahead and make some delicious blueberry milk!

Blueberry Milk Delight Refreshing and Creamy Treat

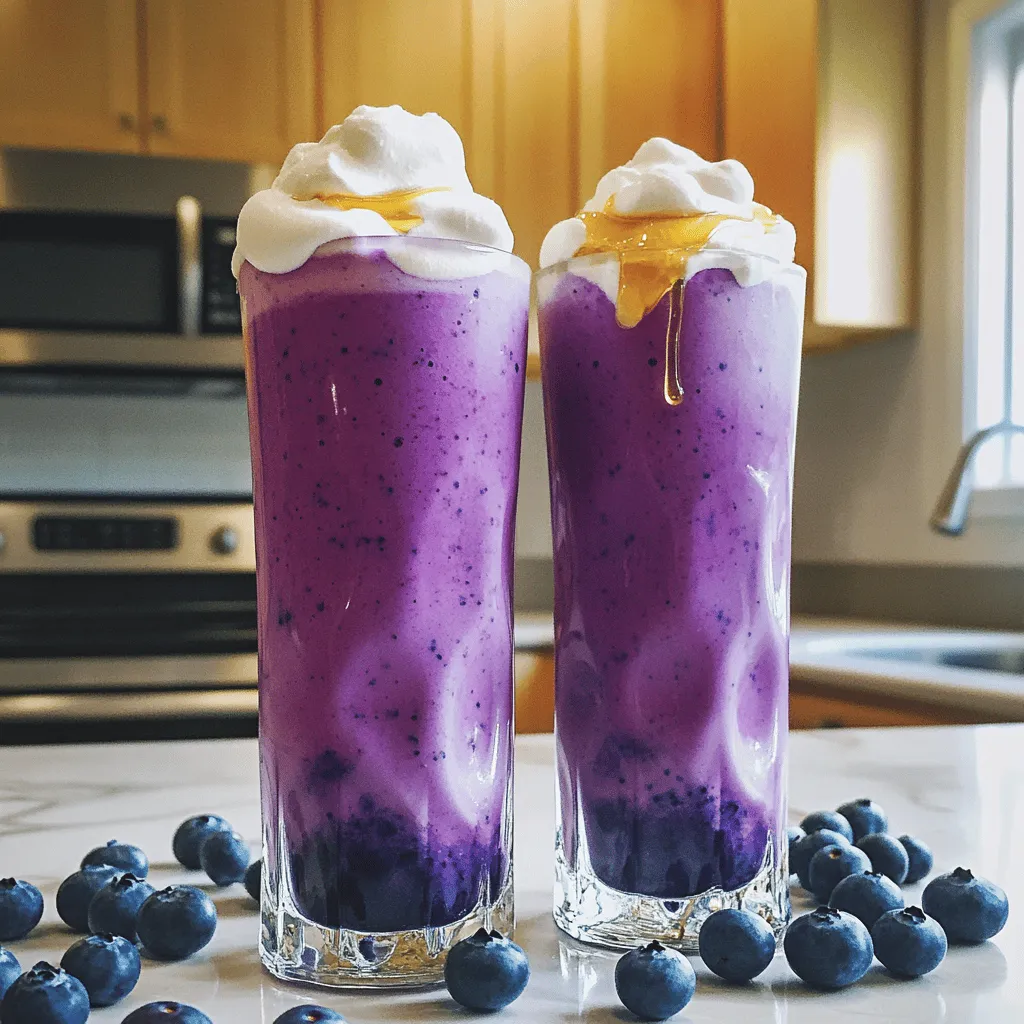
Craving a tasty treat that bursts with flavor? Blueberry milk is a fun and easy drink you can make at

- 1 cup blue sports drink - 1 cup freshly squeezed lemonade - 1/2 cup coconut water - 1/4 cup fresh lime juice - Ice cubes - Lime slices for garnish - Maraschino cherries for garnish - Fresh mint leaves for garnish The Blue Lagoon Mocktail needs colorful and tasty ingredients. Start with a blue sports drink, like Gatorade. It gives the drink its stunning color. Next, use freshly squeezed lemonade for a tangy kick. Coconut water adds a light sweetness, and fresh lime juice brings in a zesty flavor. For serving, have ice cubes ready. They keep the drink cool and refreshing. Lime slices, maraschino cherries, and fresh mint leaves are great for garnish. They add beauty and extra taste to your mocktail. Gather all these ingredients for a fun and vibrant drink. You’ll love how easy it is to make the Blue Lagoon Mocktail! Check out the Full Recipe for more details. To make a Blue Lagoon Mocktail, you'll follow a simple method. This drink is fun and easy to make. Let's get started! - Combine the blue sports drink, freshly squeezed lemonade, coconut water, and fresh lime juice in a large pitcher. - Stir the mixture until well combined. You want a bright blue color. - Prepare your serving glasses by filling them with ice cubes. Make sure the cups are full to the top. - Carefully pour the blue mixture over the ice. Fill each glass to the brim. - Garnish your drink with a slice of lime, a maraschino cherry, and a sprig of fresh mint. This makes your mocktail look beautiful! This Blue Lagoon Mocktail is a great way to cool off. For the full recipe, check out the details provided earlier. Enjoy your refreshing drink! - Use chilled ingredients for a refreshing drink. Cold drinks are always better on a hot day. Chilled sports drinks, lemonade, and coconut water keep your mocktail crisp and enjoyable. - Adjust sweetness with more or less lemonade. If you love sweet drinks, add more lemonade. If you prefer a tart taste, use less. This way, you can customize your Blue Lagoon Mocktail to fit your taste. - Experiment with ice shapes for presentation. Try using fun ice molds to make your drink look even better. Heart-shaped or star-shaped ice can add a special touch to your mocktail. - Recommended glassware for the Blue Lagoon Mocktail. Use tall glasses to show off the beautiful blue color. Clear glasses let the vibrant drink shine, making it more appealing. - Ideal occasions for serving the drink. The Blue Lagoon Mocktail is perfect for parties, picnics, and summer gatherings. Serve it at birthdays or family get-togethers for a fun twist. For the full recipe, check out the details above. Enjoy making this delightful drink! {{image_4}} You can change up the Blue Lagoon Mocktail by using different fruit juices. Try using grapefruit juice for a tangy twist. Orange juice adds sweetness and a bright flavor. You can also mix in flavored sodas for extra fizz. Lemon-lime soda or a berry soda can give it a fun pop. These changes make the drink unique and exciting, while still keeping the vibrant blue color. To make the Blue Lagoon Mocktail more appealing for kids, consider these easy tweaks. Use a less tart lemonade or add a splash of fruit punch. This adds sweetness and bright flavor. You can also use fun, colorful straws or cups. Adding fun garnishes like gummy candies or colorful fruit shapes can make the drink more exciting. These small changes can turn a simple drink into a fun treat that kids will love. To store any leftover Blue Lagoon Mocktail, pour it into a sealable container. Make sure the container is clean and dry. You can keep it in the fridge for up to two days. The longer it sits, the more the flavors blend. However, the drink may lose some fizz. If you notice separation, just stir it before serving again. For the ingredients, the blue sports drink lasts a long time, often up to a year. Fresh lemonade will stay fresh in the fridge for about three to five days. Coconut water usually lasts around five to seven days once opened. Fresh lime juice is best used within a week for the best taste. If you have leftover blue sports drink, mix it with sparkling water for a fizzy treat. You can also use it in smoothies or popsicles. Leftover coconut water is great in smoothies, oatmeal, or even as a base for soups. You can freeze it in ice cube trays for later use. This way, you add a hint of coconut flavor to your next drink or dish! A Blue Lagoon Mocktail is a fun, non-alcoholic drink. It has a bright blue color that looks like ocean water. This drink blends flavors from lemonade, coconut water, and a blue sports drink. The mix gives it a sweet and tangy taste. This drink is great for parties or hot days. It became popular in the 2000s as more people wanted tasty drinks without alcohol. Yes, you can prepare the Blue Lagoon Mocktail ahead of time. I suggest mixing all the liquids in a pitcher but keep the ice separate. If you add ice too early, it can melt and water down the drink. You can store the mix in the fridge for up to a day. Just remember to add ice and garnish right before serving. This way, your drink stays fresh and tasty. You can easily swap some ingredients if needed. If you don't have a blue sports drink, try using blue raspberry soda or any blue drink mix. For coconut water, you can use plain water or sparkling water for some fizz. If you want a different flavor, use orange juice instead of lime juice. Get creative, and find what you like best! To adjust the sweetness, you can change the lemonade amount. If you want a sweeter drink, add more lemonade. If you prefer it less sweet, use less lemonade. You can also taste the mix as you go. This way, you can find the perfect balance that suits your taste. Enjoy experimenting with flavors! The Blue Lagoon Mocktail is a fun and refreshing drink. We covered ingredients, preparation steps, and tips for serving. You can play with flavors and make it kid-friendly, too. Remember to store any leftovers properly and use extra ingredients wisely. This drink is perfect for any occasion. Enjoy making your own Blue Lagoon Mocktail and share it with friends!

Blue Lagoon Mocktail Refreshing and Easy Recipe

If you’re searching for a fun and vibrant drink, look no further! The Blue Lagoon Mocktail is both refreshing and

- 1 ½ cups graham cracker crumbs - ½ cup unsalted butter, melted - 2 tablespoons granulated sugar - 16 oz cream cheese, softened to room temperature - ½ cup granulated sugar - 1 teaspoon pure vanilla extract - 3 large eggs - 1 cup sour cream - 2 ripe peaches, pitted and thinly sliced - 1 cup mixed berries (fresh strawberries, blueberries, and raspberries) - 2 tablespoons honey The graham cracker crumbs form the base of our cheesecake. They create a crunchy layer that contrasts with the creamy filling. I love using unsalted butter to bind the crumbs. It adds richness without too much salt. Cream cheese is the star of this dessert. It gives the cheesecake its classic creamy texture. Make sure it’s softened for easy mixing. I often let it sit out for about 30 minutes before starting. Fresh peaches and mixed berries bring a burst of flavor. They add sweetness and a splash of color. Use ripe fruits for the best taste. I prefer a mix of strawberries, blueberries, and raspberries for variety. - honey - fresh mint leaves Honey makes a great topping. It adds a lovely sweetness and shine. I drizzle it over the cheesecake right before serving. Fresh mint leaves can add a vibrant green touch. They also give a refreshing taste. Simply place a few mint leaves on each slice, and you have a stunning dessert! For more details on the full recipe, check out the [Full Recipe]. To start, grab your mixing bowl. Combine the graham cracker crumbs, melted butter, and sugar. Mix it well until it looks like wet sand. Next, press this mixture firmly into the bottom of your 9-inch springform pan. This creates a solid crust. If you want extra crunch, you can pre-bake the crust for about 10 minutes at 325°F (165°C). This step adds a nice texture. Now, let’s make the filling. In a large bowl, beat the cream cheese until it's smooth. This takes just a few minutes using an electric mixer. Slowly add in the sugar and vanilla extract. Mix until it is creamy. Next, add the eggs one at a time. Mix on low speed after each egg. This helps to avoid overmixing. Finally, gently fold in the sour cream until everything is well combined and smooth. Time to layer! Pour half of the cheesecake batter into the crust. Spread it evenly. Now, arrange half of the peach slices and half of the mixed berries on top. Pour the rest of the batter over the fruit layer. Then, add the remaining peach slices and mixed berries on top. To create a marbled look, gently swirl the fruit into the batter with a spatula. Be careful not to disturb the crust. This step gives your cheesecake a beautiful finish. Follow the [Full Recipe] for baking and chilling details to complete your Summer Berry Peach Cheesecake. To get the best texture, you need to avoid overmixing after adding eggs. Overmixing can add too much air, causing your cheesecake to crack. Mix on low speed and just until the eggs blend in. Cooling is also key. After baking, turn off the oven and crack the door open slightly. Let the cheesecake cool inside for about one hour. This slow cooling helps prevent cracks. After that, chill it in the fridge for at least four hours. This time helps it firm up and develop flavor. When it’s time to serve, slice the cheesecake with a sharp knife. Wipe the knife between slices for clean cuts. Place each slice on dessert plates. To make it pop, garnish with extra berries and a fresh mint leaf. This adds color and freshness to your dish. You can serve it with whipped cream or a dollop of yogurt too. Try drizzling honey on top for a sweet touch. For the full recipe, check out the details to create this delightful treat! {{image_4}} You can change the fruit in this cheesecake for fun. Other berry combinations work well, like blackberries or cherries. Each berry adds its flavor and sweetness. You can also use seasonal fruits. Think of ripe mangoes or juicy plums in summer. These fruits can bring new colors and tastes to the dish. To make this cheesecake even better, you can add citrus zest. Zest from lemons or oranges gives a bright twist. It brightens the flavors and adds a nice scent. You can also use flavored extracts. Almond or coconut extract can give your cheesecake a unique taste. Just a little bit can make a big change. To keep your Summer Berry Peach Cheesecake fresh, store it in the fridge. Cover the cheesecake with plastic wrap or a lid to prevent it from drying out. This helps maintain flavor and texture. Leftovers can last up to five days in the fridge. For best taste, enjoy them within two to three days. Chill your cheesecake for a minimum of four hours before serving. This gives the flavors time to blend beautifully. If you want to save some cheesecake for later, freezing is a great option. First, let the cheesecake cool completely. Then, wrap it tightly in plastic wrap. For extra protection, place it in a freezer-safe bag or container. This helps prevent freezer burn. You can freeze the cheesecake for up to three months. When you're ready to enjoy it, move it to the fridge to thaw overnight. For a quicker method, you can let it sit at room temperature for about two hours. Enjoying your cheesecake later will still taste great! To set your cheesecake quicker, try these methods: - Place the cheesecake in the freezer for about 30 minutes. - Use a shallow pan with ice water underneath the cheesecake. - Turn your oven off after baking and leave the door slightly open. This helps cool it slowly. These tips will help your cheesecake firm up without cracking. The key is to avoid sudden temperature changes, which can cause cracks. Yes, you can make this cheesecake ahead of time! Here are some tips: - Prepare the cheesecake up to a day in advance. - Store it in the fridge, covered with plastic wrap. - If you want to freeze it, wrap it tightly in plastic. You can freeze it for up to a month. Making it early lets the flavors blend well. Plus, it gives you more time to relax before serving. If your cheesecake cracks, don’t worry! Here are some quick fixes: - Cover the cracks with fresh fruit or whipped cream. - Use a spatula to gently smooth the surface. - If it’s really bad, you can turn it into a trifle! Remember, a little imperfection doesn’t affect the taste. Cheesecake is still delicious no matter how it looks. For the best guidance, check the Full Recipe. To create a delicious Summer Berry Peach Cheesecake, start with graham cracker crumbs, cream cheese, and fresh fruit. Follow the step-by-step guide to prepare a creamy filling and a crunchy crust. Don't forget to try optional toppings like honey and fresh mint for extra flair. You can even explore fruit variations and clever storage tips. This cheesecake not only looks great but also tastes amazing. With a little practice, you’ll perfect your technique and impress your friends. Enjoy your tasty creation and share your joy!

Summer Berry Peach Cheesecake Delightful and Easy Treat

Are you ready for a sweet summer treat that’s easy and delightful? This Summer Berry Peach Cheesecake combines creamy tanginess

Older posts
Newer posts
← Previous Page1 … Page29 Page30 Page31 … Page91 Next →

dsad

© 2025 recipesstation • Built with GeneratePress

Our Policies

  • Copyright Policy
  • Cookie Policy
  • GDPR Policy
  • Privacy Policy
  • Disclaimer
  • Terms Of Use

More Information

  • Home
  • About
  • Contact
  • Appetizers
  • Dessert
  • Dinner
  • Drinks
©2025, recipesstation About Back To Top