Skip to content
DisclaimerTerms Of UseGDPR PolicyCookie Policy

recipesstation

  • Home
  • Drinks
  • Appetizers
  • Dinner
  • Dessert
  • About
  • Contact
  • Privacy Policy
DisclaimerTerms Of UseGDPR PolicyCookie Policy

Emily

To make a delicious Bang Bang Chicken Bowl, gather these key ingredients: - 2 cups cooked jasmine rice - 1 lb chicken breast, diced into bite-sized pieces - 1/2 cup cornstarch - 1 tablespoon vegetable oil - 1 cup shredded cabbage - 1 carrot, julienned - 1/2 cucumber, thinly sliced - 3 green onions, finely chopped - A sprinkle of sesame seeds for garnish These ingredients combine to create a bowl full of flavor and texture. The jasmine rice forms a soft base for the crispy chicken and fresh veggies. The Bang Bang Sauce is essential for adding a kick to your bowl. You will need: - 1/2 cup mayonnaise - 3 tablespoons sweet chili sauce - 1 tablespoon sriracha (adjust according to desired spice level) - 1 teaspoon fresh lime juice Mix these ingredients well for a creamy and spicy sauce. This sauce is what makes the dish stand out. When choosing fresh vegetables, look for vibrant colors and firmness. Here are some tips: - Choose cabbage that feels crisp and has no brown spots. - Pick carrots that are firm and bright orange. - Select cucumbers that are smooth and without soft spots. - For green onions, look for bright green tops and firm white bases. Fresh vegetables enhance not just taste but also nutrition. They make your Bang Bang Chicken Bowl look appealing and fresh. For the full recipe, check out the complete details. To make the Bang Bang sauce, you need just a few simple steps. First, grab a medium bowl. In the bowl, mix together 1/2 cup of mayonnaise, 3 tablespoons of sweet chili sauce, 1 tablespoon of sriracha, and 1 teaspoon of fresh lime juice. Whisk these ingredients until they blend into a smooth and creamy sauce. This sauce adds the perfect kick to your dish. Set it aside for later. Coating the chicken is key to getting that crispy texture. Start with 1 pound of diced chicken breast. Place it in a mixing bowl. Then, add 1/2 cup of cornstarch to the bowl. Toss the chicken pieces in the cornstarch until they are fully coated. Make sure each piece is covered well. This coating helps the chicken fry up crispy and delicious. Cooking the chicken right can make all the difference. Heat 1 tablespoon of vegetable oil in a large skillet over medium-high heat. Once the oil is hot, add your cornstarch-coated chicken. Cook it for about 6-8 minutes. Turn the chicken occasionally for even cooking. You want it to turn golden brown and reach an internal temperature of 165°F. Once done, remove the skillet from heat and let the chicken cool slightly. Now you're ready to assemble your Bang Bang Chicken Bowls! For the full recipe, check back to the ingredients section. To get crispy chicken, start with cornstarch. Coat the chicken pieces well. Use a generous amount for the best crunch. When cooking, make sure your oil is hot. This helps the chicken fry quickly and form a crispy crust. Don't overcrowd the pan. Cook in batches if needed. This allows steam to escape and keeps the chicken crispy. Always check the internal temperature. It should reach 165°F for safety. For the best flavor, serve your Bang Bang Chicken Bowl warm. Layer your rice first, then add the chicken. Top it with fresh veggies for crunch. Drizzle the Bang Bang sauce generously over the bowl. Add lime wedges on the side for a fresh kick. You can also sprinkle extra sesame seeds for added texture. Fresh herbs like cilantro can brighten up the flavor too. Try serving it with chopsticks for a fun experience! One mistake is not coating the chicken enough. A light dusting won't give you that crispy bite. Another mistake is cooking the chicken at too low a heat. This can lead to soggy chicken. Avoid using too much sauce before serving. It can make the dish soggy. Lastly, don’t skip the veggies. They add color, crunch, and nutrients to your meal. Following these tips will help you create a delicious Bang Bang Chicken Bowl every time! {{image_4}} You can make small changes to the recipe for a healthier meal. First, swap jasmine rice for brown rice or quinoa. These options add fiber and nutrients. You can also use less mayonnaise in the sauce. Try Greek yogurt instead for a lighter twist. If you want a low-carb choice, use cauliflower rice. It gives you that fluffy texture without the carbs. If you want a meatless version, use tofu or tempeh. These options soak up the sauce well and provide protein. You can fry them like the chicken for a nice crunch. Instead of the Bang Bang sauce, make a peanut sauce with peanut butter, soy sauce, and lime. This adds great flavor and keeps it vegan. You can also add more vegetables, like bell peppers or snap peas, for extra crunch. You can serve Bang Bang Chicken Bowls in many fun ways. Try using lettuce cups instead of bowls. This makes for a fresh and crunchy wrap. You can also turn it into a salad. Mix the rice, chicken, and veggies with a bed of greens. Drizzle the sauce on top for a tasty salad. For a fun twist, serve it in a taco shell or over noodles for a fusion meal. For the complete recipe, visit the [Full Recipe]. To keep your Bang Bang Chicken Bowl fresh, place leftovers in an airtight container. Make sure to let the food cool before sealing it. Store it in the fridge for up to three days. Keeping the rice and sauce separate helps maintain the texture and flavor. When you're ready to enjoy your leftovers, reheat them in the microwave. Place the rice and chicken in a microwave-safe bowl. Heat for one to two minutes, stirring halfway through. You can also reheat on the stove over low heat. Add a splash of water or oil to prevent sticking. You can freeze the Bang Bang Chicken Bowl for up to a month. Store each component separately. Use freezer-safe containers or bags to avoid freezer burn. Thaw in the fridge overnight before reheating. This way, you can enjoy a quick meal whenever you want, without losing flavor! Bang Bang Chicken originates from Chinese cuisine. It is a dish that combines crispy chicken with a rich, spicy sauce. The name "Bang Bang" comes from the sound made when the chicken is pounded or "banged." This dish became popular in Western culture thanks to its bold flavors and easy preparation. Many chefs put their own spin on it, making it a favorite in various restaurants. It is now loved worldwide. Yes, you can prepare Bang Bang Chicken Bowl in advance. You can cook the chicken and prepare the sauce a day ahead. Store the chicken in an airtight container in the fridge. Keep the sauce separate until you are ready to serve. Fresh vegetables can also be chopped ahead of time. Just store them in cold water to keep them crisp. When you're ready to eat, simply assemble the bowl for a quick meal. To find the best Bang Bang Chicken Bowl, check out local Asian restaurants. Many places offer their own unique twist on this dish. Look for restaurants that focus on fresh ingredients and high-quality flavors. You can also explore food blogs and online reviews to find top-rated spots. For a fun twist, try making it at home using the Full Recipe. This way, you can customize your bowl to your liking! The Bang Bang Chicken Bowl is a tasty and fun dish to make. We covered the main ingredients, from fresh veggies to the zesty sauce. I shared step-by-step tips for cooking chicken and achieving that perfect crispness. Remember to avoid common mistakes for a better result. Feel free to explore variations and healthier substitutes. Store any leftovers properly to enjoy later. This dish is not only easy to prepare, but it offers plenty of ways to make it your own. Enjoy creating your own delicious twist on this bowl!

Bang Bang Chicken Bowl Delicious and Easy Recipe

Get ready to spice up your dinner with my easy Bang Bang Chicken Bowl recipe! This dish is not only

- 2 cups uncooked basmati rice - 4 boneless, skinless chicken breasts - 2 cups low-sodium chicken broth - 1 cup Greek yogurt - 1 medium cucumber, grated - 2 cloves garlic, minced - 1 tablespoon fresh dill (or 1 teaspoon dried dill) - 2 tablespoons lemon juice - ½ cup cherry tomatoes, halved - ¼ cup red onion, finely chopped In this dish, the main ingredients create a base that is both hearty and tasty. Basmati rice adds a lovely texture. The chicken breasts cook perfectly in the chicken broth, keeping them moist and flavorful. The tzatziki sauce is a star here. It brings a cool, refreshing taste that contrasts well with the warm chicken and rice. Greek yogurt is creamy, and grated cucumber adds crunch. Garlic gives it a nice kick. For seasoning, fresh dill adds a bright note. The lemon juice adds acidity, balancing the dish. Cherry tomatoes and red onion give color and crunch. You can find the full recipe for this dish online, where it combines all these ingredients into a delicious meal. - Preheat oven to 375°F (190°C). - In a large baking dish, mix 2 cups of uncooked basmati rice, 2 cups of low-sodium chicken broth, 1 teaspoon of salt, ½ teaspoon of black pepper, and 1 teaspoon of dried oregano. Stir well to blend. - Lay 4 boneless, skinless chicken breasts on top of the rice mixture. - Season the chicken. Use a sprinkle of salt, pepper, and a pinch of oregano for flavor. - Cover the baking dish tightly with foil. This keeps the moisture in. - Place the dish in the oven and bake for 40 minutes. - While it bakes, prepare the tzatziki sauce. In a bowl, mix 1 cup of Greek yogurt, 1 grated cucumber, 2 minced garlic cloves, 1 tablespoon of fresh dill, 2 tablespoons of lemon juice, 1 teaspoon of salt, and a bit of black pepper. Stir until mixed. After 40 minutes, check the chicken. It should be at 165°F (75°C), and the rice should be soft. If needed, bake uncovered for an extra 5-10 minutes. Let it rest for 5 minutes before serving. Fluff the rice with a fork and serve with tzatziki sauce on top. Enjoy this simple, yet tasty dish! For the full recipe, check the details above. Sealing the baking dish is very important. It traps steam and keeps the rice moist. Use aluminum foil to cover the dish tightly. This step ensures even cooking for both the chicken and rice. To check if the chicken is done, use a meat thermometer. Insert it into the thickest part of the chicken. The temperature should reach 165°F (75°C). This guarantees your chicken is safe to eat. If it needs more time, bake it uncovered for 5 to 10 more minutes. For a family-style presentation, serve the dish directly from the baking dish. Fluff the rice with a fork before serving. Drizzle the tzatziki sauce over the chicken and rice. Top with fresh cherry tomatoes and red onion for color and taste. You can also add extra dill or cucumber slices as a garnish. Oven performance can vary, so adjust cooking times as needed. If your oven runs hot, check the food a bit early. If it runs cool, you may need to add a few minutes. Different rice types may also change cooking times. Brown rice usually takes longer than basmati. If you use brown rice, add extra chicken broth and bake for 10 to 15 more minutes. Always check the rice for doneness before serving. For the full recipe, refer to the earlier sections. {{image_4}} You can change the proteins in this dish to fit your taste. Turkey works well if you want a leaner option. If you prefer plant-based meals, try tofu. Both options offer great flavor and texture. Switching rice types can also bring new life to this dish. Brown rice gives a nutty taste and more fiber. Jasmine rice adds a lovely floral aroma. Feel free to experiment with what you have! Want to spice things up? Add paprika for a smoky kick. Cumin brings warmth and depth to your dish. Just a pinch can make a big difference. You can also mix in different vegetables. Bell peppers, zucchini, or spinach can add color and nutrients. Toss in what you enjoy or what’s in season. For those needing gluten-free meals, use certified gluten-free broth. This small swap makes it safe for everyone. If you're watching carbs, go for cauliflower rice instead of basmati. It gives a similar texture and absorbs flavors well. This change keeps your meal light yet satisfying. For the full recipe, refer to the earlier section. Enjoy your cooking adventure! Store your leftovers in the fridge right away. Place the chicken and rice in airtight containers. This keeps the dish fresh. I recommend glass or BPA-free plastic containers. These materials help maintain flavor and texture. You can freeze portions for later. Use freezer-safe containers or heavy-duty bags. Make sure to label them with the date. When ready to eat, thaw in the fridge overnight. Reheat in the oven or microwave until hot. The dish should reach 165°F (75°C) for safety. In the fridge, your dish lasts about three to four days. In the freezer, it can last up to three months. Look for signs of spoilage. If you see mold or a bad smell, it’s best to throw it away. Always trust your senses when it comes to food safety. Yes, you can prepare the Dump and Bake Chicken Tzatziki Rice in advance. Just follow these steps: - Meal Prep: Cook the chicken and rice as directed. Let it cool before storing. This prevents sogginess. - Freezing: You can freeze portions in airtight containers. This keeps it fresh for later meals. Just thaw in the fridge overnight before reheating. If you don’t have Greek yogurt, here are some great alternatives: - Regular Yogurt: Use plain yogurt for a similar taste but a thinner texture. - Sour Cream: This will add creaminess and a slightly tangy flavor. - Dairy-Free Options: Almond or coconut yogurt works well if you want a non-dairy choice. Absolutely! Feel free to switch up the herbs in your tzatziki sauce. Here are some ideas: - Mint: Adds a refreshing touch. - Parsley: Gives a fresh green flavor. - Chives: Provides a mild onion taste. Experiment with these herbs to create your own unique twist on this classic sauce. For the full recipe, check the detailed guide above. This recipe blends simple ingredients for a delicious meal. You combine rice, chicken, and spices for a tasty dish. Tzatziki sauce adds flavor and a cool touch. Remember to store leftovers properly to enjoy later. Feel free to experiment with different proteins and herbs to make it your own. Cooking is simple, fun, and rewarding. Enjoy every bite of your creation!

Dump and Bake Chicken Tzatziki Rice Flavorful Delight

Are you ready for a simple, yet delicious meal that the whole family will love? This Dump and Bake Chicken

- 2 boneless, skinless chicken thighs, diced into bite-sized pieces - 1 cup jasmine rice - 2 cups water or chicken broth - 1 tablespoon vegetable oil - 1/4 cup low-sodium soy sauce - 2 tablespoons honey - 1 tablespoon freshly grated ginger - 2 cloves garlic, finely minced - 1/2 teaspoon sesame oil - 1 cup fresh broccoli florets - 1/2 cup carrot, julienned - 2 green onions, sliced thinly - Sesame seeds for garnish When making a teriyaki chicken rice bowl, I focus on fresh, simple ingredients. The chicken is the star. I use two boneless thighs, cut into small pieces. This makes it easy to cook quickly. I love jasmine rice for its sweet flavor and fluffy texture. For the sauce, low-sodium soy sauce is key. It gives great taste without too much salt. I mix it with honey for sweetness. Fresh ginger and garlic add a nice kick. A touch of sesame oil rounds it out. Fresh veggies make the dish colorful and healthy. I pick bright green broccoli and sweet carrots. Green onions add a fresh crunch on top. Finally, I sprinkle sesame seeds for a nutty finish. You can find the full recipe at the end of the article. Enjoy cooking! - Bring water or broth to a boil. - Stir in jasmine rice and simmer for 15 minutes. - Fluff the rice and set aside. To cook the rice, use a medium pot. Pour in either water or chicken broth. A flavorful broth adds depth to your rice. Once the liquid boils, add the jasmine rice. Cover the pot with a lid and reduce the heat to low. Let it simmer for about 15 minutes. This will allow the rice to absorb all the liquid. After 15 minutes, fluff the rice with a fork. This step makes the rice light and airy. Keep it aside while you prepare the rest. - Combine soy sauce, honey, ginger, garlic, and sesame oil. - Whisk until smooth. For the teriyaki sauce, grab a small mixing bowl. Combine soy sauce, honey, grated ginger, minced garlic, and sesame oil. Whisk these ingredients together until the mixture is smooth. This sauce is key for flavor. Set it aside for later as you cook the chicken and veggies. - Heat vegetable oil in a skillet. - Add diced chicken and cook until golden brown. - Ensure internal temperature reaches 165°F. In a large skillet, heat vegetable oil over medium-high heat. Once the oil shimmers, add your diced chicken. Cook them for about 5 to 7 minutes. Stir occasionally and watch for that golden-brown color. Use a meat thermometer to check that the chicken reaches 165°F. This ensures it's safe to eat. - Lower heat and add broccoli and carrots. - Sauté until broccoli is bright green and tender. Once your chicken is golden, lower the heat to medium. Add fresh broccoli florets and julienned carrots to the skillet. Sauté the mixture for 3 to 5 minutes. You want the broccoli to turn bright green and tender but still crisp. This adds color and texture to your dish. - Pour teriyaki sauce over the skillet mixture. - Cook until sauce thickens. Next, pour the teriyaki sauce over the chicken and veggies in the skillet. Stir well to coat everything evenly. Allow it to cook for an additional 2 to 3 minutes. This helps the sauce thicken and stick to your chicken and veggies. - Divide rice among serving bowls. - Top with teriyaki chicken and vegetables. Now it’s time to assemble your rice bowls! Divide the fluffy jasmine rice among your serving bowls. Generously top the rice with the teriyaki chicken and vegetable mixture. This creates a colorful and delicious meal. For a finishing touch, sprinkle sliced green onions and sesame seeds on top. Enjoy your flavorful Teriyaki Chicken Rice Bowl! For the full recipe, check out the details above! - Experiment with additional spices like red pepper flakes. This adds a nice kick. - Adjust sweetness by modifying the honey quantity. More honey makes it sweeter. - Use a meat thermometer for precision. Cook chicken until it reaches 165°F. - Marinate chicken for added flavor overnight. This makes a big difference in taste. - Rinse rice before cooking for a fluffier texture. This removes excess starch. - Consider using a rice cooker for convenience. It ensures perfect rice every time. These tips will help you make a tasty Teriyaki Chicken Rice Bowl. Check out the Full Recipe for all the details! {{image_4}} You can change the protein in your Teriyaki Chicken Rice Bowl. Substitute the chicken with tofu or shrimp. Tofu gives a nice texture and absorbs flavors well. Shrimp cooks quickly and adds a sweet taste. If you want something heartier, use beef. A Teriyaki Beef Rice Bowl brings a rich flavor that pairs well with the sauce. Feel free to mix up the veggies in your bowl. Replace the broccoli with bell peppers or snap peas. Both options add a crisp bite and color. You can also try bok choy for a unique twist. Bok choy has a mild flavor and adds a nice crunch. You can tweak the teriyaki sauce to suit your taste. Try using pineapple juice for a sweeter sauce. This adds a fruity note that brightens the dish. If you like heat, incorporate Sriracha for a spicy kick. This adds depth and makes each bite exciting. For the complete recipe, check the Full Recipe. After enjoying your Teriyaki Chicken Rice Bowl, store leftovers in an airtight container in the fridge. This helps keep the flavors fresh and safe. Try to eat it within 3-4 days for the best quality. When you're ready to enjoy your leftovers, you have a couple of options. You can microwave the rice bowl for 1-2 minutes. Make sure to stir it occasionally to heat evenly. If you want a better texture, use a skillet. Just heat it over medium heat until warmed through. If you want to save some for later, freezing is a good choice. Freeze the dish in individual portions for easy meal prep. When you’re ready to eat, thaw it properly in the fridge overnight before reheating. This keeps the chicken juicy and the rice fluffy. For the full recipe, check out the earlier sections. Yes, but adjust the cooking time and water ratio. Brown rice takes longer to cook. Use 2.5 cups of water for 1 cup of brown rice. Cook it for about 40-45 minutes. This will give you a nutty flavor and more fiber. Steamed dumplings and miso soup are great sides. Both add a nice touch to your meal. You can also serve a fresh salad on the side. These will enhance your dining experience. Substitute soy sauce with tamari or coconut aminos. Both options will give you a similar taste. You can find them at most grocery stores. They are perfect for anyone avoiding gluten. Yes, prepare all components in advance and combine when ready to serve. Cook the chicken, rice, and veggies ahead of time. Store them in separate containers in the fridge. Simply reheat when you're ready to enjoy your meal. Use less honey and incorporate more vegetables for added nutrients. Add bell peppers, snap peas, or spinach. This not only boosts nutrition but also adds vibrant colors to your bowl. You can enjoy a tasty meal that’s healthy and satisfying. In this article, we explored a simple Teriyaki Chicken Rice Bowl recipe. We covered key ingredients, from chicken thighs to fresh veggies. You learned step-by-step cooking instructions to create a delicious meal. Tips helped you enhance flavors, while variations allowed for creativity. Remember, this dish is versatile and easy to make. Whether for a family dinner or meal prep, it fits any occasion. Enjoy experimenting with it, and make it your own!

Teriyaki Chicken Rice Bowl Flavorful Dinner Delight

Craving a meal that bursts with flavor? The Teriyaki Chicken Rice Bowl is your answer! This dish combines tender chicken,

To make a tasty Strawberry Dole Whip, gather these simple items: - 2 cups frozen strawberries - 1 cup canned coconut milk - 1 tablespoon honey or agave syrup - 1 teaspoon pure vanilla extract - A pinch of salt These ingredients create a bright and fruity whip. The frozen strawberries give the treat its vibrant color and fresh flavor. The coconut milk adds creaminess, while honey or agave syrup provides just the right sweetness. Vanilla extract rounds out the taste, and salt enhances all the flavors. Adding toppings can make your Strawberry Dole Whip even more fun! Consider these options: - Fresh strawberry slices - Shredded coconut - Fresh mint leaves Each topping adds texture and flavor. Fresh strawberry slices look pretty and taste great. Shredded coconut gives a tropical twist, and mint leaves add a refreshing touch. You can easily tweak the recipe based on what you have at home. Here are some ideas: - Coconut milk alternatives: Try almond milk or oat milk for a different flavor. - Sweetener alternatives: Use maple syrup or stevia if you prefer other sweeteners. With these substitutions, you can make the recipe work for your taste and pantry. Just remember to keep the same ratio for the best results. For the full recipe, check out the Strawberry Dole Whip Delight . Start by measuring out 2 cups of frozen strawberries. Make sure they are frozen. This helps create that nice, thick texture. Next, choose the right coconut milk. Look for full-fat canned coconut milk. It adds creaminess and enhances the flavor. You can find it in most grocery stores. Now it's time to blend! Add the frozen strawberries, 1 cup of coconut milk, 1 tablespoon of honey (or agave), 1 teaspoon of pure vanilla extract, and a pinch of salt into your blender. Blend on high speed. Stop to scrape down the sides as needed. This ensures all ingredients mix well. If your mixture is too thick, no worries! Gradually add more coconut milk, one tablespoon at a time. Blend after each addition until you reach a smooth and creamy texture. For a beautiful presentation, use a piping bag. Place the blended mixture into the bag. If you don’t have one, a large zip-top bag works too. Just cut off one bottom corner for easy piping. Pipe the creamy mixture into bowls or cups. Use a swirling motion to create a soft-serve look. This makes it extra fun and inviting. You can also add toppings like fresh strawberry slices, shredded coconut, or mint leaves to make it even prettier. Enjoy your Strawberry Dole Whip! For the complete recipe, refer to the Full Recipe section. To get the right texture, blend on high speed. This helps mix everything smoothly. If you stop blending, scrape down the sides of the blender. This ensures all the ingredients blend together. After blending, store the mixture in a zip-top bag. This makes it easy to serve later. You can make your Strawberry Dole Whip even better by adding more vanilla extract. This small change boosts the flavor a lot. You can also try different fruits, like mango or pineapple, for a fun twist. Mixing fruits gives you unique tastes each time you make it. Serve your Dole Whip right after making it. This keeps it fluffy and cold. If you want to keep the texture, avoid letting it sit too long. You can also place it in the freezer for a few minutes if needed. Just remember to stir it before serving to keep it creamy. {{image_4}} You can play with flavors for your Strawberry Dole Whip. Try a mixed berry version by adding blueberries or raspberries. Simply blend them with the strawberries for a burst of berry goodness. You can also create tropical Dole Whips. Swap strawberries for mango, pineapple, or even passion fruit. Each fruit brings its own unique flavor and fun twist to the treat. For a vegan or dairy-free Dole Whip, you can use different milk substitutes. Almond milk or oat milk work well. These options offer a nice flavor while keeping it plant-based. You can also choose sweeteners like maple syrup or agave nectar. These natural sweeteners fit perfectly into a vegan diet and add great taste. You can turn your Strawberry Dole Whip into a festive delight. For holiday-themed versions, add peppermint extract during winter. This makes it feel special and seasonal. In summer, try adding fresh peaches or cherries. Use whatever fruit is in season for a fresh taste. This keeps your Dole Whip exciting all year long! For the complete Strawberry Dole Whip Delight recipe, check out the [Full Recipe]. You can store leftover Strawberry Dole Whip in two ways: refrigeration or freezing. - Refrigeration: If you plan to eat it soon, put it in an airtight container. It keeps well for a day or two in the fridge. - Freezing: For longer storage, freeze the Dole Whip. Use a freezer-safe container to prevent ice crystals. To keep the texture smooth when you reheat, you need to be careful. - Best methods: The best way to refresh frozen Dole Whip is to let it sit at room temperature for about 10 minutes. This helps it soften without melting too much. - Tips: If it becomes too icy after thawing, blend it again for a creamier texture. This also brings back its delightful consistency. How long can you store Strawberry Dole Whip? - In the fridge, it lasts about 2 days. In the freezer, it can last up to 2 months. Signs of spoilage include changes in color, texture, or an off smell. If you notice any of these, it’s best to throw it away. Dole Whip started in the 1980s at Disneyland. It was made to pair with Dole Pineapple products. The treat became popular for its creamy texture and bright flavors. People loved its refreshing taste on hot days. Today, you can find Dole Whip in many flavors, like strawberry! Yes, you can! Use coconut milk or almond milk instead of dairy. These options keep it creamy and tasty. Coconut milk adds a rich flavor that pairs well with strawberries. Make sure to check your sweeteners, too. Honey and agave syrup are good choices for a dairy-free treat. To make your Dole Whip thicker, use less coconut milk. Start with the recipe's amount, then blend. If it's too thin, add more frozen strawberries. You can also blend it longer for a creamier texture. Adjust slowly, and taste as you go. Try making mango or banana soft serve, as they are fruity and creamy too. You could blend frozen mango with coconut milk for a tropical twist. Another option is to mix berries or even create a mixed fruit Dole Whip. Each version offers a fun, refreshing taste! Yes, Strawberry Dole Whip is safe for kids. It has natural ingredients like fruit and coconut milk. Always check for allergies to coconut or strawberries. The treat is sweetened with honey or agave syrup, which is safe for children. It’s a fun way to enjoy fruit! You can find Strawberry Dole Whip at some grocery stores and specialty shops. Many ice cream shops offer it too. Look for brands like Dole or local shops that make soft serve. You might even spot it at summer fairs or festivals. Enjoy the hunt for this tasty treat! To recap, we explored the delightful world of Strawberry Dole Whip. We covered ingredients, including frozen strawberries, coconut milk, and vanilla. You learned how to blend them for the perfect texture and enjoyed tips for serving. We also discussed variations, storage, and FAQs for added depth. Strawberry Dole Whip is fun, easy, and a great treat for everyone. Now, get creative with flavors and share this treat with friends and family! Enjoy every bite!

Strawberry Dole Whip Refreshing Summer Treat Recipe

Summer is here, and it’s the perfect time for a cool treat! Strawberry Dole Whip is a refreshing dessert that’s

- Fresh Peaches - Freshly Squeezed Lemon Juice - Granulated Sugar - Water - Fresh Mint Leaves - Ice Cubes To create this refreshing Peach Lemonade, gather these simple ingredients. Each one plays a key role in making your drink taste amazing. Fresh Peaches: Look for ripe, fragrant peaches. Their sweetness is vital for rich flavor. Four ripe peaches will give you a bright peach taste. Freshly Squeezed Lemon Juice: Use about six to eight medium-sized lemons. Fresh juice adds tartness, balancing the sweet peaches. Granulated Sugar: One cup of sugar is a great start. You can adjust it based on your taste. Want it sweeter? Add more sugar! Water: You need four cups total. Three cups mix with the lemon juice, and one cup helps make the peach syrup. Fresh Mint Leaves: These leaves add a nice aroma and a fresh twist. They make your drink feel fancy. Ice Cubes: Ice is essential. It keeps your lemonade chilled and refreshing on hot days. Using these ingredients, you will create a deliciously sweet and zesty Peach Lemonade. For the full experience, check the Full Recipe. To make the peach syrup, start by slicing four ripe peaches. Place the sliced peaches in a small saucepan. Add one cup of water. Heat the saucepan over medium heat. Stir occasionally to avoid sticking. Once the peaches soften, about 5-7 minutes, add one cup of granulated sugar. Mix well until the sugar dissolves completely. Remove the saucepan from heat and let it cool slightly. Strain the syrup using a fine sieve. Press down on the solids to get all the flavor. Set the syrup aside to cool completely. In a large pitcher, pour in one cup of freshly squeezed lemon juice. This usually takes about six to eight medium-sized lemons. Add the remaining three cups of water to the pitcher. Stir the mixture well until everything combines evenly. Once the peach syrup cools down, add it to the lemonade. Mix everything together until well combined. Taste your lemonade! You can add more sugar or syrup if you like it sweeter. To serve your Peachy Zesty Lemonade, fill each glass with ice cubes. Pour the lemonade over the ice. For a fun touch, garnish each glass with fresh mint leaves. This adds a nice aroma and extra flavor. Enjoy your refreshing drink on a hot summer day! When picking peaches, look for ripe fruit. Ripe peaches feel slightly soft but not mushy. Their skin should have a warm, golden color. A sweet smell means they are ready to use. Avoid peaches with dark spots or wrinkles. These signs show they might be overripe. Always choose organic peaches when you can. They taste better and are healthier for you. Sweetness is key in peach lemonade. Start with one cup of sugar. After mixing, taste the lemonade. If it’s not sweet enough, add more sugar or syrup. Stir well to dissolve the sugar completely. You can also use honey or agave syrup for a different twist. For a less sweet drink, cut down on the sugar. Remember, you can always add more, but you can't take it out. You can boost the flavor of your lemonade with simple extras. Fresh herbs like mint or basil add a nice touch. You can muddle them at the bottom of your glass. For a spicy kick, add a pinch of ginger. You can also blend in other fruits like strawberries or raspberries. These options create a fun, fruity mix. If you want a fizzy drink, try adding sparkling water. This makes your lemonade even more refreshing. These tips will help you craft the perfect Peachy Zesty Lemonade. For the complete recipe, check out the [Full Recipe]. {{image_4}} You can make a fun twist on peach lemonade by adding alcohol. Vodka works well. Use about 1.5 ounces per glass. If you want something sweeter, try peach schnapps. Add 1 ounce for a fruity flavor. Mix it into your peach lemonade before serving. For a sugar-free option, use a sugar substitute. Stevia or monk fruit can replace sugar. Start with half the amount, then taste. You can also use sparkling water instead of regular water. This keeps the drink light and bubbly. Feel free to mix other fruits into your peach lemonade. Strawberries add a nice color and taste. Blackberries or raspberries also work great. Just blend them with the peaches for a new flavor. You can even add herbs like basil for a twist. Check the Full Recipe for more ideas! Store leftover Peach Lemonade in a pitcher or jar. Use an airtight container to keep it fresh. Place it in the fridge to maintain its coolness. Make sure to consume it within a few days for the best taste. Peach Lemonade lasts about 3 to 5 days in the fridge. After that, the flavor may fade. If you notice any off smells or flavors, it's time to toss it out. Always check for freshness before serving. You can reuse peach syrup in other drinks or desserts. Pour it over pancakes or yogurt for added sweetness. If you have leftover lemons, use them in salads or dressings. Fresh mint leaves can enhance other beverages, too. Get creative and enjoy their flavors in different ways! Peach lemonade is not just tasty; it has health perks too. Peaches are high in vitamins A and C. These vitamins help keep your skin healthy and your immune system strong. The lemon juice adds vitamin C, which boosts your immune system even more. This drink is also hydrating, making it a great choice for hot summer days. Plus, it has natural sugars from the peaches, giving you a sweet taste without added junk. Yes, you can use frozen peaches! They work well when fresh peaches are not in season. Just let them thaw before using. You may need to add a bit more sugar since frozen peaches can be less sweet. Blend them well to get that peachy flavor in your drink. You can easily make peach lemonade ahead of time. Just prepare the peach syrup and lemonade mix, then store them in the fridge. Keep the syrup and lemonade separate until you are ready to serve. This way, the flavors stay fresh and bright. When it’s time to enjoy, mix them together and pour over ice. For the full recipe, check out the Peachy Zesty Lemonade section. To sum up, this guide covered how to make refreshing peach lemonade. We explored ingredients like fresh peaches, lemon juice, and mint leaves. I shared step-by-step instructions, tips for choosing peaches, and options for variations. Remember, you can adjust sweetness or add fun flavors. Proper storage can keep your drink fresh, too. Enjoy your peach lemonade, and feel free to experiment with different fruits and flavors. This drink can bring joy to any gathering or hot day. Now, it's your turn to make something delicious!

Peach Lemonade Refreshing and Easy Summer Drink

Beat the summer heat with a glass of refreshing peach lemonade! This easy drink is perfect for sunny days and

- 8 oz egg noodles - 1 lb flank steak, thinly sliced against the grain - 3 tablespoons soy sauce - 2 tablespoons oyster sauce - 1 tablespoon hoisin sauce - 1 tablespoon sesame oil - 2 tablespoons vegetable oil The base of your Mongolian beef noodles starts with egg noodles. They add a nice chewy texture. Flank steak gives a rich, meaty flavor. Slice it thinly across the grain for tenderness. The sauces—soy, oyster, and hoisin—bring deep umami notes. Sesame oil adds a nutty aroma. Vegetable oil helps to cook the beef and veggies well. - 3 cloves garlic, minced - 1-inch piece ginger, grated - 1 red bell pepper, julienned - 1 cup bok choy, chopped - 2 scallions, chopped Garlic and ginger are key aromatics. They create a strong base flavor. Red bell pepper adds sweetness and color. Bok choy keeps the dish fresh and crunchy. Scallions provide a bright finish and a bit of crunch. - 1 tablespoon brown sugar - Salt and black pepper to taste - Crushed red pepper flakes for garnish Brown sugar balances the salty sauces. Use salt and black pepper to taste. Crushed red pepper flakes add heat and a pop of color on top. These simple ingredients enhance the dish and make it special. {{ingredient_image_2}} To prepare the egg noodles, boil water in a large pot. Add the noodles and cook them according to the package instructions, usually for about 4-6 minutes. Once they are soft, drain them using a colander. Let them cool for a moment, then rinse with cold water to stop the cooking process. This step keeps the noodles from sticking together. For the marinade, you will need: - 3 tablespoons soy sauce - 2 tablespoons oyster sauce - 1 tablespoon hoisin sauce - 1 tablespoon sesame oil - 1 tablespoon brown sugar Mix these ingredients in a bowl. Add the thinly sliced flank steak. Stir well to coat the beef evenly. Marinate the beef for about 15 minutes at room temperature. This time allows the flavors to soak into the meat, making it taste great. Heat vegetable oil in a large skillet or wok over medium-high heat. When the oil is hot, add the marinated flank steak in a single layer. Cook for about 2-3 minutes on each side until the beef is browned. Avoid adding too much beef at once; this will make it steam instead of sear. Remove the beef and set it aside. In the same skillet, add minced garlic and grated ginger. Sauté for about 30 seconds, just until fragrant. Be careful not to let the garlic burn. Then, add julienned red bell pepper and chopped bok choy. Stir-fry for about 3-4 minutes. Keeping the heat high helps the vegetables stay crisp and colorful. Return the cooked beef to the skillet. Add the cooled egg noodles and toss everything together gently. Mix well to ensure the beef, vegetables, and noodles blend evenly. Taste your dish and season with salt, black pepper, and crushed red pepper flakes to adjust the spice level. This step is key to making sure each bite is flavorful. - How to slice beef correctly: Always slice flank steak against the grain. This means cutting across the fibers. This helps keep the beef tender and easy to chew. Aim for thin slices, about 1/4 inch thick. - Ensuring meat tenderness: Marinate the beef for at least 15 minutes. The soy sauce and oyster sauce will help break down tough fibers. This makes the meat juicy and flavorful. - Avoiding overcooked noodles: Follow the package instructions closely. Cook the egg noodles just until they are al dente. This means they should still have a slight bite. Drain them quickly and rinse with cold water to stop cooking. - Options for noodle substitutes: You can use rice noodles or udon noodles if you prefer. Both types work well and add a nice texture to the dish. Just adjust cooking times based on the type you choose. - How to adjust sauce ingredients: If you want a sweeter sauce, add more brown sugar. For a saltier taste, add extra soy sauce. Always taste as you mix to find the right balance for you. - Adding heat without overpowering flavors: Use crushed red pepper flakes to add spice. Start with a small amount and increase as needed. This way, you keep the dish balanced without losing other flavors. Pro Tips Marinate for Maximum Flavor: Allow the flank steak to marinate for at least 15 minutes, but for best results, consider marinating it for up to 2 hours in the refrigerator to deepen the flavor profile. Use High Heat: When cooking the steak, ensure your skillet or wok is hot enough to achieve a good sear. This will help to lock in the juices and flavor of the meat. Vegetable Variations: Feel free to substitute or add other vegetables like snap peas or broccoli. Just keep in mind the cooking times to maintain their crunch. Garnish Smartly: Always garnish your dish just before serving for the freshest taste. Scallions and crushed red pepper flakes can elevate both the presentation and flavor. {{image_4}} If you want a vegetarian twist, use tofu or seitan. These options provide great texture and flavor. Tofu absorbs sauces well, making it a perfect choice. Cut the tofu into cubes and pan-fry until golden. Seitan, made from wheat gluten, has a chewy texture. Cook it for about 5-7 minutes until heated through. This gives you a hearty vegan meal without losing the essence of Mongolian beef noodles. For a gluten-free version, swap regular noodles for rice noodles or gluten-free egg noodles. These choices keep the dish light and tasty. Check the package instructions for cooking times, as they can differ. To make the sauce gluten-free, use tamari instead of soy sauce. This simple change maintains the rich flavors while accommodating your diet. To give your dish a spicy kick, add sriracha or chili paste. Start with a small amount and taste as you go. You can also use fresh chilies for a vibrant touch. For seasonal variety, switch up the vegetables. Try broccoli, snap peas, or carrots. Each veggie brings its own flavor, keeping your dish exciting all year long. To store leftovers, let the dish cool. Then, place it in an airtight container. This keeps your Mongolian beef noodles fresh. Glass containers work well because they don’t stain. You can also use plastic containers with tight lids. Make sure to store leftovers in the fridge. They stay good for about three days. When reheating, use a skillet on low heat. This method helps keep the noodles firm. If you use a microwave, cover the dish loosely. Add a splash of water to keep moisture. Stir every minute to avoid hot spots. This way, you won't end up with soggy noodles. Yes, you can freeze Mongolian beef noodles. To freeze, let the dish cool completely first. Then, place it in a freezer-safe bag. Remove as much air as possible before sealing. It can last for about three months in the freezer. To thaw, place it in the fridge overnight. Reheat it in a skillet for the best texture. The best cut of beef for Mongolian Beef Noodles is flank steak. This cut is flavorful and tender when cooked properly. It slices easily against the grain, which helps it stay juicy. Other good options include sirloin or skirt steak, but flank steak remains my top choice. Yes, you can make Mongolian Beef Noodles ahead of time. I recommend preparing the beef and sauce a day in advance. You can also cook the noodles and store them separately. Keep everything in airtight containers in the fridge. Try to eat it within two days for the best taste. You can serve many sides with Mongolian Beef Noodles. Steamed broccoli or green beans add color and crunch. A simple cucumber salad gives a nice, fresh contrast. You might also enjoy some egg rolls or spring rolls as a tasty appetizer. Absolutely! To adjust the spice level, add less crushed red pepper flakes. If you want more heat, try adding sliced fresh chili peppers. You can also add a dash of hot sauce while cooking. Taste as you go to find your perfect balance. Mongolian Beef Noodles are a tasty dish packed with flavor and texture. You learned about the key ingredients, from egg noodles to flank steak, and the right way to cook them. We explored cooking tips and healthier variations, so you can make this meal fit your needs. Whether you want a vegetarian version or gluten-free options, you have choices. Don’t forget to store leftovers well and use the right reheating methods. Dive into this dish and enjoy every flavorful bite!

Mongolian Beef Noodles Flavorful and Easy Recipe

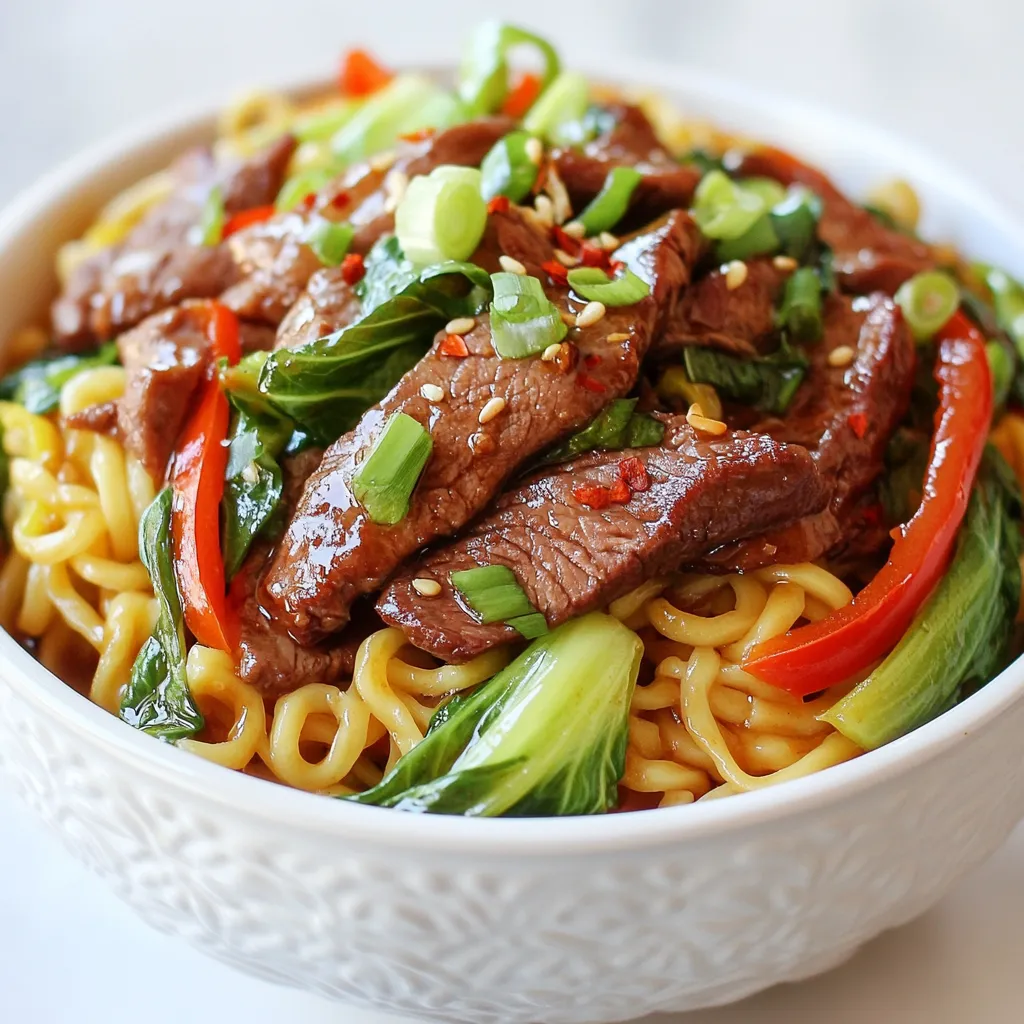
Are you ready to spice up your weeknight dinners? Mongolian Beef Noodles are both flavorful and easy to make! This

- 2 cups cooked brown rice - 1 pound ground turkey or beef - 1 can (15 oz) black beans, drained and rinsed - 1 cup corn kernels (fresh, frozen, or canned) - 1 medium onion, finely diced - 2 cloves garlic, minced - 1 tablespoon taco seasoning - 1 teaspoon ground cumin - 1 teaspoon smoked paprika - 1 cup diced tomatoes (fresh or canned) - 1 ripe avocado, diced - 1 cup shredded lettuce - ½ cup shredded cheddar cheese - Fresh cilantro leaves for garnish - Lime wedges for serving - Different proteins (e.g., chicken, tofu) - Additional toppings (e.g., sour cream, jalapeños) - Alternative grains (e.g., quinoa, cauliflower rice) This simple taco rice bowl recipe brings together big flavors and fresh ingredients. You can mix and match to make it your own. The main ingredients create a solid base. Brown rice is healthy and filling. Ground turkey or beef adds protein. Black beans and corn boost fiber and flavor. Feel free to customize your bowl! If you want a different protein, chicken or tofu works well. You can also add toppings like sour cream or jalapeños for extra flavor. If you prefer a different grain, try quinoa or cauliflower rice instead of brown rice. With these ingredients, you can create a tasty meal that suits your tastes. Mix and match to make your taco rice bowl a hit at your dinner table! {{ingredient_image_2}} - First, cook 2 cups of brown rice. Follow the package directions for the best results. - Next, finely chop one medium onion and mince two cloves of garlic. These add great flavor. - Heat a splash of olive oil in a large skillet over medium heat. - Add the chopped onion and minced garlic. Sauté for about 3–4 minutes until soft. - Now, add one pound of ground turkey or beef. Break it up with a spatula and cook until browned, about 5–7 minutes. - Sprinkle in one tablespoon of taco seasoning, one teaspoon of ground cumin, and one teaspoon of smoked paprika. Stir well to coat the meat. - Add one can of drained black beans, one cup of corn, and one cup of diced tomatoes. Mix everything together and let it simmer for about 5 minutes. - Start with a scoop of cooked brown rice in each bowl. - Layer the taco meat mixture over the rice. - Top with diced avocado, shredded lettuce, and shredded cheddar cheese. - Garnish with fresh cilantro and serve with lime wedges for a zesty touch. To make the taco meat burst with flavor, adjust the seasoning to fit your taste. Start with the taco seasoning, then add extra salt or pepper if needed. You can also mix in more spices like chili powder for a kick. When cooking the meat, use medium heat to brown it well. This helps to seal in juices and create a nice texture. Don’t rush this step; a good brown color adds depth to the flavor. Make your taco rice bowl pop with color. Use a clear bowl to showcase the layers. You can also serve the bowls family-style, allowing everyone to build their own. Pair the bowl with tortilla chips for a crunchy side, or fresh salsa for a zesty dip. A light drink, like iced tea or sparkling water, complements the meal perfectly. Prepare ingredients ahead of time for easy assembly. Cook your brown rice and store it in the fridge. Chop veggies like onion and garlic, then keep them in airtight containers. This way, you save time on busy nights. If you have leftovers, store them in separate containers. This keeps the rice and toppings fresh. Enjoy your taco rice bowl again without losing taste! Pro Tips Use Fresh Ingredients: For the best flavor, opt for fresh vegetables and herbs whenever possible. Fresh cilantro and ripe avocados can elevate your bowl significantly. Customize Your Protein: Feel free to substitute ground turkey with chicken, or even a plant-based protein like lentils or tempeh for a vegetarian option. Add Extra Spice: If you enjoy heat, consider adding chopped jalapeños or a dash of hot sauce to the taco meat mixture for an extra kick. Meal Prep Friendly: This dish is perfect for meal prepping! Cook a batch and portion it out for easy lunches or dinners throughout the week. {{image_4}} For a tasty vegetarian or vegan taco rice bowl, swap the ground turkey or beef for plant-based proteins. You can use lentils, chickpeas, or crumbled tofu. Each option adds a unique flavor and texture. For cheese lovers, try dairy-free cheese. This substitution keeps it vegan and still gives a creamy finish. To boost flavor, experiment with different spices. Try chili powder, oregano, or even a pinch of cinnamon for a twist. You can also mix in your favorite salsa or guacamole. These add vibrant flavors and a fresh touch to each bite. Adjust the spice level to fit your taste. For a milder bowl, skip hot spices. If you love heat, add jalapeños or a dash of hot sauce. You can mix in crushed red pepper for extra warmth. These simple changes let you customize heat to your liking. Store leftover taco rice bowls in the fridge. Use airtight containers to keep them fresh. This method helps prevent moisture loss and keeps flavors intact. Leftovers can last for about 3 to 4 days. You can freeze taco rice bowls for later. Portion them into single-serving containers. This makes it easy to grab when you need a quick meal. To thaw, place the container in the fridge overnight. For reheating, use the microwave or stovetop. Ensure the food is heated through. Most ingredients stay fresh for a few days in the fridge. Cooked rice lasts about 4 to 6 days. Ground meat should be used within 1 to 2 days after cooking. Look for signs of spoilage, like off smells or changes in color. If something seems off, it's best to discard it. It takes about 10 minutes to prep and 20 minutes to cook. So, the total time is 30 minutes. You can enjoy a tasty meal in no time! Yes, you can make this taco rice bowl ahead. Cook the rice and meat mix first. Store them separately in the fridge. When you're ready to eat, just reheat and assemble. This makes meal prep easy! You can use several options instead of ground turkey or beef. Try ground chicken, tofu, or lentils. Each option works well and adds its own flavor. Choose what you like best. Yes, this recipe can easily be gluten-free. Just check the taco seasoning and beans. Make sure they are labeled gluten-free. All other ingredients are naturally gluten-free, so you're good to go! Absolutely! For a slow cooker, brown the meat first, then add everything else. Cook on low for 4-6 hours. For an Instant Pot, brown the meat, then add all ingredients. Cook on high for 10 minutes and let it release naturally. Cooking methods provide tasty results too! In this article, we explored how to create a tasty taco rice bowl. You learned the key ingredients, easy instructions, and tips for perfecting the dish. Customize it with different proteins and toppings to make it your own. Remember, meal prep can save time later. Whether you want a vegetarian version or spicy twist, the options are endless. Enjoy experimenting in your kitchen. Your taco rice bowls will be a hit with family and friends. Happy cooking!

Easy Taco Rice Bowl Quick and Flavorful Meal Idea

Looking for a quick, tasty meal idea? My Easy Taco Rice Bowl is just what you need! With simple steps

To make the avocado egg salad toast, you need: - 2 ripe avocados - 4 hard-boiled eggs, peeled and coarsely chopped - 2 tablespoons creamy Greek yogurt - 1 tablespoon Dijon mustard, preferably whole grain - 1 tablespoon freshly squeezed lemon juice - ½ teaspoon garlic powder - ¼ teaspoon smoked paprika - Salt and freshly ground black pepper, to taste - 4 slices of hearty whole-grain bread - Fresh chives, finely chopped (for garnish) You can personalize your avocado egg salad with these fun add-ins: - A pinch of red pepper flakes for heat - Diced tomatoes for freshness - Chopped olives for a salty kick - A sprinkle of feta cheese for creaminess This dish is not just tasty; it’s also good for you. Here are some benefits: - Avocados provide healthy fats and vitamins. - Eggs are a great source of protein and essential nutrients. - Greek yogurt adds creaminess with less fat than mayo. - Whole-grain bread offers fiber, keeping you full longer. This meal is balanced and can energize your day! You can find the Full Recipe in the earlier section. To start, grab two ripe avocados. Slice them in half and remove the pit. Use a spoon to scoop the green flesh into a large mixing bowl. With a fork, mash the avocados. Aim for a smooth yet slightly chunky texture. This gives your salad a great mouthfeel. Now, it's time to add flavor. Take four hard-boiled eggs, peel them, and coarsely chop them. Gently fold the chopped eggs into the mashed avocado. Be careful not to break the eggs too much. Next, add two tablespoons of creamy Greek yogurt, one tablespoon of Dijon mustard, and one tablespoon of lemon juice. Mix in half a teaspoon of garlic powder and a quarter teaspoon of smoked paprika. Stir everything until well combined. Taste it and season with salt and black pepper as needed. While you mix the salad, get four slices of hearty whole-grain bread. Toast them in a toaster or on a skillet. Cook until they turn golden brown and crisp. This will create a perfect base for your creamy salad. Once toasted, spread the avocado egg salad generously on each slice. Top with finely chopped chives for a pop of flavor. If you like it spicy, add a pinch of red pepper flakes. Enjoy your delicious creation! To get that ideal creamy yet chunky texture, mash the ripe avocados carefully. Use a fork and mix until smooth but keep some small pieces. When you fold in the chopped hard-boiled eggs, be gentle. You want to avoid breaking them too much. This keeps your egg salad satisfying and textured. Taste is key! Start by adding salt and black pepper to your avocado egg salad. Then, try adding garlic powder and smoked paprika for depth. If you like it spicy, toss in a pinch of red pepper flakes. Adjust the seasoning to your liking. Fresh lemon juice adds brightness, while Greek yogurt gives creaminess and tang. Serve your avocado egg salad on toasted whole-grain bread for a crunchy base. You can top it with fresh chives for a nice pop of color. For a fun twist, try adding sliced radishes or cherry tomatoes on top. Pair it with mixed greens for a complete meal. Enjoy it as a brunch dish or a light lunch. For the full recipe, check out the Avocado Egg Salad Toast section! {{image_4}} You can change the flavor of your avocado egg salad with different seasonings. For a zesty twist, try adding a pinch of cumin or coriander. A splash of hot sauce can give it some heat. If you like it sweet, a bit of honey mustard works great. Experiment with your favorite spices to find what you love. Toppings can add crunch and flavor to your toast. Try adding sliced tomatoes or radishes for a fresh bite. You can also sprinkle sunflower seeds or pumpkin seeds on top for crunch. If you enjoy a hint of sweetness, consider adding slices of fresh fruit like figs or strawberries. Each topping can make your dish unique. For a vegan version, swap the eggs with chickpeas. Mash them up like the eggs for a similar texture. Use vegan yogurt instead of Greek yogurt for creaminess. You can also add fresh herbs like dill or cilantro for extra flavor. This way, you keep the salad tasty and plant-based. For the full recipe, check out Avocado Egg Salad Toast! To keep your avocado egg salad fresh, store it in an airtight container. This helps prevent browning. If you have leftover toast, keep the salad and bread separate. The bread can get soggy if they sit together. Consume the salad within 2 days for the best taste. To maintain freshness, use lemon juice in your salad. This simple trick slows oxidation, which keeps the color bright. Always cover the bowl tightly if you plan to store it for later. If you notice the salad darkening, just stir it. The flavor will still be tasty! You don’t need to reheat the avocado egg salad. It's best enjoyed cold. If you want to heat the bread, toast it again until crisp. Just remember, once you heat the bread, do not add the salad until you are ready to eat. This keeps everything at its best! For the complete recipe, check the [Full Recipe]. Yes, you can make avocado egg salad ahead of time. I suggest you store it in an airtight container. This keeps it fresh for about one day. The avocado may brown slightly, but the taste stays great. To slow down browning, squeeze extra lemon juice on top before sealing. This dish is best enjoyed fresh, but it works well for meal prep. Hearty whole-grain bread is my favorite choice. It has a good texture and flavor. You can also try sourdough or rye for a twist. These breads are sturdy enough to hold the creamy salad. A nice, toasted crunch adds a great contrast to the soft filling. To make avocado egg salad toast even healthier, you can swap Greek yogurt for avocado oil. This reduces calories while keeping creaminess. You can also add more veggies. Try mixing in diced bell peppers or spinach. These add nutrients without altering the taste much. Choose whole-grain bread for added fiber. Following these tips makes this dish a guilt-free delight! This blog post covered how to make avocado egg salad toast. We reviewed the ingredients and simple steps to prepare it. I shared tips for the best texture and creative serving ideas. We also explored various adaptations and how to store leftovers. My final thoughts: This dish is easy and fun to make. It’s great for any meal. I hope you feel inspired to try it today. Enjoy your cooking!

Avocado Egg Salad Toast Healthy and Simple Delight

If you’re looking for a quick, tasty, and healthy meal, you’ve found it! My Avocado Egg Salad Toast is not

To make Polish Creamy Cucumber Salad, you need some fresh ingredients. Here’s what you’ll need: - 3 medium-sized cucumbers, thinly sliced - 1 cup of creamy sour cream - 1 tablespoon of apple cider vinegar - 1 tablespoon of fresh dill, finely chopped - 1 clove of garlic, minced - 1 tablespoon of honey - Salt and freshly cracked pepper to taste - 2 green onions, chopped, for garnishing Each ingredient plays a key role in creating the dish's flavor. The cucumbers provide a refreshing crunch, while the sour cream adds creaminess. Dill gives it a nice herbal note. Garlic brings depth, and honey balances the flavors with a touch of sweetness. When choosing cucumbers, pick firm ones without blemishes. This ensures your salad will taste fresh and bright. You can use any type of cucumber, but I like the classic ones for this recipe. For the dressing, choose a good quality sour cream. It makes a big difference in taste. The apple cider vinegar adds a slight tang that contrasts perfectly with the creaminess. If you want to explore more, check out the Full Recipe for detailed steps. First, wash the cucumbers under cold running water. Make sure to remove any dirt. You can keep the skin on for a nice crunch. If you prefer a softer texture, peel them. Slice the cucumbers thinly and place them in a large mixing bowl. Next, grab a medium bowl for the dressing. Combine one cup of creamy sour cream, one tablespoon of apple cider vinegar, one tablespoon of fresh dill, one clove of minced garlic, and one tablespoon of honey. Mix these ingredients together until the dressing is smooth and well-blended. Now, pour the creamy dressing over the sliced cucumbers. Use a spatula or wooden spoon to toss the cucumbers gently. Make sure every slice gets coated in the dressing. Season the salad with a pinch of salt and a dash of freshly cracked pepper. Taste and adjust the seasoning as needed. Chilling the salad is an important step. Cover the bowl with plastic wrap or a lid. Place it in the refrigerator for at least 30 minutes. This resting time helps all the flavors blend together. Just before serving, give the salad another gentle toss. You can top it with chopped green onions for a burst of color and flavor. For the full recipe, refer to the earlier section. Using fresh ingredients makes a big difference in taste. Choose firm, bright cucumbers for the best crunch. You can add other herbs to change the flavor, like parsley or chives. A pinch of red pepper flakes can add heat if you like spice. This salad pairs well with grilled meats, like chicken or fish. It also complements hearty dishes, such as potato pancakes. For gatherings, serve it in a clear bowl to show off the vibrant colors. Garnish with extra dill or green onions for a pretty touch. {{image_4}} You can change up the creamy base in your salad. One great swap is using Greek yogurt instead of sour cream. Greek yogurt adds a nice tang and is a bit thicker. It also packs in more protein, making your salad more filling. You can also try different dressings. For instance, a light vinaigrette can give your salad a fresh twist. You might even mix in some tahini for a nutty flavor. Each option adds its own flair to this dish. Want to take your salad to the next level? Think about adding more ingredients. Chopped tomatoes or bell peppers add color and crunch. They also bring a hint of sweetness. If you like protein in your dishes, consider adding chicken or shrimp. These proteins make the salad a more complete meal. You can grill or sauté the chicken or shrimp for extra flavor. Mixing in these ingredients makes your Polish creamy cucumber salad fun and filling. To keep your Polish creamy cucumber salad fresh, use an airtight container. Glass or plastic containers work well. Make sure the lid seals tightly. This helps keep out air and moisture. Place the salad in the fridge right after you make it. It’s best to chill it quickly. If you have leftovers, try to consume them within a few days. Stir the salad gently before serving again. This ensures even dressing on the cucumbers. You can expect your salad to taste best for about 3 days in the fridge. After that, the cucumbers may become soggy, and the flavors can fade. Look for signs of spoilage, like a change in color or an off smell. If you notice any of these signs, it’s best to throw it away. For the freshest taste, enjoy the salad within the first two days. The flavors are at their peak, and the cucumbers remain crisp. If you're unsure, always trust your senses! You can store Polish creamy cucumber salad in the fridge for up to three days. Make sure to keep it in a sealed container. This helps keep the salad fresh and tasty. After three days, the cucumbers may get soggy. If you notice any off smells or changes in texture, it's best to toss it. Yes, you can make this salad ahead of time. I suggest preparing it a few hours before serving. This gives the flavors time to blend well. Just remember to chill it in the fridge. If you prepare it the night before, it will taste even better. If you don’t have fresh dill, don’t worry! You can use dried dill instead. Use about one teaspoon of dried dill for every tablespoon of fresh. Other herbs like parsley or chives can work too. They add a nice flavor. You can even skip the herbs if you prefer a simpler taste. Yes, this salad is naturally gluten-free. All the ingredients are safe for a gluten-free diet. Just check your sour cream label to be sure it is gluten-free. This salad makes a great option for those with gluten sensitivities. Enjoy this dish knowing it fits many dietary needs. For the full recipe, check out the section above. This blog post guides you to create a refreshing Polish Creamy Cucumber Salad. We covered the ingredients, the easy steps for preparation, and tips for serving. You can enhance flavors with fresh herbs and try fun variations. Proper storage helps maintain freshness, and we answered common questions to aid your cooking. Enjoy this salad at your next meal. It’s fresh, simple, and tasty!

Polish Creamy Cucumber Salad Fresh and Flavorful Dish

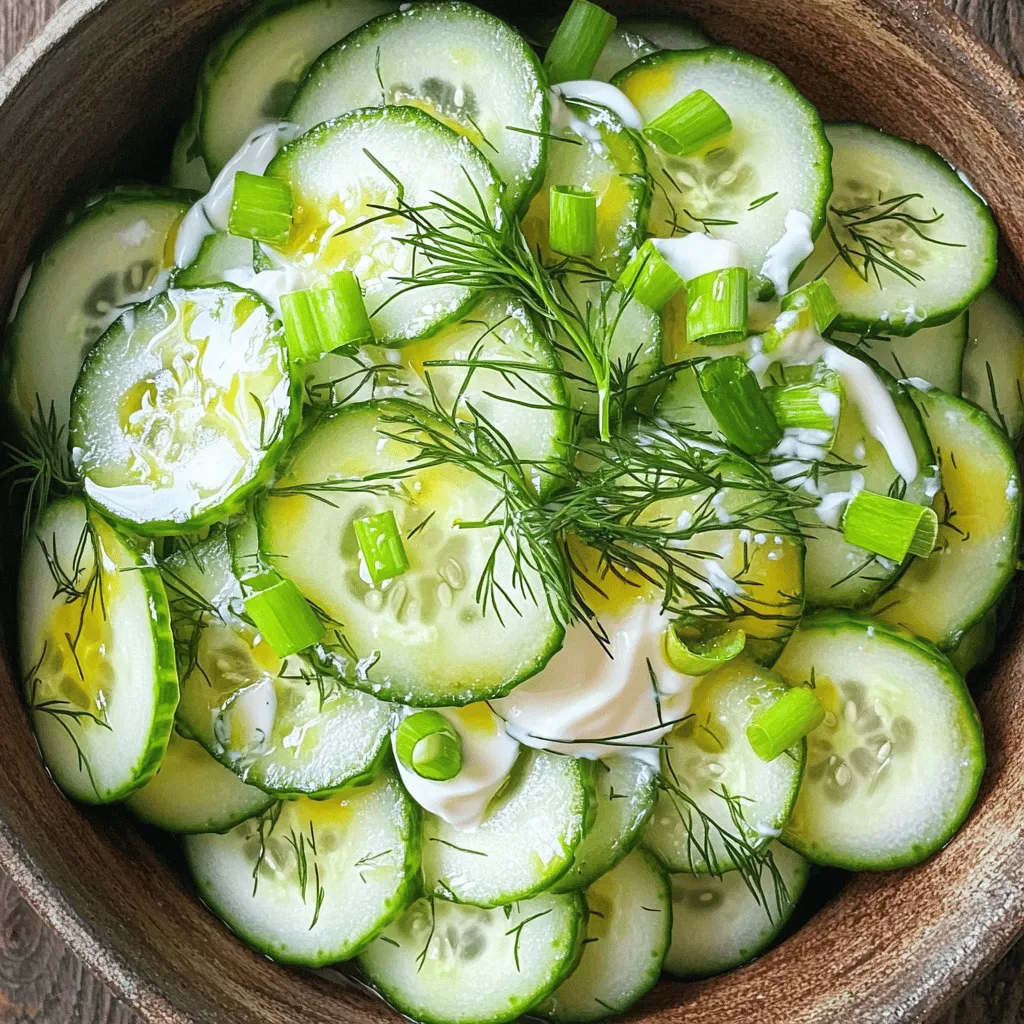
Looking for a fresh and flavorful dish that’s perfect for any meal? This Polish Creamy Cucumber Salad is just what

For a bright and tasty Orzo Summer Salad, you need fresh veggies. Here’s what to use: - 1 cup orzo pasta - 1 cup cherry tomatoes, halved - 1 medium cucumber, diced - 1 bell pepper (red or yellow for sweetness), diced - 1/2 medium red onion, finely chopped - 1/4 cup fresh basil leaves, chiffonade Each of these ingredients adds a burst of flavor. The cherry tomatoes bring sweetness, while the cucumber adds crunch. The bell pepper gives a lovely color and taste. Fresh basil offers an aromatic touch that brightens the salad. Adding protein makes your salad more filling. You can choose from: - 1/4 cup feta cheese, crumbled - Optional: 1/4 cup black olives, pitted and sliced Feta cheese adds creaminess and a nice saltiness. If you want more protein, consider adding grilled chicken or shrimp. Both options work well with the fresh flavors in the salad. The dressing is key to bringing all the flavors together. You will need: - 3 tablespoons extra virgin olive oil - 2 tablespoons freshly squeezed lemon juice - Sea salt and freshly cracked black pepper, to taste This simple dressing is light and refreshing. The olive oil adds richness, while the lemon juice gives a zesty kick. Adjust the salt and pepper to your taste. For a little twist, you can add a dash of honey or mustard for extra flavor. You can find the Full Recipe to create this delightful dish. Start by boiling salted water in a large pot. Once the water is boiling, add 1 cup of orzo pasta. Cook it for about 8 to 10 minutes, or until it is al dente. This means it should still have a slight bite to it. After cooking, drain the orzo in a colander. Rinse it under cold water to stop the cooking and cool it down. This step keeps the orzo from getting mushy. In a big mixing bowl, combine the cooled orzo with the rest of your fresh ingredients. Add 1 cup of halved cherry tomatoes, 1 medium diced cucumber, and 1 diced bell pepper. You can choose red or yellow for a sweet flavor. Next, add 1/2 medium chopped red onion. For some fresh flavor, toss in 1/4 cup of chiffonade basil leaves. If you love cheese, include 1/4 cup of crumbled feta. If you want a briny kick, add 1/4 cup of black olives. In a small bowl, mix together 3 tablespoons of extra virgin olive oil and 2 tablespoons of freshly squeezed lemon juice. Add a pinch of sea salt and some freshly cracked black pepper for taste. Whisk this mixture until it blends well. Drizzle it over your salad mix. Gently toss everything together with a large spoon. Make sure all the ingredients are coated nicely. Taste your salad and adjust the seasoning if needed. Let the salad sit for about 10 minutes. This allows the flavors to blend beautifully. For the full recipe, refer to the main section. To cook orzo well, start with plenty of water. Use a large pot and add a good amount of salt. This helps flavor the pasta. Bring the water to a boil before adding the orzo. Cook it for 8 to 10 minutes, until it is al dente. Taste a piece to check. Once done, drain it in a colander. Rinse the orzo under cold water. This stops the cooking process and cools it down. This step is key for a great Orzo Summer Salad. You can add zest to your salad with a few simple tricks. Try using fresh herbs like basil and mint. They bring bright flavors. A squeeze of lemon juice adds freshness too. For a kick, include some red pepper flakes. They add a nice heat without overpowering the dish. Sea salt and freshly cracked black pepper are must-haves. They bring out the taste of each ingredient. Always taste your salad before serving. Adjust the seasoning to suit your palate. Make your salad look as good as it tastes. Serve it in a large, colorful bowl. Garnish with extra basil leaves on top. A sprinkle of feta cheese adds a nice touch. For a fun idea, layer the salad in mason jars. This makes a cute picnic option. It also keeps the salad fresh. You can serve it right away or let it sit for a while. Letting it rest helps the flavors blend. For the full recipe, check out the details above. Enjoy every bite! {{image_4}} You can easily add grilled chicken or shrimp to your orzo summer salad. This boosts the protein and makes it more filling. Simply grill your choice of meat until it is cooked through and has nice grill marks. Slice it into bite-sized pieces and mix it into the salad. Chicken adds a mild flavor, while shrimp gives a sweet touch. Both pair well with the fresh veggies and dressing. For a vegetarian version, skip the meat and add extra cheese or nuts. Feta cheese adds creaminess, or you can use goat cheese for a tangy twist. To make it vegan, swap the feta for tofu or avocado. Both give a rich texture and flavor. You can also add chickpeas for protein. They are tasty and fill you up without meat. Feel free to swap in seasonal ingredients for a fresh twist. In summer, add zucchini or corn for sweetness. In fall, consider roasted butternut squash or apples for a cozy touch. Winter might call for kale or Brussels sprouts, lightly sautéed first. This keeps your salad exciting all year round. You can find the full recipe in the main section for easy reference. Store your Orzo Summer Salad in an airtight container. This keeps it fresh and tasty. If you have leftover dressing, store it separately. The salad will last longer this way. Make sure to use a container that is big enough to hold all the salad without squishing it. Your salad will stay good in the fridge for about three days. After that, the vegetables may get soggy. Check for any signs of spoilage before eating. If it smells off or looks unappetizing, it is best to throw it away. You can enjoy this salad cold or warm. If you want to warm it, use the microwave. Place it in a bowl and cover it with a damp paper towel. Heat it for about 30 seconds. Stir and check the temperature. Do this until it reaches your desired warmth. Avoid overheating, as it can make the salad mushy. Enjoy your leftovers with a fresh twist! Yes, you can make this salad ahead of time. Prepare it up to a day in advance. Just store it in the fridge, covered. The flavors improve as it sits. If you add dressing, do it right before serving. This keeps the salad fresh and crisp. You can use other small pasta types like ditalini or couscous. Quinoa works well, too, if you want a gluten-free option. Rice is another good choice. Just remember to adjust the cooking time as needed. The salad is not gluten-free if you use traditional orzo. However, you can easily make it gluten-free. Just substitute orzo with gluten-free pasta or quinoa. This way, you can enjoy the salad without worry. For the full recipe, check out the Orzo Summer Salad Delight! This blog post covered how to make a tasty Orzo Summer Salad. We explored fresh veggies, protein options, and dressing staples. I shared step-by-step instructions to prepare your salad with ease. Tips like cooking orzo perfectly and boosting flavor were included. Remember, you can customize this salad with grilled chicken, seasonal veggies, or make it vegan. Store leftovers correctly for later enjoyment. Enjoy making this colorful and healthy dish. I hope it brightens your meals!

Orzo Summer Salad Refreshing and Simple Recipe

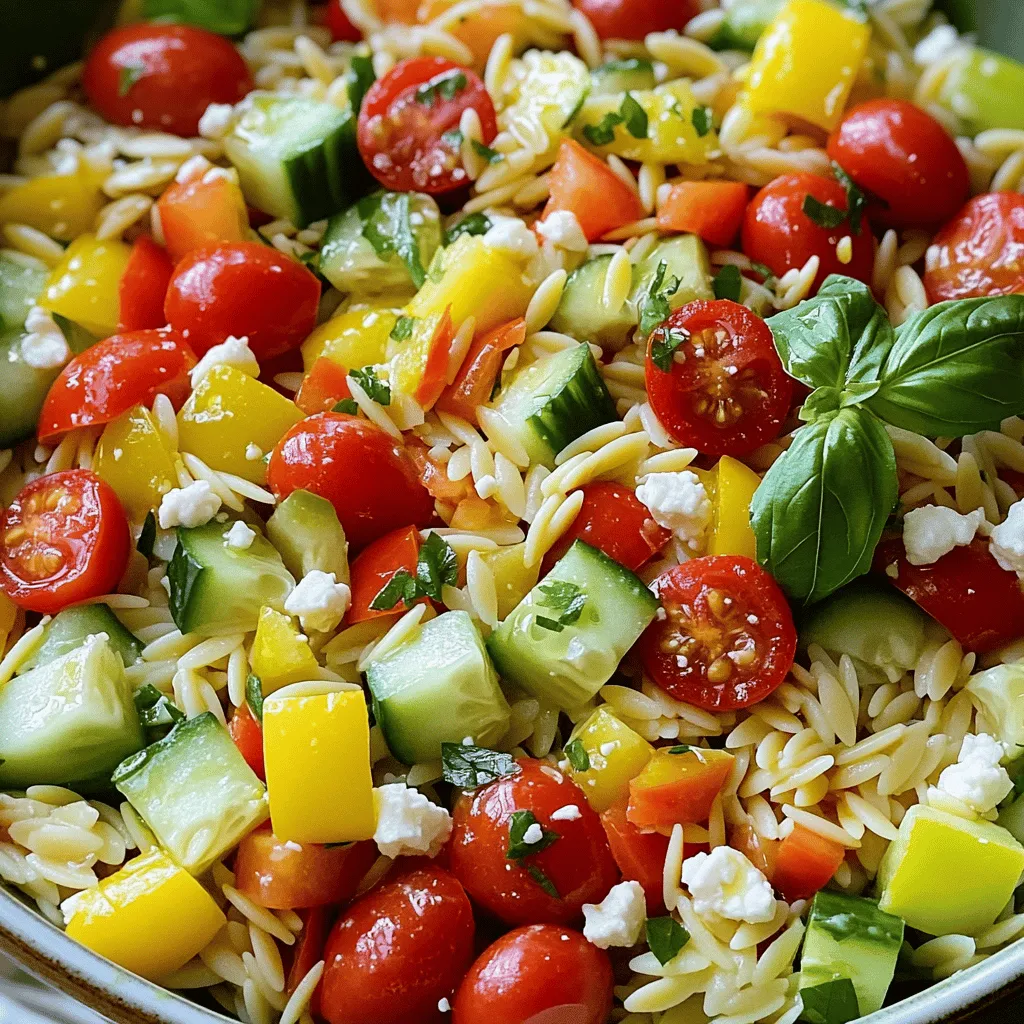
Looking for a dish that’s fresh, tasty, and easy to make? My Orzo Summer Salad is the perfect choice! Packed

Older posts
Newer posts
← Previous Page1 … Page33 Page34 Page35 … Page91 Next →

dsad

© 2025 recipesstation • Built with GeneratePress

Our Policies

  • Copyright Policy
  • Cookie Policy
  • GDPR Policy
  • Privacy Policy
  • Disclaimer
  • Terms Of Use

More Information

  • Home
  • About
  • Contact
  • Appetizers
  • Dessert
  • Dinner
  • Drinks
©2025, recipesstation About Back To Top