Skip to content
DisclaimerTerms Of UseGDPR PolicyCookie Policy

recipesstation

  • Home
  • Drinks
  • Appetizers
  • Dinner
  • Dessert
  • About
  • Contact
  • Privacy Policy
DisclaimerTerms Of UseGDPR PolicyCookie Policy

Emily

To make Mango Sago Dessert Pudding, gather these simple ingredients: - Ripe mango - diced into small cubes - Small tapioca pearls (sago) - 1 cup - Coconut milk - 1 can (400ml) - Sugar - 1/2 cup (or to taste) - Salt - 1/4 teaspoon - Water - 1 cup - Pure vanilla extract - 1/2 teaspoon - Extras for garnish - mango slices and fresh mint leaves Each ingredient plays a key role in the final taste. The ripe mango gives a sweet and fruity flavor. The small tapioca pearls offer a unique chewy texture. Coconut milk adds richness and creaminess, making each bite a delight. Adjust the sugar to match your desired sweetness. The salt balances the flavors nicely. Remember, fresh mint leaves not only add color but also a refreshing scent! For the full recipe, check out the details on how to combine these ingredients for the perfect dessert. - Bring 1 cup of water to a boil. - Add 1 cup of small tapioca pearls and cook until they turn translucent. First, you need to cook the sago. Use a medium saucepan and bring the water to a boil. Once boiling, slowly add the tapioca pearls. Stir gently to stop them from sticking. Cook the pearls for about 15 to 20 minutes. You want them to look clear and feel a bit chewy. After cooking, drain the sago using a fine mesh strainer. Then rinse them under cold water to stop the cooking process. This step is key to getting the right texture. - Combine 1 can of coconut milk, 1/2 cup sugar, and 1/4 teaspoon salt. - Heat gently while stirring until the sugar dissolves. Next, prepare the coconut milk mixture. In the same saucepan, pour in the coconut milk. Add the sugar and salt. Heat the mixture on low to medium heat. Stir it often until the sugar fully dissolves. Be careful not to let it boil. This will keep the coconut milk smooth and creamy. - Fold in the cooked sago and 1/2 teaspoon pure vanilla extract. - Simmer to blend flavors. Now, mix in the cooked sago. Gently fold it into the coconut milk mixture. Add the vanilla extract for extra flavor. Let it simmer on low heat for about 5 minutes. This helps all the flavors blend well. - Mix in diced mango and reserve some for garnish. - Gently combine to preserve fruit texture. It’s time to add the mango. Remove the saucepan from heat and mix in the diced mango. Make sure to save a few pieces for later. Stir gently so you keep the mango cubes intact. This way, you get nice bites of fruit in every spoonful. - Transfer to dessert bowls and cover. - Refrigerate for at least 2 hours. After mixing, transfer the pudding into dessert bowls. Cover them with plastic wrap to keep them fresh. Place them in the fridge for at least 2 hours. This lets the pudding cool and set up nicely. - Garnish with reserved mango and mint leaves. - Suggested presentation tips. When you are ready to serve, take the pudding out of the fridge. Garnish each bowl with the reserved mango pieces. Add a sprig of fresh mint for a nice touch. For a great look, use clear glass bowls. This way, everyone can see the beautiful layers of mango and sago. You can even drizzle a bit of coconut milk on top just before serving for an extra treat. For the full recipe, check out the Mango Sago Bliss Pudding details. To get the best texture for your sago, cook it just right. The optimal cooking time is 15-20 minutes. Keep stirring gently to avoid sticking. You want the pearls to be clear with a slight chewiness. After cooking, rinse the sago under cold water. This stops the cooking and removes extra starch. It helps each pearl stay separate and tender. You can boost flavor with extra fruits or extracts. Try adding diced kiwi, strawberries, or even a splash of lime juice. These can add a zesty twist. Adjust the sweetness to your liking, too. Start with half a cup of sugar and taste. Add more if you want it sweeter. Always remember, you can always add, but you can't take away. How you serve makes a big difference. Use clear glass bowls to show off those beautiful layers. You can drizzle some coconut milk on top just before serving. This gives a nice gloss. For special occasions, add a sprig of mint on each bowl. It not only looks great but also adds a fresh scent. Use these tips to make your dessert look extra special. {{image_4}} You can use many fruits in this dessert. Instead of mango, try ripe bananas or sweet pineapples. Both fruits add a nice taste and texture. You can also create a fruit medley. Mix mango with lychee or kiwi for a fun twist. The sweetness of these fruits pairs well with coconut and sago. If you want a vegan dessert, it’s easy! Ensure your coconut milk has no added dairy. You can find many brands that offer pure coconut milk. For a creamy touch, use cashew cream or almond milk as a substitute. Both options are dairy-free and taste great. You can also use coconut whipped cream as a garnish for a vegan-friendly touch. You can blend sago with different flavors for fun. Try adding a splash of lime juice for zing. Or mix in some matcha powder for a unique taste. These flavor combinations give your dessert a new twist. For an exotic touch, add a hint of pandan or rose water. Enjoy experimenting with these fun ideas to make your dessert special! To keep your Mango Sago Dessert Pudding fresh, store it in the fridge. Use airtight containers to avoid moisture loss. Plastic or glass containers work best. Make sure to cover the pudding tightly to keep it from soaking up other smells. You can keep this dessert in the fridge for up to three days. Check for signs of spoilage before eating. If you see any changes in color or smell a sour odor, it’s time to toss it. A good pudding should look bright and smell sweet. Freezing this pudding is possible but may change its texture. To freeze, pour the pudding into a freezer-safe container. Leave some space at the top for expansion. When you’re ready to eat, thaw it in the fridge overnight. Avoid microwaving to thaw, as it can make the pudding soggy. Serve chilled after thawing for the best taste. For the full recipe, check out the earlier sections and enjoy your delightful treat! Mango Sago Dessert Pudding is a sweet and creamy treat. It blends ripe mango, sago, and coconut milk. This dish comes from Southeast Asia, often enjoyed in summer. The bright mango flavor pairs well with chewy sago. It is a favorite in many Asian cultures, known for its refreshing taste. Yes, you can prepare Mango Sago Dessert Pudding a day ahead. Just follow the Full Recipe and chill it. This way, the flavors have time to mix. Make sure to store it in the fridge. It will stay fresh and tasty until you serve it. You can tell sago is cooked when it is translucent. It should feel slightly chewy but not hard. Stir the pearls while cooking to avoid sticking. After 15-20 minutes, taste a pearl to check the texture. If it is soft and clear, it is ready! Yes, you can use almond milk or soy milk instead. Both options will change the flavor slightly. Almond milk is lighter, while soy milk is creamier. If you want a richer taste, use heavy cream. Be aware that this may affect the final texture. Yes, Mango Sago Dessert Pudding is naturally gluten-free. The main ingredients, sago and coconut milk, do not contain gluten. Always check labels on store-bought coconut milk for cross-contamination. This dessert is perfect for those on gluten-free diets! This blog post provided a detailed guide to making Mango Sago Dessert Pudding. You learned about the key ingredients, the step-by-step cooking process, and tips to enhance flavor and presentation. Remember, you can customize this dessert with different fruits or flavors. Proper storage helps maintain freshness, too. While this dish is easy to prepare, it offers joy and tradition in every bite. Enjoy creating your perfect Mango Sago, and delight your friends and family!

Mango Sago Dessert Pudding Delightful and Easy Recipe

Are you ready to enjoy a sweet treat that’s both simple and yummy? Mango Sago Dessert Pudding is a tropical

- 2 cups fresh strawberries, hulled and sliced - 1/4 cup freshly squeezed lime juice - Garnishes: lime slices and strawberry halves Fresh ingredients bring bright flavors. The strawberries give a sweet and juicy taste. Lime juice adds a zesty kick. Together, they balance perfectly. You can’t beat the freshness of ripe strawberries. For the best taste, choose vibrant, firm strawberries. Slicing them lets their juices mix better with lime. - 1/4 cup agave syrup or honey - How to adjust sweetness to taste Sweeteners help balance the tartness of lime. I love using agave syrup or honey to sweeten my drink. Start with 1/4 cup. Then, taste it. If you want it sweeter, add more. Remember, a little goes a long way. You can always add more, but you can't take it out! - 2 cups sparkling water or lime-flavored soda - Ice cubes For the fizz, use sparkling water or lime soda. The bubbles make the drink lively. Ice cubes keep it cold and refreshing. Fill your glass with ice before pouring the mocktail. This way, your drink stays chilled longer. Mixing these base ingredients creates a fun, bubbly drink for everyone. Start with your glasses. First, take a fresh lime and cut it in half. Rub the cut edge along the rim of each glass. Next, pour some sea salt onto a small plate. Dip the glass rim into the salt. This creates a tasty border. After rimming, set the glasses aside for later use. Now it’s time to make the puree. Grab your blender and add the hulled and sliced strawberries. Pour in the freshly squeezed lime juice. If you like sweetness, add agave syrup or honey. Blend everything on high until you have a smooth puree. After blending, taste it. If you want it sweeter, add more agave or honey slowly. In a large pitcher, gently mix the strawberry puree with sparkling water or lime soda. Stir carefully to keep the bubbles intact. This fizz makes your drink special! Once mixed, fill each glass with ice cubes. Then, pour the strawberry-lime mixture over the ice. The fizz will create a beautiful effect. Garnish each drink with a lime slice and a strawberry half. Enjoy your refreshing Strawberry Lime Margarita Mocktail! For the full recipe, check the detailed instructions above. To make your Strawberry Lime Margarita Mocktail shine, focus on color and style. Use bright, colorful glassware to catch the eye. Choose glasses that highlight the mocktail's vivid red and green hues. Setting the drinks on a lively tablecloth adds fun. I love to place small bowls of fresh strawberries and lime wedges next to the drinks. This makes for a cheerful and inviting display. Serving this mocktail chilled is key for the best taste. Start by chilling your glasses in the fridge or freezer. This keeps the drink cool longer. When ready, fill the glasses with ice cubes. Use large ice cubes to slow melting. This way, your drink stays cold without watering it down too fast. Creating a visually appealing mocktail is simple. The bright red of strawberries and green from lime make a stunning contrast. For garnishing, add a slice of lime on the rim and a strawberry half hanging over the edge. This adds a nice touch. You can also sprinkle some sea salt on the rim if you like a salty kick. This not only looks great, but it also enhances the flavors of the drink. {{image_4}} You can play with the fruits in this mocktail. Blueberries and raspberries are great choices. They add a new taste and color to your drink. You can use them in the same way as strawberries. You can also switch up the citrus. Lemons and oranges work well too. Lemon gives a nice tartness, while orange adds sweetness. Both can make your drink even more refreshing. If you're looking to change the sweetness, there are options! Agave and honey are popular. They mix well and give a nice flavor. You can also use natural fruit juices. Pineapple or mango juice can add sweetness and a fun twist. Just add them to the blender with your other ingredients. Want to spice things up? Add fresh herbs like mint or basil. They bring a cool flavor that pairs well with the fruit. Just a few leaves will do! You can also try a little spice. A dash of cayenne can give your drink a kick. It adds heat and makes your taste buds dance. Just be careful not to add too much! For the full recipe, check out the detailed instructions above. To keep fresh strawberries and limes, store them in the fridge. Place strawberries in a container lined with paper towels. This helps absorb moisture. Do not wash them until you are ready to use them. For limes, keep them in a fruit drawer. This helps them stay firm and juicy. Avoid keeping them near apples or bananas. These fruits emit ethylene gas, which can spoil limes faster. If you have leftover mocktail mixture, store it in a sealed pitcher. Keep it in the fridge for up to two days. To enjoy the best taste, drink it within 24 hours. The longer it sits, the fizz may fade. If you notice a change in taste, add fresh lime juice or sweetener to brighten it up. You can get creative with leftover strawberries and lime juice. Use extra strawberries in yogurt or smoothies. They also taste great in salads. For lime juice, add it to dressings or marinades. You can even freeze leftover mocktail in ice cube trays. These cubes can add fun flavor to future drinks. A Strawberry Lime Margarita Mocktail is a fun, non-alcoholic drink. It combines fresh strawberries and tangy lime juice for a sweet and zesty flavor. This drink gives you all the taste of a traditional margarita without the alcohol. It’s perfect for parties or just a hot day at home. You can make it easily with fresh ingredients like strawberries, lime juice, and sparkling water. This refreshing drink is great for everyone to enjoy! Yes, you can prepare this mocktail ahead of time. Start by making the strawberry puree and store it in the fridge. You can mix it with sparkling water just before serving. This keeps the fizz and flavor fresh. If you want to save time, pre-slice the strawberries and limes. Just remember, avoid mixing everything too early to keep it bubbly. This mocktail has many health benefits thanks to fresh fruits. Strawberries are packed with vitamins and antioxidants. They help boost your immune system and keep your skin healthy. Limes provide vitamin C, which is great for your health too. Using agave syrup or honey adds natural sweetness without extra refined sugar. Enjoying this drink means you get tasty flavors and good nutrition at the same time. You can easily scale this recipe for a party. Simply double or triple the ingredients based on how many guests you have. For example, use 4 cups of strawberries and 1/2 cup of lime juice for a larger batch. Make sure to keep the same proportions for the other ingredients. Mix it in a big pitcher and serve in multiple glasses. This way, everyone can enjoy a refreshing drink together. For the full recipe, check out the details above! This blog post showed you how to make a tasty Strawberry Lime Margarita Mocktail. We covered fresh ingredients, sweeteners, and base ingredients. You learned the steps for preparing and mixing, plus tips for serving. We also explored fun variations and storage tips. In conclusion, this mocktail offers a fun, flavorful drink for everyone. It’s easy to customize and perfect for any occasion. Enjoy making it and impress your guests with your skills!

Strawberry Lime Margarita Mocktail Refreshing Delight

Looking for a refreshing drink that’s fun and fruity? Let me introduce you to the Strawberry Lime Margarita Mocktail! This

- 4 cups mixed greens (spinach, arugula, baby kale) - 2 cups ripe strawberries, hulled and sliced - 1 cup crunchy granola - 1/2 cup feta cheese, crumbled - 1/4 cup sliced almonds - 1/4 red onion, paper-thin slices The base of this salad shines with fresh greens. I love using a mix of spinach, arugula, and baby kale. Each green adds its unique taste and texture. The ripe strawberries bring a sweet burst of flavor. I slice them into bite-sized pieces for easy eating. Crunchy granola adds a satisfying layer of texture. Look for granola with no added sugars for a healthier option. The creamy feta cheese pairs well with the sweet strawberries. I crumble it over the top for a tasty touch. Sliced almonds add extra crunch and nutty flavor. Finally, thin slices of red onion give a sharp balance to the salad. - 3 tablespoons apple cider vinegar - 2 tablespoons honey - 1/4 cup extra virgin olive oil - 1 teaspoon Dijon mustard - Salt and black pepper The dressing is vital for tying all flavors together. I use apple cider vinegar for its tangy kick. Honey sweetens the dressing and balances the vinegar's acidity. Extra virgin olive oil gives it a rich texture. Dijon mustard adds depth and a slight spice. To finish, I season it with salt and black pepper. These simple ingredients create a zesty vinaigrette that enhances the salad. - Prep time: 15 minutes - Total time: 15 minutes - Servings: 4 This salad is quick to make, taking just 15 minutes. It serves four people, making it perfect for a family meal or a small gathering. You can find the full recipe for more details on making this delicious dish. To start, you need to whisk the dressing ingredients. In a small bowl, combine: - 3 tablespoons apple cider vinegar - 2 tablespoons honey - 1 teaspoon Dijon mustard - Salt and freshly ground black pepper to taste Mix these well until they blend smoothly. This step is key for a tasty vinaigrette. Next, it’s time to emulsify the vinaigrette. While you whisk, slowly drizzle in: - 1/4 cup extra virgin olive oil Keep whisking until the mixture looks silky. This means the oil and vinegar are combined well. Set this zesty vinaigrette aside to let the flavors meld. Now, let’s move on to the salad. In a big bowl, combine: - 4 cups mixed greens - 2 cups ripe strawberries, hulled and sliced - 1/4 red onion, paper-thin slices - 1/2 cup feta cheese, crumbled Mix these ingredients gently. They should be well combined but not squished. After that, drizzle the prepared vinaigrette over the salad. Toss everything together. Make sure the dressing coats all the ingredients evenly. Before serving, add the final touches. Scatter: - 1 cup crunchy granola - 1/4 cup sliced almonds, lightly toasted This adds a lovely crunch. For presentation, serve the salad in a beautiful bowl or on individual plates. You can garnish with an extra strawberry on top. A little drizzle of vinaigrette on the side makes it look fancy. Enjoy this Strawberry Crunch Salad with Champagne Vinaigrette! For the complete recipe, check the Full Recipe. To pick ripe, flavorful strawberries, look for bright red color. They should feel firm but not hard. A sweet scent often means they are ripe and ready to eat. Avoid berries with green or white spots. Check for any signs of mold or softness. Fresh strawberries should feel plump and have a shiny skin. If you can, buy them at a local market. They often have better flavor than store-bought ones. You can prepare parts of the salad ahead of time. Wash and slice the strawberries a few hours before serving. Store them in the fridge in a covered bowl. This keeps them fresh and tasty. You can also make the vinaigrette a day in advance. Just whisk all the dressing ingredients together and store it in a jar. Shake it well before using. Keep the granola and nuts separate until you serve the salad. This keeps them crunchy. To add more flavor, consider seasonal fruits like blueberries or peaches. Nuts, like walnuts or pecans, can add a nice crunch. You can even mix in some herbs, like mint or basil, for a fresh twist. Try using different types of cheese too. Goat cheese offers a tangy taste that works well. Remember, the key is to balance flavors and textures for a delightful bite. For the full recipe, check out the complete guide to Strawberry Crunch Salad with Champagne Vinaigrette. {{image_4}} You can switch the greens for different flavors. Try using romaine or butter lettuce for a milder taste. Kale adds a hearty crunch, while arugula gives a peppery kick. You can also mix in some watercress for a fresh, bright note. Each green brings its unique texture and flavor to the salad. If you want a vegan option, you can leave out the feta cheese. Try using vegan cheese made from nuts or tofu. These alternatives can mimic the creaminess of feta without dairy. Nutritional yeast is another great option. It adds a cheesy flavor while keeping things plant-based. Add proteins like grilled chicken or shrimp for a filling meal. For a vegetarian option, try chickpeas or black beans. Other crunchy elements include sunflower seeds or pumpkin seeds. These toppings enhance the salad's texture and flavor, making it even more enjoyable. For the complete recipe, check out the Full Recipe section. To keep your Strawberry Crunch Salad fresh, store it in an airtight container. Layer the ingredients to avoid sogginess. Place the mixed greens, strawberries, and feta at the bottom. Keep the crunchy granola and almonds separate to maintain their crispness. This way, you can enjoy the salad just like when it was freshly made. Always store the vinaigrette apart from the salad. This keeps the greens from wilting. If you mix the dressing with the salad too early, it will lose its crunch. By keeping the vinaigrette separate, you can drizzle it just before serving. This method ensures your salad remains vibrant and fresh. In the fridge, the salad lasts about 1-2 days. The vinaigrette can remain fresh for up to a week. However, the salad loses its crispness over time. Always check for any signs of spoilage before eating. For the best taste, eat the salad within a day of making it. For the full recipe, visit the main article. Yes, you can use frozen strawberries. However, there are some things to think about. Frozen strawberries can be soft when thawed. This might change the texture of your salad. If you use them, thaw and drain them first. Pat them dry to remove excess moisture. This way, your salad stays fresh and crunchy. Yes, this salad can be gluten-free. You just need to check the granola and other ingredients. Some granolas have gluten. Look for brands that specifically say "gluten-free." Also, check any packaged items for hidden gluten. When you choose good ingredients, you keep the salad safe for everyone. If you want a heartier salad, add grains or proteins. Quinoa or farro makes a great base. You could also mix in grilled chicken or chickpeas. These additions give more flavor and make your salad satisfying. Toss them in with the greens and strawberries for a complete meal. This salad recipe is simple and full of flavor. You can mix fresh greens with ripe strawberries, crunchy granola, and creamy feta. The homemade vinaigrette adds a tasty kick. Remember to serve the granola and nuts last for crunch. You can try different greens or toppings for a twist. Store leftovers carefully for best taste. Enjoy your fresh salad anytime!

Strawberry Crunch Salad with Champagne Vinaigrette Delight

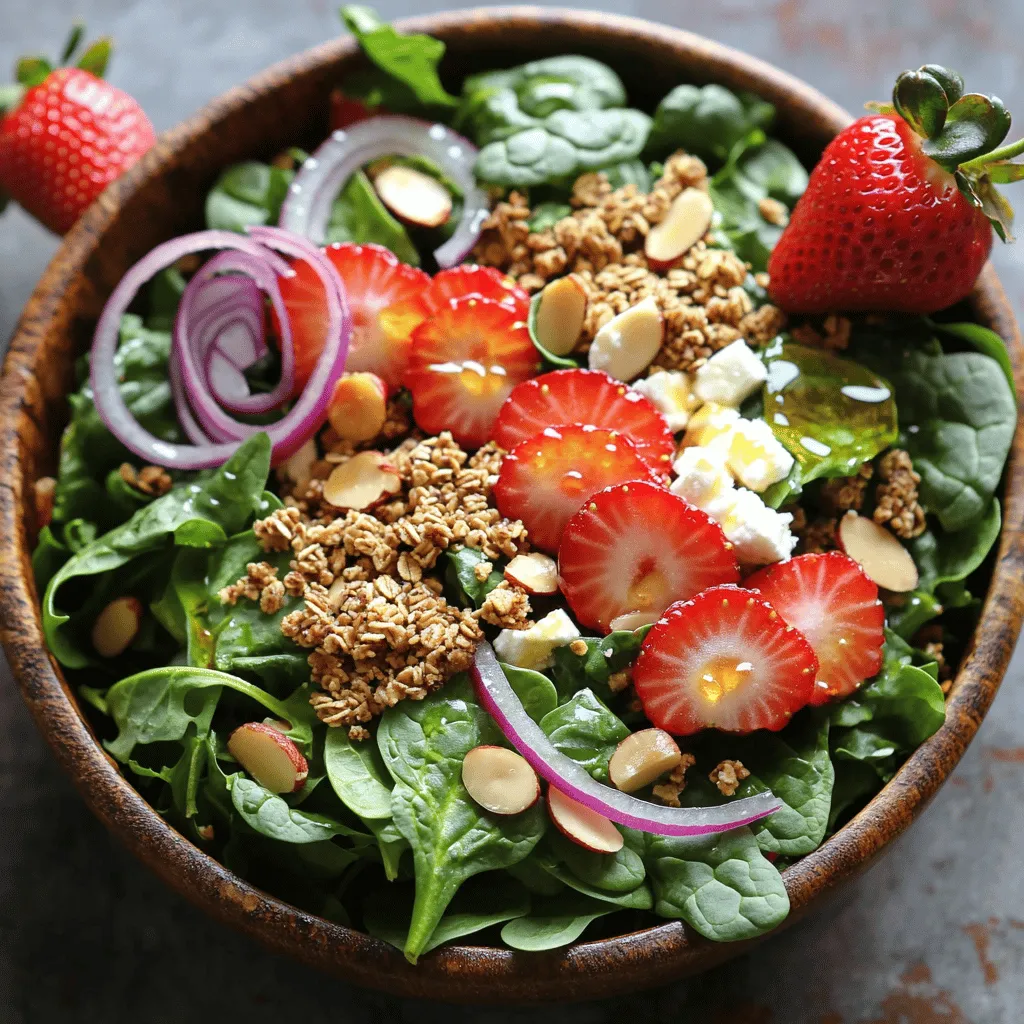
Welcome to your new favorite dish: Strawberry Crunch Salad with Champagne Vinaigrette! This delightful salad combines fresh mixed greens, ripe

To make Greek loaded hummus, you need some key ingredients. Here’s what to gather: - 1 can (15 oz) chickpeas, thoroughly drained and rinsed - 1/4 cup tahini (sesame paste) - 2 tablespoons freshly squeezed lemon juice - 2 cloves garlic, finely minced - 1/4 cup extra virgin olive oil - 1 teaspoon ground cumin - Sea salt, to taste These main ingredients create a smooth and rich base. The chickpeas provide protein, while tahini adds creaminess. Fresh lemon juice gives it a zesty kick, and garlic brings in great flavor. Now, let's talk about the toppings that make this dish pop! Here are the delicious extras you’ll want to add: - 1/2 cup cherry tomatoes, halved - 1/2 cucumber, diced into small cubes - 1/4 red onion, finely chopped - 1/2 cup Kalamata olives, pitted and sliced - 1/2 cup feta cheese, crumbled - Fresh parsley leaves, for garnish These toppings add color and texture. The tomatoes and cucumbers bring freshness, while olives and feta add a salty bite. Together, they create a feast for the eyes and taste buds. When serving Greek loaded hummus, it’s important to choose the right pairings. I recommend: - Pita bread, warmed - Fresh vegetable sticks (like carrots, bell peppers, or celery) Pita bread is a classic choice. It’s soft and perfect for scooping. Fresh veggies add crunch and make it even healthier. Enjoy this tasty dish with your favorite sides! For the full recipe, check out [Full Recipe]. To start, I place one can of chickpeas into a food processor. I always drain and rinse them first. Next, I add 1/4 cup of tahini. Then, I squeeze two tablespoons of fresh lemon juice. I also add two cloves of minced garlic. Now, I pour in 1/4 cup of extra virgin olive oil and one teaspoon of ground cumin. I sprinkle in sea salt to taste. I blend everything until it’s smooth and creamy. If it’s too thick, I add a little water or more olive oil. Once blended, I carefully transfer the hummus into a shallow dish. I use the back of a spoon to create a well in the center. Now comes the fun part! I take halved cherry tomatoes and arrange them in the well. I also add diced cucumber and finely chopped red onion. Next, I slice Kalamata olives and place them on top. This makes the dish colorful and inviting! I sprinkle 1/2 cup of crumbled feta cheese over everything. Then, I drizzle a bit more olive oil across the top. This step adds extra flavor and richness. Finally, I finish with fresh parsley leaves to add a pop of green. I love serving Greek loaded hummus with warm pita bread. The soft bread makes it easy to scoop up the hummus. You can also use fresh veggie sticks, like carrots or bell peppers. They add crunch and freshness. This dish is perfect for sharing at parties or enjoying as a snack. For the full recipe, just check the details above! To get smooth hummus, start with well-cooked chickpeas. If you have the time, soak dried chickpeas overnight and cook them until soft. Use a food processor for blending. Mix the chickpeas with tahini, lemon juice, garlic, olive oil, and cumin. Blend until creamy. If it’s too thick, add a bit of water or more olive oil. This small step makes your hummus lighter and fluffier. Making hummus ahead of time is easy. Prepare the hummus and store it in an airtight container. Keep it in the fridge for up to five days. This allows the flavors to meld, making it taste even better. When serving, add the toppings right before you eat. This keeps them fresh and vibrant. To elevate your hummus, try adding spices like smoked paprika or cayenne for heat. You can also mix in roasted garlic or herbs like dill for a fresh twist. For a Mediterranean flair, consider adding sun-dried tomatoes or roasted red peppers. These small changes can transform your dish. For a full experience, check the Full Recipe for more ideas! {{image_4}} If you want to keep this dish vegan, there are easy swaps for creaminess. Instead of feta cheese, use avocado or vegan cheese. You can also add a splash of coconut milk or use silken tofu. These options give you a rich texture without dairy. Toppings make your Greek loaded hummus pop. Think about roasted red peppers or artichokes for a sweet twist. You can also use grilled zucchini or sun-dried tomatoes for extra flavor. If you want a crunchy bite, add toasted pine nuts or sunflower seeds. Each option adds a new taste to your dish. Want to kick up the flavor? Add spices or herbs! Try smoked paprika for a smoky touch. Fresh dill or mint can brighten the dish. You can even mix in a bit of za'atar for a unique flavor. Experimenting with spices makes your hummus special every time. Remember, you can find the full recipe above to get started on your Greek loaded hummus journey! To keep leftover hummus fresh, place it in an airtight container. Make sure to cover the top with a thin layer of olive oil. This helps seal in moisture and keeps it creamy. Store it in the fridge for up to five days. If you notice any change in smell or texture, it's best to toss it. For the toppings, store them separately in airtight containers too. Cherry tomatoes and cucumbers can last for 3 to 4 days in the fridge. Feta cheese should be kept in its brine to stay fresh longer. If you use olives, store them in a small jar with some olive oil. This will keep them tasty and moist. Check the expiration dates on all ingredients before use. Chickpeas in a can usually last for 2 to 5 years. Tahini can last up to a year when unopened. Once opened, use it within 6 months. Fresh veggies like cucumbers and tomatoes are best used within a week. Always check for freshness to ensure the best flavor in your Greek loaded hummus. For a full recipe, refer to the Greek Loaded Hummus Delight section above. Greek loaded hummus has roots in both Middle Eastern and Greek cuisine. Hummus, made from chickpeas, dates back centuries. It is a staple in many cultures. The Greek twist adds ingredients like feta, olives, and fresh veggies. This makes it unique and flavorful. It reflects the vibrant flavors of the Mediterranean diet. You can enjoy it as a dip or a light meal. Yes, you can freeze Greek loaded hummus. However, some textures may change. When you freeze it, place it in an airtight container. Leave some space at the top for expansion. To thaw, move it to the fridge overnight. Stir well before serving to regain smoothness. Toppings should be added fresh, not frozen. Greek loaded hummus lasts about 3 to 5 days in the fridge. Store it in an airtight container. Make sure to keep it covered well. If you notice any off smells or colors, it's best to discard it. Keeping it fresh helps maintain its great taste and texture. For the best flavor, enjoy it sooner rather than later. You can find the full recipe above to make it fresh whenever you want! Greek Loaded Hummus is simple and fun to make. We explored key ingredients, tasty toppings, and perfect pairings. The step-by-step guide helps you create a flavorful dip. Tips shared ensure your hummus has great texture and taste. Variations offer fresh ideas, while storage info keeps leftovers safe. Remember, this dish is versatile and great for sharing. Enjoy your hummus creation, and don’t be afraid to experiment with flavors!

Greek Loaded Hummus Flavorful and Easy Recipe

Are you ready to elevate your snack game? Greek Loaded Hummus is packed with flavor and is super easy to

To create a delicious Coconut Chocolate Dome, you need the following ingredients: - 1 cup coconut cream - 1/2 cup granulated sugar - 1/2 cup unsweetened cocoa powder - 1/2 cup dark chocolate, finely chopped - 1/4 cup shredded coconut - 1 teaspoon pure vanilla extract - Pinch of salt - 1 tablespoon coconut oil - 1/4 cup milk chocolate, for coating - Fresh mint leaves, for garnish (optional) If you want to change the flavor or texture, here are some options: - Use almond milk instead of coconut cream for a nutty twist. - Try maple syrup in place of granulated sugar for a natural sweetener. - Use white chocolate instead of milk chocolate for a sweeter finish. - Add crushed nuts for extra crunch and flavor. The quality of your ingredients can make a big difference. Fresh coconut cream gives a rich flavor that can’t be replaced. High-quality cocoa powder adds depth and richness. Using good dark chocolate boosts the overall taste. When you choose the best ingredients, your Coconut Chocolate Dome turns out more delicious. It’s all about what you put in. Always aim for the best! Making the coconut chocolate dome is fun and simple. You will mix coconut cream, sugar, and cocoa, then freeze it. After that, you dip them in melted chocolate for a tasty finish. 1. Combine the base: In a medium saucepan, mix together the coconut cream, granulated sugar, cocoa powder, and salt. Stir while heating over medium heat until it is smooth. 2. Add chocolate: Take the pan off the heat. Stir in dark chocolate, shredded coconut, and vanilla. Keep stirring until the chocolate melts. 3. Cool and mold: Let the mixture cool for 10-15 minutes. Pour it into dome-shaped silicone molds, filling them just below the top. 4. Freeze: Place the molds in the freezer for about 4-5 hours, or until firm. 5. Unmold: Carefully take the domes out of the molds. If they stick, warm the outside of the mold with your hands. 6. Melt the coating: In a bowl, mix milk chocolate and coconut oil. Heat in the microwave in 30-second bursts, stirring until smooth. 7. Coat the domes: Dip the tops of each dome into the melted chocolate. Let the extra chocolate drip off. 8. Set the coating: Place the domes on a wire rack to allow the chocolate to harden. 9. Serve: Once set, place the domes on dessert plates. Add shredded coconut or mint leaves for garnish if you like. - Stir continuously to avoid lumps when mixing ingredients. - Make sure the mixture cools slightly before pouring it into the molds. - If the chocolate coating is too thick, add a bit more coconut oil to thin it out. - Keep an eye on the melting chocolate to prevent burning. For more details on the ingredients and preparation, check the Full Recipe. To get a great chocolate coating, use good quality chocolate. I like to melt milk chocolate with a bit of coconut oil. This mix helps keep the chocolate smooth and shiny. Dip each dome into the melted chocolate. Let the excess drip off before placing it on a wire rack. This will help you avoid thick spots. One common mistake is not tempering the chocolate. If you melt chocolate too fast or at high heat, it can seize. Keep the heat low and stir often. Another mistake is overfilling the molds. Fill them just below the rim. This gives enough room for the chocolate coating. Lastly, don’t skip the freezing time. It’s key to getting that perfect dome shape. For a stunning presentation, place each dome on a pretty plate. A sprinkle of shredded coconut on top looks great. You can also add fresh mint leaves for color. These small details elevate the dish. Serve right after you coat them. This keeps the chocolate shiny and fresh. For fun, consider adding a scoop of ice cream on the side. You can find the full recipe for more details. {{image_4}} You can change the taste of your Coconut Chocolate Dome in fun ways. Try adding orange zest for a fruity twist. Just add one teaspoon of zest to the mixture before you pour it into molds. If you like nuts, fold in chopped almonds or hazelnuts. This adds a nice crunch and depth of flavor. You can also switch up the chocolate used. Dark chocolate gives a rich, deep taste. White chocolate, however, adds a creamy sweetness. If you want a sweeter dome, use white chocolate for the top coating. Mix and match to find your favorite flavor balance. Sweetness can be adjusted to suit your taste. If you prefer less sweetness, cut back on the sugar. Start with a 1/4 cup and taste the mixture. You can always add more later. For those who love sweeter desserts, add a bit more sugar or honey. This flexibility makes the Coconut Chocolate Dome perfect for everyone’s taste buds. For the full recipe, check out the detailed instructions provided. Store your Coconut Chocolate Domes in an airtight container. This keeps them fresh and moist. Make sure to layer parchment paper between each dome to prevent sticking. Keep them in the fridge if you plan to eat them within a week. For longer storage, the freezer is best. Coconut Chocolate Domes last about 5 days in the fridge. If you freeze them, they can last up to 3 months. To freeze, wrap each dome tightly in plastic wrap, then place them in a freezer-safe bag. This helps avoid freezer burn. Thaw them in the fridge overnight before serving. You don’t need to reheat these domes. They taste great cold! If you like, you can warm them slightly in the microwave for 10 seconds. Just be careful not to melt the chocolate too much. Serve them cold or at room temperature for the best flavor. For a fun twist, add a scoop of ice cream on the side. Enjoy your delightful Coconut Chocolate Dome! For the full recipe, check the earlier section. The main flavors come from coconut and chocolate. You taste rich dark chocolate and creamy coconut. The vanilla adds warmth, while the pinch of salt enhances the sweetness. Shredded coconut gives a nice texture. Together, these flavors create a delightful treat. Yes, you can make them ahead! These domes freeze well, so you can prepare them a few days in advance. Just store them in an airtight container in the freezer. When ready to serve, let them thaw for a few minutes. This way, you have a tasty dessert ready anytime. To make it vegan, use dark chocolate that contains no milk. Ensure that all other ingredients, like coconut cream and sugar, are also vegan. You can omit the milk chocolate coating or use a dairy-free alternative. This way, you can enjoy the Coconut Chocolate Dome without dairy! For the full recipe, check out the detailed instructions provided earlier. The Coconut Chocolate Dome is a fun dessert. We covered key ingredients, steps, and tips for success. Quality matters for flavor, so choose fresh items. I shared tricks to avoid common mistakes and how to present your dome well. Variations let you mix flavors and adjust sweetness if you want. For storage, follow best practices to keep them fresh. With these insights, you can create a delicious treat. Enjoy making and sharing it with others!

Coconut Chocolate Dome Delightful and Easy Recipe

Indulging in a Coconut Chocolate Dome is a sweet treat you’ll love. This delightful dessert combines rich chocolate with creamy

For a vibrant and fresh Vegetarian Caesar Salad, you need quality ingredients. Here’s what you will need: - 1 cup quinoa, thoroughly rinsed - 2 cups vegetable broth - 4 cups kale, stems removed and leaves torn - 1 tablespoon extra-virgin olive oil - Salt and freshly cracked pepper, to taste - 1 cup cherry tomatoes, halved - ½ cup grated Parmesan cheese (or nutritional yeast for vegan) - 1 ripe avocado, thinly sliced - ½ cup croutons - 2 tablespoons freshly squeezed lemon juice - 1 tablespoon Dijon mustard - 1 clove garlic, finely minced - 2 tablespoons tahini These ingredients create a salad that is both filling and nutritious. Quinoa serves as a great base, while kale adds a lovely crunch. You can always tweak flavors to suit your taste. Here are some ideas: - Use vegetable broth for cooking quinoa for more flavor. - Swap out Parmesan for nutritional yeast for a vegan option. - Add a dash of Worcestershire sauce for a deeper flavor (ensure it's vegan). - Use lime juice instead of lemon for a different zest. These swaps keep the dish fresh and exciting while still staying true to a Caesar salad's roots. Feel free to get creative with your salad. Here are some fun ideas: - Add roasted chickpeas for extra protein and crunch. - Top with sliced olives for a briny kick. - Include different greens like romaine or spinach for variety. - Toss in some roasted red peppers for sweetness. - Consider adding a sprinkle of crushed red pepper for heat. These options let you customize your salad to fit your mood or the season. You can find the full recipe to guide you through each step. Enjoy making this delightful dish! To cook the quinoa, start by bringing vegetable broth to a boil in a medium pot. Once boiling, add 1 cup of rinsed quinoa. Lower the heat to a simmer and cover the pot. Cook for about 15 minutes, or until the liquid is gone. When done, fluff the quinoa with a fork. Set it aside to cool to room temperature. Next, preheat your oven to 350°F (175°C). Take 4 cups of torn kale leaves and place them on a large baking sheet. Drizzle 1 tablespoon of olive oil over the kale. Sprinkle salt and freshly cracked pepper on top. Use your hands to massage the leaves gently. This helps them get crispy. Bake for 10-15 minutes until the edges are brown, but watch closely to avoid burning. In a small bowl, whisk together 2 tablespoons of lemon juice, 1 tablespoon of Dijon mustard, 1 minced garlic clove, and 2 tablespoons of tahini. Mix until smooth. If you want a thinner dressing, add water slowly, one tablespoon at a time. Stop when it reaches your desired thickness. Now, grab a large mixing bowl. Combine the cooled quinoa, crispy kale, 1 cup of halved cherry tomatoes, and ½ cup of grated Parmesan cheese (or nutritional yeast for a vegan option). Drizzle the dressing over the salad mixture. Toss gently to coat everything well. When you're ready to serve, add sliced avocado on top and sprinkle with croutons for crunch. Enjoy your fresh and flavorful Vegetarian Caesar Salad! For the complete recipe, refer to the [Full Recipe]. To make a great dressing, start with fresh ingredients. Use ripe lemons for juice. It adds a bright flavor. Mix lemon juice, Dijon mustard, minced garlic, and tahini in a bowl. Whisk until smooth. To adjust the thickness, add water slowly. Aim for a creamy yet pourable consistency. This dressing should coat the salad nicely without being too runny. Add extras to boost the salad's taste. Consider using roasted chickpeas for crunch. They add protein and fiber, making the salad heartier. You can also toss in capers for a salty kick. Fresh herbs like basil or parsley work well too. They bring freshness and color. For a spicy twist, add sliced jalapeños or a dash of red pepper flakes. Avoid overcooking the quinoa. It should be fluffy, not mushy. Wash the kale well to remove grit, then dry it completely. Wet leaves won't crisp up in the oven. Don’t skip massaging the kale with olive oil and salt. This step makes the leaves tender. Lastly, mix the dressing with the salad just before serving. This keeps the greens crisp and fresh. For the full recipe, check out the Crispy Kale & Quinoa Caesar Salad. {{image_4}} You can easily make this salad vegan. Instead of Parmesan cheese, use nutritional yeast. It gives a cheesy flavor without dairy. For the dressing, replace tahini with blended silken tofu for a creamy texture. This swap adds protein while keeping it plant-based. You can also increase the lemon juice for extra tang. To make this salad gluten-free, choose croutons made from gluten-free bread. You can also skip croutons and add roasted chickpeas for crunch. They give great texture and protein. Make sure your Dijon mustard is gluten-free, as some brands contain gluten. This keeps your salad safe for gluten-sensitive eaters. If you want more protein in your salad, consider adding cooked chickpeas or black beans. These legumes mix well and boost nutrition. Grilled tofu or tempeh also makes a great addition. For a heartier meal, try adding roasted sweet potatoes or quinoa. They add flavor and fill you up. For the full recipe, check out the Crispy Kale & Quinoa Caesar Salad. After you enjoy your delicious Vegetarian Caesar Salad, store leftovers in an airtight container. This keeps the salad fresh and tasty. Place it in the fridge. It will stay good for about three days. If you have extra dressing, keep it in a separate container. This will stop the salad from getting soggy. If you have leftover quinoa, reheat it easily. Pour the quinoa into a pot with a splash of water. Heat it on low until warm. Stir it often. You can also use a microwave. Just cover it and heat for about one minute. Fluff it with a fork before adding to your salad. To keep your salad fresh, follow a few tips: - Store kale in a cool, dry place. Wrap it in a damp paper towel to maintain moisture. - Keep cherry tomatoes on the counter. They taste better at room temperature. - Refrigerate avocado only if it's cut. Use lemon juice on the cut side to stop browning. - Check your croutons for freshness. Store them in a sealed bag to keep them crunchy. These steps help you enjoy your salad at its best! For the full recipe, check out the Crispy Kale & Quinoa Caesar Salad. Yes, you can prepare parts of this salad in advance. Cook the quinoa and make the dressing a day before. Store them in airtight containers in the fridge. You can also wash and tear the kale. However, I recommend adding the avocado and croutons just before serving. This keeps them fresh and crisp. If you want a dairy-free option, nutritional yeast works great. It adds a cheesy flavor without using cheese. You can also use vegan Parmesan or a mix of ground nuts for a similar taste. In a pinch, you can skip cheese entirely; the salad will still taste fresh and delicious. Store leftover dressing in a sealed jar in the fridge. It lasts about a week. Stir it well before using again. If it thickens, add a bit of water to thin it out. You can use it on other salads or as a dip for veggies. A vegetarian Caesar salad is packed with nutrients. Quinoa adds protein and fiber, which keeps you full. Kale is rich in vitamins A, C, and K. Avocado provides healthy fats. This salad is low in calories but high in flavor. It’s a great choice for a light meal or side dish. This blog post showed you how to make a delicious vegetarian Caesar salad. We covered essential ingredients and tasty toppings. You learned step-by-step how to cook quinoa, prepare crispy kale, and make the perfect dressing. I shared tips to help you avoid common mistakes and variations to fit your diet. In summary, this salad is easy to customize and store. Enjoy your quick, healthy meal!

Vegetarian Caesar Salad Fresh and Flavorful Delight

Are you ready to enjoy a fresh and flavorful twist on a classic dish? My Vegetarian Caesar Salad combines crisp

- 1 cup cold brew coffee - 1 cup vanilla ice cream or a vegan alternative - 2 tablespoons unsweetened cocoa powder - 2 tablespoons pistachio butter - 1 tablespoon honey or maple syrup (to taste) - 1/4 teaspoon vanilla extract - A pinch of sea salt - Chopped pistachios, for garnish - Chocolate shavings, for garnish Using the right measurements leads to the best flavor and texture. Here are the key amounts: - Cold brew coffee: 1 cup - Vanilla ice cream: 1 cup (you can use a vegan option) - Unsweetened cocoa powder: 2 tablespoons - Pistachio butter: 2 tablespoons - Honey or maple syrup: 1 tablespoon (adjust to your taste) - Vanilla extract: 1/4 teaspoon - Sea salt: a pinch For those with dietary needs, you can substitute: - Use coconut or almond milk for a lighter shake. - Swap honey with agave syrup for a vegan option. - Replace pistachio butter with almond butter if needed. This shake is a treat, but it's good to know what you're consuming. Each serving has about: - Calories: 300 - Carbs: 40 grams - Fats: 15 grams - Proteins: 5 grams - Sugars: 20 grams Enjoy this delightful blend of flavors while keeping an eye on your intake! The full recipe offers more details for creating this shake. To make your Chocolate Pistachio Cold Brew Shake, first gather your ingredients. You need cold brew coffee, vanilla ice cream, cocoa powder, pistachio butter, honey or maple syrup, vanilla extract, and sea salt. Lay everything out before you start. Next, measure your ingredients carefully. This helps ensure the right taste and texture. For the best results, use fresh cold brew coffee. If you don't have it, brew your favorite coffee and let it chill. Now, let’s blend! Start by adding the cold brew coffee, vanilla ice cream, cocoa powder, pistachio butter, honey or maple syrup, vanilla extract, and a pinch of sea salt into a blender. Blend on high speed. Stop to scrape down the sides as needed. You want a smooth, creamy shake with no lumps. Pour your shake into two chilled glasses. This keeps it extra cold. To pour, tilt the glass slightly. This way, the shake flows smoothly and looks nice. Now for the fun part—garnishing! Sprinkle chopped pistachios and chocolate shavings on top of each shake. This makes it look fancy and adds a nice crunch. You can also add a decorative straw for a fun touch. If you like sweeter shakes, add more honey or syrup until you’re happy with the taste. You can also swap out the vanilla ice cream for a vegan option if needed. Feeling adventurous? Try adding a few mint leaves for a fresh twist or some peanut butter for a different flavor. Each option gives your shake a unique taste. Enjoy experimenting! For the best cold brew, I recommend using a brand known for its smooth taste, like Stumptown or Chameleon. These brands bring out rich coffee notes without bitterness. When it comes to pistachio butter, look for a brand that uses simple ingredients. Freshly made is best. If you can find a store that makes it, grab a jar. The flavor will shine in your shake. Chill your glasses before pouring the shake. This keeps your drink cold longer. Just pop them in the freezer for about 10 minutes. Ingredient temperature matters too. Use cold brew from the fridge and ice cream straight from the freezer. This way, your shake stays creamy without melting too fast. Be careful not to over-blend your shake. If you blend too long, it can become thin and watery. Blend just until smooth. Also, avoid using low-quality ice cream alternatives. Some can change the flavor and texture of your shake. Stick with a rich vanilla ice cream or a creamy vegan option for the best taste. Try these tips for a perfect Chocolate Pistachio Cold Brew Shake. For the full recipe, check out the recipe section above. {{image_4}} To make a vegan version, swap the ice cream for a plant-based one. I like to use almond or coconut milk ice cream. Here’s what you need: - 1 cup cold brew coffee - 1 cup almond or coconut milk ice cream - 2 tablespoons unsweetened cocoa powder - 2 tablespoons pistachio butter - 1 tablespoon maple syrup (to taste) - 1/4 teaspoon vanilla extract - A pinch of sea salt - Chopped pistachios, for garnish - Vegan chocolate shavings, for garnish Blend just as you would with the original recipe. The taste remains rich and delightful. Want a fresh twist? Add mint! This variation gives a nice coolness to your shake. Here’s how: - Add 1/4 teaspoon peppermint extract to the mix. - You can also toss in fresh mint leaves before blending. - Keep the rest of the ingredients the same. The mint adds a refreshing zing that pairs perfectly with chocolate and pistachio. Need a boost? Add protein! This shake can be a great post-workout treat. Here’s how to do it: - Mix in 1 scoop of protein powder or 1/2 cup Greek yogurt. - This keeps the shake creamy while adding protein. Enjoy your shake as a nutritious snack or meal replacement. Each of these variations provides unique flavors while keeping the core of the Chocolate Pistachio Cold Brew Shake delightful. For the full recipe, check out the listed details. To keep your Chocolate Pistachio Cold Brew Shake fresh, store it in a sealed container. Glass jars or plastic containers work well. Avoid using open cups or bowls, as they allow air in, which can spoil the shake. Always chill your shake in the fridge if you have leftovers. You can freeze leftover shake for later. Pour the shake into ice cube trays or freezer-safe containers. When you want to enjoy it again, thaw it in the fridge overnight. For quicker thawing, blend the frozen shake with a bit of cold brew coffee to regain its smooth texture. In the fridge, your shake stays good for about 1 to 2 days. After that, it may lose flavor and texture. Look for changes in color or smell. If it smells off or has an unusual texture, it’s best to toss it. Enjoy your shake fresh for the best taste! To make your shake thicker, I suggest two main tips. First, add more ice. Ice will give your shake a cold, frosty texture. Second, you can use less cold brew coffee. This will create a denser blend. If you want a creamy feel, try adding more vanilla ice cream. It makes a big difference. You can also include frozen bananas or yogurt. They add thickness and a nice flavor. Yes, you can make this shake ahead of time! If you want to prep, mix and blend your ingredients. Then, store the shake in a sealed container in the fridge. It stays fresh for up to two days. When ready to enjoy, stir the shake well before drinking. You may need to add a bit of ice if it separates. If you want to save time, prepare your ingredients in advance. Just keep them separate until you blend. If you have nut allergies or just don’t like pistachio butter, don’t worry! You have many options. You can use almond butter, cashew butter, or sunflower seed butter. Each of these will give a unique taste. If you want a nut-free option, use tahini. It’s made from sesame seeds and works well in shakes. You can also skip the nut butter and add more cocoa powder for a chocolate boost. You can create a delicious shake using simple ingredients and steps. We covered everything from the key ingredients to storage tips. By following these guidelines, you can customize your shake to fit your taste. Remember to avoid common mistakes, like over-blending, for the best results. Now, you have the tools to make a yummy shake for any occasion. Enjoy experimenting with flavors and find what you love best! Start blending and savor each sip of your creation.

Chocolate Pistachio Cold Brew Shake Delightful Treat

Craving a delicious and refreshing treat? Try my Chocolate Pistachio Cold Brew Shake! This delightful shake combines rich cold brew

- 2 cups green tea, brewed and cooled to room temperature - 1 cup unsweetened pomegranate juice - 1 tablespoon honey or agave syrup (optional, to taste) - 1/4 cup fresh mint leaves, plus more for garnish - 1 cup sparkling water - Pomegranate arils, for garnish - Ice cubes - Green tea: Rich in antioxidants, it boosts metabolism and supports heart health. - Pomegranate juice: Packed with vitamins, it promotes healthy skin and may lower blood pressure. - Mint leaves: They aid digestion and bring a refreshing taste to your drink. - Honey or agave syrup: If used, they add sweetness and can soothe a sore throat. - Sparkling water: This adds fizz and helps keep you hydrated without extra calories. - Pomegranate arils: They are tasty and provide fiber, vitamins, and antioxidants. - For green tea, select high-quality leaves or bags. Freshness affects taste. - Choose pomegranate juice with no added sugars for the best flavor. - Pick bright green mint leaves. Avoid wilted or brown ones. - If using honey or agave, look for organic options for better quality. - Select sparkling water that is unsweetened and without additives. - When buying pomegranates, look for firm ones with a vibrant color. This Pomegranate Mint Sparkling Green Tea is truly a refreshing delight! For the Full Recipe, follow the steps carefully to make the most of each ingredient. To start, brew your green tea. Boil water and steep 2 cups of green tea. Follow the package instructions for the best taste. Once done, let it cool to room temperature. This step is crucial for great flavor. If it’s too hot, it can alter the taste. Now, grab a large pitcher. Pour in your cooled green tea. Add 1 cup of unsweetened pomegranate juice. Stir well so they mix nicely. If you like it sweet, add 1 tablespoon of honey or agave syrup. Stir again until it dissolves completely. Next, take 1/4 cup of fresh mint leaves. Gently crush them to release their oils. Add the crushed mint to your pitcher and stir one more time. This will give a fresh mint taste to your drink. Before serving, fill the pitcher with ice cubes to chill the tea. Slowly add 1 cup of sparkling water and stir gently. This keeps the bubbles intact. Pour the Pomegranate Mint Sparkling Green Tea into clear glasses. For a beautiful finish, garnish with fresh mint leaves and pomegranate arils. You can add a slice of lime on the rim for extra flair. This makes your drink look fancy and fun! When making Pomegranate Mint Sparkling Green Tea, some mistakes can ruin your drink. First, do not brew the green tea too long. Overbrewing makes it bitter. Aim for 2 to 3 minutes. Second, avoid using sweetened pomegranate juice. It can make your drink overly sweet. Use unsweetened juice for the best flavor. Lastly, do not skip the mint crushing step. Crushing the mint releases its oils, giving your tea a fresh taste. Sweetness is key to balance in this tea. Start with one tablespoon of honey or agave syrup. Stir it in and taste. If you want it sweeter, add more, but do this slowly. Remember that the pomegranate juice adds some natural sweetness. You may not need much extra. If you prefer less sweetness, skip the syrup altogether for a refreshing drink. To make your Pomegranate Mint Sparkling Green Tea even more delightful, try adding a twist of lime or lemon. A splash of citrus can brighten the flavors. You can also experiment with other herbs like basil or rosemary, which can add a unique touch. For an extra burst of fruitiness, throw in some fresh berries. Pomegranate arils are great, but blueberries or raspberries work well too. These enhancements can make your drink special each time you prepare it. For the full recipe, check out the detailed steps above. {{image_4}} You can mix it up with other fruit juices. Try cranberry juice for a tart kick. Apple juice adds a sweet touch. Orange juice brings a bright citrus flavor. Experiment with these juices to find your favorite blend. If you want to switch up the sweetener, consider maple syrup or stevia. Both options can give a unique taste. Use them in the same amount as honey or agave syrup. This way, you can adjust the sweetness to fit your liking. Herbs can add depth to your drink. Basil offers a fresh twist. You can also try rosemary for a savory note. Just crush the herbs gently and stir them in. This technique will elevate your Pomegranate Mint Sparkling Green Tea to new levels of flavor. To keep your Pomegranate Mint Sparkling Green Tea fresh, store it in the fridge. Use an airtight pitcher or container to prevent any strange smells from seeping in. If you have leftover mint leaves, store them in water. This keeps them fresh longer. When stored properly, your tea will last about 3 days in the fridge. After that, the flavors can fade and change. Always check for any odd smells or tastes before drinking it. If it smells off, it’s best to discard it. You can use leftover ingredients in many fun ways. The mint leaves can enhance salads, or you can blend them into smoothies. Use extra pomegranate juice in dressings or marinades. The green tea can be a base for other refreshing drinks. This way, nothing goes to waste! Pomegranate Mint Sparkling Green Tea is a refreshing drink. It combines brewed green tea, pomegranate juice, and fresh mint. The sparkling water adds a fun fizz. This drink is colorful and bright. It’s perfect for hot days or as a party drink. Making Pomegranate Mint Sparkling Green Tea is easy. You need to brew green tea and let it cool. Then, mix the cooled tea with pomegranate juice in a large pitcher. If you like sweetness, add honey or agave syrup. Crush fresh mint leaves to release their flavor and add them to the mix. Finally, pour in sparkling water and serve over ice. You can find the full recipe above. You can find Pomegranate Mint Sparkling Green Tea at many stores. Look for it in the beverage aisle. Some cafes or tea shops may also serve it. If you prefer homemade, following the recipe is simple and fun! Green tea has many health benefits. It is rich in antioxidants, which help protect your body. Drinking green tea can boost your metabolism. It may also improve brain function and lower the risk of heart disease. Enjoying green tea regularly can be a great choice for your health. This blog post covered the ingredients, brewing steps, and storage tips for making Pomegranate Mint Sparkling Green Tea. Each ingredient brings health benefits and unique flavors. I shared how to avoid common mistakes and adjust sweetness. Variations let you explore new tastes with different fruits or herbs. Remember, fresh ingredients make a big difference in flavor and health. Enjoy your tea, and don’t hesitate to experiment with what you have on hand!

Pomegranate Mint Sparkling Green Tea Refreshing Delight

Looking to refresh your day? Try my Pomegranate Mint Sparkling Green Tea! This drink mixes the vibrant flavors of pomegranate

To make a Cherry Cola Cream Float, you need a few simple things: - 1 cup cherry cola (or your choice of cola) - 1/2 cup creamy vanilla ice cream - 1/4 cup heavy cream - 1 tablespoon cherry syrup (optional for added sweetness) - Fresh cherries, for a delightful garnish - Whipped cream (optional, for an extra treat on top) These ingredients create a perfect mix of flavors. The cherry cola adds a sweet and tangy taste, while the vanilla ice cream gives it creaminess. The heavy cream makes it rich and smooth. You can customize your float with some fun add-ins. Here are a few ideas: - A splash of chocolate syrup for a chocolaty twist - A scoop of cherry sorbet for extra cherry flavor - Crushed ice for a colder drink Feel free to experiment! Each add-in can change the taste and make your float unique. To create your Cherry Cola Cream Float, gather these tools: - A tall glass for serving - A mixing bowl for whipping cream - A hand mixer or whisk for whipping cream - A spoon for scooping ice cream These simple tools help you make the float easily. Having everything ready will let you enjoy your treat faster. For the full recipe, check the steps in the recipe section above. Start by grabbing a small bowl. Pour in the heavy cream. Use a hand mixer or a whisk. Beat the cream until soft peaks form. This takes just a few minutes. Once ready, set it aside for later. Next, take a tall glass. Pour the cherry cola in slowly. This helps keep the bubbles alive. Tilt the glass slightly while pouring. If you want it sweeter, add cherry syrup now. This makes a fun mix with the cola. Now it’s time to build your float. Carefully scoop vanilla ice cream. Place it on top of the cola. Make sure it pokes out a bit. Then, gently add the whipped cream on top. You can make it fluffy for a nice look. Finally, add fresh cherries for a lovely touch. Drizzle more cherry syrup if you like. Enjoy your Cherry Cola Cream Float right away! You can find the full recipe above. To keep your float bubbly, pour the cherry cola slowly. Tilt the glass while you pour. This helps keep the carbonation alive. Avoid stirring too much once the ice cream is in. Stirring can cause the fizz to go flat. Serve your float right away for the best experience. The longer it sits, the less fizzy it becomes. You can boost the flavor of your float in fun ways. Add a splash of cherry syrup for extra sweetness. A few drops of vanilla extract can enhance the vanilla ice cream. If you like a kick, try a hint of almond extract. Fresh mint leaves make a nice, refreshing touch too. Experiment with these additions to find your perfect flavor combo. A beautiful float is all about how you serve it. Use a tall glass to show off the layers. Start with the cola, then add the ice cream gently. Make your whipped cream a fluffy tower on top. Finish with bright, fresh cherries for color. You can drizzle extra cherry syrup on top for a glossy finish. Don’t forget a straw and a long spoon for easy sipping and scooping! For the complete recipe, check out the Full Recipe. {{image_4}} You can mix up your Cherry Cola Cream Float by using different sodas. Try root beer for a classic twist. Lemon-lime soda adds a bright, zesty taste. Even ginger ale can make a refreshing option. Each soda brings its own flavor. This allows you to find your favorite version. Vanilla ice cream is great, but you can explore other flavors. Chocolate ice cream adds a rich taste. Try cherry ice cream for more cherry goodness. Even a scoop of coffee ice cream can make it unique. Each flavor changes the float into something special. Garnishes make your float look amazing. Fresh cherries are a must. You can add sprigs of mint for a pop of color. Grated chocolate or crushed nuts can give a fun crunch. Drizzle more cherry syrup on top for extra sweetness. These little touches can make your float stand out. To keep things fresh, store any leftover cherry cola in a sealed bottle. This helps keep the fizz alive. For extra ice cream, place it in a tight container in the freezer. Heavy cream should go in the fridge, tightly closed. If you added cherry syrup, store that in a cool, dark place. You can prepare the whipped cream ahead of time. Just whip it up and store it in the fridge. It will stay good for about 2 days. You can also chill your cola in advance. But wait to combine everything until you're ready to enjoy the float. Mixing it too early will lose the fizz and fun. For fresh cherries, keep them in the fridge in a bag. Use them within a few days for the best taste. If you want whipped cream on top, add it just before serving. It does not hold well in the fridge. You want it to stay fluffy and light for your Cherry Cola Cream Float. Enjoy making it! The best soda for a float is cherry cola. It has a sweet, fruity taste. You can also use other colas or even root beer. Each soda gives a unique flavor to the float. I love using cherry cola because it pairs perfectly with vanilla ice cream. The mix of flavors is a real treat! Yes, you can make this float without heavy cream. If you skip it, your float will still taste great. You can use more vanilla ice cream instead. This keeps the creamy texture you want. You can also try using milk or half-and-half. Both options work well if you want a lighter version. Whipped cream stays good for about 2 to 3 days in the refrigerator. Make sure to store it in an airtight container. This keeps it fresh and fluffy. If it starts to look runny or separates, it’s time to throw it away. Always check before using to ensure it is still good! This blog post covered making a cherry cola cream float. You learned about key ingredients, tools, and step-by-step instructions. I shared tips to keep fizz, enhance flavor, and present your float beautifully. You can also explore customizations with different sodas and ice cream flavors. Lastly, I provided storage advice for any leftovers. Enjoy creating your perfect cherry cola cream float, and don’t forget to experiment!

Cherry Cola Cream Float Refreshing Summer Treat

Looking for a fun way to cool down this summer? Dive into the delicious world of the Cherry Cola Cream

- 2 ripe mangoes, peeled and diced - 2 tablespoons tamarind paste - 2 tablespoons honey or maple syrup Mangoes are sweet and juicy. They form the base of this drink. Tamarind adds a tangy twist. You can choose honey or maple syrup to adjust the sweetness. Both options blend well with the fruity flavor. - 1 teaspoon ground cumin - 1/2 teaspoon black salt (or regular salt) - 1 teaspoon fresh ginger, grated Ground cumin adds warmth. It pairs nicely with tamarind. Black salt gives a unique taste. If you can't find it, regular salt works too. Fresh ginger adds a zesty kick. Together, these spices make the drink special. - Fresh mint leaves - Lime wedges Mint leaves add a fresh aroma. They also look great in the glass. Lime wedges give a pop of color and flavor. These garnishes make your drink more inviting. For the complete recipe, check the Full Recipe. 1. Start with two ripe mangoes. Peel and dice them into small pieces. 2. Place the mangoes in a blender. Add two tablespoons of tamarind paste. 3. Next, add your sweetener. You can use honey or maple syrup. Two tablespoons is a good start. 4. Add one teaspoon of ground cumin and half a teaspoon of black salt or regular salt. 5. Grate one teaspoon of fresh ginger and add it to the blender. 6. Pour in one cup of cold water. Blend on high speed until smooth. 7. Taste the mixture. If you want it sweeter, add more honey or maple syrup. 8. Use a fine mesh sieve to strain the mixture into a large pitcher. This removes any pulp. 9. Press down gently with a spatula to get all the flavorful liquid. 1. Add the remaining two cups of cold water or sparkling water to the pitcher. 2. Stir well to combine all the flavors. 3. Place the pitcher in the refrigerator. Chill for at least 30 minutes. 1. Get your glasses ready. Fill each glass with ice cubes. 2. Pour the spiced mango tamarind cooler over the ice. 3. Garnish each glass with fresh mint leaves and a lime wedge. 4. Enjoy your refreshing drink! For the full recipe, refer to the earlier section. To make your spiced mango tamarind cooler just right, tweak the sweetness and spice. Start with the honey or maple syrup. If you like it sweeter, add more. For spice, you can increase the ground cumin. Try adding a dash of chili powder for a fun kick. This extra spice works well with the mango and tamarind. This cooler is great for many occasions. Serve it at summer barbecues, picnics, or pool parties. It adds a refreshing touch to any gathering. Pair it with light snacks like chips, salsa, or fresh fruit. It also goes well with spicy dishes like tacos or curry. A smooth texture makes your drink enjoyable. To achieve this, blend the mixture until it is silky. Use a high-speed blender for best results. If you want a finer texture, strain it with a fine mesh sieve. This removes any lumps and leaves you with a smooth drink. {{image_4}} You can add other fruits to your spiced mango tamarind cooler. Pineapple and lime work great. Pineapple brings sweetness, while lime adds a zesty kick. You can also mix in berries for a colorful twist. For sweeteners, honey and maple syrup are common. However, you can try agave nectar or stevia. Each sweetener changes the flavor slightly. Experiment to find your favorite! Spices are key to making this drink unique. You can add chili powder for heat. It gives a nice contrast to the sweet mango. If you want a milder drink, reduce the cumin. You can even skip it altogether if you prefer. Try adding a pinch of ground cardamom or cinnamon too. They will enhance the flavor. Remember, spices can change the whole drink, so adjust them to your taste. If you're looking for healthier options, use natural sweeteners. Coconut sugar or date syrup are good choices. They add sweetness without artificial ingredients. You can also cut calories by using less sweetener. A little goes a long way! If you want a low-calorie version, use sparkling water instead of regular water. This will keep the drink light and refreshing. To keep your spiced mango tamarind cooler fresh, store leftovers in the fridge. Use airtight containers to prevent any off-flavors. This method helps lock in the vibrant taste of mango and tamarind. The cooler lasts about three days in the fridge. After this time, the flavor may change. Signs of spoilage include changes in smell or color. If it starts to look or smell off, it’s best to toss it. You can freeze the cooler, but it may change the texture. Pour it into ice cube trays for easy use later. To defrost, place the cubes in the fridge overnight. Stir well before serving, and enjoy a refreshing taste even after freezing! You can use lime juice or apple cider vinegar instead of tamarind paste. Lime juice gives a bright, tangy taste, while apple cider vinegar adds a mild acidity. Both options will change the drink's flavor but will still be tasty. If you want a sweeter option, consider using pomegranate molasses. It adds a unique fruitiness and depth to the cooler. Yes, Spiced Mango Tamarind Cooler is healthy! Mangoes are rich in vitamins A and C. They also provide antioxidants that boost your immune system. Tamarind paste offers digestive benefits and can help with gut health. Honey or maple syrup adds natural sweetness without refined sugar. This drink keeps you hydrated, especially in hot weather. Yes, you can prepare this drink ahead of time! Just make the mixture up to 24 hours in advance. Keep it in the fridge to stay fresh. When ready to serve, pour it over ice and add garnishes. This way, you save time and impress your guests with a cool, refreshing drink. This blog post covered how to make a Spiced Mango Tamarind Cooler. We looked at the key ingredients, like ripe mangoes and tamarind paste. I provided step-by-step instructions and helpful tips for the best flavor. We also explored fun variations and storage tips. In the end, this cooler is a tasty treat for any occasion. You can easily personalize it to suit what you like. Enjoy making this refreshing drink!

Spiced Mango Tamarind Cooler Refreshing Summer Drink

Looking for a refreshing drink that’s bursting with flavor? Meet the Spiced Mango Tamarind Cooler! This tasty summer treat blends

Older posts
Newer posts
← Previous Page1 … Page34 Page35 Page36 … Page91 Next →

dsad

© 2025 recipesstation • Built with GeneratePress

Our Policies

  • Copyright Policy
  • Cookie Policy
  • GDPR Policy
  • Privacy Policy
  • Disclaimer
  • Terms Of Use

More Information

  • Home
  • About
  • Contact
  • Appetizers
  • Dessert
  • Dinner
  • Drinks
©2025, recipesstation About Back To Top