Skip to content
DisclaimerTerms Of UseGDPR PolicyCookie Policy

recipesstation

  • Home
  • Drinks
  • Appetizers
  • Dinner
  • Dessert
  • About
  • Contact
  • Privacy Policy
DisclaimerTerms Of UseGDPR PolicyCookie Policy

Emily

- 4 ripe plums, pitted and thinly sliced - 5 cups of water - 4 black tea bags or 4 tablespoons of loose black tea - 5 whole green cardamom pods, lightly crushed - 1/4 cup of honey (adjustable) - Ice cubes - Fresh mint leaves, for garnish - Lemon slices, for garnish You can find these ingredients in several places: - Local grocery stores - Specialty tea shops - Online retailers Fresh plums are often found in the produce section. Look for ones that are ripe and fragrant. For cardamom, check the spice aisle. If you want loose black tea, a specialty tea shop is a great choice. Honey can be found in the baking aisle. When you gather your ingredients, think about how each one adds flavor. The ripe plums bring sweetness, while cardamom adds warmth. This balance makes the iced tea special. You can also adjust the honey to match your taste. If you want to explore more ways to use these ingredients, check out the Full Recipe for Plum Cardamom Iced Tea. It gives you a great starting point to make this refreshing drink. 1. Begin by boiling 5 cups of water in a medium saucepan. 2. Once the water boils, remove it from heat. 3. Add 4 black tea bags and 5 crushed cardamom pods. 4. Let them steep for 5 to 7 minutes. 5. While the tea steeps, prepare the plum puree. 6. In a blender, mix the sliced plums until they are smooth. 1. After steeping, strain the tea into a large pitcher. 2. Discard the tea bags and cardamom pods. 3. While the tea is warm, mix in the plum puree. 4. Add 1/4 cup of honey to the mixture. 5. Stir gently and taste. Adjust the sweetness if needed. 1. Let the tea cool to room temperature. 2. Once cooled, place the pitcher in the fridge for at least 2 hours. 3. To serve, fill glasses with ice cubes. 4. Pour the chilled tea over the ice. 5. Garnish with fresh mint leaves and a lemon slice for extra flair. For the complete recipe, check the Full Recipe section. - Adjusting sweetness and acidity: Start with the suggested 1/4 cup of honey. Taste the tea after mixing in the plum puree. If it feels too sweet, add a splash of lemon juice. This will balance the flavors and add a nice zing. - Experimenting with steeping times: I suggest steeping the tea for 5-7 minutes. If you want a stronger flavor, steep for an extra minute or two. Just be careful, as steeping too long can make the tea bitter. - Serving in clear glasses: I love using clear glasses for this drink. The vibrant plum color looks beautiful, and it makes the drink more inviting. - Adding decorative elements: Consider using a decorative straw. Place a few whole cardamom pods in each glass. This adds a lovely aroma and makes the drink feel special. - Nutritional benefits of plums and cardamom: Plums are high in vitamins C and K. They also have fiber, which is good for digestion. Cardamom can help with digestion too and may even reduce blood pressure. - Hydration and refreshing properties: Iced tea is a great way to stay cool. This drink hydrates you while offering the sweetness of plums and the warm spice of cardamom. It's perfect for hot days! {{image_4}} You can change the sweetness in your Plum Cardamom Iced Tea by using different sweeteners. Here are two great options: - Maple syrup - Agave nectar Maple syrup adds a rich taste. It pairs well with the plums. Agave nectar is lighter and sweeter. It dissolves easily, making it a good choice. Adjust the amount according to your taste. Want to mix it up? Try using herbal tea instead of black tea. Herbal teas like chamomile or mint give a unique twist. You can also infuse your drink with other spices. For example, adding cinnamon can give a warm flavor. Experimenting with herbs opens up new tastes. Seasonal fruits can enhance your iced tea. Try adding peaches or berries for a fresh flavor. You can also use seasonal herbs. Basil or thyme can add an interesting layer. Each season brings new possibilities to make this drink exciting. Check out the Full Recipe to explore these variations. Store your leftover Plum Cardamom Iced Tea in airtight containers. This keeps it fresh and tasty. Make sure to seal the containers well to avoid air exposure. You can refrigerate the tea for up to a week. For the best flavor, drink your tea within five days. After that, the taste may fade. Signs of spoilage include off smells or a change in color. If your iced tea looks or smells strange, it's best to toss it. You can repurpose any leftover plum puree in smoothies or yogurt. It adds a sweet touch! The cardamom pods can be reused in other teas or dishes. Just rinse them off and dry them before using again. Plum Cardamom Iced Tea is a refreshing drink. It blends sweet plums and warm cardamom. The tea has a fruity, fragrant flavor. The plums add a rich sweetness, while cardamom gives a spicy, aromatic touch. Together, they create a delightful balance. This drink is perfect for hot days or gatherings. Making Plum Cardamom Iced Tea takes about 15 minutes to prepare. You boil water, steep the tea, and blend plums. Then, you need at least 2 hours for chilling. So, plan for about 2 hours and 15 minutes total. This time lets the flavors mix well, creating a tasty drink. Yes, you can use different teas. Herbal teas like chamomile or green tea can work well. If you want a stronger flavor, try using black tea. Each type of tea brings its own taste. Experimenting can lead to fun new flavors in your iced tea. You can find plums at local grocery stores. Look for ripe ones in the produce section. Cardamom can be found in spice aisles. You can also buy both online. Many specialty sites offer fresh spices and fruits. Plum Cardamom Iced Tea has many health benefits. Plums are high in vitamins and antioxidants. Cardamom can aid digestion and add flavor without extra sugar. Honey gives a natural sweetness. This drink helps you stay hydrated. It’s a healthy choice for a refreshing treat. Absolutely! You can easily double or triple the recipe. Just use more plums, tea, and water. Make sure to adjust the honey to taste. A larger batch is great for parties or gatherings. Serve in a big pitcher and enjoy with friends. You learned how to make Plum Cardamom Iced Tea. We covered the ingredients and step-by-step instructions. You can find the ingredients easily in stores or online. Tips on perfecting the taste and making it look great were also shared. Remember, you can get creative with variations and adjust for your taste. Store your leftovers correctly and enjoy the health benefits. This refreshing tea is perfect for any occasion and is fun to make. Enjoy your drink and have fun experimenting!

Plum Cardamom Iced Tea Refreshing and Flavorful Drink

Are you ready to sip on something truly refreshing? Plum Cardamom Iced Tea is not just a drink; it’s a

To make a tasty cranberry ginger punch, gather these ingredients: - 4 cups cranberry juice - 1 tablespoon fresh ginger, finely grated - 1 cup sparkling water - 1/4 cup honey (adjust based on sweetness preference) - Juice of 1 lime - 1 cup fresh cranberries (for decorative garnish) - Fresh mint leaves (for garnishing) - Ice cubes This punch is simple to make and full of flavor. You can also customize it! Here are some optional ingredients to try: - Use flavored sparkling water for a twist. - Add orange juice for a fruity kick. - Substitute agave syrup for honey if you prefer. Gather these ingredients, and you’re ready to make the perfect holiday drink! For the full recipe, check out the detailed steps in the next section. Prepping the Ingredients Start by gathering all your ingredients. You need cranberry juice, fresh ginger, sparkling water, honey, lime juice, fresh cranberries, mint leaves, and ice cubes. Measure 4 cups of cranberry juice and 1 tablespoon of grated ginger. Squeeze the juice from one lime. Get 1 cup of fresh cranberries for garnish, and have fresh mint ready. Mixing and Flavor Infusion In a large pitcher, combine the cranberry juice, grated ginger, honey, and lime juice. Stir it well. Make sure the honey dissolves fully. Cover the pitcher and let the mix sit for 30 minutes. This step is key as it lets the flavors blend together nicely. After 30 minutes, strain the mix through a fine mesh sieve. This removes the ginger bits and pulp, giving you a smooth drink. Serving Suggestions Before serving, add 1 cup of sparkling water to the pitcher. Gently stir to keep it bubbly. Prepare your glasses with ice cubes. Pour the cranberry ginger punch over the ice. For a nice touch, add fresh cranberries on top. Finish off each glass with a sprig of mint. This adds color and aroma. Enjoy your refreshing holiday drink! You can find the full recipe for more details. - Best practices for flavor balance: Start with quality cranberry juice. Use 100% juice for the best taste. Fresh ginger adds a warm, spicy kick. Lime juice brings brightness. Adjust the mix as needed. Taste as you go. - How to adjust sweetness levels: Honey is a great sweetener, but you can use less. If you want it sweeter, add more honey. Remember, you can always add more, but you can't take it out. Try different sweeteners like agave or maple syrup for a twist. - Ensuring maximum freshness: Use fresh ginger and lime juice for the best flavor. Always serve the punch cold and add ice just before serving. This keeps the drink from getting watery. If making ahead, store the base drink and add sparkling water right before serving. These tips will help you create a delicious cranberry ginger punch that everyone will love. For the complete recipe, check out the Full Recipe. Enjoy your festive drink! {{image_4}} You can make cranberry ginger punch even more fun with a few twists. Here are some ideas: - Alcoholic version with spirits: Want to add some cheer? Mix in vodka or rum. For a festive touch, try cranberry-flavored vodka. Use about 1 to 2 cups. Adjust based on taste. This adds a fun kick for adult gatherings. - Alternative sweeteners or juices: If you want to change the sweetness, swap honey for agave nectar or maple syrup. You can also use apple juice instead of cranberry juice. This gives a new flavor and can be less tart. - Seasonal variations and additions: Mix in other fruits for a seasonal vibe. Try adding orange slices or pomegranate seeds. You can also add herbs like rosemary or thyme. They give a nice twist and add depth to the flavor. These variations make your cranberry ginger punch unique, perfect for any party or holiday gathering. For the full recipe, check out the [Full Recipe]. To keep your cranberry ginger punch fresh, pour any leftover drink into a clean bottle. Seal it tightly with a lid. This method helps keep the flavors intact and stops air from getting in. If stored properly in the fridge, the punch stays fresh for about three days. However, for the best taste, try to enjoy it within one day. The ginger flavors may become stronger over time, which might change the punch's taste. If you want to repurpose your punch, use it in a fun way! You can freeze it into ice cubes. These cubes add a splash of cranberry flavor to water or other drinks later. You can also blend it into smoothies for a refreshing twist. For reheating, pour the punch into a pot. Heat it gently on low. Avoid boiling, as this will change the taste. Stir occasionally until warm, then serve it hot with some fresh mint or cranberries on top. This makes a cozy drink for chilly nights. For the full recipe, check out the Cranberry Ginger Punch instructions above! Can I make this punch ahead of time? Yes, you can make this punch ahead of time. Prepare the mix without the sparkling water. Refrigerate it for up to two days. When ready to serve, add the sparkling water for fizz. What are the health benefits of ginger? Ginger has many health benefits. It can help with digestion and reduce nausea. Ginger also has anti-inflammatory properties. This spice may help boost your immune system, which is great during winter. How can I add more flavors to my punch? You can add more flavors to your punch easily. Consider adding sliced oranges or lemons for a citrus twist. You might also try berries like blueberries or raspberries. Using different herbs, like rosemary or basil, can add a unique touch. For a spicy kick, add more ginger! For the full recipe, be sure to check out the details above! This blog post covered everything you need to know about making Cranberry Ginger Punch. We explored the complete ingredient list, step-by-step instructions, and tips for mastering flavors. You also learned fun variations and how to store any leftovers. Enjoy this refreshing drink at your next gathering. Have fun customizing it to match your taste. Share your own twists and tricks. Happy mixing!

Cranberry Ginger Punch Refreshing Holiday Drink Recipe

Looking for a festive drink that sings holiday cheer? I’ve got just the thing for you! My Cranberry Ginger Punch

- 2 ripe peaches, peeled and diced - 1 cup fresh raspberries - 1 tablespoon honey or agave syrup - 1 cup sparkling water or club soda - Juice of 1 lime - Fresh mint leaves Choosing ripe peaches is key. Look for peaches that are soft and fragrant. This means they are sweet and juicy. Fresh raspberries should be bright and plump. Check for any signs of mold or squishing. For sparkling water, choose one that is crisp and bubbly. Club soda works well too, but make sure it’s fresh. The right ingredients make this drink shine. If you want the best taste, always pick high-quality fruits and drinks. You can find the full recipe in the article. To start, take your ripe peaches. Peel and dice them into small pieces. Next, wash your fresh raspberries and remove their stems. Place both the peaches and raspberries in a blender. Add one tablespoon of honey or agave syrup. This will sweeten your drink. Squeeze the juice of one lime into the mixture for a zesty kick. Now, blend everything at high speed until it becomes smooth. After blending, you need to strain the mixture. This step is very important. Use a fine-mesh sieve to catch any bits. Pour the blended fruit into the sieve over a bowl or pitcher. Press the mixture with a spoon to get out all the juice. Discard any pulp left behind. This gives you a silky-smooth beverage. Now it’s time to assemble your mocktail. Take your serving glasses and fill each one halfway with the peach-raspberry juice. Then, carefully top each glass with sparkling water or club soda. Pour slowly to keep the bubbles fizzy. Use a long spoon to stir gently. This helps combine the juice and bubbles without losing the carbonation. For a nice touch, garnish each drink with fresh mint leaves. This adds a lovely finish to your mocktail. To see the full recipe, refer to the Full Recipe. You can change the sweetness of your Peach Raspberry Bellini Mocktail easily. If you want it sweeter, add more honey or agave syrup. If you prefer less sweetness, use less of these. You can also try other sweeteners like maple syrup or stevia. Each option gives a different taste and can match your diet needs. To keep that lovely fizz in your drink, pour the sparkling water slowly. This way, you won’t lose many bubbles. When you pour, aim for the side of the glass. It helps keep the bubbles intact. After adding bubbles, stir gently. Use a long spoon and stir just enough to mix the drink without letting the fizz escape. Serve your mocktail in clear, chilled glasses. This adds a nice touch. A slice of peach on the rim looks fancy and tastes great. For garnishing, add fresh mint leaves on top. They look pretty and smell nice too. You can even add a few whole raspberries for color. This makes your drink stand out and taste fresh. If you want the full recipe, check out the Peach Raspberry Bellini Mocktail details! {{image_4}} You can switch up the fruits in your Peach Raspberry Bellini Mocktail for fun. Try adding strawberries or blueberries. They bring a new flavor and color. Fresh strawberries give a sweet twist. Blueberries add a nice tartness. You can even mix all three for a berry blast. Seasonal fruits work well too. In summer, use juicy cherries. In fall, think about sweet apples or pears. Adding herbs can elevate your mocktail. Mint is a great choice. Just crush a few leaves and mix them in. This adds a cool taste. Basil also works well if you want something unique. Pair it with peaches for a savory touch. You can infuse the herbs by letting them sit in the juice for a while. This helps the flavors blend nicely. If you want an adult drink, make a traditional Bellini. Replace the sparkling water with Prosecco or Champagne. The fruity taste of the drink pairs well with the bubbles. You can also add a splash of peach liqueur for extra flavor. This gives a nice kick and keeps the drink refreshing. For an adult twist, these liqueurs fit perfectly. For the full recipe, check out the detailed instructions above! To store any leftovers, place the mocktail in a sealed container. Keep it in the fridge. This keeps the drink fresh for about 2 days. The bubbles may fade a bit, but the flavors stay nice. You can freeze the peach-raspberry mixture for later use. Pour the blended juice into ice cube trays. Once frozen, transfer the cubes to a zip-top bag. They can last for about 3 months. To enjoy later, thaw the cubes in the fridge for a few hours. Serve them with sparkling water to refresh the drink. For the best taste, chill the glasses before serving. This adds a cool touch to the drink. Let the mocktail chill for at least 30 minutes before serving. This helps enhance the refreshing qualities of the Peach Raspberry Bellini Mocktail. Yes, you can prepare the peach-raspberry juice a few hours in advance. Keep it in the fridge. Just add the sparkling water before serving. This keeps the fizz fresh and fun! Absolutely! The Peach Raspberry Bellini Mocktail is perfect for kids. It has sweet, fruity flavors that kids love. Plus, it’s non-alcoholic, making it safe for everyone. You can use agave syrup or maple syrup as a sweetener. They both work well. If you want a low-calorie option, try stevia. Each sweetener may change the taste a bit, so choose what you like! To serve more people, double or triple the recipe. Prepare the fruit juice in bulk. Keep the sparkling water separate until you serve. This keeps the drink bubbly and fun for your guests. The Bellini cocktail comes from Italy. It was created in the 1940s in Venice. The drink is named after the artist Giovanni Bellini. This mocktail version keeps the classic flavors while being alcohol-free, making it fresh and fruity. This blog post covered the delightful Peach Raspberry Bellini mocktail. We explored key ingredients, like ripe peaches and fresh raspberries. You learned how to make a smooth fruit mixture and assemble the drink with sparkling water. We shared tips on adjusting sweetness and enhancing presentation. You can even try variations with other fruits or herbs. In making this mocktail, you create a refreshing treat perfect for any occasion. Enjoy experimenting with flavors and sharing this delightful drink with friends!

Peach Raspberry Bellini Mocktail Refreshing Treat

Are you ready for a refreshing treat? The Peach Raspberry Bellini Mocktail is your answer! Bursting with juicy flavors, this

- 1 cup brewed strong coffee or espresso - 1 tablespoon roasted hazelnut syrup (or homemade hazelnut paste) - 2 tablespoons unsweetened cocoa powder - 1 cup steamed milk (your choice of dairy or plant-based) - 1-2 teaspoons sugar or sweetener of choice (optional) - Whipped cream for topping (optional) - Chopped roasted hazelnuts for garnish - A pinch of sea salt You can swap the brewed coffee for decaf if you prefer less caffeine. For the hazelnut syrup, try homemade hazelnut paste. If you want a sweeter drink, use flavored syrups like vanilla or caramel. Unsweetened cocoa can be replaced with sweetened cocoa if you like it sweeter. For the milk, almond, oat, or soy milk works great. You can skip the whipped cream for a lighter drink. If you don’t have hazelnuts, any nut can work for garnish. - Coffee: Rich in antioxidants, coffee may boost energy and improve mood. - Hazelnuts: Packed with healthy fats, hazelnuts support heart health and may lower cholesterol. - Cocoa Powder: This ingredient contains flavonoids that enhance brain function and boost heart health. - Milk: Provides calcium and vitamin D, which are essential for strong bones. - Sugar: While too much is not healthy, a small amount can improve taste and energy. This Roasted Hazelnut Mocha Latte is not only tasty but also brings a range of health benefits. For the complete recipe, check out the [Full Recipe]. First, brew your coffee or espresso. You want it strong. This strong brew gives your latte a rich flavor. Use your favorite method, like a French press or espresso machine. Next, gather a small bowl. Add unsweetened cocoa powder and sugar if you want it sweet. Pour in a splash of hot water. Stir until you have a smooth paste. Make sure there are no lumps. This paste will add deep chocolate flavor. Now, take a medium saucepan. Pour in your brewed coffee. Add the roasted hazelnut syrup and the chocolate paste. Whisk it all together over medium heat. Keep stirring until it’s warm but don’t let it boil. This step blends the flavors perfectly. In another saucepan, heat your milk. You can use dairy or plant-based milk. Get it hot and frothy. If you don’t have a steamer, use a microwave or stove. After heating, whisk or froth the milk until you see bubbles. This makes the milk creamy. Grab a large mug. Pour the warm coffee mixture into it. Leave some space at the top for milk. This ensures a nice blend of flavors as you pour. Gently pour the frothy steamed milk over the coffee. Let it mix a bit. This creates a lovely layered look. The milk should float on top, adding a nice texture. If you want to go all out, add whipped cream on top. Sprinkle chopped roasted hazelnuts over the cream. Lastly, add a pinch of sea salt to boost the flavors. This finishing touch makes your latte special. Enjoy every sip of your Roasted Hazelnut Mocha Latte! For the complete recipe, check the Full Recipe section. To brew the best coffee for your latte, use fresh beans. A strong coffee makes a rich base. Aim for a medium to dark roast for deeper flavor. Grind the beans just before brewing to keep the taste bright. Measure your coffee carefully; one to two tablespoons per six ounces of water works well. If using a French press, let it steep for four minutes for a full-bodied brew. Frothing milk adds a creamy texture to your latte. Start with cold milk for the best foam. Whole milk froths the best, but you can use any type. Heat the milk to about 150°F, but don’t boil it. Use a milk frother or a whisk to create foam. Move the frother up and down in the milk for airy bubbles. If you don’t have a frother, shake the milk in a jar before heating. Presentation makes your latte feel special. Use a clear glass mug to show off the layers. Pour the coffee mixture first, then add the frothed milk gently. Top with whipped cream for extra indulgence. Sprinkle chopped hazelnuts on top for a nice crunch. A pinch of sea salt brightens the flavors. Serve with a few whole hazelnuts on the side for a lovely touch. For the full recipe, check out the earlier sections. {{image_4}} You can easily make this latte dairy-free. Use almond milk, oat milk, or soy milk. Each gives a unique taste. Almond milk adds a nutty flavor. Oat milk creates a creamy texture. Soy milk offers a rich, smooth base. You can even try coconut milk for a tropical twist. Just heat and froth them like regular milk. Add fun spices to your latte for extra flavor. A pinch of cinnamon or nutmeg can warm it up. You can also try vanilla extract for a sweet touch. Or add a drop of peppermint extract for a festive vibe. These small changes can really enhance your drink. If you love chocolate or hazelnuts, go big! Add more cocoa powder for a richer taste. You can also increase the hazelnut syrup for a stronger nutty flavor. Don't be shy! Adjust these amounts to suit your taste. Each sip will be a chocolatey, nutty delight. For the full recipe, check out the details above. If you have leftover mocha latte, pour it into an airtight container. Seal it tightly and place it in the fridge. This keeps it fresh for later. Aim to use it within two days for the best flavor. To reheat your mocha latte, pour it into a saucepan. Heat it on low over the stove. Stir gently to avoid burning. You can also use a microwave. Heat it in short bursts, stirring in between. This keeps the taste and creaminess intact. Homemade hazelnut syrup can last up to two weeks in the fridge. Store it in a clean, airtight bottle. Always check for any signs of spoilage before using it. If it smells off or looks strange, it’s best to toss it out. The best coffee for a mocha latte is strong coffee or espresso. Espresso gives a rich flavor. You want a bold taste to balance the chocolate and hazelnut. A light brew may not hold up against the other flavors. Try a dark roast for a deeper taste. Yes, you can make this latte without espresso. Strong brewed coffee works well too. Use the same amount as you would for espresso. Just ensure it is strong enough to maintain the latte's richness. This will keep the flavor balanced and enjoyable. You can find Roasted Hazelnut Mocha Latte at many coffee shops. Check local cafes or specialty coffee places. Some chains offer similar flavors, but the best is often at small cafes. They tend to use fresh ingredients and make drinks with care. Yes, you can use different sweeteners in this recipe. Options include honey, maple syrup, or stevia. Choose based on your taste and dietary needs. Each sweetener will add a unique flavor, so feel free to experiment. Adjust the amount to your liking for the perfect balance. For the full recipe, check the Roasted Hazelnut Mocha Latte section. This blog covers how to make a Roasted Hazelnut Mocha Latte. We discussed key ingredients and their health benefits. I shared easy steps for making the drink, along with tips for brewing coffee and frothing milk. We also explored variations and storage tips. In closing, this latte is simple to make and enjoyable. Whether you try a new flavor or stay classic, it’s a tasty treat. So grab your coffee and start brewing today!

Roasted Hazelnut Mocha Latte Rich and Flavorful Treat

Craving a warm, rich treat? You’ve found it! The Roasted Hazelnut Mocha Latte combines the best coffee, chocolate, and hazelnut

One Skillet Salmon with Lemon Orzo is a quick and tasty dish. It combines salmon and orzo pasta in one pan. You get bright flavors from lemon and fresh herbs. This meal is perfect for a weeknight dinner. - 2 fresh salmon fillets - 1 cup orzo pasta - 2 cups vegetable broth - 1 medium lemon (zested and juiced) - 2 cloves garlic, minced - 2 tablespoons extra virgin olive oil - 1 teaspoon dried oregano - 1 teaspoon dried thyme - Sea salt and freshly ground black pepper, to taste - Fresh parsley, finely chopped, for garnish To make this dish, you will need a few tools: - A medium-sized pot for boiling orzo - A large skillet for cooking salmon and orzo - A sharp knife for cutting herbs and lemon - A cutting board for safe food prep - A serving plate to present your meal Gather these tools to help you create your delicious meal. When you have everything ready, the cooking will be easy and fun! You can find the full recipe in the earlier section. First, grab a medium pot and fill it with vegetable broth. Bring the broth to a boil over medium heat. Once it bubbles, add 1 cup of orzo pasta. Cook the orzo according to the package directions, which usually takes about 8-10 minutes. Stir it occasionally to prevent it from sticking. When the orzo is al dente, drain it and set it aside. This will be the base for our salmon dish. While the orzo cooks, take a large skillet and heat 2 tablespoons of extra virgin olive oil over medium heat. Season the 2 salmon fillets with sea salt, black pepper, and half of the lemon zest. Make sure to coat both sides. Once the oil is hot, place the salmon skin-side down in the skillet. Cook for about 4-5 minutes on each side. Your goal is a golden brown color and salmon that flakes easily with a fork. Once done, transfer the salmon to a plate and set it aside. In the same skillet, add 2 cloves of minced garlic and sauté for about 1 minute. You want the garlic to be fragrant but not burnt. Next, add the drained orzo to the skillet, along with the dried oregano, dried thyme, the remaining lemon zest, and the juice from the lemon. Stir everything well and cook for another 2-3 minutes. Taste your dish and add more salt or pepper if you like. Finally, return the salmon to the skillet, gently placing it into the orzo mixture to warm through for another 2 minutes. When ready, remove the skillet from heat and sprinkle fresh parsley on top before serving. This simple meal is quick and full of flavor, making it a perfect choice for any night of the week. For the complete recipe, check out the Full Recipe section. To cook salmon just right, start with fresh fillets. Look for bright color and a firm texture. Season each fillet with salt and pepper. This adds flavor and helps with browning. Cook the salmon skin-side down in a hot skillet. It should sizzle right away! Aim for about 4-5 minutes on each side. The salmon is done when it flakes easily with a fork. If you want a crispier skin, press down gently with a spatula. You can boost flavors in this dish easily. Use fresh herbs like dill or basil instead of dried oregano or thyme. You can also add a pinch of red pepper flakes for heat. If you prefer, swap the orzo for another small pasta. Quinoa or couscous works well too. For a richer taste, add a splash of white wine to the orzo. Always adjust salt and pepper to your taste as you cook. How you serve your meal can impress guests. Place the orzo in the center of each plate. Lay the salmon fillet gently on top. A slice of lemon adds a bright touch. Sprinkle fresh parsley all over for a splash of green. You can even add edible flowers for a fancy look. This makes your dish pop with color and charm. For the full recipe, check the earlier section. {{image_4}} You can swap salmon for other seafood. Try sea bass, trout, or shrimp. Each brings a unique taste and texture. Adjust cooking times based on the seafood you choose. For shrimp, cook until they turn pink and curl. For sea bass, follow similar steps to salmon. The key is to ensure your seafood is fresh. If you want a veggie twist, use seasonal vegetables. Try zucchini, asparagus, or spinach for a bright touch. Sauté the veggies in the skillet before adding the orzo. This adds color and nutrients to your meal. You can even mix in some peas or bell peppers for extra crunch. Stir them in with the orzo for great flavor. Boost the flavor of your dish with herbs and spices. Fresh dill, basil, or chives enhance the lemony taste. You can also add a splash of white wine for depth. A bit of red pepper flakes adds heat, if you like spice. For a creamy texture, consider a dollop of Greek yogurt or a splash of cream right before serving. Mix and match to find your favorite flavors. Follow the [Full Recipe] for a quick guide, and enjoy the fun of making your own variations! After enjoying your meal, let the leftovers cool down. Place the salmon and orzo in an airtight container. Make sure to separate the salmon from the orzo if you prefer. Store it in the fridge. It will last for 2-3 days. When you are ready to eat again, take the leftovers out of the fridge. You can reheat them in the microwave. Heat for 1-2 minutes, stirring halfway. If you prefer, you can reheat in a skillet over medium heat. Add a splash of water or broth to keep it moist. If you want to save it longer, you can freeze the leftovers. Place the salmon and orzo in a freezer-safe container. Make sure to label it with the date. It can stay in the freezer for up to 3 months. To enjoy later, thaw it in the fridge overnight before reheating. This way, you can savor this meal whenever you like! Check the [Full Recipe] for more delicious ideas. Yes, you can use other pasta types. Smaller shapes like ditalini or couscous work well. Just make sure to adjust the cooking time. Check the package for the right time to cook. You want the pasta to be al dente, just like orzo. The salmon is ready when it flakes easily with a fork. Look for a nice golden crust on the outside. The inside should be opaque and not translucent. You can also use a food thermometer; it should read 145°F (63°C) when done. For sides, I recommend a fresh salad or steamed veggies. Roasted asparagus or green beans add great flavor, too. You could also serve crusty bread to soak up the lemony sauce. These sides balance the meal well and add more color to your plate. This blog post explored a tasty salmon and orzo dish. We discussed the key ingredients, tools, and step-by-step instructions needed for success. I shared tips for cooking and enhancing flavors, plus ideas for variations using different seafood and vegetables. In short, use these insights to make a dish everyone will enjoy. Don't forget to store leftovers properly for later! This meal can be simple and fun, so dive in and enjoy every bite.

One Skillet Salmon with Lemon Orzo Simple Meal

Looking for a quick, tasty meal? This One Skillet Salmon with Lemon Orzo is your answer. It combines savory salmon

Fresh strawberries are the star of this drink. I use one cup of hulled and sliced strawberries. They give the drink a sweet and fruity taste. Always choose ripe strawberries for the best flavor. Look for bright red color and firm texture. Wash them well before using. Mint leaves add a cool touch to the mocktail. You’ll need ten fresh mint leaves, plus a few more for garnish. Gently bruise the leaves to release their oils. This gives the drink a refreshing smell and taste. Fresh mint is key here; dried mint won’t work well. For sweetness, I often use honey or agave syrup. You need two tablespoons, but feel free to adjust to your taste. Both options blend well with the strawberries and mint. If you prefer, you can use sugar or a sugar substitute. Just remember to mix well so it dissolves completely. For the full recipe, check the details above. Start by choosing a nice glass. A tall glass works best for this drink. Make sure it is clean and dry. Set your glass on a stable surface. This helps when you start mixing your ingredients. Take 1 cup of fresh strawberries and slice them. Add the sliced strawberries to your glass. Next, add 10 fresh mint leaves. Use a muddler or the back of a spoon. Press gently to mash the strawberries and mint. You want the strawberries soft and juicy. The mint should smell nice and strong. This step releases the flavors. Now, squeeze 1 lime to get fresh lime juice. Pour the juice into your glass. Then, add 2 tablespoons of honey or agave syrup. Stir well to mix everything. You want the sweetener to blend with the fruity mix. This makes your drink tasty and refreshing. Next, fill your glass with ice cubes. The ice keeps your drink cold and refreshing. Carefully pour the muddled mixture over the ice. Then, add 1 cup of soda water. Use a spoon to stir gently. This helps mix the flavors without losing bubbles. Finally, garnish with mint leaves and a few strawberry slices. Your Strawberry Mint Mojito Mocktail is ready to enjoy! For the complete recipe, check out the Full Recipe. To make a great Strawberry Mint Mojito Mocktail, start with fresh, ripe strawberries. Look for berries that are bright red and firm. They should smell sweet and fragrant. Avoid any that feel soft or have dark spots. These bad berries can ruin your drink. If possible, buy them from a local market for the best flavor. Remember, the better the strawberries, the tastier your mocktail will be! Muddling is key to releasing the flavors in your drink. Use a muddler or the back of a spoon. Press gently on the strawberries and mint leaves. You want to mash them, not turn them into mush. This helps the mint oils mix well with the strawberries. If you muddle too hard, the mint can taste bitter. A few firm presses will do the trick, giving you a refreshing taste. If you want to change the sweetness, try different options. Honey and agave syrup are great choices. You can also use simple syrup or stevia. Adjust the amount to fit your taste. If you prefer less sweetness, start with a small amount and add more as needed. You can also add more lime juice if you like it tangy. Always taste your drink before serving to make sure it fits your liking. For the complete recipe, check the Full Recipe section. {{image_4}} You can make your Strawberry Mint Mojito Mocktail even more fun by adding other fruits. Try raspberries or blueberries for a tasty twist. These berries mix well with strawberries and mint. You can also use citrus fruits like oranges or lemons. Just make sure to muddle them with the strawberries and mint for full flavor. If you want to add a kick to your mocktail, consider making an alcoholic version. You can add white rum for a classic mojito taste. Use about one to two ounces of rum for each drink. Stir it in after you mix the other ingredients. This change can make your drink great for parties or special events. You can switch up the soda water to change the drink's flavor. Try using flavored sparkling waters like lime or raspberry. These can add a nice twist without extra sweetness. You can also use tonic water for a unique, slightly bitter taste. Just pick what you love best to enjoy your refreshing drink. For the complete recipe, check out the Full Recipe above. If you have extra Strawberry Mint Mojito Mocktail, store it in the fridge. Use a sealed container to keep it fresh. The mocktail can last up to 24 hours. After that, the mint will lose its flavor and the strawberries may soften. It’s best to drink it soon for the best taste. Store your strawberries in the fridge. Keep them in a container that breathes, like a berry basket. This helps them last longer. For mint, wrap it in a damp paper towel. Place it in a plastic bag and store it in the fridge. This keeps the mint fresh and fragrant. - Fresh strawberries: Use within 3-5 days for the best flavor. - Mint leaves: Stay fresh for about a week. - Lime juice: Freshly squeezed lime juice lasts for 2-3 days in the fridge. - Soda water: Check the expiration date, but it usually lasts a long time unopened. These tips help you enjoy your Strawberry Mint Mojito Mocktail at its best. For a complete guide, check the Full Recipe. Yes, you can make this mocktail ahead of time. I recommend preparing the strawberry and mint mixture early. Just muddle the strawberries and mint, then store it in the fridge. When you’re ready to serve, add lime juice, sweetener, ice, and soda water. This way, the flavors stay fresh and vibrant. If you don’t have lime juice, you can use lemon juice. Lemon juice gives a similar tangy taste. You can also try using orange juice for a sweeter flavor. Adjust the sweetness if you choose orange juice, as it's less tart. Yes, the Strawberry Mint Mojito Mocktail is low in calories. Fresh strawberries are low in calories and high in vitamins. Using honey or agave syrup in small amounts keeps it light. You can also reduce sweetener to cut more calories. To serve this mocktail at a party, prepare a large batch in a pitcher. Muddle the strawberries and mint in advance. When guests arrive, pour over ice and add soda water. Garnish each glass with mint and strawberry slices. This makes serving quick and fun. For the full recipe, check out the detailed instructions above. This mocktail combines fresh strawberries, mint, and sweetener for a refreshing drink. We explored how to prepare your glass, muddle the strawberries, and mix in lime juice. Tips helped you choose the best ingredients and perfect your muddling. You can add other fruits or even make an alcoholic version. Store leftovers properly to enjoy later. Overall, this mocktail is easy and fun to make. Enjoy serving it at your next gathering!

Strawberry Mint Mojito Mocktail Refreshing Drink Recipe

Looking for a refreshing drink that’s delicious and easy to make? Try my Strawberry Mint Mojito Mocktail! This drink combines

- 1 pound lean ground beef - 2 medium zucchinis, diced into bite-sized pieces - 1 medium sweet potato, peeled and diced into small cubes - 1 bell pepper, diced - 1 small onion, finely chopped - 3 cloves garlic, minced - 1 teaspoon ground cumin - 1 teaspoon smoked paprika - 1/2 teaspoon chili powder - Salt and freshly ground black pepper to taste - 2 tablespoons olive oil - Fresh parsley or cilantro, finely chopped Using these fresh and vibrant ingredients makes this Ground Beef Zucchini Sweet Potato Skillet a delight. The lean ground beef provides a hearty base. Zucchini adds a nice crunch, while sweet potato gives a touch of sweetness. Bell pepper and onion round out the flavors. Garlic brings a fragrant note that ties it all together. You can easily adjust the seasoning to match your taste. Cumin and smoked paprika add depth. A hint of chili powder gives warmth without too much heat. Fresh herbs like parsley or cilantro at the end brighten the dish. For the full recipe, you can find it detailed in the previous sections. Enjoy cooking and experimenting with these ingredients! - Heat 2 tablespoons of olive oil in a large skillet over medium heat. - Add 1 small finely chopped onion and sauté for about 3-4 minutes. The onion should turn translucent. - Next, add 3 cloves of minced garlic and cook for 1 more minute. Stir it constantly to keep it from burning. - Add 1 pound of lean ground beef to the skillet. Break it apart with a wooden spoon. - Cook for 5-7 minutes, stirring often. The beef should turn brown and lose its pink color. - If there is excess fat, drain it off carefully to keep your meal lighter. - Mix in 1 medium diced sweet potato and 1 tablespoon of water. This helps to steam the potatoes. - Cover the skillet with a lid. Cook for about 10 minutes, stirring occasionally. The sweet potatoes should be fork-tender. - Once the sweet potatoes are soft, add in 2 diced zucchinis and 1 diced bell pepper. - Sprinkle the mixture with 1 teaspoon of ground cumin, 1 teaspoon of smoked paprika, and 1/2 teaspoon of chili powder. - Stir everything together to combine the spices and veggies well. - Sauté the mixture for another 5-7 minutes. The veggies should become tender yet still crisp. - Taste your skillet dish. Adjust the seasoning with salt and freshly ground black pepper before serving. For the full recipe, check out the detailed instructions above. Enjoy this hearty meal! To get that perfect browning on the beef, heat your skillet well. Start with medium-high heat and add the olive oil. Wait until the oil shimmers before adding the beef. This helps to sear the meat, adding flavor. To keep your veggies crisp, add them later in the cooking process. After the sweet potatoes are tender, stir in the zucchini and bell pepper. Sauté them just enough to soften but still keep their bite. For a beautiful presentation, serve the skillet mixture in warm bowls. A sprinkle of fresh parsley or cilantro on top adds a pop of color. You can also serve it with warm bread or over rice for a heartier meal. To enhance the meal, consider pairing it with a fresh salad or a side of roasted vegetables. This makes the dish feel more complete and satisfying. Ground beef is a great source of protein. It helps build muscle and keeps you feeling full. Zucchini is low in calories and high in vitamins. Sweet potatoes offer fiber and beta-carotene, which is good for your eyes. A suggested portion size is about one cup of the skillet mixture. This gives you a balanced meal without going overboard. Enjoy this dish as part of a healthy diet while savoring its rich flavors. For the full recipe, visit the link provided. {{image_4}} You can switch out the ground beef for turkey or chicken. Both meats have less fat and still taste great. Turkey works well, as does chicken. Just make sure to adjust cooking times as they may cook faster. For a vegetarian option, try using lentils or chickpeas. They add protein and fiber while keeping the dish hearty. You can also use plant-based ground meat. It gives you a similar texture to beef without the meat. Feel free to swap in other veggies. Carrots, spinach, or broccoli can bring new flavors and colors. You can also add mushrooms for an earthy taste. Seasonal vegetables are a great way to stay fresh. In spring, add asparagus or peas. In fall, try butternut squash or kale. These veggies keep the dish exciting and nutritious. Adding spices or sauces can boost flavor. Consider using soy sauce or teriyaki for a savory twist. Hot sauce can add a kick if you like heat. Cheese is another tasty addition. Feta or mozzarella can melt beautifully over the dish. Fresh herbs like basil or thyme can also brighten the flavors. Don't be afraid to experiment and find your favorite combination. You can find the Full Recipe to help guide you in making this delightful skillet dish. To store leftovers, let the skillet cool down first. Place the dish in an airtight container. This keeps the flavors fresh. You can keep it in the fridge for up to three days. When you're ready to eat, just reheat it in a skillet or microwave. If you want to freeze the dish, let it cool completely. Use a freezer-safe container or bag. Make sure to label it with the date. The skillet can last up to three months in the freezer. To reheat, thaw it overnight in the fridge. Heat it on the stove over medium heat until it’s hot. For meal prep, you can chop the veggies a day ahead. Store them in separate containers. This makes cooking quick and easy. You can also cook a larger batch and portion it out for lunches or dinners. Each portion should be enough for one meal. To create a low-carb Ground Beef Zucchini Sweet Potato Skillet, swap sweet potatoes for cauliflower. Cauliflower has fewer carbs and cooks well in a skillet. You can also reduce the amount of bell pepper. Use more zucchini to maintain a hearty texture. Adding spices like garlic powder or onion powder boosts flavor without adding carbs. This dish pairs well with a fresh salad. A simple mixed greens salad with lemon vinaigrette offers a nice crunch. You can also serve it with steamed broccoli or green beans. If you want something warm, garlic bread or a side of rice works too. These sides balance the meal and add variety. Yes, you can customize the seasonings to your taste. Try adding Italian herbs like oregano or basil for a different flavor profile. If you enjoy heat, include red pepper flakes or cayenne pepper. For a smoky taste, use chipotle powder instead of smoked paprika. The blend of spices can change the dish's character. Making this Ground Beef Zucchini Sweet Potato Skillet takes about 30 minutes. Prep time is roughly 10 minutes. Cooking time is around 20 minutes. This quick meal is perfect for busy weeknights or last-minute dinners. You can have a hearty dish ready in no time. Absolutely! You can prep the veggies and meat a day ahead. Store them in airtight containers in the fridge. When ready to cook, just combine everything in the skillet. If you have leftovers, store them for up to three days. Reheat on the stove or in the microwave until hot. In this blog post, you learned how to create a delicious Ground Beef Zucchini Sweet Potato Skillet. We covered the main ingredients, seasonings, and step-by-step instructions. I also shared helpful tips, variations, and storage methods. These insights aim to make cooking easier and more enjoyable for you. Whether you want to switch proteins or store leftovers, you now have the tools to make this meal work for you. Enjoy your cooking adventures!

Ground Beef Zucchini Sweet Potato Skillet Delight

Are you looking for a quick and tasty dinner? My Ground Beef Zucchini Sweet Potato Skillet packs flavor and nutrition

- 4 ripe peaches, pitted and sliced into wedges - 1 cup fresh strawberries, hulled and sliced into halves - 1 cup plump blueberries, washed - 1 cup pineapple, diced into small cubes For the best flavor, choose ripe fruits. Look for peaches that yield slightly when pressed. Keep strawberries bright red and firm. Store your fruits in the fridge, but take them out about 30 minutes before serving. This helps bring out their natural sweetness. - 3 tablespoons raw honey, preferably local - 2 tablespoons fresh lime juice, squeezed - Zest of 1 lime, finely grated - A pinch of sea salt I recommend using local honey for a richer flavor. Raw honey has more taste than processed honey. Lime juice adds a fresh zing that brightens the fruit. The sea salt enhances the sweetness, making each bite more delicious. - 1/4 cup fresh basil leaves, gently torn for flavor - Additional honey for serving When picking basil, look for bright green leaves. Avoid any brown spots. Store basil in a glass of water, like a flower, to keep it fresh. Adding more honey just before serving gives a nice touch of sweetness. Start by slicing the fruits. For the peaches, cut them into wedges. Make sure they are ripe but firm. This keeps them from getting mushy. Use a sharp knife for clean cuts. Slice the strawberries in half and wash the blueberries. Dice the pineapple into small cubes. Freshness matters here. Always choose ripe and sweet fruits for the best flavor. In a small bowl, combine honey, lime juice, lime zest, and a pinch of sea salt. Whisk these ingredients together until they blend well. The honey should dissolve into the lime juice. If it feels thick, you can warm the honey slightly. This helps it mix smoothly. The dressing should be bright and tangy, adding a nice kick to your salad. Now, it’s time to put it all together. In a large bowl, add all the prepared fruits. Drizzle the dressing over them. Use a large spoon to toss gently. Be careful not to mash the fruit. You want each piece to stay whole and coated. After tossing, add torn basil leaves on top. Toss again lightly to mix in the basil. Let the salad sit for ten minutes; this helps the flavors blend. If you want it colder, chill it in the fridge for a bit. Enjoy this refreshing dish as a side or dessert. For the full recipe, check out the complete details above. Using room temperature honey makes mixing easier. It blends well with the lime juice. A little warmth helps it dissolve faster. This way, you get a smooth dressing that coats the fruit nicely. Plus, balancing sweetness is key. Adding a pinch of sea salt enhances the flavors. It brings out the best in the honey and lime. Presenting your fruit salad is part of the fun. Serve it in a large bowl for sharing. You can also use individual dessert cups for a fancy touch. It looks great with some torn basil leaves on top. For meals, this salad pairs well with grilled chicken or fish. It also makes a lovely side at picnics or barbecues. You can prepare this salad in advance. Just wait to add the basil until right before serving. This keeps it fresh and vibrant. Store leftovers in an airtight container. They stay good in the fridge for about two days. If you want to enjoy it cold, chill it for a bit before eating. {{image_4}} You can mix up the Honey Lime Basil Peach Fruit Salad by using other fruits. Try ripe mangoes, juicy nectarines, or even sweet cherries. These fruits add new flavors and colors. You can also swap basil for mint or cilantro for a fresh twist. Each herb brings a different taste, making the salad exciting. This salad is easy to make vegan and gluten-free. The ingredients are naturally plant-based and safe for gluten-free diets. To cut calories, you can use less honey or a sugar substitute. This change keeps the sweet flavor without the extra calories, so everyone can enjoy it. Fruits change with the seasons. In summer, cling to ripe berries and juicy peaches. In fall, use apples and pears for crunch. Winter brings citrus fruits like oranges and grapefruits. Each season offers new flavors, so be creative! Adjust the recipe based on what's fresh and available near you. This way, you can enjoy the salad all year long. To keep your Honey Lime Basil Peach Fruit Salad fresh, store it in an airtight container. Place it in the fridge right after serving. This method helps maintain the salad's vibrant flavors. The salad lasts about 2 to 3 days in the fridge. After that, the fruits may lose their crispness. Can you freeze this fruit salad? The answer is no, and here’s why. Freezing affects the texture of the fruits, making them mushy when thawed. If you want to freeze individual fruits, that works well! For peaches, strawberries, and pineapple, slice them first. Spread them on a baking sheet to freeze. Once frozen, transfer them to a freezer bag. To refresh leftovers, try adding a splash of fresh lime juice. This brightens the flavors and helps the salad taste fresh again. You can also mix in more fresh basil for added aroma. For a fun twist, use the salad in smoothies or as a topping for yogurt. This way, you can enjoy your salad in new and exciting ways! Yes, you can use canned or frozen fruits. However, fresh fruits usually taste better. If you choose canned fruits, look for those packed in juice or water, not syrup. Drain and rinse them well to reduce sugar. When using frozen fruits, thaw them first. Use them carefully to avoid mushiness. Fresh fruits keep their shape and crunch, making your salad more appealing. If you cannot find basil, consider mint or cilantro. Mint adds a fresh, sweet flavor. Cilantro brings a unique taste that can brighten the salad. You can also use lemon balm or tarragon for a different twist. Each herb will change the flavor, so choose one that you love. Yes, this fruit salad is great for meal prep. You can make it a day ahead. Just store it in an airtight container in the fridge. The fruits will stay fresh for a short time. To keep them crisp, add the dressing right before eating. This way, you enjoy the best taste for breakfast or a snack. To adjust the sweetness, change the honey amount in the dressing. Start with less honey and add more if needed. You can also use maple syrup or agave nectar as alternatives. If you want a sugar-free option, try using a sugar substitute. Taste as you go to find your perfect balance. You learned how to make a delicious fruit salad. We explored fresh fruits, like peaches and berries, and the perfect dressing with honey and lime. I shared tips for storing and serving your salad, along with some fun variations. Remember, using fresh ingredients and balancing flavors is key. This salad is great for any meal or event. I encourage you to try it and let your creativity shine with seasonal fruits. Enjoy the bursts of flavor and freshness!

Honey Lime Basil Peach Fruit Salad Refreshing Delight

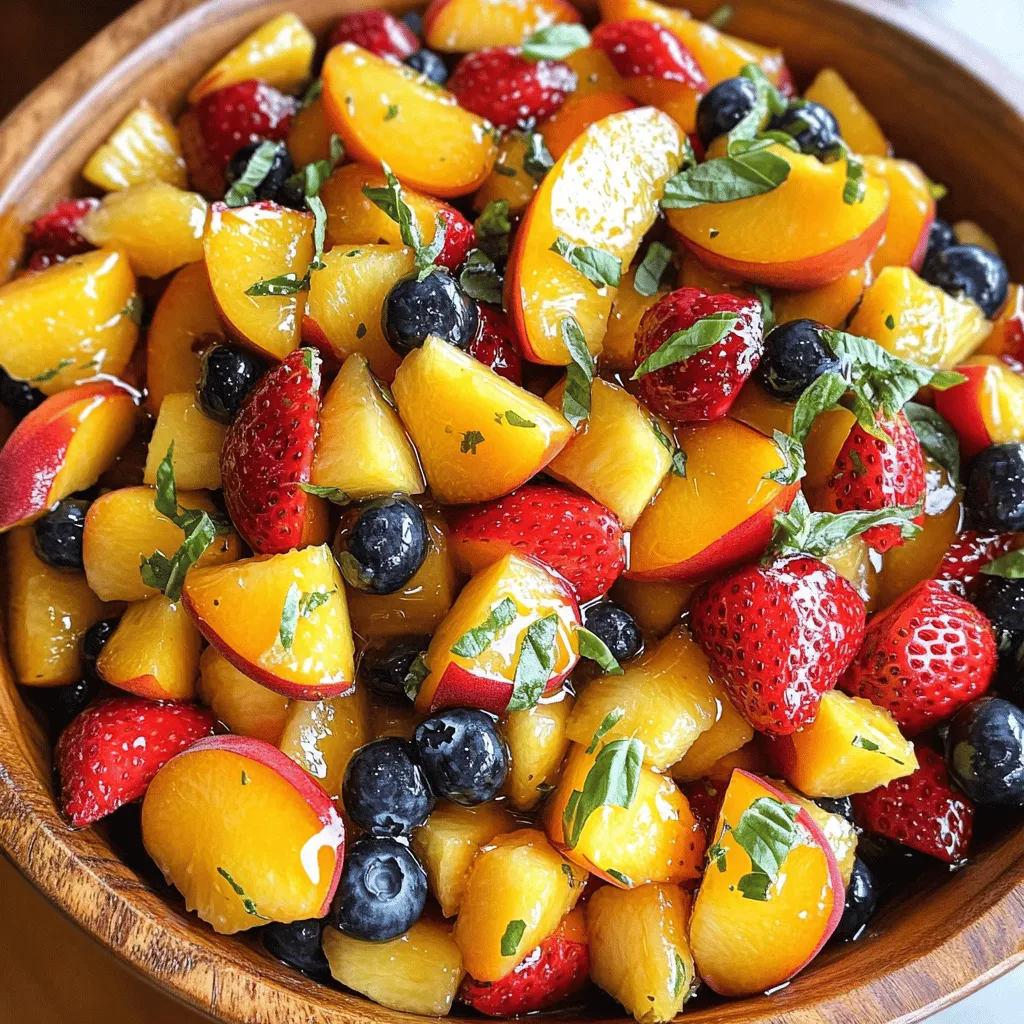
Looking for a bright and fresh dish that’s simple to make? This Honey Lime Basil Peach Fruit Salad is what

- 4 boneless, skinless chicken thighs - 1 cup jasmine rice, rinsed and drained - 2 cups low-sodium chicken broth - 1/2 cup honey BBQ sauce - 1 small onion, diced - 2 cloves garlic, minced - 1 bell pepper, diced - 1 cup corn - 1 teaspoon smoked paprika - Salt and pepper - Fresh cilantro for garnish To make One-Pan Honey BBQ Chicken Rice, gather these simple ingredients. First, the chicken thighs are the star of this dish. They stay juicy and tender, making each bite a delight. Jasmine rice is perfect here because it cooks well with the chicken broth, soaking up all the flavors. Next, we have the honey BBQ sauce. It adds a sweet and smoky touch that you will love. The diced onion and minced garlic offer a strong base for flavor. Bell peppers and corn add color and sweetness, making the dish more vibrant. You will also need smoked paprika. This spice gives the chicken an extra layer of depth. Finally, salt and pepper are essential to bring all the flavors together. Don’t forget the fresh cilantro! It adds a bright finish to your meal. By following the Full Recipe, you can create this dish that is both easy and tasty. Each ingredient plays a role in making this meal special and satisfying. First, take your chicken thighs. Season them well with salt, black pepper, and smoked paprika. This step is key. It adds flavor that seeps into the chicken. Make sure every bit of meat is coated evenly. This ensures a tasty bite every time. Now, grab a large skillet. Heat a drizzle of olive oil over medium heat. Add the diced onion and minced garlic. Sauté these for about three minutes. You want the onion to become soft and fragrant. Look for it to turn translucent. This signals that they are ready for the next step. Next, carefully add the seasoned chicken thighs to the hot skillet. Let them sear for about two to three minutes on each side. You’re aiming for a golden brown color. This step builds a rich flavor. Avoid cooking them all the way through. They will finish cooking later with the rice. Now it’s time to add the rice. Remove the chicken and set it aside. In the same pan, add rinsed jasmine rice, chicken broth, corn, and diced bell pepper. Stir everything well to mix. This helps distribute flavors evenly throughout the dish. Return the browned chicken thighs to the skillet. Nestle them into the rice mixture. Drizzle the honey BBQ sauce over everything. Let this come to a gentle simmer. Cover the skillet with a lid and lower the heat. Cook for about 20 minutes. This allows the rice to absorb all the flavors. Once cooked, take the skillet off the heat. Let it rest covered for five minutes. This step is important for the flavors to meld. Now, fluff the rice with a fork. Mix everything together gently. The dish is now ready to serve. Garnish it with fresh cilantro for a pop of color. For the full recipe, refer to the earlier section. Seasoning your dish is key. Always taste as you cook. This lets you adjust flavors. If you like it sweeter, add more honey BBQ sauce. If you enjoy a smoky flavor, feel free to add more smoked paprika. Personal taste varies, so make it yours. One common mistake is undercooking the rice. Make sure to check the rice during cooking. It should absorb all the broth and become tender. Another mistake is cooking the chicken too long. This can make it dry. The chicken should be juicy and tender. Serve the dish right from the skillet for a cozy look. If you want a fancier touch, plate each serving. Add extra cilantro and a drizzle of honey BBQ sauce on top. This adds color and flavor. A well-presented dish looks inviting and tastes even better. {{image_4}} You can switch up the rice if you like. Try brown rice or quinoa for new flavors. Both give a nice nutty taste. For vegetables, think about colorful options. Peas, carrots, or zucchini can add a pop of color and crunch. They also boost nutrition and taste. To make this dish gluten-free, use gluten-free BBQ sauce. Check the label to be sure. For a vegan version, swap the chicken for tofu or chickpeas. Use vegetable broth instead of chicken broth for flavor. Both options make the meal hearty and satisfying. Want to change the flavor? Add spices like cumin or chili powder. Fresh herbs such as basil or thyme can also elevate the dish. You can try different BBQ sauces too. Each brand has its own unique taste. A spicy BBQ sauce can add a kick, while a smoky one can deepen the flavor. For more ideas, check out the Full Recipe. It gives you all the tasty details. To keep your One-Pan Honey BBQ Chicken Rice fresh, cool it to room temperature. Place the leftovers in airtight containers. Store them in the fridge for up to three days. This helps keep the flavors intact. For best results, use glass or BPA-free plastic containers. They seal well and won’t absorb odors. When reheating, avoid the microwave if possible. Instead, use a skillet over low heat. This method warms the dish evenly and keeps the rice moist. You can add a splash of chicken broth to help with moisture. Heat until the chicken reaches 165°F for safe eating. This ensures it’s warm and tasty. To freeze, first, let the dish cool completely. Divide it into portions for easy thawing. Use freezer-safe containers or bags to prevent freezer burn. Label your containers with dates. You can store it in the freezer for up to three months. When ready to eat, thaw it overnight in the fridge. Reheat as mentioned above for the best taste and texture. Don't forget to check out the Full Recipe for more details on how to make this delicious meal! To add spice, you can mix in chopped jalapeños or crushed red pepper flakes. These will give your dish a nice kick. You could also use a spicy BBQ sauce instead of regular honey BBQ sauce. For a deeper heat, try adding a dash of cayenne pepper while cooking. Spice makes it exciting! Yes, you can use brown rice. Just remember, brown rice takes longer to cook. You will need to add about 10 to 15 extra minutes to the cooking time. Make sure to use more broth as brown rice absorbs more liquid. Check the package for specific cooking instructions. The best way to check chicken is with a meat thermometer. Insert it into the thickest part of the chicken. It should read 165°F for safe eating. If you don’t have a thermometer, cut into the chicken. The meat should be white and no longer pink. If you lack honey BBQ sauce, you can make a quick mix. Combine ketchup, honey, and soy sauce for a tasty substitute. For a smoky flavor, add a bit of liquid smoke. You can also try a store-bought BBQ sauce that you enjoy. You can store One-Pan Honey BBQ Chicken Rice in the fridge for up to 3 days. Be sure to keep it in an airtight container. If you want it to last longer, consider freezing it. Just make sure it's cooled before you store it. This recipe gives you a simple and tasty way to enjoy a meal. You learned how to prepare flavorful chicken with rice, veggies, and a touch of honey BBQ sauce. With easy steps and tips, you can avoid common mistakes and serve a great dish. Remember, you can change ingredients or try new flavors to suit your taste. Enjoy this dish now and savor the leftovers later! Cooking can be fun and rewarding with the right approach.

One-Pan Honey BBQ Chicken Rice Simple Comfort Meal

Craving a simple yet delicious meal? Look no further than One-Pan Honey BBQ Chicken Rice. This cozy dish combines tender

- Sweet rice flour - Granulated sugar - Water - Salt - Fresh watermelon juice - Diced seedless watermelon - Cornstarch or potato starch - Optional filling: Red bean paste To make watermelon mochi, gather all your ingredients first. Sweet rice flour is key. It gives mochi its chewy texture. You will also need granulated sugar for sweetness. A little salt adds flavor, too. Fresh watermelon juice gives the mochi its vibrant taste. You can make this juice by blending seedless watermelon. Diced seedless watermelon adds fun bites inside the mochi. Cornstarch or potato starch is needed for dusting. This prevents sticking. If you want a filling, red bean paste is a tasty choice. It adds a sweet surprise inside each piece. With these ingredients ready, you will create a delightful treat. Each bite bursts with flavor and texture. Enjoy the process of making this fun dessert! For the complete recipe, check out the Full Recipe. - In a medium bowl, combine: - 1 cup sweet rice flour - 1/4 cup granulated sugar - 1/4 teaspoon salt Whisk these dry ingredients well. Make sure there are no lumps. - Next, pour in: - 1/2 cup water - 1 cup fresh watermelon juice Stir until the mixture is smooth and well combined. - Transfer the mixture to a microwave-safe bowl. Cover it with plastic wrap, leaving a small gap for steam. Microwave on high for 2 minutes. - Carefully stir the mixture after the first two minutes. It will be hot! Heat it again for 1-2 minutes. The mochi should look translucent and feel slightly sticky. - Dust a clean surface with cornstarch or potato starch. This helps prevent sticking. - Let the mochi cool for about 5-10 minutes. It should be warm but safe to touch. - Divide the mochi into small pieces, about the size of a golf ball. Flatten each piece slightly. If you want, add a small spoon of red bean paste and a watermelon chunk in the center. - Fold the edges over the filling to seal it tight. Roll it gently into a round shape. Dust with more starch to avoid sticking. - Repeat until all the mochi is shaped. Place the finished pieces on a serving plate. Enjoy this delightful treat! For the complete guide, see the Full Recipe. To make the best watermelon mochi, avoid lumps. Start by whisking the dry ingredients well. This helps break up any clumps before adding water. Mix in the water slowly, stirring continuously. When you add watermelon juice, keep stirring until it’s smooth. This ensures a silky texture. Translucency is key for great mochi. After microwaving, the mixture should be slightly sticky and clear. If it’s not, microwave it for a bit longer. The right texture makes it fun to eat. Presentation matters! Serve your watermelon mochi on a nice plate. Arrange it with diced watermelon pieces. A sprig of fresh mint adds a pop of color. You can also dust the plate with cornstarch for a neat look. For a fun twist, try adding a scoop of ice cream on the side. This mix of warm and cold is delightful! One common mistake is overcooking the mochi. Keep an eye on the microwave time. If it feels too firm, you may have cooked it too long. This can lead to tough mochi. Another mistake is improper dusting. Always dust your work surface well. If you skip this step, the mochi will stick, making it hard to shape. Remember, a little extra starch goes a long way in keeping everything neat! Check out the Full Recipe for all the steps you need to create watermelon mochi at home! {{image_4}} You can make watermelon mochi even more fun. Try using different fruit juices. Instead of watermelon juice, use mango or strawberry juice. Each juice gives a unique taste. You can blend juices for a new flavor too. Think about filling the mochi with other yummy treats. In addition to watermelon chunks, try fresh berries or coconut. For a sweet surprise, add red bean paste in the center. This mix of flavors makes every bite special. Watermelon mochi has roots in Japan. Traditional mochi is made from sweet rice flour. It is often chewy and sticky. You can taste the history in each piece. Many Japanese people enjoy mochi during special celebrations. Different regions give mochi their own twist. In Hawaii, for example, they may use tropical fruits. In the U.S., you might find mochi filled with ice cream. Each version shows how mochi can change while staying true to its roots. To keep your watermelon mochi fresh, store it in an airtight container. This helps maintain its soft texture. Place a layer of parchment paper between the pieces to stop them from sticking together. You can keep your mochi at room temperature for up to 2 days. If you need to store it longer, refrigeration is best. In the fridge, it stays fresh for about 5 days. Freezing mochi is a great way to save it for later. First, wrap each piece in plastic wrap. Then, place them in a freezer bag. Make sure to press out as much air as possible to avoid freezer burn. You can freeze the mochi for up to 3 months. When you’re ready to enjoy it, take it out and let it thaw in the fridge overnight. If you want a quick option, you can leave it at room temperature for about 30 minutes. Reheat in the microwave for 10-15 seconds to restore its chewy texture. Enjoy your watermelon mochi anytime! Watermelon mochi is a sweet treat from Japan. It uses glutinous rice flour, often called sweet rice flour. This dessert features a soft, chewy texture. The fresh watermelon juice gives it a lovely flavor and color. Mochi is a popular snack in Japanese culture, often served during festivals and special occasions. It brings joy and comfort to many. Yes, you can easily make watermelon mochi vegan. To do this, replace the granulated sugar with a vegan alternative. You can use coconut sugar or maple syrup. These substitutes work well without changing the flavor. You can also skip the red bean paste filling for a fruit-only version. You can tell when mochi is cooked by its texture. Properly cooked mochi should be soft and slightly sticky. It will look translucent and shiny. If it still appears white and has a firm texture, it needs more cooking time. Always check after microwaving to ensure perfect results. You can find watermelon mochi at many Asian markets. Some specialty grocery stores also carry it. Look for stores that sell Japanese sweets. If you prefer shopping online, many websites offer pre-made mochi. You can enjoy it without the hassle of making it yourself. Mochi has some health benefits, especially when made with fruits like watermelon. Watermelon is low in calories and high in water content, keeping you hydrated. It also contains vitamins A and C. Sweet rice flour offers energy from carbohydrates. However, enjoy mochi in moderation, as it can be high in sugar. This article explored how to make delightful Watermelon Mochi. We covered the key ingredients, preparation steps, and cooking methods. You learned tips for perfect texture and how to avoid common mistakes. Variations and storage methods added to your options. In conclusion, making Watermelon Mochi is simple and fun. This treat combines flavors and textures for a refreshing dessert. Try different fruits and fillings to make it your own! Enjoy the process and share your tasty creations with friends.

Watermelon Mochi Delightful Recipe to Enjoy Today

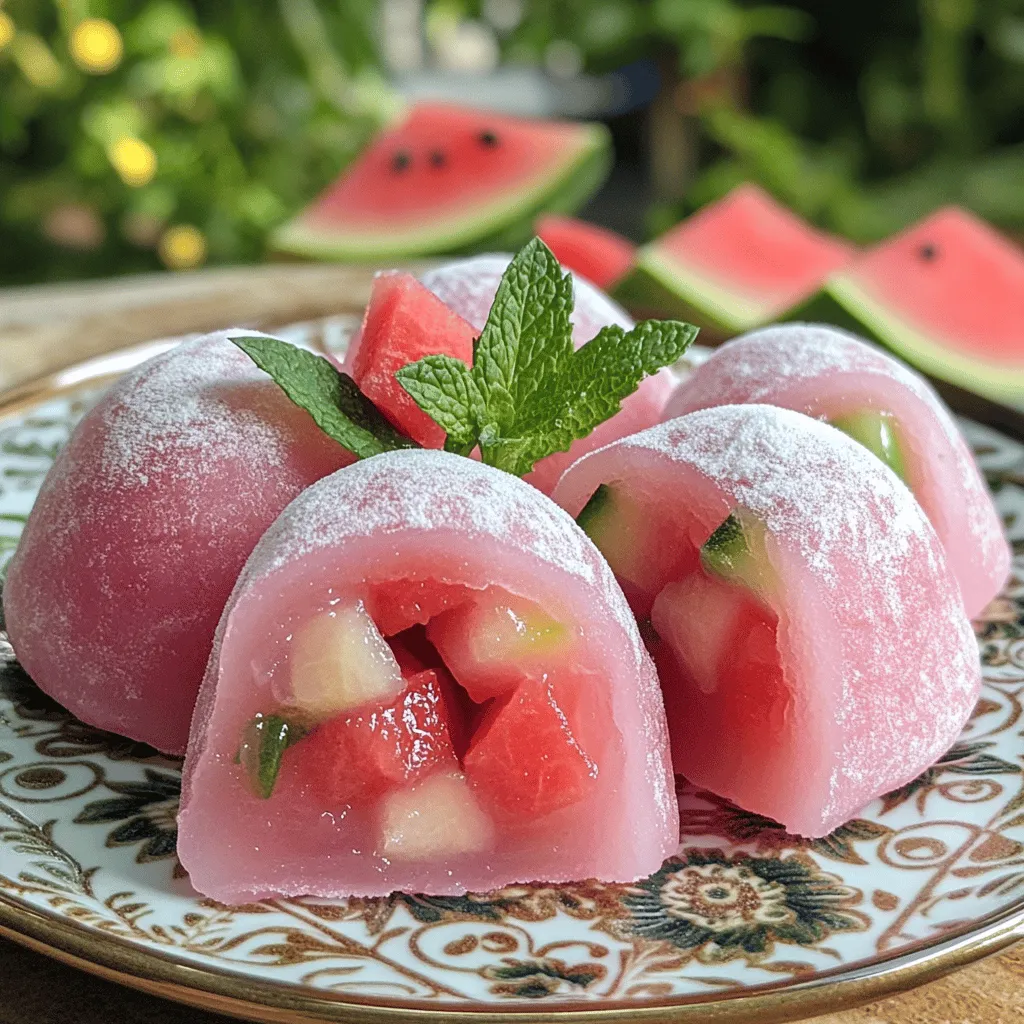
Get ready to dive into a fun treat with my Watermelon Mochi Delightful Recipe! This sweet, chewy dessert combines the

Older posts
Newer posts
← Previous Page1 … Page36 Page37 Page38 … Page91 Next →

dsad

© 2025 recipesstation • Built with GeneratePress

Our Policies

  • Copyright Policy
  • Cookie Policy
  • GDPR Policy
  • Privacy Policy
  • Disclaimer
  • Terms Of Use

More Information

  • Home
  • About
  • Contact
  • Appetizers
  • Dessert
  • Dinner
  • Drinks
©2025, recipesstation About Back To Top