Skip to content
DisclaimerTerms Of UseGDPR PolicyCookie Policy

recipesstation

  • Home
  • Drinks
  • Appetizers
  • Dinner
  • Dessert
  • About
  • Contact
  • Privacy Policy
DisclaimerTerms Of UseGDPR PolicyCookie Policy

Emily

- 2 cups fresh strawberries, hulled and sliced - 1 large cucumber, thinly sliced into half-moons - 1/4 red onion, finely sliced - 1/4 cup creamy feta cheese, crumbled - 1/4 cup fresh mint leaves, finely chopped - 3 tablespoons rich balsamic vinegar - 1 tablespoon natural honey - Salt and freshly cracked black pepper to taste To make the Cucumber Strawberry Salad, you start with fresh, bright ingredients. Strawberries add sweetness, while cucumbers bring a cool crunch. The red onion gives a sharp bite that balances the flavors. Next, creamy feta cheese adds richness. It melts into the salad, giving it a wonderful texture. Fresh mint leaves bring a fragrant touch. They add a burst of flavor that lifts the dish. For the dressing, balsamic vinegar gives a tangy kick. Honey adds just the right amount of sweetness. Together, these two create a perfect balance. You can add salt and pepper to enhance the flavors. You can find the complete recipe details in the Full Recipe section. - Slice strawberries and cucumber into thin pieces. - Finely slice the red onion as thin as you can. - In a large bowl, mix the sliced strawberries, cucumber, and red onion. - Next, add the crumbled feta cheese and chopped mint leaves. - In a small bowl, whisk balsamic vinegar and honey together until blended. - Drizzle this dressing over the salad mixture and toss gently to coat everything. - Season the salad with salt and freshly cracked black pepper. - Let the salad rest for about 10 minutes to enhance the flavors. This simple process leads to a crisp and bright Cucumber Strawberry Salad. You’ll enjoy the freshness from the strawberries and cucumber paired with the tangy feta. For the full recipe, check out the [Full Recipe](#). - Use a clear bowl for display. This shows off the bright colors of the salad. - Garnish with extra mint leaves. This adds a fresh touch to each serving. - Try a honey mustard dressing for a new twist. It adds a sweet and tangy flavor. - Add toasted nuts for crunch. Almonds or walnuts work great in this salad. - This salad pairs well with grilled meats. Serve it alongside chicken or steak for a full meal. - It’s perfect for picnics or summer gatherings. The bright flavors and colors make it a crowd favorite. For the full recipe, check out the Crisp Cucumber Strawberry Delight. {{image_4}} You can switch up the fruits in this salad easily. Try using blueberries or raspberries. Their sweet and tart flavors mix well with cucumber and strawberries. If you're in the mood for something tropical, add diced mango. It brings a sunny vibe to your dish, making each bite refreshing. Want to make your salad heartier? Incorporate avocado or nuts like walnuts or pecans. Avocado adds creaminess, while nuts add crunch. Both options enhance the texture and flavor. You could also swap out the feta cheese for goat cheese or mozzarella. These cheeses provide different tastes that can elevate your salad experience. The dressing can change the flavor profile of your salad. Craft a citrus vinaigrette using fresh lemon or lime juice. This will give a bright, zesty taste. You can also experiment with flavored balsamic vinegars, like raspberry or fig. These unique flavors can take your salad to a whole new level. For the full recipe, check out the Crisp Cucumber Strawberry Delight. To keep your Cucumber Strawberry Salad fresh, store it in the fridge. Use an air-tight container to prevent the salad from wilting. The salad stays fresh for about two days. After that, the flavors may fade, and the veggies may get soggy. You can freeze individual components of the salad, but not the whole dish. Freeze strawberries and cucumber slices separately. When you want to enjoy them, thaw in the fridge overnight. Avoid refreezing once they thaw. Serve them fresh in a new salad or smoothie. The best temperature for your salad is between 35°F and 40°F. This range keeps the cucumber crisp and the strawberries sweet. Always use air-tight containers to lock in freshness. This way, you can enjoy your salad as if it were just made! Yes, you can prepare it ahead of time. To keep the salad fresh, mix the dry ingredients first. This means the strawberries, cucumbers, red onion, and mint. Store them in the fridge without the dressing. Add the dressing just before serving. This keeps everything crisp and tasty. If you want a quick meal, you can make the salad a few hours early. If you don’t have feta, try goat cheese or ricotta. Both give a nice creaminess. You can also use mozzarella or even a vegan cheese if needed. These options blend well with the fresh flavors of the salad. Choose a cheese that you enjoy for the best taste. Yes, this salad is gluten-free. All the ingredients used are safe for those with gluten issues. You can enjoy it without worry. Just make sure that any cheese or dressing you use is also gluten-free. This way, you can serve it at any gathering with confidence. This article covered how to make a fresh cucumber strawberry salad. We explored ingredients like strawberries, cucumber, and feta cheese. The step-by-step instructions guide you through preparing and combining the salad. We shared tips for presentation, flavor enhancements, and serving ideas. Remember, you can customize this salad with different fruits or dressings. Enjoy your creation at picnics or summer gatherings! You can easily store leftovers for later. This salad is not just healthy; it can bring joy to any meal.

Cucumber Strawberry Salad Fresh and Flavorful Treat

Looking for a fresh and flavorful treat? You’re in the right place! This Cucumber Strawberry Salad is the perfect blend

- 2 cups seedless grapes (red or green) - 1 cup granulated sugar - 1/2 cup citric acid - 1 teaspoon fresh lemon juice - 1 tablespoon water To make Sour Patch Grapes, you need simple ingredients. Choose fresh, seedless grapes. You can use red or green grapes based on your taste. Both options work well and taste great. Granulated sugar gives the grapes their sweet base. The sugar balances the tartness. Citric acid adds the sour kick. You can find citric acid in bulk food stores or online. It’s a key part of this fun treat. Fresh lemon juice adds a bright flavor. It enhances the tanginess and makes everything come together. The water helps mix the lemon juice with the sugar and citric acid. This mixture creates a sticky coating for the grapes. With these ingredients ready, you can easily create a fun and tasty snack. For the full recipe, follow the steps in the next section. Start by rinsing the seedless grapes under cold water. Make sure to wash them well to get rid of dirt. After rinsing, gently pat the grapes dry with a clean kitchen towel. Keeping the grapes dry is key. If they are wet, the sour coating won't stick well. In a medium bowl, mix the granulated sugar and citric acid. Stir well until they blend nicely. This mix gives the grapes their sour kick. Next, in a small bowl, combine fresh lemon juice with water. Slowly add this mix to the sugar and citric acid. Stir until it feels like damp sand. This is the perfect texture for coating. Place the dry grapes in a large mixing bowl. Gradually sprinkle the sour sugar mixture over the grapes. Toss them gently as you sprinkle. This helps the grapes get an even coating. Make sure every grape gets covered in that tasty mixture. Carefully arrange the coated grapes in a single layer on a baking sheet lined with parchment paper. Let them sit at room temperature for about 30 minutes. This time helps the coating set. If you want to speed it up, place them in the fridge for 15 minutes. Enjoy your Sour Patch Grapes right away for the best taste. If you have leftovers, store them in an airtight container in the fridge. They will last up to 3 days. These tangy grapes make a fun snack anytime! For the full recipe, check it out here: [Full Recipe]. To make the best sour coating, focus on the right mix of sugar and acid. Aim for a balance that gives you that classic Sour Patch taste. Start with a 2:1 ratio of sugar to citric acid. You can tweak it based on your taste. If you want more tang, add more citric acid. Adjust the lemon juice too. A teaspoon will give a nice touch, but feel free to add a bit more for a stronger zing. Cleaning grapes is simple. First, rinse them under cold water. Make sure to wash each grape well. This helps remove dirt and any wax. After rinsing, dry them gently with a kitchen towel. It’s key to dry them completely. This way, the sour coating will stick better. Sour Patch Grapes shine on their own, but you can mix them with other snacks. Try serving them with cheese or nuts for a fun platter. For a twist, use skewers to create fruit kabobs. This adds a fun look and makes them easy to grab. You can even serve them in small cups for a party treat. These ideas make your Sour Patch Grapes not just tasty but also a feast for the eyes! For the complete recipe, check out the [Full Recipe]. {{image_4}} You can change the flavor of Sour Patch Grapes by adding different citrus juices. Lime juice adds a bright twist. Orange juice brings a sweet, sunny note. Both options enhance the tangy taste. You can also try flavored sugars. Look for options like raspberry or lemon. These sugars can add a unique touch to your grapes. For a smoother texture, use superfine sugar instead of granulated sugar. It coats the grapes more evenly. You can also substitute grapes with other fruits. Strawberries, blueberries, or even pineapple work great. Each fruit gives a new taste and texture. Experiment with what you have on hand. Incorporate seasonal fruits along with grapes. In summer, add sliced peaches or cherries. In fall, try apples or figs. Mixing seasonal fruits makes your treat even more fun. The added colors and flavors create a vibrant dish. Each season offers a chance to refresh your Sour Patch Grapes. To keep your Sour Patch Grapes fresh, use airtight containers. This seals in the flavor and moisture. Place the grapes in a container after they cool down. Avoid stacking too many layers, as this can crush them. For best results, refrigerate your Sour Patch Grapes. The cool temperature helps maintain their tangy taste. Make sure the container is tightly sealed to prevent drying out. Sour Patch Grapes last about three days in the fridge. After this time, they start to lose their taste and texture. Check for signs of spoilage like mushy grapes or an off smell. If you see these signs, it’s best to toss them. Yes, you can freeze Sour Patch Grapes! Freezing keeps them fresh for up to three months. To do this, wash and dry the grapes first. Then, spread them out on a baking sheet and freeze them in a single layer. Once frozen, transfer them to an airtight container or bag. This way, you can enjoy your sweet and tangy treat anytime! When you want to eat them, just take out a few grapes and let them thaw in the fridge. This method preserves their taste and tanginess. Sour Patch Grapes are a fun treat. They mix sweet grapes with a tangy coating. The grapes get covered in sugar and citric acid, which makes them taste sour and sweet. This snack is very popular because it is easy to make and fun to eat. Kids and adults love them. You can find this treat at parties, picnics, and even in lunch boxes. Yes, you can make Sour Patch Grapes vegan! The main ingredients are grapes, sugar, and citric acid, which are all vegan. You can skip the lemon juice if you want. Just be sure to check your sugar. Some brands use bone char in their process. You can use organic sugar instead for a vegan option. Sour Patch Grapes can stay fresh for up to three days when stored correctly. Keep them in an airtight container in your fridge. If you see any signs of spoilage, like mushiness or strange smells, it’s best to toss them. If you want to enjoy them longer, you can freeze them, but they may lose some texture. Absolutely! You can change the sourness by adjusting the sugar and citric acid levels. If you want them more sour, add more citric acid. If you prefer a sweeter taste, use less. Start with small changes and taste as you go. This way, you can find the perfect balance that you enjoy. Grapes are very healthy! They are low in calories and full of nutrients. They have vitamins C and K, which are good for your skin and bones. Grapes also have antioxidants that help your body stay healthy. Eating grapes can support heart health and even improve digestion. They are a tasty, nutritious snack! Sour Patch Grapes are a fun, tasty treat you can easily make at home. We covered the simple ingredients, step-by-step instructions, and useful tips to perfect your sour coating. Plus, we explored tasty variations and storage methods to keep your grapes fresh. These sweet and sour bites are perfect for parties or snacks. With a bit of creativity, you can adapt this recipe to match your tastes and preferences. Enjoy making and sharing your Sour Patch Grapes!

Sour Patch Grapes Irresistible Sweet and Tangy Treat

Are you ready to try a snack that’s both sweet and sour? Sour Patch Grapes are your new favorite treat!

- Puff pastry sheets - Fresh strawberries - Heavy whipping cream - Powdered sugar - Pure vanilla extract - Fresh lemon juice - Fresh mint leaves - Additional powdered sugar for dusting When making Strawberry and Whipped Cream Puff Pastries, I rely on a few key ingredients. First, I use puff pastry sheets. These sheets create the light and flaky texture that makes this dessert shine. I always choose fresh strawberries for their sweet and juicy flavor. They add a burst of color, too. Heavy whipping cream is the star of the show. It transforms into a fluffy filling that complements the strawberries perfectly. For added sweetness, I sprinkle in powdered sugar. This helps balance the flavors. A splash of pure vanilla extract gives the cream a warm, inviting taste. Sometimes, I add fresh lemon juice to brighten the flavors. To make my pastries even more special, I like to garnish them. Fresh mint leaves add a touch of green and freshness. I also dust extra powdered sugar on top for a sweet finish. If you want to try this delightful dessert, check out the Full Recipe. You'll love how easy it is to make these treats at home! - Preheat your oven to 400°F (200°C). - Prepare a baking sheet by lining it with parchment paper. - Roll out each sheet of puff pastry on a lightly floured surface. - Cut the pastry into circles about 3-4 inches in diameter. - Arrange the circles evenly on the lined baking sheet. - Bake for 15-20 minutes, until they are golden brown and puffed. Watch closely to avoid overbaking. - In a medium bowl, mix heavy whipping cream, powdered sugar, vanilla extract, and lemon juice. - Whip the mixture until soft peaks form for a light, fluffy texture. - Slice each cooled pastry in half horizontally to create a top and bottom half. - On the bottom half, add a generous amount of whipped cream, then top with sliced strawberries. - Place the top half back on and dust with extra powdered sugar for a sweet finish. For the full recipe details, check out the complete list of instructions. Enjoy making these delightful pastries! - Ensuring even baking: Place your puff pastry circles on a baking sheet with space in between. This allows hot air to circulate. Avoid overcrowding to help them puff up nicely. - Avoiding overbaking: Keep an eye on your pastries while they bake. They should turn golden brown, not dark brown. If they start to brown too fast, lower the oven temperature slightly. - How to achieve soft peaks: Start with cold heavy whipping cream. Use an electric mixer on medium speed. Whip until soft peaks form, which means the cream holds its shape but still has a smooth texture. - Flavor enhancement ideas: Add a teaspoon of vanilla extract or a splash of lemon juice to your whipped cream. This adds a nice twist and brightens up the flavor. - Creative filling techniques: Use a piping bag to fill your pastries with whipped cream. This makes it easy to create a nice, even layer. You can also layer strawberries in between for added texture. - Best serving practices: Arrange your Strawberry Cloud Puffs on a pretty plate. Dust them lightly with powdered sugar for a touch of elegance. Garnish with fresh mint leaves and extra strawberries for color and freshness. You can find the full recipe to get started right away! {{image_4}} You can swap strawberries for many other fruits. Ripe peaches, sweet blueberries, or juicy raspberries make excellent choices. Each fruit brings its own flavor and sweetness. Seasonal fruit options are great too. In spring, use cherries or apricots. In summer, try fresh figs or blackberries. Fall invites flavors like apples or pears. Each fruit adds its own charm to your puff pastries. For a twist, consider adding chocolate or caramel. Melted chocolate can drizzle over the whipped cream. You can also mix in some cocoa powder to the cream for a chocolatey taste. Caramel sauce can add a rich sweetness. Infusing whipped cream with spices works well too. A touch of cinnamon or nutmeg can elevate the flavor. You can even try adding a hint of mint for freshness. If you need gluten-free options, look for gluten-free puff pastry. Many stores offer brands that taste great. You can also make your own with almond flour or coconut flour. If you prefer vegan whipped cream, coconut cream is a fantastic substitute. Just chill a can of coconut milk overnight, then whip it. This way, you can enjoy a delicious treat that fits your diet. For the full recipe, check out Strawberry Cloud Puffs! To store extras in the fridge, place the filled pastries in an airtight container. Keep them in the fridge for up to two days. The whipped cream lasts about two days too. If you notice it starting to separate, give it a quick whip to revive it. You can freeze unbaked pastry for later use. Wrap the pastry sheets tightly in plastic wrap and store them in the freezer. They stay fresh for up to three months. To freeze assembled puffs, first, chill them in the fridge. Then, wrap each puff in plastic wrap and place them in a freezer bag. They can also last for three months in the freezer. To reheat puff pastry, preheat your oven to 350°F (175°C). Place the pastries on a baking sheet. Heat them for about 10 minutes. This keeps the pastry crispy. Avoid microwaving, as it can make the pastry soggy. To maintain texture, enjoy them fresh after reheating. You can tell when puff pastry is ready by looking for these signs: - It should be golden brown all over. - The layers should be puffed and airy. - If you gently tap it, it should sound hollow. These signs mean the pastry has baked perfectly. Keep an eye on it, as ovens vary. Yes, you can prepare whipped cream in advance. Here are a few tips: - Whip the cream until soft peaks form. - Store it in an airtight container in the fridge. - It will stay good for about 24 hours. If you plan to use it later, give it a quick whip before serving. This keeps it fluffy and fresh. Absolutely! You can make this recipe gluten-free. Here are some recommended products: - Look for gluten-free puff pastry brands at stores. - Check labels to ensure they are certified gluten-free. These options will help you enjoy this dessert without gluten. Leftover puff pastry can be quite useful. Here are some creative ideas: - Make mini tarts with leftover dough and any filling you like. - Cut it into strips, twist, and bake for tasty snacks. - Use it for savory dishes, like hand pies or quiches. These ideas help you avoid waste and enjoy more delicious treats. This blog outlined how to create delicious puff pastry filled with strawberries and whipped cream. We covered essential and optional ingredients, along with step-by-step instructions. I shared tips for perfect pastry, creative variations, and useful storage info. In closing, this easy recipe can impress at any gathering. With a few simple twists, you can make it your own. Enjoy making and sharing these treats with family and friends!

Strawberry and Whipped Cream Puff Pastries Delight

Ready to impress your friends with a delightful treat? Strawberry and whipped cream puff pastries are easy to make and

- 4 medium zucchini, thinly sliced - 4 medium yellow squash, thinly sliced - 1 small onion, finely chopped - 2 cloves garlic, minced - 1 cup cherry tomatoes, halved - 1 cup cooked quinoa - 1 cup shredded mozzarella cheese (or dairy-free alternative) - 1/2 cup grated Parmesan cheese (or nutritional yeast for a vegan option) Summer squash is the star of this dish. Zucchini and yellow squash add color and flavor. Their soft texture makes them perfect for baking. The onion and garlic bring warmth and depth to the dish. They create a nice base that enhances the squash. The quinoa serves as a healthy grain that adds protein. It helps make the casserole filling. Cherry tomatoes add a burst of freshness. Their sweet flavor balances the savory cheese. - 2 tablespoons olive oil - 1 teaspoon dried oregano - 1 teaspoon salt - 1/2 teaspoon black pepper Herbs and spices are key to making this dish pop. Dried oregano adds an earthy taste that complements the squash. Salt and black pepper enhance the overall flavor. Olive oil plays an important role. It helps sauté the aromatics and adds richness. It also keeps the casserole from being dry. Using high-quality olive oil boosts the flavor of each bite. For the full recipe, check out the link provided. 1. Preheating the Oven: Begin by preheating your oven to 375°F (190°C). 2. Preparing the Baking Dish: Take a 9x13-inch baking dish and grease it lightly with olive oil. This helps prevent sticking. 1. Sautéing Aromatics: In a large skillet, add 2 tablespoons of olive oil and heat it on medium. Once hot, add the chopped onion and sauté for 3-4 minutes until soft. 2. Adding Garlic: Then, add the minced garlic and sauté for one more minute. This boosts the flavor. 3. Mixing Ingredients: In a bowl, combine sliced zucchini, yellow squash, cooked quinoa, sautéed onion and garlic, and cherry tomatoes. Add oregano, salt, and black pepper. Stir well to coat everything. 1. Layering the Casserole: Place half of the squash mixture in the baking dish. Spread it evenly. Then, sprinkle half of the shredded mozzarella on top. Repeat with the rest of the mixture and cheese. 2. Final Baking Tips: Cover the dish with foil and bake for 25 minutes. Remove the foil and bake for another 15-20 minutes. Look for bubbly, golden cheese as a sign it's ready. For the full recipe, refer to the earlier section. Enjoy your wonderful summer squash casserole! To ensure even cooking, slice your summer squash uniformly. This way, all pieces cook at the same rate. Use a sharp knife to get clean cuts. If you mix zucchini and yellow squash, try to keep their slices close in size. This helps them cook together nicely. To avoid a watery casserole, remember to remove excess moisture from your vegetables. After slicing, sprinkle salt on the zucchini and yellow squash. Let them sit for about 10 minutes. This step draws out extra water. Pat the slices dry with a paper towel before mixing them in the casserole. Serving suggestions can make your dish pop. Serve the casserole in individual bowls for a nice touch. It looks fancy and feels special. You can drizzle a bit of extra olive oil or balsamic reduction on top. This adds flavor and makes it visually appealing. For garnishing choices, fresh basil leaves work wonders. They add color and a burst of flavor. You can also sprinkle some extra Parmesan cheese on top right before serving. This creates a beautiful, cheesy crust. For lighter options, consider swapping mozzarella cheese for a dairy-free alternative. Nutritional yeast can replace Parmesan, offering cheesy flavor without the calories. You can also use less cheese overall without giving up taste. Adding more vegetables is another great way to make this dish healthier. Try mixing in diced bell peppers, spinach, or even mushrooms. These veggies add nutrients and make the casserole more colorful. You can also use whole grains like brown rice instead of quinoa for added fiber. Explore the [Full Recipe] for a detailed step-by-step guide to prepare this delicious dish! {{image_4}} You can mix up the cheese in this dish. If you want a dairy-free option, use almond or cashew cheese. It melts well and tastes great. You can also try goat cheese for a tangy twist. Feta cheese adds a salty bite, too. Explore different flavors to find your favorite. Want to change the grains? You can use brown rice or farro instead of quinoa. These grains give nice texture and flavor. If you want more protein, add cooked chicken, turkey, or black beans. These swaps make the dish heartier and more filling. Spice up the casserole with herbs like thyme, basil, or rosemary. A pinch of red pepper flakes adds heat if you like it spicy. You can also toss in veggies like bell peppers or spinach for extra nutrients. These changes make the casserole more vibrant and tasty. To store leftovers, let the casserole cool down first. Once it cools, place it in an airtight container. This helps keep the flavors fresh. You can store it in the fridge for up to three days. For best results, use glass containers. They help maintain the taste and warmth. You have a few great options to reheat your casserole. The oven works best for keeping the texture nice. Preheat the oven to 350°F (175°C). Cover the dish with foil to avoid burning. Heat for about 20 minutes. If you're in a hurry, you can use the microwave. Heat it in short bursts, stirring in between. This helps heat it evenly. To freeze the casserole, let it cool completely. Then, cut it into portions for easy use later. Wrap each piece in plastic wrap, then place it in a freezer bag. Be sure to remove as much air as possible. This prevents freezer burn. You can store it in the freezer for up to three months. When ready to eat, take it out and thaw it in the fridge overnight. To reheat after freezing, use the oven for best results. Bake at 350°F (175°C) until heated through, about 30-35 minutes. Enjoy this tasty dish anytime! For the full recipe, refer to the detailed guide. Yes, you can prepare this casserole ahead of time. First, follow all the steps up to the baking point. Then, cover it tightly and store it in the fridge. This keeps the flavors fresh. When you’re ready to bake, just take it out and bake as directed. If it’s cold from the fridge, add a few extra minutes to the bake time. This helps with meal prep and saves time on busy days. If you don’t have quinoa, try using rice or farro. Both work well and add a nice texture. You can also use couscous for a quick option. If you want a gluten-free choice, try using millet or even cauliflower rice. Each substitute gives the dish a unique taste, so pick what you enjoy most. You can keep leftovers in the fridge for about 3-4 days. Make sure to store them in an airtight container to keep them fresh. If you want to store them longer, you can freeze the casserole. It will stay good for up to 3 months in the freezer. Just remember to thaw it in the fridge overnight before reheating. This blog post covered the key ingredients for a delicious casserole, including summer squash, aromatics, and flavorful cheeses. I shared step-by-step cooking instructions, tips for even cooking, and ways to present the dish nicely. You also learned about variations to suit your taste and how to store leftovers properly. With these clever tips and techniques, you can create a tasty, healthy dish that impresses everyone. Enjoy cooking and experimenting with your own twists!

Healthy Summer Squash Casserole Tasty and Simple Dish

Looking for a delicious way to enjoy summer squash? My Healthy Summer Squash Casserole is both tasty and simple! Packed

For a great Pimento Cheese Tomato Pie, gather these essential ingredients: - 1 pre-made pie crust - 2 cups fresh tomatoes, sliced - 1 cup shredded sharp cheddar cheese - 1 cup pimento cheese (store-bought or homemade) - 1/2 cup mayonnaise - 1 tablespoon Dijon mustard - 1 teaspoon garlic powder - 1/2 teaspoon onion powder - Salt and pepper to taste - Fresh basil leaves for garnish These ingredients work together to create a rich and savory pie. Each bite is a burst of flavor that makes your taste buds dance. If you want to mix things up, here are some fun substitutes: - Cheese: Try mozzarella or pepper jack for a different taste. - Mayonnaise: Greek yogurt gives a tangy twist. - Crust: Use a whole wheat crust or even a cauliflower crust for a healthier option. These swaps can change the flavor and texture while keeping the recipe simple and fun. Using fresh tomatoes and herbs is key. Fresh tomatoes add sweetness and depth. They bring the pie to life with their juicy flavor. Herbs like basil not only look pretty but also enhance taste. Fresh basil leaves brighten each slice. This pie shines with freshness, making every bite delicious. Always choose the best ingredients for a better outcome. To start, you need to pre-bake your pie crust. If you use a pre-made crust, follow the package directions. Blind baking helps keep the pie crust from getting soggy. Place the crust in the oven at 375°F (190°C) for about 10 minutes. Once it’s golden and slightly firm, take it out and let it cool. This step is key to a crisp pie. Next, let’s make the cheese mixture. In a large mixing bowl, combine the shredded sharp cheddar cheese and pimento cheese. Add in the mayonnaise and Dijon mustard. Then, sprinkle in the garlic powder and onion powder. Don’t forget a pinch of salt and pepper. Mix everything well until it’s smooth and creamy. This cheesy blend will be the star of your pie. Now, it’s time to assemble your pie. Start by arranging the sliced tomatoes in the cooled crust. Lay them in a single layer, slightly overlapping each slice. This makes the pie look nice and helps with flavor. Lightly sprinkle some salt on the tomatoes to bring out their sweetness. Next, spread the cheese mixture over the tomatoes. Make sure every slice is covered. This will create a delicious cheesy layer. Once everything is layered beautifully, place the pie in the oven. Bake for 30 to 35 minutes, until the top is golden and bubbly. After baking, let it cool for about 10 minutes. This helps the layers set. Finally, add some fresh basil leaves on top before serving. It adds a nice touch and extra flavor. Enjoy your savory Pimento Cheese Tomato Pie! For more details, check the Full Recipe. To get that perfect golden-brown crust, start by preheating your oven to 375°F (190°C). A well-prepped crust makes a huge difference. If your crust is not pre-baked, follow the package directions. Bake it until lightly golden. After baking, let it cool for a bit. This helps the crust hold its shape. For the filling, mix the cheeses and other ingredients until smooth. A smooth blend ensures even cooking. When you bake the pie, keep an eye on it. Look for that bubbling, golden top. This shows the pie is ready and full of flavor. A soggy pie crust is a common issue. To avoid this, make sure to bake your crust before adding the filling. This step helps seal the crust. You can also sprinkle some breadcrumbs on the crust before adding the tomatoes. This layer acts as a barrier. Another trick is to add the tomatoes in a single layer. Overlapping them can trap moisture. A light sprinkle of salt on the tomatoes draws out excess water. Try to use fresh tomatoes as they have lower water content than canned ones. To take your pie to the next level, think about herbs and spices. Fresh basil is a great addition. You can mix it into the cheese blend or sprinkle it on top. Other herbs like oregano or thyme can add depth. If you want a kick, consider adding a pinch of cayenne pepper. This small change can elevate the flavor. Experiment with garlic or onion powder as well. These simple tweaks can make your pie truly special. For more details, check the Full Recipe. {{image_4}} You can change the cheese for fun flavors. Try gouda for a smoky kick. Or use pepper jack for a spicy twist. Cream cheese adds creaminess without overpowering the other tastes. Each cheese adds its own special flavor, so mix and match to find your favorite. Want to make your pie heartier? Add cooked bacon or crumbled sausage. Just sprinkle it over the tomatoes before adding the cheese mix. This step adds a nice crunch and a savory taste. You can also use shredded chicken or turkey for a lighter option. Each choice makes the pie more filling and delicious. If you need a gluten-free crust, use almond flour or rice flour. These options work well for a tasty base. You can also find pre-made gluten-free crusts at stores. Just ensure they fit your pie dish. With these options, everyone can enjoy this tasty dish! For the full recipe, see the link. After you enjoy your Pimento Cheese Tomato Pie, store any leftovers in the fridge. Use an airtight container or cover the pie with plastic wrap. This keeps it fresh and prevents drying out. Try to eat the pie within three days for the best flavor. If you have a whole pie, slice it first. This makes it easier to grab a piece later. To freeze your Pimento Cheese Tomato Pie, let it cool completely. Wrap it tightly in plastic wrap, then in aluminum foil. This double layer helps protect the pie from freezer burn. You can freeze the pie for up to three months. To reheat, thaw it in the fridge overnight. Bake it at 375°F (190°C) for about 20 minutes until it’s warm. When stored correctly, your pie can last in the fridge for about three days. In the freezer, it can stay good for up to three months. Always check for any signs of spoilage before eating. If the pie looks or smells off, it’s best to throw it out. Proper storage keeps your Pimento Cheese Tomato Pie tasty for longer! You can serve Pimento Cheese Tomato Pie in many fun ways. Slice it into wedges and place it on a colorful plate. Add a fresh salad on the side for a light meal. A simple green salad with a light vinaigrette works well. You can also serve it with crispy crackers for a nice crunch. If you like, try pairing it with a chilled glass of tea or lemonade. Yes, you can make this pie ahead of time. Prepare it fully and store it in the fridge. Cover it well with plastic wrap. You can bake it later when you need it. If you bake it first, let it cool completely. Then, store it in the fridge as well. To reheat, warm it in the oven at 350°F (175°C) for about 15-20 minutes or until hot. If you don’t have pimento cheese, don’t worry! You can easily make a substitute. Mix equal parts cream cheese and shredded cheddar cheese. Add some diced roasted red peppers for that pimento flavor. You can also add a bit of hot sauce for some heat. Store-bought cheese spreads can work too. Look for ones that have similar flavors. For the best taste, try to keep it creamy. This blog post covers how to make a delicious Pimento Cheese Tomato Pie. We discussed essential ingredients, possible substitutes, and the importance of freshness. Step-by-step, I showed how to prepare, assemble, and bake your pie. Tips helped ensure a perfect bake and avoid a soggy crust. You can also customize your pie with variations and learn smart ways to store leftovers. Remember, this dish is versatile, tasty, and great for sharing. Enjoy making your pie and impressing your friends with your cooking skills!

Pimento Cheese Tomato Pie Flavorful and Simple Recipe

Looking for a tasty dish that’s both easy and satisfying? Pimento Cheese Tomato Pie is a delightful recipe you need

- 6 large eggs - 1 cup assorted bell peppers (red, yellow, and green), diced - 1 cup fresh baby spinach, chopped - 1 small zucchini, grated - 1/2 cup cherry tomatoes, halved - 1/2 cup onion, finely chopped - 1/4 cup milk (or plant-based alternative) - 1 teaspoon garlic powder - 1 teaspoon Italian seasoning - Salt and pepper, to taste - 1/2 cup shredded cheese (cheddar or mozzarella) - Olive oil, for sautéing Using fresh and vibrant ingredients makes this frittata stand out. Large eggs act as the base, giving the frittata its structure. Assorted bell peppers add color and crunch. Fresh baby spinach brings a pop of green and vital nutrients. Zucchini adds moisture and mild flavor, while cherry tomatoes contribute sweetness. Onion gives depth, and milk helps bind everything together. - Types of cheese: Feta, goat cheese, or even vegan cheese can change the taste. - Other vegetables to consider: Mushrooms, kale, or broccoli can be tasty swaps. - Dairy-free options: Use almond milk or oat milk instead of regular milk. Feel free to experiment with these options. The goal is to create a dish that you love. By mixing and matching, you can make this frittata your own. For the full recipe, check out the vibrant garden vegetable frittata details. 1. Preheat your oven to 375°F (190°C). This helps cook the frittata evenly. 2. In a bowl, whisk together 6 large eggs, 1/4 cup milk, 1 teaspoon garlic powder, 1 teaspoon Italian seasoning, and a pinch of salt and pepper. Whisk until smooth and set aside. 1. In an oven-safe skillet, heat a drizzle of olive oil over medium heat. Make sure the oil is hot. 2. Add 1/2 cup finely chopped onion to the skillet. Sauté for 3-4 minutes until the onion is translucent. 3. Add 1 cup diced bell peppers and 1 small grated zucchini. Cook for 2-3 minutes, until they soften. 4. Fold in 1 cup chopped spinach and 1/2 cup halved cherry tomatoes. Cook for about 1-2 minutes until the spinach wilts. 5. Pour the egg mixture evenly over the sautéed vegetables. Make sure all veggies are covered. 1. Let the frittata cook on the stovetop for 2-3 minutes. Lift the edges gently with a spatula to let uncooked egg flow underneath. 2. When the edges are firm but the center is still runny, sprinkle 1/2 cup shredded cheese on top. 3. Transfer the skillet to the oven and bake for 15-20 minutes, or until puffed and set. A toothpick should come out clean. 4. Once baked, remove from the oven and let it cool for a few minutes. Slice into wedges before serving. This easy vegetable frittata is a colorful and tasty dish that you can enjoy anytime. For the full recipe, check out the link above! To make a great frittata, I focus on even cooking. This keeps every bite fluffy and delicious. Here are some helpful tips: - Use a well-heated skillet. A hot pan sears the veggies and locks in flavor. - Stir the vegetables gently. This helps them cook evenly without breaking them apart. - Avoid high heat. Medium heat allows the eggs to set slowly and evenly. For the best skillet, I recommend a cast iron pan. These skillets hold heat well and cook evenly. Other good options are stainless steel or non-stick pans. Just ensure they are oven-safe. Adding herbs and spices brings life to your frittata. I love using fresh or dried herbs. Here are some of my favorites: - Basil - Chives - Thyme - Oregano You can also play with seasonings. If you like a kick, try adding red pepper flakes. For a rich flavor, sprinkle in some smoked paprika. Adjust the salt and pepper to your taste. This makes your frittata just right for you. Experiment with different flavors. The beauty of a vegetable frittata is its versatility. You can follow my Full Recipe or create your own version. Enjoy the process! {{image_4}} You can mix and match vegetables in your frittata. Use what you have on hand. Seasonal vegetables work best. - Spring: Try asparagus and peas. - Summer: Use zucchini and tomatoes. - Fall: Add butternut squash and kale. - Winter: Go for root vegetables like carrots and sweet potatoes. For extra flavor, add proteins. Sausage or ham can make the frittata more filling. Cook them first in the skillet. Drain excess fat before adding veggies. This adds depth and richness to your dish. Frittatas can fit many diets. You can make a vegetarian version by skipping meat. Just add more veggies instead. For a vegan option, use a plant-based egg substitute. You can also use silken tofu blended with spices. This keeps the same great texture. Gluten-free? No problem! This frittata is naturally gluten-free. Just ensure your cheese is also free from gluten if you add it. These variations make your frittata unique and tasty. Each version brings new flavors to the table. Get creative and enjoy! For the full recipe, check out the details above. After cooking, let the frittata cool to room temperature. Then, slice it into wedges. Use an airtight container to keep it fresh. Glass or plastic containers work great for this. Store the frittata in the fridge. It lasts up to 3 days. If you want to enjoy it later, consider freezing. To freeze, wrap the frittata slices tightly in plastic wrap. Then, place them in a freezer bag. Remove as much air as possible to avoid freezer burn. The frittata can last up to 2 months in the freezer. When you're ready to eat, thaw it in the fridge overnight. Reheat slices in the oven or microwave. For the oven, heat it at 350°F (175°C) for about 10-15 minutes. This keeps the frittata moist. If using a microwave, cover it with a damp paper towel. This prevents it from drying out. Enjoy your frittata any time! You can find the full recipe to make it again. A vegetable frittata lasts about 3 to 4 days in the fridge. To keep it fresh, store it in an airtight container. This helps prevent it from drying out. Before eating, check for any off smells or changes in texture. If it looks and smells good, enjoy! Yes, you can make a frittata ahead of time. It’s great for meal prep or brunch. Cook it fully, then let it cool. Once cool, slice it and store it in the fridge. You can reheat it easily in the microwave or oven when you're ready to serve. You can serve your frittata with many sides. A fresh salad adds crunch and color. Toast or crusty bread pairs well too. For extra flavor, serve it with salsa or avocado. These sides make your meal more filling and balanced. Yes, you can use egg substitutes in this recipe. Popular options include silken tofu or chickpea flour. These provide a similar texture. While the taste may differ, they still create a tasty dish. Just be sure to adjust cooking times for your substitute. Yes, using an oven-safe skillet is necessary for this recipe. It allows you to cook the frittata on the stovetop and then bake it. Cast iron or stainless steel skillets work best. If you don’t have one, transfer the frittata to a baking dish before oven cooking. In this blog post, we explored how to make an Easy Vegetable Frittata. You learned about essential ingredients like eggs, bell peppers, and spinach. We reviewed step-by-step instructions to prepare, cook, and finish the frittata. I shared tips for perfecting the dish and variations to keep it exciting. Remember, you can store leftovers easily and even freeze them for later. Enjoy your cooking journey and experiment with flavors! A frittata is not just simple; it’s also a fun way to eat your veggies.

Easy Vegetable Frittata Quick and Simple Recipe

Are you looking for a quick and simple meal that’s packed with flavor? This Easy Vegetable Frittata is perfect for

To make a delightful peaches and cream pie, you need these main ingredients: - 2 cups fresh peaches, peeled and sliced - 1 tablespoon fresh lemon juice - 1 cup granulated sugar, divided - 1 teaspoon pure vanilla extract - 1 tablespoon cornstarch - 1 pre-made graham cracker crust - 1 cup heavy whipping cream - 2 tablespoons powdered sugar - 1 teaspoon almond extract Each ingredient plays a key role. The peaches give sweetness, while the lemon juice brightens the flavor. The sugar enhances the natural taste of the fruit. Cornstarch thickens the filling, making it nice and creamy. The graham cracker crust adds a crunchy base. Finally, the whipped cream topping brings lightness to each slice. You can elevate your pie with some optional garnishes: - Fresh mint leaves for garnish (optional) Mint adds a fresh touch to the pie's look and taste. You can also try sprinkling some crushed nuts or a drizzle of caramel sauce for extra flavor. If you don’t have all the ingredients, here are some easy swaps: - Use canned peaches if fresh ones are not available. - Swap lemon juice for lime juice for a zesty twist. - Replace granulated sugar with brown sugar for a deeper flavor. - Use coconut cream instead of heavy whipping cream for a dairy-free option. These substitutions can give your pie a unique twist while keeping its deliciousness intact. Check out the full recipe to see how to put it all together! To start, grab a big bowl and slice the fresh peaches. Add 1 tablespoon of lemon juice and ½ cup of sugar. Toss the peaches gently. Let them sit for 20 minutes. This step helps the peaches release juice and makes a sweet syrup. Now, take a small bowl. Whisk together 1 tablespoon of cornstarch, the rest of the sugar (½ cup), and 1 teaspoon of vanilla. Pour this mix over the peaches. Stir until all the peaches are coated. Let it sit for another 10 minutes. This helps thicken the syrup. Preheat your oven to 350°F (175°C). Carefully pour the peach mixture into the graham cracker crust. Spread the peaches evenly. Bake it in the oven for about 25 minutes. The peaches should be soft and bubbling. Once finished, take it out and let it cool at room temperature. For the complete recipe, be sure to check out the Full Recipe section. To make your peaches shine, always choose ripe ones. Look for peaches that are soft but not mushy. Use fresh peaches for the best taste. A splash of lemon juice adds a nice zing. It helps balance the sweetness and keeps the peaches bright. Marinating them for 20 minutes brings out their juices. You can mix in a bit of cinnamon for warmth. This elevates the flavor and adds a cozy touch. For the perfect whipped topping, start with cold heavy cream. Cold cream whips up better and faster. Use a clean bowl and beaters to avoid unwanted flavors. Add powdered sugar for sweetness and almond extract for a hint of nuttiness. Whip until you see stiff peaks; this means it’s ready. Be careful not to overwhip, or it may turn grainy. A creamy topping will make your peaches and cream pie stand out. If your pie seems runny, it may be due to undercooked peaches or not enough cornstarch. Make sure to let the peach mixture sit long enough to thicken. If the crust burns, cover the edges with foil while baking. For a grainy topping, it’s likely that you overwhipped the cream. Start over with new cream if that happens. Remember, the key to a great pie is patience. Take your time, and enjoy the process. For the full recipe, check out the delicious Peaches & Cream Delight Pie. {{image_4}} You can make a no-bake version of this pie. This method saves time and keeps the pie cool. Use the same ingredients as the full recipe. Instead of baking, spread the peach filling over the graham cracker crust. Chill the pie in the fridge for at least two hours. This way, the flavors meld beautifully. The whipped cream topping can be added just before serving. This makes for a refreshing treat on hot days. Making this pie vegan is easy and fun. Use coconut cream instead of heavy whipping cream. You can find it in cans at the grocery store. For the crust, use a store-bought vegan graham cracker crust. In the peach filling, swap granulated sugar for coconut sugar. This adds a nice caramel flavor. Follow the full recipe steps, and you’ll have a creamy, fruity pie everyone will love. If you need a gluten-free pie, it’s simple to adapt. Choose a gluten-free graham cracker crust. Many brands offer this option. For the filling, all the ingredients are naturally gluten-free. Just be sure to check labels on the products you buy. The rest of the steps remain the same. You’ll end up with a delicious pie that fits your dietary needs. After enjoying your peaches and cream pie, store any leftovers in the fridge. Place the pie in an airtight container or cover it tightly with plastic wrap. This keeps the pie fresh for up to three days. If you use a store-bought crust, the pie may last a bit longer, but it's best to eat it soon. If you want to save some pie for later, freezing is a great option. First, let the pie cool completely. Then, wrap it tightly in plastic wrap. For added protection, place it in a freezer-safe bag or container. You can freeze the pie for up to three months. When you're ready to enjoy it, thaw the pie in the fridge overnight. To reheat your pie, start by slicing it into portions. Place the slices on a baking sheet. Preheat your oven to 350°F (175°C). Warm the pie slices for about 10-15 minutes, or until they reach your desired temperature. If you want to keep the whipped cream topping cold, serve it on the side. Enjoy every bite! For this pie, I recommend using ripe, juicy peaches. Yellow peaches work great because they are sweet and flavorful. You can also use freestone peaches, as they are easy to slice and pit. Don’t pick peaches that are hard or green. They won’t give you the best taste in your pie. Yes, you can use frozen peaches. Just make sure to thaw them first. Drain any excess liquid to avoid a soggy pie. Frozen peaches can lose some flavor, so try to use fresh if you can. They give a better taste and texture. You’ll know your pie is done when the peaches are tender and the filling bubbles. Look for a golden crust around the edges. If you see this, it’s ready! Let it cool completely at room temperature after baking. Absolutely! You can bake the pie a day in advance. Just let it cool and cover it well. Store it in the fridge. When you’re ready to serve, add the whipped cream topping. This keeps it fresh and tasty for your guests. For the full recipe, check out the details above. This blog post covered how to make a tasty Peaches and Cream Pie. We explored main ingredients, cooking steps, and ways to perfect your pie. I shared tips for flavor and texture, plus fun variations like vegan and no-bake options. You now know how to store and reheat leftovers, too. Remember, using ripe peaches makes all the difference. Enjoy your baking and impress your friends with this delicious dessert!

Peaches and Cream Pie Delicious Summer Dessert Recipe

Summer calls for light and sweet treats, and nothing beats a Peaches and Cream Pie! This dessert combines juicy peaches

- 2 large cucumbers, thinly sliced into rounds - 3 medium tomatoes, diced into bite-sized pieces - 1 small red onion, thinly sliced into rings Fresh produce brings life to this dish. The cucumbers are crisp and refreshing. The tomatoes add a juicy burst of flavor. The red onion brings a bit of sharpness. Together, they create a colorful and tasty salad. - 1/4 cup rice vinegar for a tangy flavor - 2 tablespoons extra virgin olive oil for richness - 1 teaspoon granulated sugar to balance acidity The marinade makes this dish pop. Rice vinegar gives it a nice tang. Extra virgin olive oil adds a smooth richness. Sugar balances the vinegar's acidity, making each bite delicious. This mix is simple yet effective. - 1 clove garlic, finely minced for an aromatic kick - 1 teaspoon dried oregano for an herby note - Salt and pepper to taste for seasoning - Fresh parsley, finely chopped (for garnish) Seasonings bring depth to the flavors. Garlic adds a warm aroma, while oregano gives an herby touch. Salt and pepper help to enhance all the tastes. Fresh parsley on top not only looks nice but also adds a fresh flavor. If you want to impress your guests, this is the way to do it. You can find the Full Recipe for complete details. Start by slicing the cucumbers. Use a knife to cut them into thin rounds. Thin slices help the cucumbers soak up the marinade better. Next, take the tomatoes. Dice them into bite-sized pieces. This size makes them easy to eat and mix with other veggies. Now, prepare the red onion. Slice it into thin rings. The onion adds crunch and flavor to the dish. In a small bowl, whisk together the rice vinegar and extra virgin olive oil. This mix creates a tangy and rich base. Add one teaspoon of granulated sugar. This sugar balances the vinegar’s tartness. Then, add the minced garlic and dried oregano. These will give your marinade an aromatic kick. Finally, season with salt and pepper to taste. Whisk until everything combines well and the sugar dissolves. In a large mixing bowl, combine the sliced cucumbers, diced tomatoes, and red onion. Pour the marinade over the vegetables. Toss everything together gently. Make sure all the veggies are well-coated in the dressing. Cover the bowl tightly with plastic wrap or a lid. Refrigerate for at least 30 minutes. This chilling time allows the flavors to meld and creates a refreshing salad. When ready to serve, give it a gentle toss again to mix. You can check the taste and adjust the seasoning if needed. Enjoy this vibrant dish as a side or light meal. For more details, check the Full Recipe. To boost the taste of your marinated cucumbers and tomatoes, try adding some spices. A pinch of crushed red pepper adds heat. Fresh dill gives a bright, herby taste. You can even use a splash of lemon juice for extra zing. For the best flavor, marinate your salad for at least 30 minutes. This allows the veggies to soak up the marinade. If you have time, letting it sit for a few hours or overnight really deepens the taste. When serving, presentation matters. Use a bright bowl that shows off the colors of the salad. You can layer the cucumbers and tomatoes for a nice look. Sprinkle fresh parsley on top for a pop of green. These marinated cucumbers and tomatoes work well with many dishes. Serve them alongside grilled meats or fish. They also pair nicely with rice or quinoa. You can even use them in sandwiches or wraps for added crunch. For the full recipe, check out the details above. {{image_4}} You can change the flavor of marinated cucumbers and tomatoes by using different vinegars. While rice vinegar gives a nice tang, you can try apple cider vinegar for a fruitier taste. Balsamic vinegar adds a sweet twist that pairs well with the freshness of the veggies. Explore what you like best! Adding other vegetables can also make the dish more exciting. Bell peppers bring color and crunch. You can also try carrots, radishes, or even zucchini for a unique mix. Just slice them thinly so they soak up the marinade well. This recipe is easy to adjust for different diets. It is already vegan since it uses no animal products. To keep it gluten-free, just ensure your vinegar and any additional ingredients are gluten-free. If you want a low-sugar option, you can skip the sugar entirely. The natural sugars in the tomatoes and cucumbers will keep the dish tasty. You can also try a sugar substitute for a healthier choice. For the full recipe, check out the details in the main section. After making your marinated cucumbers and tomatoes, store them in the fridge. Use an airtight container to keep them fresh. The salad stays good for about three days. The flavors deepen over time, which is great! Make sure to give it a gentle stir before serving. I don’t recommend freezing marinated cucumbers and tomatoes. The texture changes when frozen. Cucumbers become mushy, and tomatoes lose their bite. Enjoy them fresh for the best taste and crunch! If you want to keep some extra, try making a smaller batch. This way, you can enjoy them right away. For the full recipe, check the above section! You can keep marinated cucumbers and tomatoes in the fridge for about three days. After that, the veggies start to lose their crunch. Always check for any off smells or changes in color before eating. Keep your dish covered tightly to maintain freshness. Yes, you can use other oils. If you want a different taste, try avocado oil or grapeseed oil. Both options work well and add unique flavors. You can also use sesame oil for a nutty twist. Just remember, different oils may change the final taste of your dish. Marinated cucumbers and tomatoes are great with many meals. Serve them with grilled chicken or fish for a light dinner. They also make a nice side for sandwiches or wraps. Enjoy them as a snack with some pita chips. Their fresh taste adds a pop to any meal. For the full recipe, check out the details above. In this article, we explored how to make marinated cucumbers and tomatoes. We covered fresh produce, marinade ingredients, and seasonings. You learned easy steps for preparation and mixing, plus tips for enhancing flavor. There were also variations to fit different diets and storage advice for leftovers. Enjoy experimenting with this simple dish. It's fresh, healthy, and very tasty! Use the tips to make it your own and enjoy delightful flavors at your table.

Marinated Cucumbers and Tomatoes Fresh Flavor Boost

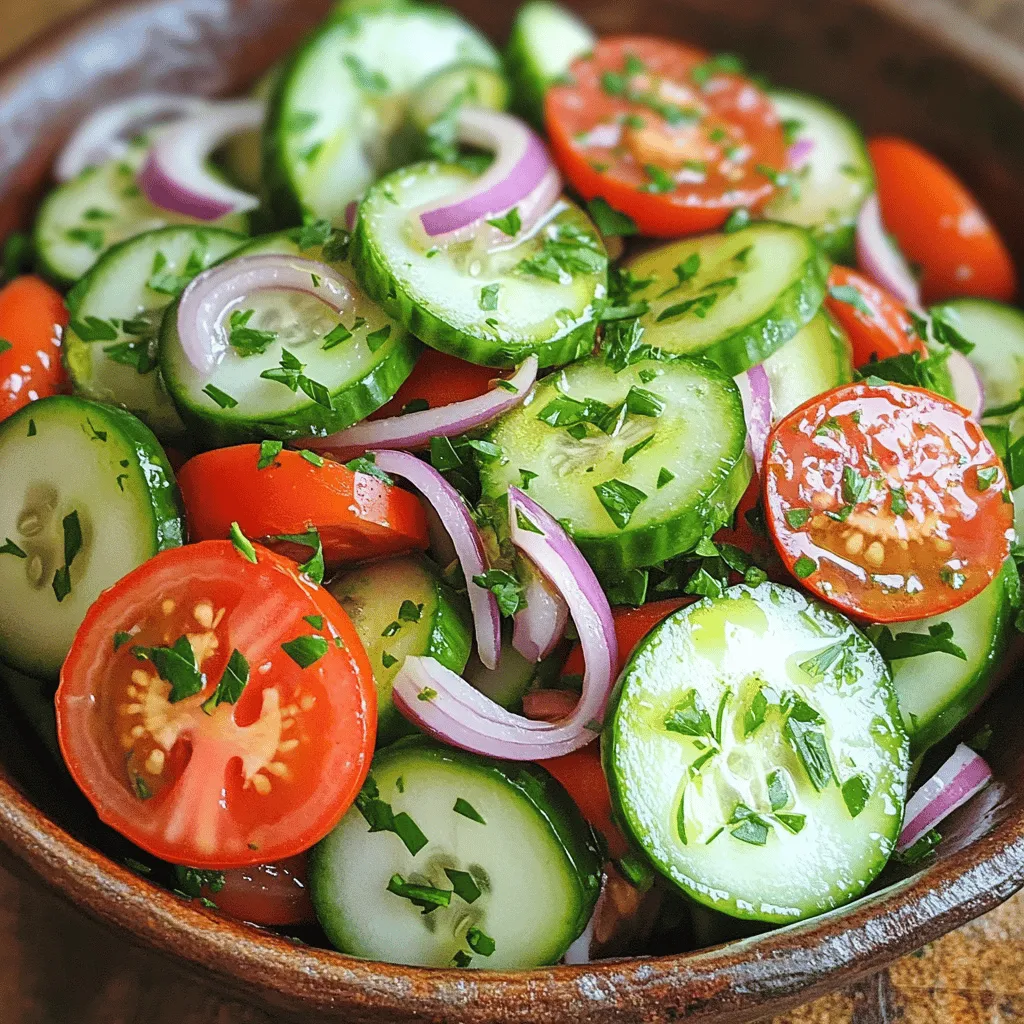
Looking for a fresh taste to elevate your meals? Marinated cucumbers and tomatoes are the perfect, quick solution! Packed with

- 2 cups fresh okra, sliced - 1 cup buttermilk - 1 cup cornmeal - 1/2 cup all-purpose flour - 1 teaspoon garlic powder - 1 teaspoon onion powder - 1/2 teaspoon cayenne pepper - 1 teaspoon salt - 1 teaspoon black pepper - Vegetable oil for frying The first step to making buttermilk fried okra is gathering all your ingredients. You need fresh okra, which you will slice into rounds. Buttermilk is key for soaking and adds a nice tangy flavor. The cornmeal gives that crispy texture, while the flour helps the coating stick well. Next, you will add spices for flavor. Garlic powder and onion powder give depth. The cayenne pepper adds a kick, but you can adjust it to your taste. Salt and black pepper enhance all the flavors. You need vegetable oil for frying. It should be deep enough to fully cover the okra. This is crucial for achieving that golden, crispy texture. You can find the full recipe for detailed steps and timing. Each ingredient plays a vital role in making this snack a standout. Enjoy your cooking adventure! Soaking is key for great buttermilk fried okra. Start by slicing 2 cups of fresh okra into 1/2-inch rounds. Place them in a medium bowl and pour in 1 cup of buttermilk. Let the okra soak for at least 30 minutes. This helps the coating stick better when frying. While the okra soaks, let's prepare the coating. In a separate shallow dish, combine 1 cup of cornmeal and 1/2 cup of all-purpose flour. Add 1 teaspoon of garlic powder, 1 teaspoon of onion powder, 1/2 teaspoon of cayenne pepper, 1 teaspoon of salt, and 1 teaspoon of black pepper. Mix well to ensure the spices are evenly distributed. Now, it's time to fry! Heat about 1 inch of vegetable oil in a deep skillet over medium-high heat. Aim for a temperature of around 350°F (175°C). When the oil is hot, take the soaked okra and let any extra buttermilk drip off. Dredge each piece in the cornmeal mixture. Make sure to coat them evenly, gently shaking off any excess. Fry the okra in batches. This keeps them from sticking together. Cook for about 3 to 4 minutes or until they turn golden brown and crispy. Use a slotted spoon to transfer the fried okra to a plate lined with paper towels. This absorbs any extra oil. Enjoy your crispy snack with your choice of dipping sauce! For the full recipe, check the complete guide above. Soaking the okra in buttermilk is key. This step helps the coating stick well. Keep the okra in buttermilk for at least 30 minutes. This will make your fried okra crispy and tasty. Avoid overcrowding in the frying pan. Fry in small batches. If you add too much okra at once, the oil cools down. This can lead to soggy okra. Frying in batches keeps the crunch intact. For dipping sauces, ranch and aioli are favorites. They add a creamy touch to the crunchy okra. You can also try spicy ketchup or a zesty hot sauce for extra flavor. When serving, arrange the fried okra on a nice platter. Garnish with fresh parsley or chopped chives. This adds color and makes the dish look appealing. Place small bowls of dipping sauces around the okra for easy access. The ideal oil temperature for frying is about 350°F (175°C). You can use a thermometer to check. If you don't have one, drop a small piece of bread in the oil. If it sizzles and browns in about 60 seconds, the oil is ready. Look for signs that the oil is hot enough. You should see gentle bubbles around the okra when it goes in. If the oil smokes, it is too hot. Let it cool before frying. Follow these tips for perfect buttermilk fried okra every time. Check the Full Recipe for more details. {{image_4}} You can make buttermilk fried okra healthier. Try using whole wheat flour instead of all-purpose flour. This adds more fiber and nutrients. If you need a gluten-free option, use almond flour or a gluten-free mix. These options still give you a nice crunch. Another way to make it healthier is to air fry the okra. Air frying cuts down on oil, making it lighter. Just coat the okra as you would for frying, then place it in the air fryer. Cook until golden brown, about 10-12 minutes, shaking the basket halfway through. To boost the flavor, experiment with different spices. Smoked paprika adds a nice, smoky taste. You can also try adding cayenne for more heat or even some lemon zest for a fresh kick. Adding herbs can enhance the flavor too. Fresh herbs like thyme or rosemary can bring a new twist. Mix them into the cornmeal coating for a fragrant touch. You might even try some chopped green onions for extra flavor. Buttermilk fried okra makes a great snack or side dish. It pairs well with many main dishes. Try serving it alongside fried chicken or barbecue ribs for a true Southern feast. For a lighter option, serve it with a crisp salad. A simple mixed greens salad with a tangy vinaigrette balances the okra's crunch. Dips also work well. Creamy ranch or spicy aioli are perfect for dipping. These flavors complement the okra nicely. If you want the full recipe, check out the Crispy Buttermilk Fried Okra recipe. To keep your fried okra crispy, store it in an airtight container. Line the container with paper towels. This helps absorb moisture. Place the okra in a single layer. If you have a lot, stack layers with more paper towels in between. The best containers are glass or plastic with tight lids. Avoid using shallow containers. They let air in, which makes the okra soggy. To reheat fried okra, use an oven or air fryer. Preheat your oven to 375°F (190°C). Spread the okra on a baking sheet in a single layer. Bake for about 10 to 15 minutes. This keeps the crunchiness intact. If using an air fryer, set it to 350°F (175°C). Heat the okra for 5 to 7 minutes. Check to ensure it is crispy before serving. Freezing fried okra is easy. First, let it cool completely. Then, place it in a freezer-safe bag. Remove as much air as possible. This helps prevent freezer burn. To defrost, transfer the bag to the fridge overnight. For best results, reheat it in the oven or air fryer after thawing. Avoid microwaving, as it makes the okra soggy. These tips will help you enjoy your buttermilk fried okra longer and keep it tasty! To make buttermilk fried okra gluten-free, swap the all-purpose flour for a gluten-free flour blend. You can also use cornmeal alone. Just mix it with the spices for a tasty coating. This keeps your dish crispy and delicious. You can test if the oil is ready by dropping a small piece of okra into it. If it sizzles and bubbles, the oil is hot enough. Another method is to use a thermometer. Aim for about 350°F (175°C) for perfect frying. Cooked buttermilk fried okra can last in the fridge for up to three days. Keep it in an airtight container to maintain its crunch. If you notice any sogginess, just reheat it in the oven to bring back some of the crispiness. Yes, you can use frozen okra! Let it thaw and drain well before soaking it in buttermilk. This helps to avoid excess water in the oil. You may need to fry it a little longer to get that golden brown color. Some popular dipping sauces for fried okra include ranch dressing, spicy aioli, or zesty remoulade. These sauces add extra flavor and excitement to each bite. Try a few to find your favorite! For more ideas, check the Full Recipe for serving suggestions. Buttermilk fried okra is a tasty dish made with simple ingredients and spices. Start by soaking fresh okra in buttermilk. Then, coat it with a mix of cornmeal, flour, and spices. Fry in hot oil until golden for the best crunch. Remember, you can adjust flavors and even try healthier options. Store leftovers properly to keep them crispy. Enjoy this dish with your favorite dipping sauces! With these tips, I hope you make the perfect batch of buttermilk fried okra every time.

Buttermilk Fried Okra Crispy and Flavorful Snack

If you’re craving a crunchy, tasty snack, buttermilk fried okra is a must-try! This southern classic combines crispy textures with

For this cake, choose ripe, fresh peaches. You need about 2 cups. Peel them, remove the pits, and dice them into small pieces. Fresh peaches give the best flavor and texture. If peaches are not in season, you can use frozen peaches. You will need a few key baking items for this recipe: - 1 cup granulated sugar - 1/2 cup unsalted butter, softened - 2 large eggs - 1 teaspoon pure vanilla extract - 1 1/2 cups all-purpose flour - 1 teaspoon baking powder - 1/2 teaspoon baking soda - 1/4 teaspoon salt - 1/2 cup buttermilk, at room temperature These ingredients work together to create a light and fluffy cake base. Make sure your butter is at room temperature for the best results. If you want to add more flavor, consider these optional ingredients: - 1 teaspoon ground cinnamon for warmth - Powdered sugar for dusting These extras can enhance your cake’s taste and look. Feel free to mix and match based on your preference. For the full details, check the Full Recipe. Start by preheating your oven to 350°F (175°C). Grab a 9-inch round cake pan. Lightly grease it with butter or non-stick spray. This step helps the cake come out easily after baking. In a large bowl, add the softened butter and granulated sugar. Use an electric mixer on medium speed. Beat the mixture for about 3 to 5 minutes. You want it to become light and fluffy. This process adds air to the batter, making your cake tender. In another bowl, whisk together the all-purpose flour, baking powder, baking soda, salt, and ground cinnamon if you choose to add it. This step ensures even mixing of dry ingredients. Next, slowly add the dry mix to the butter-sugar mixture. Alternate with the buttermilk. Start and end with the flour mix. Mix just until combined, avoiding overmixing. This keeps the cake light. Now, fold in the diced peaches with a spatula. Make sure they are evenly spread in the batter. Pour the batter into the prepared cake pan. Use a spatula to smooth the top. Place the pan in your preheated oven. Bake for 30 to 35 minutes. To check if it's done, insert a toothpick into the center. If it comes out clean, the cake is ready. Let it cool in the pan for 10 minutes, then transfer it to a wire rack. Once cool, dust the top with powdered sugar for a lovely touch before serving. For more details, check the Full Recipe. To get that lovely, light texture, follow these steps. First, use fresh peaches. They add moisture and flavor. Make sure your butter is soft. This helps create air when you mix. Cream the butter and sugar well. Mix for three to five minutes until fluffy. This is key for a soft cake. A dense cake can be a letdown. To avoid this, measure your flour correctly. Use the spoon and level method. Do not scoop the flour directly from the bag. Mix your wet and dry ingredients just until combined. Overmixing can lead to a heavy cake. Lastly, ensure you use fresh baking powder and baking soda. They help the cake rise. Serve your Peachy Paradise Cake with style. Add a dollop of whipped cream or vanilla ice cream for richness. Fresh peach slices on top make it pretty. You can also sprinkle powdered sugar for a sweet touch. This cake works well for parties or family gatherings. Enjoy the flavors with friends! For the complete recipe, check out the Full Recipe. {{image_4}} You can enjoy a gluten-free version of this peach cake. Use almond flour or a gluten-free flour blend. These options keep the cake moist and flavorful. Just replace the all-purpose flour with the gluten-free choice in the recipe. This swap makes it easy for those with gluten issues to savor this tasty treat. Spices can elevate the flavor of your peach cake. Ground cinnamon adds warmth and depth. You can also try nutmeg or ginger for a twist. Mix in one teaspoon of your chosen spice with the dry ingredients. This small change gives your cake a cozy, aromatic touch. Feel free to mix in other fruits with your peaches. Cherries, blueberries, or raspberries work well. They add color and flavor to the cake. Chop the fruits into small pieces, similar to the peaches. This ensures even distribution in the batter. You can create a fruity blend that suits your taste. To keep your peach cake fresh, let it cool completely. Wrap it tightly in plastic wrap or place it in an airtight container. Store it at room temperature for up to three days. If you want it to last longer, consider refrigerating it. Just remember to bring it to room temperature before serving. You can freeze the peach cake for later enjoyment. First, let it cool fully. Then, wrap slices in plastic wrap, followed by aluminum foil. This will help protect the cake from freezer burn. It can stay frozen for up to three months. When you're ready to eat it, just thaw it in the fridge overnight. To reheat your cake, place it in an oven set at 350°F (175°C) for about 10-15 minutes. This warms it up nicely without drying it out. If you prefer, you can use the microwave. Heat individual slices for about 15-20 seconds. Just be careful not to overheat, or it may get tough. Enjoy your cake warm! Yes, you can use canned peaches. Just drain them well before use. Fresh peaches give the best taste, but canned can work in a pinch. They add sweetness and moisture, but check for added sugar. Adjust your sugar in the recipe if needed. To check if the cake is done, insert a toothpick into the center. If it comes out clean or with a few crumbs, the cake is ready. You can also gently press the top; it should spring back. If it leaves a dent, bake it a bit longer. If you don’t have buttermilk, use regular milk with vinegar or lemon juice. Add 1 tablespoon of either to a cup of milk. Let it sit for about five minutes before using. This makes a good stand-in for buttermilk in this cake. Absolutely! This cake is easy to make and great for beginners. The steps are simple, and the ingredients are common. If you follow the instructions, you will have a lovely cake. It’s a perfect way to start baking. To make the cake more moist, ensure you don’t overmix the batter. Adding a bit more buttermilk can help too. You can also add an extra peach or two for moisture. Finally, bake it just until done to keep it soft. For the full recipe, check out the Peachy Paradise Cake section. In this article, we explored how to make a delicious peach cake. We covered the ingredients, step-by-step instructions, and helpful tips. Variations like gluten-free and added spices can make this cake unique. Proper storage keeps leftovers fresh. Take these ideas and create your own tasty peach cake. Experiment and enjoy the process. Happy baking!

Easy Peach Cake Delightful and Simple Recipe Guide

Are you ready to impress your family with a delicious peach cake? In this guide, I’ll show you how to

Older posts
Newer posts
← Previous Page1 … Page37 Page38 Page39 … Page91 Next →

dsad

© 2025 recipesstation • Built with GeneratePress

Our Policies

  • Copyright Policy
  • Cookie Policy
  • GDPR Policy
  • Privacy Policy
  • Disclaimer
  • Terms Of Use

More Information

  • Home
  • About
  • Contact
  • Appetizers
  • Dessert
  • Dinner
  • Drinks
©2025, recipesstation About Back To Top