Skip to content
DisclaimerTerms Of UseGDPR PolicyCookie Policy

recipesstation

  • Home
  • Drinks
  • Appetizers
  • Dinner
  • Dessert
  • About
  • Contact
  • Privacy Policy
DisclaimerTerms Of UseGDPR PolicyCookie Policy

Emily

- 4 medium zucchini, halved lengthwise - 1 cup freshly grated mozzarella cheese - 1/2 cup freshly grated Parmesan cheese - 1/4 cup whole wheat breadcrumbs - 2 cloves garlic, finely minced - 2 tablespoons fresh parsley, finely chopped - 1 tablespoon fresh basil, finely chopped - 1 teaspoon dried oregano - 1 teaspoon lemon zest - 3 tablespoons extra virgin olive oil - Salt and freshly ground black pepper to taste - You can swap mozzarella for any cheese you like. Cheddar or Gouda works well. - If you need gluten-free options, use gluten-free breadcrumbs instead. - Fresh herbs add more flavor but dried herbs can work too. Use about one-third of the amount. These ingredient choices help you create a tasty dish. Each item brings its own flavor and texture. With these options, you can make the recipe fit your taste and diet. For the full recipe, check out the Cheesy Herb Baked Zucchini. 1. Preheat the oven and prepare the baking sheet. Start by setting your oven to 400°F (200°C). Grab a baking sheet and line it with parchment paper. This will help keep the zucchini from sticking and make cleanup easy. 2. Mix the filling ingredients. In a medium bowl, combine the grated mozzarella, grated Parmesan, whole wheat breadcrumbs, minced garlic, chopped parsley, chopped basil, oregano, and lemon zest. Mix well until all the ingredients blend nicely. 1. Drizzle olive oil and season zucchini. Take your halved zucchini and drizzle olive oil over the cut sides. Season them with salt and freshly cracked black pepper. This adds great flavor to the dish. 2. Spoon filling onto zucchini halves. Now, spoon the cheese and herb mixture onto each zucchini half. Press it down lightly so it sticks well. This will create a delicious topping once baked. 1. Baking time and temperature. Place the baking sheet in your preheated oven. Bake the zucchini for 20 to 25 minutes. You'll know it's done when the zucchini is tender and the cheese is bubbly and golden brown. 2. Importance of monitoring for doneness. Keep an eye on the zucchini towards the end of baking. This will help you avoid burning the cheese topping. Enjoy the aromas that fill your kitchen as it bakes. For more details, check out the Full Recipe. - Choosing fresh zucchini: Look for zucchini that is firm and bright in color. Avoid zucchinis with blemishes or soft spots. The best zucchini has smooth skin and feels heavy for its size. Fresh zucchini makes a big difference in taste. - Ensuring proper seasoning and flavor balance: Use salt and pepper to bring out the zucchini's natural flavor. Add herbs like parsley and basil for freshness. Don't forget the lemon zest! It adds a nice bright touch to your dish. - Alternative baking methods: You can also use an air fryer for a quicker cook. It gives a nice crispy texture. Grilling zucchini adds a smoky flavor that many love. If you grill, watch for flare-ups to keep it safe. - Tips for achieving a crispy topping: To get a crunchy topping, use breadcrumbs mixed with cheese. Bake at a high temperature for a short time. You can even broil the zucchini for the last few minutes to make it extra crispy. - Serving suggestions: Serve the baked zucchini on a colorful plate to make it pop. It works well as a side dish or a tasty appetizer. Pair it with a light salad for a complete meal. - Garnishing with herbs and oils: A drizzle of extra virgin olive oil adds richness. Sprinkle fresh herbs on top for a burst of color and flavor. This simple touch makes your dish look gourmet and inviting. {{image_4}} You can mix cheeses to change the flavor. Try using goat cheese or feta. These cheeses add a creamy texture and tangy taste. You could also use cream cheese. This will give your dish a rich and smooth texture. Spices and toppings can elevate your baked zucchini. Red pepper flakes add a nice kick. Nuts can give a great crunch. You can also add fresh vegetables. Chopped tomatoes or bell peppers make a colorful and tasty addition. If you want a vegan option, try plant-based cheese. There are many good brands available. You can also skip the cheese. For low-carb diets, use zucchini noodles instead of the zucchini halves. This keeps the dish tasty and healthy. Feel free to explore these variations to make your baked zucchini even more delightful! For more ideas, check out the Full Recipe. To keep your baked zucchini fresh, cool it to room temperature. Place it in an airtight container. This helps lock in moisture and flavor. Store it in the fridge for up to three days. If you want to keep it longer, consider freezing. When it’s time to enjoy leftovers, you have a few options. The best way to reheat baked zucchini is in the oven. Preheat the oven to 350°F (175°C). Place the zucchini on a baking sheet and cover it with foil. This keeps the moisture in. Bake for about 10 to 15 minutes. You can also use a microwave. Heat it in short bursts, checking often to avoid sogginess. Freezing baked zucchini is simple. Allow it to cool fully. Wrap each piece in plastic wrap or foil. Then, place the wrapped zucchini in a freezer-safe bag. Be sure to remove as much air as possible. This prevents freezer burn. You can freeze it for up to three months. When you’re ready to eat, thaw it in the fridge overnight. After thawing, reheat it in the oven or microwave as mentioned above. Enjoy your cheesy herb baked zucchini any time! For the full recipe, check out the details above. You can tell baked zucchini is done when it is soft and tender. The cheese on top should be bubbly and golden brown. You might also see some slight caramelization around the edges. A fork should easily slide through the zucchini. Keep an eye on it as it bakes to avoid burning. Yes, you can use many other veggies. Eggplant works great and gives a nice flavor. Bell peppers can add color and sweetness. You might even try mushrooms for a different texture. Just make sure to adjust the cooking time, as different vegetables will bake at different rates. To spice up your baked zucchini, add red pepper flakes to the cheese mixture. You can also use spicy cheese, like pepper jack. Mixing in some diced jalapeños can add heat, too. For a smoky flavor, try adding smoked paprika. Get creative and adjust the spice to your taste! For the full recipe, check out the Cheesy Herb Baked Zucchini! Baked zucchini is a versatile dish that lets you be creative in the kitchen. We covered the ingredients, from fresh zucchini to tasty cheeses. Each step, from prepping to baking, is easy. You can try handy tips for perfect baking and even make substitutions. Explore fun variations to match your taste and dietary needs. With proper storage, your leftovers stay fresh. Enjoy this tasty treat in many ways, and share it with friends!

Baked Zucchini Delight Simple and Flavorful Recipe

If you’re seeking a simple and tasty side dish, look no further! My Baked Zucchini Delight is a flavorful recipe

- 2 pounds fresh figs, stems removed and quartered - 1 cup granulated sugar - 1/4 cup freshly squeezed lemon juice - 1 tablespoon lemon zest - 1/2 teaspoon ground cinnamon - A pinch of salt Fresh figs are the star of this jam. They offer a sweet and rich flavor. Granulated sugar helps to balance the natural sweetness. Freshly squeezed lemon juice adds a bright note and helps with the jam's set. Lemon zest gives a fresh zing that lifts the taste. Ground cinnamon adds warmth and depth, while salt enhances all the flavors. - 1 teaspoon vanilla extract - 1/4 teaspoon nutmeg - Other fruits (e.g., apples or pears) If you want to elevate the flavor, consider using vanilla extract or nutmeg. Both add a lovely twist. You can also mix in other fruits like apples or pears for a unique blend. These additions can give your fig jam new and exciting flavors. - Calories per serving: Approximately 100 - Sugar content: About 20 grams - Fiber content: Around 1 gram Fig jam can be a sweet treat, but it does contain sugar. Each serving has around 100 calories. It also provides some fiber, making it a more wholesome option. Keep in mind that moderation is key when enjoying this delicious jam. For the full recipe, check the detailed instructions and enjoy making this tasty fig jam. To start, you need to remove the stems from your fresh figs. Use a sharp knife to cut them off. Then, quarter the figs by slicing each fig into four pieces. This helps the figs cook down better. Next, place the quartered figs in a large bowl. Sprinkle on the granulated sugar. Stir gently to coat the figs with sugar. Let this sit for about 30 minutes. This waiting time allows the figs to release their natural juices, making your jam sweeter and more flavorful. After 30 minutes, it's time to add more flavor. Pour in the freshly squeezed lemon juice, lemon zest, and ground cinnamon. Toss in a pinch of salt, too. Mix everything well until combined. Now, transfer this mixture to a large saucepan. Set the heat to medium and bring the mixture to a gentle boil. Stir often to prevent sticking. Once it boils, reduce the heat to low. Allow it to simmer for about 45 minutes. Stir occasionally, mashing the figs with a potato masher or a spoon to reach your desired texture. You can keep it chunky or make it smooth. When the jam has thickened, remove the saucepan from the heat. Let it cool slightly. If you want a smoother jam, blend it with an immersion blender. While it is still warm, pour the jam into sterilized jars. Seal the jars tightly with their lids. Allow them to cool completely at room temperature. Once cooled, store the jars in the refrigerator. Enjoy your homemade fig jam with toast or as a topping on desserts. For the full recipe, check out the Sweet Bliss Fig Jam section. - Adjusting sweetness: Taste your figs before you add sugar. Some figs are sweeter than others. If you find your figs are very sweet, cut back on the sugar. You can always add more later if needed. - Ensuring proper consistency: To get the right jam texture, mash the figs well during cooking. If you want a smooth jam, use an immersion blender after cooking. Keep in mind that the jam will thicken as it cools. - Refrigerator storage guidelines: Once your fig jam cools, store it in a sealed jar in the fridge. It can last up to two weeks in the refrigerator. - Freezing options for longer shelf life: For longer storage, freeze the jam in small containers. It can last up to six months in the freezer. Just thaw it in the fridge before using. - Pairing with cheese or bread: Fig jam is great with soft cheeses like goat cheese or brie. Spread it on a slice of crusty bread for a tasty snack. - Using as a dessert topping: Try fig jam on ice cream or yogurt. It adds a sweet touch and pairs well with many desserts. {{image_4}} You can spice up your fig jam by adding cardamom. It brings a warm, sweet taste. Just a pinch goes a long way. You can also infuse your jam with fresh rosemary. This herb adds a lovely, earthy note. Try both to see which you like best! Mix figs with stone fruits like peaches or plums. This combo makes a fruity delight. You can also adapt the recipe to use seasonal fruits. In summer, try berries like raspberries or blackberries. Each season gives a new twist to your jam! Mixing fig jam with citrus adds bright notes. Try adding orange or lemon zest. It brightens the flavor and makes it lively. You can also toss in nuts like walnuts or almonds for texture. The crunch pairs well with the soft figs. For the full recipe, check out the Sweet Bliss Fig Jam section. Homemade fig jam lasts about two weeks in the fridge. To store it, keep it in a clean jar with a tight lid. If you want it to last longer, freeze it. Fig jam can stay good for up to six months in the freezer. Yes, you can use dried figs. First, soak them in warm water for about 30 minutes. This helps them soften. You may need to add a bit more sugar and lemon juice. Adjust the sugar based on how sweet the dried figs are. Fig jam is great for more than just spreading on toast. You can use it in many ways: - Mix it into yogurt for a tasty breakfast. - Use it in marinades for meat or fish. - Pair it with cheese on a charcuterie board. - Swirl it into baked goods, like muffins or cakes. With so many uses, fig jam can add flavor to many dishes. For the full recipe, click [Full Recipe]. To make easy fig jam, start by mixing fresh figs with sugar. Let this sit for 30 minutes. Then, add lemon juice, zest, cinnamon, and salt. Heat the mix until it boils, then simmer for 45 minutes. Mash the figs to your liking. Pour the warm jam into jars and seal them. Fig jam is great on toast or with cheese. Spread it on warm bread for a tasty treat. You can also use it in desserts like tarts or cakes. For a fun twist, serve it on a charcuterie board with meats and nuts. Your guests will love the mix of flavors! Feel free to play around with this recipe. Try adding spices like nutmeg or cardamom for new tastes. Mixing in other fruits can also change the flavor. Enjoy the process of making fig jam and share your creations! You now have the tools to make easy and tasty fig jam. We covered essential and optional ingredients, plus helpful tips for perfecting your jam. Remember, add your twist with spices or fruits. Enjoy your sweet creation on bread or with cheese. Don't forget to test new flavors and share your results. Fig jam is fun to make, share, and enjoy! Dive into your kitchen and start crafting your own delicious batches. You might discover new favorites along the way!

Easy Fig Jam Delicious and Simple Recipe Guide

Are you ready to learn how to make delicious fig jam? This simple and easy recipe will brighten your kitchen

To make a tasty Tomato Zucchini Casserole, gather these simple ingredients: - 3 medium zucchinis, sliced into thin rounds - 4 large ripe tomatoes, sliced - 1 large onion, thinly sliced - 3 cloves garlic, minced - 1 cup shredded mozzarella cheese - 1 cup fresh basil leaves, chopped (plus extra for garnish) - 1 teaspoon dried oregano - ½ teaspoon red pepper flakes (optional for added spice) - ¼ cup olive oil - Salt and black pepper to taste - ½ cup breadcrumbs (for crunchy topping) These ingredients work together to create a hearty meal that bursts with flavor. When it comes to tomatoes, fresh is best for this casserole. Fresh tomatoes offer bright taste and juicy texture. They help keep the dish light and vibrant. Canned tomatoes can work in a pinch, but they may make the dish too watery. If you use canned, choose whole or diced tomatoes without added salt. Drain them well before using to avoid excess moisture. You can take your casserole to the next level by adding some extra ingredients. Here are a few fun ideas: - Bell Peppers: Chop them and layer them in with the zucchini for sweetness. - Mushrooms: Sauté sliced mushrooms for an earthy flavor. - Spinach: Toss in fresh spinach for added nutrients and color. - Cheese Variations: Try parmesan or goat cheese for a different taste. These add-ins can customize your Tomato Zucchini Casserole and make it uniquely yours. You can check the Full Recipe for more details and instructions. Start by gathering all your ingredients. You need: - 3 medium zucchinis, sliced into thin rounds - 4 large ripe tomatoes, sliced - 1 large onion, thinly sliced - 3 cloves garlic, minced - 1 cup shredded mozzarella cheese - 1 cup fresh basil leaves, chopped - 1 teaspoon dried oregano - ½ teaspoon red pepper flakes (optional for spice) - ¼ cup olive oil - Salt and black pepper to taste - ½ cup breadcrumbs Next, preheat your oven to 375°F (190°C). This step is key for making sure your casserole bakes evenly. While the oven warms up, wash and slice your zucchinis and tomatoes. Thin slices help them cook well and blend flavors. In a large skillet, heat the olive oil over medium heat. Add the sliced onion and minced garlic. Cook them until soft, about 5-7 minutes. The smell will be delightful. Now it’s time to start layering your casserole. Grab a large baking dish. Begin by placing half of the sliced zucchinis at the bottom. This makes a good base. Next, add half of the sliced tomatoes on top. Then, spread half of the sautéed onion and garlic mix. This combo packs each layer with flavor. Season this layer with salt and black pepper. Sprinkle half of the chopped basil, followed by dried oregano. If you like some heat, add the red pepper flakes. Repeat the layers with the remaining zucchinis, tomatoes, onion, and garlic. Make sure each layer is rich and flavorful. Finally, top it all with shredded mozzarella cheese. This will melt beautifully. Add breadcrumbs on top for a crunchy finish. Cover the baking dish tightly with foil. This helps keep moisture in while it cooks. Place it in your preheated oven and bake for 25-30 minutes. After that time, carefully remove the foil. Bake for another 15-20 minutes until the cheese bubbles and turns golden brown. Once it’s done baking, let it sit for about 5 minutes. This resting time lets the flavors mix better. Garnish with extra fresh basil leaves before serving. You can find the Full Recipe to guide you through these steps easily. Enjoy your hearty and tasty Tomato Zucchini Casserole! To get a great flavor in your casserole, start with the onions and garlic. Use a medium heat and add olive oil to the pan. Stir them often until they are soft and smell good. This takes about 5-7 minutes. Don't rush this step; it helps the flavors mix well. A watery casserole is a common issue. To stop this, you can do a few things. First, use fresh zucchini. If you use canned zucchini, it holds more water. Second, salt the zucchini before using it. Let it sit for 10 minutes to draw out extra moisture. Pat it dry with a paper towel before adding it to the dish. Cheese can make your casserole rich and tasty. I love using mozzarella for its melt and stretch. You can also try Parmesan for a sharp flavor. If you want something different, goat cheese adds a creamy texture. Feel free to mix cheeses for even more flavor. A sprinkle of cheese can make your dish shine. Check the full recipe for tips on how much to use. {{image_4}} You can make your Tomato Zucchini Casserole heartier by adding protein. Cooked ground turkey or chicken works well. If you prefer plant-based options, try lentils or chickpeas. Simply layer the cooked protein between the vegetables. This adds flavor and makes the dish more filling. If you want a vegetarian casserole, stick with the original recipe. The cheese adds richness and flavor. For a vegan option, swap the mozzarella for a plant-based cheese. You can also use nutritional yeast for a cheesy taste without dairy. Just be sure to check for vegan breadcrumbs as well. Feel free to switch up the vegetables based on what’s in season. Add bell peppers for sweetness in summer, or leafy greens like kale in winter. Carrots can bring a nice crunch and color, too. These swaps keep your casserole fresh and exciting each time you make it. The Full Recipe allows you to explore all these variations easily! Store your Tomato Zucchini Casserole in an airtight container. This keeps it fresh longer. You can place it in the fridge for up to four days. Make sure it cools down before sealing it. This prevents moisture build-up. You can freeze your casserole too! It’s best to freeze it before baking. Wrap it tightly in plastic wrap, then cover with foil. This helps prevent freezer burn. You can freeze it for up to three months. To bake, thaw it in the fridge overnight before cooking. Reheat your casserole in the oven for the best taste. Preheat the oven to 350°F (175°C). Cover it with foil to keep it moist. Heat for about 20-25 minutes. If you want a crisp top, remove the foil for the last 5-10 minutes. Enjoy it warm! For the full recipe, check [Full Recipe]. To keep your zucchini firm, slice it thin but not too thin. Use medium heat when sautéing. This helps to draw out moisture without overcooking. You can also sprinkle some salt on the zucchini slices and let them sit for 10 minutes. This helps to draw out excess water. Pat them dry with a paper towel before layering them in the casserole. Yes, you can use various cheeses! While mozzarella is great, feel free to mix in cheddar for a sharper taste. Feta can add a nice tang, while Parmesan gives a salty kick. Try different blends to find your favorite flavor combination. Cheese is key for richness, so choose what you love. The casserole pairs well with many sides. A fresh green salad adds a nice crunch. Crusty bread or garlic bread complements the dish and soaks up the sauce. You can also serve it with grilled chicken or fish for a heartier meal. The options are endless! For the full recipe, check out the detailed steps above. We covered all you need for a great tomato zucchini casserole. We talked about ingredients, tips, and step-by-step methods. Don't forget fresh tomatoes for the best taste. Consider optional add-ins to make it your own. Your casserole will shine with the right cheese and seasoning. With the tips on storage and reheating, it will stay delicious. Now, go enjoy a hearty meal that warms both body and soul!

Tomato Zucchini Casserole Tasty and Hearty Meal

Are you ready to dive into a delicious Tomato Zucchini Casserole that warms the soul? This tasty and hearty meal

To make cheesy baked zucchini casserole, gather these ingredients: - 4 medium zucchinis, thinly sliced - 1 cup shredded mozzarella cheese - 1 cup shredded cheddar cheese - 1 cup ricotta cheese - 1 large egg - 1/2 cup grated Parmesan cheese - 1 teaspoon garlic powder - 1 teaspoon Italian seasoning - Salt and pepper, to taste - 1 cup breadcrumbs (for topping) - 2 tablespoons olive oil - Fresh basil leaves for garnish (optional) You can swap ingredients based on your needs: - Use dairy-free cheese for a vegan option. - Replace ricotta with tofu for a dairy-free alternative. - Use gluten-free breadcrumbs for those avoiding gluten. - Substitute zucchini with yellow squash for a slight flavor change. Choose zucchinis that feel firm and heavy. Look for a vibrant green color without blemishes. Smaller zucchinis tend to be more tender. Avoid any with wrinkles or soft spots. Fresh zucchinis will make your casserole taste better and have a nice texture. First, wash the zucchinis well. Then, slice them thinly. Aim for even slices for cooking. Place the slices in a large bowl. Sprinkle them with salt and pepper. Let them sit for about 10 minutes. This step draws out excess moisture. After 10 minutes, pat them dry with a paper towel. This helps keep your casserole from becoming watery. In another bowl, combine the ricotta cheese, egg, and garlic powder. Add in the Italian seasoning. Use half of the mozzarella and cheddar cheeses in this mix. Blend everything until it is smooth. This filling brings creaminess to the dish. Don’t forget to add a pinch of salt and a dash of pepper for flavor. Start by greasing a 9x13 inch baking dish with olive oil. Lay half of the zucchini slices on the bottom. Spread the cheese mixture evenly over these slices. Next, add the rest of the zucchini on top. Sprinkle the remaining mozzarella and cheddar cheeses over this layer. In a small bowl, mix breadcrumbs with olive oil. Coat the breadcrumbs well. Spread this mixture over the cheese layer for crunch. Add grated Parmesan cheese on top for extra flavor. Cover the dish with aluminum foil and bake it in a preheated oven at 375°F (190°C) for 25 minutes. After this time, remove the foil. Bake for another 15-20 minutes until golden. Let it rest for 5 minutes before serving. Enjoy your cheesy baked zucchini casserole! For the complete directions, check the Full Recipe. To keep your casserole from being watery, salt your zucchini slices first. After slicing, layer them in a bowl and sprinkle with salt. Let them sit for about 10 minutes. The salt pulls out extra moisture. Then, pat them dry with a paper towel. This simple step is key to a perfect casserole. You can mix up the cheeses in this dish. If you want a sharper taste, try using gouda or pepper jack instead of mozzarella. For a creamier texture, use cream cheese in place of ricotta. Each cheese adds its own flavor, so feel free to get creative! Baking at the right temperature is vital. Preheat your oven to 375°F (190°C) to ensure even cooking. Cover the dish with foil for the first 25 minutes to keep moisture in. Then, remove the foil to let the top brown. This gives your casserole a nice, crispy finish. Following these tips will help you create a delicious cheesy baked zucchini casserole every time! {{image_4}} You can easily boost the protein in your cheesy baked zucchini casserole. Ground meat like turkey or beef works well. Simply brown the meat in a skillet before adding it to the layers. For a plant-based option, consider using black beans or chickpeas. Rinse and drain the beans, then mix them into the cheese filling. This adds flavor and makes the dish more filling. Herbs and spices can change the flavor of your dish. Feel free to get creative! You can add fresh herbs like thyme or rosemary for a bright taste. For a bit of heat, consider red pepper flakes or paprika. You can also switch your Italian seasoning for a taco spice blend. This twist will give you a whole new experience with each bite. If you need a gluten-free option, don’t worry! You can use gluten-free breadcrumbs as a simple swap. Alternatively, crushed nuts like almonds or walnuts can add a nice crunch. Even crushed cornflakes can work if you want something different. Just ensure you check the labels to confirm they are gluten-free. These options keep your casserole delicious without gluten. For the full recipe, check out the [Full Recipe]. To store leftovers, let the casserole cool first. Then, cover it tightly with plastic wrap or foil. You can also transfer it to an airtight container. This keeps the dish fresh for up to three days in the fridge. Make sure to label it with the date so you remember when you made it. When it's time to enjoy those leftovers, reheat in the oven for the best taste. Set your oven to 350°F (175°C). Place the casserole in an oven-safe dish, cover it with foil, and heat for about 20-25 minutes. This way, the cheese stays melty, and the zucchini warms through. You can also use a microwave, but the oven gives a better texture. Freezing is a great way to save extra cheesy baked zucchini casserole. First, let it cool completely. Then, cut it into portions for easy thawing. Wrap each piece tightly in plastic wrap, then place them in a freezer bag. Remove as much air as possible to prevent freezer burn. It can last up to three months in the freezer. When you're ready to eat, thaw it overnight in the fridge before reheating. For the full recipe, check out the details above! Yes, you can prepare this casserole a day in advance. Layer the ingredients as usual, but do not bake it yet. Cover it tightly and store it in the fridge. When you are ready to eat, bake it straight from the fridge. You might need to add a few extra minutes to the baking time. This method saves time and makes meal prep easy. This dish pairs well with many sides. Here are some great options: - A fresh garden salad - Garlic bread or breadsticks - Grilled chicken or fish - A light soup, such as tomato or cucumber These options balance the rich cheese flavors and add variety to your meal. This casserole is already vegetarian. It uses zucchinis and cheese, making it a great choice. If you want to boost the protein, consider adding beans. You can mix in black beans or chickpeas for extra flavor. Just make sure the beans are well-drained and rinsed. This keeps the casserole tasty and filling without meat. For the full recipe, check out the ingredients and instructions mentioned above. This article covered the key steps to make a cheesy baked zucchini casserole. You learned about the best ingredients, useful tips for prep, and how to avoid a watery dish. I shared ways to add protein and herbs for extra flavor. Storing leftovers properly helps keep your meal fresh and tasty. Remember these tips for a fun cooking experience. Enjoy creating this dish with your own twist!

Cheesy Baked Zucchini Casserole Simple and Tasty Dish

Looking for a dish that’s both cheesy and healthy? This Cheesy Baked Zucchini Casserole is the answer! I’ll guide you

For this peach cobbler, you need ripe, fresh peaches. You will want to peel and slice about 4 cups of peaches. Look for peaches that are firm but give slightly when you press them. I like to mix in a little lemon juice to enhance the peach flavor. One teaspoon is all you need. Sugar adds sweetness and balance to the dish. You will divide 1 cup of granulated sugar in this recipe. Use ½ cup for the peaches and ½ cup for the batter. Ground cinnamon brings warmth and depth. Just one teaspoon will do the trick. For the dry mix, you will need: - 1 cup all-purpose flour - 1 tablespoon baking powder - ½ teaspoon salt These ingredients help create a light and fluffy texture. For the wet mix, combine: - 1 cup whole milk - ½ cup unsalted butter, melted and slightly cooled The milk gives moisture while the butter adds richness. When you combine dry and wet ingredients, remember to mix gently. A few lumps are fine; they help keep the batter light. Check out the Full Recipe for all the details. Start by preheating your oven to 350°F (175°C). This step is key for even cooking. A hot oven helps the cobbler rise and turn golden. In a medium bowl, toss 4 cups of fresh, sliced peaches with 1 teaspoon of fresh lemon juice. Add ½ cup of granulated sugar and 1 teaspoon of ground cinnamon. Mix well until the peaches are coated. Let this sit. The sugar will draw out the juice and enhance the flavor. In a large bowl, whisk together 1 cup of all-purpose flour, 1 tablespoon of baking powder, ½ teaspoon of salt, and the remaining ½ cup of sugar. In another bowl, combine 1 cup of whole milk and ½ cup of melted butter. Slowly pour the wet mix into the dry ingredients. Stir gently until just mixed. It’s okay to have small lumps; this keeps the batter soft. Next, grease a 9x13-inch baking dish with butter or non-stick spray. Pour the batter into the dish and spread it evenly. Spoon the peach mixture over the batter, juices included. Do not stir; this creates layers as it bakes. Now, place the dish in your preheated oven. Bake for 45-50 minutes. The top should be golden and a toothpick should come out clean when tested. The fruit will bubble and look delightful. Once baked, take it out and let it cool for about 10-15 minutes. This helps set it for serving. Enjoy your easy homemade peach cobbler! For complete details, check the Full Recipe. Choosing ripe peaches is key. Look for peaches that feel slightly soft when you press them. Their skin should be a warm golden color, with a hint of blush. If they smell sweet, they are likely ripe. Avoid peaches with bruises or dark spots. Use fresh peaches for the best flavor in your cobbler. Mixing the batter should be gentle. When you add the milk and butter, stir until just combined. If you mix too much, the cobbler may turn out tough. A few lumps in the batter are fine! They will help keep the texture light and fluffy. Remember, less mixing means a better result. For this recipe, a 9x13-inch baking dish works best. It allows the cobbler to bake evenly. Make sure to grease the dish well with butter or non-stick spray. This prevents sticking and helps with clean-up. A glass or ceramic dish can also enhance the beauty of your cobbler while baking. Using these tips will help you create a peach cobbler that is both delicious and visually appealing. For the complete recipe, check out the Full Recipe section. {{image_4}} You can make your peach cobbler even better by adding berries. Blueberries, raspberries, or blackberries work great. They add a nice tartness that balances the sweet peaches. You can mix one to two cups of berries with the peaches before baking. This twist brightens the flavor and adds color to your dish. You can also try using other fruits, like plums or cherries. Just be sure to adjust the sugar based on how sweet your fruit is. If you need a gluten-free option, it's easy to swap out the flour. Use a gluten-free all-purpose flour blend instead. Most blends work well and give you a nice texture. Just make sure it has xanthan gum in it, which helps the batter rise. Follow the same steps in the recipe, and you’ll have a tasty gluten-free peach cobbler. Everyone will love it, and no one will miss the gluten. You can change up the flavors based on the season. In the fall, add spices like nutmeg or ginger for a cozy taste. In the winter, try warming flavors like cardamom or even a splash of bourbon. For summer, fresh herbs like basil or mint can brighten the dish. Experimenting with these flavors can make your peach cobbler unique. You’ll surprise your friends and family with every bite. Peach cobbler shines as a dessert all its own. But, it pairs well with some tasty options. Serve it warm with vanilla ice cream. The creaminess of the ice cream balances the sweetness of the peaches. You can also try whipped cream for a lighter touch. For a fun twist, serve it with a scoop of peach sorbet. This keeps the peach flavor strong and refreshing. Think outside the box when serving your peach cobbler. Try it in a glass for a fun dessert parfait. Layer cobbler with ice cream and fresh peaches. This adds a nice visual and texture contrast. You can also serve it in mini jars for individual treats. This makes it easy for guests to enjoy. For breakfast, try it with yogurt and granola. The sweet and tart flavors mix well for a tasty start to your day. Toppings can elevate your peach cobbler experience. Here are some ideas to consider: - Crushed nuts for a crunchy texture - A sprinkle of cinnamon for extra warmth - Fresh mint leaves for a burst of color and flavor - A drizzle of caramel sauce for a sweet touch Feel free to mix and match toppings based on your taste. Each addition can bring out different flavors. For the full recipe, check out the Southern Delight Peach Cobbler. Enjoy exploring these serving ideas! To store leftover peach cobbler, let it cool completely. Cover it with plastic wrap or foil. Place it in the fridge for up to three days. If you want to keep it longer, freeze it. Just make sure to wrap it well in freezer-safe bags. This way, you can enjoy your peach cobbler later! Yes, you can use canned peaches instead of fresh ones. Just make sure to drain them well. Canned peaches may be sweeter, so you might want to reduce the sugar. This makes it easier and faster to prepare. However, fresh peaches give the best flavor and texture. To reheat peach cobbler, preheat your oven to 350°F (175°C). Place the cobbler in an oven-safe dish. Cover it with foil to keep it from drying out. Heat for about 15 to 20 minutes, until warm. You can also microwave it for a quick option. Just heat in short bursts to avoid overheating. Enjoy it warm, perhaps with a scoop of vanilla ice cream on top! You now know how to make a delicious peach cobbler. Fresh peaches mix well with sugar and spices to create great flavors. Follow the steps carefully for the best results. Use my tips to select ripe peaches and avoid overmixing. Don't forget to try fun variations, too. Serve it hot with your favorite topping. Enjoying this treat can make any meal special. Make it your own and share it with friends!

Easy Homemade Peach Cobbler Delightful and Simple Recipe

Discover the joy of making your own peach cobbler with my easy recipe! Peach cobbler is a comforting dessert that’s

To make Southern fried okra, gather these simple items: - 1 pound fresh okra, sliced into 1/2-inch rounds - 1 cup buttermilk - 1 cup cornmeal - 1/2 cup all-purpose flour - 1 teaspoon smoked paprika - 1/2 teaspoon garlic powder - 1/2 teaspoon onion powder - 1/2 teaspoon cayenne pepper (adjust based on your spice preference) - 1 teaspoon salt - 1/2 teaspoon freshly ground black pepper - Vegetable oil for frying These ingredients come together to create a crunchy and tasty dish. You can add a few extra touches for more flavor: - 1 tablespoon fresh herbs like parsley or thyme - 1 teaspoon lemon zest for brightness - 1/4 teaspoon cayenne pepper for added heat These options can help you customize the dish to your liking. For this recipe, you will need the following tools: - Large bowl for soaking - Medium bowl for mixing the dry coating - Deep skillet or Dutch oven for frying - Slotted spoon for lifting the okra out of the oil - Cooking thermometer to check oil temperature - Paper towels to drain excess oil Having these tools ready will make cooking easier and more fun. For the full recipe, check out the detailed steps provided. Start by washing 1 pound of fresh okra. Slice it into 1/2-inch rounds. Place the sliced okra in a large bowl. Pour in 1 cup of buttermilk. Make sure every piece is covered. Let it soak for at least 30 minutes. This step makes the okra taste better and helps the coating stick. While the okra soaks, prepare the coating. In a medium bowl, mix together the dry ingredients. You will need 1 cup of cornmeal, 1/2 cup of all-purpose flour, and some seasonings. Add 1 teaspoon of smoked paprika, 1/2 teaspoon of garlic powder, 1/2 teaspoon of onion powder, and 1/2 teaspoon of cayenne pepper. Don’t forget 1 teaspoon of salt and 1/2 teaspoon of black pepper. Stir well to combine everything evenly. Heat about 2 inches of vegetable oil in a deep skillet over medium-high heat. You want the oil to reach 350°F (175°C). You can check the temperature with a thermometer or drop in a small bit of the coating. If it sizzles right away, it’s ready. Next, take the soaked okra out of the buttermilk. Let any extra liquid drip off. Toss the okra in the cornmeal mixture. Make sure each piece is well-coated. Shake off any excess. Carefully place the coated okra into the hot oil in small batches. Avoid adding too much at once. This keeps the oil hot and helps the okra cook evenly. Fry for about 3-4 minutes. Turn them occasionally until they turn golden brown and crispy. Use a slotted spoon to lift the okra out of the oil. Place them on a plate lined with paper towels. This helps soak up any extra oil. Continue frying until all the okra is done. Serve hot and sprinkle with a little salt for extra taste. Enjoy this crunchy Southern delight! For the full recipe, check the earlier section. When making Southern fried okra, avoid these errors: - Don’t skip the buttermilk soak. This step makes the okra tender and tasty. - Avoid overcrowding the pan. Fry in small batches for even cooking. - Don’t rush the oil heating. Use a thermometer to check the right temperature. To get that perfect crunch, follow these tips: - Coat the okra well. Make sure each piece is covered in the cornmeal mix. - Shake off any extra coating. Too much can lead to a soggy texture. - Fry the okra at the right temperature. Aim for 350°F (175°C) for best results. Adjusting spices can elevate your dish: - Start with the basic recipe and taste as you go. - Add more cayenne for heat or extra salt for flavor. - Try adding herbs like thyme or oregano for a twist. By making small changes, you can cater to your taste buds. Enjoy your meal, and if you want the full recipe, check out the section above! {{image_4}} To make spicy Southern fried okra, add more cayenne pepper. Start with 1 teaspoon for a kick. You can also try adding hot sauce to the buttermilk. This gives the okra a flavorful heat. Mix in some chili powder for a deeper flavor. This variation is perfect for those who love a spicy crunch. You can easily make gluten-free fried okra. Replace all-purpose flour with a gluten-free blend. Almond flour or chickpea flour also works well. These options will still give you a nice crust. Check that your cornmeal is gluten-free too. With these swaps, everyone can enjoy this dish. If you want to use an air fryer, it’s simple. Preheat your air fryer to 400°F (200°C). Coat the okra as usual but use less oil. Place the okra in the basket in a single layer. Cook for about 10-15 minutes, shaking halfway through. For oven baking, preheat to 425°F (220°C). Spread the coated okra on a baking sheet. Bake for 20-25 minutes, flipping once. Both methods keep the okra crunchy while cutting down on oil. Store your leftover fried okra in an airtight container. This helps keep it crunchy. Make sure it cools down first. Place a paper towel at the bottom of the container. The towel absorbs moisture. This way, your okra stays crispy longer. Keep it in the fridge. It will last for about 2-3 days. To reheat fried okra, use your oven or air fryer. Preheat the oven to 350°F (175°C). Spread the okra on a baking sheet. Heat it for about 10-15 minutes. This helps restore its crunch. If using an air fryer, set it to 350°F (175°C) and cook for 5-7 minutes. Avoid using a microwave. It makes the okra soft and soggy. You can freeze fried okra for later. First, let it cool completely. Then, place it in a single layer on a baking sheet. Freeze it for a few hours until solid. After that, transfer the okra to a freezer bag. Remove as much air as possible before sealing. It can last up to 3 months in the freezer. When ready to eat, reheat it directly from frozen, following the oven or air fryer steps. For the full recipe, check [Full Recipe]. I recommend using vegetable oil for frying okra. It has a high smoke point, which is great for frying. You can also use canola oil or peanut oil. These oils help achieve a crispy texture and do not alter the flavor of the okra. Yes, you can use frozen okra. However, fresh okra gives the best crunch. If you use frozen okra, thaw and drain it well. Pat it dry to prevent excess moisture, which can make the coating soggy. The okra is done when it turns golden brown and crispy. This usually takes about 3-4 minutes per batch. You can also check the texture; it should feel firm and crunchy. Southern Fried Okra can be a tasty treat, but it is fried. While okra itself is nutritious, frying adds calories. You can enjoy it in moderation as part of a balanced diet. Southern Fried Okra pairs well with many dishes. It works great as a side for fried chicken or catfish. You can also serve it alongside cornbread and coleslaw. Try it with a spicy dip like ranch or remoulade for added flavor. For the full recipe, check out the complete guide. This guide covers all you need to fry okra perfectly and enjoy it. We discussed essential and optional ingredients, tools, and easy steps to fry. You learned common mistakes and tips for texture. Plus, we shared variations for spicy and gluten-free okra and how to store leftovers. Overall, fried okra is tasty, easy, and fun to make at home. Enjoy experimenting with flavors and cooking methods!

Southern Fried Okra Crunchy and Flavorful Dish

Welcome to the delicious world of Southern Fried Okra! This crunchy and flavorful dish brings the heart of the South

For a delicious veggie frittata, you need a few key ingredients. Here’s what you’ll use: - 6 large eggs - 1 cup fresh spinach, chopped - 1/2 cup assorted bell peppers (red, yellow, and green), diced - 1/2 cup cherry tomatoes, halved - 1/4 cup red onion, finely chopped - 1/2 cup zucchini, diced - 1/4 cup feta cheese, crumbled - 2 tablespoons olive oil - Salt and freshly ground black pepper, to taste - Fresh herbs (such as basil or parsley), for garnish These ingredients create a colorful and tasty frittata. Each one plays a role in flavor and nutrition. This frittata offers many health benefits. The eggs give you protein and healthy fats. They help build muscle and keep you feeling full. Spinach adds vitamins A, C, and K. It also has iron and calcium. Bell peppers are rich in antioxidants and vitamin C. These help your skin and immune system. Tomatoes add lycopene, which is good for heart health. Zucchini adds fiber and keeps your digestion on track. Feta cheese provides calcium and flavor without too many calories. This meal is packed with nutrients and low in carbs. Choosing fresh ingredients helps your frittata shine. Here are some tips: - Eggs: Look for eggs with bright, unbroken shells. Fresh eggs taste better and are healthier. - Spinach: Select bright green leaves without yellowing or wilting. This means it’s fresh. - Bell Peppers: Choose peppers that feel firm and heavy. Skin should be smooth, without blemishes. - Tomatoes: Pick tomatoes that are slightly soft but not mushy. Their color should be vibrant. - Zucchini: Look for small to medium-sized zucchini. They should feel firm and have shiny skin. - Feta Cheese: Opt for crumbled feta that smells fresh. Check the expiration date on the package. These tips will help you pick the best ingredients for your frittata. You’ll enjoy a meal that is not just tasty but also good for you. For the full recipe, check out the link provided. First, gather all your ingredients. This will make cooking smoother and more fun. You will need: - 6 large eggs - 1 cup fresh spinach, chopped - 1/2 cup assorted bell peppers, diced - 1/2 cup cherry tomatoes, halved - 1/4 cup red onion, finely chopped - 1/2 cup zucchini, diced - 1/4 cup feta cheese, crumbled - 2 tablespoons olive oil - Salt and freshly ground black pepper Wash and chop your veggies. It’s best to cut everything into small, even pieces. This helps them cook at the same rate. Now, let’s start cooking. Heat the olive oil in a large, oven-safe skillet over medium heat. When it’s hot, add the red onion and bell peppers. Cook for about 3-4 minutes. You want them to soften and smell good. Next, add the zucchini. Cook for 2-3 minutes more until it gets soft. Then, stir in the spinach and cherry tomatoes. Cook until the spinach wilts, which takes about 2 minutes. Remember to season with salt and pepper to taste. In a mixing bowl, whisk the eggs until they are well mixed and slightly frothy. Fold in the sautéed veggies and feta cheese gently. This will give your frittata a nice flavor. Pour the egg mixture back into the skillet. Let it cook for 2-3 minutes without stirring. You will see the edges set while the center stays a bit runny. Now, it’s time to bake! Carefully place the skillet in the preheated oven at 375°F (190°C). Bake for 15-20 minutes. Keep an eye on it. The frittata is ready when the eggs are fully set and the top turns golden. Once done, take it out of the oven and let it cool for a few minutes. Slice it into wedges for easy serving. Garnish with fresh herbs before serving. Your colorful veggie power frittata is now ready to enjoy! For the full recipe, check out the details above. To get a great frittata, focus on cooking time. You want a soft, fluffy texture. Start by cooking the vegetables until tender. This helps them blend well with the eggs. When mixing in the egg, whisk until frothy. This adds air and makes it light. After pouring the egg mix into the skillet, let it cook a bit before baking. This helps the edges set. Bake until just firm; overcooking can make it dry. Many people rush the cooking process. Don’t skip sautéing the veggies first. This step builds flavor. Also, avoid using too many eggs. Six eggs work well for this recipe. Using too few leads to a thin frittata. Another mistake is not seasoning enough. Salt and pepper enhance the taste. Lastly, don't forget to check the oven. Frittatas can overbake quickly, so watch closely. I love to serve the frittata warm on a big platter. It looks bright and inviting! For sides, a light salad of mixed greens works great. Try adding a squeeze of lemon for zing. You can also serve it with whole grain toast. This adds crunch and fiber. If you want a heartier meal, pair it with roasted potatoes. They complement the frittata's flavors nicely. For a special touch, add fresh herbs on top before serving. This gives a pop of color and flavor. Try these tips for a delightful meal experience! For the complete recipe, check out the Full Recipe. {{image_4}} You can easily change the flavors in your veggie frittata. If you want a spicy kick, add diced jalapeños or crumbled chorizo. For a smoky taste, try smoked paprika or roasted red peppers. You might also swap out the feta cheese for goat cheese or cheddar. These swaps keep things exciting and fresh. To make a vegan version of the frittata, replace eggs with chickpea flour. Mix one cup of chickpea flour with one cup of water. Add spices like turmeric and black salt for an eggy flavor. You can still use all your favorite veggies. Just skip the cheese, or try vegan cheese as a tasty alternative. Using seasonal veggies can make your frittata more vibrant. In spring, add asparagus or peas. In summer, use fresh corn and zucchini. Fall brings butternut squash and kale. Winter is perfect for hearty veggies like sweet potatoes and Brussels sprouts. These choices not only add flavor but also make your meal more nutritious. For the full recipe, check the Colorful Veggie Power Frittata. To keep your veggie frittata fresh, store leftovers in an airtight container. Make sure it cools to room temperature before sealing. This helps prevent moisture buildup, which can make the dish soggy. Place it in the fridge and enjoy within three days. If you want to keep it longer, consider freezing it. Reheat your frittata in the oven for best results. Preheat the oven to 350°F (175°C). Place the frittata on a baking sheet and cover it with foil. Heat for about 10 to 15 minutes until warmed through. You can also use the microwave for quick reheating. Just place a slice on a microwave-safe plate and heat for 30 seconds to 1 minute, checking often. If you want to save your frittata for later, freezing is a great option. Cut it into individual slices and wrap each slice in plastic wrap. Place them in a freezer-safe bag or container. Label it with the date for easy tracking. Frozen frittata keeps well for up to three months. When you’re ready to eat, thaw in the fridge overnight and reheat as needed. Enjoy your healthy meal anytime! For the full recipe, check out the Colorful Veggie Power Frittata. You can tell the frittata is done when it looks set and firm. The edges should pull away from the skillet slightly. A light golden color on top shows it is cooked well. If you insert a toothpick into the center, it should come out clean. Yes, you can prepare the frittata in advance. Make it a day before and store it in the fridge. Just cover it tightly with plastic wrap. When you are ready to eat, you can warm it in the oven at 350°F (175°C) for about 10 minutes. This keeps it fresh and tasty. You can serve your veggie frittata with many sides. A light mixed greens salad is a great choice. You can also add some fresh fruit for a sweet touch. Toast or whole-grain bread pairs well too. For a heartier meal, serve it with roasted potatoes. You can create a tasty frittata with fresh, healthy ingredients. This blog covered ingredient selection, preparation, and cooking steps. You now know how to avoid common mistakes and enhance the dish's texture. Remember, you can switch ingredients for fun flavors too. Take care of leftovers with proper storage, and you'll enjoy your frittata even longer. Cooking is fun and rewarding. Try these tips and enjoy your delicious frittata!

Healthy Veggie Frittata Wholesome and Tasty Meal

Looking for a quick, tasty, and healthy meal? My Healthy Veggie Frittata is your answer! Packed with colorful veggies and

- 2 cups fresh figs, stems removed and quartered - 1 cup fresh orange juice (about 3-4 medium oranges) - Zest of 1 orange - 1 cup granulated sugar Fresh figs are the star of this jam. They give it a sweet and rich flavor. You want them ripe but not overripe. The figs pair perfectly with fresh orange juice, adding a bright and zesty note. The zest from the orange gives an extra citrus kick. Granulated sugar balances the tartness of the fruit and helps the jam thicken. - 1 tablespoon fresh lemon juice - 1/2 teaspoon ground cinnamon - 1/4 teaspoon ground nutmeg - A pinch of salt Adding lemon juice can boost the flavor even more. Cinnamon and nutmeg give a warm, cozy touch. These spices make the jam feel special. Salt enhances the sweetness and brings out the fruit's taste. You can mix and match these additions to your liking. - Large saucepan - Sterilized jars - Measuring cups and spoons You will need a large saucepan to cook the jam. It gives enough space for the figs to soften. Sterilized jars are key for storing the jam. They keep the jam safe and fresh. Measuring cups and spoons help ensure you get the right amounts. Using the right tools makes the process smooth and easy. For the full recipe, check the details above. Start by combining the figs, fresh orange juice, and the zest from one orange. This mix will bring out the sweet and tangy flavors. Stir gently to blend everything well. Next, place the saucepan over medium heat. Cook the mixture while stirring occasionally. You will see the figs soften and release their juices after about 5 to 7 minutes. Once your figs have softened, it’s time to add the sugar and spices. Mix in the granulated sugar, fresh lemon juice, ground cinnamon, ground nutmeg, and a pinch of salt. Make sure all the ingredients are well combined. Now, increase the heat to medium-high and bring the mixture to a rolling boil. Stir frequently to stop it from sticking to the bottom of the pan. When it reaches a boil, reduce the heat to low. Let the jam simmer gently for 30 to 40 minutes. Stir it occasionally until it thickens to a jam-like consistency. To check if your jam is ready, scoop a spoonful onto a cold plate and let it sit for one minute. Run your finger through it; if it holds its shape, your jam is good to go. Remove the saucepan from heat and let the jam cool for about 10 to 15 minutes. Then, transfer the jam into sterilized jars. Seal the jars tightly and let them cool completely at room temperature before putting them in the refrigerator. For the full recipe, check out the recipe section. To ensure your orange fig jam has the right thickness, you need to test it. A simple method is the cold plate test. Scoop a spoonful of jam onto a cold plate and let it sit for a minute. Run your finger through it. If it holds its shape, it's ready. If not, let it simmer a bit longer. For a smooth texture, stir the mixture well as it cooks. You can also use an immersion blender if you prefer a finer jam. Adding spices can elevate your jam's taste. Try adding ground ginger for a warm kick or cardamom for a unique twist. You can also experiment with other fruits. Adding a cup of diced apples or pears can add sweetness and depth. Mixing in some berries can also brighten the flavor and add a beautiful color. Orange fig jam pairs well with many foods. Spread it on toast or biscuits for breakfast. It also complements cheese nicely. Try it with a soft goat cheese or Brie. You can use it as a filling in pastries or swirl it into yogurt for a tasty snack. This jam can also be a delightful topping for pancakes or waffles. For a creative twist, drizzle it over grilled meats for a sweet glaze. {{image_4}} You can switch things up by using different fruits. Try other citrus fruits, like lemon or grapefruit. These fruits add a new twist to the jam's taste. They give a nice zing that pairs well with figs. You can also add berries. Blueberries or raspberries mix well with figs. They add color and a sweet-tart flavor. Seasonal fruits like peaches or apples can work too. Each fruit brings its own charm. If you want a lower-sugar option, you have choices. Use natural sweeteners like honey or maple syrup. These add sweetness but keep it healthier. You can also try stevia for a sugar-free jam. Another option is to reduce the sugar in the recipe. Use half the sugar and let the fruit shine. This way, you create a less sweet but still tasty jam. To make your jam unique, add spices. A dash of cardamom or ginger can change the flavor. These spices lend warmth and depth to the jam. You might also try infusing with vanilla. Use a vanilla bean or extract for a lovely aroma. Fresh herbs like mint or basil can add an interesting twist too. They give a fresh taste that surprises the palate. To keep your orange fig jam fresh, use clean, sterilized jars. Fill each jar with jam, leaving a little space at the top. Seal the jars tightly to keep air out. Store them in a cool, dark place. A pantry or cupboard works well. For jars that you open, store them in the fridge. This helps maintain flavor and texture. In the refrigerator, your jam lasts about three weeks. If you want to keep it longer, freezing is a great option. Frozen jam can last up to a year. Just make sure you use freezer-safe containers. Leave some space in the container for the jam to expand when it freezes. Check your jam for any signs of spoilage. If you see mold, it's best to discard it. Bad jam may also smell off or taste strange. Always ensure your jars are sterilized before filling. This helps prevent spoilage and keeps your jam safe to eat. You can tell if your jam is ready by checking its texture. After cooking, scoop some jam onto a cold plate. Let it sit for one minute. If you run your finger through it, and it holds its shape, it's ready. The jam should look thick and glossy. If it's runny, cook it a bit longer, then test again. Yes, you can use frozen figs. Just make sure to thaw them first. When using frozen figs, they may be a bit softer. This can actually help the jam cook down faster. If you use them, cut back on cooking time. Always taste your jam, as the flavor may differ slightly from fresh figs. You can find orange fig jam in many places. Check local farmers' markets for fresh options. Grocery stores often carry it in the jam aisle. If you prefer online shopping, websites like Amazon or specialty food stores have great choices. Always read reviews to find the best quality. Yes, you can make this jam vegan! Simply replace granulated sugar with a vegan-friendly sweetener. Options include coconut sugar or agave syrup. They work well and keep the flavor nice. Just be sure to adjust the amount to your taste. This way, you can enjoy your orange fig jam while sticking to a vegan diet. This blog post covered everything you need to make delicious orange fig jam. You learned about essential ingredients like fresh figs and orange juice, and tools required for the process. I shared tips to perfect your jam's consistency and flavor variations. Now, you can confidently create your own jam, experiment with flavors, and store it safely. Enjoy adding this treat to your meals or giving it as a gift. Get started, and taste the joy of homemade jam!

Orange Fig Jam Flavorful and Simple Recipe Guide

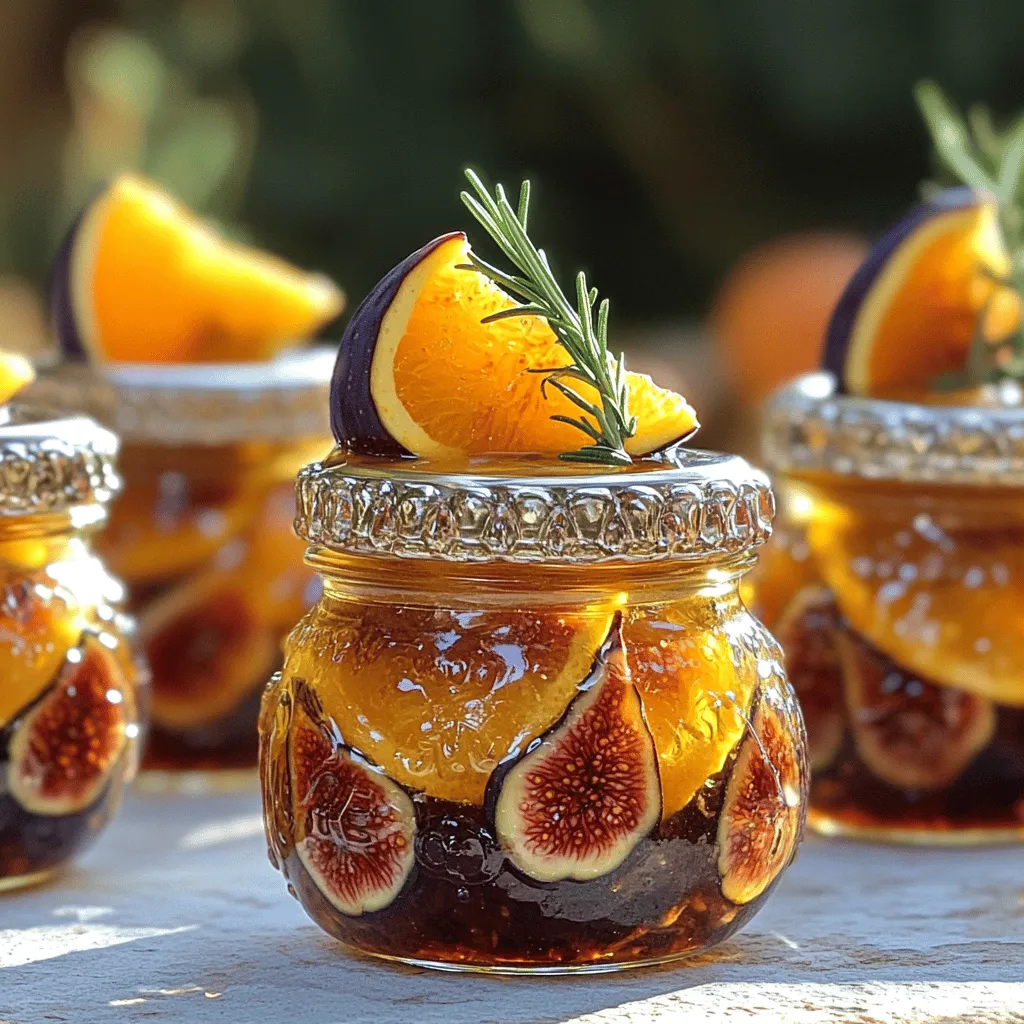
Are you ready to make a delicious and easy Orange Fig Jam? With just a few fresh ingredients, you can

To make the best peach lemonade, you need fresh, simple ingredients. Here’s what you will need: - Ripe peaches: 4, pitted and sliced - Fresh lemon juice: 1 cup (approximately 4 to 6 lemons) - Granulated sugar: 1 cup (sweetness can be adjusted to taste) - Cold water: 4 cups - Garnishes: Fresh mint leaves and thin lemon slices - Ice cubes Using ripe peaches is key. They give the drink a sweet and juicy flavor. Fresh lemon juice adds a zesty kick. Adjust the sugar based on your taste. If you like it sweeter, add more sugar. For a refreshing finish, use cold water and ice cubes. The mint leaves and lemon slices make your drink look pretty, too. For the full recipe, follow the steps in the next section. You will love how easy it is to create this refreshing summer drink! First, gather your ripe peaches. Cut them into slices and remove the pits. Next, place the sliced peaches in a blender. Add 1 cup of cold water to help with blending. Blend on high until the mixture is smooth like a puree. Now, it’s time to strain the puree. Grab a fine-mesh sieve and a large pitcher. Pour the peach puree into the sieve. Use the back of a spoon to press the puree. This helps you get as much juice as possible while leaving the pulp behind. After you have your peach juice, it's time to add flavor. Squeeze about 4 to 6 lemons to get 1 cup of fresh lemon juice. Pour this lemon juice into the pitcher with your peach juice. Next, sprinkle in 1 cup of granulated sugar. Stir the mixture well until the sugar is fully dissolved. This step is key, as it balances the tartness of the lemons with the sweetness of the peaches. Now, gradually add in 3 cups of cold water. Mix everything until well combined. Taste it! If you want it sweeter, add a bit more sugar or water to get your perfect flavor. Chilling is crucial for this drink. Once you mix everything, cover the pitcher and place it in the fridge. Let it chill for at least 30 minutes. This time lets all the flavors blend and become even tastier. It makes the drink refreshing and cool, perfect for hot summer days. When you’re ready to serve, fill your glasses with ice cubes and pour the chilled peach lemonade over the ice. Enjoy the bright flavors and the joy of summer! You can change the sweetness of your peach lemonade easily. If you want it sweeter, add more sugar. Start with a little, then taste and adjust. You can also use honey or agave syrup for a different flavor. If you like it less sweet, add more water or some lemon juice. This way, you can find just the right balance for your taste. Adding herbs can make your lemonade even better. Try fresh basil or thyme for a unique twist. You can also add ginger for a spicy kick or a hint of cinnamon for warmth. These flavors mix well with peach and lemon. Experiment with small amounts to see what you like best. Each addition can make your drink stand out. Choose your glassware to match your theme. Tall glasses are great for lemonade. You can also use mason jars for a rustic feel. When serving, fill each glass with ice cubes first. Pour the peach lemonade over the ice. For a nice touch, garnish with fresh mint leaves and a thin lemon slice. This not only looks pretty but adds extra flavor too. Enjoy your beautiful drink! {{image_4}} For a fun twist, turn your peach lemonade into a spiked drink. You can add alcohol to create a more adult-friendly version. Vodka works well because it mixes smoothly and lets the peach flavor shine. If you prefer something sweeter, try peach schnapps. This will enhance the peach taste and add a nice kick. For a more tropical vibe, rum is a great choice. It pairs well with the fruity flavors and gives a refreshing taste. Just mix in about one to two ounces of your chosen spirit for each serving. This makes the drink fun for summer parties! If you want to enjoy peach lemonade without sugar, there are great alternatives. You can use honey or agave syrup instead. Both sweeteners dissolve easily and add natural sweetness. Another option is stevia, a popular sugar substitute that is calorie-free. Make sure to adjust the amount based on the sweetness you like. Start with small amounts and taste as you go. This way, you can find the perfect balance for your lemonade without extra sugar. To keep your peach lemonade exciting, try using other fruits. In summer, juicy strawberries or sweet cherries make great additions. Blend them with peaches for a new flavor. In fall, swap peaches for apples or pears. You can even add spices like cinnamon to create warmth. For winter, citrus fruits like oranges or grapefruits add a bright note. Each season brings a chance to change the flavor and enjoy fresh ingredients. These variations will keep your peach lemonade fresh and fun all year long! Peach lemonade is not just tasty; it also has great health perks. Peaches are rich in vitamins A and C. These vitamins help keep your skin healthy and boost your immune system. Lemons are high in vitamin C too. They help with digestion and can freshen your breath. Together, they create a drink full of flavor and nutrition. Each serving of peach lemonade has about 120 calories. This amount may change based on how much sugar you use. If you want a lighter drink, try using less sugar or a sugar substitute. This makes the drink refreshing without too many calories. Staying hydrated is key in summer. Peach lemonade helps with this. It contains water from the added cold water and the fresh fruits. This drink not only tastes great but also quenches your thirst. It’s a perfect way to cool down on a hot day. Enjoying peach lemonade helps keep your body hydrated and energized. Store leftover peach lemonade in a sealed container. Keep it in the fridge. It stays fresh for about three days. After that, the taste may change. To enjoy it longer, consider freezing it. Use ice cube trays for easy servings. Yes, you can use frozen peaches! They work well in this recipe. Just let them thaw a bit before blending. This helps them break down easily. Frozen peaches may taste just as good. They also add a nice chill to the drink. Some great brands for store-bought peach lemonade include Simply, Country Time, and Minute Maid. You can find these at most grocery stores. Look for ones with real fruit juice for the best taste. Always check the labels for added sugars and flavors. In this post, we explored how to make tasty peach lemonade. We talked about the right ingredients, like ripe peaches and fresh lemon juice. The step-by-step process showed how to blend, mix, and chill for great flavor. I shared tips for sweetness and serving ideas, along with fun variations. Remember, peach lemonade is refreshing and healthy. For a twist, try adding herbs or using frozen peaches. Enjoy making this drink all summer long!

Peach Lemonade Refreshing Summer Drink Recipe

Looking for a tasty way to beat the summer heat? This Peach Lemonade recipe is just what you need! Bursting

- 8 oz lo mein noodles - 1 lb chicken breast, thinly sliced - 2 tablespoons soy sauce - 1 tablespoon sesame oil - 1 cup broccoli florets - 1 cup mixed bell peppers, sliced - 1 carrot, julienned - 3 green onions, sliced - 2 cloves garlic, minced - 1 tablespoon ginger, freshly grated - 1 tablespoon cornstarch mixed with 2 tablespoons water - Salt and pepper to taste To make Minute Chicken Lo Mein, gather all these ingredients. The lo mein noodles are the star of this dish. They cook quickly and soak up flavors well. Use fresh chicken breast for the best taste and texture. Thinly slice it to help it cook fast. The soy sauce and sesame oil add rich umami flavor. For veggies, I love using broccoli, bell peppers, and carrots. They bring color and crunch! Green onions add a fresh finish. Don't forget the garlic and ginger! They give the dish a nice kick. Season your chicken with salt and pepper to ensure every bite is tasty. Finally, the cornstarch mixed with water will thicken your sauce. It helps coat everything and makes it all come together. Now that you know the ingredients, you're ready to start cooking! {{ingredient_image_2}} To cook the lo mein noodles, bring a large pot of salted water to a boil. Add 8 oz of lo mein noodles. Cook them for about 4-6 minutes or until they are al dente. This means they should still have a slight bite. After cooking, drain the noodles and rinse them under cold water to stop the cooking. This keeps them from getting too soft. Set the noodles aside for later. Heat 1 tablespoon of sesame oil in a large pan or wok over medium-high heat. Make sure the pan is hot before adding the chicken. Season 1 lb of thinly sliced chicken breast with salt and pepper. Add the chicken to the pan and stir-fry it for about 5-7 minutes. Cook until the chicken is golden brown and fully cooked. Remove it from the pan and set it aside. In the same pan, add a splash more sesame oil if needed. Start by tossing in 2 cloves of minced garlic and 1 tablespoon of freshly grated ginger. Stir-fry these for 30 seconds. Next, add 1 cup of sliced bell peppers. Cook them for about 2 minutes. Then, add 1 cup of broccoli florets and 1 julienned carrot. Continue stir-frying for 3 more minutes until all the veggies are tender but still crisp. Return the cooked chicken to the pan with the sautéed vegetables. Drizzle 2 tablespoons of soy sauce over everything. Stir well to mix the chicken and vegetables. Now, add the cooked lo mein noodles to the pan. Toss gently to combine all the ingredients evenly. To thicken the sauce, pour in the cornstarch mixture. This is made by mixing 1 tablespoon of cornstarch with 2 tablespoons of water. Stir frequently as the sauce thickens. This should take about 1-2 minutes. You want the sauce to coat the chicken and veggies well. Remove the pan from heat. Fold in 3 sliced green onions for a fresh touch. Taste the dish and adjust the seasoning. Add more soy sauce if you want extra flavor. Enjoy your Minute Chicken Lo Mein! - Preparing Ingredients Ahead of Time: Get everything ready before you start cooking. Chop the vegetables, slice the chicken, and measure the sauces. This makes cooking fast and easy. When you have all your ingredients prepped, you can cook without delays. - Using Pre-Sliced Chicken and Vegetables: Save time by buying pre-sliced chicken and veggies. Many stores offer these options. This way, you skip the cutting and can focus on cooking. This small change makes your weeknight dinner quicker. - Recommendations for Additional Sauces: To add depth, try using oyster sauce or hoisin sauce. These sauces bring rich flavors and a hint of sweetness. You can mix them with soy sauce for a tasty twist. - Best Oils to Use: Sesame oil is key for flavor. It adds a nutty taste that works well with Asian dishes. You can also use peanut oil for a different flavor. Both oils help enhance your dish. - Ideal Serving Bowls: Choose shallow bowls for serving. They allow for easy mixing and eating. Plus, they show off the colorful lo mein. - Garnishes for Visual Appeal: Top your lo mein with sliced green onions and sesame seeds. They add color and crunch. A sprinkle of crushed peanuts also gives a nice texture. These simple touches make your dish look gourmet. Pro Tips Cook Noodles Al Dente: Make sure to cook your lo mein noodles just until al dente to prevent them from becoming mushy during the stir-frying process. Use Fresh Ingredients: Fresh vegetables and ginger will enhance the flavor of your dish significantly. Avoid using pre-packaged ingredients when possible. Adjust Seasoning: Always taste your dish before serving and adjust the seasoning with additional soy sauce or salt as needed to suit your preference. Customize Your Veggies: Feel free to substitute or add other vegetables like snap peas or baby corn according to your taste or what's in season. {{image_4}} If you want to mix things up, consider these options: - Alternative Proteins: You can swap chicken for tofu or shrimp. Tofu adds a nice texture and can soak up flavors well. Shrimp cooks quickly and gives a different taste. - Veggies You Can Use Instead: You can use any veggies you have on hand. Try snap peas, carrots, or bok choy. Each will add color and crunch. Looking to spice things up? Here are some fun ideas: - Spicy Options: Add chili oil or chili flakes for a kick. Start with a small amount and taste as you go. You can always add more if you like it hot! - Sweet and Sour Twist with Pineapple: For a sweet touch, toss in some pineapple chunks. This adds a nice contrast to the savory flavors of the dish. Need to cater to specific diets? Here’s how: - Gluten-Free Alternatives: Use gluten-free noodles instead of lo mein noodles. Rice noodles or zucchini noodles work well too. Just adjust the cooking time for each type. - Vegetarian and Vegan Options: To make this dish vegetarian, skip the chicken. Use tofu and add more veggies for protein. For vegan, ensure the soy sauce is vegan-friendly. Store your Minute Chicken Lo Mein in airtight containers. Glass or BPA-free plastic work well. Let the dish cool down before sealing it. This keeps your meal fresh and tasty. In the fridge, it stays good for up to four days. When reheating, I recommend using a non-stick pan. Add a splash of water or broth. This helps keep the noodles moist. Stir gently to prevent sticking. You can also use the microwave. Just cover it with a damp paper towel to lock in moisture. You can freeze Minute Chicken Lo Mein for later. Portion it into freezer-safe bags. Make sure to remove as much air as possible. It lasts up to three months in the freezer. To thaw, place it in the fridge overnight. Reheat and enjoy when you’re ready! Minute Chicken Lo Mein stays good for about 3 to 4 days in the fridge. To keep it fresh, store it in an airtight container. If you want it to taste great when you eat it again, cool the dish before you put it in the fridge. This helps lock in flavor and keeps the noodles from getting soggy. Yes, you can use other types of noodles. Egg noodles, rice noodles, or even spaghetti work well. Just remember to adjust the cooking time based on the type of noodles you choose. Check the package instructions to get them just right. You can add tofu, shrimp, or even beef for extra protein. If you're looking for a plant-based option, chickpeas or edamame can be great choices too. Just cook them the same way you would the chicken, and mix them in with the veggies. Absolutely! To make this dish vegetarian, skip the chicken. Use tofu or tempeh instead for protein. You can also add more veggies like snap peas or mushrooms to keep it hearty and flavorful. Don’t forget to adjust the soy sauce for taste! To customize this recipe, think about what you have on hand. You can swap in different vegetables like zucchini or spinach. You can also change the sauce by adding more soy sauce or even a splash of oyster sauce for a different kick. Just get creative with your pantry! You now have a simple guide to making Minute Chicken Lo Mein. We covered all the key steps: boiling noodles, sautéing chicken, stir-frying vegetables, and thickening the sauce. Remember to prep ingredients early for quick cooking. You can swap proteins or veggies to suit your taste. Store leftovers properly for later enjoyment. With this knowledge, you can create a tasty meal anytime. Enjoy the process and make it your own!

Minute Chicken Lo Mein Quick and Tasty Recipe

Are you craving a quick and tasty dinner? Look no further than this Minute Chicken Lo Mein recipe! I’ll show

Older posts
Newer posts
← Previous Page1 … Page40 Page41 Page42 … Page92 Next →

dsad

© 2025 recipesstation • Built with GeneratePress

Our Policies

  • Copyright Policy
  • Cookie Policy
  • GDPR Policy
  • Privacy Policy
  • Disclaimer
  • Terms Of Use

More Information

  • Home
  • About
  • Contact
  • Appetizers
  • Dessert
  • Dinner
  • Drinks
©2025, recipesstation About Back To Top