Skip to content
DisclaimerTerms Of UseGDPR PolicyCookie Policy

recipesstation

  • Home
  • Drinks
  • Appetizers
  • Dinner
  • Dessert
  • About
  • Contact
  • Privacy Policy
DisclaimerTerms Of UseGDPR PolicyCookie Policy

Emily

To make these tasty air fryer zucchini chips, gather the following items: - 2 medium zucchinis, sliced into thin rounds (approximately 1/4 inch thick) - 1 cup breadcrumbs (panko recommended for an extra crunch) - 1/2 cup finely grated Parmesan cheese - 1 teaspoon garlic powder - 1 teaspoon onion powder - 1 teaspoon smoked paprika - Salt and freshly ground black pepper, to taste - 2 large eggs, beaten - Olive oil spray These ingredients work together to create crispy and flavorful chips. The zucchini gives a fresh taste, while the breadcrumbs and cheese add crunch and richness. You can adjust the flavor with these optional seasonings: - Red pepper flakes for heat - Italian seasoning for an herbaceous twist - Lemon zest for brightness Feel free to mix and match these seasonings. This way, you can customize your chips to fit your taste. If you don't have an ingredient on hand, here are some easy swaps: - Use almond flour instead of breadcrumbs for a gluten-free option. - Swap Parmesan cheese with nutritional yeast for a vegan version. - Try using egg substitutes like flax eggs if you want to avoid eggs. These substitutions can make the recipe fit your diet while still keeping it delicious. For more details and a complete guide, check the Full Recipe. Start with fresh zucchinis. I like two medium ones for this recipe. Slice them into thin rounds, about 1/4 inch thick. This size helps them cook evenly. After slicing, use a paper towel to pat them dry. Removing excess moisture is key to getting that perfect crunch. Next, you’ll need a few simple ingredients for the coating. In a bowl, mix together: - 1 cup breadcrumbs (panko works best for crunch) - 1/2 cup finely grated Parmesan cheese - 1 teaspoon garlic powder - 1 teaspoon onion powder - 1 teaspoon smoked paprika - Salt and freshly ground black pepper to taste In another bowl, beat two large eggs. Dip each zucchini slice into the egg, coating it well. Let the excess egg drip off. Then, place the slice into the breadcrumb mixture. Press gently to ensure a good coating on both sides. Before you start cooking, preheat your air fryer to 375°F (190°C) for about 5 minutes. This step helps get your chips crispy. Lay the coated zucchini slices in the air fryer basket in a single layer, avoiding overcrowding. You may need to cook them in batches. Lightly spray the tops with olive oil spray. This extra touch helps them crisp up nicely. Cook the zucchini chips for 10-12 minutes. Flip them halfway through to ensure even cooking. Keep an eye on them to avoid burning. Once golden brown and crispy, remove them from the air fryer. Let them cool for a few minutes before serving. For a full recipe, check out the details provided above. To make your zucchini chips super crunchy, start with dry slices. After slicing, pat the zucchini rounds with a paper towel. This step removes extra moisture. Less moisture means more crunch! You can also use panko breadcrumbs instead of regular ones. Panko gives a better crunch. A light spray of olive oil helps, too. It enhances the crispiness while cooking. Air fryers work best with space. Place zucchini chips in a single layer. If they touch, they can steam instead of fry. This will make them soggy. Cook in batches if your air fryer is small. Give each batch enough room to breathe and crisp up. Seasoning is key for tasty zucchini chips. While the basic mix is great, feel free to get creative. Add cayenne for heat or lemon zest for brightness. Fresh herbs like basil or oregano can also add flavor. Taste your seasoning mix before using it. Adjust it to fit your taste. Enjoy experimenting with different spices! For the full recipe, check out the Crispy Air Fryer Zucchini Chips 🥒 section of this article. {{image_4}} To make cheesy zucchini chips, add more cheese to your mix. Use a mix of Parmesan and cheddar for a rich flavor. You can even sprinkle some cheese on top during the last few minutes of cooking. This gives them a melty, gooey finish. Remember, cheese adds fat but also great taste! If you love heat, spice up your chips! Add cayenne pepper or red pepper flakes to the breadcrumb mix. You can also try a dash of hot sauce in the egg wash. This gives your chips a nice kick. Just be sure to taste as you go, so they aren’t too spicy for you. For a lighter version, skip the breadcrumbs and use a dusting of nutritional yeast. It adds a cheesy flavor without extra carbs. You can also opt for a sprinkle of your favorite herbs, like oregano or thyme. This keeps the dish fresh and tasty while being lower in calories. These options let you enjoy a guilt-free snack! For the full recipe and more ideas, check out the Full Recipe. After you make your zucchini chips, let them cool completely. This step is key. Place them in an airtight container. If you stack them, add parchment paper between layers. This helps keep them crispy. Store the container in a cool, dry place. They should stay fresh for up to 3 days. To enjoy your leftover zucchini chips, reheating is simple. Preheat your air fryer to 350°F (175°C). Place the chips in a single layer in the basket. Heat them for about 3-5 minutes. This will bring back their crunch. You can also use an oven. Set it to 350°F (175°C) and heat the chips for 5-7 minutes. If you want to save some zucchini chips for later, freezing works well. Lay the cooled chips in a single layer on a baking sheet. Freeze them for 1-2 hours until solid. Then, put them in a freezer bag. Remove as much air as possible. They can last up to 3 months. To thaw, simply leave them in the fridge overnight. Reheat them as mentioned above for the best crunch. For the full recipe, check back to see how to make these tasty snacks! Yes, air fryer zucchini chips are a healthy snack. They have less fat than fried snacks. Zucchini is low in calories and full of vitamins. By using an air fryer, you cut down on oil. The crunch comes from baking, not frying. This method keeps the nutrients intact. Plus, you can control the seasonings. Use herbs and spices for flavor without extra calories. Absolutely! Many vegetables work well in the air fryer. You can try carrots, sweet potatoes, or even kale. Just make sure to slice them thinly for even cooking. Each veggie has its own cooking time. Keep an eye on them to avoid burning. Experiment with different seasonings to find your favorite combo! Zucchini chips are done when they turn golden brown. They should feel crispy to the touch. Cooking time is usually 10 to 12 minutes. Flip them halfway to ensure even crisping. If you find any chips that seem soft, give them more time. Keep checking to avoid overcooking. Enjoy that crunchiness! You now have all you need to make tasty air fryer zucchini chips. We covered key ingredients, step-by-step instructions, and tips for the best results. Variations let you add your own twist, from spicy to cheesy options. Storing and reheating methods keep your chips fresh longer. These chips are a fun and healthy treat. Enjoy making them and share your tasty creations!

Air Fryer Zucchini Chips Crunchy and Flavorful Snack

If you’re craving a crunchy, flavorful snack, look no further than air fryer zucchini chips! They’re easy to make and

- 4 boneless, skinless chicken thighs - 1/4 cup honey - 3 tablespoons soy sauce - 4 cloves garlic, minced - 1 tablespoon fresh ginger, grated - 1 cup broccoli florets - 1 cup bell peppers, sliced (mix of red and yellow) - Salt and pepper to taste - 2 tablespoons olive oil - 1 teaspoon sesame seeds - 2 green onions, finely chopped I love how this recipe uses just a few ingredients to create a tasty meal. The chicken thighs stay juicy, thanks to the honey and soy sauce mix. You can find these items at any local grocery store. For a vibrant touch, I like to use a mix of red and yellow bell peppers. They not only add color but also a sweet crunch. If you want to make this dish even more special, try adding fresh herbs like cilantro or basil as a garnish. It brings freshness to the table. Keep the sesame seeds and green onions handy; they add a lovely finish. For the best flavor, make sure to season your chicken well. Salt and pepper are key to making each bite delicious. Enjoy cooking with these simple yet flavorful ingredients. Check out the Full Recipe for all the steps! First, let’s get our sauce ready. In a small bowl, combine: - 1/4 cup honey - 3 tablespoons soy sauce - 4 cloves garlic, minced - 1 tablespoon fresh ginger, grated Whisk them all together. This mix will give our chicken great flavor. Next, season the chicken thighs. Sprinkle salt and pepper on both sides. This step adds a nice touch to the meat. Now, heat 2 tablespoons of olive oil in a large skillet over medium-high heat. The oil should shimmer. Once it does, carefully place the chicken thighs in the skillet. Sear each side for about 5 minutes. You want them to turn a lovely golden brown. This creates a nice crust and adds flavor. After searing, it's time for the honey garlic magic. Drizzle the honey garlic mixture over the chicken. Make sure each piece is coated well. Lower the heat to low. Let it simmer for about 5 minutes. This allows the flavors to blend beautifully. Next, add the vegetables. Toss in: - 1 cup broccoli florets - 1 cup bell peppers, sliced (mix of red and yellow) Stir the veggies in the sauce. Cover the skillet and cook for another 10 minutes. This will steam the veggies and cook the chicken through. Check that the chicken reaches 165°F (75°C) and the veggies are tender. If you want a caramelized finish, you can broil it for 2-3 minutes. Just keep an eye on it! Enjoy your One Pan Honey Garlic Chicken! For more details, check out the Full Recipe. The total cooking time for One Pan Honey Garlic Chicken is about 30 minutes. Start with 10 minutes for prep. Then, cook on medium-high heat for 5 minutes on each side. Once the chicken is seared, let it simmer on low heat for 5 more minutes. Finally, cook the veggies for 10 minutes. Always check the chicken's internal temperature. It should reach 165°F (75°C) for safe eating. Seasoning is key for great taste. Use salt and pepper to enhance the chicken's flavor. Marinating adds depth, so let the chicken sit in the honey garlic mix if you can. Even 15 minutes can make a big difference. The longer you marinate, the more the flavors will sink in. This leads to a juicy, tasty meal. Broiling adds a nice caramelization to the chicken without burning it. After cooking, place the skillet under the broiler for 2 to 3 minutes. Keep a close eye on it. This step gives a lovely glaze and an appealing color. Just remember, a little goes a long way! Enjoy your meal with that extra touch of flavor. {{image_4}} You can swap chicken thighs for other proteins. Chicken breasts work well and cook faster. If you prefer a plant-based option, try using tofu. Simply press and cube it before cooking. Shrimp is another great choice. Cook shrimp until they turn pink, about 3-4 minutes. Each protein gives a unique taste, so feel free to experiment. For this recipe, I recommend using a large oven-safe skillet. A cast-iron skillet holds heat well and enhances flavor. If you don’t have one, any large non-stick skillet is fine. A spatula helps when flipping the chicken. A whisk is useful for mixing the sauce. Make sure to have a meat thermometer to check the chicken’s doneness. Want to jazz up the dish? Add fresh herbs like cilantro or parsley. They bring a fresh taste. A dash of red pepper flakes adds heat if you like spice. You can also mix in a splash of lime juice for a zesty kick. For a different flavor profile, try adding teriyaki sauce or hoisin sauce to the honey garlic mix. These enhancements make the dish even more delightful. If you want more details, check out the Full Recipe for extra tips. To keep your One Pan Honey Garlic Chicken fresh, store it properly. Let the dish cool down first. Then, put it in an airtight container. It will last in the fridge for about three days. You can also freeze leftovers. Use freezer-safe bags or containers. They are good for up to three months. Remember to label your containers with a date. This way, you know when to use them. When you reheat your chicken, keep it juicy and tasty. The best way is to use the microwave. Heat it on medium power for a few minutes. Check it often to keep it from drying out. You can also use a skillet. Just add a splash of water or broth. Cover it and heat on low. This will help keep the flavors and texture. This recipe makes meal prep easy and fun! You can batch-cook the chicken and veggies. Store them in separate containers for quick meals. Pair them with rice or quinoa for a full dish. You can mix and match veggies based on what you like. This way, you have tasty meals ready for busy weekdays. For more ideas, check out the Full Recipe for One Pan Honey Garlic Chicken. Yes, you can prep this dish ahead. Marinate the chicken in the honey garlic mix overnight. This helps the flavors soak in. Chop the veggies and keep them in the fridge. When you’re ready, just cook everything in one pan. It saves time and tastes great! This dish pairs well with many sides. Here are some ideas: - Rice: Steamed white or brown rice absorbs the sauce well. - Noodles: Stir-fried noodles add a nice texture. - Salad: A fresh green salad balances the meal. - Quinoa: This healthy option adds protein and fiber. To add some heat, try these tips: - Red pepper flakes: Sprinkle them in the honey garlic mix. - Hot sauce: Mix a few drops into the sauce. - Jalapeños: Add sliced jalapeños with the veggies. - Sriracha: Drizzle some on top just before serving. If the chicken turns out dry, here’s how to fix it: - Brine: Soak the chicken in saltwater before cooking. - Cook with skin: Using skin-on chicken helps keep it moist. - Check temperature: Make sure it stays at 165°F (75°C). - Sauce: Serve with extra honey garlic sauce to add moisture. For the full recipe, check out the One Pan Honey Garlic Chicken Delight! This blog post covered how to create a delicious honey garlic chicken dish. We explored key ingredients, easy steps to prepare the meal, and important tips for rich flavor. I shared ideas for protein swaps and ways to store leftovers. Each point aims to help you enjoy cooking and meal prep. Remember, experimenting with flavors makes cooking fun. Use my tips to impress your family with your new skills. Enjoy your culinary journey with this tasty recipe!

One Pan Honey Garlic Chicken Quick and Tasty Meal

Looking for a quick and tasty meal? You’re in the right place! This One Pan Honey Garlic Chicken is simple

- 1 ½ cups all-purpose flour - 1 teaspoon baking powder - ½ teaspoon baking soda - ¼ teaspoon salt - ½ cup unsalted butter, softened to room temperature - 1 cup granulated sugar - 2 large eggs, at room temperature - 2 tablespoons fresh lemon zest (about 2 lemons) - 1 tablespoon fresh lemon juice - 1 teaspoon pure vanilla extract - ½ cup sour cream, at room temperature - 1 cup fresh blueberries (frozen can be used if necessary) - Powdered sugar for light dusting I always choose fresh blueberries for the best taste. Look for firm berries that are deep blue. If you can’t find fresh ones, frozen blueberries work too. Just toss them in a little flour before mixing into the batter. This helps keep them from sinking. You need a few simple tools to make this cake. Here’s what you will need: - A large mixing bowl for the batter - A medium mixing bowl for dry ingredients - A 9x5-inch loaf pan, which gives the cake its shape - An electric mixer to cream the butter and sugar Optional items include a zester for the lemon zest and a wire rack for cooling. Using a wire rack helps prevent sogginess. First, you need to preheat your oven to 350°F (175°C). This step is vital for even baking. Next, prepare a 9x5-inch loaf pan. You can grease it with butter and dust it with flour. Alternatively, you can line it with parchment paper for easy removal. Parchment paper can save time and effort when you take the cake out. In a medium bowl, sift together the all-purpose flour, baking powder, baking soda, and salt. Sifting helps aerate the flour. This makes your cake lighter and fluffier. It also ensures that the leavening agents mix well. Set this dry mixture aside for later. Now, let’s make the batter. In a large bowl, cream the softened butter and granulated sugar together. Use an electric mixer on medium speed. Beat this mixture until it gets light and fluffy, which takes about 3 to 4 minutes. Next, add the eggs one at a time. Mix well after each egg. Then, add the lemon zest, lemon juice, and vanilla extract. Mix until everything is well combined. Gradually add the dry mixture to the wet mixture. Start with the flour, then add in the sour cream. Alternate between these two. Mix until just combined. Overmixing can make your cake dense, so be gentle. Finally, fold in the blueberries carefully. This helps them stay suspended in the batter. Pour the cake batter into your prepared loaf pan. Smooth the top with a spatula. Bake in the preheated oven for about 50 to 60 minutes. You’ll know it’s done when a toothpick comes out clean or with a few moist crumbs. After baking, let the cake cool in the pan for 10 to 15 minutes. After that, transfer it to a wire rack to cool completely. This step is crucial for the best texture. When completely cool, you can dust the top with powdered sugar for a beautiful finish. Enjoy every slice of your Lemon Blueberry Delight Cake! To make a great Lemon Blueberry Pound Cake, avoid overmixing. When you mix too much, the cake can turn out dense. Mix until just combined to keep it light. Use room temperature ingredients like butter and eggs. This helps the batter blend smoothly and rise well. You can switch up the flavors in your cake. Try different fruits like raspberries or strawberries. You can also use lime or orange zest instead of lemon. Adding extracts like almond or coconut can create a unique twist. Spices like cinnamon or nutmeg can deepen the flavor, too. To check if your cake is done, use the toothpick test. Insert a toothpick in the center; it should come out clean. Look for a golden-brown top and gently springy sides. When you tap the pan, it should sound hollow. These signs mean your cake is ready to cool. For more details, check the Full Recipe. {{image_4}} If you need dairy-free options, use coconut oil or vegan butter. These work well in place of unsalted butter. For a gluten-free cake, swap all-purpose flour with a gluten-free blend. Just make sure it has a good mix of starches. For those wanting to cut sugar, try using honey or maple syrup. These natural sweeteners add flavor but may change the texture a bit. You can also use a sugar substitute, like stevia, for a low-calorie option. To create a lemon-lavender blend, add a teaspoon of dried lavender buds. This will give the cake a unique floral note. You can mix lemon zest with other fruits too. Try adding strawberries or raspberries for a fun twist. Combining blueberries with other fruits can also enhance the taste. Consider mixing in some diced peaches or cherries. These fruits pair nicely with lemon and add a burst of color. When serving, consider using a decorative cake plate. Arrange slices with a few fresh blueberries on top. Add a sprig of mint for a nice touch. It makes the cake look fresh and inviting. For gatherings, you can create a cake platter with slices. Add additional fruit or edible flowers around the cake. This will elevate its look and make it more appealing to guests. To keep your Lemon Blueberry Pound Cake fresh, wrap it well. Use plastic wrap or foil to cover the cake tightly. Store it in the fridge for up to five days. If you want to keep it longer, freeze the cake. Slice it before freezing for easy serving. Place the slices in a single layer in a freezer-safe bag. Remove as much air as possible to prevent freezer burn. When you are ready to enjoy your cake again, reheating it is simple. Preheat your oven to 350°F (175°C). Place the slices on a baking sheet. Heat for about 10 minutes or until warm. You can also use the microwave. Heat the slices for about 15-20 seconds, but be careful not to overdo it. Enjoy the cake warm, as it brings out the flavors. Uncut Lemon Blueberry Pound Cake lasts about five days in the fridge. After slicing, it is best to eat it within three days for the best taste. If you freeze it, the cake stays fresh for about three months. Just remember to wrap it well to maintain its flavor. To stop blueberries from sinking, coat them in flour first. This helps them stay suspended in the batter. Gently fold the coated blueberries into the batter at the end. Be careful not to overmix. Use a light hand when combining. This method keeps your blueberries evenly distributed. Yes, you can make this cake in advance. Bake the cake and let it cool fully. Wrap it tightly in plastic wrap. Store it in the fridge for up to three days. This keeps the cake moist. You can also freeze it for longer storage. Just remember to thaw it in the fridge before serving. Pair this cake with whipped cream for a light touch. Vanilla ice cream also works well for a sweet treat. Fresh berries on the side add a colorful pop. A drizzle of lemon glaze can enhance the flavor too. These options make your cake even more delightful. For the [Full Recipe], check out the detailed steps to bake this delicious cake! In this post, I covered how to make a delicious lemon blueberry pound cake. We discussed the essential ingredients and equipment needed, step-by-step instructions, and tips for perfecting texture. I shared variations, storage info, and answered common questions. By following these steps and tips, you will bake a cake that impresses. Explore flavors, customize your recipe, and enjoy every bite! This cake is not just a treat; it’s a perfect way to celebrate any occasion. Happy baking!

Lemon Blueberry Pound Cake Flavorful and Simple Treat

Get ready to indulge in a delightful treat! This Lemon Blueberry Pound Cake is both flavorful and simple to make.

To make your no bake chocolate oat bars, you will need the following ingredients: - 2 cups rolled oats - 1 cup almond butter (or creamy peanut butter alternative) - 1/2 cup honey or pure maple syrup - 1/2 cup unsweetened cocoa powder - 1/4 cup chia seeds - 1/4 teaspoon fine sea salt - 1/2 teaspoon pure vanilla extract - 1/2 cup dark chocolate chips (dairy-free option) - 1/4 cup shredded coconut (optional garnish) These ingredients create a rich and chewy treat. The rolled oats give great texture. Almond butter adds a nutty taste while honey or maple syrup sweetens the mix. Cocoa powder brings the chocolate flavor that we all love. Chia seeds pack in extra nutrition, and the sea salt balances the sweetness. Vanilla extract adds warmth, while dark chocolate chips make each bite delightful. If you want, sprinkle some coconut on top for extra flair. You can find the full recipe in the article to guide you through the process. In a large bowl, start with the rolled oats. Add the chia seeds, cocoa powder, and salt. Mix these dry ingredients well. Make sure they are evenly combined. This step is key for flavor. Next, pour in the almond butter. If you prefer, you can use creamy peanut butter. Then add the honey or maple syrup. Use a sturdy spatula to blend everything together. You want a sticky mixture that holds together well. Now, gently fold in the vanilla extract. Add the dark chocolate chips next. If you like, toss in the shredded coconut too. Make sure these flavorings are mixed in evenly. This will enhance the taste of the bars. Get an 8x8-inch baking dish ready. Line it with parchment paper. Leave some overhang on the sides. This helps later when you remove the bars easily. Scoop the chocolate oat mixture into your lined dish. Use a spatula to press it down firmly. Make it even across the top. This step is important for shape and texture. Place the dish in the refrigerator. Let it chill for at least 2 hours. This helps the bars set. Once firm, lift them out using the parchment paper. Cut into squares or rectangles. Enjoy your tasty no-bake chocolate oat bars! For the full recipe, refer back to the ingredients list. To keep your no-bake chocolate oat bars fresh, wrap them well. Use plastic wrap or place them in an airtight container. Store them in the refrigerator. They will stay good for about a week. If you want to keep them longer, consider freezing them. For the best texture, use your hands when mixing. This helps all the ingredients blend well. Once mixed, press the mixture firmly into the dish. This helps the bars hold their shape. A good press is key for keeping them together. Serving your bars in a fun way can make them even better. Use a bright plate to add color. You can top them with a drizzle of melted chocolate. Sprinkling some shredded coconut on top also adds a nice touch. These small changes can make your bars look fancy and inviting. Enjoy your tasty treats! {{image_4}} You can swap out almond butter for peanut butter or sunflower seed butter. Each nut butter gives a different taste and texture. If you prefer a sweeter touch, use agave syrup instead of honey or maple syrup. These changes help you find the flavor that suits you best. Adding nuts like walnuts or almonds can boost the crunch factor. You can also mix in dried fruits such as raisins or cranberries for a sweet pop. Seeds, like pumpkin or sesame seeds, bring extra nutrients and flavor. Customize your bars to suit your tastes! To make these bars vegan, use maple syrup and dairy-free chocolate chips. For gluten-free bars, ensure that your oats are labeled gluten-free. These simple swaps let everyone enjoy this tasty treat without worries. To keep your no-bake chocolate oat bars fresh, store them in an airtight container. This prevents moisture and air from getting in. Place a piece of parchment paper between layers if you stack them. This way, they won’t stick together. You can freeze these bars for longer storage. Wrap each bar in plastic wrap, then place them in a freezer-safe bag. When ready to eat, thaw them in the fridge overnight. You can also microwave them for a few seconds if you want them warm. When stored properly, these bars last about a week in the fridge. If you freeze them, they can last up to three months. Keep an eye out for any off smells or colors, as these are signs they may be spoiled. Yes, you can use quick oats. Quick oats are more processed, so they cook faster. They will make the bars softer and less chewy. Rolled oats give a heartier texture. These bars last about one week in the fridge. Watch for changes in smell or texture. If they feel sticky or smell off, it’s time to toss them. You can use creamy peanut butter or sunflower seed butter. Both work well and add great flavor. Just ensure they are smooth and creamy for best results. Yes, refrigeration helps the bars set properly. It keeps them firm and prevents spoilage. Without refrigeration, they may become too soft or go bad faster. Absolutely! Try using sunflower seed butter or soy nut butter. These are great options for nut-free diets. They keep the bars tasty without using nuts. This post covers how to make tasty no-bake oatmeal bars. We looked at the right ingredients, step-by-step instructions, and helpful tips. You can customize the flavor and adjust for diet needs. Proper storage helps keep them fresh longer. Think of all the fun variations and add-ins you can try. With this guide, you can enjoy a healthy snack that fits your taste. Now, it's time to get mixing and create your own delicious bars!

No Bake Chocolate Oat Bars Quick and Easy Recipe

Craving a quick, tasty treat? Let me show you how to make No Bake Chocolate Oat Bars! This easy recipe

To make these fudgy chocolate zucchini brownies, gather the following ingredients: - 1 cup finely grated zucchini (about 1 medium zucchini) - 1/2 cup unsweetened cocoa powder - 1/2 cup whole wheat flour (or substitute with all-purpose flour) - 1/2 cup granulated sugar - 1/4 cup packed brown sugar - 1/2 cup vegetable oil (or melted coconut oil for a richer taste) - 2 large eggs - 1 teaspoon pure vanilla extract - 1/2 teaspoon baking powder - 1/2 teaspoon baking soda - 1/4 teaspoon salt - 1/2 cup semi-sweet chocolate chips - Optional: 1/4 cup chopped nuts (such as walnuts or pecans) You can easily adapt this recipe to fit your needs. For a gluten-free version, use gluten-free flour instead of whole wheat flour. For a vegan option, replace the eggs with flax eggs or applesauce. This gives the brownies a moist texture without using dairy or eggs. You can also substitute coconut oil for vegetable oil for a unique flavor. When choosing zucchini, look for firm, shiny skin. Avoid any with soft spots or blemishes. Smaller zucchinis tend to be sweeter and more tender. If you can, try to pick organic zucchini. They usually have better flavor and fewer pesticides. Wash the zucchini well before grating. This step ensures your brownies taste fresh and delicious. For best results, use it soon after buying. Fresh zucchini makes a big difference in your brownies! First, gather all your ingredients. You will need: - 1 cup finely grated zucchini (about 1 medium zucchini) - 1/2 cup unsweetened cocoa powder - 1/2 cup whole wheat flour (or substitute with all-purpose flour) - 1/2 cup granulated sugar - 1/4 cup packed brown sugar - 1/2 cup vegetable oil (or melted coconut oil for a richer taste) - 2 large eggs - 1 teaspoon pure vanilla extract - 1/2 teaspoon baking powder - 1/2 teaspoon baking soda - 1/4 teaspoon salt - 1/2 cup semi-sweet chocolate chips - Optional: 1/4 cup chopped nuts (such as walnuts or pecans) Make sure you finely grate the zucchini. This step helps it blend well into the batter. In a large bowl, mix the grated zucchini, vegetable oil, granulated sugar, brown sugar, eggs, and vanilla extract. Use a whisk or spatula to combine everything well. You want to see a smooth mixture. This step is key because it helps to create a moist brownie. In another bowl, sift together the cocoa powder, whole wheat flour, baking powder, baking soda, and salt. Sifting helps prevent any lumps and makes the brownies lighter. Now, slowly add the dry mixture to the wet mixture. Stir gently to combine. Be careful not to overmix; this can lead to tough brownies. Next, fold in the chocolate chips and nuts gently. Pour the batter into your prepared pan, and smooth the top with a spatula. Bake in a preheated oven at 350°F (175°C) for 25-30 minutes. To check for doneness, insert a toothpick into the center. It should come out mostly clean with a few moist crumbs. Let the brownies cool in the pan for about 10 minutes. Then transfer them to a wire rack to cool completely. You can find the full recipe for more detailed steps. To get that rich and fudgy brownie texture, use the right ratio of wet to dry ingredients. The oil adds moisture, while the cocoa powder gives deep chocolate flavor. Mix the wet ingredients well before adding the dry ones. This helps blend everything evenly. Overmixing can make your brownies tough, so mix just until combined. For best results, let the batter sit for a few minutes before baking. This allows the flavors to meld. Using zucchini in brownies adds moisture and nutrition without changing the flavor. Grate the zucchini finely. This helps it blend well into the batter. Don’t skip draining excess moisture from the zucchini. Place it in a clean kitchen towel and squeeze out the water. This keeps your brownies from becoming too wet. Mix the zucchini in with the wet ingredients to ensure even distribution. Many people make simple mistakes when baking brownies. Here are a few to watch out for: - Not measuring ingredients accurately: Use measuring cups and spoons for precision. - Skipping the greasing step: Grease your pan or line it with parchment paper for easy removal. - Opening the oven door too soon: This can cause the brownies to collapse. Wait until the baking time is nearly done. - Not cooling before cutting: Let the brownies cool in the pan before slicing. This helps them set properly. These tips will help you bake perfect fudgy chocolate zucchini brownies every time. For the full recipe, check out the detailed instructions above. {{image_4}} You can make these brownies fit your needs. For a gluten-free option, swap whole wheat flour with almond or coconut flour. Both choices give a unique flavor. If you want them dairy-free, choose dairy-free chocolate chips. They still taste amazing! Always check labels for hidden dairy or gluten. Spice things up! You can add a dash of cinnamon or a pinch of nutmeg. These spices can boost the taste of chocolate. You could also add a splash of coffee for depth or a teaspoon of almond extract for a nutty flavor. Want some fruit? Try mixing in mashed banana or applesauce for extra moisture. Top your brownies with flair! After cutting them into squares, sprinkle with powdered sugar or cocoa powder. For a gourmet touch, drizzle with melted chocolate or caramel. You could also add berries on top for a fresh look. Serve with whipped cream for extra fun. These small changes make your brownies shine! To keep your fudgy chocolate zucchini brownies fresh, store them in an airtight container. This helps prevent them from drying out. You can also wrap them tightly in plastic wrap. If you stack them, place parchment paper between layers to avoid sticking. When stored properly, these brownies stay fresh for about 3 to 5 days at room temperature. If kept in the fridge, they can last up to a week. However, they taste best when eaten fresh, so enjoy them while they’re still soft and delicious! To freeze your brownies, first, let them cool completely. Then, cut them into squares. Wrap each square in plastic wrap and place them in a freezer-safe bag or container. They can last up to 3 months in the freezer. When you’re ready to enjoy a brownie, simply thaw it at room temperature or warm it in the microwave for a few seconds. Check out the Full Recipe for more details! Yes, you can use other vegetables in brownies. Some good options are carrots or sweet potatoes. These veggies add moisture and nutrients. Grating them finely helps them blend well into the batter. Think about the flavor, too. Carrots add a mild sweetness, while sweet potatoes add a rich taste. You can experiment and find what you like best. To check if brownies are done, use a toothpick. Insert it into the center of the brownies. If it comes out mostly clean with a few moist crumbs, they are ready. If there is wet batter on the toothpick, they need more time. Keep an eye on them. The baking time can vary with ovens. Fudgy brownies have more fat and less flour. This creates a rich and dense texture. Cakey brownies have more flour and less fat, giving them a lighter, fluffier feel. For fudgy brownies, use more chocolate or oil and less flour. This recipe for fudgy chocolate zucchini brownies balances both, giving you that rich taste. Yes, you can replace eggs in brownies. Some good options are flaxseed meal or applesauce. To use flaxseed, mix 1 tablespoon of flaxseed meal with 2.5 tablespoons of water. Let it sit until it thickens. For applesauce, use 1/4 cup for each egg. This keeps the brownies moist and tasty, just like the original recipe. Check out the Full Recipe for more details. These fudgy chocolate zucchini brownies are easy and fun to make. We covered the key ingredients and how to select fresh zucchini. You learned step-by-step instructions, and tips for the perfect texture. Plus, we explored ways to make them fit any diet. Now you can enjoy delicious brownies, no matter your needs. With these tips, you can wow family and friends. Happy baking!

Fudgy Chocolate Zucchini Brownies Easy and Delicious Treat

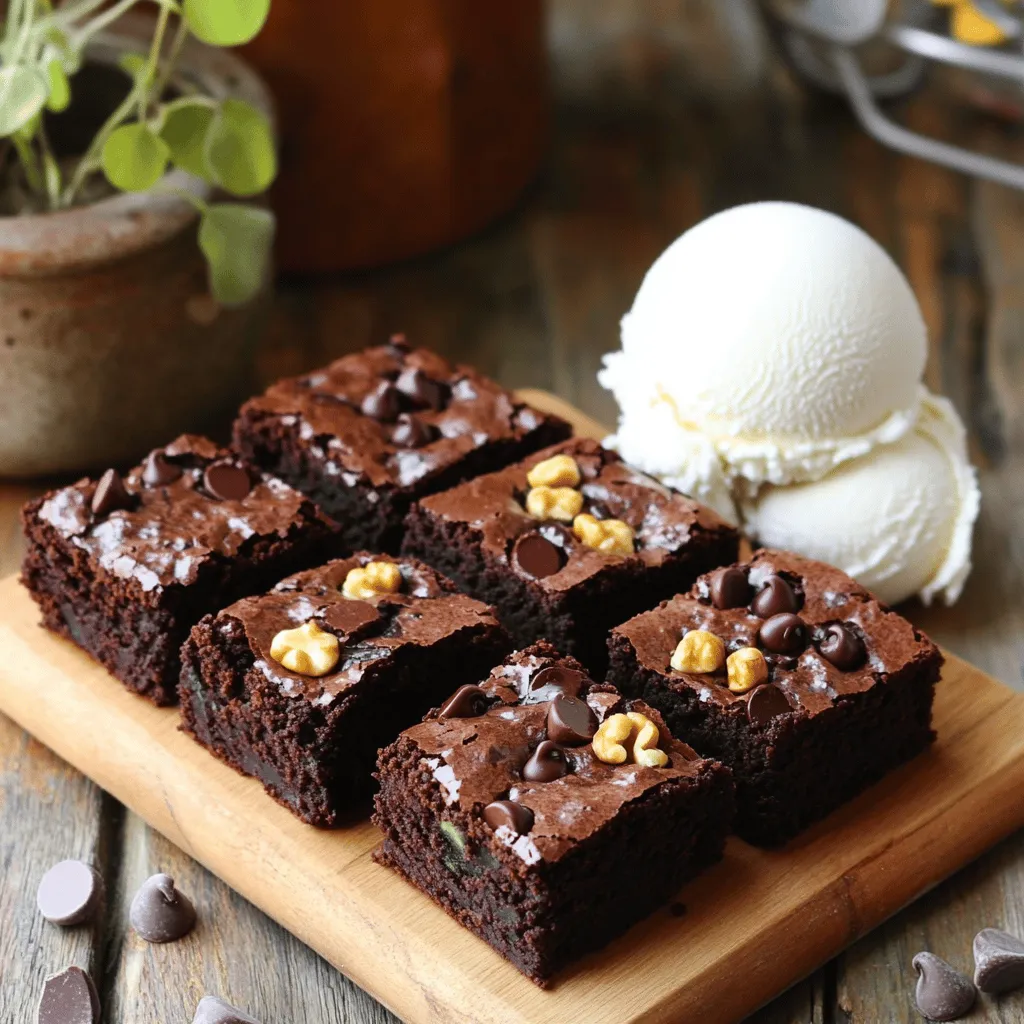
Looking for a tasty treat that sneaks in some veggies? You’ve hit the jackpot with these fudgy chocolate zucchini brownies!

- 1 cup fresh peaches, peeled and diced into small chunks - 1 large egg, at room temperature - 1 cup buttermilk (or regular milk with 1 tablespoon of vinegar added and allowed to sit for 5 minutes) - 1/2 cup unsalted butter, melted and cooled to a warm temperature - 1 teaspoon pure vanilla extract Fresh peaches are key for these muffins. They add natural sweetness and moisture. Use ripe peaches for the best flavor. Make sure to peel and chop them into small pieces. This helps them mix well into the batter. - 2 cups all-purpose flour, sifted - 1 cup granulated sugar, plus extra for sprinkling - 1 tablespoon baking powder - 1/2 teaspoon baking soda - 1/2 teaspoon salt - 1/2 teaspoon ground cinnamon Each dry ingredient plays a role in the muffin's texture. The flour gives structure. Sugar adds sweetness. Baking powder and soda help the muffins rise. Salt enhances flavor, while cinnamon adds warmth. Sifting the flour ensures there are no lumps. - 1/4 cup finely chopped walnuts (optional for added crunch) If you want extra crunch, add walnuts. They create a nice texture contrast with the soft muffin. You can also try other nuts or seeds. Maybe even a sprinkle of chocolate chips for a fun twist! For the complete recipe, check the Full Recipe. Enjoy your baking! First, set your oven to 375°F (190°C). This step is key. While the oven warms, prepare your muffin tin. You can use paper liners or grease each cup with cooking spray. This helps the muffins release easily later. In a large bowl, combine the dry ingredients. Add 2 cups of sifted flour, 1 cup of sugar, 1 tablespoon of baking powder, and 1/2 teaspoon each of baking soda, salt, and ground cinnamon. Whisk these together well. You want a smooth mix without lumps. This blend gives the muffins their structure and sweetness. Grab another bowl for the wet ingredients. Mix 1/2 cup of melted butter, 1 large egg, 1 cup of buttermilk, and 1 teaspoon of vanilla extract. Whisk until smooth. This mixture adds moisture and flavor. It’s important that your butter is warm, not hot, to avoid cooking the egg. Now, it’s time for the star of the show—peaches! Gently fold in 1 cup of diced peaches and 1/4 cup of chopped walnuts if you like. Use a spatula for this. Be careful not to overmix; a few lumps are okay. This step adds sweetness and texture to your muffins. Spoon the batter into the muffin cups, filling each about two-thirds full. This allows space for them to rise. Place the muffin tin in your preheated oven. Bake for 18-22 minutes. Check for doneness by inserting a toothpick. If it comes out clean, they are ready. Let them cool in the pan for 5 minutes before transferring them to a wire rack. Enjoy your warm muffins! For the full recipe, be sure to check out the details. To make your peach muffins moist and fluffy, follow these steps: - Use ripe peaches. They add natural sweetness and moisture. - Measure your flour carefully. Too much flour makes muffins dry. - Don't overmix the batter. A few lumps are okay. Overmixing leads to tough muffins. - Incorporate buttermilk or yogurt. These ingredients add moisture and tenderness. To check if your muffins are done, insert a toothpick into the center. If it comes out clean, they are ready. The tops should be golden brown. Avoid opening the oven door too often. This can cause your muffins to sink. Serve your peach muffins warm. Dust them with powdered sugar for a nice touch. You might drizzle honey or maple syrup on top for extra flavor. Arrange the muffins on a decorative platter. This makes them look inviting and fun. For a pop of color, add some fresh mint leaves around them. Enjoy your delicious creation! {{image_4}} To make gluten-free peach muffins, swap all-purpose flour for a gluten-free blend. Look for a mix that includes xanthan gum. This will help the muffins rise well. The rest of the recipe stays the same. Just ensure all your other ingredients are gluten-free. These muffins will still be fluffy and tasty! For vegan peach muffins, replace the egg with a flax egg. To make a flax egg, mix one tablespoon of ground flaxseed with three tablespoons of water. Let this sit for five minutes. Use non-dairy milk, like almond or oat milk, instead of buttermilk. The rest of the recipe remains the same, ensuring a moist and delicious muffin. You can add fun flavors to your peach muffins. Try mixing in a teaspoon of almond extract for a nutty taste. Adding a half cup of blueberries pairs well with peaches. You can also sprinkle some lemon zest into the batter for a fresh twist. Get creative and make these muffins your own! For the full recipe, check the detailed instructions provided above. To keep your peach muffins fresh, let them cool completely. Then, store them in an airtight container. You can keep them at room temperature for up to three days. If you want to keep them longer, the fridge is a good option. Just remember to wrap them well to avoid drying out. Freezing peach muffins is simple. First, allow them to cool fully. Then, wrap each muffin in plastic wrap. For extra protection, place them in a freezer bag or airtight container. They can last up to three months in the freezer. When you're ready to enjoy them, just take out the number you need. To reheat frozen peach muffins, simply take them out and let them thaw. You can use a microwave for about 15-20 seconds. If you prefer the oven, preheat it to 350°F (175°C). Place the muffins on a baking sheet for about 5-7 minutes. This will help keep them soft and delicious. Yes, you can use canned peaches. Drain them well to avoid excess liquid. Fresh peaches offer a better flavor and texture, but canned peaches work in a pinch. If you use canned, chop them into small chunks, similar to fresh peaches. To prevent sticking, grease your muffin tin well. Use cooking spray or line with paper liners. If you use liners, make sure they fit snugly. This helps muffins release easily after baking. You can also dust the greased pan with a little flour for added insurance. You can use regular milk with vinegar as a substitute. Just add 1 tablespoon of vinegar to 1 cup of milk. Let it sit for five minutes. This creates a similar tangy flavor. Yogurt or sour cream mixed with water can also work well as a buttermilk alternative. Peach muffins stay fresh for about three days at room temperature. Store them in an airtight container. For longer storage, place them in the fridge for up to a week. You can freeze them for about three months. Just make sure to wrap them tightly. Yes, you can make mini peach muffins! Just reduce the baking time to about 12-15 minutes. Keep an eye on them, as mini muffins bake faster. The smaller size is great for snacks or brunch. Enjoy every little bite! Check out the Full Recipe to get started on your peach muffin adventure! In this blog post, we explored how to make delicious peach muffins. Fresh and dry ingredients play a key role. Then, we walked through simple steps for mixing and baking. I shared tips for moist muffins and creative variations, like gluten-free and vegan options. Finally, we covered the best storage methods to keep muffins fresh. Enjoy baking these delightful treats! Peach muffins can bring joy to any occasion. Give them a try and savor the flavor.

Peach Muffins Delightful and Moist Recipe to Enjoy

Peach muffins are a treat you won’t forget! With a delightful burst of juicy peaches, they’re perfect for breakfast or

For this stuffed yellow squash recipe, you need a few key ingredients. The main ingredients are: - 4 medium yellow squash - 1 cup cooked quinoa - 1 cup black beans, rinsed and drained - 1 cup corn kernels (fresh or frozen) - 1 red bell pepper, diced - 1 small onion, finely chopped - 2 cloves garlic, minced - 1 teaspoon ground cumin - 1 teaspoon chili powder - Salt and pepper to taste - 1 cup shredded cheese (cheddar or Monterey Jack) - 2 tablespoons olive oil - Fresh cilantro for garnish Fresh herbs and spices are essential. They add bright flavors to the dish. Use ground cumin and chili powder for warmth and depth. You can also add fresh herbs like cilantro for a fresh finish. If you have dietary restrictions, consider these substitutions. For a gluten-free option, make sure your quinoa is certified gluten-free. For a vegan dish, swap the cheese for a dairy-free alternative and skip the cheese on top. You can replace black beans with lentils for a different protein source. This recipe allows for creativity. Mix and match ingredients based on what you have on hand. 1. First, preheat your oven to 375°F (190°C). A hot oven bakes the squash perfectly. 2. Take the yellow squash and slice each one in half lengthwise. This creates a nice boat shape. 3. Use a spoon to scoop out the seeds. This makes room for the yummy filling. 4. Place the squash halves cut side up in a baking dish. Drizzle with one tablespoon of olive oil. 5. Season the squash with salt and pepper. This adds great flavor right from the start. 6. In a large skillet, heat the rest of the olive oil over medium heat. 7. Add the finely chopped onion and diced red bell pepper to the skillet. Sauté them for about five minutes. 8. Keep stirring until they are soft and a bit translucent. This step builds a tasty flavor base. 9. Next, add the minced garlic and stir for one more minute. The garlic will smell amazing! 1. Now, it’s time to mix the stuffing ingredients. In the skillet, add cooked quinoa, rinsed black beans, and corn kernels. 2. Also, add ground cumin, chili powder, and a pinch of salt and pepper. Mix everything well. 3. Cook for another 3-5 minutes so the mixture heats through completely. This ensures every bite is warm. 4. After it's heated, take the skillet off the heat. Gently fold in half of the shredded cheese. 5. This will melt and blend into the mixture, making it creamy and rich. 6. Now, stuff each yellow squash half generously with the quinoa mixture. Pack it tightly to prevent spills. 7. Finally, sprinkle the rest of the cheese on top of each stuffed squash. This will create a nice cheesy crust. 1. Cover the baking dish with aluminum foil. This helps the squash cook evenly and stay moist. 2. Place the dish in the preheated oven and bake for 25 minutes. The squash should become tender. 3. After 25 minutes, carefully remove the foil. Return the dish to the oven for another 10-15 minutes. 4. Watch for the cheese to melt and bubble. This is a sign that the squash is done. 5. When finished, take the stuffed squash out of the oven. Let them cool for a few moments. 6. Garnish with fresh cilantro for a pop of color and flavor. Enjoy your delicious stuffed yellow squash! For the complete recipe, refer to the [Full Recipe]. To make stuffed yellow squash truly shine, focus on the seasoning. Here are some tips: - Use fresh herbs like cilantro or parsley for a bright taste. - Add a squeeze of lime juice for tanginess. - Try different spices, like paprika or oregano, to change the flavor. For the stuffing's consistency, make sure it is not too dry. You want it moist but not soggy. If needed, add a little vegetable broth or olive oil to help with this. Cooking times can vary with different ovens. If your oven runs hot, check the squash a few minutes early. For larger squash, increase the baking time by about 5–10 minutes. Smaller squash may need less time, so keep an eye on them. When serving stuffed squash, presentation is key. Arrange the squash on a colorful platter. You can sprinkle fresh cilantro on top for a nice touch. Pair the dish with a simple salad or some crusty bread. A side of lime wedges adds a fresh zest that complements the flavors perfectly. If you want more ideas, check out the Full Recipe for inspiration! {{image_4}} You can easily make stuffed yellow squash fit your diet. For vegetarians, skip any meat and focus on plant-based proteins like beans and quinoa. Vegans can use non-dairy cheese or skip the cheese altogether. Gluten-free cooks can use rice or gluten-free grains instead of quinoa. You can also choose other protein sources. Try lentils, chickpeas, or even tofu. These options will add different textures and flavors to your dish. Spice blends can change the taste of your stuffed squash. For a Mediterranean twist, add oregano and basil. If you want something spicy, try cayenne pepper or paprika. Each blend creates a new flavor experience. Using seasonal ingredients adds freshness to your dish. In summer, use fresh tomatoes or zucchini. In fall, try adding diced apples or pumpkin. These changes keep your meals exciting and diverse. Stuffed yellow squash can be served hot or cold. As appetizers, they taste great when chilled. Just cut them into smaller pieces for easy eating. Leftovers can turn into new meals. Chop them up and mix with pasta for a quick lunch. You can also add them to a salad for a colorful twist. Each way offers a new flavor adventure. To keep your stuffed yellow squash fresh, store it in an airtight container. Place it in the fridge within two hours of cooking. It stays good for about three days. Make sure to cool it down before sealing the container. This helps avoid moisture build-up, which can make the squash soggy. You have a few good ways to reheat stuffed squash. The oven works well. Preheat it to 350°F (175°C). Place the squash in a baking dish and cover with foil. Heat for about 15-20 minutes. This keeps the texture nice. You can also use the microwave for a quick heat-up. Just place the squash on a microwave-safe plate and cover it. Heat in short bursts, checking often. Stuffed squash can last in the fridge for three days. If you want to enjoy it later, freezing is a great option. Freezing stuffed squash is easy. First, let it cool completely. Then, wrap each piece tightly in plastic wrap. Place the wrapped squash in a freezer-safe bag or container. This prevents freezer burn. You can freeze it for up to three months. To keep the flavor and texture, avoid adding toppings before freezing. Add cheese and other fresh ingredients after thawing. When you're ready to eat, let it thaw in the fridge overnight. Then, reheat as described above. Enjoy your stuffed yellow squash even after a few months! For the full recipe, check out Savory Stuffed Yellow Squash. How do you know when the stuffed squash is done? You can check if the stuffed squash is done by poking it with a fork. If the squash is soft and the cheese is melted and bubbly, it’s ready to eat. The cooking time is about 35-40 minutes total. Can you use other types of squash for stuffing? Yes, you can use other types of squash like zucchini or acorn squash. Each type will bring a unique taste and texture to your dish. Just ensure the squash you choose is firm and fresh. What can I substitute for quinoa? If you want a substitute for quinoa, try brown rice or couscous. Both options give a nice texture. You might also choose lentils for a different flavor and added protein. This stuffed yellow squash is quite healthy. Here is a quick breakdown: - Calories: About 300 per serving - Protein: 12g - Fats: 10g - Carbs: 42g Each ingredient offers health benefits. Yellow squash is low in calories and high in vitamins. Quinoa provides protein and fiber. Black beans add more protein and help with digestion. To keep your fresh squash and ingredients at their best: - Store fresh squash in the fridge. Keep it in a paper bag for airflow. - Fresh herbs should go in a glass of water, like flowers. - The prepared stuffing can last in the fridge for about three days. Store it in an airtight container. You’ve learned how to make delicious stuffed squash. We covered the fresh ingredients you need, from yellow squash to black beans. The step-by-step guide helped you prepare and bake it perfectly. You saw tips for flavor and texture enhancement, along with various options for dietary needs. In conclusion, this dish is versatile and fun to make. You can adapt it to your tastes and what you have at home. Enjoy trying new ingredients and flavors. Let your creativity shine in the kitchen!

Stuffed Yellow Squash Tasty and Healthy Delight

Are you ready to savor a dish that’s both tasty and healthy? Stuffed yellow squash is your answer! This vibrant

When making Savory Tomato Pie, you need a few key items: - 1 pre-made pie crust (store-bought or homemade) - 4 medium ripe tomatoes, sliced - 1 cup mozzarella cheese, shredded - 1 cup ricotta cheese - 1/2 cup fresh basil, chopped - 1 tablespoon olive oil - 2 cloves garlic, minced - 1 teaspoon dried oregano - Salt and pepper to taste - 1/4 cup Parmesan cheese, grated - 1 egg (for egg wash) These ingredients create layers of flavor and texture. Choose ripe tomatoes for the best taste. The cheeses provide creaminess and richness. Fresh basil adds a nice aroma. For the pie crust, I recommend a few brands: - Pillsbury - Marie Callender's - Trader Joe's These brands offer reliable taste and texture. They save time, allowing you to focus on your filling. You can also use homemade dough if you prefer. Just ensure it is well chilled before use. If you don’t have certain items, here are some substitutes: - Use goat cheese instead of ricotta for a tangy flavor. - Swap mozzarella with provolone for a deeper taste. - Use dried basil if fresh is not available. Just reduce the amount to one teaspoon. - For a lower fat option, consider using part-skim ricotta cheese. These swaps keep the dish tasty while fitting your needs. Don't hesitate to mix and match based on what you have! 1. Preheat the oven to 375°F (190°C). This step is key for a good bake. 2. Press the pie crust into a 9-inch pie plate. Make sure it fits well. Use a fork to prick the bottom and sides. This lets steam escape and keeps it from getting soggy. 3. Pre-bake the crust for about 10 minutes. Look for a light golden color. After that, take it out and let it cool a bit. 4. Mix the filling. In a bowl, blend ricotta, minced garlic, chopped basil, oregano, salt, and pepper. Stir until it’s smooth. Spread this on the bottom of the crust. 5. Layer the tomatoes on top of the ricotta mix. Overlap the slices for a nice look. Then, sprinkle shredded mozzarella evenly over the tomatoes. 6. Drizzle olive oil on top. This adds flavor. Next, sprinkle grated Parmesan over the mozzarella for a tasty finish. 7. Make the egg wash. Beat the egg in a small bowl until frothy. Brush it on the edges of the pie crust. This gives it a nice shine. 8. Bake the pie for 30-35 minutes. Look for bubbly cheese and a golden brown top. 9. Let it rest for 10-15 minutes after baking. This helps with slicing. - Total Time for making the pie is about 55 minutes, including prep and baking. - Prep Time takes around 15 minutes. - Baking Time is between 30-35 minutes. Keep an eye on it to avoid burning. - Slice tomatoes ahead of time. Use a serrated knife for clean cuts. - Chop basil while waiting for the oven to preheat. Fresh herbs add great flavor. - Measure out cheeses before starting. It makes mixing easier. - Keep your work area clean. This makes it easier to focus on each step. For the full recipe, check the details above. Enjoy your cooking! To create a great tomato pie, layering is key. Start with a pre-baked crust. Keep the bottom dry to avoid sogginess. Use fresh, ripe tomatoes for the best flavor. Slice them evenly for a nice look. Overlap the slices slightly; this helps hold the filling. Spread the ricotta mix evenly on the crust. Take care to cover all edges. This step adds flavor and moisture. Want to boost your tomato pie's flavor? Start with fresh herbs. Basil adds a fragrant note that brightens the dish. You can also add a pinch of red pepper flakes for heat. Drizzle balsamic glaze on top before serving for a sweet touch. Mixing in some sautéed onions or bell peppers can add depth. Experiment with different cheeses like feta or goat cheese for a unique twist. Avoid these common pitfalls when making your pie. Do not skip pre-baking the crust. This step prevents sogginess. Be careful not to over-salt your filling. Too much salt can overpower the tomatoes' taste. Make sure to let your pie rest after baking. This allows the layers to set, making it easier to slice. Lastly, don’t rush the layering process. Take your time to create beautiful, even layers. For the full recipe, check the section above. {{image_4}} You can make your savory tomato pie even better with some fun add-ins. Try adding sliced onions for a sweet touch. Bell peppers also add crunch and color. For spice, consider jalapeños or crushed red pepper flakes. If you love herbs, fresh thyme or rosemary can boost the flavor profile. Want a creamier texture? Mix in some goat cheese with the ricotta. You can also swap mozzarella for feta cheese for a tangy twist. These small changes can turn your dish into a unique masterpiece. If you need a gluten-free option, look for gluten-free pie crusts at the store. You can also make your own crust using almond flour or oats. For a vegan version, skip the cheese and use cashew cream instead. Blend soaked cashews with nutritional yeast for a cheesy flavor. Replace the egg wash with plant-based milk for a golden look. With these options, everyone can enjoy this tasty treat, no matter their dietary needs. You can take your savory tomato pie around the world with some easy twists. For a Mediterranean flair, add olives and sun-dried tomatoes. A French version could include herbs de Provence and goat cheese. If you want an Italian touch, layer in some pesto and Parmesan. A Mexican twist might use black beans, corn, and cotija cheese. Each version brings new flavors and fun to your table. Explore these ideas to create a savory tomato pie that fits your mood and taste. To keep your leftover tomato pie fresh, let it cool first. Then, wrap it tightly in plastic wrap. You can also place it in an airtight container. Store it in the fridge for up to three days. This helps keep the flavors intact and the crust from getting too soggy. When it's time to enjoy the pie again, preheat your oven to 350°F (175°C). Place the pie on a baking sheet to catch any drips. Cover it loosely with aluminum foil to prevent the crust from burning. Bake for about 15-20 minutes. This will warm it through and keep the crust crispy. If you want to save your savory tomato pie for later, freezing is a great option. First, let the pie cool completely. Wrap it tightly in plastic wrap, then in aluminum foil. This helps prevent freezer burn. You can freeze it for up to three months. When ready to eat, thaw it in the fridge overnight before reheating. Enjoy your delicious meal again! To boost the nutrition of your Savory Tomato Pie, try these tips: - Add spinach or kale for extra greens. - Use whole wheat pie crust instead of white. - Incorporate bell peppers or zucchini for added vitamins. - Swap some mozzarella cheese for low-fat options. - Include flaxseed or chia seeds in the ricotta mix for fiber. These small changes keep the flavor while making your dish healthier. Yes, you can prepare Savory Tomato Pie ahead of time! Here’s how: - Assemble the pie up to a day in advance. - Cover it tightly and store it in the fridge. - Bake it fresh when you’re ready to serve. This method saves time and keeps the pie tasting great. Savory Tomato Pie goes well with many sides. Here are some ideas: - A fresh green salad with vinaigrette. - Roasted vegetables for a warm side. - Garlic bread for a crunchy addition. - A light soup, like tomato or minestrone. These sides balance the flavors and make a complete meal. Savory tomato pie is simple to make and fun to share. This blog post covered essential ingredients, step-by-step instructions, and useful tips. You learned about variations to suit different diets and how to store your pie. Always aim for the perfect layers and rich flavors to impress your family. Enjoy experimenting with this dish in your kitchen, and don’t shy away from making it your own. With these guidelines, you can create a tasty tomato pie that everyone will love.

Savory Tomato Pie Flavorful Recipe with Tips and Tricks

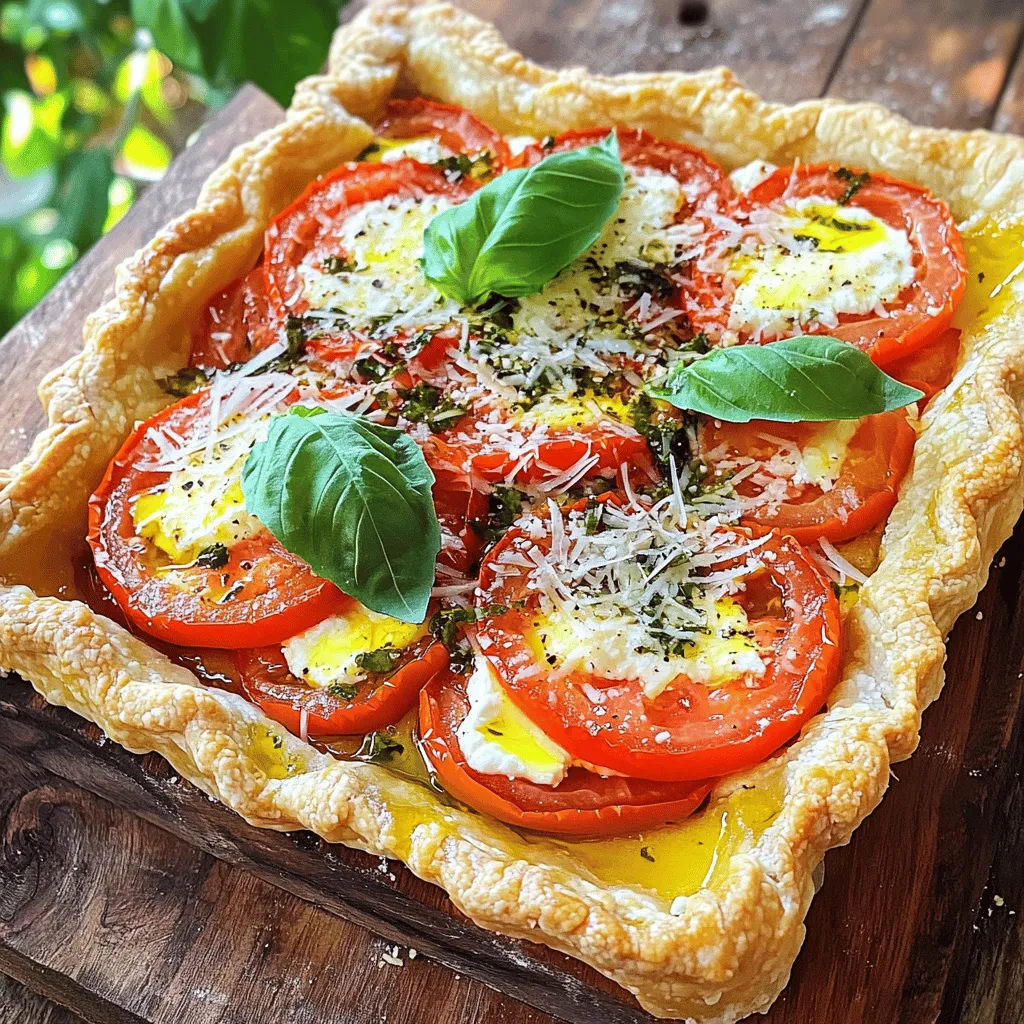
Craving a delicious savory tomato pie? You’re in the right place! I’ll guide you through a simple, flavorful recipe packed

To make this easy canned peach cobbler, you need some simple items. Gather the following ingredients: - 2 cans (15 oz each) sliced peaches in syrup - 1 cup all-purpose flour - 1 cup granulated sugar - 1 cup milk - 1/2 cup unsalted butter, melted - 1 tablespoon baking powder - 1/2 teaspoon salt - 1 teaspoon vanilla extract - 1 teaspoon ground cinnamon These ingredients blend together to create a soft and sweet dessert. You can add a few more ingredients to make your cobbler unique. Consider these options: - A pinch of nutmeg for warmth - Fresh lemon juice for a bright note - Chopped nuts like pecans for crunch - Extra cinnamon or even cardamom for spice These optional ingredients can enhance the flavor and make your cobbler special. Serving your cobbler can be just as fun as making it. Here are some ideas to enjoy your dessert: - Serve it warm with a scoop of vanilla ice cream for creaminess - Top it with whipped cream for a lighter touch - Drizzle some of the reserved peach syrup over the top for extra sweetness - Add a sprinkle of cinnamon to make it look fancy These serving ideas will make your easy canned peach cobbler even more delightful. For the full recipe, check out the delightful canned peach cobbler section! Start by gathering all your ingredients. You need canned peaches, flour, sugar, milk, butter, baking powder, salt, vanilla, and cinnamon. Preheat your oven to 350°F (175°C). This step is key for even baking. Grease a 9x13 inch baking dish with butter or cooking spray. This keeps the cobbler from sticking. In a large bowl, whisk together flour, sugar, baking powder, and salt until smooth. Add milk, melted butter, and vanilla. Mix gently until just combined. Do not overmix; this keeps your cobbler light. Pour the batter into your greased dish. Drain the peaches and arrange them on top of the batter. Drizzle some reserved syrup over the peaches. A sprinkle of cinnamon adds warmth and flavor. Place your dish in the preheated oven. Bake for 35-40 minutes. Check for a golden-brown top and a clean toothpick in the center. Once done, take it out and let it cool for about 10 minutes. Cooling enhances the flavor. Serve warm with whipped cream or vanilla ice cream. Enjoy your easy canned peach cobbler! For the full recipe, check the details above. To make the best canned peach cobbler, start with the right ingredients. Make sure your baking powder is fresh. Old baking powder can lead to a flat cobbler. When mixing, don’t overmix the batter. This keeps it light and fluffy. If you see lumps, that’s okay. It’s better to have a few lumps than a dense mix. Lastly, let the cobbler cool for a bit before serving. This helps the flavors blend and makes it easier to slice. For extra flavor, consider adding a touch of nutmeg along with cinnamon. A pinch of nutmeg can give a warm, spicy note. You can also swap half of the sugar for brown sugar. This adds a rich, caramel flavor to your cobbler. If you like a crunchy topping, sprinkle some oats or chopped nuts on top before baking. This adds a nice texture contrast. For a fun twist, try adding a splash of almond extract to the batter for a sweet, nutty taste. To impress your guests, serve the cobbler in a nice dish. Place a slice on a colorful plate. Top it with a scoop of ice cream or whipped cream. Drizzle some of the reserved peach syrup on top for extra sweetness. A sprinkle of cinnamon over the ice cream adds a nice touch. You could even add a mint leaf for color. This simple presentation makes the dessert look gourmet and inviting. {{image_4}} You can switch up the fruit in this recipe. Try using canned pears or cherries. They add a fun twist. A mix of fruits can also work great. You can get creative with your favorite flavors. Just remember to adjust the sugar if the fruit is sweeter or tarter. If you need a gluten-free option, swap the all-purpose flour for a gluten-free blend. Many brands work well in baking. Make sure to check the label for baking powder that is gluten-free. Your cobbler will still taste amazing! You can change the sweetness by using less sugar. Taste your batter and see if it needs more. If you like spice, add more cinnamon or even nutmeg. You can also try adding a bit of lemon zest for a fresh flavor. Tailor it to your taste for the perfect dessert. After you enjoy your peach cobbler, store leftovers in an airtight container. Place it in the fridge for up to four days. Make sure to cover it well to keep the flavor fresh. If you have a lot left, consider slicing it into portions. This makes it easy to grab and serve later. To reheat your cobbler, preheat the oven to 350°F (175°C). Place the cobbler in a baking dish. Cover it with foil to keep it moist. Heat for about 15-20 minutes until warm. You can also use the microwave. Heat individual slices for about 30-60 seconds. Add a scoop of ice cream on top to make it extra tasty. If you want to save your peach cobbler for later, freeze it! Allow the cobbler to cool completely. Wrap it tightly in plastic wrap, then place it in a freezer bag. It will stay good for about three months. When you’re ready to eat it, let it thaw in the fridge overnight. Reheat as mentioned before to enjoy a warm slice again. Yes, you can use fresh peaches. Just peel and slice them. You will need about 4-5 medium-sized peaches. Fresh peaches add a bright flavor. However, canned peaches save time and are sweet and juicy. If you use fresh peaches, adjust the sugar based on their ripeness. To make a lighter peach cobbler, you can swap some ingredients. Use whole wheat flour instead of all-purpose flour. You can also reduce the sugar by half. Try using low-fat milk or almond milk for less fat. For added flavor, add in a bit of lemon juice. This keeps the taste bright and fresh. Canned peach cobbler pairs well with many toppings. Whipped cream is a classic choice. Vanilla ice cream adds creaminess. You could also serve it with yogurt for a tangy twist. For a more fun touch, sprinkle some nuts or a dash of cinnamon on top. In this article, we explored how to make a simple canned peach cobbler. We covered key ingredients and optional additions for extra flavor. You learned the step-by-step baking process and vital tips to avoid mistakes. We also discussed variations, storage, and answers to common questions. Remember, this dish is fun to make and easy to share. Enjoy your homemade cobbler and get creative with flavors. Your dessert can be a hit at any gathering!

Easy Canned Peach Cobbler Simple and Delicious Dessert

Craving a sweet treat that’s quick and easy? Look no further! My Easy Canned Peach Cobbler delivers a burst of

- 2 medium zucchinis, thinly sliced into rounds - 1 cup panko breadcrumbs - ½ cup finely grated Parmesan cheese - 1 teaspoon garlic powder - 1 teaspoon onion powder - ½ teaspoon smoked paprika - Salt and freshly cracked black pepper, to taste - 2 large eggs, beaten until well mixed - 1 tablespoon olive oil, for spraying - Air Fryer - Mixing Bowls - Spray Bottle for Olive Oil For these crispy zucchini chips, fresh zucchini is key. Choose firm, bright green zucchinis. They give the best texture and flavor. Panko breadcrumbs create a light crunch. The Parmesan cheese adds a rich taste and helps the chips stick. Garlic and onion powder boost flavor. Smoked paprika brings a warm, smoky note. A little salt and pepper finish the seasoning. You need an air fryer for this recipe. It cooks the chips evenly and keeps them crispy. Mixing bowls help you prepare your ingredients. A spray bottle for olive oil is handy. It lightly coats the chips for that perfect crunch without excess oil. I use these ingredients to make a delightful snack. They are easy to prepare and fun to eat. You can find the full recipe above to guide you through the steps. Enjoy making these at home; they are sure to impress! - Preheat Air Fryer to 375°F - Prepare the Dipping Station First, I preheat my air fryer to 375°F. This step is key for crispy chips. While the fryer heats up, I prepare my dipping station. I place beaten eggs in one bowl and the breadcrumb mix in another. This makes coating easy and quick. - Dip and Roll Technique - Ensuring Even Coating Next, I take each zucchini round, dip it in the egg, and coat it well. After that, I roll it in the breadcrumb mix, pressing lightly. This helps the crumbs stick. I ensure each piece is evenly coated for the best crunch. - Arranging in the Air Fryer Basket - Air Frying Parameters (Time and Temperature) Now, I arrange the coated zucchini chips in the air fryer basket. I make sure they are in a single layer. This helps them cook evenly. I lightly mist them with olive oil for extra crispiness. I set the air fryer to cook for 10-12 minutes. Halfway through, I flip the chips to get that golden-brown color. After cooking, I let them cool on a wire rack to keep them crunchy. Don't forget to check out the Full Recipe for more details! To get that perfect crunch, cook the zucchini in a single layer. This way, hot air can flow around each chip. If they overlap, some will stay soft. Use a light mist of olive oil on top. This helps the chips turn golden and crispy while cooking. Zucchini chips taste great with dips. Try marinara sauce for a classic touch. You can also serve them with ranch dressing or a zesty yogurt dip. They pair well with sandwiches and salads, making them a fun side. You can even enjoy them on their own as a snack. Avoid overcrowding the air fryer. If you add too many chips, they won’t cook evenly. Also, pay attention to coating techniques. Make sure each zucchini slice gets enough egg and breadcrumbs. This ensures the chips stay crispy and flavorful. {{image_4}} You can spice up your zucchini chips easily. For a kick, add cayenne to the mix. Just a pinch will bring heat to every bite. If you love herbs, Italian seasoning is a great choice. Mix it into the breadcrumbs for a fresh twist. This will give your chips a savory, herbaceous flavor. If you need a gluten-free option, try almond flour. It gives the zucchini chips a nice crunch. Simply swap it for panko breadcrumbs. For those wanting a cheesy taste without dairy, vegan cheese works well too. Just use it in place of Parmesan in the full recipe. Want to switch things up? Yellow squash is a fantastic alternative. It has a similar texture and taste. You can also experiment with other veggies. Carrots and sweet potatoes can give a sweet, earthy flavor. Try different veggies to find your favorite! To keep your zucchini chips fresh, store them in an airtight container. Make sure the chips are completely cool before sealing them. This helps prevent moisture buildup. I suggest you enjoy them within 2-3 days for the best taste and crunch. For the best results, reheat your zucchini chips in the air fryer. Set it to 350°F (175°C) and cook for 3-5 minutes. This method brings back their crispy texture. If you don’t have an air fryer, you can use the oven. Preheat it to 350°F (175°C) and place the chips on a baking sheet for about 5-7 minutes. Avoid using the microwave, as it can make them soft. To freeze zucchini chips, first let them cool completely. Then, place them in a single layer on a baking sheet. Freeze them for about 1-2 hours until firm. Once frozen, transfer the chips to a freezer-safe bag or container. You can store them for up to 3 months. To thaw and re-cook, simply take out the desired amount and let them sit at room temperature for about 15 minutes. Then, air fry or bake them as mentioned before. Enjoy your crispy snack anytime! Zucchini chips stay fresh in the fridge for about three days. Store them in an airtight container to keep them crunchy. If you want to keep them longer, freeze them. They can last for about two months in the freezer. Just remember to let them cool completely before freezing. Yes, you can. Instead of eggs, try using a mixture of flour and water or a flaxseed meal mix. Mix one tablespoon of flaxseed meal with two and a half tablespoons of water, and let it sit for about five minutes. This mixture binds well and keeps the breadcrumbs on the zucchini. I love serving these chips with marinara sauce or ranch dressing. You can also try a spicy yogurt dip or a lemon-garlic aioli. These dips add extra flavor and make your snack even more fun. Yes, you can make them vegan. Just omit the Parmesan cheese and eggs. Use a vegan cheese alternative or stick with the breadcrumb coating. This way, you still get all the crunch and flavor without any animal products. You learned how to make delicious air fryer zucchini chips today. We covered key ingredients like zucchini, panko breadcrumbs, and Parmesan cheese. I shared steps for coating and air frying them to crispy perfection. Remember tips like cooking in a single layer and mists of olive oil for crunch. If you want to mix it up, try spicy versions or different veggies. Store your leftovers properly for best taste. Enjoy your tasty chips and feel free to experiment with flavors!

Crispy Air Fryer Zucchini Chips Easy Flavorful Snack

Are you ready to enjoy a tasty, guilt-free snack? Crispy air fryer zucchini chips are here to satisfy your cravings!

Older posts
Newer posts
← Previous Page1 … Page41 Page42 Page43 … Page92 Next →

dsad

© 2025 recipesstation • Built with GeneratePress

Our Policies

  • Copyright Policy
  • Cookie Policy
  • GDPR Policy
  • Privacy Policy
  • Disclaimer
  • Terms Of Use

More Information

  • Home
  • About
  • Contact
  • Appetizers
  • Dessert
  • Dinner
  • Drinks
©2025, recipesstation About Back To Top