Skip to content
DisclaimerTerms Of UseGDPR PolicyCookie Policy

recipesstation

  • Home
  • Drinks
  • Appetizers
  • Dinner
  • Dessert
  • About
  • Contact
  • Privacy Policy
DisclaimerTerms Of UseGDPR PolicyCookie Policy

Emily

- 1 pound baby carrots (or regular carrots) - 3 tablespoons honey - 2 tablespoons extra virgin olive oil - 4 cloves garlic, finely minced - 1 teaspoon fresh thyme leaves (or ½ teaspoon dried thyme) - Salt and freshly ground pepper to taste - 1 tablespoon balsamic vinegar - Fresh parsley, chopped, for garnishing The main ingredients for honey garlic roasted carrots are simple yet powerful. Carrots offer a sweet base. Honey adds a rich layer of flavor. Olive oil helps everything roast nicely. Next, you need garlic. It gives the dish a savory kick. Fresh thyme adds depth and aroma. Salt and pepper bring all these flavors together. You can enhance this dish further. Balsamic vinegar adds a tangy touch. Fresh parsley not only looks pretty but also adds freshness. Gather these items before you start cooking. You will enjoy the sweet and savory blend in this dish. For the full recipe, check out the details above. - Preheat the oven to 425°F (220°C). - In a large bowl, whisk together honey, olive oil, minced garlic, thyme, salt, and pepper. Whisking these ingredients makes a sweet and savory glaze. This mix helps coat the carrots well, giving them a rich flavor. If you want extra depth, add balsamic vinegar for a tangy twist. - Toss baby carrots with the honey garlic mixture. - Ensure even coating for optimal flavor. Make sure each carrot is coated. This step is key for that delicious taste. When you toss them, look for a shiny finish. - Line a baking sheet with parchment paper. - Roast for 25-30 minutes, turning halfway. Lining the baking sheet keeps the carrots from sticking. Place them in a single layer for even cooking. Turn them halfway through to get that nice brown caramelization. You’ll know they’re ready when they feel tender and have a sweet, golden color. Enjoy this easy recipe from the Full Recipe for a tasty side dish! To get that lovely caramelization, keep some things in mind. First, do not overcrowd the baking sheet. This lets the carrots roast evenly and brown nicely. Second, check for tenderness with a fork. When they feel soft, they are ready to come out. Always taste the carrots before serving. This lets you adjust seasoning as needed. If you want more flavor, consider adding more thyme or a splash of vinegar. A little extra can elevate the dish! Serve the roasted carrots on a pretty platter. Drizzle any remaining glaze on top for added flavor. For a pop of color, garnish with chopped parsley. It makes the dish look fresh and inviting. Enjoy this simple yet elegant side! {{image_4}} You can play with different veggies for this recipe. Try using parsnips or sweet potatoes. They add a nice twist. If you want to mix things up, add seasonal vegetables too. Root vegetables like turnips or beets work well. Each one brings its own taste and texture. You can create a colorful dish this way. The honey garlic glaze will enhance all these flavors. Want to spice things up? Add a pinch of cayenne pepper. It gives the dish a warm kick. If you prefer a fresh taste, try adding citrus zest. Lemon or orange zest can brighten the flavors. You can adjust the sweetness with more honey or less. This makes it fun to experiment with your favorite flavors. Need a vegan option? Swap the honey for maple syrup. It works just as well and tastes great. If you want a lighter dish, reduce the oil. This keeps the carrots tasty without being too rich. These changes let anyone enjoy this dish, no matter their diet. Store any leftover honey garlic roasted carrots in an airtight container. This helps keep them fresh. They can last up to 3-4 days in the fridge. Just make sure the lid is on tight to avoid drying out. For the best texture, reheat your carrots in the oven. Preheat your oven to 350°F (175°C) and place the carrots on a baking sheet. Heat them for about 10-15 minutes. If you're in a hurry, you can use the microwave. Just heat in 30-second bursts, checking often to avoid overcooking. You can freeze your honey garlic roasted carrots before or after roasting. To freeze them, place the cooled carrots in freezer-safe bags. Make sure to squeeze out all the air before sealing. They can stay fresh in the freezer for up to 3 months. When you're ready to eat them, thaw in the fridge overnight and reheat. Yes, just peel and cut them into uniform sticks. This way, they will cook evenly. Regular carrots can offer a great taste too. They should be tender and slightly caramelized. You can test this by poking them with a fork. If they are soft and sweet, they are ready. They pair well with grilled meats, salads, or as a side dish for any meal. The sweet and savory flavors complement many main dishes. Yes, you can prepare the carrots and store them before roasting. Just keep them in the fridge until you are ready to cook. This can save time on busy days. For the full recipe, check out the earlier section. This blog post showed you how to make honey garlic roasted carrots. You learned about the key ingredients, like baby carrots, honey, and olive oil. I provided clear instructions for preparation and cooking, along with helpful tips for the best flavors. You can even try variations with other veggies or seasonings. Finally, I discussed storage options, so your leftovers won’t go to waste. Now, enjoy creating this tasty dish and impress your family or friends with your skills!

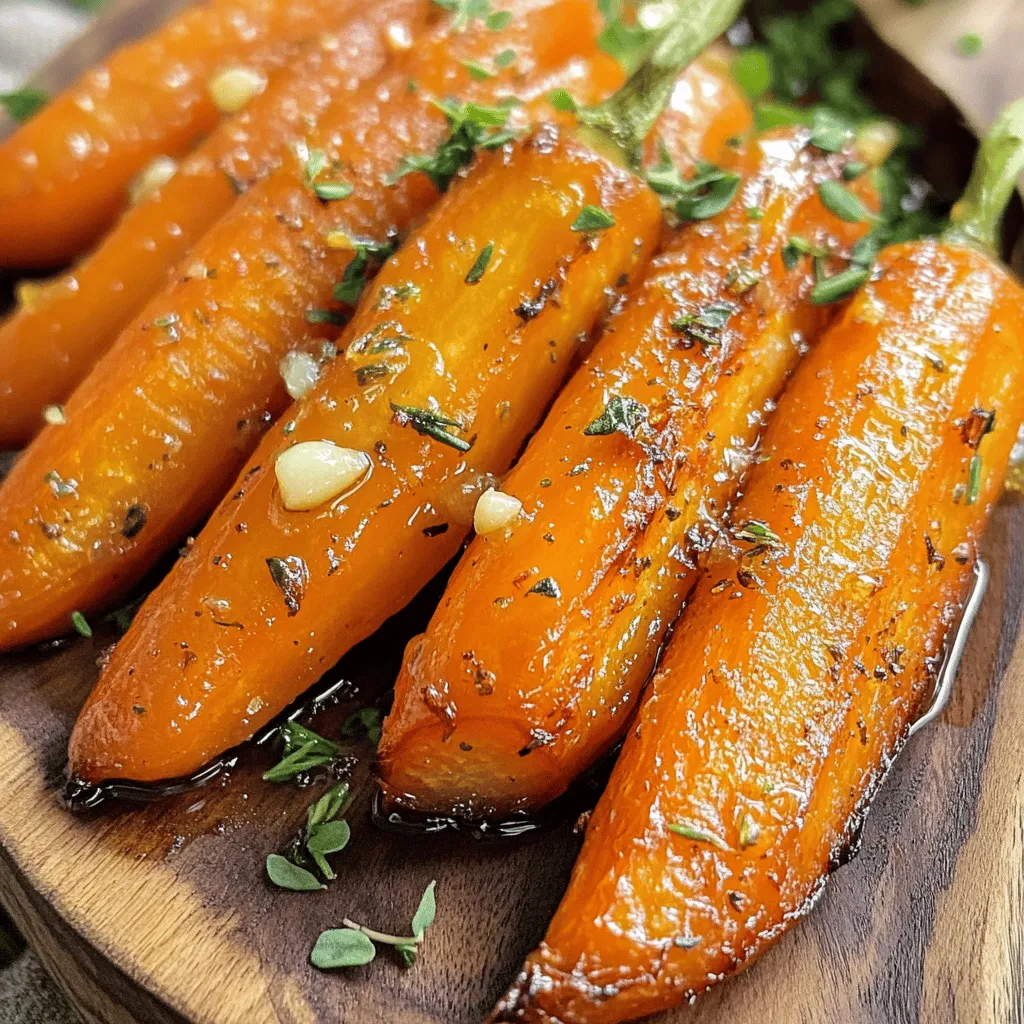
Honey Garlic Roasted Carrots Flavorful and Simple Dish

Looking for a simple, flavorful dish that brightens up your meals? Honey Garlic Roasted Carrots are your answer! With minimal

For the best no bake peach cheesecake, gather these key ingredients: - 1 ½ cups graham cracker crumbs - ½ cup unsalted butter, melted - 2 cups cream cheese, softened at room temperature - 1 cup powdered sugar - 1 teaspoon vanilla extract - 1 cup heavy whipping cream, chilled - 2 cups fresh peaches, peeled and sliced (set aside a few for garnishing) - 1 tablespoon lemon juice These ingredients work together to create a creamy and fruity dessert. The graham cracker crumbs form a tasty crust, while the cream cheese makes the filling rich and smooth. To take your cheesecake to the next level, consider these optional ingredients: - 1 teaspoon gelatin powder (for extra firmness) - 2 tablespoons warm water (to dissolve gelatin) Adding gelatin helps the cheesecake hold its shape better. If you want a firmer slice, this is a great choice. You can make swaps based on what you have at home: - Use digestive biscuits instead of graham crackers for the crust. - If you are out of cream cheese, try ricotta for a different taste. - For a dairy-free version, use vegan cream cheese and coconut cream. Making these simple substitutions allows you to still enjoy this delightful dessert. Remember, these changes might slightly alter the taste and texture, but they can be just as tasty! Check out the Full Recipe for more details. Start by mixing the graham cracker crumbs and melted butter in a bowl. Stir until the crumbs look like wet sand. Next, press this mixture into the bottom of a 9-inch springform pan. Make sure it is even and compact. Now, refrigerate the crust while you make the filling. This step helps it set well. In a large bowl, beat the softened cream cheese until smooth. This will take a few minutes. Add the powdered sugar and vanilla extract. Mix until everything is well blended. In another bowl, whip the chilled heavy cream until it forms stiff peaks. Slowly fold the whipped cream into the cream cheese mixture. Be gentle here to keep it light. Toss the sliced peaches with lemon juice to keep them fresh. Fold the peach slices into the cream cheese mixture until they are evenly mixed. If you want a firmer cheesecake, dissolve gelatin in warm water and fold it into the filling. Pour the cream cheese filling over the chilled crust. Use a spatula to spread it evenly. Once done, cover the cheesecake with plastic wrap. Refrigerate it for at least 4 hours, but overnight is best. After it sets, remove the sides of the springform pan. Lastly, top with reserved peach slices for a beautiful finish. You can find the full recipe [here](#). To make a smooth cheesecake, always start with softened cream cheese. Cold cream cheese can clump and ruin the texture. Use an electric mixer to beat the cream cheese until it is creamy. Make sure to scrape down the sides of the bowl often. This helps mix everything well. When you add the powdered sugar and vanilla, mix slowly at first. This prevents a sugary cloud from forming. Lastly, fold in the whipped cream gently. This keeps the cheesecake light and fluffy. To get the best peach flavor, choose ripe peaches. They should smell sweet and feel slightly soft. Before mixing them in, toss the peach slices with lemon juice. This keeps the color bright and adds a fresh taste. If you want a stronger peach flavor, blend some peaches into a puree. You can swirl this into the cheesecake mix or drizzle it on top before serving. This step adds both color and flavor to your dessert. For a clean look, use a warm knife to slice the cheesecake. Dip the knife in hot water, then wipe it dry. Each cut will be smooth and neat. When serving, place each slice on a cool plate to make it pop. Drizzling a homemade peach puree on the plate adds flair. Top with a fresh mint sprig for color and a hint of freshness. These simple touches make your cheesecake look as good as it tastes. For the full recipe, check out the detailed steps provided earlier. {{image_4}} You can swap peaches for other fruits. Strawberries, blueberries, or raspberries work well. Simply slice or mash them before adding to the filling. Each fruit gives a unique taste and color. For a tropical twist, try mangoes or pineapples. These fruits add a fun flair to your cheesecake. If you need a gluten-free crust, use gluten-free cookies. Almond flour or coconut flour can also work. Just mix them with melted butter. Press the mixture firmly into your pan. This simple change keeps the cheesecake tasty and safe for those with gluten allergies. For a richer flavor, add chocolate or caramel. You can swirl melted chocolate into the cream cheese mixture. Drizzle caramel sauce on top before serving. These treats add a sweet twist and make the dessert even more delightful. Your guests will love the surprise! For the full recipe, check out the Peachy Dream No-Bake Cheesecake . To keep your no-bake peach cheesecake fresh, store it in the fridge. Place it in an airtight container, or cover it tightly with plastic wrap. This helps prevent it from absorbing other fridge smells. Leftover cheesecake can stay good for up to four days. If you want to enjoy it later, freezing is a great option. If you want to save some cheesecake for later, freezing works well. First, let the cheesecake chill completely in the fridge. Then, wrap it well in plastic wrap. For extra protection, wrap it in aluminum foil too. Store it in the freezer for up to three months. Remember, the longer it freezes, the more flavor it can lose. When you're ready to enjoy your frozen cheesecake, take it out of the freezer. Move it to the fridge and let it thaw overnight. This slow thawing helps keep the texture nice. If you’re in a hurry, you can leave it at room temperature for about two hours. Avoid using a microwave, as it can change the texture. Enjoy your peachy treat! For the full recipe, check out [Full Recipe]. No bake peach cheesecake can last in the fridge for about 3 to 5 days. Store it in an airtight container to keep it fresh. If you want to keep it longer, consider freezing it. When frozen, it can last for about 1 to 2 months. Just remember to wrap it well. Yes, you can use canned peaches! However, fresh peaches taste better and have a firmer texture. If you use canned peaches, drain them well to avoid extra moisture. You can also toss them lightly in lemon juice to keep them vibrant. If you need a cream cheese substitute, try using ricotta cheese or Greek yogurt. Both options provide a creamy texture. For a vegan option, you can use cashew cream or silken tofu blended until smooth. Adjust sweetness if needed to match your taste. For the full recipe, check out the Peachy Dream No-Bake Cheesecake. This no-bake peach cheesecake offers a simple and tasty treat. You learned about essential and optional ingredients that can boost flavor. The step-by-step instructions make preparation easy, ensuring great results. Tips and tricks help achieve a smooth cheesecake and perfect peach taste. Variety is key, with options for different fruits and crusts. Store leftovers properly or freeze them for later. Overall, this recipe provides delicious enjoyment without the fuss. So, grab your ingredients and get started!

No Bake Peach Cheesecake Simple and Delightful Recipe

If you love a sweet and easy dessert, you’ll adore this No Bake Peach Cheesecake! This simple recipe bursts with

- 1 medium zucchini, finely grated - 1 cup fresh blueberries (or frozen for convenience) - 1 cup all-purpose flour - 1 cup whole wheat flour - 1 teaspoon baking powder - 1/2 teaspoon baking soda - 1/2 teaspoon salt - 1 teaspoon ground cinnamon - 1/2 cup vegetable oil (can substitute with melted coconut oil) - 1 cup granulated sugar (or adjust according to taste) - 2 large eggs, at room temperature - Zest of 1 lemon (approximately 1 tablespoon) - 2 tablespoons fresh lemon juice - 1 teaspoon vanilla extract The main ingredients bring a mix of flavor and texture. Zucchini adds moistness without a strong taste. Blueberries burst with sweetness and color. The two types of flour create a nice balance. Baking powder and baking soda help the bread rise perfectly. Cinnamon adds warmth to the mix. The oil keeps the bread tender, while the sugar brings sweetness. Eggs bind everything together, and the lemon zest and juice brighten the flavor. - Coconut Oil Substitute: Use melted coconut oil for a tropical twist. - Sweetener Adjustments: Try brown sugar for a deeper taste. - Flavor Enhancements: Add a pinch of nutmeg for more spice. Optional ingredients can change the bread’s flavor and texture. Using coconut oil adds a hint of coconut. Switching to brown sugar gives a caramel-like richness. A touch of nutmeg can lift the taste even more. These choices let you personalize your bread. For the full recipe, check the instructions above. - Preheating the Oven: First, set your oven to 350°F (175°C). This temperature helps the bread bake evenly. - Preparing the Loaf Pan: Take a 9x5 inch loaf pan. Lightly grease it with oil or line it with parchment paper. This makes it easy to remove the bread later. - Combining Dry Ingredients: In a medium bowl, whisk together the all-purpose flour, whole wheat flour, baking powder, baking soda, salt, and ground cinnamon. Mix until everything is well blended. Set this aside. - Mixing Wet Ingredients: In a large bowl, add the vegetable oil and granulated sugar. Whisk them together until creamy. This blend forms the base of your batter. - Incorporating Zucchini and Blueberries: Gently fold in the grated zucchini. Then, add the fresh blueberries. Be careful not to crush them. This keeps them whole and juicy in the bread. - Mixing Wet and Dry Ingredients: Gradually add the dry mix to the wet mix. Stir gently with a spatula until just combined. Do not overmix, as this can make the bread tough. - Pouring the Batter: Pour the batter into the prepared loaf pan. Use a spatula to spread it evenly. - Baking Time and Checks: Place the loaf pan in the oven. Bake for 55-60 minutes. To check if it's done, insert a toothpick in the center. It should come out clean or with a few moist crumbs. - Cooling the Bread: Once baked, take the bread out of the oven. Let it cool in the pan for about 10 minutes. Then, transfer it to a wire rack to cool completely. This helps keep the bread moist. For the full recipe, check out the details provided above. Enjoy your baking! Avoiding Overmixing Overmixing the batter can make your bread tough. Mix the wet and dry ingredients until just combined. You want to see some lumps. This helps keep your bread soft and light. Ensuring Moistness To keep your bread moist, use fresh zucchini. Grate it finely and squeeze out excess water. This keeps the bread from becoming soggy. You can also add a bit more oil if your batter feels dry. Serving Suggestions Slice the cooled bread and arrange it on a nice platter. You can serve it with butter or cream cheese. This makes for a delightful snack or breakfast treat. Garnishing Ideas For an extra touch, sprinkle powdered sugar on top. You can also drizzle a simple lemon glaze over the slices. Just mix powdered sugar with a little lemon juice for a sweet finish. Dealing with Dense Bread If your bread turns out dense, check your mixing method. Overmixing can cause this. You could also add a bit more baking powder to help it rise. Adjusting Sweetness If the bread is too sweet, reduce the sugar next time. You can also use less sugar if you like a tangy flavor. Taste the batter before baking to find your perfect balance. For the complete recipe and more tips, check out the Full Recipe. {{image_4}} You can make your lemon blueberry zucchini bread even better with some fun mix-ins. - Adding Nuts or Seeds: Chopped walnuts or pecans add a nice crunch. Sunflower seeds or flaxseeds boost nutrition too. Just fold in about 1/2 cup of your choice to the batter. - Different Fruit Combinations: Try adding raspberries or blackberries. They give a lovely tartness that pairs well with the lemon. You can swap the blueberries for about 1 cup of any berry you like. You can easily adapt this recipe to fit different diets. - Gluten-Free Option: Use a gluten-free flour blend instead of all-purpose and whole wheat flour. Brands like Bob’s Red Mill offer great options. Just make sure your baking powder is gluten-free too. - Vegan Adaptation: Replace the eggs with flax eggs. Mix 1 tablespoon of flaxseed meal with 2.5 tablespoons of water. Let it sit for a few minutes until thick. This keeps your bread moist and tasty. Change your bread with the seasons for new flavors. - Adding Spices for Fall: Try adding 1 teaspoon of nutmeg or pumpkin spice for a cozy fall twist. It brings warmth and depth to the lemon flavor. - Summer Berry Swaps: In summer, swap out blueberries for fresh peaches or strawberries. They bring a juicy sweetness that is perfect for warm days. Explore these options to create your perfect lemon blueberry zucchini bread. For the full recipe, check the earlier section. You can store leftover lemon blueberry zucchini bread at room temperature or in the fridge. If you choose room temperature, place it in an airtight container. This keeps it moist for about three days. If you want it to last longer, put it in the fridge. In the fridge, it can stay fresh for about a week. How to Freeze the Bread To freeze your zucchini bread, let it cool completely first. Wrap it tightly in plastic wrap. Then, place it in a freezer bag or airtight container. This keeps out air and moisture. You can freeze it for up to three months without losing flavor. Thawing Instructions When you want to enjoy your frozen bread, take it out of the freezer. Leave it in the fridge overnight to thaw. If you need it fast, you can also thaw it at room temperature for about two hours. Enjoy it warm or cold, just as you like! How Long it Lasts Lemon blueberry zucchini bread lasts about three days at room temperature. In the fridge, it can stay good for up to a week. If you freeze it, it can last for three months. The bread remains tasty as long as it is stored correctly. Always check for any signs of spoilage before eating. The bread is done when a toothpick inserted in the center comes out clean. You may see a few moist crumbs, which is okay. The top should look golden and slightly cracked. If it feels springy to the touch, it’s ready. Check it around 55 minutes, but it may need up to 60 minutes. Yes, you can use frozen blueberries. They are a great option. Just fold them in frozen to keep your batter cool. This helps prevent the bread from turning blue. Remember, the bread may take a few minutes longer to bake. You can use applesauce as a substitute for eggs. Use 1/4 cup of applesauce for each egg. Flaxseed meal also works well. Mix 1 tablespoon of flaxseed with 2.5 tablespoons of water. Let it sit for a few minutes to thicken. Yes, you can make mini loaves! Just adjust the baking time. Mini loaves usually bake for about 25 to 30 minutes. Keep an eye on them, and test with a toothpick. They should be done when the toothpick comes out clean. To boost the lemon flavor, add more lemon zest. You can also increase the lemon juice slightly. A teaspoon or two more can make a big difference. If you want an extra kick, try adding a bit of lemon extract. For an added treat, a lemon glaze on top is tasty. For the full recipe, check the notes above. You learned about the key ingredients for a tasty loaf. We covered important steps, tips, and variations for baking success. This guide helps you enjoy baking and customizing your bread. Remember, experimenting with flavors can make your bread unique. Whether you go for gluten-free or vegan, the options are endless. Follow these steps, and you'll bake a delicious treat. Enjoy your creation!

Lemon Blueberry Zucchini Bread Moist and Easy Recipe

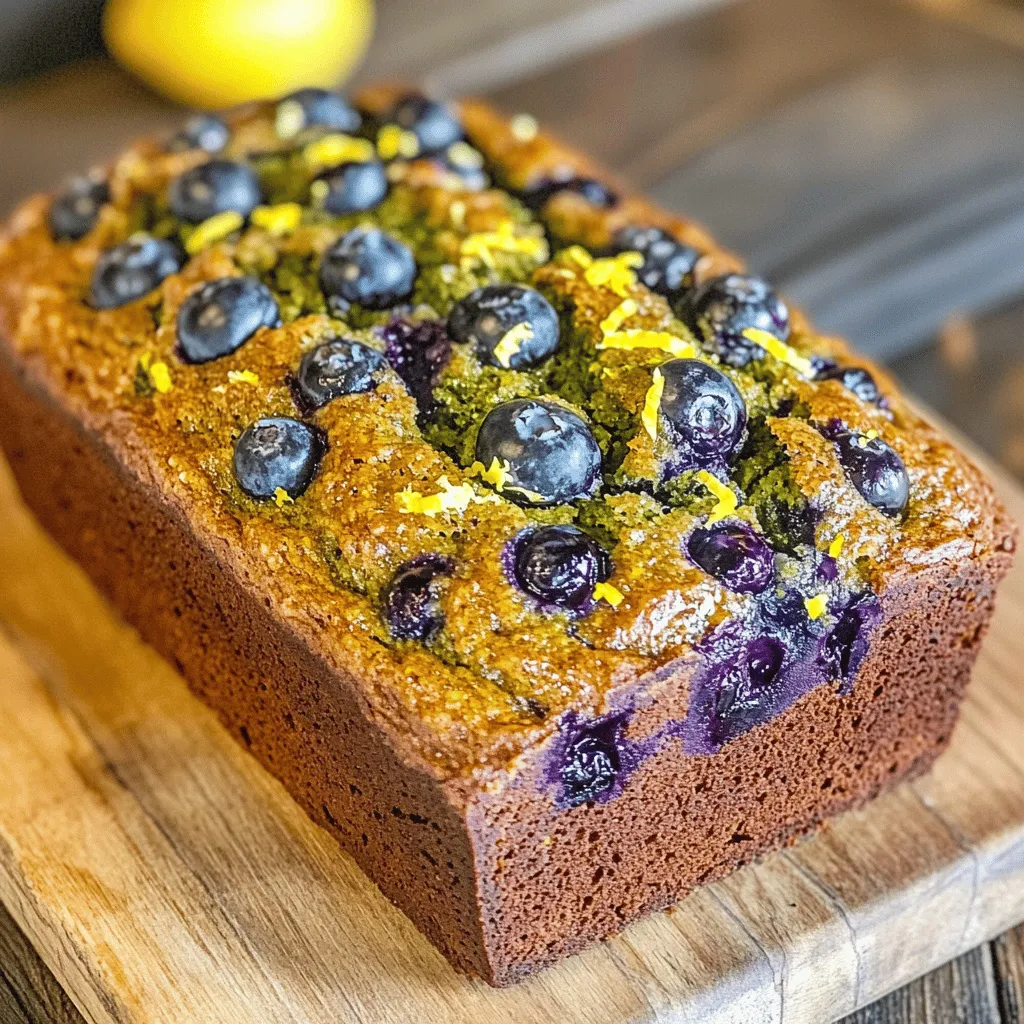
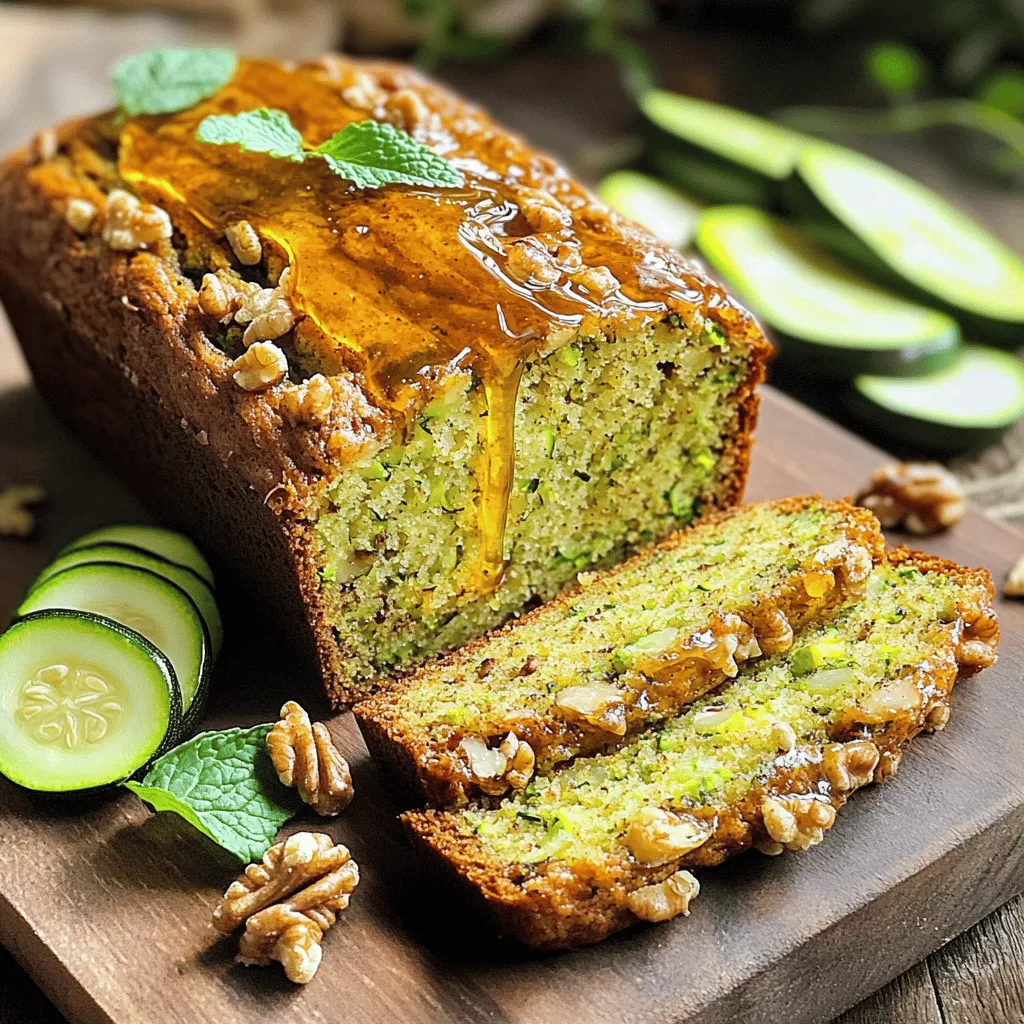
Are you ready to bake a delightfully moist Lemon Blueberry Zucchini Bread? This easy recipe packs in fresh flavors and

- 4 cups fresh peaches, peeled and sliced - 1 cup granulated sugar (divided) - 1 tablespoon fresh lemon juice - 1 teaspoon ground cinnamon - 1 cup all-purpose flour - 2 teaspoons baking powder - 1/2 teaspoon salt - 1 cup whole milk - 1/2 cup unsalted butter, melted - 1 teaspoon pure vanilla extract - 1/4 cup brown sugar (for topping) - 1/4 teaspoon freshly grated nutmeg (optional) When picking peaches, choose those that feel soft but not mushy. Look for a nice yellow color. The best peaches smell sweet and aromatic. Ripe peaches will make your cobbler taste amazing. If you don’t have fresh peaches, you can use frozen ones. Just thaw and drain excess juice. You can swap granulated sugar with coconut sugar for a different taste. If you need a dairy-free option, try almond milk instead of whole milk. - Preheat the oven to 350°F (175°C). - In a large bowl, mix 4 cups of sliced peaches with 1/2 cup of sugar, 1 tablespoon of lemon juice, and 1 teaspoon of cinnamon. Let this sit for 10 minutes. - In another bowl, whisk together 1 cup of flour, 2 teaspoons of baking powder, 1/2 teaspoon of salt, and the remaining 1/2 cup of sugar. - Grease a 9x13 inch baking dish. Pour the batter in evenly. - Spoon the peach mixture over the batter. Do not stir; the peaches will sink. - Sprinkle 1/4 cup of brown sugar on top. Optionally, add 1/4 teaspoon of nutmeg. - Bake for 45-50 minutes. Look for a golden brown top and bubbling edges. - Cool for 15-20 minutes before serving. You can find the Full Recipe to explore more delicious details. To get the best texture, avoid overmixing the batter. Mix just until the dry and wet ingredients blend. A few lumps are okay; they will disappear while baking. Letting the peaches sit is also key. This step helps release their juices, making the filling juicy and sweet. Mix the peaches with sugar and lemon juice, then wait about 10 minutes. This helps you create a fantastic flavor. Pair your warm peach cobbler with ice cream or whipped cream. The cold cream balances the warm cobbler perfectly. A scoop of vanilla ice cream melts into the cobbler, creating a tasty treat. You can also garnish with a fresh peach slice or a sprinkle of cinnamon. This adds a lovely touch and enhances the look of your dish. For a more special touch, try adding crushed nuts on top. They add crunch and flavor to this delightful dessert. {{image_4}} Adding berries or other fruits can make your peach cobbler even better. Try mixing in blueberries, raspberries, or blackberries. The tartness of these fruits pairs well with sweet peaches. You can also add apples or plums for a new twist. Experimenting with different fruits offers a fun way to change the flavor. Spices can enhance the taste of your cobbler. I love adding a pinch of nutmeg or a dash of ginger for warmth. You can also try cardamom for an exotic touch. A little cinnamon can boost the peach flavor too. Just be careful not to overpower the peaches with too many spices. If you want a vegan peach cobbler, you can swap out a few ingredients. Use almond milk or oat milk instead of whole milk. For butter, try coconut oil or a vegan butter substitute. Replace the egg with a flaxseed meal or applesauce for binding. This keeps it tasty and friendly for a vegan diet. For those needing gluten-free options, use a gluten-free flour blend instead of all-purpose flour. Make sure to check that your baking powder is gluten-free too. This way, you can still enjoy a warm, comforting cobbler without gluten. You can find a full recipe that accommodates these changes to suit your needs. To keep your peach cobbler fresh, let it cool first. Then, cover it tightly with plastic wrap or aluminum foil. You can also use an airtight container. Store it in the fridge for up to four days. This method helps retain moisture and flavor. When you’re ready to enjoy it again, it’s time to reheat. Preheat your oven to 350°F (175°C). Place the cobbler in an oven-safe dish. Heat it for about 15-20 minutes. This warms it evenly and keeps the topping crisp. If you want to save some for later, freezing is a great option. First, let the peach cobbler cool completely. Cut it into serving sizes. Wrap each piece in plastic wrap, then place them in a freezer-safe bag. This can last up to three months in the freezer. When you’re ready to eat it, take it out of the freezer. Place it in the fridge to thaw overnight. If you're in a hurry, you can use the microwave. Heat it on low in short bursts until warmed through. Enjoy your peachy paradise cobbler whenever you crave it! For the full recipe, refer back to the Peachy Paradise Cobbler section. Can I use frozen peaches for cobbler? Yes, you can use frozen peaches. Just thaw them first. Drain the extra juice to avoid a soggy cobbler. How can I make my peach cobbler less sweet? To reduce sweetness, cut back on the sugar. Use only 1/2 cup instead of 1 cup. You can also add more lemon juice to balance the flavors. What is the difference between cobbler and crumble? A cobbler has a soft biscuit-like topping. A crumble has a crumbly topping made with flour, butter, and sugar. Cobblers are usually fruitier and more cake-like. Why is my cobbler soggy? A soggy cobbler often comes from too much juice in the fruit. Make sure to drain excess liquid. Let the peaches sit with sugar for 10 minutes to help. How do I know when the cobbler is done? Your cobbler is done when the top is golden brown and the edges bubble. A toothpick should come out clean when poked in the center. For more tips, check out the Full Recipe for my Peachy Paradise Cobbler! This blog post covered everything you need for a delicious peach cobbler. We discussed ingredients, step-by-step instructions, and even tips for the best texture. I shared fun variations and storage info to keep your cobbler fresh. Remember, the right peaches make a big difference. As you bake, don’t be afraid to experiment. Each tweak can lead to new flavors. Enjoy making your peach cobbler and sharing it with loved ones!

Fresh Peach Cobbler Irresistible Summer Dessert Recipe

Summer is the perfect time to enjoy fresh peaches, and there’s no better way to savor this juicy fruit than

To make a scrumptious crustless squash pie, you need these main ingredients: - 2 cups butternut squash, roasted and pureed - 1 cup creamy cottage cheese - 3 large eggs, at room temperature - 1/2 cup finely grated Parmesan cheese - 1/4 cup all-purpose flour - 1 teaspoon ground nutmeg - 1 teaspoon ground cinnamon - 1/4 teaspoon sea salt - 1 teaspoon pure vanilla extract These ingredients form the base of your pie. The roasted butternut squash gives it a sweet and rich flavor. The cottage cheese adds creaminess, while eggs help with texture. You can add a few optional ingredients to elevate the taste: - 1 tablespoon pure maple syrup (for added sweetness) - Fresh herbs for garnish (thyme or parsley work beautifully) The maple syrup offers a touch of sweetness, while herbs add color and freshness. Both enhance your crustless pie. This crustless squash pie is not only tasty but also nutritious. Here’s a quick look at its benefits: - Butternut squash is high in vitamins A and C, which support your immune system. - Cottage cheese provides protein and calcium, good for bone health. - Eggs offer essential nutrients like choline and vitamin D. Each slice is packed with flavors and health benefits, making it a smart choice for any meal. You can find the full recipe within this guide for a detailed cooking experience. Start by gathering your ingredients. You will need: - 2 cups butternut squash, roasted and pureed - 1 cup creamy cottage cheese - 3 large eggs, at room temperature - 1/2 cup finely grated Parmesan cheese - 1/4 cup all-purpose flour - 1 teaspoon ground nutmeg - 1 teaspoon ground cinnamon - 1/4 teaspoon sea salt - 1 teaspoon pure vanilla extract - 1 tablespoon pure maple syrup (optional) - Fresh herbs for garnish Next, preheat your oven to 350°F (175°C). This step is key for even cooking. Lightly grease a 9-inch pie dish with butter or cooking spray. This will help your pie come out easily after baking. In a large bowl, mix the roasted butternut squash puree with the creamy cottage cheese. You can use a whisk or a hand mixer. Blend until it is smooth and creamy. This will be the base of your pie. Now, crack the eggs into a separate bowl. Add them one at a time to the squash mixture. Make sure to beat well after each egg. This helps the eggs mix in well. Gently fold in the rest of your ingredients: Parmesan cheese, all-purpose flour, nutmeg, cinnamon, sea salt, vanilla, and maple syrup if you want it sweeter. Stir until the batter is even and without lumps. Pour the mixture into your greased pie dish. Use a rubber spatula or the back of a spoon to smooth the top. This helps with the final look of your dish. Place the pie dish in the preheated oven. Bake for 40-45 minutes. The center should be set, and a toothpick inserted should come out clean. The top should look slightly golden. Once your pie is baked, carefully take it out of the oven. Let it cool for about 10 minutes. This makes it easier to slice. You can serve the pie warm or at room temperature. For a lovely touch, garnish the top with fresh herbs. This adds color and flavor. If you like, drizzle a bit more maple syrup on the slices right before serving. Enjoy your delicious Crustless Squash Pie! When making crustless squash pie, many people overlook the quality of the squash. Use fresh, ripe butternut squash for the best taste. Another mistake is not measuring ingredients accurately. Too much or too little can change the pie's texture. Avoid rushing the mixing process. Blend until smooth; lumps can ruin your dish. Lastly, don’t skip letting it cool before slicing. This helps it set up nicely. Roasting squash brings out its natural sweetness. Start by cutting the squash in half and removing the seeds. Brush the cut sides with olive oil and sprinkle with salt. Place it cut-side down on a baking sheet lined with parchment paper. Roast at 400°F (200°C) for about 25 to 30 minutes. Check for tenderness with a fork. Let it cool before pureeing for your pie. The key to a creamy texture is the cottage cheese. Make sure it’s smooth before mixing it with the squash. Blend them well with a whisk or mixer. The eggs also play a vital role in binding the ingredients. Use room temperature eggs, as they mix better. Lastly, fold in the flour gently to avoid over-mixing. A smooth batter will give you a fluffy pie. For the full recipe, check the instructions above. {{image_4}} You can easily change up your crustless squash pie with seasonal ingredients. In fall, use pumpkin instead of butternut squash. For spring, try zucchini or yellow squash. These swaps keep your dish fresh and exciting. Seasonal veggies also add unique flavors and textures. If you need a dairy-free option, swap cottage cheese for silken tofu. It creates a creamy base without the dairy. For a gluten-free version, replace all-purpose flour with almond flour or oat flour. Both will give your pie a nice texture without gluten. You can adjust the flavor to suit your taste. Want a bit of heat? Add a pinch of cayenne pepper or red pepper flakes. For a sweet twist, mix in some chopped apples or pears. Experiment with different herbs, like sage or rosemary, for a new flavor profile. After enjoying your crustless squash pie, store leftovers in the fridge. Let the pie cool to room temperature first. Then, cover it tightly with plastic wrap. You can also place it in an airtight container. This way, it stays fresh for up to 4 days. If you want to keep it longer, freezing is a great option. To reheat your pie, preheat your oven to 350°F (175°C). Place the pie in a baking dish and cover it with foil to prevent drying out. Heat for about 15-20 minutes or until warm. You can also use the microwave, but the oven keeps the texture better. Just heat it in 30-second intervals until it's warm. If you want to freeze the pie, slice it first. Wrap each piece in plastic wrap, then place them in a freezer bag. This method makes it easy to grab a slice later. You can freeze it for up to 3 months. When you're ready to eat, thaw in the fridge overnight before reheating. This keeps the flavors and texture intact, giving you a delicious slice whenever you crave it. To make crustless squash pie, follow these simple steps: 1. Preheat your oven to 350°F (175°C). 2. Grease a 9-inch pie dish with butter or spray. 3. Mix 2 cups of roasted butternut squash puree with 1 cup of creamy cottage cheese until smooth. 4. Add 3 large eggs, one at a time, mixing well after each. 5. Fold in 1/2 cup of grated Parmesan, 1/4 cup of flour, 1 teaspoon of nutmeg, 1 teaspoon of cinnamon, 1/4 teaspoon of salt, 1 teaspoon of vanilla extract, and 1 tablespoon of maple syrup (if you want it sweeter). 6. Pour this mixture into your pie dish. 7. Bake for 40-45 minutes until set and golden. 8. Let it cool for 10 minutes before slicing. Enjoy! For the full recipe, check the provided details. Yes, you can use other squash varieties! While butternut squash is popular, you can also try: - Acorn squash - Pumpkin - Delicata squash Each type will give a unique flavor and texture. Just roast and puree them as you would butternut squash. Crustless squash pie pairs well with various sides. Here are some tasty options: - Green salad with vinaigrette - Sautéed greens like kale or spinach - Roasted vegetables for added nutrition - A dollop of Greek yogurt or sour cream for creaminess These sides will enhance the flavors of your pie and create a balanced meal. This blog covered all you need to know about making crustless squash pie. You learned about key ingredients, baking steps, and ways to avoid common mistakes. We discussed variations for different tastes and how to store leftovers properly. Ultimately, this dish is simple, healthy, and adaptable. Now, you can impress your family and friends with your pie-making skills. Enjoy creating your own delicious crustless squash pie!

Crustless Squash Pie Tasty and Simple Recipe Guide

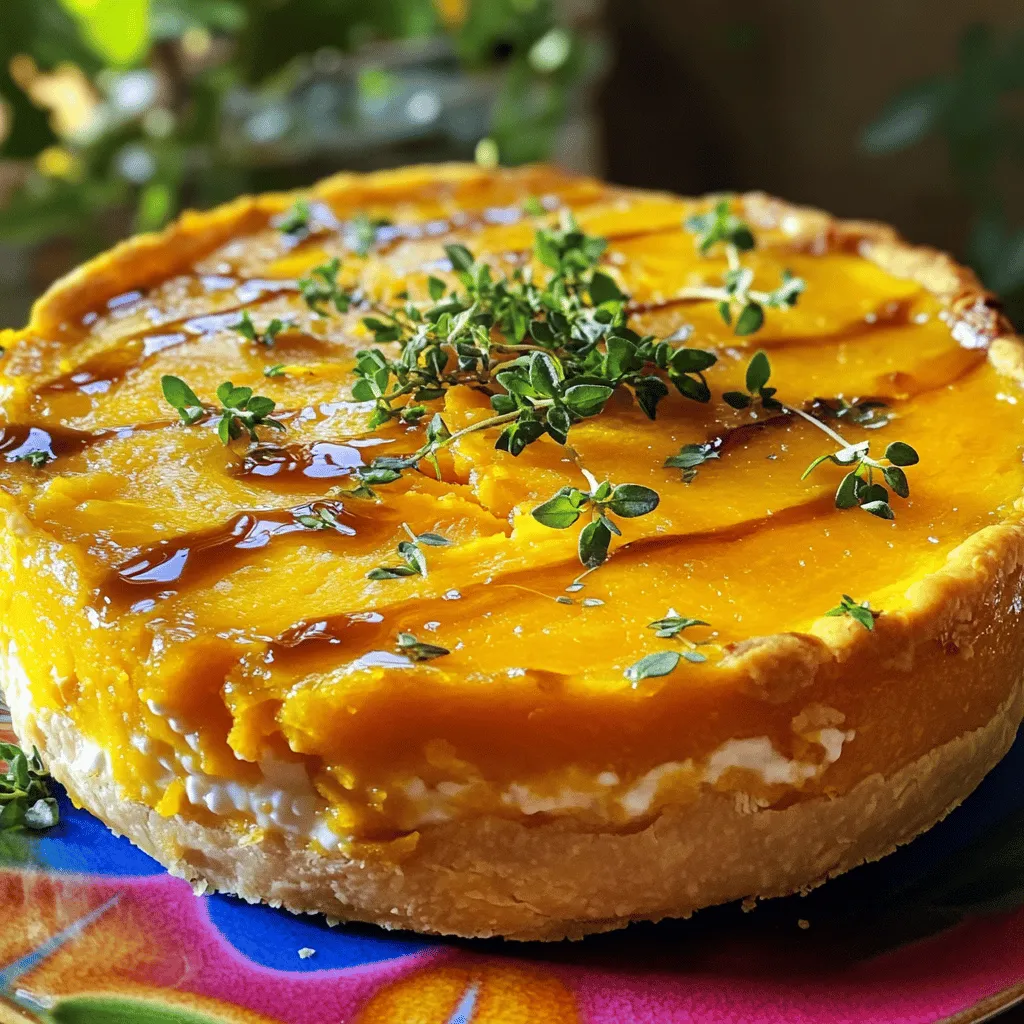
If you’re looking for a quick, tasty dish, you’ve come to the right place! This Crustless Squash Pie is simple

- 4 ripe peaches, peeled and pitted - 1 cup granulated sugar - 1 tablespoon freshly squeezed lemon juice - 1 cup water - A pinch of sea salt Choose ripe peaches for the best flavor. They should smell sweet and feel slightly soft. Avoid hard peaches, as they may lack taste. You can adjust the sugar based on your peach sweetness. If your peaches are very sweet, you can use less sugar. Fresh lemon juice brightens the taste and balances the sweetness. Keep it simple and fresh for the best results. The quality of your peaches is key. Use local, in-season peaches when possible. They have the best flavor and texture. Always look for peaches with no bruises or blemishes. Organic peaches can be a great choice too. They often taste better and are free from harmful chemicals. Remember, the peach is the star of your sorbet, so pick wisely! To start, wash your ripe peaches under cool water. Next, peel the peaches and remove the pits. Slice them into smaller pieces. This makes it easier for your blender. I love using ripe peaches for the best flavor. Their sweetness will shine in the sorbet. Now it’s time to blend. Place the peach slices in a high-speed blender or food processor. Add the cup of granulated sugar, lemon juice, and a pinch of sea salt. Pour in the water, then blend on high. You want the mixture to be smooth and creamy. If you find it needs more sweetness, add more sugar slowly. Blend again after each addition until it's perfect for your taste. Once your mixture is ready, transfer it to a shallow dish. Cover it with plastic wrap to avoid freezer burn. Place the dish in the freezer for 4 to 6 hours. When it’s hard, take it out and let it sit for 10 minutes at room temperature. This helps soften it for easier scooping. Use a fork to scrape the frozen mixture. This creates a fluffy texture for your sorbet. Finally, scoop it into chilled bowls or cones and enjoy! For the full recipe and precise measurements, check the [Full Recipe]. To get the best texture for your peach sorbet, aim for smoothness. Blend the peaches until there are no chunks left. This makes your sorbet creamy. If the mixture feels too thick, add a splash more water. Freezing time is key too. I recommend freezing it for 4 to 6 hours. If it’s too hard, let it sit out for 10 minutes before scooping. Scraping with a fork helps fluff it up and adds air. This creates a light and enjoyable sorbet. Taste is everything! After blending, take a moment to taste your peach mixture. If you want it sweeter, add more sugar, one tablespoon at a time. Blend well after each addition. For a zing, add more lemon juice. This balances the sweetness and enhances the peach flavor. You can also try adding a splash of vanilla extract for depth. Experiment to find what you love the most! When serving your sorbet, presentation matters. Use chilled bowls to keep it cool longer. Garnish with fresh peach slices and a sprig of mint for a pop of color. If you want to be fancy, serve in cones. This adds a fun twist! Enjoy your sorbet right away for the best flavor and texture. For a creative touch, pair it with cookies or a light cake. If you want the full recipe, check it out to make this delightful dessert! {{image_4}} You can switch up the peaches for other fruits. Try ripe mangoes for a tropical twist. Berries like strawberries or blueberries also work well. Each fruit gives a unique flavor. Just keep the same amount as peaches in the recipe. If you want less sugar, use honey or maple syrup. These natural sweeteners add depth. You can also use stevia or agave for a low-calorie option. Adjust the amount based on your taste. Taste as you mix for the best result. The peach sorbet is already vegan and dairy-free. It uses no milk or cream. If you want to add creaminess, try coconut milk. This will give the sorbet a rich texture. Just replace the water with coconut milk in the recipe. You can enjoy a creamy, dreamy sorbet! To keep your peach sorbet fresh, use an airtight container. This helps prevent freezer burn. Make sure to cover the top with plastic wrap before sealing. This extra layer protects the sorbet from air. Store it in the coldest part of your freezer for best results. Peach sorbet can last up to two weeks in the freezer. After that, it might lose its flavor and texture. The sugar in the sorbet acts as a preservative. But, for the best taste, try to enjoy it within the first week. If your sorbet has softened, you can re-freeze it. Scoop the softened sorbet into a bowl and mix it well. This helps break up ice crystals. Then, place it back in the container. Seal it tightly and freeze again. Allow a few hours for it to harden. Enjoy your creamy treat! For the full recipe, check the link above. To stop ice crystals, you need to blend well. Smoothness helps create a creamy texture. After mixing, freeze it in a shallow dish. This method speeds up freezing. Check it every hour and stir it. This breaks up ice crystals. Yes, frozen peaches work great! They save time and still taste good. Just let them thaw a little. Then blend the softened peaches with sugar and lemon juice. This way, you still get a tasty sorbet. Peach sorbet can melt fast. It has a light texture that won't hold up long. Serve it in chilled bowls to help it stay cool. If it starts melting, just enjoy it quickly. The flavor is worth it! For the full recipe, check out the luscious peach sorbet details above. This article covered how to make delicious peach sorbet from scratch. We talked about key ingredients, prep steps, and how to blend and freeze the mix. You learned tips for perfect texture and flavor, plus fun variations. Storing your sorbet properly keeps it fresh and tasty. In the end, making sorbet is simple and fun. Try different fruits and enjoy!

Perfect Peach Sorbet Easy Frozen Dessert Recipe

Are you ready to enjoy the sweetest, juiciest peach sorbet you’ve ever tasted? This easy frozen dessert recipe will show

Here is what you need for my best zucchini bread: - 2 medium zucchinis, grated (about 2 cups) - 1 cup all-purpose flour - 1 cup whole wheat flour - 1 teaspoon baking soda - ½ teaspoon baking powder - ½ teaspoon salt - 2 teaspoons ground cinnamon - ½ teaspoon ground nutmeg - ½ cup honey - ½ cup vegetable oil - 2 large eggs - 1 tablespoon vanilla extract - 1 cup chopped walnuts (optional) - ½ cup raisins or chocolate chips (optional) Choosing fresh ingredients is key for great zucchini bread. Here are some tips: - Zucchini: Look for firm, shiny zucchinis. They should be medium-sized, not too large. Large zucchinis have more seeds and less flavor. - Flour: Use good-quality all-purpose flour for a light texture. Whole wheat flour adds extra fiber and a nutty taste. - Honey: Choose pure honey for the best flavor. It gives the bread a nice sweetness. - Spices: Fresh spices make a big difference. Ground cinnamon and nutmeg enhance the flavor and aroma. Adding mix-ins can boost flavor and texture. Here are some popular options: - Walnuts: These add a crunchy texture and healthy fats. They also provide a rich, earthy flavor. - Raisins: They bring natural sweetness and chewiness. You can use golden or regular raisins. - Chocolate Chips: For a sweet twist, mix in semi-sweet or dark chocolate chips. They melt beautifully and create a rich taste. For the full recipe, refer to the details above. Enjoy baking your delicious zucchini bread! Start by gathering all your ingredients. You need two medium zucchinis, all-purpose flour, whole wheat flour, baking soda, baking powder, salt, cinnamon, nutmeg, honey, vegetable oil, eggs, and vanilla extract. You can also add walnuts, raisins, or chocolate chips if you like. 1. Preheat your oven to 350°F (175°C). Grease a 9x5 inch loaf pan or line it with parchment paper. This helps with easy removal later. 2. In a big bowl, mix the grated zucchini, honey, vegetable oil, eggs, and vanilla extract. Whisk these until smooth and mixed well. 3. In another bowl, combine the all-purpose flour, whole wheat flour, baking soda, baking powder, salt, cinnamon, and nutmeg. Whisk until no lumps remain. 4. Slowly fold the dry mix into the wet ingredients. Stir gently. It’s okay if the batter has small lumps. 5. If you want to add walnuts or raisins or chocolate chips, fold them in now. Make sure they spread evenly in the batter. Pour the batter into your prepared loaf pan. Use a spatula to make the top flat. This ensures even baking. 1. Place the loaf pan in the preheated oven. 2. Bake for 50 to 60 minutes. Keep an eye on it as it bakes. To check if the zucchini bread is done, use a toothpick. Insert it into the center of the bread. If it comes out clean, your bread is ready. 1. If it needs more time, bake for another 5 minutes and check again. 2. After baking, let the bread cool in the pan for about 10 minutes. Then, move it to a wire rack to cool completely before slicing. You can follow the Full Recipe for more details on the process. Enjoy your delicious zucchini bread! One common mistake is using wet zucchini. Always squeeze out excess water before grating. This helps your bread rise and keeps it from being too soggy. Another mistake is over-mixing the batter. Mix just enough to combine ingredients. Lumps are okay! Lastly, don’t skip the baking soda or baking powder. They help your bread rise and become fluffy. To get a great texture, use a mix of all-purpose and whole wheat flour. This blend gives a nice balance of lightness and heartiness. Avoid over-baking! Check your bread at the 50-minute mark. You want it moist and tender, not dry. If the top gets too brown, cover it loosely with foil during baking. To enhance the flavor, add spices like nutmeg and cinnamon. These spices warm up your bread's taste. You can also mix in nuts or chocolate chips for extra crunch and sweetness. Try adding a splash of orange juice or zest for a fresh twist. The more you experiment, the more delicious your zucchini bread will be. For the full recipe, check the section above. {{image_4}} You can make your zucchini bread more fun with nuts and fruits. I love adding chopped walnuts. They give a nice crunch and taste. You can also mix in raisins for sweetness. Chocolate chips are a great choice too if you want a treat. Just fold them in gently to the batter so they spread evenly. Feel free to try different nuts or even seeds. Almonds or pecans can work well too. If you want to switch things up, consider using different sweeteners. Honey is great, but you can also use maple syrup. It adds a unique flavor that pairs well with zucchini. If you prefer a lower-calorie option, try using stevia or monk fruit sweetener. These can keep the bread sweet without the extra sugar. Just remember to adjust the amount based on the sweetener you use, as some are sweeter than others. For those who need gluten-free options, you can easily adapt this recipe. Substitute all-purpose flour with a gluten-free flour mix. Many blends work well in baking. You can also use almond flour or coconut flour, but note that they may change the texture. If you use coconut flour, reduce the amount since it absorbs more liquid. Always check that your other ingredients, like baking powder, are gluten-free too. This way, everyone can enjoy your delicious zucchini bread! For the full recipe, be sure to check out the irresistible honey glazed zucchini bread recipe. To keep your zucchini bread fresh, store it in an airtight container. You can also wrap it tightly in plastic wrap. Make sure it cools completely before storing. This step helps prevent sogginess. Place your container in a cool, dry spot. It will stay fresh for about 3 to 5 days at room temperature. If you want to save your zucchini bread for later, freezing is a great option. First, let the bread cool completely. Then, slice it into pieces. Wrap each slice in plastic wrap or aluminum foil. Put the wrapped slices in a freezer bag. This method keeps them fresh for about 2 to 3 months. When ready to enjoy, thaw the slices at room temperature or in the microwave. If your zucchini bread feels dry after storage, don't worry! You can easily revive it. Simply sprinkle a few drops of water on the slices. Then, wrap them in a damp paper towel. Microwave them for about 10 to 15 seconds. This process adds moisture back into the bread. Now, it tastes fresh again! Yes, you can use other flours in this zucchini bread. Try almond flour for a gluten-free option. Coconut flour is another great choice, but use less due to its high absorbency. If you want a lighter texture, cake flour works well too. Just keep in mind that the flavor and texture may change with different flours. Many spices add depth to zucchini bread. Consider using cardamom for a warm, floral note. Ginger adds a nice kick, while allspice brings a hint of sweetness. You can also try adding a bit of cloves for a spicier flavor. Feel free to mix and match spices to create your own unique taste! To check if your zucchini bread is done, insert a toothpick into the center. If it comes out clean, your bread is ready. If it has wet batter on it, bake for a few more minutes. It's okay to have a few crumbs on the toothpick, but no wet batter. This ensures a nice, moist bread without being undercooked. This blog covers all you need for great zucchini bread. You learned about choosing the best ingredients and ways to mix in fun extras. I shared clear steps for preparation and baking, plus tips to avoid common mistakes. You can explore tasty variations, like different sweeteners and nuts. Finally, I provided storage tips to keep your bread fresh. With these skills, you’ll make delicious zucchini bread every time. Enjoy baking, and let your creativity shine!

Best Zucchini Bread Recipe Simple and Flavorful Tips

If you love moist, sweet, and healthy snacks, zucchini bread is for you! This simple recipe is packed with flavor

To make this delightful peach cobbler, gather these simple ingredients: - 4 cups fresh ripe peaches, sliced (or 2 cans of sliced peaches, drained) - 1 cup granulated sugar, divided - 1 teaspoon ground cinnamon - 1 teaspoon pure vanilla extract - 1 tablespoon freshly squeezed lemon juice - 1 cup all-purpose flour - 1 1/2 teaspoons baking powder - 1/2 teaspoon fine salt - 1 cup whole milk - 1/2 cup unsalted butter, melted Using fresh peaches makes this dessert shine. Fresh peaches have a vibrant taste and juicy texture. Look for ripe, fragrant peaches with no bruises. If fresh peaches aren't available, canned peaches can work too. Just make sure they are packed in water or juice, not syrup. Drain them well to avoid extra liquid in your cobbler. This recipe is flexible. If you need to avoid dairy, replace whole milk with almond milk or oat milk. For gluten-free options, use a gluten-free flour blend instead of all-purpose flour. If you have a sugar restriction, consider using a sugar substitute like monk fruit sweetener. These swaps keep the cobbler tasty and friendly for everyone! To start, wash and slice your peaches. If you use canned peaches, drain them well. In a bowl, combine the sliced peaches with half a cup of sugar, ground cinnamon, vanilla extract, and lemon juice. Toss gently so all the peaches coat well. Set this mix aside. Letting them sit for ten minutes helps the flavors blend. In a clean bowl, whisk together the flour, baking powder, salt, and the remaining half cup of sugar. Mix until there are no lumps. Slowly pour in the whole milk and melted butter. Stir gently until just combined. It’s fine if a few lumps remain. This batter will create a light and fluffy base for your cobbler. Pour the batter into a greased 9x13-inch baking dish. Spread it evenly with a spatula. Next, add the marinated peaches right on top. Spoon them out gently to keep the layers. Do not stir! Bake in a preheated oven at 350°F (175°C) for 35 to 40 minutes. Look for a golden brown top, and check with a toothpick; it should come out clean. Enjoy your warm peach cobbler! For the full recipe, check the earlier section. To make sure your peach cobbler bakes evenly, preheat your oven to 350°F (175°C). This step is key. Use a 9x13-inch baking dish to hold all the goodness. Grease it well to prevent sticking. Spread the batter evenly across the bottom. Then, layer the marinated peaches on top without stirring. This keeps the layers nice and distinct. You can make your cobbler even tastier with simple tweaks. Try adding a pinch of nutmeg for warmth. A dash of almond extract can bring a lovely nutty flavor. For a twist, mix in some fresh ginger for a zesty kick. Don’t be afraid to experiment with spices that you love! One common mistake is overmixing the batter. A few lumps are okay! Also, don’t forget to let the peaches marinate. This lets them soak up flavors. Lastly, avoid opening the oven door too soon. This can cause your cobbler to sink. Follow these tips for a perfect peach cobbler every time! {{image_4}} You can swap peaches for other fruits. Try fresh or frozen berries, like blueberries or raspberries. Apples and pears work well too. Each fruit gives a new taste and texture. Mixing fruits can also add great flavor. A berry-peach blend, for example, is a delightful twist! To make this cobbler gluten-free, use almond or coconut flour instead of all-purpose flour. These flours give a nice nutty flavor. You can also find gluten-free baking mixes. Just follow the instructions on the package. This way, you enjoy peach cobbler without gluten! You can make this peach cobbler lighter. Use less sugar, or swap it for honey or maple syrup. Try unsweetened almond milk for a dairy-free option. You can also add oats for extra fiber. These changes keep the taste great while making it healthier! For the full recipe, check out the Delightfully Simple Peach Cobbler section. After you enjoy your peach cobbler, store the leftovers in an airtight container. This keeps the cobbler fresh for up to three days. If you leave it uncovered, it will dry out. You can also cover the dish with plastic wrap or foil. Remember to let it cool before storing. To reheat your peach cobbler, use the oven for the best results. Preheat your oven to 350°F (175°C). Place the cobbler in an oven-safe dish. Heat for about 15-20 minutes until warm. If you want a softer texture, cover it with foil. You can also use the microwave for quick heating. Heat in short bursts of 30 seconds, checking often. If you want to freeze your peach cobbler, it’s easy! First, let it cool completely. Then, wrap it tightly in plastic wrap. After that, place it in an airtight container or a freezer bag. This will keep it fresh for up to three months. When you're ready to enjoy it, thaw it in the fridge overnight. Then, reheat in the oven as mentioned above. This method works well to preserve the flavors and texture. Yes, you can use frozen peaches. Just thaw them first and drain any excess juice. This keeps the cobbler from being too watery. Frozen peaches are a great option when fresh ones are not in season. Your peach cobbler is done when the top is golden brown. You can also do the toothpick test. Insert a toothpick into the center; if it comes out clean, it’s ready to enjoy! Peach cobbler is fantastic on its own, but you can enhance it. Serve it warm with vanilla ice cream or whipped cream. A sprinkle of cinnamon adds a nice touch too! Yes, you can make peach cobbler ahead of time. Just prepare it and store it in the fridge before baking. When you’re ready, bake it fresh. This way, you get that warm, delightful taste whenever you want! For the full recipe, check out the instructions above. In this post, we explored how to make a delicious peach cobbler. We covered the best ingredients, prep steps, and baking tips. I shared ways to enhance flavors and avoid common mistakes. You can also adapt the recipe to suit different diets or preferences. Peach cobbler is versatile and easy to make. With proper storage, you can enjoy it multiple times. Armed with this knowledge, you are ready to create your own perfect peach cobbler. Happy baking!

Super Easy Peach Cobbler Delightful Fresh Dessert

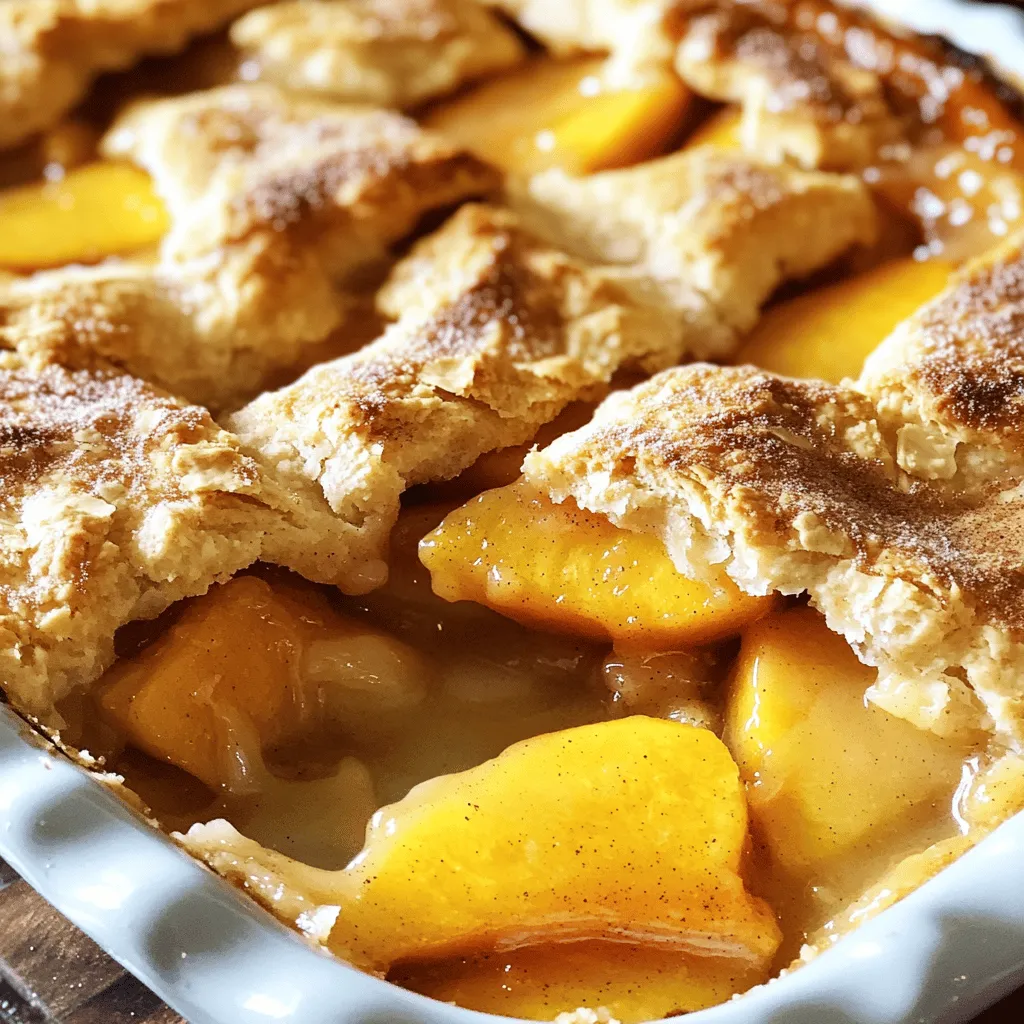
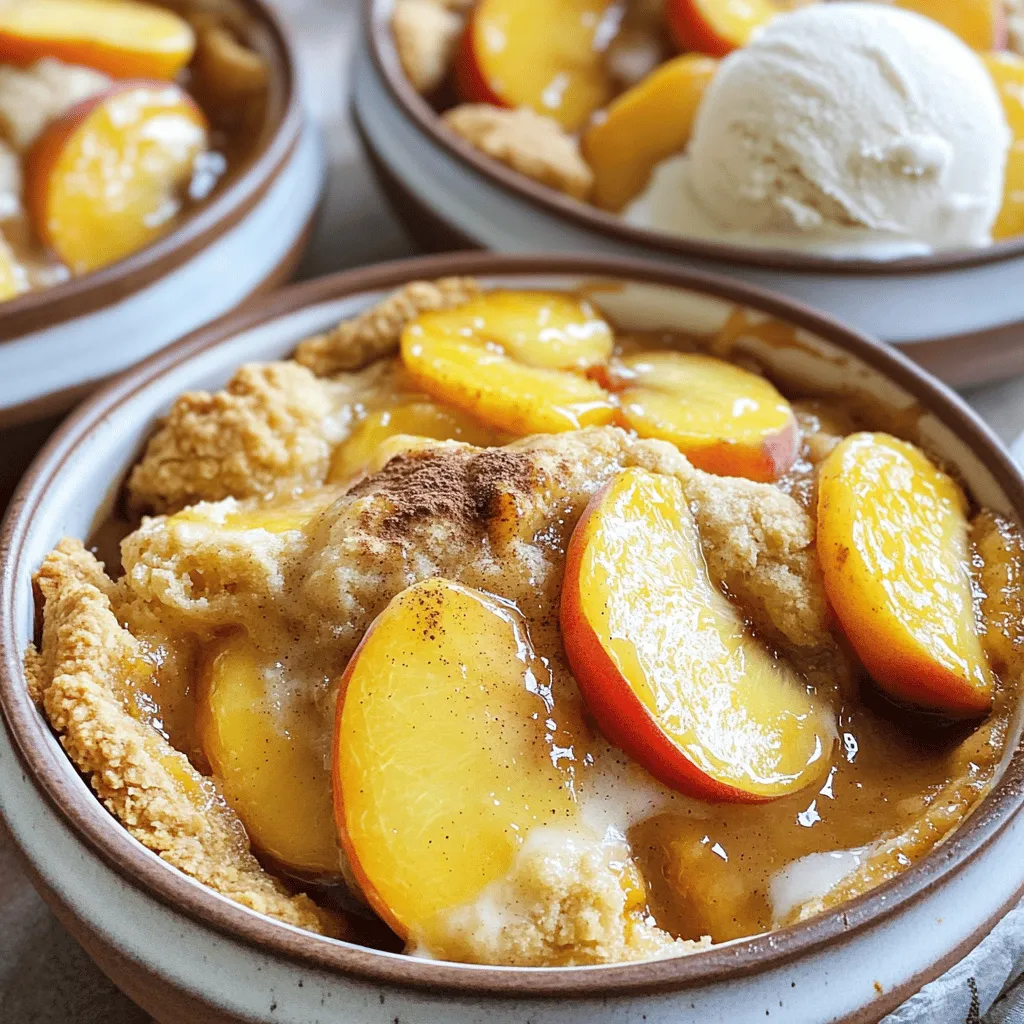
Looking for a delicious, simple dessert? You’ve found it! My Super Easy Peach Cobbler is perfect for any occasion. Juicy

- Ripe mangoes - Fresh avocados - Red onion and jalapeño - Cilantro and lime juice - Olive oil and seasoning Selecting the perfect mango Look for mangoes that feel slightly soft when you press them. A ripe mango will have a sweet aroma and a vibrant color. If you find green or hard mangoes, let them ripen at room temperature for a few days. Choosing ripe avocados Avocados should yield gently to pressure. If they feel very soft, they may be overripe. A ripe avocado looks dark and has a slight shine. If you buy them hard, let them sit on your counter for a few days. Fresh herbs and spices Always choose fresh herbs for your salsa. They add bright flavors that dried herbs cannot match. For cilantro, look for bright green leaves without any wilting. Fresh jalapeños should feel firm and have a shiny skin. Using these quality ingredients will make your Mango Avocado Salsa sing with flavor. For the full recipe, check out the detailed instructions above! First, I start by dicing the mango. Choose a ripe mango; it should feel slightly soft. Cut off the sides of the pit, then score the flesh into small cubes. Use a spoon to scoop them out easily. Next, I prepare the avocados. I slice them in half, remove the pit, and scoop out the flesh. I dice the avocado into small pieces, taking care not to mash it. Now, I chop the red onion. I use a small knife to finely chop it. The onion adds a sweet crunch. For the jalapeño, I slice it in half and remove the seeds. I mince it into tiny pieces. This step is key for adding some heat. Adjust the amount based on your spice tolerance. In a medium bowl, I combine the diced mango and avocado. Gently mix these two to keep the avocado's creamy texture. Next, I add the chopped red onion and minced jalapeño to the bowl. I mix carefully to avoid mashing anything. Then, I sprinkle fresh cilantro over the top. This herb brings a bright taste to the salsa. In a small bowl, I whisk together the lime juice and olive oil. I want this mixture well combined before I drizzle it over the salsa. Now, I carefully toss all the ingredients using a large spoon. I make sure everything is mixed well but avoid over-mashing the avocado. To finish, I season the salsa with salt and freshly cracked black pepper. I taste it and adjust the seasoning as needed. Finally, I let the salsa rest for about 10 minutes. This time allows the flavors to meld beautifully. If you want the full recipe, check out the [Full Recipe]. You can easily boost the heat of your mango avocado salsa. Just add extra jalapeño. Start with half a pepper, then taste and adjust. For a sweeter twist, try adding honey or agave syrup. This will balance the flavors and make it more delicious. Serve your salsa in a bright bowl. The colors will catch the eye. Garnish with fresh cilantro leaves on top. This adds a nice touch. Pair it with crispy tortilla chips for dipping. You can also use it as a topping for grilled chicken or fish. It makes any meal feel special. To keep your salsa fresh, store it in an airtight container. Place it in the fridge right after serving. It can stay good for up to two days. If the avocado starts to brown, mix it well before serving again. This will help it look and taste fresh. For the full recipe, check out the recipe link above. {{image_4}} You can add a fun twist to your mango avocado salsa. Try adding diced pineapple or kiwi for a sweet burst. Pineapples add juicy sweetness, while kiwi brings a tangy zing. Both fruits brighten the dish and enhance its tropical vibe. Incorporating black beans also adds a hearty touch. Black beans provide protein and fiber, making your salsa more filling. They pair well with the sweetness of mango and creaminess of avocado. Changing herbs can transform your salsa. Try using fresh basil or mint instead of cilantro. Basil gives a sweet, aromatic flavor. Mint adds a refreshing note, perfect for summer dishes. You can also add diced tomatoes or corn for extra texture. Tomatoes bring juiciness, while corn adds a sweet crunch. Both enhance the overall flavor and make your salsa even more colorful. Making your salsa vegan is easy. The recipe is already free of animal products. You can also make it gluten-free by ensuring your ingredients are certified gluten-free. For a low-sodium version, skip the added salt. The natural flavors from the fruits and lime juice shine through. You can also use a salt substitute if you prefer. Feel free to explore these variations and find what you love most! For the full recipe, check out the delicious details. Mango Avocado Salsa is fresh and fun. This salsa pairs well with many dishes. Here’s what you need: - 1 perfectly ripe mango, diced into small cubes - 2 ripe avocados, peeled, pitted, and diced - 1 small red onion, finely chopped for sweetness - 1 jalapeño pepper, seeded and minced (adjust spice level) - 1/4 cup fresh cilantro leaves, chopped coarsely - Juice of 1 fresh lime for tanginess - 1 tablespoon high-quality extra virgin olive oil - Salt and freshly cracked black pepper to taste Prep Time: 15 minutes Total Time: 25 minutes Servings: 4-6 You’ll start by mixing the mango and avocado gently. Then, add the onion and jalapeño. Next, sprinkle in the cilantro. In a small bowl, whisk lime juice with olive oil. Drizzle this over the salsa and toss it together. Finally, season with salt and pepper to taste. Let the salsa rest for 10 minutes before serving to blend the flavors. Each serving has about 120 calories. This salsa is low in fat but high in flavor. It is rich in vitamins A and C, which help boost your immune system. You’ll also benefit from healthy fats found in avocados, which support heart health. Plus, fresh cilantro adds antioxidants for a healthy kick. Enjoy this tasty dish knowing it’s good for you! You can store Mango Avocado Salsa for about 1 to 2 days in the fridge. To keep it fresh, place it in an airtight container. This helps prevent browning. The lime juice does slow down browning a bit, but it will still happen. If you notice browning, just give it a gentle stir. Yes, you can make Mango Avocado Salsa a few hours ahead. Just prepare it and cover it tightly. If you make it too early, the avocado may brown. To avoid this, you can store the diced mango and avocado separately. Combine them just before serving for the best taste and look. Mango Avocado Salsa pairs well with many dishes. Here are a few ideas: - Serve it with crispy tortilla chips for a tasty snack. - Use it as a topping for grilled chicken or fish. - Add it to tacos or burritos for a fresh twist. - Mix it into a salad for a colorful addition. This salsa adds flavor and color to any meal! In this guide, we discussed how to make Mango Avocado Salsa using fresh ingredients like ripe mangoes, avocados, and herbs. I shared tips for picking quality ingredients to get the best flavors. You learned step-by-step methods for preparation and mixing. We also covered storing tips, flavor enhancements, and fun variations. This salsa is adaptable and easy to make. Enjoy it on tacos, with chips, or as a salad! The key is using fresh produce. I hope this encourages you to create your own unique salsa blend.

Mango Avocado Salsa Fresh and Flavorful Delight

Are you ready to dive into a fresh and zesty treat? Mango Avocado Salsa is the perfect blend of sweet

- 1 lb (450g) boneless chicken breast - 1 can (14 oz) coconut milk - 2 tablespoons red curry paste - 1 tablespoon coconut oil - 1 medium onion, diced - 1 bell pepper, sliced - Fresh cilantro, chopped - Cooked jasmine rice Gathering the right ingredients makes cooking fun. You need fresh chicken for best taste. The coconut milk gives the curry a creamy texture. Red curry paste adds heat and flavor. Use coconut oil to sauté the onion. It adds a nice richness. The bell pepper brings color and crunch. You can pick any color you like. For serving, chop some fresh cilantro for garnish. It adds a nice pop of green. Jasmine rice makes the perfect base. It soaks up all the delicious curry sauce. For the full recipe, check out the details on how to put it all together. 1. First, heat 1 tablespoon of coconut oil in a large skillet over medium heat. 2. Next, add 1 medium diced onion. Sauté for about 2-3 minutes until it’s soft. 3. Then, incorporate 3 minced garlic cloves and 1 tablespoon of grated ginger. Cook for 1 more minute until fragrant. 1. Add 1 pound of boneless chicken breast, cut into bite-sized pieces. Cook until no longer pink, about 5-7 minutes. 2. Mix in 2 tablespoons of red curry paste. Stir well to coat the chicken and onion fully. 1. Gradually pour in 1 can of coconut milk and 1 cup of chicken broth. Stir to combine all ingredients. 2. Bring the mixture to a gentle simmer over medium heat. 3. Add sliced bell pepper, zucchini, and snap peas. Simmer for 5-7 minutes until vegetables are tender. 4. Stir in 2 tablespoons of fish sauce, 1 tablespoon of brown sugar, and the juice of 1 lime. Adjust seasoning as needed. 5. Serve hot over cooked jasmine rice and garnish with fresh cilantro. Follow this Full Recipe for precise measurements and detailed steps. Enjoy your cooking! To make your Thai Coconut Curry Chicken shine, start with seasoning. You can adjust the taste with fish sauce or lime juice. Fish sauce adds depth, while lime juice brings brightness. Both can change the flavor greatly. If you find your dish a bit hot, add brown sugar. It will balance the heat and round out the flavors nicely. Choosing the right pan matters. A large skillet or wok works best for this curry. They help cook everything evenly. Remember to simmer the curry after adding all the ingredients. This step is key. Simmering allows the flavors to blend well. It also helps cook the chicken and veggies just right. For a beautiful dish, serve the curry in shallow bowls. This way, the colorful veggies stand out. Place a lime wedge beside each bowl. It adds a nice touch and looks great. You can also garnish with fresh cilantro on top. It gives a pop of green and freshness to your meal. {{image_4}} You can make this dish your own by changing the protein. If you want a vegetarian meal, replace the chicken with tofu. Firm tofu absorbs flavors well and adds a nice texture. You can also use shrimp instead of chicken. Shrimp cooks quickly and adds a sweet taste. For a fun twist, try chickpeas. They add protein and are perfect for a meatless option. Adding different vegetables can change the taste and look of your curry. Bell peppers, zucchini, and snap peas work great. You can also try carrots, spinach, or broccoli. Seasonal veggies like asparagus or eggplant can bring freshness to your dish. Feel free to mix and match based on what you have at home. How spicy do you want your curry? For a mild version, use less red curry paste. Start with one tablespoon and taste as you go. If you like heat, add more curry paste. You can also include fresh chili peppers for an extra kick. Adjusting spice can make this dish perfect for anyone's palate. For the full recipe, check it out [here](#). Store any leftovers in the fridge. Use airtight containers for best results. This keeps the dish fresh. Let the curry cool first to avoid steam buildup. I recommend glass or BPA-free plastic containers. These are safe and easy to clean. You can freeze the curry for meal prep. Make sure it cools completely before freezing. Use freezer-safe containers or bags. Press out as much air as you can. When ready to eat, thaw it in the fridge overnight. Reheat gently on the stove or in the microwave. Stir well to ensure even heating. In the fridge, the curry lasts about three to four days. In the freezer, it can stay good for up to three months. Keep an eye on the color and smell. If it looks or smells off, it’s best to toss it. Enjoy your Thai Coconut Curry Chicken fresh or reheated! You can pair this dish with several tasty sides. Here are some great options: - Steamed jasmine rice - Quinoa for a nutty flavor - Fresh spring rolls for a crunchy bite - A light cucumber salad for a refreshing touch For drinks, I suggest: - A chilled Thai iced tea - Coconut water for a tropical feel - A crisp white wine, like Sauvignon Blanc Yes, you can easily make this dish dairy-free. Just swap the coconut milk with a dairy-free brand. Look for options made from almond or soy milk. For a vegan version, replace the chicken with tofu or chickpeas. This keeps the meal hearty and full of flavor. To ensure your chicken is safe to eat, check the internal temperature. It should reach 165°F (75°C). Use a meat thermometer for best results. You can also look for these signs: - The chicken should be white on the outside. - The juices should run clear, not pink. - The meat should be firm and not rubbery. This blog post covered a delicious Thai coconut curry chicken recipe. We detailed key ingredients, steps for preparation, and tips for enhancing flavor. You learned how to make it your own with variations and storage tips for leftovers. Enjoying this dish is not just about taste; it’s also about experimenting with flavors and ingredients. Dive into your pantry or fridge and create your version. Happy cooking!

Thai Coconut Curry Chicken Tasty and Simple Meal Guide

Looking for a quick, delicious meal that packs a punch? You’re in the right place! My Thai Coconut Curry Chicken

Older posts
Newer posts
← Previous Page1 … Page42 Page43 Page44 … Page92 Next →

dsad

© 2025 recipesstation • Built with GeneratePress

Our Policies

  • Copyright Policy
  • Cookie Policy
  • GDPR Policy
  • Privacy Policy
  • Disclaimer
  • Terms Of Use

More Information

  • Home
  • About
  • Contact
  • Appetizers
  • Dessert
  • Dinner
  • Drinks
©2025, recipesstation About Back To Top