Skip to content
DisclaimerTerms Of UseGDPR PolicyCookie Policy

recipesstation

  • Home
  • Drinks
  • Appetizers
  • Dinner
  • Dessert
  • About
  • Contact
  • Privacy Policy
DisclaimerTerms Of UseGDPR PolicyCookie Policy

Emily

For a tasty Chicken Bacon Ranch Casserole, you need good chicken and pasta. - 2 cups cooked chicken, shredded - 1 cup cooked pasta (penne or rotini works best) Shredded chicken gives the dish a nice texture. The pasta holds the sauce well. The right seasonings and dressings make a big difference in flavor. - 1 cup ranch dressing - 1 cup cream of chicken soup - 1 teaspoon garlic powder - 1 teaspoon onion powder - 1/2 teaspoon black pepper - 1/2 teaspoon salt Ranch dressing adds creaminess and flavor. Cream of chicken soup helps bind everything together. Toppings add fun and crunch to your casserole. - 1 cup shredded cheddar cheese - 1/2 cup frozen peas - 1/2 cup crispy tortilla strips (for topping) - Fresh parsley, chopped (for garnish) Cheddar cheese melts beautifully, while tortilla strips give a nice crunch. Fresh parsley makes your dish look pretty. For the full recipe, check out the provided details. Enjoy your cooking! To start, gather your ingredients. You will need cooked chicken, ranch dressing, cream of chicken soup, cheddar cheese, pasta, peas, and seasonings. Preheat your oven to 350°F (175°C). This step is key for perfect cooking. In a large bowl, mix the shredded chicken and ranch dressing. Add the cream of chicken soup and shredded cheese. Then, toss in the cooked pasta and frozen peas. Sprinkle in garlic powder, onion powder, salt, and black pepper. Mix well until everything is coated nicely. Next, grease a 9x13 inch casserole dish. Carefully pour the mixture into the dish. Spread it evenly for uniform baking. Now, top it with crispy tortilla strips for added crunch. Place the casserole in the preheated oven. Bake for 25-30 minutes. You’ll know it's done when it's hot and bubbly with a golden top. After baking, let it cool for about 5 minutes. This makes serving easier and safer. Serve this dish while hot. Garnish with chopped parsley for a fresh touch. It looks vibrant and inviting. You can serve it straight from the dish for a homey feel. For added flavor, offer a side of ranch dressing. A simple green salad pairs well with this casserole. It balances the rich, creamy flavors nicely. You can find the Full Recipe for more details on how to make this dish. You can prepare chicken bacon ranch casserole a day before. Just follow the recipe steps, but skip baking. Cover the dish tightly with foil or plastic wrap and refrigerate. When you're ready, bake it straight from the fridge. This makes dinner prep easy and fast! To get the best texture, cook your pasta just until it's tender. Overcooking can make it mushy in the casserole. Use rotini or penne pasta, as they hold sauces well. The crispy tortilla strips on top add a nice crunch to each bite. For extra flavor, add some cooked bacon bits to the mix. You can also stir in some diced green onions or jalapeños for a kick. Fresh herbs, like thyme or basil, can brighten the dish. These small tweaks make a big difference, turning a good casserole into a great one! {{image_4}} You can easily make this dish gluten-free. Use gluten-free pasta instead of regular pasta. Many brands offer great options that taste just as good. For the cream of chicken soup, look for gluten-free versions in stores. You can also make your own using chicken broth, milk, and cornstarch. This way, you keep all the flavors without the gluten. If you want a vegetarian version, swap the chicken for cooked mushrooms or chickpeas. These ingredients add great flavor and texture. You can also add more veggies like zucchini or bell peppers. Just sauté them first to bring out their taste. Use vegetable broth instead of chicken broth in your soup to keep it meat-free. There are many ways to change the flavor of the casserole. You can add buffalo sauce for a spicy kick. A sprinkle of barbecue sauce can give it a smoky taste. For a bit of zest, use lemon juice or lime zest. If you love herbs, add fresh basil or thyme for an extra layer of flavor. Each variation can make this dish unique and exciting. For the full recipe, check out the original. You can store leftover Chicken Bacon Ranch Casserole in the fridge. Use an airtight container for best results. It will stay fresh for up to three days. Make sure to cool the casserole before sealing it. This helps prevent condensation, which can make the dish soggy. Freezing is a great option for this casserole. First, let it cool completely. Then, wrap it tightly with plastic wrap or aluminum foil. Place it in a freezer-safe container. It can last for up to three months in the freezer. To keep the best flavor and texture, consider labeling it with the date. When you are ready to enjoy your casserole again, reheating is simple. If frozen, thaw it overnight in the fridge before reheating. Preheat your oven to 350°F (175°C). Cover the casserole with foil to keep it moist. Bake for 20 to 25 minutes, or until heated through. You can also microwave individual portions for quick meals. Just heat in short bursts, stirring in between. Enjoy every bite! For the full recipe, check out the earlier section. You can make this dish your own. Try adding vegetables like broccoli or bell peppers. You can swap the pasta for rice or quinoa. For more flavor, mix in spices like paprika or Italian seasoning. If you like heat, add jalapeños or hot sauce. You can also use different cheeses, such as mozzarella or pepper jack. Yes, you can use raw chicken, but it will take longer to cook. Cut the chicken into small pieces for even cooking. You should bake the casserole for about 45-50 minutes. Make sure the chicken reaches a safe internal temperature of 165°F (75°C). This casserole pairs well with simple sides. A green salad adds freshness and crunch. Garlic bread is great for scooping up the casserole. You can also serve roasted veggies for a healthy touch. If you want comfort, mashed potatoes work well too. For the complete recipe, check out the Full Recipe section. This blog post covers great ways to make a tasty Chicken Bacon Ranch Casserole. We looked at ingredients, step-by-step cooking tips, and how to customize your dish. You can make it ahead and store leftovers easily. Remember, you can swap ingredients for gluten-free or vegetarian options. With these ideas, you can create a dish that your family will love. Enjoy making your casserole, and don’t be afraid to try new flavors!

Chicken Bacon Ranch Casserole Flavorful Family Dish

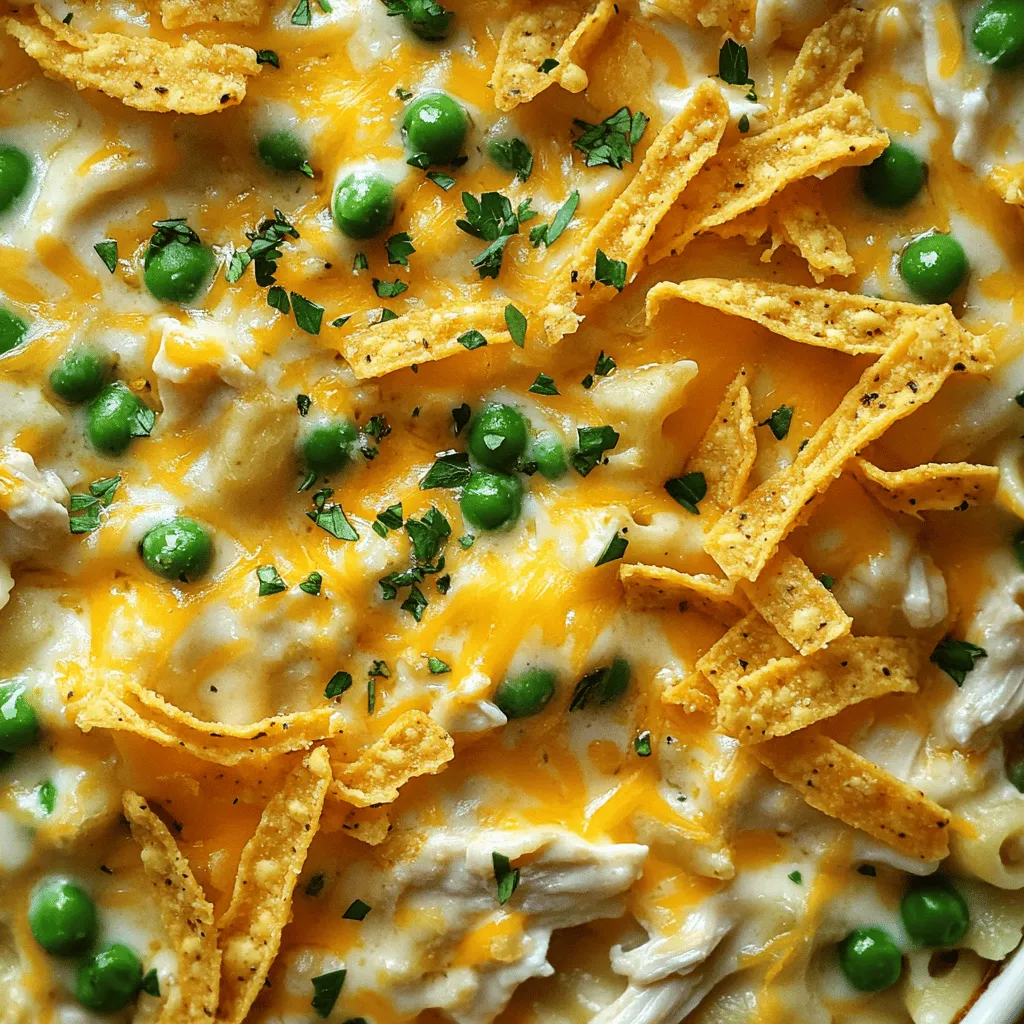
Looking for a meal that brings the whole family together? My Chicken Bacon Ranch Casserole is the perfect mix of

- 4 cups all-purpose flour - 1 packet (2 ¼ teaspoons) active dry yeast - 1 cup warm milk (approximately 110°F) - ⅓ cup granulated sugar - ¼ cup unsalted butter, melted - 1 large egg - 1 teaspoon salt - 1 tablespoon ground cinnamon - ½ cup packed brown sugar - ¼ cup unsalted butter, softened (for filling) - 1 cup powdered sugar (for frosting) - 2 tablespoons milk (for frosting) - 1 teaspoon vanilla extract For the dough, you need flour, yeast, warm milk, sugar, butter, egg, and salt. - Flour gives structure to the rolls. - Yeast helps the dough rise. - Warm milk activates the yeast. - Sugar adds sweetness and helps browning. - Butter makes the rolls rich and soft. - Egg adds moisture and flavor. - Salt enhances the taste. The filling needs brown sugar, cinnamon, and softened butter. The frosting uses powdered sugar, milk, and vanilla extract. - Brown sugar creates a rich, caramel flavor. - Cinnamon adds warmth and spice. - Softened butter helps the filling stick. - Powdered sugar makes a sweet, creamy frosting. - Milk thins the frosting for drizzling. - Vanilla extract enhances the frosting's flavor. You can find the Full Recipe to guide you through each step of making these delightful rolls. To start, you need to activate the yeast. In a small bowl, mix warm milk with sugar. Sprinkle the active dry yeast on top of the milk. Let it sit for 5 to 10 minutes. You will see bubbles forming. This means your yeast is alive and ready to rise. In a large bowl, mix 2 cups of flour with melted butter, egg, and salt. Stir until smooth. Then, add the frothy yeast mix to this flour mix. Gradually add the rest of the flour, half a cup at a time. Mix it until the dough feels soft and a little sticky. Put the dough on a floured surface. Knead it for about 5 to 7 minutes. The dough should be smooth and elastic. Next, place it in a greased bowl. Cover it with a towel and let it rise in a warm spot for about 1 hour. The dough should double in size. After it rises, punch it down gently. Roll it out to make a rectangle. Spread softened butter on top. Sprinkle the cinnamon and sugar mixture evenly across the dough. Roll the dough tightly into a log shape and cut it into 12 pieces. Arrange the rolls in a greased baking dish. Leave some space between each roll. Cover them again with a towel. Let them rise for another 30 minutes. Preheat your oven to 350°F (175°C). Bake the rolls for 20 to 25 minutes. They should be golden brown and smell amazing. As the rolls bake, prepare the frosting. In a bowl, mix powdered sugar, milk, and vanilla. Whisk until smooth and creamy. Once the rolls are baked, let them cool for a few minutes. Drizzle the frosting over the warm rolls. Enjoy the soft and yummy delight of your homemade cinnamon rolls! For the complete recipe, refer to the Full Recipe section. To make soft and fluffy cinnamon rolls, use warm milk. Warm milk helps the yeast grow. Use a kitchen thermometer to check the milk temp. It should be about 110°F. Knead the dough well. This builds gluten, making the rolls airy. Let the dough rise in a warm place. The warmth helps it double in size. After baking, cover the rolls with a towel. This keeps them soft as they cool. One mistake is using cold ingredients. Cold butter or milk can slow down yeast action. Another mistake is not kneading enough. Kneading helps the dough become smooth. If the dough is too sticky, add a little flour. Avoid opening the oven door too often while baking. This lets heat escape and can lead to uneven baking. Lastly, don’t skip the second rise. This step is key for fluffy rolls. Always use dry measuring cups for flour and sugar. Spoon the flour into the cup, then level it off with a knife. Don’t pack the flour down, as this adds too much. For liquids, use a clear measuring cup with markings. Always check at eye level for accuracy. When measuring sticky ingredients like butter, use a light spray of cooking oil on the cup. This helps them slide right out. For the best results, follow the Full Recipe closely. {{image_4}} You can add nuts or raisins to your cinnamon rolls for extra flavor. I love walnuts or pecans. They add a nice crunch. To do this, chop the nuts and spread them on the dough before rolling. If you prefer raisins, sprinkle them on top of the cinnamon sugar. This gives your rolls a sweet, chewy surprise. Both options boost the taste and texture. For a twist, try adding chocolate or cream cheese. You can spread softened cream cheese on the dough before adding cinnamon. This makes the rolls rich and creamy. If you like chocolate, use chocolate chips. Sprinkle them over the cinnamon mixture. The melted chocolate creates a gooey delight. Both options make your cinnamon rolls even more special. Frosting can change everything. Instead of the classic vanilla frosting, try maple or citrus. For maple, mix powdered sugar with maple syrup instead of milk. This gives a warm, sweet flavor. For a citrus twist, add lemon or orange zest to the frosting. The bright flavor pairs well with the warm rolls. These simple changes can impress your family and friends. Explore the [Full Recipe](#) for more tips on making the best cinnamon rolls! To keep your cinnamon rolls fresh, let them cool. Place them in an airtight container. You want to store them at room temperature. They will stay good for about 2 to 3 days. If you want them to last longer, consider freezing them. To enjoy that fresh-baked taste, reheat your cinnamon rolls. Preheat your oven to 350°F (175°C). Place the rolls on a baking sheet. Cover them with aluminum foil to prevent drying. Heat for about 10-15 minutes. You can also heat them in the microwave. Just warm them for 20-30 seconds. Add a drizzle of frosting afterward for extra flavor. If you want to save some for later, freezing is a great option. Once they cool, wrap each roll in plastic wrap. Then, place them in a freezer bag, removing as much air as you can. They can last up to 2 months in the freezer. When you're ready to eat, thaw them in the fridge overnight. Then, reheat them to restore their soft texture. This way, you can enjoy your homemade cinnamon rolls anytime! Yes, you can use instant yeast. Just skip the step of proofing it. Mix instant yeast directly into your flour. This saves time and still gives you soft rolls. Homemade cinnamon rolls last about 2-3 days at room temperature. If you want them fresh longer, store them in the fridge. They can last up to a week that way. Cinnamon rolls pair well with coffee or tea. You can also serve them with fruit, like berries or sliced bananas. A side of creamy yogurt adds a nice touch too. You can easily make cinnamon rolls by hand. Start by mixing the ingredients in a bowl. Use a wooden spoon to combine them. Once mixed, knead the dough on a floured surface. Yes, you can prepare cinnamon rolls ahead of time. Make the dough and fill the rolls. Then, cover them and place them in the fridge overnight. In the morning, let them rise before baking. This saves time and gives you fresh rolls! For more detailed instructions, check out the Full Recipe. To make fluffy twisted cinnamon rolls, you need some simple ingredients. Here’s what you will need: - 4 cups all-purpose flour - 1 packet (2 ¼ teaspoons) active dry yeast - 1 cup warm milk (approximately 110°F) - ⅓ cup granulated sugar - ¼ cup unsalted butter, melted - 1 large egg - 1 teaspoon salt - 1 tablespoon ground cinnamon - ½ cup packed brown sugar - ¼ cup unsalted butter, softened (for filling) - 1 cup powdered sugar (for frosting) - 2 tablespoons milk (for frosting) - 1 teaspoon vanilla extract Now, let’s go through the steps to create these delightful rolls. 1. First, warm up your milk. Mix it with the sugar in a small bowl. Then, sprinkle the yeast on top. Let it sit for 5-10 minutes. You want it to look foamy. This means the yeast is ready. 2. Next, in a large bowl, mix 2 cups of flour with melted butter, egg, and salt. Stir until it is smooth. 3. Pour the foamy yeast mixture into this bowl. Slowly add the rest of the flour. Mix it in ½ cup at a time. You want a soft and slightly sticky dough. 4. Take the dough out and knead it on a floured surface for 5-7 minutes. The dough should feel smooth. Place it in a greased bowl and cover it with a towel. Let it rise in a warm spot for about 1 hour. It should double in size. 5. While your dough rises, prepare the filling. In a small bowl, mix the brown sugar with the ground cinnamon. Set this aside. 6. After the dough has risen, punch it down gently. Roll it out to a rectangle about 16x12 inches. Spread the softened butter on the dough. Then, sprinkle the cinnamon sugar mix on top. 7. Start rolling the dough tightly from one long side. Pinch the seams to seal it. Cut the log into 12 equal pieces. 8. Place the rolls in a greased baking dish or on a lined baking sheet. Make sure to leave space between them. Cover with a towel again and let them rise for another 30 minutes. 9. Preheat your oven to 350°F (175°C). Bake the cinnamon rolls for 20-25 minutes. They should be golden brown and smell amazing. 10. While they bake, make the frosting. In a bowl, whisk the powdered sugar, 2 tablespoons of milk, and vanilla until smooth. 11. When the rolls are done, let them cool for a few minutes. Drizzle the frosting over the warm rolls. Enjoy your fluffy twisted cinnamon rolls! For the full recipe, check the detailed steps above. You now know how to make delicious homemade cinnamon rolls. We covered the key ingredients for the dough, filling, and frosting. You learned step-by-step instructions, from activating yeast to baking the rolls. I shared tips for soft, fluffy rolls and common mistakes to avoid. You can try fun variations like adding nuts or chocolate. Proper storage helps keep your rolls fresh, no matter how long you wait to enjoy them. Now, you can impress friends and family with your baking skills and warm, sweet treats. Enjoy every bite!

Homemade Cinnamon Rolls Soft and Yummy Delight

Welcome to your new favorite recipe: Homemade Cinnamon Rolls Soft and Yummy Delight! Imagine waking up to the sweet smell
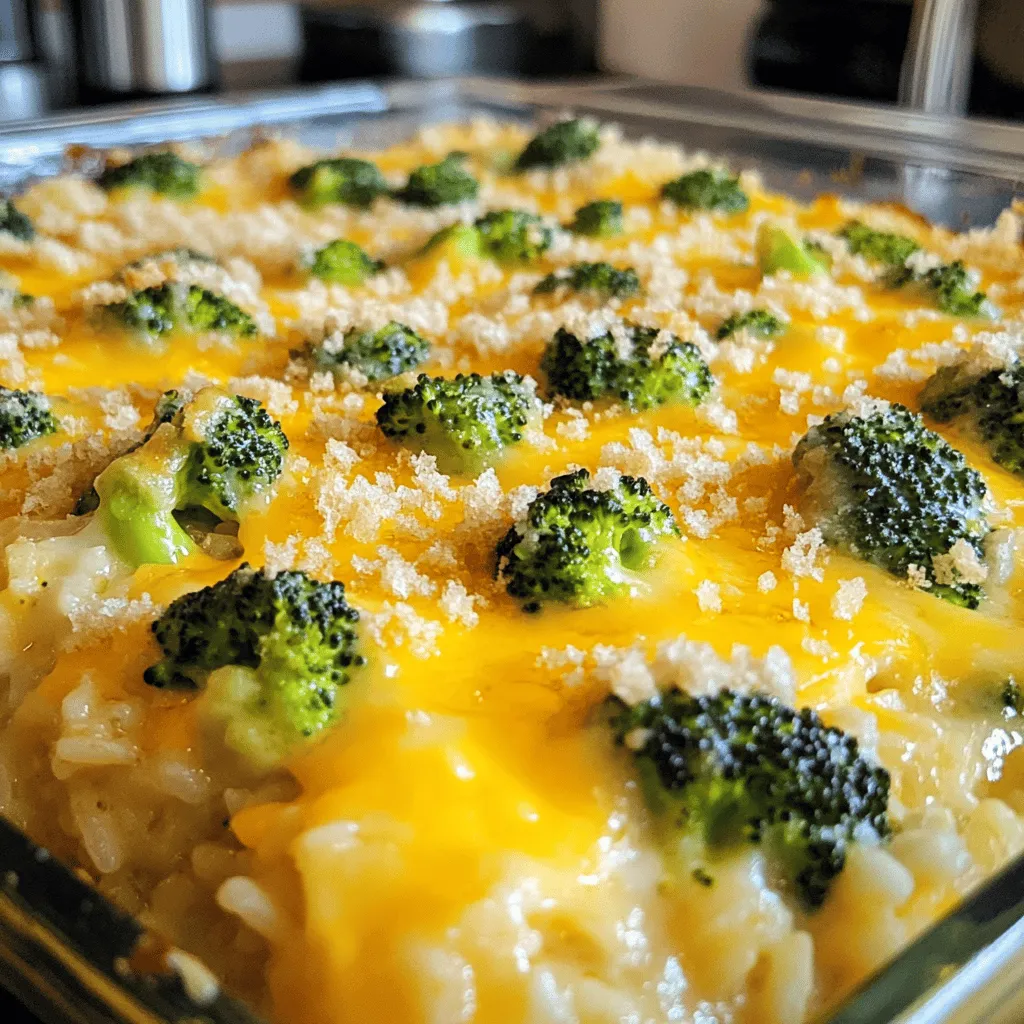
- 1 cup uncooked brown rice - 2 cups vegetable broth - 2 cups broccoli florets (fresh or frozen) - 1 cup shredded cheddar cheese - 1 cup cream of mushroom soup (canned or homemade) - 1/2 cup grated Parmesan cheese - 1 teaspoon garlic powder - 1/2 teaspoon onion powder - Salt and pepper to taste - 1/2 cup breadcrumbs - 2 tablespoons olive oil - Fresh parsley, chopped, for garnish To adjust servings, you can easily scale the recipe. If you want to serve more, double the ingredients. For fewer servings, cut the amounts in half. This way, you can always make the right amount for your needs. Remember, the cooking times may change slightly when you adjust the quantities. Keep an eye on the casserole as it bakes, ensuring it turns golden brown and bubbly. For the full recipe, check the details above. 1. Preheat the Oven: Start by preheating your oven to 350°F (175°C). This step is key for even baking. 2. Cook Rice: In a medium pot, boil 2 cups of vegetable broth. Add 1 cup of uncooked brown rice. Lower the heat and cover. Cook for about 45 minutes until the rice is soft and all the broth is absorbed. 1. Combine Ingredients: In a large bowl, mix the cooked rice with 2 cups of broccoli florets, 1 cup of shredded cheddar cheese, and 1 cup of cream of mushroom soup. 2. Add Seasonings: Sprinkle in 1 teaspoon of garlic powder, 1/2 teaspoon of onion powder, and season with salt and pepper to taste. Stir it all together until everything is well coated. 1. Transfer to Casserole Dish: Pour the rice and broccoli mixture into a greased 9x13 inch casserole dish. Spread it evenly across the bottom. 2. Prepare Topping: In a small bowl, mix 1/2 cup of breadcrumbs with 2 tablespoons of olive oil. Make sure every breadcrumb is coated. Sprinkle this mixture on top of the casserole. 3. Add Parmesan: For extra flavor, add 1/2 cup of grated Parmesan cheese on top of the breadcrumbs. 4. Bake: Place the casserole in the oven and bake for 25-30 minutes. You want it bubbly and the breadcrumbs to be golden brown. 5. Cool and Garnish: After baking, let the casserole cool for about 5 minutes. Just before serving, add freshly chopped parsley for a pop of color. For the full recipe, check out the [Full Recipe]. - Cooking time adjustments for firmness of rice: For softer rice, extend the cooking time by 5-10 minutes. If you prefer firmer rice, check it at 40 minutes. This small change can make a big difference in texture. - Tips for achieving a golden breadcrumb topping: Mix breadcrumbs with olive oil until well coated. Spread them evenly across the top of the casserole. For extra crunch, broil it for the last 2-3 minutes of baking. Just watch it closely to avoid burning. - Suggested spices and herbs to add: Consider adding thyme or paprika for depth. A dash of cayenne can bring a nice kick. For a fresh touch, mix in some chopped chives or parsley. - Ways to incorporate protein: To make this dish heartier, add cooked chicken, turkey, or even beans. These proteins complement the cheesy broccoli well. Just mix them in with the rice and broccoli for a complete meal. Explore the [Full Recipe] to see how these tips can elevate your Cheesy Broccoli Rice Casserole! {{image_4}} You can easily change up the rice in this dish. Swap brown rice for white rice if you prefer a softer texture. Quinoa is another great choice. It cooks fast and adds a nice nutty flavor. If you want to make this dish vegan, there are many plant-based options. Use plant-based cheese instead of cheddar. You can also replace the cream of mushroom soup with a vegan version. This keeps the dish creamy and delicious without using any animal products. Feel free to add more vegetables for extra flavor and nutrition. Peas, carrots, or corn can work well. You can mix in cooked chicken or turkey for a heartier meal. For added texture, consider mixing in some nuts, like chopped almonds or walnuts. They add a nice crunch. You can also try spices like paprika or cayenne pepper for a bit of heat. Exploring these variations can make your cheesy broccoli rice casserole even more exciting. Check the Full Recipe for all the details! To keep your cheesy broccoli rice casserole fresh, store it in an airtight container. You can refrigerate it for up to four days. If you want to save it for longer, freezing is a great option. Wrap the casserole tightly in plastic wrap and then in foil. It can last up to three months in the freezer. When you're ready to enjoy leftovers, the best way to reheat is in the oven. Preheat your oven to 350°F (175°C). Place the casserole in a covered dish to prevent it from drying out. Heat for about 20-25 minutes, or until it is hot all the way through. If you need a quicker option, the microwave works too. Use a microwave-safe dish and cover it. Heat in short bursts of one minute, stirring in between, until it's warm. To restore texture and flavor, add a splash of vegetable broth before reheating. This keeps the casserole creamy and delicious. Enjoy every bite of this comforting dish! How can I make the casserole ahead of time? You can prepare the casserole a day before. Just follow the recipe steps and stop before baking. Cover it with plastic wrap and keep it in the fridge. When ready, bake it straight from the fridge. Add a few extra minutes to the cooking time. Can I substitute frozen broccoli for fresh? Yes, frozen broccoli works great! It’s easy to use and saves time. Just thaw it first and drain any excess water to prevent a soggy casserole. This keeps the dish tasty and fresh. Is it possible to use different types of cheese? Absolutely! You can mix and match your favorite cheeses. Try mozzarella for a stretchy texture or gouda for a smoky flavor. Just keep the total amount of cheese the same for the best results. What can I serve alongside this dish? This casserole pairs well with a simple green salad or roasted vegetables. You can also serve it with grilled chicken or fish for a full meal. It’s a great way to balance flavors and add variety to your plate. For the complete recipe, check out the Full Recipe section. In this blog post, I shared a simple recipe for Cheesy Broccoli Rice Casserole. We covered the ingredients, step-by-step instructions, and tips for the best results. I emphasized how to adjust ingredients and variations to fit your needs. You can easily store and reheat leftovers for later. This dish is crowd-pleasing and easy to make, whether for family meals or gatherings. With these guidelines, you’re ready to create a delicious casserole your loved ones will enjoy. Happy cooking!

Cheesy Broccoli Rice Casserole Flavorful Comfort Dish

If you’re looking for a cozy, filling meal that’s easy to make, you’ve found it! My Cheesy Broccoli Rice Casserole

- 1 lb boneless, skinless chicken breasts, cut into 1-inch cubes - 1 tablespoon extra virgin olive oil - 1 medium onion, finely chopped - 3 cloves garlic, minced - 2 cans (15 oz each) white beans (cannellini or great northern), thoroughly drained and rinsed - 2 cups low-sodium chicken broth - 1 cup sour cream, at room temperature - 1 cup Monterey Jack cheese, freshly shredded - 1 can (4 oz) diced green chilies, well-drained - 1 teaspoon ground cumin - 1 teaspoon smoked paprika - 1 teaspoon mild chili powder - Sea salt and freshly cracked black pepper, to taste - Fresh cilantro, chopped (for garnish) - Lime wedges, for serving The main ingredients in this creamy white chicken chili are simple yet flavorful. The chicken brings protein, while the white beans add creaminess. The broth makes it hearty, and the spices give it a kick. - For beans, you can use black beans or pinto beans. - Instead of chicken, try turkey or tofu for a different protein. - For a dairy-free option, substitute sour cream with coconut cream. These substitutes will still keep your chili tasty and satisfying. Feel free to mix and match based on what you have at home. - A spacious pot or Dutch oven - A sharp knife for cutting - A cutting board for prep - A wooden spoon for stirring - Measuring cups and spoons Having the right tools makes cooking easier. A Dutch oven heats evenly and holds flavors well. A good knife saves time when chopping. Make sure to gather everything before you start. 1. Cooking the aromatics: Start by heating olive oil in a large pot over medium heat. Add the chopped onion and sauté for about 5 minutes. The onion should turn soft and fragrant. Next, add minced garlic and cook for 1 more minute. Stir often to keep the garlic from burning. 2. Browning the chicken: Now, add the cubed chicken to the pot. Cook it for about 5 to 7 minutes. Stir the chicken to brown all sides. You want it golden for the best flavor. 1. Adding beans and seasonings: Once the chicken is browned, it’s time to add the white beans, chicken broth, and diced green chilies. Sprinkle in the ground cumin, smoked paprika, and chili powder. Season with sea salt and black pepper. Bring this mixture to a rolling boil. 2. Creating the creamy texture: After boiling, lower the heat and cover the pot. Let it simmer for about 20 minutes. This helps the chicken cook through and the flavors blend. When done, remove it from heat, and let it cool for a few minutes. Stir in sour cream and shredded Monterey Jack cheese. Mix until it’s smooth and creamy. 1. Simmering and melding flavors: Put the pot back on low heat. Warm it gently for another 5 minutes. Avoid boiling again; you want a nice, even heat. 2. Adjusting seasoning before serving: Taste your chili at this point. If it needs more flavor, add extra salt or pepper. This final touch makes all the difference. Now you're ready to enjoy this creamy white chicken chili! For more details, check the Full Recipe. - Overcooking chicken: This can make it tough. Cook it just until no pink remains. - Not seasoning properly: A dish needs salt and spices. Taste as you go. - Recommended herbs or spices: I love adding fresh cilantro and lime juice. They brighten the dish. - Using homemade chicken broth: This adds depth. Store-bought works too, but homemade is richer. - Best side dishes to pair: Cornbread and tortilla chips are perfect. They add crunch and balance. - Presentation ideas for serving: Use rustic bowls. Top with extra cheese and cilantro for a pop of color. For the full recipe of Creamy White Chicken Chili, check out the complete instructions. Enjoy the process and get creative! {{image_4}} You can easily change the protein in creamy white chicken chili. If you want a leaner option, try turkey. Ground turkey works well and cooks quickly. For a plant-based choice, use chickpeas or tofu. Both options add protein and texture. They fit right into the creamy broth and keep the dish hearty. Adjusting the spice level is simple. If you prefer mild flavors, skip the chili powder or use less. For a medium kick, add a small amount of diced jalapeños. If you love heat, use more chili powder or add fresh chopped serrano peppers. You can also sprinkle some cayenne pepper on top for an extra boost. Making creamy white chicken chili fit special diets is easy. To make it gluten-free, ensure your broth has no gluten. For a vegan option, swap chicken for plant-based protein and use coconut cream instead of sour cream. You can also choose nutritional yeast for a cheesy flavor without dairy. These swaps let everyone enjoy this dish! For the full recipe, check out the complete instructions above. To keep your creamy white chicken chili fresh, store it in an airtight container. Let it cool to room temperature before sealing. Place it in the fridge if you plan to eat it within three days. For best taste, consume it within this time frame. You can freeze creamy white chicken chili if you need to save it for later. Pour the cooled chili into a freezer-safe container. Leave some space at the top for expansion. Seal it tightly and label with the date. It will last up to three months in the freezer. To thaw, place it in the fridge overnight. For quicker results, use the microwave on low power. When reheating, use the stove for best results. Pour the chili into a pot over medium heat. Stir often to prevent it from sticking. If it seems too thick, add a splash of chicken broth or water. You can also reheat it in the microwave. Use a microwave-safe bowl and heat in short intervals, stirring in between. This keeps the chili creamy and delicious. For the full recipe, check the earlier section. Creamy white chicken chili can last for about three to four days in the fridge. To store it, let the chili cool down. Then, transfer it to an airtight container. This helps keep it fresh and tasty. When you reheat it, make sure it’s heated all the way through. Stir it well to mix the flavors. Yes, you can easily make creamy white chicken chili in a slow cooker! Here’s how: 1. Start by adding the chicken, onion, garlic, beans, green chilies, and broth to the slow cooker. 2. Sprinkle in your spices: cumin, smoked paprika, and chili powder. 3. Cook on low for about six to seven hours or on high for three to four hours. 4. About 30 minutes before serving, stir in the sour cream and cheese. 5. This will make it creamy and delicious. You can serve creamy white chicken chili with many tasty sides. Here are some ideas: - Warm tortilla chips are great for dipping. - Fresh cornbread adds a nice touch. - A simple green salad balances the meal. - You can also try rice for a filling option. These sides will complement your chili and make a complete meal. In this post, we explored creamy white chicken chili. We discussed key ingredients, useful substitutes, and essential kitchen tools needed. I shared step-by-step instructions to make it easy. I also covered tips to avoid common mistakes and ways to enhance flavors. Plus, we looked at variations to fit different diets and tastes. Finally, I included storage tips to keep your chili fresh longer. Enjoy making this dish and impress your family with its rich taste!

Creamy White Chicken Chili Savory and Simple Dish

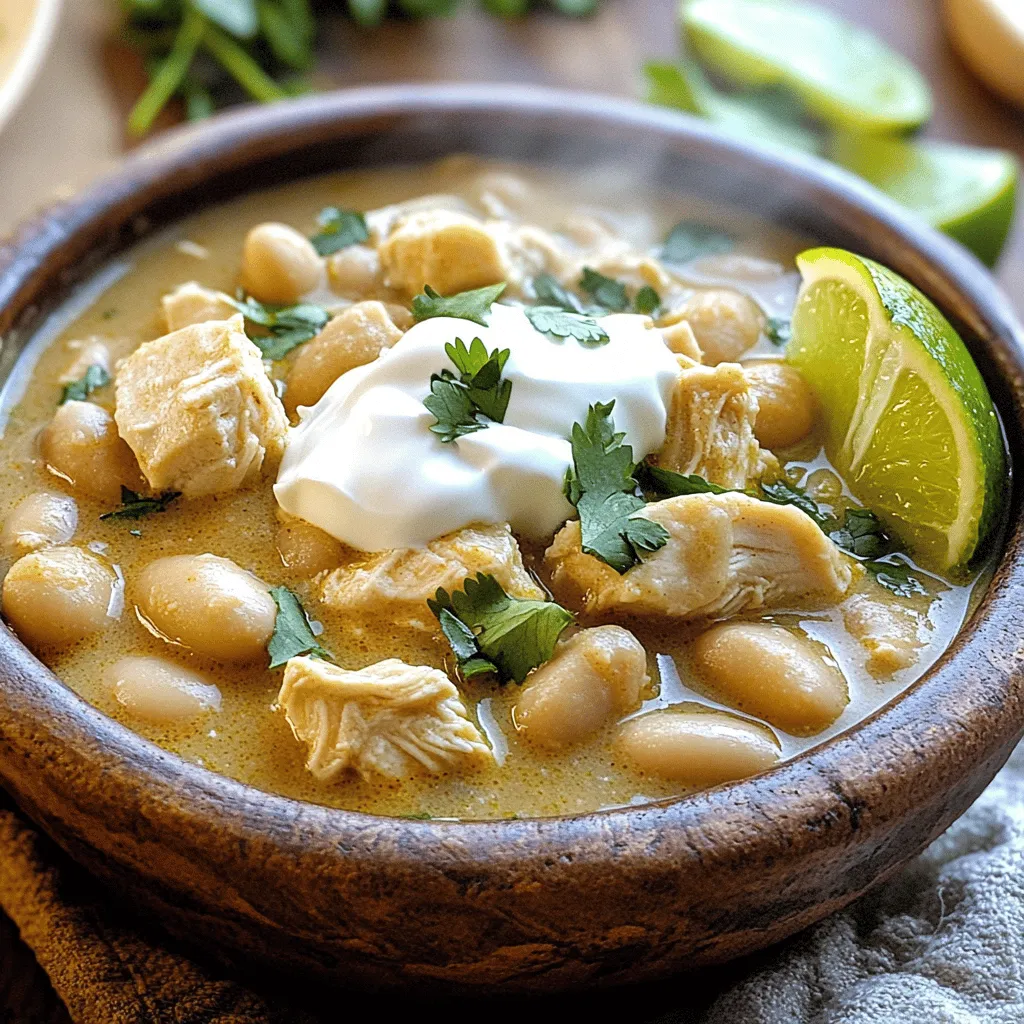
Looking for a warm, delicious meal that’s easy to make? Creamy White Chicken Chili is the answer! With tender chicken,

- 1 pound large shrimp, peeled and deveined - 2 cups broccoli florets - 4 cloves garlic, minced - Zest and juice of 1 lemon - 3 tablespoons olive oil - 1 teaspoon red pepper flakes (optional) - Salt and freshly cracked black pepper to taste - Fresh parsley for garnish In this dish, fresh shrimp takes center stage. You want to use large shrimp for the best texture. Make sure they are peeled and deveined to cut down on prep time. Broccoli brings color and crunch. I love using broccoli florets because they soak up the garlic and lemon flavors. Garlic adds a punch, making the dish so tasty. You can mince it finely for a stronger flavor. The zest and juice of a lemon brighten everything up. It gives the dish a fresh taste that balances the richness of the shrimp. For the oil, I prefer olive oil. It adds a nice depth and helps cook the shrimp evenly. If you like heat, add red pepper flakes. They give the dish a fun kick. Don’t forget salt and pepper. They enhance all the flavors. Finally, fresh parsley adds a touch of color and freshness. For the full recipe, check out the details above! - Heat 2 tablespoons of olive oil in a large skillet over medium heat. - Add 4 cloves of minced garlic and sauté for about 1 minute. - Stir often to keep the garlic from burning. - Next, add 2 cups of broccoli florets to the skillet. - Season the broccoli with salt, pepper, and optional red pepper flakes. - Cook the broccoli for 5-7 minutes until it's tender and bright green. - After the broccoli is done, push it to one side of the pan. - Pour the remaining tablespoon of olive oil into the empty side. - Place 1 pound of shrimp in a single layer on the oiled side. - Sprinkle lemon zest on the shrimp. - Cook the shrimp for about 2-3 minutes on each side. - They should turn pink and opaque when done. - Once cooked, mix the shrimp and broccoli together in the pan. - Squeeze fresh lemon juice over the shrimp and broccoli. - Toss everything to blend the flavors well. - Remove the skillet from heat and garnish with fresh parsley. - For serving, place the dish on a large platter. - Drizzle any pan juices over the top and add lemon wedges. For the complete recipe, check the [Full Recipe]. Enjoy your meal! To make your shrimp shine, focus on oil temperature. Heat your olive oil over medium heat. If the oil is too hot, the garlic burns. If it's too cool, the shrimp won't cook well. Start by sautéing the garlic for just one minute. This step releases its rich flavor without burning. Timing for shrimp is key. Cook them for about 2 to 3 minutes on each side. You want them pink and opaque, not rubbery. Want to spice things up? Add red pepper flakes for heat. Fresh herbs like basil or dill can elevate the dish. Consider adding other spices like paprika for depth. You can also toss in extra veggies. Bell peppers, snap peas, or asparagus work well. These add color and nutrients to your meal. Pair your dish with simple sides. A fluffy rice or warm crusty bread complements the shrimp. For a light touch, serve with a green salad. This balances the meal nicely. When it comes to drinks, a chilled white wine works best. A crisp Sauvignon Blanc or a light Pinot Grigio enhances the flavors. You could also serve sparkling water with lemon for a refreshing option. Enjoy this one pan meal with friends or family! {{image_4}} You can change the vegetables in this dish. If you want to skip broccoli, try snap peas, bell peppers, or asparagus. These options add color and crunch. You can also think about using seasonal veggies. In spring, use fresh green beans or zucchini. In fall, consider roasted carrots or Brussels sprouts. Seasonal vegetables not only taste great, but they also keep your dish fresh and exciting. If shrimp is not your thing, you have options. You can use scallops or fish like tilapia or cod. They cook quickly and soak up the lemon flavor well. If you want a heartier meal, try chicken breast. Cut it into bite-sized pieces and sauté the same way as the shrimp. For a plant-based choice, use tofu. Press and cube the tofu before cooking it until golden. This gives a nice texture and a different twist to the dish. Want a zesty kick? Swap lemon for lime. Lime adds a tangy twist that brightens the dish. You can also add creamy elements. Mix in a splash of cream or a dollop of sour cream at the end. This adds richness and balances the dish's brightness. Don't be afraid to play with flavors. Experimenting can lead to a delicious new favorite. For the full recipe, check the earlier section. To keep your One Pan Lemon Garlic Shrimp fresh, follow these steps: - Place leftovers in an airtight container. - Let the dish cool down to room temperature first. - Store it in the fridge within two hours of cooking. Your shrimp will last in the fridge for up to three days. After that, it may lose flavor and texture. Always check for signs of spoilage before eating. When you're ready to enjoy your leftovers, reheating is key to keeping that great taste. Here’s how: - Microwaving Tips: - Use a microwave-safe plate. - Cover the shrimp loosely with a damp paper towel. - Heat in short bursts, about 30 seconds at a time, stirring between each. This method helps maintain moisture and flavor. - Skillet Reheating Methods: - Heat a non-stick skillet over medium heat. - Add a splash of olive oil to keep it juicy. - Place the shrimp in the skillet, stirring gently for about 3-5 minutes. This method revives the shrimp's texture and taste. Enjoy your meal! It takes about 10 minutes to prep and 10 minutes to cook. In total, you’ll spend around 20 minutes on this tasty dish. This quick cooking time makes it a great option for busy weeknights. Yes, you can skip the broccoli if you prefer. You can use other veggies like bell peppers, asparagus, or snap peas instead. Just ensure they cook well with the shrimp. To keep shrimp tender, do not overcook them. Cook until they are pink and opaque, usually about 2-3 minutes on each side. Also, use fresh shrimp for the best texture and taste. Absolutely! You can use frozen shrimp. Just thaw them first in cold water. Once thawed, pat them dry before cooking. This helps them sear better and prevents excess moisture. This blog post covered how to make a tasty One Pan Lemon Garlic Shrimp dish. We discussed key ingredients, step-by-step instructions, and tips for perfecting the meal. You learned how to add your own twist with different vegetables or proteins. In conclusion, this dish is simple and full of flavor. You can easily modify it to fit your taste. So grab your ingredients and start cooking this quick, delicious meal! Enjoy the process and impress your family and friends.

One Pan Lemon Garlic Shrimp Quick and Tasty Dish

Looking for a quick and tasty dish that’s full of flavor? My One Pan Lemon Garlic Shrimp is just what

To make fiesta stuffed bell peppers, you need: - 4 large bell peppers (any color) - 1 cup quinoa, rinsed - 2 cups vegetable broth - 1 can (15 oz) black beans, drained and rinsed - 1 cup corn kernels (fresh or frozen) - 1 cup diced tomatoes (canned or fresh) - 1 teaspoon ground cumin - 1 teaspoon smoked paprika - ½ teaspoon garlic powder - ½ teaspoon onion powder - Salt and black pepper to taste - 1 cup shredded cheese (cheddar or a Mexican blend) - Fresh cilantro, chopped (for garnish) - Lime wedges (for serving) If you don’t have quinoa, you can use rice or couscous. Both options work well. For the black beans, kidney beans or lentils are great swaps. If you want a different flavor, try using chickpeas. Instead of corn, you can use peas or diced zucchini. If you’re not a fan of tomatoes, skip them or use salsa for added flavor. You can also change the cheese to mozzarella or feta if you like. This recipe serves four people. Each serving has about: - Calories: 350 - Protein: 15g - Carbohydrates: 50g - Fiber: 12g - Fat: 10g - Sodium: 400mg Eating stuffed peppers gives you a good mix of nutrients. You get protein from beans and quinoa. The peppers add vitamins A and C. Plus, you get fiber from all the veggies. This dish is filling and healthy! For the full recipe, check out the cooking instructions above. Start by preheating your oven to 375°F (190°C). This step is key to making sure your stuffed peppers cook evenly. A hot oven helps the peppers become tender and the cheese melt nicely. Next, grab four large bell peppers. Cut off the tops and remove the seeds and membranes inside. If they don’t stand up straight, trim a little from the bottom. Be careful not to make holes. Now, take a medium saucepan. Bring two cups of vegetable broth to a boil. Add one cup of rinsed quinoa. Reduce the heat to low and cover the pot. Let it simmer for about 15 minutes. The quinoa should absorb all the broth and become fluffy. In a large bowl, combine the cooked quinoa, one can of black beans, one cup of corn, and one cup of diced tomatoes. Add the spices: one teaspoon each of ground cumin and smoked paprika, plus half a teaspoon of garlic and onion powders. Don’t forget salt and black pepper to taste. Mix everything well. Take your mixture and spoon it into each bell pepper. Press down gently to pack it in. Arrange the stuffed peppers upright in a baking dish. This helps them cook evenly and look great. Sprinkle shredded cheese on top of each pepper. Cover the dish tightly with foil and place it in your preheated oven. Bake for 25 minutes. After that, remove the foil and bake for another 10-15 minutes. This step helps the cheese bubble up and turn golden. Once they are done, let the peppers cool a bit. Garnish with chopped cilantro and serve with lime wedges. Enjoy your colorful and tasty feast! For the complete recipe details, refer to the Full Recipe. To make your stuffed bell peppers sing with flavor, use fresh herbs. Fresh cilantro brightens the dish. You can also add lime juice to the filling for a zesty kick. For more depth, try adding a splash of hot sauce or diced jalapeños. These small changes can transform your meal. Serve the stuffed peppers with a side of simple salad. A fresh green salad with a light vinaigrette complements the peppers well. You can also add some tortilla chips for crunch. Pairing with avocado slices can add creaminess. If you want something hearty, serve with rice or quinoa on the side. Presentation makes your meal inviting. Arrange the stuffed peppers on a colorful platter. Drizzle some lime juice over the top just before serving. Add a sprinkle of chopped cilantro for color. Consider using different colored peppers for a vibrant look. For the final touch, place a lime wedge next to each pepper. This adds charm and a hint of freshness. For the complete recipe, check the Full Recipe section. {{image_4}} You can change up the filling in stuffed bell peppers to match your taste. Try brown rice instead of quinoa for a different texture. You can also use ground turkey or beef for a meatier option. If you love Mediterranean flavors, mix in feta cheese, olives, and herbs. For a fun twist, add chopped nuts like walnuts or almonds. You can also go sweet by using fruits like diced apples or raisins mixed with nuts and spices. Stuffed bell peppers are easy to modify for different diets. For a vegan version, skip the cheese and use lentils or chickpeas. Always check that your vegetable broth is vegan. If you need gluten-free options, quinoa is safe to use. Most fresh veggies and beans are gluten-free too. You can also swap out the cheese for a vegan cheese blend or nutritional yeast for a cheesy taste. Adjusting the spice level can make your stuffed peppers more exciting. If you like heat, add diced jalapeños or a pinch of cayenne pepper to the filling. You can also use spicy cheese blends. For milder flavors, skip the spices and focus on herbs like basil or parsley. Taste the filling before stuffing to ensure it’s just right for you. To store your leftover stuffed bell peppers, let them cool completely. Place them in an airtight container. They will keep well in the fridge for up to four days. If you want to enjoy them later, make sure to seal them tightly to avoid drying out. When you’re ready to eat your leftovers, preheat the oven to 350°F (175°C). Place the stuffed peppers in an oven-safe dish and cover them with foil. Heat for about 20 minutes until they are warm throughout. You can also use the microwave. Just place a pepper on a microwave-safe plate and heat for about 2-3 minutes. If you want to freeze your stuffed peppers, it’s best to do this before baking. Wrap each stuffed pepper tightly in plastic wrap and then in foil. Store them in a freezer bag. They can last for up to three months. When you're ready to cook them, thaw them overnight in the fridge and then bake as directed in the Full Recipe. Enjoy your delicious meal anytime! You can use rice or couscous instead of quinoa. Brown rice adds a nice texture. White rice cooks faster and is easy to find. Couscous cooks in just a few minutes and is light. For a low-carb option, try cauliflower rice. It gives a fresh flavor and works well with the spices. Yes, you can make stuffed peppers in advance. Prepare them, then store them in the fridge. You can stuff the peppers a day ahead. This makes dinner easy on busy nights. Just bake them when you are ready to eat. Peppers are cooked when they are tender and slightly soft. The cheese should be melted and bubbly. You can poke them with a fork to check. If the fork goes in easily, they are ready. The cooking time may vary based on the size of your peppers. Stuffed peppers last about 3 to 4 days in the fridge. Store them in an airtight container. They taste great even after a couple of days. Just reheat them in the oven or microwave before serving. Yes! You can use many types of cheese. Cheddar and Monterey Jack are great choices. Feta adds a tangy kick. Mozzarella gives a nice gooey texture. Feel free to mix cheeses for more flavor. Enjoy experimenting with your favorites! For the full recipe, check out the complete guide to make these tasty stuffed bell peppers. You learned about the key ingredients for stuffed peppers and their nutritious benefits. I shared steps to make perfect stuffed peppers, from preheating to baking. Tips helped enhance flavor and presentation. Variations showed ways to switch fillings and adjust for diets. Lastly, I outlined how to store and reheat leftovers. Now, you’re ready to create a delicious meal that’s both healthy and satisfying. Enjoy your cooking journey!

Stuffed Bell Peppers Flavorful and Easy Recipe

Are you ready to cook up a colorful and tasty meal? Stuffed bell peppers are easy to make and bursting

- 2 boneless, skinless chicken breasts - Marinara sauce (store-bought or homemade) - Shredded mozzarella cheese - 1 cup all-purpose flour - 2 large eggs, beaten - 1 cup Italian-style breadcrumbs - 1/2 cup grated Parmesan cheese - 1 teaspoon garlic powder - 1 teaspoon dried oregano - 1 teaspoon dried basil - Salt and pepper, to taste In this recipe, we focus on fresh, simple ingredients. The chicken gives a nice base for flavor. Marinara sauce adds tang and richness. Mozzarella cheese melts beautifully, adding creaminess. For the coating, all-purpose flour helps the egg stick. Eggs bind the breadcrumbs to the chicken. The Italian-style breadcrumbs add a crispy crunch that everyone loves. Seasoning is key. Grated Parmesan cheese adds a salty, nutty flavor. Garlic powder gives a warm taste, while dried oregano and basil add depth. Just a pinch of salt and pepper helps bring all the flavors together. You can find the full recipe for this dish online. Understanding these ingredients helps you make this dish perfect every time. Enjoy cooking! 1. Preheat your oven to 375°F (190°C). This step is key for even cooking. 2. Place the chicken breasts between two sheets of plastic wrap. Using a meat mallet or rolling pin, pound the chicken to an even thickness of about 1/2 inch. This helps the chicken cook evenly and stay juicy. 1. Set up three shallow dishes in a line. Fill the first dish with all-purpose flour. Beat the eggs in the second dish. In the third dish, mix the breadcrumbs, grated Parmesan, garlic powder, dried oregano, dried basil, salt, and pepper. This mix gives flavor. 2. Coat one chicken breast at a time. First, dredge it in flour and shake off excess flour. Next, dip it into the beaten eggs, letting extra egg drip back. Finally, press the chicken into the breadcrumb mixture, covering it well on both sides. 1. In a large skillet, pour olive oil to cover the bottom. Heat over medium heat. To test if the oil is hot, drop in a small piece of breadcrumb; it should sizzle. 2. Carefully add the coated chicken breast. Fry for about 4-5 minutes on each side or until golden brown. If needed, cook in batches to avoid crowding the skillet. Once done, transfer the chicken to a paper towel-lined plate to drain excess oil. 1. In a baking dish, spread 1/3 cup of marinara sauce evenly across the bottom. Lay the fried chicken breasts over the sauce in a single layer. 2. Spoon additional marinara sauce over each chicken breast. Sprinkle shredded mozzarella cheese on top. 3. Carefully place the baking dish into the preheated oven. Bake for about 20-25 minutes, or until the cheese is melted and bubbly. The chicken should reach an internal temperature of 165°F (75°C). For a full recipe, check the detailed instructions. Enjoy making this easy chicken parmesan! To make the best chicken parmesan, start with even chicken breasts. This helps them cook evenly and stay juicy. Place the chicken between two sheets of plastic wrap. Use a meat mallet to gently pound them to about 1/2 inch thick. This small step makes a big difference in cooking. Next, frying oil temperature is key. Heat olive oil over medium heat until it's hot. You can test this by dropping in a small piece of breadcrumb. If it sizzles, the oil is ready. This ensures a crispy and golden crust. Pair your chicken parmesan with tasty side dishes. Pasta is a classic choice, but a fresh salad works great too. The bright flavors of salad balance the rich cheese and sauce. For presentation, serve the chicken directly from the baking dish. This gives a cozy, rustic look. If you want something fancier, plate the chicken on individual dishes. Add a sprinkle of extra parmesan and a sprig of basil on top. It makes the dish look beautiful and inviting. Using the right skillet can change your cooking game. A cast-iron skillet is perfect for frying chicken. It heats evenly and helps create a nice crust. For baking, any medium-sized baking dish will do. Glass or ceramic dishes are great options. They hold heat well and look nice on the table. With these tips and tricks, you can make a chicken parmesan that impresses everyone. For the full recipe, check the earlier section to get started! {{image_4}} You can change a few ingredients for a fresh twist. Instead of marinara sauce, try pesto. It adds a bright, herby flavor. You can also use a white sauce for a creamy touch. For cheese, mozzarella is great, but you can use provolone or gouda. Both melt well and add a unique taste. Mixing cheeses can create a richer flavor profile. If you want a lighter dish, bake the chicken instead of frying it. This method cuts down on oil and fat. Just brush the chicken with olive oil and bake until golden. Using whole wheat breadcrumbs is another great option. They add fiber and nutrients. Gluten-free breadcrumbs work too, making this dish friendly for those with gluten sensitivities. Boost the flavor by adding vegetables. Spinach, mushrooms, or bell peppers make tasty additions. You can sauté them and layer them with the chicken. For extra spices, consider red pepper flakes for heat or fresh herbs for depth. Toppings like olives or sun-dried tomatoes add a lovely texture and taste. They bring a Mediterranean flair to your Chicken Parmesan. For more details on making this dish, check out the Full Recipe. To keep your Chicken Parmesan fresh, cool it first. Place the leftovers in an airtight container. I recommend using glass or plastic containers with tight-fitting lids. Store them in the fridge for up to three days. This way, you can enjoy the flavors later without losing quality. For reheating, you can use either the oven or microwave. The oven gives the best results. Preheat it to 350°F (175°C). Place the Chicken Parmesan on a baking sheet. Cover it with foil to keep it moist. Heat for about 15-20 minutes until warm. If you use the microwave, place a piece on a microwave-safe plate. Heat it for about 1-2 minutes, checking often. To keep the crispy texture, I suggest adding a paper towel over the chicken. This helps absorb moisture. You can freeze baked Chicken Parmesan easily. Allow it to cool completely first. Wrap each piece in plastic wrap, then place it in a freezer bag. You can freeze it for up to three months. To thaw, move the chicken to the fridge overnight. When you’re ready to cook, reheat it in the oven as mentioned before. This way, you’ll enjoy a delicious meal without much fuss. For more details, check out the Full Recipe. It takes about 45 minutes to make Easy Chicken Parmesan. You will spend around 15 minutes on prep. Cooking the chicken and baking it takes about 30 minutes. Yes, you can make Chicken Parmesan ahead of time! You can prepare the chicken and coat it. Store the coated chicken in the fridge for up to a day. You can also make the sauce ahead of time. Just reheat the sauce when you are ready to cook. If you want alternatives, you can use turkey or pork. For a vegetarian option, try eggplant or zucchini. Both work well and taste great with the sauce and cheese. Chicken Parmesan goes well with many sides. You can serve it with spaghetti or a fresh salad. Garlic bread or roasted vegetables make great choices too. Yes, you can make Chicken Parmesan gluten-free! Use gluten-free breadcrumbs instead of regular ones. You can also use almond flour for a different texture. Just make sure your marinara sauce is gluten-free too. You now know how to make Easy Chicken Parmesan from start to finish. We covered the main ingredients, crucial tips for perfecting your dish, and even variations to suit different tastes. Remember, the key lies in even chicken thickness, the right frying temperature, and good storage practices. This dish brings flavor and joy to any meal. With this knowledge, you can impress family and friends with your cooking skills. Enjoy your delicious creation and don’t hesitate to customize it to make it your own!

Easy Chicken Parmesan Simple and Quick Dinner Solution

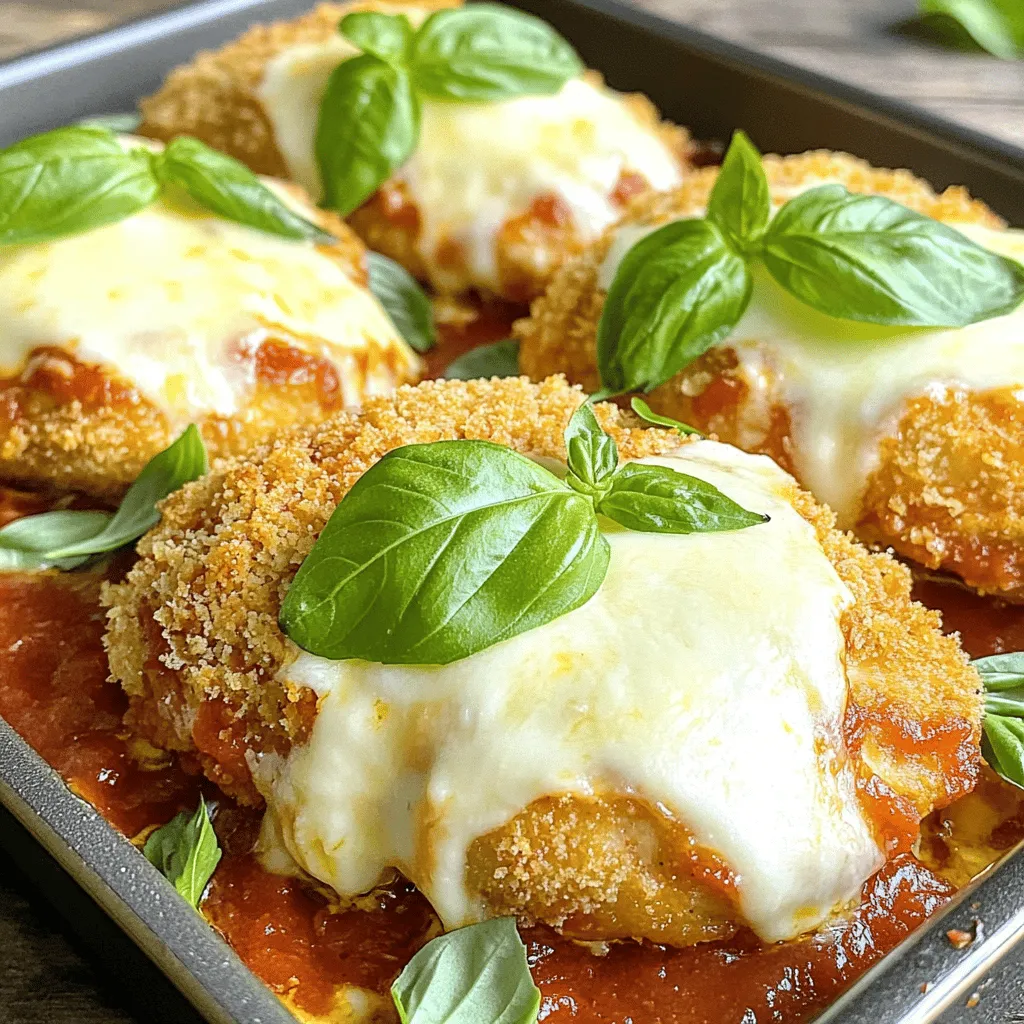
Looking for a quick and satisfying dinner? My Easy Chicken Parmesan is the perfect solution! With just a few simple

- 2 cups rotini pasta - 2 cups cooked chicken, shredded or diced - 1 cup cherry tomatoes, halved - 1 cucumber, diced - 1/2 cup red onion, finely chopped - 1/2 cup Kalamata olives, pitted and halved - 1/2 cup feta cheese, crumbled - 1/4 cup fresh parsley, chopped - 1/4 cup extra virgin olive oil - 2 tablespoons red wine vinegar (or balsamic vinegar) - 1 teaspoon dried oregano - Salt and pepper to taste Gather these ingredients before starting. The rotini pasta gives a nice twist. You can use any cooked chicken. Shredded or diced works great. Fresh veggies add crunch and color. Cherry tomatoes burst with flavor, while cucumbers cool the dish. Red onion adds a nice bite. Kalamata olives bring a salty kick. Feta cheese adds creaminess. Fresh parsley brightens the salad. For the dressing, the extra virgin olive oil is key for richness. Red wine vinegar gives a tangy note. Dried oregano enhances the Mediterranean vibe. Salt and pepper balance the flavors. {{ingredient_image_2}} Importance of Al Dente Cooking the pasta al dente means it stays firm. This gives the salad a great texture. When you bite into it, you want a bit of a chew. Overcooked pasta becomes mushy. So, keep an eye on your timer! Draining and Cooling Once the pasta is cooked, drain it in a colander. Rinse it under cold water. This stops it from cooking more. Cooling the pasta helps keep the salad light and fresh. Mixing the Ingredients In a large bowl, add your cooled pasta. Next, toss in the cooked chicken, cherry tomatoes, cucumber, red onion, Kalamata olives, feta cheese, and parsley. Stir gently to mix. You want to keep the ingredients whole and pretty. Handling Delicate Ingredients When you mix, be kind to soft items like feta. Break them up gently. This keeps the salad looking nice and helps the flavors shine. Combining Oil and Vinegar In a small bowl, whisk together olive oil and vinegar. You can use red wine vinegar or balsamic. This is your salad's flavor booster. Seasoning Tips Add dried oregano and salt and pepper to taste. These simple spices enhance the taste. Make sure to whisk well so everything blends. Tossing the Salad Pour the dressing over the salad mix. Toss everything together carefully. You want each piece to be coated in that tasty dressing. Chilling for Flavor Development Cover the bowl with plastic wrap. Chill the salad in the fridge for at least 30 minutes. This lets the flavors come together. When you serve it, the taste will be even better! How to Avoid Mushy Pasta To get perfect pasta, cook it al dente. Boil salted water and add the rotini. Follow the package time closely. Once done, drain it and rinse under cold water. This stops cooking and keeps it firm. Best Types of Pasta for Salad Rotini is great for salads. Its spiral shape holds the dressing well. You can also use penne or farfalle. These shapes add fun and texture to your dish. Options for Chicken If you want to switch the chicken, use grilled shrimp or chickpeas. These add protein and flavor. You can also try turkey or tofu for a tasty twist. Variations for Vegetables Feel free to change the veggies. Add bell peppers for sweetness or spinach for greens. Artichokes and zucchini also work well. Mix and match to keep it fresh! Alternative Dressings While the olive oil and vinegar mix is tasty, try Greek yogurt or tahini. These add creaminess. You can also use lemon juice for a zesty kick. Adding Extra Flavor For more flavor, add garlic or a pinch of red pepper flakes. Fresh herbs like basil or mint can brighten up the salad. Experimenting makes it your own! Pro Tips Cook Pasta Al Dente: Ensure the rotini pasta is cooked al dente, as it will absorb the dressing and flavors while maintaining a nice texture in the salad. Use Fresh Ingredients: Opt for fresh, high-quality ingredients, especially the vegetables and herbs, to enhance the overall flavor and nutrition of your salad. Chill for Flavor: Allow the salad to chill for at least 30 minutes before serving. This chilling time helps the flavors meld together, creating a more delicious dish. Customize Your Dressing: Feel free to experiment with different vinegars or add spices like garlic powder or red pepper flakes to the dressing for a personalized touch. {{image_4}} Substituting Chicken To make this salad vegetarian, swap the chicken for chickpeas or tofu. Both add protein and flavor. You can also use grilled vegetables for extra taste. Additional Protein Options If you want more protein, try adding beans, lentils, or nuts. These options keep the dish hearty and satisfying. Just remember to balance the flavors. Choosing Gluten-Free Pasta Select gluten-free pasta, like rice or corn pasta. Cook it just like regular pasta. This way, everyone can enjoy the dish without worry. Overall Flavor Retention Gluten-free pasta still tastes great. The flavors from the dressing and veggies shine through. You won’t miss the gluten in this tasty salad. Enhancing with Pesto Pesto adds a rich and fresh flavor to your salad. Just mix some in with the dressing. It brings the whole dish together with its vibrant taste. Flavor Pairing Tips Pair pesto with sun-dried tomatoes or artichokes for a burst of flavor. These ingredients work well with chicken and pasta. They make your salad even more delicious and fun to eat. For storing leftovers, use airtight containers. Glass or plastic containers work well. They keep the salad fresh and prevent odors. Make sure the salad is cool before sealing it. In the refrigerator, your Mediterranean chicken pasta salad lasts about 3 to 4 days. Check for signs of spoilage like changes in texture or smell. Always give it a quick look before eating. You can freeze this pasta salad, but it’s not the best option. Freezing can change the texture of the pasta and veggies. If you decide to freeze it, follow these steps: 1. Divide the salad into portions. 2. Use freezer-safe bags or containers. 3. Remove as much air as possible before sealing. To thaw, place the container in the fridge overnight. Avoid using the microwave, as it can make the pasta mushy. Once thawed, give it a good stir and check the taste. You might need to add extra dressing or seasoning. Mediterranean Chicken Pasta Salad stays fresh for about three to five days in the fridge. Store it in an airtight container to keep it safe. The flavors get better as it sits, but it can lose crunch over time. Always check for any signs of spoilage before eating. Absolutely! You can add any vegetables you like. Bell peppers, spinach, or artichokes work well. Just remember to chop them small to mix well with the pasta. Adding more veggies makes the salad even more colorful and nutritious. Serve the salad chilled for the best taste. A large bowl works great for gatherings. You can also plate individual portions. Garnish with extra parsley or feta cheese for a nice touch. This salad looks as good as it tastes! This blog post guides you through making a tasty Mediterranean Chicken Pasta Salad. We covered important ingredients, clear steps, and helpful tips to ensure your salad shines. You learned how to cook pasta perfectly, mix ingredients, and create a delicious dressing. Customizing flavors and storing leftovers were also discussed. Remember, this salad is versatile. Feel free to swap ingredients and adjust flavors. Enjoy every bite of your fresh creation!

Mediterranean Chicken Pasta Salad Fresh and Tasty Meal

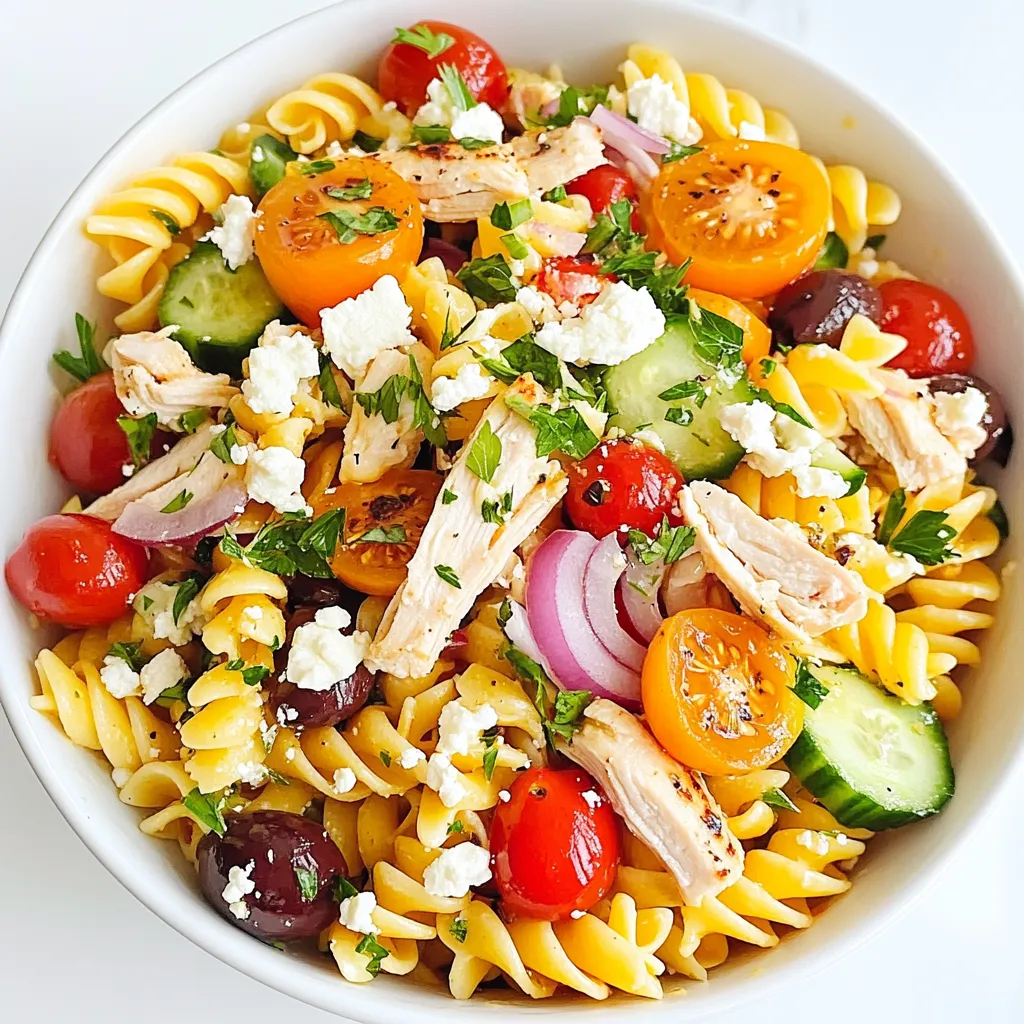
Welcome to a taste adventure with my Mediterranean Chicken Pasta Salad! This fresh and tasty meal combines vibrant flavors and

To make a tasty Cheesy Broccoli Rice Casserole, you need the following: - 2 cups cooked brown rice - 2 cups fresh broccoli florets, blanched - 1 cup shredded sharp cheddar cheese - 1 cup cottage cheese - 1 cup milk (preferably whole for creaminess) - 1/2 cup grated Parmesan cheese - 1/2 teaspoon garlic powder - 1/2 teaspoon onion powder - Salt and freshly ground black pepper to taste - 1/4 cup bread crumbs (optional, for topping) - 2 tablespoons olive oil (for greasing the dish) These ingredients work together to create a creamy, cheesy mix with a nice crunch on top. You can add more flavor and fun! Here are some optional ingredients: - Cooked chicken or turkey for protein - Sautéed onions or bell peppers for extra veggies - Different cheeses like mozzarella or gouda for a twist - Herbs such as thyme or rosemary for added flavor - Hot sauce for a spicy kick Feel free to mix and match based on what you have at home. For the best results, keep these tips in mind: - Use fresh broccoli for a bright color and crisp bite. - Cook the brown rice ahead of time and let it cool. This prevents sogginess. - Whole milk adds creaminess. If you want it lighter, you can use skim milk. - Don’t skip the garlic and onion powder. They add great depth of flavor. - If you use bread crumbs, toast them lightly for extra crunch. With these tips, you can make a casserole that will wow your family and friends. For the complete recipe, check out the Full Recipe section. First, preheat your oven to 350°F (175°C). This step is key for even baking. While the oven heats, grease a medium baking dish with 2 tablespoons of olive oil. This helps the casserole from sticking. Next, cook 2 cups of brown rice according to package directions. You can use leftover rice, too. Then, blanch 2 cups of fresh broccoli florets. This means you boil them briefly and then cool them fast in ice water. This keeps them bright and crunchy. In a big mixing bowl, add your cooked brown rice and the blanched broccoli. Use a spatula to mix them well. Make sure every piece of broccoli is mixed in. Now, grab another bowl. Whisk together 1 cup of sharp cheddar cheese, 1 cup of cottage cheese, and 1 cup of milk. Add 1/2 teaspoon of garlic powder and 1/2 teaspoon of onion powder. Don’t forget to add salt and pepper to taste. Make sure this mixture is nice and smooth. Pour this cheesy mix over your rice and broccoli. Gently fold it all together. You want every bite to have that creamy goodness. Now it’s time to transfer the mix into your greased baking dish. Spread it evenly with your spatula. If you want a crunchy topping, sprinkle 1/4 cup of bread crumbs on top. Place the dish in your preheated oven. Bake for 25-30 minutes. Keep an eye on it. You want it to be bubbly and golden brown on top. Once it looks perfect, remove it from the oven. Let it cool for 5-10 minutes before serving. This will help avoid burns and make it easier to cut. Enjoy your cheesy broccoli rice casserole! For the full recipe, check out the earlier section. To get a creamy and rich casserole, use whole milk or cream. The sharp cheddar adds a nice bite. If you want more flavor, try adding a pinch of cayenne pepper or smoked paprika. These spices can give your dish a gentle kick. Ensure you blanch the broccoli; this keeps it bright and crisp. One common mistake is overcooking the casserole. Keep an eye on it as it bakes. You want it bubbly and golden, not dry. Another error is not mixing well. Make sure the cheese sauce coats all the rice and broccoli evenly. This helps every bite to be full of flavor. Lastly, don't skip the resting time. Let it cool for a few minutes before serving. Serve this casserole hot from the oven. You can pair it with roasted chicken or a fresh salad. For a fun twist, add some crumbled bacon or toasted nuts on top before serving. This adds crunch and flavor. If you want to make it look fancy, chop some fresh parsley and sprinkle it on top. For the full recipe, check back to create your cheesy masterpiece! {{image_4}} You can easily make this dish vegetarian by using vegetable broth instead of milk. You can also add more veggies. Think about bell peppers or carrots for extra color and nutrition. To make this casserole gluten-free, swap regular bread crumbs for gluten-free ones. You can also use gluten-free rice. This keeps the dish tasty and safe for those with gluten sensitivities. If you want to change up the cheese, feel free! Try mozzarella for a milder taste or pepper jack for a spicy kick. You can also mix different cheeses to create your own unique flavor. For the full recipe, check out the details above! To store leftovers, first let the casserole cool. Then, place it in an airtight container. Make sure to cover it well to keep it fresh. You can store it in the fridge for up to four days. If you want to keep it longer, freezing is a great option. When you are ready to eat, you have a few choices. You can reheat it in the oven or microwave. For the oven, preheat to 350°F (175°C). Place the casserole in a dish and cover it with foil. Bake for about 15-20 minutes. For the microwave, heat in a safe bowl for 2-3 minutes. Stir in between to heat evenly. To freeze, make sure the casserole is completely cool. Cut it into portions and wrap each piece in plastic wrap. Then place them in a freezer-safe bag. This helps keep them fresh for up to three months. When you want to eat it, thaw overnight in the fridge. Then reheat as mentioned. For the best taste, try to eat it within a month. For the full recipe, check the link. You can use white rice if you prefer. It cooks faster and is softer. Quinoa is another great choice. It adds a nutty flavor and is high in protein. Cauliflower rice works too for a low-carb option. Just remember, cooking times may vary with these substitutes. Yes, you can make this casserole ahead of time. Prepare it and place it in the fridge. Cover it tightly with plastic wrap or foil. When ready to bake, just remove the cover and cook. It may need a few extra minutes in the oven. This casserole lasts for about 3 to 5 days in the fridge. Store it in an airtight container. If you want it to last longer, consider freezing it instead. Absolutely! Frozen broccoli is a great time saver. Just thaw it and drain any excess water. Then, mix it into your casserole as you would with fresh broccoli. It may not hold its shape as well but will still taste delicious. For the full recipe, check the section above. In this blog post, we explored the key ingredients for a delicious cheesy broccoli rice casserole. I shared step-by-step instructions for making it, along with tips for perfecting flavor and texture. We also looked at variations to suit different diets and how to store any leftovers. Remember, this dish is easy to make and full of flavor. You can always adapt it to fit your tastes. Enjoy your cooking and savor each bite!

Cheesy Broccoli Rice Casserole Easy Family Favorite

If you’re looking for an easy, tasty dish that your whole family will love, you’ve found it! This Cheesy Broccoli

To make a delightful lemon blueberry pound cake, gather these basic items: - 1 ½ cups all-purpose flour - 1 teaspoon baking powder - ½ teaspoon baking soda - ¼ teaspoon salt - ½ cup unsalted butter, softened - 1 cup granulated sugar - 2 large eggs, at room temperature - Zest of 1 lemon (about 1 tablespoon) - 1 tablespoon freshly squeezed lemon juice - ½ cup buttermilk (or milk with 1 teaspoon white vinegar) - 1 cup fresh blueberries (or frozen if fresh are unavailable) For a beautiful finish, consider these extras: - Powdered sugar for dusting - Whole blueberries for decoration - A sprig of mint for freshness When selecting blueberries, look for these signs: - Pick berries that are firm and plump. - Choose berries with a deep blue color. - Avoid any with green or red spots. - Check for a light white powder on the surface; it’s a natural protective coating. - Smell the berries; they should have a sweet aroma. Using fresh ingredients makes your cake tastier. Trust me, it’s worth the effort! For the full recipe, check the complete guide. Start by preheating your oven to 350°F (175°C). Grease a 9x5 inch loaf pan lightly. Line the pan with parchment paper. This helps you remove the cake easily later. In a medium bowl, mix together the dry ingredients: - 1 ½ cups all-purpose flour - 1 teaspoon baking powder - ½ teaspoon baking soda - ¼ teaspoon salt Whisk these together until they are well combined. Set this bowl aside for now. In a large mixing bowl, cream the softened butter and granulated sugar. Use an electric mixer on medium speed. Beat them for about 3-4 minutes. The mixture should look light and fluffy. Add the eggs to the butter-sugar mix one at a time. Make sure to mix well after each addition. Then add the lemon zest and lemon juice. Mix until everything is blended smoothly. Gradually add your dry mixture to the wet ingredients. Do this in parts, alternating with the buttermilk. Start and end with the dry mix. Keep the mixer on low speed to avoid overmixing. This keeps your cake tender. Gently fold in the fresh blueberries using a spatula. Ensure they are spread evenly without breaking. Pour the batter into your prepared loaf pan. Smooth the top with the spatula. Bake in the oven for 50-60 minutes. A toothpick should come out clean when the cake is done. Let the cake cool in the pan for about 10 minutes. Then, move it to a wire rack to cool completely. If you want, dust the cooled cake with powdered sugar before serving. Enjoy the bright flavors of lemon and blueberries with every bite! For the full recipe, check the details above. To get a moist and fluffy cake, follow a few easy steps. First, make sure your butter is soft. This helps it mix well with sugar. Cream them together until light and airy. Second, add the eggs one by one. This ensures they blend in well. When mixing the dry and wet ingredients, do not overmix. Mixing just until combined keeps the cake tender. Lastly, fold in the blueberries gently. This prevents them from breaking apart in the batter. One big mistake is using cold ingredients. Always let your eggs and butter sit at room temperature. Another mistake is overmixing the batter. This can make your cake dense. Also, don’t skip lining your pan with parchment paper. Doing so helps the cake come out easily. Lastly, keep an eye on baking time. Every oven is different, so check your cake a bit early. Start with fresh blueberries. They should be firm and plump. Look for vivid color, which shows ripeness. For lemons, choose ones that feel heavy for their size. This means they have lots of juice. Use unsalted butter for better control over salt levels. When it comes to flour, go for all-purpose flour for the best results. Lastly, use fresh buttermilk or make your own by adding vinegar to milk. Quality ingredients make a big difference in taste. For the full recipe, refer back to the beginning of this article. {{image_4}} You can make this cake gluten-free with a simple swap. Use gluten-free flour instead of all-purpose flour. Brands like Bob’s Red Mill or King Arthur Flour work well. The rest of the recipe stays the same. The taste and texture will still shine through. Just make sure to check that your baking powder is gluten-free too! For a fun twist, you can add nuts or other fruits. Chopped walnuts or pecans add a nice crunch. If you like other fruits, try raspberries or strawberries. These can complement the lemon and blueberry flavors. Mix in about half a cup of nuts or fruits. Just be careful not to overload the batter. If you want a different shape, try a Bundt cake. Follow the same recipe, but use a Bundt pan. Grease it well to prevent sticking. Bake for about 60-70 minutes. The cake will have a lovely, fancy look. This makes it perfect for special occasions or gatherings. For the full recipe, check out the Lemon Blueberry Dream Cake 🫐 section above! To keep your lemon blueberry pound cake fresh, store it in an airtight container. This will help maintain its moisture. Place the container at room temperature if you plan to eat it within a few days. For longer storage, move it to the fridge. Always allow it to cool completely before storing to avoid condensation. Freezing is a great option if you have extra cake. First, slice the cake into individual pieces. Wrap each slice tightly in plastic wrap. Then, place the wrapped slices in a freezer-safe bag or container. You can freeze the cake for up to three months. When you're ready to enjoy it, simply thaw it in the fridge overnight. To reheat your cake, you can use a microwave or an oven. For the microwave, place a slice on a microwave-safe plate and heat for about 15-20 seconds. This warms the cake nicely. If you prefer the oven, preheat it to 350°F (175°C). Wrap the cake in foil and heat for about 10-15 minutes. This method helps keep the cake moist. Enjoy every bite of your delightful treat! To make lemon blueberry pound cake, gather your ingredients. You need flour, sugar, butter, eggs, blueberries, and lemon. Follow the steps in the Full Recipe for best results. Start by mixing dry ingredients in one bowl. In another bowl, cream butter and sugar. Then, add eggs and lemon juice. Combine both mixtures slowly. Gently fold in blueberries before baking. Bake at 350°F for about 50-60 minutes. Enjoy the bright, fresh taste! Yes, you can substitute buttermilk. If you don't have buttermilk, mix one cup of milk with one teaspoon of white vinegar. Let it sit for about five minutes. This will mimic the tangy taste of buttermilk. It helps to keep the cake moist and adds flavor. Your cake will still turn out great! To store your lemon blueberry pound cake, wrap it tightly in plastic wrap. This keeps it fresh and moist. You can also place it in an airtight container. Store it at room temperature for up to three days. If you need to keep it longer, freeze the cake. Wrap it well and store it in the freezer for up to three months. Simply thaw it in the fridge when you're ready to enjoy! This blog post shared insights into making a delicious lemon blueberry pound cake. We covered key ingredients, prep steps, and baking tips to ensure a great texture. I also touched on variations and storage methods. Remember, fresh blueberries and careful mixing make a big difference. Enjoy experimenting with different flavors and practices. With these tips, you can create a cake that impresses everyone. Happy baking!

Lemon Blueberry Pound Cake Delightfully Moist Recipe

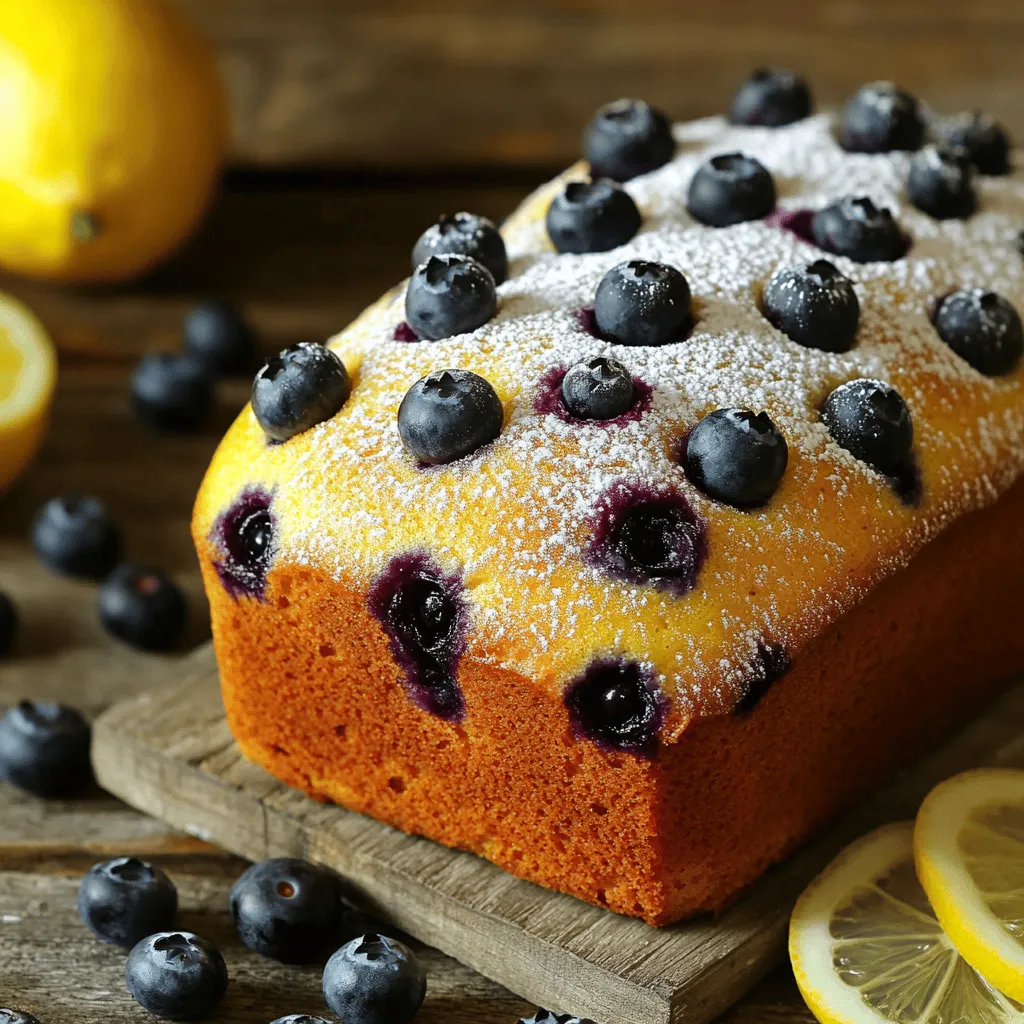
If you crave a moist and zesty dessert, you’re in the right place! This Lemon Blueberry Pound Cake recipe combines

Older posts
Newer posts
← Previous Page1 … Page45 Page46 Page47 … Page91 Next →

dsad

© 2025 recipesstation • Built with GeneratePress

Our Policies

  • Copyright Policy
  • Cookie Policy
  • GDPR Policy
  • Privacy Policy
  • Disclaimer
  • Terms Of Use

More Information

  • Home
  • About
  • Contact
  • Appetizers
  • Dessert
  • Dinner
  • Drinks
©2025, recipesstation About Back To Top