
Ingredient Taco Casserole Flavorful Comfort Dish
Looking for a dish that packs a punch and warms your soul? Say hello to Ingredient Taco Casserole! This flavorful
Looking for a dish that packs a punch and warms your soul? Say hello to Ingredient Taco Casserole! This flavorful
![- 1 pound Brussels sprouts - 4 cloves garlic - 3 tablespoons olive oil - ½ cup Parmesan cheese - 1 teaspoon sea salt - ½ teaspoon black pepper - ½ teaspoon red pepper flakes (optional) - 2 tablespoons balsamic vinegar - Fresh parsley For this Garlic Parmesan Roasted Brussels Sprouts recipe, start with fresh Brussels sprouts. Choose ones that are firm and bright green. Trim them and cut them in half. This helps them cook evenly. Next, you will need garlic. Use fresh garlic for the best flavor. Mince it finely. The olive oil adds richness and helps the sprouts crisp up in the oven. Parmesan cheese is key to this dish. Use freshly grated cheese for the best taste. It melts beautifully and adds a savory touch. For seasoning, sea salt and black pepper will elevate the flavor. If you like heat, red pepper flakes add a nice kick. A drizzle of balsamic vinegar at the end brings a sweet and tangy note. Lastly, fresh parsley adds color and brightness. It makes the dish look appealing and fresh. Enjoy these delicious sprouts as a side or snack! For the full recipe, check out the details above. - Preheat the oven to 400°F (200°C). - Trim and halve the Brussels sprouts. Start by preheating your oven to 400°F (200°C). This step is key for getting a nice crisp on the sprouts. While the oven heats up, grab your Brussels sprouts. Trim off the stem ends and slice each sprout in half. This helps them cook evenly. - Mix Brussels sprouts with olive oil and seasonings. - Toss until evenly coated. In a large bowl, add the halved Brussels sprouts. Pour in 3 tablespoons of extra virgin olive oil. Then, add 4 cloves of minced garlic, 1 teaspoon of sea salt, ½ teaspoon of black pepper, and optional red pepper flakes. Toss everything together. Make sure each sprout gets coated in the oil and seasonings. This step adds tons of flavor. - Initial roasting for 20 minutes. - Adding Parmesan cheese. - Final roasting until golden brown. Spread the seasoned Brussels sprouts onto a baking sheet in a single layer. This helps them roast properly. Place the sheet in the oven and roast for 20 minutes. After that, take them out carefully. Sprinkle ½ cup of freshly grated Parmesan cheese evenly over the sprouts. Return the baking sheet to the oven and roast for an additional 10 to 15 minutes. You want them golden brown and crispy. The cheese should be melted and bubbling. For added flavor, drizzle 2 tablespoons of balsamic vinegar over the sprouts once they are done. Before serving, sprinkle fresh parsley on top for a colorful touch. If you want the full recipe, check it out [Full Recipe]. To get that lovely crispiness, always spread the Brussels sprouts in a single layer on the baking sheet. This allows hot air to flow around each sprout, roasting them evenly. I recommend roasting for about 20 minutes first. Then, sprinkle on the Parmesan cheese and roast for another 10 to 15 minutes. Keep an eye on them; you want a golden brown color. When preparing garlic, I like to mince it finely. This helps it release its strong flavor. For the Parmesan cheese, fresh is best. Choose a high-quality block of cheese and grate it just before using. It melts better and tastes richer than pre-grated options. For serving, place the Brussels sprouts in a large, shallow bowl. This makes them look beautiful and highlights their crispy texture. To add a finishing touch, sprinkle more Parmesan and fresh parsley on top. The green and gold colors pop and make the dish more inviting. For the full recipe, check out the link above. {{image_4}} To add heat to your dish, try spicy garlic Parmesan Brussels sprouts. You can mix in some red pepper flakes, or even cayenne pepper, to kick up the flavor. Start with a half teaspoon of red pepper flakes. If you like more heat, feel free to add more. The spice pairs well with the garlic and cheese. The warmth enhances the taste and adds excitement to every bite. You can switch up the cheese for a new taste. Instead of Parmesan, try Pecorino Romano. This cheese offers a sharper flavor. Another option is to use a blend of cheddar and mozzarella. This mix gives a creamy texture and rich taste. Each cheese brings its own charm to the dish. Experiment to find your favorite combination. If you want a vegan twist, there are great options. Substitute the Parmesan with nutritional yeast. This ingredient gives a cheesy flavor without dairy. You can also use vegan cheese shreds that melt well. Look for brands that taste good and melt nicely. This way, you can enjoy the same delicious dish while keeping it plant-based. To store your Garlic Parmesan Roasted Brussels Sprouts, first let them cool down. Place them in an airtight container. This keeps them fresh. You can store them in the fridge for up to three days. If you want to keep them longer, freezing is a good option. When you reheat Brussels sprouts, you want them crispy. The best way is to use an oven. Preheat your oven to 350°F (175°C). Spread the sprouts on a baking sheet. Heat for about 10 to 15 minutes. Check them often to avoid burning. You can also use a skillet. Heat a bit of olive oil over medium heat. Add the sprouts and cook until they are crispy again. To freeze Brussels sprouts, follow these steps. First, let them cool completely. Spread them on a baking sheet in a single layer. Freeze them for about two hours. After that, transfer them to a freezer-safe bag. Remove as much air as you can. They can stay frozen for up to three months. When you want to use them, thaw them in the fridge overnight. Then, reheat as mentioned above for the best results. For the full recipe, check out the detailed instructions. Yes, you can make Garlic Parmesan Roasted Brussels sprouts ahead of time. Cook them fully and let them cool. Store them in an airtight container in your fridge. They stay fresh for up to three days. When you're ready to eat them, just reheat in the oven. This will help regain some crispiness. You can also roast them in advance and add the cheese later. Brussels sprouts pair well with many dishes. You can serve them alongside roasted chicken or grilled salmon. They also go great with pasta or quinoa for a vegetarian option. For a larger meal, add them to a holiday feast. They add color and flavor to any plate. Try serving them with a tangy sauce or a fresh salad for balance. You’ll know Brussels sprouts are done roasting when they are golden brown and crispy. Check if they have a nice caramelized color. The cheese should be melted and bubbling. Use a fork to poke one; it should feel tender inside. This is the perfect time to take them out of the oven. Enjoy their delicious flavor and crisp texture! This guide covers everything you need for Garlic Parmesan Roasted Brussels sprouts. We discussed main ingredients, seasoning, and garnishing. You learned how to prep and roast them perfectly. Tips helped ensure crispiness and flavor. Variations offered new ideas for spice and cheese. Finally, I shared storage methods to keep leftovers fresh. Enjoy your tasty dish with confidence!](https://recipesstation.com/wp-content/uploads/2025/06/14e6e303-70ee-47e4-86a5-a4c1295d598b.webp)
Are you ready to transform Brussels sprouts into a tasty treat? With my Garlic Parmesan Roasted Brussels Sprouts recipe, you’ll
![To make loaded sweet potato fries, you need some key items. Here’s what you should gather: - 2 large sweet potatoes, cut into uniform fries - 2 tablespoons extra virgin olive oil - 1 teaspoon smoked paprika - 1 teaspoon garlic powder - Salt and freshly ground black pepper to taste Sweet potatoes serve as the base. They give the fries a wonderful sweetness. Olive oil helps them crisp up nicely. Smoked paprika and garlic powder add depth and flavor. Don’t forget the salt and pepper for that perfect taste! Once your fries are baked and crispy, it’s time to load them up! Here are my favorite toppings: - 1 cup canned black beans, rinsed and drained - 1 cup corn kernels (can be fresh, frozen, or canned) - 1 cup sharp cheddar cheese, freshly shredded - 1 ripe avocado, diced - 1/2 cup plain Greek yogurt or sour cream Black beans and corn add protein and texture. Cheddar cheese melts beautifully and gives a creamy touch. Diced avocado adds a fresh taste. Lastly, Greek yogurt or sour cream provides a cool contrast. For a final touch, consider these optional garnishes: - 2 green onions, finely chopped - Fresh cilantro leaves, for garnish Chopped green onions add crunch and color. Fresh cilantro gives a bright flavor. You can mix and match these garnishes to suit your taste. For the full recipe, check the details above! 1. Preheat the oven and prepare the baking sheet First, set your oven to 425°F (220°C). This high heat helps make the fries crispy. Line a baking sheet with parchment paper. This keeps the fries from sticking and makes cleanup easy. 2. Coat the sweet potatoes with oil and spices Take your sweet potatoes and cut them into uniform fries. Place them in a large bowl. Add 2 tablespoons of extra virgin olive oil, 1 teaspoon of smoked paprika, 1 teaspoon of garlic powder, and salt and pepper to taste. Toss the fries well until every piece is coated with oil and spices. 1. Arranging the fries on the baking sheet Spread the coated sweet potato fries in a single layer on the prepared baking sheet. Make sure there’s space between each fry. This space helps them crisp up nicely. 2. Cooking time and flipping instructions Bake the fries in your preheated oven for 20-25 minutes. Flip the fries halfway through the cooking time. This way, they cook evenly and turn golden brown. 1. Preparing the black bean and corn mixture While the fries bake, gather your toppings. In a small bowl, mix 1 cup of rinsed black beans with 1 cup of corn. You can add a pinch of salt and a squeeze of lime juice for extra flavor if you wish. Stir this mixture well. 2. Melting the cheese on fries When the fries are crispy, take them out of the oven. Sprinkle 1 cup of shredded cheddar cheese over the hot fries. Return the baking sheet to the oven for about 5 minutes, until the cheese is melted and bubbly. Now, your loaded sweet potato fries are almost ready! Just top them with the black bean and corn mixture, diced avocado, and a drizzle of Greek yogurt or sour cream. Don’t forget the green onions and fresh cilantro for the best taste. Enjoy your delicious creation! For the complete recipe, check [Full Recipe]. To make your sweet potato fries crispy, cut them evenly. This helps them cook at the same rate. Aim for about 1/4 inch thickness. Thicker fries will take longer to cook and may not get as crispy. Avoid overcrowding your baking sheet. If the fries touch, they will steam instead of crisp. Bake them in batches if needed. Spread them out in a single layer. You’ll love the crunchy results! Add a splash of lime juice to your fries. It gives a fresh kick and brightens the flavor. You can also play with spices. Try chili powder or cumin for a different taste. Smoked paprika adds a nice depth too. Get creative with your seasonings! Select the right baking sheet for best results. A heavy-duty, rimmed baking sheet works great. It helps to distribute heat evenly. Use parchment paper for easy cleanup and less sticking. For mixing, a large bowl is best. A sturdy spatula helps in evenly coating the fries. Keep these tools handy to make cooking smooth and fun. Check the [Full Recipe] for more details on the cooking process! {{image_4}} You can change the flavor of your loaded sweet potato fries with fun toppings. Try adding spicy jalapeños and salsa for a kick. The heat from the jalapeños pairs well with the sweetness of the fries. You can also choose different kinds of cheese. Pepper jack gives a nice spice, while feta adds a tangy flavor. Mix and match to find your favorite combo! If you want a lighter option, use an air fryer. It cooks the fries with less oil while still keeping them crispy. This method makes your fries healthier without losing taste. For a dairy-free meal, swap Greek yogurt with a dairy-free option like cashew cream. This way, you still get creaminess without the dairy. You can explore different cuisines with your loaded fries. For a Southwest style, add toppings like black beans, corn, and avocado. You can drizzle lime juice for extra zest. If you want a Mediterranean twist, try adding olives, hummus, or fresh herbs. These flavors will transform your fries into a whole new dish. For the full recipe, check out the [Full Recipe]. To keep your loaded sweet potato fries fresh, let them cool first. Place them in an airtight container. This helps keep moisture out and preserves flavor. You can store them in the fridge for up to three days. If you want the fries to stay crisp, avoid stacking them. Place a paper towel at the bottom of the container to absorb extra moisture. When you're ready to enjoy your fries again, I recommend using the oven. Preheat it to 400°F (200°C). Spread the fries on a baking sheet in a single layer. This method helps them regain their crispiness. Bake for about 10 minutes, flipping halfway through. If you need a quick option, you can use the microwave. Place the fries on a microwave-safe plate. Heat them in 30-second bursts until warm. Be aware that they might not be as crispy. You can freeze cooked loaded sweet potato fries, but you must do it right. Allow the fries to cool completely. Lay them flat on a baking sheet and freeze until solid. After that, transfer them to a freezer bag. Remove as much air as possible to avoid freezer burn. They can last up to three months in the freezer. To prepare from frozen, you can bake the fries straight from the freezer. Preheat your oven to 425°F (220°C) and bake for about 15-20 minutes. Keep an eye on them to make sure they cook evenly. Enjoy your tasty fries anytime! For the full recipe, refer to the instructions above. Yes, you can prepare loaded sweet potato fries ahead of time. I suggest cooking the fries fresh for the best texture. However, you can make the toppings early. For example, mix the black beans and corn together and store them in the fridge. You can also chop the avocado and green onions ahead of time. Just keep them in airtight containers to stay fresh. When you’re ready to eat, bake the fries and add your tasty toppings. This way, you save time and still enjoy the full flavor! Sweet potato fries pair well with many sauces. Here are a few great options: - Honey mustard: Sweet and tangy, it adds a nice kick. - Chipotle mayo: Creamy with a bit of heat, it’s a perfect match. - Ranch dressing: Cool and creamy, it balances the sweetness of the fries. - Guacamole: Creamy and fresh, it complements the fries well. Feel free to mix and match these sauces to find your favorite! Making loaded fries vegan is easy! Skip the cheddar cheese and use vegan cheese instead. You can also swap the Greek yogurt with a plant-based yogurt. Look for options made from almonds or coconut. This way, you keep the creamy texture while making it vegan-friendly. Enjoy your loaded sweet potato fries without missing out on flavor! Loaded sweet potato fries are a tasty and fun dish. You learned key ingredients, from sweet potatoes to toppings that enhance flavor. I shared tips to get them crispy and variations to try. You can make ahead, store well, and reheat easily. Enjoy experimenting with flavors and enjoying this treat. Simple steps make your fries a hit, every time. Keep it fresh, flavorful, and fun!](https://recipesstation.com/wp-content/uploads/2025/06/7239931e-5a96-48f9-ba07-784674e1c515.webp)
Imagine sinking your teeth into crispy, golden Loaded Sweet Potato Fries, piled high with bold toppings and flavor! This simple,
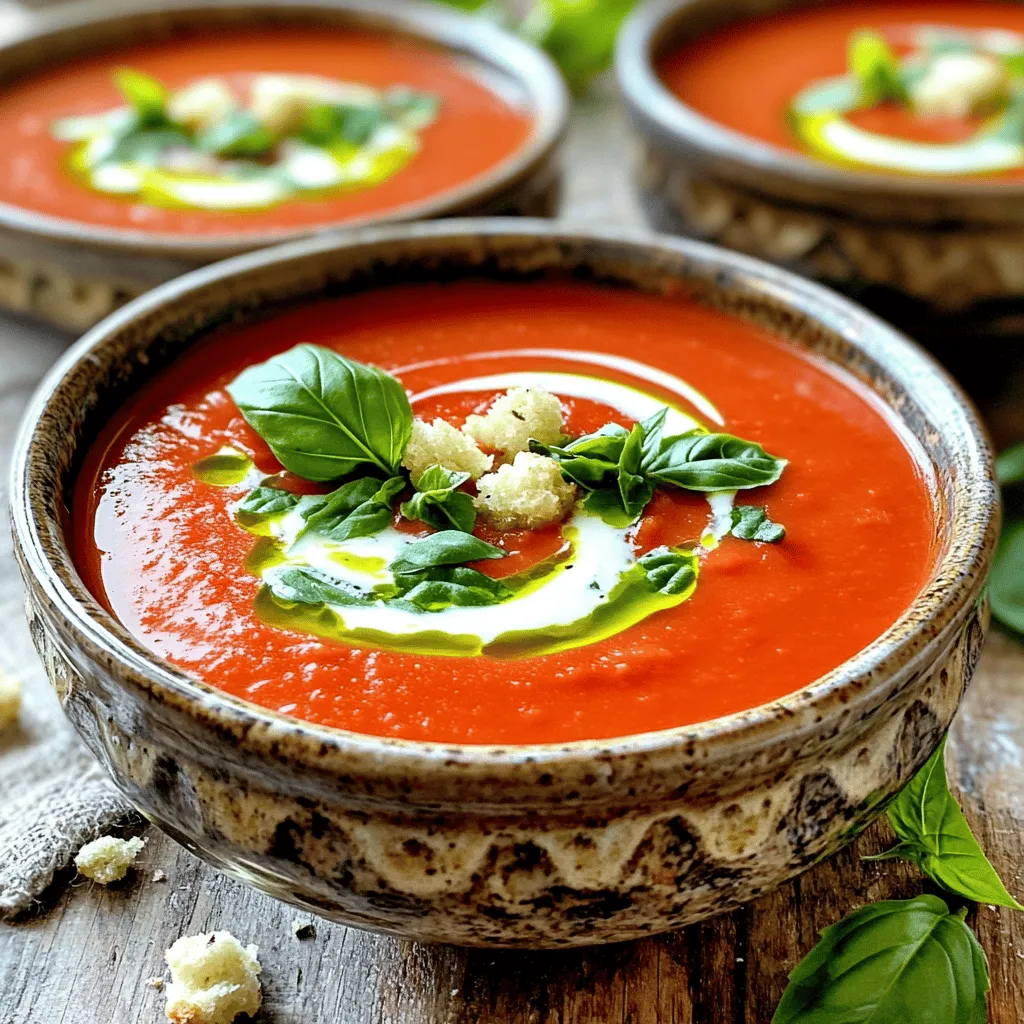
There’s nothing quite like a warm bowl of Creamy Tomato Basil Soup on a chilly day. This easy recipe bursts
![- Chicken: 2 cups shredded cooked chicken (rotisserie recommended) - Vegetables: 1 cup each of diced carrots, peas, and potatoes, 1/2 cup finely diced celery, and 1/2 cup chopped onion - Base: 3 tablespoons unsalted butter, 3 tablespoons all-purpose flour - Liquids: 2 cups low sodium chicken broth, 1 cup whole milk - Seasoning: 1 teaspoon garlic powder, 1 teaspoon dried thyme, salt, and pepper - Crust: 1 package of refrigerated pie pastry (2 crusts) or homemade pie crust - Fresh herbs: Consider adding rosemary or parsley - Extra vegetables: Corn or green beans for added texture - Presentation ideas: Garnish with fresh herbs for a pop of color - Pair with a light salad for balance When making classic chicken pot pie, focus on quality ingredients. I love using rotisserie chicken for its rich flavor. You can add diced carrots, peas, and potatoes for a hearty mix. The butter and flour create a creamy base that blends well with chicken broth and milk. Feel free to mix in fresh herbs like parsley or rosemary. They add a nice touch to the dish. For extra crunch and flavor, consider adding corn or green beans. When serving, garnish your pie with fresh herbs. This adds color and makes it look appealing. Pairing with a light salad helps balance the meal. You can find the complete recipe in the [Full Recipe] section for all the steps to create this comforting dish. - Preheat your oven to 425°F (220°C). - Gather and measure all ingredients for efficiency. - In a large saucepan, melt the butter over medium heat. - Add the chopped onion, diced celery, and potatoes. Cook until soft. This takes about 5 minutes. - Next, sprinkle the flour over the veggies. Stir well to coat them. - Slowly whisk in the chicken broth and milk. This helps avoid lumps. - Keep stirring until the mixture thickens. This should take around 5-7 minutes. - Roll out one pie crust into a 9-inch pie dish. - Pour the cooled chicken filling into the crust. Spread it evenly. - Roll out the second crust and place it on top. Trim any excess and crimp the edges. - Brush the top crust with beaten egg. This gives it a nice color. - Cut a few slits in the top crust to let steam escape. - Place the pie in the oven and bake for 30-35 minutes. Look for a golden brown crust. These steps will lead you to a warm, comforting chicken pot pie. For the full recipe, check out the Cozy Chicken Pot Pie section. To make a flaky crust, keep your ingredients cold. Use chilled butter and ice water. This helps create layers in the dough. Avoid overworking the dough. Mix until just combined. Overmixing can lead to a tough crust. For a golden finish, brush the top with beaten egg. This adds a nice shine and color. You can boost the flavor with fresh herbs. Try adding rosemary or parsley for a fresh touch. A dash of hot sauce can add heat if you like spice. A squeeze of lemon juice can brighten the dish. Balance flavors with a hint of acidity or heat. This can make your pot pie even more delicious. To ensure even cooking, rotate the pie halfway through baking. This helps it bake evenly and avoids soggy spots. After baking, let the pie rest for 5-10 minutes. This allows the filling to set, making it easier to slice. A well-rested pie has the best texture and flavor. {{image_4}} You can easily switch out the chicken for turkey. This works great after a holiday feast. If you want a vegetarian option, try using mushrooms or lentils for protein. For a lighter dish, choose low-fat milk and butter. These swaps keep the taste good while cutting calories. For a cheesy twist, add shredded cheddar or mozzarella to the filling. This makes the pie super creamy. You can also mix in global spices like curry powder or smoked paprika. These spices give your pot pie a fun and unique flavor. If you’re gluten-free, look for a gluten-free pie crust. Many stores sell these now. You can also make your own using almond or coconut flour. For those avoiding dairy, use almond milk or coconut cream in place of milk. This way, everyone can enjoy a slice of this comfort food. To store your leftover chicken pot pie, place it in an airtight container. This helps keep it fresh. You can store it in the fridge for up to three days. Make sure to let it cool before sealing. This way, it will not steam inside the container. You can freeze chicken pot pie before or after baking. If you freeze it before baking, wrap it well in plastic wrap and foil. It can last for up to three months. When you are ready to bake, simply remove it from the freezer and bake it straight from frozen. If you freeze it after baking, let it cool first. Then, wrap it tightly and store it in the freezer. To reheat, thaw it in the fridge overnight before warming. To keep the crust nice and flaky, the oven is your best friend. Preheat the oven to 350°F (175°C). Place the pot pie on a baking sheet to catch any drips. Reheat it for about 25 to 30 minutes. Check the crust; it should feel warm and crisp. If the edges brown too fast, cover them with foil. This helps the pie heat through without burning the crust. The best chicken for pot pie is rotisserie chicken. It’s already seasoned and tender. You can also use cooked chicken breast. Just make sure it is shredded or diced well. This chicken adds great flavor and saves time. Yes, you can make chicken pot pie ahead of time. Prepare the filling and let it cool. Then, store it in the fridge for up to two days. You can also freeze it. Just wrap it well in plastic wrap and foil. When you're ready, bake it from frozen. This way, you’ll have a warm, tasty meal waiting for you. Look for a bubbling filling. The crust should be golden brown. These are good signs that your pot pie is ready. Let it rest for a bit before serving. This helps the filling set up nicely. Chicken pot pie can be a bit rich. It has protein from the chicken and vitamins from the vegetables. You can make it healthier by using less butter and low-fat milk. Adding more veggies also boosts the nutrition. Consider using whole grain crust for added fiber. For the full recipe, check out Cozy Chicken Pot Pie. You can now create a delicious chicken pot pie with ease. This guide covered essential ingredients, straightforward steps, and tips for the best results. Remember, you can customize your pie with different spices, vegetables, or even cheese. Whether you bake it fresh or freeze it for later, each bite will be comforting and tasty. Enjoy trying this classic dish with your family, and have fun experimenting with flavors that suit your taste. Happy cooking!](https://recipesstation.com/wp-content/uploads/2025/06/ae692175-1ca2-493c-99bc-020666ba95e0.webp)
There’s something special about Classic Chicken Pot Pie—it warms the heart and fills the belly. With tender chicken, fresh veggies,
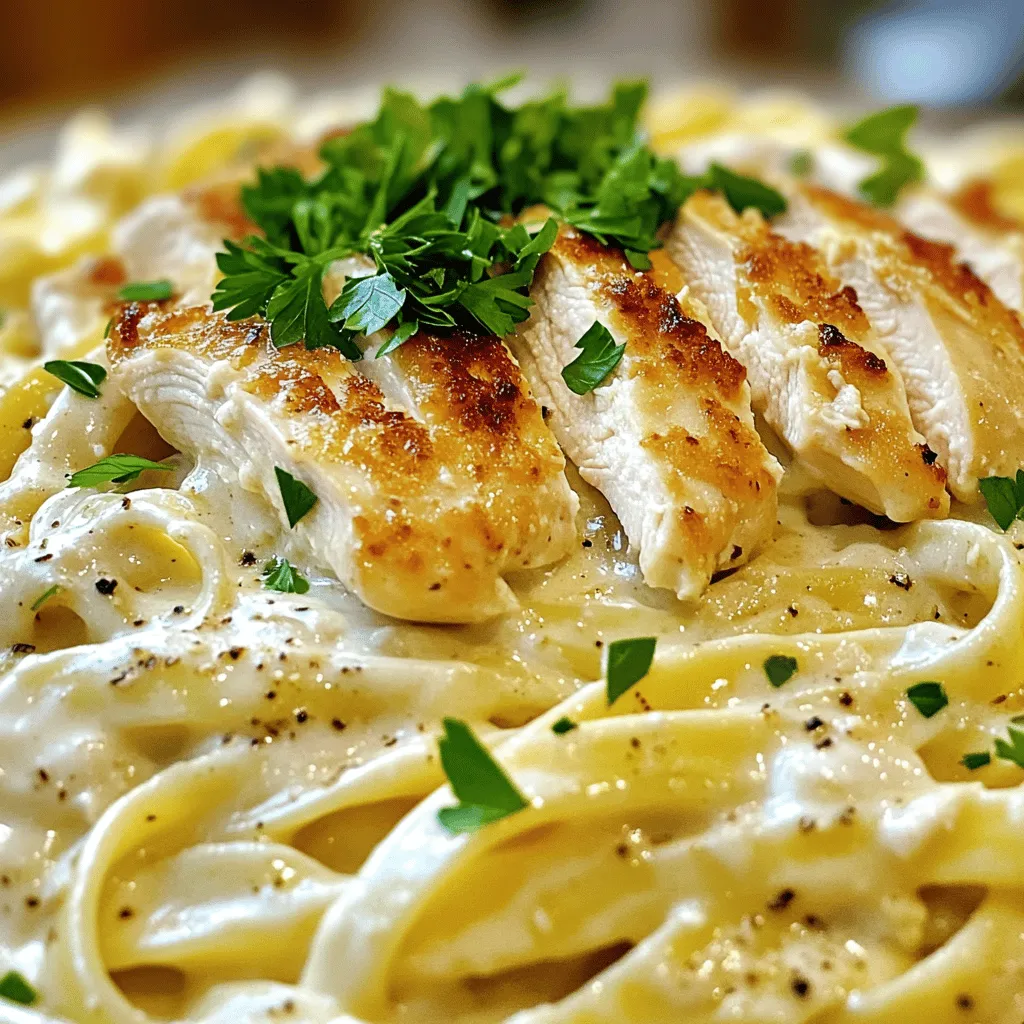
If you crave a simple yet rich meal, look no further than Easy Chicken Alfredo Pasta. This creamy delight features
![- 1 whole chicken (4-5 lbs) - 4 cloves of garlic, finely minced - 2 large lemons (one sliced into rounds, one juiced) - 2 teaspoons fresh rosemary, finely chopped (or 1 teaspoon dried rosemary) - 2 teaspoons fresh thyme, finely chopped (or 1 teaspoon dried thyme) - 1/4 cup extra virgin olive oil - Salt, to taste - Black pepper, to taste - 1 cup chicken broth or vegetable broth - Fresh parsley, chopped, for garnish To create a juicy and flavorful dish, you need the right ingredients. Start with a whole chicken. I prefer it around 4 to 5 pounds for the best results. Fresh garlic adds a punch of flavor. Use four cloves, minced well, to ensure the taste spreads throughout the chicken. Lemons are key to this recipe. You need two large lemons. One gets juiced, while the other is sliced into rounds. The slices go inside the chicken. They add a fresh, zesty taste. For herbs, I use fresh rosemary and thyme. They bring out the flavors in the chicken. If you don’t have fresh herbs, dried ones work too. You’ll also want olive oil, salt, and black pepper. They season the chicken perfectly. Lastly, add chicken broth for moisture. It helps keep the chicken juicy as it roasts. If you want a pop of color, consider adding fresh parsley as a garnish. It makes the dish look vibrant and fresh. For the complete recipe, you can check out the Full Recipe. Set your oven to 425°F (220°C). This hot temperature helps crisp the chicken skin. In a bowl, mix minced garlic, lemon juice, and herbs. Add olive oil, salt, and pepper. Whisk well until combined. This marinade will pack flavor into your chicken. Take a whole chicken and pat it dry with paper towels. Drying it helps the skin become crispy. Rub the marinade all over the chicken, including the cavity. Make sure to coat every part well. Slice one lemon into rounds. Place these lemon slices inside the chicken cavity. This adds a nice flavor while cooking. Put the chicken breast-side up on a roasting rack in a pan. Pour chicken broth into the pan for moisture and extra flavor. Roast the chicken for about 1 hour and 15 minutes. Use a meat thermometer to check the internal temperature. It should reach 165°F (75°C) for safe eating. The skin should be golden brown. Baste the chicken with pan juices halfway through for added moisture. Once cooked, take the chicken out of the oven. Cover it loosely with aluminum foil and let it rest for 10-15 minutes. Resting is key for juicy meat, as it allows the juices to settle. For the full recipe, refer to the [Full Recipe]. Enjoy your juicy and flavorful Lemon Garlic Roasted Chicken! To get that perfect crispy skin, start by drying your chicken well. Use paper towels to pat it all over. This helps remove extra moisture. Moisture leads to soggy skin, which we don’t want! After drying, let the chicken sit for a bit. This air exposure helps it crisp up nicely in the oven. Want to amp up the flavor? Try adding herbs like sage or oregano. These herbs pair well with lemon and garlic. You can also add a pinch of smoked paprika for a hint of smokiness. If you love heat, some red pepper flakes can spice things up. Feel free to mix and match to find your favorite flavor combo! Basting is key for a juicy chicken! I recommend basting every 30 minutes while roasting. Use the pan juices to keep the chicken moist. This also adds extra flavor. Make sure to use a spoon or baster to drizzle the juices over the chicken. Doing this helps keep it tender and flavorful throughout the cooking process. {{image_4}} You can change the herbs for new flavors. Instead of rosemary and thyme, use sage or oregano. These herbs add a different taste. For a spicy kick, add red pepper flakes. Mixing herbs can create a unique twist on the classic recipe. Lemons are great, but try other citrus fruits too. Using lime will give a fun flavor. Oranges can add sweetness to the dish. Simply slice and stuff them in the chicken like you do with lemons. Each fruit brings its own taste to the meal. You can cook this chicken in different ways. If you want to use a slow cooker, season the chicken as usual. Place it in the slow cooker with broth. Cook on low for 6-8 hours for tender meat. Grilling is another option. Marinate the chicken and grill it over medium heat until cooked through. Each method offers a new way to enjoy this dish. To keep your Lemon Garlic Roasted Chicken fresh, store leftovers right away. First, let the chicken cool down. Then, slice it into pieces for easy storage. Place the chicken in an airtight container. This helps keep out air and moisture. You can also wrap it well in aluminum foil or plastic wrap. If you plan to eat it later, freezing is a good option. Just make sure to use freezer-safe bags or containers. When reheating, keep the chicken juicy and tasty. One method is to use the oven. Preheat it to 350°F (175°C). Place the chicken in a baking dish and cover it with foil. This keeps moisture in. Heat it for about 20-30 minutes or until warm. You can also use the microwave for quick reheating. Put the chicken on a microwave-safe plate. Cover it with a damp paper towel to help it stay moist. Heat in short bursts, checking often to avoid drying out. Cooked chicken can last in the fridge for 3-4 days. If you freeze it, it can stay good for up to 4 months. Always check for any signs of spoilage before eating. If it smells bad or looks odd, it’s best to throw it away. Keeping track of how long you store your chicken helps you enjoy it safely. You can tell if the chicken is done by checking its internal temperature. The chicken should reach 165°F (75°C) in the thickest part of the breast. Use a meat thermometer for the best results. This step is key to ensure the chicken is safe to eat. If you don't have a thermometer, look for clear juices running from the chicken when you cut it. The skin should be golden brown and crispy. Yes, you can prepare much of this recipe ahead of time. You can marinate the chicken up to 24 hours in advance. Just keep it in the fridge until you're ready to roast it. This will deepen the flavors and save you time on cooking day. If you’re short on time, you can even prep the garlic and herbs a few days before. This chicken pairs well with many sides. I recommend serving it with roasted veggies, mashed potatoes, or a fresh salad. You can also add garlic bread for a yummy touch. For a lighter option, try pairing it with steamed green beans or a quinoa salad. This makes the meal colorful and balanced. For the complete Lemon Garlic Roasted Chicken recipe, check the [Full Recipe](#). Here you’ll find all the details you need to make this dish amazing! Lemon Garlic Roasted Chicken is a simple, tasty dish. You need a whole chicken, garlic, lemons, and some herbs. Applying the right marinade and roasting technique gives you juicy meat. Remember to rest your chicken after cooking for the best results. Don’t forget to try out variations and enjoy leftovers. With these tips, you can impress anyone with your cooking skills. Enjoy your flavorful meal!](https://recipesstation.com/wp-content/uploads/2025/06/63c93bba-8da8-4864-a4e9-14a6c2b5c1bd.webp)
Are you ready to impress your dinner guests with a dish that’s juicy and full of flavor? Lemon Garlic Roasted
![To create a tasty baked ziti, you need a few key ingredients: - 1 pound ziti pasta - 2 cups marinara sauce - 1 cup creamy ricotta cheese - 1 cup shredded mozzarella cheese, plus more for topping - 1 cup freshly grated Parmesan cheese - 1 teaspoon garlic powder - 1 teaspoon onion powder - 1/2 teaspoon red pepper flakes (adjust according to spice preference) - Salt and black pepper, to taste These ingredients come together to form a rich and cheesy dish that warms the heart. The ziti pasta serves as the perfect base, while the marinara sauce adds a vibrant flavor. The three cheeses combine to create a creamy, cheesy experience that you won’t forget. For a little extra flair, consider these optional ingredients: - Fresh basil - Extra virgin olive oil - 1/2 cup panko breadcrumbs (for crispy topping) Fresh basil adds a pop of color and flavor to your dish. A drizzle of extra virgin olive oil enhances richness. If you're after a crispy topping, panko breadcrumbs give you that satisfying crunch. This simple touch can elevate your baked ziti to a new level. For the full recipe, be sure to check out the complete instructions and tips to make this dish shine! First, preheat your oven to 375°F (190°C). This step is key for baking ziti evenly. Next, bring a large pot of salted water to a boil. Add your ziti pasta and cook it until it is al dente. This means it should be firm to bite but not hard. Be careful not to overcook the pasta, as it will soften more when you bake it later. Once cooked, drain the pasta and set it aside. In a large mixing bowl, combine the creamy ricotta cheese, half of the shredded mozzarella, and grated Parmesan cheese. Add chopped basil, garlic powder, onion powder, and red pepper flakes. Season with salt and black pepper to taste. Mix everything together until smooth and creamy. This cheese mixture is what makes your baked ziti so rich and tasty. Now it's time to layer your ingredients. Grease a 9x13-inch baking dish with a bit of olive oil. Spread half of the ziti and marinara sauce at the bottom. Then, spoon the cheese mixture over the pasta evenly. Next, add the rest of the ziti mixture on top. Finish by sprinkling the remaining mozzarella cheese over everything. If you want a crunchy topping, sprinkle optional panko breadcrumbs on top. Cover the baking dish with aluminum foil, ensuring it does not touch the cheese. Bake the ziti in the preheated oven for about 25 minutes. After that, remove the foil and bake for another 15-20 minutes. You want the cheese to be bubbly and golden brown. Before serving, drizzle some extra virgin olive oil on top to add flavor and help the breadcrumbs crisp up. Enjoy this comforting dish with family and friends! For the complete recipe, check out the Full Recipe. To get the best baked ziti, cook your pasta until it's al dente. This means it should be firm, not soft. If you overcook the pasta, it will turn mushy in the oven. Use a good quality marinara sauce for more flavor. A rich, tasty sauce makes all the difference. Mix your cheeses well. This helps spread the flavors evenly throughout the dish. I always recommend adding fresh herbs. They add a nice depth of flavor. Basil, oregano, or even thyme can brighten the dish. Serving baked ziti can be fun! Pair it with a fresh salad and warm garlic bread. This makes for a complete meal. You can also serve it in individual portions for a nice touch. It looks elegant and is easy for guests to enjoy. {{image_4}} You can change some ingredients in baked ziti to suit your taste. Try using ground beef or sausage for added protein. This gives the dish a hearty flavor. If you want to boost nutrition, add vegetables. Spinach or mushrooms work great. They add a fresh taste and a nice texture to the dish. If you love spice, make a spicy baked ziti. Add more red pepper flakes than the recipe calls for. You can also use a spicy marinara sauce. This will warm up your dish and give it a kick. Adjust the spice level to your liking for a great surprise in every bite. For those who need gluten-free options, substitute gluten-free pasta. There are many great brands available. You can also make it vegan. Use plant-based cheeses and sauces. They melt well and taste delicious. This way, everyone can enjoy baked ziti, regardless of dietary needs. For all these variations, check out the Full Recipe for more ideas and details! To keep your baked ziti fresh, store it in the fridge. Place it in an airtight container. It will last for 3-4 days. Before sealing, let it cool. This step helps reduce moisture buildup. If moisture stays in the container, it may make the pasta soggy. You can freeze baked ziti for later. First, let it cool completely. Then, wrap it tightly with plastic wrap or foil. Place it in a freezer-safe container. It can stay frozen for up to three months. When you are ready to enjoy it, thaw it in the fridge overnight. This helps maintain the best flavor and texture. To reheat, place it in the oven at 350°F (175°C). Cover it with foil to keep it moist. Bake for about 30-40 minutes, or until heated through. For the best results, check that the cheese is melted and bubbly before serving. Enjoy your cheesy delight again! For the full recipe, check out the Cheesy Delight Baked Ziti section. Yes, you can use other pasta types. Penne and rigatoni work great. They hold sauce well, just like ziti. Each option adds a unique texture to the dish. Feel free to switch things up! You can prepare baked ziti a day in advance. Just follow the recipe steps until it’s ready to bake. Cover it with foil and store it in the fridge. When you’re ready, bake it as directed. This makes meal prep easy and fun! Reheat baked ziti in the microwave or oven. For the microwave, heat it in short bursts. Stir it between heating to warm evenly. If using the oven, preheat to 350°F. Cover the dish with foil to keep it moist. Bake for about 20 minutes. Yes, this recipe freezes well. Let the baked ziti cool completely. Wrap it tightly in foil or use a freezer-safe container. It can last up to 3 months in the freezer. To thaw, move it to the fridge overnight before baking. Absolutely! Adding veggies makes baked ziti even better. Try spinach, mushrooms, or bell peppers. Sauté them lightly before mixing them in. This boosts flavor and nutrition. You can enjoy a delicious and colorful dish! For the full recipe, check out the [Full Recipe]. Baked ziti is a classic dish that brings warmth and comfort. We explored key ingredients, from ziti pasta to three cheeses. I gave step-by-step instructions for perfect assembly and baking. Tips on storage and variations make this dish even more versatile. Now, with these insights, you're ready to create a flavorful baked ziti that wows friends and family. Enjoy your cooking journey and share your tasty results!](https://recipesstation.com/wp-content/uploads/2025/06/cd04e799-1e98-48c3-89f3-3bd2910c6dfe.webp)
Welcome to the ultimate comfort food delight: Baked Ziti with Three Cheeses! If you crave a dish that melts in

Wake up to the smell of Fluffy Buttermilk Pancakes! These cakes are soft, tasty, and perfect for breakfast. I’ll show
![- 2 cups cooked chicken, shredded - 1 cup carrots, diced - 1 cup peas (fresh or frozen) - 1 cup celery, diced - 1/2 cup onion, diced - 1/3 cup all-purpose flour - 1 cup chicken broth - 1 cup milk - 1 teaspoon garlic powder - 1 teaspoon dried thyme - 1 tablespoon olive oil - Salt and pepper to taste - 1 package refrigerated pie crusts (or homemade, if preferred) - 1 egg, beaten (for egg wash) Each ingredient plays a key role in taste and texture. Use precise measurements to achieve the best results. For instance, too much flour may lead to a thick filling, while too little can make it runny. You can use fresh or frozen vegetables in your chicken pot pie. Fresh veggies bring a crisp taste, while frozen options save time. If you choose frozen peas, they heat quickly and add color. Fresh carrots and celery can enhance texture. I often mix both to enjoy the best of both worlds. To make a classic chicken pot pie, you need to gather your ingredients first. This recipe uses simple items that are easy to find. You will need cooked chicken, carrots, peas, celery, onion, flour, chicken broth, milk, garlic powder, thyme, olive oil, and a pie crust. Having everything ready helps you move smoothly through each step. 1. Preheat your oven to 425°F (220°C). This is key for a golden crust. 2. In a skillet, heat olive oil over medium heat. Add diced onions, celery, and carrots. Stir them for about 5 minutes until they are soft. 3. Add the peas and cook for 2 more minutes. This warms them up. 4. Sprinkle flour over the veggies and stir well. Cook for 1 minute to remove any raw taste. 5. Slowly pour in the chicken broth while stirring. This avoids lumps. Keep stirring until the mixture thickens, which takes about 3-4 minutes. 6. Add milk, garlic powder, thyme, salt, and pepper. Mix everything well. 7. Fold in the shredded chicken. Make sure it’s mixed well and then set it aside. 8. Take one pie crust and fit it into a 9-inch pie dish. Pour in the chicken filling. 9. Roll out the second crust and place it on top. Crimp the edges to seal them. Cut small slits on top for steam to escape. 10. Brush the top with beaten egg for a nice finish. Bake for 30-35 minutes until golden brown. Let it cool for 10 minutes before serving. For a great crust, keep your ingredients cold. Use chilled butter or lard if you make your own. Roll the dough out gently to avoid tearing. If using store-bought crust, let it sit at room temperature for a few minutes before using. This makes it easier to handle. Don’t forget to brush the crust with egg wash for that beautiful shine. For more detailed steps, check the Full Recipe. To thicken your chicken pot pie filling, use flour. This simple method works well. First, sprinkle the flour over the veggie mix. Stir it in and cook for one minute. This helps remove any raw taste. Then, slowly add your chicken broth while stirring. This will create a nice, thick sauce. You want it creamy but not too thick. If it's too runny, add a bit more flour mixed with cold water. This method keeps your filling rich and tasty. Many home cooks face common pitfalls when making pot pie. One big mistake is overcooking the filling. If you cook it too long, the chicken can dry out. Another mistake is not seasoning enough. Always taste your filling and adjust the salt and pepper. Using fresh herbs makes a big difference too. Avoid using a pie crust that’s too thick. A thin crust bakes better and gets that nice golden color. Lastly, don’t forget to cut slits in the top crust for steam to escape. Herbs and spices can elevate your pot pie. I love using dried thyme, as it adds warmth. Garlic powder boosts the flavor too. For a fresh twist, try adding parsley or rosemary. You can mix in a pinch of nutmeg for a unique taste. Adjust these seasonings to fit your preference. Fresh herbs can also brighten the dish. A little goes a long way, so use them wisely. Experiment with flavors until you find your favorite combination. Enjoy your cooking journey with these tips! {{image_4}} If you want to switch up the classic chicken pot pie, there are many tasty choices. You can use turkey, beef, or even seafood. Each option brings its own flavor. Turkey works well during holidays. Beef gives a hearty twist, while seafood adds a light touch. Consider using cooked meats to make the process smoother. You can create a vegetarian version of chicken pot pie, too. Replace the chicken with hearty vegetables like mushrooms, zucchini, or eggplant. For protein, add chickpeas or lentils. Use vegetable broth instead of chicken broth. This keeps the dish rich and satisfying without meat. You still get that creamy filling and flaky crust that everyone loves. The crust makes a big difference in chicken pot pie. You can choose homemade or store-bought. Homemade crust gives a fresh taste and texture. It allows you to control the ingredients too. But, if you're short on time, store-bought crust works well. Just remember to follow the baking instructions on the package. Each type brings its own charm to the dish. To see the full recipe for classic chicken pot pie, check [Full Recipe]. To keep your chicken pot pie fresh, let it cool completely first. Wrap it tightly in plastic wrap or aluminum foil. You can also store it in an airtight container. This helps keep moisture in and prevents any strong odors from other foods. Store it in the fridge for up to three days. When you're ready to enjoy your chicken pot pie again, preheat your oven to 350°F (175°C). Remove any wrapping and place the pie on a baking sheet. Cover the top loosely with foil to prevent over-browning. Heat for about 20-25 minutes. If you like a crispier crust, remove the foil for the last 5 minutes of heating. Make sure the center is hot before serving! Freezing is a great option if you want to save some pie for later. Prepare your pie as usual, but do not bake it. Wrap it well in plastic wrap and then in foil to keep it airtight. You can freeze it for up to three months. When you’re ready to bake, remove the wrapping and bake it from frozen at 425°F (220°C) for about 50-60 minutes. This method keeps the filling tasty and the crust flaky. Enjoy your chicken pot pie anytime! For more detailed steps, check out the Full Recipe for guidance. Yes, you can make Classic Chicken Pot Pie ahead of time. Prepare the filling and crust, then store them separately. Keep the filling in the fridge for up to two days. For longer storage, freeze the filling for up to three months. When ready to bake, assemble the pie and bake it straight from frozen or after thawing. This saves time and ensures a fresh meal on busy nights. If you want a chicken pot pie without chicken, try these options: - Cooked turkey - Shredded beef - Diced tofu - Chickpeas - Mushrooms Each option brings its own flavor. Adjust the cooking time accordingly, especially for meat. To make the pot pie filling ahead of time, follow these steps: 1. Cook the filling as per the recipe. 2. Let it cool completely. 3. Store it in an airtight container. You can refrigerate it for up to two days or freeze it for up to three months. When you are ready to use it, thaw it in the fridge overnight. This makes meal prep easy and quick. Check out the Full Recipe for more detailed instructions. In this blog post, we explored how to make the classic chicken pot pie. We discussed key ingredients, measurement details, and the choice between fresh and frozen veggies. You learned step-by-step instructions for preparing and cooking, along with tips for a perfect crust. We covered ways to thicken the filling, common mistakes, and flavor enhancements. Finally, I shared storage methods and answers to common questions. With this guide, you can create a delicious chicken pot pie that everyone will love. Enjoy making it your own!](https://recipesstation.com/wp-content/uploads/2025/06/0c68f91e-4f4c-489d-9e32-b2153d406efd.webp)
Are you ready for a dish that warms the soul? Classic Chicken Pot Pie is the ultimate comfort food, perfect
