Skip to content
DisclaimerTerms Of UseGDPR PolicyCookie Policy

recipesstation

  • Home
  • Drinks
  • Appetizers
  • Dinner
  • Dessert
  • About
  • Contact
  • Privacy Policy
DisclaimerTerms Of UseGDPR PolicyCookie Policy

Emily

To make Lemon Blueberry Overnight Oats, you will need the following ingredients: - 1 cup rolled oats - 1 cup almond milk (or any milk of your choice) - 1/2 cup Greek yogurt (or plant-based yogurt alternative) - 1 tablespoon honey or maple syrup - Zest of 1 lemon - Juice of 1 lemon - 1/2 teaspoon vanilla extract - 1/2 teaspoon ground cinnamon - 1/2 cup fresh blueberries (plus extra for garnish) - A pinch of salt Each ingredient plays a key role in creating a tasty meal. The rolled oats form the base, giving it a hearty feel. Almond milk adds creaminess, while Greek yogurt boosts protein and tang. Honey or maple syrup sweetens it, and lemon zest and juice brighten the flavor. Vanilla and cinnamon add warmth, while blueberries bring freshness and color. You can find the full recipe for Lemon Blueberry Overnight Oats in the section below. This recipe is not just simple; it brings joy with each bite! To make Lemon Blueberry Overnight Oats, follow these simple steps. - Combine rolled oats and almond milk Start by adding 1 cup of rolled oats to a bowl. Pour in 1 cup of almond milk. Stir well until the oats soak up the milk. - Mix in Greek yogurt and sweeteners Next, add 1/2 cup of Greek yogurt to the bowl. If you like it sweet, mix in 1 tablespoon of honey or maple syrup. Stir until smooth. - Fold in lemon zest, juice, and spices Now, add the zest and juice of 1 lemon. Include 1/2 teaspoon of vanilla extract, 1/2 teaspoon of ground cinnamon, and a pinch of salt. Mix well to enhance the flavor. - Gently incorporate fresh blueberries Carefully fold in 1/2 cup of fresh blueberries. Do this gently so you don’t mash the berries. This step keeps the blueberries whole and juicy. - Transfer to a jar or container Next, pour the mixture into a jar or an airtight container. Seal it well to keep it fresh. - Refrigerate overnight or for 4-6 hours Place the container in the fridge for at least 4-6 hours or overnight. This lets the oats soak and flavors blend. - Stir and adjust consistency before serving In the morning, take the oats out and give them a good stir. If they are too thick, add a splash of milk to loosen them up. For the full recipe, check the details above. Enjoy your tasty and healthy breakfast! - Make a batch for the week. This saves time and keeps breakfast easy. - Customize sweetness to taste. You can add more or less honey or syrup. - Layer ingredients for easy serving. This makes it fun to grab and go. - Use glass jars for visual appeal. They show off the bright colors of the oats and berries. - Garnish with mint or extra blueberries. This adds a touch of freshness and looks nice. - High in fiber from oats. This helps with digestion and keeps you full. - Packed with antioxidants from blueberries. These help protect your body from damage. - Probiotics from Greek yogurt. They support gut health and boost your immune system. This lemon blueberry overnight oats recipe is a tasty and healthy choice. You can find the full recipe in the main article. Enjoy your delicious meal! {{image_4}} You can change the flavor of your Lemon Blueberry Overnight Oats by swapping ingredients. Here are some ideas: - Use different types of milk, like coconut or soy. - Replace maple syrup with agave or stevia for a lower-calorie option. - Add chia seeds for extra texture and nutrition. These swaps keep your oats fresh and exciting. You can find new flavors that you love while keeping the base recipe intact. To make your overnight oats even more delicious, try these flavor combos: - Add nuts or seeds for a crunchy texture. Almonds or walnuts work well. - Mix in other fruits like strawberries or peaches for a fruity twist. - Experiment with spices such as nutmeg or cardamom to enhance the taste. These combinations let you get creative in the kitchen. You can easily customize your oats to fit your mood or taste. For the full recipe, check the section above! You should store your Lemon Blueberry Overnight Oats in an airtight container. This helps keep them fresh and tasty. They can last for up to five days in the fridge. This makes them a great option for meal prep. You can make a big batch, and enjoy them all week. If you want to save some for later, these overnight oats are suitable for freezing. Just scoop them into a freezer-safe container. When you're ready to eat, thaw them in the fridge overnight. Before serving, add fresh toppings like blueberries or a drizzle of honey. This will bring back that fresh taste. Lemon blueberry overnight oats stay fresh for about five days in the fridge. Keep them in an airtight container to maintain flavor and texture. The oats soften as they soak, making them even tastier over time. Just give them a good stir before serving. Yes, you can make these oats vegan easily. Simply replace Greek yogurt with a plant-based yogurt. Use maple syrup instead of honey for sweetness. Swap almond milk for any non-dairy milk you prefer. This way, you keep all the flavor while making a vegan meal. If you don't have Greek yogurt, try using any plant-based yogurt. Options like almond or coconut yogurt work well. You can also use silken tofu blended until smooth for a creamy feel. This keeps the texture nice and rich while adding your own twist. To make more servings, multiply all ingredients by the number of servings you want. For example, if you want four servings, double the ingredients listed in the full recipe. Make sure your container can hold the larger batch. It’s easy to share this delicious meal with friends or family! Absolutely! You can add nuts, seeds, or other fruits to boost flavor and texture. Try adding chia seeds for extra nutrition or sliced bananas for sweetness. Get creative! The fun of overnight oats is the chance to customize them to your taste. These Lemon Blueberry Overnight Oats are not just easy to make; they're also healthy and tasty. You learned how to combine oats, yogurt, and blueberries into a delicious breakfast. Remember, you can customize them to fit your taste and needs. Make a big batch, store them, and enjoy! These oats are packed with fiber and good nutrients. They are a great way to start your day. Now it’s your turn to try this recipe and share it with others!

Lemon Blueberry Overnight Oats Simple and Tasty Meal

Start your day on a tasty note with Lemon Blueberry Overnight Oats! This simple meal is not only quick to

This dish shines because of its fresh and simple ingredients. Here’s what you need: - 8 oz (about 225g) penne pasta - 1 tablespoon olive oil - 4 cloves garlic, finely minced - 1 can (14 oz) diced tomatoes, undrained - 2 cups vegetable broth - 1 cup heavy cream (or coconut cream for a dairy-free option) - 1 teaspoon dried basil - Salt and pepper to taste - 1 cup fresh basil leaves, roughly chopped - ½ cup grated Parmesan cheese (or nutritional yeast for a vegan alternative) - Additional fresh basil leaves for garnishing Each ingredient plays a role. The penne pasta absorbs flavors. The garlic gives a warm touch. Diced tomatoes add sweetness and acidity. Vegetable broth forms the base. Heavy cream brings richness. Fresh basil adds a lovely aroma. You can tweak this recipe to fit your taste. Here are some optional ingredients: - Red pepper flakes for heat - Spinach or kale for added greens - Mushrooms for an earthy flavor - Cooked chicken or shrimp for protein - Lemon zest for brightness Feel free to add or skip these as you like. The dish remains creamy and delicious no matter what. Having the right tools makes cooking easier. Here are the must-haves: - A large pot for cooking - A wooden spoon for stirring - A chef’s knife for chopping - A cutting board for prep - Measuring cups for accuracy With these tools, you can whip up this pasta without a hitch. They help you work efficiently and enjoy the process. For the complete recipe, refer to the [Full Recipe]. To start making One-Pot Creamy Tomato Basil Pasta, gather your ingredients. You will need: - 8 oz (about 225g) penne pasta - 1 tablespoon olive oil - 4 cloves garlic, finely minced - 1 can (14 oz) diced tomatoes, undrained - 2 cups vegetable broth - 1 cup heavy cream (or coconut cream for a dairy-free option) - 1 teaspoon dried basil - Salt and pepper to taste - 1 cup fresh basil leaves, roughly chopped - ½ cup grated Parmesan cheese (or nutritional yeast for a vegan alternative) - Additional fresh basil leaves for garnishing Now, measure everything out. This keeps the cooking process smooth and fun. 1. Heat the olive oil in a large pot over medium heat. 2. Add the minced garlic and sauté for 1-2 minutes. Be careful not to brown the garlic; it should smell sweet. 3. Next, pour in the undrained diced tomatoes, vegetable broth, and dried basil. Stir gently to combine. 4. Increase the heat to bring it all to a gentle simmer. 5. Add the penne pasta to the pot. Cover it and cook for 10-12 minutes. Stir now and then to keep the pasta from sticking. 6. Once the pasta is al dente, stir in the heavy cream (or coconut cream). Season with salt and pepper. Let it simmer for 2-3 more minutes. This thickens the sauce and makes it creamy. When the pasta is ready, remove the pot from the heat. Stir in the chopped fresh basil and grated Parmesan cheese. Mix well until everything is creamy and delicious. Before serving, taste it. Adjust with more salt or pepper if needed. Serve the creamy pasta warm and top each bowl with extra fresh basil leaves and a sprinkle of Parmesan cheese. Enjoy your meal! For the full recipe, check out the complete instructions above. To make your pasta creamy, start with the right cream. I like heavy cream, but coconut cream works too. It gives you a nice, rich taste. Adding it at the end makes the sauce silky. Make sure to stir it well into the pasta. This keeps it from clumping. Another trick is to let the pasta absorb some broth before adding cream. This helps the sauce cling to the pasta. For extra creaminess, stir in some grated cheese. Parmesan melts easily and adds flavor. One common mistake is overcooking the pasta. You want it al dente, or firm to the bite. If you cook it too long, it can turn mushy. Stirring occasionally helps, so the pasta cooks evenly. Another mistake is skipping salt. Always season your broth and cream. This brings out the flavors of the tomatoes and basil. Finally, don’t forget to taste as you go. Adjust salt and pepper to suit your taste. To boost flavor, add fresh herbs at the end. Chopped basil adds a bright note. You can also add a splash of lemon juice for brightness. If you want more texture, toss in some sautéed veggies. Spinach or bell peppers work well. They add color and nutrition too. For those who love heat, a pinch of red pepper flakes can spice things up. It gives your dish a little kick without overpowering the flavors. Explore the [Full Recipe] for all the details! {{image_4}} You can easily make this dish dairy-free or vegan. Swap heavy cream for coconut cream. This adds a rich flavor. Use nutritional yeast instead of Parmesan cheese. It gives a cheesy taste without dairy. Add a pinch of salt to enhance the flavor. This way, everyone can enjoy the creamy goodness. Want to add some protein? Try cooked chicken or shrimp. They both mix well with the pasta. You can also use chickpeas or lentils for a plant-based option. Just add them in when you combine the cream. This adds texture and makes the meal more filling. Adding veggies boosts health and flavor. In spring, mix in fresh peas or asparagus. In summer, try diced zucchini or bell peppers. For fall, roasted butternut squash or spinach works great. In winter, add kale or broccoli. Just toss them in during the last few minutes of cooking. This keeps the veggies vibrant and adds a pop of color. After you enjoy your one-pot creamy tomato basil pasta, it's important to store any leftovers right. Allow the pasta to cool to room temperature first. Then, transfer it to an airtight container. Store it in the fridge for up to three days. Make sure to keep it sealed tightly to prevent drying out. When you're ready to eat the leftovers, reheating is simple. You can use a microwave or a stovetop. For the microwave, place the pasta in a bowl. Add a splash of water or broth to keep it moist. Heat it in short bursts, stirring in between. If using the stovetop, warm it in a pan over low heat, stirring gently. You may also want to add a bit of cream to restore the sauce's creaminess. If you want to save some pasta for later, freezing is a great option. Portion the cooled pasta into freezer-safe containers. Leave some space at the top, as it will expand when frozen. It can last up to two months in the freezer. To reheat, let it thaw in the fridge overnight. Then, follow the reheating instructions above. Enjoy a quick meal whenever you need it! For the full recipe, check out the details above. I recommend using penne pasta. It holds sauce well, adding flavor to every bite. Other good options include rigatoni or fusilli. These shapes trap the sauce nicely. This keeps your dish creamy and delicious. Yes, you can! Use coconut cream for a dairy-free option. It gives a rich taste without dairy. You can also use a mix of vegetable broth and cashew cream for a lighter sauce. This will keep your pasta creamy and satisfying. To change servings, simply multiply the ingredients. For example, if you want to serve six, increase everything by 1.5 times. If you want fewer servings, cut the amounts in half. Just remember to keep the same cooking time, so your pasta cooks evenly. For the full recipe, check out the One-Pot Creamy Tomato Basil Pasta. In this article, you learned how to make creamy tomato basil pasta. We covered key ingredients, easy steps to cook, and ways to customize it. I shared tips for perfect texture and flavor. You also discovered variations like dairy-free options and protein add-ins. Lastly, we talked about storing leftovers to enjoy later. This dish is simple, fun, and packed with flavor. I hope you feel inspired to try it! Enjoy cooking!

One-Pot Creamy Tomato Basil Pasta Simple Delight

Welcome to the world of easy cooking! Today, I’ll show you how to make One-Pot Creamy Tomato Basil Pasta. This

- 2 cans chickpeas (15 oz each), thoroughly rinsed and drained - 1 can coconut milk (13.5 oz) - 2 tablespoons curry powder - 1 teaspoon ground cumin - 1 teaspoon ground turmeric - 1 teaspoon chili powder Chickpeas are the star here. They add protein and a nice texture. Coconut milk gives the dish a creamy base. It balances the spices well. You can adjust the spice levels with chili powder. Each spice adds flavor and warmth to the curry. - 1 large onion, finely chopped - 3 cloves garlic, minced - 1-inch piece of fresh ginger, grated - 1 can diced tomatoes (14.5 oz) - 2 tablespoons olive oil - 2 cups fresh spinach, packed - Fresh cilantro, chopped (for garnish) - Cooked rice or naan bread (for serving) Onions, garlic, and ginger build a flavor base. Diced tomatoes add moisture and sweetness. Fresh spinach adds color and nutrition. Serve with rice or naan for a filling meal. Cilantro adds a fresh finish. - Large pot - Chopping board and knife - Measuring cups and spoons A large pot is key for cooking the curry. Use a chopping board and knife for prepping ingredients. Measuring cups and spoons help ensure accuracy in your recipe. This setup makes cooking easier and more fun. For the full recipe, check out the provided link. 1. Sautéing onions and aromatics Start by heating the olive oil in a large pot over medium heat. Add the finely chopped onion. Cook it for about 5 minutes. You want the onion to get soft and turn translucent. This step builds the base flavor of your curry. Next, add the minced garlic and grated ginger. Cook for another 2 minutes. The aroma will fill your kitchen, making you eager to dive in! 2. Blooming the spices Now, it’s time to add the spices. Sprinkle the curry powder, ground cumin, ground turmeric, and chili powder into the pot. Stir well to mix everything. Cook for one more minute. This helps the spices release their full flavor. Blooming the spices is a key step to a rich taste. 1. Combining liquids Carefully pour in the diced tomatoes and coconut milk. Mix well until you have a smooth blend. Increase the heat a bit. Bring the mixture to a gentle simmer. This is where the magic happens, as all the flavors begin to meld together. 2. Incorporating chickpeas Now, fold in the rinsed chickpeas. They add protein and texture. Season with salt and freshly ground black pepper. Let the curry simmer for 15 to 20 minutes. Stir occasionally to ensure even cooking. The chickpeas should soak up all the delicious flavors. 1. Adding spinach In the last few minutes of cooking, add the fresh spinach. Stir it in until it wilts. This adds freshness and color to your dish. It’s a simple way to make your curry even more nutritious. 2. Adjusting seasoning Taste your curry and adjust the seasoning if needed. You may want to add a pinch more salt or pepper. This step is important to ensure every bite is full of flavor. Once you’ve achieved the perfect taste, remove the pot from heat. Let it rest for a few moments before serving. For the full recipe, check out the detailed steps above! Enjoy this easy comfort food dish that warms the heart and pleases the palate. To cook chickpeas, use canned ones for ease. Rinse and drain them well. If you cook dried chickpeas, soak them overnight. Boil them for about 1-2 hours until soft. Balancing flavors is key. You want sweet, salty, and spicy notes. Adjust salt and spices as you taste. If it's too hot, add a touch of sugar or more coconut milk to mellow the heat. Serve your chickpea curry over warm rice. Naan bread is also a great choice. Both soak up the rich sauce well. For presentation, use a deep bowl to showcase the vibrant colors. Add a sprinkle of fresh cilantro on top for a pop of green. It makes the dish look fresh and inviting. Add more veggies to boost nutrition. Spinach is a great addition, but you can also use bell peppers or carrots. They add color and crunch. Consider adding superfoods like kale or quinoa. They increase fiber and protein. You can mix in cooked lentils for extra heartiness. These additions make your meal even healthier and more filling. For the full recipe, check out the Chickpea Bliss Curry. {{image_4}} For a unique twist, you can change the spices. If you want an Indian-inspired flavor, use spices like garam masala or cardamom. These spices add warmth and depth. You can also try a Thai-inspired version. Use red curry paste and fresh basil. This will give your dish a fresh kick and a new flavor. You can boost the nutrition of your curry by adding protein or fiber. Tofu or tempeh works well. They soak up the curry flavors and add a nice texture. Lentils or beans are another great choice. They make the dish heartier and more filling. Mixing these proteins keeps your meal exciting and healthy. You can cook this curry in different ways. The Instant Pot is a fast option. It saves time and keeps the chickpeas tender. Simply set it to the “manual” setting for about 10 minutes. A slow cooker is perfect if you want to set it and forget it. Cook on low for about 6 hours. Both methods create delicious results. For the full recipe, check the link. For storage, I recommend using airtight glass containers. These keep the curry fresh and safe. When properly stored, Vegan Chickpea Curry lasts up to five days in the fridge. If you plan to eat it later, store it in smaller portions. This helps with quick meals. Freezing is a great way to save your curry. Use freezer-safe containers or bags. Make sure to leave some space for expansion. To thaw, put the container in the fridge overnight. For reheating, simply warm it on the stove or in the microwave. Add a splash of water if it gets too thick. Batch cooking is smart for busy weeks. Make a large pot of curry and divide it into servings. You can enjoy it over rice or with bread. Got leftovers? Use them in wraps or salads. This way, you minimize waste and maximize flavor. For the full recipe, check out the Chickpea Bliss Curry 🥘. Yes, you can make vegan chickpea curry without coconut milk. Many options work well. You can use vegetable broth for a lighter taste. Almond milk also adds creaminess without coconut. If you want thickness, try cashew cream. This gives a rich flavor. Each choice changes the taste a bit, so choose what you like best. Yes, this recipe is gluten-free! Chickpeas are naturally gluten-free. Just ensure all spices and canned goods are labeled gluten-free. Some curry powders may have gluten, so check the label. If you serve it with rice or gluten-free naan, it stays gluten-free. This makes it safe for those with gluten sensitivities. To spice up your vegan chickpea curry, start with the chili powder. Adjust it to match your heat level. Add fresh chili peppers for a kick. Try cayenne for more heat. You can also use garam masala for warmth and depth. Don’t forget to add fresh herbs like cilantro for brightness. Taste as you go, and make it your own! This blog post covered how to make a delicious vegan chickpea curry. We explored the main ingredients like chickpeas and coconut milk, plus spices that make it tasty. I shared step-by-step instructions from prepping to cooking. You learned about tips for texture, serving ideas, and variations to try. Finally, we discussed storage methods and FAQs to help. Enjoy making this dish and feel free to get creative. Your kitchen journey starts now!

Vegan Chickpea Curry Easy Comfort Food Dish

Looking for an easy, delicious recipe? Vegan Chickpea Curry is your answer! It’s filled with wholesome ingredients like chickpeas, coconut

- 1 pound Brussels sprouts, trimmed and halved - 3 tablespoons extra virgin olive oil - 4 cloves garlic, finely minced - 1/2 cup freshly grated Parmesan cheese - 1 teaspoon sea salt - 1/2 teaspoon freshly cracked black pepper - 1/2 teaspoon red pepper flakes (optional, for a spicy kick) - 2 tablespoons thick balsamic vinegar - Fresh parsley, finely chopped (for garnish) In this dish, I focus on fresh Brussels sprouts. Choose firm ones with bright green leaves. The olive oil adds richness, while garlic brings a bold flavor. Freshly grated Parmesan gives that yummy cheesy touch. I often use sea salt and cracked black pepper for extra taste. If you like heat, add red pepper flakes. The balsamic vinegar adds sweetness and tang, making each bite delightful. Finally, fresh parsley brightens the dish and adds color. With these ingredients, you will create a dish that is both tasty and fun to eat. You can find the Full Recipe above for detailed steps. Start by preheating your oven to 400°F (200°C). This temperature helps the Brussels sprouts become really crispy. Next, line a baking sheet with parchment paper. This will stop sticking and make cleanup easy. In a large bowl, take 1 pound of halved Brussels sprouts. Add 3 tablespoons of extra virgin olive oil, 4 minced garlic cloves, 1 teaspoon of sea salt, 1/2 teaspoon of black pepper, and optional red pepper flakes. Toss everything well. Make sure each sprout gets coated in oil and seasonings for great flavor. Spread the coated Brussels sprouts on the baking sheet. Keep them in a single layer. This space helps them roast evenly and get crispy. Roast the sprouts in your preheated oven for 20 minutes. After that, carefully take the baking sheet out. Sprinkle 1/2 cup of freshly grated Parmesan cheese over the sprouts. Toss gently to coat. Then, put them back in the oven for another 10 to 15 minutes. You want them golden brown and crispy. Enjoy the crunchy, cheesy goodness! For the full recipe, check out the main article! To get the best crispiness from your Brussels sprouts, space them out on the baking sheet. If they sit too close, they will steam instead of roast. Aim for a single layer. This allows hot air to flow around each sprout. Adjust roasting time based on your oven. If your sprouts are smaller, check them a bit earlier. For larger ones, you may need a few more minutes. Just keep an eye on them to prevent burning. Want to boost the flavor? Add extra spices or herbs! A sprinkle of garlic powder or onion powder can add depth. Fresh herbs like thyme or rosemary can work wonders too. If you want to switch up the cheese, try using Pecorino Romano or even a sharp cheddar. Each cheese brings a new twist to the dish. These Crispy Garlic Parmesan Brussels Sprouts pair well with many main dishes. They go great with roasted chicken or grilled steak. You can also serve them alongside pasta for a vegetarian option. Serve them hot for the best taste. The crispy texture fades as they cool, so enjoy them fresh out of the oven. For more details on the recipe, check out the Full Recipe. {{image_4}} To spice up your Brussels sprouts, add red pepper flakes or hot sauce. This gives the dish a nice kick. Start with 1/2 teaspoon of red pepper flakes. You can always add more if you want more heat. Mix these spicy additions with the oil and garlic before coating the sprouts. The heat blends well with the cheese and garlic flavors, creating a delightful contrast. You can make these Brussels sprouts vegan by skipping the cheese. Instead, use nutritional yeast. Nutritional yeast has a cheesy taste, making it a perfect substitute. Use about 1/2 cup of nutritional yeast to cover the sprouts. This change keeps the dish flavorful while making it dairy-free. It’s a great option for those who want to enjoy a plant-based meal. Adding nuts or seeds to your Brussels sprouts can elevate the texture. Try tossing in some chopped walnuts or sunflower seeds. They add a delightful crunch. You can also mix in other veggies for more flavor. Carrots or bell peppers work nicely. Cut them into small pieces and roast them with the Brussels sprouts. This way, you create a colorful and tasty dish that is fun to eat. For the full recipe, check out the detailed steps above. To keep your crispy garlic Parmesan Brussels sprouts fresh, first let them cool completely. Place them in an airtight container. This helps lock in flavor and keeps them from drying out. Store the container in your fridge. You can keep them for about 3 to 4 days. If you want to enjoy them later, don’t forget to label the container with the date. To reheat your Brussels sprouts and keep them crispy, use the oven. Preheat it to 350°F (175°C). Spread the sprouts on a baking sheet. Heat them for about 10 to 15 minutes. Check often to avoid burning. You can also use an air fryer. Set it to 350°F (175°C) for about 5 to 8 minutes. This method works great for keeping that tasty crunch. To reduce bitterness, you can soak the Brussels sprouts in salted water before cooking. This helps draw out some of the strong flavors. Another tip is to roast them with a bit of sweetness, like honey or maple syrup, to balance the taste. Yes, you can use frozen Brussels sprouts. However, they may not get as crispy as fresh ones. Thaw them first and pat them dry before cooking. This helps remove excess moisture that can make them soggy. If you don’t have balsamic vinegar, you can use red wine vinegar or apple cider vinegar. Both options add a nice tang. You can also mix a bit of honey with your vinegar for a sweet twist. Brussels sprouts can be a delicious and healthy side dish. This guide breaks down easy steps to roast them perfectly. We covered the best ingredients, prep methods, and cooking tips. I shared fun ways to enhance flavor and make variations. Storing leftovers properly keeps them fresh. Remember, fresh sprouts and the right seasonings make a big difference. I hope you enjoy cooking and sharing these tasty sprouts with friends and family. They are a great addition to any meal!

Crispy Garlic Parmesan Brussels Sprouts Delightful Dish

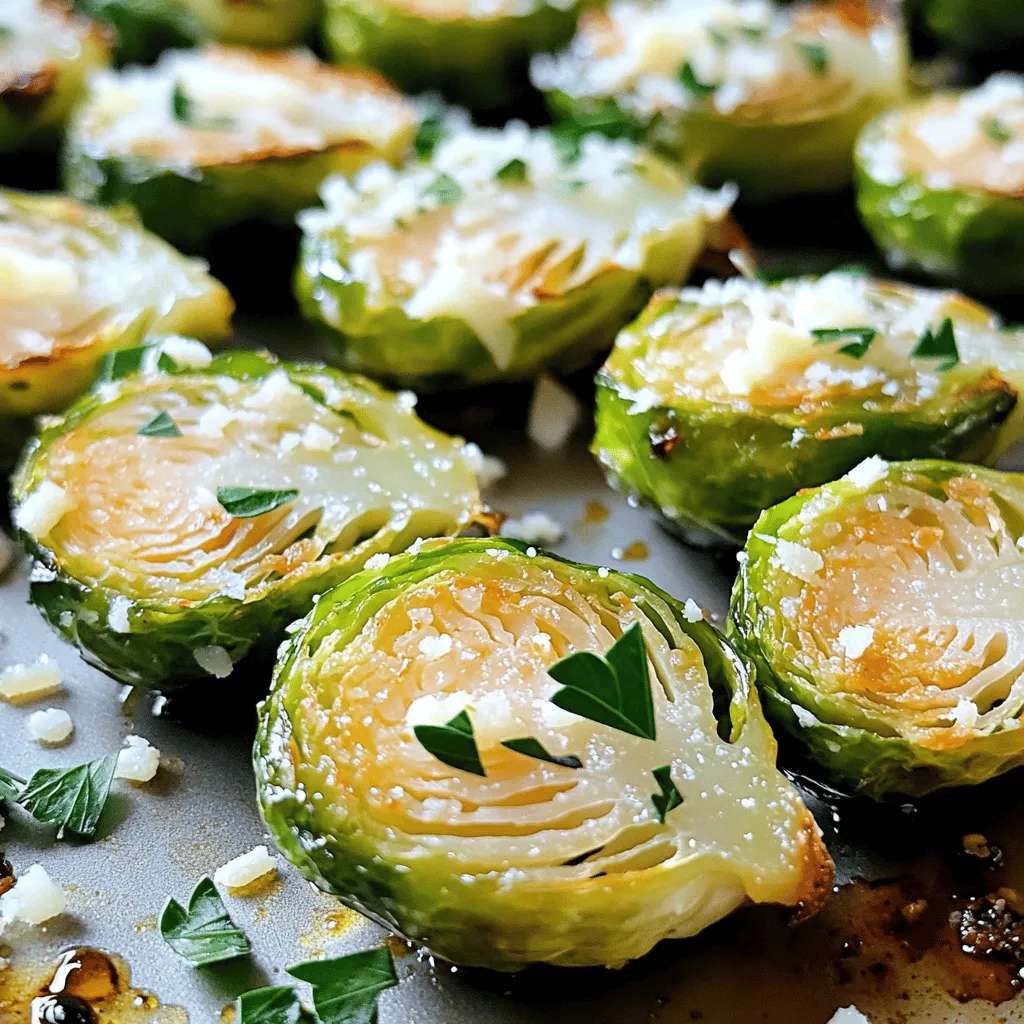
Are you ready to transform Brussels sprouts into a crispy, cheesy delight? In this blog post, I’ll guide you through

- 1 cup canned or carton coconut milk - 1/2 cup almond milk - 1/4 cup chia seeds - 2 tablespoons maple syrup - 1 ripe mango - 1 teaspoon pure vanilla extract - A pinch of salt - Toasted coconut flakes (for garnish) - Fresh mint leaves (for garnish) You will need simple ingredients to make this mango coconut chia pudding. Coconut milk gives a rich taste, while almond milk adds lightness. Chia seeds are the star, swelling up to create a pudding-like texture. Maple syrup brings sweetness, and vanilla adds a warm flavor. A ripe mango is key for freshness. The toasted coconut flakes will give a nice crunch on top. Fresh mint leaves not only look good but add a burst of flavor. This dessert packs a punch with nutrients. Each serving has around 200-250 calories. Chia seeds are high in fiber and omega-3 fatty acids. Mango offers vitamin C and A, which are good for your skin and immune system. Coconut milk adds healthy fats, making this pudding both filling and nutritious. Chia seeds help keep you full. They can also aid digestion due to their high fiber content. Coconut milk is great for hydration and is dairy-free. Mango gives you energy and is excellent for digestion as well. This pudding not only tastes good but also supports your health goals. For the full recipe, check out the detailed instructions. Start by mixing the coconut milk and almond milk in a medium bowl. Use any milk you like, but I prefer this combo for taste. Next, add the chia seeds, maple syrup, vanilla extract, and a pinch of salt. Whisk everything together well. This helps distribute the chia seeds evenly and prevents clumping. Refrigeration is key for this recipe. It allows the chia seeds to soak up the liquids and swell. Chill the mixture for at least 4 hours, but overnight is best. This gives you a creamy, pudding-like texture that’s so satisfying. When ready to serve, grab small cups or bowls. Start with a layer of chia pudding at the bottom. Then, add a layer of diced mango on top. Repeat the layers until your cups are full. For a lovely finish, sprinkle toasted coconut flakes on top. Add a few mint leaves for a fresh touch. This makes your dessert not just tasty but also beautiful! You can find the complete instructions in the Full Recipe. To get the right thickness in your pudding, adjust the almond milk. If your pudding is too thick, add a splash of almond milk. This helps create a creamy texture. Stir well until you reach your desired consistency. Use a whisk to mix everything evenly. Make sure the chia seeds spread out well. This prevents clumping and ensures a smooth pudding. You can boost the flavor with sweeteners. Try honey or agave syrup if you want more sweetness. You can also add spices like cinnamon or nutmeg for warmth. For garnishes, consider using toasted coconut flakes. Fresh mint leaves add a nice touch too. They make your dessert look pretty and taste fresh. Mango Coconut Chia Pudding tastes great on its own, but you can pair it with other treats. Serve it with fresh fruit or granola for extra crunch. It works well for breakfast or as a snack. This pudding is perfect for family gatherings or warm weather picnics. It’s a refreshing treat that everyone will enjoy. {{image_4}} You can make this pudding even better with some easy swaps. If you want a dairy-free treat, use coconut or almond milk. You can also try oat milk or soy milk for a different taste. If you want to cut sugar, use less maple syrup or a sugar-free sweetener. Want to make it more fun? Try adding different fruits! Berries, bananas, or pineapple work well. You can also mix in spices like cinnamon or nutmeg for a warm flavor. A splash of coconut extract can boost the coconut taste, too. Get creative with how you serve your pudding. Use jars, cups, or even bowls to make it special. You can layer the pudding and mango in clear glasses to show off the colors. Try adding a layer of toasted coconut flakes between the pudding and mango for a tasty surprise. For more details, check out the Full Recipe! Store any leftovers in an airtight container. Glass jars work great for this. They keep the pudding fresh and let you see the beautiful layers. If you have a lot of pudding, divide it into smaller containers. This makes it easy to grab a quick snack. In the fridge, the pudding lasts about 4 to 5 days. Just make sure it stays covered to prevent drying out. Freezing is not the best option for this chia pudding. It might change the texture when thawed. You can use excess chia pudding in many ways. Mix it into smoothies for a creamy boost. You can also layer it in parfaits with yogurt and fruits. Or, spoon it over oatmeal for a fun breakfast twist. To make Mango Coconut Chia Pudding, you need about 10 minutes for prep. After that, it needs to chill for at least 4 hours. I recommend letting it sit overnight for the best texture. This gives the chia seeds time to soak and swell. Yes, you can use many types of milk for this recipe. You can swap coconut milk for almond, soy, or oat milk. Each milk adds its own flavor. Choose what you like best! If your pudding is too thick, just add a splash of almond milk. Stir until it reaches your desired creaminess. This simple trick helps you adjust the texture easily. Absolutely! This recipe is great for meal prep. You can make a big batch and store it in the fridge. It lasts well for 3 to 5 days. Just layer the pudding and mango when you're ready to eat. Yes, frozen mango works just fine! Just thaw it before using. This way, it mixes well with your pudding. Frozen mango can be a great time-saver, too! You now know how to make Mango Coconut Chia Pudding. This dish is simple and tasty, using just a few key ingredients. You learned about the health benefits of chia seeds, coconut milk, and mango. Remember to chill the pudding for the best texture and flavor. Feel free to try variations or adjust it to your taste. Enjoy this light, refreshing dessert at any time!

Mango Coconut Chia Pudding Deliciously Simple Recipe

Looking for an easy and tasty treat? Your search ends here! This Mango Coconut Chia Pudding recipe combines fruity mango,

- 1 cup whole grain pasta - 1 cup cooked quinoa - 1 cup cherry tomatoes, halved - 1 cup fresh spinach, chopped - 1/2 cup canned chickpeas, rinsed and drained These main ingredients create a solid base for your Minute Protein Pasta Bowl. The whole grain pasta gives you fiber and carbs. Quinoa adds protein and a nutty taste. Fresh vegetables like cherry tomatoes and spinach add color and nutrients. Chickpeas boost your protein and add a nice texture. - 1/4 cup feta cheese, crumbled - Fresh basil leaves for garnish Feta cheese adds a creamy and salty flavor to your bowl. It is optional but highly recommended. Fresh basil leaves give a burst of flavor and look great on top. - 2 tablespoons extra virgin olive oil - 1 tablespoon freshly squeezed lemon juice - 1 teaspoon garlic powder The dressing makes the dish pop. Extra virgin olive oil is rich in healthy fats. Lemon juice adds brightness and freshness. Garlic powder gives a nice, savory touch. You can also add salt and pepper to taste for extra flavor. {{ingredient_image_2}} Start by boiling salted water in a large pot. Use enough salt to make the water taste like the sea. Once the water boils, add 1 cup of whole grain pasta. Cook the pasta based on the package instructions. For al dente pasta, this takes about 8-10 minutes. Check the pasta for tenderness before draining. After cooking, drain the pasta and let it cool slightly. While the pasta cooks, take a large mixing bowl. Combine 1 cup of cooked quinoa, 1 cup of halved cherry tomatoes, 1 cup of chopped fresh spinach, and 1/2 cup of rinsed chickpeas. Stir gently to mix these ingredients evenly. Even mixing helps each bite have great flavor. Now, add the drained pasta to the bowl with quinoa and veggies. Gently fold the pasta into the mixture. This way, you avoid breaking the pasta. Next, drizzle 2 tablespoons of extra virgin olive oil and 1 tablespoon of lemon juice over the top. Sprinkle in 1 teaspoon of garlic powder, salt, and black pepper to taste. Using a spatula or a large spoon, carefully toss all the components together. Make sure everything is well-coated with the dressing. If you want feta cheese, gently fold it into the mix now. This adds a creamy burst of flavor. Finally, serve the pasta bowl in plates or bowls, garnished with fresh basil leaves. Enjoy your healthy and tasty Minute Protein Pasta Bowl! To cook pasta just right, time is key. Aim for al dente pasta, which means it should be firm yet tender. This usually takes about 8 to 10 minutes. Check the package for exact times. To cool the pasta, drain it and run it under cold water. This stops the cooking process and helps keep the texture perfect. Want to mix things up? Try different dressings! A balsamic vinaigrette can add a tangy twist. You can also experiment with a creamy ranch or a spicy chili sauce. Fresh herbs like basil, parsley, and oregano can boost flavor too. Just chop them up and mix them in for a fresh taste. Make your bowl look as good as it tastes! Serve the pasta in shallow dishes for an elegant touch. Arrange your fresh basil leaves on top for a pop of green. You can also add colorful veggies like bell peppers and carrots. A sprinkle of lemon zest can brighten the dish and make it more appealing. Pro Tips Perfect Pasta: Always cook pasta in a large pot of boiling salted water to ensure even cooking and to prevent sticking. Chickpea Variation: For added flavor, consider roasting the chickpeas beforehand with spices such as cumin and paprika. Freshness Matters: Use fresh spinach and ripe cherry tomatoes for the best taste and texture, enhancing the overall flavor of the dish. Customize Your Bowl: Feel free to add grilled chicken or shrimp for extra protein, or substitute with your favorite veggies for variety. {{image_4}} Want to make your Minute Protein Pasta Bowl even heartier? Add grilled chicken or shrimp. These options bring more protein and flavor. Just grill them until cooked through and slice them before adding. If you prefer vegetarian sources, consider adding tofu or tempeh. Both options are high in protein and will blend nicely with the other ingredients. You can season them to match the bowl's flavors. For those needing gluten-free options, use gluten-free pasta. Many brands offer pasta made from rice or lentils. These alternatives work well and keep the dish tasty. If you want a vegan twist, skip the feta cheese. You can replace it with avocado or a sprinkle of nutritional yeast. Both add creaminess and flavor without dairy. Looking to jazz up your dish? Add Mediterranean-inspired ingredients. Try kalamata olives, artichoke hearts, or roasted red peppers. These additions will give your pasta bowl a delicious twist. For a spicy kick, consider adding crushed red pepper flakes or diced jalapeños. A little heat can elevate the flavors and make your meal exciting. To keep your Minute Protein Pasta Bowl fresh, refrigerate leftovers right away. Place the pasta in an airtight container. This helps prevent sogginess and keeps flavors intact. I recommend storing it in the fridge for up to three days. When you are ready to eat, simply take it out, and enjoy! For longer storage, you can freeze the pasta bowl. First, let it cool completely. Then, transfer it to a freezer-safe container. Make sure to leave some space for expansion. You can freeze it for up to three months. When it's time to eat, thaw it overnight in the fridge. To reheat, use the microwave or a pot over low heat. Add a splash of water to keep it moist and improve texture. The Minute Protein Pasta Bowl stays fresh in the fridge for about three days. After that, it may lose its taste and texture. Watch for signs of spoilage, such as off smells or a change in color. If you notice anything unusual, it's best to throw it away. Enjoy your dish while it’s fresh for the best flavor! A Minute Protein Pasta Bowl is a quick meal packed with flavor and nutrients. It combines whole grain pasta, quinoa, and fresh veggies. This dish gives you protein, fiber, and vitamins in one bowl. It's great for busy days when you need a healthy meal fast. You can make it in just 20 minutes. Plus, it’s easy to customize based on your taste. Yes, you can meal prep a Minute Protein Pasta Bowl! Here are some tips: - Cook the pasta and quinoa ahead. Store them in the fridge for up to three days. - Prepare the veggies. Chop the cherry tomatoes and spinach, then keep them in airtight containers. - Mix and match. You can change up the ingredients each week to keep it interesting. - Dress it just before eating. This keeps the pasta fresh and prevents sogginess. To make a Minute Protein Pasta Bowl vegan, simply skip the feta cheese. Here are some ideas for non-dairy options: - Nutritional yeast. This adds a cheesy flavor and extra nutrients. - Vegan cheese. There are many plant-based cheese options available. - Extra veggies. Increase the portion of chickpeas or add avocado for creaminess. These swaps keep your dish tasty and satisfying! This pasta bowl is simple, tasty, and full of good stuff. We covered main ingredients like whole grain pasta, quinoa, and fresh vegetables. You learned step-by-step instructions to cook and mix these ingredients. I shared tips for perfecting your dish and how to store your leftovers. Don’t forget about fun variations, from adding protein to swapping dressings. Now, you can make a meal that’s healthy and filling. Enjoy crafting this great dish for your next meal!

Minute Protein Pasta Bowl Quick and Easy Recipe Guide

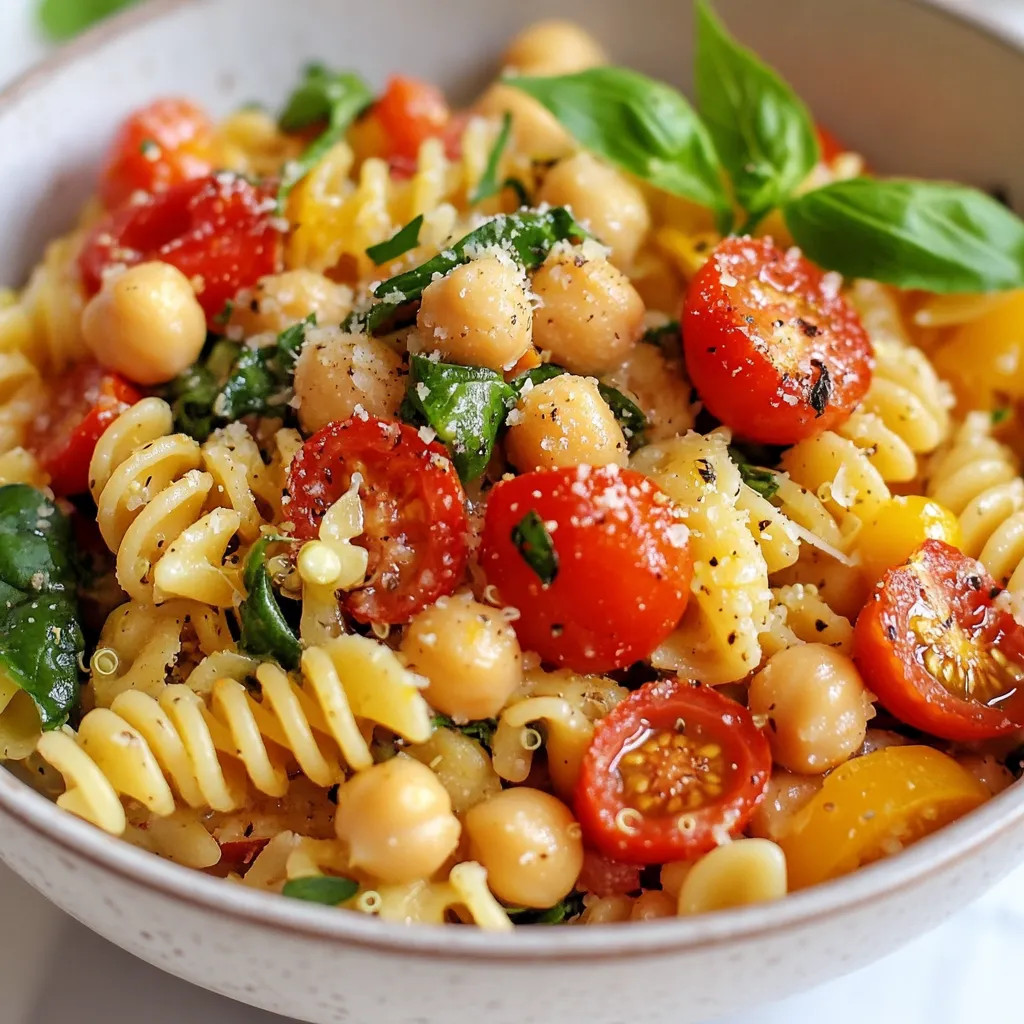
Looking for a quick, nutritious meal? The Minute Protein Pasta Bowl is your answer! Packed with whole grain pasta, cooked

Making Minute Pepperoni Pizza Roll-Ups is simple. Here’s what you need: - 1 large tortilla (choose either whole wheat or white) - 1/2 cup pizza sauce (store-bought or homemade) - 1/2 cup shredded mozzarella cheese (fresh or pre-shredded) - 1/4 cup sliced pepperoni (or any preferred sausage) - 1 teaspoon Italian seasoning (or to taste) - 1 tablespoon olive oil (for brushing) - Fresh basil leaves for garnish (optional) - Red pepper flakes (for an added kick, optional) Each ingredient plays a role in the final dish. The tortilla serves as the base. You can pick whole wheat for a healthy choice or white for a classic taste. The pizza sauce adds rich flavor, and you can use store-bought for ease or make your own for a fresh twist. Cheese is key in these roll-ups. Mozzarella is the best choice, either fresh or pre-shredded. For the meat, pepperoni is a favorite, but feel free to swap it with your preferred sausage. Spicing things up? Italian seasoning brings warmth and depth. Add red pepper flakes for heat if you like. Finally, fresh basil leaves not only add flavor but also brighten up the dish. With these simple ingredients, you’re on your way to creating a tasty snack that everyone will love! {{ingredient_image_2}} 1. Start by laying the tortilla flat on a clean surface. This helps keep everything neat. 2. Take a spoon or spatula and spread the pizza sauce across the tortilla. Leave about a half-inch border around the edges. This border stops spills when you roll it up. 3. Next, sprinkle the shredded mozzarella cheese evenly over the sauce. Make sure to cover the sauce completely. Then, layer the sliced pepperoni on top. You can add as much as you like! 1. Begin at one side of the tortilla. Tightly roll it into a log shape. Keep the filling secure as you roll. 2. To make the outside crispy, lightly brush the rolled tortilla with olive oil. You can use a pastry brush or even your fingers. 3. Place the roll seam side down on a cutting board. Slice it into one-inch sections using a sharp knife. 4. Preheat a non-stick skillet over medium heat. Once hot, place the slices cut side down in the skillet. Cook for about 2-3 minutes on each side. You want them golden-brown and crispy. 1. After cooking, carefully remove the roll-ups from the skillet. Arrange them on a serving platter. 2. For a nice touch, garnish the roll-ups with fresh basil leaves. If you like a little heat, sprinkle some red pepper flakes on top. These simple steps make for a fun snack that is easy to share! - To get that perfect crispy texture, use medium heat. This helps the outside crisp up without burning. - Adjust seasoning to match your taste. Add more Italian seasoning or red pepper flakes for extra flavor. - When flipping the roll-ups, use a spatula. Gently lift them to avoid breaking. - Serve with a side of fresh salad or crunchy veggies. They balance the rich flavors well. - For drinks, try soda, iced tea, or even lemonade. These drinks pair nicely with the pizza flavor. Pro Tips Use Fresh Ingredients: Fresh mozzarella cheese and high-quality pepperoni can elevate the flavor of your roll-ups significantly. Experiment with Fillings: Feel free to swap out the pepperoni for other toppings like bell peppers, mushrooms, or even cooked sausage for a different twist. Control the Crispiness: Adjust the heat of your skillet to ensure the roll-ups are golden brown without burning; cooking at medium heat usually works best. Make it a Meal: Serve these roll-ups with a side salad or some roasted vegetables for a complete and balanced meal. {{image_4}} You can easily change up the Minute Pepperoni Pizza Roll-Ups to match your taste. Here are some fun swaps: - Cheese Options: If you want a vegan version, try using dairy-free cheese. Other great choices are cheddar, Monterey Jack, or pepper jack for a spicy kick. - Meat Alternatives: Instead of pepperoni, you can use cooked chicken, turkey, or even diced veggies like bell peppers or mushrooms. These add flavor and make your roll-ups unique. - Sauce Modifications: If you like it spicy, swap the pizza sauce for a spicy sauce. Pesto is also a great choice for a fresh twist. You can prepare these roll-ups in different ways to suit your kitchen style. Here are two popular methods: - Oven-Baked Method: Preheat your oven to 400°F (200°C). After you roll up the tortillas, place them seam-side down on a baking sheet. Brush them with olive oil and bake for about 12-15 minutes until golden brown and crispy. - Air Fryer Options: For a healthier twist, use an air fryer. Preheat it to 375°F (190°C). Place the roll-ups in a single layer and cook for about 8-10 minutes. This method gives you a crispy texture with less oil. To keep your Minute Pepperoni Pizza Roll-Ups fresh, store them in the fridge. Place them in an airtight container. They stay good for about 3 days. If you want to keep them longer, you can freeze them. Wrap each roll-up tightly in plastic wrap, then put them in a freezer bag. They can last up to 2 months in the freezer. To reheat your roll-ups, use a skillet or an oven. Heat the skillet over medium heat. Place the roll-ups in the skillet and cook for 2-3 minutes on each side. This method keeps them crispy. If using the oven, preheat it to 350°F (175°C). Place the roll-ups on a baking sheet and heat for about 10 minutes. Avoiding sogginess is key. If you want to microwave them, do so in short bursts to prevent them from getting too soft. Enjoy your roll-ups at their best! Minute Pepperoni Pizza Roll-Ups can last about 3 to 4 days in the fridge. Store them in an airtight container. This keeps them fresh and tasty. Yes, you can make these roll-ups ahead of time. Just prepare them, then wrap them in plastic wrap. Keep them in the fridge until you are ready to cook. You can use sliced turkey, salami, or even veggies. Try mushrooms or bell peppers for a twist. These options give you variety without losing flavor. Absolutely! Preheat your oven to 400°F (200°C). Place the roll-ups on a baking sheet and bake for 10-12 minutes. This method gives you a nice crisp outside. You can dip them in ranch dressing, marinara sauce, or garlic butter. These dips add new flavors and keep things fun at snack time. This blog post covered all the tasty steps to make Minute Pepperoni Pizza Roll-Ups. You learned about ingredients, preparation, cooking, and even how to store leftovers. I shared tips for perfecting texture and flavors. Don’t be afraid to mix and match ingredients to fit your taste. Enjoying these roll-ups can be a fun and easy meal. Try different sauces and toppings for more variety. Remember, the best meals are the ones you create yourself, so get cooking!

Minute Pepperoni Pizza Roll-Ups Easy Snack Delight

Craving a quick and delicious snack? Look no further! My Minute Pepperoni Pizza Roll-Ups are the perfect bite-sized treat for

- 2 large chicken breasts - 1 cup chicken broth - 1 tablespoon taco seasoning - 8 small corn tortillas - 1 cup red cabbage, finely shredded - 1 cup green cabbage, finely shredded - 1 medium carrot, finely grated - ¼ cup mayonnaise - 1 tablespoon apple cider vinegar - 1 teaspoon honey - Fresh cilantro, roughly chopped - Lime wedges - Salt and freshly ground black pepper To make pulled chicken tacos with slaw, gather these ingredients. The chicken breasts and broth create a juicy base. Taco seasoning gives the chicken a bold flavor. Corn tortillas add the perfect touch for holding all the goodness. Next, for the slaw, red and green cabbage provide a crunchy bite. The carrot adds color and sweetness. Mayonnaise, apple cider vinegar, and honey mix to make a creamy dressing. This slaw will balance the spicy chicken. Don't forget the garnishes! Fresh cilantro brightens up the dish. Lime wedges add a zesty finish. Salt and pepper enhance all the flavors. For the full recipe, check out the detailed instructions. Happy cooking! To start, I place the chicken breasts in a slow cooker. I pour one cup of chicken broth over the chicken. Then, I sprinkle one tablespoon of taco seasoning on top. I make sure to rub the seasoning in well. Next, I cover the slow cooker. I set it to cook on low for 6 to 8 hours or on high for about 4 hours. The chicken is ready when it is very tender. It should shred easily with a fork. Once done, I remove the chicken and shred it using two forks. I mix the shredded chicken back into the broth for a flavor boost. While the chicken cooks, I prepare the crunchy slaw. I take a large mixing bowl and combine one cup of finely shredded red cabbage, one cup of finely shredded green cabbage, and one medium grated carrot. I stir them together until mixed well. In a smaller bowl, I whisk together ¼ cup of mayonnaise, one tablespoon of apple cider vinegar, one teaspoon of honey, and a pinch of salt and pepper. This creamy dressing adds great taste. I pour the dressing over the cabbage and carrot mix. Then, I toss everything until the veggies are evenly coated. I taste and adjust the seasoning if needed. Now, it’s time to assemble the tacos! I heat a dry skillet over medium heat. I place each small corn tortilla in the pan for about 30 seconds on each side. I want them soft and pliable for easy filling. To build the tacos, I lay a generous amount of pulled chicken onto each warm tortilla. I then add a hearty scoop of the crunchy slaw on top. For a finishing touch, I garnish the tacos with fresh chopped cilantro. I serve them with lime wedges on the side for a zesty squeeze. You can find the Full Recipe for more details and tips. - To ensure the chicken is tender, cook it low and slow. This method makes the meat juicy. - Use chicken broth to add depth to the flavor. It keeps the chicken moist and tasty. - For a flavor boost, rub the taco seasoning into the chicken. This helps the spices soak in well. - To achieve the perfect crunch, use fresh cabbage. Cut it just before serving for extra crispness. - Grate the carrot finely. It adds sweetness and texture to the slaw. - Adjust the seasoning to suit your taste. Add more honey for sweetness or vinegar for tang. - For presentation, serve the tacos on a bright platter. This makes them more appealing. - Garnish with lime wedges and fresh cilantro. The colors make the dish pop. - Consider serving with sides like rice or beans. A refreshing drink like lemonade pairs well too. For a complete guide, check out the Full Recipe for Pulled Chicken Tacos with Slaw. {{image_4}} You can switch up the meat in these tacos. Pulled pork or beef works great. Both options add rich flavor. If you're a vegetarian, consider using jackfruit. When cooked, jackfruit shreds nicely and takes on flavors well. This makes it a fun choice for pulled tacos. You can also change the dressing for your slaw. Try a yogurt-based dressing for a lighter twist. It adds creaminess without being too heavy. You might want to spice it up too. Adding chili powder or paprika can give your slaw an extra kick. Toppings can take your tacos to the next level. Slices of creamy avocado can add richness. Shredded cheese also makes a tasty addition. For those who like heat, try spicy salsa or hot sauce. Both will enhance the flavors in your tacos. To keep your pulled chicken and slaw fresh, follow these tips: - Chicken: Store leftover pulled chicken in an airtight container. It can last up to four days in the fridge. - Slaw: Place slaw in a separate container to keep it crunchy. It stays fresh for about three days. - Tortillas: Keep tortillas in a sealed bag. They can last a week in the fridge but are best used fresh. When it’s time to enjoy your leftovers, use these methods: - Chicken: Reheat chicken in a skillet over medium heat. Add a splash of broth to keep it moist. - Slaw: For slaw, avoid reheating. Instead, toss in a bit more dressing. This keeps the flavors bright and fresh. Freezing is a great way to save your pulled chicken for later: - Chicken: Cool the shredded chicken completely. Place it in a freezer-safe bag. It can last up to three months. - Slaw and Tortillas: Freeze slaw and tortillas separately. The slaw may lose crunch, so use it fresh if possible. Tortillas can stay good for up to two months in the freezer. For the full experience, check out the Full Recipe! You can tell the chicken is cooked when it is very tender. The meat should shred easily with a fork. If you see clear juices when you cut into it, that's a good sign. The internal temperature should reach 165°F (74°C). This ensures safety and perfect texture. Yes, you can use store-bought slaw mix. It saves time and is very convenient. However, fresh slaw offers better taste and crunch. Store mixes might lack flavor and freshness. If you choose store-bought, add some extra seasonings for a boost. You can serve many sides with pulled chicken tacos. Some tasty options are: - Rice and beans - Mexican street corn - Guacamole and chips - A fresh salad - Roasted vegetables These sides complement the flavors and add variety. The spice level of these tacos depends on the seasoning you use. The taco seasoning can be mild or spicy. If you want more heat, add hot sauce or jalapeños. If you prefer less spice, use a mild seasoning or skip the hot sauce. Adjusting heat makes it fun for everyone! This blog covered how to make delicious pulled chicken tacos. We discussed key ingredients like chicken broth, tortillas, and fresh slaw. I shared step-by-step instructions from cooking the chicken to assembling the tacos. Our tips helped ensure juicy chicken and crunchy slaw. You can also explore variations and learn how to store leftovers. Enjoy creating these flavorful tacos and make them your own. Happy cooking!

Pulled Chicken Tacos with Slaw Flavorful Delight

Are you ready to spice up your dinner routine? These Pulled Chicken Tacos with Slaw are the answer! With tender

To make Raspberry Lemonade Bars, you will need a few simple ingredients. Here’s the list: - 1 cup all-purpose flour - 1/2 cup powdered sugar (plus extra for dusting) - 1/2 cup unsalted butter, softened to room temperature - 1/4 teaspoon salt - 2 large eggs - 1 cup granulated sugar - 1/4 cup freshly squeezed lemon juice - Zest of 1 lemon - 1 cup fresh raspberries - 1/2 teaspoon baking powder These ingredients work together to create a creamy filling and a buttery crust. The raspberries offer a burst of flavor, while the lemon adds a zesty kick. You can find most ingredients in your kitchen or local store. If you want to make it even easier, check the full recipe for more details. First, preheat your oven to 350°F (175°C). This step is key for even baking. Line an 8x8-inch pan with parchment paper. Leave some paper hanging over the sides. It helps to lift the bars out later. In a medium bowl, mix 1/2 cup of softened butter with 1/2 cup of powdered sugar. Use an electric mixer to cream them until light and fluffy. Next, add 1 cup of all-purpose flour and 1/4 teaspoon of salt. Mix until the dough looks crumbly. Press this mixture evenly into the bottom of your prepared pan. Now, place the crust in the oven and bake for 15 minutes. You want it to get a light golden brown color. When it's done, take it out and let it cool for a few minutes. In a large bowl, whisk together 2 large eggs and 1 cup of granulated sugar. Mix until it's smooth and slightly frothy. Then, add 1/4 cup of freshly squeezed lemon juice, the zest of 1 lemon, and 1/2 teaspoon of baking powder. Stir until well combined. Gently fold in 1 cup of fresh raspberries, being careful not to mash them. Pour the raspberry filling over the cooled crust. Spread it out evenly. Put the pan back in the oven and bake for 25-30 minutes. The filling should be set, and the edges should look lightly golden. After baking, let the bars cool at room temperature for about 30 minutes. Then, move the pan to the fridge and chill for at least 2 hours. This step helps the bars firm up. When the bars are chilled, lift them out of the pan using the parchment paper. Dust the top with extra powdered sugar for a sweet finish. Cut the bars into squares and enjoy your refreshing dessert! For the full recipe, check out the recipe section above. To make the crust just right, use softened butter. It mixes better with the sugar. Cream the butter and sugar until light and fluffy. This makes a tender crust. Press it firmly into the pan. This ensures it holds together after baking. Keep an eye on the baking time. You want it golden but not too dark. If you have leftovers, store them in an airtight container. They can last in the fridge for up to five days. To keep them fresh, make sure they are fully chilled before storing. You can also layer them with parchment paper to prevent sticking. Want to boost the flavor? Try adding a bit of lime juice. It gives a nice twist. You can also mix in other berries like blueberries or blackberries. They add color and taste. For a fun touch, sprinkle some lemon zest on top before serving. {{image_4}} You can easily swap some ingredients in this recipe. If you're out of all-purpose flour, use almond flour or oat flour. Both options work well. Instead of unsalted butter, you can try coconut oil. The taste will change, but it will still be delicious. If you don't have powdered sugar, make your own by blending granulated sugar until fine. This will give a smooth finish. While raspberries are tasty, you can try other fruits. Blueberries, strawberries, or even blackberries can add a new twist. Each fruit brings its own flavor. For a tropical vibe, add diced mango or pineapple. Just make sure to keep the amount similar to the raspberries. Want to make these bars vegan? Substitute eggs with flaxseed meal. Mix 1 tablespoon of flaxseed with 2.5 tablespoons of water. Let it sit for five minutes to thicken. For gluten-free bars, use a gluten-free flour blend. This will keep the texture but change the flavor slightly. You can still enjoy these bars without gluten or animal products. For more details, check the Full Recipe for ideas on how to make these changes. To keep your raspberry lemonade bars fresh, store them in an airtight container. Use parchment paper between layers to prevent sticking. They stay fresh for about 5 days at room temperature. If you want to keep them longer, the fridge is a great option. They can last up to 10 days when chilled. Just remember to cover them well to keep moisture out. You can freeze raspberry lemonade bars for later. To do this, cut the bars into squares first. Wrap each square tightly in plastic wrap. Then, place them in a freezer-safe bag or container. They can be frozen for up to 3 months. When you're ready to enjoy them, just thaw in the fridge overnight. They'll taste just as good as fresh! Raspberry Lemonade Bars last about 4 to 5 days in the fridge. Store them in an airtight container. They will stay fresh and tasty for your family or guests. If you want to keep them longer, you can freeze them. Just wrap them tightly in plastic wrap and foil. Yes, you can use frozen raspberries. They work great in this recipe. Just make sure to thaw and drain excess liquid before mixing them in. This helps to keep your bars from getting too soggy. Fresh raspberries are lovely, but frozen ones are just as good. Raspberry Lemonade Bars taste great with whipped cream or vanilla ice cream. You can also pair them with a scoop of lemon sorbet for a refreshing twist. Fresh mint leaves add a nice touch as well. These sides enhance the fruity flavors and make your dessert even better. To make the bars less sweet, reduce the granulated sugar by a quarter cup. You can also use less powdered sugar for dusting. Another option is to add more lemon juice. This adds tartness and balances the sweetness well. Adjusting sweetness is easy and personalizes the bars to your taste. You may find pre-made Raspberry Lemonade Bars at local bakeries or specialty dessert shops. Some grocery stores also sell them in the bakery section. If you prefer homemade, check out the Full Recipe for a simple guide to making your own delicious bars. You learned about making delicious Raspberry Lemonade Bars with simple steps and key ingredients. We covered how to create the crust, filling, and bake the bars to perfection. You also discovered helpful tips for storing leftovers and some fun variations. These treats are bright, fruity, and perfect for any occasion. I hope you enjoy making and sharing them with friends and family. Happy baking!

Raspberry Lemonade Bars Tasty and Easy Recipe

If you’re looking for a treat that bursts with flavor, these Raspberry Lemonade Bars are for you! This tasty and

- 500g chicken breast, thinly sliced - 2 cups fresh Thai basil leaves - 4 cloves garlic, minced - 2 red chilies, finely sliced - 1 bell pepper, sliced - 1 small onion, sliced - 1 tablespoon vegetable oil - 2 tablespoons soy sauce - 1 tablespoon oyster sauce - 1 teaspoon sugar The chicken is the star of this dish. I love using fresh chicken breast because it cooks quickly. Thai basil adds a unique flavor that you cannot find anywhere else. The garlic and chilies give the dish a bold kick. You can pick any color of bell pepper. I often go for red or yellow for a pop of color. The onion adds sweetness that works well with the other ingredients. - 1 tablespoon fish sauce - Extra vegetables for variety Fish sauce adds depth to the flavor. If you want a more complex taste, use it. You can also add any veggies you like. Carrots or snap peas work well and add crunch. - Jasmine rice I always serve this dish over jasmine rice. The rice soaks up the tasty sauce and balances the flavors. You can add side dishes like a simple cucumber salad. Fresh herbs or lime wedges make great garnishes. A sprinkle of extra Thai basil on top looks nice, too. First, we need to marinate the chicken. Take 500g of thinly sliced chicken breast and place it in a mixing bowl. Add 2 tablespoons of soy sauce, 1 tablespoon of oyster sauce, and 1 teaspoon of sugar. If you want to deepen the flavor, you can also add 1 tablespoon of fish sauce. Mix well to coat the chicken. Cover the bowl and let it marinate for about 10-15 minutes. This step adds great taste to the dish. Next, we heat the oil. Use a large skillet or a wok. Pour in 1 tablespoon of vegetable oil and heat it over medium-high heat. You want the oil shimmering but not smoking. Now, add aromatics to the hot oil. Toss in 4 cloves of minced garlic and 2 finely sliced red chilies. Stir-fry for about 30 seconds until the garlic turns golden and fragrant. Be careful not to burn the garlic, as it can taste bitter. It's time to cook the chicken. Raise the heat to high and add the marinated chicken to the skillet. Stir-fry the chicken for about 5-7 minutes. You want it fully cooked and lightly caramelized. Stir it frequently to ensure even cooking. Now, we add some vegetables. Incorporate 1 sliced bell pepper and 1 small sliced onion into the skillet. Stir-fry for an additional 2-3 minutes. This will let the veggies soften while keeping a bit of crunch. Next, it's time for the star of the show—basil! Gently fold in 2 cups of fresh Thai basil leaves. Stir-fry for another 1-2 minutes, just until the basil wilts. This will let the aromatic flavor shine through. Finally, serve the stir-fry hot over a bed of cooked jasmine rice. This dish is best enjoyed right away. For more detailed instructions, check the Full Recipe. Fresh ingredients make a big difference in flavor. Use fresh Thai basil for the best taste. The unique flavor of basil adds depth. High heat is key for stir-frying. It cooks quickly and keeps ingredients crisp. Heat your oil until it shimmers before adding food. This prevents sogginess and enhances flavor. Choose the right chilies for your taste. Red chilies add heat and color. For less spice, use fewer chilies or remove the seeds. You can also use milder peppers, like bell peppers. If you want it even milder, skip the chilies altogether. Visual appeal is important for any dish. Serve in deep bowls with rice for a lovely look. Bright colors make the meal pop. Garnish with fresh basil leaves and slices of chili. This adds flavor and brightens the dish. Try serving with lime wedges for a fresh touch. For the full recipe, check the details provided. {{image_4}} You can switch up the protein in this dish. Shrimp, tofu, or beef all work well. - Shrimp: Use about 500g of peeled and deveined shrimp. Cook them until pink and tender. - Tofu: Use firm tofu, cut into cubes. Sauté until golden for a crispy texture. - Beef: Thinly slice beef and marinate just like the chicken. Use flank or sirloin for the best flavor. Each option gives a unique twist to the classic Thai basil chicken stir-fry. Adding more veggies can boost the dish's flavor and nutrients. Here are some great choices: - Broccoli: Adds crunch and color. Cut into small florets. - Carrots: Slice thinly for sweetness and texture. - Snow peas: Add them for a crisp bite. They cook quickly and keep their bright color. Feel free to mix and match these veggies based on what you have at home. Changing the sauce can create different tastes. Here are some ideas: - Spicy sauce: Add more chilies or a dash of sriracha for heat. - Sweet sauce: Mix in a bit of honey or brown sugar for sweetness. - Homemade sauce: Combine soy sauce, garlic, and lime juice for a fresh twist. Experimenting with sauces can make this dish feel new each time you cook it. For the full recipe, you can find it above. To keep Thai Basil Chicken Stir-Fry fresh, use airtight containers. Glass containers work well. They help avoid any odors. Let the stir-fry cool first, then store it in the fridge. This dish stays good for about three days. When it's time to reheat, use a skillet. Heat it on low to medium heat. Add a splash of water or broth to keep it moist. Stir often to avoid sticking. This helps keep the flavor and texture just right. You want to warm it through, not cook it again. Yes, you can freeze Thai Basil Chicken Stir-Fry! Use freezer-safe bags or containers. Make sure to remove air to prevent freezer burn. It’s best to freeze it without the rice. This way, the stir-fry stays fresh for about three months. When ready to eat, thaw it in the fridge overnight before reheating. Thai basil has a unique flavor. It tastes sweet and slightly spicy. The leaves are darker and smaller than regular basil. Thai basil has a hint of anise, while regular basil is more minty. The stems are purple and can be used in cooking too. This type of basil holds up well in heat, making it perfect for stir-frys. Yes, you can prepare this dish ahead. Chop the vegetables and slice the chicken. Store them in the fridge until you are ready to cook. You can also mix the sauces ahead of time. Just keep them in a sealed container. When it's time to cook, it will save you a lot of time. This recipe works great for meal prep. You can easily make a larger batch. Just double or triple the ingredients. Store the stir-fry in meal prep containers. This makes it easy to grab a quick lunch or dinner. When reheating, add a splash of water to keep it moist. For the full recipe, check out the details above. This blog post explored how to make a delicious Thai Basil Chicken Stir-Fry. We covered key ingredients, from chicken to fresh basil, and suggested great serving ideas. I showed you step-by-step how to prep the chicken and cook it for the best taste. Authentic flavor tips and variations made sure you can customize your dish. Remember, fresh ingredients really matter for a tasty meal. By trying these tips, you can enjoy a great dish at home. Happy cooking!

Thai Basil Chicken Stir-Fry Flavorful Weeknight Meal

Looking for a quick and tasty meal? This Thai Basil Chicken Stir-Fry is perfect for busy weeknights! With fresh basil,

Older posts
Newer posts
← Previous Page1 … Page57 Page58 Page59 … Page91 Next →

dsad

© 2025 recipesstation • Built with GeneratePress

Our Policies

  • Copyright Policy
  • Cookie Policy
  • GDPR Policy
  • Privacy Policy
  • Disclaimer
  • Terms Of Use

More Information

  • Home
  • About
  • Contact
  • Appetizers
  • Dessert
  • Dinner
  • Drinks
©2025, recipesstation About Back To Top