Skip to content
DisclaimerTerms Of UseGDPR PolicyCookie Policy

recipesstation

  • Home
  • Drinks
  • Appetizers
  • Dinner
  • Dessert
  • About
  • Contact
  • Privacy Policy
DisclaimerTerms Of UseGDPR PolicyCookie Policy

Emily

- 1 cup all-purpose flour - 1/2 cup granulated sugar (plus extra for rolling) - 2 teaspoons baking powder - 1/2 teaspoon salt - 1 teaspoon ground cinnamon (plus extra for rolling) - 1/4 cup unsalted butter, melted - 1/2 cup milk (preferably whole) - 1 large egg - 1 teaspoon vanilla extract To make Air Fryer Cinnamon Churro Donut Holes, you need simple ingredients. All-purpose flour is the base. It gives the donut holes their structure. Granulated sugar adds sweetness. You will need some sugar to coat the donut holes later. Baking powder helps them rise. Salt balances the flavors. Ground cinnamon gives that classic churro taste. Melted unsalted butter adds richness. Whole milk makes the dough moist. A large egg binds everything together. Lastly, vanilla extract adds a lovely aroma. With these ingredients, you can create a delicious treat that is both fun to make and eat! Mixing dry ingredients Start by taking a medium bowl. Add 1 cup of all-purpose flour. Next, add 1/2 cup of granulated sugar. Then, include 2 teaspoons of baking powder, 1/2 teaspoon of salt, and 1 teaspoon of ground cinnamon. Whisk these dry ingredients well. This helps mix them evenly. Set this bowl aside for later use. Combining wet ingredients In another bowl, melt 1/4 cup of unsalted butter. Then, whisk in 1/2 cup of milk, 1 large egg, and 1 teaspoon of vanilla extract. Mix until smooth. This will create a tasty base for your dough. Forming the dough Slowly pour the wet mixture into the dry ingredients. Use a spatula to stir gently. Mix until just combined. Be careful not to overmix. The dough should stay slightly sticky for the best texture. Preheating the air fryer Set your air fryer to 350°F (175°C). Preheat it for about 5 minutes. This helps ensure even cooking. Rolling donut holes Lightly grease your hands with cooking spray. Scoop small dough portions and roll them into balls. Aim for golf ball-sized pieces. Handle the dough gently to keep it tender. Cooking time and temperature Place the rolled donut holes in the air fryer basket. Make sure they have space around them. If needed, cook in batches. Cook for 8-10 minutes. Check for a lovely golden brown color. Shake the basket halfway through for even cooking. Making the cinnamon sugar coating While the donut holes cook, mix 1/4 cup of granulated sugar with 1 tablespoon of ground cinnamon in a small bowl. Stir well to combine. Coating the donut holes Once cooked, remove the donut holes from the air fryer. While warm, roll each one in the cinnamon sugar mixture. Ensure they are coated on all sides. Cooling instructions Place the churro donut holes on a wire rack. Allow them to cool slightly before serving. This helps keep their delightful texture. Enjoy them warm for the best taste! - Ensuring the right dough consistency The dough should be slightly sticky but smooth. Mix the wet and dry parts gently. Overmixing can make the donut holes tough. - Best practices for cooking in batches Do not overcrowd the air fryer. Leave space around each donut hole. This lets hot air circulate and cook evenly. If you have a lot, cook them in two or three rounds. - Monitoring doneness Check the donut holes after 8 minutes. They should look golden brown. If not, give them a couple more minutes. Always shake the basket halfway through for even cooking. - Presentation ideas Serve the warm donut holes in a cute bowl. Line it with parchment paper for a nice touch. Dust with extra cinnamon sugar for fun. - Dipping sauce recommendations Pair these churro donut holes with chocolate sauce or caramel. A creamy dip makes them even more delightful. You can also serve a scoop of vanilla ice cream on the side! {{image_4}} You can add fun flavors to your churro donut holes. Try mixing in chocolate chips or nuts. This adds a tasty surprise in each bite. Chopped walnuts or pecans work great for a crunchy texture. You could also use flavored extracts. Almond or orange extract adds a unique twist. Experiment with spices too! Instead of just cinnamon, try nutmeg or cardamom. These spices give a warm and cozy flavor. You can even add a pinch of cayenne pepper for a little heat. Get creative and find your favorite mix! If you need gluten-free options, switch to a gluten-free flour blend. This keeps the texture light and fluffy. Just check that your baking powder is also gluten-free. For dairy-free alternatives, use almond milk or oat milk instead of regular milk. You can also use coconut oil in place of butter. This gives a lovely flavor while keeping it dairy-free. These swaps help everyone enjoy your churro donut holes! After making your air fryer cinnamon churro donut holes, let them cool. Place them in an airtight container. This keeps them fresh for up to three days. You can store them at room temperature. Make sure they are not stacked on top of each other. This prevents them from getting soggy. If you want to save them for later, freezing is a great option. To freeze, first, let the donut holes cool completely. Then, place them in a single layer on a baking sheet. Freeze them for about two hours. Once frozen, transfer them to a freezer-safe bag or container. They can last for up to three months in the freezer. When you are ready to eat them, there are easy reheating suggestions. You can reheat them in the air fryer at 350°F (175°C) for about 3-5 minutes. This warms them up and keeps them crispy. Alternatively, you can use a microwave for 15-20 seconds. However, this may make them a bit softer. Enjoy your tasty treats anytime! Can I use frozen dough for this recipe? Yes, you can use frozen dough. Just let it thaw first. Make sure to follow the steps to mix and form the dough as usual. How do I know when the donut holes are done? Look for a golden brown color on the outside. You can also insert a toothpick. If it comes out clean, they are done! What can I use instead of an air fryer? You can bake these donut holes in a regular oven. Preheat your oven to 350°F (175°C) and bake for about 12-15 minutes. What if my dough is too sticky? If your dough is too sticky, sprinkle a little flour on your hands and the dough. This will help you handle it better without adding too much flour. How can I prevent the donut holes from drying out? To keep the donut holes moist, do not overcook them. Remove them as soon as they turn golden. Store them in an airtight container right after they cool. This blog post covered how to make delicious air fryer donut holes. We explored essential ingredients, preparation steps, and cooking instructions. I shared handy tips for storing and serving your treat. You can even try different flavors or adjust for dietary needs. With simple steps and easy ingredients, you can enjoy warm, sweet donut holes anytime. Now it’s time to get cooking and enjoy your tasty creation!

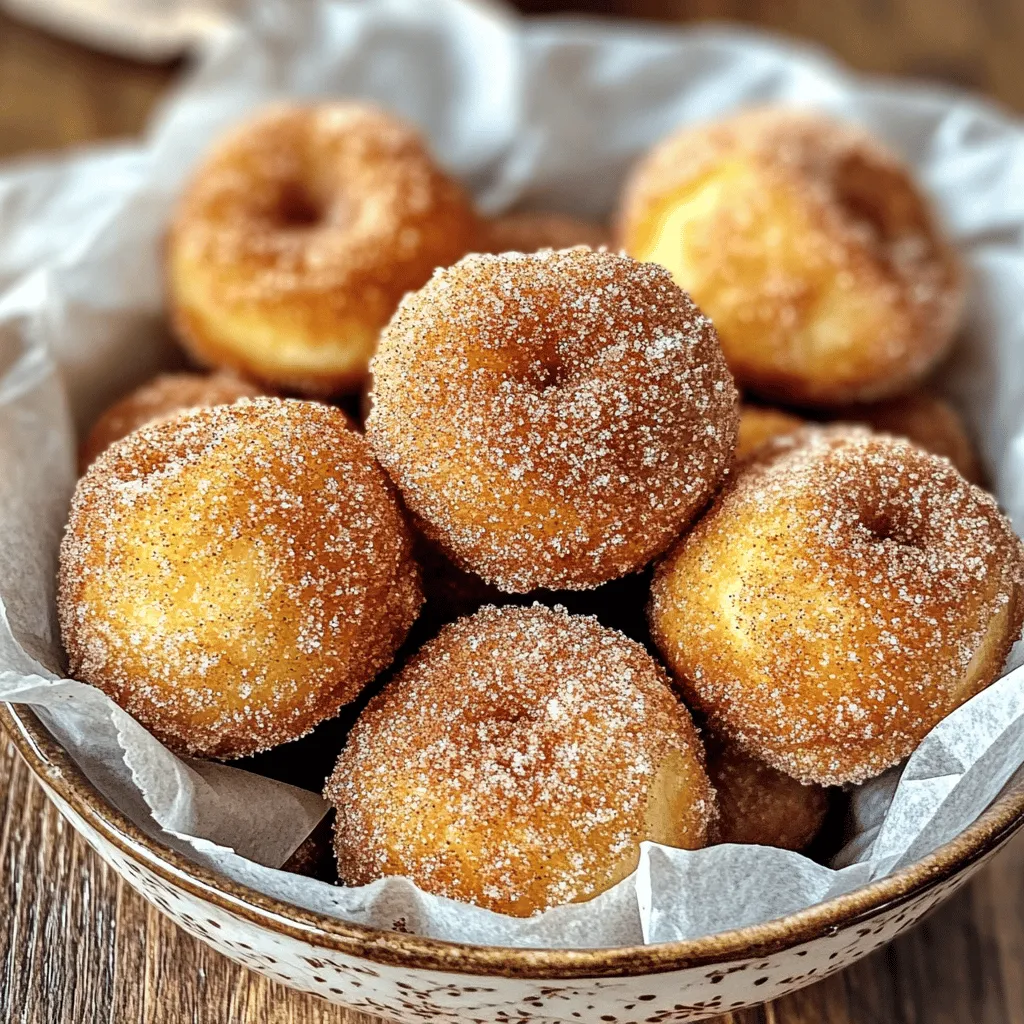
Air Fryer Cinnamon Churro Donut Holes Delight

Get ready to indulge in a sweet treat with my Air Fryer Cinnamon Churro Donut Holes! These fluffy bites are

- 1 pound cooked chicken, shredded or diced - 1 cup frozen mixed vegetables (peas, carrots, corn) - 1 cup chicken broth - 1/2 cup heavy cream - 1 small onion, diced - 2 cloves garlic, minced - 2 tablespoons butter - 1 teaspoon dried thyme - Salt and pepper to taste - 1 package (17.3 oz) puff pastry sheets, thawed - 1 egg, beaten (for egg wash) Let’s dive into what makes this dish so tasty. First, you need one pound of cooked chicken. You can use rotisserie chicken or leftover chicken from a previous meal. Shredding or dicing it keeps the pieces bite-sized and easy to eat. Next, grab one cup of frozen mixed vegetables. Peas, carrots, and corn add color and nutrition. They bring a sweet crunch to the dish, making every bite enjoyable. For the sauce, you will use one cup of chicken broth and half a cup of heavy cream. The chicken broth adds flavor, while the cream gives richness. Together, they create a creamy and comforting base. You will also need one small onion and two cloves of garlic. Dicing the onion and mincing the garlic infuse the dish with great aroma. Start with these two ingredients, and your kitchen will smell amazing. Add two tablespoons of butter for sautéing the onion and garlic. Butter adds a nice depth of flavor. Don't forget the herbs! One teaspoon of dried thyme adds a lovely earthiness. Season with salt and pepper to taste. These simple seasonings elevate the dish without overpowering the natural flavors. You will need one package of puff pastry sheets, thawed. This is your golden topping that creates a flaky crust. The puff pastry is key to making a pot pie look and taste great. Lastly, brush the top with one beaten egg. This gives your pastry a beautiful golden color when baked. These ingredients come together to create a delightful chicken pot pie that warms the heart. - Preheat the oven to 400°F (200°C). - In a large skillet, melt 2 tablespoons of butter over medium heat. - Add 1 small diced onion and sauté for about 5 minutes until soft. - Mix in 2 minced garlic cloves and stir for 1 minute. - Add 1 pound of cooked chicken and 1 cup of frozen mixed vegetables. - Pour in 1 cup of chicken broth and 1/2 cup of heavy cream. - Stir in 1 teaspoon of dried thyme, along with salt and pepper. - Let the mixture simmer for 5-7 minutes until it thickens. - On a floured surface, roll out the puff pastry until it's large enough. - Pour the chicken and vegetable filling into your baking dish. - Carefully cover it with puff pastry, sealing the edges tightly. - Cut a few small slits in the top of the pastry for steam to escape. - Brush the top with a beaten egg for a golden finish. - Place the dish in the oven and bake for 25-30 minutes. - The pastry should puff up and turn golden brown. - Let the pot pie cool for a few minutes before serving. - How to ensure perfect puff pastry texture To get a great puff pastry, keep it cold. Use chilled butter and don’t overwork the dough. Roll it out gently and make sure to have layers. When you bake, the steam makes it puff up. - Substitutions for fresh ingredients If you don’t have fresh veggies, frozen ones work well. You can also swap heavy cream with half-and-half for a lighter dish. For herbs, dried thyme is a good choice if you lack fresh herbs. - Optimal cooking times for varied ovens Ovens can vary, so keep an eye on your dish. Start checking around 25 minutes. If the pastry is golden and puffy, it’s done. Adjust time by a few minutes based on your oven. - Presentation ideas for serving Serve the pot pie in the baking dish for a rustic look. You can also spoon portions into bowls for a more elegant setting. - Best sides to pair with chicken pot pie A fresh salad or steamed green beans makes a great side. You can also serve crusty bread for dipping in the filling. - Ideal garnishes for added flavor Fresh thyme or chopped parsley adds color and taste. A sprinkle of black pepper can also enhance the dish's flavor. {{image_4}} You can easily tweak this recipe to fit different diets. For a vegetarian option, use vegetable broth instead of chicken broth. This keeps the taste rich and satisfying while making it plant-based. If you need a gluten-free alternative, choose gluten-free puff pastry. It puffs up nicely and tastes great. For those watching their fat intake, try using low-fat creams. This will still give you a creamy texture without the extra calories. To switch things up, play with different herbs. Rosemary or oregano can add a lovely twist to the classic flavor. If you like cheese, add some grated cheese to the filling. This makes it creamy and even more delicious. If you want some heat, experiment with spices like cayenne or paprika. A little bit can go a long way in making your pot pie exciting. To store your leftover chicken pot pie, let it cool first. Cover it tightly with plastic wrap or aluminum foil. This keeps the moisture in and stops it from drying out. Place it in the fridge for up to three days. For longer storage, you can freeze it. Wrap the pot pie in plastic wrap, then in foil. This method helps keep the flavor. You can freeze it for up to three months. To reheat the pot pie in the oven, preheat it to 350°F (175°C). Place the pie in an oven-safe dish. Cover it with foil to keep it from browning too much. Heat for about 20-25 minutes or until hot. If you want a crispier top, remove the foil for the last 5 minutes. For quick meals, you can microwave individual portions. Place a slice on a microwave-safe plate. Cover it with a damp paper towel to keep it moist. Heat on high for 1-2 minutes, checking every 30 seconds. Be careful, as the filling can get very hot. Can I use leftover chicken in this recipe? Yes, you can use leftover chicken. It saves time and adds flavor. Just shred or dice it into small pieces. How long can the chicken pot pie be stored? You can store the chicken pot pie in the fridge for up to three days. Make sure to cover it well. Can I make this dish ahead of time? Yes, you can prepare it a day ahead. Just assemble it but do not bake. Cover it and store it in the fridge. Bake it fresh when ready to serve. What should I do if my filling is too runny? If the filling is too runny, try adding a bit of flour. Mix it well and let it simmer longer. This will help thicken the sauce. How do I know when the pot pie is fully cooked? Your pot pie is done when the pastry is golden brown. Also, the filling should bubble slightly at the edges. Can I double the recipe for larger gatherings? Yes, you can double the recipe easily. Just use a larger dish and make sure to adjust the baking time. This blog post covered a delicious chicken pot pie recipe. We listed the key ingredients, offered step-by-step instructions, and provided tips for better results. You learned about variations to suit dietary needs and how to store leftovers properly. Chicken pot pie is fun to make and share. Try your own twists with flavors. Remember, cooking is about enjoying the experience. Happy baking!

Puff Pastry Easy Chicken Pot Pie Delightful Recipe

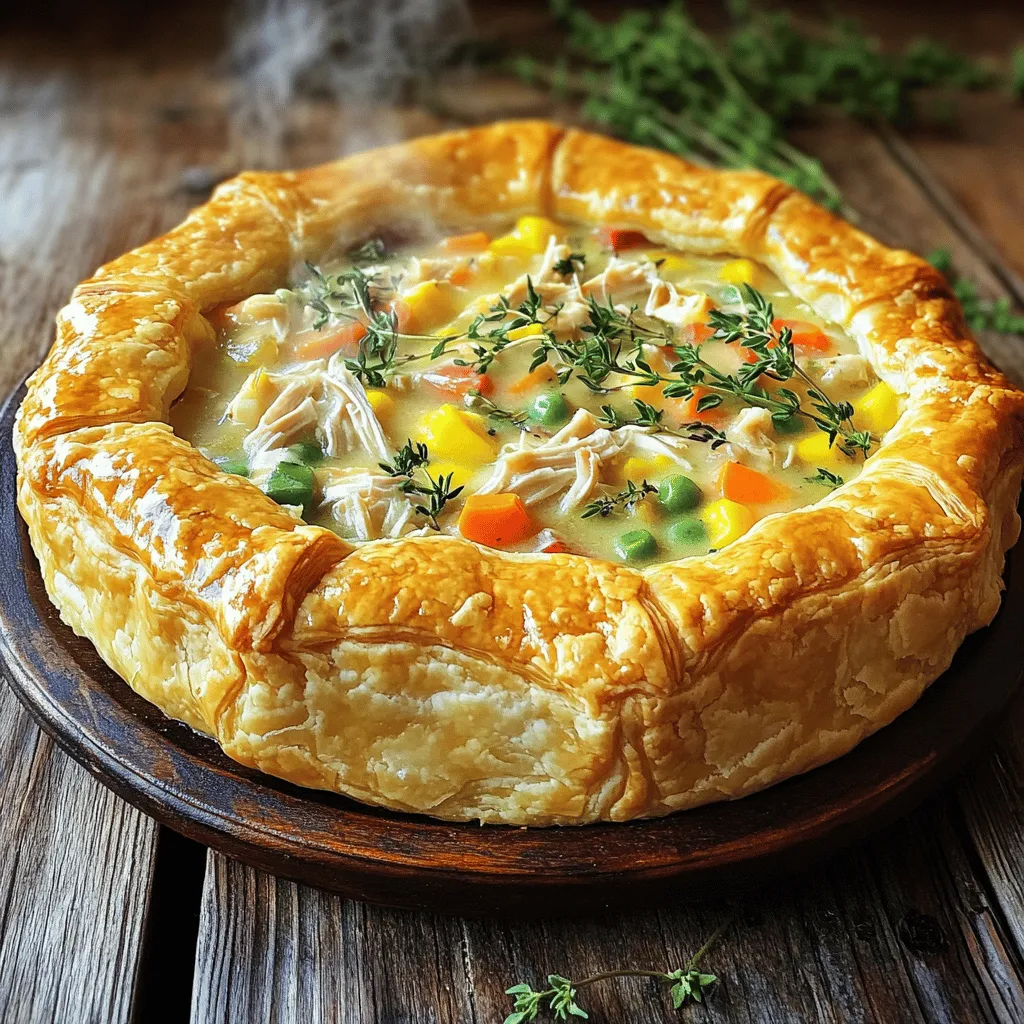
Craving comfort food? You’re in for a treat with my Puff Pastry Easy Chicken Pot Pie Delightful Recipe! This dish

To make your own Pumpkin Cream Cold Brew, gather these ingredients: - 1 cup cold brew coffee - 1/2 cup milk (your choice of dairy or non-dairy alternative) - 1/4 cup heavy cream (or coconut cream for dairy-free) - 2 tablespoons pumpkin puree - 1 tablespoon maple syrup (or your favorite sweetener) - 1/2 teaspoon vanilla extract - 1/4 teaspoon pumpkin pie spice - Ice cubes - Whipped cream (optional, for extra indulgence) - Ground cinnamon or nutmeg (for garnish) You can easily swap ingredients based on your taste: - Use almond or oat milk in place of regular milk for a lighter option. - Coconut cream works well instead of heavy cream if you want a dairy-free choice. - For sweeteners, honey or agave syrup can replace maple syrup. Adjust the amount based on your sweetness level. - If you don’t have pumpkin pie spice, mix cinnamon, nutmeg, and ginger as a quick substitute. Choosing fresh and good quality ingredients makes a big difference: - Look for cold brew coffee made from high-quality beans. This will give you a rich flavor. - Select real pumpkin puree, not pumpkin pie filling, for the best taste. - Choose full-fat heavy cream for a richer texture, or select good brands for dairy-free options. - Use pure vanilla extract for a more authentic taste. Avoid imitation vanilla for the best results. By selecting the right ingredients, you ensure a creamy and tasty drink that you'll love. To make your Pumpkin Cream Cold Brew, start with a bowl. Combine the heavy cream, pumpkin puree, maple syrup, vanilla extract, and pumpkin pie spice. Whisk it all together until smooth. This helps blend the flavors well. Taste it, and add more maple syrup if you want it sweeter. Next, grab a tall glass. Fill it with ice cubes, almost to the top. Then, pour the cold brew coffee over the ice, filling it up to about two-thirds full. Now, gently spoon the pumpkin cream mixture on top. Do this slowly to create layers. You want to see the dark coffee and the creamy pumpkin mix. If you want to go all out, add whipped cream on top. Finish it with a sprinkle of ground cinnamon or nutmeg. This adds a nice aroma and makes it look pretty. When you are ready to drink, use a straw or spoon. Stir it a little to mix the flavors. Enjoy every sip of this tasty drink! To get that perfect creamy texture, use heavy cream. If you want a dairy-free option, coconut cream works great. Make sure both are cold before mixing. This helps them blend better. Whisk the mixture well until it is really smooth. If you see lumps, keep whisking. The smoother it is, the creamier your drink will taste. Presentation is key to a great drink. When you layer the pumpkin cream, be gentle. Spoon it slowly to keep the layers separate. For a fun touch, use a festive straw. You can also add a cinnamon stick for extra flair. This makes your drink look special and inviting. Remember, a little sprinkle of spice on top not only looks good but adds to the smell. The better it looks, the more you'll want to drink it! To make this drink just right, you can change the sweetness. Start with the maple syrup. If you want it sweeter, add more syrup. You can also use honey or agave syrup for a different taste. If you like spices, play with the pumpkin pie spice. Add a bit more if you want a bolder flavor. You could even mix in a dash of nutmeg or clove for variety. Layering is key to a great look. Fill your glass with ice first. Then, pour the cold brew carefully over the ice. This helps keep the layers separate. When adding the pumpkin cream, use a spoon. Gently dollop it on top of the coffee. This lets the cream float and creates a beautiful look. You can also try pouring it slowly over the back of a spoon for a neat effect. To make your drink special, think about how you serve it. Use a fun straw to add flair. A cinnamon stick on the side looks nice and adds flavor. Consider decorating the whipped cream with a sprinkle of cinnamon or nutmeg. This adds aroma and taste. You can even try different garnishes like chocolate shavings or caramel drizzle for a unique twist. Enjoy your drink with friends and share the joy! {{image_4}} You can easily make this drink dairy-free or vegan. Just swap out regular milk and cream for non-dairy alternatives. Use almond milk, oat milk, or coconut milk for the base. For the cream, try coconut cream. It gives a rich texture without dairy. This way, everyone can enjoy a cozy sip of pumpkin goodness. Want to make your drink even more fun? Try adding flavors like chocolate or caramel. A drizzle of chocolate syrup on top can create a sweet twist. You can also mix in caramel sauce with the pumpkin cream. This adds a rich, buttery taste. Get creative and add spices like cardamom or nutmeg for extra warmth. This drink is great for many moments. For casual mornings, serve it with a fun straw and a dash of cinnamon. If you have friends over, make a big batch and serve it in a pitcher. Add festive garnishes like whipped cream and pumpkin pie spice. For cozy evenings, pair it with a warm cookie for a perfect treat. To keep your ingredients fresh, store them in airtight containers. Place leftover pumpkin puree in a small container and seal it well. You can store heavy cream in its original container. If you use non-dairy milk, keep it in its carton. Store maple syrup in a cool, dark place. You can make the pumpkin cream ahead of time. Just mix the heavy cream, pumpkin puree, maple syrup, vanilla extract, and pumpkin pie spice. Store it in the fridge for up to two days. When you are ready to serve, just whip it up again for fluffiness. Cold brew coffee can last in the fridge for about a week. If you make a big batch, just pour it into a sealed pitcher. The pumpkin cream mix stays fresh for two days in the fridge. After that, the flavors may fade. Whipped cream must be used within two days if made fresh. Yes, you can use regular brewed coffee. It will change the drink's taste. Cold brew is smoother and less bitter. If you use hot coffee, let it cool first. This way, you keep the drink chilled and refreshing. To reduce the sweetness, cut back on the maple syrup. You can also use less pumpkin puree. If you want more flavor without the sugar, add a pinch of salt. This trick helps balance the sweetness without adding more syrup. The best non-dairy milk depends on your taste. Almond milk adds a nice nutty flavor. Oat milk gives creaminess, making it great for this drink. Coconut milk offers a rich taste, especially if you like tropical flavors. Choose what fits your style! This blog covers everything you need for a Pumpkin Cream Cold Brew. We explored key ingredients, with tips on quality and substitutions. I shared step-by-step instructions and techniques to make it creamy and visually appealing. We discussed adjustments to sweetness and how to layer it right. I also offered dairy-free options and serving ideas. To wrap up, enjoy making this drink your own. Experiment with flavors and enjoy every sip!

Pumpkin Cream Cold Brew Copycat Tasty and Easy Recipe

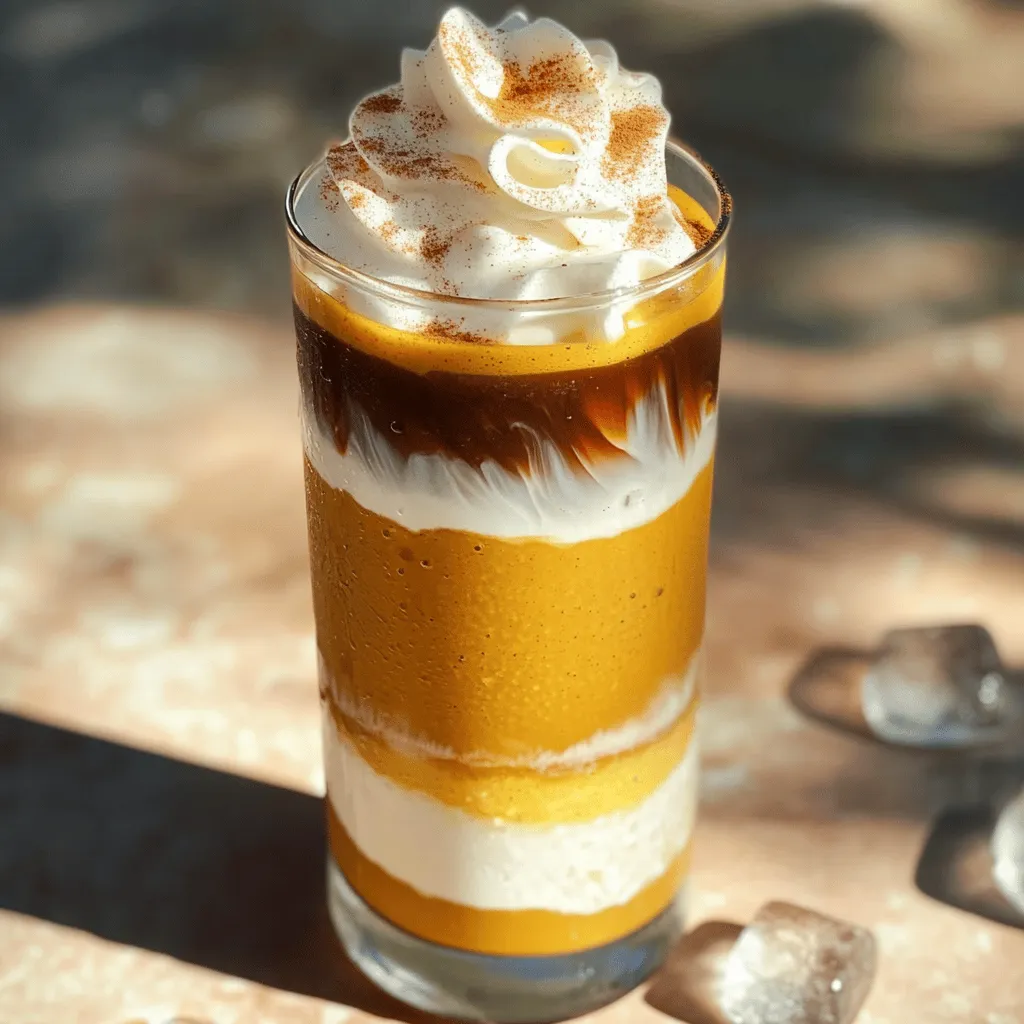
Ready to take your fall coffee game to the next level? This Pumpkin Cream Cold Brew copycat recipe gives you

To make One Pot Creamy Lemon Spinach Orzo, you need these main ingredients: - 1 cup orzo pasta - 2 cups vegetable broth - 1 cup fresh spinach, roughly chopped - 1 tablespoon extra virgin olive oil - 2 garlic cloves, minced - Zest of 1 lemon - Juice of 1 lemon - 1/2 cup cream cheese, softened to room temperature - 1/2 teaspoon dried oregano - Salt and freshly cracked black pepper to taste These ingredients work well together to create a creamy and zesty dish. You can add more flavor with these optional ingredients: - 1/4 cup grated Parmesan cheese (for extra richness) - Fresh parsley, chopped (for garnish) Adding Parmesan cheese gives a nice depth to the orzo. Fresh parsley adds a pop of color and freshness. If you're dealing with allergies, here are some easy substitutions: - Use gluten-free orzo to make it gluten-free. - Swap cream cheese with a dairy-free cream cheese for a vegan option. - Replace vegetable broth with homemade broth if you prefer. These substitutions keep the dish delicious while accommodating dietary needs. Start by gathering all your ingredients. This makes cooking easier and faster. You need: - 1 cup orzo pasta - 2 cups vegetable broth - 1 cup fresh spinach, roughly chopped - 1 tablespoon extra virgin olive oil - 2 garlic cloves, minced - Zest of 1 lemon - Juice of 1 lemon - 1/2 cup cream cheese, softened to room temperature - 1/2 teaspoon dried oregano - Salt and freshly cracked black pepper to taste - 1/4 cup grated Parmesan cheese (optional for extra richness) - Fresh parsley, chopped, for garnish Heat the olive oil in a large pot over medium heat. Once the oil shimmers, add the minced garlic. Sauté for about 1 minute. You want the garlic fragrant, not browned. Next, add the orzo pasta. Stir it well to coat with the oil. Toast the orzo lightly for 2-3 minutes, stirring to avoid burning. Now, pour in the vegetable broth. Bring this mix to a rolling boil. Once boiling, lower the heat and cover the pot. Let it simmer gently for 8-10 minutes. The orzo should be al dente and most liquid absorbed when done. Remove the lid from the pot. Add the chopped spinach, lemon zest, lemon juice, and softened cream cheese. Stir vigorously until the cream cheese melts and the mix is creamy. Season with dried oregano, salt, and black pepper. Taste as you go to adjust flavors. If you like, fold in the grated Parmesan for extra creaminess. Cook for another 2-3 minutes, stirring occasionally. This lets everything heat through and blend well. Once done, take the pot off the heat. Let it sit covered for a couple of minutes. This helps the flavors meld before you serve. To cook orzo well, use a big pot. Fill it with water and add salt. Bring the water to a boil before adding the orzo. Stir often to stop it from sticking. Cook for 8-10 minutes until it's just right. Drain it if needed, but for this recipe, keep it in the pot. This keeps the orzo nice and creamy. Fresh herbs can make your dish shine. I love adding parsley and basil. Chop them finely and stir them in at the end. This adds brightness and freshness. You can also use thyme or dill for a different taste. Always taste your dish before serving. Adjust the herbs to match your likes. You can make this dish ahead of time. Cook the orzo and mix in the creamy sauce. Let it cool, then store it in an airtight container. It stays good in the fridge for about three days. When you're ready to eat, just reheat it on the stove or in the microwave. Add a splash of broth for extra creaminess while reheating. This makes a quick and tasty meal anytime! {{image_4}} You can easily add protein to One Pot Creamy Lemon Spinach Orzo. Chicken or shrimp makes a great choice. Cook diced chicken in the pot before adding garlic. For shrimp, toss them in with the spinach. They cook quickly and add flavor. You can also use canned chickpeas for a plant-based option. Just rinse and mix them in with the spinach. They add protein and texture, making the dish heartier. To make this dish vegetarian, simply skip the Parmesan cheese or use a vegetarian option. For a vegan version, swap cream cheese for a plant-based cream cheese. You can also use almond milk or cashew cream for a rich taste. Make sure the vegetable broth is vegan as well. These changes keep the dish creamy and delicious without any animal products. Adding seasonal veggies enhances flavor and nutrition. In spring, fresh peas or asparagus pair well with lemon. In summer, zucchini or bell peppers add color and crunch. Fall favorites like butternut squash bring sweetness. You can toss any of these into the pot with the spinach. Just adjust cooking time as needed. This keeps the dish vibrant and exciting all year long. To store your leftover creamy lemon spinach orzo, first let it cool. Place it in an airtight container. This helps keep the flavor fresh. You can keep it in the fridge for up to three days. Make sure to label the container with the date. This way, you will know when to use it. When you are ready to eat your orzo again, you can reheat it easily. Place it in a pot over low heat. Add a splash of vegetable broth or water to help it stay creamy. Stir it often until it warms up. You can also use the microwave. Just heat it in short bursts, stirring in between. If you want to keep orzo for later, freezing works well. Portion it into small containers. Leave some space at the top for expansion. It will stay good in the freezer for up to three months. When ready to eat it, let it thaw in the fridge overnight. Reheat it as mentioned above to enjoy its creamy goodness again. Yes, you can use other pasta types. Small pasta like ditalini or acini di pepe works well. You can also try rice or quinoa for a gluten-free option. Just keep an eye on the cooking time. Different pasta may need slight adjustments. If you need a cream cheese substitute, use Greek yogurt or sour cream. Both will add creaminess and tang. You can also try cashew cream for a dairy-free option. It gives a rich taste without the dairy. The creamy orzo stays fresh in the fridge for up to three days. Store it in an airtight container to keep it safe. When you reheat, add a splash of broth or water to bring back its creaminess. This blog post covered how to make a delicious one pot creamy lemon spinach orzo. We discussed the main ingredients and optional ones to boost flavor. I shared tips for cooking orzo perfectly and making it ahead for meal prep. There are also variations, storage info, and answers to common questions. Cook this dish for a quick meal that's easy and fun. Enjoy your cooking journey!

One Pot Creamy Lemon Spinach Orzo Delight Recipe

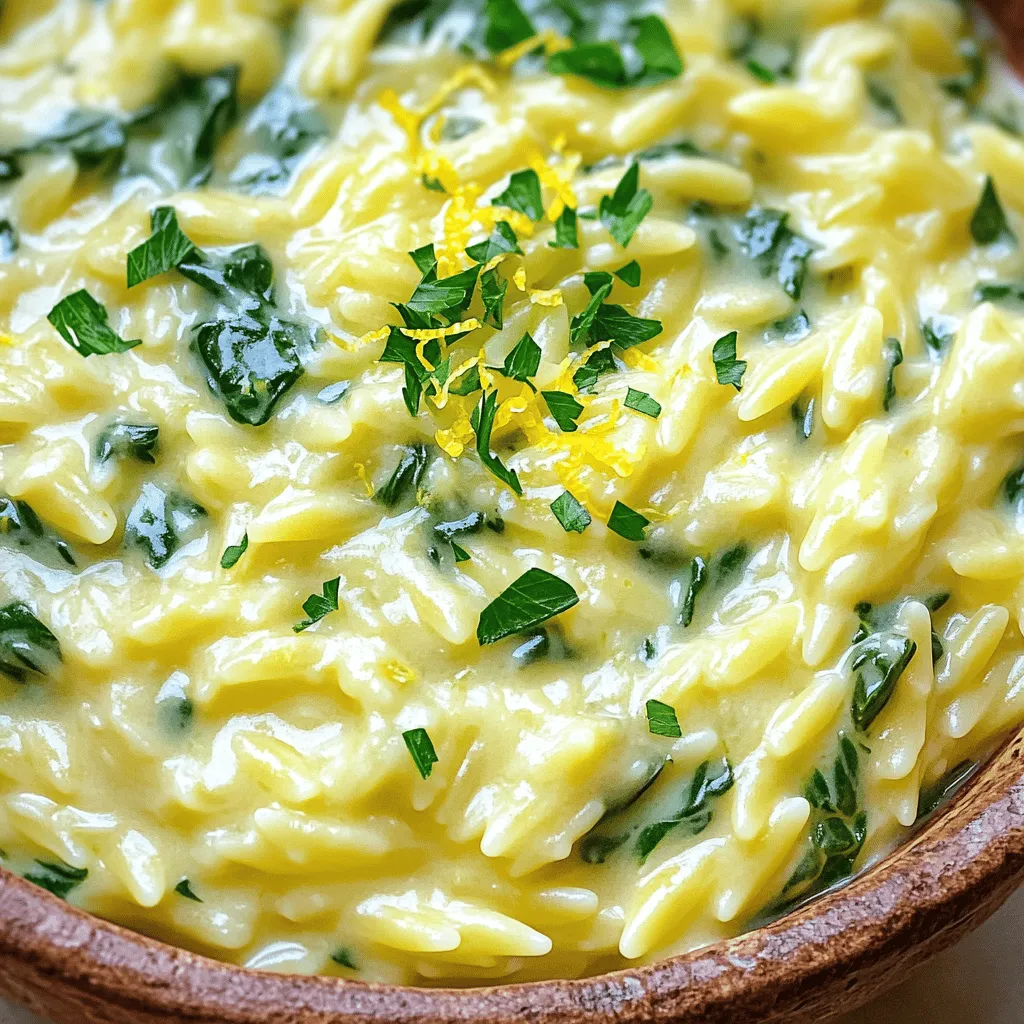
Looking for a quick and tasty dinner idea? My One Pot Creamy Lemon Spinach Orzo is a game changer! This

- 1 lb sirloin steak - 2 tablespoons olive oil - 4 tablespoons unsalted butter - 5 cloves garlic - Fresh thyme leaves - Salt and black pepper - Red pepper flakes (optional) - 2 cups broccoli florets - Lemon zest and juice Gather these ingredients to create a flavorful dish. Sirloin steak offers a tender bite and great taste. Olive oil helps sear the meat and keep it juicy. Unsalted butter adds richness and a creamy texture. Fresh garlic gives a strong, savory kick and elevates the dish. For seasoning, fresh thyme leaves bring a lovely herbal note. Salt and black pepper enhance the natural flavors. If you like a bit of heat, add red pepper flakes for a spicy twist. Broccoli florets add color and crunch. Lemon zest and juice brighten the dish and balance the flavors. This combination makes for a delicious and satisfying meal. Make sure to have all these ingredients ready before you start cooking. Enjoy the process of creating Garlic Butter Steak Bites with Broccoli, knowing each component plays an important role in the final dish. To start, you need to marinate the steak. Take your sirloin steak and cut it into bite-sized cubes. In a bowl, mix the steak with salt, black pepper, and thyme leaves. This blend gives the meat great flavor. Let it sit for about 15 minutes. This short wait helps the steak absorb those tasty seasonings. Next, it’s time to sear the steak. Heat olive oil in a large skillet over medium-high heat. Once the oil shimmers, carefully place the marinated steak cubes in a single layer. Avoid overcrowding the pan. This helps each piece brown nicely. Sear the steak bites for about 2-3 minutes on each side. Look for a nice brown crust. Remove the steak from the skillet and cover it with foil to keep it warm. Now, let’s sauté the broccoli and garlic. Lower the heat slightly in the same skillet. Add the unsalted butter and minced garlic. Stir the garlic for about 1 minute. You want it to smell great but not burn. Then, toss in the broccoli florets. Stir-fry them for about 3-5 minutes. The goal is to keep them tender and bright green. Once the broccoli is ready, it’s time to combine everything. Return the steak bites to the skillet. Add the lemon zest and juice. Toss everything together until coated in the garlicky butter. If you like a little heat, sprinkle in red pepper flakes. This adds a nice kick to the dish. Cook everything for another 1-2 minutes. This ensures the dish is heated through. Taste the mixture and adjust the seasoning if needed. You might want more salt, pepper, or lemon juice. To serve, place the steak bites and broccoli in shallow bowls. Garnish with fresh thyme leaves and a squeeze of lemon juice. Enjoy this delicious meal! To get the best steak, know the right temperatures. For medium-rare, aim for 130°F. For medium, go for 140°F. Use a meat thermometer for accuracy. This tool helps you check inside the steak without cutting it. You can boost the taste with extra spices. Try adding paprika or onion powder. Fresh herbs like rosemary also work well. For oils, consider using avocado oil. It has a light flavor and a high smoke point. Plating matters! Serve the steak and broccoli in shallow bowls or on a large platter. This makes the dish look inviting. Garnish with fresh thyme leaves and a squeeze of lemon. This adds freshness and color. {{image_4}} You can switch the steak for chicken or shrimp. Chicken thighs work well and stay juicy. For shrimp, use large ones for a nice bite. Just adjust cooking time. Cook shrimp for about 2-3 minutes until they turn pink. If you want a vegetarian version, use firm tofu or tempeh. Cut them into cubes and season like the steak. Sauté until golden brown for great flavor. If you don't have broccoli, try green beans or snap peas. Both cook quickly and add crunch. Cauliflower is another great substitute. Its mild flavor soaks up the garlic butter nicely. For seasonal ideas, use asparagus in spring or Brussels sprouts in fall. Both bring a unique taste and pair well with the dish. Feel free to mix up the sauce! Add teriyaki or soy sauce for a sweet and salty kick. Just drizzle it in with the garlic and butter. If you want something creamy, try adding sour cream or cream cheese. Mix that in after cooking the steak and broccoli. It will make the dish rich and smooth. After enjoying Garlic Butter Steak Bites with Broccoli, you might have some leftovers. To keep them fresh, store them in the fridge. Place the steak and broccoli in airtight containers. They will stay fresh for up to three days. Make sure to let them cool down before sealing. This helps prevent moisture buildup inside the container. To enjoy your leftovers, you need the right reheating method. The best way to reheat steak is on the stove. Heat a skillet over medium heat. Add a small amount of olive oil to the pan. Place the steak bites in the skillet for about 2-3 minutes. Stir gently to warm evenly. For the broccoli, you can add it to the skillet too. This keeps the broccoli bright and tasty. If you want to save your Garlic Butter Steak Bites and broccoli for later, freezing is a great option. First, allow them to cool completely. Then, place them in freezer-safe bags or containers. Remove as much air as possible to prevent freezer burn. Frozen steak bites and broccoli can last up to three months. When you're ready to eat, thaw them overnight in the fridge. Reheat using the methods mentioned above for the best taste. Yes, you can use other cuts of steak. Good options include: - Ribeye - Filet mignon - Flank steak Each cut adds its own flavor and texture. Ribeye is rich and tender. Filet mignon is very soft. Flank steak is lean and flavorful. Choose based on your taste and budget. For the best flavor, marinate the steak for 15 to 30 minutes. This lets the salt and spices soak in. You can also marinate for up to 2 hours in the fridge. Longer marinating can make the steak too salty or mushy. Yes, you can prepare this dish ahead of time. Cook the steak bites and broccoli. Let them cool, then store in airtight containers. This keeps them fresh for up to 3 days in the fridge. Reheat gently in a pan or microwave before serving. Many side dishes pair well with this meal. Here are some ideas: - Mashed potatoes - Rice pilaf - Garlic bread - Simple green salad These sides balance the rich flavors of the steak and broccoli. Feel free to mix and match! This blog gave you all you need for a tasty garlic butter steak dish. You learned about key ingredients like sirloin, herbs, and veggies. We walked through cooking steps to achieve the perfect steak and flavorful broccoli. I shared tips to enhance flavor, options for variations, and advice on storage. With these insights, you can enjoy this meal fresh, adapted, or even prepped in advance. Now, it’s time to gather your ingredients and start cooking! Enjoy the tasty results.

Garlic Butter Steak Bites With Broccoli Delight

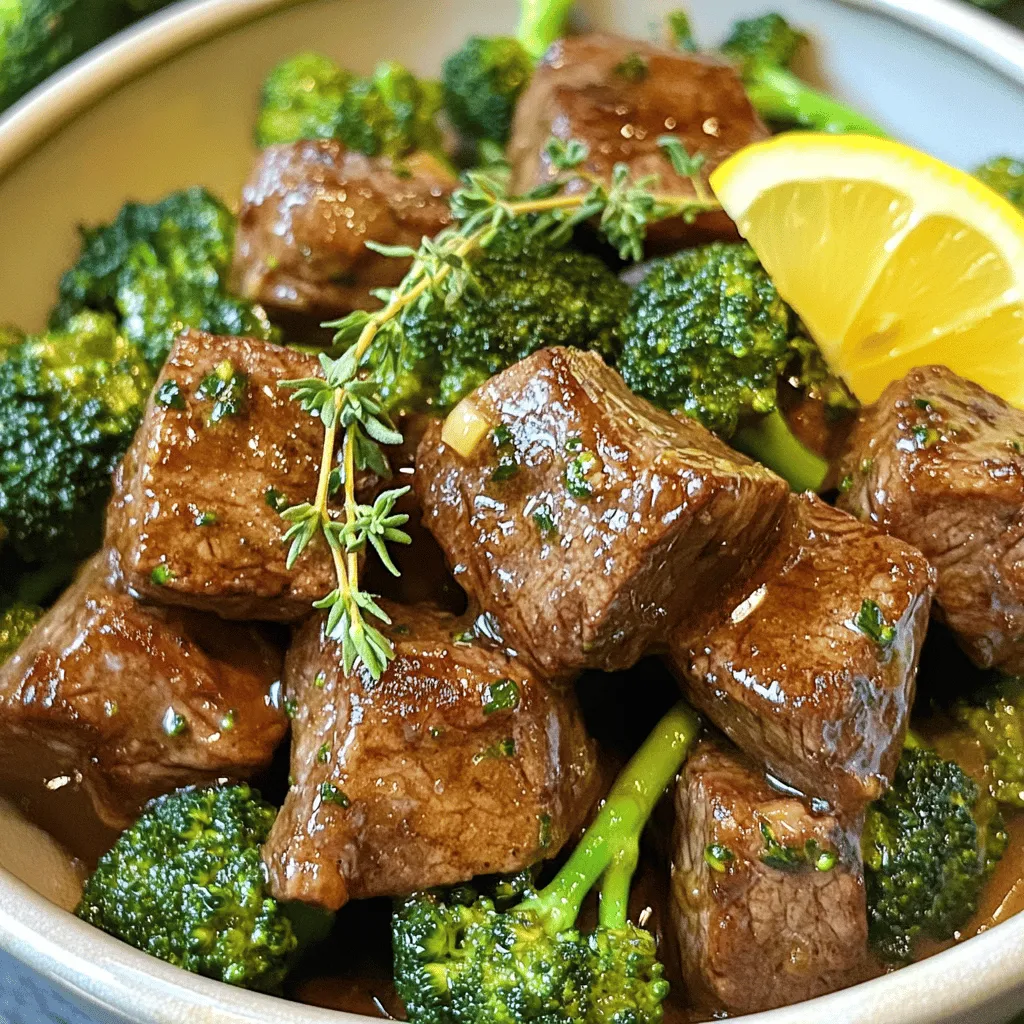
Are you ready to elevate your dinner game? Garlic Butter Steak Bites With Broccoli Delight combines tender steak bites with

For this tasty one-pot creamy taco pasta, you'll need: - 12 oz. pasta (penne or rotini recommended) - 1 lb. ground beef or turkey - 1 packet taco seasoning - 1 small onion, finely diced - 2 cloves garlic, minced - 1 can (14 oz.) diced tomatoes with juices - 1 can (15 oz.) black beans, drained and rinsed - 2 cups chicken broth - 1 cup heavy cream - 1 cup shredded cheddar cheese - 1 cup corn (frozen or canned) - Salt and freshly ground pepper to taste - Fresh cilantro or parsley for garnish (optional) When choosing pasta for this dish, I suggest using penne or rotini. Both shapes hold sauce well. Penne has a smooth surface that allows the sauce to cling. Rotini, with its spirals, traps chunks of meat and beans. Either option makes a great base for your creamy taco sauce. Garnishes add a fresh touch to your meal. I recommend using fresh cilantro or parsley to brighten the dish. You can also add lime wedges for a zesty kick. A sprinkle of extra cheddar cheese on top makes it even more delicious. These simple additions enhance the flavor and look of your dish. {{ingredient_image_2}} Start by heating a large pot over medium heat. Add the ground beef or turkey. Cook it for 5-7 minutes. Break it apart with a wooden spatula as it cooks. You want it to be evenly browned. If there is extra fat, carefully drain it. This keeps the dish from being greasy. Next, add the finely diced onion and minced garlic to the pot. Sauté them for 2-3 minutes. Stir them often until the onion turns translucent and fragrant. This step builds a strong base of flavor for your dish. Now, it's time to add the fun stuff! Sprinkle in the taco seasoning. Add the diced tomatoes with their juices, the drained black beans, and corn. Pour in the chicken broth and stir well. Bring this mixture to a gentle boil to combine all the flavors. Once boiling, add the pasta to the pot. Stir everything together. Cover the pot, then reduce the heat to low. Let it simmer for about 10-12 minutes. Stir occasionally until the pasta is cooked to al dente. Make sure it absorbs all the tasty juices. When the pasta is done, turn the heat to very low. Pour in the heavy cream next. Add the shredded cheddar cheese and stir continuously. This helps the cheese melt into a creamy sauce. Season with salt and pepper to taste. Finally, remove the pot from the heat. Let it sit for a few minutes. This helps the sauce thicken slightly. Serve the creamy taco pasta warm. You can sprinkle chopped cilantro or parsley on top for a fresh touch. Enjoy this easy and flavorful meal! To get the sauce just right, I recommend checking your heat level. After adding the cream and cheese, keep it on low heat. This helps the cheese melt smoothly without clumping. If the sauce seems too thin, let it sit off the heat for a few minutes. It thickens as it cools. If it’s too thick, stir in a splash more chicken broth. This gives you the perfect creamy texture. Want to amp up the flavor? Try adding some chopped jalapeños for heat or a dash of lime juice for brightness. You can also toss in some diced bell peppers while sautéing the onions. This adds sweetness and color. For a smoky taste, mix in some smoked paprika or a splash of hot sauce. These small tweaks can really take your dish to the next level. Cooking pasta to al dente is key for great texture. Start with plenty of boiling water and add a good pinch of salt. This helps the pasta absorb flavor. Check the pasta a minute before the package says it’s done. It should be firm yet tender. Stir occasionally to prevent sticking. Once done, don’t rinse it! This keeps the starch, which helps the sauce cling better. Pro Tips Choose Your Pasta Wisely: Opt for short pasta shapes like penne or rotini that hold the sauce well and provide a satisfying bite. Customize the Spice Level: Adjust the amount of taco seasoning based on your preference for heat; add jalapeños for an extra kick! Make It Vegetarian: Substitute the meat with a plant-based protein or add more beans and vegetables for a hearty vegetarian version. Leftover Magic: This dish makes excellent leftovers! Just add a splash of chicken broth when reheating to bring back the creaminess. {{image_4}} To make a vegetarian version, skip the meat. Use extra beans and veggies instead. For protein, use 1 can of chickpeas or lentils. You can add bell peppers or zucchini for extra flavor. The taco seasoning will still add that great taste. If you like heat, add diced jalapeños or a pinch of cayenne pepper. You can also use spicy taco seasoning. For a kick, mix in some chipotle sauce. This will give your pasta a smoky flavor. Adjust the spice to your liking, and enjoy the heat! You can swap some ingredients for different flavors. Use ground chicken or pork instead of beef. If you want a lighter dish, try half-and-half instead of heavy cream. For cheese, use pepper jack for a spicy twist. You can also use vegetable broth for a vegetarian-friendly option. Each swap keeps the dish tasty and fresh. To keep your One-Pot Creamy Taco Pasta fresh, let it cool first. Then, place it in an airtight container. Store it in the fridge for up to three days. This helps to maintain the flavor and texture. When you’re ready to enjoy your leftovers, reheat them on the stove. Add a splash of chicken broth or water to help loosen the sauce. Heat it over low to medium heat. Stir often until it’s warm throughout. You can also use the microwave. Just cover it and heat in short bursts, stirring in between. If you want to save some for later, freezing works well. Pack the pasta in a freezer-safe container. Leave some space at the top since it will expand. It keeps well for about two months. To eat, thaw it in the fridge overnight before reheating. Enjoy your meal anytime! Yes, you can use other meats. Ground turkey is a great choice. It’s lean and tasty. You can also try ground chicken or even plant-based meat. Just sauté it the same way. Adjust cooking time as needed. To make this dish gluten-free, use gluten-free pasta. Look for brands that fit this need. Most other ingredients in the recipe are naturally gluten-free. Always check labels for hidden gluten. You can replace heavy cream with half-and-half or milk mixed with cornstarch. Coconut cream is another option if you want a dairy-free choice. Each will change the taste slightly, so pick what you like! This blog post covered key steps for making a delicious pasta dish. We talked about ingredients, cooking methods, and useful tips to improve flavor. You learned about variations and how to store leftovers, too. Remember, you can mix up the recipe to suit your taste. Use this guide to make pasta an easy and enjoyable meal. Keep experimenting to find what you love most. Happy cooking!

One-Pot Creamy Taco Pasta Easy and Flavorful Meal

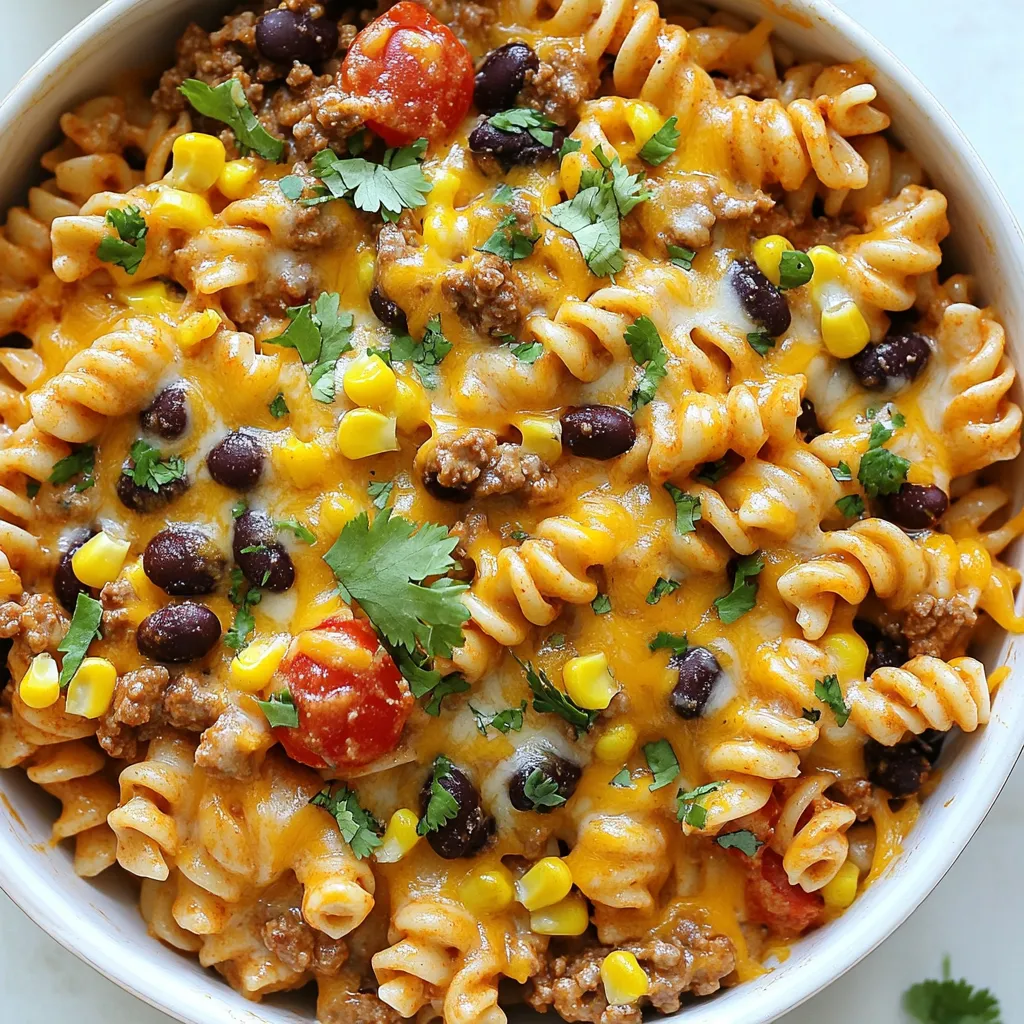
Craving a quick, tasty meal? My One-Pot Creamy Taco Pasta is your new go-to! This dish combines zesty flavors and

- 1 lb boneless, skinless chicken thighs, cut into bite-sized pieces - 2 tablespoons fresh ginger, minced - 3 cloves garlic, minced - 2 cups mixed bell peppers, sliced (red, yellow, and green) - 1 cup broccoli florets - 1 cup snap peas - 3 tablespoons low-sodium soy sauce - 1 tablespoon rice vinegar - 1 tablespoon honey - 2 teaspoons cornstarch mixed with 2 tablespoons water (for thickening) - Sesame seeds for garnish - Fresh cilantro for garnish (optional) Gathering these ingredients is key for a tasty and quick meal. The chicken thighs bring a rich flavor, while the fresh ginger and garlic add a warm, zesty taste. Mixed bell peppers, broccoli, and snap peas provide crunch and color. The sauce, made from soy sauce, rice vinegar, and honey, gives the dish a sweet and savory kick. Lastly, sesame seeds and cilantro make the stir fry look beautiful and add extra layers of flavor. To start, you need to heat your skillet. Pour one tablespoon of sesame oil into a large skillet over medium-high heat. Wait until the oil shimmers, which means it's ready. Now, add the bite-sized chicken pieces in a single layer. Cook the chicken for about 5 to 7 minutes. Stir it often to help it cook evenly. You want it to be fully cooked and golden brown outside. Once done, take the chicken out and set it aside on a plate. Next, it’s time for the vegetables. In the same skillet, add the remaining tablespoon of sesame oil. When the oil is hot, toss in the minced ginger and garlic. Sauté them for about 30 seconds, stirring all the time. You want them fragrant but not burnt. Now, add the sliced mixed bell peppers, broccoli florets, and snap peas. Stir-fry these veggies for about 3 to 4 minutes. Toss them to coat with the oil and cook until they are tender-crisp. Now, let’s bring it all together. Reintroduce the cooked chicken to the skillet with the veggies. Pour in the low-sodium soy sauce, rice vinegar, and honey. Stir everything well so the sauce spreads evenly. Then, slowly add the cornstarch mixture. Keep stirring as the sauce heats up. After about 1 to 2 minutes, the sauce will thicken. Finally, toss in the sliced green onions and mix everything for a final toss. Your stir fry is now ready to serve! Using high heat is key for stir-frying. This method cooks food fast, locking in flavors. When you heat your skillet or wok until it shimmers, it’s ready for action. Stirring constantly helps everything cook evenly. This prevents burning and keeps the chicken juicy. Remember, the goal is to get a nice golden brown on your chicken. To adjust sweetness, use honey. It adds a nice touch to the dish. You can start with one tablespoon. If you want it sweeter, add a little more. Using fresh ingredients, like ginger and garlic, makes a big difference. Fresh veggies also boost the flavor. They stay bright and crisp, giving your stir fry a delicious taste. When serving, consider using a large bowl or individual plates. This makes it easy for everyone to enjoy. Distribute the chicken and veggies evenly. For a shiny finish, drizzle a bit of extra honey on top. Serve it with steamed jasmine rice. The rice soaks up the sauce and adds a nice contrast to the dish. {{image_4}} You can switch the chicken for other proteins. Tofu is a great choice for a vegetarian meal. It absorbs flavors well and adds a nice texture. If you prefer seafood, shrimp works nicely too. Cook shrimp until they are pink and firm. This keeps the dish light and tasty. Feel free to mix in other veggies. Carrots, zucchini, or snap peas add color and crunch. In summer, use fresh corn or green beans. In winter, try using hearty greens like kale or Swiss chard. Seasonal veggies not only taste better but also add nutrients. You can change the sauce to fit your needs. For a low-sugar option, use less honey or a sugar substitute. If you need it gluten-free, use tamari instead of soy sauce. Want some heat? Add red pepper flakes or sriracha. Adjust the sauce to make it just right for you! Store your leftover sesame ginger chicken stir fry in an airtight container. This keeps it fresh and safe. You can keep it in the fridge for up to three days. After that, the flavors may fade, and the texture could change. Always let it cool before you seal it up. To freeze your stir fry, let it cool completely. Then, place it in a freezer-safe bag or container. Try to remove as much air as possible. This helps prevent freezer burn. You can freeze it for up to three months. When you want to eat it, thaw it in the fridge overnight. When reheating, heat it gently on the stove or in the microwave. Add a splash of water or broth to help steam it. This keeps the chicken and veggies from drying out. Stir it well as it heats. Get creative with your leftovers! You can make a tasty wrap by adding the stir fry to a tortilla. Serve it with rice for lunch or over noodles for a quick dinner. You can also mix it into a salad for a fresh twist. For meal prep, portion the stir fry into individual containers. This makes it easy to grab for lunch or dinner during the week. You’ll have a delicious meal ready in no time! Yes, you can use chicken breasts. The main difference is texture. Chicken thighs are juicier and richer in flavor. Breasts are leaner and can dry out if overcooked. If you use breasts, cook them quickly to keep them moist. If you need a soy sauce substitute, try tamari or coconut aminos. Both options work well for gluten-free diets. You can also use liquid aminos for a similar taste. If you're avoiding soy, these options add flavor without the allergens. You can store the stir fry in the fridge for up to four days. Make sure to use an airtight container. If you want to keep it longer, freeze it for up to three months. Thaw in the fridge and reheat gently on the stove. This blog post offers a complete guide to making sesame ginger chicken stir fry. We explored the main ingredients, like chicken, fresh ginger, and veggies. I shared step-by-step instructions for cooking and combining everything. We discussed tips to enhance flavor and variations to suit your tastes. Finally, I covered how to store leftovers and answered common questions. Enjoy this tasty dish with the helpful tips provided. You’ll create a meal that’s both fast and delicious!

Sesame Ginger Chicken Stir Fry Tasty and Quick Meal

Looking for a quick and tasty meal? My Sesame Ginger Chicken Stir Fry is your solution! With juicy chicken thighs,

- 2 cups apple cider - 2 1/2 cups all-purpose flour - 1 cup granulated sugar The main ingredients are key to making this cake moist and flavorful. The apple cider adds sweetness and depth. Using all-purpose flour gives the cake structure. Granulated sugar enhances the cake's sweetness, making each bite a treat. - 1 teaspoon ground cinnamon - 1/2 teaspoon ground nutmeg - 1/2 teaspoon ground allspice Spices make this cake special. Ground cinnamon adds warmth and comfort. Nutmeg brings a lovely, subtle flavor. Allspice rounds out the mix with its unique taste. Together, these spices create that cozy, seasonal vibe. - 3 large eggs - 3/4 cup unsalted butter - 1 cup finely chopped apples The eggs help bind the cake. They give it a light and airy texture. Unsalted butter adds richness and moisture. Chopped apples, preferably Granny Smith, bring freshness and a slight tartness. This mix of flavors makes the cake truly delightful. - Preheat the oven to 350°F (175°C). - Grease the Bundt pan well with cooking spray or butter. This helps the cake come out easily. - Pour 2 cups of apple cider into a small saucepan. - Bring it to a boil over medium heat. - Reduce the heat and let it simmer. Stir often. Cook until it reduces to 1 cup. This takes about 20 minutes. - Once reduced, remove it from the heat and let it cool a bit. - In a bowl, mix the dry ingredients: flour, baking powder, baking soda, salt, and half the spices. - In a bigger bowl, beat together the softened butter, granulated sugar, and brown sugar. - Mix until it looks light and fluffy. This takes about 3-4 minutes. - Add the eggs one at a time. Mix well after each addition. - Stir in the vanilla extract and the cooled apple cider. - Gradually add the dry mixture to the wet mixture. Use a spatula to fold them together. Don’t overmix. - Finally, fold in the finely chopped apples. They add great flavor and texture. - Pour the batter into the prepared Bundt pan. Smooth the top with a spatula. - Bake in the oven for 45-50 minutes. A toothpick should come out clean when inserted into the center. - Once baked, let the cake cool in the pan for about 10 minutes. - Carefully invert the cake onto a wire rack to cool completely. - Roll the cooled cake in granulated sugar to coat the outside. This gives it that classic donut look and sweetness. To make this cake moist, I recommend using Granny Smith apples. They add a nice tartness, which balances the sweet flavors in the cake. Accurate measuring of apple cider is key. Too much or too little cider can change the cake's texture. Always reduce the cider as the recipe states to concentrate its flavor. When baking, always test with a toothpick for doneness. Insert it in the center of the cake. If it comes out clean, the cake is ready. If it has batter on it, bake a little longer. Avoid overmixing the batter when combining wet and dry ingredients. This keeps the cake light and fluffy. Overmixing can make it dense and tough. To cut and serve, slice the cake into generous wedges. Arrange them on a rustic wooden platter for a lovely display. For a cozy touch, serve with warm apple cider. You can also dust the slices lightly with powdered sugar for extra sweetness and a beautiful finish. {{image_4}} You can easily change the taste of your Apple Cider Donut Bundt Cake. Try adding nuts or raisins for a great twist. Walnuts or pecans add crunch and flavor. Raisins give a sweet bite that pairs well with the spices. Another fun option is to use different spices. Cardamom gives a warm and unique flavor. You can mix it with the cinnamon and nutmeg for a new taste. A maple glaze makes this cake even better. To create it, mix 1 cup of powdered sugar with 2 tablespoons of maple syrup and 2 tablespoons of milk. Drizzle this over the cooled cake for a sweet topping. You can also use cream cheese frosting. Beat 8 ounces of softened cream cheese with 1/2 cup of butter. Add 3 cups of powdered sugar and 1 teaspoon of vanilla. Spread this creamy frosting on top for a rich flavor. If you need a gluten-free cake, you can substitute all-purpose flour with a gluten-free flour blend. Look for a blend that includes xanthan gum. This will help bind the cake and keep it moist. Just make sure to follow the same amount as in the recipe. Enjoy a delicious gluten-free version! To keep your Apple Cider Donut Bundt Cake fresh at room temperature, store it in an airtight container. This will help keep the cake moist and delicious for up to three days. If you want to refrigerate the cake, wrap it tightly in plastic wrap. Place it in a container to prevent it from absorbing other smells. This method will keep it fresh for about a week. Freezing the cake is a great way to enjoy it later. To freeze, let the cake cool completely. Then, wrap it tightly in plastic wrap and place it in a freezer-safe bag. This will protect it from freezer burn. You can freeze it for up to three months. When you're ready to serve, remove the cake from the freezer. Let it thaw in the fridge overnight. If you’re short on time, you can let it sit at room temperature for a few hours. Once thawed, you can roll it in sugar again for a fresh donut-like coating. Enjoy your cake! The best apple for this cake is Granny Smith. They are tart and hold their shape well. You can also try Honeycrisp or Fuji apples. These apples add sweetness and flavor. Mixing different apples can create a nice balance in taste. Yes, you can make this cake a day in advance. Just store it in an airtight container. This keeps it moist and fresh. You can also freeze it for up to three months. Wrap it tightly in plastic wrap. When you're ready, thaw it overnight in the fridge. To check if the cake is done, use a toothpick. Insert it into the center of the cake. If it comes out clean, the cake is ready. You can also look for a golden-brown color on top. The edges should pull away from the pan slightly. This cake combines simple ingredients and easy steps to create a tasty treat. You use apple cider, flour, and sugar as the base, adding spices like cinnamon for flavor. Tips ensure your cake stays moist and delicious. You can also personalize it with nuts or a sweet glaze. In short, whether for yourself or a gathering, this cake is sure to please. Enjoy baking and sharing this delightful dessert!

Apple Cider Donut Bundt Cake Easy and Delicious Recipe

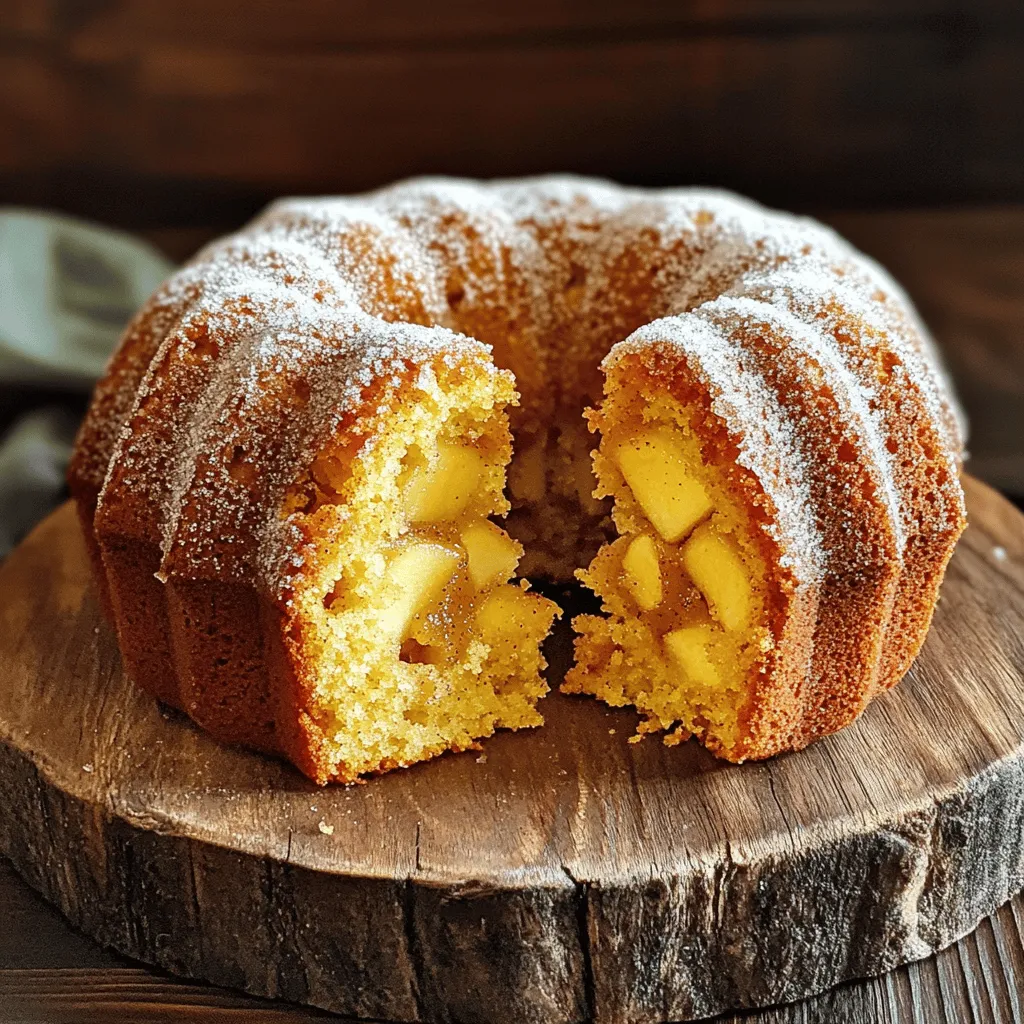
Craving a sweet treat that captures fall’s essence? You’re in the right place! This Apple Cider Donut Bundt Cake is

To make this creamy dish, gather these key items: - 10 oz pasta (fusilli or penne works best) - 2 cups fresh broccoli florets - 4 cups low-sodium vegetable broth - 1 cup heavy cream or full-fat coconut milk - 1 ½ cups sharp cheddar cheese, freshly grated - 1 tablespoon extra virgin olive oil - 3 cloves garlic, minced - ½ teaspoon onion powder - ½ teaspoon garlic powder - Salt and freshly ground black pepper, to taste You can add some fun touches with these garnishes: - Additional cheddar cheese - A sprinkle of black pepper - Chopped fresh parsley If you want to switch things up, consider these swaps: - Use gluten-free pasta for a gluten-free version. - Replace heavy cream with plain yogurt for a lighter option. - Try different cheeses like gouda or mozzarella for unique flavors. Start by heating 1 tablespoon of extra virgin olive oil in a large pot over medium heat. Once the oil is hot, add 3 cloves of minced garlic. Sauté the garlic for 1-2 minutes. It should smell fragrant, but be careful not to let it brown. Burnt garlic can ruin the dish. Next, add 10 ounces of dry pasta and 2 cups of fresh broccoli florets to the pot. Pour in 4 cups of vegetable broth. Then, add ½ teaspoon of onion powder and ½ teaspoon of garlic powder. Season it with salt and freshly ground black pepper. Stir everything well. Make sure the pasta and broccoli are mixed evenly in the broth. Bring the mixture to a gentle boil. Once boiling, reduce the heat to a simmer. Cover the pot and cook for 10-12 minutes. Stir occasionally to stop the pasta from sticking. The pasta should be al dente, and the broccoli should be tender yet bright green. When the pasta is cooked to your liking, lower the heat. Gently pour in 1 cup of heavy cream or full-fat coconut milk. Stir the mixture until the cream blends in well. You will notice the sauce thickening slightly. Gradually add 1 ½ cups of freshly grated sharp cheddar cheese. Keep stirring continuously until the cheese melts completely. This will give you a smooth and creamy sauce. Taste the pasta and adjust the seasoning with more salt and black pepper if needed. Serve the creamy broccoli cheddar pasta right away while it’s warm. For a tasty finish, top it with more cheddar cheese. You can also add a sprinkle of freshly cracked black pepper or some chopped fresh parsley for extra flavor and color. To make the best pasta, start with a large pot. Fill it with water and add a pinch of salt. This helps flavor the pasta as it cooks. Bring the water to a rolling boil before adding your pasta. Stir the pasta right after you add it to keep it from sticking. Cook it until it is al dente, which means it should be firm to the bite. This will help the pasta hold its shape in the creamy sauce. For creamy broccoli cheddar pasta, sharp cheddar is the best choice. It gives a strong flavor that pairs well with the broccoli. Always use freshly grated cheese. Packaged cheese often has additives that can affect how it melts. You can try different types of cheese too, like gouda or mozzarella, if you want to mix it up. Just remember, the cheese should melt smoothly to keep your sauce creamy. To keep broccoli bright and crunchy, add it to the pot at the right time. Add the florets when you add the pasta and broth. This way, they will cook together. Keep an eye on the broccoli as it cooks. It should stay bright green and tender, not mushy. Stir gently to prevent it from breaking apart. If you follow these steps, your broccoli will shine in this dish! {{image_4}} You can make this dish gluten-free. Use gluten-free pasta made from rice or corn. This choice keeps the creamy texture and rich flavor while being safe for gluten-free diets. To make this dish vegan, swap the cheese and cream. Use nutritional yeast for a cheesy flavor. Replace heavy cream with full-fat coconut milk for a creamy base. These changes keep the dish rich and tasty without any animal products. Want to add protein? You can mix in cooked chicken or tofu. For chicken, use grilled or rotisserie pieces. If using tofu, press and cube it before adding. This protein boost makes the meal more filling and nutritious. To keep your creamy broccoli cheddar pasta fresh, let it cool first. Place it in an airtight container. Store it in the fridge for up to three days. This way, you can enjoy it again without losing flavor. When you're ready to eat leftovers, reheat with care. Use a pot on low heat. Add a splash of vegetable broth or cream if it seems dry. Stir often until it’s warmed through. You want it hot, not boiling. To freeze, use a freezer-safe container. It can last up to three months. When you’re ready to eat, thaw it in the fridge overnight. Reheat as mentioned before. This keeps the taste and texture nice. Yes, you can use frozen broccoli. Frozen broccoli is quick and easy. It cooks faster than fresh. Just add it to the pot with the pasta and broth. You may need to reduce cooking time slightly. This way, you keep the bright green color and flavor. Fusilli and penne work best for this dish. Both shapes hold the creamy sauce well. Fusilli’s twists capture more cheese, while penne’s tubes let sauce fill them. You can use other pasta if you like, but these are the top choices. To make this dish dairy-free, use full-fat coconut milk. It gives a creamy texture that works well. Also, choose dairy-free cheese for a cheesy flavor without dairy. This way, you still enjoy all the taste without the dairy. You can serve this pasta with a fresh salad. A simple green salad pairs well. You could also add garlic bread for a crunchy side. If you want more protein, grilled chicken or tofu works great too. This blog post explores how to make One Pot Creamy Broccoli Cheddar Pasta. We covered ingredients, from main items to optional garnishes. The step-by-step guide walks you through cooking methods and cheese melting. Tips ensure perfect pasta and broccoli. Variations show gluten-free and vegan options. Lastly, storage info and FAQs help you keep your dish fresh and enjoyable. Remember, cooking is fun, and you can adjust each recipe to fit your taste. Enjoy experimenting!

One Pot Creamy Broccoli Cheddar Pasta Delightful Dish

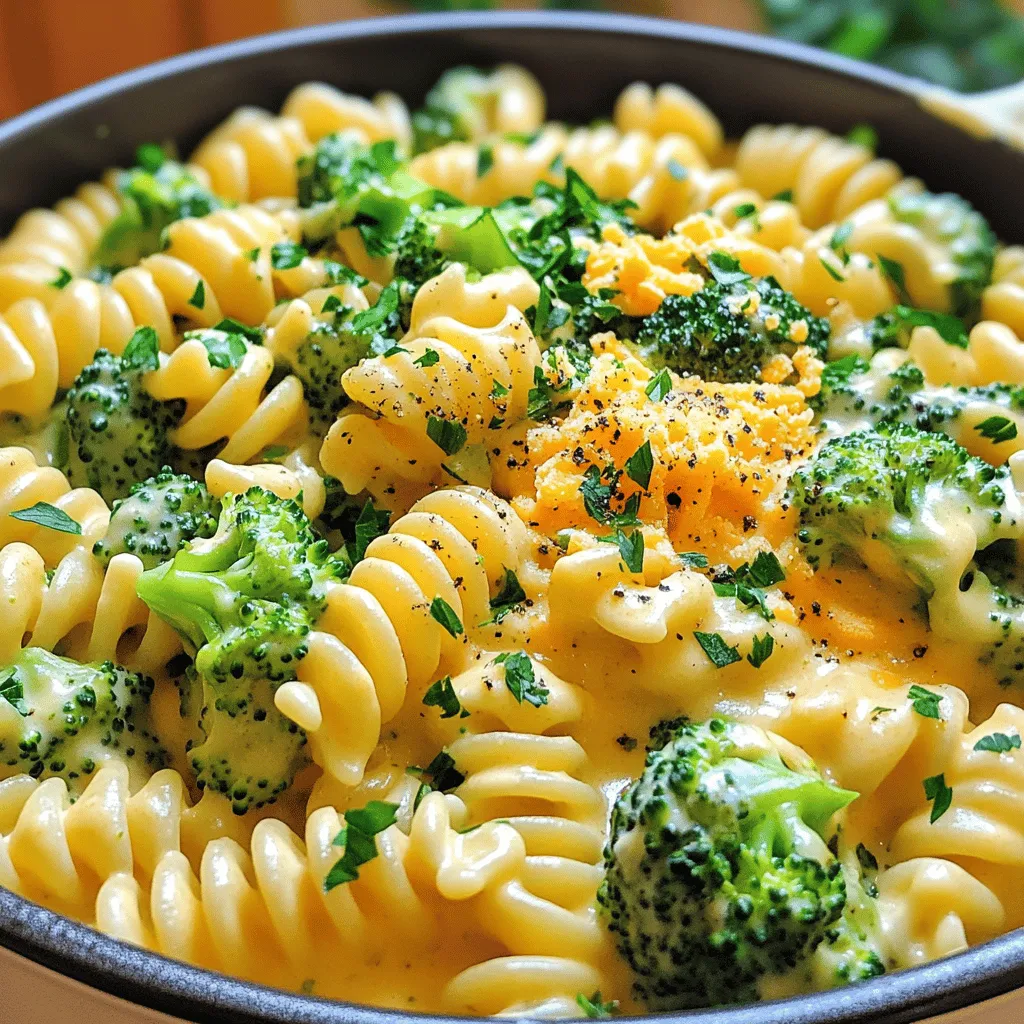
Ready for a delicious meal that’s easy to make? One Pot Creamy Broccoli Cheddar Pasta is a delight! In just

To make these delightful cheesecake cups, you'll need the following ingredients: - 1 cup Oreo cookie crumbs - 2 tablespoons unsalted butter, melted - 8 oz cream cheese, softened to room temperature - 1/2 cup Nutella chocolate hazelnut spread - 1/2 cup powdered sugar - 1 teaspoon pure vanilla extract - 1 cup heavy whipping cream - Additional Oreo cookies, crumbled, for topping - Shaved chocolate (optional) for an elegant garnish For the best results, use measuring cups and spoons. Always level off dry ingredients with a straight edge. This way, you avoid adding too much or too little. When measuring sticky items like Nutella, spray the cup with cooking spray first. This helps it slide out easily. For cream cheese, make sure it is soft. This leads to a smooth texture. You can easily swap some ingredients to fit different diets: - Use gluten-free cookies instead of Oreos for a gluten-free option. - Choose dairy-free cream cheese and whipped cream for a vegan treat. - If you're watching sugar, select a sugar-free Nutella spread. These swaps help everyone enjoy this dessert without worry. To start, grab a medium bowl. Combine 1 cup of Oreo cookie crumbs with 2 tablespoons of melted butter. Mix them well. You want the crumbs to look like wet sand. Once mixed, divide the crumb mixture into about 6 cups or jars. Press the mixture firmly at the bottom of each cup. This creates a solid base for the cheesecake. Next, take a clean bowl. Beat 8 oz of softened cream cheese with 1/2 cup of Nutella, 1/2 cup of powdered sugar, and 1 teaspoon of vanilla extract. Use an electric mixer on medium speed. Mix until smooth with no lumps. In another bowl, whip 1 cup of heavy cream until stiff peaks form, about 3-5 minutes. Gently fold the whipped cream into the Nutella mixture in two additions. This keeps it light and fluffy. Now it's time to fill the cups. Use a spoon or piping bag to add the Nutella cheesecake mixture. Leave a little space at the top. Sprinkle the extra crumbled Oreo cookies over the cheesecake layer. This adds a nice crunch. Cover the cups with plastic wrap and place them in the refrigerator. Chill for at least 4 hours or overnight for the best taste. If you like, add shaved chocolate on top just before serving. Enjoy this delightful treat! To get a smooth cheesecake, start with soft cream cheese. Let it sit at room temperature for about 30 minutes. This helps it blend well. Mix the cream cheese with Nutella, powdered sugar, and vanilla extract. Beat them together until there are no lumps. Use a hand mixer for the best results. If you notice lumps, keep mixing until the texture is even. Whipping cream is key to a light texture. Begin with cold heavy cream for the best results. Use a clean bowl and beaters to avoid any residue. Start mixing on low speed to avoid splatter. Gradually increase to high speed until stiff peaks form. This usually takes about 3 to 5 minutes. Be careful not to over-whip, as it can turn grainy. Presentation makes a big difference! Use clear cups to show off the layers of your cheesecake. This adds fun to your dessert. Sprinkle crumbled Oreos on top for a nice crunch. For an extra touch, add shaved chocolate before serving. A fresh mint sprig can also brighten the look. Serve the cups on a decorative platter for a stunning display. {{image_4}} You can change up the flavor of your cheesecake cups. Mix in peanut butter for a nutty twist. Just add 1/4 cup of creamy peanut butter to the Nutella mix. For a tropical vibe, try coconut. Swap out some cream cheese with coconut cream. This adds rich flavor and creamy texture. Toppings can take your dessert to the next level. Use crushed nuts for crunch. Chopped hazelnuts or almonds work well. You can also add fresh berries for a burst of color and flavor. Strawberries or raspberries add a nice tartness. A drizzle of caramel or chocolate sauce can make it extra sweet and rich. These cheesecake cups fit many events. For a birthday party, add colorful sprinkles on top. If you're hosting a dinner, use clear cups for a fancy touch. For casual get-togethers, serve them in fun, colorful jars. They look great and taste even better. Each cup offers a personal treat for your guests. To keep your cheesecake cups fresh, cover them tightly. Use plastic wrap or a lid. This prevents them from absorbing other flavors in the fridge. Store them in the refrigerator for best results. They taste great cold and firm. You can freeze these cheesecake cups! First, cover them with plastic wrap. Then, place them in an airtight container. This stops ice crystals from forming. They will last in the freezer for about three months. When ready to eat, thaw them in the fridge overnight. These cheesecake cups will stay fresh in the fridge for about four days. To enjoy them at their best, eat them within this time frame. Always check for any changes in smell or color before enjoying. Freshness is key for the best taste! Yes, you can use reduced-fat cream cheese. It works well in this recipe. The texture may be slightly different, but the taste will still be great. Just make sure it’s softened before mixing. This will help create a smooth filling. These cheesecake cups last about 3-4 days in the fridge. Store them in an airtight container. Keep the extra Oreo crumbs separate until serving for the best crunch. Enjoy them cold for a refreshing treat on warm days. Absolutely! You can make these cups a day ahead. This allows the flavors to meld together nicely. Just remember to cover them well before chilling. They will taste even better after a night in the fridge. This blog post covered how to make No Bake Nutella Oreo Cheesecake Cups. We detailed the ingredients, alternative options, and the step-by-step instructions. You learned tips for a smooth mixture and presentation ideas. We shared variations to suit your taste and discussed storage for freshness. These cheesecake cups are easy and fun to make. I hope you feel inspired to try this recipe and enjoy the process!

No Bake Nutella Oreo Cheesecake Cups Delightful Treat

Looking for a sweet treat that’s quick and easy? Look no further! My No Bake Nutella Oreo Cheesecake Cups are

Older posts
Newer posts
← Previous Page1 … Page5 Page6 Page7 … Page91 Next →

dsad

© 2025 recipesstation • Built with GeneratePress

Our Policies

  • Copyright Policy
  • Cookie Policy
  • GDPR Policy
  • Privacy Policy
  • Disclaimer
  • Terms Of Use

More Information

  • Home
  • About
  • Contact
  • Appetizers
  • Dessert
  • Dinner
  • Drinks
©2025, recipesstation About Back To Top