Skip to content
DisclaimerTerms Of UseGDPR PolicyCookie Policy

recipesstation

  • Home
  • Drinks
  • Appetizers
  • Dinner
  • Dessert
  • About
  • Contact
  • Privacy Policy
DisclaimerTerms Of UseGDPR PolicyCookie Policy

Emily

When making creamy tomato spinach pasta, gather these key ingredients. They will help you create a tasty dish with great flavors. - Pasta type options: - 8 oz (225g) of penne or fettuccine - Fresh produce selection: - 2 cups of fresh spinach, washed and chopped - 1 cup of cherry tomatoes, halved - 2 cloves of garlic, minced - Dairy and seasonings needed: - 1 cup of heavy cream - 1 tablespoon of extra virgin olive oil - 1 teaspoon of Italian seasoning - ½ teaspoon of red pepper flakes (optional) - Salt and black pepper to taste - Freshly grated Parmesan cheese for serving - Fresh basil leaves for garnish These ingredients are simple yet pack a punch. Don't forget to check out the Full Recipe for more details on how to bring it all together! Start by boiling water in a large pot. Make sure to add salt to the water; it should taste like the sea. Once the water boils, add 8 oz of pasta. Cook according to the package directions until it is al dente. This usually takes around 8 to 10 minutes. After cooking, drain the pasta, but save ½ cup of the starchy water. This water helps thicken the sauce later. In a large skillet, heat 1 tablespoon of extra virgin olive oil over medium heat. Once the oil is hot, add 2 cloves of minced garlic. Sauté the garlic for about 30 seconds. You want it to smell great and turn golden, but don't burn it. Next, add 1 cup of halved cherry tomatoes to the skillet. Sauté these for 3 to 5 minutes until they soften and release their juices. Stir them occasionally to cook evenly. Now it's time to add the cream. Lower the heat and pour in 1 cup of heavy cream slowly. Stir well to mix everything. Add 1 teaspoon of Italian seasoning and ½ teaspoon of red pepper flakes if you like some heat. Let the sauce simmer for 2 to 3 minutes. This helps it thicken slightly. If it becomes too thick, you can adjust it with some reserved pasta water. Next, gently fold 2 cups of chopped spinach into the sauce. Cook for about 2 minutes until the spinach wilts and turns bright green. Then, add the drained pasta to the skillet. Toss everything together, making sure each piece of pasta is coated in sauce. If the sauce is still too thick, stir in a bit more of the reserved pasta water until you reach your desired thickness. To boost the taste of your creamy tomato spinach pasta, try these ideas: - Spices: Add a pinch of garlic powder or onion powder for depth. A bit of oregano can also brighten the dish. - Cheese: Use a mix of Parmesan and mozzarella for a creamy, rich flavor. Feta can add a nice tang too. - Freshness: Toss in some fresh lemon juice or zest. This brightens the dish and adds a lovely aroma. Getting the sauce just right is key for this dish. Here are some tips: - Sauce Consistency: When you mix in the cream, watch it closely. If it thickens too much, add a splash of reserved pasta water. This keeps the sauce silky and smooth. - Preventing Overcooked Pasta: Cook the pasta until it’s al dente. This means it should still have a bit of bite. Drain it right away to stop the cooking. Toss it with the sauce quickly to keep it from getting mushy. These simple tricks help create a dish full of flavor and perfect texture. Enjoy your cooking! {{image_4}} You can change the pasta type for this creamy tomato spinach pasta. Here are some ideas: - Gluten-Free Pasta: Try using gluten-free penne or fettuccine. They taste great and work well in the sauce. - Whole Wheat Pasta: Whole wheat options add fiber and a nutty flavor. They are perfect for a healthier dish. - Alternative Shapes: Consider using rotini or farfalle. Their shapes hold the sauce nicely, making every bite tasty. Adding protein makes this dish more filling. Here are a few great choices: - Chicken: Cook sliced chicken breast in the skillet before adding garlic. This adds a nice flavor and makes the meal heartier. - Shrimp: Sauté shrimp with garlic for a quick protein boost. They cook fast and pair well with the sauce. - Vegetarian Options: For a meatless meal, try chickpeas or tofu. They add protein and texture while keeping it plant-based. These variations let you customize your creamy tomato spinach pasta. You can make it fit your taste and needs perfectly! For the full recipe, check out the detailed instructions. To keep your creamy tomato spinach pasta fresh, store it in an airtight container. This method keeps the flavors locked in. Place it in the fridge within two hours of cooking. It will stay fresh for about three to four days. If you want to keep it longer, consider freezing it. When you're ready to enjoy leftovers, reheat the pasta gently. The stovetop is the best method, as it warms the dish evenly. Heat it in a skillet over low heat. Add a splash of water or cream to keep it from drying out. Stir often to ensure even heating. If you choose the microwave, use a microwave-safe dish. Cover it with a lid or a damp paper towel. Heat in short bursts, stirring in between. This method helps maintain moisture. Remember, no one likes dry pasta! Can I use frozen spinach instead of fresh? Yes, you can use frozen spinach. Make sure to thaw it first. Squeeze out excess water. This will help keep the dish from being watery. How to adjust the recipe for larger servings? To serve more people, simply double the ingredients. This means using 16 oz of pasta and 4 cups of spinach. Adjust the sauce and seasonings too. Taste as you go for the best flavor. Can I make this dish ahead of time? Yes, you can prepare the dish ahead. Cook the pasta and sauce separately. Store them in the fridge. Combine them just before serving to keep the pasta fresh. What to do if the sauce is too thick? If your sauce is thick, add the reserved pasta water. Stir in a little at a time until you reach your desired consistency. This will help make it creamy and smooth. How to fix if the pasta is too mushy? If your pasta is mushy, it's best to start over with fresh pasta. You can try to drain it and toss it in cold water. This may help firm it up a bit, but it won't be perfect. Always watch your cooking time to avoid mushy pasta. This blog post shared how to make a flavorful pasta dish. We covered key ingredients like pasta, fresh produce, and dairy. You learned the steps for cooking pasta, sautéing garlic and tomatoes, and creating a creamy sauce. We also explored tips for flavor boosts, cooking techniques, and variations. Lastly, I shared storage and reheating methods, plus answers to common questions. With these tips, you can create a delicious dish that suits your taste and needs. Dive into the kitchen and enjoy every bite!

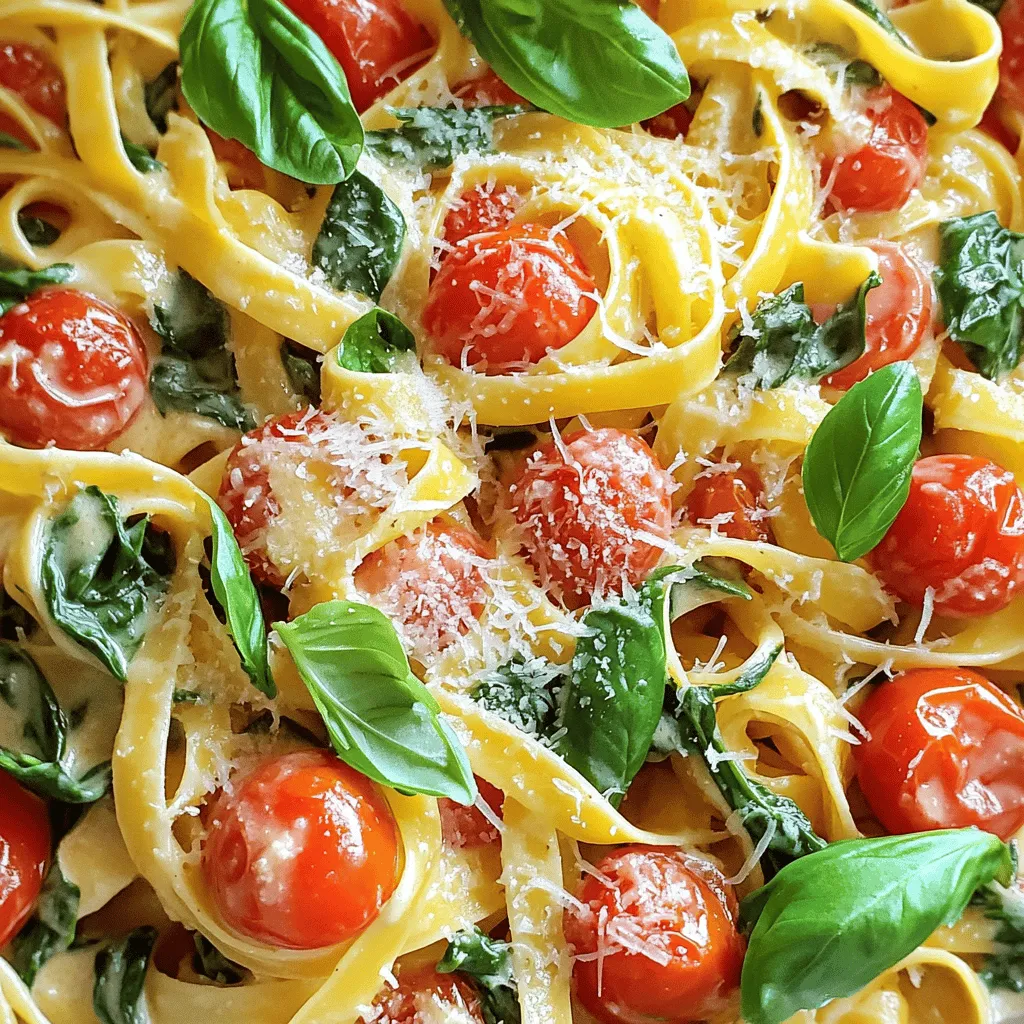
Creamy Tomato Spinach Pasta Quick and Tasty Meal

Ready to whip up a quick and tasty meal? Creamy Tomato Spinach Pasta is your answer! This dish combines pasta,

- 2 ripe avocados, halved and pitted - 1/3 cup unsweetened cocoa powder - 1/4 cup pure maple syrup - 1/4 cup almond milk (or your preferred non-dairy milk) - 1 teaspoon pure vanilla extract - A pinch of fine sea salt - Dark chocolate shavings and an assortment of fresh berries for garnish When I prepare chocolate avocado mousse, I love how simple the ingredients are. Each item brings rich flavor and great texture. Avocados are the star here. They provide a creamy base and healthy fats. Nutritional Information One serving of this mousse has about 200 calories. It has 15 grams of fat, 3 grams of protein, and 20 grams of carbs. Avocados are super healthy. They have fiber, vitamins, and good fats. Eating avocados may help your heart and lower bad cholesterol. They are also great for your skin! Using fresh ingredients makes this mousse taste even better. The dark chocolate shavings and berries add a fun touch. You can find the full recipe above to make this rich delight. To start, cutting and scooping avocados is simple. First, take a ripe avocado and place it on a stable cutting board. Use a sharp knife to slice it in half, lengthwise. Gently twist the halves apart to separate them. Next, carefully remove the pit with the knife. To scoop out the flesh, use a spoon to glide along the inside of the skin. This will give you creamy chunks of avocado for your mousse. Now, let’s blend the ingredients for the best texture. Add the avocado flesh to a blender or food processor. Then, pour in the unsweetened cocoa powder, pure maple syrup, almond milk, vanilla extract, and a pinch of sea salt. Blend on high speed until the mixture becomes smooth and creamy. You may need to stop and scrape the sides of the blender to mix everything well. This step is crucial for a velvety texture. Next, it's time for taste testing. After blending, take a small spoonful of the mousse. If it needs more sweetness, add a bit more maple syrup. Blend again to mix in any extra sweetness. This step lets you adjust the flavor to your liking. For serving, spoon the mousse into small bowls or cups. Cover them with plastic wrap and chill in the fridge for at least 30 minutes. This chilling helps the mousse set and brings the flavors together. When ready to serve, add dark chocolate shavings and fresh berries on top. These not only look great but also add a burst of flavor. For the full recipe, check the detailed instructions provided earlier. Enjoy your rich and creamy chocolate avocado mousse! To make your chocolate avocado mousse super smooth, start with ripe avocados. They should feel soft but not mushy. Cut them in half and scoop the green flesh into your blender. Add the cocoa powder, maple syrup, almond milk, vanilla extract, and a pinch of sea salt. If your blender struggles, you can use a food processor. It works just as well. Blend until everything is creamy. Stop to scrape the sides if needed. If you want it sweeter, add more maple syrup and blend again. For a stunning look, serve your mousse in clear glass cups. This shows off its rich, dark color. You can also layer it with fresh berries for a pop of color and taste. To garnish, add a sprinkle of dark chocolate shavings on top. A sprig of mint adds a fresh touch and great aroma. These little details make your dessert look fancy. Plus, they add flavor and fun! For the full recipe, check out the details above. Enjoy your delightful mousse! {{image_4}} You can easily change the taste of your chocolate avocado mousse. Adding peanut butter or almond butter gives it a rich, nutty flavor. Just mix in a couple of tablespoons when you blend the mousse. This adds depth and pairs well with chocolate. Another fun twist is adding mint or coffee. A few drops of mint extract brighten the dessert. If you want a deeper taste, try instant coffee. Just one teaspoon can change the flavor in a great way. You can make this mousse fit different diets. For those with nut allergies, use oat milk or rice milk instead of almond milk. You can also swap the maple syrup for agave syrup for a sugar-free option. This recipe is already vegan since it uses avocados and plant-based milk. To ensure it is gluten-free, just check your cocoa powder and any toppings. You can enjoy this creamy dessert without worry! To keep your chocolate avocado mousse fresh, store it in the fridge. Use airtight containers to avoid any strong odors. If you have leftover mousse, it will stay safe to eat for about 2 to 3 days. Before serving, give it a quick stir to restore its creamy texture. You can freeze mousse for future use. First, pour the mousse into freezer-safe containers. Leave some space at the top, as the mousse will expand when frozen. It keeps well for about a month. When you're ready to enjoy it, take it out and place it in the fridge overnight to defrost. You can also leave it at room temperature for about 30 minutes. Once it's soft, stir it to regain its smoothness. Enjoy your creamy treat again! For the full recipe, check out the detailed preparation steps. Can I use other sweeteners instead of maple syrup? Yes, you can use other sweeteners. Honey or agave syrup works well. You can even use stevia for a low-calorie option. Just adjust the amount to fit your taste. Each sweetener brings a unique flavor. Is this recipe suitable for kids? Absolutely! Chocolate avocado mousse is kid-friendly. It is smooth, rich, and sweet. Kids will love the taste. Plus, it is healthy. Avocados provide good fats and nutrients. What can I serve with chocolate avocado mousse? You can serve this mousse with fresh berries or nuts. Adding whipped cream can enhance the dessert. Try pairing it with a scoop of vanilla ice cream for a fun twist. Use your creativity! How long does the mousse last in the fridge? The mousse lasts up to three days in the fridge. Store it in an airtight container. Just make sure to cover it well. It may darken slightly but will still taste great. Can I add protein powder to the mousse? Yes, you can add protein powder. It makes your mousse even more nutritious. Use a flavor that complements chocolate, like vanilla. Start with a small amount and blend well. Adjust based on your taste. This blog post shared how to make a tasty chocolate avocado mousse. We listed essential ingredients and explained each step in detail. You learned tips for blending and presentation, plus variations to suit different tastes and diets. I also covered how to store your mousse, so it stays fresh. Enjoy creating your mousse, knowing it’s both delicious and healthy! Don't forget to experiment with flavors and toppings. Each bite should be fun and full of joy!

Chocolate Avocado Mousse Creamy and Rich Delight

Ready to indulge in a dessert that’s both rich and healthy? My Chocolate Avocado Mousse is a creamy delight that

- 1 can (15 oz) chickpeas, thoroughly rinsed and drained - 2 tablespoons extra-virgin olive oil - 1 teaspoon dried oregano - Salt and black pepper to taste - 1 cup cherry tomatoes, halved - 1 crisp cucumber, diced - 1 red bell pepper, diced - 1/4 medium red onion, finely chopped - 2 tablespoons fresh parsley, finely chopped - Juice of 1 lemon, fresh squeezed - 1/2 cup Kalamata olives, pitted and halved - 1/4 cup feta cheese, crumbled This salad is vibrant and fresh. You get great flavor from simple items. The chickpeas are the star, providing protein and fiber. Olive oil adds richness, while the lemon juice brings a bright zing. Each fresh ingredient adds its own unique taste. The cherry tomatoes burst with sweetness. The cucumber gives a nice crunch. Red bell pepper adds a sweet, crisp bite. The red onion offers a mild kick. Fresh parsley gives color and a hint of earthiness. Kalamata olives add a salty, briny touch. Feta cheese brings creaminess that balances the other flavors. You can find the full recipe for more details on how to put it all together. Start by combining the chickpeas, cherry tomatoes, cucumber, red bell pepper, red onion, and Kalamata olives in a large mixing bowl. This mix creates a colorful and hearty base for your salad. Chickpeas add protein, while the veggies bring crunch and flavor. Each ingredient plays a role in making this salad fresh and vibrant. In a separate small bowl, whisk together the olive oil, lemon juice, oregano, salt, and pepper. This dressing adds a zesty and aromatic touch to the salad. The lemon juice gives brightness, while the olive oil adds richness. Blend these until they are well combined. A good dressing brings all the ingredients together. Drizzle the dressing over the salad base. Combine the ingredients gently until everything is well coated. Be careful not to mash the veggies. Next, add the crumbled feta cheese and chopped parsley. Mix lightly again to keep the feta intact. This final step adds creaminess and a burst of fresh taste. Taste the salad and adjust the seasoning as needed. If you want more zing, add extra lemon juice or a dash of olive oil. Let the salad rest for at least 15 minutes at room temperature. This resting time helps the flavors meld beautifully. You can find the Full Recipe for more details. Let the salad rest for 15 minutes. This allows the flavors to blend well. You will taste the difference. Adjust the taste with more lemon juice or olive oil. A little more acidity can brighten the dish. Serve the salad in a large bowl for sharing. This gives a welcoming feel. For a fancy touch, plate it in individual bowls. Garnish with fresh parsley and a lemon wedge. This adds color and makes the dish pop. You can also drizzle balsamic glaze over it for extra flair. For the Full Recipe, check the section above. {{image_4}} You can swap out olives and feta cheese for different flavors. If you don’t like olives, try sun-dried tomatoes or roasted red peppers. Instead of feta, use creamy avocado or a vegan cheese. These swaps keep the salad fresh and tasty. Adding extra veggies makes your salad even better. Consider chopped carrots, radishes, or spinach. You can also add proteins like grilled chicken or chickpea patties. This change makes the salad heartier and more filling. Herbs and spices can change the whole taste. Instead of oregano, try basil or dill. These fresh flavors add excitement to your dish. A pinch of cumin or smoked paprika can also bring warmth and depth. To create a vegan version, simply skip the feta cheese. You can use nutritional yeast to give a cheesy flavor. Add more lemon juice for zest and brightness. This way, everyone can enjoy the salad. For the Full Recipe, check the previous section. To keep your Mediterranean Chickpea Salad fresh, store it in the fridge. Use an airtight container. This helps keep the flavors intact. You can enjoy the salad for up to three days when stored properly. If you want to save your salad for longer, freezing is an option. However, keep in mind that some veggies may lose their crunch after thawing. To freeze, place the salad in a freezer-safe bag. Remove all air before sealing. When ready to eat, thaw it overnight in the fridge. Reheat gently in a pan if you prefer it warm, but I recommend enjoying it cold for the best taste. Yes, you can make this salad ahead of time. It keeps well in the fridge. I suggest preparing it a few hours before you plan to serve it. The flavors will blend nicely as it chills. Just remember to add the feta just before serving to keep it fresh. This salad pairs well with grilled chicken or fish. You can also serve it with pita bread or hummus for a fuller meal. If you want something light, try it with a side of roasted veggies. Yes, this salad is very healthy. Chickpeas are high in protein and fiber. The veggies provide vitamins and minerals. Olive oil adds healthy fats, while feta cheese gives a bit of calcium. This mix makes it a balanced dish. To make it gluten-free, you can enjoy it as is. For a dairy-free version, skip the feta or use a dairy-free cheese. If you need low-sodium options, rinse the chickpeas well and use low-sodium olives. You can find the Full Recipe for Mediterranean Chickpea Salad with a Zesty Twist above. It includes all the steps and tips to make this delicious dish. This Mediterranean Chickpea Salad is simple, healthy, and full of fresh flavors. We explored essential pantry items, fresh produce, and tasty extras. I shared how to prepare the salad base, create a zesty dressing, and serve it well. I hope the tips on variations and storage help you enjoy this dish longer. Remember, you can make it your own by adding different ingredients or adjusting flavors. Enjoy making this salad a staple in your meals. It’s a delightful way to eat fresh and stay healthy!

Mediterranean Chickpea Salad Fresh and Flavorful Delight

Looking for a dish that packs a punch of flavor while keeping it fresh? Meet the Mediterranean Chickpea Salad! This

To create a delicious shrimp and grits casserole, gather these main ingredients: - 1 cup stone-ground grits - 4 cups chicken broth - 1 cup shredded sharp cheddar cheese - 1 cup whole milk - 1 pound medium shrimp, peeled and deveined - 1 bell pepper, diced (choose between red or green for color) - 1 small onion, finely chopped - 2 cloves garlic, minced - 1 teaspoon smoked paprika - 1 teaspoon cayenne pepper (adjust to your spice preference) - Salt and freshly ground black pepper, to taste - 2 tablespoons extra-virgin olive oil - 1 teaspoon fresh parsley, finely chopped (for garnish) These ingredients create a creamy and flavorful base for your casserole. You can personalize your shrimp and grits casserole with these optional seasonings and add-ins: - Lemon juice for brightness - Old Bay seasoning for a coastal twist - Crumbled bacon for added crunch - Spinach or kale for extra greens - Diced tomatoes for a touch of acidity Feel free to mix and match these options to suit your taste. To enhance your meal, consider serving these accompaniments alongside your casserole: - A simple green salad with vinaigrette - Crusty bread or garlic bread for dipping - Cold beverages like iced tea or lemonade These sides complement the rich flavors of the shrimp and grits casserole perfectly. For the full recipe, check the earlier sections to guide you through making this comforting dish. First, I get my oven ready by preheating it to 350°F (175°C). This helps the casserole bake evenly. I then grab a large saucepan and pour in 4 cups of chicken broth. I bring it to a rolling boil. Once it bubbles, I slowly add 1 cup of stone-ground grits. I stir constantly to keep lumps from forming. After mixing well, I lower the heat and let the grits simmer for about 20-25 minutes. I stir frequently until they thicken to my liking. When done, I remove the pan from the heat. I mix in 1 cup of shredded sharp cheddar cheese and 1 cup of whole milk until creamy. I season with salt and black pepper. I set it aside to cool slightly. Next, I heat 2 tablespoons of extra-virgin olive oil in a skillet over medium heat. I add 1 diced bell pepper, 1 small chopped onion, and 2 minced garlic cloves. I sauté this mix until the veggies soften and the onion turns translucent. This takes about 5-7 minutes. Then, I add 1 pound of medium shrimp, 1 teaspoon of smoked paprika, and 1 teaspoon of cayenne pepper. I cook the shrimp until they turn pink, which takes about 3-4 minutes. After cooking, I remove the skillet from the heat and let the mixture cool slightly. Now, I grab a large mixing bowl. I pour in the creamy cheese grits mixture and the sautéed shrimp and veggies. I stir well to mix everything evenly. Next, I transfer this combined mixture into a greased baking dish, about 9x13 inches. I spread it out evenly so it bakes uniformly. I then place the dish in the preheated oven and bake for 25-30 minutes. I watch for the top to turn golden and bubbly. After baking, I let the casserole cool for a few minutes. Then, I slice it into generous squares. I love to garnish each square with fresh parsley for a pop of color. This step really makes the dish shine! For the full recipe, check out the details provided earlier. To make great grits, use stone-ground grits. They give a rich and creamy texture. Don't rush the cooking process. Stir them often and let them simmer for about 20-25 minutes. This will help avoid lumps and ensure even cooking. After they thicken, mix in cheese and milk for extra creaminess. Taste and adjust salt and pepper as needed for a balanced flavor. Seasonings can make or break your dish. Start with smoked paprika for a deep, smoky note. Add cayenne pepper for some heat, but adjust it to your taste. Fresh garlic and onions add a lovely aroma. You can also try adding fresh herbs like thyme or dill for a fresh twist. Don't forget to taste as you go. The right blend can elevate your shrimp and grits casserole. When baking, preheat your oven to 350°F (175°C). This ensures even cooking. Spread the mixture evenly in the baking dish to cook uniformly. Bake for 25-30 minutes until the top is golden and bubbly. Let the casserole cool for a bit before serving. This helps it set and makes slicing easier. For a finishing touch, sprinkle fresh parsley on top for color and freshness. For the Full Recipe, check the details provided above. {{image_4}} To add some heat, use more cayenne pepper. You can also include diced jalapeños. This will spice up your dish and give it an extra kick. If you enjoy bold flavors, try adding hot sauce to the shrimp mix. It enhances the flavor while keeping it fun. Adjust the spice to match your taste. If you want it hot, don't hold back! For a creamy garlic version, add roasted garlic to your grits. Simply roast garlic in the oven until soft and blend it in. This will give your grits a rich, savory flavor. You can also add more cheese to make it even creamier. A blend of cream cheese and cheddar works well. This twist makes the dish feel more luxurious. If you prefer a vegetarian option, skip the shrimp entirely. Replace it with sautéed mushrooms or zucchini for texture. You can also use vegetable broth instead of chicken broth. For added flavor, mix in sun-dried tomatoes and spinach. This gives the dish a fresh and vibrant taste. You won't miss the shrimp with these tasty substitutes. For the complete recipe, check out [Full Recipe]. To store your shrimp and grits casserole, let it cool first. Place it in an airtight container. Make sure to cover it well to keep moisture in and odors out. This dish stays fresh for about three to four days in the fridge. Label your container with the date for easy tracking. When you are ready to enjoy leftovers, preheat your oven to 350°F (175°C). Place the casserole in an oven-safe dish. Heat it for about 20 minutes or until it's hot throughout. If you're in a hurry, you can also microwave it. Use a microwave-safe dish and heat in short bursts, checking often, until warm. If you want to save the casserole for later, freezing is a great option. First, let it cool completely. Then, wrap it well in plastic wrap and foil. This prevents freezer burn. It can last up to three months in the freezer. When you’re ready to eat it, thaw it in the fridge overnight and reheat as mentioned above. Enjoy your shrimp and grits casserole even after weeks! For the full recipe, check out the details above. To add spice, increase the cayenne pepper. You can also add hot sauce or crushed red pepper flakes. Taste the mixture as you go. This helps you find the right heat. Use smoked paprika for a smoky flavor that pairs well with the heat. Yes, you can use frozen shrimp. Just make sure to thaw them first. You can do this overnight in the fridge or place them in cold water. This helps them cook evenly. Frozen shrimp can be just as tasty as fresh shrimp. If you need a substitute, use vegetable broth or seafood stock. These options keep the flavors rich. You can also use water for a lighter taste. Just remember to add a bit more seasoning to enhance the flavor. For a creamy touch, mix in some milk or cream. In this blog post, I covered how to make a delicious shrimp and grits casserole. We explored the main ingredients, optional seasonings, and the steps to prepare this dish. I shared tips for perfecting your grits and variations to try. Storing and reheating your casserole was also discussed. By following these steps and tips, you’ll create a meal that excites your taste buds. Enjoy experimenting with flavors and sharing this dish with family and friends.

Savory Shrimp and Grits Casserole Easy Comfort Dish

If you’re craving a warm and filling dish, my Savory Shrimp and Grits Casserole is perfect for you. This easy

To make a great Spaghetti Aglio e Olio, you need these key ingredients: - 400g spaghetti - 6 cloves garlic, thinly sliced - 1/2 cup extra virgin olive oil - 1 teaspoon red pepper flakes - Zest and juice of 1 lemon - 1/4 cup fresh parsley, finely chopped - Salt, to taste - Optional: Shavings of Parmesan cheese These ingredients come together to create a simple yet tasty dish. The garlic and olive oil form the base, while the lemon adds a bright touch. You can enhance your spaghetti with a few extras: - Suggested toppings for extra flavor: Try adding cooked shrimp or grilled chicken for protein. - Seasoning variations: Fresh herbs like basil or oregano can add depth. - Alternative pasta types: Feel free to swap spaghetti for linguine or fettuccine. These options let you customize your dish and make it your own. For the full recipe, check out the complete guide. To start, fill a large pot with water. Add a good amount of salt to the water. This step is key, as it enhances the pasta's flavor. Bring the water to a rolling boil. Once boiling, add the spaghetti. Cook it for about 8 to 10 minutes, or until it's al dente. This means it should still have a slight bite. Before draining, save 1 cup of the starchy pasta water. Drain the spaghetti and set it aside. Next, grab a large skillet and pour in the extra virgin olive oil. Heat the oil over medium heat. When the oil is warm, add the thinly sliced garlic. Stir the garlic gently, keeping an eye on it. You want it to turn a lovely golden brown. This should take about 2 to 3 minutes. Be careful not to burn it! If the garlic starts to smell bitter, it is too late. Now it’s time to add some heat! Sprinkle the red pepper flakes into the skillet. Stir them in and sauté for 30 more seconds. This will bring out the spicy aroma. Then, add the drained spaghetti to the skillet. Use tongs to toss the spaghetti in the garlic oil. Make sure every strand is coated. Next, pour in the reserved pasta water, starting with 1/4 cup. Keep tossing the pasta well. Add in the lemon zest and drizzle the fresh lemon juice over it. Toss until everything combines and shines. For the complete recipe, check out the Full Recipe. To get the best garlic flavor, watch the cooking time. You want it golden, not burnt. If you cook garlic too long, it can taste bitter. Saute the garlic for 2-3 minutes until it turns a nice golden brown. This adds a sweet, rich flavor. For spice, red pepper flakes are key. Start with one teaspoon. You can add more if you like it spicy. If you're unsure, add less at first. You can always adjust it later. Lemon zest and juice are game-changers. They brighten the dish and add a fresh taste. Zest before you cut the lemon. This way, you get more flavor. The juice gives a nice tang that balances the oil and garlic. If you're out of lemons, try lime or orange. Each citrus fruit brings a unique twist to the dish. Experiment and find what you like best. For a great look, plate your spaghetti in a nest shape. Use tongs to twirl the pasta. This makes it appealing to the eye. Don't forget to sprinkle parsley on top for color. Pair your spaghetti with crusty bread or a fresh salad. They complement the meal well. For drinks, a crisp white wine works best. Look for a Pinot Grigio or Sauvignon Blanc. These wines enhance the flavors of your dish. For the full recipe, check out Spaghetti Aglio e Olio with a Zesty Twist. {{image_4}} Spaghetti Aglio e Olio can fit many diets. For vegan versions, skip the cheese or use a vegan alternative. You can find great vegan parmesan at stores or online. For gluten-free needs, use gluten-free pasta. Many brands offer options that taste great and work well with this dish. You can spice up your Aglio e Olio with added vegetables. Spinach or cherry tomatoes add color and nutrients. Just sauté them briefly before adding the pasta. If you want protein, shrimp or grilled chicken work well. Cook them separately, then mix them in with the pasta. Each Italian region has its flavors. From the north, you might use truffle oil for a rich taste. The south may add capers or olives for a briny kick. You can also use local herbs and spices to reflect your area. These twists make your dish unique and personal. Don't forget to check the [Full Recipe] for guidance! After enjoying your spaghetti, let it cool down. Place it in a bowl for a few minutes. This helps the steam escape. Use a good container to keep it fresh. A tight-sealing container works best. Make sure to store it in the fridge. It can last up to three days this way. When reheating, you want to keep it moist. Use a skillet on low heat. Add a splash of olive oil or reserved pasta water. This helps restore its creamy texture. You can also use a microwave. Cover the dish to trap steam. Heat it in short bursts, checking often. Aim for about 165°F to ensure food safety. You can freeze spaghetti for later use. First, let it cool completely. Place it in a freezer-safe bag. Remove as much air as you can. This prevents freezer burn. You can keep it frozen for up to three months. To defrost, move it to the fridge overnight. You can also use cold water for quicker results. Just make sure to drain it well before reheating. Enjoy your stored spaghetti with the same flavor as fresh! Aglio e Olio is Italian for "garlic and oil." It highlights the main ingredients. This dish comes from Naples, Italy. It shows how simple items can create amazing flavors. Yes, you can! Cook the spaghetti and let it cool. Store it in a container. Keep the garlic oil separate in the fridge. When ready, heat the oil and toss with pasta. This saves time, and the dish still tastes great. You can add your favorite ingredients. Here are some ideas: - Vegetables: Try spinach, cherry tomatoes, or bell peppers. - Proteins: Add shrimp, chicken, or chickpeas for more heartiness. - Cheese: Use feta or goat cheese for a different taste. Feel free to experiment! Each addition makes the dish unique. Yes, it has some health benefits. Here’s why: - Garlic supports heart health and boosts immunity. - Olive oil is rich in good fats and antioxidants. - Parsley adds vitamins and minerals. This dish is simple but full of goodness. Enjoy it as part of a balanced diet. For the full recipe, check the earlier section. Spaghetti Aglio e Olio is simple yet full of flavor. With just a few ingredients, you can create this classic dish. Remember to sauté the garlic carefully and balance the spice to your liking. Consider adding fresh veggies or proteins for a twist. Don't forget the importance of great storage and reheating methods. Enjoy making this dish your own, and share it with friends. Cooking should be fun and creative. Happy cooking!

Spaghetti Aglio e Olio Flavorful and Easy Recipe

Discover the magic of Spaghetti Aglio e Olio, a classic Italian dish that’s simple yet incredibly flavorful. With just a

For oven-baked chicken fajitas, you need: - 1 lb (450g) boneless, skinless chicken breasts, sliced into thin strips - 1 red bell pepper, sliced into strips - 1 yellow bell pepper, sliced into strips - 1 medium red onion, sliced into wedges These ingredients form the base of your dish. The chicken gives protein, while the peppers and onion add color and crunch. To add flavor, use: - 3 tablespoons extra virgin olive oil - 2 tablespoons fajita seasoning - 1 teaspoon garlic powder - 1 teaspoon smoked paprika - Salt and freshly ground black pepper, to taste The olive oil helps the spices stick. Fajita seasoning offers that classic taste. Smoked paprika adds a nice touch of warmth. For extra flavor, consider: - Sour cream - Guacamole - Shredded cheese - Fresh cilantro leaves These toppings let everyone customize their fajitas. You can mix and match to find your favorite combination. Enjoy exploring the Full Recipe to make this tasty meal! Start by preheating your oven to 400°F (200°C). This step makes sure the oven is hot when you bake the fajitas. In a large mixing bowl, add the chicken slices, red bell pepper strips, yellow bell pepper strips, and onion wedges. This mix gives the fajitas great color and taste. Drizzle olive oil over the chicken and veggies. Then, sprinkle the fajita seasoning, garlic powder, smoked paprika, salt, and black pepper on top. Use your hands or a spoon to toss everything well. Make sure all the chicken and vegetables get coated with the spices. Line a large baking sheet with parchment paper. This makes cleanup easier. Spread the seasoned chicken and veggie mix in one even layer on the baking sheet. Place the baking sheet in your preheated oven. Bake for 20-25 minutes. Stir the mixture halfway through. The fajitas are ready when the chicken is no longer pink and the veggies are tender. While the fajitas are baking, heat a dry skillet over medium heat. Warm each tortilla for about 30 seconds on each side. This makes them soft and easy to roll. Once the chicken and veggies are out of the oven, let them rest for a couple of minutes. This helps the flavors mix well. To serve, place a good amount of the chicken and veggie mix in the center of each warm tortilla. Let everyone add their favorite toppings from the optional list. Enjoy your meal! For more details, check out the Full Recipe. To make sure your fajitas cook evenly, cut the chicken and veggies into uniform sizes. This helps them cook at the same rate. Stir the mixture halfway through baking. This will allow heat to reach all sides of the ingredients, giving you tender chicken and crisp veggies. Use fresh ingredients for the best taste. You can swap the bell peppers for other colors or add in some jalapeños for heat. Try marinating the chicken for about an hour with the spices and oil before baking. This adds depth to the flavor. You can also sprinkle fresh lime juice before serving for a zesty finish. Warm tortillas on a dry skillet to make them soft and flexible. Heat each tortilla for about 30 seconds on both sides. This step makes them easy to fold without tearing. If you want extra flavor, brush the tortillas with a bit of olive oil before warming. Serve them warm with the fajitas for the best taste. For the full recipe, check out the detailed instructions above. {{image_4}} You can easily switch the chicken for other meats. Try beef or shrimp for a new taste. Just cut them into strips, just like the chicken. Adjust the cooking time for each type. Beef may need a bit longer, while shrimp cooks faster. Each option brings its own flavor to the dish. If you want a meatless version, use mushrooms or tofu. Both options soak up the spices well. Slice them thin, just like the chicken. You can also mix in extra veggies. Think zucchini, squash, or even corn for color. This makes a tasty meal for everyone. Change the spices for a new twist. Use taco seasoning for a more classic flavor. Or add chili powder for a spicy kick. You can even try curry powder for a unique taste. Experiment with lime or lemon juice for zest. Each change provides a fresh take on your fajitas. For the full recipe, check out the earlier section. After enjoying your delicious oven-baked chicken fajitas, store any leftovers in an airtight container. Keep them in the fridge for up to three days. Make sure the fajitas cool down before sealing the container. This helps keep them fresh and tasty. To reheat your leftovers, you have a few options. The best way is to use the oven. Preheat your oven to 350°F (175°C). Place the fajitas on a baking sheet and cover with foil. Bake for about 10-15 minutes until heated through. If you prefer, you can use a microwave. Heat in short bursts, checking often, until warm. You can freeze fajitas for up to three months. Pack the cooled fajita filling in freezer-safe bags. Squeeze out as much air as possible before sealing. When ready to eat, thaw in the fridge overnight. Reheat as mentioned above for a quick meal. Enjoy your oven-baked chicken fajitas anytime! Yes, you can use other meats like beef or shrimp. Chicken is great, but beef adds a nice taste. Shrimp cooks fast and is fun to eat. Just adjust cooking times for each type. To spice up your fajitas, add more seasoning. You can use more fajita seasoning or chili powder. Fresh jalapeños or hot sauce also work well. Start with small amounts to find your perfect heat level. Absolutely! You can slice the chicken and veggies a day before. Just store them in the fridge. This saves time and makes cooking easier. You can also mix the seasonings ahead. Toppings add fun to your fajitas! Some popular choices are sour cream, guacamole, and shredded cheese. Fresh cilantro adds a nice touch. You can also try salsa or diced tomatoes for extra flavor. Leftovers stay fresh in the fridge for three to four days. Make sure to store them in an airtight container. You can reheat them in the oven or on the stove for the best taste. This blog post detailed how to create tasty fajitas. You learned about key ingredients, seasonings, and optional toppings. I provided step-by-step instructions for baking and assembling your fajitas. Additionally, I shared tips for cooking evenly and enhancing flavor. The blog also covered storage, variations, and answers to common questions. Fajitas are fun to make and enjoy. Experiment with different proteins and toppings. With practice, you’ll master a dish that everyone loves. Get ready to impress your family and friends with your new skills!

Oven-Baked Chicken Fajitas Tasty and Simple Meal

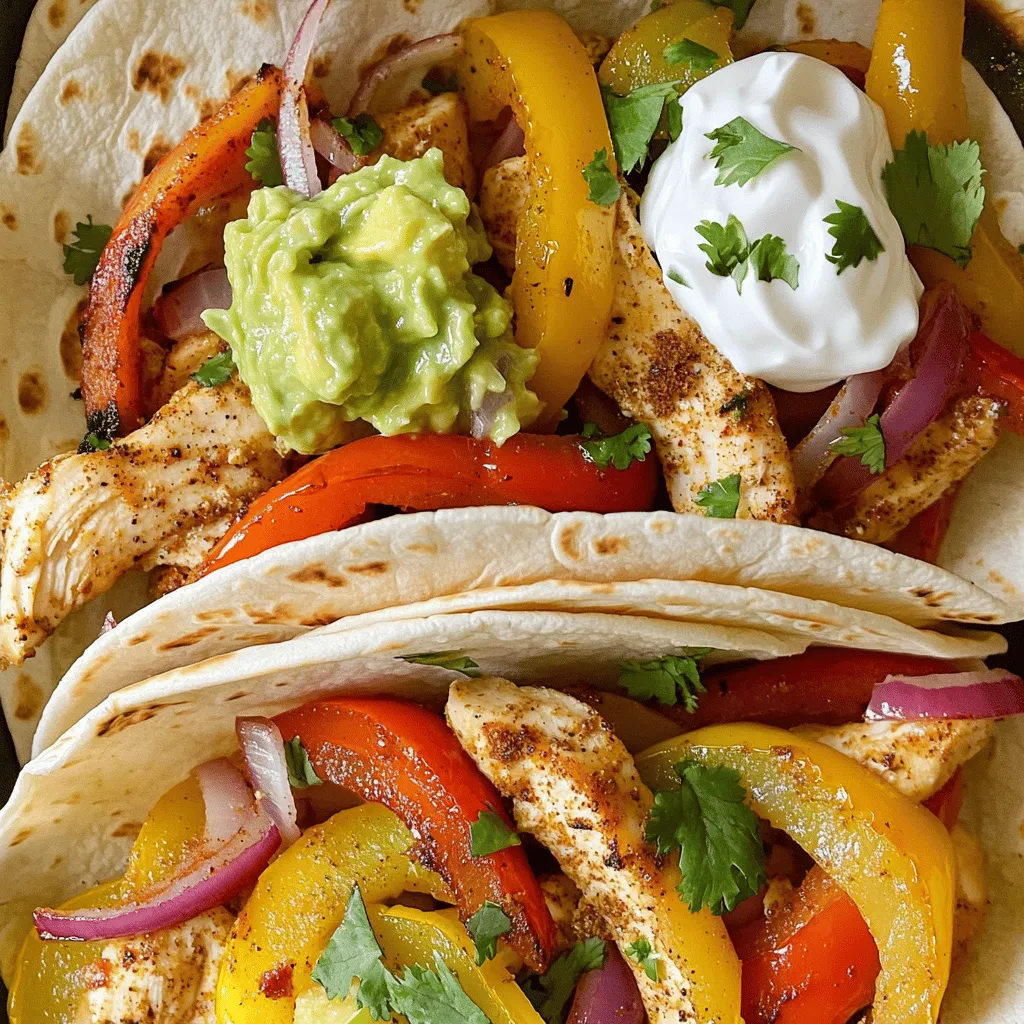
Are you ready for an easy and tasty dinner? Oven-Baked Chicken Fajitas combine spicy chicken, crisp veggies, and warm tortillas.

To make a tasty Mediterranean quinoa salad, you need fresh and vibrant ingredients. Here’s what you’ll need: - 1 cup quinoa, thoroughly rinsed - 2 cups vegetable broth or water - 1 cup cherry tomatoes, halved - 1 cucumber, diced into small cubes - 1 red bell pepper, diced - 1/2 red onion, finely chopped - 1/2 cup Kalamata olives, pitted and sliced - 1/2 cup feta cheese, crumbled - 1/4 cup fresh parsley, roughly chopped - 1/4 cup fresh mint, finely chopped - 3 tablespoons extra virgin olive oil - 2 tablespoons freshly squeezed lemon juice - 1 teaspoon dried oregano - Salt and freshly ground black pepper, to taste Each ingredient adds its own flavor and texture. Quinoa is a great base, rich in protein. The fresh veggies bring crunch. Feta gives a creamy touch, while olives add a salty bite. Don't forget the herbs! They make this dish bright and refreshing. Check out the Full Recipe for more details on how to combine these ingredients into a delightful salad. To start, you need to cook the quinoa. Combine 1 cup of rinsed quinoa with 2 cups of vegetable broth in a medium saucepan. Place it over medium heat and bring it to a vigorous boil. Once it boils, reduce the heat to low. Cover the saucepan and let it simmer for about 15 minutes. After this time, the quinoa should be fluffy and all the liquid absorbed. Remove it from the heat and keep it covered for an additional 5 minutes. Finally, fluff the quinoa gently with a fork to separate the grains. Once your quinoa cools, transfer it to a large bowl. You can speed up the cooling by stirring it occasionally. Now, add in your fresh ingredients. Toss in 1 cup of halved cherry tomatoes, 1 diced cucumber, 1 diced red bell pepper, and 1/2 finely chopped red onion. Don’t forget to add 1/2 cup of sliced Kalamata olives and 1/2 cup of crumbled feta cheese. Mix everything well so all the flavors blend together. Now, let’s make the dressing. In a small bowl, whisk together 3 tablespoons of extra virgin olive oil, 2 tablespoons of freshly squeezed lemon juice, 1 teaspoon of dried oregano, and a pinch of salt and pepper. This dressing adds a zesty kick to your salad. Drizzle it over the mixed salad ingredients and toss gently to coat everything evenly. This step brings together the freshness of the ingredients. For the full recipe, check out the details above. To make the best quinoa, rinse it well. Quinoa has a natural coating called saponins. This can taste bitter. Rinsing removes that coating. After cooking, let the quinoa cool. Cooling helps all the flavors mix well. Refrigerate your salad before serving. This step allows the flavors to meld beautifully. You can adjust the seasoning after mixing too. This way, you ensure the taste is just right for you. Serve the Mediterranean quinoa salad in a large, colorful bowl. This makes the dish look inviting. For an extra touch, garnish with more feta cheese and fresh herbs. The bright colors and textures will wow your guests. If you want to find the complete recipe, check the [Full Recipe]. {{image_4}} You can easily boost the protein in your Mediterranean quinoa salad. Grilled chicken or shrimp adds a tasty touch. They bring a savory flavor that pairs well with the fresh ingredients. If you prefer a vegetarian option, add chickpeas or any beans you like. They provide protein without meat. Both choices make your salad heartier and more satisfying. For those who need a dairy-free option, try using vegan feta. It keeps the creamy taste without the dairy. You can also swap quinoa for couscous or bulgur. Both grains cook quickly and absorb flavors well. This swap creates a different texture but keeps the salad delicious. You can make this salad unique by using seasonal vegetables. Try adding zucchini or colorful bell peppers during summer. They add crunch and freshness. In spring, fresh peas or asparagus work beautifully. Also, think about using different herbs based on what you have. Basil or dill can add a fun twist to your salad. Mixing in seasonal ingredients makes your salad feel fresh and exciting. For more ideas, check out the Full Recipe to get inspired! Store any leftovers in an airtight container. This keeps the salad fresh. Aim to eat it within 3-5 days for the best taste. The flavors will stay bright and enjoyable. If you want to save some for later, freeze it in portion-sized containers. This makes it easy to grab and go. When you're ready to eat, thaw it in the refrigerator. Before serving, refresh it with a bit of extra dressing. This will bring back the fresh taste. Enjoy your Mediterranean quinoa salad later with just a few simple steps! You can make Mediterranean quinoa salad vegan by replacing feta cheese. Use a dairy-free feta or tofu. Both options work well and keep the salad creamy and tasty. Yes, you can prepare the salad a few hours ahead. Making it early helps the flavors blend better. Just store it in the fridge until you are ready to serve. This salad pairs great with grilled meats or pita. You can also enjoy it as a light meal on its own. It is fresh and filling, making it perfect for lunch or dinner. In summary, we've explored the ingredients and steps to make a Mediterranean quinoa salad. You learned about cooking the quinoa, mixing in fresh veggies, and making a zesty dressing. I shared tips for enhancing flavor and presentation, plus ideas for variations and storage options. This salad is healthy and versatile. Whether you enjoy it solo or as a side, you can adapt it to fit your tastes. Enjoy creating this colorful and nutritious dish whenever you want something fresh and flavorful!

Mediterranean Quinoa Salad Fresh and Flavorful Dish

Looking for a fresh and tasty dish? This Mediterranean Quinoa Salad is just what you need! Packed with vibrant vegetables,

- Spinach - Artichoke Hearts - Garlic - Cream Cheese - Sour Cream - Mayonnaise - Mozzarella Cheese - Parmesan Cheese - Red Pepper Flakes - Salt and Pepper Fresh ingredients make the dip taste great. I love using spinach and artichoke hearts. Spinach adds a nice green color and a healthy punch. Canned artichoke hearts bring a unique taste that pairs well with spinach. Garlic is a must! It gives the dip a warm, savory flavor. Use fresh garlic for the best taste. It brings a richness that makes every bite special. For the creamy base, I use several dairy components. Cream cheese is the star here. It creates a smooth and lush texture. I mix in sour cream and mayonnaise for a tangy kick. Mozzarella cheese adds stretchiness while Parmesan cheese gives a salty bite. I often use a mix of both cheeses to balance flavors. Don’t forget the seasoning! A pinch of red pepper flakes gives a bit of heat. Adjust it to your taste. Salt and pepper are key for enhancing all the flavors. You can find the full recipe for this creamy delight below. - Preheat the Oven First, set your oven to 375°F (190°C). This heat level helps the dip bake evenly. - Make the Creamy Base In a large bowl, mix cream cheese, sour cream, and mayonnaise. Use a hand mixer or spoon. Blend until smooth and lump-free. - Combine Spinach and Artichokes Gently fold in chopped spinach and artichoke hearts. Add minced garlic and half the mozzarella and Parmesan cheese. Mix until well combined. - Season the Mixture Sprinkle in salt and pepper to taste. Be sure to taste as you season. This makes sure the flavors shine. - Transfer to Baking Dish Pour the creamy mixture into a greased baking dish. Spread it evenly with a spatula. - Baking Time and Temperature Bake for 20-25 minutes. Look for bubbling edges and melted cheese on top. This shows it's ready. This is just one part of crafting a delicious Spinach Artichoke Dip. For the full experience, check the Full Recipe. Balancing Seasonings To make your spinach artichoke dip shine, season it well. Start with salt and pepper to bring out the flavors. Taste as you go. If you like heat, add red pepper flakes. They give a nice kick without overpowering the dish. Choosing Fresh Ingredients Using fresh spinach and artichoke hearts makes a big difference. Fresh spinach adds a bright taste and vibrant color. If you use canned artichokes, drain them well. This keeps the dip from getting too watery. Mixing Techniques Mix the cream cheese, sour cream, and mayonnaise until smooth. Use a hand mixer for a creamy texture. Then, gently fold in the spinach and artichokes. This keeps the dip light and fluffy. Baking Tips for a Perfect Top For a golden top, sprinkle the remaining mozzarella and Parmesan cheese evenly. Bake until bubbly and golden brown. This will give you a nice crust that adds to the dip's flavor and looks great in a serving dish. Best Pairings Serve your dip hot with crunchy tortilla chips, toasted bread, or fresh veggie sticks. These add texture and make it fun to eat. You can also pair it with a light salad for a full meal. Presentation Tips Garnish your dip with a sprinkle of red pepper flakes or a few fresh spinach leaves. This adds color and makes it look appealing. Serve it in a nice dish to impress your guests. For a detailed guide, check the Full Recipe. {{image_4}} You can change the cheese in your dip to add new flavors. Try using gouda for a smoky touch or feta for a tangy twist. A blend of cheeses gives you a richer taste. For those who prefer a vegan option, swap cream cheese with cashew cheese or tofu. Nutritional yeast adds a cheesy flavor without dairy. Adding spices can make your dip stand out. Try garlic powder, onion powder, or paprika for extra flavor. Mixing in diced tomatoes or bell peppers gives a fresh crunch. These veggies not only taste great but also add color to your dish. If you want a lower-fat dip, use Greek yogurt instead of sour cream or mayonnaise. This choice keeps the creaminess while cutting calories. For gluten-free options, serve with rice crackers or veggie sticks instead of bread. These swaps let everyone enjoy the dip without worry. To keep your Spinach Artichoke Dip fresh, store any leftovers in an airtight container. Make sure the dip has cooled down before sealing it. Place it in the fridge. This will keep the flavors intact and the dip creamy. If you want to freeze the dip, use a freezer-safe container. Leave some space at the top, as the dip may expand. Wrap the container tightly with plastic wrap for extra protection. This way, you can enjoy it later! To reheat the dip, the oven is best. Preheat it to 350°F (175°C). Place the dip in an oven-safe dish. Cover it with foil to keep moisture in. Heat for about 15-20 minutes or until hot. Stir halfway through to ensure even heating. You can also use a microwave. Place the dip in a microwave-safe bowl. Heat it in short bursts, about 30 seconds at a time. Stir well between heating times. This helps keep the texture smooth and creamy. In the fridge, Spinach Artichoke Dip lasts about 3-5 days. Always check for signs of spoilage. If it smells off or has changed color, it's time to toss it. When frozen, the dip can last for about 2-3 months. After that, its quality may go down, even if it's safe to eat. To know if it’s spoiled, look for mold or a strange odor. Enjoy your creamy delight while it's at its best! To make this dip, gather your ingredients first. You will need fresh spinach, canned artichoke hearts, cream cheese, sour cream, mayonnaise, mozzarella cheese, Parmesan cheese, garlic, and seasoning. Mix cream cheese, sour cream, and mayonnaise in a bowl until smooth. Then, fold in the spinach, artichokes, garlic, and half of the cheeses. Add salt and pepper to taste. Transfer this mix to a baking dish, top with the remaining cheeses, and bake at 375°F for 20-25 minutes. For the full recipe, check out the details provided earlier. Yes, you can prepare this dip ahead of time. Make the dip as described and store it in the fridge. Just cover the dish tightly with plastic wrap. You can do this a day before your event. When you're ready, bake it straight from the fridge. Just be sure to add a few extra minutes to the baking time for even heating. This dip pairs well with several tasty options. Serve it with crispy toasted bread, crunchy tortilla chips, or fresh vegetable sticks, like carrots and bell peppers. You can also offer pita chips or crackers for a fun twist. Adding a garnish of red pepper flakes or fresh spinach leaves enhances its look and flavor. In this post, we explored how to make a delicious spinach artichoke dip. We covered fresh ingredients like spinach and artichokes, essential dairy components, and key seasonings. The step-by-step guide leads you from preparation to baking, ensuring you create the perfect creamy dip. I shared tips for flavor and texture, variations to try, and how to store leftovers. Enjoy your dip with great pairings, and remember, this tasty treat can always be customized. Now, get cooking and enjoy a flavorful dish that everyone will love!

Spinach Artichoke Dip Creamy and Flavorful Delight

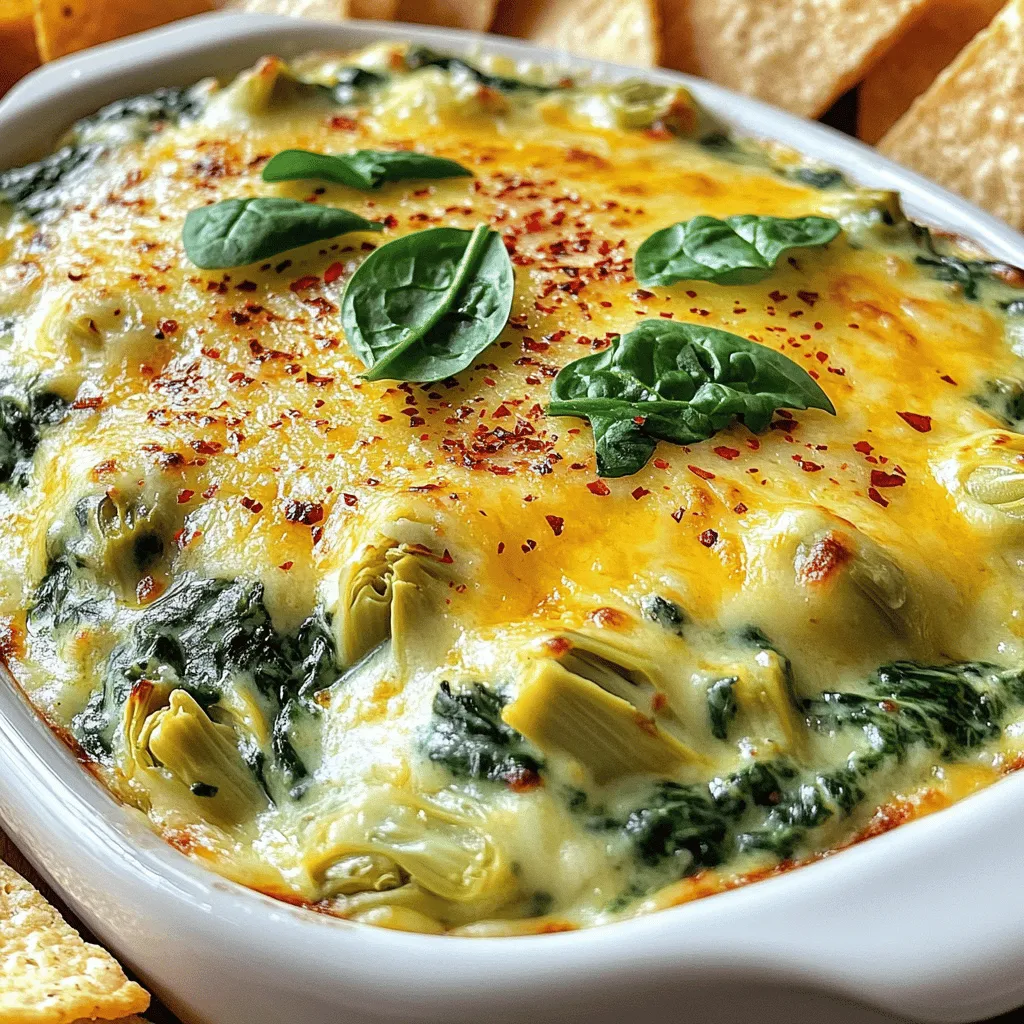
Are you ready to make a creamy and flavorful spinach artichoke dip that wows everyone? This tasty dish is perfect

- 2 medium sweet potatoes, peeled and diced into small cubes - 1 red bell pepper, diced into similar-sized pieces - 1 small yellow onion, finely diced - 2 cloves garlic, minced (about 2 teaspoons) - 2 tablespoons extra virgin olive oil - 1 teaspoon smoked paprika - ½ teaspoon ground cumin - Salt and freshly ground black pepper to taste - 4 large eggs - Fresh cilantro or parsley, chopped, for garnish - Sweet potatoes: Choose medium-sized ones for the right texture. - Bell pepper: Red adds sweetness and color. - Onion: A small onion gives a great base flavor. - Garlic: Fresh is best for strong taste. - Olive oil: Extra virgin provides rich flavor. - Spices: Smoked paprika adds depth, while cumin brings warmth. - Eggs: Fresh eggs enhance taste and nutrition. - Herbs: Cilantro or parsley brightens the dish. - Calories: Approximately 300 per serving - Protein: 12 grams - Carbohydrates: 40 grams - Dietary Fiber: 6 grams - Sugars: 6 grams - Fat: 12 grams - Saturated Fat: 2 grams This dish is not just tasty; it's packed with nutrients. Sweet potatoes offer fiber and vitamins, while eggs provide protein. Enjoy a balanced start to your day with this easy breakfast. For the full recipe, check the detailed instructions above. Start by gathering your ingredients. You need sweet potatoes, a red bell pepper, onion, garlic, and olive oil. Heat the olive oil in a large, non-stick skillet over medium heat. Make sure the oil gets hot, but don’t let it smoke. This will help the sweet potatoes cook evenly and get a nice color. Once your oil is hot, add the diced sweet potatoes to the skillet. Stir them gently to coat with oil. Cook for about 10-12 minutes. Stir every few minutes for even cooking. You want them soft and slightly caramelized for the best flavor. After the sweet potatoes are tender, add the diced onion and red bell pepper. Cook these for another 5 minutes. Stir often until all the vegetables are soft and golden. Now, it’s time to add the garlic, smoked paprika, and cumin. Stir these in and let them cook for about 2 minutes. This will bring out the flavors and make your kitchen smell amazing. Next, use a spoon to make four small wells in the vegetable mix. Crack an egg into each well. Be gentle to keep the yolks whole. Cover the skillet with a lid and turn the heat to low. Cook the eggs for 5-7 minutes. Check them to see if they are cooked to your liking. If you want runny yolks, watch them closely. Once done, take the skillet off the heat and let it sit for a minute. This helps all the flavors blend together. Before serving, sprinkle fresh cilantro or parsley on top for color and taste. For the complete recipe, check out the Full Recipe section. Enjoy your savory sweet potato hash with eggs! When cooking sweet potatoes, choose small cubes for even cooking. I find that sautéing them in a non-stick skillet works best. Use medium heat and wait until the oil is hot. This helps achieve a nice caramelized flavor without burning. Stir them often, about every few minutes, to avoid sticking and ensure they cook evenly. To cook the eggs just right, make small wells in your sweet potato hash. Crack an egg into each well gently. Cover the pan with a lid to trap the heat. This helps the eggs cook evenly. Keep an eye on them, as cooking time can vary. For runny yolks, cook for about 5 minutes. For firmer yolks, leave them for 7 minutes. To boost the flavor, add spices like smoked paprika and ground cumin. They bring warmth and depth to the dish. Fresh herbs like cilantro or parsley add brightness and color. For extra zest, consider a squeeze of lime juice before serving. This gives a fresh finish to your savory sweet potato hash with eggs. Check out the Full Recipe for more details! {{image_4}} You can easily make this dish vegetarian or vegan. For a vegetarian option, simply skip the eggs and add extra veggies. Spinach, kale, or mushrooms work great. If you want a vegan hash, replace the eggs with tofu. Just crumble firm tofu and sauté it until golden. It adds protein and keeps the dish hearty. Feel free to mix and match ingredients. If you don’t have sweet potatoes, regular potatoes work well. You can also swap the red bell pepper for green or yellow peppers. For spices, chili powder or onion powder can add a nice kick. Use any herbs you like to brighten it up. Toppings can make your hash even better. Try adding avocado slices for creaminess. A sprinkle of feta cheese or goat cheese adds tangy flavor. Fresh herbs like basil or dill can brighten the dish. Hot sauce is perfect if you enjoy some heat. These options keep your sweet potato hash fresh and exciting! After you enjoy your sweet potato hash, store the leftovers in an airtight container. Allow the dish to cool down before sealing it. This helps keep your hash fresh and tasty. Place it in the fridge for up to four days. If you need longer storage, consider freezing it. To reheat your sweet potato hash, use a skillet over medium heat. Add a splash of olive oil or a bit of water to prevent sticking. Stir often until heated through. This keeps the flavors bright and the texture nice. You can also use a microwave. Heat it in a bowl for about one to two minutes. Stir halfway for even heating. If you want to freeze your sweet potato hash, let it cool completely first. Use freezer-safe bags or containers. Divide it into portions for easy meals later. Label each bag with the date. This way, you can enjoy it within three months for the best taste. When ready to eat, thaw overnight in the fridge or use the microwave for a quicker option. Sweet potato hash keeps well in the fridge for about 3 to 5 days. Store it in an airtight container. Make sure to let it cool before sealing. This will help keep it fresh longer. Yes, you can make sweet potato hash ahead of time. Cook it, let it cool, and then store it in the fridge. You can enjoy it for breakfast or lunch later in the week. Just reheat it in a skillet or microwave. You can serve sweet potato hash with eggs alongside many delicious items. Some great options include: - Avocado slices for creaminess - Toast or crusty bread for crunch - Fresh fruit for a sweet touch - A side salad for freshness These pairings add flavor and texture to your meal! Check out the Full Recipe for more ideas. We covered how to make sweet potato hash, from gathering ingredients to cooking. You learned the right steps for each part and picked up tips for perfect flavor. I shared variations to suit different diets and explained how to store leftovers effectively. Sweet potato hash is versatile and fun to make. Explore new flavors, customize it, and enjoy it with your favorite sides! This dish is sure to become a staple in your kitchen.

Savory Sweet Potato Hash with Eggs Easy Breakfast Dish

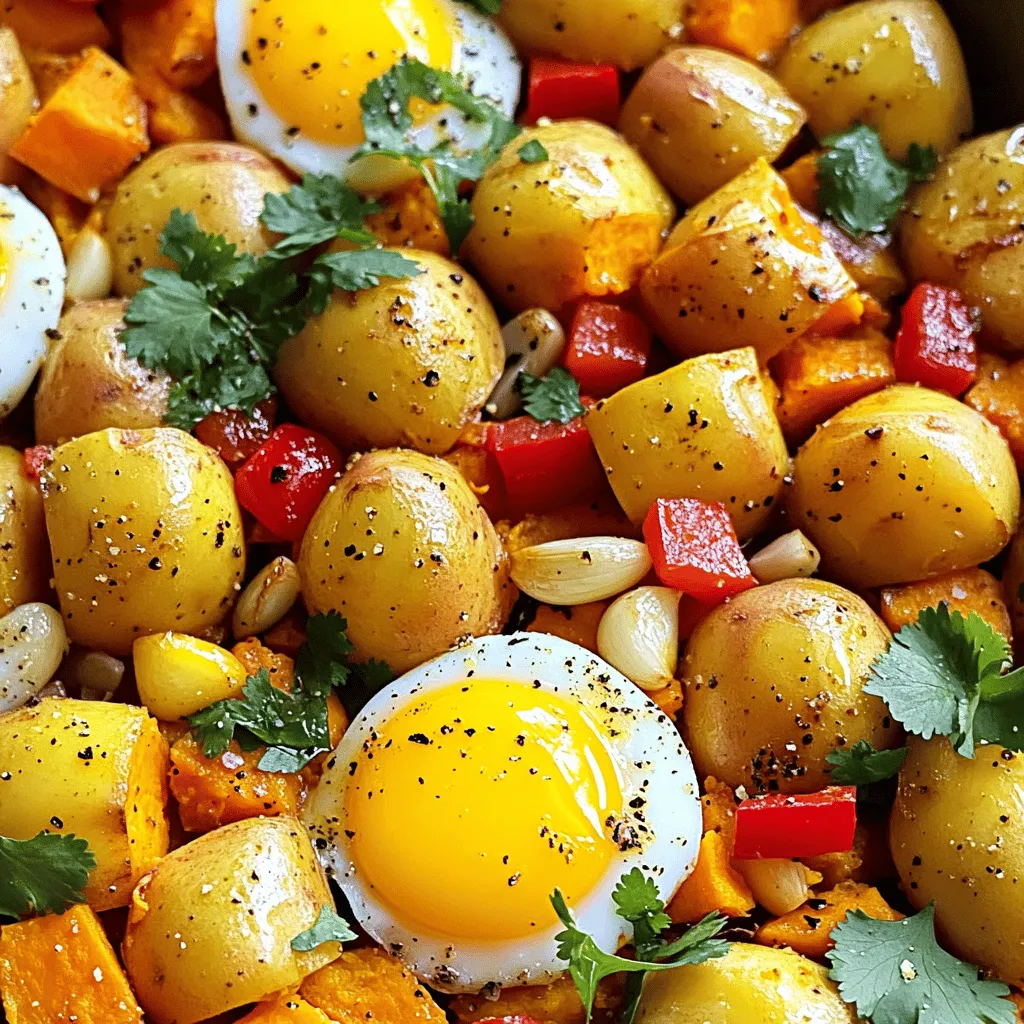
Start your day with a dish that’s both hearty and healthy: Sweet Potato Hash with Eggs! This easy breakfast recipe

- 1 can chickpeas (15 oz) - Fresh mixed greens (spinach, arugula, romaine) - Cherry tomatoes - Cucumber - Red onion - Optional: Feta cheese, parsley - Extra virgin olive oil - Smoked paprika - Garlic powder - Ground cumin - Sea salt and black pepper - Lemon juice You need fresh and simple ingredients to make this crispy chickpea salad. Start with a can of chickpeas, which gives you a great base. After draining and rinsing, these chickpeas become crispy stars of the dish. For greens, I love a mix of spinach, arugula, and romaine. They add a nice crunch and flavor. Cherry tomatoes bring sweetness and color, while cucumber adds crunch. Red onion gives it a bit of a kick. You can add feta cheese for creaminess and parsley for a fresh burst. Next, let’s talk about seasoning. Extra virgin olive oil makes everything smooth and rich. Smoked paprika adds depth, while garlic powder brings a nice warm flavor. Ground cumin gives an earthy note. Lastly, sea salt and black pepper enhance all these flavors. For dressing, you only need fresh lemon juice. It brightens everything up and ties the salad together. This simple mix of ingredients keeps it fresh and tasty. Check out the Full Recipe for detailed steps to bring this salad to life! - Preheat the oven: Start by heating your oven to 400°F (200°C). This step is key for crispiness. - Dry and season the chickpeas: Use paper towels to dry the chickpeas well. This helps them get crunchy. In a bowl, drizzle the olive oil over the chickpeas. - Roasting instructions: Add smoked paprika, garlic powder, cumin, salt, and pepper to the bowl. Toss until evenly coated. Spread the chickpeas on a baking sheet. Roast for 25-30 minutes, shaking the pan halfway through. Watch for a golden, crunchy finish. - Combine fresh salad ingredients: In a large bowl, mix fresh greens, halved cherry tomatoes, diced cucumber, and thinly sliced red onion. Gently toss to avoid bruising the greens. - Dress the salad with lemon juice: Drizzle fresh lemon juice over the salad. Use tongs to toss everything softly until the greens are bright and fresh. - Add crispy chickpeas to the salad: Once the chickpeas cool slightly, mix them into the salad. The warm, crispy chickpeas add a great texture. - Optionally sprinkle with feta and garnish: If you like, add crumbled feta cheese on top. Finish with fresh parsley for color. This adds a lovely touch to your dish. Enjoy your Crispy Chickpea Salad! For the full recipe, check the details above. To get the best crispy chickpeas, drying them is key. After rinsing, I always pat them dry with paper towels. Removing moisture helps them roast better. If they are wet, they won't get crunchy. Once dry, toss the chickpeas in olive oil and spices. I like to use smoked paprika, garlic powder, and cumin. Make sure each chickpea gets a good coating. This step adds tons of flavor. For roasting, I recommend a hot oven at 400°F (200°C). Spread the chickpeas on a baking sheet in a single layer. This helps them cook evenly. I shake the pan halfway through. It ensures they crisp up all around. Keep an eye on them to avoid burning. This salad pairs well with grilled chicken or fish. The flavors blend nicely, and the crunch stays intact. You can also serve it with pita bread for a fuller meal. To enhance the flavor, I love adding fresh herbs like cilantro or mint. They give a nice, bright note. You could also add sliced avocado for creaminess. For creamy dressings, try yogurt or tahini. They add richness and pair well with the chickpeas. A lemon-tahini dressing is a personal favorite of mine. It complements the salad's freshness. If you prefer vinaigrettes, a simple mix of olive oil and vinegar works great. Balsamic or red wine vinegar adds a nice tang. You can also mix in some honey for sweetness. Check out the full recipe for all the details on making this crispy chickpea salad. {{image_4}} If you want to shake things up, you can swap chickpeas for other legumes. Try black beans or lentils for a change. Each option brings its own flavor and texture. You can also switch greens and vegetables. Kale, romaine, or mixed baby greens work great. Bell peppers, carrots, or radishes can add extra crunch too. Experiment with different spices and herbs to change the taste. Try using curry powder for a warm twist. Fresh herbs like basil or cilantro can brighten the salad. You can also add fruits or nuts. Apples, pears, or dried cranberries add sweetness. Almonds or walnuts offer a nice crunch. Each addition gives your salad a unique flair. Incorporate seasonal ingredients for fresh flavors. In summer, add ripe peaches or sweet corn. In fall, consider roasted squash or apples. Adjust your salad based on dietary restrictions too. For gluten-free options, use quinoa or a different grain. This way, everyone can enjoy your crispy chickpea salad. You can find the full recipe in the earlier sections. To keep your crispy chickpea salad fresh, store it in an airtight container. This helps maintain the flavors. You can place it in the fridge for later enjoyment. To keep the chickpeas crispy, store them separately. This way, they won't get soggy. When you are ready to eat, mix them back in for a crunchy bite. Chickpeas can be reheated, but take care. Use the oven or air fryer for best results. Heat them at 350°F (175°C) for about 10 minutes. This will restore their crunch. To refresh the salad, add a bit of fresh lemon juice. This brightens the flavors and makes it taste fresh again. Expect your salad to last up to three days in the fridge. Always check for signs of spoilage. If you see any mold or if it smells off, discard it. Freshness is key for the best taste and safety. Enjoy your crispy chickpea salad while it’s at its best! For the full recipe, check out the Crispy Chickpea Salad 🥗. To make crispy chickpeas, follow these key points: - Dry the chickpeas well. Use paper towels to remove moisture. - Use enough oil. Drizzle two tablespoons of olive oil for crispiness. - Season well. Add spices like smoked paprika and garlic powder. - Roast at the right temperature. Set your oven to 400°F (200°C). - Shake the pan. Halfway through roasting, shake to ensure even crisping. These steps help achieve that perfect crunch you want in your salad. Crispy chickpeas add a delightful texture to your dish. You can prep the salad ahead but keep a few tips in mind: - Store chickpeas separately. This keeps them crunchy. - Mix greens and veggies just before serving. This prevents sogginess. - Dress the salad last. Wait to add lemon juice until you are ready to eat. By prepping this way, you can enjoy fresh flavors without losing texture. For a vegan version, consider these ingredient swaps: - Leave out the feta cheese. It can be omitted for a lighter taste. - Add avocado. This gives creaminess without dairy. - Use tahini dressing. This adds rich flavor and keeps it plant-based. These swaps maintain the taste and make the salad vegan-friendly. Explore your options for a delicious twist! This salad brings together simple, healthy ingredients for a tasty meal. You prepare crispy chickpeas, fresh greens, and a zesty lemon dressing. I’ve shared tips for making it great, variations to try, and how to store leftovers. Explore different flavors and ingredients to keep it exciting. You can adapt this recipe to fit any season or taste preference. Enjoy the crunch and freshness of each bite. Making salads like this can be both fun and rewarding.

Crispy Chickpea Salad Fresh and Flavorful Delight

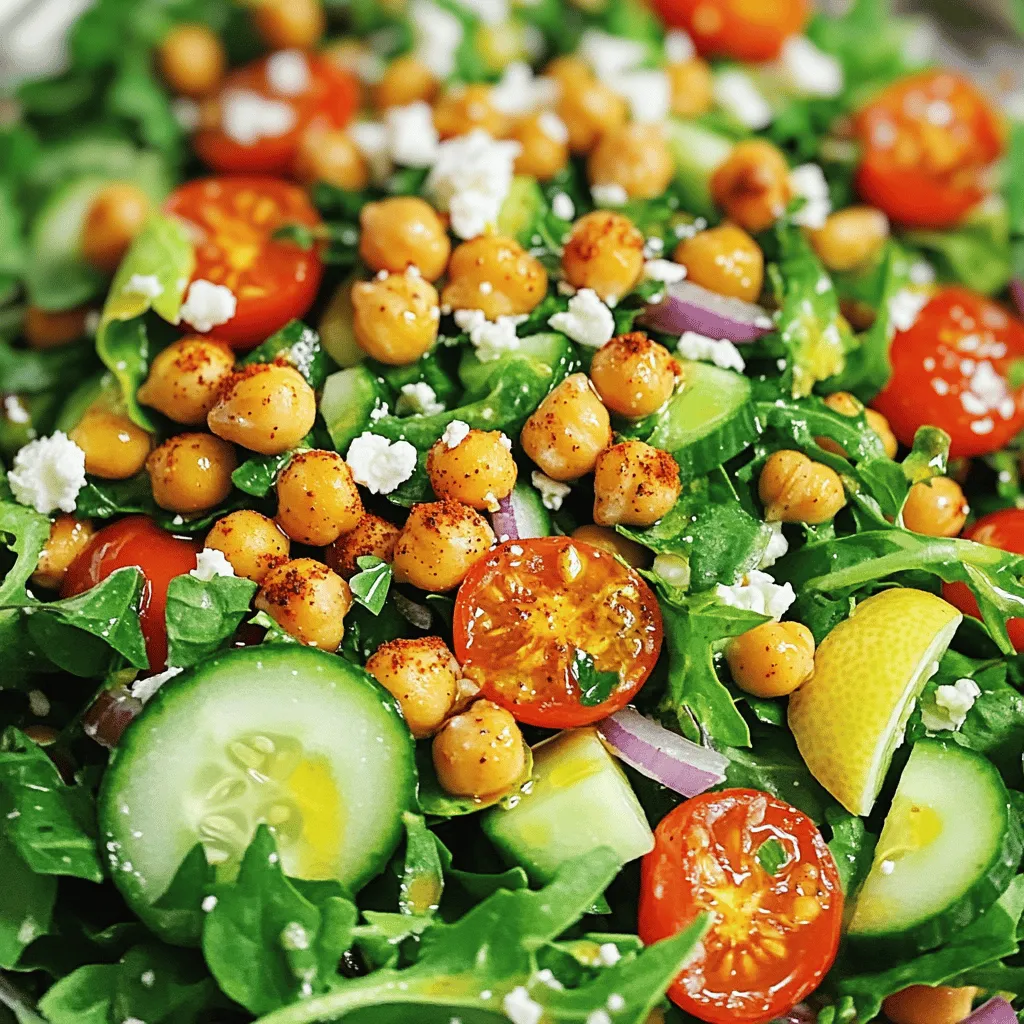
Want a fresh and tasty salad that’s easy to make? My Crispy Chickpea Salad is the perfect meal for any

Older posts
Newer posts
← Previous Page1 … Page61 Page62 Page63 … Page91 Next →

dsad

© 2025 recipesstation • Built with GeneratePress

Our Policies

  • Copyright Policy
  • Cookie Policy
  • GDPR Policy
  • Privacy Policy
  • Disclaimer
  • Terms Of Use

More Information

  • Home
  • About
  • Contact
  • Appetizers
  • Dessert
  • Dinner
  • Drinks
©2025, recipesstation About Back To Top