![- 1 cup rolled oats - 1/2 cup pumpkin puree - 1/4 cup almond butter (or your preferred nut butter) These main ingredients form the base of your bites. Rolled oats give a hearty texture. Pumpkin puree adds moisture and flavor. Almond butter provides healthy fats and protein. - 1/4 cup honey or maple syrup - 1 teaspoon pure vanilla extract - 1 teaspoon pumpkin spice - 1/4 teaspoon sea salt Sweeteners like honey or maple syrup add natural sweetness. Pure vanilla extract enhances the flavor profile. Pumpkin spice brings warmth, while sea salt balances the sweetness. - 1/2 cup mini chocolate chips (optional) - 1/4 cup chopped nuts (such as walnuts or pecans, optional) Adding mini chocolate chips gives a fun twist. Chopped nuts add crunch and extra nutrition. You can mix and match these add-ins to suit your taste. For the full recipe, check out the detailed steps to make these delicious bites! Start by taking a large mixing bowl. Combine the rolled oats, pumpkin puree, almond butter, and sweeteners. Use a spatula or spoon to stir until the mixture is smooth and well blended. This base is where all the magic begins. Next, incorporate the pumpkin spice and sea salt into the mix. Stir it well to ensure the flavors blend evenly. This step is key for creating that warm, cozy taste we love in pumpkin spice treats. You want a thick, sticky mixture that holds together nicely. Now, if you want to get creative, gently fold in any optional ingredients, like mini chocolate chips or chopped nuts. These add extra texture and flavor. Once mixed, use your hands to roll the mixture into small balls, about one inch in diameter. Arrange these energy bites on a baking sheet lined with parchment paper. This keeps them from sticking. After you shape all the bites, chill them in the refrigerator for about 30 minutes. This helps them firm up. Once chilled, you can store them in an airtight container. They stay fresh for up to one week. For the full recipe, be sure to check out the detailed instructions. To get the right texture for your pumpkin spice energy bites, you may need to adjust the mix. If your mixture feels too wet, add more rolled oats. If it seems too dry, mix in extra almond butter. Make sure to mix well so no clumps remain. You can tweak the flavors if you want. Try different spices like cinnamon or nutmeg for a twist. If you prefer a sweeter bite, swap honey for maple syrup. Experimenting with combinations can lead to fun and tasty surprises! Presentation matters! You can stack your energy bites in a colorful bowl. For a snack duo, pair them with a warm drink like tea or coffee. This way, you'll enjoy a delightful flavor journey. {{image_4}} You can make these energy bites fit your needs. If you want gluten-free options, use gluten-free oats. You can find these at most grocery stores. For nut-free bites, replace almond butter with sunflower seed butter. This swap keeps the flavor while avoiding nuts. Feel free to get creative with flavors. You can add seasonal spices like ginger or allspice for a twist. Dried fruits like cranberries or raisins also add a sweet touch. Seeds like chia or flax can boost nutrition. They add crunch and are packed with health benefits. If you follow a vegan diet, swap honey with maple syrup for sweetness. For low-sugar options, use a sugar substitute like stevia or erythritol. You can also reduce the amount of sweeteners in the recipe. This helps maintain flavor while cutting down on sugar. To make the most of your Pumpkin Spice Energy Bites, check the [Full Recipe]. To keep your Pumpkin Spice Energy Bites fresh, store them in the refrigerator. Use an airtight container to prevent moisture from getting in. This helps maintain their flavor and texture. A simple plastic or glass container works well. If you want to save some for later, freezing is a great option. To freeze them, place the energy bites in a single layer on a baking sheet. Once they are frozen solid, transfer them to a freezer-safe bag or container. This prevents them from sticking together. They will stay fresh for up to three months in the freezer. In the refrigerator, these energy bites last about one week. After that, they can start to lose their taste. Look out for signs of spoilage. If you see any mold or a change in smell, it's best to toss them. If you notice a slimy texture, that’s also a sign they are no longer good. Always check before you indulge in these tasty bites. For the best freshness, use airtight containers. They keep out air and moisture. You can find many options at your local store. Look for BPA-free plastic or glass containers. If you're eco-conscious, consider using glass jars. They are reusable and reduce waste. Another option is to use silicone bags. They are great for snacks and help the planet too. Pumpkin Spice Energy Bites last up to one week in the fridge. Store them in an airtight container to keep them fresh. If you want to save some for later, you can freeze them. They last about three months in the freezer. Just thaw them in the fridge before enjoying. Yes, you can! If you don’t have pumpkin puree, use applesauce or mashed bananas. Both options give a nice sweetness and moisture. For a different flavor, try using sweet potato puree. Each option will change the taste slightly, but they will still work well. Absolutely! These energy bites are packed with good ingredients. Rolled oats provide fiber and energy. Pumpkin puree is full of vitamins A and C. Almond butter adds healthy fats and protein. Just be mindful of your serving size. Two bites are a great snack to keep you energized without overdoing it. In this post, I covered how to make Pumpkin Spice Energy Bites. We discussed key ingredients like oats, pumpkin puree, and almond butter. I shared tips for mixing the base and enhancing flavors. You learned how to shape the bites and customize them for different tastes or diets. These treats not only taste great but also pack nutrition. With easy steps and simple ingredients, anyone can make them. Enjoy these energy bites as a quick snack or dessert. Experiment with variations and make them your own!](https://recipesstation.com/wp-content/uploads/2025/05/c8df38eb-7533-45cf-8d82-29bd4cf3afaa.webp)
Pumpkin Spice Energy Bites Tasty and Healthy Snack
Love pumpkin spice? You’re in for a treat! These Pumpkin Spice Energy Bites pack a delicious flavor punch while keeping
Love pumpkin spice? You’re in for a treat! These Pumpkin Spice Energy Bites pack a delicious flavor punch while keeping

Looking for a light and fresh dish that’s bursting with flavor? Spaghetti Squash Primavera is your answer! This delightful meal
![- 4 medium green tomatoes - 1 cup all-purpose flour - 1 cup cornmeal - 2 large eggs, beaten To make fried green tomatoes, start with firm green tomatoes. They should be bright and slightly firm. Slice them into 1/2-inch thick rounds for the best texture. - 1 teaspoon paprika - 1 teaspoon garlic powder - 1/2 teaspoon cayenne pepper - 1 teaspoon salt - 1/2 teaspoon black pepper Seasoning is key for flavor. Use paprika for a warm taste. Garlic powder adds depth. If you like spice, add cayenne pepper. Salt and black pepper will enhance all the flavors. - 1/2 cup mayonnaise - 2 tablespoons Dijon mustard - 1 tablespoon capers - 1 tablespoon pickles - 1 teaspoon fresh lemon juice The zesty remoulade is a must-have for dipping. Mix mayonnaise with Dijon mustard for creaminess. Add minced capers and pickles for tang. Lemon juice brightens up the sauce. This dip pairs perfectly with the crispy tomatoes. For the complete recipe, please refer to the [Full Recipe]. Washing and Slicing the Tomatoes Start by washing the green tomatoes under cool water. Use a gentle scrub to remove dirt. Next, slice them into 1/2-inch thick rounds. Make sure each slice is even for best cooking. Patting Dry for Optimal Frying After slicing, use a paper towel to pat each slice dry. This step helps keep the tomatoes from getting soggy. Dry slices will fry up crisp and golden. Setting Up the Breading Station You need three bowls for the breading process. In the first bowl, mix 1 cup of flour, 1 teaspoon of paprika, 1 teaspoon of garlic powder, 1/2 teaspoon of cayenne pepper, 1 teaspoon of salt, and 1/2 teaspoon of black pepper. In the second bowl, beat 2 large eggs. Put 1 cup of cornmeal in the third bowl for the final coating. Dredging and Coating Steps Take each tomato slice and dredge it in the flour mix first. Shake off any extra flour. Next, dip it in the beaten eggs, letting the excess drip off. Finally, coat the slice in cornmeal. Press down gently to ensure it sticks well. Heating the Oil Pour about 1/4 inch of vegetable oil into a large skillet. Heat the oil over medium-high heat. You will know it’s ready when it shimmers. Cooking Time and Technique Add the breaded tomato slices in batches. Don’t overcrowd the pan. Fry each slice for about 3-4 minutes on each side. They should turn golden brown and crispy. Drain and Cool Once fried, transfer the tomatoes to a plate lined with paper towels. This helps absorb any extra oil. Let them cool slightly before serving. Enjoy your crispy fried green tomatoes with zesty remoulade from the Full Recipe! When you pick green tomatoes, look for ones that are firm and shiny. These signs mean they are fresh and ready for frying. Avoid tomatoes with soft spots or wrinkles, as they may not fry well. Ripeness is key. Green tomatoes should be mostly firm, with a slight give when pressed. If they are too hard, they may be tough to bite into. A perfect green tomato has a bright color and a smooth skin. To get crispy fried green tomatoes, you must dry them well. After slicing, pat each tomato round with a paper towel. Removing moisture helps the coating stick and fry properly. Keep an eye on your oil's temperature. Heat the oil until it shimmers, but don’t let it smoke. If the oil is too hot, the outside will burn while the inside remains raw. A medium-high heat works best for even frying. You can add fun flavors with different seasonings. Try Italian herbs like oregano or basil for a twist. Adding some cheese to the cornmeal can make it special too. For dipping sauces, a zesty remoulade pairs well with fried green tomatoes. You can also use ranch or a spicy aioli for more variety. Each sauce adds a unique flavor that enhances your meal. {{image_4}} You can serve fried green tomatoes in many fun ways. One great option is to pair them with different dipping sauces. A zesty remoulade adds a tangy kick. You might also try ranch dressing or a spicy aioli for extra flavor. Adding cheese is another tasty idea. Crumbled feta or sharp cheddar can enhance the dish. You can place the cheese on top of the tomatoes right after frying. It will melt slightly and add a creamy touch. If you want a healthier option, try oven-baking your fried green tomatoes. Preheat your oven to 425°F (220°C). Place the breaded tomato slices on a baking sheet lined with parchment paper. Spray them lightly with cooking oil. Bake for about 20-25 minutes until golden and crispy. The air fryer is another great choice. It cooks the tomatoes quickly and uses less oil. Set your air fryer to 400°F (200°C). Cook the slices in a single layer for about 10-12 minutes, flipping halfway through. You’ll get a crunchy texture without deep frying! Fried green tomatoes have many regional adaptations. In the South, they are a classic side dish. You might find them served with shrimp and grits. In other areas, people enjoy them as a topping on sandwiches. International takes on fried green tomatoes can be exciting too. In Italy, a similar dish uses green eggplants. They slice and fry them, serving them with marinara sauce. In Mexico, they might use green tomatillos for a tangy twist. Feel free to mix and match these ideas. Experiment with flavors and cooking methods to find your favorite version of this crispy delight. For a full recipe, check out the Crispy Fried Green Tomatoes with Zesty Remoulade! To keep your fried green tomatoes fresh, follow these steps: - Best Practices for Refrigeration: Place them in an airtight container. This keeps out moisture and air. Line the bottom with paper towels to absorb extra oil. Store them in the fridge for up to three days. - Freezing Instructions for Longer Storage: If you want to save them longer, freeze the tomatoes. First, cool them completely. Then, lay them on a baking sheet in a single layer. Freeze for about two hours. After they are firm, transfer them to a freezer bag. They can last up to three months in the freezer. When you're ready to enjoy your tasty leftovers, use these methods: - Oven: Preheat your oven to 375°F (190°C). Place the tomatoes on a baking sheet. Bake for about 10-15 minutes, until they are hot and crispy again. - Microwave: This method is quick but can make them soft. Place the tomatoes on a microwave-safe plate. Heat in 30-second intervals until warm. - Air Fryer: For a crispy finish, use the air fryer. Preheat it to 350°F (175°C). Place the tomatoes in a single layer and cook for about 5-7 minutes. This keeps them crispy and delicious. Enjoy your crispy fried green tomatoes with the zesty remoulade from the Full Recipe. Fried green tomatoes are slices of unripe tomatoes, coated and fried until crispy. This dish has roots in Southern cuisine. It gained fame from the book and film “Fried Green Tomatoes at the Whistle Stop Cafe.” People have enjoyed this dish for over a century. It showcases the unique tartness of green tomatoes. The crispy texture and zesty flavors make it a favorite for many. You can use ripe tomatoes, but the flavor differs. Ripe tomatoes are sweet and juicy. They may not hold their shape as well when fried. Green tomatoes are firmer and less sweet. This firmness gives the dish a crisp bite. For the best results, stick with green tomatoes. Their tangy taste pairs perfectly with the crunch from frying. The best oil for frying has a high smoke point. Vegetable oil, canola oil, and peanut oil are great choices. These oils can handle high heat without burning. They also have a neutral flavor, letting the tomatoes shine. Avoid using olive oil, as it burns at low temperatures. Choosing the right oil is key for perfectly fried green tomatoes. To make fried green tomatoes healthier, try baking them. You can use an air fryer for a crisp result with less oil. Instead of all-purpose flour, use whole wheat flour for more fiber. You can also cut back on the salt in the breading. Serve with a light dipping sauce made from Greek yogurt instead of mayonnaise. These changes can keep the flavor while making it a bit lighter. Fried green tomatoes combine simple ingredients for a tasty dish. You learned about selecting ripe tomatoes, breading, and frying techniques. We explored variations and how to store leftovers. Each step builds flavor and texture, making your meal memorable. Enjoy this dish with your favorite dipping sauce or try a new twist. Fried green tomatoes bring comfort and joy to the table. Dive into this classic recipe and make it your own!](https://recipesstation.com/wp-content/uploads/2025/05/9cb20dc4-d820-45ae-bd18-c0d7961592d6.webp)
Fried green tomatoes are a true Southern delight, combining crunch with tangy flavor. In this guide, I’ll show you how

S’mores Dip is the perfect dessert for any gathering! This warm, gooey treat combines rich chocolate, sweet marshmallows, and crunchy
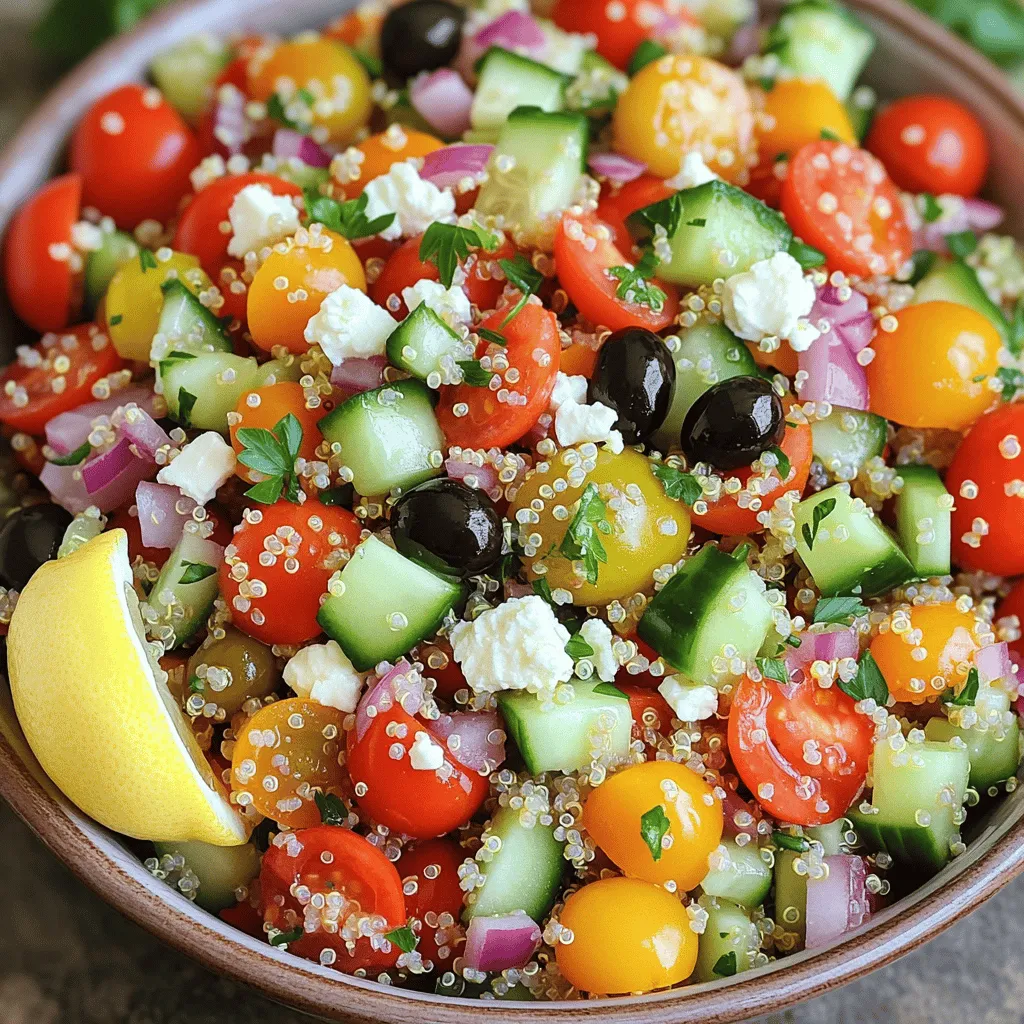
Looking to brighten your meals with a fresh twist? This Mediterranean Quinoa Salad is the perfect answer! Packed with vibrant

Looking for a tasty and healthy breakfast option? I’ve got you covered with my simple Chickpea Flour Pancakes recipe! Made

Looking for a meal that’s both bold and flavorful? Coconut Curry Lentils hit the spot! They are quick to make
![- 1 can (15 oz) chickpeas, drained and thoroughly rinsed - 1 large roasted red pepper (store-bought jarred or homemade) - 2 tablespoons tahini (sesame paste) Chickpeas are the heart of hummus. They give it a nice creamy texture. The roasted red pepper adds a sweet and smoky flavor. Tahini brings a rich, nutty taste that balances the dish. - 1 clove garlic, finely minced - 1 tablespoon fresh lemon juice - 1/2 teaspoon ground cumin - 1/2 teaspoon smoked paprika - Salt, to taste Garlic gives the hummus a punchy flavor. Lemon juice brightens the dish and adds freshness. Cumin and smoked paprika add warmth and depth. A pinch of salt helps to bring all the flavors together. - 2 tablespoons extra virgin olive oil - Fresh parsley, finely chopped for garnish - Pita chips or assorted vegetable sticks (carrots, cucumbers, bell peppers) for serving A drizzle of olive oil makes the hummus shine and adds richness. Fresh parsley not only looks great but also adds a fresh taste. Serve with pita chips or veggie sticks for a fun and healthy dip. For the full recipe, check out the details above. - Drain and Rinse Chickpeas: Start with one can of chickpeas. Drain them and rinse under cold water. This step helps remove excess sodium and improves the flavor. - Roast Red Pepper if Homemade: If you want to make your own roasted red pepper, you can do this easily. Cut the pepper in half and remove the seeds. Place it skin-side up on a baking sheet. Broil it in your oven until the skin is blackened. Let it cool, then peel off the skin. - Combine in Food Processor: In your food processor, add the rinsed chickpeas, roasted red pepper, tahini, olive oil, minced garlic, lemon juice, ground cumin, smoked paprika, and a pinch of salt. - Achieving Smooth Consistency: Blend all these ingredients until they form a creamy mixture. If the hummus is too thick, slowly add water. Start with one tablespoon at a time. Blend again until smooth and creamy. - Adjust Seasoning: Once blended, taste the hummus. If it needs more flavor, add a bit more salt or lemon juice. Blend again for a few seconds to mix in any new flavors. - Transfer and Garnish: Carefully scoop the hummus into a serving bowl. Drizzle some extra virgin olive oil on top. Sprinkle finely chopped parsley for a fresh look. Serve it with pita chips or colorful veggie sticks. For the complete recipe, check the [Full Recipe]. How to Adjust Thickness To get your hummus just right, start with the right amount of water. If the mix is too thick, add water slowly. Use one tablespoon at a time. Blend after each addition. This way, you control the thickness. You want a smooth, creamy dip that is easy to scoop. Common Mistakes to Avoid Avoid over-blending your hummus; it can become too airy. Also, don't skip the water if the mix is thick. Adding too much salt at once can ruin the flavor. Taste as you go, and adjust in small amounts. Popular Additions Try adding a pinch of chili flakes for some heat. You can also mix in fresh herbs like basil or cilantro. These will brighten the flavors. A splash of balsamic vinegar can add a sweet touch. Olive oil can also enhance the taste and creaminess. Balancing Flavor Profiles Balance is key in hummus. If it tastes too lemony, add a bit more tahini. If it is bland, a touch more salt will help. Always remember to taste as you mix. Adjust flavors until it feels just right. Serving Style Suggestions Serve your hummus in a shallow bowl for a nice look. Drizzle olive oil on top to make it shine. Place colorful vegetable sticks or pita chips around the bowl. This creates a fun, inviting display for your guests. Creative Garnishing Ideas Garnish with fresh parsley or paprika for color. You can also add a few whole chickpeas on top. For a twist, sprinkle some roasted nuts for crunch. These small touches make your hummus eye-catching and delicious. For the full recipe, check out Roasted Red Pepper Hummus Bliss! {{image_4}} You can easily change the heat level of your hummus. If you love spice, add chili flakes or jalapeños. Start small and blend well. Taste it and decide if you want more heat. For a fresh twist, add herbs like basil or cilantro. A splash of citrus, like lime or orange juice, brightens the flavor. This adds zest without overpowering the dip. Not all kitchens have the same items. You can replace tahini with sunflower seed butter. This gives a nut-free option that tastes great. If you want a different bean, try black beans or white beans instead of chickpeas. Both options create unique flavors. Each choice brings its own charm to the mix. Hummus is not just a dip. You can create hummus bowls for a fun meal. Top with sliced veggies, olives, or seeds. Try it as a spread for sandwiches or wraps. It adds creaminess and flavor. You can also use it as a base for grain bowls. The options are endless! For a detailed recipe, check out the Full Recipe. To keep your roasted red pepper hummus fresh, store it in airtight containers. This prevents air from getting in and keeps it smooth. Use a clean spoon to scoop out hummus. This will help avoid any bacteria from spoiling your dip. Refrigeration is key. Make sure your fridge is set to a cool temperature. Store the hummus in the back of the fridge, where it’s coldest. This way, it stays fresh for longer. In the refrigerator, your roasted red pepper hummus lasts about four to five days. If you want to save it for later, freezing is a great option. When you freeze it, it can last up to three months. Just make sure to use a freezer-safe container. When you're ready to enjoy the hummus again, thaw it overnight in the fridge. This slow method helps keep its creamy texture. Once thawed, mix it well. You might need to add a bit of water to restore its smoothness. This makes it just as good as when you first made it. Enjoy your delicious dip with pita chips or veggie sticks! Roasted red pepper hummus is a creamy dip made from chickpeas, tahini, and roasted red peppers. This dip has a rich, smoky flavor that makes it a crowd-pleaser. You can enjoy it with pita chips or fresh veggies. It’s a great snack or appetizer for any gathering. To add some heat, try these tips: - Mix in a few chili flakes. - Add diced jalapeños for a fresh kick. - Use harissa paste for a bold flavor. Start with a small amount and taste as you go. This way, you find the right level of spice for you. Yes, roasted red pepper hummus is quite healthy. It contains chickpeas, which are high in protein and fiber. Tahini adds healthy fats, while red peppers provide vitamins A and C. It is a nutritious option for snacks or meals. Just watch the amount of olive oil and salt you add to keep it healthy. Roasted red pepper hummus combines simple ingredients for a rich flavor. You learned how to prepare, blend, and garnish it. You discovered tips for perfecting the texture and enhancing flavor. Variations keep it exciting, from spice adjustments to different beans and fun serving ideas. Storing hummus is straightforward, ensuring you enjoy it longer. With creativity and practice, this dish can become a staple in your kitchen. Now, it’s time to enjoy this tasty, healthy snack!](https://recipesstation.com/wp-content/uploads/2025/05/155c7ff6-b813-4ca0-85a8-4a5b85024fe2.webp)
Are you ready to elevate your snacking game? This Roasted Red Pepper Hummus brings creamy, bold flavors to your table.

Looking for a delicious dish that’s simple to make? You’re in the right place! My Cheesy Cauliflower Bake is not
![To make this dish, you need: - 4 boneless, skinless chicken breasts - 1/4 cup extra virgin olive oil - Zest and juice of 2 fresh lemons - 4 cloves of garlic, minced - 2 tablespoons fresh rosemary, finely chopped - 2 tablespoons fresh thyme, finely chopped - 1 teaspoon sea salt - 1/2 teaspoon freshly cracked black pepper You can add a touch of sweetness with: - 1 teaspoon honey Fresh parsley is great for garnish. It adds color and flavor. The marinade is the star here. It includes: - Olive oil for richness - Lemon zest and juice for tang - Garlic for depth - Rosemary and thyme for herbal notes - Sea salt and black pepper for seasoning Mix these ingredients well to form a fragrant marinade. This is key to getting that juicy and flavorful grilled chicken. You can find the full recipe in the article for step-by-step guidance. To start, gather all your ingredients. In a large bowl, mix together the olive oil, lemon zest, and lemon juice. Add the minced garlic, chopped rosemary, and thyme. Then, sprinkle in the sea salt and black pepper. If you like a hint of sweetness, add honey. Whisk it all together. This will be your marinade—a bright and flavorful blend. Now, take your chicken breasts and place them in a zip-top bag or a shallow dish. Pour the marinade over the chicken. Make sure each piece is well-coated. Seal the bag or cover the dish with plastic wrap. Refrigerate for at least 30 minutes. For the best flavor, let it marinate for up to 4 hours. Preheat your grill to medium-high heat, around 375°F to 450°F. Remove the chicken from the marinade and let the excess drip off. Arrange the chicken on the grill, but don’t overcrowd it. Grill one side for 6-7 minutes without moving it. Flip the chicken and grill the other side for another 6-7 minutes. Check the internal temperature; it should reach 165°F to be safe. Once done, take the chicken off the grill. Let it rest for about 5 minutes on a cutting board. This helps keep it juicy. Before serving, sprinkle fresh parsley on top for color and flavor. Pair the grilled chicken with roasted vegetables or a fresh garden salad for a delightful meal. For the full recipe, check out the complete instructions above. For the best flavor, always start with fresh herbs. Fresh herbs make a big difference. I recommend using rosemary and thyme for this dish. Mix your marinade well. Ensure all the flavors blend. Let the chicken marinate for at least 30 minutes. For stronger flavor, go for 4 hours. The longer, the better! Keep the chicken in the fridge while it marinates. This keeps it safe and helps the flavors soak in. Grilling at the right temperature is key. Preheat your grill to medium-high heat, around 375°F to 450°F. This gives you nice grill marks. Cook the chicken for 6-7 minutes on each side. Do not flip too soon; let it sear. Check the internal temperature with a meat thermometer. It should reach 165°F for safety. To keep your chicken juicy, let it rest after grilling. Let it sit for about 5 minutes. This helps the juices redistribute. Avoid cutting it right away. Also, don’t overcrowd the grill. Space the chicken well for even cooking. If you follow these tips, your chicken will turn out flavorful and juicy every time. For the full recipe, check out the [Full Recipe]. {{image_4}} You can change the flavor by using different herbs. Fresh basil adds a sweet touch. Oregano gives a robust taste. Chives add a mild onion flavor. Mix and match to find your favorite blend. Each herb brings its unique flavor, so experiment! If you want a change from chicken, try other proteins. Turkey works great with this marinade. Fish like salmon or tilapia also absorbs the zesty flavors well. For a vegetarian option, use firm tofu. Marinate it just like the chicken for tasty results. This recipe is gluten-free by nature. Use gluten-free soy sauce if you want a salty kick. Avoid sauces with wheat. Always check labels to ensure all ingredients are safe. Enjoy a delicious meal without worry! For the full recipe, visit the link above. After enjoying your Lemon Herb Grilled Chicken, store any leftovers right away. Place the chicken in an airtight container. This keeps it fresh and safe. You can store it in the fridge for up to four days. If you have a lot, divide it into smaller portions for easy meals later. To reheat your chicken, preheat your oven to 350°F (175°C). Place the chicken on a baking sheet. Cover it with foil to keep it moist. Heat for about 15-20 minutes or until warm. You can also microwave it. Just place the chicken on a plate and cover it with a damp paper towel. Heat for 1-2 minutes, checking to avoid overcooking. If you want to save the chicken for later, freezing is great. First, let it cool completely. Wrap each piece in plastic wrap, then place it in a freezer bag. Label the bag with the date. Frozen chicken will stay good for up to three months. To thaw, move it to the fridge overnight before reheating. For best results, use the chicken within three months. You can find all these tips and more in the Full Recipe. You should marinate the chicken for at least 30 minutes. For a stronger flavor, try marinating for up to 4 hours. This time allows the chicken to soak up the lemon and herb flavors. If you’re tight on time, don’t worry. Even a short marinade will still taste great. Yes, you can bake the chicken if grilling isn't an option. Preheat your oven to 400°F (200°C). Place the marinated chicken on a baking sheet. Bake for 20-25 minutes or until it reaches 165°F (75°C) inside. Baking gives you juicy chicken, but grilling adds those lovely char marks and smoky flavor. You can serve it with many sides. Roasted seasonal vegetables add color and nutrition. A fresh garden salad pairs well too, enhancing the zesty flavors. You might also consider serving it with quinoa or rice for a hearty meal. The best way to check is by using a meat thermometer. Insert it into the thickest part of the chicken. It should read 165°F (75°C) for safe eating. If you don’t have a thermometer, look for clear juices and no pink meat. For the full recipe, check out the details above. Enjoy your cooking! Lemon herb grilled chicken is a flavorful dish you can make easily. We explored key ingredients like marinade and grilling tips. I shared ideas for variations and ways to store leftovers. Remember, the right marinade and grilling time make all the difference. Enjoy experimenting with different herbs and proteins for tasty twists. Cook smart, store well, and you’ll always have a winning meal.](https://recipesstation.com/wp-content/uploads/2025/05/ad3ca8f8-5192-4930-be37-4e53aeb47cdb.webp)
Are you ready to add a zesty twist to your next meal? My Lemon Herb Grilled Chicken is bursting with
