![- 1 cup water - 2 tablespoons granulated sugar - 1/2 teaspoon salt - 1/4 cup unsalted butter, cut into pieces - 1 cup all-purpose flour - 2 large eggs, lightly beaten - 2 teaspoons vanilla extract - Oil for frying (vegetable or canola) - 1/2 cup granulated sugar (for coating) - 1 tablespoon ground cinnamon - Medium saucepan - Wooden spoon - Piping bag with star tip - Deep fryer or heavy-bottomed pot - For a dairy-free option, use margarine instead of butter. - You can try gluten-free flour for a gluten-free version. Look for one-to-one flour blends. To make churro dough, first, boil water, sugar, salt, and butter. Use a medium saucepan for this. Heat the mixture on medium until it boils. Once it is boiling, remove the pan from heat. Add all the flour at once. Stir with a wooden spoon until you form a ball. The dough should pull away from the sides of the pan. This takes about 1-2 minutes. Let the dough cool for a few minutes. It should be warm but not hot. Next, add the eggs and vanilla extract. Add them one at a time. Mix well after each addition. You want the dough to be smooth and fully combined. Now it’s time to fry the churros. Heat oil in a deep fryer or heavy pot. The oil should reach 375°F (190°C). You need enough oil to cover the churros. Prepare a piping bag with a large star tip. Pipe 6-inch strips of dough into the hot oil. Use scissors to cut them off. Fry a few churros at a time. This helps them cook evenly. Fry for 2-3 minutes on each side until they turn golden brown. Once done, use a slotted spoon to take them out. Place them on a plate lined with paper towels. This lets excess oil drain away. While churros are still warm, roll them in cinnamon sugar. In a shallow bowl, mix sugar with ground cinnamon. Coat each churro until it shines. Serve your churros warm. They taste great with chocolate sauce or dulce de leche for dipping. For a beautiful display, stack the churros on a plate. Sprinkling extra cinnamon sugar on top adds a nice touch. Enjoy your crispy, sweet treat! For a full recipe, check out the [Full Recipe]. To avoid soggy churros, keep an eye on the oil temperature. Hot oil is key. Heat your oil to 375°F (190°C). Use a thermometer for accuracy. If the oil is too cool, churros will absorb too much oil. If it's too hot, they will burn quickly. Always test a small piece of dough first. It should bubble and float right up. You can tell when churros are done by their color. They should turn a deep golden brown. Cook them about 2-3 minutes per side. For the dough, it should be smooth and not sticky. You want it to hold its shape when piped. If it’s too runny, add a bit more flour. If it’s too thick, a splash of water can help. For dipping, I love rich chocolate sauce or creamy dulce de leche. They pair perfectly with warm churros. To impress guests, stack churros high on a plate. Sprinkle extra cinnamon sugar on top. Serve the sauces in small bowls on the side for a fun touch. This makes for an eye-catching presentation. You can also add fresh fruit for color and flavor. For the full recipe, check out the link provided. {{image_4}} When it comes to cinnamon sugar churros, you can have fun with variations. Let's explore some tasty ideas. You can mix things up by adding flavors. Chocolate or caramel can make your churros extra special. Just add a bit to the dough before frying. You can also try different spices. A pinch of nutmeg or cardamom can give your churros a warm twist. Experiment with what you love! Stuffed churros are a delightful surprise. You can fill them with sweet cream or rich chocolate. To do this, pipe the filling into the churro after frying. A simple pastry cream or chocolate ganache works well. It adds a creamy texture to each bite! If you want a lighter treat, try air fryer churros. They use less oil and still taste great. Just pipe the dough onto the air fryer basket and cook until golden. Baked churros are another option. You can shape them on a baking sheet, brush with oil, and bake until crisp. These versions give you all the yum without the guilt! For the full recipe, check out the crispy cinnamon sugar churros section. Enjoy making these tasty treats! To keep your churros fresh, follow these tips: - Allow them to cool completely. - Place them in an airtight container. - Store at room temperature for up to two days. - For longer storage, consider freezing them. To revive churros for the best texture: - Preheat your oven to 350°F (175°C). - Place churros on a baking sheet. - Heat for about 10 minutes. - This method keeps them crispy, just like fresh. To freeze churros, follow these steps: - Allow churros to cool completely. - Lay them on a baking sheet in a single layer. - Freeze for 1-2 hours until firm. - Transfer to a freezer-safe bag for up to three months. - Thaw in the fridge overnight before reheating. With these storage methods, you can enjoy your homemade churros even after the initial delight. For more detailed instructions, check the Full Recipe. To make cinnamon sugar churros from scratch, you need simple ingredients. First, heat water, sugar, salt, and butter in a saucepan until boiling. Remove from heat and stir in flour until a dough forms. After cooling slightly, mix in eggs and vanilla. Pipe the dough into hot oil and fry until golden brown. Finally, coat in a mix of cinnamon and sugar. For the full recipe, check out the details above. Yes, you can use store-bought dough for churros. Look for choux pastry or similar dough. However, homemade dough gives the best flavor. Store-bought options are convenient but may lack the fresh taste you want. It’s fun to try making dough from scratch, too! Churros pair wonderfully with several dipping sauces. Chocolate sauce is a classic choice. It adds richness and sweetness. Dulce de leche is another option, offering a creamy texture. You can also try caramel or fruit sauces for a fruity twist. Get creative and find your favorite! To prevent churros from becoming oily, maintain the right oil temperature. Heat oil to 375°F (190°C) before frying. If the oil is too cool, churros absorb more oil. Fry small batches to avoid cooling the oil too much. Drain on paper towels after frying to remove excess oil. Serve churros warm for the best experience. Stack them on a plate for a fun look. Sprinkle with extra cinnamon sugar for a sweet touch. Offer dipping sauces in small bowls on the side. This makes it interactive and fun for everyone! Making delicious churros is fun and rewarding. We covered everything from ingredients and tools to helpful tips and tasty variations. With simple steps to follow, you can fry, coat, and enjoy fresh churros at home. Remember to explore different flavors and presentation ideas to elevate your treat. Whether you choose to dip or stuff your churros, creativity makes them even better. Now, go ahead and treat yourself to these sweet delights whenever you crave them. Enjoy your churro adventure!](https://recipesstation.com/wp-content/uploads/2025/05/04d576d8-3d7e-43eb-86ba-9e40a4230b1b.webp)
Cinnamon Sugar Churros Irresistible Homemade Treat
Who can resist the warm, crunchy goodness of homemade cinnamon sugar churros? In this post, I’ll show you how to
Who can resist the warm, crunchy goodness of homemade cinnamon sugar churros? In this post, I’ll show you how to
![To make banana oatmeal pancakes, you need a few key items: - 1 cup rolled oats - 1 ripe banana, thoroughly mashed - 1 cup milk (choose either dairy or your favorite non-dairy alternative) - 2 tablespoons honey or pure maple syrup - 1 teaspoon baking powder - 1/2 teaspoon pure vanilla extract - 1/4 teaspoon ground cinnamon - A pinch of salt - 1 tablespoon coconut oil (for cooking) These ingredients create a moist and fluffy pancake. The oats add fiber, and the banana sweetens naturally. To make your pancakes even more delicious, consider these tasty toppings: - Sliced bananas - Additional maple syrup - Chopped nuts - Fresh berries These toppings not only add flavor but also make your pancakes look beautiful. You can mix and match according to your taste. Banana oatmeal pancakes are a healthy choice. They provide: - Good fiber from oats - Natural sweetness from bananas - Healthy fats from coconut oil Each serving has a balanced mix of carbs and protein. This combination gives you energy to start your day right. Enjoy these pancakes for breakfast or a snack! For the full recipe, you can refer to the earlier section. To start, you need rolled oats. Place one cup of oats in a blender or food processor. Blend them until they turn into fine oat flour. This oat flour is key for fluffy pancakes. It gives them a nice texture and taste. Next, take a large bowl. Add one ripe, mashed banana. Pour in one cup of milk, which can be dairy or non-dairy. Then, add two tablespoons of honey or maple syrup. Include one teaspoon of vanilla extract and half a teaspoon of ground cinnamon. Don't forget a pinch of salt! Use a whisk to mix until everything is smooth. Now, sprinkle the oat flour and one teaspoon of baking powder into the wet mix. Stir gently until they just combine. Avoid overmixing; this helps keep your pancakes light. Let the batter rest for five minutes. This step is important for the texture. Heat a non-stick skillet over medium heat. Add one tablespoon of coconut oil to coat the surface. For each pancake, pour a ladle of batter onto the skillet. Cook for about 2-3 minutes until bubbles form. Flip and cook for another 1-2 minutes until golden brown. For serving, stack the pancakes high on a plate. Top them with sliced bananas, a drizzle of warm maple syrup, and your choice of nuts or berries. This makes the dish colorful and tasty. Enjoy your healthy treat! For the full recipe, check out the earlier section. To make your banana oatmeal pancakes fluffy, use rolled oats. Blend them into a fine flour for best results. Mix wet ingredients until smooth. Let the batter rest for five minutes. This step helps the pancakes rise nicely. Avoid overmixing the batter. Stir until just combined, or pancakes may turn tough. Ensure your skillet is hot enough before adding the batter. If it's too cool, pancakes won’t cook evenly. Use coconut oil in your skillet for flavor and non-stick benefits. Cook pancakes until bubbles appear. This shows they are ready to flip. For storing leftovers, let them cool completely. Place them in an airtight container in the fridge. Reheat in the toaster for a quick breakfast. Check the [Full Recipe] for more cooking tips! {{image_4}} You can make these pancakes even better by adding fruits and nuts. Try mixing in blueberries or diced apples for sweetness. Chopped nuts, like walnuts or almonds, add a nice crunch and healthy fats. You can also top your pancakes with sliced strawberries or raspberries. Each fruit offers a burst of flavor and color, making breakfast fun. If you need a gluten-free option, use certified gluten-free oats. This keeps the pancakes light and fluffy. For dairy-free choices, almond milk or oat milk works great. You can also swap honey for agave syrup if you want a vegan option. These simple changes make this recipe fit many diets without losing taste. To change the flavor, add spices like nutmeg or ginger. They bring warmth and depth to your pancakes. You can also try adding a splash of orange juice or zest for a citrus twist. For a chocolaty treat, mix in some cocoa powder. These flavor options keep your breakfasts exciting and new. For the Full Recipe, check the top of this article. Storing leftover pancakes is easy. First, let them cool to room temperature. Then, stack them with parchment paper between each pancake. This helps to prevent sticking. Place the stack in an airtight container or a resealable plastic bag. Make sure to squeeze out excess air before sealing. Store them in the fridge for up to three days. Reheating pancakes can bring back their fluffy texture. You can use a microwave or a skillet. For the microwave, place one or two pancakes on a plate. Heat them for about 20-30 seconds. Check if they are warm throughout. If not, heat for another 10 seconds. For the skillet, warm it over low heat. Add a small amount of coconut oil to the pan. Cook the pancakes for about 1 minute on each side. This method gives them a nice crispness. Freezing pancakes is a smart option for quick meals. After cooling, stack pancakes with parchment paper between them. Wrap the stack tightly in plastic wrap or aluminum foil. Then, place the wrapped pancakes in a freezer-safe bag. Label it with the date. You can freeze pancakes for up to two months. When you want to eat them, thaw them overnight in the fridge before reheating. This keeps them tasting fresh and delicious. For a complete guide, check the Full Recipe. Yes, you can use other fruits. Applesauce works well as a banana swap. You can also try mashed berries or pureed peaches. Each fruit gives a unique taste and texture. Just remember to adjust the liquid if needed. If you need a substitute for honey or maple syrup, you have options. Agave nectar is a great choice. You can also use brown sugar mixed with a little water. For a sugar-free option, try mashed dates or a sugar-free syrup. You can tell pancakes are done by looking for bubbles. When bubbles form on the surface, it’s time to flip. After flipping, cook for another 1-2 minutes. The pancakes should be golden brown on both sides. If you’re unsure, you can always cut one open to check! You learned how to make delicious banana oatmeal pancakes. We covered the main ingredients, step-by-step instructions, and helpful tips. You can also explore fun variations and storage methods to keep them fresh. Perfect your pancake game by avoiding common mistakes, and enjoy serving them with tasty toppings. These pancakes are not just good, they can be adapted and saved for later. Dive into this recipe and savor each bite!](https://recipesstation.com/wp-content/uploads/2025/05/8cdb0c1d-5e1c-4e06-96fc-7e0a03f40ced.webp)
Are you ready to flip your breakfast routine? These Banana Oatmeal Pancakes are both fluffy and healthy! Made with simple
. Selecting ripe heirloom tomatoes is key to a great Caprese salad. Look for tomatoes that feel heavy for their size and have a slight give when you press them. Their color should be bright, and the skin should be smooth. Ripe heirloom tomatoes offer sweet, rich flavors that shine through in this dish. Fresh mozzarella is another important ingredient. Choose buffalo mozzarella if you can. It has a creamy texture and rich taste that adds depth to your salad. Always buy mozzarella that is stored in water or whey. This helps keep it moist and fresh. To tell when your balsamic reduction is done, watch for its thickness. It should coat the back of a spoon when it’s ready. This usually takes about 10 to 15 minutes of simmering. Remember to stir it occasionally to prevent burning. If you have excess balsamic reduction, store it in a sealed jar in the fridge. It can last up to a month. You can use it on other salads or as a glaze for meats and veggies. Plating your Caprese salad in an elegant way can impress your guests. Use a large white platter to show off the vibrant colors of the tomatoes and mozzarella. Arrange the slices in a circular pattern for an attractive display. For garnishing, fresh basil leaves are perfect. Tuck a few whole leaves or small sprigs on top for a pop of color and flavor. Drizzle some extra virgin olive oil around the edges of the platter for a stunning finish. This Caprese Delight truly looks as good as it tastes! You can switch up the cheese in your Caprese salad. Try using burrata instead of mozzarella. Burrata is creamy and rich, adding a new layer of taste. You can also use cherry tomatoes instead of large heirloom ones. Cherry tomatoes offer a burst of sweetness. They are fun to eat and bring color to your plate. Want to make your salad heartier? Add grilled chicken or shrimp. These proteins blend well with the salad's fresh flavors. For vegetarians, consider adding chickpeas or grilled zucchini. These options keep the dish delicious and filling without meat. To amp up the taste, consider adding capers or olives. These ingredients give a salty, savory touch to your dish. You can also sprinkle in some nuts like pine nuts or walnuts. Nuts add a nice crunch and contrast to the soft cheese and tomatoes. They also boost the salad's nutrition. Explore these variations to make your Caprese salad unique and tasty. For the full recipe, check out the Caprese Delight with Balsamic Drizzle. {{image_4}} To keep your Caprese salad fresh, store leftovers in an airtight container. Place a paper towel inside to absorb moisture. This method helps prevent sogginess. Refrigerate and enjoy within three days for the best taste. Before eating, refresh the salad by adding a drizzle of olive oil. This brightens flavors and adds moisture. If you want to repurpose it, mix the salad into pasta or grain dishes. You can also use it as a topping for grilled chicken or fish. These options add variety and excitement to your meals. For a perfect dining experience, I recommend serving your Caprese salad with crusty bread. The bread soaks up the balsamic reduction and olive oil, adding a delightful texture. Antipasto also makes a great side. The salty meats and marinated veggies balance the fresh flavors of the salad. When it comes to wine, pair this dish with a crisp white, like Sauvignon Blanc. Its acidity enhances the salad's freshness. This salad shines at summer parties. Its bright colors and flavors bring joy to any table. It’s also perfect for picnics and barbecues. Just pack it in a sturdy container, and you’re ready to impress your friends. Serve it cold to keep everything fresh and tasty. When it comes to larger gatherings, adjust your servings. You can easily double or triple the recipe. Just make sure to keep the tomato and mozzarella ratios in mind. For smaller meals, you can scale it down. It’s easy to make just enough for two or four people. This flexibility makes it a great choice for any event. For the full recipe, check out the Caprese Delight with Balsamic Drizzle . To make a balsamic reduction, follow these steps: 1. Pour 1/4 cup of balsamic vinegar into a small saucepan. 2. If you like, add 1 teaspoon of honey for sweetness. 3. Place the saucepan on medium heat and bring it to a gentle boil. 4. Once boiling, lower the heat to low. 5. Let it simmer for 10–15 minutes. Stir occasionally. 6. Remove it from heat when it thickens enough to coat a spoon. 7. Allow it to cool before using it on your salad. This reduction adds a sweet and tangy kick to your Caprese salad. Yes, you can prepare Caprese salad ahead of time. Here are some tips: - Slice the tomatoes and mozzarella in advance. - Store them in separate containers to keep them fresh. - Wait to add the basil until just before serving. - Drizzle the balsamic reduction and olive oil right before serving. This way, your salad will taste fresh and vibrant. Caprese salad comes from Italy, specifically from the island of Capri. It became popular in the 20th century. The salad features simple ingredients: ripe tomatoes, fresh mozzarella, and basil. These ingredients reflect the colors of the Italian flag: red, white, and green. The dish remains a favorite for its fresh flavors and bright colors. To check if your tomatoes are ripe, look for these signs: - They should feel slightly soft when you gently squeeze them. - The color should be deep, bright red or yellow. - There should be a sweet, earthy smell near the stem. Using ripe tomatoes ensures your Caprese salad has the best flavor. This blog post explored the delicious Caprese salad. We discussed fresh ingredients, like heirloom tomatoes and buffalo mozzarella. I shared step-by-step instructions for making a balsamic reduction. We also covered tips for choosing the best items and presenting your salad beautifully. Incorporating variations, storage tips, and serving ideas helps you enjoy this dish in many ways. Remember, fresh ingredients and good preparation make all the difference. Now, you can create a bright and tasty Caprese salad for any occasion!](https://recipesstation.com/wp-content/uploads/2025/05/74795da9-8f8a-41c7-a6a4-4ac27b1a4040.webp)
If you want to impress your friends with a classic Caprese salad, you’re in the right place! This dish is

Looking for a snack that’s both tasty and fun to make? Try Sriracha Honey Cauliflower Bites! These crispy, spicy treats
![- 1 pound Brussels sprouts, trimmed and halved - 3 tablespoons extra virgin olive oil - 1/4 cup pure maple syrup - 1 tablespoon balsamic vinegar - 1 teaspoon Dijon mustard - 1/2 teaspoon garlic powder - Sea salt and freshly cracked black pepper to taste - 1/4 cup pecans, roughly chopped (optional) - 2 tablespoons fresh parsley, finely chopped, for garnish - Mixing bowl - Baking sheet - Small saucepan - Oven You need simple ingredients to create tasty Maple Glazed Brussels Sprouts. Start with Brussels sprouts, the star of this dish. Trim them and cut them in half. The olive oil adds richness and helps the sprouts crisp up. Pure maple syrup gives a sweet touch, while balsamic vinegar adds a tangy kick. Dijon mustard brings depth, and garlic powder adds savory notes. Don’t forget the sea salt and black pepper for flavor. Optional pecans give a nice crunch, and fresh parsley adds color. Gather all your equipment. A mixing bowl helps with tossing, while a baking sheet is perfect for roasting. You will also need a small saucepan for the glaze. Finally, your oven will bring everything together with heat. With these ingredients and tools, you’re ready to make a delicious side dish! For the complete recipe, check out the [Full Recipe]. - Preheat oven to 400°F (200°C). - Trim and halve Brussels sprouts. Start by setting your oven to 400°F (200°C). This heat helps the sprouts cook evenly. Next, take your Brussels sprouts and trim off the ends. Cut them in half to make sure they roast nicely. - Toss Brussels sprouts with olive oil, salt, and pepper. - Arrange on baking sheet with cut sides down. - Roast for about 20 minutes, stirring halfway. In a large bowl, add the halved Brussels sprouts. Pour in 3 tablespoons of olive oil. Sprinkle with sea salt and freshly cracked black pepper. Toss well so every sprout gets coated. Next, spread the sprouts on a baking sheet, cut sides facing down. This helps them get crispy. Roast in the oven for about 20 minutes. Stir them halfway through to keep them from burning. - Combine maple syrup, balsamic vinegar, Dijon mustard, and garlic powder in a saucepan. - Heat and simmer the glaze. While the sprouts cook, grab a small saucepan. Combine 1/4 cup of pure maple syrup, 1 tablespoon of balsamic vinegar, 1 teaspoon of Dijon mustard, and 1/2 teaspoon of garlic powder. Heat it over medium heat while stirring. Once it simmers, remove it from heat. - Drizzle glaze over roasted Brussels sprouts. - Add pecans if desired. - Return to oven for an additional 5 minutes. Once the Brussels sprouts are golden, take them out of the oven. Drizzle the maple glaze over them. If you like, sprinkle 1/4 cup of roughly chopped pecans on top for extra crunch. Pop them back in the oven for 5 more minutes. This will caramelize the glaze and enhance the flavors. Enjoy these tasty Brussels sprouts! For the full recipe, see above. To pick the freshest Brussels sprouts, look for tight, bright green heads. Avoid any that are yellow or wilted. Fresh sprouts have a firm feel and a nice shine. You can also try other glazes. Honey gives a sweet touch, while soy sauce adds a salty kick. Both can change the flavor profile and keep your dish exciting. For the best caramelization, arrange the sprouts cut side down. This helps them brown nicely. Keep space between them on the baking sheet. If they are too close, they will steam instead of roast. Pre-seasoning is easy. Toss the sprouts with olive oil, salt, and pepper before roasting. This step adds flavor right from the start. Maple glazed Brussels sprouts pair well with roasted meats or fish. They also work great with grains like quinoa or farro. For special occasions, serve them in a large, colorful bowl. Add a sprinkle of pecans and parsley on top for a beautiful look. This makes the dish pop and invites everyone to dig in. {{image_4}} If you want to skip the pecans, no problem! You can use seeds instead. Sunflower or pumpkin seeds work well. They add a nice crunch without the nuts. You can also leave out the nuts entirely. The dish will still taste great without them. Want a kick? Add red pepper flakes for heat. Start with a pinch and adjust to your liking. If you want a different flavor, use spicy mustard instead of Dijon. It brings a zesty punch that pairs well with the maple glaze. To keep this dish fully plant-based, check your ingredients. Use vegan mustard and maple syrup. Most brands are vegan, but it's good to check. You can also swap any non-vegan items for vegan-friendly choices. This way, everyone can enjoy the tasty Brussels sprouts! For the full recipe, check out the details above. To store cooked Brussels sprouts, let them cool first. Place them in an airtight container. This helps keep them fresh. In the fridge, they last about 3 to 5 days. If you notice any moisture, dry them before storing. This prevents sogginess and keeps them tasty. When reheating, you want to keep the texture nice. I suggest using an oven or a skillet. For the oven, preheat it to 350°F (175°C). Place the sprouts on a baking sheet and heat for about 10 minutes. Stir them halfway to warm evenly. If using a skillet, add a splash of water and cover it. This steams them, keeping them moist. You can also toss leftovers into salads or grain bowls for an easy meal. If you want to freeze Brussels sprouts, start with cooled, cooked ones. Use a freezer-safe bag. Squeeze out as much air as possible. This helps prevent freezer burn. They stay good for about 2 to 3 months. When ready to use, thaw them overnight in the fridge. Reheat in the oven or skillet for best results. This way, you enjoy that delicious flavor even later! Making Maple Glazed Brussels Sprouts takes about 35 minutes. You need 10 minutes to prep. Roasting takes around 20 minutes. This gives you time to make the glaze while they roast. Yes, you can prepare these Brussels sprouts ahead. Trim and halve the sprouts. Store them in the fridge for one day before cooking. You can also make the glaze up to three days in advance. Just keep it in a sealed container. When ready, roast the sprouts and add the glaze. These Brussels sprouts pair well with many dishes. Try serving them with roasted chicken or pork. They also go great with quinoa or rice dishes. For a vegetarian meal, serve them with a hearty grain salad. Yes, this recipe is gluten-free. All the ingredients, like maple syrup and olive oil, are free from gluten. Always double-check labels, especially for mustard and vinegar, to ensure they are gluten-free. You can use frozen Brussels sprouts, but fresh is best. Frozen sprouts may not roast as well. They tend to be softer and can lack crunch. If you use frozen, thaw and drain them before roasting. This helps remove excess water. For the best flavor, fresh is always the way to go. This blog post covered a simple and tasty recipe for Maple Glazed Brussels Sprouts. We looked at the key ingredients, step-by-step instructions, and tips to make your dish shine. Remember, fresh sprouts give the best flavor and texture. Whether you're adding nuts or making it vegan, these sprouts can fit any meal. Store leftovers properly, and enjoy them later. With these insights, you can now create a delicious dish that will impress anyone at your table. Don't hesitate to experiment and make it your own!](https://recipesstation.com/wp-content/uploads/2025/05/10328f2d-aae6-48a6-af43-63b7adec324b.webp)
If you’re craving a side dish that’s both sweet and savory, I’ve got just the recipe for you: Maple Glazed
![- 3 cups cooked pasta (penne or rotini) - 2 cups cooked chicken breast, shredded - 2 cups Alfredo sauce (store-bought or homemade) The main ingredients form the heart of this dish. Pasta serves as the base and adds texture. Shredded chicken brings protein and flavor. The Alfredo sauce makes it creamy and rich. I recommend using a high-quality sauce for the best taste. You can make your own or grab a jar from the store. - 1 cup shredded mozzarella cheese - ½ cup grated Parmesan cheese - 1 cup broccoli florets (fresh or frozen) - 1 cup diced bell peppers (red or green for color) Cheese adds a gooey layer on top that melts beautifully. Mozzarella offers that classic stretchy goodness. Parmesan enhances the flavor with a salty kick. Broccoli and bell peppers give a pop of color and nutrients. You can mix and match veggies to suit your taste. - 1 teaspoon garlic powder - 1 teaspoon Italian seasoning - Salt and pepper to taste - Fresh parsley, chopped (for garnish) Seasoning is key to pulling all the flavors together. Garlic powder adds depth, while Italian seasoning gives a hint of herbs. Adjust salt and pepper based on your preference. Fresh parsley on top not only looks nice but also adds brightness. Explore different herbs to make this dish your own. For the complete recipe, check the [Full Recipe]. - Preheat the oven to 350°F (175°C). - In a large bowl, combine cooked pasta, shredded chicken, Alfredo sauce, broccoli, and bell peppers. Mix well until everything is coated in sauce. This step ensures every bite is creamy and tasty. - Carefully transfer the mixed ingredients into a 9x13-inch baking dish, spreading them evenly. - Sprinkle shredded mozzarella and grated Parmesan cheese generously on top. This cheesy layer will melt and create a delicious crust. - Cover the dish with aluminum foil to keep moisture in, and place it in the oven. Bake for 20 minutes. - After 20 minutes, remove the foil and bake for another 10-15 minutes. Look for bubbly cheese and a golden color. This means it’s ready to enjoy! Letting the dish rest for 5 minutes after baking is key. This time helps the flavors mix well. It also makes it easier to serve. Covering the dish with foil while baking keeps the moisture inside. This step ensures your meal stays creamy and delicious. You can add spices or herbs for extra flavor. Try a pinch of red pepper flakes for heat. Fresh basil or oregano also works well. If you want a thicker sauce, reduce the amount of milk in your Alfredo sauce. For a creamier texture, add a bit more cheese or cream. Serve your chicken Alfredo bake with garlic bread for a cozy meal. A fresh side salad adds color and crunch. For a pretty touch, garnish with chopped parsley and extra cheese. This simple step makes your dish look gourmet and inviting. {{image_4}} You can make this dish lighter by swapping regular pasta for whole grain pasta. Whole grain pasta adds fiber and nutrients, which is a great choice for everyone. You can also choose low-fat cheese or a low-fat Alfredo sauce. This keeps the creamy taste while reducing calories and fat. If you want a change, use turkey or shrimp instead of chicken. Both options add unique flavors and can make this dish exciting. For a vegan version, use plant-based Alfredo sauce and dairy-free cheese. This way, everyone can enjoy a tasty meal. Boost nutrition by adding veggies like spinach, zucchini, or mushrooms. Spinach blends well into the sauce while zucchini and mushrooms add texture. For a pop of color, mix different bell pepper shades. Red, yellow, and green peppers not only look good but also taste great together. To store leftover chicken Alfredo bake, let it cool to room temperature. Place it in an airtight container. This helps keep it fresh. I recommend using a glass or plastic container with a tight lid. You can store it in the fridge for up to three days. Make sure to label the container with the date. When reheating, you have two good options: the oven or the microwave. For the oven, preheat it to 350°F. Place the bake in an oven-safe dish and cover it with foil. Heat for about 20 minutes. This helps keep the dish creamy. If you choose the microwave, use a microwave-safe plate. Heat in one-minute intervals until warm. Stir to keep the sauce smooth. You can freeze this dish before or after baking. If freezing before, cover it tightly with foil or plastic wrap. This keeps out air and prevents freezer burn. If freezing after baking, let it cool first. Then, use an airtight container. To thaw, place it in the fridge overnight. Reheat it in the oven or microwave as described above for the best results. Yes, you can prepare this dish ahead of time. Start by mixing all your ingredients. After that, cover the dish and put it in the fridge. You can store it for up to two days. When ready to bake, let it sit at room temperature for about 30 minutes. This helps it bake evenly. Then, pop it in the oven for the same time as the recipe states. If you need a substitute, try using homemade white sauce. You can also use a mix of cream cheese and milk. Add some garlic powder and Parmesan cheese for extra flavor. Store-bought options like jarred cheese sauce work too. Just make sure it fits your taste. Your Chicken Alfredo Bake is ready when the cheese is bubbly and golden. Check the center with a knife. If it comes out hot, the dish is done. Let it rest for five minutes after baking. This helps the flavors settle and makes serving easier. Absolutely! Kids love creamy pasta and cheese. To make it even more fun, let them help mix ingredients. You can also hide veggies like broccoli in the bake. If your kids are picky, try using their favorite pasta shape. This will make the dish more appealing to them. This Easy Chicken Alfredo Bake combines simple ingredients for a delicious meal. You mix pasta, chicken, and veggies with Alfredo sauce, then bake it until bubbly. Remember to let it rest before serving. You can try different proteins or add more vegetables for variation. This dish is perfect for families and is easy to store or reheat. Whether you customize it or stick to the classic recipe, you’ll enjoy every bite. Happy cooking!](https://recipesstation.com/wp-content/uploads/2025/05/5db2c1df-25eb-4a2a-bcc3-727e513d3d97.webp)
Looking for a quick, satisfying meal to delight your family? The Easy Chicken Alfredo Bake is your answer! This dish
![To make Almond Joy Energy Balls, you need a few simple ingredients. Each one adds flavor and nutrition. Here is the list of what you'll need: - 1 cup pitted dates - 1 cup unsweetened shredded coconut - 1/2 cup almond butter - 1/2 cup rolled oats - 1/4 cup almonds, roughly chopped - 2 tablespoons cocoa powder - 1 tablespoon honey or maple syrup (optional for sweetness) - 1 teaspoon vanilla extract - A pinch of salt These ingredients work together to create a tasty and healthy snack. Dates provide natural sweetness and fiber. Shredded coconut gives a chewy texture and a hint of tropical flavor. Almond butter adds creaminess and healthy fats. Rolled oats bring a nice heartiness, while almonds offer crunch. Cocoa powder gives a rich chocolate flavor. You can choose honey or maple syrup for extra sweetness, based on your taste. A touch of salt helps balance all the flavors. With the Full Recipe, you can enjoy making this delicious snack at home. 1. Start by placing the pitted dates into your food processor. Pulse them until they become a sticky paste. Make sure there are no chunks left. 2. Next, add the almond butter, rolled oats, shredded coconut, cocoa powder, vanilla extract, and a pinch of salt to the date paste. If you want it sweeter, add honey or maple syrup now. 3. Blend the mix until all ingredients combine well. The texture should be sticky and hold together when pressed. If it feels dry, add a bit of water or extra dates. 1. With a spatula, gently fold in the chopped almonds. They add a nice crunch to each bite. 2. Now, use your hands to shape the mixture into small balls. Aim for about the size of a tablespoon. Make sure each ball is compact. 3. Transfer the energy balls to a parchment-lined baking sheet or plate. Space them out to keep them from sticking. 1. To set the energy balls, refrigerate them for at least 30 minutes. This helps them firm up. 2. For presentation, serve them in a bright bowl. Sprinkle some extra shredded coconut or cocoa powder on top. They look great and taste even better! Follow the [Full Recipe] for detailed steps and enjoy this tasty snack! To get the right texture, pulse your dates well. You want a smooth, sticky paste. If it feels dry, add a little water or more dates. This helps everything stick together. Adjusting sweetness is easy. Taste your mixture before shaping the balls. If you want it sweeter, add honey or maple syrup. Just mix it in and taste again. For substituting ingredients, you can switch almond butter with peanut butter. If you don’t have almonds, try walnuts or pecans. The recipe is flexible, so feel free to experiment! For pairing ideas, serve these energy balls with a glass of almond milk or yogurt. They also go well with fresh fruit. You can enjoy them as a snack or after a workout. To make your presentation creative, place the energy balls in a colorful bowl. You can sprinkle extra coconut or cocoa powder on top. This makes them look fun and tasty! {{image_4}} You can switch up the nuts in Almond Joy Energy Balls for a new twist. - Cashew or Peanut Butter: Use cashew butter for a creamy texture. Peanut butter adds a rich flavor. Both options work well and change the taste a bit. - Other Nut Types: Try hazelnuts or walnuts for more crunch. Each nut brings its unique flavor and texture. Boost the taste of your energy balls with fun additions. - Adding Spices or Extracts: A pinch of cinnamon or nutmeg gives warmth. Vanilla or almond extract can add depth. Experiment with different spices to find your favorite mix. - Incorporating Superfoods: Chia seeds or flaxseeds can pack in more health benefits. They add fiber and omega-3s, making your snack even better for you. You can still enjoy these energy balls with some easy swaps. - Gluten-Free Options: Use certified gluten-free oats for safe snacking. This keeps the recipe safe for those with gluten sensitivities. - Vegan Substitutions: Replace honey with maple syrup for a vegan-friendly option. This way, everyone can enjoy these tasty treats. Feel free to explore these variations to make the Almond Joy Energy Balls your own! For the full recipe, check out the [Full Recipe]. - Refrigerator Storage: Keep your Almond Joy Energy Balls in an airtight container. They stay fresh for up to a week in the fridge. This cool storage helps maintain their texture and flavor. - Freezing Instructions: For longer storage, freeze the energy balls. Place them in a single layer on a baking sheet. Once frozen, transfer them to a freezer bag. They can last for up to three months in the freezer. - How Long They Last: When stored properly, these energy balls can last about 7 days in the fridge. In the freezer, they are good for about 3 months. - Signs of Spoilage: Look for any off smells or changes in texture. If they feel dry or hard, it’s best to throw them out. Fresh energy balls should be soft and chewy. Yes, you can. Dried fruit like figs or apricots work well. They add sweetness and moisture. However, remember that each fruit has a unique taste. Adjust the other ingredients to match the new flavor. To reduce sweetness, cut back on dates or sweeteners. You can also add extra oats or coconut. This change will keep the energy balls tasty while lowering the sugar content. Absolutely! These energy balls are a healthy snack for kids. They offer energy without processed sugars. Plus, kids love the chocolate and coconut flavors. Just make sure they are not allergic to any ingredients. Yes, you can skip the cocoa powder. The energy balls will still taste great. They will have a lighter color and a different flavor. You may want to add extra coconut or nuts for texture. For the full recipe, check the instructions above. You can easily make Almond Joy Energy Balls using simple ingredients. We covered what you need, from dates to cocoa powder. Then, we walked through each step to create your energy balls, from mixing to shaping. I shared tips to ensure perfect texture and flavor. We explored tasty variations to suit your needs, including allergy-friendly options. Finally, I provided storage advice so your energy balls stay fresh. Enjoy making these healthy snacks, and feel free to experiment. They are tasty, fun, and great for any time!](https://recipesstation.com/wp-content/uploads/2025/05/609a57a2-d793-465d-948b-e61a64ba6b71.webp)
Craving a delicious yet healthy snack? Meet your new favorite—Almond Joy Energy Balls! These tasty bites pack in the sweet

Looking for an easy, delicious comfort food? You’ve found it! This Savory Vegetable Frittata is packed with fresh veggies and
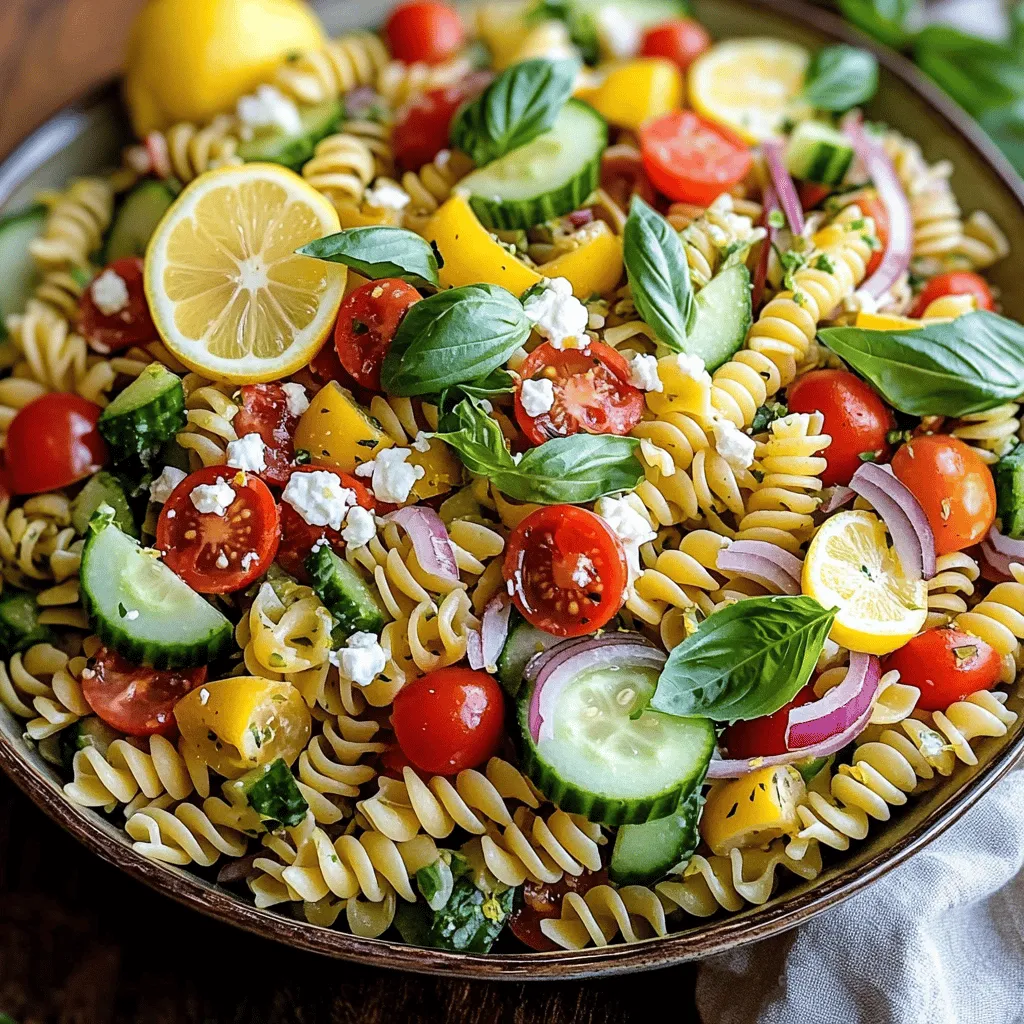
Looking for a bright and zesty dish that’s perfect for any occasion? My Lemon Basil Pasta Salad is a fresh

Are you ready to savor a warm, comforting dish packed with flavor? This Savory Sweet Potato Chickpea Curry is not
