Skip to content
DisclaimerTerms Of UseGDPR PolicyCookie Policy

recipesstation

  • Home
  • Drinks
  • Appetizers
  • Dinner
  • Dessert
  • About
  • Contact
  • Privacy Policy
DisclaimerTerms Of UseGDPR PolicyCookie Policy

Emily

- 2 large sweet potatoes, thoroughly washed and scrubbed - 3 tablespoons extra virgin olive oil - 1 teaspoon smoked paprika for a rich flavor - 1 teaspoon garlic powder for depth - 1 teaspoon onion powder for sweetness - ½ teaspoon sea salt, or to taste - ¼ teaspoon freshly cracked black pepper - Fresh parsley, finely chopped (for garnish) Sweet potatoes are the star of this dish. They are bright, sweet, and packed with nutrients. Use firm, unblemished sweet potatoes for the best results. The olive oil will help the spices stick and create a crispy texture when baked. For seasonings, I love using smoked paprika. It adds a warm, smoky flavor. Garlic powder gives a nice punch, and onion powder brings in sweetness. Sea salt and black pepper round it all out. Don’t forget the fresh parsley! It adds a pop of color and freshness. You can skip it if you want, but I highly recommend it. For the full recipe, check out the detailed instructions to create these crispy, flavorful snacks! First, preheat your oven to 425°F (220°C). This temperature is key to getting crispy sweet potato wedges. A hot oven helps to cook the wedges evenly and gives them a nice crunch. Make sure your oven is fully preheated before you put in the wedges to ensure the best results. Next, wash the sweet potatoes well. Scrub them to remove any dirt. This step is important for clean and tasty wedges. After washing, cut the sweet potatoes into wedges about 1-inch thick. Uniform size helps them cook evenly. If some wedges are thicker, they may not cook at the same rate as thinner ones. Now, let’s mix the seasoning. In a large bowl, combine 3 tablespoons of olive oil, 1 teaspoon of smoked paprika, 1 teaspoon of garlic powder, 1 teaspoon of onion powder, ½ teaspoon of sea salt, and ¼ teaspoon of black pepper. Whisk these ingredients until they blend well. This mix adds great flavor! When you add the sweet potato wedges to the seasoning, toss them gently. Make sure each wedge is coated evenly. This ensures every bite is packed with flavor. Line a baking sheet with parchment paper. This helps with easy cleanup. Spread the sweet potato wedges in a single layer on the sheet. Make sure they do not touch or overlap. This will help them crisp up nicely. Bake the wedges in the oven for 25-30 minutes. Halfway through, flip the wedges over. This helps them brown and get crispy on all sides. When they are done baking, let them cool for a few minutes. This helps them firm up before you serve them. Enjoy these crispy and flavorful snacks! If you want to try more, check out the Full Recipe for additional tips. To get sweet potato wedges crispy, start with dry potatoes. After washing, pat them dry. This helps them crisp up in the oven. Cut your sweet potatoes into uniform wedges. Aim for 1-inch thickness. This ensures they cook at the same rate. Overcrowding the baking sheet is a common mistake. Each wedge needs space to breathe. If they touch, they will steam instead of crisp. Flip the wedges halfway through baking. This helps both sides brown evenly. You can play with flavors using different spices. Try adding cayenne for heat or Italian herbs for a twist. Mix in some cumin for an earthy taste. You might also love adding rosemary for a fresh touch. Don’t hesitate to blend flavors. Sweet potatoes go well with maple and cinnamon, too. For dips, you can't go wrong with garlic aioli or ranch. Both add creamy goodness that pairs well. If you want something spicy, try a sriracha mayo. To make a simple homemade sauce, mix Greek yogurt with lemon juice, garlic, and herbs. It’s fresh and tasty. For more ideas, check out the Full Recipe! {{image_4}} You can add cheese for a creamy twist. I love using parmesan or cheddar. Both cheeses melt nicely and add flavor. When you add cheese, reduce the cooking time by a few minutes. Keep an eye on them to avoid burning the cheese. Sprinkle the cheese on the wedges during the last five minutes of baking. This gives it time to melt and become bubbly. For a kick, try adding cayenne or chili powder. Just a little can boost the heat. Start with half a teaspoon, then taste. Adjust the spice level to your liking. Pair the heat with a hint of sweetness from the sweet potatoes. This balance makes the flavor pop. Serve with a cooling dip, like yogurt, to balance the spice. Using herbs can elevate your wedges. Fresh or dried herbs like rosemary or thyme work well. Toss the wedges with herbs before baking for a fragrant touch. Pair these wedges with grilled chicken or fish for a gourmet meal. You can even sprinkle some herbs on top after baking for extra flavor. For more ideas, check the Full Recipe. To keep your sweet potato wedges fresh, follow these best practices: - Let the wedges cool completely after baking. - Place the wedges in an airtight container. - Line the bottom with paper towels to absorb moisture. For best results, use glass or BPA-free plastic containers. These options help maintain crispness and flavor. When it comes to reheating, the oven works best. Here’s how you can do it: - Preheat your oven to 400°F (200°C). - Spread the wedges in a single layer on a baking sheet. - Bake for about 10-15 minutes. This helps restore crispiness. You can also use a microwave, but the texture may suffer. If you choose this method: - Place wedges on a microwave-safe plate. - Heat in short bursts of 30 seconds. Check often to avoid sogginess. By following these tips, you’ll enjoy your baked sweet potato wedges just as much the next day. For the complete recipe, check out the Full Recipe. Yes, you can use other potatoes. Regular russet potatoes work well. They will have a different taste but still be delicious. Yukon Gold potatoes are also a good choice. They are creamy and have a nice flavor. Just remember to adjust cooking times since different potatoes may cook faster or slower. You will know the wedges are done when they are golden brown and crispy. A fork should easily pierce them. If they feel soft inside, that is a good sign. The edges should be crispy to the touch. If you want them extra crispy, leave them in the oven for a few more minutes. Yes, you can make these wedges ahead of time. Prepare them as normal and let them cool. Then, store them in an airtight container. When you're ready to eat, reheat them in the oven. This keeps them crispy. Just set the oven to 400°F (200°C) for about 10 minutes. These wedges pair well with many dishes. Try serving them with grilled chicken or fish. They also go great with burgers or sandwiches. For a light meal, add a salad. Dipping sauces like garlic aioli or spicy ketchup enhance the flavor too. You can find the full recipe to explore more serving ideas! Baked sweet potato wedges are a delight. You learned about the best ingredients, from sweet potatoes to seasonings. I shared step-by-step tips to prepare and bake them perfectly. You now have secrets to achieve crispy texture and tasty variations. Remember to store leftovers correctly and reheating tips for best results. Enjoy these wedges with simple dips or as part of a meal. Experiment and find your favorite flavors. With this guide, your sweet potato wedges will always be a hit!

Baked Sweet Potato Wedges Crispy and Flavorful Snack

Craving a snack that’s both crispy and full of flavor? Baked sweet potato wedges are your answer! They’re easy to

- 2 ripe avocados, halved and pitted - 2 cloves garlic, finely minced - 2 tablespoons freshly squeezed lemon juice - ¼ cup fresh basil leaves, packed - ½ cup Greek yogurt, plain - ½ teaspoon red pepper flakes (optional for heat) - Salt and freshly ground black pepper to taste - 8 oz spaghetti or your preferred pasta type - 2 tablespoons extra virgin olive oil - Handful of cherry tomatoes, halved (for garnish) - Grated Parmesan cheese (optional, for serving) You can swap the Greek yogurt for a dairy-free option like cashew cream if needed. Adding more garlic can also enhance the flavor. Feel free to adjust the red pepper flakes to suit your spice level. This creamy avocado pasta recipe serves four and contains about 400 calories per serving. Key ingredients provide important nutrients: - Avocado: Rich in healthy fats, fiber, and vitamins C and E. It helps improve heart health and keeps you full. - Greek Yogurt: Offers protein and probiotics, which support digestion and muscle health. - Olive Oil: A source of healthy fats, it can lower bad cholesterol levels. - Garlic: Contains allicin, a compound known for its health benefits, including boosting the immune system. Overall, this dish combines tasty ingredients that support a healthy diet while being quick and easy to prepare. To cook the spaghetti, bring a large pot of salted water to a boil. Add the pasta and cook according to the package directions. Aim for al dente, which means the pasta should be firm but not hard. This will give your dish great texture. Before draining, make sure to reserve about ½ cup of the starchy pasta water. This water will help thicken and bind the sauce later. While the pasta cooks, we can make the sauce. Take two ripe avocados, cut them in half, and remove the pits. Scoop the avocado flesh into a blender. Add two cloves of minced garlic, two tablespoons of fresh lemon juice, and ¼ cup of fresh basil leaves. Then, include ½ cup of plain Greek yogurt and salt and pepper to taste. If you like a bit of heat, add ½ teaspoon of red pepper flakes. Blend everything until smooth. If your mixture is too thick, you can add a bit of reserved pasta water. Each ingredient adds rich flavor. The avocado gives creaminess, the garlic adds zest, and the lemon juice brightens it all up. Once the pasta is done, drain it and return it to the pot. Pour the creamy avocado sauce over the hot pasta. Gently toss them together, ensuring every piece of pasta is coated. Now, add the reserved pasta water a little at a time until you reach the sauce’s perfect consistency. It should be creamy and cling to the pasta. Drizzle two tablespoons of extra virgin olive oil over the dish and toss it again. This adds flavor and richness. Your creamy avocado pasta is ready to serve! To keep your sauce smooth, blend the avocados until they are completely creamy. If you notice chunks, blend a bit longer. You can also add a splash of pasta water to help blend. For a richer texture, substitute Greek yogurt with heavy cream or coconut cream. This adds creaminess without extra work. You can boost the taste with fresh herbs like parsley or cilantro. A pinch of cumin or smoked paprika adds a nice touch too. For protein, mix in grilled chicken, shrimp, or chickpeas. They pair well with the creamy sauce and add nutrition. Serve your pasta in deep bowls for a beautiful look. Add fresh basil leaves and a drizzle of olive oil on top. For added flair, sprinkle some grated Parmesan cheese or vegan cheese alternatives. Cherry tomatoes not only taste great but also add a pop of color. {{image_4}} To make this creamy avocado pasta vegan, simply swap out a few key ingredients. Instead of Greek yogurt, use cashew cream for that rich, creamy texture. Cashew cream is made by blending soaked cashews with water until smooth. This keeps your dish dairy-free while still giving you the creaminess you crave. If you need a gluten-free meal, choose pasta made from rice, quinoa, or lentils. These options provide great texture and flavor. For a low-carb choice, use zucchini noodles or spaghetti squash. Both add a fresh taste and keep the dish light. There are endless ways to make this dish your own! Add in vegetables like spinach, peas, or broccoli for extra color and nutrients. For protein, consider grilled chicken, shrimp, or chickpeas. Nuts like walnuts or pine nuts can add a nice crunch. You can also change things up with seasonal ingredients. In summer, toss in fresh corn or bell peppers; in fall, try roasted butternut squash. Each variation keeps your creamy avocado pasta exciting and new. To keep your creamy avocado pasta fresh, store it in an airtight container. This helps prevent air from drying it out. When refrigerated, it can last about 2 to 3 days. However, avocado can brown quickly. To slow this, squeeze extra lemon juice over the pasta before sealing it. This tip keeps the dish looking and tasting great. When reheating, use a gentle heat to avoid ruining the texture. The best way is to warm it on the stove. Add a splash of water or olive oil to help loosen the sauce. Stir continuously until heated through. If the sauce thickens in the fridge, adding a bit more reserved pasta water will help. This keeps your dish creamy and delicious. Creamy avocado pasta stays good in the fridge for about 2 days. To keep it fresh, store it in an airtight container. If you notice the sauce turning brown, that's normal. Just stir it well before serving. Yes, you can make the avocado sauce ahead of time. To keep it fresh, store it in an airtight container. Squeeze a little lemon juice on top to slow down browning. When ready to use, stir it well before mixing it with the pasta. You can serve creamy avocado pasta with a side salad or garlic bread. Grilled chicken or shrimp adds protein. Roasted vegetables also pair nicely. For extra crunch, try adding toasted nuts or seeds. Yes, creamy avocado pasta is healthy. Avocados are full of healthy fats and fiber. Greek yogurt adds protein and creaminess. For a lighter dish, use whole grain or vegetable pasta. You can also swap out the Greek yogurt for a plant-based option if desired. In this post, we explored how to make a creamy avocado pasta that is both tasty and healthy. We covered each ingredient and its benefits, along with cooking steps for the perfect dish. I shared tips for customizing and presenting your pasta, ensuring delicious results every time. Remember, this recipe is flexible. You can adjust it to fit your taste or diet. Enjoy creating your creamy avocado pasta, and make it your own!

Creamy Avocado Pasta Simple and Quick Delight

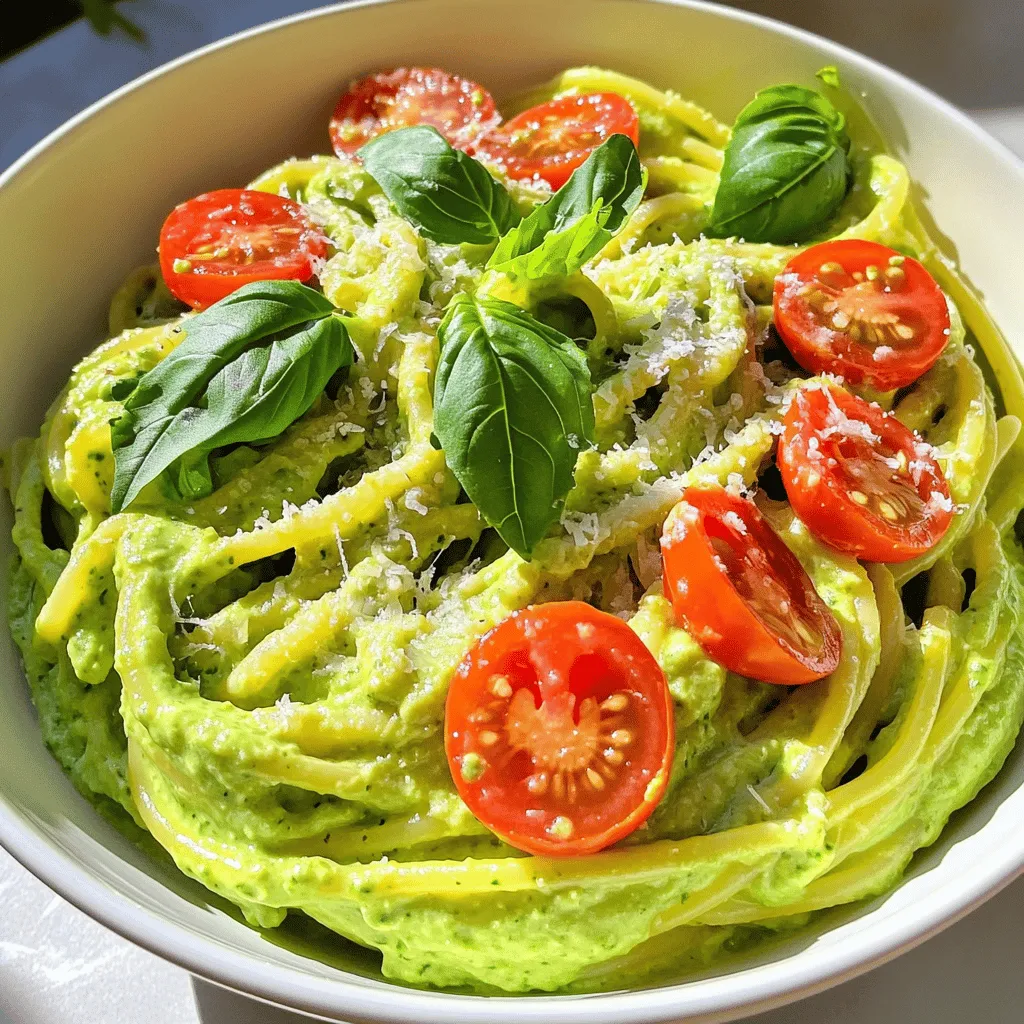
Looking for a quick and tasty meal? You’ll love my Creamy Avocado Pasta! This dish combines smooth avocado with a

This Asian Sesame Chicken Salad is fresh, vibrant, and packed with flavor. It combines tender chicken with crisp greens and colorful veggies. The dressing adds a sweet and nutty twist. You can whip this up in just 25 minutes! - 2 cups cooked and shredded chicken breast - 4 cups mixed greens (spinach, romaine, and arugula) - 1 cup shredded carrots - 1 red bell pepper, thinly sliced - 1 cup cucumber, julienned - 1/4 cup green onions, chopped - 1/4 cup sesame seeds, toasted - 1/2 cup shelled edamame - 1/3 cup sesame oil - 2 tablespoons soy sauce (preferably low-sodium) - 2 tablespoons honey - 1 tablespoon rice vinegar - 1 tablespoon fresh ginger, minced - Salt and pepper to taste This recipe offers a great balance of protein and greens. It’s perfect for lunch or dinner. Enjoy the crispness of the vegetables and the crunch of the sesame seeds. Shredding the chicken Start with two cups of cooked chicken breast. Use your hands or two forks to shred it. Aim for small, bite-sized pieces. This makes it easy to eat in the salad. Preparing the vegetables Next, wash and chop your veggies. Use four cups of mixed greens. I like a mix of spinach, romaine, and arugula for a fresh taste. Shred one cup of carrots and slice one red bell pepper thinly. Julienning one cup of cucumber adds crunch. Don’t forget to chop a quarter cup of green onions, too. Making the dressing In a small bowl, combine the dressing ingredients. You'll need one-third cup of sesame oil, two tablespoons of low-sodium soy sauce, and two tablespoons of honey. Add one tablespoon of rice vinegar and one tablespoon of minced fresh ginger. Season with a pinch of salt and pepper. Whisk until well blended. Mixing ingredients in a bowl In a large bowl, add the shredded chicken, mixed greens, carrots, bell pepper, cucumber, green onions, and shelled edamame. Give it a good stir to combine everything. Tossing the salad with dressing Drizzle your dressing over the salad. Use tongs to toss gently. Make sure every piece gets a bit of that tasty dressing. This helps the flavors mix well. Sprinkling sesame seeds Once tossed, sprinkle a quarter cup of toasted sesame seeds on top. This adds a nice crunch and nutty flavor. Letting flavors meld Let the salad sit for about 5-10 minutes. This time allows the flavors to meld. It makes each bite even better. For the full recipe, check out the detailed instructions above. Enjoy your fresh and flavorful Asian Sesame Chicken Salad! To make your salad fresh, always use crisp greens. Look for bright colors and firm textures. Rinse your produce well and dry it thoroughly. Remove any wilted leaves to keep your salad vibrant. When mixing ingredients, use a large bowl. Start with the heavier items, like chicken, and add greens on top. This helps to prevent crushing the greens. Use tongs or salad servers for gentle tossing. Aim for an even mix to ensure each bite has the right flavor. You can play with different oils and vinegars for your dressing. If you prefer a lighter taste, try avocado oil or grape seed oil. For a tangy kick, replace rice vinegar with apple cider vinegar. Customization is key. If you want more sweetness, add more honey. If you like it spicier, consider a dash of chili oil or a sprinkle of crushed red pepper. Adjust the salt to match your taste too. For the full recipe, check the details above. {{image_4}} You can swap chicken for shrimp, tofu, or grilled steak. Each option brings a unique taste. If you want a meat-free salad, try using marinated tofu. It soaks up flavor well. For greens, you can use kale, butter lettuce, or even cabbage. Each green offers a different crunch and taste. Mixing in herbs like cilantro or mint can also brighten your dish. For a gluten-free salad, use tamari instead of soy sauce. Tamari tastes great and keeps the dish safe for gluten-free diets. If you want a vegan option, skip the chicken and honey. Use maple syrup instead of honey for sweetness. Also, make sure your dressing is vegan-friendly. You can create a low-carb version by replacing carrots with bell peppers. This keeps the salad light but still full of flavor. Enjoy these variations to make the salad your own! To keep your salad fresh, refrigerate it right away. Use airtight containers to prevent moisture loss. I like to portion out the salad into smaller containers. This way, you can grab a quick meal later. Make sure to store the dressing separately. This keeps the salad crispy and vibrant. When stored properly, your Asian sesame chicken salad lasts about three days in the fridge. After that, it may lose its taste and texture. Signs of spoilage include wilting greens, off smells, or slimy vegetables. If you see any of these, it’s best to toss the salad. Always trust your senses when checking for freshness. You can enjoy this salad with many tasty sides. Try serving it with: - Steamed jasmine rice - Crispy spring rolls - Grilled shrimp skewers - Miso soup - Fresh fruit salad These dishes enhance the flavors of the salad. Each option adds a new twist to your meal. Yes, you can prepare parts of the salad in advance. Here are some tips: - Store the salad greens and vegetables in separate containers. This keeps them fresh and crunchy. - Cook and shred the chicken a day before. Just keep it chilled in the fridge. - Mix the dressing ahead of time and store it in a sealed jar. Combine everything just before serving to keep it fresh. This salad can be made gluten-free. Here’s how: - Use gluten-free soy sauce instead of regular soy sauce. - Check your sesame oil for gluten-free labeling. - Ensure that all other ingredients are gluten-free. These simple swaps make your salad safe and delicious for everyone. You learned how to make a tasty Asian Sesame Chicken Salad. We covered the ingredients, step-by-step instructions, and helpful tips. Remember, you can customize the salad with various ingredients or dressings. Proper storage keeps your leftovers fresh. Making this salad fits many diets, so everyone can enjoy it. Now you can feel confident in trying this recipe at home. Enjoy your healthy meal that’s easy to prepare and packed with flavor!

Asian Sesame Chicken Salad Fresh and Flavorful Dish

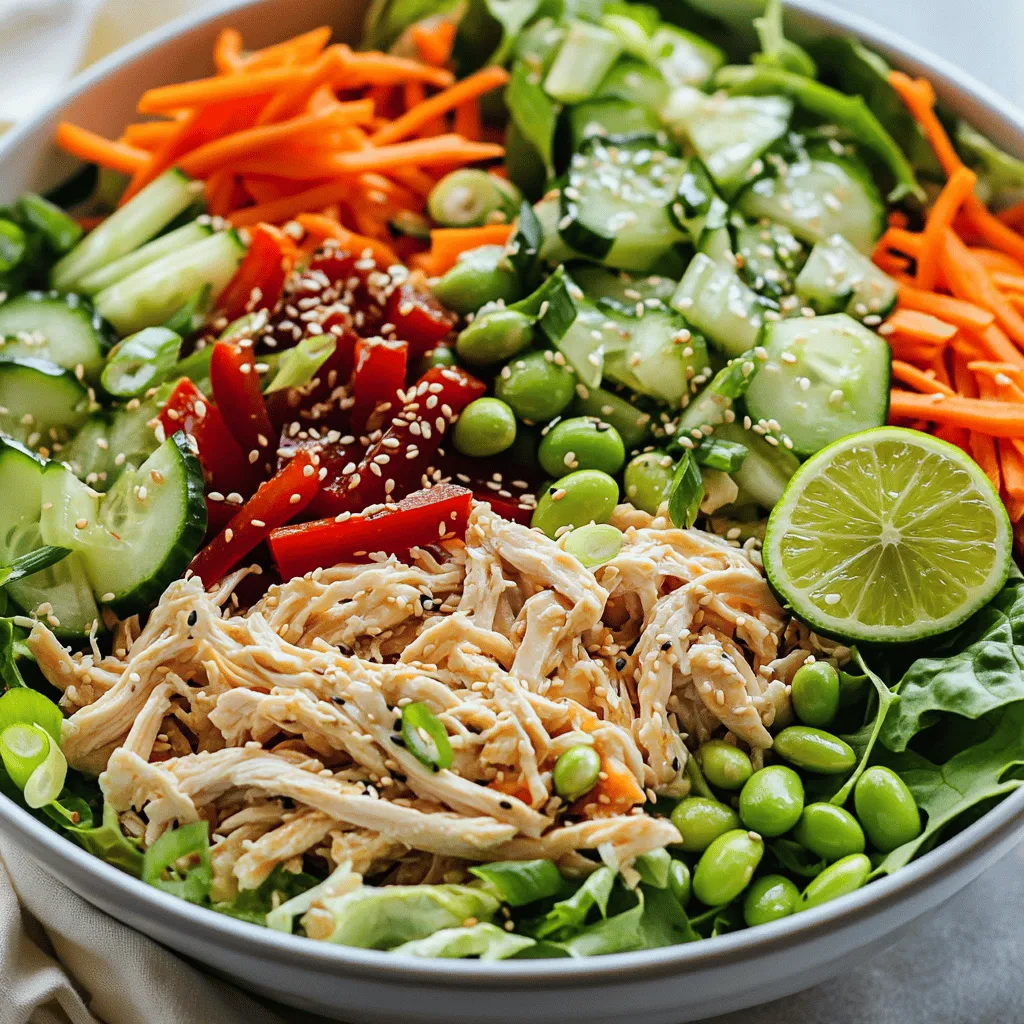
Are you ready for a fresh and tasty dish? Asian Sesame Chicken Salad is a perfect mix of flavors, crunch,

To make stuffed zucchini boats, you need fresh and tasty ingredients. Here’s what you will need: - 4 medium zucchinis - 1 cup cooked quinoa - 1 cup cherry tomatoes, halved - 1/2 cup red bell pepper, finely chopped - 1/2 cup corn kernels (fresh or frozen) - 1 cup black beans, rinsed and drained - 1 teaspoon ground cumin - 1 teaspoon chili powder - 1/2 teaspoon garlic powder - 1 cup shredded cheese (cheddar or mozzarella) - Salt and pepper to taste - 2 tablespoons olive oil - Fresh cilantro, chopped, for garnish Using these ingredients makes the dish flavorful and healthy. Quinoa adds protein, while black beans bring fiber. Zucchini is low in calories, making this meal light and satisfying. You can find the full recipe in the previous section. Enjoy the mix of fresh veggies and spices! - Preheat the oven to 375°F (190°C). - Rinse and slice the zucchinis, scoop out seeds. - Coat the zucchini with olive oil, salt, and pepper. Start by warming your oven. This step helps cook our zucchini evenly. Next, rinse the zucchinis to remove dirt. Slice them in half lengthwise to create boats. Use a spoon to scoop out the seeds. Make sure to leave enough flesh so the zucchini stays firm. Finally, drizzle olive oil on the cut sides. Sprinkle salt and pepper for extra taste. - Combine quinoa, vegetables, spices, and beans in a bowl. - Mix thoroughly to blend flavors. In a large bowl, add the cooked quinoa. Toss in halved cherry tomatoes, chopped red bell pepper, corn, and black beans. Then, add the spices: ground cumin, chili powder, and garlic powder. Mixing everything well is key. This helps all the flavors come together nicely. - Fill zucchini boats with the mixture. - Top with cheese, cover with foil, and bake. - Remove foil and bake until golden and tender. Take the quinoa mixture and spoon it into each zucchini boat. Press down gently to pack it inside. Then, sprinkle shredded cheese on top of each boat. Cover the baking sheet with aluminum foil to keep moisture in. Bake for 20 minutes. After that, take off the foil. Bake for another 10 to 15 minutes until the cheese is golden and bubbly. The zucchinis should also be tender. For the full recipe, check the main section. Enjoy your tasty stuffed zucchini boats! - Choose firm zucchinis for the best results. Soft zucchinis can fall apart. - Avoid over-scooping to maintain structure. Keep some flesh for support. - Experiment with spices or add fresh herbs. Basil and oregano work well. - Drizzle with balsamic glaze for added flavor. This adds a sweet touch. - Adjust baking time based on zucchini size. Smaller zucchinis need less time. - Broil briefly for extra crispiness on top. This makes the cheese melt nicely. For a full recipe, check out the delightful stuffed zucchini boats that I love to make! {{image_4}} Stuffed zucchini boats are a fun dish. You can change them up in many ways. Here are some tasty options. If you want a meatless meal, try these swaps: - Replace black beans with cooked lentils. Lentils give a nice texture. - Use vegan cheese for a dairy-free version. It still melts and tastes great. For those who enjoy meat, consider these ideas: - Incorporate ground turkey or beef for a meaty filling. It adds richness and heartiness. - Use chickpeas for a different plant-based protein. They are filling and add fiber. Keeping it gluten-free? Here are some tips: - Ensure quinoa is labeled gluten-free. This helps avoid any issues. - Use grain-free fillings like cauliflower rice. It’s low in carbs and very tasty. Feel free to mix and match these ideas. Each variation can turn your stuffed zucchini boats into something new and exciting. For the complete recipe, check out the [Full Recipe]. Store your stuffed zucchini boats in an airtight container for up to 3 days. This helps keep them fresh and tasty. Make sure they cool down before you put them in the fridge. You can enjoy them again without losing flavor. Want to save some for later? You can freeze stuffed zucchini boats prior to baking. This gives them a longer shelf life. To use them, just thaw before baking. Adjust the cooking time as needed, since they start frozen. For the best texture, reheat in the oven. This keeps the zucchini firm and the cheese melty. If you’re in a hurry, you can use the microwave for quick warming. Just be careful not to overheat, or the zucchini might get mushy. Try these storage tips to enjoy your delicious stuffed zucchini boats later. You’ll find they taste just as good! For the full recipe, check out the delightful stuffed zucchini boats. Yes, prepare and store in the fridge before baking. This saves time on busy days. You can assemble the boats and cover them with plastic wrap. When ready, just pop them in the oven. Zucchini should be tender, and cheese should be bubbly and golden. Use a fork to check the zucchini's softness. The cheese will look melted and slightly browned. This means your dish is ready to eat! Pair with a side salad or garlic bread for a complete meal. A fresh salad adds crunch and balance. Garlic bread brings warmth and flavor. Both options complement the zucchini boats well. Absolutely! Use whatever vegetables and spices suit your taste. You can switch out the black beans for lentils or add spinach. Try different herbs for unique flavors, like basil or oregano. Yes, using low-carb fillings makes them suitable for a keto diet. Substitute the quinoa with cauliflower rice if you want fewer carbs. This keeps your meal delicious without sacrificing flavor. For the full recipe, check out the delightful stuffed zucchini boats section. Stuffed zucchini boats are easy and fun to make. We shared ingredients, preparation steps, and storage tips. You can customize the filling to fit your taste and diet. This dish is great for healthy meals or impressing guests. Remember, fresh ingredients bring out the best flavors. Now, try making these delicious zucchini boats for yourself and enjoy the rewarding taste of your hard work!

Stuffed Zucchini Boats Flavorful and Healthy Meal

Looking for a meal that’s both tasty and healthy? Stuffed zucchini boats are your answer! They’re easy to make and

To make maple glazed carrots, you need a few key items: - 1 lb baby carrots (or 4 medium-sized regular carrots, peeled and cut into evenly sized sticks) - 2 tablespoons unsalted butter - 3 tablespoons pure maple syrup - 1 tablespoon fresh thyme leaves (or 1 teaspoon dried thyme) - Sea salt and freshly ground black pepper to taste - 1 teaspoon lemon juice (optional, for added brightness) These ingredients create a sweet and savory flavor that makes the dish shine. The maple syrup adds sweetness while the butter gives a rich taste. Fresh thyme brings a nice herbal note, balancing the sweetness well. For extra depth in flavor, consider adding: - A pinch of cinnamon for warmth - A sprinkle of nutmeg for a cozy touch - Chopped pecans or walnuts for crunch These optional ingredients can enhance the dish. Cinnamon offers a warm spice, while nuts provide a delightful texture. You can mix and match based on your taste preferences. If you don’t have an ingredient, here are some swaps: - Use olive oil instead of butter for a dairy-free option - Honey or agave nectar can replace maple syrup if needed - Use rosemary or oregano instead of thyme for a different flavor profile These substitutions help you adapt the recipe to what you have on hand. Each swap can change the taste slightly, so feel free to explore. Just remember, whatever you choose, the goal is to keep that sweet and savory balance. For the full recipe, refer back to the main section. To start, wash the baby carrots well under cold water. If you use regular carrots, peel them first. Then cut them into even sticks. This helps them cook evenly. Aim for pieces about the same size. This way, they’ll all be tender at the same time. Heat a large non-stick skillet on medium heat. Add 2 tablespoons of unsalted butter and let it melt. When the butter foams, add the carrots. Sauté the carrots for about 5 minutes. Stir them occasionally until they get a nice color. After that, pour in 3 tablespoons of pure maple syrup. Sprinkle in the fresh thyme leaves. Toss everything well with tongs or a spatula. Cook for another 5-7 minutes, stirring often. The maple syrup will reduce and thicken, coating the carrots in a sweet glaze. Season with sea salt and black pepper. For a bright taste, add 1 teaspoon of lemon juice if you like. Remove from heat when the carrots are tender and glistening. Transfer the glazed carrots to a serving dish. For a special touch, garnish with a sprig of fresh thyme. This adds a lovely look and a hint of herbal flavor. Serve the carrots warm. They pair well with many main dishes, making them a perfect side. Enjoy your delicious maple glazed carrots with your favorite meal! For detailed steps, check the Full Recipe. To get the best maple glazed carrots, size matters. Use baby carrots or cut regular carrots into even pieces. This helps them cook evenly. Start with a hot pan to get a nice sear. Melt your butter until it foams before adding the carrots. This step gives them a great flavor. Stir often to avoid burning, and watch for a nice glaze to form. Many people skip lemon juice, but it brightens the dish. A little acid can balance the sweetness of the maple syrup. Fresh thyme adds a lovely herb taste that elevates the dish. If you use dried thyme, remember it is stronger, so less is more. Sea salt and black pepper enhance all the flavors, so don’t skip them! Maple glazed carrots pair well with many main dishes. They work great with roasted chicken or grilled salmon. For a vegetarian meal, serve them with quinoa or a hearty salad. You can also add them to a feast with mashed potatoes and green beans. Try them with a warm bread roll to soak up the sweet glaze. For the full recipe, check out the section above. {{image_4}} You can enhance maple glazed carrots by adding spices and herbs. Try cinnamon for warmth. Nutmeg adds a cozy touch, perfect for fall. You can also mix in fresh herbs, like parsley or dill, for added flavor. Thyme works great, but rosemary can give a nice twist too. Each spice changes the taste in a fun way. If you want a different sweetener, honey is a great choice. Agave nectar also works well. For a lower-calorie option, use stevia or monk fruit sweetener. Each option gives a unique flavor. Adjust the amount based on your taste. You can even mix sweeteners for a fun combo! You can easily adapt this recipe for different diets. For a vegan version, swap butter with coconut oil or vegan butter. If you’re watching carbs, use a sugar-free syrup. You can even add nuts for crunch. These changes make the dish suit your needs while keeping it tasty. For the complete recipe, check out the Full Recipe section. To keep your leftover maple glazed carrots fresh, place them in an airtight container. Make sure the carrots are cool before sealing the container. Store them in the fridge for up to three days. This way, they stay tasty and keep their sweet flavor. When you want to reheat your carrots, use a skillet for the best taste. Heat the skillet over medium heat. Add a splash of water or a bit of butter to keep them moist. Cook for about 5 minutes, stirring often. This method helps the glaze stick and keeps the carrots soft. You can also use the microwave, but be careful not to overcook them. Heat them in short bursts, stirring in between. Yes, you can freeze maple glazed carrots, but they may lose some texture. To freeze, let the carrots cool completely. Then, spread them on a baking sheet in a single layer. Freeze for about 1-2 hours. Once frozen, transfer them to a freezer bag, squeezing out the air. They can last up to three months in the freezer. To eat them, thaw in the fridge overnight and reheat as mentioned above. Check the Full Recipe for more details on making these delightful carrots. To enhance the flavor, consider adding a pinch of cinnamon or nutmeg. These spices add warmth and depth. You can also try using fresh herbs like parsley or dill for a fresh note. A splash of balsamic vinegar can add a tangy twist. Experiment with different flavors to find your favorite combo. Yes, you can use regular carrots! Just peel them and cut them into even sticks. Aim for sizes that are similar to baby carrots. This ensures they cook evenly. Regular carrots offer a heartier texture and a great taste. They can absorb the maple glaze well, giving you a rich flavor. If you want more sweetness, add extra maple syrup. Start with a small amount and taste as you go. If it's too sweet, you can balance it with a little lemon juice. This adds brightness and cuts the sweetness. Adjust gradually to get your perfect flavor. For less sweetness, reduce the syrup used in the recipe. For the full recipe, check out the details above. This post covered all you need for perfect maple glazed carrots. We explored essential and optional ingredients, plus helpful substitutions. I provided clear steps for preparation and cooking. You learned tips for perfecting your dish and creative variations to try. Finally, we discussed storing and reheating leftovers. Remember, cooking should be fun and easy. Enjoy trying new flavors and techniques. Happy cooking!

Maple Glazed Carrots Savory and Sweet Side Dish

Looking for a new side dish that combines savory and sweet? Maple Glazed Carrots might be your answer! This dish

- 9 lasagna noodles - 2 cups ricotta cheese - 1 large egg - 3 cups fresh spinach, chopped - 1 cup mozzarella cheese, shredded - 1/2 cup Parmesan cheese, grated - 3 cups marinara sauce - 1 teaspoon dried oregano - 1/2 teaspoon black pepper - Salt, to taste - Olive oil, for sautéing It’s vital to use fresh and quality ingredients in your lasagna. Fresh spinach adds a nice color and taste. When picking spinach, look for leaves that are bright and firm. Avoid wilted or yellowing leaves, as they may not taste good. Choosing good cheeses makes a big difference too. Fresh ricotta has a creamy texture and mild flavor. It blends well with spinach and adds richness. Aged Parmesan adds a sharp taste. Always go for whole cheeses over pre-shredded options. They melt better and taste fresher. Each serving of this lasagna packs a punch. You get protein from the ricotta and mozzarella. The spinach adds vitamins A and C. Here’s a quick look at the caloric breakdown per serving: - Approx. 350 calories - High in calcium and iron This dish gives you a hearty meal while still being healthy. To start, you need to cook the lasagna noodles. Boil a large pot of water. Add salt for flavor. Cook the noodles until they are al dente, which means they should be firm but not hard. Follow the package instructions. Drain the noodles well. Lay them flat on a clean kitchen towel. This helps prevent them from sticking together. Next, let’s make the spinach filling. In a skillet, heat a small amount of olive oil over medium heat. Add the chopped spinach and sauté it. Stir often until the spinach wilts, which takes about 3-4 minutes. Remove it from heat and let it cool. In a mixing bowl, combine ricotta cheese, a large egg, the sautéed spinach, dried oregano, black pepper, and a pinch of salt. Mix it all well with a spatula or fork. Now it’s time to layer the lasagna. Start by spreading a thin layer of marinara sauce in the bottom of your baking dish. This helps prevent sticking and adds flavor. Place three lasagna noodles over the sauce. Next, spread half of the ricotta-spinach mixture evenly on top. Pour in one cup of marinara sauce and sprinkle half of the mozzarella cheese on top. Repeat this process. Add another three noodles, the rest of the ricotta-spinach mix, another cup of marinara, and the remaining mozzarella cheese. For the top layer, place the last three noodles. Cover them with the rest of the marinara sauce. Finally, sprinkle the grated Parmesan cheese over the top. This creates a delicious crust when baked. Enjoy making this hearty meal! For the full recipe, refer to the earlier section. Avoid overcooking the noodles. This will make them mushy and hard to work with. Cook them al dente; they will finish cooking in the oven. Skipping the rest time post-baking is another mistake. Let the lasagna cool for at least 10 minutes. This helps it set and makes slicing easier. Use aluminum foil effectively. Cover your dish tightly before baking to keep moisture in. Lightly spray the foil with cooking spray to prevent sticking. Check for doneness by looking for bubbling sauce and a golden top. If it looks undercooked, bake it a bit longer. For garnishing, add fresh basil leaves on top. This adds color and flavor. A light sprinkle of extra Parmesan cheese also enhances the look. Pair your lasagna with a fresh salad or garlic bread. A crisp side complements the rich flavors of the lasagna. {{image_4}} You can switch up your lasagna with alternative ingredients. Use gluten-free noodles if you want to avoid gluten. Many brands offer great options that taste wonderful. This way, everyone can enjoy your dish. You can also play with cheese. Try using cottage cheese instead of ricotta for a lighter taste. Goat cheese can add a tangy flavor that really pops. Mix and match to find your favorite blend. If you want a vegan lasagna, swap the ricotta with tofu. Blend firm tofu with a bit of lemon juice and nutritional yeast for a creamy, cheesy feel. You can also use cashew cheese for a rich taste. Add more veggies for extra nutrition. Try mushrooms, zucchini, or bell peppers. They add flavor and color to your dish. You can also include cooked lentils for protein, making it hearty and filling. Boost the flavor with herbs and spices. Fresh basil and thyme can brighten your dish. If you like heat, add red pepper flakes for a kick. Consider unique sauce variations too. Instead of marinara, try a white sauce or pesto. This will give your lasagna a fresh twist. Don't forget to layer in some garlic for an extra punch of flavor. For the complete recipe, check out the Full Recipe. After enjoying your classic lasagna with spinach, store leftovers in the fridge. Let the dish cool down first. Use a tight lid or plastic wrap to cover it. This keeps the moisture in and prevents it from drying out. When ready to reheat, slice the lasagna into portions. Place a slice on a plate and cover it with a damp paper towel. This helps keep it moist as it warms up in the microwave. You can freeze your lasagna to enjoy later. If you want to freeze it before baking, assemble it in a freezer-safe dish. Cover it well with foil and label it with the date. If you freeze it after baking, let it cool completely first. Then wrap it tightly in foil or plastic wrap. To thaw, move the lasagna to the fridge for at least 24 hours. Reheat it in the oven at 375°F (190°C) until hot throughout. In the fridge, your lasagna lasts about 3 to 5 days. If you freeze it, it can last up to 3 months. For best taste, eat it within this time. Just remember to check for any signs of freezer burn before you enjoy it. Yes, you can prepare this lasagna in advance. Here’s how: - Cook the lasagna noodles as per the recipe. - Prepare the spinach filling and layer the lasagna in your baking dish. - Instead of baking it right away, cover it tightly with plastic wrap or foil. - Store it in the fridge for up to 24 hours before baking. This way, flavors meld nicely. Just remember to adjust baking time. If it's cold from the fridge, it may need more time in the oven. Reheating lasagna can be tricky. You want to keep it moist and tasty. Here are some tips: - Preheat your oven to 350°F (175°C). - Place the lasagna in a baking dish and cover it with foil. - Heat for 20-30 minutes, until hot in the center. - If you like a crispy top, uncover it for the last 10 minutes. This method keeps the layers nice, soft, and gooey. Yes, there are good options if you need a change. Try these: - Cottage cheese: It gives a similar texture. - Cream cheese: This adds a richer taste but mix it well. - Tofu: Perfect for a vegan option. Blend it until smooth. Each option brings a unique touch to the lasagna while keeping it creamy. This lasagna pairs well with simple sides: - A fresh garden salad: Lettuce, tomatoes, and cucumbers work well. - Garlic bread: Crunchy and buttery bread complements the meal. - Roasted vegetables: Carrots and zucchini add nice colors and flavors. These sides balance the hearty lasagna and make the meal complete. For the full recipe and details, check out the Spinach Delight Lasagna. In this blog post, we explored making Classic Lasagna with Spinach. You learned about the ingredients, preparation steps, and tips for success. Fresh ingredients are key for great flavor and health benefits. Avoid common mistakes for the best results. Remember, there are many variations, so feel free to experiment. Finally, proper storage will keep your lasagna tasty for later. Enjoy creating this dish and share it with your loved ones!

Classic Lasagna with Spinach Tasty and Hearty Meal

Are you ready to elevate your dinner game with a classic dish that warms the heart? This Classic Lasagna with

To make these tasty scones, you need a few key ingredients. Here’s what you will need: - 2 cups all-purpose flour - 1 tablespoon baking powder - 1/2 teaspoon salt - 1/4 teaspoon black pepper - 1/2 cup cold unsalted butter, cubed - 1 cup sharp cheddar cheese, finely grated - 1/4 cup fresh chives, finely chopped - 2/3 cup whole milk - 1 large egg (for egg wash) These ingredients work together to create a rich and savory flavor. The sharp cheddar gives a nice bite, while the chives add a fresh touch. You can add fun twists to your scones. Here are some optional ingredients to consider: - Crumbled bacon for a smoky flavor - Sun-dried tomatoes for a burst of sweetness - Different cheeses like feta or pepper jack for new tastes Using these optional ingredients can make each batch unique. Feel free to mix and match to find your favorite combination! If you have dietary needs, you can still enjoy these scones. Here are some easy swaps: - Use gluten-free flour instead of all-purpose flour for a gluten-free version. - Swap the butter for coconut oil or vegan butter for a dairy-free option. - Substitute almond milk or soy milk for whole milk to make it dairy-free. These substitutions keep the flavor while meeting your dietary needs. Enjoy the process and make it your own! First, preheat your oven to 400°F (200°C). Line a baking sheet with parchment paper. In a mixing bowl, combine 2 cups of all-purpose flour, 1 tablespoon of baking powder, 1/2 teaspoon of salt, and 1/4 teaspoon of black pepper. Whisk these dry ingredients well. Next, add 1/2 cup of cold, cubed unsalted butter. Use your fingertips or a pastry cutter to mix the butter until it looks like coarse crumbs, with some larger pieces for flakiness. Now, fold in 1 cup of finely grated sharp cheddar cheese and 1/4 cup of finely chopped fresh chives. Mix until they are evenly spread throughout. Gradually pour in 2/3 cup of whole milk while gently mixing with a fork. Stop as soon as the dough starts to come together. This keeps your scones light and fluffy. Lightly flour a clean surface and place the dough on it. Knead the dough gently just a few times to combine everything. Shape the dough into a round disc that is about 1 inch thick. With a sharp knife, cut the disc into 8 wedges. You can also use a round cutter for classic scone shapes. Place the pieces on the prepared baking sheet, leaving enough space for them to rise. In a small bowl, beat 1 large egg until smooth. Use a pastry brush to coat the tops of the scones with the egg wash. This gives them a nice golden color when baked. Now, place your baking sheet in the preheated oven. Bake the scones for 15-20 minutes. They should be golden brown and sound hollow when tapped on the bottom. Once baked, let them cool on the sheet for a few minutes. Then, transfer them to a wire rack or serving platter. For the full recipe, check the earlier section. Enjoy your warm, savory cheddar and chive scones! To get the best texture, keep your butter cold. When you mix it with flour, it should be in small pieces. This helps make your scones flaky. I recommend using your fingers or a pastry cutter. Aim for a mix that looks like coarse crumbs. Fresh ingredients make a big difference. Use sharp cheddar cheese for a strong taste. Chives should be fresh and bright green. If you can, buy them from a local market. Fresh ingredients add life to your scones and can transform your meal. Don’t overwork your dough. Mix just until it comes together. Over-kneading makes scones tough. Also, avoid skipping the egg wash. It gives your scones a lovely golden color. Lastly, make sure your oven is preheated. This helps them rise well and bake evenly. For a full recipe, check out the [Full Recipe] section. {{image_4}} You can switch up the cheese for different tastes. Try using Gruyère for a nutty flavor. Or go with feta for a salty twist. Each cheese brings its own charm to the scones. Mixing cheeses can also give you a fun blend. Experimenting is part of the fun! Herbs can add a burst of freshness. Basil or parsley can brighten the flavor. You can also use dill for a unique taste. Adding herbs gives your scones a garden-fresh note. Don’t be afraid to mix different herbs for a special touch. You’ll love the new flavors you create! If you want a change, try sweet scones. Replace cheese and chives with fruits like blueberries. Add sugar and a hint of vanilla for sweetness. Sweet scones are great for breakfast or tea time. They provide a nice contrast to the savory ones. You can enjoy both styles for variety! For the full details on making these delightful scones, check out the Full Recipe. To keep your savory cheddar and chive scones fresh, store them in an airtight container. This method helps retain moisture and prevents them from drying out. If you plan to eat them within a day or two, this method works perfectly. - Cool completely before storing. - Layer with parchment paper if stacking. - Avoid the fridge; cold air can make them tough. When you want to enjoy a warm scone, reheating is simple. You can use an oven or a microwave. - Oven method: Preheat to 350°F (175°C). Place scones on a baking sheet. Heat for about 5-10 minutes, or until warm. - Microwave method: Place a scone on a microwave-safe plate. Heat for 10-15 seconds. Check for warmth, adding more time if needed. Freezing scones is a great way to keep them delicious for longer. This method lets you enjoy them anytime. - Cool completely before freezing. - Wrap each scone in plastic wrap. - Place wrapped scones in a freezer bag. Remove as much air as possible. You can freeze them for up to three months. When ready to eat, thaw in the fridge overnight then reheat. For the full recipe, check the link above. You can tell your scones are done when they turn golden brown. When you tap the bottom, it should sound hollow. This means they cooked well. The baking time usually ranges from 15 to 20 minutes. Keep an eye on them as ovens can vary. Enjoy the lovely aroma; it’s a good sign! Yes, you can make the dough ahead of time. After mixing, wrap it tightly in plastic wrap. Store it in the fridge for up to 24 hours. When you're ready to bake, just roll it out and cut it. This makes it easy for busy days. Just remember to let it warm a bit before baking. Savory cheddar and chive scones pair well with many things. Serve them with butter or cream cheese. They also go great with soup or salad. Try topping them with avocado or smoked salmon. For a special touch, add a sprinkle of extra chives on top. They make a perfect snack or brunch item. - Full Recipe: Savory Cheddar and Chive Scones You now have all the tools to bake perfect savory cheddar and chive scones. We covered essential and optional ingredients, plus fun variations to try. I shared step-by-step instructions to guide your baking. Remember, fresh ingredients and avoiding common mistakes will make a big difference. Enjoy experimenting with flavors and storing them for later use. These scones can be a great treat any time. Take your time and have fun baking!

Savory Cheddar and Chive Scones Flavorful and Easy Recipe

If you love warm, flaky scones packed with flavor, you’ll enjoy my savory cheddar and chive scones. This simple recipe

To make Lemon Blueberry Overnight Oats, you will need the following ingredients: - 1 cup rolled oats - 1 cup almond milk (or any milk of your choice) - 1/2 cup Greek yogurt (or plant-based yogurt alternative) - 1 tablespoon honey or maple syrup - Zest of 1 lemon - Juice of 1 lemon - 1/2 teaspoon vanilla extract - 1/2 teaspoon ground cinnamon - 1/2 cup fresh blueberries (plus extra for garnish) - A pinch of salt Each ingredient plays a key role in creating a tasty meal. The rolled oats form the base, giving it a hearty feel. Almond milk adds creaminess, while Greek yogurt boosts protein and tang. Honey or maple syrup sweetens it, and lemon zest and juice brighten the flavor. Vanilla and cinnamon add warmth, while blueberries bring freshness and color. You can find the full recipe for Lemon Blueberry Overnight Oats in the section below. This recipe is not just simple; it brings joy with each bite! To make Lemon Blueberry Overnight Oats, follow these simple steps. - Combine rolled oats and almond milk Start by adding 1 cup of rolled oats to a bowl. Pour in 1 cup of almond milk. Stir well until the oats soak up the milk. - Mix in Greek yogurt and sweeteners Next, add 1/2 cup of Greek yogurt to the bowl. If you like it sweet, mix in 1 tablespoon of honey or maple syrup. Stir until smooth. - Fold in lemon zest, juice, and spices Now, add the zest and juice of 1 lemon. Include 1/2 teaspoon of vanilla extract, 1/2 teaspoon of ground cinnamon, and a pinch of salt. Mix well to enhance the flavor. - Gently incorporate fresh blueberries Carefully fold in 1/2 cup of fresh blueberries. Do this gently so you don’t mash the berries. This step keeps the blueberries whole and juicy. - Transfer to a jar or container Next, pour the mixture into a jar or an airtight container. Seal it well to keep it fresh. - Refrigerate overnight or for 4-6 hours Place the container in the fridge for at least 4-6 hours or overnight. This lets the oats soak and flavors blend. - Stir and adjust consistency before serving In the morning, take the oats out and give them a good stir. If they are too thick, add a splash of milk to loosen them up. For the full recipe, check the details above. Enjoy your tasty and healthy breakfast! - Make a batch for the week. This saves time and keeps breakfast easy. - Customize sweetness to taste. You can add more or less honey or syrup. - Layer ingredients for easy serving. This makes it fun to grab and go. - Use glass jars for visual appeal. They show off the bright colors of the oats and berries. - Garnish with mint or extra blueberries. This adds a touch of freshness and looks nice. - High in fiber from oats. This helps with digestion and keeps you full. - Packed with antioxidants from blueberries. These help protect your body from damage. - Probiotics from Greek yogurt. They support gut health and boost your immune system. This lemon blueberry overnight oats recipe is a tasty and healthy choice. You can find the full recipe in the main article. Enjoy your delicious meal! {{image_4}} You can change the flavor of your Lemon Blueberry Overnight Oats by swapping ingredients. Here are some ideas: - Use different types of milk, like coconut or soy. - Replace maple syrup with agave or stevia for a lower-calorie option. - Add chia seeds for extra texture and nutrition. These swaps keep your oats fresh and exciting. You can find new flavors that you love while keeping the base recipe intact. To make your overnight oats even more delicious, try these flavor combos: - Add nuts or seeds for a crunchy texture. Almonds or walnuts work well. - Mix in other fruits like strawberries or peaches for a fruity twist. - Experiment with spices such as nutmeg or cardamom to enhance the taste. These combinations let you get creative in the kitchen. You can easily customize your oats to fit your mood or taste. For the full recipe, check the section above! You should store your Lemon Blueberry Overnight Oats in an airtight container. This helps keep them fresh and tasty. They can last for up to five days in the fridge. This makes them a great option for meal prep. You can make a big batch, and enjoy them all week. If you want to save some for later, these overnight oats are suitable for freezing. Just scoop them into a freezer-safe container. When you're ready to eat, thaw them in the fridge overnight. Before serving, add fresh toppings like blueberries or a drizzle of honey. This will bring back that fresh taste. Lemon blueberry overnight oats stay fresh for about five days in the fridge. Keep them in an airtight container to maintain flavor and texture. The oats soften as they soak, making them even tastier over time. Just give them a good stir before serving. Yes, you can make these oats vegan easily. Simply replace Greek yogurt with a plant-based yogurt. Use maple syrup instead of honey for sweetness. Swap almond milk for any non-dairy milk you prefer. This way, you keep all the flavor while making a vegan meal. If you don't have Greek yogurt, try using any plant-based yogurt. Options like almond or coconut yogurt work well. You can also use silken tofu blended until smooth for a creamy feel. This keeps the texture nice and rich while adding your own twist. To make more servings, multiply all ingredients by the number of servings you want. For example, if you want four servings, double the ingredients listed in the full recipe. Make sure your container can hold the larger batch. It’s easy to share this delicious meal with friends or family! Absolutely! You can add nuts, seeds, or other fruits to boost flavor and texture. Try adding chia seeds for extra nutrition or sliced bananas for sweetness. Get creative! The fun of overnight oats is the chance to customize them to your taste. These Lemon Blueberry Overnight Oats are not just easy to make; they're also healthy and tasty. You learned how to combine oats, yogurt, and blueberries into a delicious breakfast. Remember, you can customize them to fit your taste and needs. Make a big batch, store them, and enjoy! These oats are packed with fiber and good nutrients. They are a great way to start your day. Now it’s your turn to try this recipe and share it with others!

Lemon Blueberry Overnight Oats Simple and Tasty Meal

Start your day on a tasty note with Lemon Blueberry Overnight Oats! This simple meal is not only quick to

This dish shines because of its fresh and simple ingredients. Here’s what you need: - 8 oz (about 225g) penne pasta - 1 tablespoon olive oil - 4 cloves garlic, finely minced - 1 can (14 oz) diced tomatoes, undrained - 2 cups vegetable broth - 1 cup heavy cream (or coconut cream for a dairy-free option) - 1 teaspoon dried basil - Salt and pepper to taste - 1 cup fresh basil leaves, roughly chopped - ½ cup grated Parmesan cheese (or nutritional yeast for a vegan alternative) - Additional fresh basil leaves for garnishing Each ingredient plays a role. The penne pasta absorbs flavors. The garlic gives a warm touch. Diced tomatoes add sweetness and acidity. Vegetable broth forms the base. Heavy cream brings richness. Fresh basil adds a lovely aroma. You can tweak this recipe to fit your taste. Here are some optional ingredients: - Red pepper flakes for heat - Spinach or kale for added greens - Mushrooms for an earthy flavor - Cooked chicken or shrimp for protein - Lemon zest for brightness Feel free to add or skip these as you like. The dish remains creamy and delicious no matter what. Having the right tools makes cooking easier. Here are the must-haves: - A large pot for cooking - A wooden spoon for stirring - A chef’s knife for chopping - A cutting board for prep - Measuring cups for accuracy With these tools, you can whip up this pasta without a hitch. They help you work efficiently and enjoy the process. For the complete recipe, refer to the [Full Recipe]. To start making One-Pot Creamy Tomato Basil Pasta, gather your ingredients. You will need: - 8 oz (about 225g) penne pasta - 1 tablespoon olive oil - 4 cloves garlic, finely minced - 1 can (14 oz) diced tomatoes, undrained - 2 cups vegetable broth - 1 cup heavy cream (or coconut cream for a dairy-free option) - 1 teaspoon dried basil - Salt and pepper to taste - 1 cup fresh basil leaves, roughly chopped - ½ cup grated Parmesan cheese (or nutritional yeast for a vegan alternative) - Additional fresh basil leaves for garnishing Now, measure everything out. This keeps the cooking process smooth and fun. 1. Heat the olive oil in a large pot over medium heat. 2. Add the minced garlic and sauté for 1-2 minutes. Be careful not to brown the garlic; it should smell sweet. 3. Next, pour in the undrained diced tomatoes, vegetable broth, and dried basil. Stir gently to combine. 4. Increase the heat to bring it all to a gentle simmer. 5. Add the penne pasta to the pot. Cover it and cook for 10-12 minutes. Stir now and then to keep the pasta from sticking. 6. Once the pasta is al dente, stir in the heavy cream (or coconut cream). Season with salt and pepper. Let it simmer for 2-3 more minutes. This thickens the sauce and makes it creamy. When the pasta is ready, remove the pot from the heat. Stir in the chopped fresh basil and grated Parmesan cheese. Mix well until everything is creamy and delicious. Before serving, taste it. Adjust with more salt or pepper if needed. Serve the creamy pasta warm and top each bowl with extra fresh basil leaves and a sprinkle of Parmesan cheese. Enjoy your meal! For the full recipe, check out the complete instructions above. To make your pasta creamy, start with the right cream. I like heavy cream, but coconut cream works too. It gives you a nice, rich taste. Adding it at the end makes the sauce silky. Make sure to stir it well into the pasta. This keeps it from clumping. Another trick is to let the pasta absorb some broth before adding cream. This helps the sauce cling to the pasta. For extra creaminess, stir in some grated cheese. Parmesan melts easily and adds flavor. One common mistake is overcooking the pasta. You want it al dente, or firm to the bite. If you cook it too long, it can turn mushy. Stirring occasionally helps, so the pasta cooks evenly. Another mistake is skipping salt. Always season your broth and cream. This brings out the flavors of the tomatoes and basil. Finally, don’t forget to taste as you go. Adjust salt and pepper to suit your taste. To boost flavor, add fresh herbs at the end. Chopped basil adds a bright note. You can also add a splash of lemon juice for brightness. If you want more texture, toss in some sautéed veggies. Spinach or bell peppers work well. They add color and nutrition too. For those who love heat, a pinch of red pepper flakes can spice things up. It gives your dish a little kick without overpowering the flavors. Explore the [Full Recipe] for all the details! {{image_4}} You can easily make this dish dairy-free or vegan. Swap heavy cream for coconut cream. This adds a rich flavor. Use nutritional yeast instead of Parmesan cheese. It gives a cheesy taste without dairy. Add a pinch of salt to enhance the flavor. This way, everyone can enjoy the creamy goodness. Want to add some protein? Try cooked chicken or shrimp. They both mix well with the pasta. You can also use chickpeas or lentils for a plant-based option. Just add them in when you combine the cream. This adds texture and makes the meal more filling. Adding veggies boosts health and flavor. In spring, mix in fresh peas or asparagus. In summer, try diced zucchini or bell peppers. For fall, roasted butternut squash or spinach works great. In winter, add kale or broccoli. Just toss them in during the last few minutes of cooking. This keeps the veggies vibrant and adds a pop of color. After you enjoy your one-pot creamy tomato basil pasta, it's important to store any leftovers right. Allow the pasta to cool to room temperature first. Then, transfer it to an airtight container. Store it in the fridge for up to three days. Make sure to keep it sealed tightly to prevent drying out. When you're ready to eat the leftovers, reheating is simple. You can use a microwave or a stovetop. For the microwave, place the pasta in a bowl. Add a splash of water or broth to keep it moist. Heat it in short bursts, stirring in between. If using the stovetop, warm it in a pan over low heat, stirring gently. You may also want to add a bit of cream to restore the sauce's creaminess. If you want to save some pasta for later, freezing is a great option. Portion the cooled pasta into freezer-safe containers. Leave some space at the top, as it will expand when frozen. It can last up to two months in the freezer. To reheat, let it thaw in the fridge overnight. Then, follow the reheating instructions above. Enjoy a quick meal whenever you need it! For the full recipe, check out the details above. I recommend using penne pasta. It holds sauce well, adding flavor to every bite. Other good options include rigatoni or fusilli. These shapes trap the sauce nicely. This keeps your dish creamy and delicious. Yes, you can! Use coconut cream for a dairy-free option. It gives a rich taste without dairy. You can also use a mix of vegetable broth and cashew cream for a lighter sauce. This will keep your pasta creamy and satisfying. To change servings, simply multiply the ingredients. For example, if you want to serve six, increase everything by 1.5 times. If you want fewer servings, cut the amounts in half. Just remember to keep the same cooking time, so your pasta cooks evenly. For the full recipe, check out the One-Pot Creamy Tomato Basil Pasta. In this article, you learned how to make creamy tomato basil pasta. We covered key ingredients, easy steps to cook, and ways to customize it. I shared tips for perfect texture and flavor. You also discovered variations like dairy-free options and protein add-ins. Lastly, we talked about storing leftovers to enjoy later. This dish is simple, fun, and packed with flavor. I hope you feel inspired to try it! Enjoy cooking!

One-Pot Creamy Tomato Basil Pasta Simple Delight

Welcome to the world of easy cooking! Today, I’ll show you how to make One-Pot Creamy Tomato Basil Pasta. This

- 2 cans chickpeas (15 oz each), thoroughly rinsed and drained - 1 can coconut milk (13.5 oz) - 2 tablespoons curry powder - 1 teaspoon ground cumin - 1 teaspoon ground turmeric - 1 teaspoon chili powder Chickpeas are the star here. They add protein and a nice texture. Coconut milk gives the dish a creamy base. It balances the spices well. You can adjust the spice levels with chili powder. Each spice adds flavor and warmth to the curry. - 1 large onion, finely chopped - 3 cloves garlic, minced - 1-inch piece of fresh ginger, grated - 1 can diced tomatoes (14.5 oz) - 2 tablespoons olive oil - 2 cups fresh spinach, packed - Fresh cilantro, chopped (for garnish) - Cooked rice or naan bread (for serving) Onions, garlic, and ginger build a flavor base. Diced tomatoes add moisture and sweetness. Fresh spinach adds color and nutrition. Serve with rice or naan for a filling meal. Cilantro adds a fresh finish. - Large pot - Chopping board and knife - Measuring cups and spoons A large pot is key for cooking the curry. Use a chopping board and knife for prepping ingredients. Measuring cups and spoons help ensure accuracy in your recipe. This setup makes cooking easier and more fun. For the full recipe, check out the provided link. 1. Sautéing onions and aromatics Start by heating the olive oil in a large pot over medium heat. Add the finely chopped onion. Cook it for about 5 minutes. You want the onion to get soft and turn translucent. This step builds the base flavor of your curry. Next, add the minced garlic and grated ginger. Cook for another 2 minutes. The aroma will fill your kitchen, making you eager to dive in! 2. Blooming the spices Now, it’s time to add the spices. Sprinkle the curry powder, ground cumin, ground turmeric, and chili powder into the pot. Stir well to mix everything. Cook for one more minute. This helps the spices release their full flavor. Blooming the spices is a key step to a rich taste. 1. Combining liquids Carefully pour in the diced tomatoes and coconut milk. Mix well until you have a smooth blend. Increase the heat a bit. Bring the mixture to a gentle simmer. This is where the magic happens, as all the flavors begin to meld together. 2. Incorporating chickpeas Now, fold in the rinsed chickpeas. They add protein and texture. Season with salt and freshly ground black pepper. Let the curry simmer for 15 to 20 minutes. Stir occasionally to ensure even cooking. The chickpeas should soak up all the delicious flavors. 1. Adding spinach In the last few minutes of cooking, add the fresh spinach. Stir it in until it wilts. This adds freshness and color to your dish. It’s a simple way to make your curry even more nutritious. 2. Adjusting seasoning Taste your curry and adjust the seasoning if needed. You may want to add a pinch more salt or pepper. This step is important to ensure every bite is full of flavor. Once you’ve achieved the perfect taste, remove the pot from heat. Let it rest for a few moments before serving. For the full recipe, check out the detailed steps above! Enjoy this easy comfort food dish that warms the heart and pleases the palate. To cook chickpeas, use canned ones for ease. Rinse and drain them well. If you cook dried chickpeas, soak them overnight. Boil them for about 1-2 hours until soft. Balancing flavors is key. You want sweet, salty, and spicy notes. Adjust salt and spices as you taste. If it's too hot, add a touch of sugar or more coconut milk to mellow the heat. Serve your chickpea curry over warm rice. Naan bread is also a great choice. Both soak up the rich sauce well. For presentation, use a deep bowl to showcase the vibrant colors. Add a sprinkle of fresh cilantro on top for a pop of green. It makes the dish look fresh and inviting. Add more veggies to boost nutrition. Spinach is a great addition, but you can also use bell peppers or carrots. They add color and crunch. Consider adding superfoods like kale or quinoa. They increase fiber and protein. You can mix in cooked lentils for extra heartiness. These additions make your meal even healthier and more filling. For the full recipe, check out the Chickpea Bliss Curry. {{image_4}} For a unique twist, you can change the spices. If you want an Indian-inspired flavor, use spices like garam masala or cardamom. These spices add warmth and depth. You can also try a Thai-inspired version. Use red curry paste and fresh basil. This will give your dish a fresh kick and a new flavor. You can boost the nutrition of your curry by adding protein or fiber. Tofu or tempeh works well. They soak up the curry flavors and add a nice texture. Lentils or beans are another great choice. They make the dish heartier and more filling. Mixing these proteins keeps your meal exciting and healthy. You can cook this curry in different ways. The Instant Pot is a fast option. It saves time and keeps the chickpeas tender. Simply set it to the “manual” setting for about 10 minutes. A slow cooker is perfect if you want to set it and forget it. Cook on low for about 6 hours. Both methods create delicious results. For the full recipe, check the link. For storage, I recommend using airtight glass containers. These keep the curry fresh and safe. When properly stored, Vegan Chickpea Curry lasts up to five days in the fridge. If you plan to eat it later, store it in smaller portions. This helps with quick meals. Freezing is a great way to save your curry. Use freezer-safe containers or bags. Make sure to leave some space for expansion. To thaw, put the container in the fridge overnight. For reheating, simply warm it on the stove or in the microwave. Add a splash of water if it gets too thick. Batch cooking is smart for busy weeks. Make a large pot of curry and divide it into servings. You can enjoy it over rice or with bread. Got leftovers? Use them in wraps or salads. This way, you minimize waste and maximize flavor. For the full recipe, check out the Chickpea Bliss Curry 🥘. Yes, you can make vegan chickpea curry without coconut milk. Many options work well. You can use vegetable broth for a lighter taste. Almond milk also adds creaminess without coconut. If you want thickness, try cashew cream. This gives a rich flavor. Each choice changes the taste a bit, so choose what you like best. Yes, this recipe is gluten-free! Chickpeas are naturally gluten-free. Just ensure all spices and canned goods are labeled gluten-free. Some curry powders may have gluten, so check the label. If you serve it with rice or gluten-free naan, it stays gluten-free. This makes it safe for those with gluten sensitivities. To spice up your vegan chickpea curry, start with the chili powder. Adjust it to match your heat level. Add fresh chili peppers for a kick. Try cayenne for more heat. You can also use garam masala for warmth and depth. Don’t forget to add fresh herbs like cilantro for brightness. Taste as you go, and make it your own! This blog post covered how to make a delicious vegan chickpea curry. We explored the main ingredients like chickpeas and coconut milk, plus spices that make it tasty. I shared step-by-step instructions from prepping to cooking. You learned about tips for texture, serving ideas, and variations to try. Finally, we discussed storage methods and FAQs to help. Enjoy making this dish and feel free to get creative. Your kitchen journey starts now!

Vegan Chickpea Curry Easy Comfort Food Dish

Looking for an easy, delicious recipe? Vegan Chickpea Curry is your answer! It’s filled with wholesome ingredients like chickpeas, coconut

Older posts
Page1 Page2 … Page31 Next →

dsad

© 2025 recipesstation • Built with GeneratePress

Our Policies

  • Copyright Policy
  • Cookie Policy
  • GDPR Policy
  • Privacy Policy
  • Disclaimer
  • Terms Of Use

More Information

  • Home
  • About
  • Contact
  • Appetizers
  • Dessert
  • Dinner
  • Drinks
©2025, recipesstation About Back To Top