
Easy Sheet Pan Fajitas Quick and Flavorful Recipe
Looking for a quick and tasty dinner? My Easy Sheet Pan Fajitas are your answer! This one-pan wonder combines fresh
Looking for a quick and tasty dinner? My Easy Sheet Pan Fajitas are your answer! This one-pan wonder combines fresh

Are you ready to indulge in the ultimate comfort food? Southern fried chicken is crispy, flavorful, and loved by many.
. Start by preheating your oven to 425°F (220°C). This high temperature helps roast the potatoes perfectly. It allows them to get crispy on the outside while staying soft inside. A hot oven is key to great roasted potatoes. Next, grab a big mixing bowl. Add 2 pounds of halved baby potatoes. Toss in 4 minced garlic cloves, 3 tablespoons of olive oil, 2 teaspoons of dried rosemary, 2 teaspoons of dried thyme, and 1 teaspoon of smoked paprika. Now, add salt and black pepper to taste. Use a spatula or your hands to mix everything. Make sure the potatoes get a good coat of oil and herbs. This step is vital for flavor. Spread the seasoned potatoes on a large baking sheet. Keep them in a single layer to allow for even cooking. If they are too crowded, they will steam instead of roast. Bake for 25-30 minutes. Halfway through, flip the potatoes. This helps them brown evenly. You want them golden and crispy on all sides. When they look perfect, take them out and let them cool for a few minutes. This will enhance their texture. For serving, place the potatoes in a nice dish and sprinkle with fresh parsley for color and flavor. For the complete recipe, check out the [Full Recipe]. When making garlic herb roasted potatoes, the right variety matters. I love using baby potatoes. They have a creamy texture and roast well. You can also try Yukon Gold or red potatoes. They hold their shape and soak up flavors nicely. Avoid starchy potatoes like Russets. They can turn mushy instead of crispy. You can boost the flavor of your potatoes with extra herbs and spices. Fresh herbs like rosemary and thyme work well. You can also add parsley for freshness. If you like a little kick, try red pepper flakes. For a smoky twist, add more smoked paprika. Each spice adds its own magic to the dish. To get that perfect crispiness, follow a few simple tricks. First, make sure your oven is hot enough. Preheat to 425°F (220°C). Second, space out the potatoes on the baking sheet. Crowding them makes steaming happen, not roasting. Finally, flip the potatoes halfway through cooking. This helps them brown evenly on all sides. For the best texture, let them cool for a few minutes after roasting. This step makes a big difference in crunch! {{image_4}} When it comes to herbs, you can customize your roasted potatoes. Fresh herbs offer a bright taste. Dried herbs, on the other hand, have a strong flavor. If you have fresh rosemary or thyme, use them. They add a lovely aroma. You can also mix herbs like oregano and basil for a unique twist. Experiment to find your favorite blend. Adding heat is an easy way to spice things up. Red pepper flakes bring a nice kick. Just a pinch can change the whole dish. You can also try spices like cumin or curry powder for a new vibe. These spices add warmth and depth. They can make your Garlic Herb Roasted Potatoes stand out. Combining potatoes with other veggies makes your dish more colorful and tasty. Think about adding carrots, bell peppers, or onions. Just chop them to a similar size as the potatoes. This ensures even cooking. Roasting mixed vegetables not only boosts flavor but also makes a vibrant plate. You can enjoy these tasty variations by following the [Full Recipe]. To store cooked Garlic Herb Roasted Potatoes, let them cool first. Place them in an airtight container. This prevents moisture loss and keeps them fresh. You can store them in the fridge for up to three days. When you’re ready to eat them, you will enjoy their taste and texture. To reheat the potatoes, use an oven or an air fryer. This helps maintain their crispy texture. Preheat your oven to 375°F (190°C). Spread the potatoes on a baking sheet. Heat them for about 10 to 15 minutes until warm. If using an air fryer, set it to 350°F (175°C) for about 5 to 7 minutes. Both methods keep your potatoes delicious. You can freeze Garlic Herb Roasted Potatoes if you want to save them longer. First, let them cool completely. Then, place them in a freezer-safe bag. Remove as much air as possible before sealing. They can last for up to three months in the freezer. To defrost, move them to the fridge overnight. Reheat them in the oven or air fryer for the best results. Enjoy the flavors just like when they were fresh! Garlic Herb Roasted Potatoes can last about 3 to 5 days in the fridge. To store them, place the leftovers in an airtight container. This helps keep them fresh and flavorful. When you are ready to eat, check for any signs of spoilage, like an off smell or changes in texture. Yes, you can use other types of potatoes! While baby potatoes are perfect for this recipe, you can try Yukon Gold or red potatoes. Both types have great flavor and texture. Just make sure to cut them into similar sizes for even cooking. These roasted potatoes pair well with many dishes. They go great with grilled chicken or fish. You can also serve them alongside a fresh salad or roasted vegetables. For a hearty meal, add a steak or a pork chop. The flavors complement each other nicely! Roasting garlic herb potatoes is simple and fun. You start with baby potatoes, garlic, and spices. After roasting, you achieve a crispy, tasty snack or side dish. Use fresh herbs or spices to change the flavor. Store leftovers properly to keep them fresh. Remember, these potatoes pair well with many meals. Enjoy the process, experiment with your ingredients, and savor the delicious results!](https://recipesstation.com/wp-content/uploads/2025/06/e14e170d-5132-4933-ba9a-3127786553e7.webp)
If you’re looking for the perfect side dish, you’ve found it! Garlic Herb Roasted Potatoes are easy to make and
. After enjoying your Easy Cheesy Baked Ziti, store any leftovers in a tight container. This helps keep the dish fresh. You can place it in the fridge for up to five days. If you want to save it longer, freeze the ziti. It will stay good for about three months in the freezer. To reheat the ziti, the oven gives the best results. Preheat your oven to 350°F (175°C). Place the ziti in an oven-safe dish. Cover it with foil to keep it moist. Bake for about 20 minutes or until heated through. You can also use a microwave for quicker reheating. Place a serving on a microwave-safe plate. Heat it in 30-second bursts until hot. However, the oven keeps the texture and cheese melty better than the microwave. For more tips on reheating or storage, check out the Full Recipe. Can I make this ahead of time? Yes, you can make Easy Cheesy Baked Ziti ahead of time. Prepare the dish up to the baking step. Cover it tightly and store it in the fridge for up to two days. When ready to bake, let it sit at room temperature for 30 minutes. Then, pop it in the oven as usual. This saves time on busy nights and still tastes great! How do I make it spicier? To add spice, consider red pepper flakes or diced jalapeños. You can mix these into the sauce before combining with the pasta. Another option is to use spicy Italian sausage instead of ground beef. These simple changes boost the flavor and heat level, making your ziti pop! Is Easy Cheesy Baked Ziti healthy? Easy Cheesy Baked Ziti can be part of a balanced diet. It has pasta, cheese, and sauce, which offer carbs and protein. To make it healthier, use whole wheat pasta and low-fat cheese. Add veggies like spinach or zucchini for extra nutrients. How to make a gluten-free version? To make a gluten-free version, swap regular pasta for gluten-free ziti. Many brands offer tasty options that cook similarly. Make sure to check the marinara sauce for hidden gluten. With these swaps, everyone can enjoy this dish without worry! For the full recipe, check out the [Full Recipe]. In this post, we explored how to make Easy Cheesy Baked Ziti. We covered the essential ingredients, tips for selecting fresh items, and tasty substitutions. I shared step-by-step instructions for preparation, mixing, baking, and offered tricks for flavor enhancement. Baked ziti is versatile. You can customize it to fit your needs. Remember to store your leftovers properly for future meals. Enjoy experimenting with flavors and ingredients. Happy cooking!](https://recipesstation.com/wp-content/uploads/2025/06/981ae4f8-3c4f-4ec5-957a-b84a6367d3e3.webp)
Are you craving a warm, cheesy dish that the whole family will love? Look no further! This Easy Cheesy Baked
![- 2 pounds chicken wings - 1/4 cup of honey - 3 tablespoons soy sauce - 2 tablespoons sriracha - 4 cloves garlic, finely minced - 1 teaspoon ginger, finely minced - 1 tablespoon olive oil - 1 teaspoon smoked paprika - 1/2 teaspoon freshly ground black pepper - 1/2 teaspoon salt - Sesame seeds and chopped green onions for garnishing - Additional spices for personal preference - Side dips like ranch or blue cheese dressing When I whip up Spicy Honey Garlic Chicken Wings, the first step is gathering my ingredients. I always use fresh chicken wings for the best flavor. Honey brings a natural sweetness that balances the heat from sriracha. Soy sauce adds a savory depth that makes every bite mouthwatering. Garlic and ginger are key players in this dish. They infuse the wings with a warm, aromatic flavor. Smoked paprika gives a lovely smokiness, while black pepper and salt enhance all the tastes. For a special touch, I suggest garnishing with sesame seeds and green onions. They add color and a nice crunch. Optional ingredients like extra spices or dips can tailor the wings to your liking. For the full experience, you can explore the [Full Recipe]. It helps you create these wings step by step. - Preheat your oven to 425°F (220°C). - Line a baking sheet with aluminum foil and place a wire rack on top. - In a large bowl, mix honey, soy sauce, sriracha, minced garlic, minced ginger, olive oil, smoked paprika, black pepper, and salt. Whisk until smooth. - Take the chicken wings and place them in the bowl with the marinade. - Use your hands or tongs to coat each wing well. - For the best flavor, let them marinate for at least 30 minutes. If you have more time, two hours will deepen the taste. - Lay the marinated wings out in a single layer on the wire rack. - Bake for 30 to 35 minutes. - Flip the wings halfway through cooking. This ensures they get crispy on both sides. After following these steps, your spicy honey garlic chicken wings will be bursting with flavor! For the full recipe, check out the complete details. To make your wings crispy, use a wire rack. This allows hot air to flow around each wing. It helps them cook evenly. If you don’t have a wire rack, try flipping the wings halfway through baking. Bake them at 425°F for about 30 to 35 minutes. If you want extra crispiness, you can cook them a bit longer. Just keep an eye on them so they don’t burn. Using leftover marinade can boost flavor. After baking, toss the wings in it for extra taste. If you want more heat, add sriracha to the marinade. You can adjust it based on your spice level. Start with two tablespoons and add more as needed. Remember, it’s all about finding the right balance for your taste buds. For presentation, serve the wings on a big platter. Sprinkle extra sesame seeds and green onions on top. This makes them look fancy and inviting. Pair them with ranch or blue cheese dressing for dipping. You can also serve them with fresh veggies like carrots or celery. They add a nice crunch and freshness to your meal. {{image_4}} You can easily change the heat level of your spicy honey garlic chicken wings. For a mild option, reduce the sriracha to just 1 tablespoon. If you want medium heat, stick with the 2 tablespoons. For hot wings, add an extra tablespoon or two of sriracha. You can also use fresh chili peppers for a unique flavor. Don't limit yourself to just one sauce! You can try BBQ sauce mixed with honey for a smoky flavor. Teriyaki sauce adds a sweet and savory twist. Mix flavors to create your own special sauce. This way, you can enjoy a new taste every time you make these wings. You can cook chicken wings in different ways. An air fryer gives you crispy wings without much oil. Set the air fryer to 400°F and cook for about 25 minutes. Flip them halfway for even crispiness. If you prefer the oven, follow the [Full Recipe] instructions for perfect wings. Grilling is another great option. Preheat the grill to medium heat and cook wings for about 20 minutes. Turn them often to avoid burning. No matter the method, your wings will be full of flavor! To keep your Spicy Honey Garlic Chicken Wings fresh, store them in an airtight container. This helps keep out air and moisture. Place the wings in the fridge if you plan to eat them within three days. For longer storage, use the freezer. Wrap the wings tightly in plastic wrap before placing them in a freezer bag. This method prevents freezer burn. To keep the wings crispy, avoid stacking them. Lay them flat in a single layer. You can also place parchment paper between layers if you must stack them. This keeps the wings from sticking together. To reheat your wings, the oven works best. Preheat your oven to 350°F (175°C). Spread the wings on a baking sheet in a single layer. Bake them for about 10 to 15 minutes. This method keeps them crispy. You can also use an air fryer. Set it to 350°F (175°C) and heat for about 5 to 7 minutes. This will crisp them up nicely. Avoid using the microwave. Microwaving wings often makes them soggy. If you must use it, cover the wings with a paper towel. This helps some, but the oven or air fryer is still better for keeping that crispy texture. For best flavor, marinate chicken wings for at least 30 minutes. If you have time, let them sit for up to 2 hours in the fridge. The longer marinating time helps the wings soak up all the tasty spices. Yes, you can use frozen chicken wings. Just make sure to thaw them first. Thaw overnight in the fridge or run them under cold water. Once thawed, follow the same marinating and cooking steps. You can serve the wings with a variety of sides. Some great options are: - Celery sticks - Carrot sticks - Ranch dressing - Blue cheese dressing - A fresh salad These sides will cool down the spice and add crunch to your meal. To make more wings, simply double or triple the ingredients. Keep the same marinating and cooking times. Just make sure your baking sheet can fit all the wings without crowding them. This way, they cook evenly and stay crispy. Each serving of Spicy Honey Garlic Chicken Wings contains: - Calories: About 400 - Protein: 30 grams - Carbohydrates: 20 grams - Fat: 25 grams These details can change based on the exact ingredients and portion sizes. For a more precise count, you can use a nutrition calculator. For the full recipe, check out the detailed instructions above. Fiery Honey Garlic Chicken Wings bring bold flavors to your table. Here’s how to make them. - 2 pounds chicken wings - 1/4 cup of honey - 3 tablespoons soy sauce - 2 tablespoons sriracha (adjust for your desired heat level) - 4 cloves garlic, finely minced - 1 teaspoon ginger, finely minced - 1 tablespoon olive oil - 1 teaspoon smoked paprika - 1/2 teaspoon freshly ground black pepper - 1/2 teaspoon salt - Sesame seeds for garnishing - Chopped green onions for garnishing 1. Preheat your oven to 425°F (220°C). Line a baking sheet with foil. Place a wire rack on top for crispiness. 2. In a large bowl, whisk together honey, soy sauce, sriracha, minced garlic, minced ginger, olive oil, smoked paprika, black pepper, and salt. Mix until smooth. 3. Add chicken wings to the marinade. Use your hands or tongs to coat each wing well. For a deeper flavor, marinate for at least 30 minutes. If you can, let them sit for 2 hours in the fridge. 4. Lay the marinated wings in a single layer on the wire rack. This helps them cook evenly and get crispy. 5. Bake the wings for 30 to 35 minutes. Flip them halfway to get both sides golden brown. 6. Toss wings in any leftover marinade after baking for extra flavor. This step is optional but tasty. 7. Serve hot, garnished with sesame seeds and chopped green onions for a fresh touch. Serve the wings on a large platter. Add extra sesame seeds and green onions for a great look. Pair with ranch or blue cheese dressing for dipping. You now have a clear guide to making spicy honey garlic chicken wings. We covered the necessary ingredients, marinating, and baking steps. Remember tips for crispiness and flavor enhancement. You can also try fun variations, different sauces, and serve these wings with cool dips or side dishes. Storing and reheating the wings properly keeps them tasty. Enjoy bringing this delicious dish to your table!](https://recipesstation.com/wp-content/uploads/2025/06/24aa4c33-af5e-4d4e-9158-284007884a22.webp)
Are you ready to elevate your wing game? Spicy Honey Garlic Chicken Wings deliver an irresistible flavor that’s hard to
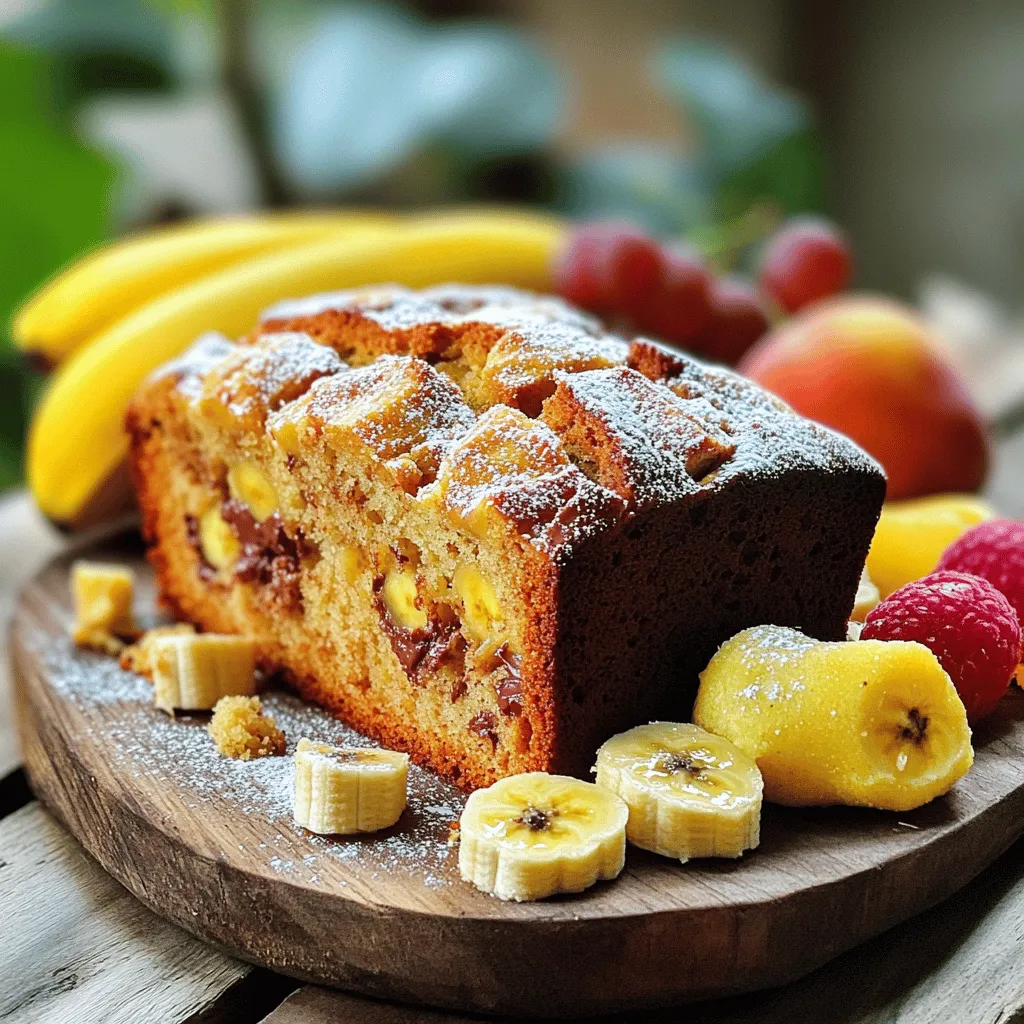
Are you ready to whip up a simple and tasty classic banana bread? This recipe is your guide to making
![- 4 salmon fillets (approximately 6 ounces each) - 2 tablespoons extra-virgin olive oil - 2 tablespoons freshly squeezed lemon juice - 1 teaspoon freshly grated lemon zest - 3 cloves garlic, finely minced - 1 teaspoon dried oregano - 1 teaspoon dried thyme The main ingredients bring a clean, bright taste to your dish. Salmon fillets are rich and tender, making them perfect for this recipe. Olive oil and lemon juice create a fresh marinade that enhances the salmon’s flavor. Garlic adds depth, while oregano and thyme bring warmth. Together, these ingredients make a flavorful base. - 1 cup cherry tomatoes, halved - 1 cup asparagus spears, trimmed The vegetables add color and nutrition. Cherry tomatoes burst with sweetness and juice, balancing the dish. Asparagus spears give a nice crunch and earthy taste. They complement the salmon well and soak up the marinade flavors. - Sea salt and freshly ground black pepper to taste - Fresh parsley, finely chopped (for garnish) Seasoning is key for a tasty meal. Sea salt and black pepper bring out all the flavors in the dish. Fresh parsley adds a pop of color and a fresh note when you serve. This blend of seasonings ties everything together beautifully. For the full recipe, check out the [Full Recipe]. To start, you need to make the marinade. Gather these ingredients: - 2 tablespoons extra-virgin olive oil - 2 tablespoons freshly squeezed lemon juice - 1 teaspoon freshly grated lemon zest - 3 cloves garlic, finely minced - 1 teaspoon dried oregano - 1 teaspoon dried thyme - Sea salt and freshly ground black pepper to taste In a small bowl, mix the olive oil, lemon juice, lemon zest, garlic, oregano, thyme, salt, and pepper. Stir it well until everything blends together. This mixture adds zest and brightness to your salmon. Next, prepare your baking sheet. Line it with parchment paper for easy cleanup. Place the salmon fillets skin-side down. Make sure they fit nicely without crowding. Pour half of the marinade over the salmon. Let it soak in for flavor. Now, on the other side of the baking sheet, add the cherry tomatoes and asparagus spears. Drizzle the remaining marinade over these veggies. Toss them gently to coat each piece. Now, it’s time to bake! Preheat your oven to 400°F (200°C). Once it reaches the right temperature, put your baking sheet inside. Bake for 15 to 20 minutes. You’ll know it’s done when the salmon flakes easily with a fork and the veggies look vibrant and tender. After baking, take the pan out and let it rest for a couple of minutes. This step helps lock in flavors. You can check the full recipe if you want more details. To check if your salmon is done, look for its color. The fish should turn from bright pink to a lighter shade. You can also use a fork to flake it gently. If it separates easily, it's ready to eat. This texture shows that the fish is cooked but still moist. You can make this dish unique by changing the herbs or spices. Try adding dill, basil, or even a pinch of red pepper flakes for heat. You can also mix in vegetables like bell peppers or zucchini. These additions will bring new flavors to your plate. For a nice look, plate the salmon and veggies together. You can serve them right on the baking sheet for a rustic style. If you want something fancier, put them on individual plates. Don’t forget to sprinkle fresh parsley on top. A lemon wedge on the side adds a bright touch. These details make your meal feel special, even if it’s simple. {{image_4}} You can add couscous to the baking sheet. This gives a nice texture and flavor. To do this, simply cook the couscous as per the package instructions. Spread it on one side of the baking sheet with the salmon. The couscous soaks up the tasty juices from the salmon and veggies. It also makes the meal heartier and filling. You can mix in some lemon zest or herbs for extra flavor. Substituting asparagus with spinach is another great twist. Spinach cooks down quickly and adds a fresh taste. Just toss fresh spinach with the marinade before spreading it on the baking sheet. The spinach will wilt and soak up the lemony flavor. This variation is perfect for a quick dinner, keeping it light and healthy. You can even mix in some cherry tomatoes for color and sweetness. If you need a gluten-free meal, it's easy to adapt. Make sure all the ingredients you use are gluten-free. Most salmon and veggies are naturally gluten-free. Check the couscous package if you choose to add it. There are gluten-free options available. You can also try quinoa or rice as a substitute. These grains make the meal gluten-free while still being delicious. For the full recipe, check out the One-Pan Lemon Herb Salmon details above. Store leftover One-Pan Lemon Herb Salmon in an airtight container. Make sure to cool the salmon first. Place it in the fridge within two hours of cooking. This keeps it fresh and safe to eat. It’s best to eat leftovers within two to three days. If you have veggies left, store them separately to keep their texture. To freeze salmon, wrap each fillet tightly in plastic wrap. Then, place them in a freezer bag or container. Squeeze out as much air as possible. This prevents freezer burn. You can freeze the salmon for up to three months. To thaw, move the salmon to the fridge for about 12 hours. This slow thaw method keeps the fish moist. For reheating, the oven works best. Preheat it to 350°F (175°C). Place the salmon on a baking sheet and cover it loosely with foil. Heat for about 10-15 minutes. This helps keep the fish from drying out. You can also use the microwave. Heat in short bursts of 30 seconds. Check often to avoid overcooking. Enjoy your meal again! Bake your One-Pan Lemon Herb Salmon for 15 to 20 minutes at 400°F (200°C). The salmon should be opaque and flake easily with a fork. This time ensures the fish stays moist, while the veggies cook perfectly. Keep an eye on it, as every oven can be a bit different! Yes! You can use other types of fish like cod or tilapia. They cook well and absorb flavors nicely. Just adjust the cooking time a little. Thin fillets will need less time, while thicker ones may need a few extra minutes. To boost the flavor, try adding fresh herbs like dill or basil. You can also mix in a little chili flake for heat or a splash of soy sauce for depth. Marinating the fish longer will deepen the flavor too. Just remember, a little goes a long way! For more tips and the complete recipe, check out the Full Recipe. This blog post showed you how to make One-Pan Lemon Herb Salmon. You learned about the key ingredients like salmon, olive oil, and fresh herbs. I shared step-by-step instructions for marinating, baking, and serving the dish. You now have tips to ensure your salmon cooks perfectly, as well as ideas for variations. Remember, cooking can be fun! Experiment with flavors and make this meal your own. Enjoy your tasty dish, and share it with loved ones for a joyful dining experience.](https://recipesstation.com/wp-content/uploads/2025/06/5a2e03d2-b555-41a8-a2f2-9d100cefa645.webp)
Looking for an easy, tasty meal? Try my One-Pan Lemon Herb Salmon! This dish combines tender salmon, fresh veggies, and

Looking for a dish that packs a punch and warms your soul? Say hello to Ingredient Taco Casserole! This flavorful
![- 1 pound Brussels sprouts - 4 cloves garlic - 3 tablespoons olive oil - ½ cup Parmesan cheese - 1 teaspoon sea salt - ½ teaspoon black pepper - ½ teaspoon red pepper flakes (optional) - 2 tablespoons balsamic vinegar - Fresh parsley For this Garlic Parmesan Roasted Brussels Sprouts recipe, start with fresh Brussels sprouts. Choose ones that are firm and bright green. Trim them and cut them in half. This helps them cook evenly. Next, you will need garlic. Use fresh garlic for the best flavor. Mince it finely. The olive oil adds richness and helps the sprouts crisp up in the oven. Parmesan cheese is key to this dish. Use freshly grated cheese for the best taste. It melts beautifully and adds a savory touch. For seasoning, sea salt and black pepper will elevate the flavor. If you like heat, red pepper flakes add a nice kick. A drizzle of balsamic vinegar at the end brings a sweet and tangy note. Lastly, fresh parsley adds color and brightness. It makes the dish look appealing and fresh. Enjoy these delicious sprouts as a side or snack! For the full recipe, check out the details above. - Preheat the oven to 400°F (200°C). - Trim and halve the Brussels sprouts. Start by preheating your oven to 400°F (200°C). This step is key for getting a nice crisp on the sprouts. While the oven heats up, grab your Brussels sprouts. Trim off the stem ends and slice each sprout in half. This helps them cook evenly. - Mix Brussels sprouts with olive oil and seasonings. - Toss until evenly coated. In a large bowl, add the halved Brussels sprouts. Pour in 3 tablespoons of extra virgin olive oil. Then, add 4 cloves of minced garlic, 1 teaspoon of sea salt, ½ teaspoon of black pepper, and optional red pepper flakes. Toss everything together. Make sure each sprout gets coated in the oil and seasonings. This step adds tons of flavor. - Initial roasting for 20 minutes. - Adding Parmesan cheese. - Final roasting until golden brown. Spread the seasoned Brussels sprouts onto a baking sheet in a single layer. This helps them roast properly. Place the sheet in the oven and roast for 20 minutes. After that, take them out carefully. Sprinkle ½ cup of freshly grated Parmesan cheese evenly over the sprouts. Return the baking sheet to the oven and roast for an additional 10 to 15 minutes. You want them golden brown and crispy. The cheese should be melted and bubbling. For added flavor, drizzle 2 tablespoons of balsamic vinegar over the sprouts once they are done. Before serving, sprinkle fresh parsley on top for a colorful touch. If you want the full recipe, check it out [Full Recipe]. To get that lovely crispiness, always spread the Brussels sprouts in a single layer on the baking sheet. This allows hot air to flow around each sprout, roasting them evenly. I recommend roasting for about 20 minutes first. Then, sprinkle on the Parmesan cheese and roast for another 10 to 15 minutes. Keep an eye on them; you want a golden brown color. When preparing garlic, I like to mince it finely. This helps it release its strong flavor. For the Parmesan cheese, fresh is best. Choose a high-quality block of cheese and grate it just before using. It melts better and tastes richer than pre-grated options. For serving, place the Brussels sprouts in a large, shallow bowl. This makes them look beautiful and highlights their crispy texture. To add a finishing touch, sprinkle more Parmesan and fresh parsley on top. The green and gold colors pop and make the dish more inviting. For the full recipe, check out the link above. {{image_4}} To add heat to your dish, try spicy garlic Parmesan Brussels sprouts. You can mix in some red pepper flakes, or even cayenne pepper, to kick up the flavor. Start with a half teaspoon of red pepper flakes. If you like more heat, feel free to add more. The spice pairs well with the garlic and cheese. The warmth enhances the taste and adds excitement to every bite. You can switch up the cheese for a new taste. Instead of Parmesan, try Pecorino Romano. This cheese offers a sharper flavor. Another option is to use a blend of cheddar and mozzarella. This mix gives a creamy texture and rich taste. Each cheese brings its own charm to the dish. Experiment to find your favorite combination. If you want a vegan twist, there are great options. Substitute the Parmesan with nutritional yeast. This ingredient gives a cheesy flavor without dairy. You can also use vegan cheese shreds that melt well. Look for brands that taste good and melt nicely. This way, you can enjoy the same delicious dish while keeping it plant-based. To store your Garlic Parmesan Roasted Brussels Sprouts, first let them cool down. Place them in an airtight container. This keeps them fresh. You can store them in the fridge for up to three days. If you want to keep them longer, freezing is a good option. When you reheat Brussels sprouts, you want them crispy. The best way is to use an oven. Preheat your oven to 350°F (175°C). Spread the sprouts on a baking sheet. Heat for about 10 to 15 minutes. Check them often to avoid burning. You can also use a skillet. Heat a bit of olive oil over medium heat. Add the sprouts and cook until they are crispy again. To freeze Brussels sprouts, follow these steps. First, let them cool completely. Spread them on a baking sheet in a single layer. Freeze them for about two hours. After that, transfer them to a freezer-safe bag. Remove as much air as you can. They can stay frozen for up to three months. When you want to use them, thaw them in the fridge overnight. Then, reheat as mentioned above for the best results. For the full recipe, check out the detailed instructions. Yes, you can make Garlic Parmesan Roasted Brussels sprouts ahead of time. Cook them fully and let them cool. Store them in an airtight container in your fridge. They stay fresh for up to three days. When you're ready to eat them, just reheat in the oven. This will help regain some crispiness. You can also roast them in advance and add the cheese later. Brussels sprouts pair well with many dishes. You can serve them alongside roasted chicken or grilled salmon. They also go great with pasta or quinoa for a vegetarian option. For a larger meal, add them to a holiday feast. They add color and flavor to any plate. Try serving them with a tangy sauce or a fresh salad for balance. You’ll know Brussels sprouts are done roasting when they are golden brown and crispy. Check if they have a nice caramelized color. The cheese should be melted and bubbling. Use a fork to poke one; it should feel tender inside. This is the perfect time to take them out of the oven. Enjoy their delicious flavor and crisp texture! This guide covers everything you need for Garlic Parmesan Roasted Brussels sprouts. We discussed main ingredients, seasoning, and garnishing. You learned how to prep and roast them perfectly. Tips helped ensure crispiness and flavor. Variations offered new ideas for spice and cheese. Finally, I shared storage methods to keep leftovers fresh. Enjoy your tasty dish with confidence!](https://recipesstation.com/wp-content/uploads/2025/06/14e6e303-70ee-47e4-86a5-a4c1295d598b.webp)
Are you ready to transform Brussels sprouts into a tasty treat? With my Garlic Parmesan Roasted Brussels Sprouts recipe, you’ll
![To make loaded sweet potato fries, you need some key items. Here’s what you should gather: - 2 large sweet potatoes, cut into uniform fries - 2 tablespoons extra virgin olive oil - 1 teaspoon smoked paprika - 1 teaspoon garlic powder - Salt and freshly ground black pepper to taste Sweet potatoes serve as the base. They give the fries a wonderful sweetness. Olive oil helps them crisp up nicely. Smoked paprika and garlic powder add depth and flavor. Don’t forget the salt and pepper for that perfect taste! Once your fries are baked and crispy, it’s time to load them up! Here are my favorite toppings: - 1 cup canned black beans, rinsed and drained - 1 cup corn kernels (can be fresh, frozen, or canned) - 1 cup sharp cheddar cheese, freshly shredded - 1 ripe avocado, diced - 1/2 cup plain Greek yogurt or sour cream Black beans and corn add protein and texture. Cheddar cheese melts beautifully and gives a creamy touch. Diced avocado adds a fresh taste. Lastly, Greek yogurt or sour cream provides a cool contrast. For a final touch, consider these optional garnishes: - 2 green onions, finely chopped - Fresh cilantro leaves, for garnish Chopped green onions add crunch and color. Fresh cilantro gives a bright flavor. You can mix and match these garnishes to suit your taste. For the full recipe, check the details above! 1. Preheat the oven and prepare the baking sheet First, set your oven to 425°F (220°C). This high heat helps make the fries crispy. Line a baking sheet with parchment paper. This keeps the fries from sticking and makes cleanup easy. 2. Coat the sweet potatoes with oil and spices Take your sweet potatoes and cut them into uniform fries. Place them in a large bowl. Add 2 tablespoons of extra virgin olive oil, 1 teaspoon of smoked paprika, 1 teaspoon of garlic powder, and salt and pepper to taste. Toss the fries well until every piece is coated with oil and spices. 1. Arranging the fries on the baking sheet Spread the coated sweet potato fries in a single layer on the prepared baking sheet. Make sure there’s space between each fry. This space helps them crisp up nicely. 2. Cooking time and flipping instructions Bake the fries in your preheated oven for 20-25 minutes. Flip the fries halfway through the cooking time. This way, they cook evenly and turn golden brown. 1. Preparing the black bean and corn mixture While the fries bake, gather your toppings. In a small bowl, mix 1 cup of rinsed black beans with 1 cup of corn. You can add a pinch of salt and a squeeze of lime juice for extra flavor if you wish. Stir this mixture well. 2. Melting the cheese on fries When the fries are crispy, take them out of the oven. Sprinkle 1 cup of shredded cheddar cheese over the hot fries. Return the baking sheet to the oven for about 5 minutes, until the cheese is melted and bubbly. Now, your loaded sweet potato fries are almost ready! Just top them with the black bean and corn mixture, diced avocado, and a drizzle of Greek yogurt or sour cream. Don’t forget the green onions and fresh cilantro for the best taste. Enjoy your delicious creation! For the complete recipe, check [Full Recipe]. To make your sweet potato fries crispy, cut them evenly. This helps them cook at the same rate. Aim for about 1/4 inch thickness. Thicker fries will take longer to cook and may not get as crispy. Avoid overcrowding your baking sheet. If the fries touch, they will steam instead of crisp. Bake them in batches if needed. Spread them out in a single layer. You’ll love the crunchy results! Add a splash of lime juice to your fries. It gives a fresh kick and brightens the flavor. You can also play with spices. Try chili powder or cumin for a different taste. Smoked paprika adds a nice depth too. Get creative with your seasonings! Select the right baking sheet for best results. A heavy-duty, rimmed baking sheet works great. It helps to distribute heat evenly. Use parchment paper for easy cleanup and less sticking. For mixing, a large bowl is best. A sturdy spatula helps in evenly coating the fries. Keep these tools handy to make cooking smooth and fun. Check the [Full Recipe] for more details on the cooking process! {{image_4}} You can change the flavor of your loaded sweet potato fries with fun toppings. Try adding spicy jalapeños and salsa for a kick. The heat from the jalapeños pairs well with the sweetness of the fries. You can also choose different kinds of cheese. Pepper jack gives a nice spice, while feta adds a tangy flavor. Mix and match to find your favorite combo! If you want a lighter option, use an air fryer. It cooks the fries with less oil while still keeping them crispy. This method makes your fries healthier without losing taste. For a dairy-free meal, swap Greek yogurt with a dairy-free option like cashew cream. This way, you still get creaminess without the dairy. You can explore different cuisines with your loaded fries. For a Southwest style, add toppings like black beans, corn, and avocado. You can drizzle lime juice for extra zest. If you want a Mediterranean twist, try adding olives, hummus, or fresh herbs. These flavors will transform your fries into a whole new dish. For the full recipe, check out the [Full Recipe]. To keep your loaded sweet potato fries fresh, let them cool first. Place them in an airtight container. This helps keep moisture out and preserves flavor. You can store them in the fridge for up to three days. If you want the fries to stay crisp, avoid stacking them. Place a paper towel at the bottom of the container to absorb extra moisture. When you're ready to enjoy your fries again, I recommend using the oven. Preheat it to 400°F (200°C). Spread the fries on a baking sheet in a single layer. This method helps them regain their crispiness. Bake for about 10 minutes, flipping halfway through. If you need a quick option, you can use the microwave. Place the fries on a microwave-safe plate. Heat them in 30-second bursts until warm. Be aware that they might not be as crispy. You can freeze cooked loaded sweet potato fries, but you must do it right. Allow the fries to cool completely. Lay them flat on a baking sheet and freeze until solid. After that, transfer them to a freezer bag. Remove as much air as possible to avoid freezer burn. They can last up to three months in the freezer. To prepare from frozen, you can bake the fries straight from the freezer. Preheat your oven to 425°F (220°C) and bake for about 15-20 minutes. Keep an eye on them to make sure they cook evenly. Enjoy your tasty fries anytime! For the full recipe, refer to the instructions above. Yes, you can prepare loaded sweet potato fries ahead of time. I suggest cooking the fries fresh for the best texture. However, you can make the toppings early. For example, mix the black beans and corn together and store them in the fridge. You can also chop the avocado and green onions ahead of time. Just keep them in airtight containers to stay fresh. When you’re ready to eat, bake the fries and add your tasty toppings. This way, you save time and still enjoy the full flavor! Sweet potato fries pair well with many sauces. Here are a few great options: - Honey mustard: Sweet and tangy, it adds a nice kick. - Chipotle mayo: Creamy with a bit of heat, it’s a perfect match. - Ranch dressing: Cool and creamy, it balances the sweetness of the fries. - Guacamole: Creamy and fresh, it complements the fries well. Feel free to mix and match these sauces to find your favorite! Making loaded fries vegan is easy! Skip the cheddar cheese and use vegan cheese instead. You can also swap the Greek yogurt with a plant-based yogurt. Look for options made from almonds or coconut. This way, you keep the creamy texture while making it vegan-friendly. Enjoy your loaded sweet potato fries without missing out on flavor! Loaded sweet potato fries are a tasty and fun dish. You learned key ingredients, from sweet potatoes to toppings that enhance flavor. I shared tips to get them crispy and variations to try. You can make ahead, store well, and reheat easily. Enjoy experimenting with flavors and enjoying this treat. Simple steps make your fries a hit, every time. Keep it fresh, flavorful, and fun!](https://recipesstation.com/wp-content/uploads/2025/06/7239931e-5a96-48f9-ba07-784674e1c515.webp)
Imagine sinking your teeth into crispy, golden Loaded Sweet Potato Fries, piled high with bold toppings and flavor! This simple,
