Skip to content
DisclaimerTerms Of UseGDPR PolicyCookie Policy

recipesstation

  • Home
  • Drinks
  • Appetizers
  • Dinner
  • Dessert
  • About
  • Contact
  • Privacy Policy
DisclaimerTerms Of UseGDPR PolicyCookie Policy

Emily

To make a delicious creamy tomato basil soup, gather these key ingredients: - 2 tablespoons olive oil - 1 medium onion, diced - 3 cloves garlic, minced - 2 cans (14 oz each) diced tomatoes (or 4 cups fresh tomatoes, chopped) - 2 cups vegetable broth - 1 cup heavy cream (or coconut cream for a dairy-free option) - 1/4 cup fresh basil, finely chopped - 1 teaspoon sugar (optional) - Salt and freshly cracked pepper to taste These ingredients work together to create a rich and flavorful base. The olive oil adds a nice depth, while the garlic and onion bring sweetness and warmth. The diced tomatoes provide acidity, and the heavy cream makes the soup creamy and luscious. You can add a few extras to boost the flavor of your soup. Here are some optional ingredients: - A pinch of red pepper flakes for heat - 1 teaspoon Italian seasoning for added herbs - A splash of balsamic vinegar for tanginess These optional ingredients can take your soup to the next level. The red pepper flakes add warmth, while the Italian seasoning enhances the herb profile. A splash of balsamic vinegar can balance the sweetness of the tomatoes. Presentation matters. Consider garnishing your soup with: - Croutons for crunch - Additional fresh basil leaves for brightness - A drizzle of extra cream for visual appeal Garnishing adds texture and enhances the look of your dish. Croutons give a satisfying crunch, while fresh basil adds a burst of color and flavor. A drizzle of cream can create an inviting swirl, making your soup even more appealing. For the complete recipe, check out the Full Recipe. Start by heating olive oil in a large pot over medium heat. You want it shimmering but not smoking. Next, add the diced onion. Sauté this for about five minutes. Stir it now and then until it softens and turns translucent. Then, add the minced garlic. Cook it for one minute. Be careful not to burn the garlic; it can taste bitter. Now, pour in the diced tomatoes along with their juices. Follow with the vegetable broth. If you like, add the teaspoon of sugar. This helps balance the tomato's acidity. Mix everything well. Bring it to a gentle boil, then lower the heat. Let it simmer uncovered for 15 to 20 minutes. This step lets the flavors meld beautifully. Using an immersion blender, puree the soup until smooth. If you don’t have one, carefully transfer the soup to a blender. Do this in batches and vent the lid to avoid pressure. Once blended, return the soup to the pot if needed. Stir in the heavy cream or coconut cream. Warm it on low for about five minutes. Avoid boiling to keep the cream from curdling. Finally, add the freshly chopped basil. Season it with salt and freshly cracked pepper to your taste. Cook it for another two minutes to let the basil flavor shine. Now, your creamy tomato basil soup is ready to serve! To make your soup creamy, start with good ingredients. Use heavy cream for richness, or coconut cream for a dairy-free option. Blend the soup until it’s smooth. If you want an extra creamy touch, add more cream after blending. This gives the soup a velvety finish. One mistake you can make is burning the garlic. Keep the heat low when adding it. If you let it burn, the soup will taste bitter. Another mistake is not seasoning enough. Always taste your soup before serving. Adjust the salt and pepper to enhance the flavors. Lastly, don’t skip simmering. This step helps the flavors blend well. If you’re short on time, use canned tomatoes. They cook faster than fresh ones. You can also chop the onion and garlic ahead of time. Store them in the fridge to save time on cooking day. If you have a busy schedule, make a big batch and freeze some. This way, you can enjoy the soup anytime without the fuss. For the full recipe, check out the delicious steps above! {{image_4}} You can easily make creamy tomato basil soup vegan. Instead of heavy cream, use coconut cream. It adds a nice texture and flavor. You can also swap vegetable broth for water if needed. This keeps the soup rich without any animal products. To boost protein, add grilled chicken or beans. Shredded chicken works great for a hearty meal. Just stir it in before serving. For a plant-based option, use white beans or chickpeas. They blend well with the soup's flavors. Both options make the soup more filling and satisfying. You can spice up your soup with fun flavors. Try adding a pinch of red pepper flakes for heat. Or, mix in smoked paprika for a smoky taste. Fresh herbs like thyme or oregano can also enhance the flavor. Just remember to add them towards the end to keep their aroma fresh. For the full recipe, check out the complete guide on creamy tomato basil bliss. To keep your creamy tomato basil soup fresh, let it cool first. Place leftovers in an airtight container. Store the soup in the fridge for up to five days. Make sure to label the container with the date. This helps you track how long it has been stored. If you want to save some soup for later, freezing works well. Pour the cooled soup into freezer-safe containers or bags. Leave some space at the top for expansion. Seal tightly and label with the date. You can freeze it for up to three months. For best taste, try to use it sooner. When you're ready to enjoy your soup again, thaw it in the fridge overnight. Reheat on the stove over low heat. Stir often to ensure even warming. If the soup seems too thick, add a splash of broth or water. Heat gently until it’s hot. If you want, blend it again for a smooth texture. This way, it tastes just as good as when you first made it! You can serve many tasty sides with this soup. Here are some great options: - Grilled cheese sandwiches - Garlic bread or toast - A fresh green salad - Crispy croutons for added crunch Pairing these foods will make your meal feel complete and warm. The creamy soup and crunchy sides balance flavors well. Yes, you can use fresh tomatoes! If you prefer fresh ones, here’s how: - Use about 4 cups of chopped fresh tomatoes. - Blanch them to remove the skin if desired. - This gives the soup a bright flavor. Fresh tomatoes can add a nice touch to the soup. Just make sure to adjust the cooking time if needed. If you like some heat, there are easy ways to spice up your soup: - Add red pepper flakes while cooking. - Stir in a diced jalapeño with the onions. - Use spicy diced tomatoes instead of regular ones. These options will add warmth and depth to the soup's flavor. Enjoy experimenting with the spice level! This article shared all you need for creamy tomato basil soup. You learned about key ingredients, step-by-step cooking, and tips for the best texture. I also covered variations for different diets and ways to store leftovers. Remember, with a few simple tweaks, you can enjoy this soup any way you like. Trust your taste buds, experiment freely, and savor every spoonful. Enjoy your cooking journey!

Creamy Tomato Basil Soup Flavorful and Comforting Recipe

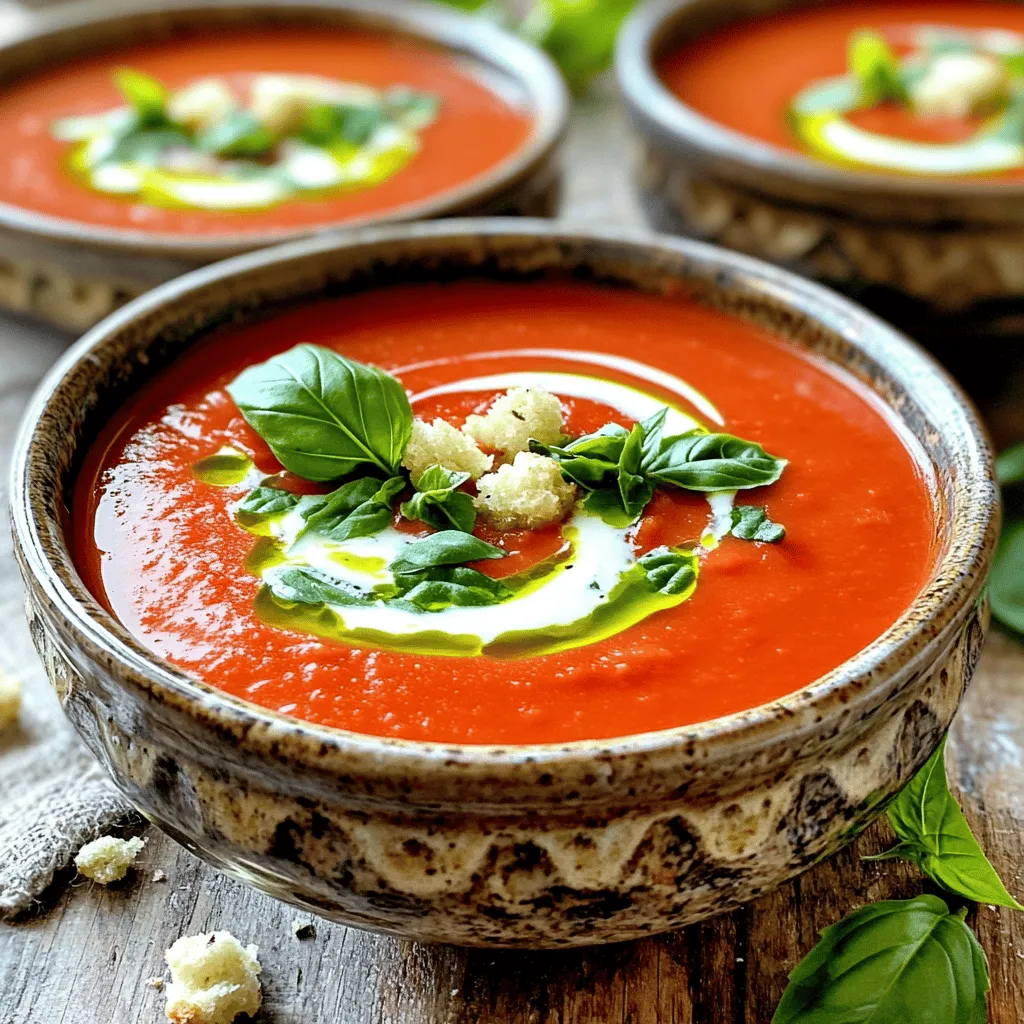
There’s nothing quite like a warm bowl of Creamy Tomato Basil Soup on a chilly day. This easy recipe bursts

- Chicken: 2 cups shredded cooked chicken (rotisserie recommended) - Vegetables: 1 cup each of diced carrots, peas, and potatoes, 1/2 cup finely diced celery, and 1/2 cup chopped onion - Base: 3 tablespoons unsalted butter, 3 tablespoons all-purpose flour - Liquids: 2 cups low sodium chicken broth, 1 cup whole milk - Seasoning: 1 teaspoon garlic powder, 1 teaspoon dried thyme, salt, and pepper - Crust: 1 package of refrigerated pie pastry (2 crusts) or homemade pie crust - Fresh herbs: Consider adding rosemary or parsley - Extra vegetables: Corn or green beans for added texture - Presentation ideas: Garnish with fresh herbs for a pop of color - Pair with a light salad for balance When making classic chicken pot pie, focus on quality ingredients. I love using rotisserie chicken for its rich flavor. You can add diced carrots, peas, and potatoes for a hearty mix. The butter and flour create a creamy base that blends well with chicken broth and milk. Feel free to mix in fresh herbs like parsley or rosemary. They add a nice touch to the dish. For extra crunch and flavor, consider adding corn or green beans. When serving, garnish your pie with fresh herbs. This adds color and makes it look appealing. Pairing with a light salad helps balance the meal. You can find the complete recipe in the [Full Recipe] section for all the steps to create this comforting dish. - Preheat your oven to 425°F (220°C). - Gather and measure all ingredients for efficiency. - In a large saucepan, melt the butter over medium heat. - Add the chopped onion, diced celery, and potatoes. Cook until soft. This takes about 5 minutes. - Next, sprinkle the flour over the veggies. Stir well to coat them. - Slowly whisk in the chicken broth and milk. This helps avoid lumps. - Keep stirring until the mixture thickens. This should take around 5-7 minutes. - Roll out one pie crust into a 9-inch pie dish. - Pour the cooled chicken filling into the crust. Spread it evenly. - Roll out the second crust and place it on top. Trim any excess and crimp the edges. - Brush the top crust with beaten egg. This gives it a nice color. - Cut a few slits in the top crust to let steam escape. - Place the pie in the oven and bake for 30-35 minutes. Look for a golden brown crust. These steps will lead you to a warm, comforting chicken pot pie. For the full recipe, check out the Cozy Chicken Pot Pie section. To make a flaky crust, keep your ingredients cold. Use chilled butter and ice water. This helps create layers in the dough. Avoid overworking the dough. Mix until just combined. Overmixing can lead to a tough crust. For a golden finish, brush the top with beaten egg. This adds a nice shine and color. You can boost the flavor with fresh herbs. Try adding rosemary or parsley for a fresh touch. A dash of hot sauce can add heat if you like spice. A squeeze of lemon juice can brighten the dish. Balance flavors with a hint of acidity or heat. This can make your pot pie even more delicious. To ensure even cooking, rotate the pie halfway through baking. This helps it bake evenly and avoids soggy spots. After baking, let the pie rest for 5-10 minutes. This allows the filling to set, making it easier to slice. A well-rested pie has the best texture and flavor. {{image_4}} You can easily switch out the chicken for turkey. This works great after a holiday feast. If you want a vegetarian option, try using mushrooms or lentils for protein. For a lighter dish, choose low-fat milk and butter. These swaps keep the taste good while cutting calories. For a cheesy twist, add shredded cheddar or mozzarella to the filling. This makes the pie super creamy. You can also mix in global spices like curry powder or smoked paprika. These spices give your pot pie a fun and unique flavor. If you’re gluten-free, look for a gluten-free pie crust. Many stores sell these now. You can also make your own using almond or coconut flour. For those avoiding dairy, use almond milk or coconut cream in place of milk. This way, everyone can enjoy a slice of this comfort food. To store your leftover chicken pot pie, place it in an airtight container. This helps keep it fresh. You can store it in the fridge for up to three days. Make sure to let it cool before sealing. This way, it will not steam inside the container. You can freeze chicken pot pie before or after baking. If you freeze it before baking, wrap it well in plastic wrap and foil. It can last for up to three months. When you are ready to bake, simply remove it from the freezer and bake it straight from frozen. If you freeze it after baking, let it cool first. Then, wrap it tightly and store it in the freezer. To reheat, thaw it in the fridge overnight before warming. To keep the crust nice and flaky, the oven is your best friend. Preheat the oven to 350°F (175°C). Place the pot pie on a baking sheet to catch any drips. Reheat it for about 25 to 30 minutes. Check the crust; it should feel warm and crisp. If the edges brown too fast, cover them with foil. This helps the pie heat through without burning the crust. The best chicken for pot pie is rotisserie chicken. It’s already seasoned and tender. You can also use cooked chicken breast. Just make sure it is shredded or diced well. This chicken adds great flavor and saves time. Yes, you can make chicken pot pie ahead of time. Prepare the filling and let it cool. Then, store it in the fridge for up to two days. You can also freeze it. Just wrap it well in plastic wrap and foil. When you're ready, bake it from frozen. This way, you’ll have a warm, tasty meal waiting for you. Look for a bubbling filling. The crust should be golden brown. These are good signs that your pot pie is ready. Let it rest for a bit before serving. This helps the filling set up nicely. Chicken pot pie can be a bit rich. It has protein from the chicken and vitamins from the vegetables. You can make it healthier by using less butter and low-fat milk. Adding more veggies also boosts the nutrition. Consider using whole grain crust for added fiber. For the full recipe, check out Cozy Chicken Pot Pie. You can now create a delicious chicken pot pie with ease. This guide covered essential ingredients, straightforward steps, and tips for the best results. Remember, you can customize your pie with different spices, vegetables, or even cheese. Whether you bake it fresh or freeze it for later, each bite will be comforting and tasty. Enjoy trying this classic dish with your family, and have fun experimenting with flavors that suit your taste. Happy cooking!

Classic Chicken Pot Pie Comforting and Delicious Favorite

There’s something special about Classic Chicken Pot Pie—it warms the heart and fills the belly. With tender chicken, fresh veggies,

To make Easy Chicken Alfredo Pasta, you need simple and fresh ingredients. Here is what you will need: - 8 oz fettuccine pasta - 2 boneless, skinless chicken breasts - 2 tablespoons extra virgin olive oil - 2 cloves garlic, finely minced - 1 cup heavy cream - 1 cup freshly grated Parmesan cheese - 1 teaspoon Italian seasoning blend - Salt and freshly ground black pepper, to taste - Fresh parsley, finely chopped (for garnish) These ingredients create a creamy and rich sauce that coats the pasta beautifully. Each component plays an important role. The fettuccine provides a nice base, while the chicken adds protein. The garlic gives depth, and the heavy cream creates that luxurious texture we love. Parmesan cheese adds a salty and nutty flavor that ties everything together. Don't forget to garnish with parsley; it adds color and freshness to your dish. For the full recipe, you can refer to the detailed instructions. This meal is quick to prepare and sure to impress anyone at your table. Enjoy the process of cooking and savor the delightful flavors you create! To cook fettuccine al dente, start with a large pot of salted water. Bring it to a rolling boil. Add the fettuccine and cook for about 8-10 minutes. Check the pasta a minute or two before the time is up. It should be firm yet tender when you bite into it. After cooking, drain the pasta but save a small cup of pasta water. This water helps adjust the sauce later. For the chicken breasts, season them well. Use salt, pepper, and Italian seasoning. This gives the chicken great flavor. For cooking, I like to sear the chicken in a hot skillet. Heat olive oil over medium heat. Once hot, add the chicken. Cook for 6-7 minutes on each side. The chicken should be golden and cooked through. Always check that it reaches 165°F. Let it rest before slicing it thinly. Sauté garlic for maximum flavor. In the same skillet where you cooked the chicken, add minced garlic. Sauté it for about 30 seconds. Stir it constantly to avoid burning. Next, pour in the heavy cream. Increase the heat slightly to bring it to a gentle simmer. To thicken the sauce, gradually stir in grated Parmesan cheese. Mix until it melts and the sauce thickens. If it gets too thick, add a splash of reserved pasta water to loosen it. To mix the pasta and sauce, add the cooked fettuccine directly into the skillet. Toss it gently to coat the pasta. Then, fold in the sliced chicken to combine everything well. For serving, use tongs to plate the Chicken Alfredo. Twirl the pasta into nests for a nice look. Top with the chicken slices and sprinkle with fresh parsley. This adds a pop of color to your dish. For the full recipe, check out the detailed steps in the main article. To get a creamy texture in your Chicken Alfredo, use heavy cream. It makes the sauce rich and smooth. Stir in the Parmesan cheese slowly. This helps it melt evenly and keeps the sauce creamy. If the sauce feels thick, splash in some reserved pasta water. This adds moisture without ruining the flavor. When it comes to seasoning, taste as you go. The right amount of salt and pepper can really change the dish. If you want a little more flavor, add more Italian seasoning. Always adjust to your liking. For making Chicken Alfredo, I recommend using a large skillet. A non-stick skillet works best for easy cooking and cleanup. This helps prevent the sauce from sticking. A good pot for boiling pasta is also key. Make sure it is big enough for the fettuccine to move freely. When serving, use tongs for a neat presentation. They help you plate the pasta without making a mess. A large serving spoon can also help with portions. One mistake to watch out for is overcooking the chicken. Cook it until it reaches 165°F. This keeps it juicy and tender. If you leave it too long, it can dry out. Another mistake is skipping the pasta water. This water helps to loosen the sauce. It also adds a bit of starch, which helps the sauce cling to the pasta. Always save a cup before draining the pasta. For the full recipe, check out the section above. Enjoy your cooking! {{image_4}} You can switch out heavy cream for several lighter options. Here are some ideas: - Milk: Use whole milk for a creamier sauce. - Greek Yogurt: Mix Greek yogurt with a bit of milk. This adds creaminess and protein. - Coconut Cream: For a dairy-free option, coconut cream works great. When it comes to pasta, fettuccine is classic, but you can try different types: - Penne: This shape holds the sauce well. - Spaghetti: A simple and popular choice. - Zoodles: For a low-carb option, use spiralized zucchini. Adding veggies boosts nutrition and flavor. Here are some tasty options: - Spinach: It wilts nicely and adds color. - Broccoli: A fun crunch and a healthy twist. - Mushrooms: They bring earthy notes to the dish. You can also change up the cheese for more fun flavors: - Mozzarella: This cheese melts beautifully and adds stretch. - Gorgonzola: For a bold, tangy kick. - Asiago: A sharp flavor that pairs well with cream. For gluten-free options, try these: - Gluten-Free Pasta: Many brands offer great alternatives. - Quinoa Pasta: A healthy choice that is also gluten-free. If you need a dairy-free version, consider these tips: - Nut-Based Cream: Use cashew cream for richness. - Nutritional Yeast: This gives a cheesy flavor without dairy. To lower the calories, you can: - Use Less Cream: Cut back on heavy cream and add more broth. - Opt for Lean Chicken: Skinless chicken thighs are tasty and lower in fat. With these variations, you can create a dish that fits your taste and needs. Check out the Full Recipe for more details on making your own Easy Chicken Alfredo Pasta. To store your Chicken Alfredo pasta safely, first let it cool. Place it in airtight containers. Make sure they are tightly sealed to keep out air. This will help prevent spoilage. You can store it in the fridge for up to three days. For best results, use glass or BPA-free plastic containers. These types keep the food fresh and do not absorb odors. To reheat your Chicken Alfredo, use the stovetop or microwave. On the stovetop, warm it on low heat. Stir often to keep the sauce creamy. If it seems dry, add a splash of milk or cream. In the microwave, heat in short bursts of 30 seconds. Stir between intervals to ensure even heating. This keeps your dish smooth and tasty. You can refresh the dish by adding fresh parsley or a sprinkle of cheese. This adds flavor and makes it look nice. Yes, you can freeze Chicken Alfredo! To freeze, let it cool completely. Then, put it in freezer-safe containers. Remove as much air as you can. It can last up to three months in the freezer. When ready to eat, thaw in the fridge overnight. Reheat on the stovetop, adding a bit of cream to regain the texture. Enjoy the same creamy delight with less hassle! For the full recipe, check out Creamy Chicken Alfredo Delight 🥛. Making Chicken Alfredo is quick and easy. The prep time is about 10 minutes. Cooking the pasta and chicken takes around 20 minutes. In total, you can have this dish ready in about 30 minutes. This makes it perfect for a weeknight meal. Yes, you can use frozen chicken. If you cook from frozen, it will take longer. Make sure to cook the chicken until it reaches 165°F. I recommend thawing it first for even cooking. If you use frozen chicken, add a few extra minutes to the cooking time. Chicken Alfredo pairs well with various side dishes. You can serve it with garlic bread for a tasty touch. A light green salad can add freshness. Steamed broccoli or sautéed spinach are also great choices. These sides balance the creamy dish and enhance the meal. If your Alfredo sauce is too thick, don’t worry! You can fix this easily. Just add a splash of the reserved pasta water. Stir it in slowly until you reach your desired consistency. You can also add a bit more cream if needed. This keeps the sauce creamy and smooth. This blog post guides you through making Chicken Alfredo. You learned about the key ingredients, cooking steps, and essential tips. We covered variations for dietary needs and how to store and reheat leftovers. Remember, practice is key. Avoid common mistakes to improve your dish. With these tips, you can create a delicious Chicken Alfredo that suits your taste. Enjoy your cooking and impress your friends and family!

Easy Chicken Alfredo Pasta Simple Creamy Delight

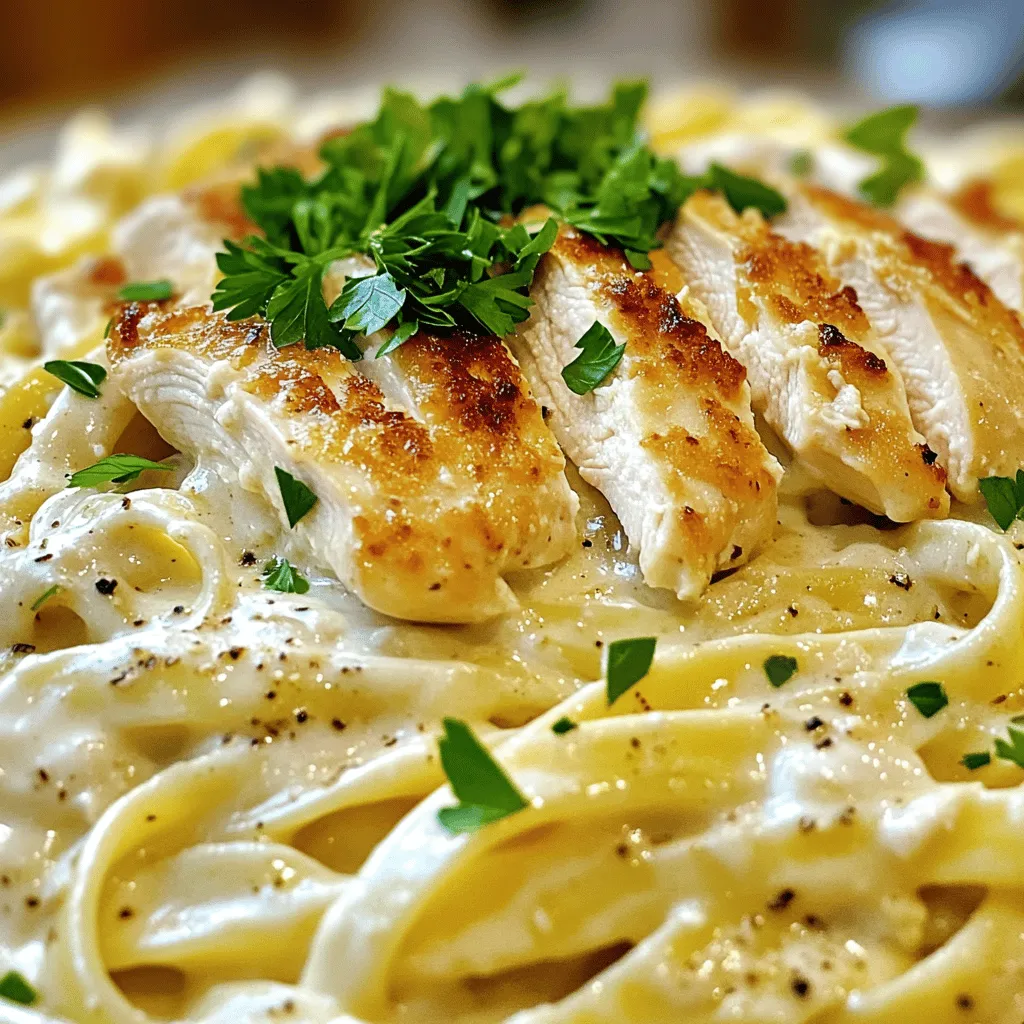
If you crave a simple yet rich meal, look no further than Easy Chicken Alfredo Pasta. This creamy delight features

- 1 whole chicken (4-5 lbs) - 4 cloves of garlic, finely minced - 2 large lemons (one sliced into rounds, one juiced) - 2 teaspoons fresh rosemary, finely chopped (or 1 teaspoon dried rosemary) - 2 teaspoons fresh thyme, finely chopped (or 1 teaspoon dried thyme) - 1/4 cup extra virgin olive oil - Salt, to taste - Black pepper, to taste - 1 cup chicken broth or vegetable broth - Fresh parsley, chopped, for garnish To create a juicy and flavorful dish, you need the right ingredients. Start with a whole chicken. I prefer it around 4 to 5 pounds for the best results. Fresh garlic adds a punch of flavor. Use four cloves, minced well, to ensure the taste spreads throughout the chicken. Lemons are key to this recipe. You need two large lemons. One gets juiced, while the other is sliced into rounds. The slices go inside the chicken. They add a fresh, zesty taste. For herbs, I use fresh rosemary and thyme. They bring out the flavors in the chicken. If you don’t have fresh herbs, dried ones work too. You’ll also want olive oil, salt, and black pepper. They season the chicken perfectly. Lastly, add chicken broth for moisture. It helps keep the chicken juicy as it roasts. If you want a pop of color, consider adding fresh parsley as a garnish. It makes the dish look vibrant and fresh. For the complete recipe, you can check out the Full Recipe. Set your oven to 425°F (220°C). This hot temperature helps crisp the chicken skin. In a bowl, mix minced garlic, lemon juice, and herbs. Add olive oil, salt, and pepper. Whisk well until combined. This marinade will pack flavor into your chicken. Take a whole chicken and pat it dry with paper towels. Drying it helps the skin become crispy. Rub the marinade all over the chicken, including the cavity. Make sure to coat every part well. Slice one lemon into rounds. Place these lemon slices inside the chicken cavity. This adds a nice flavor while cooking. Put the chicken breast-side up on a roasting rack in a pan. Pour chicken broth into the pan for moisture and extra flavor. Roast the chicken for about 1 hour and 15 minutes. Use a meat thermometer to check the internal temperature. It should reach 165°F (75°C) for safe eating. The skin should be golden brown. Baste the chicken with pan juices halfway through for added moisture. Once cooked, take the chicken out of the oven. Cover it loosely with aluminum foil and let it rest for 10-15 minutes. Resting is key for juicy meat, as it allows the juices to settle. For the full recipe, refer to the [Full Recipe]. Enjoy your juicy and flavorful Lemon Garlic Roasted Chicken! To get that perfect crispy skin, start by drying your chicken well. Use paper towels to pat it all over. This helps remove extra moisture. Moisture leads to soggy skin, which we don’t want! After drying, let the chicken sit for a bit. This air exposure helps it crisp up nicely in the oven. Want to amp up the flavor? Try adding herbs like sage or oregano. These herbs pair well with lemon and garlic. You can also add a pinch of smoked paprika for a hint of smokiness. If you love heat, some red pepper flakes can spice things up. Feel free to mix and match to find your favorite flavor combo! Basting is key for a juicy chicken! I recommend basting every 30 minutes while roasting. Use the pan juices to keep the chicken moist. This also adds extra flavor. Make sure to use a spoon or baster to drizzle the juices over the chicken. Doing this helps keep it tender and flavorful throughout the cooking process. {{image_4}} You can change the herbs for new flavors. Instead of rosemary and thyme, use sage or oregano. These herbs add a different taste. For a spicy kick, add red pepper flakes. Mixing herbs can create a unique twist on the classic recipe. Lemons are great, but try other citrus fruits too. Using lime will give a fun flavor. Oranges can add sweetness to the dish. Simply slice and stuff them in the chicken like you do with lemons. Each fruit brings its own taste to the meal. You can cook this chicken in different ways. If you want to use a slow cooker, season the chicken as usual. Place it in the slow cooker with broth. Cook on low for 6-8 hours for tender meat. Grilling is another option. Marinate the chicken and grill it over medium heat until cooked through. Each method offers a new way to enjoy this dish. To keep your Lemon Garlic Roasted Chicken fresh, store leftovers right away. First, let the chicken cool down. Then, slice it into pieces for easy storage. Place the chicken in an airtight container. This helps keep out air and moisture. You can also wrap it well in aluminum foil or plastic wrap. If you plan to eat it later, freezing is a good option. Just make sure to use freezer-safe bags or containers. When reheating, keep the chicken juicy and tasty. One method is to use the oven. Preheat it to 350°F (175°C). Place the chicken in a baking dish and cover it with foil. This keeps moisture in. Heat it for about 20-30 minutes or until warm. You can also use the microwave for quick reheating. Put the chicken on a microwave-safe plate. Cover it with a damp paper towel to help it stay moist. Heat in short bursts, checking often to avoid drying out. Cooked chicken can last in the fridge for 3-4 days. If you freeze it, it can stay good for up to 4 months. Always check for any signs of spoilage before eating. If it smells bad or looks odd, it’s best to throw it away. Keeping track of how long you store your chicken helps you enjoy it safely. You can tell if the chicken is done by checking its internal temperature. The chicken should reach 165°F (75°C) in the thickest part of the breast. Use a meat thermometer for the best results. This step is key to ensure the chicken is safe to eat. If you don't have a thermometer, look for clear juices running from the chicken when you cut it. The skin should be golden brown and crispy. Yes, you can prepare much of this recipe ahead of time. You can marinate the chicken up to 24 hours in advance. Just keep it in the fridge until you're ready to roast it. This will deepen the flavors and save you time on cooking day. If you’re short on time, you can even prep the garlic and herbs a few days before. This chicken pairs well with many sides. I recommend serving it with roasted veggies, mashed potatoes, or a fresh salad. You can also add garlic bread for a yummy touch. For a lighter option, try pairing it with steamed green beans or a quinoa salad. This makes the meal colorful and balanced. For the complete Lemon Garlic Roasted Chicken recipe, check the [Full Recipe](#). Here you’ll find all the details you need to make this dish amazing! Lemon Garlic Roasted Chicken is a simple, tasty dish. You need a whole chicken, garlic, lemons, and some herbs. Applying the right marinade and roasting technique gives you juicy meat. Remember to rest your chicken after cooking for the best results. Don’t forget to try out variations and enjoy leftovers. With these tips, you can impress anyone with your cooking skills. Enjoy your flavorful meal!

Lemon Garlic Roasted Chicken Juicy and Flavorful Dish

Are you ready to impress your dinner guests with a dish that’s juicy and full of flavor? Lemon Garlic Roasted

To create a tasty baked ziti, you need a few key ingredients: - 1 pound ziti pasta - 2 cups marinara sauce - 1 cup creamy ricotta cheese - 1 cup shredded mozzarella cheese, plus more for topping - 1 cup freshly grated Parmesan cheese - 1 teaspoon garlic powder - 1 teaspoon onion powder - 1/2 teaspoon red pepper flakes (adjust according to spice preference) - Salt and black pepper, to taste These ingredients come together to form a rich and cheesy dish that warms the heart. The ziti pasta serves as the perfect base, while the marinara sauce adds a vibrant flavor. The three cheeses combine to create a creamy, cheesy experience that you won’t forget. For a little extra flair, consider these optional ingredients: - Fresh basil - Extra virgin olive oil - 1/2 cup panko breadcrumbs (for crispy topping) Fresh basil adds a pop of color and flavor to your dish. A drizzle of extra virgin olive oil enhances richness. If you're after a crispy topping, panko breadcrumbs give you that satisfying crunch. This simple touch can elevate your baked ziti to a new level. For the full recipe, be sure to check out the complete instructions and tips to make this dish shine! First, preheat your oven to 375°F (190°C). This step is key for baking ziti evenly. Next, bring a large pot of salted water to a boil. Add your ziti pasta and cook it until it is al dente. This means it should be firm to bite but not hard. Be careful not to overcook the pasta, as it will soften more when you bake it later. Once cooked, drain the pasta and set it aside. In a large mixing bowl, combine the creamy ricotta cheese, half of the shredded mozzarella, and grated Parmesan cheese. Add chopped basil, garlic powder, onion powder, and red pepper flakes. Season with salt and black pepper to taste. Mix everything together until smooth and creamy. This cheese mixture is what makes your baked ziti so rich and tasty. Now it's time to layer your ingredients. Grease a 9x13-inch baking dish with a bit of olive oil. Spread half of the ziti and marinara sauce at the bottom. Then, spoon the cheese mixture over the pasta evenly. Next, add the rest of the ziti mixture on top. Finish by sprinkling the remaining mozzarella cheese over everything. If you want a crunchy topping, sprinkle optional panko breadcrumbs on top. Cover the baking dish with aluminum foil, ensuring it does not touch the cheese. Bake the ziti in the preheated oven for about 25 minutes. After that, remove the foil and bake for another 15-20 minutes. You want the cheese to be bubbly and golden brown. Before serving, drizzle some extra virgin olive oil on top to add flavor and help the breadcrumbs crisp up. Enjoy this comforting dish with family and friends! For the complete recipe, check out the Full Recipe. To get the best baked ziti, cook your pasta until it's al dente. This means it should be firm, not soft. If you overcook the pasta, it will turn mushy in the oven. Use a good quality marinara sauce for more flavor. A rich, tasty sauce makes all the difference. Mix your cheeses well. This helps spread the flavors evenly throughout the dish. I always recommend adding fresh herbs. They add a nice depth of flavor. Basil, oregano, or even thyme can brighten the dish. Serving baked ziti can be fun! Pair it with a fresh salad and warm garlic bread. This makes for a complete meal. You can also serve it in individual portions for a nice touch. It looks elegant and is easy for guests to enjoy. {{image_4}} You can change some ingredients in baked ziti to suit your taste. Try using ground beef or sausage for added protein. This gives the dish a hearty flavor. If you want to boost nutrition, add vegetables. Spinach or mushrooms work great. They add a fresh taste and a nice texture to the dish. If you love spice, make a spicy baked ziti. Add more red pepper flakes than the recipe calls for. You can also use a spicy marinara sauce. This will warm up your dish and give it a kick. Adjust the spice level to your liking for a great surprise in every bite. For those who need gluten-free options, substitute gluten-free pasta. There are many great brands available. You can also make it vegan. Use plant-based cheeses and sauces. They melt well and taste delicious. This way, everyone can enjoy baked ziti, regardless of dietary needs. For all these variations, check out the Full Recipe for more ideas and details! To keep your baked ziti fresh, store it in the fridge. Place it in an airtight container. It will last for 3-4 days. Before sealing, let it cool. This step helps reduce moisture buildup. If moisture stays in the container, it may make the pasta soggy. You can freeze baked ziti for later. First, let it cool completely. Then, wrap it tightly with plastic wrap or foil. Place it in a freezer-safe container. It can stay frozen for up to three months. When you are ready to enjoy it, thaw it in the fridge overnight. This helps maintain the best flavor and texture. To reheat, place it in the oven at 350°F (175°C). Cover it with foil to keep it moist. Bake for about 30-40 minutes, or until heated through. For the best results, check that the cheese is melted and bubbly before serving. Enjoy your cheesy delight again! For the full recipe, check out the Cheesy Delight Baked Ziti section. Yes, you can use other pasta types. Penne and rigatoni work great. They hold sauce well, just like ziti. Each option adds a unique texture to the dish. Feel free to switch things up! You can prepare baked ziti a day in advance. Just follow the recipe steps until it’s ready to bake. Cover it with foil and store it in the fridge. When you’re ready, bake it as directed. This makes meal prep easy and fun! Reheat baked ziti in the microwave or oven. For the microwave, heat it in short bursts. Stir it between heating to warm evenly. If using the oven, preheat to 350°F. Cover the dish with foil to keep it moist. Bake for about 20 minutes. Yes, this recipe freezes well. Let the baked ziti cool completely. Wrap it tightly in foil or use a freezer-safe container. It can last up to 3 months in the freezer. To thaw, move it to the fridge overnight before baking. Absolutely! Adding veggies makes baked ziti even better. Try spinach, mushrooms, or bell peppers. Sauté them lightly before mixing them in. This boosts flavor and nutrition. You can enjoy a delicious and colorful dish! For the full recipe, check out the [Full Recipe]. Baked ziti is a classic dish that brings warmth and comfort. We explored key ingredients, from ziti pasta to three cheeses. I gave step-by-step instructions for perfect assembly and baking. Tips on storage and variations make this dish even more versatile. Now, with these insights, you're ready to create a flavorful baked ziti that wows friends and family. Enjoy your cooking journey and share your tasty results!

Baked Ziti with Three Cheeses Savory Comfort Dish

Welcome to the ultimate comfort food delight: Baked Ziti with Three Cheeses! If you crave a dish that melts in

What makes buttermilk pancakes so fluffy? The secret lies in the ingredients and technique. Buttermilk adds moisture and a slight tang, which makes the pancakes tender. Baking powder and baking soda work together to create lift. This combination gives you those lovely, fluffy layers. How do you mix the batter? Start by sifting the dry ingredients together. This helps to break up any clumps. In a separate bowl, whisk the buttermilk, egg, and melted butter. Pour the wet mix into the dry mix. Stir gently until just combined. It’s okay if there are some lumps. Overmixing can lead to tough pancakes. What’s the best cooking method? Preheat your skillet over medium heat. A hot pan helps create that perfect golden-brown crust. Grease it lightly with cooking spray or butter. Pour the batter onto the skillet, using a ladle or measuring cup. Look for bubbles to form on the surface. This means it’s time to flip. What toppings should you use? I love maple syrup, fresh berries, or whipped cream. These add flavor and make your pancakes even more special. For a fun twist, try adding chocolate chips or nuts to the batter before cooking. For the complete process, check out the Full Recipe to enjoy these delightful pancakes. This blog post covered key points about understanding error code 500. We learned that it signals a server issue, which often frustrates users. Knowing its causes helps you troubleshoot better. My top tips can guide you in fixing this error quickly. Remember, staying calm is key when tech fails. Be proactive and seek help when needed. You can turn these problems into learning moments. Stay prepared, and you’ll tackle future issues with ease.

Fluffy Buttermilk Pancakes Soft and Tasty Breakfast Treat

Wake up to the smell of Fluffy Buttermilk Pancakes! These cakes are soft, tasty, and perfect for breakfast. I’ll show

- 2 cups cooked chicken, shredded - 1 cup carrots, diced - 1 cup peas (fresh or frozen) - 1 cup celery, diced - 1/2 cup onion, diced - 1/3 cup all-purpose flour - 1 cup chicken broth - 1 cup milk - 1 teaspoon garlic powder - 1 teaspoon dried thyme - 1 tablespoon olive oil - Salt and pepper to taste - 1 package refrigerated pie crusts (or homemade, if preferred) - 1 egg, beaten (for egg wash) Each ingredient plays a key role in taste and texture. Use precise measurements to achieve the best results. For instance, too much flour may lead to a thick filling, while too little can make it runny. You can use fresh or frozen vegetables in your chicken pot pie. Fresh veggies bring a crisp taste, while frozen options save time. If you choose frozen peas, they heat quickly and add color. Fresh carrots and celery can enhance texture. I often mix both to enjoy the best of both worlds. To make a classic chicken pot pie, you need to gather your ingredients first. This recipe uses simple items that are easy to find. You will need cooked chicken, carrots, peas, celery, onion, flour, chicken broth, milk, garlic powder, thyme, olive oil, and a pie crust. Having everything ready helps you move smoothly through each step. 1. Preheat your oven to 425°F (220°C). This is key for a golden crust. 2. In a skillet, heat olive oil over medium heat. Add diced onions, celery, and carrots. Stir them for about 5 minutes until they are soft. 3. Add the peas and cook for 2 more minutes. This warms them up. 4. Sprinkle flour over the veggies and stir well. Cook for 1 minute to remove any raw taste. 5. Slowly pour in the chicken broth while stirring. This avoids lumps. Keep stirring until the mixture thickens, which takes about 3-4 minutes. 6. Add milk, garlic powder, thyme, salt, and pepper. Mix everything well. 7. Fold in the shredded chicken. Make sure it’s mixed well and then set it aside. 8. Take one pie crust and fit it into a 9-inch pie dish. Pour in the chicken filling. 9. Roll out the second crust and place it on top. Crimp the edges to seal them. Cut small slits on top for steam to escape. 10. Brush the top with beaten egg for a nice finish. Bake for 30-35 minutes until golden brown. Let it cool for 10 minutes before serving. For a great crust, keep your ingredients cold. Use chilled butter or lard if you make your own. Roll the dough out gently to avoid tearing. If using store-bought crust, let it sit at room temperature for a few minutes before using. This makes it easier to handle. Don’t forget to brush the crust with egg wash for that beautiful shine. For more detailed steps, check the Full Recipe. To thicken your chicken pot pie filling, use flour. This simple method works well. First, sprinkle the flour over the veggie mix. Stir it in and cook for one minute. This helps remove any raw taste. Then, slowly add your chicken broth while stirring. This will create a nice, thick sauce. You want it creamy but not too thick. If it's too runny, add a bit more flour mixed with cold water. This method keeps your filling rich and tasty. Many home cooks face common pitfalls when making pot pie. One big mistake is overcooking the filling. If you cook it too long, the chicken can dry out. Another mistake is not seasoning enough. Always taste your filling and adjust the salt and pepper. Using fresh herbs makes a big difference too. Avoid using a pie crust that’s too thick. A thin crust bakes better and gets that nice golden color. Lastly, don’t forget to cut slits in the top crust for steam to escape. Herbs and spices can elevate your pot pie. I love using dried thyme, as it adds warmth. Garlic powder boosts the flavor too. For a fresh twist, try adding parsley or rosemary. You can mix in a pinch of nutmeg for a unique taste. Adjust these seasonings to fit your preference. Fresh herbs can also brighten the dish. A little goes a long way, so use them wisely. Experiment with flavors until you find your favorite combination. Enjoy your cooking journey with these tips! {{image_4}} If you want to switch up the classic chicken pot pie, there are many tasty choices. You can use turkey, beef, or even seafood. Each option brings its own flavor. Turkey works well during holidays. Beef gives a hearty twist, while seafood adds a light touch. Consider using cooked meats to make the process smoother. You can create a vegetarian version of chicken pot pie, too. Replace the chicken with hearty vegetables like mushrooms, zucchini, or eggplant. For protein, add chickpeas or lentils. Use vegetable broth instead of chicken broth. This keeps the dish rich and satisfying without meat. You still get that creamy filling and flaky crust that everyone loves. The crust makes a big difference in chicken pot pie. You can choose homemade or store-bought. Homemade crust gives a fresh taste and texture. It allows you to control the ingredients too. But, if you're short on time, store-bought crust works well. Just remember to follow the baking instructions on the package. Each type brings its own charm to the dish. To see the full recipe for classic chicken pot pie, check [Full Recipe]. To keep your chicken pot pie fresh, let it cool completely first. Wrap it tightly in plastic wrap or aluminum foil. You can also store it in an airtight container. This helps keep moisture in and prevents any strong odors from other foods. Store it in the fridge for up to three days. When you're ready to enjoy your chicken pot pie again, preheat your oven to 350°F (175°C). Remove any wrapping and place the pie on a baking sheet. Cover the top loosely with foil to prevent over-browning. Heat for about 20-25 minutes. If you like a crispier crust, remove the foil for the last 5 minutes of heating. Make sure the center is hot before serving! Freezing is a great option if you want to save some pie for later. Prepare your pie as usual, but do not bake it. Wrap it well in plastic wrap and then in foil to keep it airtight. You can freeze it for up to three months. When you’re ready to bake, remove the wrapping and bake it from frozen at 425°F (220°C) for about 50-60 minutes. This method keeps the filling tasty and the crust flaky. Enjoy your chicken pot pie anytime! For more detailed steps, check out the Full Recipe for guidance. Yes, you can make Classic Chicken Pot Pie ahead of time. Prepare the filling and crust, then store them separately. Keep the filling in the fridge for up to two days. For longer storage, freeze the filling for up to three months. When ready to bake, assemble the pie and bake it straight from frozen or after thawing. This saves time and ensures a fresh meal on busy nights. If you want a chicken pot pie without chicken, try these options: - Cooked turkey - Shredded beef - Diced tofu - Chickpeas - Mushrooms Each option brings its own flavor. Adjust the cooking time accordingly, especially for meat. To make the pot pie filling ahead of time, follow these steps: 1. Cook the filling as per the recipe. 2. Let it cool completely. 3. Store it in an airtight container. You can refrigerate it for up to two days or freeze it for up to three months. When you are ready to use it, thaw it in the fridge overnight. This makes meal prep easy and quick. Check out the Full Recipe for more detailed instructions. In this blog post, we explored how to make the classic chicken pot pie. We discussed key ingredients, measurement details, and the choice between fresh and frozen veggies. You learned step-by-step instructions for preparing and cooking, along with tips for a perfect crust. We covered ways to thicken the filling, common mistakes, and flavor enhancements. Finally, I shared storage methods and answers to common questions. With this guide, you can create a delicious chicken pot pie that everyone will love. Enjoy making it your own!

Classic Chicken Pot Pie Comfort Food Recipe Delight

Are you ready for a dish that warms the soul? Classic Chicken Pot Pie is the ultimate comfort food, perfect

To make Tuscan White Bean Soup, you need simple, fresh ingredients. Here’s what you’ll need: - 1 tablespoon extra virgin olive oil - 1 medium onion, finely diced - 2 cloves garlic, minced - 1 medium carrot, finely diced - 1 celery stalk, finely diced - 2 cups vegetable broth (low-sodium preferred) - 2 cans (15 oz each) white beans (cannellini or great northern), thoroughly rinsed and drained - 1 cup fresh kale or Swiss chard, roughly chopped - 1 teaspoon dried thyme - 1 teaspoon dried rosemary - Salt and freshly ground black pepper to taste - 1 tablespoon freshly squeezed lemon juice - Fresh parsley, chopped, for garnishing These ingredients create a rich and hearty soup. The beans provide protein, while the vegetables add texture and flavor. You can make your soup even better with some extra touches. Here are some optional garnishes and add-ins: - Crusty bread for dipping - Grated Parmesan cheese on top - A drizzle of olive oil for extra richness - A pinch of red pepper flakes for heat Feel free to mix and match these options. They can add new layers of taste and make the soup even more enjoyable. Choosing fresh ingredients can improve the soup's flavor. Here are some tips to help you pick the best: - Onion: Look for firm onions with dry, papery skin. Avoid any that feel soft. - Garlic: Choose bulbs that are heavy and firm. They should not have green shoots. - Carrots and Celery: Pick bright, firm vegetables. They should feel crisp and not bend easily. - Kale/Swiss Chard: Select vibrant, dark greens without any yellowing or wilting. - Beans: If using canned beans, go for brands with low sodium and no added sugar. Selecting the best ingredients makes a big difference in taste. Always look for fresh, high-quality items to ensure your soup shines. For the full recipe, check the details above. Start by heating 1 tablespoon of extra virgin olive oil in a large pot over medium heat. Once the oil shimmers, add 1 medium onion, finely diced. Cook the onion for about 5 minutes. Stir it occasionally until it turns soft and clear. Next, add 2 minced garlic cloves, 1 finely diced medium carrot, and 1 finely diced celery stalk. Cook these vegetables for 5 more minutes. You want them to soften nicely. Now, it's time to build the soup. Pour in 2 cups of low-sodium vegetable broth and bring the pot to a strong boil. Once it bubbles, lower the heat. Stir in 2 cans of thoroughly rinsed and drained white beans. I recommend using either cannellini or great northern beans. Add 1 teaspoon each of dried thyme and dried rosemary. Let the soup simmer for about 15 minutes. This step helps all the flavors blend together perfectly. After simmering, fold in 1 cup of roughly chopped fresh kale or Swiss chard. Cook for an extra 5 minutes until the greens wilt and brighten the soup. Before serving, season with salt and freshly ground black pepper. Add 1 tablespoon of freshly squeezed lemon juice to brighten the taste. Adjust the seasoning to your liking. Now, ladle the soup into bowls and garnish with freshly chopped parsley for a lovely finish. Enjoy your warm bowl of Tuscan White Bean Soup! For the complete instructions, check the Full Recipe. To boost flavor, use fresh herbs like parsley and thyme. They add depth. Dried herbs work well too. Just remember, dried herbs are stronger. Use half the amount. Lemon juice at the end brightens the soup. It adds a fresh zing that wakes up all the flavors. Texture is key for a great soup. Start with a nice onion and garlic base. Sauté them until soft. This builds a rich flavor. When adding beans, stir gently. You want them whole, not mushy. Adding greens like kale at the end keeps them vibrant. They should be tender but still bright. Avoid adding too much salt too early. Taste first before seasoning. Too much can ruin the soup. Don’t skip the lemon juice. It balances the beans and herbs. Lastly, let the soup simmer. This helps the flavors mix well. A quick boil may not create the same depth. For a full recipe, check the earlier section! {{image_4}} You can easily make this soup vegetarian or vegan. The base is already veggie-friendly. Just use vegetable broth, and you’re set. For vegans, skip any dairy products. You can add a splash of coconut milk for creaminess. This gives the soup a rich taste without losing its charm. If you want more protein, adding sausages or meats works great. Italian sausage adds a spicy kick. Just brown the sausage before adding other ingredients. For a milder taste, use chicken or turkey sausage. You can also add diced ham or cooked chicken. This makes the soup heartier and satisfying. Seasonal ingredients can change the soup's flavor. In spring, add fresh peas or asparagus. In summer, try zucchini or bell peppers. Fall is great for adding pumpkin or squash. These changes keep the soup fresh and fun. You can adjust the herbs too. Fresh basil or oregano can lift the flavors. For the full recipe, check out the complete instructions I provided earlier. After you make Tuscan White Bean Soup, let it cool. Once cool, transfer it to an airtight container. This keeps the soup fresh and tasty. Store it in the fridge for up to five days. To keep the flavors strong, avoid adding garnishes until you serve it. If you have extra soup, freezing is a good option. Use freezer-safe bags or containers. Leave some space for the soup to expand as it freezes. You can freeze Tuscan White Bean Soup for up to three months. When you are ready to eat, thaw it in the fridge overnight. To reheat the soup, use a pot on medium heat. Stir it often to warm it evenly. You can also use the microwave. Heat in short bursts, stirring in between. If the soup seems thick, add a splash of broth or water to reach your desired consistency. Enjoy your warm, comforting bowl! To make your soup creamy, try blending part of the beans. Use a blender to puree half of the soup. Then, stir it back in. This adds a rich texture without adding cream. You can also add a splash of non-dairy milk for extra creaminess. Yes, you can use dried beans! Start by soaking them overnight. Cook the soaked beans until tender before adding them to your soup. This may take longer, but the flavor is fantastic. Just remember to adjust the cooking time in the recipe for the beans to soften fully. Serve this soup with crusty bread for a perfect meal. A fresh salad also pairs well and adds crunch. For a more filling option, try a side of grilled vegetables. You can even enjoy it with a sprinkle of cheese on top for extra flavor. Tuscan White Bean Soup lasts about 3 to 5 days in the fridge. Store it in an airtight container to keep it fresh. If you want to save it longer, consider freezing it. Just thaw and reheat when you're ready to enjoy it again. For the full recipe, refer to the earlier section. This blog post shared how to make a tasty Tuscan White Bean Soup. We explored key ingredients, steps for cooking, and ways to enhance flavor. You learned about variations and how to store your soup. Remember, fresh ingredients make a big difference. Don't shy away from trying new add-ins. You can enjoy this dish in many ways, so get creative. Always taste as you go to make it perfect for you. Now, it’s time to make your own delicious soup and share it with friends and family.

Tuscan White Bean Soup Flavorful and Simple Recipe

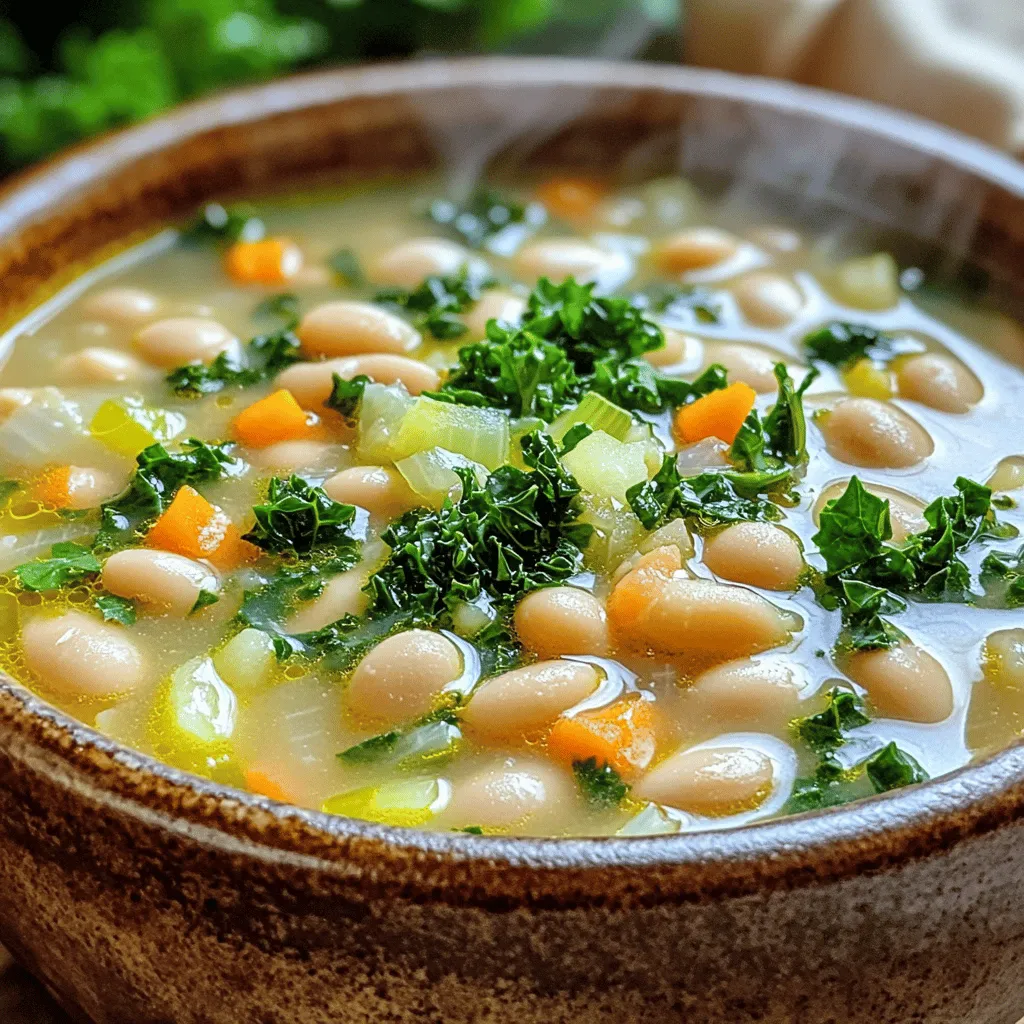
Are you ready to dive into a warm bowl of comfort? This Tuscan White Bean Soup is both flavorful and

- 1 cup unsalted butter, softened - 1 cup packed brown sugar - 1/2 cup granulated sugar - 2 large eggs - 2 teaspoons pure vanilla extract - 2 1/2 cups all-purpose flour - 1 teaspoon baking soda - 1/2 teaspoon fine sea salt - 1 cup chocolate chips - 1 cup mini marshmallows - 1/2 cup graham cracker crumbs - 9x13-inch baking pan - Electric mixer - Mixing bowls When making S'mores Cookie Bars, use fresh ingredients for the best taste. Start with unsalted butter. It gives you control over salt levels. Brown sugar is key for moisture and richness. Granulated sugar adds sweetness and a nice crunch. Eggs help bind everything together. Pure vanilla extract gives a warm flavor that enhances the bars. You also need all-purpose flour for structure. Baking soda helps them rise, making them soft. Fine sea salt balances sweetness. Chocolate chips add that gooey goodness. Mini marshmallows provide that classic s'mores taste, while graham cracker crumbs give a crunchy layer. Having the right tools is important too. A 9x13-inch baking pan is perfect for even baking. An electric mixer saves time and makes creaming easy. Mixing bowls help keep your workspace organized. For the full recipe, check the details above. Enjoy making this treat! - Preheat oven to 350°F (175°C). - Grease the baking pan with butter or cooking spray. - In a large bowl, cream together butter and both sugars. - Add eggs one at a time, then stir in vanilla extract. - In another bowl, combine flour, baking soda, and sea salt. - Take half of the cookie dough and spread it in the pan. - Sprinkle graham cracker crumbs over the dough layer. - Add the reserved chocolate chips and mini marshmallows on top. - Spread the remaining dough over the filling, letting some peek through. - Top with extra graham cracker crumbs for added crunch. - Bake for 25-30 minutes until edges are golden brown. - Check if the center feels set but soft to the touch. For the complete recipe, you can refer to the Full Recipe section. To make the best s'mores cookie bars, avoid overmixing the dough. When you mix too much, the bars become tough. Mix just until the ingredients come together. This keeps your bars soft and chewy. Also, ensure even baking. If your oven has hot spots, rotate the pan halfway through baking. This helps all sides bake evenly. Look for golden edges and a soft center. Serve these bars warm for a gooey experience. The chocolate and marshmallows melt in your mouth. You can add extra toppings for a decadent flair. Try drizzling warm chocolate sauce on top. You can also sprinkle more mini marshmallows for fun. Let the bars cool for at least 15 minutes before cutting. This will help them set. Use a sharp knife for clean squares. A clean cut makes for nice-looking pieces. You can serve them warm or at room temperature. Enjoy your s'mores cookie bars with family and friends! For more details, check the Full Recipe. {{image_4}} You can easily change up the flavor of your s'mores cookie bars. One simple swap is to use dark chocolate chips instead of milk chocolate. Dark chocolate adds a rich, bold taste that pairs perfectly with the sweet marshmallows. If you want a fun twist, add peanut butter to the cookie dough. Just mix in half a cup of creamy peanut butter with your butter and sugars. It adds a nutty flavor that kids and adults love! If you need a gluten-free option, you can use gluten-free flour instead of all-purpose flour. This keeps the bars just as tasty without the gluten. For a vegan version, swap out the butter for coconut oil and use flax eggs instead of regular eggs. To make a flax egg, mix one tablespoon of ground flaxseed with three tablespoons of water. Let it sit for a few minutes until it thickens. These changes let everyone enjoy this sweet treat! You can make your s'mores bars fit any season or holiday. For Halloween, add crushed candy corn on top for a spooky touch. For Christmas, mix in some peppermint extract or crushed candy canes for a festive flavor. In the summer, try adding fresh berries for a burst of fruit. Get creative and have fun with seasonal ingredients! Check out the Full Recipe for more ideas. To keep your s'mores cookie bars fresh, store them at room temperature. Place them in an airtight container. This helps them stay soft and delicious. If it's warm, cover them with plastic wrap. You can also refrigerate them to extend freshness. Just make sure to wrap them well to prevent drying out. Want to save some for later? You can freeze your s'mores cookie bars. Cut them into squares and wrap each one in plastic wrap. Then place them in a freezer bag. They keep well for up to three months. To enjoy again, thaw them in the fridge overnight. For a warm treat, you can reheat them in the oven at 350°F for about 10 minutes. When stored properly, s'mores cookie bars can last up to a week at room temperature. If you refrigerate them, they can last about two weeks. Freezing extends their life to three months. Just remember, the fresher they are, the better they taste. Enjoy them while they’re soft and gooey for the best experience! Look for golden brown edges and a set center. The top should look slightly shiny. If you press it gently, it should feel soft but not mushy. This means they are ready to come out! Yes, you can! Make the bars and let them cool completely. Cut them into squares and store in an airtight container. They stay fresh for up to three days. You can also freeze them for later use. Just thaw them before serving. You can use cookie crumbs or crushed pretzels. If you want a gluten-free option, try almond flour or gluten-free cookies. These give a nice flavor and texture to your bars. Absolutely! Use unsweetened applesauce, mashed bananas, or a flaxseed mixture. For the flaxseed, mix one tablespoon of ground flaxseed with three tablespoons of water. Let it sit for five minutes before adding it to your mix. Yes, they are safe to eat for about three days at room temperature. Keep them in an airtight container to maintain freshness. If you see any mold or strange smells, it’s best to discard them. Enjoy the Full Recipe for these delicious treats! In this article, we covered the essential ingredients for making delicious s'mores cookie bars. We walked through the step-by-step process, provided tips for perfect texture, and explored fun variations. Remember, proper storage helps keep your treats fresh. Experiment with flavors and enjoy the gooey goodness! These bars are perfect for any occasion and will surely please everyone. Enjoy baking them and have fun sharing with friends!

S’mores Cookie Bars Irresistible Sweet Treat Delight

Get ready to dive into a sweet adventure with my S’mores Cookie Bars! These bars combine gooey chocolate, fluffy marshmallows,

- 1 cup frozen spinach - 1 cup canned artichoke hearts - 1 cup cream cheese - 1/2 cup sour cream - 1/2 cup mayonnaise - 1 cup shredded mozzarella cheese - 1/2 cup grated Parmesan cheese - 2 cloves garlic - 1/2 teaspoon onion powder - 1/2 teaspoon red pepper flakes (optional) - Salt and black pepper to taste The main ingredients create a rich and creamy dip. First, I use frozen spinach. It’s easy to find and quick to prepare. Thaw it and drain excess water before mixing. Next, I choose canned artichoke hearts. They add a nice texture and flavor. Cream cheese forms the base of the dip. It makes the dip thick and creamy. Adding sour cream and mayonnaise gives it extra richness. I use shredded mozzarella for its meltiness. It makes the dip gooey and indulgent. Grated Parmesan adds a sharp flavor that balances the creaminess. Minced garlic gives the dip a wonderful aroma. A bit of onion powder adds depth. I often sprinkle in red pepper flakes for a touch of heat. Finally, I season with salt and black pepper to taste. You can adjust these to your liking. - Variations for dairy-free options - Suggested spices for extra flavor - Additional ingredients for more texture For those who want to customize, you can make it dairy-free. Try using cashew cream or silken tofu for creaminess. For more spice, add cayenne pepper or smoked paprika. You can also mix in chopped jalapeños for a kick. If you want more texture, consider adding diced bell peppers or roasted red peppers. They add color and crunch. You might even try some cooked chicken or crab for protein. This dip is versatile and can fit many tastes. For the full recipe, check out the complete guide. - Begin by preheating your oven to 350°F (175°C). - Thaw and drain spinach completely. Remove all excess water to keep the dip thick. - In a bowl, combine cream cheese, sour cream, and mayonnaise. - Use a mixer or spatula to achieve a smooth texture. This step is key for a creamy dip. - Fold in the chopped artichoke hearts and spinach. Mix them well into the creamy base. - Add half of the mozzarella cheese, onion powder, and a pinch of salt and pepper. Stir until everything is creamy and well mixed. - Transfer the mixture to a medium baking dish. Spread it evenly with a spatula. - Sprinkle the remaining mozzarella cheese on top for that golden finish. - Bake for 25-30 minutes. Check for doneness when the dip is hot and the cheese is bubbly. Enjoy this dip warm with your favorite dippables! For the full recipe, check out the detailed instructions. To avoid a watery texture, ensure you drain the spinach well. Squeeze out any extra water with your hands. For creaminess, check your cheese consistency. Cream cheese and sour cream should be soft. If they are too cold, your dip may not mix well. For the best dippables, try toasted baguette slices or crunchy tortilla chips. Fresh veggies like carrot sticks or celery add a nice crunch. To make your dip look fancy, garnish it with chopped parsley or extra red pepper flakes. This adds color and a bit of flair. After serving, let the dip cool for a bit. Store it in an airtight container. This keeps it fresh longer. When reheating, use the oven at 350°F (175°C) for about 15 minutes. This ensures it warms evenly and retains its creamy texture. {{image_4}} If you want a dairy-free version, try cashew cream. Soak raw cashews in water for a few hours. Blend them with a bit of water until smooth. Use this in place of cream cheese. You can also add a splash of lemon juice for a brighter flavor. Make sure to check the taste and add more salt if needed. For a plant-based dip, use the cashew cream mentioned above. You can also swap sour cream with coconut yogurt. This will keep it creamy and add a nice touch. Nutritional yeast gives a cheesy flavor without dairy. Try to blend in a bit of garlic powder for an extra kick. Want to make it heartier? Add cooked chicken or shrimp. Shred the chicken into bite-sized pieces. For shrimp, make sure they are cooked and chopped. If you add protein, adjust your baking time to ensure it heats through. Serve with a sprinkle of fresh herbs for a nice look. To keep your Spinach Artichoke Dip fresh, store it in an airtight container. Let it cool completely before sealing. This dip lasts about 3 to 5 days in the fridge. Make sure to check for any signs of spoilage, like an off smell or mold, before enjoying leftovers. You can freeze this dip for up to 3 months. To do this, place the cooled dip in a freezer-safe container. Leave some space at the top for expansion. When you're ready to use it, thaw the dip overnight in the fridge. Reheat it in the oven at 350°F (175°C) until hot, about 20 minutes. For best results, cover the dish with foil to keep it moist. Don’t let leftover dip go to waste! Here are some fun ideas: - Pasta: Stir it into cooked pasta for a creamy dish. - Stuffed Peppers: Use it as a filling for bell peppers, then bake until tender. - Pizza: Spread it on pizza dough as a sauce before adding toppings. These ideas help you enjoy every last bit of your delicious Spinach Artichoke Dip. For the full recipe, check out the details above. You can store Spinach Artichoke Dip in the fridge for about three to four days. It stays tasty if you keep it in an airtight container. Just make sure it cools down before you put it away. Yes, you can make this dip ahead of time! Prepare the dip and place it in a baking dish. Cover it tightly with plastic wrap and store it in the fridge. When you're ready to serve, just bake it for about 30 minutes. This way, you save time when guests arrive. If you need a substitute for cream cheese, there are several options. You can use Greek yogurt for a tangy twist. Silken tofu is a great dairy-free choice. Another option is cashew cream for a rich and creamy flavor. Each choice will give a different taste, so pick one you like! While Spinach Artichoke Dip is best served warm, you can serve it cold if you prefer. The flavors will still be good, but the texture will change. Cold dip is creamy but less gooey. If you go this route, consider adding some fresh herbs for a fresh taste. We've explored the recipe for a tasty Spinach Artichoke Dip. I covered the key ingredients, step-by-step instructions, and helpful tips. Customization options let you add your favorite flavors and toppings. Proper storage keeps your leftovers fresh. I hope you find joy in making this dip and sharing it with others. Enjoy your cooking and happy dipping!

Spinach Artichoke Dip Creamy and Flavorful Delight

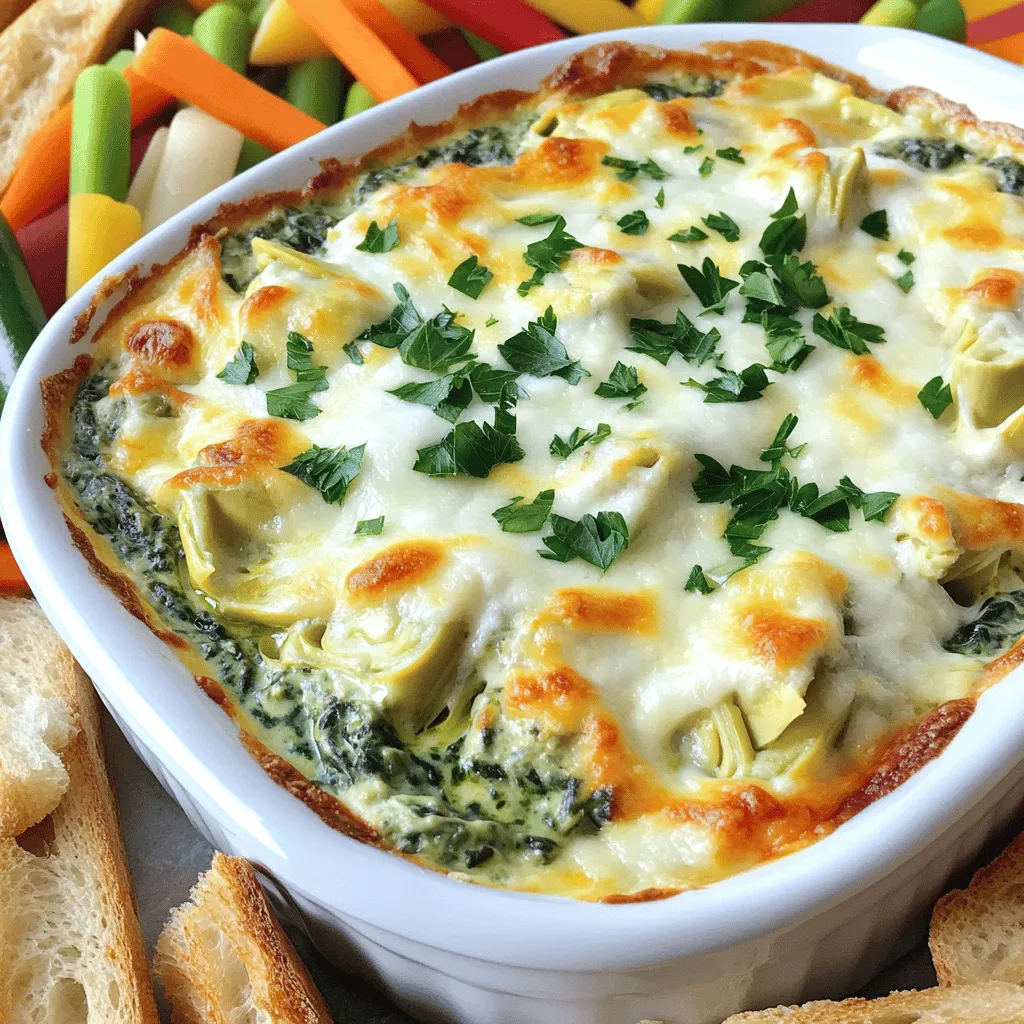
Get ready to satisfy your cravings with my creamy and flavorful Spinach Artichoke Dip! This crowd-pleasing appetizer is not just

Older posts
Newer posts
← Previous Page1 … Page33 Page34 Page35 … Page73 Next →

dsad

© 2025 recipesstation • Built with GeneratePress

Our Policies

  • Copyright Policy
  • Cookie Policy
  • GDPR Policy
  • Privacy Policy
  • Disclaimer
  • Terms Of Use

More Information

  • Home
  • About
  • Contact
  • Appetizers
  • Dessert
  • Dinner
  • Drinks
©2025, recipesstation About Back To Top