Skip to content
DisclaimerTerms Of UseGDPR PolicyCookie Policy

recipesstation

  • Home
  • Drinks
  • Appetizers
  • Dinner
  • Dessert
  • About
  • Contact
  • Privacy Policy
DisclaimerTerms Of UseGDPR PolicyCookie Policy

Emily

- 2 large sweet potatoes - 2 tablespoons olive oil - 1 teaspoon garlic powder - 1 teaspoon smoked paprika - ½ teaspoon sea salt - ½ teaspoon black pepper - ¼ teaspoon cayenne pepper (optional) To make air fryer sweet potato fries, you need just a few key ingredients. Start with two large sweet potatoes. They give the fries a natural sweetness. Next, grab two tablespoons of olive oil. This oil helps the fries crisp up nicely. For flavor, use one teaspoon each of garlic powder and smoked paprika. Garlic powder adds warmth, while smoked paprika brings a subtle smokiness. You will also need half a teaspoon each of sea salt and black pepper. These spices enhance the natural sweet taste of the potatoes. If you like extra heat, add a quarter teaspoon of cayenne pepper. This step is optional, but it can really boost the flavor! Gather these items, and you’re ready to create crispy, delicious fries. You can find the full recipe in the steps that follow! - Wash and peel sweet potatoes - Cut into uniform sticks, aiming for 1/4 inch thickness Start by washing the sweet potatoes under cold water. This removes any dirt and grit. Next, peel them using a vegetable peeler. Uniform sticks are key for even cooking. Aim for about 1/4 inch thick. This thickness helps the fries cook quickly and get crispy. - Soak cut fries in cold water for a minimum of 30 minutes - Drain and pat dry with a kitchen towel Soaking the fries is important. Place them in a bowl and cover with cold water. Let them soak for at least 30 minutes. This step helps remove excess starch. Less starch means crispier fries! After soaking, drain the fries and pat them dry with a kitchen towel. Removing moisture is essential for crispiness. - Combine with olive oil and spices - Ensure even coating on all fries In a large bowl, mix the dried fries with olive oil and spices. Use 2 tablespoons of olive oil, 1 teaspoon of garlic powder, 1 teaspoon of smoked paprika, ½ teaspoon of sea salt, and ½ teaspoon of black pepper. Add ¼ teaspoon of cayenne pepper if you want extra heat. Toss everything well. Make sure each fry gets a nice coat of the seasoning mix. - Preheat air fryer to 400°F (200°C) - Air fry fries in a single layer for 15-20 minutes, shaking halfway Preheat your air fryer to 400°F (200°C). This step is crucial for achieving that perfect crunch. Once heated, place the seasoned fries in the air fryer basket. Make sure to arrange them in a single layer, so they cook evenly. Air fry for 15-20 minutes. Shake the basket halfway through to ensure all sides get crispy. - Look for golden color and crispiness - Allow to cool slightly before serving The fries are ready when they turn a golden color and are crispy. If they need more time, add 2-3 minutes. Keep an eye on them to prevent burning. Once cooked, take them out and let them cool slightly. This short wait makes for a crispier bite when you serve them. To make the crispiest sweet potato fries, soak and dry them well. This step is key. Soaking removes excess starch, which helps the fries crisp up nicely. After soaking for at least 30 minutes, drain them. Pat them dry with a clean towel or paper towels to remove moisture. When placing fries in the air fryer basket, arrange them in a single layer. Avoid overcrowding the basket. If you add too many fries, they will steam instead of crisp. Fry in small batches if needed. Get creative with your spices! You can try various blends to change the flavor of your fries. For a classic taste, stick with garlic powder and smoked paprika. If you want more heat, add cayenne pepper. To adjust seasonings, taste and tweak as you go. If you love herbs, sprinkle some dried oregano or rosemary. You can also try a dash of cinnamon for a sweet twist. Dipping sauces can take your fries to the next level. Try tangy yogurt sauce or spicy sriracha mayo. Ketchup is a classic, but you can also mix it with hot sauce for extra kick. For a fun presentation, serve fries in a rustic basket lined with parchment paper. Add fresh herbs like parsley for a pop of color. This makes it more appealing when you host friends or family. Check out the Full Recipe for more details on making these delicious fries! {{image_4}} You can make sweet potato fries even more fun by adding flavors. Here are two tasty ideas: - Buffalo-style sweet potato fries: For a spicy twist, toss your fries in buffalo sauce after air frying. The heat from the sauce will give them a zesty kick. Serve with blue cheese dressing on the side. It’s a fun way to enjoy your fries! - Sweet and spicy version: Mix brown sugar and chili powder into your seasoning. This creates a sweet and spicy taste that pairs well with the natural sweetness of sweet potatoes. Go for about 1 tablespoon of brown sugar and 1 teaspoon of chili powder to start. Toss the fries with this mix before air frying. If you don’t have an air fryer, you can still enjoy sweet potato fries. Here are two simple methods: - How to bake sweet potato fries in the oven: Preheat your oven to 425°F (220°C). Spread the seasoned fries on a baking sheet lined with parchment paper. Bake for 20-25 minutes, flipping halfway through. Keep an eye on them to ensure they don’t burn. - Tips for frying in oil: If you prefer frying, heat about 2 inches of oil in a deep pot. Fry the sweet potato fries in small batches for about 3-5 minutes or until golden. Be cautious with the hot oil. Drain the fries on paper towels to remove excess oil. For the full recipe, check out the earlier section! To store leftover sweet potato fries, let them cool first. Place them in an airtight container. You can keep them in the fridge for up to three days. This keeps them fresh and tasty. When reheating, the goal is to keep them crispy. Preheat your air fryer to 350°F (175°C). Place the fries in the basket in a single layer. Heat them for about 5-7 minutes. This way, they will regain their crunch. If you want to save sweet potato fries for a longer time, freezing is a great option. First, fully cook them in the air fryer. Let them cool completely. Then, spread them on a baking sheet in a single layer. Freeze them for about 1-2 hours until firm. After that, transfer the fries to a freezer bag. Squeeze out as much air as you can before sealing. When you are ready to cook from frozen, no need to thaw. Preheat your air fryer to 400°F (200°C). Cook the frozen fries for 15-20 minutes, shaking the basket halfway. This ensures they cook evenly and stay crispy. To make air fryer sweet potato fries, follow these steps: 1. Wash and Peel: Clean 2 large sweet potatoes and peel them. 2. Cut into Sticks: Slice them into uniform sticks, about 1/4 inch thick. 3. Soak in Water: Soak the fries in cold water for at least 30 minutes. This helps remove excess starch. 4. Dry the Fries: After soaking, drain and pat the fries dry with a towel. 5. Season: Toss them with 2 tablespoons of olive oil and spices, like garlic powder and smoked paprika. 6. Preheat Air Fryer: Set the air fryer to 400°F (200°C) for about 5 minutes. 7. Air Fry: Place the fries in a single layer and cook for 15-20 minutes, shaking halfway. 8. Check for Doneness: They should be golden and crispy. If not, add a few more minutes. Common pitfalls include not soaking long enough and overcrowding the basket. Both can lead to soggy fries. Yes, you can use frozen sweet potato fries in an air fryer. Here are the guidelines: - Do Not Thaw: Cook them straight from the freezer. Thawing can make them soggy. - Adjust Cooking Time: Cook for about 10-15 minutes at 400°F (200°C). - Shake the Basket: Shake halfway through to ensure even cooking. Always check the package for specific instructions, as cooking times can vary. Soggy fries often come from a few common causes: - Too Much Moisture: Not drying the fries well after soaking leads to sogginess. - Overcrowding: If you fill the air fryer too full, the fries won’t crisp. - Low Temperature: Cooking at a lower temperature can also cause sogginess. To avoid this, soak, dry, and spread fries in a single layer in the air fryer. Sweet potato fries pair well with many dipping sauces. Here are some popular and unique options: - Ketchup: Classic and simple, always a favorite. - Yogurt Sauce: A tangy yogurt sauce with herbs adds freshness. - Sriracha Mayo: Mix mayonnaise with sriracha for a spicy kick. - Maple Syrup: Drizzle with maple syrup for a sweet contrast. - Chipotle Aioli: Blend chipotle peppers with mayo for a smoky flavor. Feel free to experiment with your favorite sauces to enhance the flavor experience. For the full recipe, check out the link. This blog post covered how to make delicious air fryer sweet potato fries. We talked about the right ingredients, how to prepare and soak the fries, and the best cooking techniques. You can also try different spices and serving ideas to keep things fun. Remember to store leftovers properly for the best taste. Sweet potato fries can be a tasty and healthy snack, so give them a try. Enjoy your cooking and the smiles it brings!

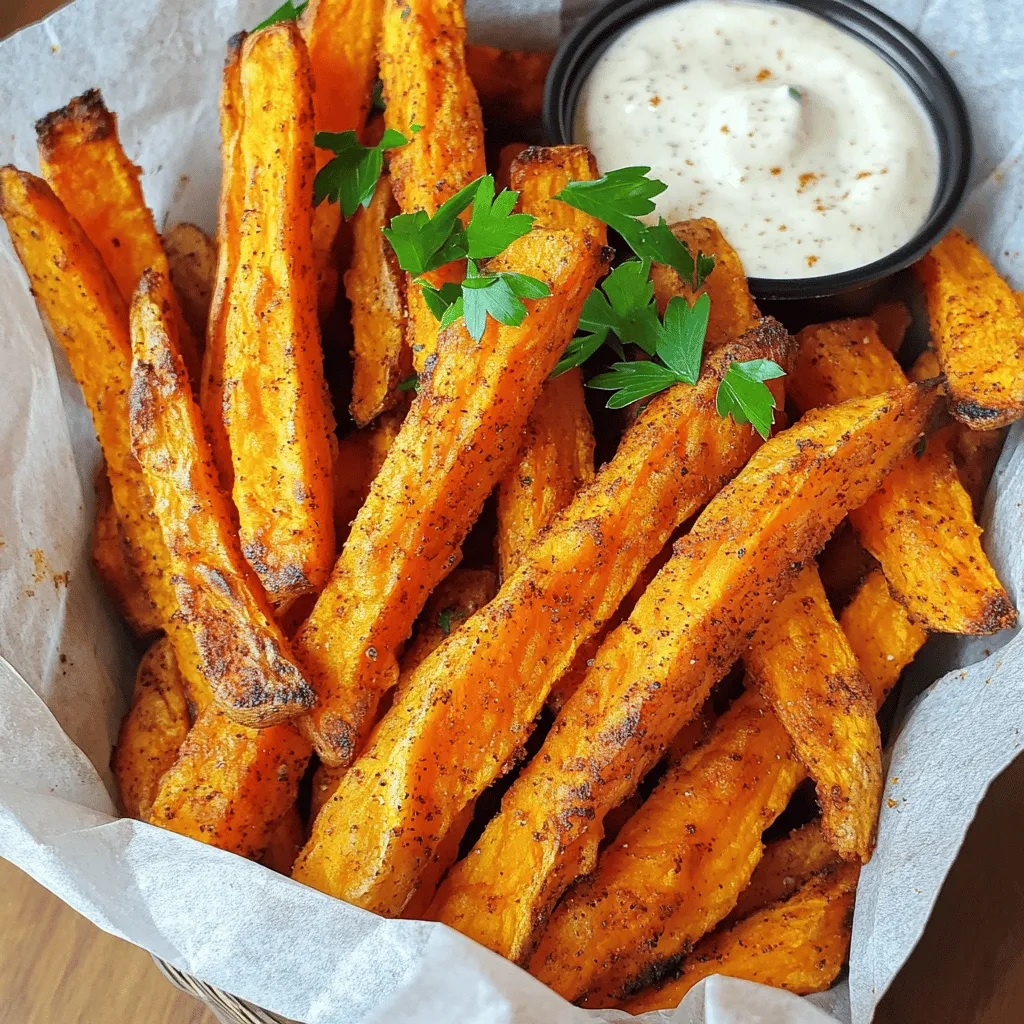
Air Fryer Sweet Potato Fries Crispy and Simple Recipe

Do you crave crispy, golden sweet potato fries but dread the hassle of frying? I’ve got you covered! In this

- 1 pound boneless, skinless chicken thighs - 1 can coconut milk - 2 tablespoons red curry paste - 1 onion, finely chopped - 3 cloves garlic, minced - 1 tablespoon fresh ginger, grated - 1 bell pepper, sliced into thin strips - 2 tablespoons fish sauce (or soy sauce) - 1 tablespoon packed brown sugar - 1 cup baby spinach, loosely packed - Fresh cilantro, chopped, for garnish - Cooked jasmine rice, for serving - Salt and freshly ground pepper - Optional: lime wedges for serving These ingredients come together to create a rich and tasty Coconut Curry Chicken. The chicken thighs stay juicy and tender, while the coconut milk gives a creamy texture. The red curry paste adds warmth and depth. You can find the full recipe at the end to guide you through the cooking process! Remember, fresh herbs like cilantro and lime wedges can brighten the dish and make it visually appealing. Enjoy crafting this vibrant meal! 1. Start by heating olive oil in a large skillet or Dutch oven over medium heat. 2. Once hot, add the finely chopped onion. Sauté it for 3-4 minutes. It should turn translucent and soft. 3. Next, add minced garlic and grated ginger. Stir for about a minute. You want to bring out their great aroma. 4. Now, incorporate the red curry paste. Cook it while stirring for about 2 minutes. This deepens the flavors. 1. Gradually pour in the coconut milk. Stir well to mix in the curry paste. 2. Add the chicken pieces along with sliced bell pepper, fish sauce, and brown sugar. 3. Season with salt and freshly ground pepper. Increase the heat until it simmers gently. 4. Cover the skillet and let it cook for about 15 minutes. The chicken should be cooked and tender. 5. After 15 minutes, fold in baby spinach. Cook for another 2-3 minutes until it wilts. Taste and adjust the seasoning. 1. Remove from heat and sprinkle with freshly chopped cilantro. This adds a burst of freshness. 2. Serve the Coconut Curry Chicken hot over jasmine rice. Enjoy the rich flavors and warm spices. You can find the full recipe and more tips to enhance your cooking experience. - Cut chicken into even pieces. This helps it cook evenly. - Adjust spice level by changing the curry paste. More paste makes it spicier. - Use shallow bowls for serving. This showcases the vibrant colors. - Add fresh herbs and lime for garnish. This makes the dish pop! - Prepare ingredients in advance. Chop veggies and measure spices before cooking. - Use pre-cooked rice for quicker meals. This saves you valuable time in the kitchen. These simple tips will help you make the most of your Coconut Curry Chicken. Enjoy the cooking process and have fun! For the full recipe, check out the relevant section in this article. {{image_4}} If you're looking to switch things up, consider a vegetarian option. You can replace the chicken with tofu or chickpeas. Tofu absorbs flavors, making it a great choice. Chickpeas add protein and a nice texture. Both options work well with the rich coconut curry sauce. For those needing gluten-free meals, replace fish sauce with gluten-free soy sauce. This keeps the dish flavorful without gluten. Always check labels to ensure all ingredients are safe for gluten-free diets. Don't be afraid to play with flavors! You can try different curry pastes like green or Massaman. Each type offers a unique taste. Green curry paste is more aromatic, while Massaman is sweeter and richer. Adding vegetables is also a fun way to change the dish. Zucchini and carrots make great additions. They add color and nutrients. Just chop them up and toss them in with the chicken. Side dishes can enhance your meal. Naan bread is perfect for dipping into the curry. Steamed vegetables also pair well, balancing flavors and adding crunch. For drinks, coconut water is refreshing and complements the curry. Thai iced tea is another option. Its sweetness and creaminess contrast nicely with the savory curry. For the full recipe, check out the [Full Recipe]. To keep your Coconut Curry Chicken fresh, store it in an airtight container. This helps lock in flavors and moisture. Place the container in the fridge. Your leftovers will stay good for about 3 to 4 days. If you want to save some for later, freezing is a great option. Divide the curry into single-serve portions. Use freezer-safe containers or zip-lock bags. Make sure to remove as much air as possible to prevent freezer burn. You can freeze it for up to 3 months. When it's time to enjoy your curry again, reheating is simple. For stovetop reheating, place it in a pot over low heat. Stir often to keep it from sticking. If you prefer the microwave, put it in a microwave-safe dish. Heat in short bursts, stirring in between. Both methods keep the flavors intact. You can use almond milk or heavy cream as a substitute. Almond milk gives a nutty taste. Heavy cream adds richness but is less coconut-like. Both options work well in this dish. Yes, you can add heat to your curry! Try using more red curry paste. You can also mix in chili flakes or fresh chilies for extra spice. Adjust the amount to fit your taste. Coconut Curry Chicken stays good for about 3 to 4 days in the fridge. Make sure to store it in an airtight container. If it smells off or looks strange, throw it away. You learned how to make a tasty Coconut Curry Chicken dish. We covered the main ingredients like chicken, coconut milk, and red curry paste. I shared tips on cooking, serving, and how to adjust to your taste. Remember, you can also try variations, like making it vegetarian or gluten-free. Finally, store your leftovers right and you'll enjoy this meal longer. Dive in and make it your own! Enjoy the process and the flavor!

Coconut Curry Chicken Flavorful and Simple Recipe

Looking for a dish that warms your soul and pleases the palate? My Coconut Curry Chicken recipe is both flavorful

To make tasty peanut butter banana overnight oats, gather these key ingredients: - 1 cup rolled oats - 2 cups almond milk (or your preferred milk) - 2 ripe bananas (one mashed and one sliced) - 2 tablespoons natural peanut butter - 1 tablespoon chia seeds - 1 tablespoon maple syrup (optional) - 1/2 teaspoon vanilla extract - Pinch of salt These ingredients work together to create a creamy and filling breakfast. The oats soak up the milk and flavors overnight. Bananas add natural sweetness while peanut butter gives a rich taste. You can add a few optional ingredients to boost flavor: - Ground cinnamon for warmth - Cocoa powder for a chocolate twist - Nutmeg for a spicy kick - Greek yogurt for extra creaminess These additions allow you to customize your oats based on your taste. Toppings make your oats even more enjoyable. Here are some great options: - Chopped nuts like almonds or walnuts - Additional banana slices for more sweetness - A drizzle of peanut butter for extra flavor - Fresh berries for a tart contrast These toppings not only add flavor but also make your breakfast look beautiful. Enjoy exploring different combinations! To start, gather your ingredients. This recipe is simple and quick. You will need rolled oats, almond milk, bananas, natural peanut butter, chia seeds, maple syrup, vanilla extract, and salt. Having everything ready makes the process smooth and fun. In a mixing bowl, combine these ingredients: - 1 cup rolled oats - 2 cups almond milk (or your preferred milk) - 2 ripe bananas (one mashed and one sliced) - 2 tablespoons natural peanut butter - 1 tablespoon chia seeds - 1 tablespoon maple syrup (optional) - 1/2 teaspoon vanilla extract - Pinch of salt Mix them well. Stir until the blend is creamy and smooth. This step is key to ensure all the flavors blend together nicely. Once mixed, you can divide the mixture into two jars or air-tight containers. Now, it’s time to layer the sliced bananas on top of each jar. This adds flavor and makes it look pretty. Seal the jars and place them in the fridge. Let them soak overnight or for at least 4 hours. The oats will absorb the milk and soften. When you wake up, just stir and enjoy! Remember, for a creamier texture, you can add a splash of milk before serving. Enjoy your Peanut Butter Banana Overnight Oats! For the complete recipe, check the [Full Recipe]. To get the best texture in your overnight oats, use rolled oats. These oats soak up liquid well, getting soft but not mushy. Another tip is to mix the oats with enough milk. I recommend two cups of almond milk for a creamy consistency. If you want it even creamier, add a splash more milk before you eat. You can adjust the sweetness to fit your taste. If you like it sweeter, add a tablespoon of maple syrup. If you want a richer taste, use a ripe banana. Ripe bananas are sweeter and add more flavor. You can also add spices like cinnamon or nutmeg for a warm touch. Serve your oats in clear jars. This shows off the layers and makes it look nice. Top your oats with chopped nuts or extra banana slices. A drizzle of peanut butter on top adds a nice finish. Enjoy your oats cold straight from the fridge, or warm them up if you prefer. For the full recipe, check out Peanut Butter Banana Bliss Overnight Oats. {{image_4}} You can easily make this recipe vegan and gluten-free. To do this, ensure your oats are certified gluten-free. Use almond milk, oat milk, or coconut milk instead of regular milk. These options keep the dish creamy and delicious. For the peanut butter, choose a brand that is both natural and vegan. You can also swap the maple syrup for agave syrup, which is a great vegan sweetener. Want to spice things up? Try adding a scoop of protein powder to boost nutrition. You can also mix in cocoa powder for a chocolate twist. If you enjoy fruity flavors, add berries or diced apples. Cinnamon or nutmeg can give a warm flavor. These add-ins make your oats even more exciting and tasty! You can use many types of milk for this recipe. Almond milk is popular for its nutty taste. Oat milk is creamy and has a mild flavor. Coconut milk adds a tropical vibe. You can also try soy milk for extra protein. Each milk will change the taste a bit, so feel free to explore your favorites. Just remember to adjust the sweetness based on your milk choice. For the full recipe, check out Peanut Butter Banana Bliss Overnight Oats! You can store your peanut butter banana overnight oats in jars or airtight containers. Glass jars work great because they let you see the layers. Make sure to seal them tightly. This keeps your oats fresh and tasty. Your overnight oats will stay fresh in the fridge for about 3 to 5 days. If you want the best taste, enjoy them within the first 2 days. Check for any changes in smell or texture before eating. If they look or smell off, it's best to toss them. You can enjoy your oats cold or warm. If you prefer them warm, simply remove the lid and heat in the microwave for about 30 seconds. Stir and check the warmth. You can add a splash of milk if they feel too thick after heating. For the full recipe, check out the Peanut Butter Banana Bliss Overnight Oats! Yes, you can use instant oats. They cook quicker and will soften faster. However, they can become mushy. Rolled oats give a better texture and bite. If you like creaminess, go for instant oats. You can keep the oats in the fridge for up to five days. This makes them great for meal prep. Just make sure you store them in airtight containers. Each morning, stir them well before eating. If you need a substitute, try almond butter or sunflower seed butter. Both work well and taste great. You can also use tahini for a nut-free option. Each choice will change the flavor a bit, but they will still be yummy. Yes, you can add protein powder to boost nutrition. Mix in a scoop while blending the ingredients. Choose a flavor that matches your taste. Chocolate or vanilla can add a fun twist. Absolutely! Frozen bananas work well. They add creaminess and sweetness. Just thaw them before mixing. You can mash them easily when soft. This is a great way to use ripe bananas too. Chia seeds help thicken the oats. If you don’t have them, you can skip them. You can also use ground flaxseed as an alternative. This will keep your oats just as nutritious. Yes, you can make them gluten-free! Just ensure you use certified gluten-free oats. This will keep your breakfast safe and tasty. Gluten-free oats are easy to find in stores. You can get creative with toppings! Try chopped nuts, extra banana slices, or berries. A drizzle of honey or maple syrup adds sweetness. These toppings make your oats more exciting and fun to eat. You can heat overnight oats if you prefer warm meals. Just pop them in the microwave for a minute or two. Stir well and add a splash of milk to loosen the texture. Enjoy them warm for a cozy breakfast! For the full recipe, check out [Full Recipe]. You've learned how to make delicious overnight oats with simple steps. We covered the key ingredients, from main items to tasty toppings. I shared tips to get the best texture and flavor, plus ways to store your oats. You can even try vegan or gluten-free options! These easy recipes give you room to be creative. Enjoy your oats now or save them for later. You have the tools to make this a fun part of your meals. Enjoy your cooking!

Peanut Butter Banana Overnight Oats Easy Recipe

Start your morning right with my Peanut Butter Banana Overnight Oats! This easy recipe brings together creamy peanut butter, sweet

- Cherry tomatoes - Fresh mozzarella balls (bocconcini) - Fresh basil leaves - Balsamic glaze - Extra virgin olive oil - Sea salt and freshly ground black pepper - Skewers First, rinse the cherry tomatoes under cold water. This step helps remove dirt. After that, dry them gently with a clean towel. Next, drain the fresh mozzarella balls. Let them sit for a minute to dry. This makes assembly easier. Now, take your skewer. Start by adding a cherry tomato. Then, add a fresh basil leaf. Follow this with a mozzarella ball. Repeat this process. Aim for three to four sets of tomato, basil, and mozzarella on each skewer. Leave space at both ends for handling. Once your skewers are ready, place them on a nice platter. This makes them look appealing. Drizzle extra virgin olive oil over the skewers. Sprinkle them with sea salt and black pepper. This enhances the flavors. Finally, drizzle balsamic glaze on top. This adds a sweet and tangy touch. Serve the skewers at room temperature or chill them for an hour. This is a great way to let the flavors blend. For more details, check the Full Recipe. To make your mini Caprese skewers pop, focus on presentation. Use a large white platter to show off the colors. Add a few sprigs of fresh basil around the skewers. This adds green and makes it look fresh. Consider a small bowl of balsamic glaze for dipping. This not only adds style, but it also gives guests a way to enjoy more flavor. Serving your skewers at room temperature works well, but chilling them can enhance the taste. Let them sit in the fridge for about an hour before serving. The cold brings out the flavors and makes them refreshing. To boost flavor, sprinkle some Italian seasoning over the skewers. You can also add a pinch of garlic powder for a zing. These small changes can make a big impact on taste. Pair the skewers with a light white wine or sparkling water. They complement the fresh ingredients and make for a delightful bite. You could even serve them with crusty bread for a heartier option. These tips will help your mini Caprese skewers stand out. For the complete recipe, check the full recipe section. Store any leftover mini Caprese skewers in the fridge. Use an airtight container to keep them fresh. You can enjoy them for up to three days. After that, they may lose their flavor and texture. These skewers taste best when served cold or at room temperature. If you do want to warm them up, remove the skewers from the fridge. Let them sit at room temp for about 15 minutes before serving. This helps maintain their taste and texture. Avoid using a microwave, as it can make the cheese rubbery. Enjoy your mini Caprese skewers with their fresh flavors intact! {{image_4}} Caprese skewers come from Italy. They are inspired by the classic Caprese salad. This salad features fresh tomatoes, mozzarella, and basil. It represents the colors of the Italian flag. Traditionally, these ingredients are served fresh. They are often drizzled with olive oil and balsamic vinegar. The skewers make it easy to enjoy this tasty combo at parties or gatherings. Yes, you can prepare these skewers in advance. Assemble them a few hours before your event. Keep them covered in the fridge. This helps the flavors blend well. Just remember to drizzle the balsamic glaze right before serving. This keeps the skewers looking fresh and tasty. Absolutely! For a vegan version, swap out the mozzarella. Use marinated tofu or vegan cheese instead. Cherry tomatoes and basil are already vegan-friendly. You can also add some avocado for creaminess. This keeps the flavor and texture enjoyable while catering to dietary needs. Each serving of mini Caprese skewers has about 100 calories. They contain 7 grams of fat, 6 grams of carbs, and 5 grams of protein. This makes them a light yet satisfying snack. The combination of fresh ingredients keeps the calories low while still providing great flavor. The ingredients in these skewers offer many health perks. Fresh mozzarella gives you protein and calcium. This helps build strong bones and muscles. Cherry tomatoes are low in calories and high in vitamins A and C. They also have lycopene, which is good for your heart. Basil adds another layer of health. This herb is rich in antioxidants. It may help reduce inflammation and support your immune system. Plus, its strong flavor makes your dish taste even better. Enjoying these skewers not only pleases your palate but also offers health benefits. This blog post explored making delicious Caprese skewers. We covered key ingredients like cherry tomatoes and mozzarella. I shared steps for preparation, assembly, and presentation. You can impress guests with tips on flavor and visual appeal. I also discussed variations to fit any diet and how to store leftovers. Caprese skewers are versatile and fun. They bring fresh flavors to any table. Enjoy experimenting with new combinations, and serve them at your next gathering!

Mini Caprese Skewers Simple and Tasty Appetizer

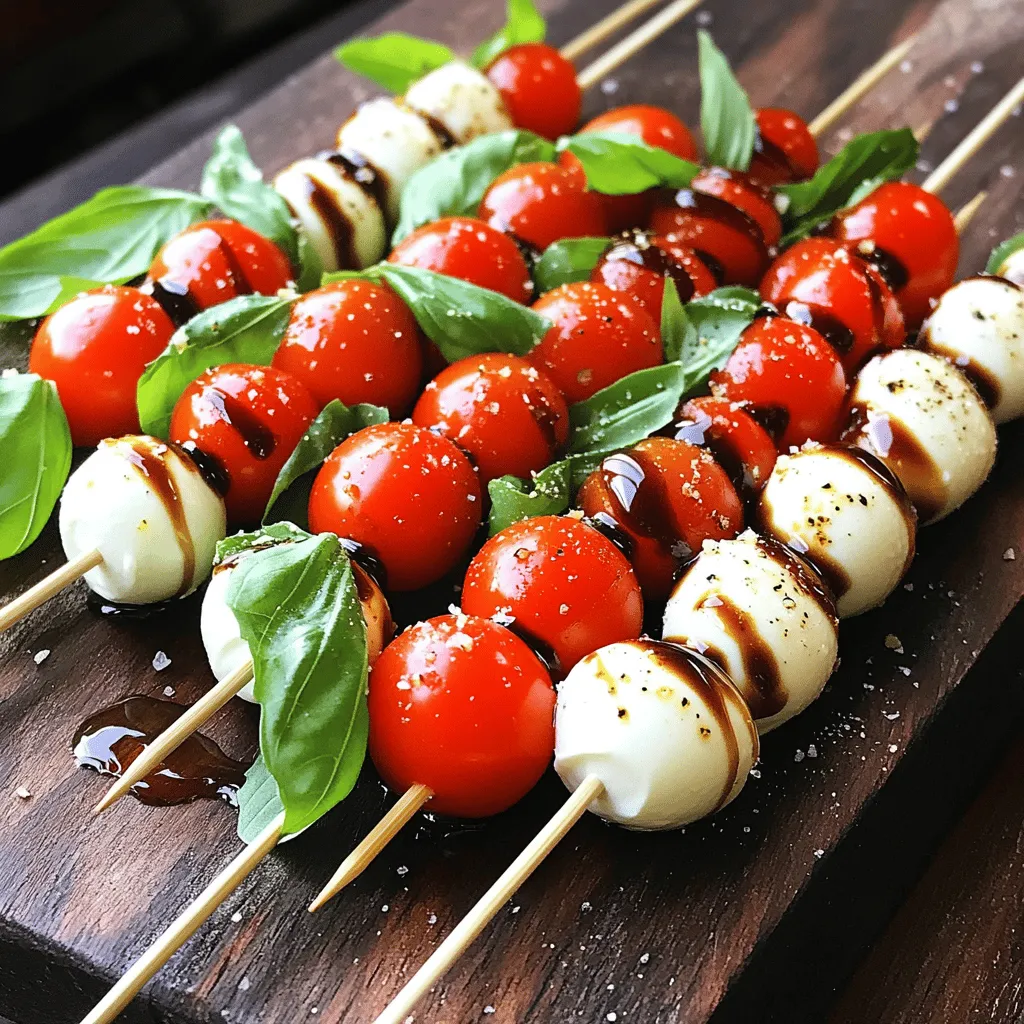
Looking for a simple, tasty appetizer that impresses? Mini Caprese Skewers are your answer! These delightful bites combine fresh cherry

- 1 pound large shrimp, peeled and deveined - 4 tablespoons unsalted butter - 4 cloves garlic, finely minced - Zest and juice of 1 fresh lemon - 1/4 teaspoon red pepper flakes - Sea salt and freshly ground black pepper, to taste - 1 tablespoon fresh parsley, finely chopped - Lemon wedges, for serving The main ingredients create a big flavor. The shrimp form the heart of this dish, providing a sweet and mild taste. Large shrimp work best since they cook evenly and stay juicy. If you want a rich flavor, unsalted butter is key. It allows the other flavors to shine. Garlic adds a wonderful aroma and taste. Mince the garlic finely to release its oils. This step makes sure you spread the garlic flavor evenly. Lemon is the star in this recipe. The zest adds a bright note, while the juice gives a tangy burst. Together, they balance the richness of the butter. Optional ingredients can make this dish your own. Red pepper flakes bring some heat. Adjust the amount to suit your taste. Fresh parsley adds color and freshness to the final dish. Season with sea salt and black pepper for depth. You can find the full recipe to make Lemon Garlic Butter Shrimp delicious and simple. - Peeling and deveining shrimp: Start by rinsing the shrimp under cold water. Use a firm hand to peel off the shell. Then, use a small knife to make a shallow cut along the back. Remove the dark vein inside. This keeps the shrimp clean and tasty. - Mincing garlic and preparing lemon zest: Next, take your garlic cloves. Use a knife to chop them finely. The smaller the pieces, the better the flavor. Now, grab a fresh lemon. Use a grater to remove the outer yellow skin, but avoid the white part. This zest adds a bright taste. - Melting the butter and sautéing garlic: Heat a large skillet over medium heat. Add the unsalted butter. Once it melts, it will begin to bubble. Quickly add the minced garlic. Sauté it for about one minute. Stir often to keep it fragrant without burning. - Adding shrimp and seasoning for flavor: If you like it spicy, toss in the red pepper flakes. Then, add the shrimp to the skillet. Cook them for about 2-3 minutes. They will start to turn pink. Flip them to cook the other side. This ensures they cook evenly. - Final touches with lemon juice and parsley: After flipping, squeeze in the fresh lemon juice. Add the lemon zest you prepared earlier. Season with sea salt and freshly ground black pepper. Cook for another 2-3 minutes. Remove from heat and sprinkle the chopped parsley on top. - Plating the shrimp uniquely: For a great look, serve the shrimp in a shallow bowl. Pour some of the buttery sauce over them. This makes the dish more appealing. - Adding garnishes and complements: Add lemon wedges on the side. They provide a fresh touch. You can also sprinkle a bit more parsley on top to make it pop. Enjoy your Lemon Garlic Butter Shrimp right away for the best taste. For the complete recipe, check out the [Full Recipe]. Cook large shrimp for about 2-3 minutes per side. They turn pink when ready. Do not overcook them. Overcooked shrimp become rubbery and tough. To find the best flavor, balance the lemon and garlic. The lemon adds brightness, while garlic gives depth. Adjust these to your taste. To sauté garlic, heat your skillet, then add the butter. Add garlic after the butter melts. Stir it often to avoid burning. Burnt garlic tastes bitter, which ruins the dish. For the best lemon flavor, use fresh lemons. They have more juice and zest than old ones. Zest the lemon first, then juice it. Serve shrimp in a shallow bowl for a nice look. Drizzle the garlic butter sauce over the top. Add lemon wedges and parsley for color. The green parsley pops against the shrimp's pink. Enjoy this dish right away for the best taste and view. {{image_4}} You can spice up your Lemon Garlic Butter Shrimp easily. Adding some heat makes the dish exciting. Try adding jalapeños, chili powder, or cayenne pepper. Start with a small amount. You can always add more if you like it hot. Aim for a nice balance so the spice enhances the flavor, not overpowers it. Fresh herbs can change the flavor of your dish. You can use basil, cilantro, or thyme instead of parsley. Each herb gives a new taste. Basil offers a sweet touch, while cilantro adds a fresh zing. You can mix and match to find your favorite combination. Just chop them finely and sprinkle them in at the end. Transforming this shrimp dish into pasta is easy. Just cook your favorite pasta while making the shrimp. Spaghetti or fettuccine works great. When the shrimp is done, toss it with the pasta. This adds a nice twist. You can also add veggies like spinach or cherry tomatoes for more color and nutrition. Make sure to save some sauce for a tasty finish. For the full recipe, check out Lemon Garlic Butter Shrimp Delight. Store your leftover shrimp in an airtight container. This keeps them fresh and safe. Place the shrimp in the fridge if you plan to eat them soon. They stay good for up to two days. If you want to keep them longer, consider freezing. For cooked shrimp, cool them first before storage. This helps prevent moisture loss. Avoid stacking them too tightly; this keeps them from sticking together. To reheat shrimp, use low heat. You can use a skillet or microwave. If using a skillet, add a splash of water or broth. This helps keep the shrimp moist. Heat for just a few minutes until warm. In the microwave, use a cover. This traps steam and keeps shrimp juicy. Heat in short bursts of 30 seconds. Check often to avoid overcooking. Overcooked shrimp can turn tough and rubbery. Yes, you can freeze Lemon Garlic Butter Shrimp! First, cool the shrimp completely. Then, place them in a freezer-safe bag. Remove as much air as you can. This prevents freezer burn. When you are ready to eat, thaw shrimp in the fridge overnight. You can also use cold water for quick thawing. Just seal them in a bag and submerge. Avoid thawing shrimp in the microwave, as this can cook them unevenly. For the full recipe to enjoy now or later, check out the Lemon Garlic Butter Shrimp Delight! 1. Are fresh or frozen shrimp better? Fresh shrimp often taste better, but frozen shrimp can be just as good. They are often frozen right after harvest, locking in their flavor. If you choose frozen shrimp, look for those labeled as "wild-caught" for the best taste. 2. How do I choose shrimp at the store? When selecting shrimp, check for a fresh, briny smell. The shrimp should look moist and shiny. Avoid any shrimp with black spots or a strong fishy odor. Size matters too; larger shrimp work best for this recipe. 1. What can I substitute for unsalted butter? You can use olive oil for a lighter option. Coconut oil is another choice, adding a hint of sweetness. If you prefer a different flavor, ghee can also work well. 2. Can I make this recipe dairy-free? Yes, you can easily make this recipe dairy-free. Use a plant-based butter spread or olive oil. Both choices will keep the dish tasty and satisfying. 1. What color should shrimp be when done? Cooked shrimp change from gray to a bright pink color. The flesh should be opaque and firm to the touch when they are fully cooked. 2. Are there any signs of undercooked shrimp? Undercooked shrimp may still look translucent and gray. They may also feel soft and rubbery. Make sure to cook them until they are fully pink and firm for the best results. Lemon garlic butter shrimp is a simple and tasty dish. We explored its main ingredients, step-by-step cooking, and tips for perfection. Each bite bursts with flavor, making it a favorite meal. Try serving it with pasta or adding herbs for variety. Remember, proper storage helps keep leftovers fresh. Whether you choose fresh or frozen shrimp, you now have the knowledge to make this dish shine. Enjoy experimenting and sharing your results with family and friends. Great meals create great memories. Happy cooking!

Lemon Garlic Butter Shrimp Flavorful and Simple Recipe

Looking for a quick and tasty meal? My Lemon Garlic Butter Shrimp recipe is perfect for you! This dish combines

To make Mango Coconut Chia Pudding, you will need just a few simple ingredients. This treat is both tasty and good for you. Here’s the full recipe to guide you through each step. - Coconut milk options: You can choose between canned or carton coconut milk. Canned coconut milk gives a rich, creamy texture. Carton coconut milk is lighter and less thick. Both work well, so pick what you like best. - Almond milk alternatives: If you want something different, any milk can work. You can use oat, soy, or rice milk instead of almond milk. This way, you can customize your pudding to fit your tastes. - Sweetener choices: Honey and maple syrup are both great choices. Honey adds a nice floral note while maple syrup offers a warm sweetness. You can adjust the amount to make it sweeter or less sweet based on your taste. Gather these ingredients, and you’ll be ready to create a delicious dessert that’s both fun to eat and packed with nutrients. 1. Mixing the base ingredients: Start by grabbing a mixing bowl. Pour in 1 cup of coconut milk and 1/2 cup of almond milk. Add 2 tablespoons of honey or maple syrup, 1/2 teaspoon of vanilla extract, and a pinch of salt. Whisk them all together until smooth. 2. Incorporating chia seeds: Next, slowly sprinkle in 1/4 cup of chia seeds. Stir continuously. This helps keep the seeds from clumping. Make sure they mix well into the liquid. 3. Refrigeration time for thickening: Cover your bowl with plastic wrap or a lid. Place it in the fridge for at least 4 hours, or better yet, overnight. This time lets the chia seeds soak up the liquid. You'll see it turn into a thick pudding. 1. Layering technique for presentation: When you’re ready to serve, take your chia pudding from the fridge. Stir it gently to make it creamy again. Use elegant glasses or bowls for a nice touch. 2. Garnishing suggestions: Start by spooning a layer of chia pudding into each glass. Then, add a layer of diced mango on top. Keep layering until the glasses are full. Finish with more mango on top for a beautiful look. For a fresh finish, garnish each serving with mint leaves. This adds color and a lovely aroma. For the best chia pudding, you must stir the chia seeds well. This step is key to avoid clumping. When you add the seeds to the liquid, keep mixing. This helps them spread evenly. I suggest chilling the mixture for at least four hours. However, overnight is best. This time allows the chia seeds to absorb the liquid fully. The end result will be a thick, creamy pudding. Sweetness can make or break your pudding. Start with the recipe's suggested amount of sweetener. You can always add more if needed. Honey and maple syrup are great choices, but you have other options. Agave nectar and stevia are popular alternatives. Just remember to adjust the amount based on the type you choose. This way, you can make your pudding just right for your taste. {{image_4}} You can make mango coconut chia pudding even better! Try adding other fruits. Berries like strawberries or blueberries work great. They add color and extra flavor. Bananas also blend well and give a nice creaminess. Spices can change the taste too. A pinch of cinnamon makes it warm and cozy. You can also add nutmeg for a sweet, nutty flavor. These little changes make your dessert unique and fun. If you want to switch things up, you can use different milks. Almond milk is a good choice, but you can also try oat milk or soy milk. Each one gives a new twist to the dish. For sweeteners, honey and maple syrup are popular. But if you want something different, try agave syrup or stevia. These options can help adjust the sweetness to fit your taste. For the full recipe, check out the recipe section. To keep your mango coconut chia pudding fresh, use airtight containers. Glass jars work great for this. They seal well and show off the pretty layers. You can store your pudding in the fridge for up to 5 days. This means you can enjoy it all week! If you have leftover chia pudding, don’t toss it! You can use it in many ways. Try mixing it into smoothies for added creaminess. You can also spread it on toast with some fruit. To add a new twist, flavor leftover portions with cocoa powder, nut butter, or fresh fruit. Get creative and enjoy your delicious treat! Check out the Full Recipe for more ideas. Can I use frozen mango? Yes, you can use frozen mango in this recipe. Just thaw the mango first. This makes it easy to mix into your pudding. Frozen mango is often just as tasty as fresh mango. How can I make this recipe vegan? To make this recipe vegan, use maple syrup instead of honey. Also, ensure you choose a plant-based milk. Both almond milk and coconut milk are great options. Is chia pudding healthy? Yes, chia pudding is a healthy choice. Chia seeds are rich in fiber and omega-3 fatty acids. They help keep you full and support heart health. Plus, coconut milk adds healthy fats. This makes the pudding both tasty and nourishing. For more details, check the Full Recipe and start creating this delicious treat! This blog post covered how to make delicious mango coconut chia pudding. We discussed ingredient choices, like coconut milk types and sweeteners, along with step-by-step directions. We also shared tips for perfect consistency, flavor variations, and proper storage. In the end, chia pudding is easy to customize and great for meals. Enjoy exploring different flavors and tweaking the recipe to fit your taste!

Mango Coconut Chia Pudding Tasty and Nourishing Treat

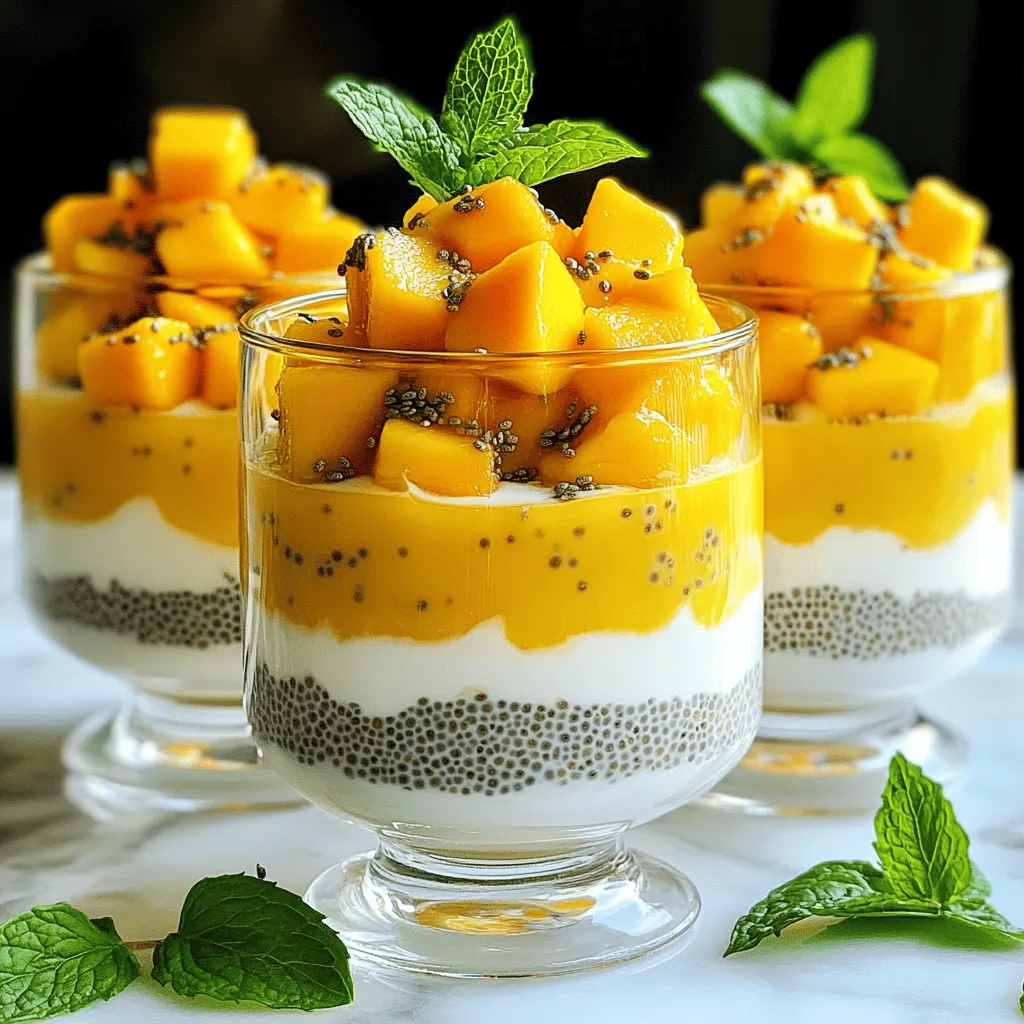
Are you ready to indulge in a deliciously healthy treat? My Mango Coconut Chia Pudding is the answer! This creamy

To make a delicious chocolate lava cake, you need just a few simple ingredients. Here’s what you will need: - ½ cup unsalted butter (plus extra for greasing) - 1 cup semi-sweet chocolate chips - 2 large eggs - 2 large egg yolks - ½ cup granulated sugar - ¼ cup all-purpose flour - 1 teaspoon vanilla extract - A pinch of salt - Powdered sugar for dusting (optional) - Fresh raspberries or strawberries for garnish (optional) Each ingredient plays a key role. The butter and chocolate create the rich base. Eggs and yolks give it structure and help it rise. Sugar adds sweetness and flavor. Flour holds it all together. Vanilla adds a nice touch, while salt balances the taste. Remember to keep your butter extra for greasing the ramekins. This step is important to ensure the cakes come out smoothly after baking. For the best results, I recommend using semi-sweet chocolate chips. They melt perfectly and bring that rich chocolate taste we love in a lava cake. For the full recipe, check out the instructions later in the article. Happy baking! First, preheat your oven to 425°F (220°C). This ensures even baking. Next, generously grease four 6 oz ramekins with butter. Place them on a baking tray to catch any drips. This makes it easier to move them in and out of the oven. Now, let’s melt the butter and chocolate. In a medium microwave-safe bowl, combine ½ cup unsalted butter and 1 cup semi-sweet chocolate chips. Heat in the microwave in 30-second intervals. Stir after each interval until smooth and melted. Allow it to cool for a few minutes. Next, whisk the eggs and sugar together. In a separate mixing bowl, whisk 2 large eggs, 2 large egg yolks, and ½ cup granulated sugar. Keep whisking for about 3-5 minutes. You want it to turn light in color and fluffy. Once your mixtures are ready, combine them carefully. Fold the cooled melted chocolate mixture into the egg mixture using a spatula. Gently mix until fully combined. Now, it's time to add flour. Sift in ¼ cup all-purpose flour and a pinch of salt. Add 1 teaspoon vanilla extract to enhance flavor. Fold the batter until you see no traces of flour. Be careful not to overmix. Fill the ramekins with batter. Divide the mixture evenly among them, filling each about ¾ full. This allows room for the cakes to rise. Now, bake in the preheated oven for 12-14 minutes. The edges should feel firm, and the center should jiggle slightly. After baking, remove the ramekins from the oven. Let them cool for about a minute. To serve, carefully run a knife around the edges of each cake to loosen it. Invert each cake onto individual plates with a gentle tap. For a beautiful finish, dust the hot cakes with powdered sugar. This adds a nice touch. You can also garnish with fresh raspberries or strawberries for a pop of color and flavor. Serve the lava cakes warm to reveal their gooey center. Enjoy! To get that gooey center, timing is key. Bake your cakes for 12 to 14 minutes. Watch them closely! The edges should be firm, while the center remains soft. To check for doneness, gently shake the ramekin. It should jiggle slightly in the middle. If it wobbles too much, it needs more time. One mistake is overmixing the batter. This can make your cake dense instead of light. Mix just until you can’t see flour. Another common error is baking at the wrong temperature. Always preheat your oven to 425°F (220°C). An oven that is too cool will ruin your lava cake. You need some basic tools to make this treat. Use a mixing bowl, whisk, and spatula. You also need four ramekins. I recommend 6 oz ramekins for the best results. Having a baking tray is helpful too. It catches any drips and makes it easy to move your cakes. {{image_4}} You can change the taste of your chocolate lava cake by adding flavored extracts. A few drops of mint or almond extract can make a big difference. You can also add spices like cinnamon for a warm note. Spices bring a unique twist that surprises your taste buds. Think about using different fillings inside your cake. For a fun change, try caramel or peanut butter in the center. You can even swap out the chocolate type. Use dark chocolate for a richer taste or white chocolate for a sweeter option. Each choice adds a new layer of flavor. When it comes to serving, the options are endless! Pair your lava cake with a scoop of ice cream or a dollop of whipped cream for a creamy contrast. You can also drizzle chocolate or fruit sauce over the cake. These toppings enhance the dessert's appeal and taste. For the full recipe, check out the detailed steps provided. After enjoying your chocolate lava cakes, you may have some left. To store them short-term, let them cool completely. Place the cakes in an airtight container. Keep them in the fridge for up to three days. If you want to store them long-term, you can freeze them. Wrap each cooled cake in plastic wrap, then place them in a freezer bag. They can last up to three months in the freezer. When you’re ready to enjoy your leftover lava cakes, reheating is easy. For the best results, use the oven. Preheat your oven to 350°F (175°C). Remove the cakes from the fridge or freezer. If frozen, let them thaw for about 30 minutes. Place the cakes on a baking sheet. Heat for 10-15 minutes in the oven. This method warms the cake evenly and keeps the center gooey. If you’re in a hurry, you can use the microwave. Heat each cake for about 30 seconds on medium power. Check if the center is warm enough. If not, heat it in 10-second bursts. This method is quick, but it may not keep the cake as moist. Enjoy your chocolate lava cake warm for the best experience! The cooking time for Chocolate Lava Cake is about 12 to 14 minutes. This timing gives you soft edges and a gooey center. I always recommend checking at the 12-minute mark. The cakes should feel firm around the edges while the center remains slightly jiggly. Yes, you can make Chocolate Lava Cake in advance. Prepare the batter and fill the ramekins. Then, cover them and refrigerate for up to 24 hours. When you are ready to bake, just add a couple of extra minutes to the cooking time. You will know your Lava Cake is done when the edges are firm. The center should still jiggle a bit. Insert a toothpick into the center; it should come out with some batter on it. If it comes out clean, the cake is overcooked. You can substitute some ingredients in the recipe. For instance, you can use dark chocolate instead of semi-sweet. You can also use coconut oil in place of butter for a dairy-free option. Just keep in mind that these changes can alter the taste and texture. I love serving Chocolate Lava Cake with a scoop of vanilla ice cream. The cold ice cream pairs well with the warm cake. Fresh berries, like raspberries or strawberries, also add a nice touch. They bring a fruity flavor that balances the rich chocolate. You can find the full recipe for this decadent treat above. In this article, we explored how to make a delicious chocolate lava cake. We covered the ingredients, step-by-step instructions, tips for success, variations, and storage info. Baking this treat is fun and simple. Remember to check your cake for doneness and avoid overmixing. Try different flavors and fillings to find your favorite version. With a bit of practice, you can impress anyone with your baking skills. Enjoy your chocolate lava cake warm and with a sweet garnish!

Chocolate Lava Cake Rich and Decadent Dessert

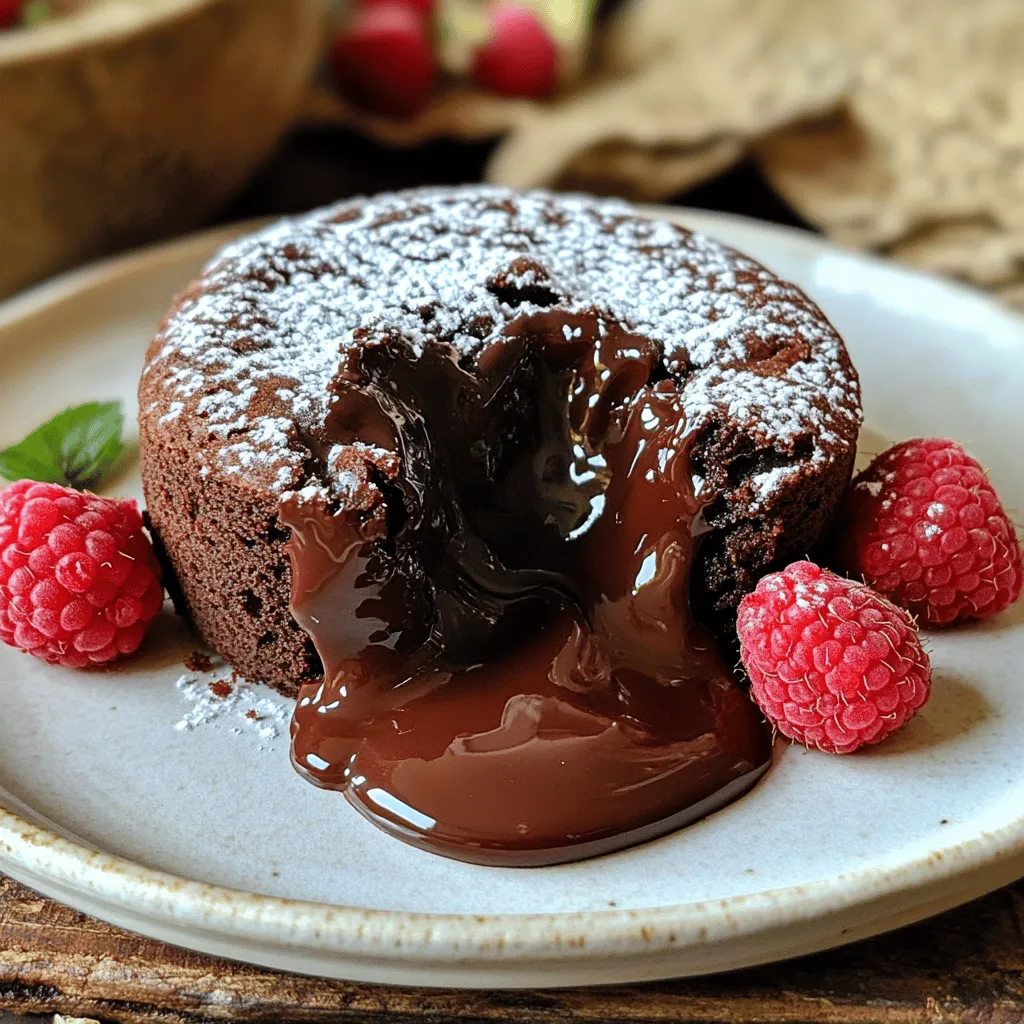
Indulging in a rich and decadent Chocolate Lava Cake is a treat for any dessert lover. Imagine a warm, molten

To make a tasty zucchini noodle stir fry, gather these ingredients: - 2 medium zucchinis, spiralized into noodles - 1 bell pepper (choose red or yellow), sliced into thin strips - 1 cup snap peas, ends trimmed - 1 medium carrot, peeled and julienned - 3 green onions, sliced (white and green parts separated) - 2 cloves garlic, minced finely - 1 tablespoon fresh ginger, grated - 3 tablespoons soy sauce (or gluten-free tamari) - 1 tablespoon sesame oil - 1 tablespoon olive oil - 1 tablespoon rice vinegar - 1 teaspoon chili flakes (optional, for added heat) - Sesame seeds, for garnish You will need a few tools to make this dish: - A spiralizer for the zucchini - A large skillet or wok for cooking - A cutting board and knife for chopping - Measuring spoons for accuracy - A spatula for stirring Want to boost the taste? Consider adding these options: - Cooked protein like chicken, shrimp, or tofu - Fresh herbs like basil or cilantro - A squeeze of lime juice for brightness - Crushed peanuts for crunch Using these ingredients and tools, your zucchini noodle stir fry will be bold and flavorful! For the complete recipe, check out the Full Recipe. First, grab two medium zucchinis. Use a spiralizer to turn them into noodles. This tool makes long, fun strands. After spiralizing, set the noodles aside. They will soak up flavors later. You can also use a peeler for wider noodles, but spiralized ones add a nice touch. Next, heat a large skillet or wok over medium heat. Add one tablespoon of olive oil and let it warm for a minute. Then, add two cloves of minced garlic and one tablespoon of grated ginger. Sauté this mix for about one minute. The aroma will fill your kitchen. Now, toss in one sliced bell pepper, one cup of snap peas, and one julienned carrot. Stir-fry these veggies for three to four minutes. You want them soft but still crunchy. Bright colors make your dish look good. Once the veggies are ready, gently add the zucchini noodles. Pour in three tablespoons of soy sauce, one tablespoon of sesame oil, and one tablespoon of rice vinegar. If you like heat, sprinkle in one teaspoon of chili flakes. Toss everything well and stir-fry for two to three minutes. The noodles should be warm but not mushy. Finally, take the skillet off the heat. Fold in three sliced green onions, mixing them into the stir fry. This adds a fresh flavor. Serve your dish right away, either on plates or in bowls. For the finishing touch, sprinkle sesame seeds on top. For a pop of color, serve it in a bright bowl. A slice of lime or lemon on the side adds a nice zest. This vibrant zucchini noodle stir fry is a bold and flavorful meal that you can enjoy any day. For the full recipe, refer back to the earlier section. To spiralize zucchini, use a spiralizer. This tool makes long, noodle-like strands. First, wash the zucchinis well. Trim the ends, then place one in the spiralizer. Turn the handle gently and watch the noodles form! If you want thicker noodles, use the wide blade. For thinner noodles, use the narrow blade. Set your noodles aside after spiralizing. Stir frying is fast and fun! Heat your skillet or wok before adding oil. Use medium-high heat for the best results. Start with garlic and ginger for flavor. Sauté them for a minute before adding veggies. Always stir quickly to keep everything crisp. Add the zucchini last to avoid overcooking. Toss everything together until heated through. Many cooks overcook their vegetables. This makes them soggy and dull. To keep your stir fry vibrant, watch the time. Cook bell peppers and snap peas for just a few minutes. Use high heat; this helps lock in flavors. Don’t crowd the pan; this steams rather than fries. If you have a lot, cook in batches. Follow these tips for a great stir fry! For the complete recipe, refer to the section titled Full Recipe. {{image_4}} You can add protein to your zucchini noodle stir fry for extra flavor and nutrition. Some great options include: - Chicken breast, thinly sliced - Shrimp, peeled and deveined - Tofu, cubed and pressed - Beef, cut into thin strips Each protein can add its unique taste. Cook the protein first in the skillet, then set it aside. Add it back in when you mix in the zucchini noodles. This helps ensure everything is well-seasoned and tasty. To make this stir fry gluten-free, you can use tamari instead of soy sauce. Tamari has a rich flavor and works well in Asian dishes. For a vegan option, use tofu or chickpeas as your protein. Both options keep the dish delicious and filling. You can also replace sesame oil with avocado oil for a different taste. Feel free to swap in any seasonal vegetables you have on hand. Some tasty choices include: - Broccoli florets - Cauliflower, chopped into small pieces - Asparagus, cut into bite-sized pieces - Spinach, added at the end for a boost of color Using seasonal veggies not only enhances flavor but also adds variety. Mixing different vegetables keeps your meals exciting and fresh. For the full recipe, check the earlier sections to guide you through this vibrant dish. To store leftover stir fry, let it cool down first. Place it in an airtight container. This way, the flavors stay fresh. You can keep it in the fridge for up to three days. When you reheat stir fry, use a skillet for the best taste. Heat it on medium-low. Add a splash of water or oil to keep it moist. Stir frequently to warm it evenly. You can also use the microwave, but it might make the veggies soft. For freezing zucchini noodles, I recommend blanching them first. Boil water and add the noodles for two minutes. Then, cool them quickly in ice water. Drain and pack them into freezer bags. They can last for about two months. Just remember, frozen noodles may become softer when cooked later. If you don’t have zucchini, try using carrots or squash. You can spiralize these too. Other great choices are spaghetti squash or even regular pasta if you prefer. Each option brings its own taste and texture. Carrots add a nice crunch, while spaghetti squash gives a unique flavor. Experiment to find what you like best. You can store zucchini noodle stir fry in the fridge for up to three days. Place it in an airtight container to keep it fresh. Make sure to let it cool before sealing it. This way, it won’t get soggy and will taste great when you reheat it. Yes, you can make zucchini noodle stir fry in advance. Just cook it, let it cool, and store it in the fridge. However, I suggest keeping the zucchini noodles separate if possible. If they sit too long, they can become mushy. Reheat everything on the stove or in the microwave before serving. For the full recipe, check out the details above. This blog post covered everything you need to know about making a delicious zucchini noodle stir fry. We explored the required ingredients, helpful tools, and optional flavors for your dish. I shared step-by-step instructions, tips to perfect your technique, and variations for every diet. Plus, we went over how to store your leftovers and answered key questions. With these insights, you can create a tasty meal that's quick and healthy. Enjoy your cooking journey and make it fun!

Zucchini Noodle Stir Fry Bold and Flavorful Meal

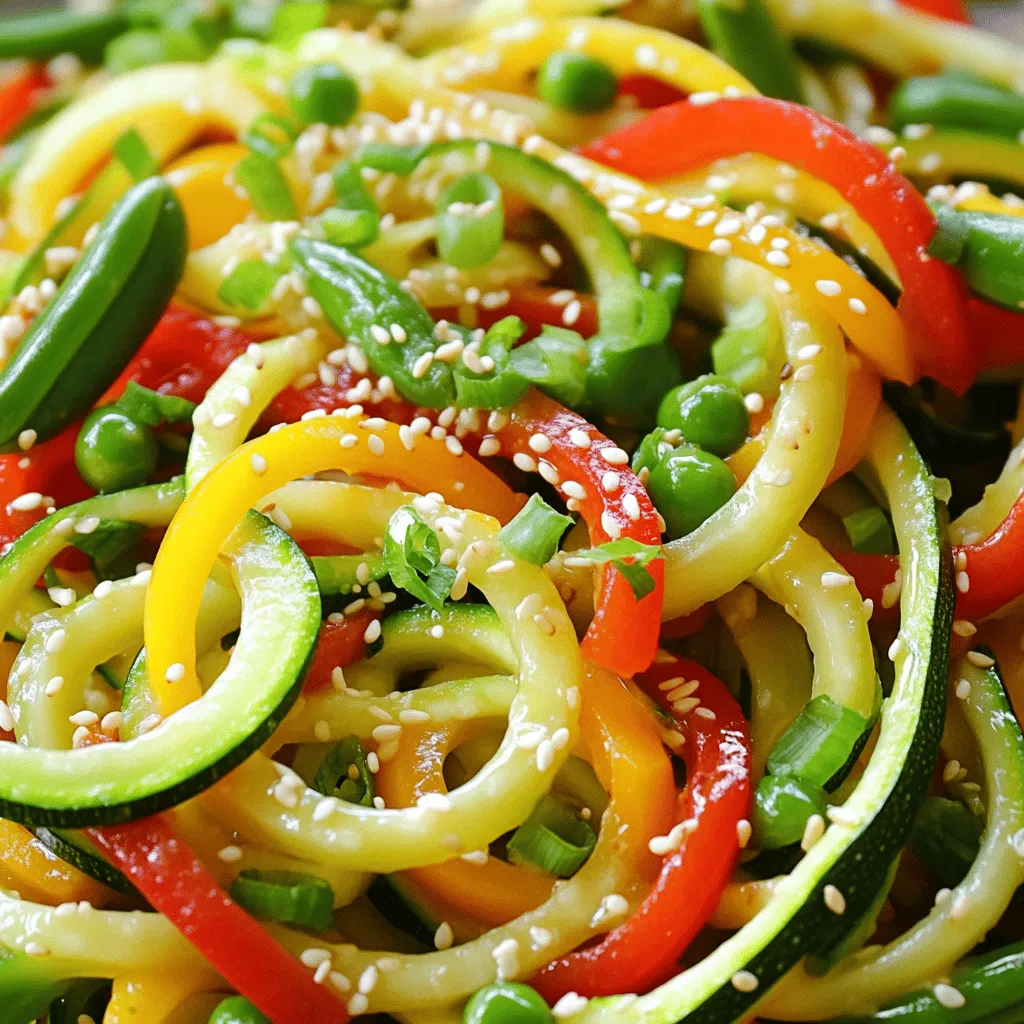
Are you ready to transform your dinner routine? Zucchini noodle stir fry is a bold and tasty option that will

- 1 pound shrimp, peeled and deveined - 1 avocado, sliced - 1 cup shredded red cabbage - Lime wedges, for serving - 3 tablespoons honey - 3 tablespoons soy sauce (or tamari for gluten-free) - 2 cloves garlic, minced - 1 teaspoon fresh ginger, grated - 1 tablespoon lime juice - Salt and pepper to taste - 1 tablespoon olive oil - 8 corn tortillas - 1/4 cup fresh cilantro, chopped When I make honey garlic shrimp tacos, I love using fresh and vibrant ingredients. The shrimp are the star, so you want them to be the best you can find. Fresh shrimp make a big difference in flavor and texture. For the marinade, honey brings a lovely sweetness. Pair it with soy sauce for saltiness. Garlic and ginger add depth. This mix creates a tasty sauce that clings to the shrimp perfectly. Don’t forget about the toppings! The avocado adds creaminess. Shredded red cabbage gives a nice crunch. Fresh lime juice brightens it all up. Each bite bursts with flavor. You can find the full recipe above to follow along. - Whisk honey, soy sauce, garlic, ginger, and lime juice together. - Toss shrimp and let marinate for 15 minutes. Start by mixing the marinade. In a bowl, add honey, soy sauce, minced garlic, grated ginger, and lime juice. This blend creates a sweet and tangy flavor. Once mixed, add the shrimp. Toss them gently until they are coated well. Set the bowl aside. Let the shrimp marinate for 15 minutes. This step is key for great taste. - Heat olive oil in a skillet and cook shrimp until pink. - Remove shrimp and set aside. Next, heat olive oil in a skillet over medium-high heat. Wait until the oil shimmers. Carefully add the marinated shrimp. Cook them for about 2 to 3 minutes. Stir occasionally until they turn pink and opaque. Once cooked, remove the shrimp from the skillet and place them on a plate. This method locks in the flavor. - Simmer reserved marinade for sauce. - Combine shrimp with sauce and warm tortillas. - Assemble tacos with ingredients as described in the full recipe. In the same skillet, pour in the reserved marinade. Bring it to a gentle simmer. Let it cook for about 2 minutes. This reduces and thickens the sauce. Add the cooked shrimp back into the skillet. Toss them in the sauce until well-coated. Heat thoroughly for another minute. Season with salt and pepper. Next, warm the corn tortillas in a dry skillet for about 30 seconds on each side. They should be soft and pliable. Now it’s time to assemble! Lay a warm tortilla flat. Add a generous portion of honey garlic shrimp in the center. Top it with shredded red cabbage, avocado slices, and fresh cilantro. Enjoy every bite of these tasty tacos! To make sure your shrimp are perfect, avoid overcooking them. Cook shrimp for 2-3 minutes until they turn pink. When they are overcooked, they become rubbery. Keep a close eye on them. For seasoning, balance the sweet honey and salty soy sauce. Add lime juice for freshness. This mix brings out the best flavors in your shrimp. Always taste your marinade before adding shrimp. Adjust with salt or lime juice if needed. To enhance your tacos, pair them with sides like rice or beans. You can also add toppings like sliced jalapeños or sour cream. This adds a kick and creaminess. For a stunning presentation, stack your tacos high. Use colorful ingredients like red cabbage and cilantro. Serve on a bright plate with lime wedges. This makes your dish pop and looks inviting. Marinate your shrimp a few hours ahead for a richer flavor. This lets the shrimp soak up all the tasty ingredients. If you're in a hurry, a 15-minute marinade works too. For leftovers, store the shrimp and toppings separately. This keeps everything fresh. When reheating, do it gently in a skillet. Avoid the microwave to keep the shrimp tender. Enjoy your meal anytime! {{image_4}} You can swap shrimp for chicken or tofu. Chicken works well with the marinade. Use boneless chicken breasts or thighs. Cut them into bite-sized pieces. Marinate them just like the shrimp. Cook until golden and cooked through. Tofu offers a great vegetarian option. Use firm tofu, and press it to remove water. Cut it into cubes and marinate. Sauté until crispy for a tasty twist. For gluten-free tacos, use tamari instead of soy sauce. Corn tortillas are naturally gluten-free. Ensure all your ingredients are certified gluten-free. For dairy-free options, skip any cheese toppings. You can also add extra avocado for creaminess. If you want a vegetarian dish, replace shrimp with veggies. Grilled peppers, zucchini, or mushrooms add great flavors. Spice up your tacos with jalapeños for heat. Slice them thinly and add on top. You can also try different toppings like diced tomatoes. Crumbled cheese adds creaminess and flavor. Fresh herbs like mint or parsley can brighten the dish. Squeeze extra lime juice for a fresh kick. Feel free to mix and match toppings to find your favorite combination. To keep your tacos fresh, wrap them well. Use plastic wrap or foil to cover each taco. Place them in an airtight container. This helps maintain their taste and texture. You can store them in the fridge for up to three days. If you want to save them longer, freeze the shrimp separately from the tortillas. Cooked shrimp can last in the fridge for up to three days. If marinated but not cooked, shrimp can stay fresh for about two hours at room temperature. In the fridge, marinated shrimp can last around 24 hours. Always look for any off smells or changes in color to ensure freshness. To reheat your tacos, use a skillet over medium heat. Heat the tacos for about one to two minutes on each side. This keeps them soft and warm. If you want to reheat shrimp, place them in a pan and add a splash of water. Cover with a lid and heat for about three to five minutes. Avoid using a microwave, as it can dry them out. For best results, keep the shrimp and tortillas separate until you're ready to eat. You can use tamari for a gluten-free option. Coconut aminos is another tasty choice. Both give a rich flavor to the dish. If you want less salt, try low-sodium soy sauce. Yes, you can prepare the shrimp and marinade ahead of time. Marinate the shrimp and keep it in the fridge for up to 2 hours. Cook the shrimp when you're ready to serve. This keeps the flavors fresh. Cooked shrimp turn pink and opaque. They should curl into a C shape. If they look gray or feel rubbery, they are not done. Keep an eye on the cooking time; it usually takes 2-3 minutes. Try adding shredded red cabbage for crunch. Sliced avocado adds creaminess. Fresh cilantro gives a burst of flavor. You can also use diced tomatoes or pickled jalapeños for extra zing. Yes, you can easily double the recipe. Just make sure to adjust cooking times if needed. Use a larger skillet or cook in batches to keep shrimp from steaming. Enjoy sharing these tasty tacos! This blog post shows how to make honey garlic shrimp tacos. You learned about fresh ingredients, marinade, and cooking essentials. Then, we outlined steps for marinating and cooking shrimp. I shared tips for perfect shrimp and serving suggestions. You also discovered different ways to modify the recipe. Enjoy making these tacos for a tasty meal. Experiment with ingredients to make it your own. Happy cooking!

Honey Garlic Shrimp Tacos Tasty and Quick Delight

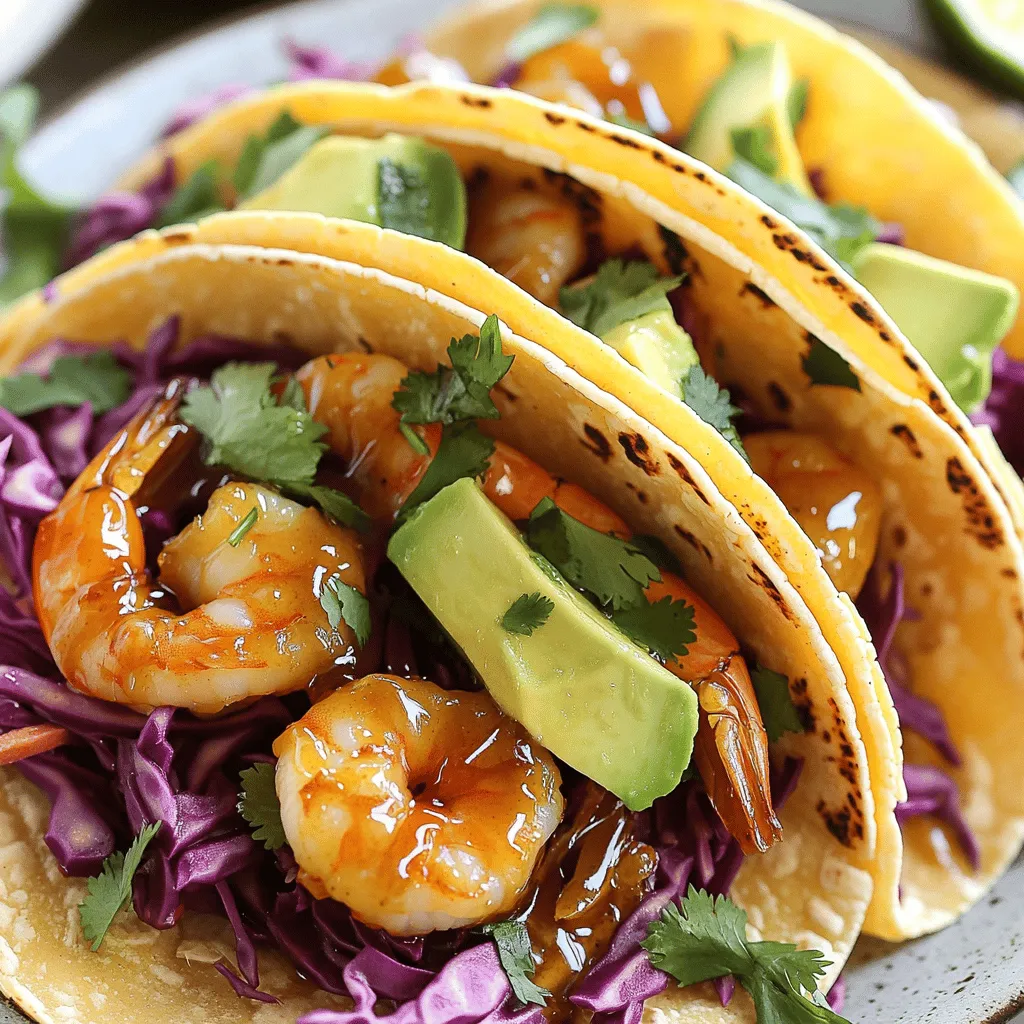
Are you ready to spice up your weeknight dinners? Honey Garlic Shrimp Tacos are quick, tasty, and perfect for anyone

- 4 large sweet potatoes - 1 cup milk (or dairy-free alternative) - 2 tablespoons unsalted butter - 1/2 cup brown sugar - Ground spices and seasoning (cinnamon, nutmeg, salt, pepper) - Cheeses (sharp cheddar and Parmesan) - 1 cup pecans, chopped - 1/2 cup rolled oats The sweet potato casserole needs simple ingredients that blend well. Sweet potatoes are the base. They add natural sweetness and creaminess. For extra creaminess, use milk or a dairy-free option. I love unsweetened almond milk for a lighter touch. Unsalted butter adds richness. Brown sugar enhances the sweetness. Ground cinnamon and nutmeg give warmth and depth. Salt and pepper balance the flavors. Cheddar and Parmesan bring a savory kick. They melt beautifully and add a nice texture. Chopped pecans add crunch. Rolled oats add a hearty element to the topping. You can find the Full Recipe at the end for more details. 1. Preheat oven and prepare sweet potatoes Start by preheating your oven to 350°F (175°C). This step is key for baking your casserole evenly. Next, take 4 large sweet potatoes, peel them, and cut them into 1-inch cubes. 2. Boil and mash sweet potatoes Place the sweet potato cubes in a large pot. Cover them with water and bring it to a boil over medium-high heat. Cook the potatoes for 15-20 minutes until they are fork-tender. Drain the potatoes and let them cool for a few minutes. Then, mash them in the pot until smooth and creamy. 3. Mix sweet potato mixture ingredients In a large bowl, combine your mashed sweet potatoes with 1 cup of milk, 2 tablespoons of unsalted butter, and 1/2 cup of packed brown sugar. Add 1 teaspoon of ground cinnamon, 1/2 teaspoon of ground nutmeg, and season with salt and freshly ground black pepper. Mix everything well until it’s creamy. Finally, fold in 3/4 cup of shredded sharp cheddar cheese, saving 1/4 cup for later. 1. Transfer to baking dish and prepare topping Pour the sweet potato mixture into a greased 9x13-inch baking dish. Spread it evenly with a spatula. In another bowl, combine 1 cup of finely chopped pecans, 1/2 cup of rolled oats, and the reserved cheddar cheese. Mix it well and sprinkle this topping evenly over the sweet potato mixture. 2. Bake and check for doneness Place the baking dish in your preheated oven. Bake for 30-35 minutes. You want the top to look golden brown and crispy. After baking, take it out and let it cool for about 5-10 minutes before serving. This will help it set a little more. For the complete recipe, refer to the Full Recipe section. To make the best savory sweet potato casserole, focus on mashing technique. Use a potato masher for smoothness. Avoid using a blender; it makes the potatoes gummy. Mash until creamy, but leave a few chunks for texture. Adjust cooking time based on your sweet potatoes. They should be fork-tender after 15-20 minutes of boiling. If they’re larger, cook them a bit longer. Always check for doneness by piercing with a fork. When serving, choose a decorative dish to elevate the look. This dish deserves a warm and inviting presentation. Drizzle honey on top for a sweet touch. It pairs perfectly with the savory flavors. For garnishing, sprinkle fresh parsley over the casserole. This adds a pop of color and freshness. You can also add a few extra pecans on top for crunch. For the full recipe, check the earlier sections. Enjoy your savory sweet potato casserole! {{image_4}} You can easily make swaps in this recipe. For a dairy-free option, use unsweetened almond milk instead of regular milk. This keeps the dish creamy without dairy. If you want to add more flavor, think about spices and herbs. A pinch of cayenne pepper can add heat. Fresh thyme or rosemary gives a nice earthy taste. This casserole pairs well with many proteins. Try serving it alongside roasted chicken or grilled salmon. It adds a great balance to your meal. For meal prep, this dish stores well in the fridge. You can make it ahead and reheat when ready to eat. Simply cover it tightly and keep it in the fridge for up to three days. For more details, check the Full Recipe. To keep your savory sweet potato casserole fresh, you can store it in the fridge or freezer. - Refrigeration tips: Let the casserole cool completely. Cover it tightly with plastic wrap or aluminum foil. It will stay good for about 3 to 5 days in the fridge. - Freezing instructions: If you want to freeze it, place the cooled casserole in an airtight container. You can also use a freezer-safe dish. It will last for about 2 to 3 months. Thaw it overnight in the fridge before reheating. Reheating your casserole properly ensures it stays delicious. - Best methods for reheating: Preheat your oven to 350°F (175°C). Cover the dish with foil to keep it moist. Heat for about 20-30 minutes or until heated through. You can also use a microwave on medium power, stirring occasionally. - Maintaining texture and flavor: To keep the top crispy, uncover the casserole in the last 10 minutes of reheating. This method helps revive the crunchy topping while warming the creamy base. Enjoy your tasty dish again! Can I make this recipe ahead of time? Yes, you can prepare this dish ahead of time. Make the casserole and store it in the fridge. Cover it well to keep it fresh. Bake it the next day for a warm meal. What can I substitute for sweet potatoes? You can use butternut squash or regular potatoes. Both can offer a nice taste. Just chop them into similar-sized pieces before cooking. Is there a vegan version of this casserole? Absolutely! Use almond milk instead of regular milk. Swap the butter for coconut oil or vegan butter. You can also skip the cheese or choose a plant-based cheese. How long does the casserole last in the fridge? This casserole lasts about 3 to 5 days in the fridge. Make sure to store it in an airtight container. Reheat it well before serving. For the full recipe, check the detailed steps above! This blog post shared a delicious sweet potato casserole recipe. We covered the key ingredients, like sweet potatoes and cheese, and walked through easy preparation steps. You learned tips for perfecting the dish and creative serving ideas. Variations let you customize flavors and make it your own. Proper storage and reheating techniques ensure your casserole stays fresh. Try this recipe for a comforting meal that everyone will enjoy. Happy cooking!

Savory Sweet Potato Casserole Simple and Tasty Dish

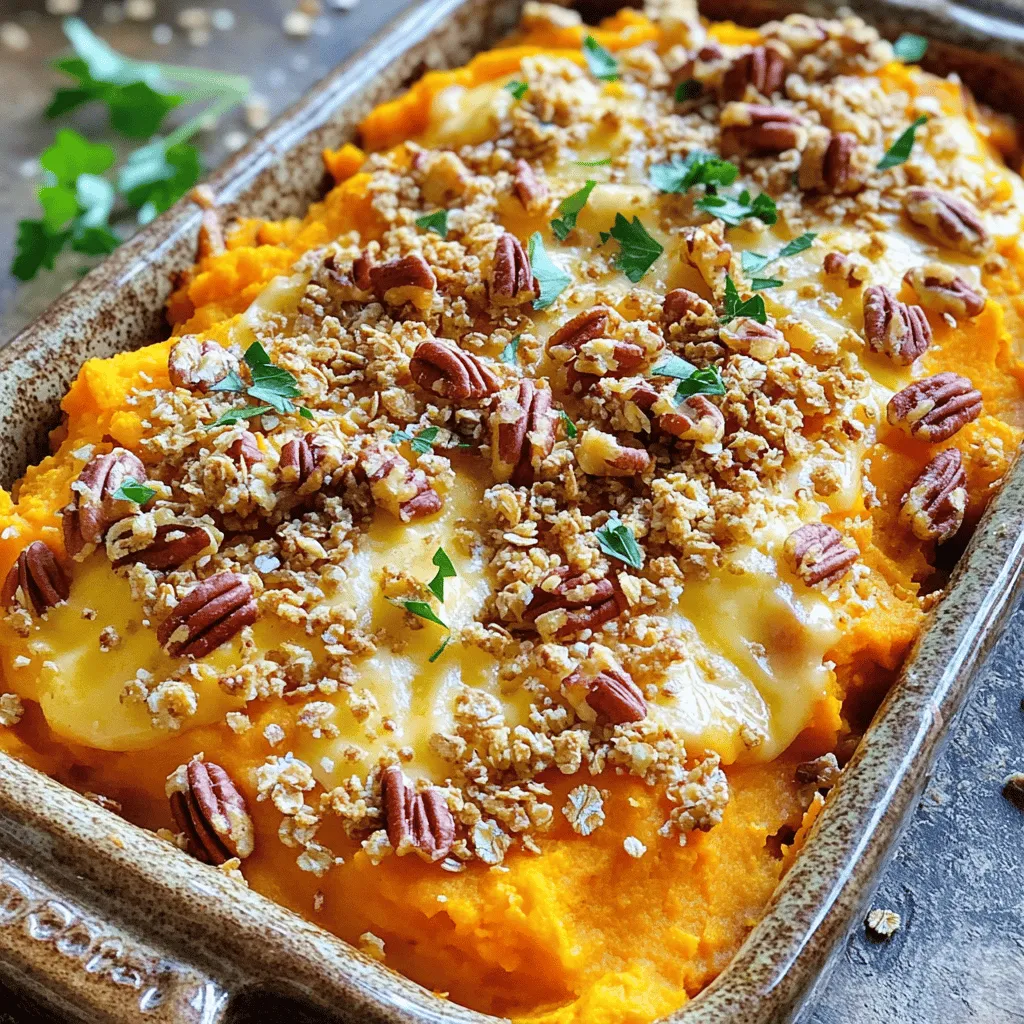
If you’re craving a warm, comforting dish that bursts with flavor, you’re in the right place! My Savory Sweet Potato

Older posts
Newer posts
← Previous Page1 … Page36 Page37 Page38 … Page73 Next →

dsad

© 2025 recipesstation • Built with GeneratePress

Our Policies

  • Copyright Policy
  • Cookie Policy
  • GDPR Policy
  • Privacy Policy
  • Disclaimer
  • Terms Of Use

More Information

  • Home
  • About
  • Contact
  • Appetizers
  • Dessert
  • Dinner
  • Drinks
©2025, recipesstation About Back To Top