Skip to content
DisclaimerTerms Of UseGDPR PolicyCookie Policy

recipesstation

  • Home
  • Drinks
  • Appetizers
  • Dinner
  • Dessert
  • About
  • Contact
  • Privacy Policy
DisclaimerTerms Of UseGDPR PolicyCookie Policy

Emily

- 4 boneless, skinless chicken breasts - 1 cup panko breadcrumbs for extra crunch - 1/2 cup grated Parmesan cheese - 2 teaspoons Italian seasoning - 1 teaspoon garlic powder - 1 teaspoon salt - 1/2 teaspoon black pepper - 2 large eggs - 1 cup marinara sauce - 1 cup shredded mozzarella cheese - Fresh basil leaves for garnish You can use turkey or tofu if you prefer. Both options work well in this dish. For low-carb fans, zucchini makes a great base. Slice it thin and bake it like chicken. When measuring dry ingredients, use a dry measuring cup. Fill it and level off with a knife. For wet ingredients, use a liquid measuring cup. Pour until the liquid hits the line. This keeps your measurements precise. A kitchen scale is also handy for accuracy. First, preheat your oven to 400°F (200°C). This step is key for the right texture. While the oven heats, line a baking sheet with parchment paper. This helps keep the chicken from sticking and makes cleanup easy. In a shallow bowl, mix 1 cup of panko breadcrumbs, 1/2 cup of grated Parmesan cheese, 2 teaspoons of Italian seasoning, 1 teaspoon of garlic powder, 1 teaspoon of salt, and 1/2 teaspoon of black pepper. Stir these well until all the flavors blend. In another bowl, crack 2 large eggs and beat them with a fork. Dip each chicken breast into the egg, making sure it gets coated well. Next, place it in the breadcrumb mix. Press down lightly to help the crumbs stick. Arrange the coated chicken on the baking sheet with space between each piece. Bake for about 20 minutes. Keep an eye on them as they bake. You want them to turn golden brown. After 20 minutes, take the baking sheet out of the oven. Spoon marinara sauce over each chicken breast, covering them well. Then, sprinkle 1 cup of shredded mozzarella cheese on top. Return the baking sheet to the oven for another 10-15 minutes. The cheese should melt and bubble nicely. Make sure the chicken reaches an internal temperature of 165°F (75°C). Let the chicken rest for about 5 minutes once it’s done. This helps the juices settle. If you want, add fresh basil leaves for a nice touch. For the full recipe, check the complete guide available. For juicy chicken, adjust the cooking time based on thickness. Thinner pieces need less time, while thicker pieces take longer. Always check the internal temperature. It should reach 165°F (75°C) for safe eating. To achieve crispy breading, use panko breadcrumbs. They provide a great crunch. Press them firmly onto the chicken for a better hold. A light spray of cooking oil before baking helps, too. I love pairing chicken Parmesan with pasta. Spaghetti or fettuccine works well. A fresh side salad adds a nice crunch and color. Toss greens with a simple vinaigrette for a delightful contrast. For garnishing, fresh basil leaves shine on the dish. They add color and flavor. You can also drizzle extra marinara sauce around the plate for a pretty touch. Avoid overcrowding the baking sheet. Give each piece space to cook evenly. This helps achieve that perfect crunch. Let the chicken rest after baking. This step keeps the juices inside. Cutting too soon can lead to dry chicken. Wait for about five minutes before serving to enjoy the best texture. For the full recipe, check the details listed earlier. {{image_4}} You can switch up the cheese in this dish. Instead of mozzarella, try provolone or fontina. They melt well and add a rich taste. Provolone gives a sharp flavor, while fontina creates a creamy texture. For a vegan version, use cashew cheese. It has a nutty flavor and works great. Blend soaked cashews with nutritional yeast for a cheesy taste. This option keeps the dish tasty while being plant-based. To boost flavor, add more herbs and spices to the breadcrumb mix. Try dried oregano, thyme, or even crushed red pepper for a kick. These additions make the dish more exciting. You can also incorporate roasted vegetables into the meal. Zucchini, bell peppers, or cherry tomatoes add color and nutrition. Toss them with olive oil, salt, and pepper, then roast alongside the chicken. Change how you serve the chicken for a new twist. Make a sandwich with the chicken, marinara, and cheese. This way, you have a tasty, handheld meal. Another option is to serve it on a salad. Slice the chicken and place it on fresh greens. Drizzle some extra marinara on top for flavor. You can bake the chicken in marinara sauce for a different texture. This method keeps the chicken juicy and adds a rich sauce flavor. It’s a fun way to enjoy classic chicken parmesan in a new style. For the Full Recipe, check out the detailed instructions to make your own oven-baked chicken parmesan! To store your Oven-Baked Chicken Parmesan, first, let it cool completely. This step is key because it helps avoid moisture build-up, which can make your chicken soggy. Once cooled, place the chicken in an airtight container. This type of container keeps the chicken fresh and prevents it from absorbing other odors in your fridge. You can also wrap the chicken tightly in plastic wrap if you don’t have a container. When it's time to enjoy your leftovers, reheating correctly is important. The best way to reheat chicken is in the oven. Preheat your oven to 350°F (175°C). Place the chicken on a baking sheet and cover it loosely with foil. This method keeps the chicken moist while warming. Heat for about 15-20 minutes until the chicken is hot. If you want to freeze the chicken, wrap it well in foil or freezer bags. To thaw, place it in the fridge overnight before reheating. In the refrigerator, your Chicken Parmesan can last about 3-4 days. Be sure to check for any signs of spoilage before eating. For frozen leftovers, they can last up to 2-3 months. For the best taste and quality, use them within this time frame. Always label your containers with the date, so you know when you made it. Yes, you can use chicken thighs. They have a richer flavor and stay moist. However, they take a bit longer to cook. Thighs usually need about 25-30 minutes in the oven. Make sure the internal temperature reaches 165°F (75°C) for safe eating. The best way to check is with a meat thermometer. Insert it into the thickest part of the chicken. It should read 165°F (75°C). If you don’t have a thermometer, cut into the chicken. The juices should run clear, not pink. This gives you a good sign the chicken is fully cooked. Yes, you can prep this dish in advance. You can coat the chicken and store it in the fridge for a day. For deeper flavor, marinate it overnight in the fridge. Just remember to let it sit at room temperature for 15 minutes before baking. This helps it cook evenly. Check the Full Recipe for more tips. This recipe for Chicken Parmesan is both simple and delicious. We covered the key ingredients, including chicken and panko for crunch. Proper prep and measuring are crucial for great results. I shared tips to ensure a perfect bake and offered serving ideas. With variations and storage tips, this dish is versatile. In closing, enjoy making this classic meal with your own twists. Let your creativity shine in the kitchen!

Oven-Baked Chicken Parmesan Crunchy and Tasty Meal

Craving a meal that’s crunchy, cheesy, and full of flavor? Look no further! My Oven-Baked Chicken Parmesan is the perfect

To create Peanut Butter Chocolate Chip Energy Balls, you need a few simple ingredients. Here’s what you will need: - 1 cup natural peanut butter (creamy or chunky) - 1 cup rolled oats (old-fashioned) - 1/2 cup honey or pure maple syrup - 1/2 cup mini chocolate chips (dark or milk) - 1/4 cup ground flaxseed - 1/2 teaspoon pure vanilla extract - A pinch of salt Each ingredient plays a key role in making these energy balls delicious and nutritious. Natural peanut butter gives a rich, nutty flavor and healthy fats. Rolled oats add texture and fiber, while honey or maple syrup adds natural sweetness. Mini chocolate chips bring a fun, sweet touch. Ground flaxseed boosts nutrition with omega-3s. Pure vanilla extract enhances the overall flavor, and a pinch of salt balances the sweetness. I love how these ingredients work together to create a tasty snack. You can mix and match based on what you have at home. This recipe is flexible, making it easy to adapt. For the full recipe, check out the details provided earlier. In a large bowl, add the natural peanut butter, honey, and vanilla extract. Stir these ingredients together until the mixture is smooth. You want it creamy and well mixed. This step is key to getting the right taste in each energy ball. Now, it’s time to add the dry ingredients. Toss in the rolled oats, ground flaxseed, and a pinch of salt. Mix everything together until you have a thick, even mixture. This helps create a strong base for our energy balls. Next, fold in the mini chocolate chips. Make sure they are spread out throughout the mixture. Each bite should have a taste of chocolate. This adds a fun twist and makes the energy balls even more enjoyable. Using your hands, scoop out tablespoon-sized portions of the mixture. Roll each portion into a smooth ball. Place them on a lined baking sheet or plate. This step is easy and lets you see your progress. Cover the baking sheet with plastic wrap or a clean towel. Place it in the fridge for at least 30 minutes. Chilling helps the energy balls firm up, making them easier to eat later. Once chilled, these energy balls are ready for snacking! Enjoy them right away or store any leftovers in an airtight container in the fridge. They stay fresh for up to one week. These bites make great snacks for busy days or a quick pick-me-up. For the full recipe, check the earlier section. When mixing your ingredients, start with the wet ones first. This helps them blend well. Use a big bowl and a sturdy spatula. Stir until the peanut butter and sweetener are smooth. This makes it easier to combine with the dry ingredients later. If the mixture feels too thick, add a teaspoon of water to loosen it. For a great texture, use rolled oats instead of quick oats. Rolled oats give a nice chewiness. Ground flaxseed adds fiber and makes the balls more filling. If you want a softer ball, add a bit more honey. For a firmer ball, mix in a touch more oats. These energy balls work best as snacks before or after workouts. They give you energy without making you feel heavy. You can also enjoy them as a quick breakfast on busy mornings. Store them in the fridge for easy access. For the full recipe, check the earlier section. {{image_4}} You can change the nut butter in this recipe. Try almond butter or cashew butter. Each nut brings its own taste. If you love a stronger flavor, go for almond butter. It adds a nice twist. Just use the same amount as peanut butter. Want to make these energy balls even better? Consider adding extras like dried fruit or seeds. Chopped dates or raisins can add sweetness. You can also try sunflower seeds or pumpkin seeds. These add crunch and nutrition. Just keep the total amount around one cup for the best texture. You can spice up your energy balls too! Try adding a dash of cinnamon or cocoa powder. Cinnamon gives warmth, while cocoa boosts the chocolate flavor. You could also add a touch of nutmeg for a unique taste. Experiment with these flavors to find your favorite mix! For the complete recipe, check out the [Full Recipe]. To store your peanut butter chocolate chip energy balls, place them in an airtight container. This keeps them fresh and tasty. You can layer them with parchment paper to prevent sticking. Store the container in the refrigerator. This way, they'll stay good for about one week. If you want to keep them longer, freezing is a great option. Place the energy balls in a single layer on a baking sheet. Freeze them for about an hour until firm. After that, transfer the balls to a freezer-safe bag or container. Remember to label the bag with the date. They can last up to three months in the freezer. Just thaw them in the fridge before enjoying. These energy balls are best eaten fresh, but they stay good for a while. In the fridge, they last up to a week. To check freshness, look for any changes in smell or texture. If they feel too dry or hard, it's time to toss them. For the best taste, enjoy them within the first few days. For the full recipe, refer to the earlier section. Yes, you can use crunchy peanut butter. It adds a nice texture. Your energy balls will have a delightful crunch. Just keep the other ingredients the same. To make these energy balls vegan, switch honey for pure maple syrup. Both work well for sweetness. Ensure your chocolate chips are dairy-free too. This way, you keep the taste and make them plant-based. These energy balls pack a nutritious punch. Peanut butter provides protein and healthy fats. Rolled oats offer fiber, which helps digestion. Flaxseed is rich in omega-3 fatty acids. Chocolate chips can bring joy and antioxidants. Together, these ingredients support energy and overall health. Absolutely! Doubling the recipe is easy. Just use twice as much of each ingredient. This way, you can enjoy more energy balls or share with friends. They will still taste great. You know they’re done chilling when they feel firm. After about 30 minutes in the fridge, check their texture. If they hold their shape well, they are ready. Enjoy your tasty snacks! These energy balls blend tasty ingredients into a quick snack. We learned how to mix wet and dry items perfectly. You can customize them with different nuts or spices for extra flavor. Remember to store them right to keep them fresh. Try this fun recipe to fuel your day. Enjoy making these healthy treats at home! They are easy, fun to eat, and full of energy.

Peanut Butter Chocolate Chip Energy Balls Easy Snack

Looking for a quick and tasty snack? Peanut Butter Chocolate Chip Energy Balls are the answer! These little bites pack

- Fresh spinach (1 cup, finely chopped) - Canned artichoke hearts (1 cup, drained and coarsely chopped) - Cream cheese (1 cup, softened) - Sour cream (1 cup) - Shredded mozzarella cheese (1 cup, low-moisture) - Grated Parmesan cheese (1/2 cup) - Minced garlic (2 cloves) - Fresh lemon juice (1 teaspoon) - Seasonings: Salt, pepper, red pepper flakes (optional) Gathering the right ingredients is key to making a great creamy spinach and artichoke dip. I always start with fresh spinach, which adds a vibrant touch. Canned artichoke hearts provide a tender texture and rich flavor. Cream cheese is essential for that creamy base. Sour cream gives a nice tang that balances the richness. For the cheeses, I like low-moisture mozzarella for melting, and Parmesan adds depth. Minced garlic brings fragrant notes that enhance the dip. A splash of fresh lemon juice brightens the flavors. Finally, seasonings like salt, pepper, and optional red pepper flakes give it a little kick. Each ingredient plays an important role. When you mix them, you create a dip that is creamy, cheesy, and utterly delicious. You can find the full recipe to help you bring this dish to life. 1. Preheat your oven to 350°F (175°C). This helps our dip become bubbly. 2. In a large bowl, blend the cream cheese and sour cream. Mix until smooth. 3. Fold in the fresh spinach, artichokes, mozzarella, and Parmesan cheese. Make sure everything is well combined. 1. Add the minced garlic, lemon juice, and seasonings to your mixture. Stir well to mix. 2. Transfer the dip to a baking dish. Spread it evenly for even cooking. 3. Bake in the preheated oven for 20-25 minutes. Look for a bubbly, golden top. For the full recipe, refer to the recipe section above. Enjoy this delightful dip warm! - Use room temperature cream cheese for easy blending. - Adjust sour cream quantity for desired tanginess. To make your dip extra creamy, start with cream cheese at room temperature. This helps it mix smoothly with the other ingredients. If you like a bit more tang, play with the amount of sour cream. Adding more will give it a zesty kick. - Experiment with different cheeses (e.g., cheddar or feta). - Add a splash of Worcestershire sauce or hot sauce for depth. Want to amp up the flavor? Try mixing in different cheeses. Cheddar adds sharpness, while feta brings a salty touch. For extra depth, add a splash of Worcestershire sauce or a few drops of hot sauce. These small tweaks can change everything about the dish. For the complete experience, follow the Full Recipe. It will guide you step-by-step to a delicious dip that everyone will love. {{image_4}} If you want a lighter version of this dip, try these swaps. - Greek yogurt for sour cream: This adds protein and cuts fat. - Reduced-fat cream cheese: This keeps the creaminess while lowering calories. These small changes make your dip healthier without losing flavor. You still get that rich, creamy taste everyone loves. You can change the main ingredients for a different twist. - Swap spinach for kale: Kale adds a nice crunch and extra nutrients. - Use frozen artichoke hearts: They save time and are just as tasty. These swaps let you get creative. You can make this dip with what you have on hand. Just remember to follow the Full Recipe for the best results! To keep your creamy spinach and artichoke dip fresh, refrigerate it in an airtight container. This way, you can enjoy it for up to 3 days. Just make sure the lid is on tight to keep out air and moisture. If you plan to eat it later, take it out of the fridge about 30 minutes before you want to serve it. This helps bring back that creamy texture. You can also freeze this dip if you want to save it for later. It can be frozen before or after baking. If you freeze it before baking, cover the dish tightly with plastic wrap. When you are ready to enjoy it, thaw it in the refrigerator overnight. After that, just pop it in the oven until it is hot and bubbly. If you freeze it after baking, you can reheat it straight from the freezer. Just add a few extra minutes to the baking time. Enjoy your creamy treat anytime! You can prep the dip, cover it, and store it in the fridge. When you are ready to enjoy, just bake it before serving. This makes it easy for parties or gatherings. The dip stays fresh and tasty. Yes! You can use fresh artichokes. Just make sure you cook and prepare them properly before mixing them in. Fresh artichokes can add a great taste. You can serve it with tortilla chips, baguette slices, or fresh veggie sticks like carrots and bell peppers. These pair well with the creamy texture of the dip. You can also try pita chips for a fun twist. Enjoy every bite! This blog post covered a delicious spinach and artichoke dip. You learned the key ingredients, easy steps to prepare, and baking tips for the best flavor. I shared options for making it healthier and ways to store leftovers, too. This dip is perfect for any gathering or snack. Don’t hesitate to customize it based on your taste. Enjoy making this creamy treat as a crowd-pleaser at your next event. Your guests will love it!

Creamy Spinach and Artichoke Dip Irresistible Delight

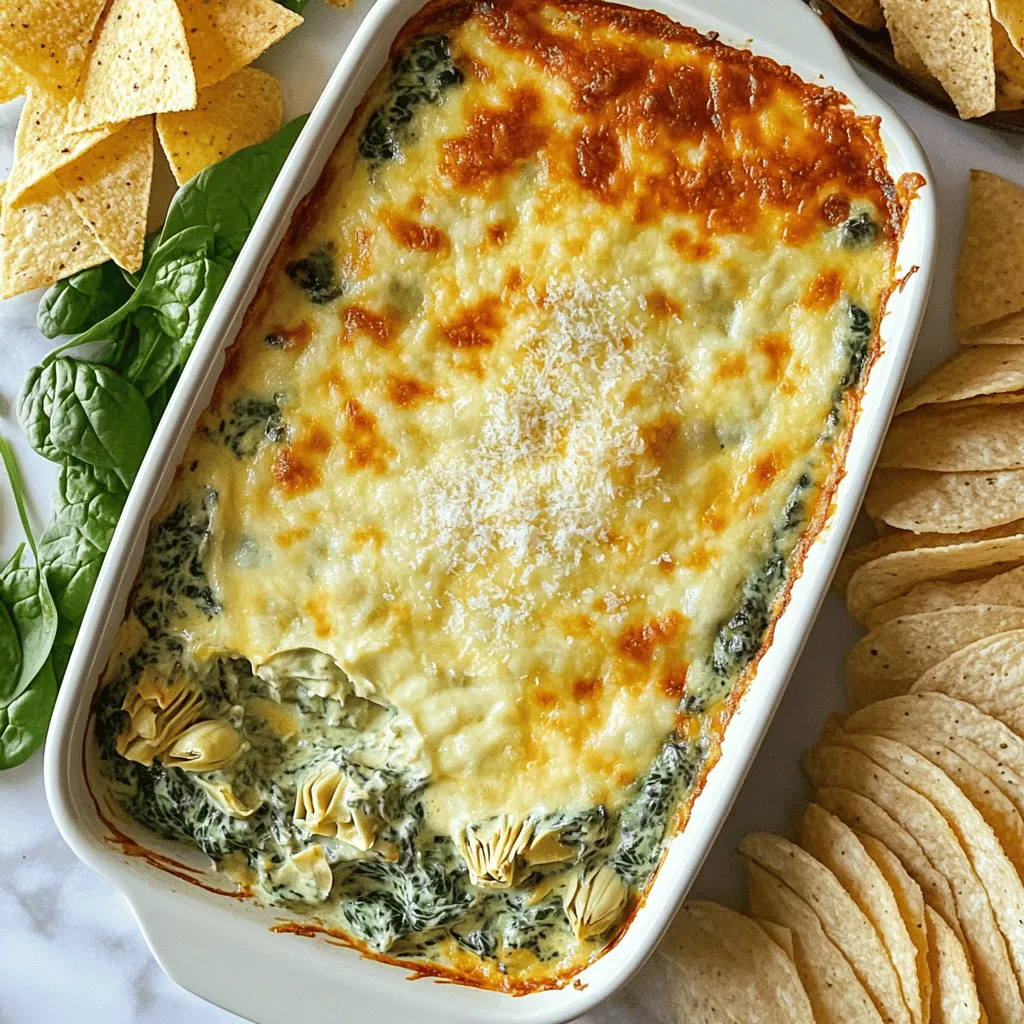
Are you ready to dive into a bowl of bliss? This Creamy Spinach and Artichoke Dip is everything you need

To make crispy garlic parmesan Brussels sprouts, you need the following main ingredients: - 1 lb Brussels sprouts, trimmed and halved - 3 tablespoons extra virgin olive oil - 4 cloves garlic, finely minced - 1 teaspoon sea salt - ½ teaspoon freshly ground black pepper - ½ cup freshly grated Parmesan cheese These ingredients form the base of the dish. The Brussels sprouts give a great crunch, while the garlic adds a nice depth of flavor. Next, you need some essential seasonings and toppings: - 1 teaspoon lemon zest (from about half a lemon) - 1 tablespoon balsamic glaze (for drizzling) - Fresh parsley, finely chopped (for garnish) Lemon zest brightens the dish, while balsamic glaze adds sweetness. Fresh parsley gives a pop of color and freshness. You can also add optional ingredients for extra flavor: - Red pepper flakes for heat - Toasted nuts for crunch - Other herbs like thyme or rosemary These ingredients can elevate your Brussels sprouts. Feel free to mix and match based on what you like. If you want the full recipe, check the details above. First, you need to preheat your oven to 425°F (220°C). This high heat helps make the Brussels sprouts crispy. Line a baking sheet with parchment paper. This step keeps the sprouts from sticking and makes cleanup easy. In a large bowl, add 1 pound of trimmed and halved Brussels sprouts. Pour in 3 tablespoons of extra virgin olive oil. Next, add 4 finely minced garlic cloves, 1 teaspoon of sea salt, and ½ teaspoon of black pepper. Mix everything well. You want the Brussels sprouts to be coated evenly. Now, spread the Brussels sprouts on the baking sheet. Make sure they are in a single layer to get crispy. Roast them in the oven for 15 minutes. After 15 minutes, take them out and sprinkle ½ cup of grated Parmesan cheese on top. Put them back in the oven for another 10 to 15 minutes. Watch closely until they turn golden brown and crispy. Once they are done, add 1 teaspoon of lemon zest over them for a fresh flavor. Drizzle some balsamic glaze on top and garnish with chopped parsley. Serve warm to enjoy this tasty dish. For the full recipe, check the section above. To get that perfect crunch, follow a few key steps. First, cut your Brussels sprouts in half. This exposes more surface area, allowing them to crisp up nicely. Next, make sure to toss them well in olive oil. Aim for an even coat without over-saturating. Spread them out on the baking sheet. They need space to breathe; crowded sprouts will steam, not roast. Lastly, roast at a high temperature, around 425°F. This helps to develop a golden brown color and great texture. When picking Brussels sprouts, look for bright green ones. They should feel firm and heavy in your hand. Avoid any that are yellow or have dark spots. Fresh sprouts have a tight, compact shape. A good rule is to pick smaller ones. They tend to be sweeter and less bitter. If you find organic options, grab those! They often have better flavor and are grown without harmful pesticides. Oven times may vary based on your model. Keep an eye on your sprouts! If they seem to brown too fast, lower the temperature by 25°F. For extra crunch, you can finish under the broiler for 1-2 minutes. Just watch closely to prevent burning. If you like them softer, roast them a bit longer before adding cheese. These tips help you customize the dish to fit your taste. {{image_4}} You can switch up the cheese in this recipe. Instead of Parmesan, try Pecorino Romano for a sharper taste. Feta cheese offers a creamy contrast that is tasty. Nutritional yeast gives a cheesy flavor for a vegan option. Each cheese creates a unique twist on flavor. For an extra kick, consider adding spices like paprika or cayenne pepper. These spices add warmth and depth to your dish. A pinch of smoked paprika brings a lovely smoky flavor. You can also try Italian seasoning for herbal notes. If you want a vegan version, simply leave out the cheese. Use a plant-based cheese that melts well for a similar effect. You can also enhance flavor by adding a bit more garlic. This keeps your dish full of flavor while ensuring it remains plant-based. For the full recipe, check out the detailed instructions above! Once you finish the Crispy Garlic Parmesan Brussels Sprouts, cool them down. Place the leftovers in an airtight container. They can last up to four days in the fridge. Make sure to keep them away from strong-smelling foods. This way, they stay fresh and tasty. You can also freeze Brussels sprouts for later. Start by cooling them completely. Then, spread them on a baking sheet in a single layer. Freeze them for about an hour. Once frozen, transfer them to a freezer-safe bag. They can last up to three months in the freezer. To reheat the Brussels sprouts, preheat your oven to 375°F (190°C). Spread the sprouts on a baking sheet. Bake them for about 10 to 15 minutes until hot. This helps them regain some crispiness. You can also use a microwave, but they might lose some crunch. Enjoy your delicious leftovers! To reduce bitterness, try these tips: - Trim off the ends. - Halve each sprout. - Roast them until crispy. - Add a touch of sweetness, like balsamic glaze. These steps help balance the flavors and make them more enjoyable. Yes, you can prepare Brussels sprouts in advance! - Trim and halve them. - Toss them in olive oil, garlic, salt, and pepper. - Store them in the fridge for up to 24 hours. Roast them before serving for the best texture. These Brussels sprouts pair well with many dishes. - Serve them with grilled chicken or steak. - They go great as a side for pasta dishes. - Try them with a hearty grain salad. The flavors complement each other nicely! Absolutely! The recipe is naturally gluten-free. - Just ensure your balsamic glaze does not contain gluten. All the ingredients listed in the Full Recipe are safe for gluten-free diets. Enjoy this dish worry-free while savoring the taste! Crispy Garlic Parmesan Brussels Sprouts are easy to make. We explored key ingredients and seasonings. You learned how to prepare them to perfection. Using my tips, you can ensure crispiness and better taste. Don’t forget about fun variations to try. Storing and reheating leftovers is simple too. With simple tweaks, you can make these sprouts your own. If you follow this guide, you will impress your friends and family with your cooking skills. Enjoy your delicious dish again and again.

Crispy Garlic Parmesan Brussels Sprouts Flavorful Delight

If you’re ready to fall in love with Brussels sprouts, I’ve got the perfect recipe for you! These Crispy Garlic

To make honey mustard chicken thighs, gather these key items: - 4 bone-in, skin-on chicken thighs - 1/4 cup Dijon mustard - 1/4 cup honey - 2 tablespoons olive oil - 3 cloves garlic, minced - 1 teaspoon paprika - 1 teaspoon dried thyme - Salt and pepper to taste - Fresh parsley, chopped (for garnish) You can boost the taste with these optional ingredients: - 1 tablespoon apple cider vinegar for tang - 1 teaspoon chili powder for heat - Lemon zest for a fresh kick - A sprinkle of brown sugar for extra sweetness This dish is not only tasty but also has solid nutrition. Each serving of honey mustard chicken thighs has: - About 350 calories - 20 grams of fat - 30 grams of protein - 5 grams of carbohydrates - Rich vitamins from the garlic and herbs These ingredients come together to create a meal that is both simple and full of flavor. Every bite offers sweet, tangy goodness that makes your taste buds dance. First, you need to preheat your oven. This step is key for great cooking. Set your oven to 400°F (200°C). This temperature ensures your chicken cooks evenly and gets crispy. While the oven warms up, you can prepare the marinade and chicken. Now, let’s whip up the honey mustard marinade. In a medium bowl, add 1/4 cup of Dijon mustard and 1/4 cup of honey. These two ingredients balance well, giving a sweet and tangy flavor. Next, pour in 2 tablespoons of olive oil for richness. Then, add 3 minced garlic cloves for a flavor boost. Sprinkle in 1 teaspoon of paprika and 1 teaspoon of dried thyme for extra taste. Add salt and pepper to your liking. Whisk everything together until it’s smooth and well mixed. This marinade is what makes the chicken shine. Now, it’s time to work with the chicken. Take 4 bone-in, skin-on chicken thighs and pat them dry with paper towels. This step is important. Dry skin gets crispy when cooked. Place the chicken in a large bowl or a baking dish. Pour the marinade over the chicken, making sure each piece gets covered. For the best flavor, let the chicken marinate for at least 20 minutes. If you have more time, marinate it longer. This allows the flavors to soak in deeply. After marinating, you’re ready to bake your chicken! Check the full recipe for more details. To get that perfect crispy skin, start with dry chicken. Pat the chicken thighs with paper towels before marinating. This step helps remove excess moisture. For the best results, use bone-in, skin-on thighs. The skin will crisp up beautifully in the oven. A high oven temperature of 400°F (200°C) also aids in achieving crispy skin. If you want an extra crunch, broil the chicken for the last few minutes. Just watch closely to avoid burning. Marinating chicken is key for flavor. I suggest a minimum of 20 minutes. This allows the marinade to soak in. For even deeper flavor, marinate for up to 2 hours. You can also prepare the chicken in the morning and let it sit in the fridge until dinner. Just remember, longer marination means more flavor, but don’t exceed 24 hours. The acidity in the mustard can affect the texture if left too long. To ensure your chicken is done, use a meat thermometer. The safe internal temperature is 165°F (75°C). Insert the thermometer into the thickest part of the thigh, avoiding bone. If you don't have a thermometer, check the juices. They should run clear, not pink. The skin should look golden brown. If it’s still pale, give it a few more minutes in the oven. Always let the chicken rest for 5 minutes after baking. This helps keep it juicy and tender. For the full recipe, check out the section above. {{image_4}} You can change the flavor of your honey mustard chicken thighs by using different herbs. Try rosemary for a woodsy taste. You can also use oregano for a hint of the Mediterranean. Basil adds a fresh twist, while cilantro gives it a bright flavor. Mix and match these herbs to find your favorite blend. Experimenting with herbs makes cooking fun and exciting! Grilling honey mustard chicken thighs brings a smoky flavor that’s hard to beat. Start by following the marinade steps from the Full Recipe. After marinating, preheat your grill to medium-high heat. Place the chicken thighs skin-side down on the grill. Cook for about 7-10 minutes per side. This gives you crispy skin and juicy meat. You can brush extra marinade on during cooking for added flavor. Using a slow cooker for honey mustard chicken thighs is super easy. First, prepare the marinade like in the Full Recipe. Place the chicken thighs in the slow cooker and pour the marinade over them. Set it to low for 6-7 hours or high for 3-4 hours. This method makes the chicken very tender and full of flavor. Serve it with rice to soak up the delicious sauce! To keep your honey mustard chicken thighs fresh, let them cool completely. Once cool, place them in an airtight container. You can store them in the fridge for up to three days. If you want to keep them longer, freezing is a great option. Always label the container with the date to track storage time. When you’re ready to enjoy the leftovers, reheat them in the oven. Set your oven to 350°F (175°C). Place the chicken on a baking sheet and cover it with foil. Heat for about 20 minutes. This method keeps the chicken juicy and the skin crispy. You can also use a microwave, but the skin may lose its crispiness. If you use the microwave, heat on medium power for short bursts, checking often. If you want to freeze the chicken, first ensure it is completely cooled. Wrap each thigh in plastic wrap, then place them in a freezer bag. Squeeze out excess air before sealing. You can freeze honey mustard chicken thighs for up to three months. To thaw, place them in the fridge overnight before reheating. Enjoy this simple and tasty meal anytime! You can find the full recipe in the article to make it again. You can serve honey mustard chicken thighs with many sides. Some great options include: - Roasted vegetables like carrots and broccoli - Mashed potatoes or sweet potatoes - A fresh garden salad with a light dressing - Rice or quinoa for a hearty side - Garlic bread or dinner rolls for a cozy touch These sides balance the sweet and tangy flavors of the chicken. They also add color and texture to your meal. Yes, you can use boneless chicken thighs. They will cook faster than bone-in thighs. To adjust the cooking time, bake them for about 25-30 minutes. Always check that the internal temperature reaches 165°F (75°C). Boneless thighs will still absorb the honey mustard flavor well. To add spice, try these options: - Mix in a teaspoon of cayenne pepper or red pepper flakes into the marinade. - Substitute some Dijon mustard with spicy brown mustard. - Add minced jalapeños or a splash of hot sauce for heat. These tweaks will give your chicken a nice kick without losing its sweet taste. Enjoy experimenting with flavors! This blog post explored the tasty world of honey mustard chicken thighs. We reviewed main ingredients, optional add-ons, and their nutrition facts. I detailed simple steps for cooking, from preheating the oven to making a flavorful marinade. With tips for crispy skin and perfect doneness, you can easily wow your family or friends. We also looked at fun recipe variations, storage tips, and addressed common questions. Enjoying this dish is simple, and you can create your own favorite twist. Happy cooking!

Honey Mustard Chicken Thighs Flavorful and Simple Meal

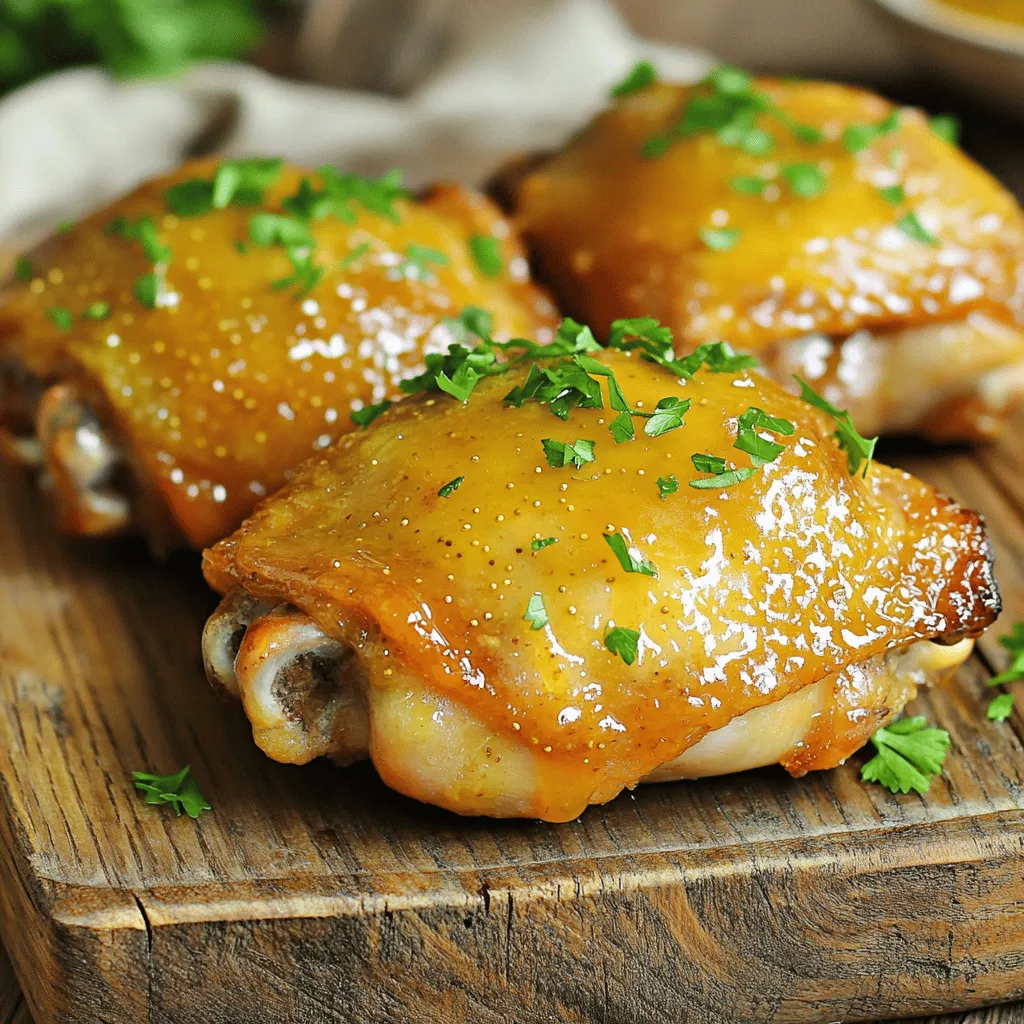
Looking for a simple yet flavorful meal? Honey Mustard Chicken Thighs might be your new favorite. This dish balances sweet

- 1 cup rolled oats - 2 cups vegetable broth - 1 cup fresh spinach, finely chopped - 2 large eggs - 1 tablespoon extra virgin olive oil - 1 garlic clove, finely minced - 1/2 teaspoon red pepper flakes (optional, for spice) - Salt and freshly ground black pepper, to taste - Fresh herbs for garnish (such as chives or parsley) When I make savory oatmeal with spinach and eggs, I choose high-quality ingredients. The rolled oats form the base, offering a hearty texture. I prefer using vegetable broth instead of water. It adds rich flavor and depth. Fresh spinach is a must. It wilts down nicely and brings vibrant color. The eggs are the star here, providing protein and creaminess. I usually opt for large eggs, fried sunny-side up. This way, the yolk runs into the oats. Extra virgin olive oil adds healthy fats and enhances the dish's taste. Garlic gives a savory punch, while red pepper flakes bring a hint of heat. I season with salt and pepper to balance the flavors. Finally, fresh herbs, like chives or parsley, give a pop of freshness and color. For the Full Recipe, check the complete cooking instructions. - Gather all ingredients: - 1 cup rolled oats - 2 cups vegetable broth - 1 cup fresh spinach, finely chopped - 2 large eggs - 1 tablespoon extra virgin olive oil - 1 garlic clove, finely minced - 1/2 teaspoon red pepper flakes (optional) - Salt and freshly ground black pepper, to taste - Fresh herbs for garnish - Prepare cooking utensils: - A medium-sized saucepan - A non-stick skillet - Measuring cups and spoons - A spoon for stirring - Start by pouring the vegetable broth into a medium saucepan. Bring it to a vigorous boil over medium heat. - Once boiling, slowly stir in the rolled oats. Then, reduce the heat to low. Let the oats simmer gently. - Cook the oats for about 5-7 minutes. Stir occasionally. You want the oats to become tender and creamy. - In a non-stick skillet, heat the olive oil over medium heat. Add the minced garlic. If you like spice, toss in the red pepper flakes. - Sauté for about 1 minute. You want the garlic fragrant, not browned. - Add the chopped spinach to the skillet. Cook for 2-3 minutes until it wilts and turns bright green. Season with salt and pepper. - Remove the skillet from heat and set the spinach aside. - In the same skillet, crack the eggs. Cook them sunny-side up, or to your liking. This takes about 3-4 minutes. - Once the oatmeal is done, spoon it into two bowls. Top each bowl with the sautéed spinach. Place a fried egg on top of each. - You can garnish with fresh herbs. Add more salt and pepper if you wish. Enjoy your meal! To make your oatmeal creamy, adjust the liquid ratios. I use two cups of vegetable broth for one cup of rolled oats. This mix gives a rich, smooth texture. If you want thicker oatmeal, add less broth. For creaminess, cook your oats for about five to seven minutes. Stir occasionally to keep them from sticking. Boost the flavor of your oatmeal with extra spices. Consider adding garlic powder, cumin, or smoked paprika. These spices can make your dish pop. You can also use different oils for sautéing. Try sesame oil or coconut oil for a unique twist. These choices add depth and richness to your meal. Choose the right dish to serve your oatmeal. A shallow bowl works best for a beautiful presentation. Pair your oatmeal with slices of avocado or fresh fruit for balance. For drinks, a cup of green tea or fresh orange juice can complement the flavors nicely. {{image_4}} You can switch out spinach for other greens like kale or Swiss chard. These greens add unique flavors and nutrients. Try adding cheese like feta or goat cheese for creaminess. Avocado is another great choice. It brings healthy fats and a smooth texture to your bowl. To make this dish vegan-friendly, replace the eggs with tofu. Scrambled tofu works great as a protein substitute. You can also cook oatmeal in the microwave. Use the same proportions of oats and broth. Microwave on high for about 2-3 minutes, stirring halfway through. This method is quick and perfect for busy mornings. Experiment with umami elements like miso or nutritional yeast. These will deepen the flavor and add a savory touch. Adjust spice levels by adding more red pepper flakes or a splash of hot sauce. You can also try spices like cumin or smoked paprika for a different kick. Each change can transform your savory oatmeal into a new dish. For the complete recipe, check out the Full Recipe section. To keep your savory oatmeal fresh, store it in an airtight container. Place it in the fridge within two hours after cooking. It should stay good for about three to five days. If you want to save it longer, you can freeze it. Just make sure to leave some space in the container for the oatmeal to expand. You can freeze it for up to three months. When reheating, the best method is to use the stove. Place the oatmeal in a pan and add a splash of vegetable broth or water. Heat it over low to medium heat, stirring often. This helps keep the texture creamy. You can also use the microwave. Just heat it in 30-second bursts, stirring in between. This way, your oatmeal won’t dry out. In the fridge, your savory oatmeal will be fresh for up to five days. If you freeze it, it can last for three months. After this time, the flavor and texture might change. Always check for any signs of spoilage, like off smells or mold, before eating. You can easily boost the health factor of this dish. Here are some tips: - Use whole grain oats instead of regular oats for more fiber. - Add more veggies, like diced tomatoes or bell peppers. They are low-cal and tasty. - Swap the eggs for egg whites if you want less fat and cholesterol. - Try different greens, like kale or Swiss chard, for variety. - Mix in seeds or nuts, such as chia seeds or walnuts, for healthy fats and crunch. These changes can make your meal even more nutritious while keeping it delicious! Yes, you can prep this recipe ahead of time. Here’s how: - Cook the oatmeal and spinach mixture first. Store them in the fridge. - Reheat the oatmeal on the stove or in the microwave. Add a splash of broth if it’s thick. - Fry the eggs fresh when you’re ready to eat. This keeps them tasty and warm. - You can prepare everything up to two days in advance. This makes it easy to enjoy a healthy breakfast on busy mornings! Here are some common mistakes and how to fix them: - Cooking the oats too long can make them mushy. Keep an eye on the timer. - Not using enough broth can lead to dry oats. Adjust the liquid for creaminess. - Overcooking the spinach can make it lose color and nutrients. Sauté it just until wilted. - Not seasoning enough can result in bland flavors. Add salt and pepper to taste. Avoiding these errors will help you make perfect savory oatmeal every time! Yes, this dish works great for meal prepping. Here are some best practices: - Store each component separately. Keep the oatmeal, spinach, and eggs in different containers. - Use airtight containers to keep everything fresh in the fridge. - Reheat the oatmeal and spinach together, but cook the eggs fresh for best taste. - Label the containers with dates to keep track of freshness. This way, you can enjoy a healthy meal anytime, without extra cooking! For the complete recipe, check out the Full Recipe section. This recipe combines rolled oats, spinach, and eggs for a tasty meal. I shared step-by-step directions to cook it perfectly. Use tips to enhance flavors and textures. Explore variations to keep things fresh and fun. Remember, it’s easy to store leftovers and reheat them well. Try different spices or greens to match your taste. If you stick to these guides, you’ll enjoy savory oatmeal again and again. Enjoy your cooking journey!

Savory Oatmeal with Spinach and Eggs Healthy Breakfast

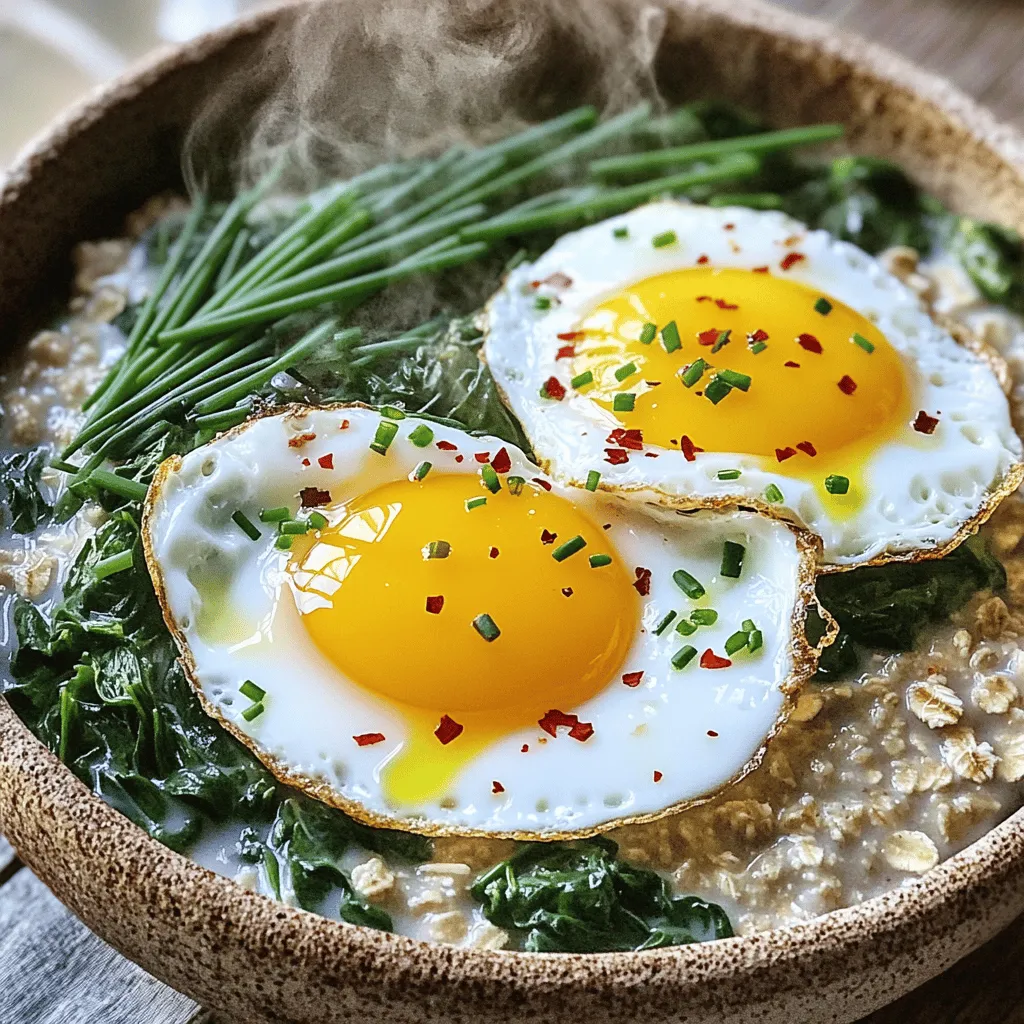
Start your day right with my savory oatmeal with spinach and eggs! This healthy breakfast blends comfort and nutrition. I’ll

- 1 cup quinoa - 2 cups vegetable broth (or water) - 1 red bell pepper, chopped into bite-sized pieces - 1 yellow bell pepper, chopped into bite-sized pieces - 1 medium zucchini, sliced into half-moons - 1 cup cherry tomatoes, halved - 1 red onion, diced thoughtfully - 3 tablespoons extra-virgin olive oil - 1 teaspoon garlic powder - 1 teaspoon smoked paprika - Sea salt and freshly ground black pepper, to taste The base of this roasted vegetable grain bowl is quinoa. Quinoa is a great grain. It cooks quickly and is full of protein. I love using vegetable broth for cooking it. The broth adds a nice depth of flavor. Next, I use assorted vegetables. I like bell peppers, zucchini, cherry tomatoes, and red onion. These veggies roast well. They become sweet and tender. The colors make the bowl attractive too! Seasonings are key to packing flavor. I use garlic powder and smoked paprika. These spices bring warmth and earthiness. Sea salt and black pepper help balance everything. - 1 ripe avocado, sliced delicately - ½ cup creamy hummus (store-bought or homemade) - Fresh parsley or cilantro, chopped, for garnish Garnishes take this bowl to the next level. Avocado adds creaminess and healthy fats. Hummus gives a smooth texture and flavor boost. Fresh herbs like parsley or cilantro bring freshness. These add color and taste, making the dish pop! For the full recipe, check out the detailed instructions to assemble your delicious meal. - Preheat the oven to 400°F (200°C). - In a medium pot, combine 1 cup of rinsed quinoa with 2 cups of vegetable broth. Bring this mixture to a boil over medium-high heat. Once it boils, lower the heat and cover the pot. Let it simmer for about 15 minutes, until fluffy. After cooking, let it sit covered for 5 more minutes before fluffing with a fork. - Grab a large baking sheet. Chop 1 red bell pepper, 1 yellow bell pepper, 1 medium zucchini, 1 cup of cherry tomatoes, and 1 red onion. Spread these veggies evenly on the baking sheet. - Drizzle 3 tablespoons of extra-virgin olive oil over the veggies. Then, sprinkle with 1 teaspoon of garlic powder, 1 teaspoon of smoked paprika, sea salt, and freshly ground black pepper. Use your hands to toss the veggies until they are well-coated. - Place the baking sheet in the preheated oven. Roast the vegetables for 20-25 minutes. Stir them halfway through for even cooking. The veggies should become tender and caramelized. - To assemble the bowls, start with a scoop of quinoa in each bowl. Top it with the roasted vegetables. Then, add slices of avocado and a dollop of creamy hummus. - Finish with a sprinkle of chopped fresh parsley or cilantro to add a pop of color. Enjoy this vibrant and tasty dish! For the full recipe, check out the details above. To make perfect quinoa, avoid common mistakes. One mistake is not rinsing it. Rinsing removes a bitter coating called saponin. Always rinse it under cool water for a minute before cooking. Another mistake is using too much water. The ratio is always one part quinoa to two parts liquid. If you add too much, it can turn mushy. To tell when quinoa is done, look for tiny white spirals. These are the germ of the grain. When all the water is absorbed, it's time to remove it from heat. Let it rest for five minutes, then fluff it with a fork. When roasting vegetables, caramelization brings out their natural sweetness. To achieve this, keep the pieces uniform in size. This helps them cook evenly. Spread them out on the baking sheet. If they are too crowded, they will steam instead of roast. Timing is key for different vegetables. For example, bell peppers and zucchini take about 20-25 minutes. Cherry tomatoes may need just 15 minutes. Always check for tenderness halfway through cooking. Stir the vegetables to ensure even browning. For ideal pairings, top your grain bowl with creamy avocado and hummus. These add rich flavors and smooth textures. You can also sprinkle some fresh herbs like cilantro or parsley for brightness. When plating, focus on color and height. Start with a base of quinoa. Then, layer the roasted vegetables on top. Place avocado slices and a dollop of hummus artfully on the bowl. Serve with a lemon or lime wedge. This adds a fresh zing that enhances the flavors. For the complete recipe, check the Full Recipe section. {{image_4}} You can switch quinoa for brown rice or farro. Both options add unique textures. Brown rice gives a chewy bite. Farro offers a nutty flavor that enhances the bowl. For gluten-free choices, try using millet or buckwheat. Both grains are rich and filling. They keep your dish hearty and satisfying. Using seasonal produce boosts freshness and taste. For spring, add asparagus or peas. In summer, consider zucchini and corn. Autumn calls for sweet potatoes or Brussels sprouts. Winter veggies like kale or root veggies work well too. You can mix colors and textures for a fun look. Try tossing in roasted beets for a sweet twist. You can elevate your grain bowl with sauces or dressings. A simple lemon-tahini dressing adds brightness. For a spicy kick, try sriracha or harissa. Incorporating proteins like tofu or grilled chicken makes it more filling. Tofu can be marinated and roasted for added flavor. Chicken pairs well with roasted garlic and herbs, adding depth. For the complete recipe, refer to the Full Recipe section above. To keep your roasted vegetable grain bowl fresh, store leftovers in the fridge. Place the grain bowl in an airtight container. This helps to lock in moisture and flavor. You can safely keep it in the fridge for up to three days. When ready to eat, the best way to reheat your grain bowl is in the microwave. Place it in a microwave-safe dish and cover it with a damp paper towel. Heat for one to two minutes, stirring halfway through. This method helps to keep the grains fluffy and the veggies tender. If you prefer, you can also reheat it on the stove. Use a non-stick pan over low heat. Add a splash of water to keep it moist while warming. Yes, you can freeze the grain bowl! To do this, separate the quinoa and vegetables. Use airtight containers or freezer bags for storage. Make sure to remove as much air as possible. This helps prevent freezer burn. You can freeze it for up to three months. When ready to enjoy, thaw it in the fridge overnight before reheating. This method keeps the flavors intact and the texture pleasant. If you want to swap quinoa, try brown rice or farro. Both provide a hearty base. You can also use millet or couscous. These grains add great texture and taste. Just remember to adjust cooking times. For brown rice, it usually takes about 45 minutes to cook. Farro cooks in about 30 minutes. To make this dish vegan, ensure all ingredients are plant-based. Use vegetable broth instead of chicken broth. Make sure your hummus is dairy-free. Check the label before buying. Avoid any toppings that contain animal products. This way, you keep the meal fresh and tasty without animal ingredients. Yes, this dish can be gluten-free. Quinoa is naturally gluten-free. If you choose other grains, ensure they are certified gluten-free. Some brands may process grains in facilities with gluten. Always read the labels carefully. The seasonings used in this recipe are also gluten-free. This makes the grain bowl safe for those with gluten sensitivities. You learned how to make a tasty grain bowl with quinoa and veggies. We covered key ingredients, step-by-step instructions, and helpful tips. You can even change it up with different grains and seasonal veggies. Don't forget to store leftovers properly and try new garnishes like avocado and hummus. Making this dish is fun and offers many options. Enjoy experimenting with flavors and sharing your tasty creations!

Roasted Vegetable Grain Bowl Packed with Flavor

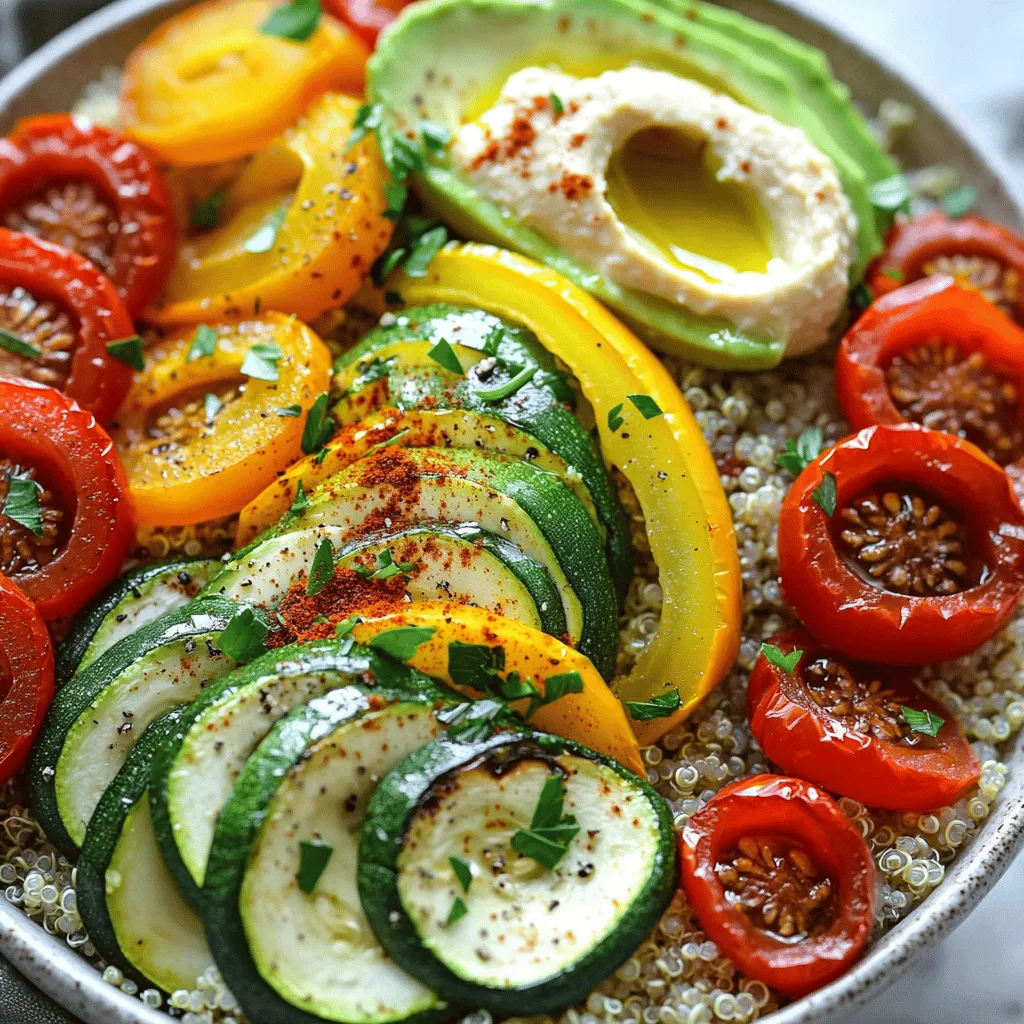
Are you looking for a bright, tasty meal that’s easy to make? A Roasted Vegetable Grain Bowl offers fresh flavors,

To make a rich and creamy chocolate avocado mousse, you will need: - 2 ripe avocados, peeled and pitted - 1/2 cup unsweetened cocoa powder - 1/2 cup maple syrup (or substitute with agave syrup) - 1/4 cup almond milk (or any milk of choice) - 1 teaspoon vanilla extract - A pinch of sea salt These ingredients create a smooth and velvety texture. The avocados provide creaminess without the need for heavy cream. The cocoa powder adds deep chocolate flavor, while the maple syrup gives natural sweetness. You can customize your mousse with these optional ingredients: - Fresh berries (such as raspberries or strawberries, for garnish) - Shaved dark chocolate (for garnish) - A dash of espresso powder for a coffee kick - A few mint leaves for a refreshing touch These additions can change the flavor and make the dish more fun. Try different toppings to see what you like best. Avocados are not just creamy and delicious; they also offer great nutrition. Here are some benefits: - High in healthy fats that support heart health - Full of fiber, which aids digestion - Packed with vitamins like E, K, and B6 Using avocado in dessert makes it healthier without losing taste. It’s a smart way to enjoy something sweet while getting nutrients. You can find the full recipe [here](#). To start, you need ripe avocados. Cut them in half, remove the pit, and scoop the flesh into your blender. Next, add the unsweetened cocoa powder. This gives the mousse its rich chocolate flavor. Then, pour in the maple syrup. You can swap it for agave syrup if you wish. Add the almond milk for creaminess and the vanilla extract for extra depth. Don’t forget a pinch of sea salt to balance the sweetness. Blend the mixture on high speed. Watch as it transforms into a creamy delight. You may need to stop and scrape down the sides of the blender. This helps mix everything evenly. Blend until you achieve a silky smooth consistency. Taste your mousse. If you want it sweeter, add more maple syrup. Blend again until smooth. Once blended, scoop the mousse into individual bowls or cups. Cover them with plastic wrap or lids. Place them in the fridge for at least 30 minutes. This chilling time helps the mousse firm up and lets the flavors mingle. When you are ready to serve, top each bowl with fresh berries. Add some shaved dark chocolate for a beautiful finish. For the full recipe, check here. To make a great chocolate avocado mousse, pick ripe avocados. Look for ones that feel soft but not mushy. Press gently; if it yields slightly, it's perfect. Avoid any avocados with dark spots or blemishes. These can spoil your mousse's flavor. Ripe avocados have a rich, creamy texture that blends well. They add a smooth and creamy base that makes your dessert delightful. The sweetness of your mousse can change based on your taste. I use maple syrup for a nice, natural sweetness. However, agave syrup works well too. If you want it sweeter, add more syrup, a little at a time. Taste as you go; this helps you find the right balance. You can also use honey if you like. For a sugar-free option, try stevia or monk fruit sweetener. These can give you a lighter version without the added sugar. Presentation matters when serving mousse. Use clear glass cups to showcase that rich, dark color. Garnish each serving with fresh berries for a pop of color. Raspberries or strawberries are my favorites. A sprinkle of shaved dark chocolate adds a fancy touch. It also brings a nice texture. Arrange the garnishes artfully for a beautiful display. This way, your guests will be excited to dig in. For more tips, check out the Full Recipe for added insights! {{image_4}} You can easily make this mousse dairy-free and vegan. Just use almond milk or any plant milk. Maple syrup keeps it sweet without animal products. This mousse is rich and creamy, just like the original. You get all the taste without the dairy. This chocolate avocado mousse is naturally gluten-free. The main ingredients, like avocados and cocoa powder, are safe for gluten-free diets. You don’t need to change much for this option. Just ensure that any added sweetener or flavoring is also gluten-free. You can add fun flavors to this mousse. A little mint extract gives a fresh taste. Adding espresso powder makes it like a mocha treat. Just mix in these flavors when blending. Start with a small amount, then taste and adjust. This way, you create a mousse that suits your taste perfectly. For the full recipe, check out the section above. After you enjoy your mousse, store any leftovers in the fridge. Use airtight containers to keep it fresh. This helps prevent the mousse from absorbing other smells. If you leave it uncovered, it may lose its creamy texture. Chocolate avocado mousse lasts about 3 to 5 days in the fridge. Check for any changes in color or smell before eating. If it looks or smells odd, it’s best to throw it away. Always remember, fresh is best! You can freeze the mousse for up to 2 months. Use freezer-safe containers or ice cube trays for easy portions. Before serving, thaw it in the fridge overnight. Stir it well to restore the creamy texture. This mousse is rich and delicious, even after freezing! For the full recipe, check out the detailed instructions above. Yes, you can use other sweeteners. If you want a different taste, try honey or agave syrup. You can also use stevia if you want it low-calorie. Just remember, each sweetener has a different flavor. Start with a little and taste as you go. Adjust until you find the perfect sweetness for your mousse. Absolutely! This mousse is a hit with kids. It tastes rich and sweet, just like a dessert should. Plus, it packs in healthy fats from avocados. This dessert is a sneaky way to add nutrition to their diet. It’s fun to make together too. Kids love to help blend and decorate with berries and chocolate. To make your mousse fluffier, add a bit of whipped cream or whipped coconut cream. This will lighten the texture and give it a nice, airy feel. You can also fold in the whipped cream gently after blending the avocado mixture. Don’t mix too hard; you want to keep that fluffiness. Enjoy your rich and creamy Chocolate Avocado Mousse! For the full recipe, check out [Full Recipe]. This blog post showed you how to make chocolate avocado mousse step by step. You learned about the main and optional ingredients, tips for the perfect texture, and how to store leftovers. Variations for special diets and flavor changes help everyone enjoy this treat. Remember, avocado adds health benefits, making this dessert rich and good for you. With these tips and tricks, you can impress anyone with your mousse. Enjoy making and sharing this delightful dessert!

Chocolate Avocado Mousse Rich and Creamy Delight

Are you ready to indulge in a rich and creamy dessert that’s good for you? Chocolate Avocado Mousse combines the

Lemon Garlic Butter Shrimp is a quick and tasty dish. It combines fresh shrimp with rich butter and bright lemon. This meal takes just 15 minutes to make. It serves four, so it's perfect for a family dinner or a quick weeknight meal. To make this dish, gather these ingredients: - 1 pound large shrimp, peeled and deveined - 4 tablespoons unsalted butter - 4 cloves garlic, finely minced - 1 lemon, zested and juiced - 1 teaspoon red pepper flakes (adjust based on your spice preference) - Salt and freshly ground black pepper to taste - 2 tablespoons fresh parsley, finely chopped - Lemon wedges for garnish You can swap out some ingredients if needed. For a dairy-free option, use olive oil instead of butter. If you want a different flavor, try lime juice instead of lemon juice. You can also use fresh herbs like basil or cilantro instead of parsley for a unique twist. Start by gathering your ingredients. This makes cooking smooth and fun. You need: - 1 pound large shrimp, peeled and deveined - 4 tablespoons unsalted butter - 4 cloves garlic, finely minced - 1 lemon, zested and juiced - 1 teaspoon red pepper flakes - Salt and freshly ground black pepper to taste - 2 tablespoons fresh parsley, finely chopped - Lemon wedges for garnish Next, wash the shrimp under cold water. Pat them dry with a paper towel. This helps the shrimp brown nicely. Zest and juice the lemon. Set these aside for later. Mince the garlic and chop the parsley. Now, heat a large skillet over medium heat. This usually takes about 2 minutes. Add the butter and let it melt. Keep an eye on it. Once it bubbles, add the minced garlic. Cook for 1-2 minutes, stirring often. You want the garlic to smell great, but not brown. After the garlic, add the red pepper flakes and lemon zest. Stir this mix for another minute. It should smell amazing! Now, gently add the shrimp to the skillet. Season them with salt and pepper. Cook the shrimp for 2-3 minutes on each side. They should turn pink and opaque. Once cooked, pour in the lemon juice. Stir everything together. Let it simmer for 1 more minute. This thickens the sauce a little. To get the best shrimp, always use fresh or thawed shrimp. Frozen shrimp can work, but they may release water. Make sure not to overcrowd the skillet. This helps the shrimp sear nicely. If you love spice, feel free to add more red pepper flakes. For a twist, try adding fresh herbs like basil or dill. These can brighten the dish even more! Don’t forget to serve your shrimp right away. Garnish with parsley and lemon wedges. This adds color and freshness. For a complete meal, pair your shrimp with crusty bread or fluffy rice. Enjoy this simple yet flavorful dish! To make your Lemon Garlic Butter Shrimp even better, you can add a few simple touches. Consider using fresh herbs like basil or dill for a fresh taste. You can also try adding a splash of white wine while cooking. This will give the dish a nice depth and richness. If you like heat, you can increase the red pepper flakes or add a dash of hot sauce. A sprinkle of lemon zest at the end adds brightness and aroma. Many home cooks make mistakes that can affect the flavor and texture. Here are a few to watch out for: - Overcooking the shrimp: Shrimp cook fast. Remove them from heat as soon as they turn pink and opaque. - Burning the garlic: Garlic can turn bitter if it burns. Cook it gently and stir often. - Not seasoning enough: Always taste your dish before serving. Adjust the salt, pepper, and lemon juice for the best flavor. Having the right tools makes cooking easier and more fun. Here are some must-haves for this recipe: - A large skillet or pan: This ensures even cooking and enough space for the shrimp. - A good quality chef’s knife: Use it for chopping garlic and herbs. - A zester: This tool helps you get the lemon zest without the bitter white pith. - A spatula: Use it to turn the shrimp without breaking them. For the full recipe, check the details above and enjoy your cooking adventure! {{image_4}} To spice things up, add more heat. Use more red pepper flakes. You could also add fresh diced jalapeños. This gives your dish a nice kick. Adjust the spice level to your taste. If you love heat, go for it! Herbs can brighten the flavor. Try adding fresh basil or dill. You can also use thyme or oregano. These herbs mix well with lemon and shrimp. They add freshness and depth. Chop the herbs finely and add them at the end for the best flavor. If you want something new, use other proteins. Chicken or scallops work well with this recipe. You can even try tofu for a vegetarian option. Just adjust the cooking time. Make sure to cook until fully done for safety. Each protein brings a different taste, making your meal unique! For the complete recipe, please refer to the Full Recipe. You can keep leftover lemon garlic butter shrimp in the fridge. Place it in an airtight container. It stays fresh for up to three days. Make sure it cools down first before sealing it. This helps keep the shrimp juicy and tasty. If you want to save shrimp for later, freezing works well. Put the shrimp in a freezer-safe bag. Try to remove as much air as possible. They can last up to three months in the freezer. When you’re ready to eat, thaw them in the fridge overnight for best results. To reheat your shrimp, use a skillet over low heat. Add a bit of butter or oil to keep it moist. Heat gently, stirring often, for about five minutes. You can also use the microwave. Just cover the dish and heat in short bursts. This method helps you avoid overcooking the shrimp. Enjoy the bright flavors all over again! For a full recipe, check the full recipe section. You can make Lemon Garlic Butter Shrimp ahead of time. Cook the shrimp and sauce as usual. Let it cool completely. Store it in an airtight container in the fridge. When ready to eat, reheat it on the stove over low heat. Add a little extra butter and lemon juice to freshen it up. Yes, you can use frozen shrimp. Just make sure to thaw it first. Place the shrimp in cold water for about 15 minutes. Drain and pat them dry before cooking. This helps the shrimp cook evenly and absorb the flavors well. Lemon Garlic Butter Shrimp pairs well with many sides. Here are some great options: - Rice: Fluffy white or brown rice soaks up the sauce. - Pasta: Toss cooked pasta with the shrimp for a hearty meal. - Bread: Crusty bread is perfect for dipping into the garlic butter. - Salad: A fresh green salad adds a crisp texture. - Vegetables: Sautéed or steamed veggies make a nice contrast. For the full recipe, check out the [Full Recipe]. This blog post covered all you need to make lemon garlic butter shrimp. We discussed the key ingredients, optional substitutions, and the full recipe. You learned step-by-step instructions, cooking tips, and common mistakes to avoid. We also explored tasty variations and proper storage methods. In conclusion, cooking shrimp can be fun and easy. With these tips, you can enjoy great meals. Try different flavors and enjoy your culinary success!

Lemon Garlic Butter Shrimp Flavorful and Simple Meal

Looking for a quick and tasty meal? You’ve come to the right place! In this post, I’ll show you how

- 1 cup rolled oats - ½ cup creamy almond butter - ¼ cup honey or maple syrup These main ingredients are the heart of your bites. Rolled oats give a nice texture. Creamy almond butter adds richness. Honey or maple syrup provides sweetness. - 1 cup unsweetened shredded coconut - ½ cup dark chocolate chips - ¼ cup finely chopped almonds The additional ingredients really make these bites shine. Unsweetened shredded coconut gives a tropical flavor. Dark chocolate chips add a sweet touch. Finely chopped almonds give a nice crunch. - 1 teaspoon pure vanilla extract - ½ teaspoon sea salt Flavor enhancers are key in this recipe. Pure vanilla extract adds depth. A pinch of sea salt balances the sweetness. For the full recipe, check the details above. Enjoy making these Almond Joy Energy Bites! - Combine 1 cup rolled oats and ½ cup creamy almond butter in a large bowl. - Add ¼ cup honey or maple syrup to the mix. Stir well until it blends. - Incorporate 1 cup unsweetened shredded coconut, ½ cup dark chocolate chips, and ¼ cup finely chopped almonds. - Add 1 teaspoon pure vanilla extract and ½ teaspoon sea salt. Mix thoroughly. - Roll the mixture into bite-sized balls, about 1 inch wide. - Chill the bites in the refrigerator for at least 30 minutes. Store them in an airtight container for up to a week. For the full recipe, check out the detailed instructions and ingredient list. To prevent sticking while rolling the bites, wet your hands slightly. This helps the mixture slide off easily. If the mixture feels too dry, add a splash of almond butter or a little honey. This will help you reach the right consistency. For serving, arrange the energy bites on a colorful plate. You can also use a mason jar for a fun look. To make them pop, sprinkle a bit of shredded coconut on top. This adds a nice touch for your guests. To prepare in advance, roll the bites and chill them first. Once firm, store them in an airtight container. This keeps them fresh for up to one week. You can also freeze them for longer storage. Just place them in a freezer bag and label it. When ready to eat, thaw them in the fridge overnight before serving. {{image_4}} When you make Almond Joy Energy Bites, you can easily change the recipe to fit your taste. Here are some fun ideas. - Use peanut butter instead of almond butter for a different flavor. - Try agave syrup in place of honey or maple syrup for a vegan option. - Add protein powder to boost the nutrition. This makes them great for post-workout snacks. - Incorporate dried fruits or seeds like raisins, chia, or pumpkin seeds for extra texture. - Make nut-free options by using sunflower seed butter instead of almond butter. - For vegan modifications, ensure you use maple syrup and dairy-free chocolate chips. These variations keep your energy bites exciting and can fit different diets. Feel free to mix and match based on what you have at home! Remember, these ideas help you create a snack you love. Check out the Full Recipe for all the details. Store your Almond Joy Energy Bites in an airtight container. This helps keep them fresh. A glass jar or a plastic container will work well. Place a piece of parchment paper between layers if you stack them. This prevents them from sticking together. Refrigerate the container for best results. The cool temperature helps the bites last longer. Avoid storing them at room temperature, as they can get too soft and lose their shape. Almond Joy Energy Bites can last up to one week in the fridge. They taste best within the first few days. Look for signs of spoilage. If you see mold or an off smell, it’s time to throw them out. If they feel very hard or dry, they may not be enjoyable. Always check before eating to ensure they are still fresh. You don’t need to reheat these bites. They taste great straight from the fridge. If they feel a bit firm, let them sit at room temperature for a few minutes. This softens them slightly and makes them enjoyable. For an extra treat, pair them with fresh fruit or a dollop of yogurt. This adds flavor and makes a satisfying snack. Enjoy these bites anytime you need a quick energy boost! To make Almond Joy Energy Bites, follow these simple steps: 1. Mix the base: In a large bowl, combine 1 cup of rolled oats and ½ cup of creamy almond butter. 2. Add sweetness: Pour in ¼ cup of honey or maple syrup. Stir until well mixed. 3. Incorporate flavors: Add 1 cup of unsweetened shredded coconut, ½ cup of dark chocolate chips, ¼ cup of finely chopped almonds, 1 teaspoon of pure vanilla extract, and ½ teaspoon of sea salt. Mix well. 4. Shape the bites: Take small portions and roll them into balls about 1 inch in size. 5. Chill: Place them on a baking sheet and chill in the fridge for at least 30 minutes. 6. Store: Keep them in an airtight container in the refrigerator for up to one week. For the full recipe, check the recipe section. Yes, you can freeze Almond Joy Energy Bites. To do this, first, roll the bites as directed. Next, place them on a baking sheet lined with parchment paper. Freeze them for about an hour until firm. Once frozen, transfer the bites to an airtight container or a zip-top bag. They can last for up to three months in the freezer. To enjoy, simply thaw them in the fridge for a few hours or leave them at room temperature for about 30 minutes. You can try many fun variations of Almond Joy Energy Bites. Here are a few ideas: - Nut Butter Swap: Use peanut butter instead of almond butter for a different taste. - Sweetener Change: Try agave syrup or brown rice syrup instead of honey or maple syrup. - Add-ins: Mix in dried fruit like cranberries or raisins for added sweetness. - Protein Boost: Add some protein powder for an extra energy kick. These changes can give your bites a fresh twist. This recipe yields about 16 Almond Joy Energy Bites. Each bite is perfect for a quick snack or a sweet treat. If you need more bites, you can easily double the recipe! Almond Joy Energy Bites are easy and fun to make. We covered the main and additional ingredients, plus tips for great results. Personalize these bites with different flavors or dietary needs. Store them properly for lasting freshness. With these ideas, you can enjoy delicious, healthy snacks every day. Try these bites for a sweet treat that boosts your energy and satisfies your cravings. You’ll love how simple and tasty they are!

Almond Joy Energy Bites Tasty and Simple Recipe

Looking for a quick snack that satisfies your sweet tooth? These Almond Joy Energy Bites are the perfect blend of

Older posts
Newer posts
← Previous Page1 … Page42 Page43 Page44 … Page72 Next →

dsad

© 2025 recipesstation • Built with GeneratePress

Our Policies

  • Copyright Policy
  • Cookie Policy
  • GDPR Policy
  • Privacy Policy
  • Disclaimer
  • Terms Of Use

More Information

  • Home
  • About
  • Contact
  • Appetizers
  • Dessert
  • Dinner
  • Drinks
©2025, recipesstation About Back To Top