Skip to content
DisclaimerTerms Of UseGDPR PolicyCookie Policy

recipesstation

  • Home
  • Drinks
  • Appetizers
  • Dinner
  • Dessert
  • About
  • Contact
  • Privacy Policy
DisclaimerTerms Of UseGDPR PolicyCookie Policy

Emily

- 1 pound large shrimp, peeled and deveined - 2 ripe avocados, diced into bite-sized cubes - 1 cup cherry tomatoes, halved - 1 cucumber, diced - 1/4 red onion, finely chopped - 1/4 cup fresh cilantro, chopped - 2 tablespoons extra virgin olive oil - 1 tablespoon freshly squeezed lime juice - 1/2 teaspoon garlic powder - Salt and freshly ground black pepper to taste - Optional: Sliced radishes for garnish You need a mix of fresh ingredients to make this salad shine. Start with shrimp. I like to use one pound of large shrimp for a good bite. Make sure they are peeled and deveined for easy eating. Avocados bring creaminess. Two ripe avocados, diced into cubes, add great texture. Cherry tomatoes add a burst of flavor. Halve one cup and toss them in. A cucumber gives a refreshing crunch. Dice one cucumber and add it to the bowl. For some sharpness, chop a quarter of a red onion finely. Fresh cilantro brightens the dish. Use a quarter cup and chop it well. Next, you need a simple dressing. Combine two tablespoons of extra virgin olive oil with one tablespoon of lime juice. Add half a teaspoon of garlic powder for depth. Season with salt and black pepper to taste. For a fun touch, slice some radishes to garnish the salad. They add color and a nice crunch. All these ingredients come together in the Healthy Avocado Shrimp Salad. You can find the full recipe listed above. To start, cook the shrimp in boiling water. Bring a pot of salted water to a rolling boil. Add the shrimp and let them cook for about 2-3 minutes. You will know they are done when they turn pink and opaque. Once cooked, drain the shrimp and rinse them under cold running water. This stops the cooking process. Set the shrimp aside to cool completely. Next, let's make the dressing. You will need a few simple ingredients: extra virgin olive oil, freshly squeezed lime juice, garlic powder, salt, and pepper. In a small mixing bowl, whisk together these ingredients. Make sure to taste the dressing. Adjust the seasoning if you want more flavor. A well-balanced dressing makes your salad pop. Now it’s time to combine all the salad ingredients. In a large mixing bowl, carefully add the cooled shrimp, diced avocados, halved cherry tomatoes, diced cucumber, chopped red onion, and fresh cilantro. Use a gentle folding motion to mix the ingredients together. Be careful not to mash the avocados. We want them to stay in nice, chunky pieces. Once your salad is assembled, drizzle the dressing over the mixture. Gently toss everything together. Make sure every bite is coated but avoid crushing the avocados. For the best flavor, let the salad chill in the refrigerator for at least 15 minutes. This allows the flavors to blend well. You can serve it chilled or at room temperature. For a fun touch, feel free to add sliced radishes on top for crunch. For the full recipe, check out the details above. To get the best texture, avoid mashing the avocados. You want those creamy cubes intact. Gently fold them into the salad when mixing. This keeps the dish fresh and appealing. Cooling the shrimp properly is also key. After cooking, rinse them under cold water right away. This stops the cooking process. It helps keep the shrimp tender and juicy. Spices and herbs can boost flavor. Consider adding paprika for a smoky taste or a pinch of cayenne for heat. Fresh dill or parsley can elevate the dish. Always adjust seasoning to your liking. A little salt can go a long way, so taste as you go. For an eye-catching look, serve in elegant bowls or on colorful platters. A large bowl allows guests to help themselves. Use vibrant plates to make the colors pop. Garnish with extra cilantro or lime wedges. This adds a fresh touch and brightens the dish. You can also sprinkle some sliced radishes on top for a crunch that looks great! For the full recipe, check out the details above. {{image_4}} You can change the shrimp in this salad if you want. Try using crab or scallops instead. If you prefer a different protein, grilled chicken or tofu works well too. For veggies, mix in bell peppers or radishes for extra crunch. You can also add fresh herbs like dill or basil for a twist of flavor. The dressing can be fun to change up! For a creamy option, use Greek yogurt instead of oil. This adds a nice texture and tang. If you like some heat, sprinkle in chili flakes or a dash of hot sauce. This will give your salad a spicy kick that wakes up the taste buds. Want to make it gluten-free? This salad is naturally gluten-free, so you’re all set! For a low-carb option, skip the tomatoes or cucumbers. If you're vegan, swap the shrimp for chickpeas or lentils. Use a plant-based yogurt for the dressing. These changes keep the salad tasty and healthy for everyone. If you want to explore more, check out the Full Recipe for detailed steps and tips! To keep your leftover salad fresh, store it in an airtight container. This helps keep moisture out. Always use a container that seals well, like glass or hard plastic. These containers help maintain the salad's taste and texture. If you want to keep the salad longer, store the dressing separately. This keeps the salad from getting soggy. When ready to eat, just pour the dressing on top and mix it gently. The salad stays fresh for about 1 to 2 days in the refrigerator. After that, the ingredients may begin to lose their quality. Signs your salad has spoiled include a bad smell, discoloration, or a slimy texture. If you notice any of these signs, it's best to throw it away. I don't recommend reheating this salad. The shrimp can lose their flavor and texture when heated. Plus, reheating can make the avocado mushy. If you do want to warm it up, be very gentle. Use low heat and only for a short time. This way, you can try to keep the avocado's creamy texture intact. For the best taste, enjoy the salad cold. Yes, you can use frozen shrimp for this recipe. Frozen shrimp are often just as fresh as fresh shrimp. They are frozen soon after being caught. This keeps their taste and texture intact. When using frozen shrimp, thaw them first. You can do this by letting them sit in the fridge overnight or placing them in cold water for about 30 minutes. Just make sure to drain them well before cooking. This will help avoid extra water in your salad. To make your salad more filling, consider adding grains or legumes. Quinoa, brown rice, or farro can add bulk and make the dish heartier. You can also add beans like black beans or chickpeas. These options are healthy and will keep you satisfied longer. Just remember to adjust the dressing to balance the flavors. Avocado and shrimp both offer great health benefits. Avocados are rich in healthy fats, fiber, and vitamins. They help support heart health and improve digestion. Shrimp is low in calories and high in protein. It also contains important nutrients like selenium and vitamin B12. Together, they make a nutritious and tasty meal. This salad can last in the refrigerator for about two days. Keep it in an airtight container to maintain freshness. However, the avocados may brown a bit over time. To slow this down, you can add extra lime juice before storing. This helps keep the color and taste brighter. Yes, you can make this salad ahead of time. You can prepare the shrimp and chop the veggies early. Just wait to add the dressing until you are ready to serve. This way, the salad stays fresh and crunchy. You can store it in the fridge for up to two days. For the full recipe, check out the complete instructions above. This post covers a delicious shrimp and avocado salad. You learned about each ingredient, how to cook shrimp, and mix everything together. I shared tips for the best texture and flavor. You also explored ways to modify the recipe to fit your taste. Remember to store leftovers properly to keep them fresh. With these insights, you can make a tasty salad any time. Enjoy experimenting and personalizing your dish for anyone who tries it!

Healthy Avocado Shrimp Salad Fresh and Flavorful Mix

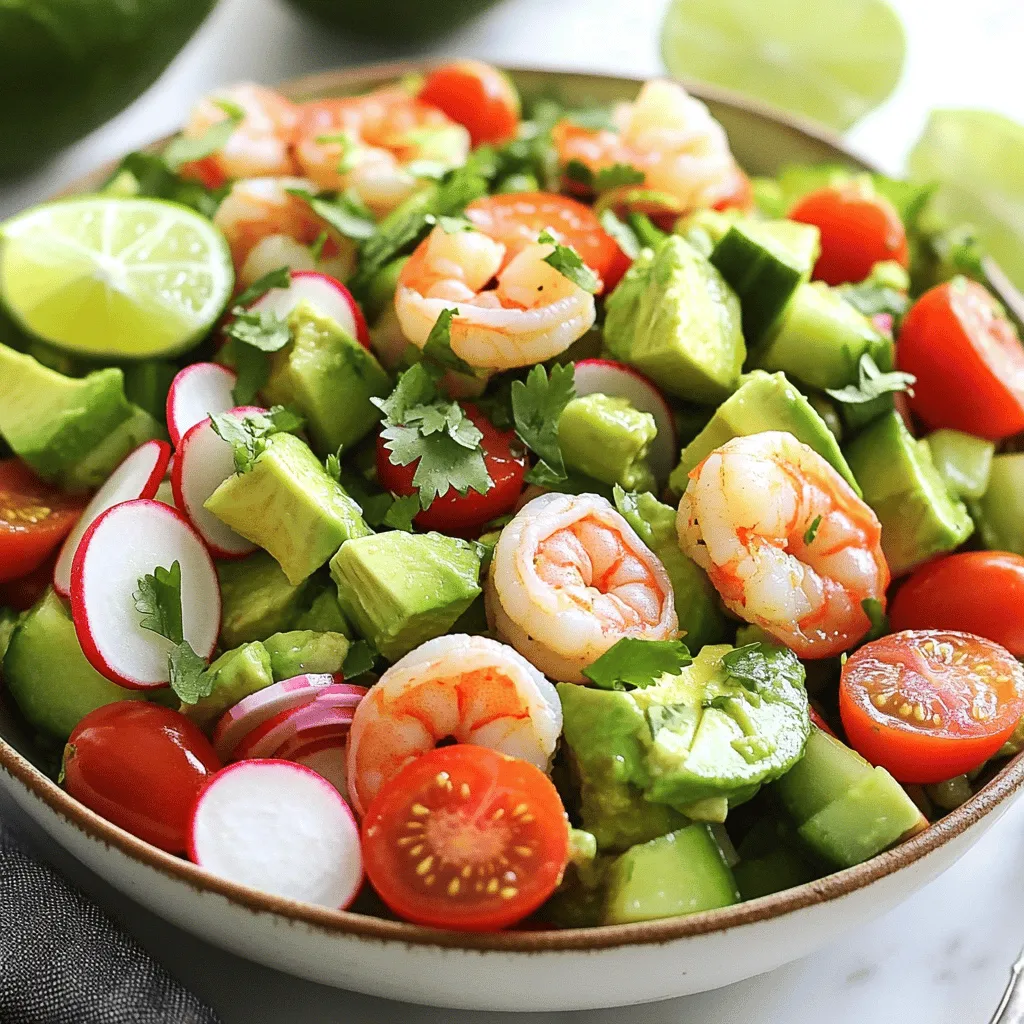
Looking for a light meal that bursts with fresh flavors? This Healthy Avocado Shrimp Salad combines succulent shrimp, creamy avocados,

To create the delicious Garlic Butter Herb Roasted Chicken, gather these simple ingredients: - 1 whole chicken (approximately 4-5 lbs) - 1/2 cup unsalted butter, softened to room temperature - 6 cloves garlic, finely minced - 2 tablespoons fresh rosemary, finely chopped - 2 tablespoons fresh thyme, finely chopped - 1 tablespoon fresh parsley, finely chopped - Juice and zest of 1 fresh lemon - Salt and pepper, to taste - 1 large onion, quartered - 4 medium potatoes, cut into uniform wedges - 3 medium carrots, cut into chunky pieces - 1 cup chicken broth Each ingredient plays a key role in bringing out rich flavors. The whole chicken serves as the star, while the garlic and herbs add depth. The butter helps the skin turn golden and crispy. Fresh lemon brightens the dish, creating a balance with the savory notes. Make sure your ingredients are fresh. Fresh herbs provide a vibrant taste that dried ones cannot match. The same goes for the lemon juice and zest. Using a whole chicken ensures even cooking and maximum flavor. For more detailed instructions on how to bring all these flavors together, check out the Full Recipe. Enjoy the process, and let your kitchen fill with mouthwatering aromas! - Preheat your oven to 425°F (220°C). - In a mixing bowl, combine 1/2 cup of softened butter, 6 minced garlic cloves, 2 tablespoons each of chopped rosemary and thyme, 1 tablespoon of chopped parsley, juice and zest from 1 lemon, and a pinch of salt and pepper. Mix well to form a smooth garlic herb butter. - Pat the chicken dry with paper towels. This helps achieve crispy skin. - Use your fingers to gently loosen the skin over the breast and thighs. - Take a good amount of the garlic herb butter and rub it under the skin. Spread it evenly. - Coat the outside of the chicken with the remaining garlic herb butter. Save any leftover butter for later. - Stuff the cavity of the chicken with the quartered onion and leftover herb stems. - In a roasting pan, arrange 4 potato wedges and 3 chunky carrot pieces. Sprinkle them with salt and pepper. Drizzle with any leftover garlic herb butter and toss gently. - Place the chicken on top of the vegetables. Pour 1 cup of chicken broth into the bottom of the pan. This keeps the chicken juicy as it cooks. - Roast the chicken for about 1 hour and 15 minutes. Baste the chicken with the drippings at least twice. This adds flavor and moisture. - Use a meat thermometer to check that the internal temperature reaches 165°F (75°C). The juices should run clear when the chicken is done. - After roasting, let the chicken rest for 10-15 minutes. This helps the juices redistribute, making every slice juicy and tasty. - For a great presentation, arrange the sliced chicken on a large platter. Surround it with the caramelized potatoes and vibrant carrots. Add fresh herb sprigs for color. Enjoy your meal! For the complete recipe, check the Full Recipe. To get that perfect crispy skin, start by drying the chicken well. Moisture on the skin leads to steam, which prevents crisping. Use paper towels to pat the chicken dry inside and out. This simple step makes a huge difference. Next, cook the chicken at a high temperature. I recommend 425°F (220°C). This heat helps the skin to brown and crisp up nicely. Roast it on the middle oven rack for even cooking. Fresh herbs always taste better than dried herbs. They bring bright flavors to your dish. For this recipe, I use rosemary, thyme, and parsley. If you only have dried herbs, use less. Dried herbs are stronger. Lemon juice and zest also play a big role in flavor. The juice adds brightness, while the zest gives a nice zing. Together, they make the garlic butter even better. Don't skip this step! Basting helps keep the chicken moist and flavorful. Start basting after the first 30 minutes of cooking. Use a spoon or a baster to drizzle the juices over the chicken. Repeat this every 20 minutes. Regular basting adds depth to the flavor. Plus, it helps achieve that lovely golden color on the skin. For the best result, baste with the drippings from the pan. Try these tips for a juicy, flavorful meal. For the full recipe, check out the Garlic Butter Herb Roasted Chicken 🧄. {{image_4}} You can swap out herbs for different tastes. Instead of rosemary, try oregano or basil. Thyme can be replaced with dill or sage. For a spicy kick, add crushed red pepper or smoked paprika. Citrus flavors can enhance your dish too. Use lime or orange juice for a twist. The zest from these fruits can also add a fresh touch. Feel free to use other veggies in your dish. Sweet potatoes, parsnips, or Brussels sprouts work well. Broccoli can add a nice crunch. Just keep cooking times in mind. Harder vegetables like carrots need more time than softer ones like zucchini. Cut them into similar sizes to ensure even cooking. You don’t have to use the oven for this recipe. A slow cooker can make it easy. Simply set it on low for 6 to 8 hours. The chicken will be juicy and tender. An air fryer is another great option. Cook at 360°F for about 50 minutes for crispy skin. Adjust the time based on your air fryer model. For the full recipe, check out Garlic Butter Herb Roasted Chicken. To keep your garlic butter herb roasted chicken fresh, let it cool first. Place the chicken in an airtight container. Store it in the fridge for up to four days. If you have leftover veggies, add them to the same container. For easy meals, shred the chicken and use it in salads or sandwiches. You can freeze roasted chicken for later use. Wrap it tightly in plastic wrap or foil. Place it in a freezer bag, removing as much air as possible. It can stay frozen for up to three months. When it's time to enjoy it again, defrost the chicken in the fridge overnight. This method keeps it safe and tasty. To reheat the chicken without drying it out, use an oven or microwave. For the oven, preheat to 350°F (175°C). Place the chicken in a baking dish with a splash of broth. Cover it with foil to keep moisture in. Heat for about 20-30 minutes. If using a microwave, place the chicken on a microwave-safe plate. Add a little broth and cover it. Heat in short bursts, checking often to avoid overcooking. For the complete process, refer to the Full Recipe. Roasting time for chicken depends on its weight. For a whole chicken around 4-5 lbs, roast it for about 1 hour and 15 minutes. This timing ensures the chicken reaches a safe internal temperature. Always check the thickest part of the meat to ensure it's cooked through. Yes, you can, but it's best to thaw it first. If you cook a frozen chicken, it will take much longer to cook. Always use a meat thermometer to ensure it reaches 165°F (75°C) inside. This step is crucial for food safety. To check if your chicken is done, use a meat thermometer. Insert it into the thickest part of the thigh without touching the bone. If it reads 165°F (75°C), the chicken is safe to eat. Also, look for clear juices when you cut into it. Great sides include roasted vegetables, mashed potatoes, or a fresh garden salad. You can also serve rice or quinoa for a healthy touch. These sides complement the chicken's rich flavors well. To keep the chicken juicy, pat it dry before seasoning. Loosen the skin and apply the garlic herb butter generously. Basting the chicken with its own juices during roasting adds moisture. Let it rest after cooking to keep it tender. In this guide, we explored how to make a Garlic Butter Herb Roasted Chicken. We discussed the key ingredients and step-by-step instructions for prepping and cooking. You learned tips for crispy skin and flavor enhancement. We also looked at variations, storage, and answered common questions about the dish. Roasting chicken this way makes for a tasty meal that anyone can enjoy. With practice, you will create juicy, flavorful chicken every time. Enjoy your cooking journey!

Garlic Butter Herb Roasted Chicken Flavorful Delight

Are you ready for a mouthwatering experience? My Garlic Butter Herb Roasted Chicken is the perfect dish for any meal.

To make a great classic French toast, you need a few key items. Here’s what you will need: - 4 thick slices of brioche bread or your favorite thick-cut bread - 2 large, room-temperature eggs - 1/2 cup whole milk, preferably fresh - 1 teaspoon pure vanilla extract - 1/2 teaspoon ground cinnamon - 1 tablespoon unsalted butter (for cooking) - Generous amount of pure maple syrup (for serving) - Fresh mixed berries (optional, for garnish) - Powdered sugar (optional, for a sweet touch) These ingredients create a rich and flavorful base for your French toast. Choosing the right bread is key for great French toast. I recommend using thick-cut bread like brioche or challah. These types soak up the egg mixture well. They also provide a soft texture and rich taste when cooked. You can also try sourdough or even a nice loaf of whole grain bread for a twist. Each type of bread brings its own unique flavor to the dish. To make your French toast even better, consider adding toppings. Here are some great options: - Fresh mixed berries like strawberries, blueberries, or raspberries - A light dusting of powdered sugar for sweetness - A dollop of whipped cream for extra richness - Chopped nuts for a crunchy texture - Sliced bananas for a fruity touch These toppings add color and flavor, making your meal more exciting. You can mix and match to find your perfect combination. To start, grab a large bowl. Crack the two eggs into it. Whisk the eggs until they become smooth. Next, add in the whole milk, vanilla extract, and ground cinnamon. Mix everything well until it is fully combined. Be sure there are no clumps of egg in the mixture. This egg mixture is what will soak into your bread and give it that delicious flavor. Now, heat a non-stick skillet over medium heat. Add one tablespoon of unsalted butter to the skillet. Let it melt completely. This will help create a nice golden crust on your French toast. Once the butter is melted, take your slices of brioche or thick-cut bread. Dip each slice into the egg mixture, allowing it to soak for about 15 seconds on each side. Be careful not to soak too long. You want the bread moist but not soggy. Let any excess mixture drip off before placing it in the skillet. Place the soaked bread slices in the skillet. Cook the first side for about 3-4 minutes. You want it to turn golden brown and crisp. Once the first side is ready, use a spatula to flip the slices. Cook for another 2-3 minutes until the second side is also golden brown. When your French toast is done, take it out of the skillet. Serve it right away on a warm plate for the best texture. Drizzle a generous amount of pure maple syrup over the top. For a special touch, add some fresh mixed berries as a garnish. You can also sprinkle powdered sugar on top for a sweet finish. This will make your breakfast look and taste amazing. Enjoy every bite of your classic French toast delight! To get the right texture for French toast, choose thick bread. My favorite is brioche. The egg mixture should soak in, but not too much. Aim for about 15 seconds on each side. This gives you a soft inside with a crispy outside. Heat is key when cooking French toast. Use medium heat on your skillet. Add butter and let it melt. Once hot, place the soaked bread in the pan. Cook for 3-4 minutes on the first side. Flip it and cook for 2-3 more minutes. This timing will help you get a nice golden brown color. Many people make mistakes when cooking French toast. Here are a few to watch for: - Too much soaking: Don’t let the bread soak too long. It can become mushy. - Not enough heat: If the pan is too cool, the bread won’t brown well. - Skipping the butter: Butter adds flavor and helps with browning. Don’t skip it! - Overcrowding the skillet: Cook in batches if needed. This helps each slice cook evenly. For more tips and a full recipe, check out the Full Recipe. {{image_4}} You can make your French toast even better by adding flavors. Try mixing in some orange zest for a bright touch. A spoonful of brown sugar adds sweetness. If you love spices, add nutmeg or cardamom for warmth. You can even blend in some cocoa powder for a chocolate twist. Each of these flavors can change your dish and surprise your taste buds. While brioche is classic, don't limit yourself! Challah gives a rich and soft texture. Sourdough brings a tangy flavor that contrasts well with syrup. Whole grain bread adds more fiber and a nutty taste. Even croissants can work! They give a flaky and buttery experience. Choose the bread that excites you the most for a fun twist on this dish. French toast doesn’t always have to be sweet. You can create a savory version too! Use a mixture of eggs and cheese, like cheddar or feta. Add herbs like thyme or basil to the egg mix. Top your toast with sautéed mushrooms or spinach for added flavor. A sprinkle of salt and pepper can enhance the taste. This savory twist is perfect for brunch or a light dinner. For more ideas, check out the Full Recipe. Store any leftover French toast in an airtight container. Let it cool first. This keeps it fresh and prevents sogginess. If you plan to eat it within two days, store it in the fridge. For longer storage, freezing is best. To reheat French toast, use your toaster or oven. Preheat your oven to 350°F (175°C). Place the slices on a baking sheet and warm for about 10 minutes. This method keeps the toast crispy. You can also use a microwave. Heat for 20-30 seconds, but it may lose its crispness. You can freeze French toast for easy meals later. First, let the slices cool completely. Then, stack them with parchment paper in between. Place the stack in a freezer bag or wrap it tightly. French toast can last up to three months in the freezer. When you're ready to eat, just thaw in the fridge overnight. Reheat it as mentioned earlier. Enjoy your French toast whenever you want with this easy storage method! The best bread for French toast is thick and soft. I recommend using brioche or challah. They both soak up the egg mixture well. This gives you a rich, creamy texture. You could also use French bread or sourdough. Just ensure it is not too dry. A good slice will give you a delicious bite. Yes, you can make French toast without milk or eggs. Use non-dairy milk like almond or oat milk. For eggs, try using a mixture of mashed bananas or flaxseed. Combine one tablespoon of flaxseed with three tablespoons of water. Let it sit for a few minutes until it thickens. This works well to bind the bread. To make French toast rise and fluff up, use fresh bread. Slightly stale bread absorbs the mixture better. Make sure you soak each slice just enough. Let it sit in the egg mixture for around 15 seconds on each side. Also, beating the eggs well adds air. This helps create a light texture. For more tips, check out the Full Recipe for specifics on cooking times. In this post, we've explored how to make classic French toast. We covered the best ingredients, step-by-step cooking instructions, and useful tips for perfect texture. We also looked at fun variations and how to store leftovers. French toast can be a simple yet delicious breakfast. With these tips, you can make it just right every time. Enjoy your cooking adventure and impress your friends with your skills!

Classic French Toast with Maple Syrup Delight

Are you ready to elevate your breakfast game? In this guide, I’ll share my favorite recipe for Classic French Toast

To make a delicious cinnamon roll casserole, you’ll need these key ingredients: - 1 loaf of cinnamon-raisin bread (or any cinnamon-flavored bread) - 4 large eggs - 1 cup whole milk - 1/2 cup heavy cream - 1/2 cup packed brown sugar - 1 tablespoon pure vanilla extract - 1 teaspoon ground cinnamon - 1/2 teaspoon ground nutmeg - 1/4 teaspoon salt These ingredients create a rich, custardy base. The bread soaks up all the flavors. You can add extra flavors and textures to your casserole with these options: - 1/2 cup chopped pecans (for crunch) - 1/2 cup raisins (for sweetness) - Powdered sugar for dusting (for a sweet finish) Feel free to mix these in or sprinkle them on top. They make the dish even more fun! If you have dietary needs, don’t worry! Here are some easy swaps: - Use gluten-free bread for a gluten-free version. - Swap whole milk for almond or oat milk for a dairy-free option. - Replace heavy cream with coconut cream for a lighter choice. These changes keep the flavor but fit your diet. Enjoy your cinnamon roll casserole, no matter your needs! Start by preheating your oven to 350°F (175°C). This step is key to ensure even cooking. Next, grab a 9x13 inch casserole dish and grease it well. You can use butter or cooking spray. Greasing helps prevent the casserole from sticking. Now, take your loaf of cinnamon-raisin bread and tear it into bite-sized pieces. Spread these pieces evenly in the bottom of the dish. Make sure no gaps remain, as this will help the custard soak in fully. In a large mixing bowl, add the four large eggs. Then pour in one cup of whole milk and half a cup of heavy cream. Next, add half a cup of packed brown sugar. This adds sweetness and depth. Toss in one tablespoon of pure vanilla extract, one teaspoon of ground cinnamon, half a teaspoon of nutmeg, and a quarter teaspoon of salt. Whisk these ingredients together until smooth. You want a well-blended custard mixture. Once mixed, pour it evenly over the torn bread pieces. Use a spatula to press any floating bread down into the custard. Now, let the mixture sit for about ten minutes. This resting time allows the bread to soak up the custard. After that, if you wish, sprinkle half a cup of chopped pecans and half a cup of raisins on top. These add a nice crunch and sweetness. Place the casserole in your preheated oven and bake for 35 to 40 minutes. You’ll know it’s done when the top is golden brown. A toothpick inserted in the center should come out clean. Once baked, take it out and cool for a few minutes. For a sweet touch, dust the top lightly with powdered sugar. To get the best texture for your casserole, use stale bread. Stale bread absorbs the custard better. Tear it into pieces that are not too small. This way, they will hold their shape while baking. Let the mixture rest for ten minutes before baking. This helps the bread soak up the custard. Bake until the top is golden brown. A toothpick should come out clean from the center. This means the casserole is ready! To make your life easier, use a few key tools. A 9x13 inch casserole dish is a must for this recipe. A whisk helps mix the custard smoothly. You will also need a spatula for pressing the bread down. A sharp knife works great for cutting the casserole once it’s baked. If you have a toothpick, keep it handy to check for doneness. These tools make baking a breeze! Serve your cinnamon roll casserole warm for the best taste. It pairs well with sweet toppings like maple syrup or whipped cream. You can also add fresh fruit, like berries or sliced bananas, for a nice touch. If you want something more savory, serve it with crispy bacon or sausage. This mix of flavors makes for a great meal. Don't forget to sprinkle some powdered sugar on top for a sweet finish! {{image_4}} You can change up the flavors in your cinnamon roll casserole. Adding chocolate chips can make it sweeter. If you love fruit, consider adding berries or apples. These fruits add a fresh taste and a bit of tartness. You might also mix in some nut butter for a rich flavor. Try peanut butter or almond butter to make it unique. To make this dish nut-free, simply skip the pecans. You can still enjoy the same great taste. For a dairy-free option, use almond milk or coconut milk. Replace heavy cream with a dairy-free cream alternative. These swaps keep the casserole creamy without dairy. You can serve this casserole for breakfast or dessert. For breakfast, stick to the classic recipe. Add some maple syrup on top for sweetness. For dessert, you can drizzle it with chocolate sauce. You might even serve it with ice cream. This makes it a fun treat after dinner. Whatever you choose, this casserole is sure to impress. Enjoy experimenting with the Full Recipe! To keep your cinnamon roll casserole fresh, place leftovers in an airtight container. Make sure it cools down first to prevent steam buildup. Store it in the fridge for up to three days. If you want it to last longer, consider freezing it. When you're ready to enjoy leftovers, preheat your oven to 350°F (175°C). Place the casserole in an oven-safe dish. Cover it with foil to prevent it from drying out. Bake for about 20 minutes or until it's warm throughout. You can also microwave individual servings for quicker reheating. To freeze the casserole, cut it into portions. Wrap each piece tightly in plastic wrap, then in aluminum foil. This double wrapping protects it from freezer burn. It can stay in the freezer for up to three months. When you're ready to eat, thaw it in the fridge overnight before reheating. For a quick meal, you can also bake it directly from frozen. Just add extra time to the baking. Enjoy your cinnamon roll casserole anytime! Yes, you can prepare this casserole ahead of time. Just follow the recipe steps up to the baking part. Cover the dish tightly and place it in the fridge. You can keep it there for up to 24 hours. When you're ready to bake, let it sit at room temperature for about 30 minutes. Then, bake it as directed. This makes serving easy for brunch or family gatherings. To reheat leftovers, preheat your oven to 350°F (175°C). Place the casserole in an oven-safe dish. Cover it with foil to keep it moist. Heat it for about 15-20 minutes. You can also use the microwave for quick reheating. Just place a serving on a microwave-safe plate, cover it, and heat for 1-2 minutes. Keep an eye on it to avoid overheating. The casserole lasts about 3-4 days in the fridge. Make sure to store it in an airtight container. If you want it to last longer, consider freezing it. Just cut it into portions and wrap each piece tightly. You can freeze it for up to 2 months. When you're ready to eat, thaw it overnight in the fridge and reheat as needed. The cinnamon roll casserole is a delightful mix of ingredients and flavors. You learned how to prepare it step by step, from mixing the custard to adding tasty toppings. I shared valuable tips for the perfect texture and help for dietary needs. You can even store leftovers or freeze them for later. This dish can be a sweet breakfast or a tasty dessert. Enjoy making your own and try different flavors. Each bite is sure to please everyone. Happy cooking!

Cinnamon Roll Casserole Comforting and Easy Recipe

Cinnamon Roll Casserole is the perfect blend of warm, sweet, and easy-to-make goodness. This dish turns your favorite breakfast treat

- 1 can (15 oz) chickpeas, rinsed and drained - 1 cup cherry tomatoes, halved - 1 medium cucumber, diced - 1 red bell pepper, diced - 1/4 red onion, finely chopped - 1/2 cup Kalamata olives, pitted and sliced - 1/4 cup feta cheese, crumbled (optional but recommended) - 3 tablespoons extra virgin olive oil - 2 tablespoons fresh lemon juice - 1 teaspoon dried oregano - Sea salt and freshly ground black pepper to taste - Fresh parsley, chopped (for garnish) When you make this Mediterranean chickpea salad, you want to select fresh ingredients. Fresh vegetables make a big difference in taste. The chickpeas are the star, but each ingredient adds to the flavor. Chickpeas are high in protein and fiber. They help you feel full and satisfied. Cherry tomatoes bring sweetness and color. They also add vitamins A and C. Cucumbers give a nice crunch and hydration. Red bell peppers add a sweet, juicy bite. They are also rich in antioxidants. Red onion offers a mild sharpness. Kalamata olives provide a briny flavor that enhances the dish. Feta cheese adds creaminess, but you can skip it for a vegan option. Olive oil and lemon juice create a tasty dressing. They bring all the flavors together. Dried oregano adds a classic Mediterranean touch. Finally, salt and pepper enhance everything. You can adjust these to your taste. You can find the full recipe linked above. It will guide you through making this salad step by step, ensuring a fresh and flavorful dish every time. 1. Combine chickpeas and vegetables in a bowl. Start with a large mixing bowl. Add 1 can of rinsed chickpeas, 1 cup of halved cherry tomatoes, 1 diced cucumber, 1 diced red bell pepper, 1/4 finely chopped red onion, and 1/2 cup of sliced Kalamata olives. Toss these together gently. 2. Prepare and whisk the dressing ingredients together. In a small bowl, mix 3 tablespoons of extra virgin olive oil, 2 tablespoons of fresh lemon juice, 1 teaspoon of dried oregano, and a pinch of sea salt with black pepper. Whisk until well combined. 3. Drizzle and toss dressing with the salad base. Pour the dressing over the salad mixture. Use a large spoon to toss everything gently until all ingredients are coated. 1. Optional addition of feta cheese. If you like, sprinkle 1/4 cup of crumbled feta cheese on top. Toss lightly just enough to mix without breaking the cheese. 2. Adjusting seasoning to taste. Taste the salad and decide if you need more salt, pepper, or lemon juice. Adjust to your liking. 3. Resting time to enhance flavors. Let the salad sit for about 10 minutes. This helps the flavors blend well. Just before serving, add some chopped parsley for extra color and flavor. Feel free to check out the Full Recipe for a complete guide to making this delightful Mediterranean Chickpea Salad! - How to rinse chickpeas effectively for optimal flavor: Start by draining the can of chickpeas. Then, place them in a fine mesh strainer. Rinse them under cold water for about 30 seconds. This removes excess salt and helps improve their taste. - Tips for selecting the freshest vegetables: Choose bright-colored vegetables. They should feel firm and have no soft spots. Look for tomatoes that are plump and smell sweet. For cucumbers, pick ones that are dark green and smooth. - Recommended serving temperature: Serve your Mediterranean chickpea salad chilled or at room temperature. Letting it sit for 10 minutes after mixing allows flavors to blend nicely. - Ideas for elegant serving options: Use a large, shallow bowl for a family-style dish. You can also serve it in individual bowls for a more personal touch. - Garnishing suggestions for color and taste: Add extra Kalamata olives on top for a pop of color. A sprinkle of fresh parsley adds a nice green touch and enhances flavor. - Pairing suggestions with other dishes: This salad pairs well with grilled meats or fish. It also complements pita bread or a light soup, making it a versatile dish. For the full recipe, check out the Mediterranean Chickpea Salad Delight. {{image_4}} You can change the chickpeas for other beans. Black beans or cannellini beans work well. They add a new taste and texture. For dressings, try tahini dressing instead of the standard olive oil. It gives a creamy and nutty flavor. You can also mix lemon juice with yogurt for a tangy twist. Seasonal vegetables can make your salad even better. Add bell peppers in summer or roasted squash in fall. Each choice adds freshness and color. To make this salad vegan, just skip the feta cheese. The salad still tastes great without it. You can also add nutritional yeast for a cheesy flavor. If you need a low-sodium option, rinse your chickpeas well. Use fresh herbs for flavor instead of salt. This keeps your dish tasty and healthy. For gluten-free eaters, this salad is naturally gluten-free. Just ensure that any dressing you use is also gluten-free. This way, everyone can enjoy it. To keep your Mediterranean chickpea salad fresh, place it in an airtight container. This helps prevent air from making the salad soggy. Store it in the fridge right after serving. It will stay fresh for about three days. After that, the veggies may lose their crunch. If you notice any off smells or colors, it’s best to toss it. Can you freeze the salad? I wouldn’t recommend it. Freezing can make the vegetables mushy when thawed. Instead, if you want to save some for later, try freezing the chickpeas and dressing separately. This way, you can mix them fresh later. Just remember to thaw them in the fridge overnight before using. This keeps the salad tasty and fresh. How to make Mediterranean chickpea salad vegan? To make this salad vegan, simply leave out the feta cheese. The chickpeas and veggies provide enough flavor. You can also add a bit more lemon juice for extra zest. Can I prepare this salad in advance? Yes, you can make this salad ahead of time. Just keep it in the fridge. It tastes even better after resting. What's the best way to serve Mediterranean chickpea salad? Serve this salad chilled or at room temperature. It looks great in a large bowl or on individual plates. Add extra olives and parsley on top for a nice touch. How to prevent vegetables from getting soggy? To keep the veggies crisp, wait to add the dressing until just before serving. This keeps them fresh and crunchy. Can I use dried chickpeas instead of canned? Yes, you can use dried chickpeas. Just soak and cook them first. This gives a great texture and taste. How to adjust the flavor profile for personal preferences? You can change the flavor by adding your favorite herbs or spices. Try basil, mint, or even a pinch of cumin for a twist. You now have a complete guide to making a delicious Mediterranean chickpea salad. We covered the key ingredients, their health benefits, and easy steps to prepare the dish. You learned tips for choosing fresh veggies and storing leftovers. Try different variations to suit your taste. Enjoy this salad as a healthy meal or side. With its vibrant flavors and textures, it’s sure to please everyone. Remember, this salad is not only tasty but also packed with nutrients! Happy cooking!

Mediterranean Chickpea Salad Fresh and Flavorful Dish

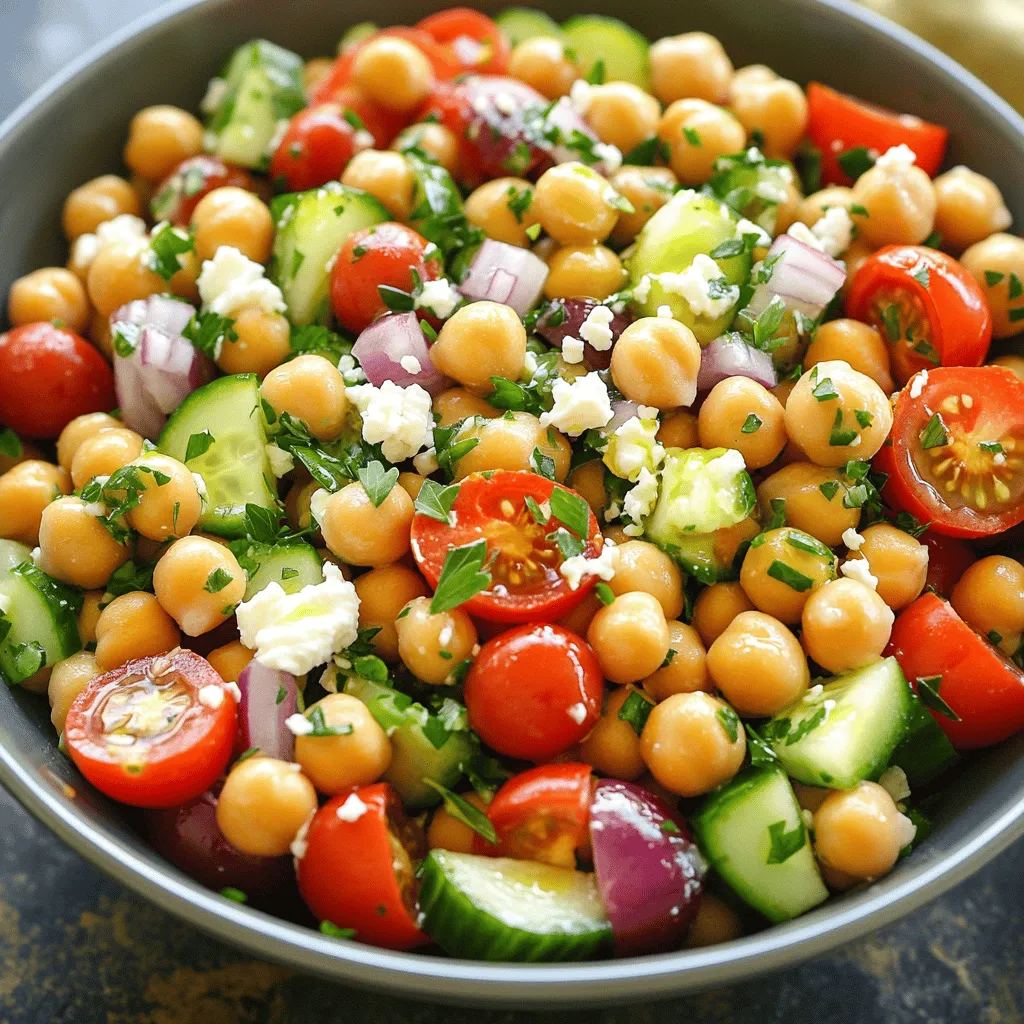
If you’re craving a dish that bursts with fresh flavors and vibrant colors, you’ve found it! This Mediterranean Chickpea Salad

- 1 can (15 oz) chickpeas, drained and rinsed - 1 tablespoon olive oil - Seasoning ingredients: garlic powder, smoked paprika, ground cumin, salt, black pepper, cayenne pepper (optional) - Air fryer - Mixing bowl - Clean kitchen towel - Measuring spoons To make air fryer crispy chickpeas, you need just a few simple items. First, grab a can of chickpeas. Make sure to rinse and drain them well. This helps get rid of any extra salt. Next, you'll need some olive oil to help the spices stick. The spices are where the magic happens! I love using garlic powder for a savory kick. Smoked paprika adds a hint of smokiness. Ground cumin gives a warm, earthy taste. You can also use salt and black pepper for basic seasoning. If you like heat, add a pinch of cayenne pepper. For your kitchen tools, you need an air fryer. It makes the chickpeas crispy without deep frying. A mixing bowl helps you combine the chickpeas and oil. A clean kitchen towel is key for drying the chickpeas. Lastly, have some measuring spoons ready to get the right amounts of each spice. With these ingredients and tools, you are ready to create a tasty and crunchy snack. For the full recipe, check out the detailed steps! - Preheat the air fryer to 400°F (200°C) for 5 minutes. - Rinse and pat dry the chickpeas thoroughly. First, I always start by preheating the air fryer. This step is key for making crispy chickpeas. While it heats up, I rinse the chickpeas under cold water. After rinsing, I grab a clean kitchen towel and gently pat them dry. Getting rid of moisture helps them become crunchy. - Combine chickpeas with olive oil and spices in a mixing bowl. - Arrange chickpeas in the air fryer in a single layer and cook for 15-20 minutes. Next, I take a mixing bowl and add the dried chickpeas. I drizzle in a tablespoon of olive oil. Then, I sprinkle in garlic powder, smoked paprika, ground cumin, salt, and black pepper. If you like heat, add cayenne pepper too! I toss everything together until the chickpeas are well coated in the spices. Now, I carefully arrange the chickpeas in the air fryer basket in a single layer. This helps them cook evenly. I set the timer for 15 to 20 minutes. Every 5 minutes, I shake the basket. This ensures that they brown nicely and become super crispy. - Shake the basket every 5 minutes for even cooking. - Allow cooling before serving for extra crispiness. Once the timer goes off, I take a peek. If they look golden brown, I know they’re ready. I let the chickpeas cool for a few minutes. This step is important as they will get crunchier as they cool down. For more details, you can check the [Full Recipe]. To make crispy chickpeas, you must dry them completely. Moist chickpeas will not get crunchy. After rinsing, lay them on a clean towel. Pat them gently until they feel dry. This step is key for that perfect crisp. Cooking time affects how crispy your chickpeas will be. For a light crunch, air fry for 15 minutes. If you want them extra crunchy, add a few more minutes. Check them often to avoid burning. Every air fryer is a bit different, so adjust as needed. Spice it up! You can use many different spices to add flavor. Try adding onion powder or Italian herbs for a twist. If you like heat, sprinkle on more cayenne pepper. You can even mix in some nutritional yeast for a cheesy taste. Crispy chickpeas pair well with dips. Hummus is a classic choice. You can also try yogurt sauce or spicy salsa. Serve them as a snack or on salads for extra crunch. Check the Full Recipe for more ideas! {{image_4}} You can change up the flavor of your crispy chickpeas with different seasonings. Here are two tasty options: - Italian herb blend: Mix dried oregano, basil, and thyme for a fresh taste. This blend works well if you want a classic, savory flavor. - Curry spice mix: Use curry powder for a fun twist. This adds warmth and depth to the chickpeas. It's a great way to enjoy an exotic snack. If you want more options, try these methods for cooking chickpeas: - Oven-baked version: Preheat your oven to 400°F (200°C). Spread the seasoned chickpeas on a baking sheet in a single layer. Bake for 25 to 30 minutes, shaking the pan halfway through. This method is great for making larger batches. - Cooking in a conventional fryer: Heat oil in a deep fryer. Carefully add the seasoned chickpeas and fry until golden brown. This gives you a crunchy texture, but be mindful of the oil and temperature. Experiment with these variations to find your favorite flavor! For the full recipe, check out the detailed steps above. To keep your crispy chickpeas fresh, store them in an airtight container. This method prevents moisture from sneaking in and ruining their crunch. Make sure the chickpeas are completely cooled before sealing the container. If you have a lot left over, you can also try dividing them into smaller containers. This way, you can enjoy a snack whenever you want without losing texture. When it's time to enjoy your leftovers, you want to bring back that crunch. The best way to reheat crispy chickpeas is to use the air fryer again. Set the air fryer to 350°F (175°C) and cook for about 5 to 7 minutes. Keep an eye on them to avoid burning. If you don’t have an air fryer, you can use an oven. Spread the chickpeas on a baking sheet and bake at 350°F (175°C) for about 10 minutes. Both methods will help regain that crispiness you love. Yes, you can use dried chickpeas. However, you must cook them first. Soak them overnight in water. After soaking, boil them until they are tender. This process takes about 1 to 2 hours. Once cooked, drain and rinse them. The dried chickpeas will have a firmer texture and may need a little more time in the air fryer, around 20 to 25 minutes. Just remember to dry them well before seasoning to get that nice crunch. There are a few reasons your chickpeas may not be crispy. The most common mistake is not drying them well. After rinsing, use a clean kitchen towel to pat them dry. Any moisture left will steam the chickpeas instead of making them crispy. Another issue could be overcrowding the air fryer basket. Make sure to arrange them in a single layer. If they are too close, they won’t cook evenly. Lastly, check your air fryer’s temperature. If it is not hot enough, they may turn out soft. Crispy chickpeas can last about 3 to 4 days when stored properly. Keep them in an airtight container at room temperature. If you notice them becoming soft, that is a sign they are past their prime. For the best taste, enjoy them fresh. You can also re-crisp them in the air fryer for a few minutes if they lose their crunch. Crispy chickpeas are easy to make and delicious. We covered the main ingredients, tools, and a simple cooking process. I shared tips for achieving the perfect crunch and flavor. You can even try new seasonings or cooking methods to mix things up. Remember to store leftovers properly to keep them fresh. With this guide, you can enjoy tasty snacks anytime. Happy cooking!

Air Fryer Crispy Chickpeas Tasty and Crunchy Snack

Are you ready for a snack that’s both tasty and healthy? Air fryer crispy chickpeas are here to become your

- 2 cups cooked white or brown rice - 2 cups fresh broccoli florets - 1 cup shredded sharp cheddar cheese - 1 cup cream of mushroom soup - 1/2 cup milk - Spices: garlic powder, onion powder, black pepper, salt - 1/2 cup crispy breadcrumbs - 2 tablespoons olive oil or melted butter To create this cheesy broccoli rice casserole, gather your main ingredients first. You need two cups of cooked rice; either white or brown works well. Next, grab two cups of fresh broccoli florets. Chop them into bite-sized pieces so they mix easily. Finally, you'll want one cup of shredded sharp cheddar cheese for that rich, cheesy flavor. Next are the additional ingredients. You'll need one cup of cream of mushroom soup. This adds creaminess and depth. Use one-half cup of milk to make the mixture smooth. For flavor, sprinkle in garlic powder, onion powder, black pepper, and salt. These spices will make your dish pop. If you want to add a crunchy layer, consider the optional ingredients. You can use one-half cup of crispy breadcrumbs on top. This gives a nice texture. Also, you can grease your dish with two tablespoons of olive oil or melted butter. This helps prevent sticking and adds flavor. For the full recipe, check out the details above. Set your oven to 350°F (175°C). While it heats up, grab a 9x13 inch casserole dish. Coat it with olive oil or melted butter to stop the casserole from sticking to the dish. This step is key for easy serving later. In a large mixing bowl, add the cooked rice, fresh broccoli florets, shredded cheese, cream of mushroom soup, and milk. Use a wooden spoon or spatula to mix everything well. Make sure every bite has a taste of cheese and broccoli. This blend creates a yummy base for your casserole. Now, sprinkle in the garlic powder, onion powder, black pepper, and salt. Stir everything again to spread the flavors evenly. This seasoning adds depth to the dish. It makes each bite pop with flavor. The right seasonings make a good dish great. You can find the complete directions in the Full Recipe. To make your cheesy broccoli rice casserole just right, bake it until it turns golden brown. This means the cheese has melted and the top is crispy. You'll know it's done when it's hot all the way through. After baking, let it cool for about five minutes. This helps when you serve it, keeping everything in place. A great way to make your dish pop is to add a garnish. You can sprinkle some fresh parsley on top. Extra shredded cheddar cheese also works well. These small touches make the meal look inviting and colorful. Feel free to mix things up with your cheese. Try using different varieties like mozzarella or pepper jack. This adds new flavors to the dish. You can also add proteins like diced chicken or mushrooms. These options make the casserole heartier and more filling. {{image_4}} You can easily tweak this dish for vegetarians. First, swap the cream of mushroom soup for a homemade version. You can blend mushrooms, broth, and cream for a fresh taste. Next, add more veggies. Bell peppers and carrots work great. They bring color and crunch, making your casserole even better. If you want a vegan take, it's simple! Substitute the cheese with dairy-free options. There are many good brands that melt well. Also, use plant-based milk and cream. Almond milk or coconut cream can work nicely. This way, everyone can enjoy this dish, no matter their diet. Want to kick up the flavor? You can add spices! Paprika gives a nice warmth, while cayenne adds heat. If you prefer fresh tastes, mix in herbs too. Thyme and basil are great choices. They add a lovely aroma and taste that makes every bite special. Store any leftovers in an airtight container for up to 3-4 days. This keeps the casserole fresh and tasty. Make sure it cools down before sealing. This will help avoid steam buildup. You can enjoy it as a quick meal later. If you want to save some for later, freezing works great! First, let the casserole cool completely. Then, wrap it tightly in plastic wrap. You can also use a freezer-safe container. This way, it lasts up to three months. When you're ready to eat, just thaw it overnight in the fridge before reheating. To reheat, you have two good options. For the oven, set it to 350°F (175°C). Place the casserole in a baking dish and cover it with foil. Bake for about 20-25 minutes. For the microwave, cut it into smaller pieces. Heat it in short bursts of 1-2 minutes. Check often to avoid overheating. Both methods will bring back the creamy goodness of your cheesy broccoli rice casserole. For the full recipe, check the details above. Baking this casserole takes about 25 to 30 minutes. You’ll know it’s done when it’s hot throughout. The top should have a nice golden brown color. This browning adds flavor and texture. Let it cool for five minutes before serving. This helps it hold its shape. Yes, you can prepare this casserole ahead of time. Mix the rice, broccoli, cheese, and soup. Store it in the fridge for up to a day before baking. Just cover it tightly. When you're ready, bake it straight from the fridge. You may need to add a few extra minutes to the baking time. This casserole goes well with many sides. Try serving it with a fresh salad. A simple green salad adds crunch and color. You can also pair it with grilled chicken for extra protein. For a heartier meal, serve it with roasted vegetables. Each side complements the creamy, cheesy flavors of the casserole. This blog post shared a simple recipe for cheesy broccoli rice casserole. We covered the main and optional ingredients, plus step-by-step instructions for baking. I offered tips for perfecting your dish and ideas for variations, like vegetarian and vegan options. In my view, this casserole is a fun meal for everyone. It’s easy to make and can fit different tastes. Enjoy creating your tasty version, and don’t forget to share your favorite tips and tweaks!

Cheesy Broccoli Rice Casserole Easy Family Meal

Looking for a simple and tasty family meal? Try my Cheesy Broccoli Rice Casserole! This dish combines tender broccoli, creamy

- 1 cup rolled oats - 1 cup almond milk (or any milk of your choice) - ½ cup pumpkin puree - 2 tablespoons maple syrup (or honey for sweetness) - 1 teaspoon pumpkin pie spice - ½ teaspoon vanilla extract - ¼ teaspoon sea salt - 2 tablespoons chia seeds (optional, for added texture and nutrition) The base of my pumpkin spice overnight oats is rolled oats. They soak up the flavors and create a nice texture. I use almond milk, but feel free to pick any milk you love. Pumpkin puree gives that rich, fall taste. Sweeteners like maple syrup or honey add a touch of natural sweetness. Pumpkin pie spice brings warmth, while vanilla extract adds a lovely aroma. A pinch of sea salt balances the flavors. If you want a little crunch and nutrition, chia seeds are a great choice. - Sliced bananas - Chopped walnuts - Cinnamon sprinkle Toppings can take your oats to the next level. I love adding sliced bananas for creaminess. Chopped walnuts give a nice crunch and extra flavor. A sprinkle of cinnamon on top makes it feel like fall. You can mix and match these toppings based on what you like. They add color and make your dish look pretty too. Always feel free to get creative and add your own favorite toppings! For the full recipe, check out [Full Recipe]. - In a medium bowl, combine 1 cup rolled oats and 1 cup almond milk. - Add ½ cup pumpkin puree and 2 tablespoons maple syrup. - Sprinkle in 1 teaspoon pumpkin pie spice, ½ teaspoon vanilla extract, and ¼ teaspoon sea salt. - Mix well until everything blends smoothly. - If you want a boost of fiber, fold in 2 tablespoons chia seeds. - Transfer your mix into airtight containers or jars. - Seal them tightly to keep air out. - Place in the fridge overnight or for at least 4 hours. - When ready to eat, stir your oats well. - If it's too thick, add a splash of almond milk. - Top with sliced bananas, chopped walnuts, and a sprinkle of cinnamon. This method ensures you enjoy a creamy, flavorful breakfast. For the complete recipe, check out the Full Recipe. To get the right texture for your pumpkin spice overnight oats, adjust the liquid. Use more liquid if you want a creamier mix. Less liquid will make the oats thicker. Soaking time also matters. You can soak them overnight or for just a few hours. The longer they soak, the softer they become. Want to boost the flavor? Add a pinch of nutmeg or ginger. These spices add warmth and depth. You can also try different milk alternatives. Coconut milk adds a nice twist, while oat milk keeps it simple. Each option changes the taste just a bit. Meal prep saves time. You can batch prep these oats for the week. Just make a big batch and store it in the fridge. For easy grab-and-go meals, divide the oats into jars. Each jar is a quick breakfast ready to enjoy. {{image_4}} You can easily make these oats nut-free. To do this, substitute almond milk with oat or coconut milk. Both options work great and keep the oats creamy. If you need to avoid chia seeds for allergies, simply omit them. The oats will still taste amazing without them. Want a vegan version? It's simple! Use maple syrup instead of honey for sweetness. Make sure all other ingredients are vegan-friendly too. This keeps your breakfast plant-based and delicious. Adding seasonal flavors makes these oats even better. You can mix in cranberries or pecans for a holiday touch. Adjust the spices to match the season. For example, add extra cinnamon in the winter for warmth. Use these ideas to make your overnight oats unique every time! Pumpkin spice overnight oats last about 3 to 5 days in the fridge. Store them in airtight containers to keep them fresh. Check for signs they have gone bad. If you see any mold or off smells, it's best to toss them out. The oats may also become overly dry or mushy, which means they have lost their good texture. You can freeze overnight oats for long-term storage. This is a great option if you want to prepare meals ahead of time. Use freezer-safe containers or jars to store individual servings. Leave some space at the top, as the oats will expand when frozen. When you're ready to enjoy them, thaw in the fridge overnight. For a quick thaw, you can place the jar in warm water for a few minutes. Once thawed, stir well before serving. You may need to add a splash of almond milk to reach your desired creaminess. Enjoy this flavorful fall delight anytime! You can find the full recipe [here](#). Pumpkin spice overnight oats last up to five days in the fridge. Store them in airtight containers. After five days, the oats may become mushy. Check for any signs of spoilage before eating. Freshness is key for the best taste. Yes, you can use quick oats instead of rolled oats. Quick oats will absorb liquid faster. This may change the texture, making it softer and creamier. If you like chewy oats, stick with rolled oats. Using sweeteners is not necessary, but it enhances flavor. Maple syrup or honey adds a nice sweetness. If you prefer less sugar, you could skip it. The pumpkin puree provides some natural sweetness as well. You can warm up pumpkin spice overnight oats if you prefer them hot. Heat them in the microwave for about one minute. Stir well to ensure even heating. You may want to add a splash of almond milk to keep them creamy. To make this recipe more filling, add protein-rich toppings. Consider adding Greek yogurt or nut butter. You can also increase the chia seeds for added fiber. More toppings will help keep you satisfied longer. You now have everything you need to make delicious pumpkin spice overnight oats. We covered the key ingredients, step-by-step instructions, and helpful tips. You can customize your oats with different flavors and toppings for a treat every time. Don't hesitate to batch prepare for the week. With these easy steps, you’ll enjoy a healthy breakfast that fits any busy schedule. Enjoy the process of making this simple, tasty meal!

Pumpkin Spice Overnight Oats Flavorful Fall Delight

Fall is here, and so is the cozy taste of pumpkin spice! Imagine waking up to a bowl of Pumpkin

To make your rainbow veggie sushi rolls, gather these key ingredients: - 1 cup sushi rice - 1 1/4 cups water - 2 tablespoons rice vinegar - 1 tablespoon sugar - 1 teaspoon salt - 4 sheets of nori (seaweed) - 1/2 cucumber, julienned - 1 small carrot, julienned - 1/2 bell pepper (any color), sliced into thin strips - 1 avocado, sliced - 1/4 cup sprouts (such as alfalfa or radish) These ingredients will give your sushi rolls a fresh and colorful look. Each veggie adds a unique taste and crunch. The sushi rice serves as a soft base that holds everything together. You can enhance your sushi experience by adding: - Soy sauce, for dipping - Pickled ginger (optional) - Wasabi (optional) These extras add bold flavors and a nice kick to your rolls. Try different amounts to find your perfect taste. Using good sushi rice is vital. Here are some tips for perfect rice: - Rinse the rice under cold water until the water runs clear. - Use a rice cooker if possible for even cooking. - Allow the rice to rest after cooking, covered, for about 10 minutes. - Mix in the vinegar, sugar, and salt gently to avoid breaking the grains. This method ensures your rice is sticky and flavorful. It helps the sushi hold its shape when you roll it. For the full recipe, follow the steps carefully for the best results. To start, rinse 1 cup of sushi rice under cold water. Keep rinsing until the water runs clear. This step removes excess starch. Next, place the rice in a medium pot with 1 1/4 cups of water. Bring it to a boil over medium heat. Once boiling, reduce the heat to low and cover the pot. Let it cook for about 15 minutes, until the water is absorbed. After cooking, remove the pot from the heat, keeping it covered. Allow the rice to rest for 10 minutes. This resting time is key for fluffy rice. While the rice rests, mix 2 tablespoons of rice vinegar, 1 tablespoon of sugar, and 1 teaspoon of salt in a small bowl. Stir until the sugar and salt dissolve. Once the rice has rested, use a fork to fluff it up gently. Then, fold the vinegar mixture into the rice. It adds a nice tang and flavor. Let the seasoned rice cool to room temperature before you assemble the rolls. To assemble, lay a bamboo sushi mat on a clean surface. Cover it with plastic wrap to keep it clean. Place a sheet of nori, shiny side down, on the mat. Wet your hands to keep the rice from sticking. Take a handful of sushi rice and spread it evenly over the nori, covering about 2/3 of the sheet. Leave a small space at the top. This will help seal the roll later. Now it's time to add the veggies. Place strips of cucumber, carrot, bell pepper, avocado, and a handful of sprouts horizontally on the rice-covered area. Begin rolling the sushi away from you, using the mat to guide it. Roll it tightly, but not too tight. You don’t want the filling to squeeze out. Once rolled, moisten the top edge of the nori with a bit of water. This will help seal the roll. To cut, use a sharp, damp knife. Cut the roll into 6-8 pieces. Wipe the knife with a damp cloth between cuts for cleaner edges. Finally, arrange the sushi rolls on a plate. Serve them with soy sauce, pickled ginger, and wasabi if you like. Enjoy your beautiful and healthy rainbow veggie sushi! For the full recipe, check the details provided earlier. Rolling sushi can be tricky, but it gets easier with practice. Use a bamboo mat for support. Place the nori on the mat, shiny side down. Wet your hands before handling rice to avoid stickiness. Spread sushi rice evenly, leaving space at the top. Add your veggies in a line across the rice. Tightly roll away from you, using the mat to shape it. Keep the roll firm but not too tight. This way, you keep all the fillings inside. To keep nori fresh, store it in an airtight container. Avoid moisture, as it can make nori soggy. Use nori quickly after opening the package. If you notice it getting soft, try toasting it lightly. Just pass it over a flame for a few seconds. This brings back some crispness. Always keep the nori in a cool, dry place. Dipping sauces can elevate your sushi experience. Soy sauce is the classic choice. It adds a salty flavor that pairs well with veggies. You can mix soy sauce with wasabi for some heat. Another great option is a sesame sauce. This adds a nutty twist. For a refreshing touch, try a ponzu sauce. It is made with citrus juice and soy sauce. Don’t forget to serve pickled ginger on the side. It cleanses your palate between bites. {{image_4}} You can make these sushi rolls unique by adding different vegetables. Try using radishes, zucchini, or sweet potatoes. Each veggie adds new colors and flavors. For example, add thin strips of purple cabbage for crunch and vibrant color. You can also include pickled vegetables for a tangy twist. The key is to slice the veggies thinly. This ensures they fit well in the roll and enhance the taste. Adding protein can make your sushi rolls more filling. Tofu is a great choice for vegetarians. Simply slice it into thin strips and marinate it in soy sauce. This adds flavor and texture. If you enjoy seafood, crab meat works well too. You can use real crab or imitation crab. Both options blend nicely with the veggies. Just be sure to chop the protein into bite-sized pieces for easy rolling. While sushi rice is traditional, you can experiment with other types. Brown rice gives a nuttier flavor and adds fiber. Quinoa is another healthy choice. It’s packed with nutrients and has a unique taste. You can also try cauliflower rice for a low-carb option. Just make sure to season it well, as it has a milder flavor. This will keep your rolls tasty and satisfying. For the full experience, check out the Full Recipe to see how to perfectly prepare each type of rice. To keep your leftover sushi rolls fresh, wrap them tightly in plastic wrap. This keeps the nori from getting too soft. You can also place them in an airtight container. Avoid stacking the rolls to prevent them from squishing. I like to eat the sushi rolls cold. The fresh taste of the veggies shines that way. If you prefer warm sushi, use a microwave. Heat them for about 10-15 seconds. Be careful not to overheat, as this can make the rice dry. Store your sushi rolls in the fridge for up to two days. After that, the nori may lose its crispness. If you see any signs of spoilage, like an off smell, throw them away. For best taste, enjoy them fresh from the kitchen. You can find the full recipe for Rainbow Veggie Sushi Rolls [here](#). To make vegan Rainbow Veggie Sushi Rolls, start by preparing sushi rice. Rinse 1 cup of sushi rice under cold water until the water runs clear. Cook it with 1 1/4 cups of water in a pot. Once cooked, season the rice with a mixture of rice vinegar, sugar, and salt. Next, place a sheet of nori on a bamboo mat. Spread the rice over two-thirds of the nori, leaving the top edge bare. Add strips of vegetables like cucumber, carrot, and bell pepper. Roll it up tightly and seal the edge with water. Cut the roll into pieces and serve. Yes, you can use brown rice instead of sushi rice. Brown rice adds a nutty flavor and more fiber. However, it has a different texture. Cook it longer and add a bit more water. You may also need to adjust the seasoning to suit its flavor. The best way to cut sushi rolls is with a sharp, wet knife. Wetting the knife prevents the rice from sticking. Cut the roll into 6 to 8 pieces with a gentle, downward motion. Wipe the knife between cuts to keep edges clean. This method keeps your rolls looking neat and pretty. Sushi rolls stay fresh for about 24 hours if stored properly. Keep them in an airtight container in the fridge. The nori may soften, but the filling should remain fresh. For the best taste, enjoy them within the same day they are made. If you need a substitute for nori, try soy paper or rice paper. Soy paper is thicker and adds a unique flavor. Rice paper works well too but requires dampening before use. You can also wrap sushi in lettuce leaves for a fresh twist. Yes, you can make Rainbow Veggie Sushi Rolls ahead of time. Prepare them a few hours before serving. Store them in the fridge with a damp cloth over them to keep them moist. However, for the best taste, serve them fresh when you can. For the complete recipe, check out the Full Recipe. Making rainbow veggie sushi rolls is fun and easy. You learned about key ingredients, sushi rice tips, and step-by-step prep. The right techniques help you roll, cut, and serve sushi perfectly. Plus, you can customize your rolls with different veggies or proteins. Storing your leftovers is simple too. Now it’s time for you to try it. Enjoy the process, get creative, and share your tasty creations!

Rainbow Veggie Sushi Rolls Flavorful and Healthy Dish

Dive into the colorful world of Rainbow Veggie Sushi Rolls! This dish is not only vibrant and fun, but it’s

To make coconut lime rice, you'll need the following ingredients: - 1 cup jasmine rice - 1 can (13.5 oz) coconut milk - 1 cup water - 1 tablespoon lime zest - 2 tablespoons fresh lime juice - 1 teaspoon sugar (optional) - ½ teaspoon salt - Fresh cilantro, chopped (for garnish) - Lime wedges (for serving) Choosing the right ingredients makes a big difference. Use high-quality jasmine rice for the best texture. Look for coconut milk that is creamy and rich. This adds a nice flavor to the rice. Fresh limes are key for bright taste. Always buy limes that feel heavy for their size; these are juicier. When it comes to cilantro, fresh is best. Dried herbs just won't give the same punch. If you can’t find jasmine rice, you can use basmati rice instead. It has a nice aroma and cooks well. For a dairy-free option, use a coconut cream instead of coconut milk for a richer taste. If you don't have fresh limes, lime juice in a bottle will work, but fresh is always better. You can skip the sugar if you prefer no sweetness. Just remember to adjust the salt to keep the flavor balanced. To start, rinse the jasmine rice well under cold water. Keep rinsing until the water runs clear. This step is key to fluffy rice. Next, gather your ingredients. You will need one cup of jasmine rice, one can of coconut milk, one cup of water, one tablespoon of lime zest, and two tablespoons of fresh lime juice. Also, have one teaspoon of sugar and half a teaspoon of salt ready. For garnish, chop fresh cilantro and have some lime wedges on hand. In a medium saucepan, mix the rinsed rice with coconut milk, water, salt, and sugar if you choose. Stir gently to combine everything well. Place the saucepan over medium-high heat and bring it to a boil. When it bubbles, reduce the heat to the lowest setting. Cover the saucepan tightly and let it simmer for about 15 minutes. This allows the rice to absorb all the liquid. Once done, remove it from heat but leave the lid on for another 10 minutes. This resting period makes the rice even fluffier. After resting, fluff the rice with a fork to separate the grains. Now, fold in the lime zest and fresh lime juice gently. Taste the rice to see if it needs more salt or lime juice. Serve the coconut lime rice warm. Garnish with cilantro and add lime wedges for a fresh touch. This dish pairs well with grilled chicken or fish and adds a tropical flair to any meal. For the complete recipe, refer to the Full Recipe section. One mistake is not rinsing the rice. Rinsing removes extra starch and makes the rice fluffy. Another error is using too much heat while cooking. This can burn the rice or make it sticky. Keep the heat low once it boils. Also, don’t skip the resting time after cooking. Letting it sit helps the rice absorb flavors better. To get the best texture, use jasmine rice. It has a lovely aroma and a soft bite. Make sure to measure the liquid carefully. The right ratio of coconut milk and water is key. If you want creamier rice, add more coconut milk. If it’s too wet, cook it without the lid for a few minutes. You can add other ingredients to spice things up. For a tropical twist, mix in some diced pineapple. If you like heat, toss in a pinch of chili flakes. Adding fresh herbs like mint can also brighten the dish. For a savory note, try a squeeze of fish sauce. These options can elevate your coconut lime rice to a new level. For the full recipe, check out the sections above. {{image_4}} You can take coconut lime rice to new heights with fun flavors. Add pineapple for a sweet twist. Just mix in small chunks of fresh pineapple after cooking. This brightens the dish and adds a tropical flair. You can also try adding spices. A pinch of cumin gives a warm taste. If you like heat, add a bit of chili powder. For a fresh note, toss in some green onions or even a dash of ginger. Each of these options will change the dish and make it even more exciting! Coconut lime rice is easy to adjust for different diets. To make it vegan, just stick to the basic recipe. Use only coconut milk and water. You won’t need any animal products. It is already gluten-free too! Always check your coconut milk brand for gluten. Some brands might add gluten during processing. This dish can fit into many diets without much change. Coconut lime rice pairs well with many main dishes. It goes great with grilled chicken or shrimp. The light flavors complement the rich taste of the meat. You can also serve it alongside fish tacos for a fun dinner. If you want a vegetarian option, try it with black beans and veggies. This adds a colorful and healthy touch to your plate. The Full Recipe for coconut lime rice is versatile, so feel free to mix and match! To store leftover coconut lime rice, let it cool first. Place it in an airtight container. This keeps moisture in and prevents drying out. Make sure to seal it well. Label the container with the date. This helps you keep track of freshness. When you want to reheat the rice, add a splash of water. This helps restore moisture. You can use a microwave or stovetop. For the microwave, heat it in short bursts. Stir it in between to ensure even warming. On the stovetop, use low heat and stir often. Coconut lime rice lasts about four days in the fridge. If you want to keep it longer, freeze it. It can stay in the freezer for up to three months. When freezing, use a freezer-safe container. Make sure to leave some space for expansion. When you’re ready to eat, thaw it in the fridge overnight. Then, reheat as mentioned before. Enjoy your delicious coconut lime rice anytime! To make Coconut Lime Rice vegan, simply use coconut milk. The main ingredient is already vegan. Ensure you skip any non-vegan toppings. You can add extra veggies, like peas or bell peppers, for more flavor and nutrients. Yes, you can use brown rice instead of jasmine rice. Brown rice has a nuttier flavor and takes longer to cook. Adjust your water and cooking time. Use about 1 ½ cups of water for 1 cup of brown rice. Cook for about 40-45 minutes instead of 15. Coconut Lime Rice pairs well with many dishes. Here are some great options: - Grilled chicken or shrimp - Spicy curry - Tacos or burritos - Stir-fried vegetables - Black bean salad These dishes complement the rice's creamy and zesty flavor. Enjoy this tasty side with your favorite main meals! You can check the Full Recipe for detailed cooking steps. This blog post covered every important detail for making Coconut Lime Rice. You learned about the best ingredients, preparation steps, and cooking tips. We also discussed storage options and common FAQs. By applying these ideas, you can make a tasty dish that suits your needs. Enjoy experimenting with flavors and variations to create your perfect Coconut Lime Rice. Happy cooking!

Coconut Lime Rice Flavorful and Easy Side Dish

Are you ready to brighten your meals? Coconut Lime Rice is a delicious side dish that adds a tropical twist

Older posts
Newer posts
← Previous Page1 … Page54 Page55 Page56 … Page66 Next →

dsad

© 2025 recipesstation • Built with GeneratePress

Our Policies

  • Copyright Policy
  • Cookie Policy
  • GDPR Policy
  • Privacy Policy
  • Disclaimer
  • Terms Of Use

More Information

  • Home
  • About
  • Contact
  • Appetizers
  • Dessert
  • Dinner
  • Drinks
©2025, recipesstation About Back To Top