Skip to content
DisclaimerTerms Of UseGDPR PolicyCookie Policy

recipesstation

  • Home
  • Drinks
  • Appetizers
  • Dinner
  • Dessert
  • About
  • Contact
  • Privacy Policy
DisclaimerTerms Of UseGDPR PolicyCookie Policy

Emily

For my healthy spinach and feta wraps, I gather the following ingredients: - 4 large whole wheat tortillas - 2 cups fresh spinach, thoroughly washed and roughly chopped - 1 cup feta cheese, crumbled - 1 medium cucumber, finely diced - 1 medium carrot, grated - 1/4 of a red onion, thinly sliced - 1/2 cup hummus, either store-bought or homemade - 1 tablespoon extra virgin olive oil - 1 tablespoon freshly squeezed lemon juice - Salt and freshly cracked pepper to taste - Fresh dill for garnish (optional) These wraps are not just tasty; they are also good for you. Each wrap provides a healthy dose of fiber from the whole wheat tortillas and spinach. The feta cheese adds protein and calcium. Spinach is rich in vitamins A, C, and K. Cucumber and carrot bring hydration and crunch. Overall, these wraps are low in calories yet high in nutrients, making them a great choice for a light meal. You can enhance your wraps with some simple garnishes. Try fresh dill for a pop of flavor and color. You could also add a squeeze of lemon juice on top or serve with a side of yogurt dip. If you want more crunch, slice some radishes and sprinkle them on. These little touches will make your meal even better! To start, gather a small bowl and your ingredients. Combine 1 tablespoon of extra virgin olive oil, 1 tablespoon of freshly squeezed lemon juice, salt, and pepper. Whisk these ingredients together until they blend smoothly. This dressing adds flavor and ties the whole wrap together. Set it aside for now. Next, take a large mixing bowl and add 2 cups of fresh spinach, chopped roughly. Then, add 1 medium cucumber, diced finely. Grate 1 medium carrot and slice 1/4 of a red onion thinly. Toss all these vegetables gently. This helps mix the colors and flavors nicely. Now, it’s time to put everything together. Take one large whole wheat tortilla and spread about 2 tablespoons of hummus on it. Leave an inch of space around the edges. In the center, add a scoop of your mixed vegetables and feta cheese. Make sure not to overfill for easy wrapping. Fold in the sides and roll from the bottom to the top. Repeat this with the rest of the tortillas. For a lovely touch, cut each wrap in half diagonally and arrange them on a platter. If you like, sprinkle some fresh dill on top for extra flair. You can find the complete preparation in the Full Recipe. To keep your spinach and feta wraps fresh, start with quality ingredients. Use fresh spinach and crumbled feta, as they make a big difference. Wash the spinach well to remove dirt and grit. Store any leftover wraps in an airtight container. This keeps them crisp and tasty for later. One common mistake is overfilling the wraps. This makes them hard to roll. Aim for a good balance of filling. Also, avoid using soggy tortillas. They can tear easily and make a mess. Lastly, don’t forget to season your filling. A little salt and pepper can enhance the flavors. Serve these wraps with a side of fresh fruit or a light salad. This adds color and nutrients to your meal. You can also slice the wraps into pinwheels for a fun twist. For dips, try yogurt or a creamy dressing. These add extra flavor and make your meal more exciting. For the full recipe, check out the detailed instructions above. {{image_4}} You can easily add proteins to your spinach and feta wraps. Grilled chicken or turkey slices work great. These proteins add flavor and make the wraps heartier. Simply cook the meat, slice it thin, and layer it with the filling. This change makes a filling meal for lunch or dinner. If you want a vegan option, you can skip the feta cheese. Instead, use avocado for creaminess. You can also add chickpeas for protein and texture. These swaps keep the wrap tasty and satisfying. With fresh veggies and a creamy spread, it stays delicious and healthy. Spice can enhance your wraps. Consider adding spices like cumin or paprika for warmth. Fresh herbs like basil or cilantro can also brighten the flavors. If you like heat, a few red pepper flakes will do the trick. Experiment with different spices to find your favorite mix. These tweaks keep your meal exciting and fresh every time. For the complete recipe, check the [Full Recipe]. To keep your Healthy Spinach and Feta Wraps fresh, wrap them tightly in plastic wrap or foil. This helps avoid air exposure, which can make them soggy. Store them in an airtight container in the fridge. If you have leftover filling, store it separately in a sealed container. You can make these wraps in advance. Prepare the filling and store it in the fridge. When you are ready to eat, spread the hummus on the tortillas and add the filling. This keeps the wraps fresh and prevents them from getting soggy. You can also pre-assemble the wraps and store them for quick meals. Most of the ingredients for these wraps last well in the fridge. Spinach stays fresh for about 5-7 days, while feta cheese can last 1-2 weeks. Tortillas usually last for a month if unopened. Keep an eye on your ingredients to ensure they remain fresh and tasty. To make Healthy Spinach and Feta Wraps, start by mixing your veggies. You need spinach, cucumber, carrot, and red onion. Toss these in a bowl. Next, add crumbled feta cheese and mix gently. Make a dressing with olive oil, lemon juice, salt, and pepper. Drizzle this over the veggie mix. Spread hummus on whole wheat tortillas and add the filling. Fold and roll each wrap tightly. For a nice touch, cut them in half and serve. Check the Full Recipe for all details. Yes, you can make these wraps ahead of time. They stay fresh in the fridge for up to two days. Just wrap them tightly in plastic or foil. To keep the tortillas from getting soggy, store the dressing separately. When ready to eat, drizzle the dressing on just before serving. If you want to substitute feta cheese, try goat cheese or ricotta. Both give a nice creamy texture. For a dairy-free option, use tofu that has been crumbled and seasoned. Nutritional yeast can also add a cheesy flavor without dairy. These wraps are great for meal prepping! They are easy to prepare in bulk. Just remember to keep the dressing separate to maintain freshness. You can pack them for lunch or a quick snack. They are healthy and will keep you satisfied. In this article, we covered how to make healthy spinach and feta wraps. We discussed the ingredients, step-by-step instructions, and helpful tips. You can add proteins or try vegan options for variety. Proper storage is key for freshness. Lastly, I answered common questions about prep and substitutions. With these tips, you can create tasty wraps that impress. Enjoy making and sharing your delicious wraps!

Healthy Spinach and Feta Wraps Light and Tasty Meal

Looking for a light and tasty meal that packs a nutritious punch? You’ve found it! These Healthy Spinach and Feta

Here’s what you need for a delightful Dark Chocolate Pumpkin Tart. - Essential ingredients for the crust - 1 ½ cups graham cracker crumbs - ½ cup unsweetened cocoa powder - ½ cup unsalted butter, melted - 3 tablespoons granulated sugar - Key components for the filling - 1 (15-ounce) can pumpkin puree - 1 cup heavy cream - ½ cup packed brown sugar - ½ teaspoon pure vanilla extract - 1 teaspoon pumpkin pie spice - 1 cup dark chocolate chips (60% cacao or higher) - 2 large eggs - Optional toppings and garnishes - Whipped cream (for serving) - Cocoa powder (for dusting) This list gives you everything to create a rich and creamy experience. Each ingredient plays a key role in flavor and texture. The graham cracker crust adds crunch, while the dark chocolate and pumpkin filling bursts with flavor. Don't forget the whipped cream on top for that perfect finish! If you want the full recipe, check it out in detail! To make the crust, start by mixing graham cracker crumbs and cocoa powder in a bowl. Next, add melted butter and sugar. Stir until everything blends well. The mixture should look like wet sand. Now, press this mix into a 9-inch tart pan. Make sure to cover the bottom and sides evenly. Use your fingers or the base of a glass to pack it down. Bake the crust in a preheated oven at 350°F (175°C) for 10 minutes. This gives it a nice, firm texture. Once done, let it cool on a wire rack for a few minutes. In a large bowl, whisk pumpkin puree and heavy cream until smooth. Then, add brown sugar, vanilla extract, pumpkin pie spice, and eggs. Mix well to combine all the flavors. For the chocolate, use a microwave-safe bowl. Add dark chocolate chips and heat them in 30-second bursts. Stir between each burst until the chocolate melts and is smooth. Slowly pour this melted chocolate into the pumpkin mixture. Whisk continuously to mix them evenly. This step makes the filling creamy and rich. Now, pour the chocolate-pumpkin filling into your cooled crust. Use a spatula to smooth the top. Return the tart to the oven and bake it for 40 to 45 minutes. Look for the edges to be set while the center is still a bit jiggly. After baking, let the tart cool at room temperature for 30 minutes. Then, transfer it to the fridge for at least 2 hours. This chilling time helps the filling set perfectly. For the full recipe, refer to the complete instructions provided earlier. To achieve a velvety filling, mix the pumpkin and cream well. The key is to whisk until smooth. If the filling has lumps, it won't set right. Use a good quality dark chocolate for a creamy finish. Chilling the tart is very important. After baking, let it cool at room temperature for 30 minutes. Then, move it to the fridge for at least 2 hours. This helps the filling set and improves the taste. You can boost the flavor with extra spices. Try adding a pinch of nutmeg or cardamom. These spices pair well with pumpkin and chocolate. You could also add a splash of orange zest for a fresh twist. Balancing flavors is key. The rich chocolate needs the sweetness of pumpkin. Adjust the sugar in the filling if you prefer it sweeter. Remember, you want both flavors to shine through. If you want alternatives to whipped cream, consider using mascarpone cheese or crème fraîche. Both add a nice tang that enhances the tart’s richness. For plating, slice the tart into elegant wedges. Dust cocoa powder on top for a beautiful finish. You could also drizzle caramel or chocolate sauce for extra flair. A decorative platter will make your tart look even more inviting. For the Full Recipe, check out the details on how to make this delightful dessert! {{image_4}} You can change the crust to fit your needs. If you want a gluten-free option, use gluten-free crumbs. They work just as well as regular graham crackers. Mix the gluten-free crumbs with cocoa and butter, just like the recipe says. If you love cookies, try a cookie-based crust. Use crushed chocolate cookies or even gingersnaps for a fun twist. The flavors will add a new layer to your tart. Just remember to follow the same steps for pressing the crust into the pan. You can make the filling even more exciting. Try adding different spices like nutmeg or ginger for warmth. If you want a kick, a splash of liqueur like rum or bourbon can enhance the taste. You can also combine different types of chocolate. Milk chocolate adds sweetness, while white chocolate gives a creamier texture. Mix them with dark chocolate for a unique taste. Make sure to melt them properly before adding to the pumpkin mixture. Seasonal ingredients can make your tart shine. In fall, add fresh apples or pears for a fruity touch. In winter, sprinkle some crushed peppermint for a festive vibe. For decoration, think outside the box! Use colorful sprinkles or edible gold dust to make your tart pop. You can also drizzle caramel or chocolate on top for a sweet finish. These small changes can impress your guests and make your tart special. For the full recipe, check out the details provided. To keep your Dark Chocolate Pumpkin Tart fresh, proper storage is key. First, let the tart cool completely at room temperature. After it cools, cover it with plastic wrap or foil. This will help prevent it from drying out. Store it in the fridge for up to five days. If you want to keep it longer, you can freeze it. For freezing, wrap the tart tightly in plastic wrap, then in aluminum foil. This double-layer helps prevent freezer burn. The tart can last in the freezer for up to three months. Just remember to label it with the date! If you want to enjoy the tart warm, reheating is easy. Preheat your oven to 350°F (175°C). Place the tart on a baking sheet. Cover it loosely with aluminum foil to avoid over-baking. Heat for about 10-15 minutes. This method keeps the texture nice and creamy. Avoid using the microwave, as it can make the filling rubbery. If you prefer, you can serve it cold right from the fridge. Topping it with whipped cream adds a fresh touch! For the full recipe, check out the details above. Enjoy your delicious tart! You can tell when your tart is ready by looking at the filling. The edges should be firm, while the center remains a bit jiggly. This jiggle shows that it will set as it cools. Cooling the tart is very important. Let it rest at room temperature for about 30 minutes before moving it to the fridge. This helps the filling firm up nicely. Yes, you can make the tart ahead of time. I recommend preparing it a day before serving. Once baked and cooled, wrap it tightly and place it in the fridge. It will stay fresh for up to three days. Just remember to add whipped cream and cocoa dust just before serving. If you can't find pumpkin puree, you have some options. You can use butternut squash puree or sweet potato puree instead. Both of these will give you a similar flavor and texture. You may need to adjust the sweetness a bit. Taste the filling before baking to make sure it is to your liking. This blog post explored making a delicious chocolate pumpkin tart. We covered essential ingredients for a great crust and filling, along with tips for perfecting texture and flavor. I shared storage advice and answered common questions. Keep experimenting with variations and toppings to make your tart unique. Each twist can add fun and flavor. Enjoy the process, and remember, practice makes perfect!

Dark Chocolate Pumpkin Tart Rich and Creamy Delight

Are you ready to treat yourself to a dessert that blends rich dark chocolate with creamy pumpkin? My Dark Chocolate

- 1 pound chicken tenderloins - 1 cup buttermilk - 1 teaspoon garlic powder - 1 teaspoon onion powder - 1 teaspoon dried oregano - 1 teaspoon dried thyme - 1 teaspoon paprika - Salt and pepper to taste These main ingredients are key to getting the flavor just right. The chicken tenderloins are juicy and cook quickly. The buttermilk makes the chicken tender and adds a nice tang. Garlic powder and onion powder deepen the flavor. The dried herbs, oregano, thyme, and paprika, bring a taste of Greece to the dish. Don’t forget the salt and pepper. They enhance all the flavors. - 1 cup all-purpose flour - 1 cup panko breadcrumbs - 1/2 cup feta cheese, crumbled - 1/4 cup fresh parsley, finely chopped The breading is where the crunch comes from. All-purpose flour helps the chicken stick. Panko breadcrumbs add a great crispiness. Feta cheese gives a salty flavor, while parsley adds freshness. This mix makes each bite a delight. - Olive oil for frying - Salt and pepper to taste Using olive oil is essential for frying. It has a high smoke point and adds a nice flavor. Salt and pepper are the final touches that make everything pop. Use them to taste for a perfect balance. For the full recipe, check out the detailed instructions above. To start, you need the marinade. In a medium bowl, mix the buttermilk, garlic powder, onion powder, oregano, thyme, paprika, salt, and pepper. Whisk until smooth. This mix adds flavor and moisture. Next, add the chicken tenderloins. Make sure each piece gets coated well. Cover the bowl with plastic wrap. Place it in the fridge for at least 1 hour. For best results, marinate overnight. This time allows the flavors to soak into the chicken. Now, it’s time for the breading station. You need three shallow bowls. In the first bowl, place the flour. In the second bowl, pour the remaining buttermilk mixture. In the third bowl, combine panko breadcrumbs, crumbled feta, and parsley. This mixture gives a tasty crunch. Proper coating is key for crispy chicken. Make sure to coat each tender evenly in flour, then buttermilk, and finally, the breadcrumb mix. This step ensures every bite is flavorful. For cooking, grab a large skillet. Heat a generous amount of olive oil over medium-high heat. You’ll know the oil is ready when it shimmers. Carefully add the chicken tenders in small batches. Avoid overcrowding the pan. Fry each tender for 4-5 minutes on each side. Look for a golden brown color. This shows they are cooked through. Use tongs to move the cooked tenders to a plate lined with paper towels. This absorbs extra oil, keeping them crispy. For the full recipe, check the detailed instructions. - Choosing the right oil: Use olive oil for frying. It adds flavor and helps achieve a golden color. Other oils, like canola or vegetable oil, work too, but they may lack flavor. - Temperature tips for frying: Heat the oil to medium-high. This keeps the tenders from soaking in oil. If the oil is too hot, they may burn. If it's too cool, they will become soggy. - Additional herbs and spices to consider: Try adding lemon zest or dill for a fresh twist. You can also use smoked paprika for a deeper flavor. - Importance of marinating time: Marinate the chicken for at least one hour. This helps the spices soak in and gives the tenders a richer taste. For more flavor, leave them overnight. - Complementary sides for a complete meal: Serve these tenders with a Greek salad or roasted vegetables. A side of tzatziki sauce makes a great dip too. - Garnishing ideas for presentation: Sprinkle extra parsley on top before serving. A wedge of lemon adds a nice touch and color. For more details and the complete recipe, check the Full Recipe section. {{image_4}} You can change the flavor of your crispy Greek chicken tenders easily. Try adding Mediterranean herbs like basil or rosemary. These herbs will give your dish a fresh taste. You can also add chili flakes for some heat. If you like spice, this simple twist can make your meal exciting. Baking is a great option if you want a healthier meal. Preheat your oven to 400°F. Place the coated chicken tenders on a baking sheet. Spray them lightly with cooking oil. Bake for about 20 minutes, flipping halfway through. For crispy results, use an air fryer. Set it to 375°F and cook for about 10-12 minutes. This method gives you a crunchy outside without deep frying. These chicken tenders are not just a meal; they can be a snack too. Turn them into wraps with lettuce, tomatoes, and your favorite sauce. You can also chop them up and add them to salads for extra protein. If you have leftovers, use them in sandwiches or pasta dishes. This way, you can enjoy the tenders in different ways throughout the week. For the full recipe, check out the [Full Recipe] section! To keep your crispy Greek chicken tenders fresh, follow these tips: - Place leftover tenders in an airtight container. - Store them in the fridge for up to 3 days. - Ensure the tenders cool down before sealing the container. When you want to enjoy leftovers, reheating is key. Here are some methods: - Use an oven at 350°F. Bake for about 10-15 minutes. - For a quick method, use a skillet over medium heat. Heat for 3-5 minutes. - To freeze, wrap tenders in foil or freezer bags. They last up to 3 months. Fresh ingredients make a big difference. Here’s how to store them: - Keep chicken in the coldest part of the fridge. Use it within 2 days if not frozen. - Store dry ingredients like flour in a cool, dry place. Seal tightly to prevent moisture. - Check expiration dates on spices and replace old ones to ensure flavor. For the complete process, don’t forget to check the Full Recipe for guidance. To get crispy chicken tenders, follow these steps: - Use panko breadcrumbs for extra crunch. - Make sure the oil is hot before adding the chicken. - Fry in small batches to avoid steaming. - Let cooked tenders rest on paper towels to drain excess oil. Each step helps create a golden, crunchy layer on the outside. Yes, you can easily make this recipe gluten-free. Use gluten-free flour and gluten-free breadcrumbs instead of regular ones. This way, you can enjoy the same crispy texture without gluten. Pair these tenders with various tasty sauces: - Tzatziki sauce for a classic Greek touch. - Honey mustard for a sweet and tangy flavor. - Spicy yogurt sauce for a kick of heat. These sauces add fun flavors to your meal. To adjust the recipe for more servings, simply increase the amount of chicken and other ingredients. For every additional pound of chicken, add the same amount of marinade and breading ingredients. This keeps the flavors balanced. While buttermilk adds flavor and tenderness, you can use substitutes. Try plain yogurt or a milk-lemon juice mix. These options still provide some acidity and moisture, giving you tasty chicken without buttermilk. For the full recipe, check the details above. This blog post covers how to make crispy Greek chicken tenders. You learned about the key ingredients, like chicken, buttermilk, and spices. I explained how to marinate chicken, set up a breading station, and fry the tenders. Tips for perfect crispiness and flavor enhancements are also shared. You can even explore variations and storage advice. Enjoy making these tenders, whether as a meal or snack!

Crispy Greek Chicken Tenders Flavorful and Easy Recipe

If you’re craving a tasty, crunchy treat, my Crispy Greek Chicken Tenders recipe is just what you need. Made with

To make honey garlic butter carrots, gather these simple items: - 1 lb baby carrots, peeled - 2 tablespoons unsalted butter - 3 tablespoons honey - 3 cloves garlic, minced - 1 tablespoon soy sauce (or tamari for gluten-free) - Salt and pepper to taste - Fresh parsley or chives, chopped, for garnish These ingredients blend together to create a sweet and savory dish that pleases everyone. You can swap out some ingredients if needed: - Use olive oil instead of butter for a dairy-free option. - Maple syrup can replace honey for a vegan choice. - Garlic powder works if you don’t have fresh garlic. - Coconut aminos can stand in for soy sauce. These substitutes keep the flavor strong while meeting your dietary needs. Each ingredient in this dish brings its own health perks: - Carrots: Rich in vitamins A and K, great for your eyes and skin. - Butter: Provides healthy fats that support brain health. - Honey: Natural sweetener with antioxidants that may boost health. - Garlic: Known for its immune benefits and heart health support. - Soy Sauce: Adds umami flavor while packing protein and minerals. - Parsley: Loaded with vitamins C and K, it helps with digestion. Including these ingredients not only enhances taste but also boosts nutrition in your meals. To make honey garlic butter carrots, follow these simple steps: 1. Prep the Carrots: Wash and peel the baby carrots. This step brings out their natural sweetness. 2. Melt the Butter: Heat a large skillet over medium heat. Add the unsalted butter and let it melt completely. This creates a rich base for your sauce. 3. Sauté the Garlic: Add minced garlic to the melted butter. Stir for about one minute until it smells fragrant. Be careful not to brown the garlic. 4. Add Honey and Soy Sauce: Pour in the honey and soy sauce. Stir well to mix everything into a smooth sauce. 5. Coat the Carrots: Add the peeled baby carrots to the skillet. Toss them gently in the sauce until well coated. 6. Steam the Carrots: Cover the skillet with a lid. Let the carrots steam for 5-7 minutes. Check if they are tender but still crisp. 7. Finish Cooking: Remove the lid and season with salt and pepper. Cook for another 2-3 minutes to let the sauce thicken. 8. Prepare for Serving: Take the skillet off the heat. Transfer the glazed carrots to a serving dish, ensuring they are covered in sauce. 9. Garnish: Sprinkle fresh chopped parsley or chives on top for a pop of color and flavor. - Choose Fresh Carrots: Select vibrant, firm baby carrots for the best taste. - Adjust Cooking Time: If you prefer softer carrots, steam them a little longer. Just keep an eye on them to maintain some crunch. - Taste as You Go: Always taste and adjust the seasoning. A little extra salt or pepper can enhance the flavor. A visual guide can help you master these steps. Watch videos that show how to sauté garlic without burning it. Look for clips that demonstrate how to coat carrots evenly in sauce. These resources can enhance your cooking skills and boost your confidence in the kitchen. For a complete guide, check out the Full Recipe. To make honey garlic butter carrots pop, think about adding fresh herbs. You can use thyme or rosemary for a nice herbal note. A splash of lemon juice at the end brightens the dish too. Experiment with spices like paprika or a hint of chili for warmth. Peel and wash the carrots ahead of time. You can do this the night before. If you choose baby carrots, skip peeling. They save time and still taste great. Use a microwave to steam them quickly if you’re in a rush. Just toss them in a bowl with a little water and cover it. Don’t overcook the carrots. They should be tender but still have a slight crunch. If the garlic browns, it turns bitter. Keep an eye on it while cooking. Lastly, don’t skip seasoning. Salt and pepper bring out all the flavors. For the full recipe, check the honey garlic butter carrots section. {{image_4}} You can swap honey for other sweeteners. Maple syrup works well. Agave nectar is another option. Each sweetener brings its unique taste. You might find maple syrup adds a warm, earthy flavor. If you choose agave nectar, it will give a milder sweetness. Adjust the amount to your liking. Want to kick up your dish? Add in some herbs or spices. Fresh thyme or rosemary can enhance the taste. A pinch of red pepper flakes adds spice. You can also mix in a splash of lemon juice for brightness. Don’t forget toasted nuts for crunch! Pecans or walnuts pair nicely with the carrots. Making this dish vegan is simple. Swap butter for a plant-based alternative. Use coconut oil or vegan butter. For gluten-free options, ensure your soy sauce is gluten-free. Tamari is a great choice. The dish remains just as tasty with these swaps. You'll enjoy the same sweet and savory flavors! For the full recipe, check out the Honey Garlic Butter Carrots recipe above. Store your honey garlic butter carrots in an airtight container. This keeps them fresh and tasty. Let the carrots cool down before sealing them. Always refrigerate leftovers within two hours of cooking. You can layer the carrots with parchment paper to prevent sticking. Reheat your carrots gently to keep them tender. Use a microwave for quick reheating. Place the carrots in a microwave-safe dish, cover, and heat for about one minute. Stir halfway through to ensure even heating. You can also reheat them in a skillet on low heat. Add a bit of water to keep them moist while warming. When stored properly, honey garlic butter carrots last up to five days in the fridge. Check for any signs of spoilage before eating. If they look or smell off, it's best to throw them away. For longer storage, consider freezing them, but keep in mind they may lose some texture. Enjoy these delicious carrots again by following the full recipe! To make honey garlic butter carrots, gather your ingredients first. You need baby carrots, butter, honey, garlic, soy sauce, salt, and pepper. Start by washing and peeling the carrots. Melt the butter in a skillet over medium heat. Next, sauté minced garlic for about a minute. Then, mix in honey and soy sauce. Add the carrots and toss them in the sauce. Cover the skillet and steam for about five to seven minutes. Finally, season with salt and pepper, and garnish with parsley or chives. You can find the Full Recipe to guide you through each step. Yes, you can use other vegetables! Think about green beans, broccoli, or even sweet potatoes. Each vegetable will bring a new flavor and texture. Just keep in mind that cooking times may vary. For example, sweet potatoes take longer to cook than baby carrots. Adjust your steaming time so everything cooks evenly. Honey garlic butter carrots pair well with many dishes. Serve them alongside roasted chicken or grilled fish for a balanced meal. They also complement rice or quinoa nicely. For a hearty option, try them with a beef or pork roast. Adding a fresh salad can brighten up your plate too. Mix and match to find your favorite combinations! This blog covers how to make honey garlic butter carrots. We discussed the key ingredients and their health benefits. I shared step-by-step cooking tips and how to enhance their flavor. To save time, I provided quick prep tricks and discussed common mistakes to avoid. We also explored variations with sweeteners and add-ins, plus storage tips for leftovers. Now, you can create tasty carrots that impress everyone. Enjoy cooking and experimenting in the kitchen!

Honey Garlic Butter Carrots Flavorful Side Dish Recipe

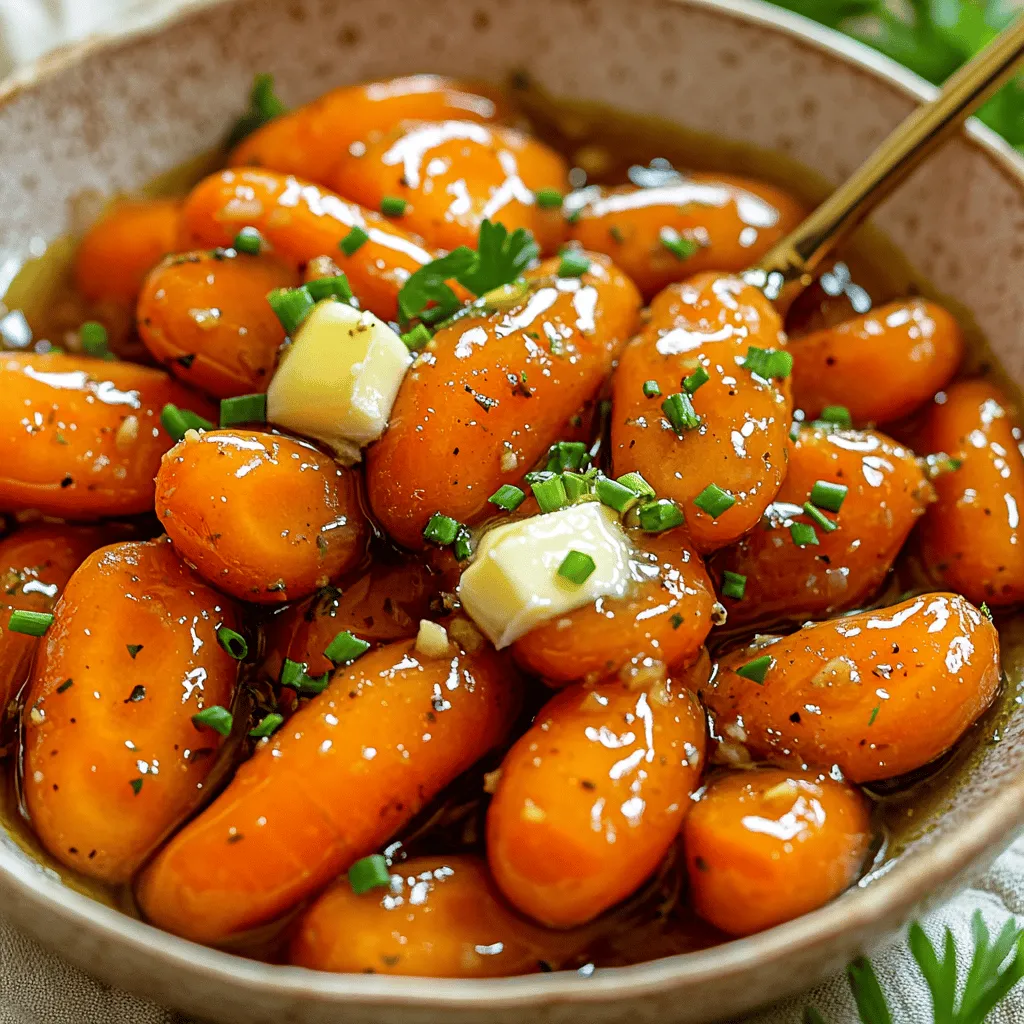
Looking for a tasty side dish that will impress your family and friends? Honey Garlic Butter Carrots are the answer!

For this dish, you need simple and fresh items. Here’s what you will need: - 1 medium head of cauliflower, cut into bite-sized florets - 1 cup cornstarch - 2 teaspoons garlic powder - 1 teaspoon ginger powder - ½ teaspoon salt - ½ teaspoon black pepper - ½ cup vegetable oil (for frying) - 2 tablespoons soy sauce - 2 tablespoons rice vinegar - 2 tablespoons honey or agave syrup - 1 tablespoon sesame oil - 2 cloves garlic, minced - ½ teaspoon crushed red pepper flakes These ingredients work together to create a crispy and flavorful dish. The spices are key to building flavor. I recommend: - Garlic powder: Adds a nice depth. - Ginger powder: Brings warmth and zest. - Crushed red pepper flakes: For a kick of heat. - Soy sauce: Gives that savory umami flavor. - Rice vinegar: Balances the sweetness. - Sesame oil: Adds a nutty aroma. These spices and sauces transform simple cauliflower into a tasty dish. Garnishes can elevate your dish. For General Tso's Cauliflower, consider: - 2 green onions, finely chopped - Sesame seeds These garnishes add color and texture, making your meal pop! For the complete cooking method, check the Full Recipe. First, get your cauliflower head and cut it into bite-sized florets. You want them small enough to cook quickly. In a large bowl, mix the cornstarch, garlic powder, ginger powder, salt, and black pepper. This mix gives the cauliflower a nice flavor and crunch. Toss the florets in the bowl until each piece is coated. Make sure there are no dry spots left. Now it's time to fry! Heat the vegetable oil in a skillet over medium-high heat. When the oil is hot and shimmering, add the coated cauliflower in batches. Fry them for about 4-5 minutes. Turn them occasionally for even cooking. You want them golden brown and crispy. Use a slotted spoon to take them out and place them on paper towels. This helps soak up any extra oil. Next, let’s make the sauce. In a saucepan, mix soy sauce, rice vinegar, honey or agave syrup, sesame oil, minced garlic, and crushed red pepper flakes. Heat this over medium heat for about 2-3 minutes. Stir gently until warmed through and a bit thick. Add the crispy cauliflower to the sauce. Toss carefully to coat each piece well. Cook for another 1-2 minutes until everything is hot and shiny. Now your General Tso's cauliflower is ready! Serve it on a colorful plate. Garnish with green onions and sesame seeds for a beautiful finish. You can find the full recipe if you want to follow these steps again. Enjoy! To get that perfect crunch, use cornstarch. It coats the cauliflower well. Toss the florets in the cornstarch mixture until fully covered. This step stops floury spots. Fry in hot oil for crispy results. Don’t overcrowd the pan. Fry in small batches to ensure even cooking. Drain them on paper towels to remove extra oil. For an even crunchier texture, try double frying. Just fry them once, let them cool, and then fry again. If you want a gluten-free option, use tamari instead of soy sauce. You can swap honey for maple syrup or agave syrup for a vegan version. For a low-carb choice, try cauliflower rice instead of florets. You can also use arrowroot powder in place of cornstarch. It gives a similar crispy texture. If you have nut allergies, omit sesame oil. Use sunflower oil for frying instead. Serve your General Tso's cauliflower on a colorful plate. Add green onions and sesame seeds for a lovely touch. Pair it with steamed rice or quinoa for a filling meal. You can also add a fresh salad on the side. For extra flavor, drizzle more sauce on top right before serving. This dish is best enjoyed hot. You can find the full recipe for General Tso's Cauliflower above to guide you along. {{image_4}} If you want to make General Tso's Cauliflower vegan, swap honey for agave syrup. Agave is a sweetener from a plant. It tastes great and works just as well. Maple syrup is another option. It adds a nice flavor too. This keeps your dish plant-based while still tasting sweet. To make this dish gluten-free, use tamari in place of soy sauce. Tamari is similar but has no gluten. Always check your cornstarch too. Most brands are gluten-free, but some may mix with wheat. This switch lets everyone enjoy this tasty dish without worry. You can boost the health factor by adding other veggies. Bell peppers, broccoli, or snap peas mix well with cauliflower. Just chop them into bite-sized pieces. Toss them in the cornstarch mix with the cauliflower. This adds color, taste, and nutrition to your plate. For a full recipe, check the main article. To store leftover General Tso's cauliflower, first let it cool down. Place the cooled cauliflower in an airtight container. It can last in the fridge for up to three days. Make sure to seal the container well to keep moisture out. This helps prevent sogginess. When you reheat the cauliflower, keep it crispy. Use an oven or an air fryer for best results. Preheat your oven to 375°F (190°C). Spread the cauliflower on a baking sheet. Heat it for about 10 to 15 minutes. This method will keep the texture nice and crunchy. If you use a microwave, be aware it may make the cauliflower soft. You can freeze General Tso's cauliflower too! Separate the florets before freezing. Use a freezer-safe bag or container. It can stay fresh for about a month. When ready to eat, thaw it in the fridge overnight. Then, reheat it in the oven for a crispy finish. Enjoy your tasty, freezer-friendly dish! For the full recipe, check out the earlier section. Yes, you can make General Tso's Cauliflower ahead of time. Cook the cauliflower and let it cool. Store it in the fridge for up to three days. When you are ready to eat, warm it in the oven. This keeps it crispy. You can also store the sauce separately. Reheat the sauce on the stove before mixing it with the cauliflower. General Tso's Cauliflower pairs well with many dishes. Here are some great options: - White rice or brown rice - Quinoa for a healthy twist - Steamed broccoli for added greens - Egg rolls for a crunchy side - A fresh cucumber salad for a cool contrast These sides balance the flavors and add variety to your meal. General Tso's Cauliflower offers a plant-based twist on the classic dish. The cauliflower adds a nice crunch. It is lighter than General Tso's Chicken, which is fried meat. The sauce is the same, giving both dishes a sweet and spicy flavor. Some people prefer the cauliflower for its unique texture and taste. Others enjoy the heartiness of the chicken. Both dishes are delicious, but the cauliflower is a great option for those seeking a veggie-friendly meal. For the complete recipe, check out the Full Recipe. You learned how to make General Tso's Cauliflower from scratch. We covered key ingredients, important steps, and useful tips. You can find ways to adjust the recipe for special diets. Storing leftovers and reheating them well keeps the dish tasty. Whether you want a veggie meal or just love flavor, this dish fits. Enjoy this dish now and experiment with variations later. It's fun to cook and share with friends. Dive into your kitchen, and savor each bite!

General Tso’s Cauliflower Crispy and Flavorful Dish

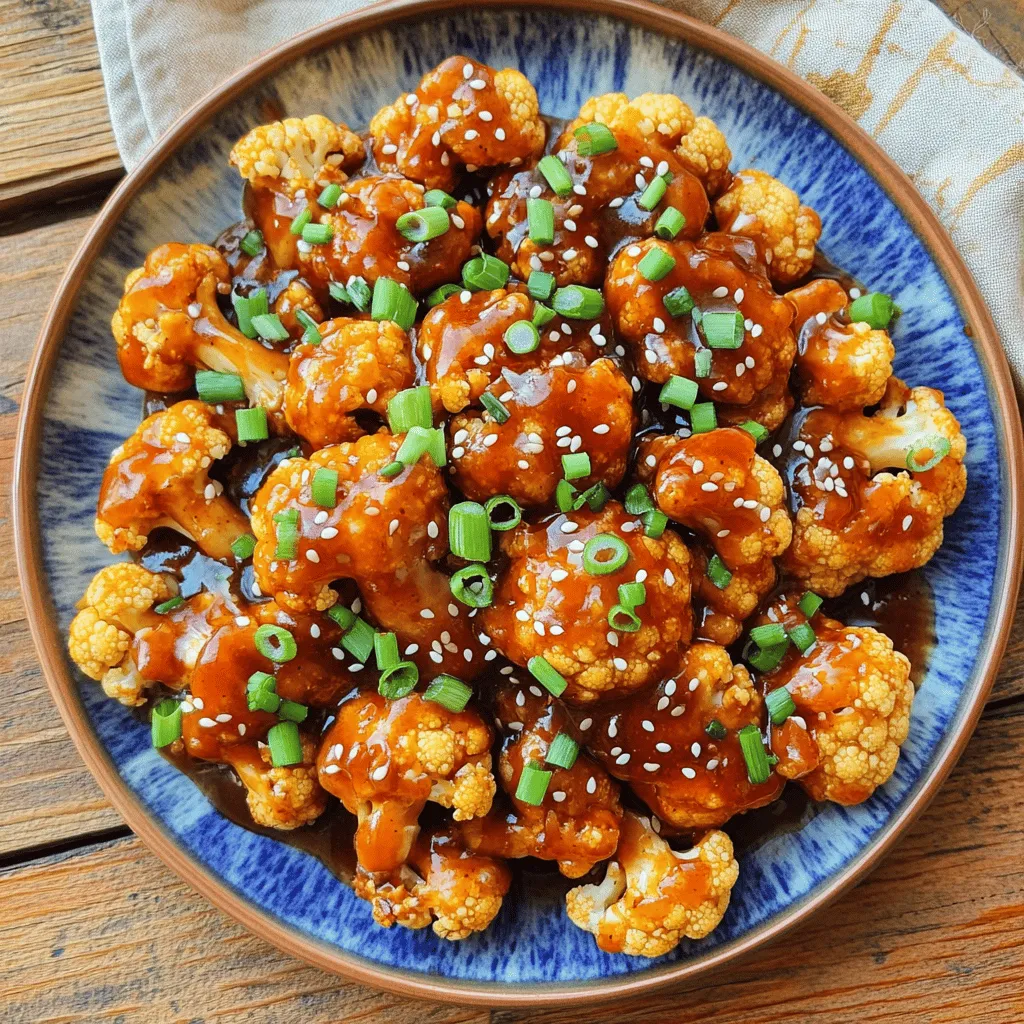
If you love flavorful meals that pack a healthy punch, you’re in for a treat! General Tso’s Cauliflower brings all

- 4 boneless, skinless chicken thighs - 1 cup fresh pineapple chunks (diced) - 1 red bell pepper (sliced into strips) - 1 yellow bell pepper (sliced into strips) - 1 red onion (cut into wedges) The main ingredients bring a burst of flavor to your meal. Chicken thighs are juicy and tender, which makes them perfect for this recipe. Fresh pineapple adds sweetness and a tropical vibe. Bell peppers add crunch and color, while the red onion gives a nice bite. - 2 tablespoons soy sauce - 2 tablespoons honey - 1 tablespoon sesame oil - 2 cloves garlic (minced) - 1-inch piece ginger (finely grated) The marinade is key to a great taste. Soy sauce gives umami and saltiness. Honey brings a touch of sweetness that balances everything. Sesame oil adds a nutty flavor, while garlic and ginger give a fresh, zingy kick. - Fresh cilantro (chopped, for garnish) - Lime wedges (for serving) Garnishing with fresh cilantro adds a bright flavor. Lime wedges give a zesty finish when squeezed over the dish. Together, these toppings enhance the dish’s tropical feel. You can find the Full Recipe to guide you through making this meal. - Preheat the oven: Start by preheating your oven to 425°F (220°C). This helps cook everything evenly. - Prepare the marinade: In a medium bowl, mix soy sauce, honey, sesame oil, minced garlic, grated ginger, black pepper, and salt. Whisk until smooth. - Best practices for marinating: Use a resealable bag or shallow dish. Place the chicken thighs in and pour half the marinade over them. Make sure each piece gets coated. - Recommended marination time: Let the chicken marinate at room temperature for at least 20 minutes or up to 2 hours in the fridge. This gives it great flavor. - Arranging chicken and vegetables on the sheet pan: Line a large baking sheet with parchment paper. Position the marinated chicken in the center. Surround it with pineapple chunks, red and yellow bell peppers, and onion wedges. Spread them out evenly for even cooking. - Tips for even cooking: Make sure to leave space between each piece. This allows hot air to circulate and cook everything well. - Optimal baking temperature: Bake the pan in the preheated oven at 425°F (220°C). - Cooking time and testing doneness: Bake for 25-30 minutes. The chicken is ready when it reaches 165°F (75°C). The veggies should be tender and slightly caramelized. Using a meat thermometer is key to perfect chicken. Aim for 165°F inside. It helps ensure your chicken is safe to eat. Also, broiling at the end adds crispiness. Set your oven to broil for 2-3 minutes. Watch closely so nothing burns. This step makes your meal look and taste great. To deepen flavor, marinate your chicken longer. Two hours in the fridge works well. If short on time, 20 minutes at room temperature is fine. Just make sure every piece of chicken gets coated. This method infuses the meat with taste. For serving, use a colorful platter. Arrange the chicken and veggies in an eye-catching way. Sprinkle extra cilantro on top for color. Lime wedges add a fresh touch. They make the dish look vibrant and inviting, perfect for sharing. This simple presentation can impress anyone at your table. For the full recipe, check out the Tropical Bliss Sheet Pan Hawaiian Chicken. {{image_4}} You can easily change the chicken in this recipe. If you prefer, use boneless chicken breasts instead of thighs. They cook faster and still taste great. If you want to try something different, use firm tofu or tempeh for a plant-based option. For veggies, swap bell peppers with zucchini or broccoli. They will roast nicely and add color to your dish. To spice things up, add red pepper flakes or chili powder. This will give your dish a nice kick. You can also try adding fresh herbs like basil or mint for a different twist. For a tropical touch, mix in mango or papaya chunks. They will add sweetness and freshness to your meal. If you need a gluten-free option, replace soy sauce with tamari or coconut aminos. Both are tasty and safe for gluten-free diets. For a vegan version, use jackfruit in place of chicken. It mimics the texture well and takes on the marinade's flavor. This dish can easily fit many different diets, making it versatile and fun. Don't forget to check the Full Recipe for more details! To keep your Sheet Pan Hawaiian Chicken fresh, store leftovers in the fridge. Use an airtight container. It can stay good for about 3 to 4 days. For best taste, eat it within this time. If you want to keep it longer, freezing is a great option. Place the chicken and veggies in freezer bags. Squeeze out the air before sealing. It can last up to 3 months in the freezer. When it's time to eat your leftovers, reheating properly is key. The best way to reheat is in the oven. Preheat your oven to 350°F (175°C). Place the chicken and vegetables on a baking sheet. Heat for about 15-20 minutes or until warmed through. You can also use the microwave for quick reheating. Just cover the dish to keep moisture in. Heat in short bursts to avoid overcooking. How long does your Sheet Pan Hawaiian Chicken stay fresh? In the fridge, it lasts about 3 to 4 days. If frozen, it remains safe for 3 months. After that, it may lose taste and texture. Always check for any signs of spoilage, like off smells or changes in color, before eating. Enjoy your meal without worry! Yes, you can use chicken breasts instead of thighs. Chicken breasts cook faster than thighs. If you choose breasts, watch the cooking time closely. They may need about 20-25 minutes in the oven. The key is to ensure they reach an internal temperature of 165°F. This keeps the meat juicy and safe to eat. To check if the chicken is fully cooked, use a meat thermometer. Insert it into the thickest part of the chicken. The temperature should read 165°F. If you don’t have a thermometer, cut the chicken to check for clear juices. If the juices run clear, it is done. Sheet Pan Hawaiian Chicken goes well with many sides. Here are some ideas: - Steamed rice or jasmine rice - Quinoa for a healthy twist - A fresh salad with lime vinaigrette - Grilled corn on the cob - Coconut rice for a tropical feel These sides will make your meal even more delicious and colorful! Yes, this dish is great for meal prep. You can make it ahead and store it in the fridge. Divide the chicken and veggies into meal prep containers. It will stay fresh for about 3-4 days. Reheat it in the oven or microwave for a quick meal. This makes it easy to enjoy healthy food all week! For the full recipe, check out the Tropical Bliss Sheet Pan Hawaiian Chicken. This recipe for Sheet Pan Hawaiian Chicken combines juicy chicken thighs with fresh pineapple, bell peppers, and a flavorful marinade. We discussed how to prep, marinate, and bake for the best results. I also shared tips for presentation and storage. In the end, this dish is easy to adapt, allowing for tasty variations. Whether you stick to the classic or experiment, enjoy creating a delicious meal. Happy cooking!

Sheet Pan Hawaiian Chicken Flavorful and Simple Meal

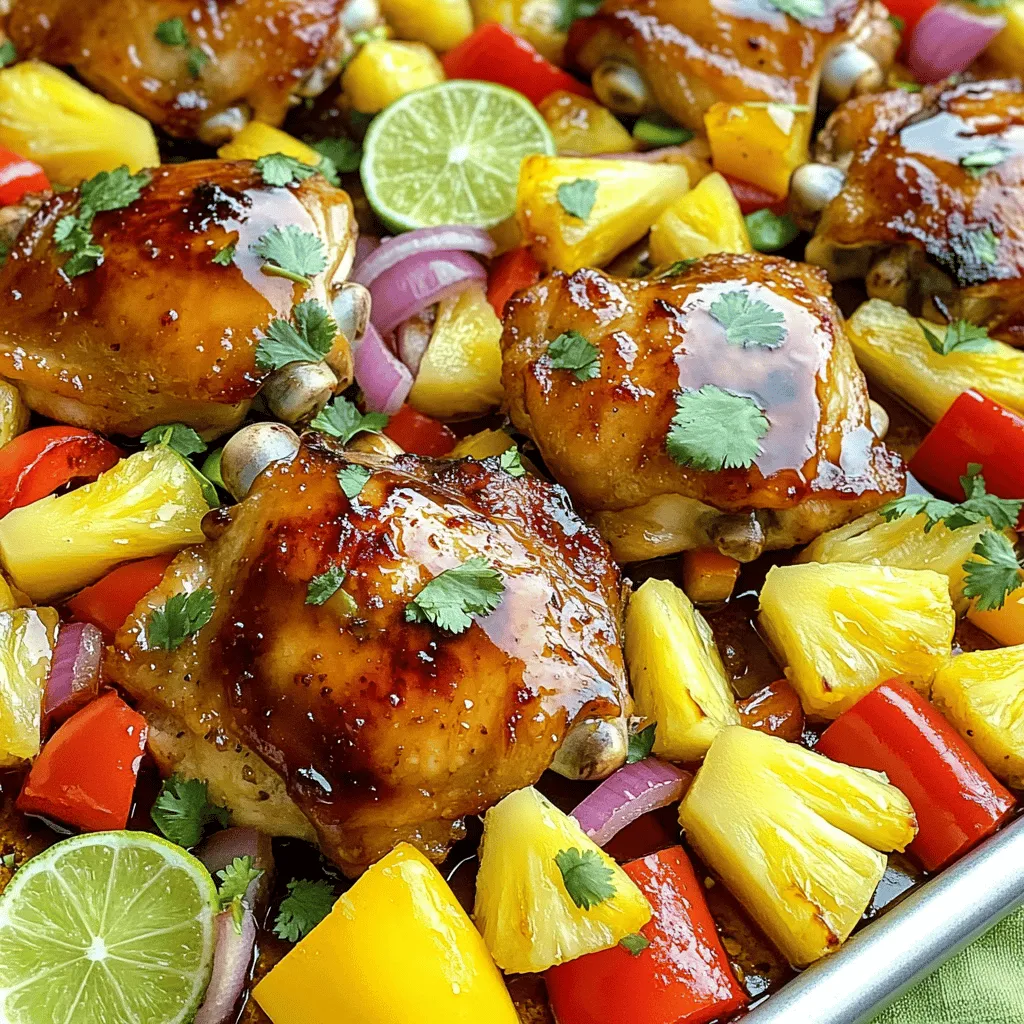
Looking for a fun and easy dinner? I have the perfect dish for you: Sheet Pan Hawaiian Chicken! This simple

To make this dish, you will need: - 2 lobster tails - 4 tablespoons unsalted butter - 4 cloves garlic, minced - 1/2 cup heavy cream - 1/4 teaspoon paprika - 1/4 teaspoon red pepper flakes (adjust for spice) - Salt and pepper to taste You can elevate your dish with these extras: - Fresh parsley, finely chopped (for garnish) - Lemon wedges (for serving) If you lack an ingredient, try these swaps: - Use salted butter instead of unsalted. - Swap heavy cream for half-and-half for a lighter sauce. - Garlic powder can replace fresh garlic, but use less. - If you want a spicy kick, try cayenne pepper instead of red pepper flakes. This list covers everything you need to create creamy garlic butter lobster tails. For the full recipe, check out the complete cooking instructions. Start by preheating your oven to 400°F (200°C). This gets the oven hot and ready for your lobster tails. Next, grab your lobster tails. Use kitchen scissors to cut the top shell lengthwise. Be careful not to cut the meat underneath. Gently pull the lobster meat from the shell, keeping it attached at the base. This step helps with presentation. Lift the lobster meat above the shell for a stunning look. In a medium saucepan, melt 4 tablespoons of unsalted butter over medium heat. Once melted, add 4 minced garlic cloves. Sauté the garlic for about 1 minute. Watch closely; you don’t want it to brown. After the garlic is fragrant, slowly pour in 1/2 cup of heavy cream while stirring. Then add 1/4 teaspoon of paprika and 1/4 teaspoon of red pepper flakes. Season with salt and pepper to taste. Let the sauce simmer for 2-3 minutes until it thickens slightly. Place the lobster tails on a baking sheet, flesh side up. Pour the creamy garlic butter sauce generously over the lobster meat. Reserve a bit of sauce for later. Bake the lobster tails in the oven for about 12-15 minutes. The meat should look opaque and firm. For a nice golden finish, switch the oven to broil. Broil for an extra 1-2 minutes, but keep a close watch to avoid burning. Once done, remove the lobster tails, drizzle with the reserved sauce, and garnish with chopped parsley. Serve with lemon wedges for a fresh burst. For the full recipe, check the details above. When you choose lobster tails, look for firm shells. Fresh lobster tails should feel heavy for their size. The shell should have a slight shine, and there should be no strong odor. If possible, buy from a trusted fishmonger or grocery store. They can help you pick the best ones. To make the sauce rich and smooth, keep the heat low. Melt the butter gently to avoid burning. Add garlic and sauté just until fragrant. Then, slowly whisk in the cream. This helps it blend well. Taste and adjust with salt, pepper, and a little spice. If you want more heat, add more red pepper flakes. Presentation makes your dish pop. Serve the lobster tails on a big platter. Arrange lemon wedges around the tails for color. Sprinkle chopped parsley on top for a fresh look. For a final touch, drizzle the reserved sauce over the tails. This not only adds flavor but looks great too. For the full recipe, check out the details above. {{image_4}} You can change the flavor of your lobster tails by using different herbs and spices. Try adding fresh thyme or rosemary for a fragrant twist. A pinch of lemon zest can give a bright, fresh taste. If you like heat, consider using cayenne pepper or chili powder instead of red pepper flakes. Experimenting with these options can elevate your dish. Grilling or steaming lobster tails brings out their natural sweetness. For grilling, preheat your grill to medium heat. Brush the tails with garlic butter and grill for about 5-7 minutes. Turn them halfway through for even cooking. Steaming is another easy option. Place the tails in a steamer basket over boiling water. Steam for about 8-10 minutes until the meat turns opaque. Both methods keep the lobster juicy and tender. Pair your creamy garlic butter lobster tails with sides that complement their rich flavor. A fresh green salad with lemon vinaigrette offers a nice contrast. Garlic bread is also a perfect choice for soaking up that creamy sauce. For a heartier meal, serve with roasted vegetables or creamy mashed potatoes. These sides make your meal balanced and satisfying. After enjoying your creamy garlic butter lobster tails, store leftovers properly. First, let them cool down to room temperature. Then, place the lobster tails in an airtight container. This keeps them fresh and prevents odors from mixing. You can keep them in the fridge for up to 3 days. When you are ready to reheat, avoid the microwave if possible. Microwaving can make lobster rubbery. Instead, preheat your oven to 350°F (175°C). Place the lobster tails on a baking sheet and cover them with foil. Heat for about 10 minutes, or until warmed through. You can also reheat on the stovetop. Just use a pan over low heat and add a little butter to keep it moist. If you have more lobster tails than you can eat, freezing is a great option. Wrap each tail tightly in plastic wrap, then place them in a freezer bag. Remove as much air as you can before sealing. This helps prevent freezer burn. You can freeze lobster tails for up to 3 months. When you are ready to use them, thaw them in the fridge overnight before reheating. For the full experience, follow the full recipe! You can tell lobster tails are cooked when the meat turns opaque. It should feel firm to the touch. The internal temperature should reach 140°F (60°C). Once you see the color change, it's time to take them out. Avoid overcooking, as this can make the meat tough. Yes, you can use frozen lobster tails! Just make sure to thaw them first. Place them in the fridge overnight or run them under cold water for 30-60 minutes. Once thawed, you can follow the full recipe with no issues. This makes it easy to enjoy lobster tails at home. Creamy garlic butter lobster tails pair well with many sides. Here are some great options: - Garlic bread - Steamed asparagus - Roasted potatoes - A fresh green salad - Rice pilaf These sides add color and texture to your meal. Enjoy your delicious dish with these perfect accompaniments! You now know how to make creamy garlic butter lobster tails from start to finish. We covered all the key ingredients, step-by-step instructions, and helpful tips for the best results. Remember to be creative with flavors and cooking methods. Storing and reheating tips will keep your dish fresh too. Enjoy this delicious meal for special occasions or weeknight dinners. With these skills, you can impress anyone with your cooking!

Creamy Garlic Butter Lobster Tails Irresistible Recipe

Dive into a world of flavor with my Creamy Garlic Butter Lobster Tails recipe! This dish is perfect for impressing

To make Mongolian Beef Noodles, you will need these simple ingredients: - 8 oz. egg noodles - 1 lb. beef flank steak, thinly sliced - 3 tablespoons low-sodium soy sauce - 1 tablespoon hoisin sauce - 2 tablespoons brown sugar - 1 tablespoon cornstarch - 2 tablespoons vegetable oil - 1 cup broccoli florets - 1 red bell pepper, sliced - 1 medium carrot, julienned - 3 green onions, chopped - 2 cloves garlic, minced - 1 teaspoon fresh ginger, grated - Sesame seeds for garnish (optional) These ingredients blend to create a dish full of flavor. The beef adds richness. The vegetables bring color and crunch. The sauces provide a sweet and salty balance. You can find most of these items in your local grocery store. If you want to add a bit of flair, try using fresh vegetables from a farmer's market. For the full recipe, follow the steps carefully to ensure a delicious meal. How to cook the noodles properly To cook the egg noodles, follow the package directions. Boil water, add noodles, and cook until tender. This usually takes about 5-7 minutes. Drain the noodles well, ensuring they do not stick together. Rinse them with cold water to stop the cooking process. Marinating the beef effectively For the beef, slice flank steak thinly against the grain. This makes it more tender. In a bowl, mix soy sauce, hoisin sauce, brown sugar, and cornstarch. Whisk until smooth. Add the beef slices and coat them well. Let the beef marinate for 15-20 minutes. This step enhances the flavor. Stir-fry techniques for perfect beef Heat vegetable oil in a large skillet over medium-high heat. Once the oil is hot, add the marinated beef. Discard any extra marinade. Stir-fry the beef for about 3-4 minutes. Cook until the beef is browned and cooked through. Remove the beef from the skillet and set it aside. Cooking vegetables without losing crunch In the same skillet, add broccoli, red bell pepper, carrot, garlic, and ginger. Stir-fry these vegetables for about 3-5 minutes. Make sure they stay tender yet crunchy. The quick cooking time helps keep their bright colors and nutrients. Combining ingredients for optimal flavor Return the cooked beef to the skillet with the vegetables. Add the cooked noodles and any remaining marinade. Toss everything together gently. Cook for an additional 2-3 minutes until everything is well mixed and heated through. Adding green onions for freshness Remove the skillet from the heat and stir in chopped green onions. They add a fresh burst of flavor. Plating and garnishing suggestions Serve the Mongolian Beef Noodles hot in deep bowls. For a nice touch, garnish with extra green onions and a sprinkle of sesame seeds. This makes your dish look appealing and inviting. For the full recipe, check the details above. For great taste, use high-quality soy sauce, like Kikkoman or Lee Kum Kee. Their rich flavor adds depth to your dish. Hoisin sauce is another key. I recommend Lee Kum Kee for its sweetness and savory notes. Tweak the amount of soy sauce and hoisin sauce to match your taste. If you want it sweeter, add more brown sugar. For a salty kick, increase the soy sauce. Stir-frying is an art that requires heat and speed. Use a large skillet or wok and heat it well before adding oil. This helps create a nice sear on the beef. Cut the beef against the grain. This makes it tender and easy to chew. Aim for thin slices, about a quarter-inch thick. This ensures quick cooking and keeps the meat juicy. For serving, opt for deep bowls. They add comfort and style to your dish. Add a few extra slices of green onion on top for color. A sprinkle of sesame seeds adds a nice touch too. Think about using chopsticks for serving. It can make the meal more fun and authentic. Enjoy showing off your beautiful Mongolian Beef Noodles! {{image_4}} You can change up the vegetables in this dish easily. Try adding snap peas, bok choy, or mushrooms. Each veggie brings its own flavor and texture. You can also swap the beef for chicken, shrimp, or tofu. Each protein will give your dish a new twist. Want more heat? Add red pepper flakes or sliced jalapeños. These spices will spice up your meal. You can also mix in oyster sauce or chili garlic sauce. These sauces deepen the flavor and add richness. For gluten-free options, use rice noodles instead of egg noodles. They work just as well and taste great. If you need low-sodium alternatives, look for low-sodium soy sauce. You can also use coconut aminos for a different flavor. Check the Full Recipe for more details! To keep your Mongolian Beef Noodles fresh, store them in the fridge. The ideal temperature is below 40°F (4°C). Use airtight containers to prevent moisture loss. Glass or plastic containers work well. Make sure to cool the noodles before sealing the container. This helps avoid soggy noodles. Reheat your noodles using a skillet. Heat over medium-low heat. Add a splash of water or broth to keep them moist. Stir the noodles gently as they heat. You can also use a microwave. Place the noodles in a bowl and cover with a damp paper towel. Heat for one to two minutes, checking often. This way, you keep the texture and flavor intact. If you want to freeze Mongolian Beef Noodles, pack them tightly in freezer-safe bags. Remove as much air as possible to avoid freezer burn. Label the bags with the date. They stay fresh for up to three months. To thaw, place them in the fridge overnight. Reheat as explained above. This keeps your dish tasty and enjoyable. For the full recipe, refer to the main article. The best cut is flank steak. It is tender and flavorful. You should slice it thinly against the grain. This cut cooks quickly and stays juicy. Other good options are sirloin or ribeye. They offer great taste too. Yes, you can make it ahead. Cook the noodles and beef, then cool them. Store in the fridge for up to two days. When ready, reheat in a skillet. Add a splash of water to keep it moist. Fresh veggies can be added just before serving. Mongolian Beef Noodles are not very spicy. The dish is more sweet and savory. You can adjust the spice level. Add chili flakes or sriracha for heat. This lets you customize it to your taste. Many Asian restaurants serve it. Look for places that offer Mongolian dishes. Noodles are often included on the menu. Check online reviews to find the best spots. You might also find it in fusion restaurants. Yes, chicken or tofu work well as substitutes. Use chicken breast for a lean option. Tofu is great for a vegetarian dish. If using tofu, press it to remove water first. This helps it absorb flavors better. You can serve it with steamed rice or fried rice. A side of stir-fried vegetables adds color and crunch. Spring rolls or dumplings are great appetizers too. For a refreshing touch, try a simple salad. You can also enjoy it with a hot soup. For the full recipe, check the section above. In this article, we explored how to make delicious Mongolian Beef Noodles. We discussed the key ingredients, proper cooking techniques, and helpful tips to enhance your dish. Remember, the right cut of beef and fresh veggies are vital for great flavor. You can also make substitutions or add spice to fit your taste. Keep these pointers in mind as you cook. Enjoy mastering this dish in your kitchen! Your meals can be exciting and satisfying with just a little effort.

Mongolian Beef Noodles Flavorful and Easy Recipe

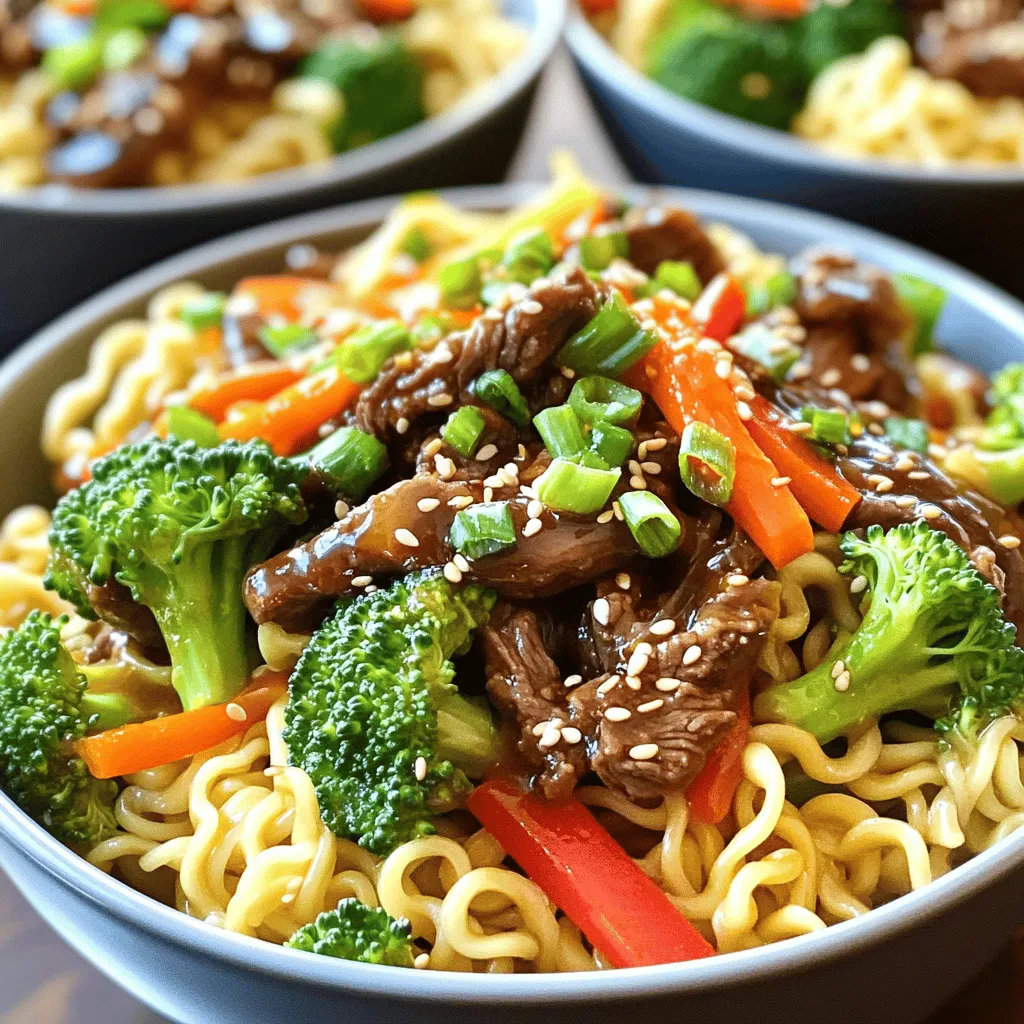
Are you ready for a dinner that combines flavor and ease? Mongolian Beef Noodles are a simple yet delicious meal

To make these tasty apple pie cookies, gather these key ingredients: - 2 cups all-purpose flour - 1/2 teaspoon salt - 1/2 teaspoon baking powder - 1/2 cup unsalted butter, softened - 1/2 cup granulated sugar - 1 large egg - 1 teaspoon vanilla extract - 1 teaspoon ground cinnamon - 2 medium apples, peeled, cored, and diced - 1/3 cup brown sugar, packed - 1 tablespoon lemon juice - 1 tablespoon cornstarch - 1 egg yolk (for egg wash) - 1 tablespoon milk (for egg wash) - Optional: powdered sugar for dusting Each of these ingredients plays a crucial role in the taste and texture of the cookies. The apples bring sweetness and moisture, while the flour forms the dough. The butter adds richness, and the sugar balances the flavors. To make your baking smooth, you'll need a few simple tools: - Medium and large mixing bowls - Electric mixer or wooden spoon - Rolling pin - Round cookie cutter (3 inches) - Parchment paper - Baking sheet - Wire rack for cooling These tools help you mix, shape, and bake your cookies with ease. Having them ready makes the process more fun. Don’t fret if you’re missing an ingredient! Here are some swaps you can try: - Use coconut oil instead of butter for a dairy-free option. - Swap granulated sugar with coconut sugar for a lower glycemic index. - Apples can be replaced with pears or peaches for a twist. - Use gluten-free flour if you need a gluten-free version. These substitutions help you customize your cookies without losing flavor or fun. Try them out to make the recipe your own. For the complete recipe, check the Full Recipe section. To start, gather your ingredients. You need flour, salt, baking powder, butter, sugar, egg, and vanilla. In a medium bowl, mix the flour, salt, and baking powder. In a large bowl, cream the butter and sugar until it looks fluffy. Next, add the egg and vanilla. Mix well. Slowly add the dry mix to the wet mix. Stir until you get a smooth dough. Wrap the dough in plastic wrap and chill it in the fridge for 30 minutes. While the dough chills, let’s make the apple filling. You will need apples, brown sugar, lemon juice, cinnamon, and cornstarch. Peel and dice the apples. In a bowl, mix the apples with brown sugar, lemon juice, cinnamon, and cornstarch. Stir gently. Let this sit for about 10 minutes. This helps the apples release their juices and blend the flavors. Now, preheat your oven to 350°F (175°C). Line a baking sheet with parchment paper. Roll out the chilled dough on a floured surface until it is 1/8 inch thick. Use a round cookie cutter to cut out circles. Take half of these circles and place a tablespoon of apple filling on each. Fold the remaining circles over the filling and press the edges with a fork to seal. In a small bowl, whisk an egg yolk and milk for the egg wash. Brush this on top of each cookie for a golden finish. Place the cookies on the baking sheet and bake for 15-18 minutes. They should be golden brown and puffed up. Once baked, let them cool on a wire rack. You can dust them with powdered sugar for a nice touch. Enjoy your delicious apple pie cookies! For the full recipe, check out the details! To get the right texture for your apple pie cookies, start with chilled dough. This keeps the cookies from spreading too much while baking. When you roll out the dough, try to keep it even. Aim for about 1/8 inch thick. If the dough feels too soft, chill it again for a bit. This will help your cookies hold their shape. Timing is key for great flavors. Let the apple filling rest for about 10 minutes. This allows the apples to release their juices and mix well with the sugars and spices. Bake your cookies for 15-18 minutes. Keep an eye on them towards the end. The cookies should be golden brown and puffed up, signaling they are ready. One common mistake is overworking the dough. Mix just until combined to keep cookies tender. Another mistake is not sealing the edges well. Press them firmly with a fork to prevent the filling from leaking. Lastly, don’t skip the egg wash. It gives your cookies a lovely golden sheen. For the full recipe, you can refer back for more detailed instructions. {{image_4}} You can easily change the taste of your apple pie cookies. Try adding spices like nutmeg or allspice. A pinch of ginger can give them a warm kick. If you like a sweeter touch, mix in some vanilla bean or cardamom. Each spice adds a new layer to the flavor. Experiment until you find your favorite mix! If you need a gluten-free option, swap regular flour with a gluten-free blend. Look for blends that work well for baking. You can also use almond flour for a nutty flavor. Just remember to check the baking powder for gluten. This way, everyone can enjoy these tasty treats! Serve your apple pie cookies with a scoop of vanilla ice cream. It adds a creamy touch that pairs well with the warm cookies. You can also drizzle caramel sauce on top for extra sweetness. For a fun twist, try serving them with a side of whipped cream. These ideas make your snack time even more special. For the full recipe, check out the complete guide! To keep your apple pie cookies fresh, place them in an airtight container. Store them at room temperature for up to three days. If you want them to last longer, consider refrigeration. Just be sure to let them cool completely before packing them away. This helps prevent sogginess. If you want to save some for later, freezing is a great option. First, let the cookies cool fully. Then, wrap each cookie in plastic wrap. Place them in a freezer-safe bag or container. They can last for up to three months in the freezer. When you're ready to enjoy, just take out as many as you want. To reheat your cookies, preheat your oven to 350°F (175°C). Place the cookies on a baking sheet for about 5 to 10 minutes. This will help them regain their crispiness. You can also use a microwave, but this may make them soft. For the best taste, the oven is the way to go. Enjoy your treats warm! These apple pie cookies are perfect because they blend the best of two worlds: cookies and pie. They have a soft, flaky crust that melts in your mouth. The apple filling is sweet and spiced just right. I use fresh apples, cinnamon, and a touch of lemon juice to brighten the flavor. Each bite is a burst of apple goodness. Plus, they’re easy to make and fun to share! Absolutely! You can use different apples for these cookies. Granny Smith apples are tart and hold their shape well. Honeycrisp apples are sweet and juicy. You can also mix different types for a unique taste. Just remember to adjust the sugar based on how sweet the apples are. Experiment and find your favorite mix! To check if the cookies are done, look for a golden color on top. The edges should be slightly firm, but the center can still be soft. A gentle press on the top should leave a slight indentation. Bake them for about 15-18 minutes for the best results. Enjoy the sweet aroma as they bake! In this post, we covered making perfect apple pie cookies from start to finish. We explored essential ingredients, step-by-step instructions, and tips for the best texture and flavor. You can also adapt the recipe with different spices or dietary needs. Remember, practice makes perfect in baking. Try different variations and make these cookies your own. With these tips, you'll create delightful treats that everyone will enjoy. Happy baking!

Perfect Apple Pie Cookies Simple and Delicious Snack

Craving a sweet treat with the taste of fall? These Perfect Apple Pie Cookies are just what you need! They

- Chicken: boneless skinless thighs - Sauces and Marinades: soy sauce, brown sugar, rice vinegar, sesame oil - Aromatics: garlic, ginger For this Easy Teriyaki Chicken Meal Prep, I use boneless skinless chicken thighs. They stay juicy and tender. You will also need some key sauces: soy sauce, brown sugar, rice vinegar, and sesame oil. These create a rich and sweet glaze. Don't forget the aromatics! Fresh garlic and ginger add a strong flavor. They make a big difference in the taste of your dish. - Rice: jasmine rice - Vegetables: broccoli, bell peppers - Garnishes: green onions, sesame seeds For a complete meal, I like using jasmine rice. It has a nice aroma and fluffy texture. Add some colorful veggies like broccoli and bell peppers. They bring crunch and nutrients. Lastly, sprinkle chopped green onions and sesame seeds on top. They enhance the dish's look and taste. This Easy Teriyaki Chicken Meal Prep is simple and delicious! You can find the Full Recipe for more details on how to make it. To start, you need to prepare the marinade. In a large bowl, mix together: - 1 cup low-sodium soy sauce - 1/2 cup brown sugar - 1/4 cup rice vinegar - 2 tablespoons sesame oil - 2 cloves garlic, minced - 1 tablespoon fresh ginger, minced Stir until the brown sugar dissolves. Next, coat the chicken pieces in the marinade. Make sure each piece is fully covered. Cover the bowl with plastic wrap and refrigerate for at least 30 minutes. For the best flavor, marinate for up to 2 hours. While the chicken marinates, rinse the rice. Place 2 cups of jasmine rice in a fine-mesh strainer. Rinse under cold water until it runs clear. This removes excess starch. In a medium pot, combine the rinsed rice with 2 cups of water. Bring to a boil over high heat. Once boiling, reduce the heat to low. Cover the pot and let it simmer for 15 to 20 minutes. The rice is done when it has absorbed all the water. Remove from heat and let it steam, covered, for 5 more minutes. Next, prepare the vegetables. Bring a pot of water to a boil. Add 2 cups of broccoli florets and 1 cup of sliced bell peppers. Cook for about 3 to 4 minutes. You want them bright and tender-crisp. Drain them in a colander and set aside. Now it's time to cook the chicken. Heat a large skillet or wok over medium-high heat. Add the marinated chicken along with all the marinade. Stir-fry the chicken for 8 to 10 minutes. Stir occasionally until the chicken is cooked through. The sauce will thicken and coat the chicken pieces nicely. To put your meal prep together, start with the cooked rice. Evenly distribute it among your meal prep containers. Next, add the cooked teriyaki chicken on top of the rice. Finally, layer the blanched broccoli and sliced bell peppers over each portion. After assembling, garnish each container with chopped green onions and sesame seeds. Let the meal prep containers cool completely at room temperature. Once cooled, seal them with lids. Store them in the refrigerator for up to 4 days. Enjoy your Easy Teriyaki Chicken Meal Prep whenever you need a quick meal! To enhance the taste of your teriyaki chicken, try different marinades. You can add pineapple juice for sweetness or Sriracha for spice. Both options add a fun twist to the dish. Use fresh herbs like cilantro or basil to give it a bright flavor. For juicy chicken, don't skip marinating. It makes a huge difference! Aim for at least 30 minutes, but let it sit for up to 2 hours. This allows the chicken to absorb all those tasty flavors. When cooking, make sure not to overcrowd the pan. This helps the chicken brown nicely. Having the right tools makes meal prep easy. A good cutting board and a sharp knife are must-haves. A large mixing bowl helps mix your marinade well. A good skillet or wok is key for cooking the chicken evenly. For storage, use airtight containers. Glass containers work best as they keep food fresh. Look for ones that are microwave-safe. This way, you can heat your meals quickly. To save time, prep your ingredients first. Chop your veggies and chicken before you start cooking. This step makes the process much smoother. Try batch cooking too! Make extra teriyaki chicken and freeze it. You can enjoy it later when you need a quick meal. Use your weekends for meal prep. This way, your weeknights stay stress-free. For the full recipe, refer back above. {{image_4}} You can switch the chicken for other proteins. Try pork, beef, or tofu for variety. Each protein gives a unique taste and texture. - Substitutes for chicken: Use boneless pork chops or beef strips. - Vegetarian options: Tofu absorbs flavors well. Tempeh is another great choice. Teriyaki sauce is delicious, but there are alternatives. Sweet and sour or hoisin sauce can add a different flair. - Teriyaki sauce alternatives: Try a homemade sauce with soy sauce, honey, and ginger. - Customizations for spice levels: Add chili paste or sriracha for heat. Adjust based on your taste. Seasonal veggies enhance flavor and nutrition. Fresh produce makes your meal prep even better. - Suggest adding seasonal vegetables: In spring, use asparagus or peas. In fall, add sweet potatoes or Brussels sprouts. - Using different rice types: Substitute jasmine rice with brown rice or quinoa for a health boost. Each grain adds its unique taste and benefits. For the complete recipe, refer to the [Full Recipe]. You can store Easy Teriyaki Chicken Meal Prep in the fridge for up to 4 days. To keep it fresh, place it in airtight containers. Make sure to let the meal cool down completely before sealing them. This helps prevent moisture build-up, which can make your meal soggy. For longer storage, you can freeze the meal prep containers. Wrap each container tightly in plastic wrap before placing it in the freezer. When you’re ready to eat, take it out and thaw it overnight in the fridge. To reheat, microwave it for 3-5 minutes until hot. Stir halfway to heat evenly. Always check for signs of spoilage. If you see any discoloration or strange smells, do not eat it. The chicken should smell savory and good. It's best to follow food safety rules. If in doubt, throw it out! You can store Easy Teriyaki Chicken Meal Prep in the refrigerator for up to 4 days. Make sure to seal the containers tightly. For longer storage, you can freeze the meal prep. In the freezer, it lasts for about 3 months. When you are ready to eat, thaw it in the fridge overnight. Yes, you can use chicken breasts. They are leaner than thighs. This makes them cook faster and result in a different texture. Chicken breasts may also be less juicy. If you prefer a tender bite, thighs work best with teriyaki sauce. If you need a soy sauce substitute, try tamari for gluten-free options. Coconut aminos also work for low-sodium choices. Both will give you a similar umami flavor in your meal prep. To add heat, consider using red pepper flakes or sriracha. You can mix these into the marinade. If you want a fresh kick, add sliced jalapeños when cooking the chicken. This will give your dish a nice spicy boost. Yes! You can use carrots, snap peas, or zucchini. These vegetables pair well with teriyaki chicken. Just be sure to chop them to a similar size for even cooking. Enjoy experimenting with your favorite veggies! In this post, we explored making Easy Teriyaki Chicken Meal Prep. We covered essential ingredients like chicken, sauces, and vegetables. I shared step-by-step directions for marinating, cooking, and assembling your meal. Tips for flavor and storage were also included. Meal prepping saves time and ensures tasty meals. With the right ingredients and methods, you can enjoy delicious teriyaki chicken throughout the week. Get started, and let your kitchen creativity shine!

Easy Teriyaki Chicken Meal Prep Simple and Tasty Dish

Are you looking for a quick and tasty meal prep idea? Look no further! My Easy Teriyaki Chicken Meal Prep

Older posts
Newer posts
← Previous Page1 … Page55 Page56 Page57 … Page66 Next →

dsad

© 2025 recipesstation • Built with GeneratePress

Our Policies

  • Copyright Policy
  • Cookie Policy
  • GDPR Policy
  • Privacy Policy
  • Disclaimer
  • Terms Of Use

More Information

  • Home
  • About
  • Contact
  • Appetizers
  • Dessert
  • Dinner
  • Drinks
©2025, recipesstation About Back To Top