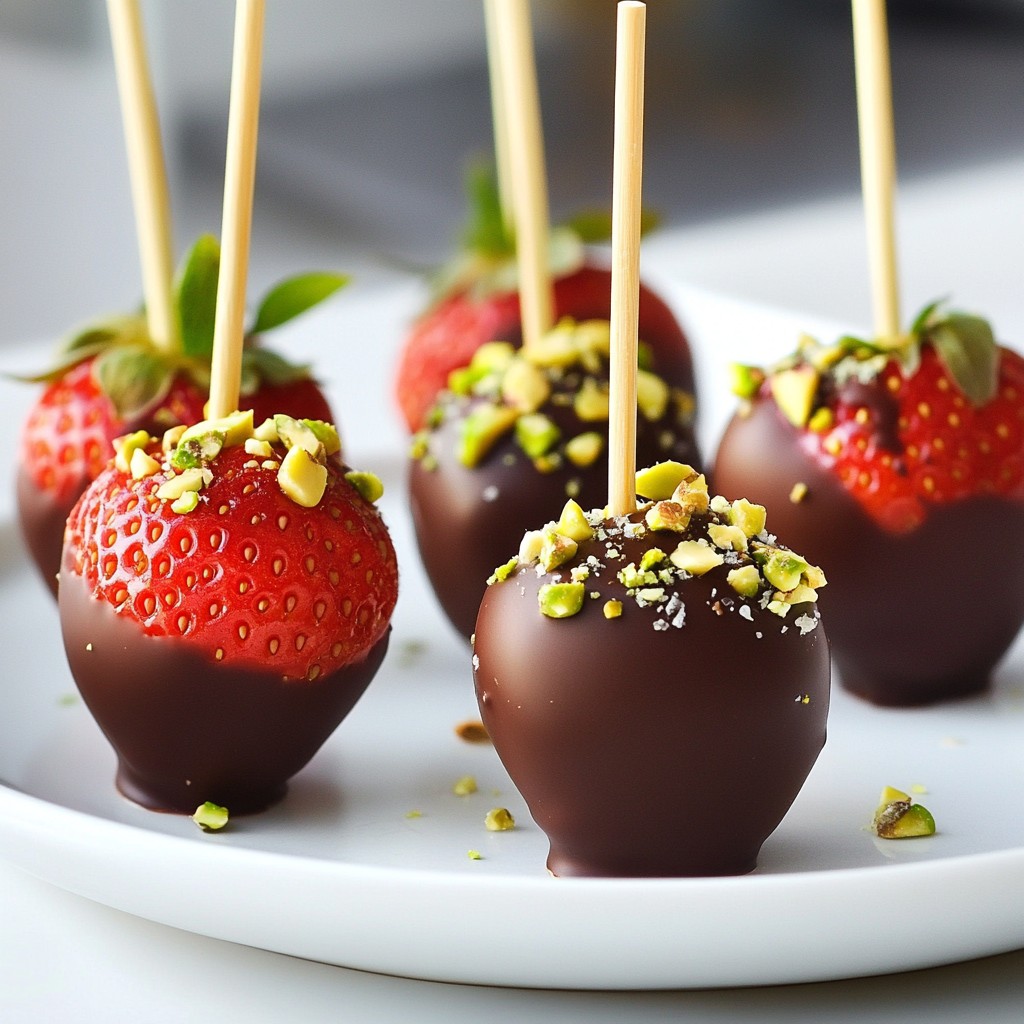
Craving something sweet and fun? Chocolate Covered Strawberry Pops are the perfect treat! With juicy strawberries dipped in rich chocolate, they are simple to make and taste amazing. In this post, I'll share everything you need: easy steps, key ingredients, and tips to make these delightful snacks shine. So grab your lollipop sticks and let’s dive into this delicious journey together!
Why I Love This Recipe
- Deliciously Decadent: The rich flavor of dark chocolate paired with fresh strawberries creates a luxurious treat that’s perfect for any occasion.
- Customizable Toppings: Whether you prefer nuts, sprinkles, or even coconut flakes, these pops can be tailored to suit your taste, making them a fun project for everyone.
- Easy to Make: With simple ingredients and straightforward steps, this recipe is accessible for both novice and experienced cooks, ensuring great results every time.
- Perfect for Sharing: These pops not only look beautiful but are also easy to grab and enjoy, making them ideal for parties, gatherings, or just a sweet treat at home.
Ingredients
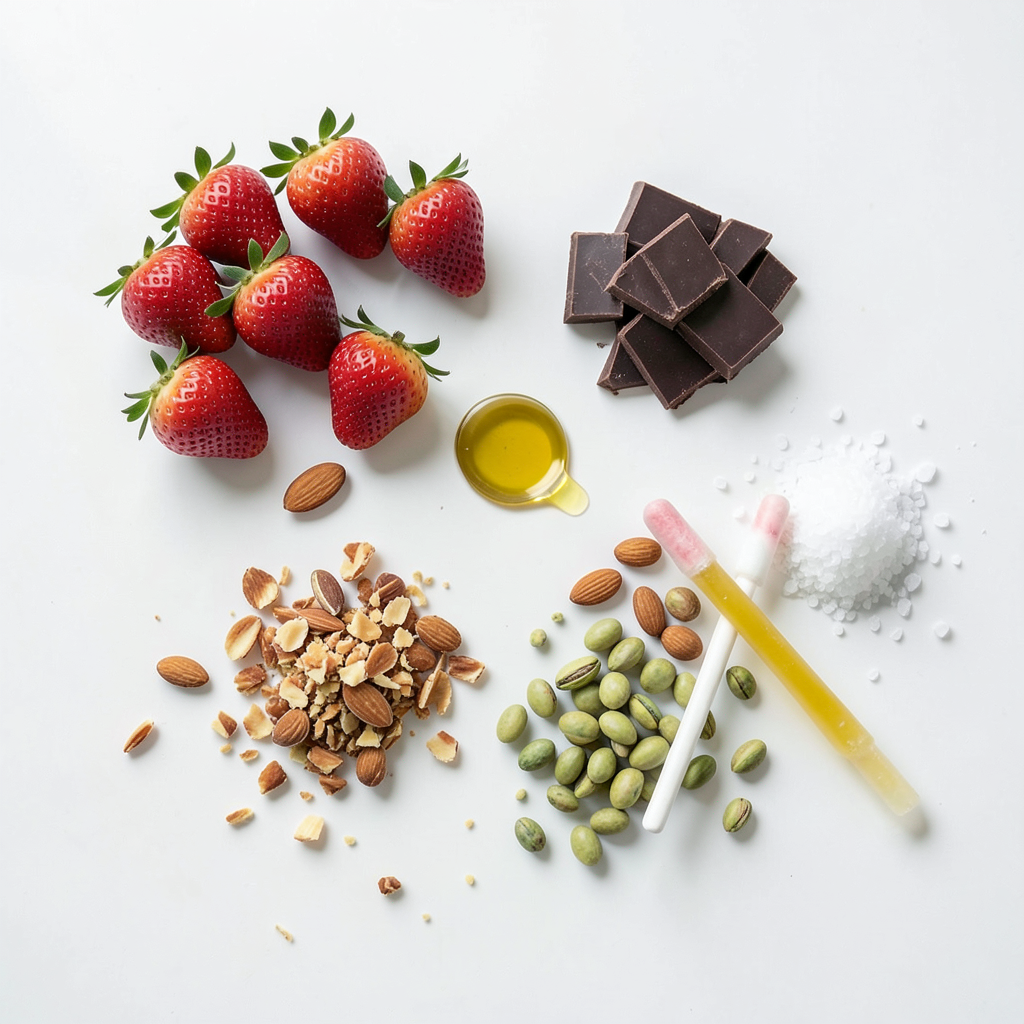
Main Ingredients
- 1 pound fresh strawberries, thoroughly washed and dried
- 8 oz dark chocolate, either chopped into small pieces or using chocolate chips
- 1 tablespoon coconut oil for a smooth melt
Optional Ingredients
- 1/2 cup crushed nuts (almonds, pistachios) or colorful sprinkles for decoration
- A pinch of sea salt (optional, for an elegant finish)
Tools Needed
- Lollipop sticks or skewers for easy handling
- Heat-resistant bowl for melting chocolate
- Parchment-lined baking tray for cooling the pops
Gathering the right ingredients is key to making great Chocolate Covered Strawberry Pops. Fresh strawberries are a must. They should be firm and brightly colored. Dark chocolate gives the best rich taste. Adding coconut oil helps the chocolate melt better. You can also use crushed nuts or colorful sprinkles to dress up your pops. A pinch of sea salt adds a nice touch too.
You will need some tools to make this treat. Lollipop sticks or skewers help you dip the strawberries without mess. A heat-resistant bowl keeps you safe while melting the chocolate. A parchment-lined baking tray allows for easy cleanup and cooling.
Step-by-Step Instructions
Preparing the Strawberries
First, wash your strawberries well. Use cold water to rinse them off. After washing, dry them gently with a paper towel. This step is key. Moisture can stop the chocolate from sticking. Next, take each strawberry and insert a lollipop stick. Push it in halfway up the berry. This makes it easy to dip and eat.
Melting the Chocolate
Now, let’s melt the chocolate. You can use a double boiler or a microwave. For the double boiler, place a heat-safe bowl over a pot of simmering water. Stir the chocolate and coconut oil together until melted. If using a microwave, heat for 30 seconds at a time. Stir between each interval. Keep going until the chocolate is smooth. This is important for a good dip.
Dipping and Decorating
Hold the stick and dip each strawberry into the melted chocolate. Swirl it around to coat it well. Let the excess chocolate drip back into the bowl. While the chocolate is still wet, add your toppings. You can use crushed nuts or colorful sprinkles. This adds a fun look and a nice crunch.
Setting and Chilling
To set the chocolate, stand the dipped strawberries upright in a cup or lay them on a baking tray lined with parchment paper. If you want, sprinkle a pinch of sea salt on top for extra flavor. Next, place the tray in the fridge. Chill for about 30 minutes. This will help the chocolate harden and set nicely.
Tips & Tricks
Achieving the Best Chocolate Coating
To get the best chocolate coating, you must dry the strawberries well. Even a little water can make the chocolate slide off. After washing, gently pat the strawberries with a paper towel.
The ideal chocolate melting temperature is around 120°F. If you use a double boiler, keep the water at a simmer. If using a microwave, heat in 30-second bursts. Stir in between to avoid burning.
Decorating Ideas
You can get creative with toppings. Try crushed nuts like almonds or pistachios for a crunch. Colorful sprinkles add fun and cheer to your pops.
For serving, arrange the pops in a tall glass filled with rice or beans for support. This makes for a great display and keeps them upright.
Making Ahead
Yes, you can make chocolate-covered strawberry pops in advance. They stay fresh for a few days if stored properly.
To store them, place the pops in an airtight container in the fridge. Keep layers separated by parchment paper to avoid sticking. Enjoy your treats later!
Pro Tips
- Dry Strawberries Thoroughly: Ensure your strawberries are completely dry before dipping to prevent the chocolate from sliding off.
- Use Quality Chocolate: Opt for high-quality dark chocolate for the best flavor and texture. It melts better and tastes richer.
- Experiment with Toppings: Try different toppings like shredded coconut, or mini chocolate chips for added texture and flavor.
- Chill Before Serving: Let the chocolate-covered strawberries chill in the fridge for at least 30 minutes to ensure the chocolate hardens properly.
Variations
Flavor Variations
You can change the flavor of your Chocolate Covered Strawberry Pops to suit your taste.
- Using white or milk chocolate: Instead of dark chocolate, try using white or milk chocolate. Each type brings its own sweetness and creaminess.
- Incorporating flavor extracts: Adding flavor extracts, like vanilla or peppermint, can give a fun twist. Just a few drops mixed into the melted chocolate can change the game.
Dietary Adjustments
If you have dietary needs, here are some great options.
- Options for dairy-free chocolate: Look for dairy-free chocolate brands. They often use almond or coconut milk. These still melt well and taste great.
- Suggestions for gluten-free alternatives: Most ingredients in this recipe are gluten-free. Just ensure your chocolate and any toppings are certified gluten-free.
Seasonal Themes
Make your pops fit the season or occasion.
- Holiday-themed decorations: For holidays, use colored sprinkles or themed decorations. Red and green for Christmas or orange and black for Halloween can make them festive.
- Fun designs for birthdays or anniversaries: You can create fun designs using colored chocolate. Just melt and drizzle it on top for a special touch.
These variations let you enjoy Chocolate Covered Strawberry Pops in many ways!
Storage Info
Best Practices for Storing
To keep your chocolate-covered strawberry pops fresh, store them in the fridge. The ideal temperature is between 32°F and 40°F. Use an airtight container to prevent moisture and odors. A glass or plastic container works best. Avoid stacking the pops directly on top of each other to keep the chocolate from smudging.
Shelf Life
Chocolate-covered strawberry pops last about three days in the fridge. After that, they may lose flavor and texture. Look for signs of spoilage like sticky or wet chocolate, mushy strawberries, or an off smell. If you notice any of these signs, it is best to throw them away. Enjoy your pops while they are fresh for the best taste!
FAQs
How to make chocolate-covered strawberries without coconut oil?
You can make chocolate-covered strawberries without coconut oil. Use a small amount of butter instead. It helps chocolate melt smoothly. Another option is to use shortening. Shortening also gives a nice shine to your chocolate.
Can chocolate-covered strawberries be frozen?
Yes, chocolate-covered strawberries can be frozen. To freeze them, place the pops in a single layer on a tray. Make sure they do not touch each other. Once frozen, transfer them to a freezer-safe bag. When you want to eat them, take them out and let them thaw in the fridge. This keeps them fresh and tasty.
What is the best type of chocolate for melting?
The best chocolate for melting is dark chocolate. I recommend brands like Ghirardelli or Guittard. They melt well and taste great. You could also use milk chocolate or white chocolate if you like. Just remember to chop it into small pieces for even melting.
In this article, we explored how to create delicious chocolate-covered strawberry pops. We covered the main ingredients like fresh strawberries, dark chocolate, and coconut oil. You learned about preparation, melting techniques, and topping options. Don't forget about tips for storing them and variations you can try. For the best results, follow the steps closely. Enjoy making these treats, whether for a party or just to treat yourself. Everyone will love them, and they’re sure to impress!