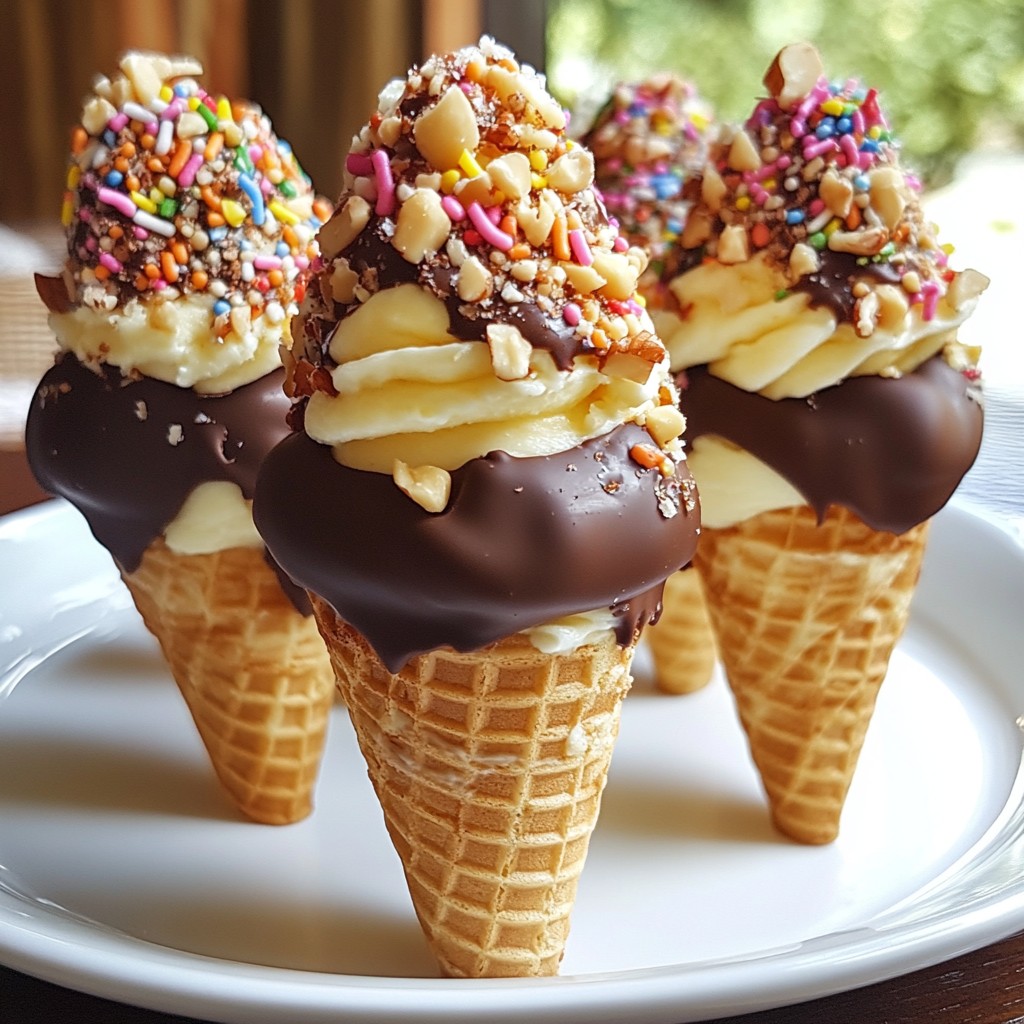
Get ready for a dessert that’s both fun and easy! Chocolate Dipped Cheesecake Cones are a treat you’ll love to make. With a creamy filling tucked inside a crunchy cone and dipped in rich chocolate, it’s a perfect sweet bite. I’ll show you the simple steps to whip this up, plus tips for perfect toppings and variations. Let’s dive into the deliciousness!
Why I Love This Recipe
- Deliciously Creamy: The cheesecake filling is rich and creamy, providing a delightful contrast to the crunchy sugar cone.
- Customizable Toppings: You can personalize each cone with your favorite toppings, making them perfect for any occasion or preference.
- Fun Presentation: These cones are not only tasty but also visually appealing, making them a hit at parties and gatherings.
- Easy to Make: With simple ingredients and straightforward steps, this recipe is quick and easy, perfect for both novice and experienced bakers.
Ingredients
Essential Ingredients for Chocolate Dipped Cheesecake Cones
To make these tasty cones, you need:
- 10 sugar cones
- 8 oz cream cheese, softened
- 1/2 cup powdered sugar
- 1 teaspoon vanilla extract
- 1 cup heavy whipping cream
- 1 cup semi-sweet chocolate chips
- 1 tablespoon coconut oil
These ingredients form the base of your cheesecake filling and the rich chocolate coating. The cream cheese gives a smooth texture, while the heavy cream adds fluffiness.
Optional Toppings to Enhance Your Dessert
You can make your dessert even more fun with toppings. Try these:
- Crushed nuts
- Colorful sprinkles
- Crushed cookies
These toppings add crunch and color. They also let you customize each cone to your taste.
Equipment Needed for Preparation
You will need a few tools to make the process easy:
- Medium mixing bowl
- Large mixing bowl
- Electric mixer
- Spatula
- Parchment paper
- Microwave-safe bowl
Having these tools on hand helps you work faster and keeps your kitchen neat. Enjoy creating your Chocolate Dipped Cheesecake Cones!

Step-by-Step Instructions
Preparing the Cheesecake Filling
To start, gather your cream cheese, powdered sugar, and vanilla extract. In a medium bowl, mix the cream cheese and powdered sugar. Use a whisk or mixer to blend until smooth. You want it creamy and lump-free. Next, take a large bowl and pour in the heavy cream. Using an electric mixer, whip it until stiff peaks form. This means when you lift the whisk, the cream holds its shape. Now, you need to fold the whipped cream into the cheesecake mix. Use a spatula and be gentle. This keeps the mixture fluffy. When combined, the filling should be smooth and light.
Making the Chocolate Coating
While the cheesecake filling chills, it’s time to prepare the chocolate. Take a microwave-safe bowl and add the semi-sweet chocolate chips and coconut oil. Heat this in the microwave. Do it in 30-second bursts, stirring well each time. Keep going until the chocolate melts and becomes smooth. Make sure there are no lumps in the mixture.
Assembling and Dipping the Cones
Once the cheesecake filling is ready, take your sugar cones. Spoon the filling into each cone, packing it down gently. Make sure to fill them all the way to the top. Stand the filled cones in a cup or tray. This keeps them upright. Place them in the freezer for at least 1 hour. This helps the filling set. After the chilling time, take the cones out. Dip the top of each cone into the melted chocolate. Let any extra chocolate drip back into the bowl. Place them on a tray lined with parchment paper. While the chocolate is still warm, sprinkle your choice of toppings. You can use crushed nuts, colorful sprinkles, or crushed cookies. Finally, put the cones back in the freezer for another 15-20 minutes. This helps the chocolate harden. Now, your Chocolate Dipped Cheesecake Cones are ready to serve! Enjoy the blend of creamy and crunchy flavors.
Tips & Tricks
How to Achieve the Perfect Whipped Cream
To make the best whipped cream, start with cold heavy cream. Cold cream whips better and faster. Use a clean bowl and beaters to avoid any mess. Beat the cream on medium speed until you see soft peaks. This means the cream will hold its shape but still look fluffy. Keep mixing until you see stiff peaks. This means the cream will hold its shape without falling. Gently fold this whipped cream into your cheesecake mix. Be careful not to deflate the cream.
Tricks for Filling the Cones Without Mess
Filling the cones can be tricky. Use a piping bag for neat filling. If you don’t have one, cut a small corner off a plastic bag. Fill the bag with the cheesecake mix. Squeeze the mix gently into each cone. Fill them up to the top, but don’t overfill. This helps prevent spills. Pack the filling down lightly to remove air pockets. Stand each cone in a cup or on a tray to keep them upright.
Best Practices for Melting Chocolate
Melting chocolate requires care. Use a microwave-safe bowl for easy melting. Combine chocolate chips and coconut oil. Heat the bowl in 30-second bursts. Stir well between each burst. This helps the chocolate melt evenly. Stop when the chocolate is mostly melted. Stir until smooth to avoid burning. If you see lumps, heat for a few more seconds. Be patient; this will give you a smooth coating for your cones.
Pro Tips
- Use Room Temperature Ingredients: Allow your cream cheese to soften at room temperature before mixing. This ensures a smoother and creamier cheesecake filling without lumps.
- Whip to Stiff Peaks: When whipping the heavy cream, make sure to whip it until stiff peaks form. This will give your cheesecake filling a light and airy texture.
- Chill for Best Results: Don’t skip the chilling step! Freezing the filled cones helps to set the cheesecake filling, making them easier to dip in chocolate without losing their shape.
- Experiment with Toppings: Feel free to get creative with your toppings! Try different combinations of nuts, sprinkles, or even crushed candies to customize your cones to your taste.
Variations
Different Flavor Fillings for Your Cones
You can change up the flavor of your cheesecake filling. Add different extracts to make it unique. For a fruity twist, mix in fresh fruit puree. You could use strawberries, raspberries, or even mango. You can also add a touch of lemon juice for a zesty kick. If you love chocolate, try folding in cocoa powder or melted chocolate. This will give your cones a rich, chocolatey flavor. You can even use flavored cream cheese, like strawberry or chocolate, for added taste.
Alternative Chocolate Coatings
While semi-sweet chocolate is delicious, you can switch it up. White chocolate gives a sweet and creamy touch. Just melt it the same way as dark chocolate. You can also use milk chocolate for a sweeter flavor. For a fun twist, try colored candy melts. They add fun colors and can match any theme. If you want a healthier option, use dark chocolate. It has a richer flavor and is lower in sugar.
Creative Toppings to Try
Toppings add fun and crunch to your cones. You can sprinkle crushed nuts on top for a nutty flavor. Almonds, walnuts, or pecans work great. Colorful sprinkles make your cones look festive and fun. Crushed cookies, like Oreos or graham crackers, add extra texture. For a tropical touch, try shredded coconut. You could even drizzle caramel or chocolate sauce over the top. Each topping gives your cones a new taste and look. Mix and match to find your favorite combination!
Storage Info
How to Store Leftover Cheesecake Cones
To keep your leftover cheesecake cones fresh, store them in an airtight container. This helps to keep the cones crunchy and the filling creamy. Place a layer of parchment paper between layers to avoid sticking. You can store them in the fridge for up to three days.
Freezing Tips for Long-Term Enjoyment
If you want to save your cheesecake cones for later, freezing is a great option. First, freeze the filled cones for about one hour until firm. Then, wrap each cone in plastic wrap and place them in a freezer-safe bag. They can last in the freezer for up to two months. When you're ready to enjoy them, thaw in the fridge for a few hours.
Best Practices for Using Stored Ingredients
When using stored ingredients, check for freshness first. If you find any signs of spoilage, discard them. For the cream cheese, ensure it’s smooth and creamy before mixing. If your whipped cream is stored, re-whip it slightly before folding into the mixture. This keeps the texture light and fluffy. Enjoy your cheesecake cones at their best!
FAQs
Can I make Chocolate Dipped Cheesecake Cones ahead of time?
Yes, you can make Chocolate Dipped Cheesecake Cones ahead of time. After you fill the cones, chill them in the freezer. They can stay frozen for about a week. This way, you have a sweet treat ready when you want it. Just remember to add the chocolate coating and toppings right before serving.
What can I use instead of cream cheese?
If you want a change, you can use mascarpone cheese as a swap for cream cheese. It has a creamy texture and a mild taste. You could also try Greek yogurt for a lighter option. Just know that it might change the flavor and texture a bit.
How to prevent the chocolate from cracking?
To avoid cracking chocolate, make sure it is smooth and warm when you dip the cones. Adding coconut oil helps the chocolate stay shiny and soft. After dipping, let the chocolate set at room temperature for a few minutes. Then, place the cones back in the freezer to firm up. This helps keep the chocolate intact when you bite into your cone.
You learned how to make Chocolate Dipped Cheesecake Cones, from choosing the right ingredients to preparing a smooth cheesecake filling. I shared tips for perfect whipped cream and how to fill cones neatly. There are many fun variations and creative toppings to try. Remember to store any extras properly for later enjoyment. These cones are sure to impress, so enjoy your tasty creations. Happy baking!