Cottage Cheese Cheesecake Cups Creamy Dessert Delight

WANT TO SAVE THIS RECIPE?

Looking for a creamy dessert that’s easy to make and delightful to eat? Try my Cottage Cheese Cheesecake Cups! These tasty treats combine rich cottage cheese with sweet flavors and crunchy crusts. Whether you’re hosting a party or just treating yourself, these cups will impress. Join me as we explore the simple steps and fun variations that will make this dessert a showstopper at any gathering!

Ingredients

Cottage Cheese and Dairy Ingredients

For this recipe, I use:

– 2 cups cottage cheese, blended until smooth

– 1/2 cup Greek yogurt

Cottage cheese adds a creamy texture. Greek yogurt makes the dessert extra rich and tangy.

Sweeteners and Flavorings

You will need:

– 1/2 cup honey or maple syrup

– 1 teaspoon vanilla extract

– 1 tablespoon freshly squeezed lemon juice

– 1 teaspoon cornstarch

– 1/4 teaspoon salt

Honey or maple syrup gives sweetness. Vanilla and lemon juice add nice flavors.

Crust Ingredients

For the crust, gather:

– 1 cup graham cracker crumbs

– 4 tablespoons unsalted butter, melted

The graham cracker crumbs create a crunchy base. The melted butter holds it all together.

Garnish Options

For garnish, consider:

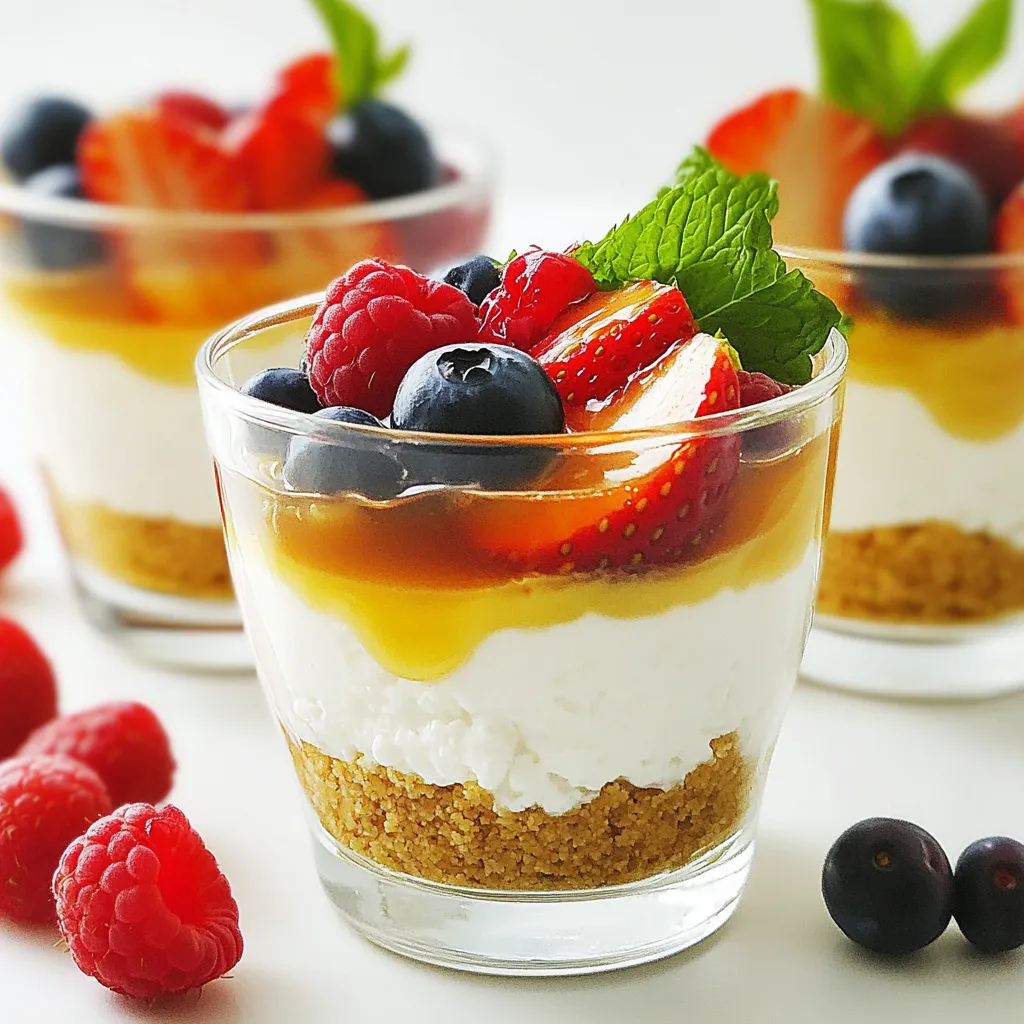
– Fresh berries (such as strawberries, blueberries, and raspberries)

– Fresh mint leaves for garnish (optional)

Berries add color and taste. Mint leaves give a fresh touch to your dessert.

Step-by-Step Instructions

Prep the Cottage Cheese Mixture

Start by blending two cups of cottage cheese until smooth. Add half a cup of Greek yogurt, half a cup of honey or maple syrup, one teaspoon of vanilla extract, one tablespoon of fresh lemon juice, one teaspoon of cornstarch, and a pinch of salt. Blend this mixture on high until it is creamy and lump-free. Set it aside for later.

Prepare the Crust

In a medium bowl, mix one cup of graham cracker crumbs with four tablespoons of melted unsalted butter. Use a fork or your fingers to combine them well. The mixture should feel like wet sand. This will form a tasty crust for your cups.

Assemble the Cups

Take your clear dessert cups or small glasses. Spoon about two tablespoons of the graham cracker mixture into each cup. Press down lightly with a spoon to make a firm crust layer. Make sure it is even across the bottom.

Add the Filling

Now, carefully spoon the creamy cottage cheese mixture on top of the crust in each cup. Fill them about two-thirds full. Gently tap the cups on the counter to remove any air bubbles. This ensures a nice, smooth finish.

Chill

Place the cups in the refrigerator. Let them chill for at least two hours. This helps the mixture set properly, making each bite delightful.

Garnish and Serve

Once chilled, take the cups out of the fridge. Top each cheesecake cup with fresh berries like strawberries or blueberries. You can also add a mint leaf for a fun touch. Serve right away and enjoy your yummy dessert!

Tips & Tricks

Achieving the Perfect Texture

To make your cottage cheese cheesecake cups smooth, blend the cottage cheese well. I recommend using a high-speed blender. It breaks down lumps quickly. Combine it with Greek yogurt for extra creaminess. The mixture should feel velvety. If it’s too thick, add a splash of milk or water.

Substitutions for Ingredients

You can swap honey for maple syrup if you prefer. For a lighter option, use low-fat cottage cheese. If you want a dairy-free treat, try a plant-based yogurt. You can also use sugar instead of honey or syrup. Just adjust the amount to taste.

Presentation Tips

Use clear dessert cups to show off the layers. Start with a neat layer of graham cracker crust. Then, spoon the creamy filling carefully on top. After chilling, garnish with fresh berries for color. A mint leaf adds a nice touch. Arrange them on a pretty platter for serving.

Variations

Flavor Variations

You can change up the flavors in your cheesecake cups. Here are some fun ideas:

Chocolate: Add cocoa powder to the cottage cheese mixture for a rich chocolate taste.

Fruit-infused: Blend in pureed fruits like strawberries or blueberries. This adds natural sweetness and color.

Citrus: Try adding orange or lime zest for a bright twist. It makes the dessert refreshing.

Spices: Add a pinch of cinnamon or nutmeg for warmth. These spices complement the creaminess perfectly.

Experiment with these flavors to find your favorite!

Different Crust Options

You can use different crusts for your cheesecake cups. Here are some choices:

Gluten-free: Use almond flour or gluten-free cookies instead of graham crackers.

Oreo crust: Crush Oreos for a chocolatey twist. This adds a fun flavor.

Nut crust: Mix ground nuts like pecans or walnuts with butter. This gives a crunchy texture.

Coconut crust: Combine shredded coconut with melted butter for a tropical flavor.

Switching the crust can make each cup unique!

Individual Serving Suggestions

Making individual servings can be fun. Here are some ideas to make your dessert special:

Layering: Alternate layers of cheesecake mixture with fruit or sauce in the cups. This looks great and tastes amazing.

Mini cups: Use smaller cups for bite-sized treats. Perfect for parties or snacks.

Themed toppings: Use seasonal fruits or colored sprinkles for holidays. This adds a festive touch.

Serving with sauce: Drizzle chocolate or caramel sauce over the top for extra sweetness.

These tips help you create a dessert that everyone will love!

Storage Info

How to Store Leftover Cheesecake Cups

Store any leftover cheesecake cups in the fridge. Use an airtight container to keep them fresh. They will stay good for up to three days. If you skip the lid, the cups may dry out or absorb smells from the fridge.

Freezing Instructions

You can freeze these cheesecake cups if you want to save them for later. Cover each cup tightly with plastic wrap. Then, place them in a freezer-safe container. They can last for up to two months in the freezer. To eat, move them to the fridge overnight to thaw.

Shelf Life Guidelines

These cheesecake cups are best eaten fresh. However, they can last:

In the fridge: 3 days

In the freezer: 2 months

Check for any signs of spoilage before eating. If they smell off or look strange, it is best to throw them away.

FAQs

Can I use low-fat cottage cheese?

Yes, you can use low-fat cottage cheese. It still gives a creamy texture. The flavor stays nice too. Some people prefer low-fat options for health reasons. Just blend it well to keep it smooth.

How long do the cheesecake cups need to chill?

The cheesecake cups need to chill for at least 2 hours. This time helps them set properly. Chilling makes the cups firmer and tastier. You can chill them longer if you want.

Can I make these cheesecake cups ahead of time?

Absolutely! You can make these cups a day before. Just store them in the fridge. This helps the flavors blend well. Plus, it saves time for parties or gatherings.

What can I use instead of graham crackers?

If you don’t have graham crackers, try crushed cookies. Vanilla wafers work well too. You can also use gluten-free cookies for a gluten-free option. Just make sure to mix them with melted butter.

Are these cheesecake cups suitable for a specific diet?

Yes, these cheesecake cups can fit various diets. Use low-fat cottage cheese for a lighter option. You can also choose maple syrup for a vegan sweetener. Adjust the crust for gluten-free needs. These options make them more inclusive for everyone.

Making cheesecake cups is easy and fun. First, gather ingredients like cottage cheese, sweeteners, and crust options. Mix, assemble, and chill your cups for the best texture. Don’t forget to try different flavors and garnishes.

Finally, store extras correctly to enjoy later. With these tips and tricks, you can create tasty desserts that impress. Enjoy your delicious cheesecake cups with friends and family!

For this recipe, I use: - 2 cups cottage cheese, blended until smooth - 1/2 cup Greek yogurt Cottage cheese adds a creamy texture. Greek yogurt makes the dessert extra rich and tangy. You will need: - 1/2 cup honey or maple syrup - 1 teaspoon vanilla extract - 1 tablespoon freshly squeezed lemon juice - 1 teaspoon cornstarch - 1/4 teaspoon salt Honey or maple syrup gives sweetness. Vanilla and lemon juice add nice flavors. For the crust, gather: - 1 cup graham cracker crumbs - 4 tablespoons unsalted butter, melted The graham cracker crumbs create a crunchy base. The melted butter holds it all together. For garnish, consider: - Fresh berries (such as strawberries, blueberries, and raspberries) - Fresh mint leaves for garnish (optional) Berries add color and taste. Mint leaves give a fresh touch to your dessert. Start by blending two cups of cottage cheese until smooth. Add half a cup of Greek yogurt, half a cup of honey or maple syrup, one teaspoon of vanilla extract, one tablespoon of fresh lemon juice, one teaspoon of cornstarch, and a pinch of salt. Blend this mixture on high until it is creamy and lump-free. Set it aside for later. In a medium bowl, mix one cup of graham cracker crumbs with four tablespoons of melted unsalted butter. Use a fork or your fingers to combine them well. The mixture should feel like wet sand. This will form a tasty crust for your cups. Take your clear dessert cups or small glasses. Spoon about two tablespoons of the graham cracker mixture into each cup. Press down lightly with a spoon to make a firm crust layer. Make sure it is even across the bottom. Now, carefully spoon the creamy cottage cheese mixture on top of the crust in each cup. Fill them about two-thirds full. Gently tap the cups on the counter to remove any air bubbles. This ensures a nice, smooth finish. Place the cups in the refrigerator. Let them chill for at least two hours. This helps the mixture set properly, making each bite delightful. Once chilled, take the cups out of the fridge. Top each cheesecake cup with fresh berries like strawberries or blueberries. You can also add a mint leaf for a fun touch. Serve right away and enjoy your yummy dessert! To make your cottage cheese cheesecake cups smooth, blend the cottage cheese well. I recommend using a high-speed blender. It breaks down lumps quickly. Combine it with Greek yogurt for extra creaminess. The mixture should feel velvety. If it’s too thick, add a splash of milk or water. You can swap honey for maple syrup if you prefer. For a lighter option, use low-fat cottage cheese. If you want a dairy-free treat, try a plant-based yogurt. You can also use sugar instead of honey or syrup. Just adjust the amount to taste. Use clear dessert cups to show off the layers. Start with a neat layer of graham cracker crust. Then, spoon the creamy filling carefully on top. After chilling, garnish with fresh berries for color. A mint leaf adds a nice touch. Arrange them on a pretty platter for serving. {{image_4}} You can change up the flavors in your cheesecake cups. Here are some fun ideas: - Chocolate: Add cocoa powder to the cottage cheese mixture for a rich chocolate taste. - Fruit-infused: Blend in pureed fruits like strawberries or blueberries. This adds natural sweetness and color. - Citrus: Try adding orange or lime zest for a bright twist. It makes the dessert refreshing. - Spices: Add a pinch of cinnamon or nutmeg for warmth. These spices complement the creaminess perfectly. Experiment with these flavors to find your favorite! You can use different crusts for your cheesecake cups. Here are some choices: - Gluten-free: Use almond flour or gluten-free cookies instead of graham crackers. - Oreo crust: Crush Oreos for a chocolatey twist. This adds a fun flavor. - Nut crust: Mix ground nuts like pecans or walnuts with butter. This gives a crunchy texture. - Coconut crust: Combine shredded coconut with melted butter for a tropical flavor. Switching the crust can make each cup unique! Making individual servings can be fun. Here are some ideas to make your dessert special: - Layering: Alternate layers of cheesecake mixture with fruit or sauce in the cups. This looks great and tastes amazing. - Mini cups: Use smaller cups for bite-sized treats. Perfect for parties or snacks. - Themed toppings: Use seasonal fruits or colored sprinkles for holidays. This adds a festive touch. - Serving with sauce: Drizzle chocolate or caramel sauce over the top for extra sweetness. These tips help you create a dessert that everyone will love! Store any leftover cheesecake cups in the fridge. Use an airtight container to keep them fresh. They will stay good for up to three days. If you skip the lid, the cups may dry out or absorb smells from the fridge. You can freeze these cheesecake cups if you want to save them for later. Cover each cup tightly with plastic wrap. Then, place them in a freezer-safe container. They can last for up to two months in the freezer. To eat, move them to the fridge overnight to thaw. These cheesecake cups are best eaten fresh. However, they can last: - In the fridge: 3 days - In the freezer: 2 months Check for any signs of spoilage before eating. If they smell off or look strange, it is best to throw them away. Yes, you can use low-fat cottage cheese. It still gives a creamy texture. The flavor stays nice too. Some people prefer low-fat options for health reasons. Just blend it well to keep it smooth. The cheesecake cups need to chill for at least 2 hours. This time helps them set properly. Chilling makes the cups firmer and tastier. You can chill them longer if you want. Absolutely! You can make these cups a day before. Just store them in the fridge. This helps the flavors blend well. Plus, it saves time for parties or gatherings. If you don’t have graham crackers, try crushed cookies. Vanilla wafers work well too. You can also use gluten-free cookies for a gluten-free option. Just make sure to mix them with melted butter. Yes, these cheesecake cups can fit various diets. Use low-fat cottage cheese for a lighter option. You can also choose maple syrup for a vegan sweetener. Adjust the crust for gluten-free needs. These options make them more inclusive for everyone. Making cheesecake cups is easy and fun. First, gather ingredients like cottage cheese, sweeteners, and crust options. Mix, assemble, and chill your cups for the best texture. Don’t forget to try different flavors and garnishes. Finally, store extras correctly to enjoy later. With these tips and tricks, you can create tasty desserts that impress. Enjoy your delicious cheesecake cups with friends and family!

Cottage Cheese Cheesecake Cups

Indulge in the deliciousness of Cottage Cheese Cheesecake Cups! This simple dessert combines creamy cottage cheese, Greek yogurt, and a touch of honey for a refreshing twist on cheesecake. Perfect for any occasion, these individual cups are topped with fresh berries for a burst of flavor. Ready in just 15 minutes plus chilling time, click through to discover this delightful recipe and impress your guests! #CottageCheeseCheesecake #DessertRecipe #HealthyDesserts #CheesecakeCups

Ingredients
  

2 cups cottage cheese, blended until smooth

1/2 cup Greek yogurt

1/2 cup honey or maple syrup

1 teaspoon vanilla extract

1 tablespoon freshly squeezed lemon juice

1 teaspoon cornstarch

1/4 teaspoon salt

1 cup graham cracker crumbs

4 tablespoons unsalted butter, melted

Fresh berries (such as strawberries, blueberries, and raspberries) for garnish

Fresh mint leaves for garnish (optional)

Instructions
 

Prep the Cottage Cheese Mixture: In a blender or food processor, add the cottage cheese, Greek yogurt, honey (or maple syrup), vanilla extract, freshly squeezed lemon juice, cornstarch, and salt. Blend on high until the mixture becomes creamy and smooth, ensuring there are no lumps. Once blended, set the mixture aside.

    Prepare the Crust: In a medium bowl, combine the graham cracker crumbs with the melted unsalted butter. Use a fork or your hands to mix until all the crumbs are evenly coated in butter and have a texture that resembles wet sand.

      Assemble the Cups: Gather your clear dessert cups or small glasses. Spoon about 2 tablespoons of the graham cracker mixture into the bottom of each cup. Press the crumbs down lightly with the back of a spoon or your fingers to form a compact crust layer.

        Add the Filling: Carefully spoon the creamy cottage cheese mixture on top of the crust in each cup, filling them to about two-thirds full. Gently tap the cups on the countertop to remove any trapped air bubbles and to level off the filling.

          Chill: Transfer the assembled cheesecake cups to the refrigerator. Allow them to chill for a minimum of 2 hours, enabling the mixture to set properly.

            Garnish and Serve: After the cups have set, remove them from the refrigerator. Top each cheesecake cup with a generous helping of fresh berries and a mint leaf for a refreshing touch, if desired. Serve immediately and enjoy your delightful dessert!

              Prep Time, Total Time, Servings: 15 mins | 2 hrs | 4 servings

                WANT TO SAVE THIS RECIPE?

                Leave a Comment

                Recipe Rating