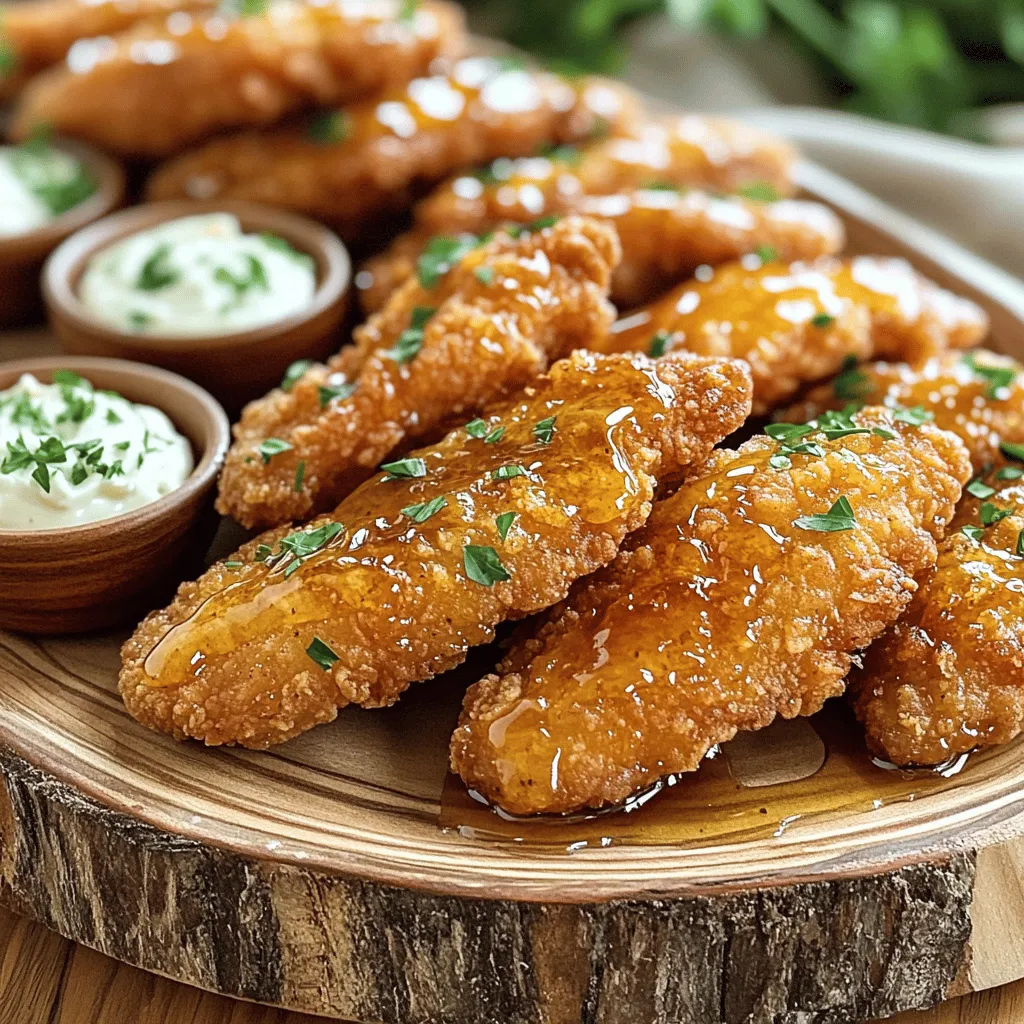
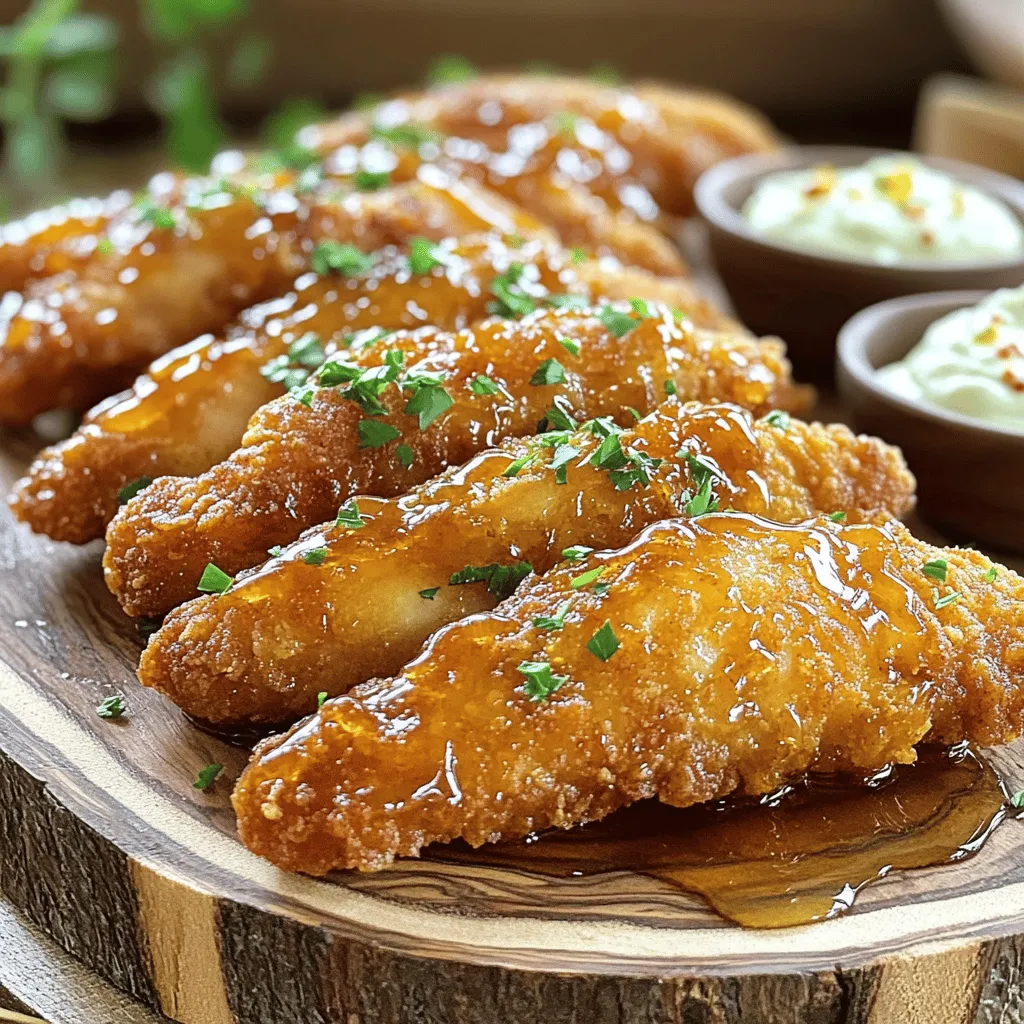
Are you ready to make a dinner that will impress? My Crispy Honey Chicken Tenders are easy and bursting with flavor. With just a few simple ingredients, you can whip up this delight for your family. Whether you’re a novice or an expert in the kitchen, this dish is a must-try! In this article, I’ll share my step-by-step guide, tips, and variations to make your meal amazing. Let’s dive in!
“`markdown
H2 – Ingredients
To make the best crispy honey chicken tenders, you need simple ingredients. Here’s what you will need:
– 1 lb chicken breast, sliced into strips
– 1 cup buttermilk
– 1 cup all-purpose flour
– 1/2 cup cornmeal
– 1 tablespoon garlic powder
– 1 tablespoon onion powder
– 1 teaspoon paprika
– 1 teaspoon black pepper
– 1 teaspoon salt
– 1/2 teaspoon cayenne pepper (optional, for a spicy kick)
– 1/4 cup honey
– 2 tablespoons soy sauce
– Oil for frying
Each ingredient plays a key role. The buttermilk helps tenderize the chicken. It adds flavor and moisture. The flour and cornmeal create a crunchy coating. The spices bring depth to your dish.
You can add more spices if you like bold flavors. A pinch of chili powder or dried herbs can work well.
For the honey sauce, the sweet honey pairs perfectly with soy sauce. This mix adds rich flavor to the crispy tenders.
These ingredients come together to create a dish everyone will love.Enjoy cooking!
“`
Step-by-Step Instructions
Marinating the Chicken
First, take your chicken strips and coat them in buttermilk. This helps the chicken stay moist and adds flavor. Place the coated strips in a bowl, cover it, and refrigerate for at least 30 minutes. This marinating time allows the flavors to soak in and tenderizes the chicken.
Preparing the Coating
While the chicken marinates, you can prepare the coating. In a large bowl, mix together the flour, cornmeal, garlic powder, onion powder, paprika, black pepper, salt, and cayenne pepper. This mix gives the chicken a tasty crust. To ensure a crispy coating, press the chicken strips into the flour mixture firmly.
Frying the Chicken Tenders
Next, heat oil in a deep skillet or frying pan. Pour enough oil to cover the bottom, about 1-2 inches deep. Heat the oil to around 350°F (175°C). You can test the heat by dropping a pinch of the flour mix into the oil. If it sizzles, you are ready. Carefully add the chicken tenders in batches to avoid crowding. Fry them for about 4-5 minutes on each side until golden brown. Use a slotted spoon to transfer them to a plate lined with paper towels.
Making the Honey Sauce
While the chicken cooks, let’s make the honey sauce. In a small saucepan, combine 1/4 cup of honey and 2 tablespoons of soy sauce. Heat this over low heat. Stir until everything blends and is warm. Make sure it does not boil, as this can change the texture.
Glazing the Tenders
Once your chicken tenders are fried, it’s time to glaze them. You can either drizzle the honey-soy mixture over the chicken or toss the tenders in the saucepan. If you toss, you get a nice even coating. For a pretty presentation, arrange the tenders on a large platter. You can garnish with chopped parsley for color. Enjoy this crispy honey chicken tenders dish!
Tips & Tricks
Achieving Maximum Crispiness
To get those chicken tenders super crispy, marination is key. Soak your chicken strips in buttermilk for at least 30 minutes. This step makes the chicken juicy and helps the coating stick better.
Next, frying temperature matters. Heat your oil to about 350°F (175°C). You can test the oil by dropping a bit of the flour mix into it. If it sizzles, you’re good to go. Frying at the right temperature ensures a crunchy outside and tender inside.
Serving Suggestions
When serving your crispy honey chicken tenders, pair them with sides that complement their flavor. Fresh coleslaw, crispy fries, or roasted veggies work great.
For dipping sauces, ranch and honey mustard are classic choices. You can also try spicy aioli or sweet chili sauce for a fun twist. These sauces add more flavor and make each bite exciting.
Flavor Enhancements
Want to mix things up? You can add spice to the coating. Try using cayenne pepper for heat or smoked paprika for a smoky twist.
For marinades, consider adding lemon juice or hot sauce to the buttermilk. This gives your chicken a zesty kick. You can also experiment with different glazes. Teriyaki sauce or a spicy barbecue sauce can create fun flavors.Enjoy making these tenders your own!
Variations
Healthier Baked Option
You can bake crispy honey chicken tenders for a lighter version. Start by preheating your oven to 400°F (200°C). Instead of frying, line a baking sheet with parchment paper. Place the coated chicken strips on the sheet without crowding them. Spray the chicken lightly with oil for a nice crisp. Bake for about 20-25 minutes, flipping halfway through. This way, you keep the flavor while cutting down on oil.
Flavor Variations
Get creative with flavors! You can add different spices to the flour mixture. Try using oregano, thyme, or even lemon zest for a fresh twist. For glaze options, consider adding chili sauce or balsamic vinegar. These changes can give your chicken tenders a whole new taste.
Dietary Adaptations
If you need gluten-free options, substitute all-purpose flour with almond flour or a gluten-free blend. For those on low-sodium diets, use low-sodium soy sauce. You can also skip the salt in the coating mix and enjoy a tasty meal without the extra sodium.
Storage Info
How to Store Leftovers
To keep your crispy honey chicken tenders fresh, follow these tips. First, let them cool to room temperature. This step helps prevent moisture build-up. Once cooled, place the tenders in an airtight container. A glass or plastic container works well. Make sure to separate layers with parchment paper to avoid sticking. Store the container in the fridge. They should stay good for about three days.
Reheating Tips
When you want to enjoy your leftovers, reheating them properly is key. For the best crispiness, use an oven. Preheat the oven to 375°F (190°C). Place the tenders on a baking sheet. Bake them for about 10-12 minutes. This method keeps them crispy and tasty.
If you need to use the microwave, here’s a quick trick. Place a paper towel on a microwave-safe plate. Arrange the chicken tenders on top. Cover them with another paper towel to trap steam. Heat them for about 1-2 minutes. Check if they are warm enough. You might need to heat them a little longer. Enjoy your meal with the flavor intact!
FAQs
Can I use frozen chicken for this recipe?
Yes, you can use frozen chicken. However, you must thaw it first. To do this, place the chicken in the fridge overnight. If you’re short on time, use the cold water method. Seal the chicken in a bag and submerge it in cold water for about an hour. Change the water every 30 minutes. Once thawed, pat it dry. This helps the chicken absorb the buttermilk better.
How do I know when the chicken is fully cooked?
To check if the chicken is done, use a meat thermometer. Insert it into the thickest part of a tender. The safe internal temperature for chicken is 165°F (75°C). If the chicken reaches this temperature, it is safe to eat. If you don’t have a thermometer, cut into one tender. The meat should be white and juices should run clear.
What can I substitute for buttermilk?
If you don’t have buttermilk, you can make a quick substitute. Mix 1 cup of milk with 1 tablespoon of vinegar or lemon juice. Let it sit for about 5-10 minutes. This will create a tangy milk that works well in the recipe. You can also use plain yogurt thinned with a bit of water.
Is it possible to make these tenders ahead of time?
Yes, you can prepare the chicken tenders ahead. Marinate the chicken in buttermilk and store it in the fridge for up to 24 hours. You can also coat the chicken in the flour mixture and keep it in the fridge. Just make sure to fry them fresh when you’re ready. This ensures they stay crispy.
In this post, we covered how to make delicious chicken tenders. You learned about key ingredients, marinating tips, and achieving maximum crispiness. We also explored baking options and flavor variations, along with how to store leftovers. By following these steps, you can create a meal that’s both tasty and fun to make. Remember, you can always adjust the recipe to match your taste. Enjoy your cooking adventure with these chicken tenders!