Dill Pickled Okra Tangy and Crunchy Delight

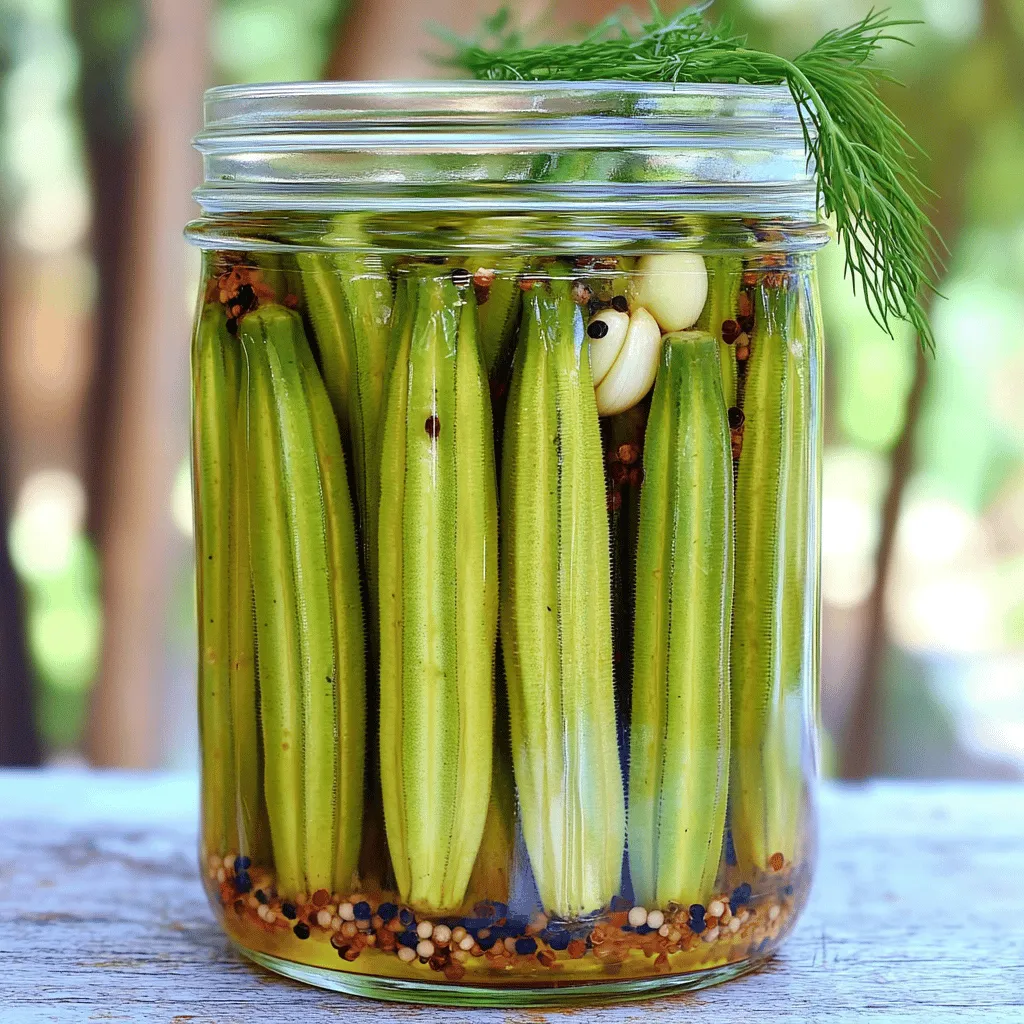
Are you ready to dive into a tangy and crunchy delight? Dill pickled okra is a perfect snack or side dish, packed with bold flavors. In this post, I’ll guide you through easy steps to make your own at home. I’ll also share tips for customizing the taste and ensure you achieve that perfect crunch. Let’s get started on this delicious journey together!

Ingredients

Main Ingredients for Dill Pickled Okra

– 1 pound fresh okra, with stems trimmed

– 1 cup distilled white vinegar

– 1 cup water

Seasoning Ingredients

– 2 tablespoons kosher salt

– 2 tablespoons granulated sugar

– 4 cloves garlic, crushed

Optional Ingredients for Extra Flavor

– 1 tablespoon dill seeds

– 1 tablespoon whole black peppercorns

– 1 teaspoon red pepper flakes (optional, for a spicy kick)

– 2 sprigs fresh dill

When making dill pickled okra, you need fresh okra. Look for pods that are bright green and firm. The vinegar adds the tangy bite, while the water helps balance the brine. Kosher salt is your best friend here, as it adds flavor without making the pickles too salty. Granulated sugar softens the sharpness and brings a nice sweetness.

Garlic brings a savory depth that pairs well with the okra. If you want a more complex flavor, consider adding dill seeds and whole black peppercorns. They add warmth and aroma. If you like heat, red pepper flakes give a nice kick without overpowering the taste. Fresh dill adds brightness and a burst of flavor.

For the full recipe, just check out the details above. Enjoy creating this crunchy delight!

Step-by-Step Instructions

Preparing the Okra

First, rinse the fresh okra under cold running water. This removes dirt and makes it clean. Next, trim the stem ends carefully. Do not cut into the pods. Keeping the pod intact helps with crunch. Set the okra aside for later.

Making the Pickling Brine

Grab a medium saucepan and combine the following:

– 1 cup distilled white vinegar

– 1 cup water

– 2 tablespoons kosher salt

– 2 tablespoons granulated sugar

Place the saucepan over medium-high heat. Bring this mixture to a boil, stirring all the time. Wait until the salt and sugar dissolve fully. After that, remove the saucepan from heat. Let the brine cool to a warm temperature.

Packing the Jar

Take your sterilized quart jar. Start by adding:

– 4 cloves crushed garlic

– 1 tablespoon dill seeds

– 1 tablespoon whole black peppercorns

– 1 teaspoon red pepper flakes (if you want a bit of heat)

– 2 sprigs fresh dill

Now, carefully pack the okra upright into the jar. Arrange the okra snugly but do not squish them. This keeps their shape and crunch.

Adding the Brine

Now, pour the warm pickling brine over the okra. Make sure every pod is fully submerged. Leave about a half-inch of space at the top of the jar. This allows for the expansion during pickling.

Final Steps

Use a clean cloth to wipe the jar’s rim. This ensures a good seal. Secure the lid tightly on the jar. Allow the jar to cool to room temperature. This may take around 30 minutes. After cooling, place the jar in the fridge. For the best taste, let the okra pickle for at least 48 hours. The longer they sit, the better they taste.

Now you can enjoy your dill pickled okra as a tangy snack! Check out the Full Recipe for all the details.

Tips & Tricks

Achieving the Perfect Crunch

To get that perfect crunch in your dill pickled okra, trimming is key. Trim the stem ends, but don’t cut into the pods. This keeps the okra firm and helps it hold its shape. A sharp knife works best for this task. You want to ensure that each pod stays whole during pickling. The right technique makes a big difference in texture.

Adjusting Spice Levels

You can easily change the heat in your pickled okra. If you like it spicy, add more red pepper flakes. Start with one teaspoon and adjust to your taste. If you prefer a milder flavor, skip the red pepper flakes altogether. Tasting the brine before you pour it over the okra is a smart move. This way, you can find your perfect balance of spice.

Best Practices for Sterilizing Jars

Safety is vital when pickling. Always sterilize your jars before use. You can do this by boiling them in water for 10 minutes. Let them air dry on a clean towel. A clean jar helps prevent spoilage. For extra safety, make sure your lids are also new or well sterilized. This simple step ensures your dill pickled okra stays fresh and tasty for longer.

Variations

Spicy Dill Pickled Okra

To make your okra spicy, add more red pepper flakes. I suggest starting with two teaspoons instead of one. This small change brings heat but preserves that delightful crunch. The spiciness pairs well with the tangy brine. You can adjust the heat level based on your taste. If you want even more kick, try adding sliced jalapeños to the jar. They will soak in the brine and add extra flavor.

Garlic Dill Pickled Okra

Do you love garlic? Increase the garlic quantity for a more robust flavor. Instead of four cloves, try using six or eight. The garlic infuses into the brine, making each bite packed with flavor. You can also use garlic powder if you prefer. Just remember, fresh garlic gives the best taste! This variation pairs well with sandwiches or as a snack.

Sweet Dill Pickled Okra

For those who enjoy a hint of sweetness, adjust the sugar levels. Increase the granulated sugar from two tablespoons to four. This small tweak creates a nice balance between sweet and tangy. You can also use honey or agave syrup if you want a natural sweetener. This sweet version is fantastic on cheese boards or as a side dish. Try it out for a unique twist!

Discover the [Full Recipe] to create these tasty variations!

Storage Info

How to Store Dill Pickled Okra

To keep your dill pickled okra fresh, store it in the refrigerator. Make sure to place the jar tightly sealed. This helps keep the flavor strong and the crunch intact.

Shelf Life of Pickled Okra

You can keep dill pickled okra in the fridge for about 1 to 2 months. After that, the flavor may fade. For best taste, enjoy it within this time frame.

Signs of Spoilage

Look for signs of spoilage in your okra. If you see any mold, it’s time to toss it. A sour or off smell is also a warning sign. If the okra becomes mushy or changes color, do not eat it. Always trust your senses when it comes to food safety.

For the full recipe, check out Dill Pickled Okra!

FAQs

Can I make dill pickled okra without canning?

Yes, you can make dill pickled okra without canning. This method is easy and quick. You only need to store your pickled okra in the fridge. This way, you keep it fresh without the need for long-term storage. Just follow the steps in the Full Recipe. Your okra will last for weeks in the fridge. This method keeps the crunch and flavor intact.

What are the health benefits of pickled okra?

Pickled okra has many health benefits. It is low in calories and rich in fiber. This helps with digestion and keeps you full. Okra is also high in vitamins A, C, and K. These vitamins support your immune system and help your skin. The vinegar in pickles can assist with blood sugar control. Overall, pickled okra is a healthy snack choice.

Where can I purchase pre-made dill pickled okra?

You can find pre-made dill pickled okra at grocery stores. Look in the pickle aisle or the canned vegetable section. Brands like Mt. Olive and Grillo’s Pickles often have good options. You may also find them at farmers’ markets or specialty stores. Be sure to check the label for quality and ingredients.

Dill pickled okra is easy and fun to make at home. You learned about the key ingredients and steps for perfect pickles. Remember to adjust spices for your taste. Store them correctly to keep their crunch and flavor. With your new knowledge, you can enjoy these tangy snacks anytime. Dive into this delicious project, and relish the rewards of your creation!

- 1 pound fresh okra, with stems trimmed - 1 cup distilled white vinegar - 1 cup water - 2 tablespoons kosher salt - 2 tablespoons granulated sugar - 4 cloves garlic, crushed - 1 tablespoon dill seeds - 1 tablespoon whole black peppercorns - 1 teaspoon red pepper flakes (optional, for a spicy kick) - 2 sprigs fresh dill When making dill pickled okra, you need fresh okra. Look for pods that are bright green and firm. The vinegar adds the tangy bite, while the water helps balance the brine. Kosher salt is your best friend here, as it adds flavor without making the pickles too salty. Granulated sugar softens the sharpness and brings a nice sweetness. Garlic brings a savory depth that pairs well with the okra. If you want a more complex flavor, consider adding dill seeds and whole black peppercorns. They add warmth and aroma. If you like heat, red pepper flakes give a nice kick without overpowering the taste. Fresh dill adds brightness and a burst of flavor. For the full recipe, just check out the details above. Enjoy creating this crunchy delight! First, rinse the fresh okra under cold running water. This removes dirt and makes it clean. Next, trim the stem ends carefully. Do not cut into the pods. Keeping the pod intact helps with crunch. Set the okra aside for later. Grab a medium saucepan and combine the following: - 1 cup distilled white vinegar - 1 cup water - 2 tablespoons kosher salt - 2 tablespoons granulated sugar Place the saucepan over medium-high heat. Bring this mixture to a boil, stirring all the time. Wait until the salt and sugar dissolve fully. After that, remove the saucepan from heat. Let the brine cool to a warm temperature. Take your sterilized quart jar. Start by adding: - 4 cloves crushed garlic - 1 tablespoon dill seeds - 1 tablespoon whole black peppercorns - 1 teaspoon red pepper flakes (if you want a bit of heat) - 2 sprigs fresh dill Now, carefully pack the okra upright into the jar. Arrange the okra snugly but do not squish them. This keeps their shape and crunch. Now, pour the warm pickling brine over the okra. Make sure every pod is fully submerged. Leave about a half-inch of space at the top of the jar. This allows for the expansion during pickling. Use a clean cloth to wipe the jar's rim. This ensures a good seal. Secure the lid tightly on the jar. Allow the jar to cool to room temperature. This may take around 30 minutes. After cooling, place the jar in the fridge. For the best taste, let the okra pickle for at least 48 hours. The longer they sit, the better they taste. Now you can enjoy your dill pickled okra as a tangy snack! Check out the Full Recipe for all the details. To get that perfect crunch in your dill pickled okra, trimming is key. Trim the stem ends, but don’t cut into the pods. This keeps the okra firm and helps it hold its shape. A sharp knife works best for this task. You want to ensure that each pod stays whole during pickling. The right technique makes a big difference in texture. You can easily change the heat in your pickled okra. If you like it spicy, add more red pepper flakes. Start with one teaspoon and adjust to your taste. If you prefer a milder flavor, skip the red pepper flakes altogether. Tasting the brine before you pour it over the okra is a smart move. This way, you can find your perfect balance of spice. Safety is vital when pickling. Always sterilize your jars before use. You can do this by boiling them in water for 10 minutes. Let them air dry on a clean towel. A clean jar helps prevent spoilage. For extra safety, make sure your lids are also new or well sterilized. This simple step ensures your dill pickled okra stays fresh and tasty for longer. {{image_4}} To make your okra spicy, add more red pepper flakes. I suggest starting with two teaspoons instead of one. This small change brings heat but preserves that delightful crunch. The spiciness pairs well with the tangy brine. You can adjust the heat level based on your taste. If you want even more kick, try adding sliced jalapeños to the jar. They will soak in the brine and add extra flavor. Do you love garlic? Increase the garlic quantity for a more robust flavor. Instead of four cloves, try using six or eight. The garlic infuses into the brine, making each bite packed with flavor. You can also use garlic powder if you prefer. Just remember, fresh garlic gives the best taste! This variation pairs well with sandwiches or as a snack. For those who enjoy a hint of sweetness, adjust the sugar levels. Increase the granulated sugar from two tablespoons to four. This small tweak creates a nice balance between sweet and tangy. You can also use honey or agave syrup if you want a natural sweetener. This sweet version is fantastic on cheese boards or as a side dish. Try it out for a unique twist! Discover the [Full Recipe] to create these tasty variations! To keep your dill pickled okra fresh, store it in the refrigerator. Make sure to place the jar tightly sealed. This helps keep the flavor strong and the crunch intact. You can keep dill pickled okra in the fridge for about 1 to 2 months. After that, the flavor may fade. For best taste, enjoy it within this time frame. Look for signs of spoilage in your okra. If you see any mold, it’s time to toss it. A sour or off smell is also a warning sign. If the okra becomes mushy or changes color, do not eat it. Always trust your senses when it comes to food safety. For the full recipe, check out Dill Pickled Okra! Yes, you can make dill pickled okra without canning. This method is easy and quick. You only need to store your pickled okra in the fridge. This way, you keep it fresh without the need for long-term storage. Just follow the steps in the Full Recipe. Your okra will last for weeks in the fridge. This method keeps the crunch and flavor intact. Pickled okra has many health benefits. It is low in calories and rich in fiber. This helps with digestion and keeps you full. Okra is also high in vitamins A, C, and K. These vitamins support your immune system and help your skin. The vinegar in pickles can assist with blood sugar control. Overall, pickled okra is a healthy snack choice. You can find pre-made dill pickled okra at grocery stores. Look in the pickle aisle or the canned vegetable section. Brands like Mt. Olive and Grillo's Pickles often have good options. You may also find them at farmers' markets or specialty stores. Be sure to check the label for quality and ingredients. Dill pickled okra is easy and fun to make at home. You learned about the key ingredients and steps for perfect pickles. Remember to adjust spices for your taste. Store them correctly to keep their crunch and flavor. With your new knowledge, you can enjoy these tangy snacks anytime. Dive into this delicious project, and relish the rewards of your creation!

Dill Pickled Okra

Discover the delightful flavor of homemade dill pickled okra! This easy recipe guides you through pickling fresh okra with a perfect blend of vinegar, spices, and garlic. In just a few simple steps, you’ll create a crunchy and tangy snack that’s perfect for salads or sandwiches. Ready to give it a try? Click through to explore the full recipe and start your pickling adventure today!

Ingredients
  

1 pound fresh okra, with stems trimmed

1 cup distilled white vinegar

1 cup water

2 tablespoons kosher salt

2 tablespoons granulated sugar

4 cloves garlic, crushed

1 tablespoon dill seeds

1 tablespoon whole black peppercorns

1 teaspoon red pepper flakes (optional, for a spicy kick)

2 sprigs fresh dill

1 quart-sized glass jar with a lid, sterilized

Instructions
 

Prepare the Okra: Start by rinsing the fresh okra thoroughly under cold running water. Carefully trim the stem ends, making sure not to cut into the pods themselves, as this will help maintain their structure. Set the okra aside for later.

    Make the Pickling Brine: In a medium saucepan, combine the distilled white vinegar, water, kosher salt, and granulated sugar. Place the saucepan over medium-high heat and bring the mixture to a boil. Stir continuously until both the salt and sugar have dissolved completely. Once dissolved, remove the saucepan from heat and allow the brine to cool to a warm temperature.

      Pack the Jar: In your pre-sterilized quart jar, begin by adding the crushed garlic, dill seeds, whole black peppercorns, and optional red pepper flakes (if you enjoy a spicy touch). Gently add the fresh dill sprigs for a burst of flavor. Next, carefully pack the prepared okra upright into the jar, arranging them snugly while maintaining their shape.

        Add the Brine: Once the okra is packed, carefully pour the warm pickling brine over the okra. Ensure that all the pods are fully submerged in the liquid by leaving a half-inch of space at the top of the jar to allow for expansion during pickling.

          Seal and Cool: With a clean cloth, wipe down the jar's rim to remove any spills or residues that may prevent a good seal. Secure the jar tightly with its lid. Allow the jar to cool to room temperature, which may take about 30 minutes.

            Refrigerate: After the jar has cooled, place it in the refrigerator. For the best flavor, let the okra pickle for at least 48 hours. The longer they sit, the deeper the flavor will become.

              Enjoy: Your delicious dill pickled okra is ready to be enjoyed! They can be savored as a tangy snack, tossed into salads for an extra crunch, or added to sandwiches for a zesty twist.

                Prep Time: 15 min | Total Time: 48 hrs | Servings: 4-6

                  Leave a Comment

                  Recipe Rating