Craving a sweet and salty treat? You’re in the right place! I’m sharing my easy and tasty recipe for homemade peanut butter cups. This treat is simple, fun, and perfect for chocolate lovers. You won’t need fancy tools or skills to make these delights. Follow along as I guide you through each step. Let’s whip up a batch that’s sure to impress!
Why I Love This Recipe
- Easy to Make: This recipe requires minimal ingredients and steps, making it accessible for bakers of all skill levels.
- Decadent Flavor: The combination of rich dark chocolate and creamy peanut butter creates a luxurious taste that’s hard to resist.
- Customizable: You can easily adjust the sweetness or add mix-ins like crushed nuts or sea salt to suit your personal preferences.
- Perfect for Sharing: These homemade peanut butter cups are a crowd-pleaser, making them ideal for parties or gifting to friends and family.
Ingredients
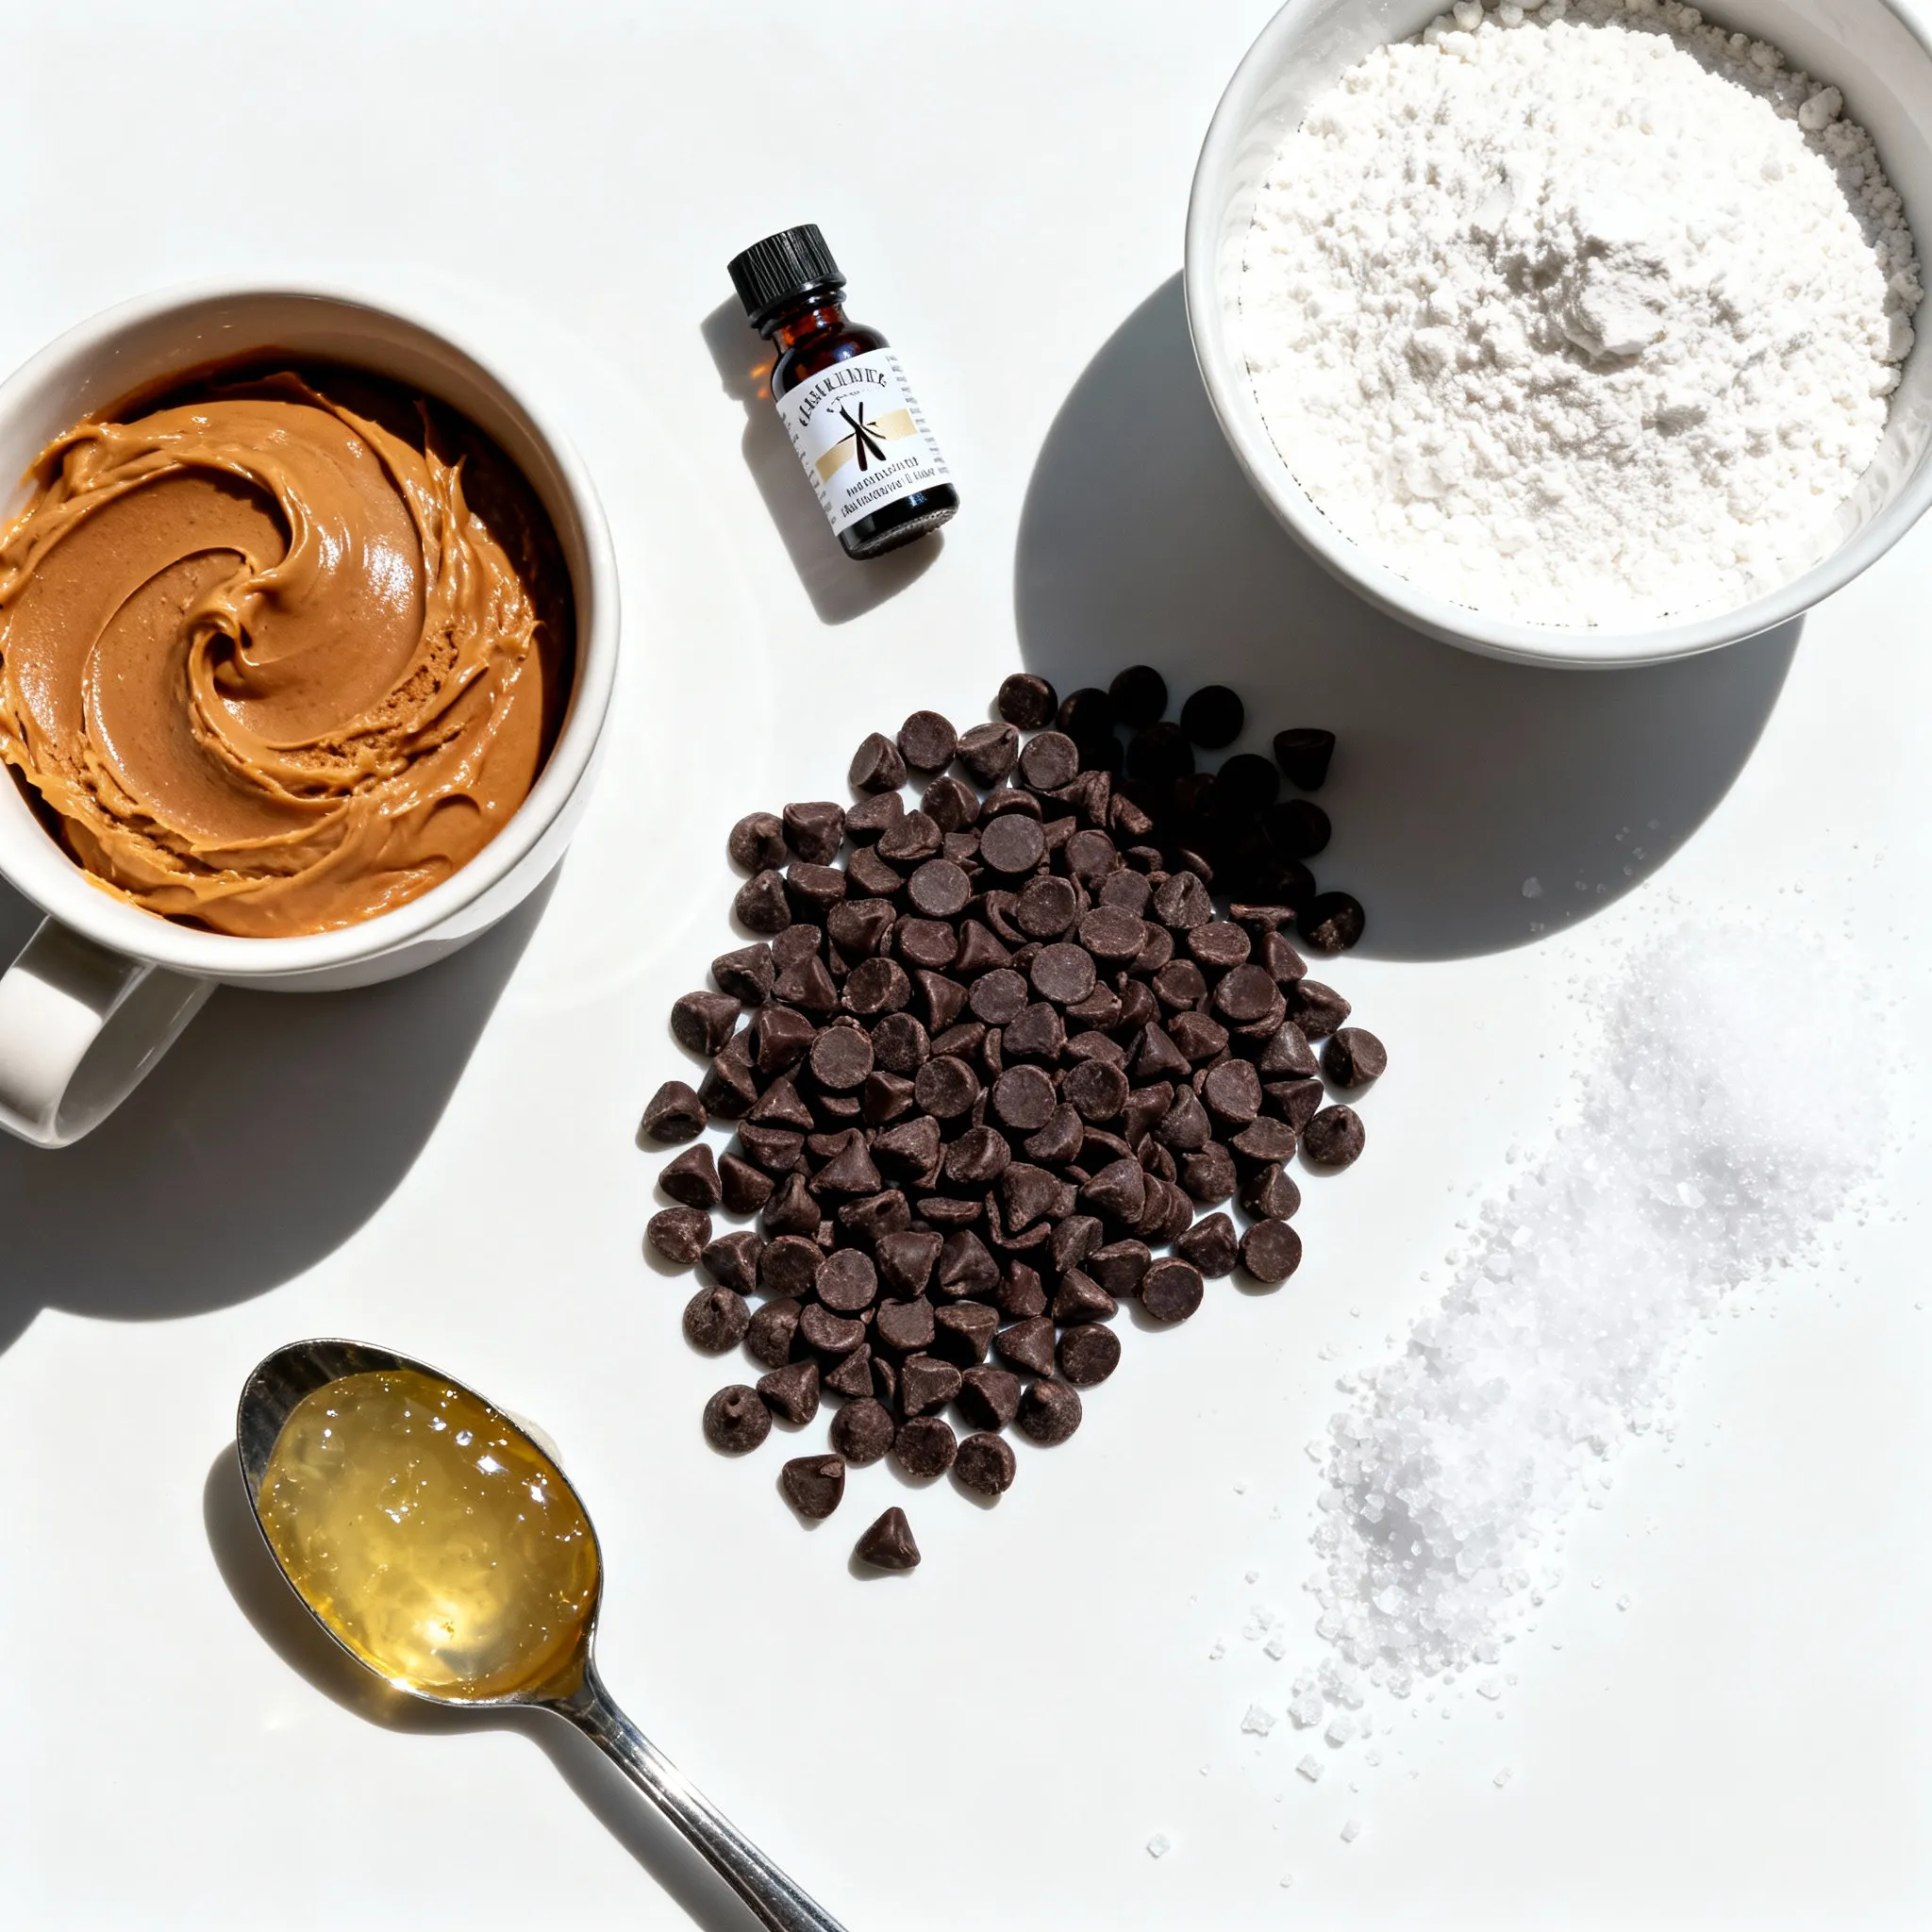
List of Ingredients
– 1 cup creamy peanut butter
– 1/4 cup powdered sugar
– 1/2 teaspoon pure vanilla extract
– 1 1/2 cups dark chocolate chips (preferably 70% cacao)
– 1 tablespoon coconut oil
– A pinch of flaky sea salt
Ingredient Notes
– Peanut Butter: You can use crunchy peanut butter if you prefer some texture.
– Powdered Sugar: This sugar helps sweeten and thicken the filling. You may replace it with a sugar substitute if needed.
– Chocolate Chips: Use high-quality chocolate for a better taste. Dark chocolate gives a rich flavor.
– Coconut Oil: This helps make the chocolate smooth. You can skip it, but the texture will change.
– Flaky Sea Salt: A little pinch on top boosts flavor and looks great.
Measuring Tips for Accuracy
– Use dry measuring cups for solids like peanut butter and sugar.
– Level off the measuring cup with a knife for exact amounts.
– For sticky ingredients, lightly grease the cup with oil.
– Use a kitchen scale for precise measurements, especially for chocolate chips.
– Always double-check your ingredients before starting to ensure nothing is missing.
Step-by-Step Instructions
Preparing the Peanut Butter Filling
To start, grab a medium bowl. Add 1 cup of creamy peanut butter. Next, mix in 1/4 cup of powdered sugar. Add 1/2 teaspoon of pure vanilla extract. Finally, toss in a pinch of flaky sea salt. Stir all these together until smooth. This mixture should be thick and creamy. Set it aside for now. It will firm up as you melt the chocolate.
Melting the Chocolate Properly
Now, take a microwave-safe bowl. In it, combine 1 1/2 cups of dark chocolate chips and 1 tablespoon of coconut oil. The coconut oil helps the chocolate melt evenly. Microwave this mix in 30-second bursts. After each burst, take it out and stir. Repeat this until the chocolate is shiny and smooth. Be careful not to overheat; it should not be burnt or lumpy.
Creating the Chocolate Shells
Line a standard muffin tin with paper liners. This helps to easily remove the cups later. Pour about 1 tablespoon of the melted chocolate into each liner. Use the back of a spoon to spread it evenly across the bottom. Make sure the chocolate layer is thick enough to hold the filling. This will create a solid base for your peanut butter cups.
Assembling the Peanut Butter Cups
Next, take the peanut butter filling. Scoop about 1 tablespoon and place it on top of the chocolate layer in each liner. Press it down gently to flatten it. This helps it stick to the chocolate below. Now, pour another tablespoon of melted chocolate over the peanut butter. Make sure it covers the filling completely. Use a spatula to smooth the top for a neat look.
Chilling and Serving
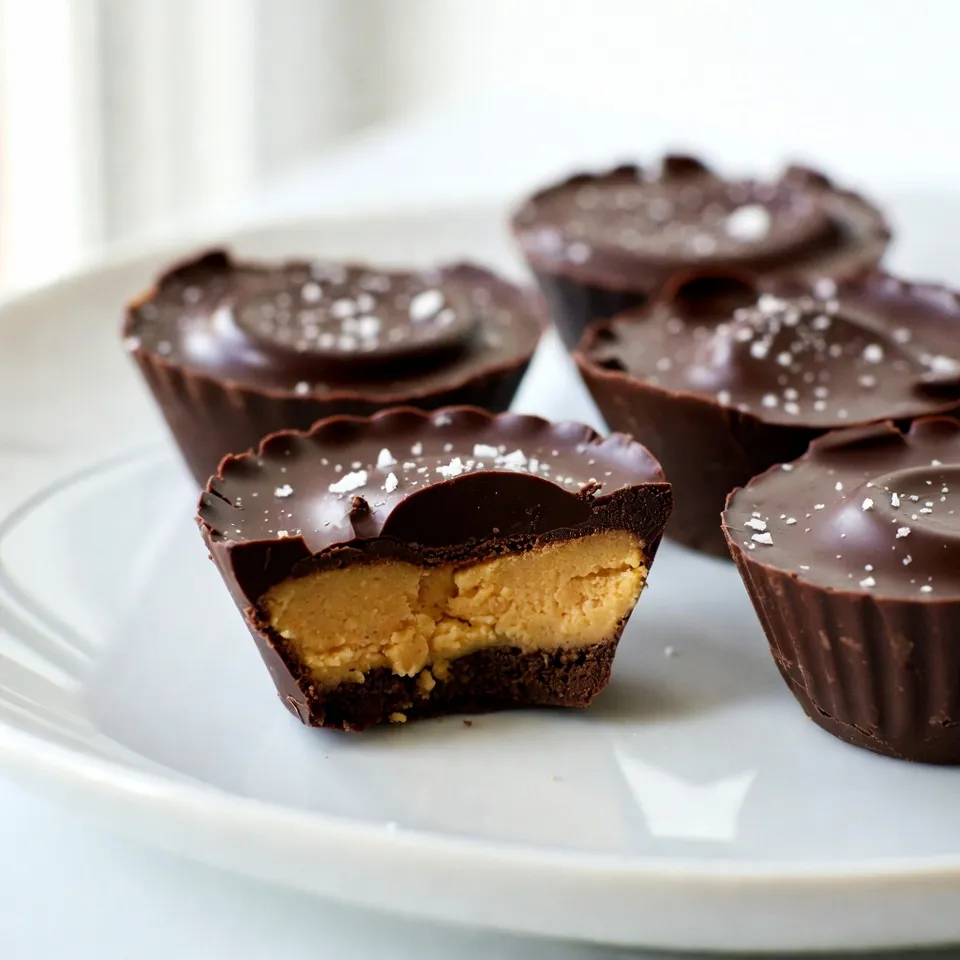
Place the muffin tin into the refrigerator. Let the cups chill for at least 30 minutes. This allows the chocolate to harden well. Once they are set, take them out carefully. Peel off the paper liners. Now, you can serve your homemade peanut butter cups. They are perfect as a sweet treat or a fun dessert!
Tips & Tricks
Best Practices for Melting Chocolate
When melting chocolate, use a microwave-safe bowl. Mix dark chocolate chips with coconut oil. Heat in 30-second bursts. Stir well between heats. This helps prevent burning. The chocolate should be smooth and shiny. If it looks grainy, it’s overheated. You can fix it by adding a bit more coconut oil and stirring until smooth.
Peanut Butter Filling Techniques
For the peanut butter filling, mix creamy peanut butter with powdered sugar. Add vanilla extract and a pinch of flaky sea salt. Stir until smooth. Let it sit for a few minutes. This makes it firmer and easier to work with. When layering, scoop a tablespoon of filling. Press it down gently in the chocolate shell. Make sure it’s flat and sticks to the chocolate.
Presentation Tips for Serving
Before chilling, sprinkle a tiny pinch of flaky sea salt on top. This adds flavor and looks great. Once set, remove the cups from liners carefully. Arrange them on a nice plate. For a fun touch, use colorful liners. You can also add a drizzle of melted chocolate on top for a fancy look. This makes your homemade peanut butter cups stand out!
Pro Tips
- Quality Chocolate Matters: Use high-quality dark chocolate for a richer flavor. The better the chocolate, the more decadent your peanut butter cups will taste.
- Chill Between Layers: For better layering, chill the chocolate shell before adding the peanut butter filling. This helps prevent the layers from mixing and keeps the cups looking neat.
- Experiment with Flavors: Feel free to add a pinch of cinnamon or a dash of espresso powder to the peanut butter mixture for an extra flavor kick!
- Storage Tips: Store your peanut butter cups in an airtight container in the fridge to keep them fresh and maintain the perfect texture.
Variations
Vegan Peanut Butter Cups
You can make vegan peanut butter cups easily. Replace the dark chocolate with dairy-free chocolate chips. Use maple syrup instead of powdered sugar. The creamy peanut butter stays the same. This way, you keep the rich taste without any animal products.
Low-Sugar or Sugar-Free Options
To make low-sugar or sugar-free peanut butter cups, swap the powdered sugar with a sugar substitute. Erythritol or stevia work well. These options let you enjoy the treat while keeping sugar low. Just check the substitute’s sweetness level. Adjust the amount you use for the best flavor.
Flavor Additions
You can add fun flavors to your peanut butter cups. Try mixing in a pinch of sea salt for a sweet and salty taste. Crushed nuts like almonds or hazelnuts add crunch and flavor. You can also add a dash of cinnamon or chili powder for a spicy twist. Get creative with your favorite flavors!
Storage Info
How to Store Homemade Peanut Butter Cups
To keep your homemade peanut butter cups fresh, store them in an airtight container. A simple plastic or glass container works well. If you leave them in the freezer, they can last longer.
Shelf Life & Freezing Tips
These treats stay fresh in the fridge for about a week. If you want to save them longer, freeze them. They can last for up to three months in the freezer. Just make sure to wrap them well to avoid freezer burn.
Best Containers for Storage
Use a shallow container with a lid for the fridge. This keeps the cups from getting squished. For the freezer, a freezer-safe bag or a hard container with a tight seal works best. You can also place parchment paper between layers to prevent sticking.
FAQs
Can I use crunchy peanut butter instead of creamy?
Yes, you can use crunchy peanut butter. It adds a fun texture. Just keep in mind that the filling may be less smooth. If you enjoy a bit of crunch in your treats, this is a great option.
What type of chocolate is best for peanut butter cups?
Dark chocolate is best for peanut butter cups. I recommend using chocolate that is at least 70% cacao. This gives a rich flavor that pairs well with the sweet peanut butter. You can also use milk chocolate if you prefer a sweeter taste.
How do I fix grainy chocolate?
If your chocolate is grainy, it may have overheated. To fix it, add a small amount of coconut oil. Stir it in gently until the chocolate becomes smooth again. Remember, heating chocolate in short bursts helps prevent this problem.
Can I make these ahead of time?
Yes, you can make these cups a day or two ahead of time. Just store them in an airtight container in the fridge. This way, they stay fresh and ready to enjoy when you want a sweet treat.
How should I serve them for a party?
For a party, arrange the peanut butter cups on a nice platter. You can sprinkle a little flaky sea salt on top for extra flair. These treats are perfect for sharing! You can also offer them in individual cupcake liners for a fun touch.
In this post, we covered how to make peanut butter cups from start to finish. You learned about the key ingredients, tips for perfecting your technique, and fun variations to try. Whether you’re vegan, low-sugar, or looking for new flavors, there’s something for everyone. Remember, storing them right keeps your treats fresh longer. Enjoy sharing these treats with friends and family. Making peanut butter cups is not just fun; it’s a tasty way to impress! Stay creative and keep experimenting with your own ideas in the kitche