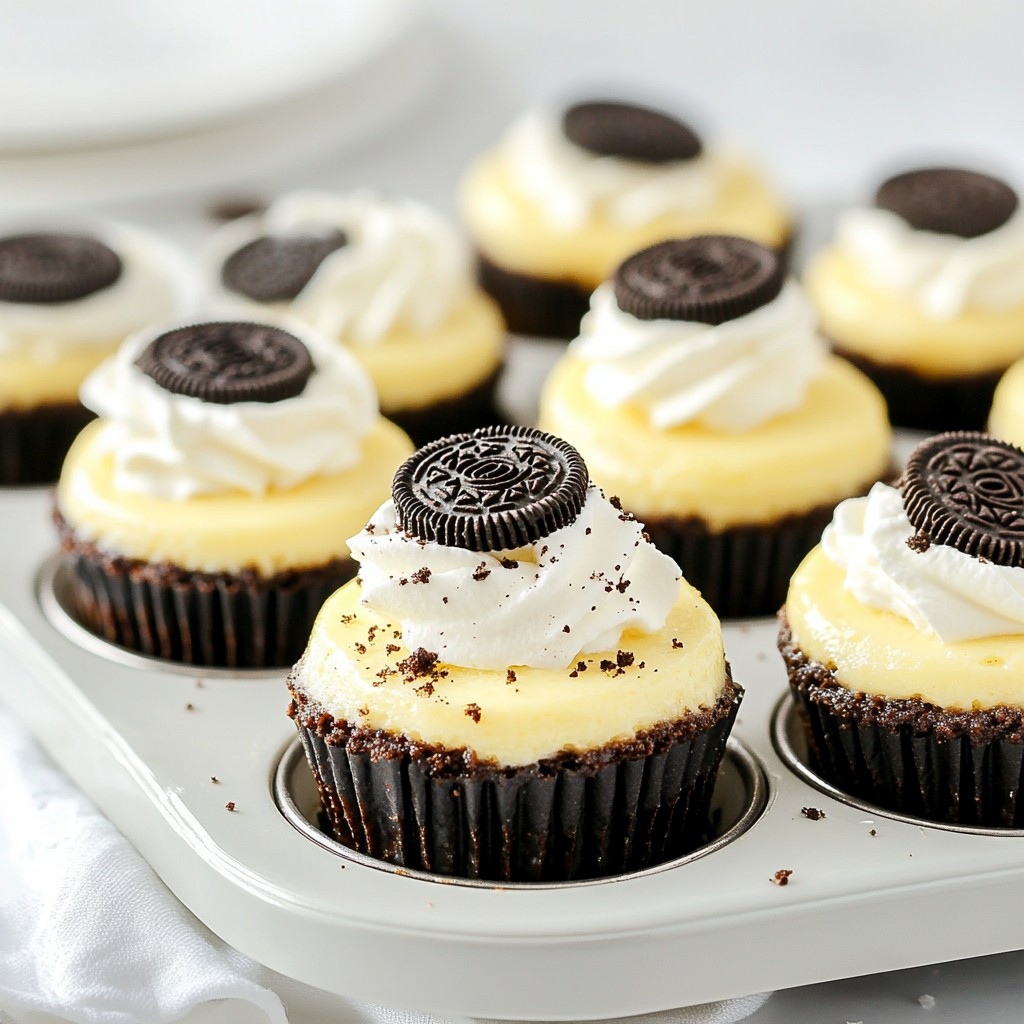
If you're craving a sweet treat that’s easy to love, Mini Oreo Cheesecakes are your answer! These bite-sized delights blend rich creaminess with the classic crunch of Oreos. Perfect for parties or a cozy night in, they’re fun to make and eat. Join me as I share a simple recipe and helpful tips to ensure your cheesecakes turn out perfect. Let’s dive into this deliciousness together!
Why I Love This Recipe
- Rich and Creamy Texture: This cheesecake has a beautifully smooth and creamy texture that melts in your mouth, making it a delightful treat for any dessert lover.
- Perfect Portion Size: These mini cheesecakes are the ideal size for satisfying your sweet tooth without overindulging, perfect for parties or personal enjoyment.
- Simple Preparation: With easy-to-follow steps, this recipe is perfect for both novice and experienced bakers, ensuring success every time.
- Decadent Flavor: The combination of Oreo cookies and cream cheese creates a rich, chocolatey flavor that is simply irresistible and sure to impress.
Ingredients
Main Ingredients for Mini Oreo Cheesecakes
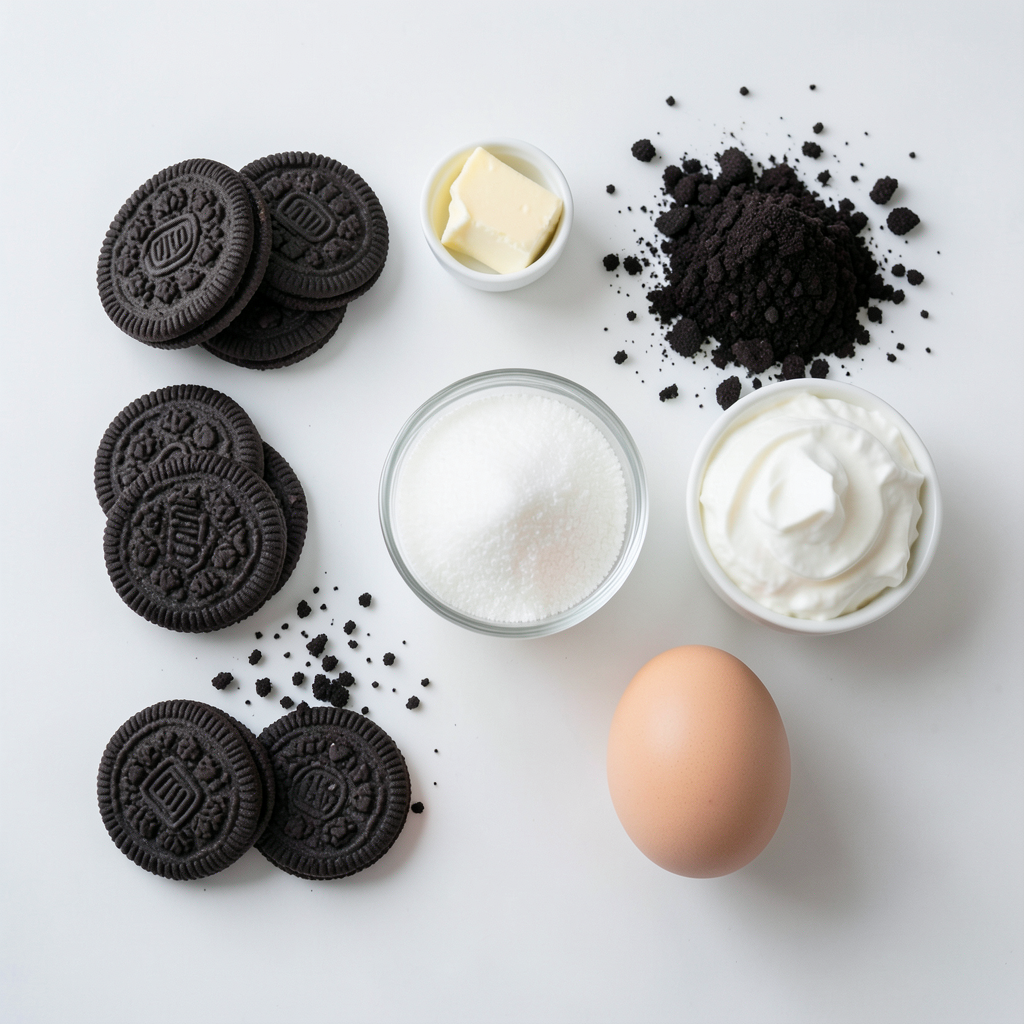
To make these tasty mini cheesecakes, gather these key ingredients:
- 18 Oreo cookies (9 crushed for the crust, 9 crushed for the filling)
- 2 tablespoons unsalted butter, melted
- 8 oz cream cheese, softened to room temperature
- 1/2 cup granulated sugar
- 1 teaspoon pure vanilla extract
- 1/4 cup sour cream
- 1 large egg, at room temperature
- Pinch of fine salt
These ingredients create a creamy and rich dessert that everyone loves.
Optional Toppings and Garnishes
You can make these cheesecakes even better with some fun toppings. Here are a few ideas:
- Whipped cream for a light and fluffy touch
- Additional Oreo crumbs for extra crunch
- Fresh berries like strawberries or raspberries for a fruity twist
- A drizzle of chocolate sauce for a sweet finish
These toppings add a burst of flavor and make your cheesecakes look stunning!
Substitutions for Allergies or Preferences
If you have allergies or special diets, there are great swaps. Here are some options:
- Use gluten-free cookies instead of Oreos for a gluten-free treat.
- Swap cream cheese for dairy-free cream cheese for a vegan option.
- Agave syrup can replace granulated sugar for a healthier choice.
These substitutions keep the dessert delicious while meeting various dietary needs.
Step-by-Step Instructions
Preparation of the Crust
To start, preheat your oven to 325°F (160°C). This step is key for even cooking. Next, take 9 Oreo cookies and crush them into fine crumbs. You can use a food processor or a rolling pin for this. In a medium bowl, combine the crushed Oreos with 2 tablespoons of melted butter. Stir until it looks like wet sand.
Now, line a standard muffin tin with paper liners. Evenly fill each liner with the Oreo crumb mix. Use the back of a spoon or your fingers to press it down. Make sure it forms a solid crust at the bottom. This crust will hold all that creamy goodness later.
Making the Cheesecake Filling
In a large bowl, beat 8 oz of softened cream cheese with an electric mixer. Mix it until smooth and creamy. Gradually add 1/2 cup of granulated sugar, 1 teaspoon of pure vanilla extract, and 1/4 cup of sour cream. Keep mixing on medium speed until everything is well combined.
Next, add 1 large egg and a pinch of salt. Mix just until combined. Be careful not to over-mix. This helps keep the cheesecake light and fluffy. Finally, gently fold in the remaining 9 crushed Oreos. This adds a nice texture and flavor to the filling.
Baking and Cooling Process
Now, it's time to fill the cups. Carefully spoon the cheesecake filling over the crusts in the muffin tin. Fill each cup about 3/4 full. This allows room for the cheesecakes to rise a bit while baking.
Place the muffin tin in the preheated oven. Bake for about 20-25 minutes. The centers should be set but might seem a little jiggly. That’s just right! After baking, take the tin out and let it cool at room temperature for about 30 minutes.
After cooling, transfer the cheesecakes to the refrigerator. Chill them for at least 2 hours, or overnight for the best taste. You want that creamy texture to shine.
Tips & Tricks
How to Ensure Smooth Cheesecake Filling
To make a smooth cheesecake filling, start with softened cream cheese. This helps mix well. Beat the cream cheese first until creamy. Next, add sugar, vanilla, and sour cream. Mix these until smooth. Add the egg last, and mix just enough to blend. Over-mixing can add air, causing cracks.
Common Mistakes to Avoid
One common mistake is using cold cream cheese. Cold cheese makes lumps in your filling. Another mistake is over-mixing the batter after adding the egg. This can create a dense texture. Lastly, avoid opening the oven door while baking. This can cause the cheesecakes to sink.
Ways to Enhance Flavor or Texture
To enhance flavor, try adding a splash of lemon juice or zest. This adds a bright taste. For texture, fold in mini chocolate chips or nuts. These add crunch and fun. You can also swap out some cream cheese for mascarpone. This makes the filling even creamier.
Pro Tips
- Use Room Temperature Ingredients: Allow your cream cheese and egg to sit at room temperature for about 30 minutes before mixing. This helps achieve a smoother, creamier filling without lumps.
- Don’t Overmix the Batter: Mix the cheesecake filling just until combined. Overmixing can incorporate too much air, leading to cracks in the cheesecakes while they bake.
- Check for Doneness: The cheesecakes are done when the edges are set but the center is still slightly jiggly. They will continue to firm up as they cool.
- Chill for Best Results: For the best texture and flavor, chill the mini cheesecakes for at least 2 hours, but overnight is even better!
Variations
Different Flavor Additions (e.g., Mint, Peanut Butter)
You can easily change the flavor of your mini cheesecakes. For a mint twist, add 1 teaspoon of mint extract to the filling. This gives a fresh and cool taste. You can also fold in some crushed mint Oreos for extra crunch. If you love peanut butter, use 1/2 cup of creamy peanut butter instead of half the cream cheese. This change will create a rich, nutty flavor. You can even swirl in some chocolate sauce for a delightful finish.
Low-Calorie or Healthier Alternatives
Want a lighter version of the mini cheesecakes? You can swap regular cream cheese for a low-fat or Greek yogurt option. This keeps the creaminess but cuts down on calories. Use a sugar substitute like stevia or monk fruit to lower the sugar count. For the crust, you can use almond flour instead of Oreos. This will give a different flavor and a bit of crunch without all the carbs.
Mini Cheesecake Cupcake Versions
If you want a fun twist, make these cheesecakes into cupcake versions. Use cupcake liners in a muffin tin, just like before. Fill them with the cheesecake mix but add a layer of chocolate cake batter at the bottom. This will create a delightful surprise when you bite into it. You can also top these with mini chocolate chips or a drizzle of chocolate sauce for added flair.
Storage Info
How to Properly Store Mini Cheesecakes
To keep your mini Oreo cheesecakes fresh, place them in an airtight container. Make sure to layer them with parchment paper to avoid sticking. Store them in the refrigerator for up to five days. Keeping them chilled helps retain their creamy texture and rich flavor.
Freezing Recommendations
You can freeze mini cheesecakes for a longer shelf life. First, let them cool completely. Then, wrap each cheesecake tightly in plastic wrap. Place them in a freezer-safe bag or container. They can last in the freezer for up to three months. When you're ready to enjoy them, just thaw in the fridge overnight.
Reheating Tips for Best Texture
If you want to eat your cheesecake warm, avoid using the microwave, as it can make them rubbery. Instead, preheat your oven to 300°F (150°C). Place the cheesecakes in the oven for about 10-15 minutes. This gentle heat will help restore their creamy texture without drying them out. Enjoy your delicious treat!
FAQs
Can I make Mini Oreo Cheesecakes ahead of time?
Yes, you can make Mini Oreo Cheesecakes ahead of time. These treats hold up well in the fridge. I suggest making them a day in advance. This gives the flavors time to blend. Just cover them tightly with plastic wrap. They will taste fresh and delicious when you serve them.
What should I do if my cheesecake cracks?
If your cheesecake cracks, don't worry! This can happen to anyone. You can cover it up with whipped cream or extra Oreo crumbs. Make sure to check your oven temperature. Too high of a temp can cause cracks. Also, avoid over-mixing your batter. This keeps the air out, which helps prevent cracks.
How do I tell when cheesecakes are done baking?
To know if your cheesecakes are done, look for a slight jiggle in the center. They should be set around the edges. A toothpick test can help too. Insert a toothpick into the center; it should come out mostly clean. If it has batter on it, they need more time in the oven.
Can I use other cookies for the crust?
Yes, you can use other cookies for the crust! Try using graham crackers or chocolate cookies. Just crush them the same way you do Oreos. You can also mix different cookie types for fun flavors. Be creative!
You learned how to make Mini Oreo Cheesecakes step by step. We covered the main ingredients, tips, and variations. Remember, the key is to focus on smooth filling and avoid common mistakes. Store them right for the best taste. With these tips, you can impress anyone with your baking skills. Enjoy experimenting with flavors and toppings to make your cheesecakes truly unique. Now, go ahead and create a sweet treat that everyone will love!