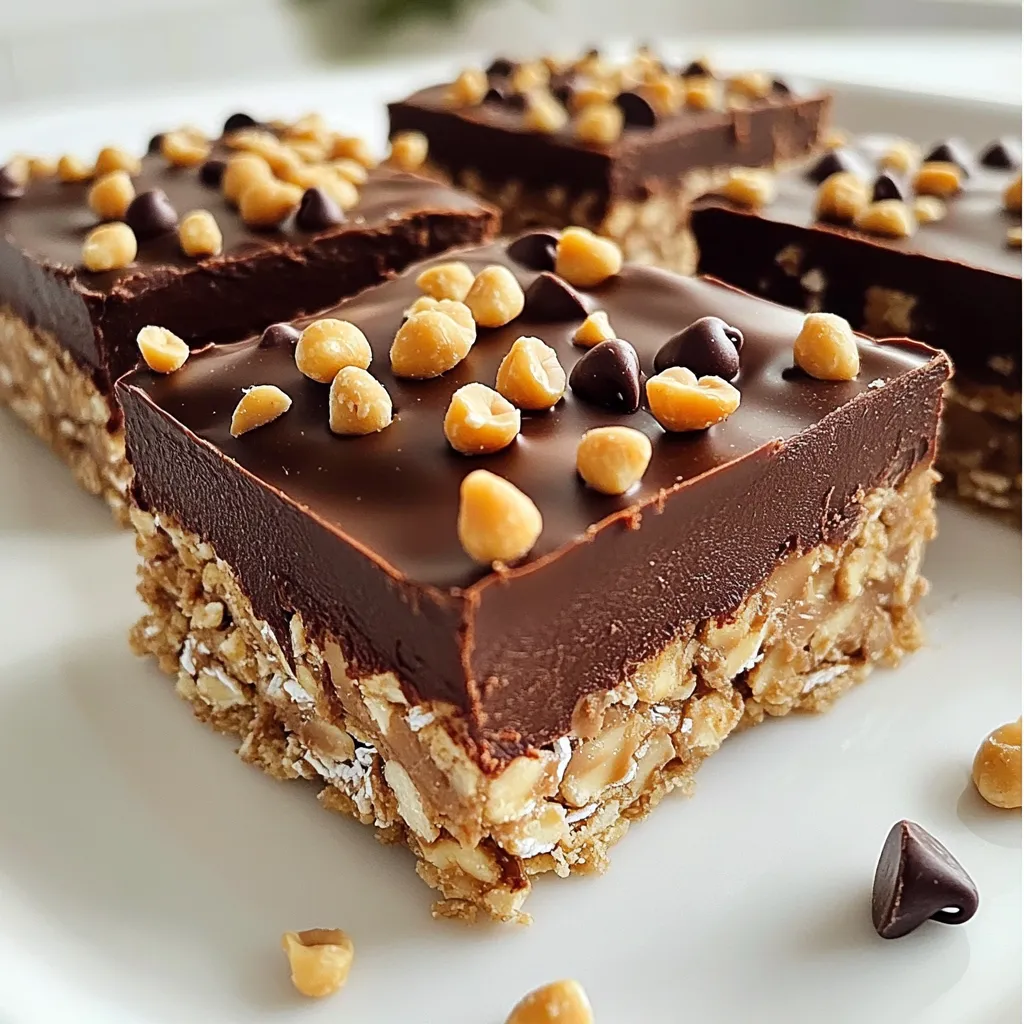
Indulge in a quick, tasty treat with my No-Bake Chocolate Peanut Butter Oat Squares! These squares are packed with flavor and nutritious ingredients. You can whip them up in no time, making them perfect for busy days or sweet cravings. Whether you’re a baking newbie or an experienced chef, this easy recipe will satisfy your sweet tooth. Let’s dive into this delicious journey together!
Ingredients
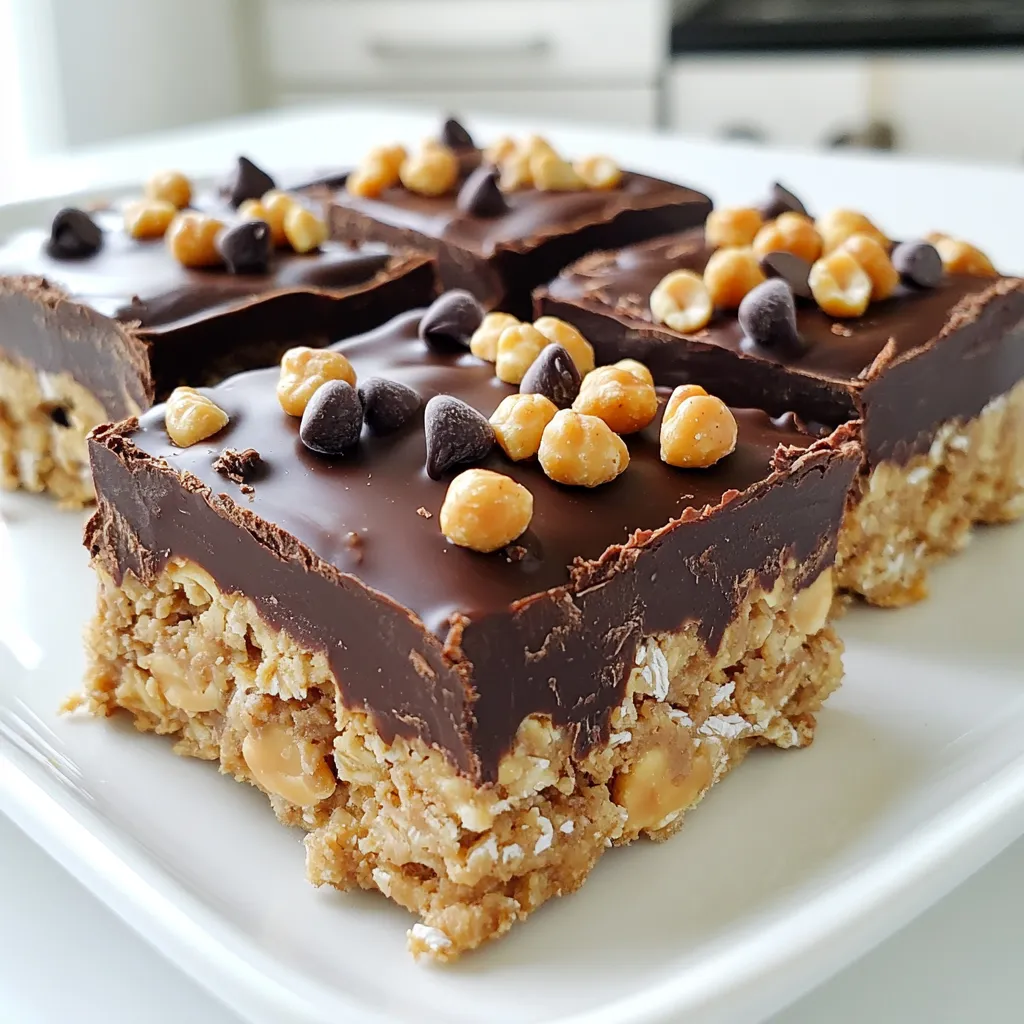
To make these no-bake chocolate peanut butter oat squares, gather your ingredients. Here’s what you’ll need:
– 1 cup rolled oats
– 1/2 cup natural peanut butter (smooth or crunchy)
– 1/4 cup honey or pure maple syrup
– 1/2 cup dark chocolate chips (dairy-free if desired)
– 1/4 cup milk (dairy or non-dairy alternative)
– 1/2 teaspoon pure vanilla extract
– A pinch of sea salt
– Optional toppings: crushed peanuts, unsweetened shredded coconut, or mini chocolate chips
Each ingredient plays a key role. Rolled oats provide a hearty base. Peanut butter adds creaminess and protein. Honey or maple syrup gives natural sweetness. Dark chocolate chips bring rich flavor. Milk helps the chocolate melt smoothly. Vanilla extract adds a nice touch. Sea salt balances the sweetness. You can add toppings for extra crunch and flavor.
Now that you have your ingredients, you’re ready to start making these delicious squares!
Step-by-Step Instructions
Preparation of the Oat Mixture
Start by gathering your ingredients. In a medium mixing bowl, add one cup of rolled oats, half a cup of natural peanut butter, and a quarter cup of honey or maple syrup. Don’t forget a pinch of sea salt! Use a sturdy spatula or a wooden spoon to mix everything together. Keep stirring until you have a thick paste. This step is key, as you want all the ingredients to blend well.
Melting the Chocolate
Next, take a small saucepan and place it over low heat. Add half a cup of dark chocolate chips and a quarter cup of milk. Stir the mixture continuously with a spatula. Keep an eye on it until the chocolate melts completely and looks glossy. Once smooth, remove the pan from the heat. Stir in half a teaspoon of pure vanilla extract for an extra kick of flavor.
Combining Mixtures and Setting in Baking Dish
Now it’s time to combine the mixtures! Carefully pour the warm chocolate over the oat mixture in your bowl. Mix vigorously until every oat is coated with chocolate. The mixture will be thick, so take your time.
Prepare an 8×8 inch baking dish by lining it with parchment paper. This will help you lift the squares out later. Transfer the thick mixture into the dish. Use a spatula or your clean hands to spread it evenly. Firmly press it down to create a compact layer.
If you want, sprinkle your choice of toppings, like crushed peanuts or mini chocolate chips, on top. Gently press them down with your fingers.
Refrigerate for at least 2 hours, or until firm. When ready, lift the squares out using the parchment paper. Cut them into even squares or bars. Enjoy your delicious no-bake chocolate peanut butter oat squares!
Tips & Tricks
How to Achieve the Best Texture
To get a great texture, use rolled oats. They give a nice chew. Mix the peanut butter and honey until smooth. This helps the oats stick together well. After you add the chocolate, mix thoroughly. A thick paste is key for a good bite. Press the mixture firmly into the pan. This ensures it holds its shape when cut.
Substitutions for Dietary Needs
If you need to swap ingredients, it’s easy. For a nut-free option, use sun butter. Maple syrup works great if you want to avoid honey. Choose dairy-free chocolate chips for a vegan treat. If you need gluten-free, make sure your oats are certified gluten-free. These simple swaps let everyone enjoy these squares.
Presentation Ideas for Serving
Presentation makes a dish special. Cut the squares into even pieces for a clean look. Place them on a colorful plate to catch the eye. Dust with cocoa powder for a fancy touch. Adding crushed peanuts or mini chocolate chips on top adds texture. Serve chilled or at room temperature for the best taste.
Variations
Flavor Enhancements
You can make these squares even tastier with simple flavor boosts. Try adding a dash of cinnamon for warmth. A few drops of almond extract can give a lovely twist. If you want a richer taste, mix in a tablespoon of cocoa powder. These small changes can take your squares to the next level!
Ingredient Swaps for Different Diets
Do you have dietary needs? You can easily swap ingredients. Use almond butter or sunflower seed butter if you have nut allergies. For a vegan option, replace honey with agave syrup or maple syrup. If you want gluten-free squares, ensure your oats are certified gluten-free. These swaps keep the flavor while fitting your diet!
Creative Toppings to Try
Toppings can add fun and crunch to your squares. Try crushed peanuts for a nutty bite. Unsweetened shredded coconut adds a tropical twist. Mini chocolate chips are always a hit! You can also sprinkle on some chia seeds or hemp seeds for extra nutrition. Mix and match toppings to find your favorite combo!
Storage Info
Best Practices for Storing Squares
Store your no-bake chocolate peanut butter oat squares in an airtight container. This keeps them fresh and tasty. You can layer parchment paper between the squares to prevent sticking. Remember to keep them cool and dry.
How Long Do They Last?
These squares can last up to one week in the fridge. If stored properly, they stay fresh and delicious. If you notice any change in texture or smell, it’s best to toss them.
Freezing Tips for Longer Storage
For longer storage, freeze the squares. Cut them into individual pieces first. Wrap each piece in plastic wrap and place them in a freezer-safe bag. They can last up to three months in the freezer. When you want one, just thaw it in the fridge overnight. Enjoy your treat whenever you like!
FAQs
Can I use different types of nut butters?
Yes, you can! Almond butter, cashew butter, or sunflower seed butter work great. Each nut butter brings a unique taste and texture. Just pick one that you enjoy. If you choose a nut butter that is thicker, you may need to add a bit more milk or sweetener.
What is the best way to cut the squares?
To cut the squares, use a sharp knife. First, lift the squares out of the baking dish using the parchment paper. Place it on a cutting board. For neat cuts, wipe the knife with a damp cloth after each cut. This helps keep the edges clean.
Are there vegetarian or vegan options for this recipe?
Yes, this recipe can easily be made vegan. Use maple syrup instead of honey. Also, choose dairy-free chocolate chips and non-dairy milk. With these swaps, everyone can enjoy these tasty treats!
This article covers a fun and tasty recipe for no-bake chocolate oat squares. You learned about the key ingredients like oats, peanut butter, and dark chocolate. I shared step-by-step instructions for making the oat mixture and melting chocolate. You also discovered great tips for the best texture and fun ways to serve.
Keep these ideas in mind to enjoy your own delicious squares. Experiment with flavors and toppings to make them your own. Enjoy every bite!