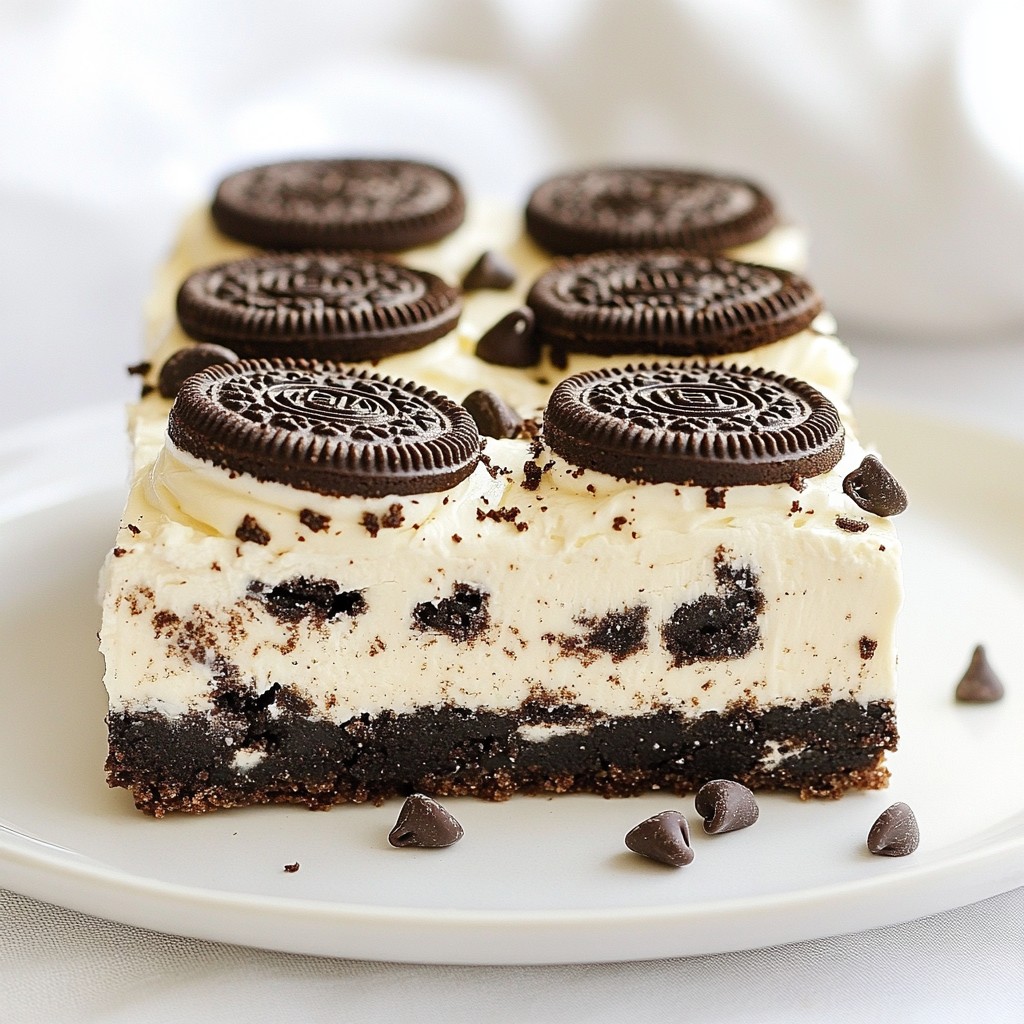
Craving a sweet treat that’s easy to make? These No Bake Oreo Cheesecake Bars are your answer! With just a few simple ingredients and no oven required, you can whip up a delicious dessert that everyone will love. In this post, I’ll guide you through each step for a creamy and delightful treat. Let’s dive into the world of Oreo cheesecake bliss and create a dessert that shines at any gathering!
Why I Love This Recipe
- Effortless Preparation: This no-bake cheesecake bars recipe requires minimal effort, making it perfect for any skill level in the kitchen.
- Irresistible Flavor: The combination of creamy cheesecake and crunchy Oreo cookies creates a delicious flavor that everyone loves.
- Perfect for Any Occasion: These cheesecake bars are great for parties, gatherings, or simply a sweet treat at home.
- Customizable Toppings: You can easily personalize the bars with different toppings like fruit, chocolate, or additional crushed cookies.
Ingredients
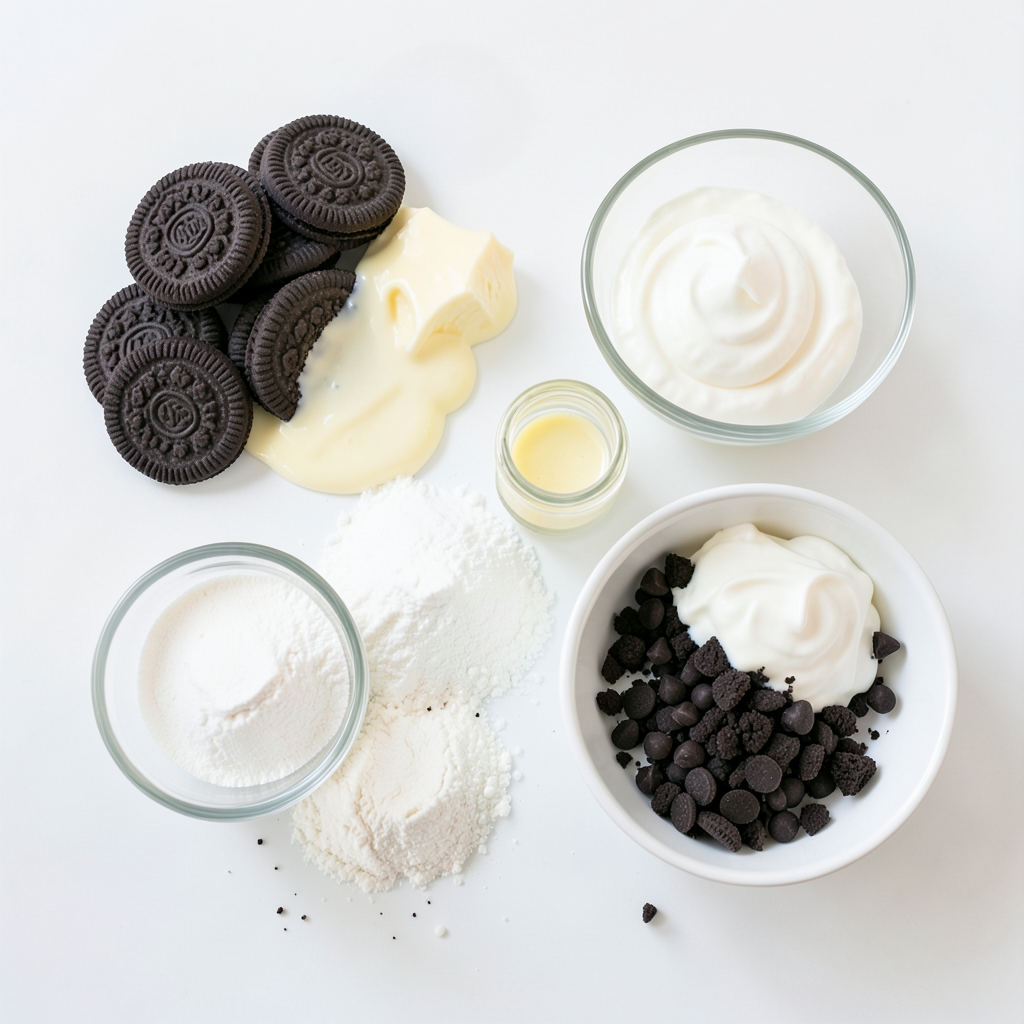
List of Ingredients
- 24 Oreo cookies, finely crushed
- 1/4 cup unsalted butter, melted
- 8 oz cream cheese, softened to room temperature
- 1/2 cup powdered sugar, sifted
- 1 tsp vanilla extract
- 1 cup heavy whipping cream, chilled
- 1/4 cup chocolate chips (for garnish)
- Extra crushed Oreo cookies (for garnish)
Importance of Quality Ingredients
Using quality ingredients is key for flavor and texture. Fresh cream cheese adds creaminess. Good vanilla extract enhances taste. Fresh whipped cream helps create a light filling. High-quality chocolate chips give a rich finish. Using real Oreos ensures the cookies taste great. Each ingredient contributes to the final product, making your bars truly special.
Substitutions and Alternatives
You can easily swap ingredients based on your needs. Try using gluten-free cookies to make it gluten-free. If you want a lighter option, use reduced-fat cream cheese. For a vegan version, use dairy-free cream cheese and coconut cream instead of heavy cream. You can also switch vanilla extract for other flavors, like almond or mint. These swaps can keep the recipe fun and interesting!
Step-by-Step Instructions
Preparation of the Crust
To make the crust, grab a medium mixing bowl. Add 24 finely crushed Oreo cookies and 1/4 cup melted unsalted butter. Mix them well until the cookie crumbs soak up the butter. This mixture should feel moist. Next, take a 9x9 inch baking dish and transfer the cookie mixture into it. Use the back of a measuring cup or your hands to press it down firmly. This creates a nice, even layer at the bottom of the dish.
Making the Cheesecake Filling
Now, let’s make the cheesecake filling. In a large mixing bowl, beat 8 oz softened cream cheese using an electric mixer. Mix until it’s creamy and smooth, with no lumps. Gradually add 1/2 cup sifted powdered sugar and 1 tsp vanilla extract. Continue mixing until everything is blended well. The filling should look light and airy.
Next, take another chilled bowl and whip 1 cup of heavy cream. Use the electric mixer again until stiff peaks form, which usually takes a few minutes. This is key for a fluffy filling.
Combining and Chilling the Mixture
Gently fold the whipped cream into the cream cheese mixture using a spatula. Be careful not to deflate the whipped cream. This is important for keeping it light. After that, fold in 1/2 cup of crushed Oreo cookies for extra flavor.
Pour the cheesecake filling over the crust in your baking dish. Use a spatula to smooth the top evenly. Cover the dish tightly with plastic wrap. Chill in the fridge for at least 4 hours. This helps it set properly.
Before serving, sprinkle the top with chocolate chips and extra crushed Oreos for a tasty crunch. Now, you’re ready to slice and serve these delightful bars!
Tips & Tricks
How to Achieve Perfect Creaminess
To get a creamy texture, start with room temperature cream cheese. This helps blend smoothly. Beat it until it’s light and fluffy. Mix in the powdered sugar slowly. This step keeps the mix from getting lumpy. When you fold in the whipped cream, do it gently. You want to keep that airiness.
Tips for Efficient Assembly
For quick assembly, prep your tools first. Use a measuring cup to press the crust firmly. This makes a nice base. Have your bowls ready for mixing. Another tip is to use a spatula to spread the filling evenly. It helps create a nice finish for your cheesecake bars.
Cooling and Setting Recommendations
Chill your bars for at least four hours. This helps them set properly. If you want them to be firmer, let them chill overnight. Wrap them tightly in plastic wrap to keep them fresh. When ready to serve, slice them while cold. This makes cutting easier and cleaner.
Pro Tips
- Chill Your Tools: For best results, chill your mixing bowl and beaters before whipping the cream. This helps achieve stiff peaks more easily.
- Use Room Temperature Ingredients: Ensure that your cream cheese is at room temperature before mixing. This prevents lumps and creates a smoother cheesecake filling.
- Don’t Overmix: When folding the whipped cream into the cream cheese mixture, do so gently to maintain the light and airy texture of the filling.
- Enhance Flavor with Toppings: Experiment with different toppings like drizzled chocolate or fruit to add variety and a personal touch to your cheesecake bars.
Variations
Flavor Variations (Mint, Peanut Butter, etc.)
You can easily change the flavor of your No Bake Oreo Cheesecake Bars. Mint lovers can add 1 teaspoon of mint extract to the cream cheese filling. This adds a fresh twist to the classic taste. For a peanut butter version, fold in 1/2 cup of creamy peanut butter into the filling. The rich flavor pairs well with the Oreo crust. You can also try adding crushed candy bars or fruit puree for more fun flavors. The possibilities are endless!
Serving Suggestions (Plating Ideas)
How you serve these bars can elevate your dessert game. Place them on a decorative platter for a simple touch. Add a dollop of whipped cream on each bar for extra creaminess. You can also top each piece with an Oreo half for a cute look. If you want to impress, drizzle chocolate sauce over the bars before serving. This adds a gourmet feel to your dessert. Remember, presentation matters as much as taste!
Dietary Substitutions (Gluten-Free, Vegan Options)
If you need a gluten-free option, use gluten-free Oreo cookies for the crust. This keeps the bars tasty while accommodating dietary needs. For a vegan version, substitute cream cheese with vegan cream cheese. Use coconut cream instead of heavy whipping cream and maple syrup instead of powdered sugar. These swaps keep the texture creamy and delicious. Don't hesitate to get creative with your ingredients to fit your lifestyle!
Storage Info
Best Practices for Storing Leftovers
To keep your No Bake Oreo Cheesecake Bars fresh, store them in the fridge. Use an airtight container to prevent them from drying out. These bars can last up to five days in the fridge. Make sure to cut them into bars before storing. This way, it’s easy to grab a piece whenever you want a tasty snack.
Freezing Instructions for Longer Storage
If you want to enjoy these bars later, freezing is a great option. First, wrap each bar in plastic wrap. Then, place the wrapped bars in a freezer-safe bag or container. This helps keep them fresh and tasty. They can stay frozen for up to three months. Just remember to label your container with the date.
How to Thaw Before Serving
To thaw your frozen Oreo Cheesecake Bars, take them out of the freezer. Leave them in the fridge overnight to thaw slowly. This keeps the texture nice and creamy. If you're in a hurry, you can let them sit at room temperature for about 30 minutes. Once thawed, they're ready to serve and enjoy!
FAQs
How long does No Bake Oreo Cheesecake Bars last?
No Bake Oreo Cheesecake Bars last about 5 days in the fridge. They taste best when eaten fresh, but they can still be enjoyable for a few days. Make sure to cover them tightly with plastic wrap or store them in an airtight container. This keeps them from drying out and helps preserve their creamy texture.
Can I use different cookies for the crust?
Yes, you can use different cookies for the crust. Try chocolate sandwich cookies, graham crackers, or even vanilla wafers. Just crush them finely and mix with melted butter like you do with Oreos. Each type will give a unique flavor to your cheesecake bars.
What can I serve with Cheesecake Bars?
You can serve No Bake Oreo Cheesecake Bars with various toppings. Fresh fruits like strawberries or raspberries complement the rich flavors well. You can also add whipped cream or chocolate drizzle for extra sweetness. For a fun twist, sprinkle some crushed cookies on top for added texture.
How can I make this recipe vegan?
To make vegan No Bake Oreo Cheesecake Bars, swap out the cream cheese with a dairy-free cream cheese alternative. Use coconut cream instead of heavy whipping cream for a creamy texture. For the crust, make sure your cookies are dairy-free. Adjust the other ingredients as needed to fit a vegan diet.
This blog post taught you about making No Bake Oreo Cheesecake Bars. We explored key ingredients and their quality. You now know about tips for smooth filling and easy assembly. We've looked at tasty variations and how to store your treats.
Remember, perfect desserts start with the right ingredients. Try new flavors and techniques to impress your friends. Enjoy creating your cheesecake bars, and share your tasty results! Your kitchen is ready for delicious fun!


