
Are you craving a dessert that’s both easy and delicious? Look no further! This No-Bake Oreo Cheesecake is a creamy dream come true. With just a few simple ingredients and no baking required, you can create a treat that will impress everyone. I’ll guide you through each step, ensuring your cheesecake turns out perfectly every time. Get ready to delight your taste buds and enjoy a sweet success!
Why I Love This Recipe
- Decadent Flavor: This cheesecake combines the rich, creamy texture of cream cheese with the chocolatey crunch of Oreo cookies, making every bite a delightful experience.
- Easy to Make: With simple ingredients and straightforward steps, this dessert can be whipped up even by novice bakers, ensuring everyone can enjoy a homemade treat.
- Perfect for Any Occasion: Whether it’s a birthday, holiday, or just a casual gathering, this cheesecake is the perfect showstopper that will impress family and friends alike.
- Customizable: Add your personal touch by varying the toppings or mixing in different flavors, making it a versatile recipe that can be adapted to your taste.
Ingredients
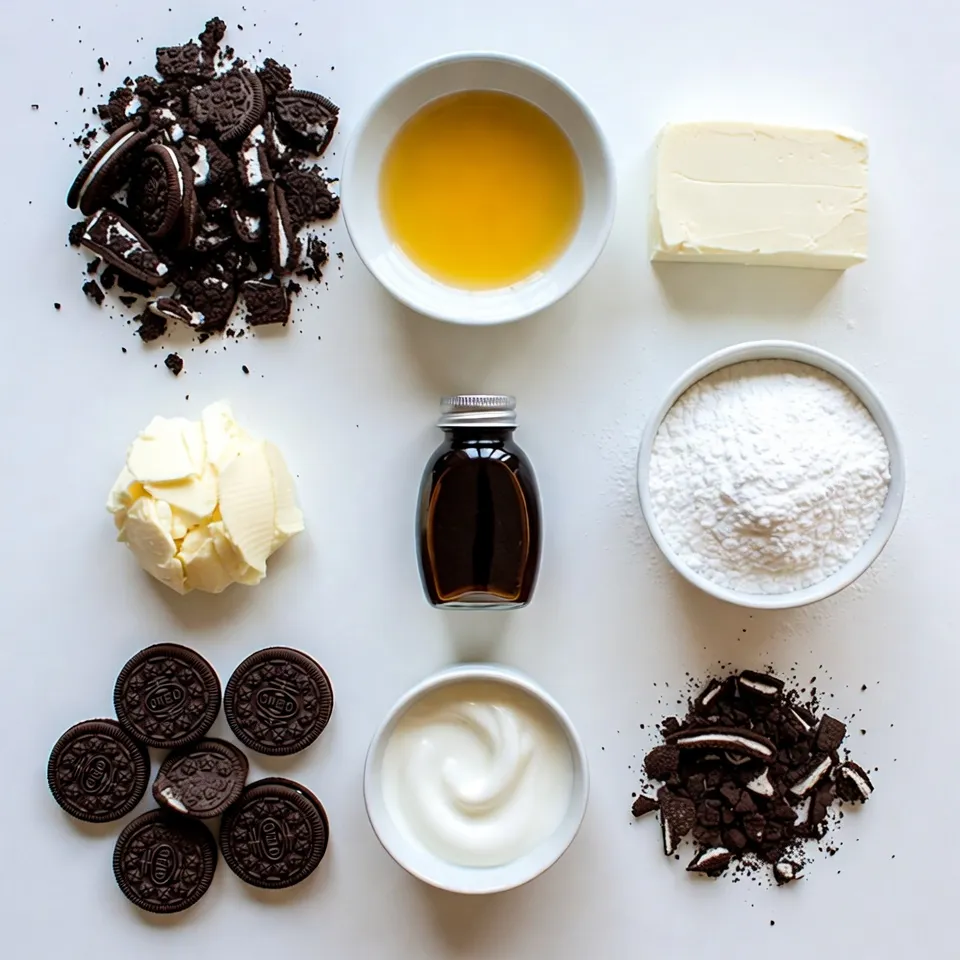
To make a No-Bake Oreo Cheesecake, you need simple ingredients that pack a lot of flavor. Here’s what you’ll need:
– 24 Oreo cookies, finely crushed
– 5 tablespoons unsalted butter, melted
– 16 ounces cream cheese, softened
– 1 cup powdered sugar
– 1 teaspoon pure vanilla extract
– 1 cup heavy whipping cream
– 8 Oreo cookies, coarsely chopped
– Additional crushed Oreos for garnishing
These ingredients work together to create a rich and creamy cheesecake. The crushed Oreos form the crust, giving a delightful chocolate flavor. Softened cream cheese provides that smooth texture we all love. The heavy whipping cream adds lightness, making it feel airy.
Using the right amount of each ingredient is key. Too many cookies can make the crust too crumbly, while not enough cream cheese might make it too soft. Always measure carefully! Enjoy the process of gathering these ingredients. It sets the stage for a fun and tasty kitchen adventure.
Step-by-Step Instructions
Preparing the Crust
1. First, take 24 Oreo cookies and crush them finely. You can use a food processor or place them in a bag and crush them with a rolling pin.
2. In a medium bowl, combine the crushed Oreos with 5 tablespoons of melted unsalted butter. Mix well until the cookies are coated and the mixture looks like wet sand.
3. Next, press this mixture firmly into the bottom of a 9-inch springform pan. Use the back of a measuring cup or your fingers to make it even.
4. Once the crust is ready, place it in the refrigerator to firm up while you make the filling.
Making the Filling
1. In a large bowl, beat 16 ounces of softened cream cheese using an electric mixer. Mix until it is smooth and creamy.
2. Gradually add in 1 cup of powdered sugar and 1 teaspoon of pure vanilla extract. Keep mixing until everything is well combined and fluffy.
Assembling the Cheesecake
1. In another clean bowl, whip 1 cup of heavy whipping cream until stiff peaks form. This step adds a light texture to your cheesecake.
2. Gently fold the whipped cream into the cream cheese mixture. Use a spatula and be careful not to deflate it.
3. Now, fold in 8 coarsely chopped Oreo cookies until they are evenly distributed in the filling.
4. Retrieve the crust from the refrigerator. Carefully pour the filling over the crust. Smooth the top with a spatula.
5. Tap the pan lightly on the counter to remove any trapped air bubbles.
6. Cover the cheesecake with plastic wrap and refrigerate for at least 4 hours. For the best texture, let it set overnight.
Tips & Tricks
Perfecting the Cheesecake Texture
Whipped cream adds fluffiness to your cheesecake. This light texture makes each bite melt in your mouth. To keep the cream airy, fold it gently into the cream cheese mix. Use a spatula and move in a circular motion. Be careful not to stir too hard. The goal is to keep the air you whipped into the cream.
Time-Saving Secrets
You can make this cheesecake ahead of time. Prepare it the day before you need it. Store it in the fridge until you’re ready to serve. Cover it tightly with plastic wrap to keep it fresh. If you have leftovers, you can still enjoy them later. Just make sure to store them properly.
Presentation Ideas
Presentation makes your cheesecake even more special. Slice it into elegant wedges for serving. Place them on a decorative platter to impress your guests. For a fun touch, drizzle chocolate sauce on the plate. Add dollops of whipped cream and sprinkle extra crushed Oreos on top. This makes your dessert look as good as it tastes.
Pro Tips
- Chill Your Tools: For the best results when whipping cream, chill your mixing bowl and beaters in the refrigerator for about 15 minutes before use. This helps the cream whip faster and achieve stiff peaks more easily.
- Room Temperature Ingredients: Ensure that your cream cheese is at room temperature before mixing. This will help you achieve a smooth and creamy filling without lumps.
- Don’t Overmix: When combining the whipped cream with the cream cheese mixture, fold gently to maintain the light and airy texture. Overmixing can deflate the whipped cream and result in a denser cheesecake.
- Garnish Creatively: Besides crushed Oreos, consider adding a drizzle of chocolate or caramel sauce over the top of the cheesecake for an extra layer of flavor and visual appeal.
Variations
Flavor Variations
You can change the flavor of your no-bake Oreo cheesecake easily.
– Adding peanut butter or chocolate: Mix in some peanut butter for a nutty twist. It adds a creamy texture and rich taste. You can also melt some chocolate and fold it into the filling for a deeper flavor. Just remember to adjust the sugar to balance the taste.
– Using different cookies for the crust: Not a fan of Oreos? Try using other cookies like chocolate wafers or graham crackers. They can bring a new taste and texture to your cheesecake. Just crush them and mix with butter as you would with Oreos.
Dietary Adjustments
Catering to different diets is simple with this recipe.
– Gluten-free options: Use gluten-free cookies for the crust. Many brands offer gluten-free Oreos or similar cookies. Just check the label to ensure they fit your needs.
– Dairy-free substitutions: You can make this cheesecake dairy-free. Use a dairy-free cream cheese and coconut cream instead of heavy cream. It will still be creamy and delicious, just without dairy.
These variations let you enjoy this cheesecake any way you like!
Storage Info
How to Store Leftovers
To keep your no-bake Oreo cheesecake fresh, cover it tightly. Use plastic wrap or foil. Store it in the fridge for up to five days. Make sure it is well-sealed to avoid drying out. If you notice any crust breakage, simply press it back together gently.
Freeze Instructions
To freeze the cheesecake, first let it chill completely. Once set, wrap it well in plastic wrap. You can then place it in an airtight container. It freezes well for up to three months. When you are ready to enjoy it, thaw it in the fridge overnight. Avoid thawing at room temperature to keep the texture smooth.
FAQs
How long does the no-bake cheesecake need to chill?
The no-bake cheesecake needs to chill for at least 4 hours. This chilling time helps it set properly. I recommend letting it chill overnight for the best texture. When it chills, the flavors meld and the cheesecake firms up nicely. If you skip the chilling time, it may not hold its shape when cut.
Can I use low-fat cream cheese?
Yes, you can use low-fat cream cheese. However, it may change the texture and flavor. Low-fat cream cheese often has more water content. This can make your cheesecake less creamy. If you use it, expect a slightly different taste and texture. The cheesecake might not be as rich and fluffy as using full-fat cream cheese.
Is it necessary to use a springform pan?
A springform pan is not strictly necessary, but it is helpful. It allows you to remove the cheesecake easily. If you don’t have one, you can use a regular pie dish. Just be careful when slicing and serving. You might want to line the dish with parchment paper to help with removal.
This blog covered a delicious no-bake Oreo cheesecake. We talked about the key ingredients and how to prepare them step by step. I shared tips to make your cheesecake light and fluffy, along with variations to suit your taste. Proper storage helps keep your dessert fresh and tasty.
In the end, this cheesecake is easy and fun to make. You can impress your friends with this treat. Remember, creativity with flavors is welcome. Enjoy your dessert-making journe


